

Page 1
@Makeblock
Technical support: [email protected]
Address: 4th Floor, Building C3, Nanshan iPark, No.1001 Xueyuan Avenue,
Nanshan District, Shenzhen, Guangdong Province, China
www.makeblock.com
D1.1.2_KD010045000
Page 2
neuron explorer kit
User Manual
Page 3

Foreword
Thank you for purchasing Makeblock Neuron.
This manual mainly includes the detailed descriptions for each
block of the Neuron and the various combinations of blocks. We also
provide a quick start guide in our product package. Before you read
this manual, we recommend that you get to know how to play with the
Neuron by referring to the quick start guide.
For more examples and documents, please visit the website:
http://www.makeblock.com/steam-kits/neuron/
Page 4

Energy & Communication Blocks
The energy & communication blocks can provide power for other blocks.
The communication blocks provide a variety of approaches to wireless communication,
which allows the wireless communication between blocks and mobile / tablet / computer, as well as wireless
communication among dierent block combinations.
Page 5
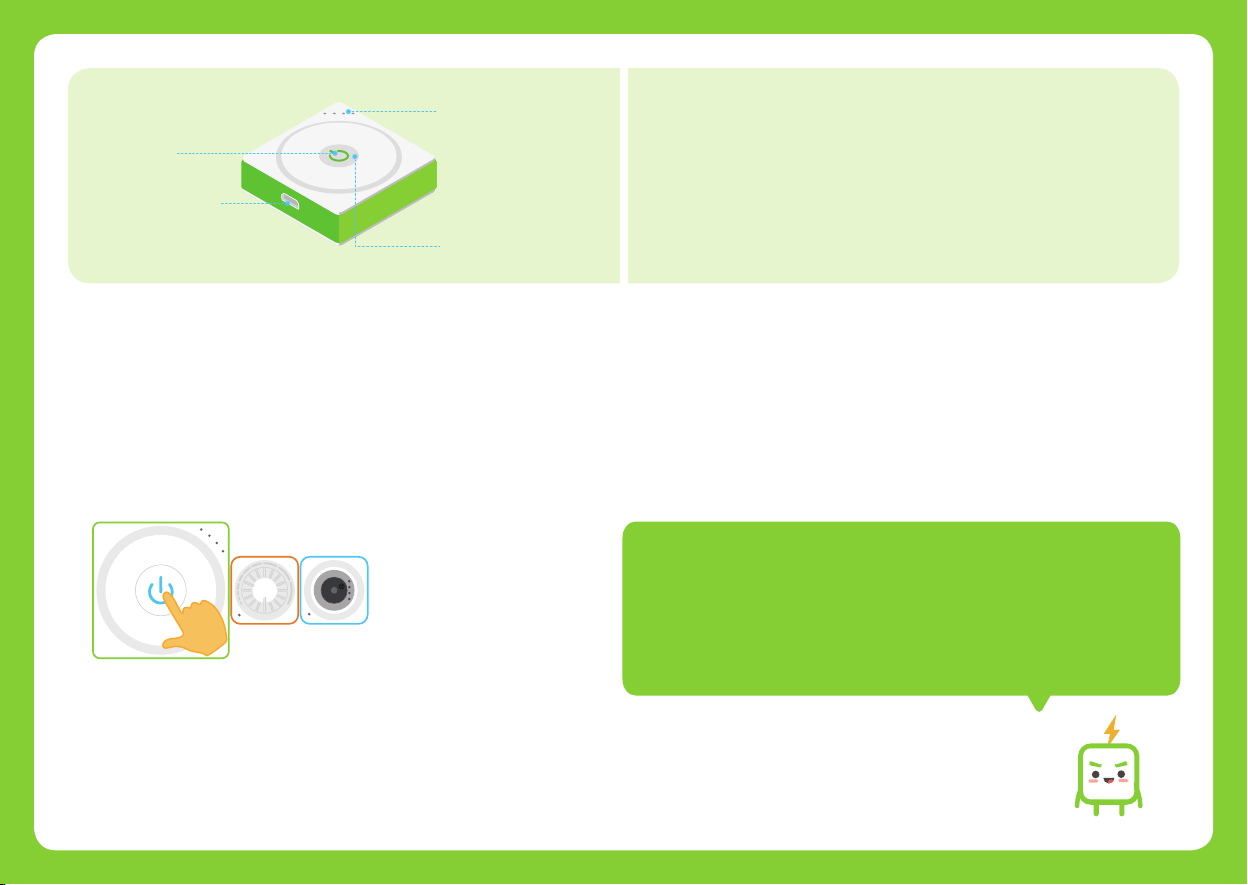
Power Button
Micro USB Connector
p
t
r
a
m
s
Battery Indicator
Block battery level display.
r
e
w
o
Smart Power
Supply power to other blocks. The built-in Bluetooth block allows
you to connect the blocks to your phone or tablet and to program
the blocks.
Power Status Indicator
How does it work?
A. Supply power to other blocks.
Press the power button to power it on so that it can provide power to other blocks. To
turn it o, long press the power button for about 3 seconds until all lights are o.
If the smart power is turned on but is not connected to other blocks, it will be
automatically o aer 16 seconds. Double press the power button to cancel or
r
K
n
S
r
m
e
a
w
r
o
t
P
B
e
u
b
o
z
z
restart the function.
Aer the smart power block is turned on, the initialization will take about
1 second and the power status indicator will keep solid green during the
initialization process.
5
Page 6
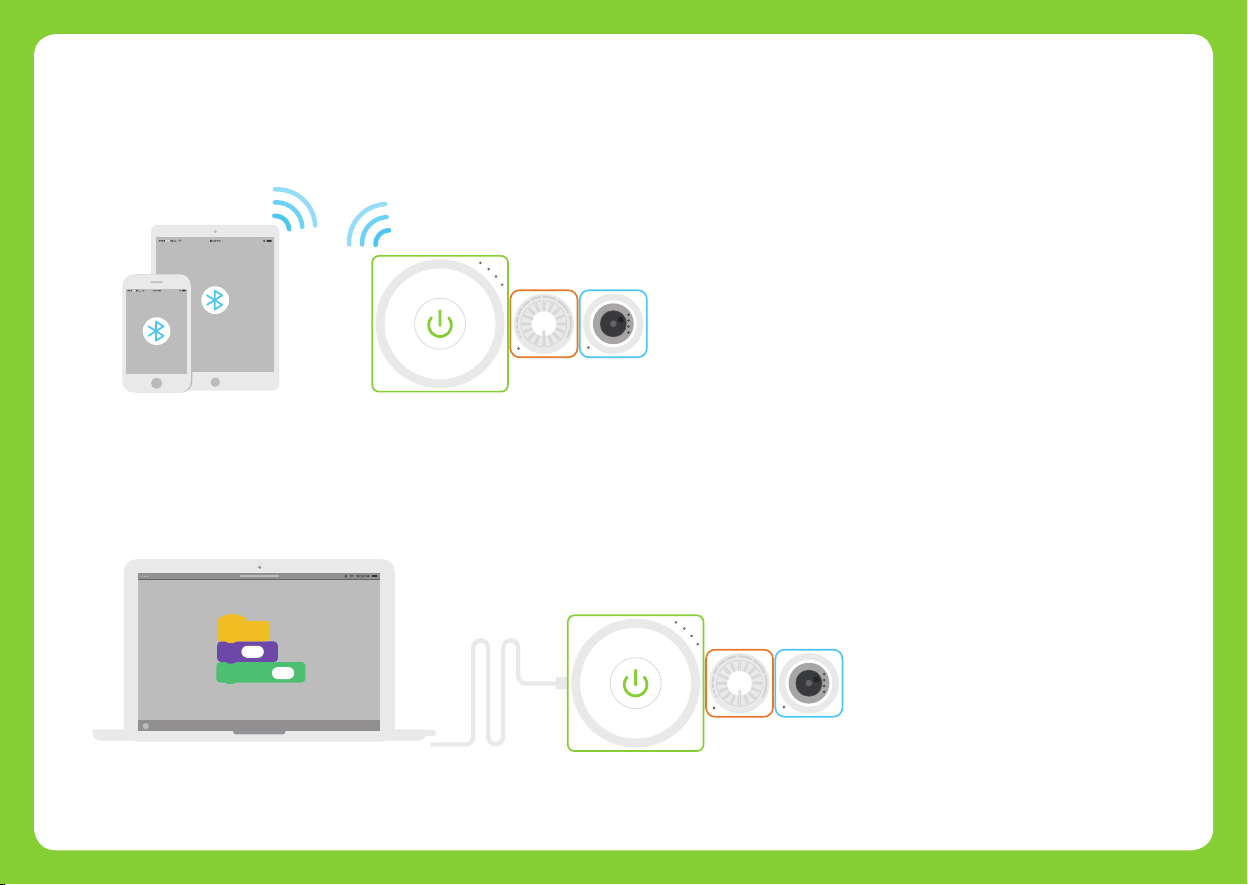
B. Connect Neuron to a mobile phone or tablet via Bluetooth and uses the Neuron app or
Swi Playgrounds to program the blocks.
The power status indicator will turn green when the Bluetooth connection is completed.
r
K
n
S
r
m
e
a
w
r
o
t
P
B
e
u
b
o
z
z
C. Connect blocks to computer via a USB cable and use mBlock 5 to program the blocks.
The power status indicator will turn green when the connection is completed.
r
K
n
S
r
m
e
a
w
r
o
t
P
B
e
u
b
o
z
z
01
Page 7

Charge the smart power block
We recommend you to charge your smart power block when the last indicator is blinking.
Charge it via the power adapter(not included)
S
r
m
e
a
w
r
o
t
P
Tips: Please charge the block every three months when you set it aside.
Specifications
Battery Capacity
Output Voltage
Input Voltage
Bluetooth transmission distance
Frequency Band
950mAh
DC 5V
DC 5V
Within 10 meters
2402 ~ 2480MHz
Input Current
Operating Temperature
Storage Temperature
Bluetooth Specification
Output Power Class
OR
Charge it via computer
1A
<
0°C ~ 45°C
-10°C ~ 55°C
BT 4.0
≤ 4dBm
S
r
m
e
a
w
r
o
t
P
02
Page 8

Input Blocks
The input blocks receive information from the environment, such as sound, light, image or motion,
and the information is then converted into electrical signals. The signals will be transmitted to the output blocks
and instruct output blocks whether to responde or how to perform.
Input blocks are widely applied in daily life, like the light switch and the volume knob.
03
Page 9
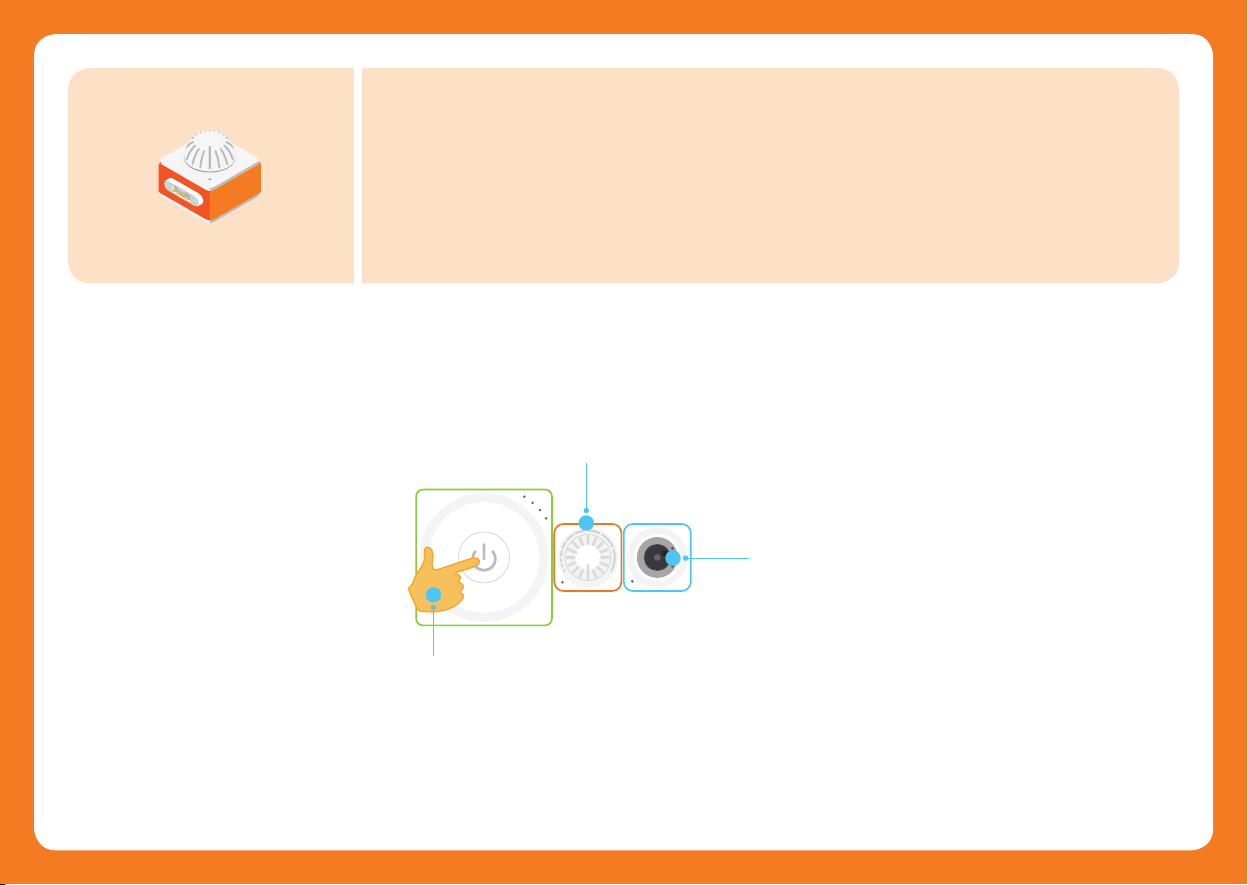
Knob
Have a try!
b
o
n
K
The knob is an input block which is used to adjust values. When you connect the knob to output
blocks, you can adjust the output eects by turning the knob. It's just like you adjust the volume by
turning the knob on the speaker in daily life.
Turn the knob clockwise.
2
3
r
K
1
S
r
m
e
a
w
r
o
t
P
n
B
e
u
b
o
z
z
The buzzer will make
dierent sounds.
Press the power button
04
Page 10
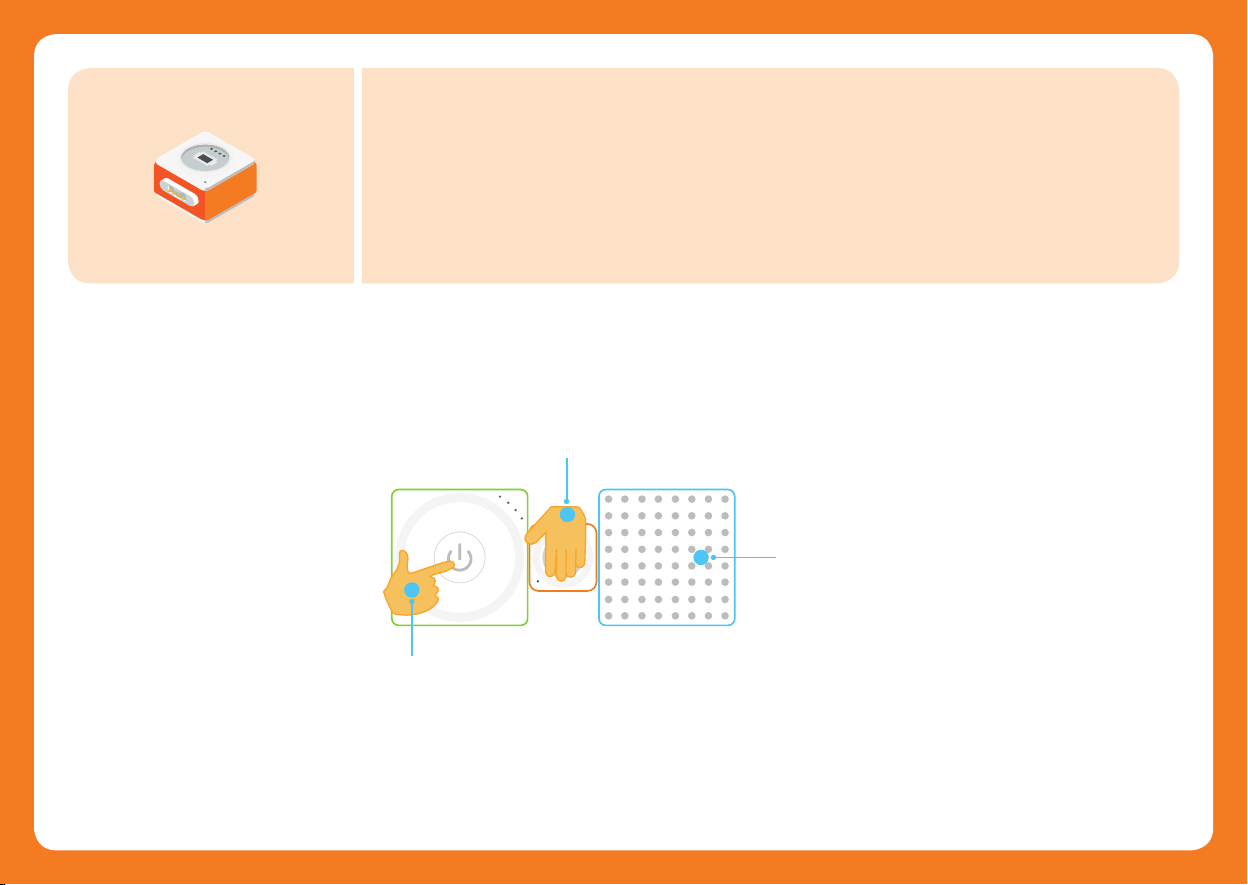
Light Sensor
Have a try!
r
o
s
n
e
S
t
h
L
g
i
The light sensor can detect the intensity of light in the surrounding environment. The stronger
the intensity of light received by the block, the stronger the output signal will be. In everyday life,
the brightness of mobile phone screen will automatically change in response to the ambient light
condition, which is credited to the light sensor.
Cover the light sensor with your hand.
2
L
3
r
i
o
g
s
h
n
t
e
1
S
r
m
e
a
w
r
o
t
P
S
You will notice that the LED panel
becomes dark.
Press the power button
05
Page 11
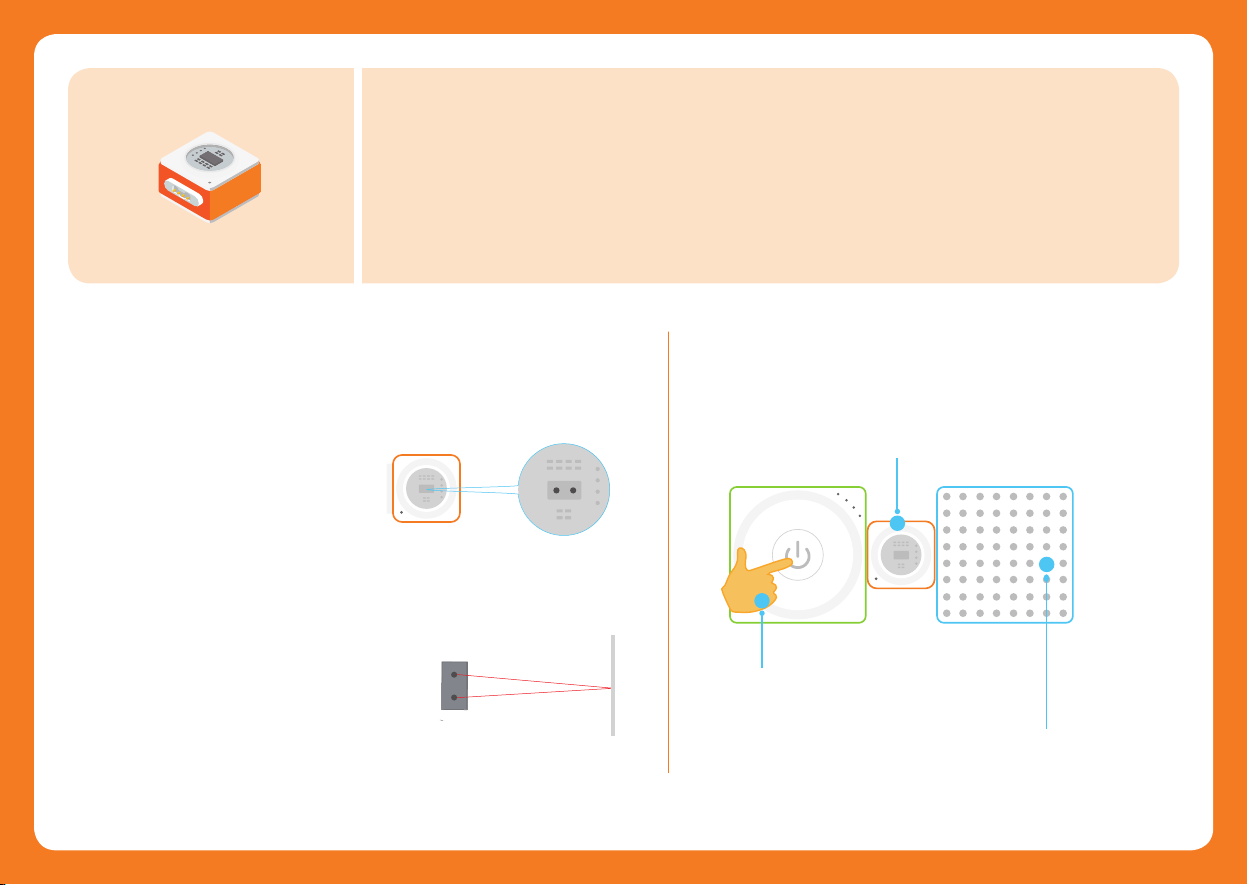
Ranging Sensor
r
o
s
n
e
S
g
n
i
R
g
a
n
Ranging sensor can be used to measure distance between the block and the obstacle.
Measurement range: 2cm ~ 200cm.
Science Tips Have a try!
How does the ranging sensor measure distance?
The ranging sensor includes an IR
transmitter and an IR receiver.
The IR transmitter emits infrared light
which will be reflected when it hit an
obstacle. Aer the reflected infrared light
is received by the IR receiver, the distance
between the obstacle and the block can
be calculated by the time lag between
transmission and reception.
06
R
r
a
o
n
s
g
n
i
e
n
S
g
IR receiver
IR transmitter
IR receiver
IR transmitter
Place your hand over the ranging sensor and gradually
move your hand away from the sensor.
2
R
r
a
o
n
s
g
n
i
e
n
S
g
1
S
r
m
e
a
w
r
o
t
P
3
Press the power button
More lights will turn red on the
LED panel.
Page 12
r
o
s
n
e
S
p
m
e
T
Have a try!
Temperature Sensor
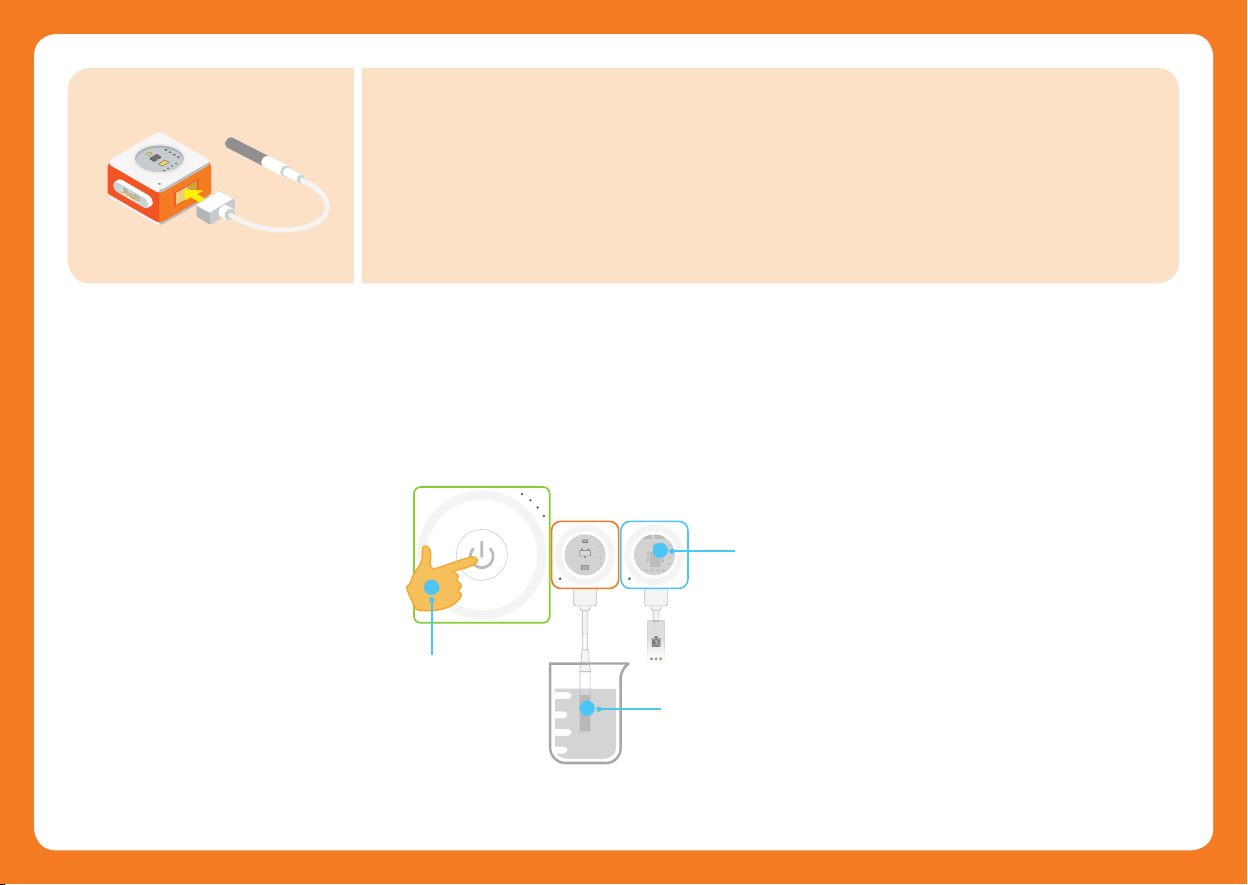
Plug the temperature probe into the slot. The temperature sensor can detect temperatures ranging
p
m
e
T
from -55°C to 125°C.
Accuracy: ±0.5°C ( -10°C ~ 85°C)
The probe cable of the temperature sensor may be damaged if temperature exceeds 100°C. Please use it carefully
to avoid damaging the device.
1
S
m
a
w
r
o
t
P
Press the power button
3
r
T
e
m
r
e
Temp
L
o
E
s
n
p
e
S
2
p
i
D
r
t
S
LED
Place the temperature sensor probe in
The RGB lights on the LED strip
will light up one by one.
hot water.
07
Page 13
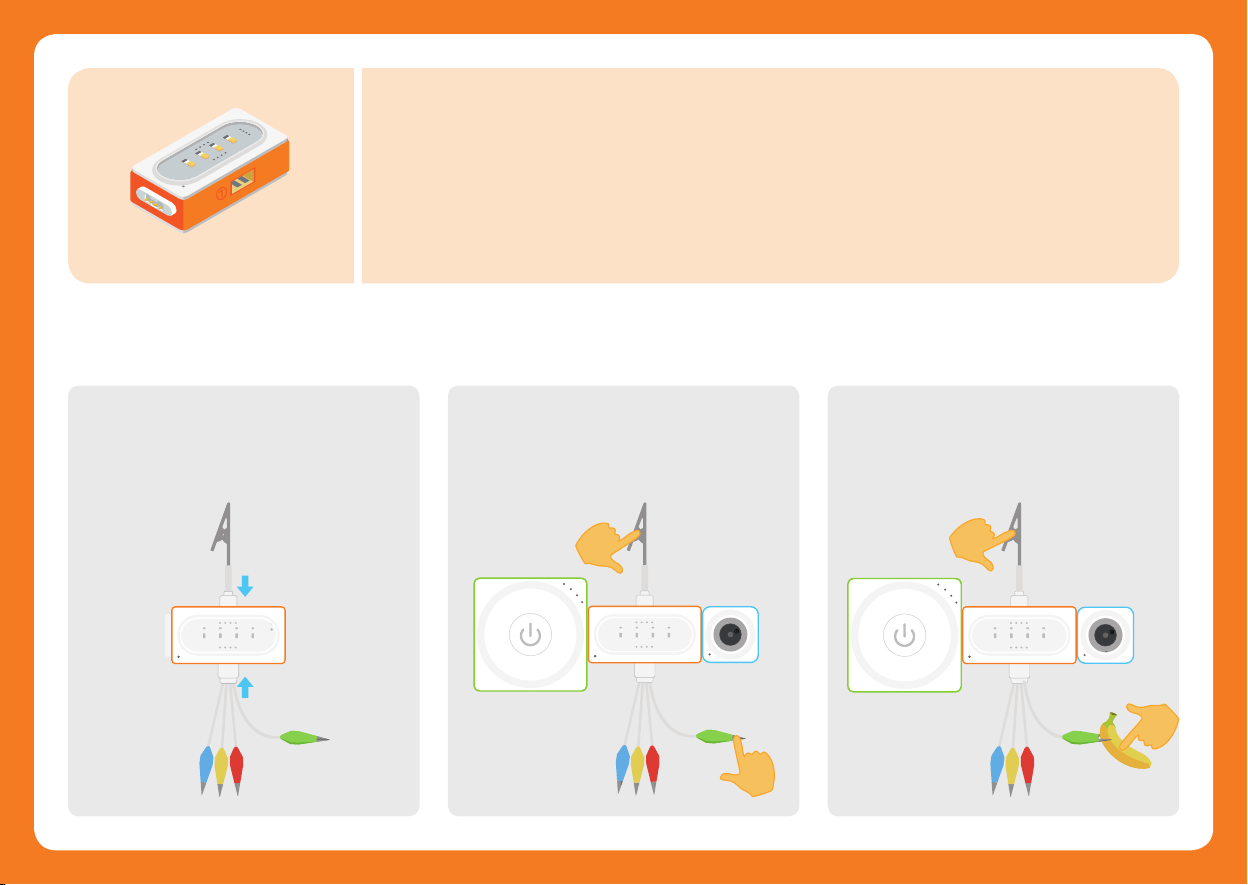
Funny Touch
funny touch
How does it work?
Plug the Funny Switch into the slot 1
plug the GND wire into the slot 2.
D
N
G
Funny Touch
Funny
By connecting the Funny Touch to conductive objects (such as bananas, water) to turn the object into
a touch switch. Check the conduction status between the Funny Switch and the GND wire to achive
simple and fun eects.
,
Connect blocks and touch the metal part of Funny
Switch with one hand and the metal part of the
GND wire clip with another hand. Look, the blocks
chain starts to work now!
D
N
G
S
r
m
e
a
w
r
o
t
P
Funny Touch
Funny
r
B
e
u
z
z
Use a Funny Switch to clip on a conductive object,
such as a banana. Touch the banana with one
hand and the metal part of the GND wire clip with
another hand. See what will happen!
D
N
G
r
B
e
u
z
Funny Touch
S
r
m
e
a
w
r
o
t
P
Funny
z
08
Page 14
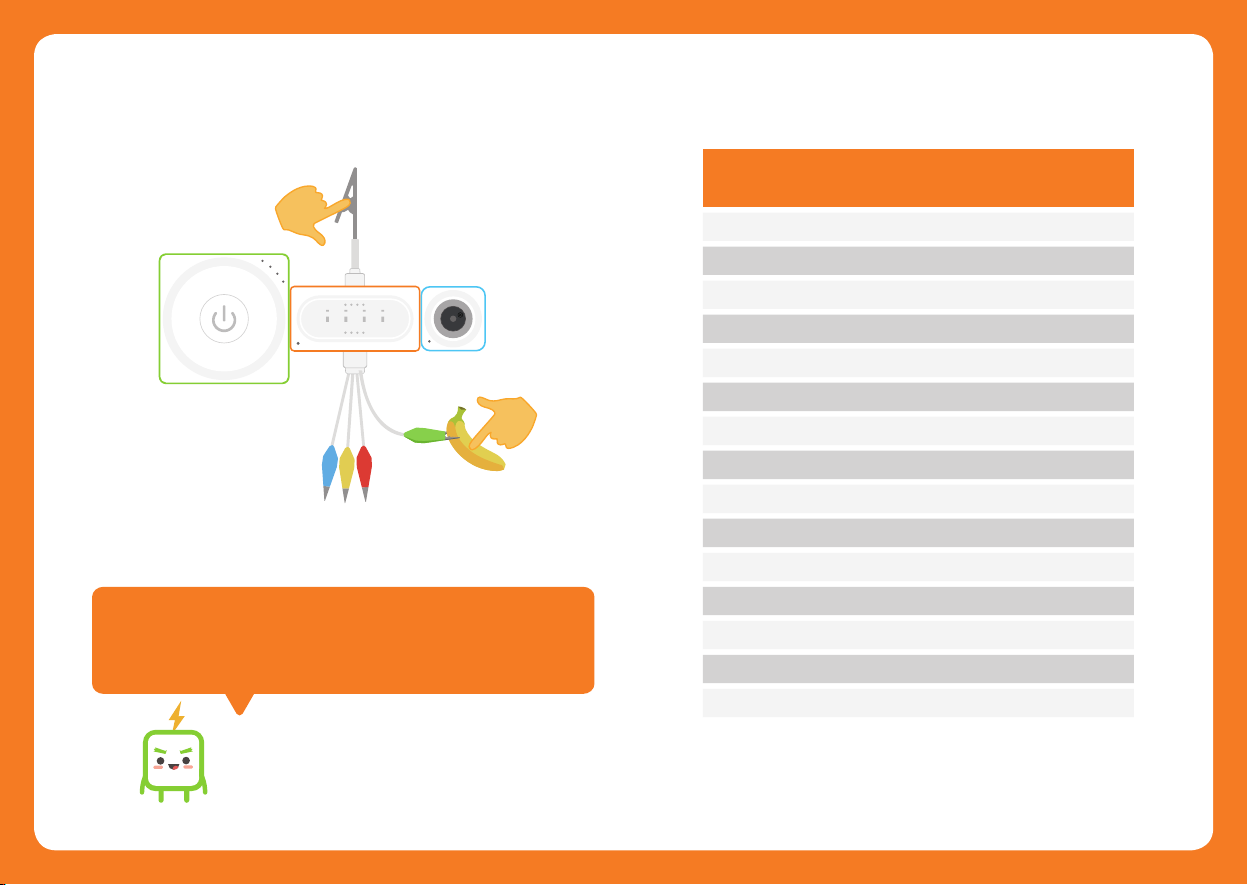
Colors of the
Funny Switches
Musical
alphabet
Sol-fa
syllables
D
N
G
r
B
e
u
z
Funny Touch
S
r
m
e
a
w
r
o
t
P
Funny
z
Aer the Funny Touch is connected to the buzzer, you can touch
Funny Switches of dierent colors or touch several Funny Switches at
the same time. Listen, the buzzer is making dierent sounds!
Blue
Yellow
Red
Green
Red, Green
Yellow, Green
Yellow, Red, Green
Yellow, Red
Blue, Red, Green
Blue, Yellow, Red, Green
Blue, Green
Blue, Yellow, Green
Blue, Yellow, Red
Blue, Red
Blue, Yellow
C4
D4
E4
F4
G4
A4
B4
C5
D5
E5
E3
F3
G3
A3
B3
Do
Re
Mi
Fa
Sol
La
Ti
Do+
Re+
Mi+
Mi-
Fa-
Sol-
La-
Ti-
09
Page 15

10
Output Blocks
The output block receives the signal from the input block and gives corresponding responses,
such as making sounds and rotating the motor. In our everyday life, output blocks can be seen everywhere,
like neon lights, alarms and so on.
Page 16
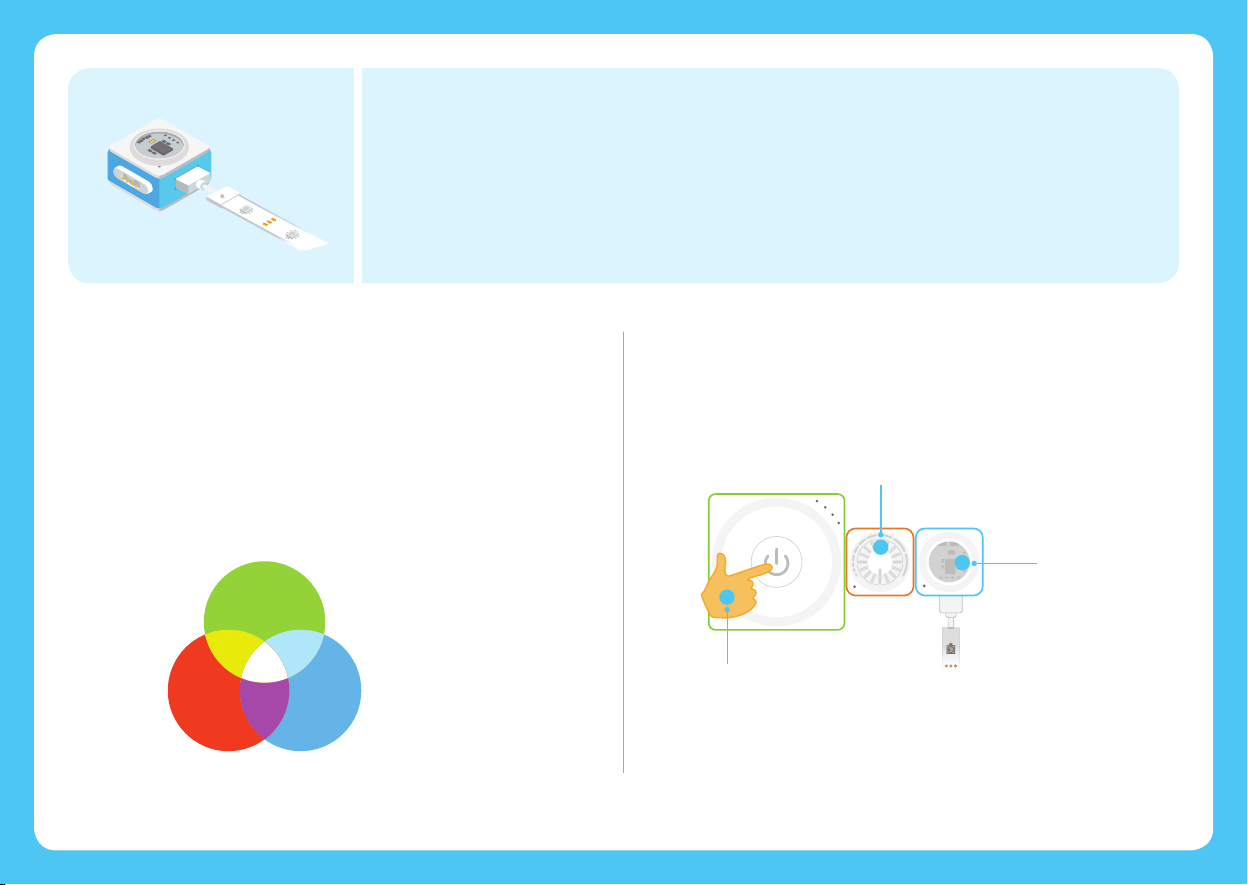
LED Strip Driver + LED Strip
p
p
i
i
r
r
t
t
S
S
D
D
E
E
L
L
LED
LED
Insert the LED strip into the LED strip driver slot. The LED strip contains 15 RGB lights. With the
将灯带插到灯带驱动插槽。灯带包含15个
Neuron app or mBlock 5, you can program the RGB lights to change their colors.
程对模块编程可以改变
RGB
灯的颜色,发现更多乐趣。
RGB
灯。通过神经元
app
或慧编
Science Tips
Why do the RGB lights have so many colors?
The RGB is an addictive color model in which red, green and blue lights
add together to reproduce nearly 16.78 million colors.
Green
Red
Blue
Have a try!
1
S
r
m
e
a
w
r
o
t
P
Press the power button
Turn the knob.
2
K
n
b
o
3
L
E
p
See what will happen!
i
D
r
t
S
LED
11
Page 17
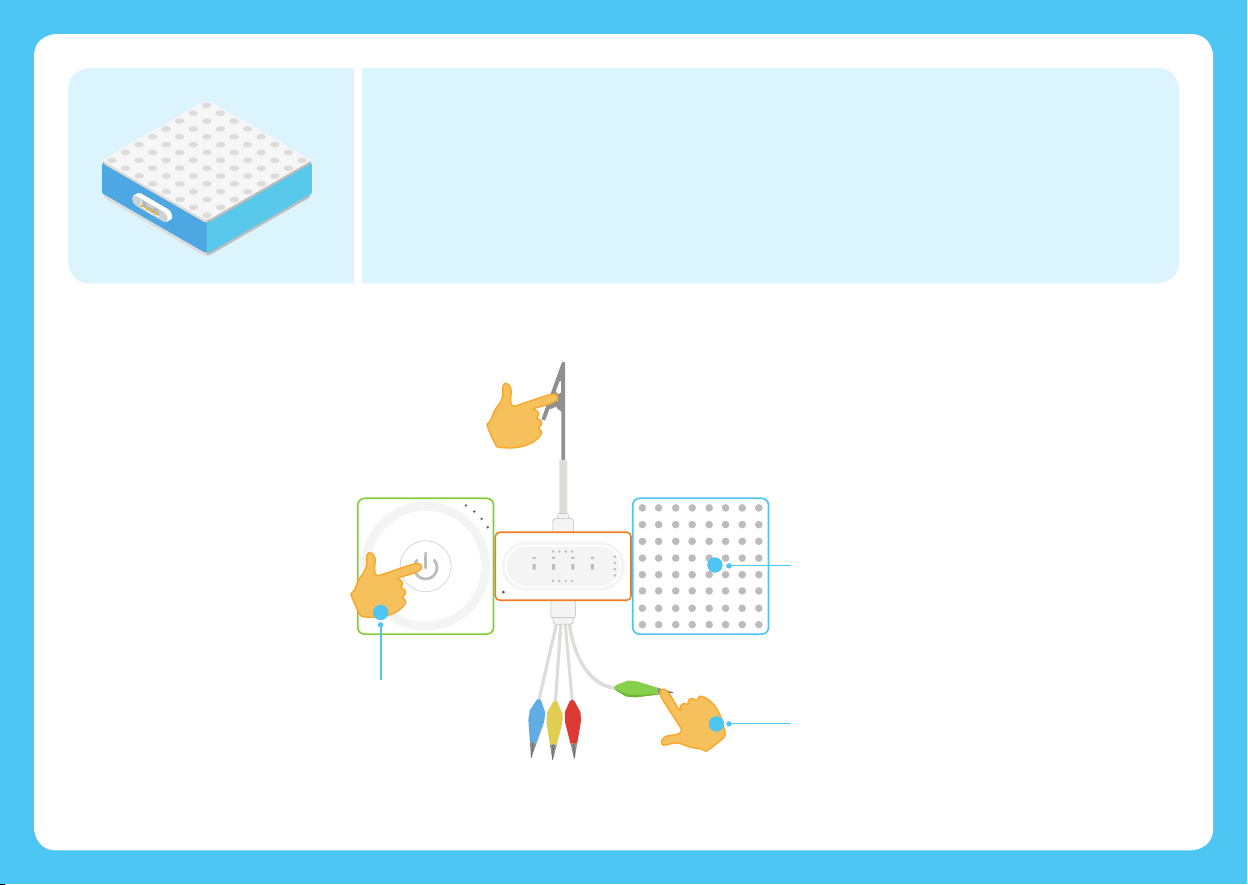
Have a try!
LED Panel
The LED panel contains 64 RGB lights. With the Neuron app or Swi Playgrounds, you can program
the RGB lights to change their colors.
D
N
G
12
1
S
r
m
e
a
w
r
o
t
P
Press the power button
Funny Touch
Funny
3
Observe how the color changes on the LED panel.
Touch Funny Switches of dierent colors to create
dierent colors of yours!
2
Try touching Funny Switch of dierent colors or try
touching multiple Funny Switches at the same time.
Page 18
Buzzer
Have a try!
r
r
e
e
z
z
z
z
u
u
B
B
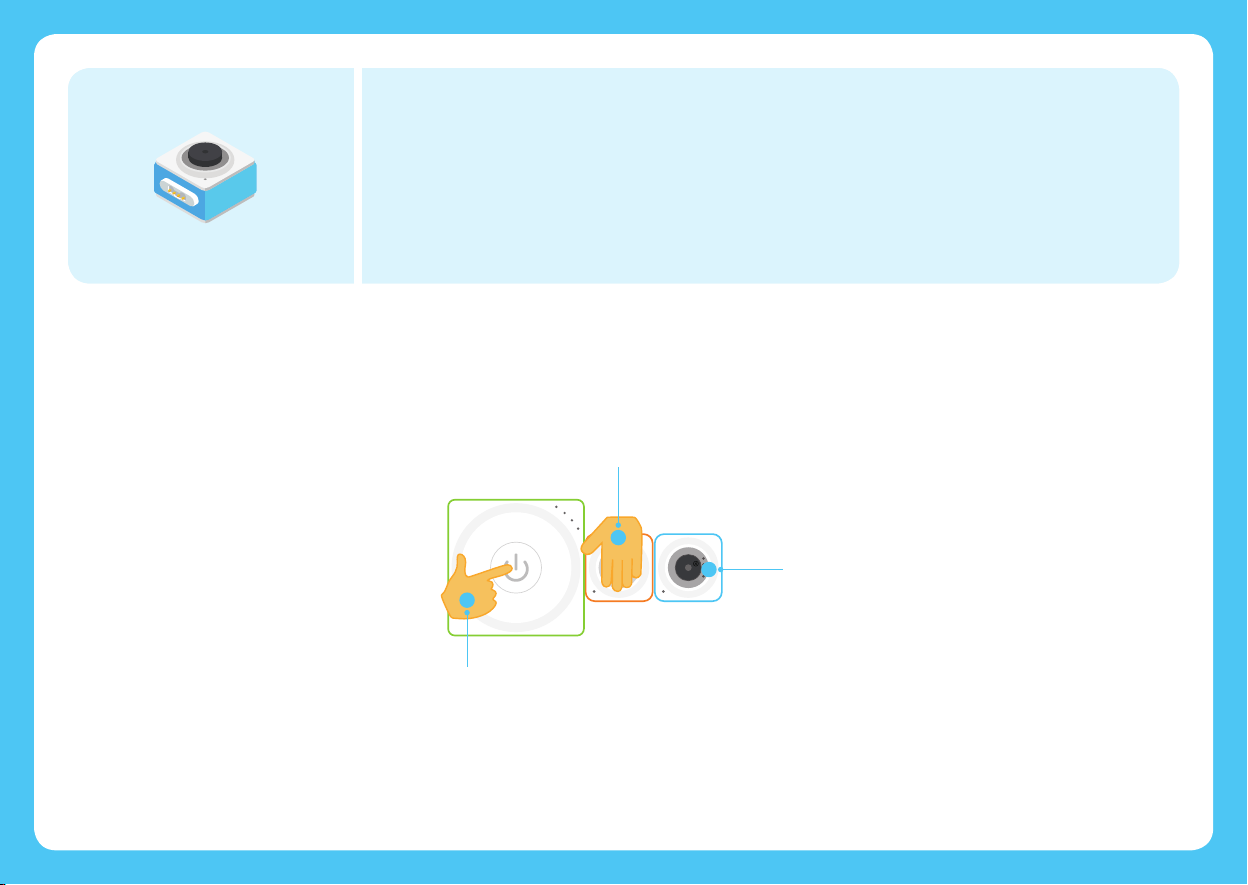
The buzzer will make a sound when it receives an on signal. Programming the buzzer with the Neuron
app or Swi Playgrounds can get dierent sound eects.
The sound of the buzzer changes.
2
L
3
r
i
o
g
s
h
n
t
e
1
S
r
m
e
a
w
r
o
t
P
S
r
B
e
u
z
z
Cover the light sensor
with your hands.
Press the power button
13
Page 19
Dual DC Motor Driver
Dual DC Motor Driver
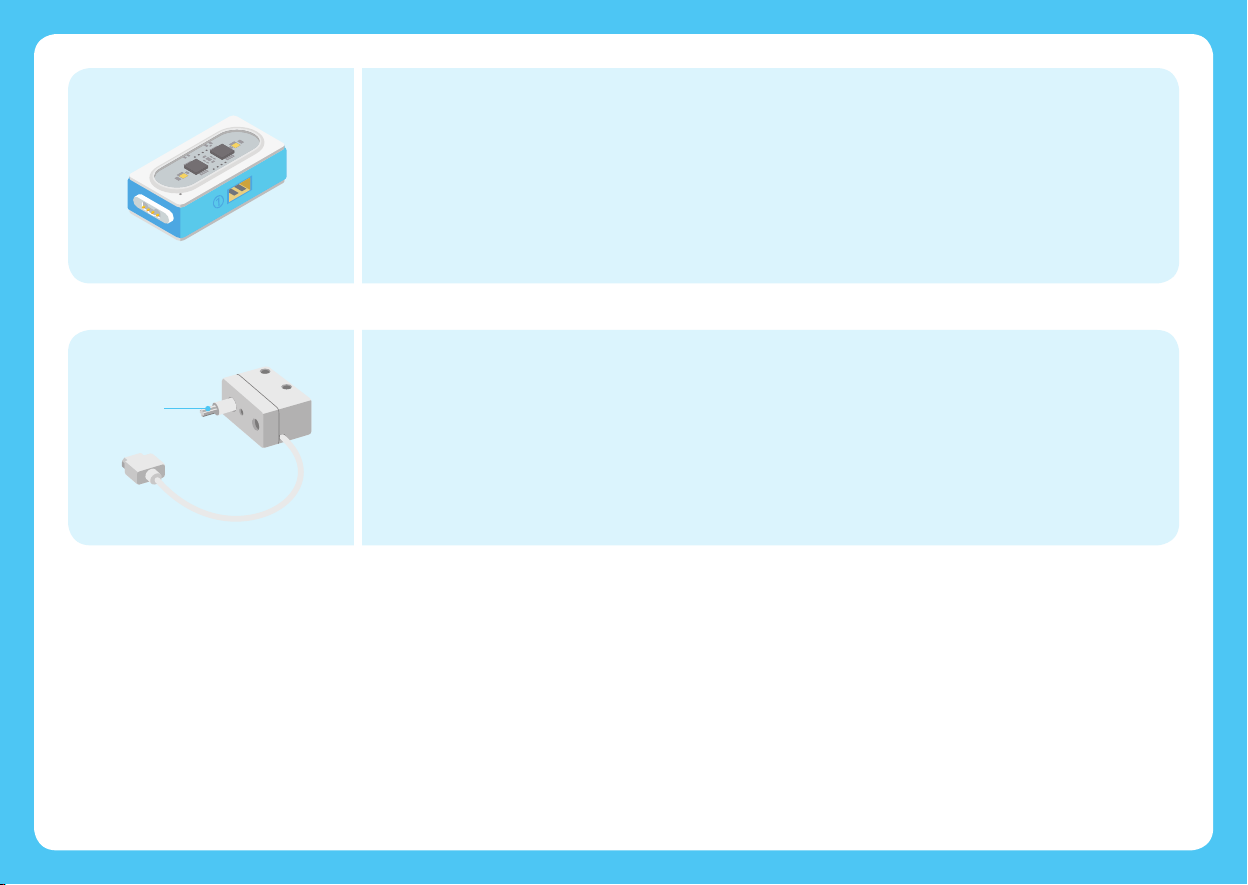
The DC (Direct Current) motor driver can drive two DC motors simultaneously.
river
otor D
C M
D
The DC (Direct Current) motor driver can drive two DC motors simultaneously.
14
Output sha
r
o
t
o
M
DC Motor
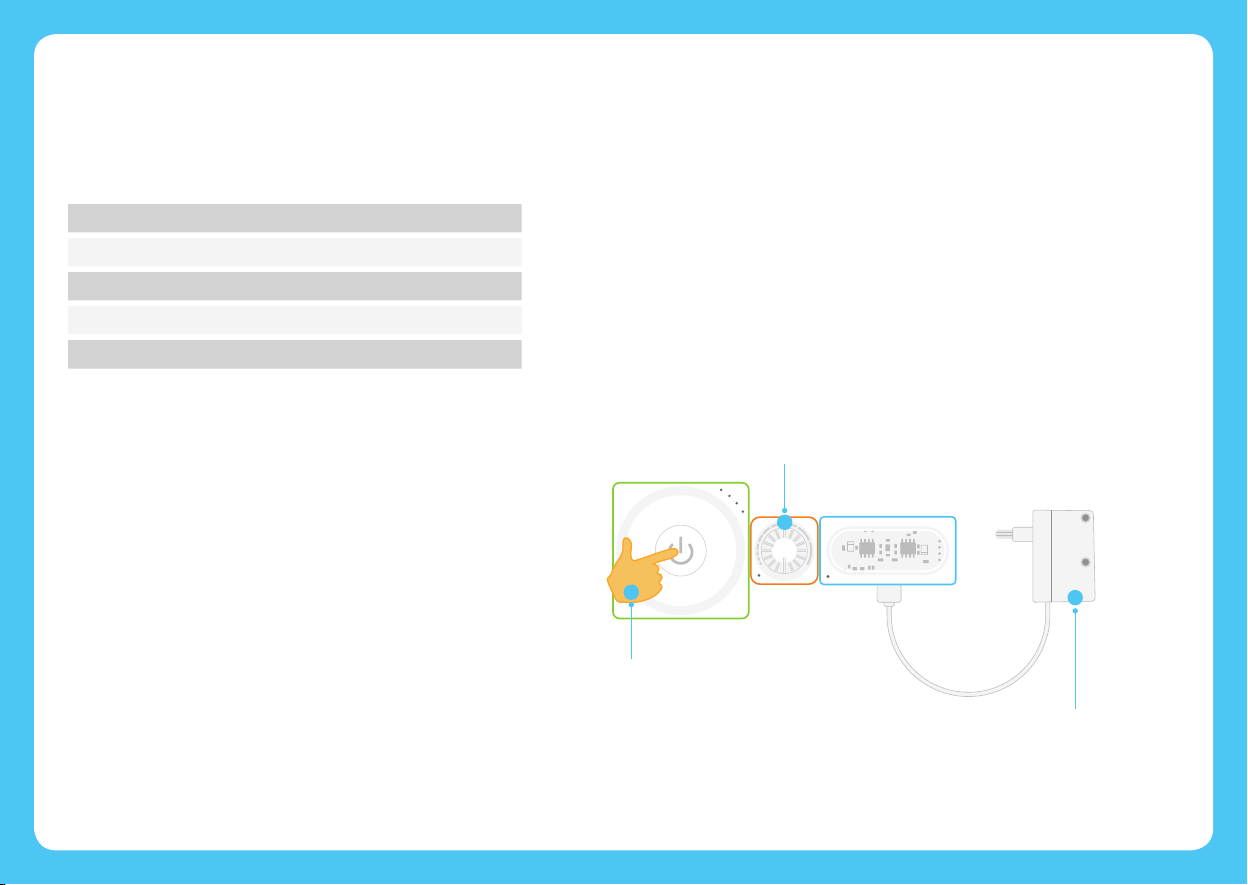
Plug the motor into the dual DC motor driver’s slot. The DC motor includes an output sha. When
the motor driver receives an on signal, the output sha starts to rotate. The motor is compatible
with LEGO parts.
Page 20
Motor Specifications
Rated Speed
Rated Current
Stall Torque
Stall Current
Gear Ration
12000±10% RPM
≤85 mA
≥ 28 gf.cm
≤0.88 A
1:48
Have a try!
Turn the knob.
1
S
r
m
e
a
w
r
o
t
P
Press the power button
2
K
n
b
o
DC Motor Driver
Motor
3
Observe how the motor rotation
frequency changes.
15
Page 21
How does it work?
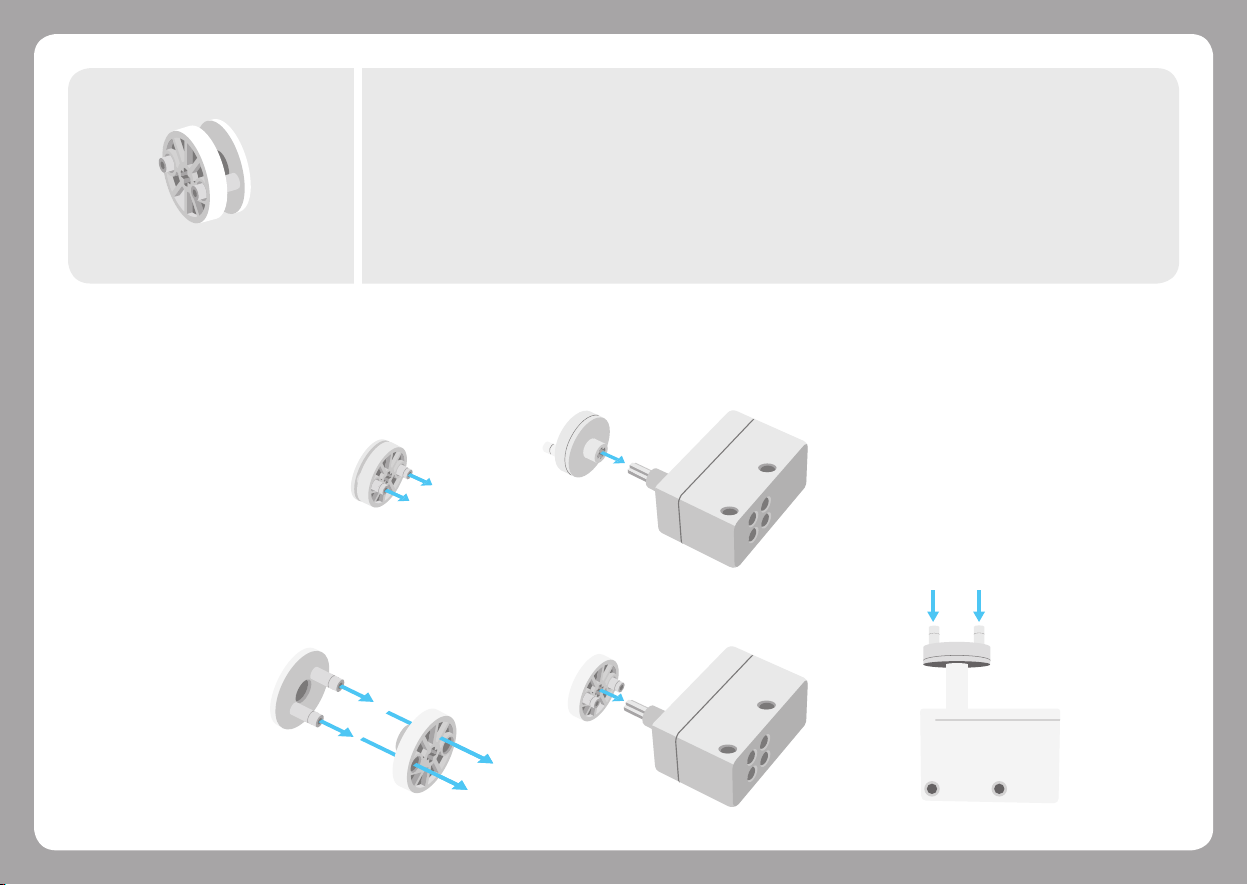
Building instructions
Dismantling instructions
Motor connector
Used to fix the motor and paper cra.
16
Page 22
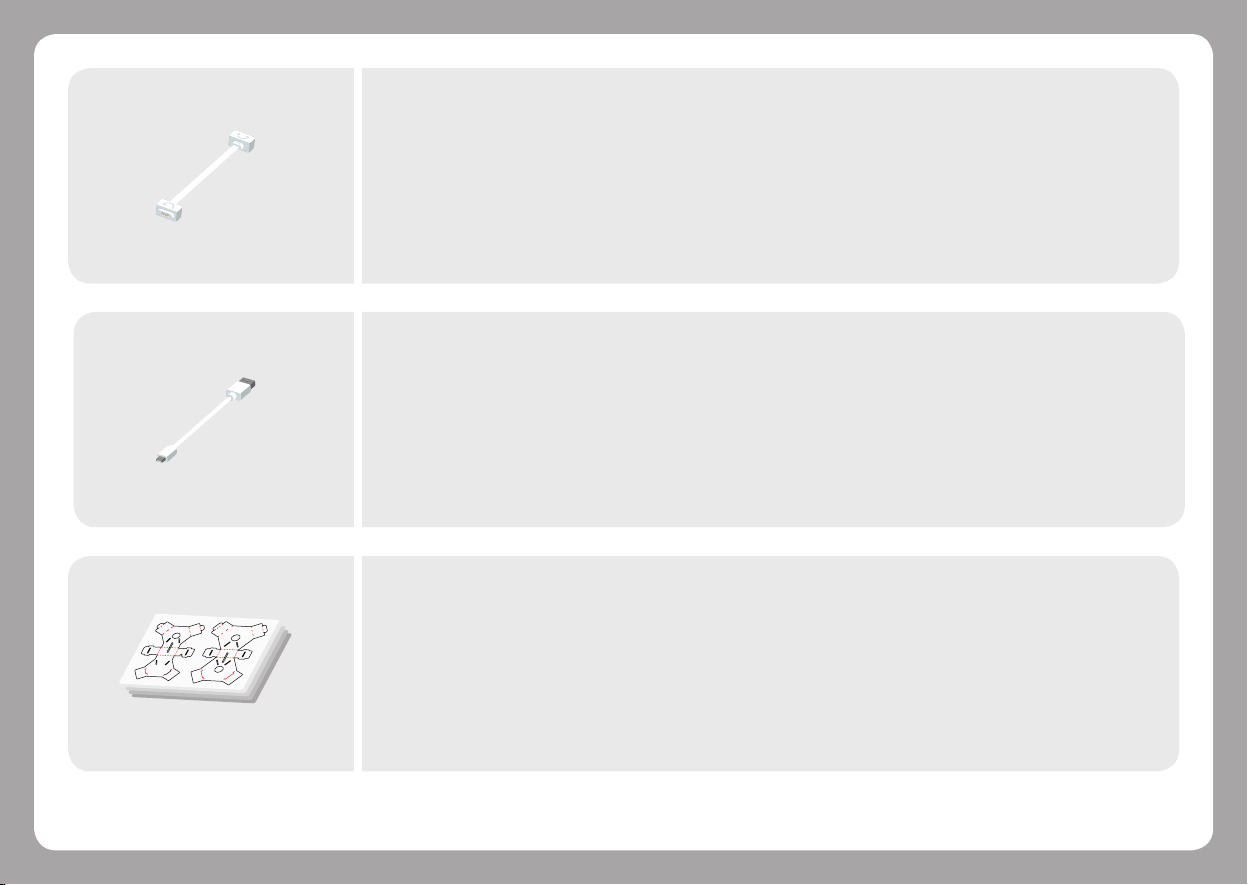
Magnet Wire
Provide more flexible ways to connect blocks.
USB Cable
Used for power supply and data transmission.
Project Materials Package
We provide a wide range of building materials and electronic blocks. You can build your own
projects like Piano and LED Sword. To get access to building guides, please sign in for the Neuron
app or Swi Playgrounds.
17
Page 23
Why does the program stop running aer
exiting the Makeblock Neuron app?
Why does the Funny Touch block fail to
work properly?
18
The smart power block can not store programs, so it
needs the app to run the program online.
It might be caused by the following reasons:
The power supply is unstable. Please use a high quality
power adapter or a high quality portable power.
Mistakenly plug the Funny Switch to slot 2 and the GND
wire to slot 1, please replug them to the correct slots.
What should I do if the blocks give no
response?
It might be caused by the following reasons:
When not using the Neuron app or mBlock 5, the input
block is not connected to the le of the ouput block.
The Neuron firmware upgrade process is interrupted
(due to poor connection). Please try to upgrade
firmware again.
The silicone case of the block was installed improperly,
which may cause poor contact. Please make sure the
silicone case is put in the correct place.
To check more FAQs, please visit: http://www.makeblock.com/cn/steam-kits/neuron
Why is the battery life getting poorer?
The smart power block uses a lithium-ion battery,
multiple charges and discharges may decrease the
battery life gradually.
Page 24
FCC STATEMENT:
This device complies with Part 15 of the FCC Rules. Operation is subject to the following two conditions:
(1) This device may not cause harmful interference, and
(2) This device must accept any interference received, including interference that may cause undesired operation.
Warning: Changes or modifications not expressly approved by the party responsible for compliance could void the user's authority to operate the
equipment.
NOTE: This equipment has been tested and found to comply with the limits for a Class B digital device, pursuant to Part 15 of the FCC Rules. These
limits are designed to provide reasonable protection against harmful interference in a residential installation. This equipment generates uses and
can radiate radio frequency energy and, if not installed and used in accordance with the instructions, may cause harmful interference to radio
communications. However, there is no guarantee that interference will not occur in a particular installation. If this equipment does cause harmful
interference to radio or television reception, which can be determined by turning the equipment o and on, the user is encouraged to try to correct the
interference by one or more of the following measures:
Reorient or relocate the receiving antenna.
Increase the separation between the equipment and receiver.
Connect the equipment into an outlet on a circuit dierent from that to which the receiver is connected.
Consult the dealer or an experienced radio/TV technician for help.
RF warning statement:
The device has been evaluated to meet general RF exposure requirement. The device can be used in portable exposure condition without restriction.
IC STATEMENT:
This device complies with Industry Canada licence-exempt RSS standard(s). Operation is subject to the following two conditions:
(1) this device may not cause interference, and
(2) this device must accept any interference, including interference that may cause undesired operation of the device.
19
Page 25
Le présent appareil est conforme aux CNR d'Industrie Canada applicables aux appareils radio exempts de licence. L'exploitation est autorisée aux deux
conditions suivantes :
(1) l'appareil nedoit pas produire de brouillage, et
(2) l'utilisateur de l'appareil doit accepter tout brouillage radioélectrique subi, même si le brouillage est susceptible d'en compromettre le
fonctionnement.
DECLARATION OF CONFORMITY
Declaration of conformity Hereby, Makeblock Co., Ltd., declares that this product is in compliance with the essential requirements and other relevant
provisions of Directive RED 2014/53/EU and the RoHS directive 2011/65/EU
Caution:
Recommended for children of ages 6+.
Not suitable for children under ages 3.
Children need to be accompanied by adults when using the product.
To avoid the product damage, please don't disassemble, repair or modify this product yourself.
20
Page 26
Age
6+
WARNING:
CHOKING HAZARD
- Small parts. Not for children under 3 years.
Children to use only under adult's supervision.
21
 Loading...