

Page 1

For more add-on packs please visit:
http://learn.makeblock.com/en/mbot-add-on-packs/
For more information, please scan the QR code
bellow with your smart device:
If you have any questions or concerns about our products,
please do not hesitate to contact us!
Makeblock Co., Ltd.
Technical support: www.makeblock.com/support
Tel: +86(0)755-26392228
Address: 4th Floor, Building C3, Nanshan iPark, No.1001 Xueyuan Avenue,
Nanshan District, Shenzhen, Guangdong Province, China 518055
mBot Servo Pack
+Makeblock @Makeblock @Makeblock
www.makeblock.com
D2.1.9_7.40.3637
Page 2

Index
mBot Add-on Pack Contents (1:1) ···········································
Construction Knowledge for the add-on pack························
Dancing Cat················································································
Head-Shaking Cat······································································
Light-Emitting Cat······································································
02
03
07
13
19
Page 3

mBot Add-on Pack Contents (1:1)
Construction Knowledge for the add-on pack
M2 Nut
M4 Nut
M2.2×6.5mm Self-drilling Screw
M2.2×8mm Self-drilling Screw
M2×10mm Screw
M4×8mm Screw
Servo Arm
M4×25mm Brass Stud
Unit: millimeter (mm)
1. Adjust servo
You need to adjust the servo in order to make it rotate to a certain
angle as precisely as you want. You can adjust it with mBlock,
mBlockly and MakeBlock in three steps, as follow:
1.1 Wire connections
Befor adjusting servo, you need to prepare mCore, RJ25 adapter
module and the servo to be adjusted. Connect the wires as follows.
Connect RJ25 adapter module to the Port4 of mCore and connect
servo to the slot2 of RJ25 adapter module.
1.2 Adjust servo with software
Adjust servo with mBlockly
①
Firstly, you should connect mBlockly to your mCore, then develop
program as follow. After that, click "Go" to see the servo automatically
rotate to 90°.
Any unknown parts can be checked here.
02 03
Page 4

Adjust servo with mBlock
②
Firstly, you should connect mBlock to your mCore, then develop
program as follows. After that, click "Start"(the green flag) to see the
servo automatically rotate to 90°.
Adjust servo with MakeBlock
③
Firstly, you should connect MakeBlock to your mCore, then
develop program as follow. After that, click button to see the servo
automatically rotate to 90°.
2.Install parts to servo
Insert self-drilling screws through the parts, then torque them into
corresponding holes on servo arm to fix the parts.
Tip
If installing parts to the servo arm
is difficult, you can torque the selfdrilling screws into corresponding holes
and then spin them out, so that to
expand the size of the holes for easier
installation.
1.3 Install servo arm
Intall servo arm to the servo as follows (pay attention to their angle).
Then the adjustment is completed.
04 05
You can use mBlock or Makeblock App to program your cat after the
construction.
mBot also supports mBlock programming. We already prepared
some examples for you. To download the examples please visit:
http://learn.makeblock.com/en/mbot-add-on-packs/
Makeblock App have added new control panels for mBot servo
pack, so now you can control your cat more quickly. To download
Makeblock App please visit:
http://learn.makeblock.com/en/makeblock-app/
3.Controlling and programming
Page 5

Dancing Cat
mBot Servo Pack- Dancing Cat
mBot Class mBot Add-On Pack
If your mBot already has an mCore case,
please keep it for later construction.
Step 1
M4×25mm Brass Stud ×2
M4×8mm Screw ×2
Step 2
Plate I1-Blue ×1
Bracket 3×3 ×1
M4×8mm Screw ×2
M4 Nut ×2
Dancing Cat
06 07
Page 6
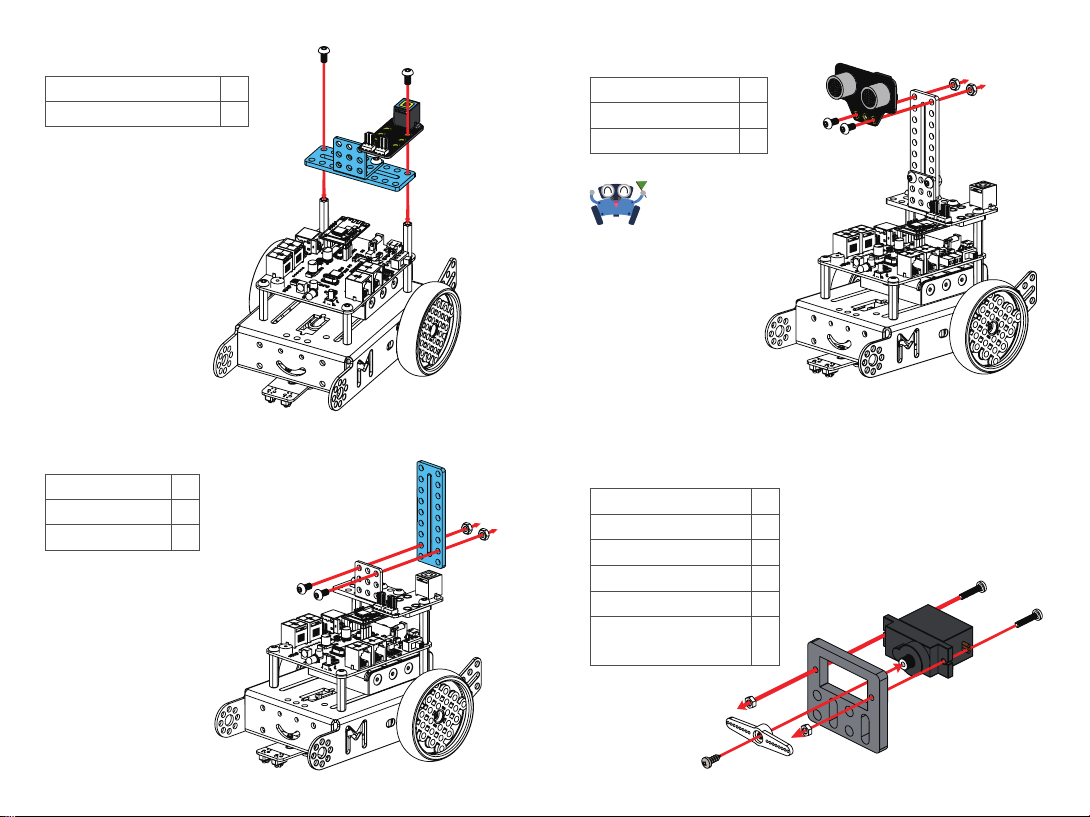
Step 3
Step 5
M4×8mm Screw ×2
Me RJ25 Adapter Module ×1
Step 4
Plate I1-Blue ×1
M4×8mm Screw ×2
M4 Nut ×2
Me Ultrasonic Sensor ×1
M4×8mm Screw ×2
M4 Nut ×2
Tip
The ultrasonic sensor is included
in mBot.
Step 6
Firstly,you should adjust servo to 90 degrees with software, then
install servo arm to the servo (pay attention to their angle).
9g Micro Servo ×1
9g Micro Servo Bracket ×1
Servo Arm ×1
M2×10mm Screw ×2
M2 Nut ×2
M2.2×6.5mm
Self-drilling Screw
×1
08 09
Page 7
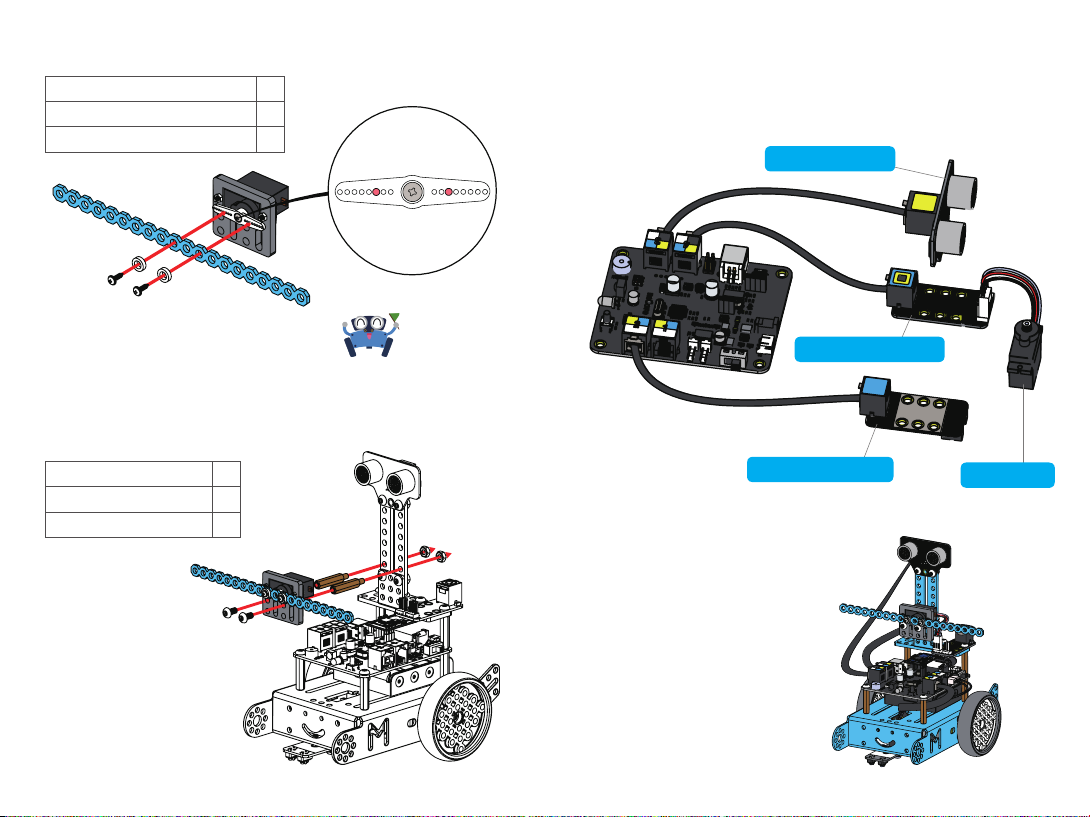
Step 7
Cuttable Linkage-Blue ×1
M2.2×8mm Self-drilling Screw ×2
Plastic Spacer 4×7×2mm ×2
Step 9 Wire connections
This is the reference picture of wire connections in construction
examples. You can also change the ports according to your own
program.
Me Ultrasonic Sensor
Tip
Please insert self-drilling
screw through the hole
marked red.
Me RJ25 Adapter Module
Step 8
M4×25mm Brass Stud ×2
M4×8mm Screw ×2
M4 Nut ×2
Good job !
You have finished the construction.
Now you can control your Dancing
Cat according to the constructions
on page 5.
10 11
Me Line-follower Sensor
9g Micro Servo
Page 8
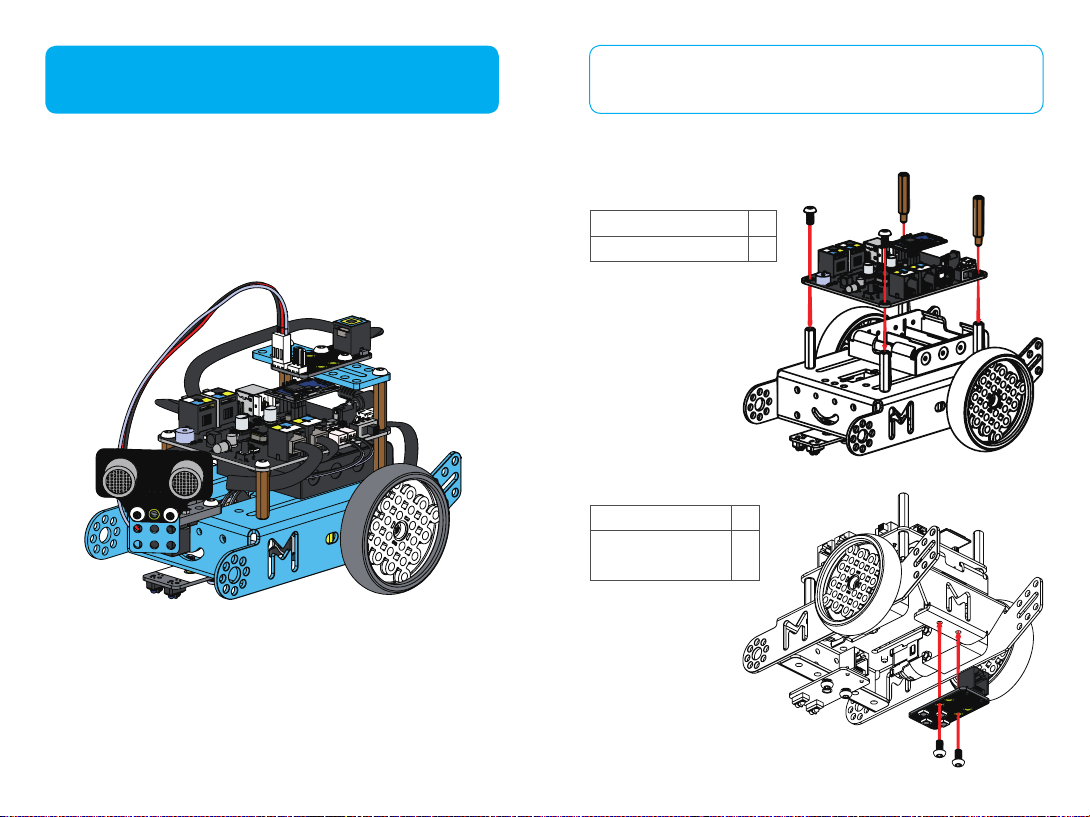
Head-Shaking Cat
mBot Servo Pack- Head-Shaking Cat
mBot Class mBot Add-On Pack
Head-Shaking Cat
If your mBot already has an mCore case,
please keep it for later construction.
Step 1
M4×25mm Brass Stud ×2
M4×8mm Screw ×2
Step 2
M4×8mm Screw ×2
Me RGB LED
Module
×1
12 13
Page 9
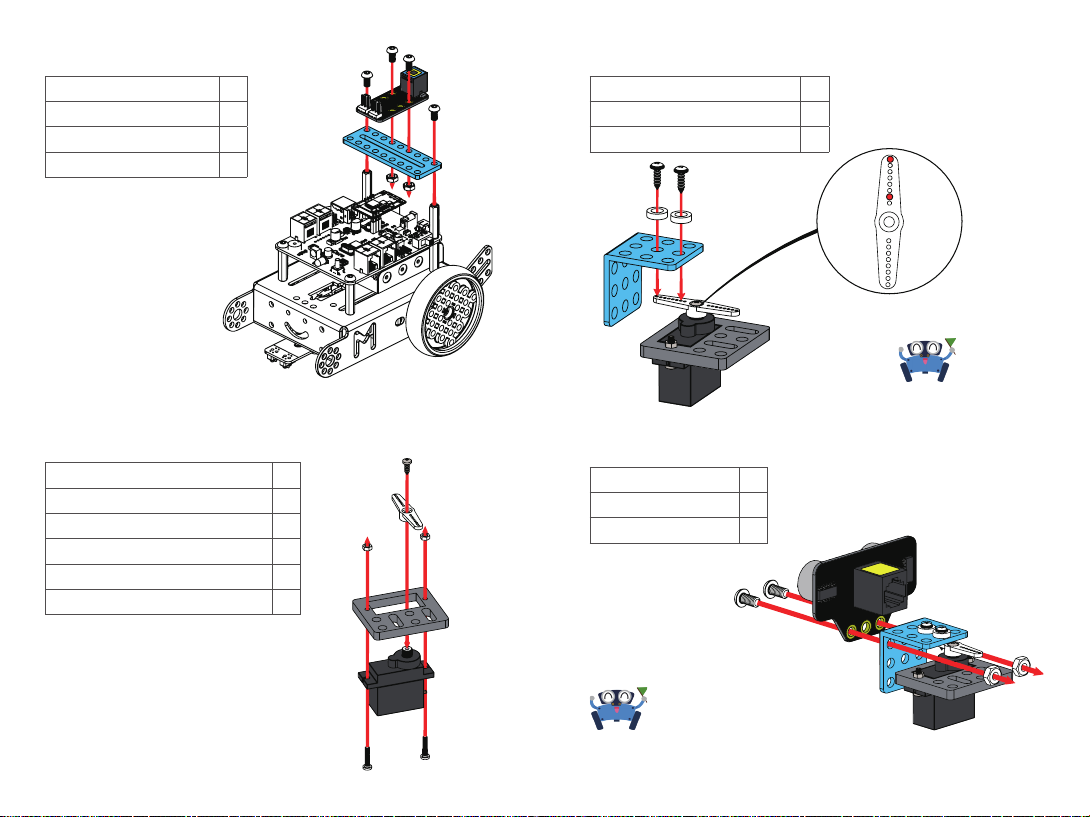
Step 3
Step 5
Plate I1-Blue ×1
Me RJ25 Adapter Module ×1
M4×8mm Screw ×4
M4 Nut ×2
Step 4
Firstly, you should adjust servo to 90 degrees with software,
then install servo arm to the servo (pay attention to their angle).
9g Micro Servo ×1
9g Micro Servo Bracket ×1
Servo Arm ×1
M2×10mm Screw ×2
M2 Nut ×2
M2.2×6.5mm Self-drilling Screw ×1
Bracket 3×3 ×1
M2.2×8mm Self-drilling Screw ×2
Plastic Spacer 4×7×2mm ×2
Step 6
Me Ultrasonic Sensor ×1
M4×8mm Screw ×2
M4 Nut ×2
Tip
Please insert self-drilling
screw through the hole
marked red.
Tip
The ultrasonic sensor is
included in mBot.
14 15
Page 10
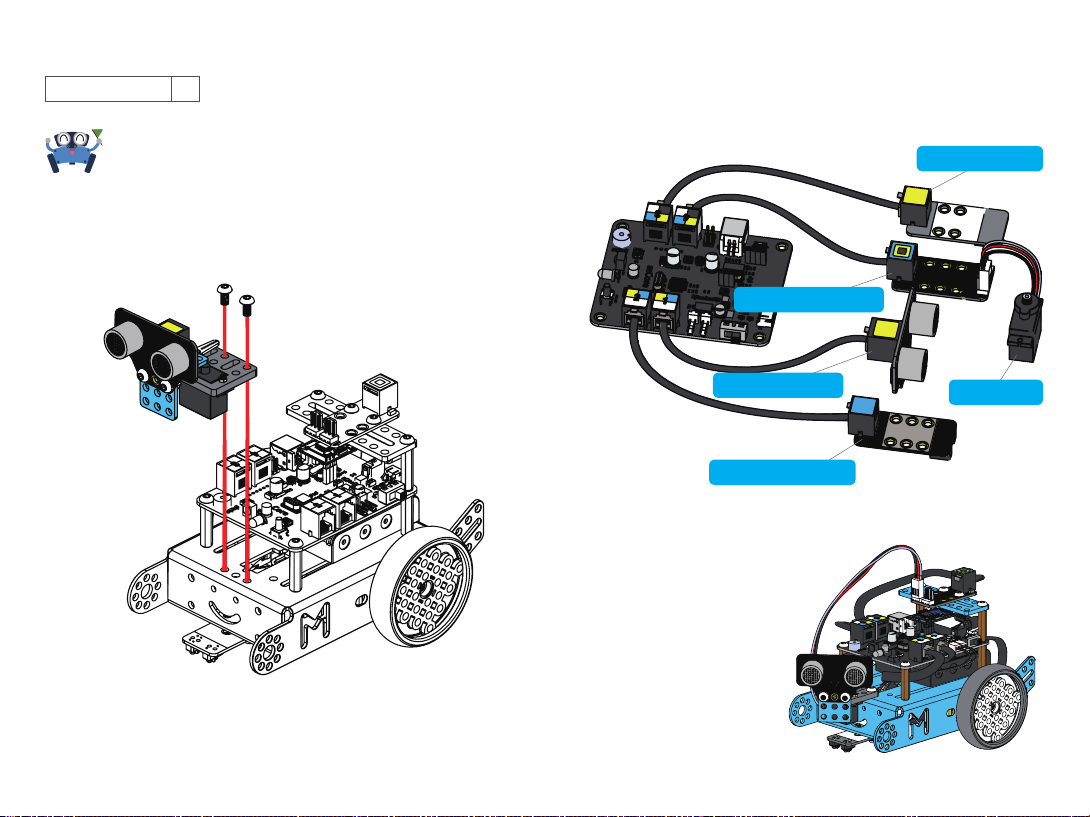
Step 7
M4×8mm Screw ×2
Tip
If these two holes on your mBot are without
thread, please fix the parts with M4 nuts.
Step 8 Wire connections
This is the reference picture of wire connections in construction
examples. You can also change the ports according to your own
program.
Me RGB LED Module
Me RJ25 Adapter Module
Me Ultrasonic Sensor
Me Line-follower Sensor
9g Micro Servo
Good job !
You have finished the construction.
Now you can control your
Head-Shaking Cat according to the
constructions on page 5.
16 17
Page 11
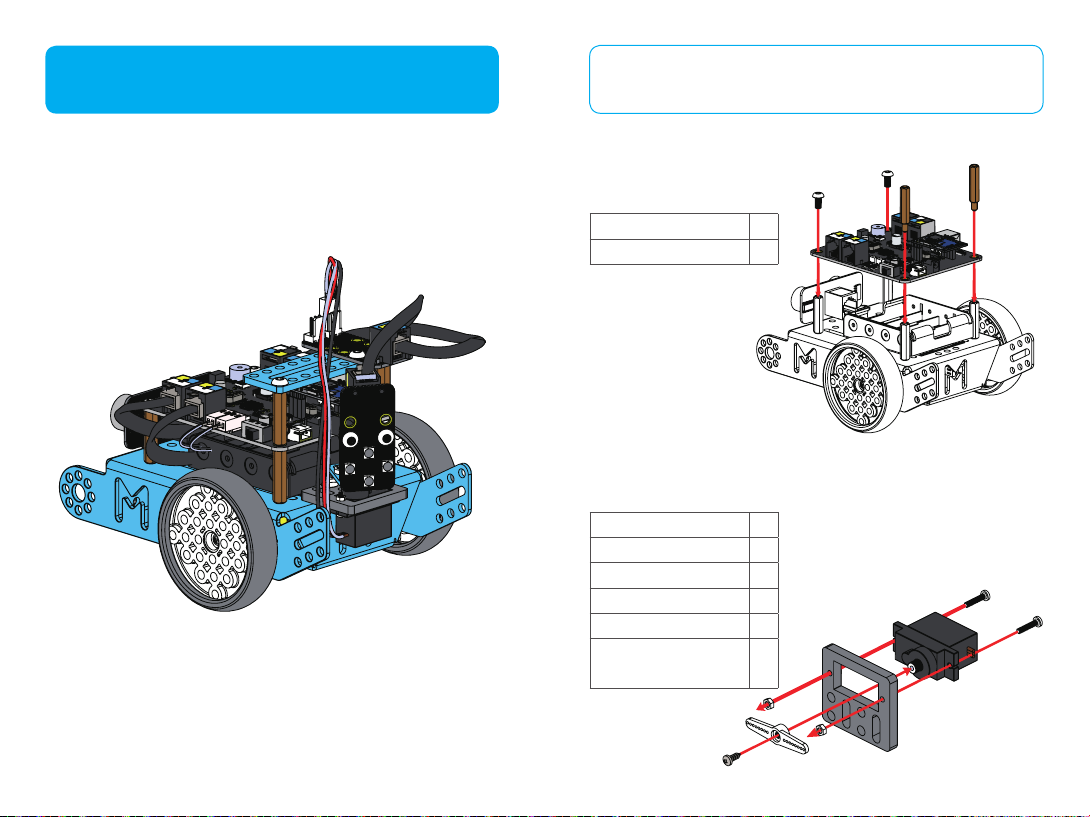
Light-Emitting Cat
mBot Servo Pack- Light-Emitting Cat
mBot Class mBot Add-On Pack
Light-Emitting Cat
If your mBot already has an mCore case,
please keep it for later construction.
Step 1
M4×25mm Brass Stud ×2
M4×8mm Screw ×2
Step 2
Firstly,you should adjust servo to 90 degrees with software, then
install servo arm to the servo (pay attention to their angle).
9g Micro Servo ×1
9g Micro Servo Bracket ×1
Servo Arm ×1
M2×10mm Screw ×2
M2 Nut ×2
M2.2×6.5mm
Self-drilling Screw
×1
18 19
Page 12
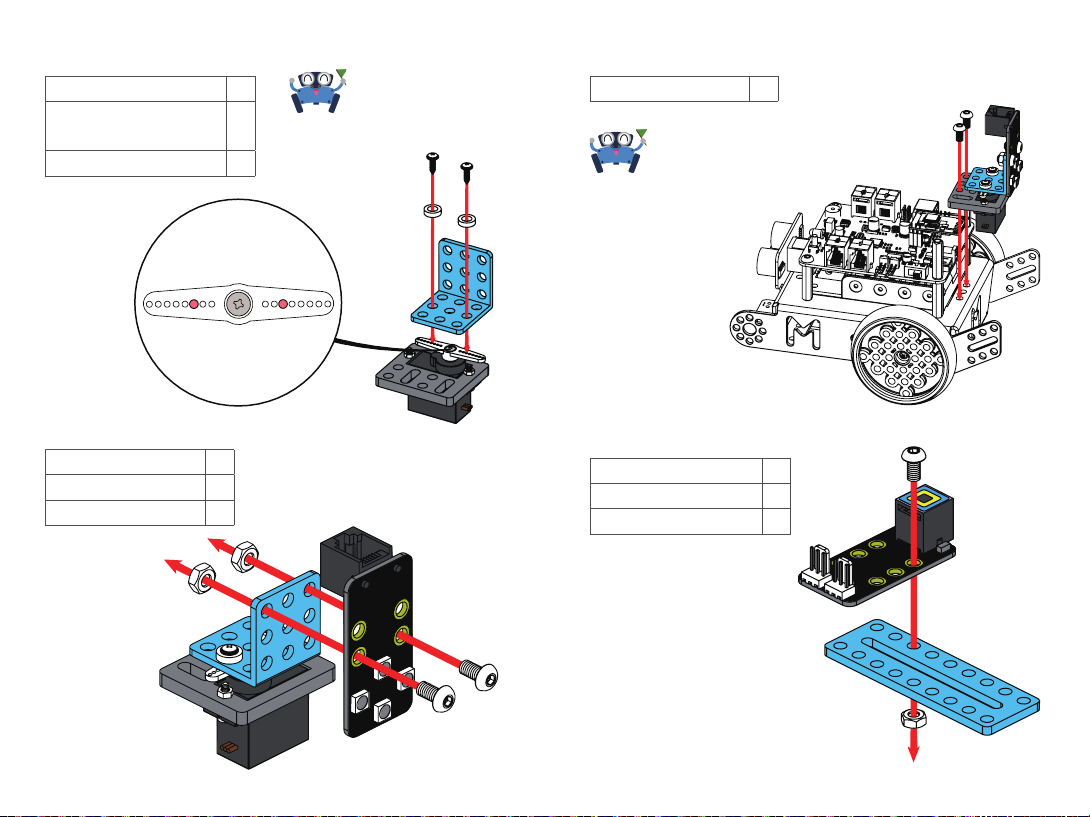
Step 3
Step 5
Bracket 3×3 ×1
M2.2×8mm
Self-drilling Screw
Plastic Spacer 4×7×2mm ×2
Step 4
Me RGB LED Module ×1
M4×8mm Screw ×2
M4 Nut ×2
Please insert self-drilling
×2
screw through the hole
marked red.
Tip
M4×8mm Screw ×2
Tip
If these two holes on your
mBot are without thread,
please fix the parts with M4
nuts.
Step 6
M4×8mm Screw ×1
M4 Nut ×1
Me RJ25 Adapter Module ×1
20 21
Page 13
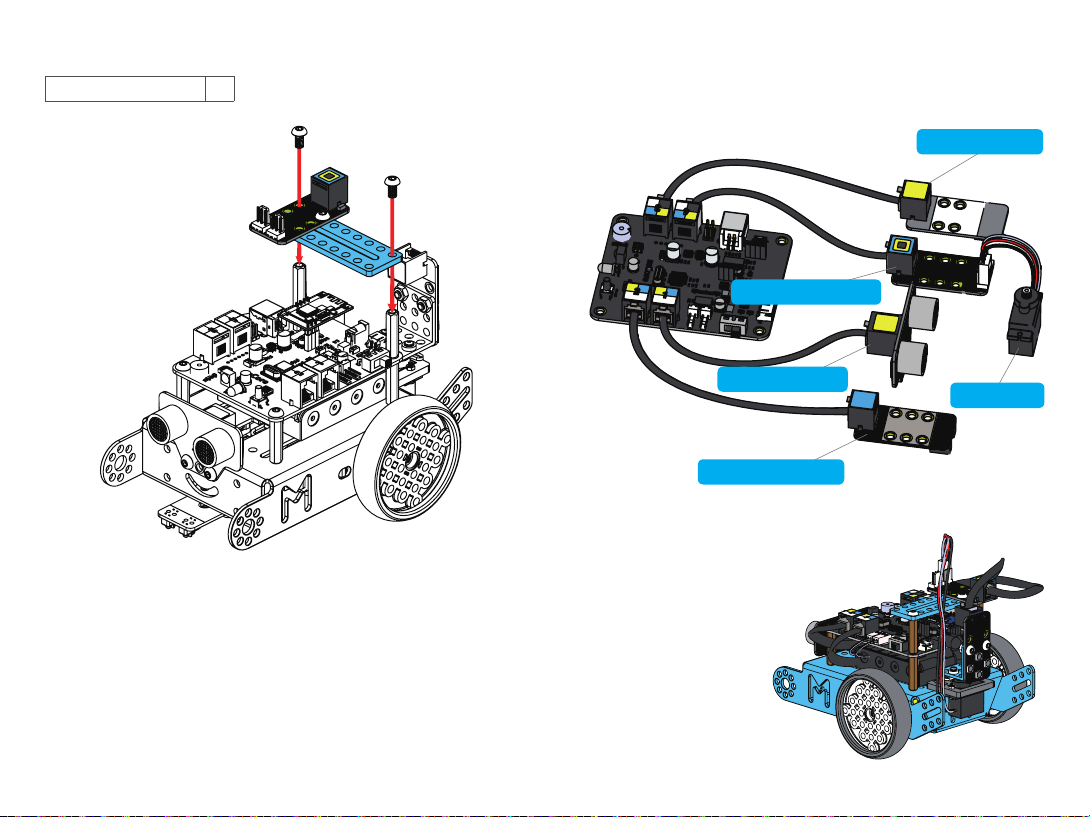
Step 7
M4×8mm Screw ×2
Step 8 Wire connections
This is the reference picture of wire connections in construction
examples. You can also change the ports according to your own
program.
Me RJ25 Adapter Module
Me RGB LED Module
Me Ultrasonic Sensor
Me Line-follower Sensor
9g Micro Servo
Good job !
You have finished the
construction. Now you can
control your Light-Emitting Cat
according to the constructions
on page 5.
22 23
Page 14

24
 Loading...