

Page 1

SKP-BAR-BLK
SCAFELL PIKE
Audio Soundbar & Wired Subwoofer
Instructions Guide
Page 2

.............................................. 1
What’s In The Box? .................................................... 4
Support ..................................................................... 5
..................................................... 6
Wall Mounng ........................................................... 6
Mode Indicator Lights ................................................8
Fixing the Soundbar ...................................................9
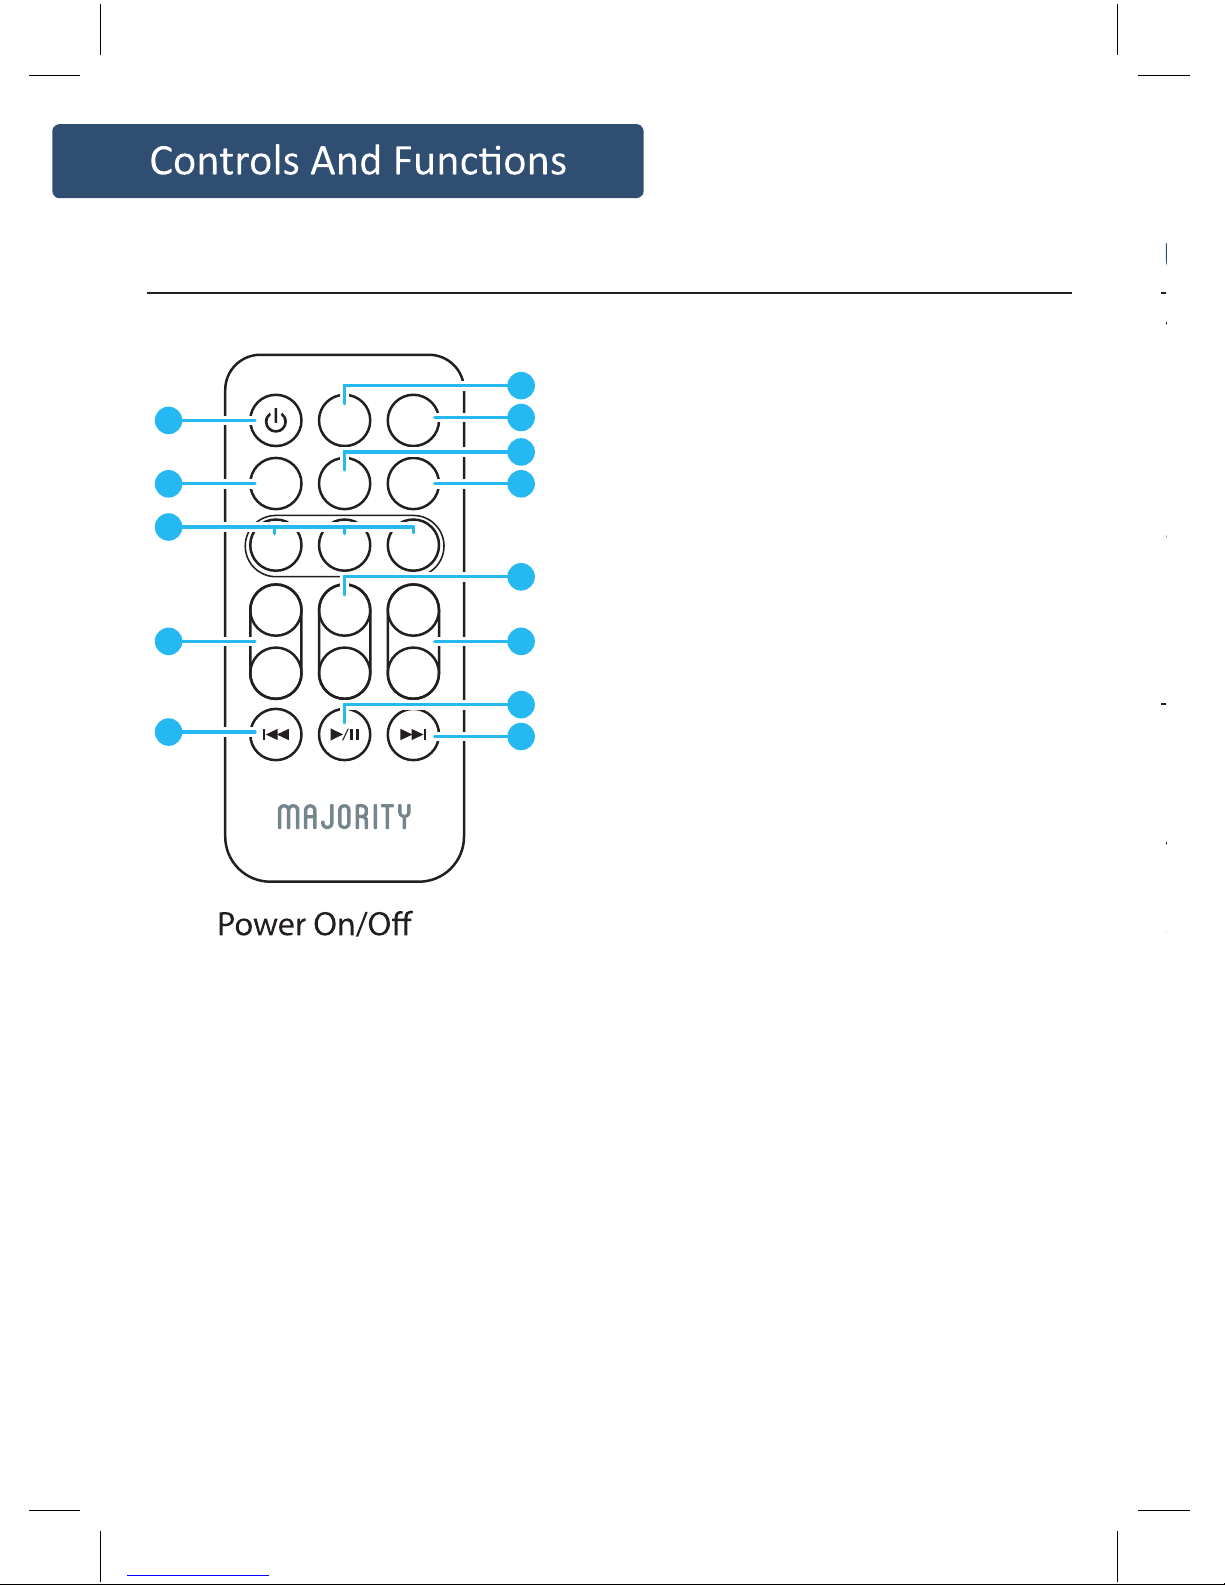
Connecng the Subwoofer with the Soundbar ....... 13
............................................ 10
................ 11
.............................. 12
................................................ 14
...................................................... 15
............................................................ 16
................................................................. 16
................................................... 17
Contents
Front View/LED Indicator Light
Watch video tutorials and register
your product for a FREE 3-year warranty
at www.majorityradios.co.uk
YEAR
WARRANTY
Warranty
Playing Audio Wirelessly ..........................................
14
Page 3

1
Rear View: Panel Interface Connection
8. OPTICAL In Socket
9. 3.5mm Line In Socket
10. AUX (L/R) In Socket
11. Subwoofer Output
12. DC 18V 1.5A Socket
Front View/LED Indicator Light
1. Speaker Drivers
2. Remote Control Sensor
3. LED Indicator Light
Side View: Buttons
4.
5. Select a mode: Bluetooth, AUX in,
LINE in or OPTICAL in
6. Volume increase
7. Volume decrease
The Majority Scafell Pike will automatically turn to standby mode
after 60 minutes if the TV or external unit is discontinued or
1
2 3
POWER
SOURCE
VOL+
VOL-
4
5
6
7
LINE IN AUX IN
SW.OUT
DC 18V
OPTICAL
8 9 10 11 12
Page 4
2
13.
Switch the unit between on and
Standby mode
14. BT button
Bluetooth input buttons
15. Music/Movie/Dialog
buttons
Press the button to select a
desired music mode: Music,
Movie, Voice
16. Treble+/Treble- buttons
(It must be in mode of Music)
17. Back button
Skip backwards to the
beginning of the track or to
the previous track in Bluetooth
mode
18. OPTICAL button
Optical in button
19. PAIR/MUTE button
One touch to silence the unit or
restore the sound
Press and hold 2 seconds to
select PAIR mode
20. LINE button
Line In for 3.5mm input
21. AUX button
AUX for RCA L/R input
22. BASS+/BASS- buttons
(It must be in mode of Music)
23. VOL +/- buttons
Adjust the volume
24. Play/Stop button
Play/pause/resume playback in
Bluetooth mode
25. Skip button
Skip forwards to the next track
in Bluetooth mode
The remote control sensor at the front of the soundbar is
sensitive to the remote control’s commands up to a maximum of
6 metres away and within a maximum arc of 40 degrees.
Please note that the operating distance may vary depending on
the brightness of the room.
Remove the battery compartment located on the back of the
remote control.
The unit comes standard with a battery
installed. To avoid discharging it, it is locked
with a plastic tape. Remove the tape to
activate the battery.
If you have to change, insert a CR2025 3V
battery, observing the correct polarity.
Replace the battery compartment.
STANDBY
LINE
OPTICAL
BT
MUSIC
TREBLE+ BASS+ VOLUME+
VOLUME-BASS-TREBLE-
MOVIE VOICE
AUX
PAIR/
MUTE
13
14
15
16
17
21
20
19
18
22
23
25
24
Remote Control
Using the Remote Control
Remote Control Battery Replacement
Page 5

3
The remote control sensor at the front of the soundbar is
sensitive to the remote control’s commands up to a maximum of
6 metres away and within a maximum arc of 40 degrees.
Please note that the operating distance may vary depending on
the brightness of the room.
Remove the battery compartment located on the back of the
remote control.
The unit comes standard with a battery
installed. To avoid discharging it, it is locked
with a plastic tape. Remove the tape to
activate the battery.
If you have to change, insert a CR2025 3V
battery, observing the correct polarity.
Replace the battery compartment.
Using the Remote Control
Remote Control Battery Replacement
Page 6

STANDBY
LINE
OPTICAL
BT
MUSIC
TREBLE+ BASS+ VOLUME+
VOLUME-BASS-TREBLE-
MOVIE VOICE
AUX
PAIR/
MUTE
1. Majority Scafell Pike Soundbar
2. Remote Control
3. Adapter
4. 3.5mm to 3.5mm Audio cable
5. RCA Stereo Audio Cable
6. Subwoofer
7. Wall Plugs
8. Screws
9. Instructions Guide
Majority Scafell Pike Soundbar
Remote
Control
Adapter 3.5mm to
3.5mm Audio
Cable
RCA Stereo
Audio Cable
Subwoofer Wall Plugs x 2 Screws x 2 Instruction
Guide
4
What’s In The Box?
Box Contents
Page 7

5
Thank you for your purchase of the Majority Scafell Pike.
Please follow the guidance of the manual to set up your new
purchase and begin enjoying its features.
If you require further assistance with your new soundbar,
please contact our support team on the Majority website:
https://www.majorityradios.co.uk/support
Support
Support
Page 8

6
Wall Mounting
Safety
Use the RCA Stereo Audio Cable to connect the TV’s stereo
RCA(L/R). Audio output socket to the AUX(L/R) Sockets of the
unit.
Then press the AUX button on the remote control or press the
source button on the unit to choose the AUX function.
Turn on your television set to use the Majority Scafell Pike.
Fixing the Soundbar
1/. Installation must be carried out by qualied personnel only.
Incorrect assembly can result in severe personal injury and property
damage. If you are going to install this Soundbar yourself, you must
have studied installations, such as electrical wiring and plumbing that
may be buried inside the wall. It is installer's responsibility to verify that
the wall safely support the total load of the Soundbar.
2/. Additional tools (not included) are required for the installation.
3/. Do not over-tighten screws.
4/. Keep this user manual for future reference.
5/. Use an electric stud nder to check the wall type before drilling and
mounting.
Tools & xings required
1/. Drill tted with masonry drill bit
3/. Pencil
5/. Spirit level
2/. Screwdriver
4/. Ruler
Place the soundbar in the desired position and using a spirit level
check that the soundbar is level.
Make a light pencil mark on the wall at the top edge of both xing
brackets. The mark should be positioned directly above each bracket.
Note the mounting points on the soundbar (one is 160mm from the
end while the other is 160mm from the other end),so you should use
the soundbar as a template to get the right mounting positions.
Place the soundbar away from the work area and then mark two
xing points 7mm below the light pencil marks for the screws. These
marks should be 470mm apart and level. Before drilling, use a spirit
level to check that the xing points marked are level.
Page 9

LINE IN AUX IN
SW.OUT
DC 18V
OPTICAL
Rear view of the unit
AUX IN
7
LINE IN AUX IN
SW.OUT
DC 18V
OPTICAL
470mm
Distance between the holes of two metal brackets
If xing to a solid masonry wall, use a masonry drill bit, drill holes to a
depth of approximately 30mm and insert the wall plugs. Insert the
screws into the wall plugs and drive home the screws until the heads
stand proud of the wall by about 1mm.
If xing to timber, follow the directions above, but only drill a small
pilot hole for each screw and do not use the wall plugs provided.
If xing to hollow plaster board walls, use a drill bit suitable for wood
and replace the wall plugs with wall anchors appropriate for the
application. Locate the xing points into wall studs and cross braces
where possible.
Locate the soundbar onto the screw heads and check that the screws
are fully engaged into the keyhole mount before releasing your hold.
Page 10

8
Mode Indicator Lights
State Indicator Lights
Red
Optical mode
Yellow
AUX mode
White
Line in mode
Green
Bluetooth ready Flashing blue
Bluetooth connected Blue
Use the RCA Stereo Audio Cable to connect the TV’s stereo
RCA(L/R). Audio output socket to the AUX(L/R) Sockets of the
unit.
Then press the AUX button on the remote control or press the
source button on the unit to choose the AUX function.
Turn on your television set to use the Majority Scafell Pike.
Fixing the Soundbar
Page 11

9
Use the RCA Stereo Audio Cable to connect the TV’s stereo
RCA(L/R). Audio output socket to the AUX(L/R) Sockets of the
unit.
Then press the AUX button on the remote control or press the
source button on the unit to choose the AUX function.
Turn on your television set to use the Majority Scafell Pike.
LINE IN AUX IN
SW.OUT
DC 18V
OPTICAL
Rear view of the unit
RCA stereo audio cable
AUX IN
Fixing the Soundbar
Page 12

10
You will need: An audio source with an Optical Audio Output and a Digital
Optical Audio cable (not included)
Connect the Digital Optical Audio cable to the optical output on
the audio source and to the Optical Input on the speaker bar.
Press the POWER button on side panel or POWER button directly
on the remote control to switch on the unit.
Press the OPTICAL button on the remote control to switch
to Optical mode or one touch SOURCE button on main unit
repeatedly to select the Optical mode. The mode indicator LED
will turn Yellow.
Using the native controls on your connected device, make
sure the audio settings are set to PCM or Optical Audio and are
turned On.
Audio from the connected audio source will now be played
through the speakers.
LINE IN AUX IN
SW.OUT
DC 18V
OPTICAL
LINE IN AUX IN
SW.OUT
DC 18V
OPTICAL
Rear view of the unit
OPTICAL cable
Using the Optical Input
Plug one end of a 3.5mm audio input cable (included) into the
Line in on the unit. Before use, disconnect any cables connected
to the Stereo RCA Inputs.
Plug the other end of the cable into the audio output/
headphone output on an MP3 player or other audio source.
Press the POWER button on side panel or POWER button directly
on the remote control to switch on the unit.
Press the SOURCE button repeatedly or directly press the LINE
in button on remote control to enter LINE in mode. The mode
indicator will turn green.
Audio played through the connected device will now be heard
through the speakers.
Using the MP3 LINK Connection (Line In)
Page 13

11
Plug one end of a 3.5mm audio input cable (included) into the
Line in on the unit. Before use, disconnect any cables connected
to the Stereo RCA Inputs.
Plug the other end of the cable into the audio output/
headphone output on an MP3 player or other audio source.
Press the POWER button on side panel or POWER button directly
on the remote control to switch on the unit.
Press the SOURCE button repeatedly or directly press the LINE
in button on remote control to enter LINE in mode. The mode
indicator will turn green.
Audio played through the connected device will now be heard
through the speakers.
LINE IN AUX IN
SW.OUT
DC 18V
OPTICAL
Rear view of the unit
Audio device
3.5mm to 3.5mm
audio cable
Using the MP3 LINK Connection (Line In)
Page 14

12
Page 15

13
Follow the below instructions to connect the wired
subwoofer to the subwoofer.
1/. Plug the soundbar into mains sockets. Press POWER button on
the unit or STANDBY button on the remote control to switch on
the unit.
2/. User the RCA audio cable from the subwoofer to connect to
the SW.OUT jack (subwoofer out) on the soundbar.
3/. When audio is played through any source, the bar will
automatically use the connected subwoofer.
Connecting the Subwoofer with the Soundbar
LINE IN AUX IN
SW.OUT
DC 18V
OPTICAL
Page 16

14
Playing Audio Wirelessly
Pairing a Bluetooth Device for the First Time
Bluetooth Operation
Press the POWER button on the unit or the POWER button on the remote
control to switch on the unit.
Select and press the BT button directly on the remote control or press the
SOURCE button repeatedly to enter Bluetooth mode, indicated by a ashing
blue light.
Using the native controls on your Bluetooth device, select the “Majority
Scafell Pike” in your Bluetooth settings to pair.
If your device requests a password, enter the default “0000”.
Refer to the “user manual” for your specic device for instructions on pairing
and connecting Bluetooth devices.
When successfully paired and connected, a beep will issue from the unit and
the Pairing Indicator will display a solid blue light. After initial pairing, the
unit will stay paired unless unpaired manually by the user, or until it is erased
due to a reset of the device.
If the soundbar is Bluetooth connected to a device, you can press the
MUTE/PAIR button for 3 seconds to exit this device in order to pair the device
with another Bluetooth device.
If your device should become unpaired or you nd it is unable to connect,
repeat the above steps.
Follow the instructions for Pairing a Bluetooth Device.
Use the native controls on the connected Bluetooth Device to select a track.
To play, pause or skip the selected track, use the native controls on the
connected Bluetooth Device.
Audio played through the connected Bluetooth device will now be heard
through the speakers.
Page 17

15
If the Soundbar does not work properly as desired, please check
the following checklist.
Malfunction Possible causes/measures
No power / function
Check whether the power is switched on or
Check whether the power adaptor is
properly connected to power outlet or not.
No sound
Check whether unit is set to MUTE or not.
Check whether MODE is correctly selected
or not.
Check whether cables are properly installed
or not.
No sound from bluetooth
connection
Check whether you have pressed PAIR
button before pairing.
Check whether external device requires
password “0000” to start with.
Function disturbance
If a particular mode is causing problems,
please try an alternative connection to
your TV such as Optical, AUX or Bluetooth.
Remote control does not work
[properly]
Check whether the battery run out or not.
Replaces a new one if necessary.
Check whether there is obstacle on the
front of remote sensor or not.
No sound when connection
and switches to OPTICAL IN
mode
Check and ensures the audio setting of the
input source (e.g. TV,game console,DVD
player, etc.)is set to PCM mode while using
digital connection (such as Optical,HDMI
and COAXIAL)
Page 18

16
Page 19

17
Page 20

www.majorityradios.co.uk
 Loading...