

Page 1

PEG-NET-BLK
MAJORITY
PETERHOUSE
GRADUATE
Internet Radio
Instrucons Guide
Page 2

What’s In The Box? ���������������������������������������������������� 1
Controls And Funcons ����������������������������������������������3
Navigaon Controls �������������������������������������������������� 6
Basic Operaon �������������������������������������������������������� 7
Internet Radio ����������������������������������������������������������� 9
Pre-seng your favourite internet staons ������������� 10
Media Centre ������������������������������������������������������������11
Spofy Connect ������������������������������������������������������� 13
Informaon Centre �������������������������������������������������� 14
Connecons ������������������������������������������������������������� 15
Bluetooth ����������������������������������������������������������������� 16
Local Radio �������������������������������������������������������������� 17
Conguraon Sengs ��������������������������������������������� 18
Date&Time: For manual date and me setup ��������������������� 21
Alarm Sengs ����������������������������������������������������������22
Seng the Alarm ����������������������������������������������������23
Other Funcons �������������������������������������������������������26
Troubleshoong ������������������������������������������������������29
Specicaons ����������������������������������������������������������30
Warranty �����������������������������������������������������������������30
Safety Informaon��������������������������������������������������� 31
Watch video tutorials and register
your product for a FREE 3-year warranty
at www.majorityradios.co.uk
Contents
3
YEAR
WARRANTY
Page 3

1
What’s In The Box?
1. Majority Peterhouse Graduate
2. Remote Control
3. DC-In Power cable
4. Instructions Manual
Box Contents
Page 4

2
Controls And Funcons
Radio Front View
1. Display screen
2. Standby button
3. Menu button
4. Favourites button
5. Previous ( ) button
6. Select Dial
Vol+/Vol- dial
Rotate = Scroll,
Press = Select
7. Dimmer button
8. Next button ( )
9. Alarm button
10. Sleep button
Standby
Menu Sleep
AlarmFav
Dimmer
Navigate
OK
325
4
8710
9
6
1
Page 5

3
Radio Back View
11. ON/OFF Switch
12. DC 12V Power In
13. Line Out
14. Aux In
15. USB Port
LINE OUTDC 12V
AUX IN
USB
11 12 13 14 15
Controls And Funcons
Page 6
4
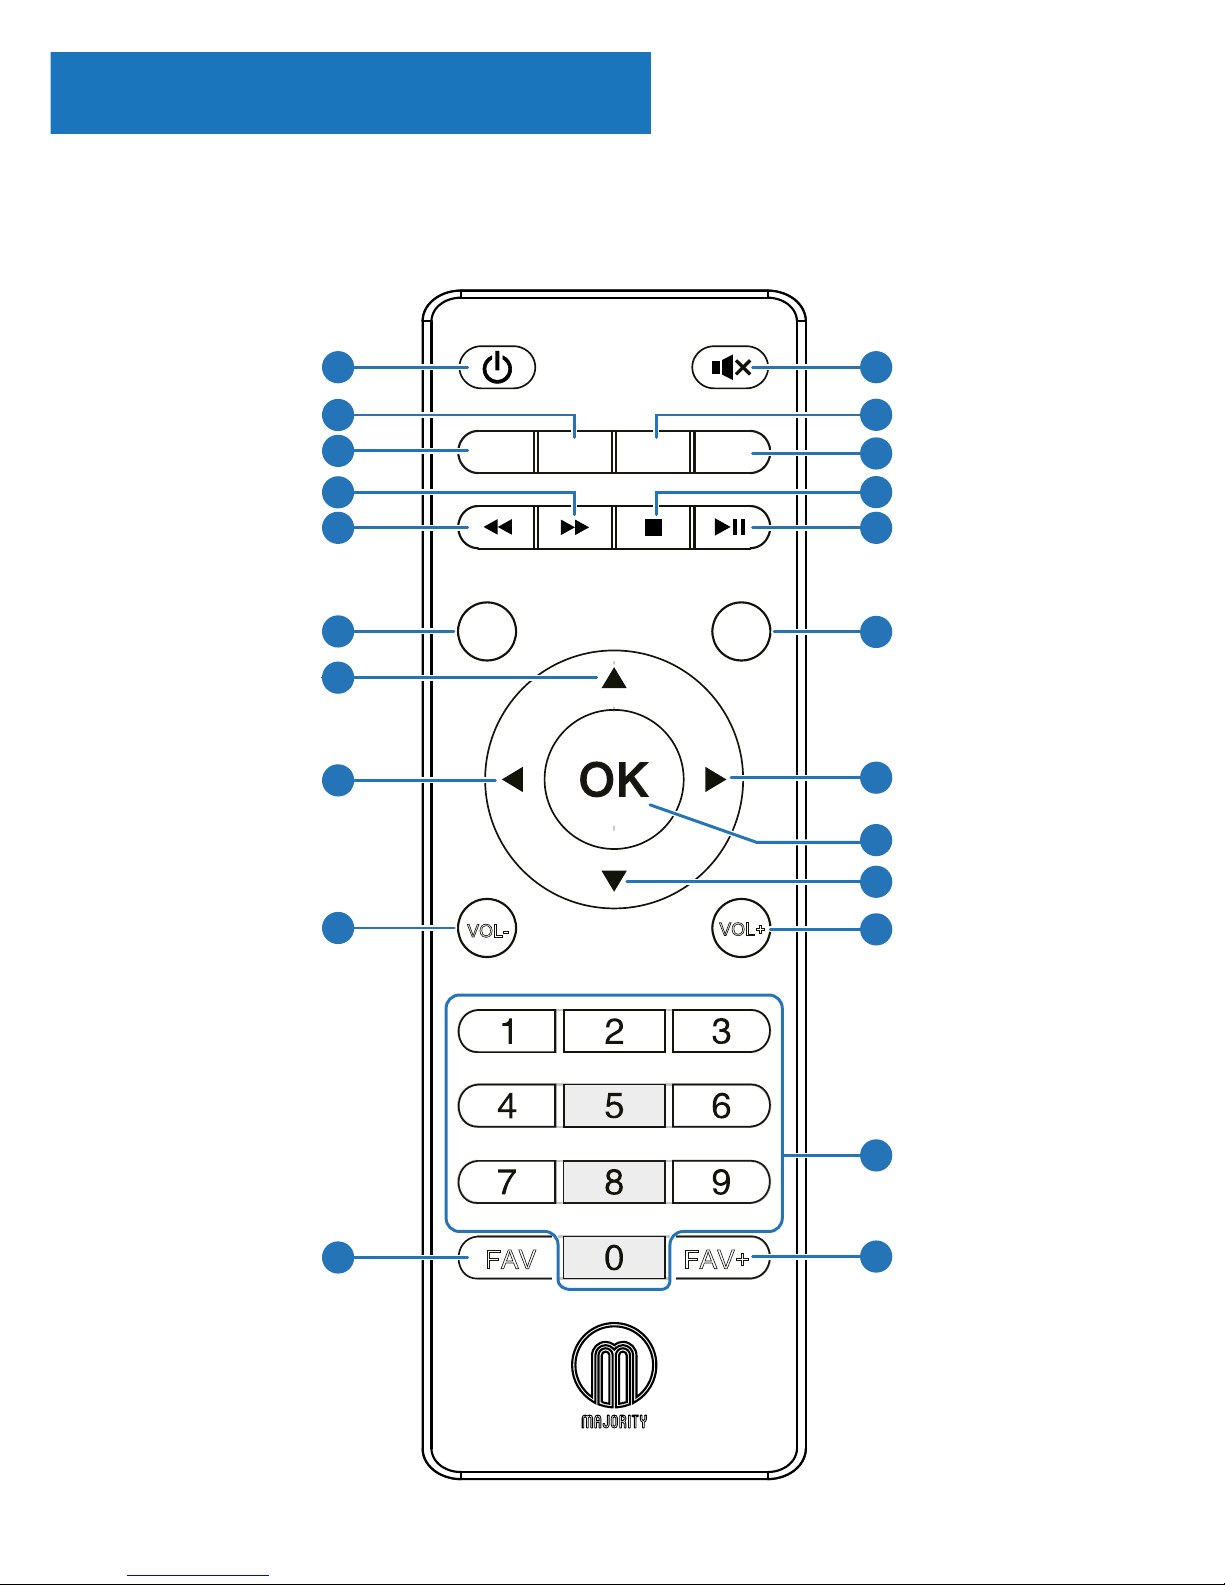
Remote Control
Controls And Funcons
EQ AlarmSleepDimmer
FAV FAV+
HOMEMODE
VOL+
VOL-
ABC DEF
JKLGHI MNO
TUVPQRS WXYZ
1 11
12
13
14
15
16
17
18
19
20
21
22
2
3
4
5
6
7
8
9
10
Page 7

5
Controls And Funcons
1. Power On/O
Switch the unit between on and
Standby mode
2. Dimmer
Switch between two dimmer
settings
3. Equaliser
Adjust the sound to dierent
media options for the best sound
4. Skip forward button
Skip forward through tracks in
Bluetooth Mode
5. Skip backward button
Skip backwards through tracks in
Bluetooth Mode
6. MODE button
Scroll through available audio
modes on display screen
7. Scroll up
8. < back button/scroll left
Go back to previous display
screen or options available. Also
use to scroll left
9. Vol - button
10. Fav Preset recall
When in the audio mode view
favourite stations that have been
set
11. MUTE button
Stop/start audio sounding
12. Sleep button
Select repeatedly until desired
sleep timer set on top right of
display
13. Alarm button
Select to view and create alarm
options
14. Stop button
15. Pause/Play
16. HOME button
View main display screen
17. > forward button/scroll
right
Use to go to next option/screen
or scroll right.
18. Select button
Select chosen option
19. Scroll down
20. Vol + button
21. Keypad
Type numbers and letters
22. Add as a favourite/preset
When on the desired station,
press to set as a favourite. Use the
select OK button to choose preset
number
Page 8

6
Navigation Controls
Controls and Funcons
Standby button: This should be used to turn your radio on
and o. The Standby screen will display the time, date and any
settings set such as alarms.
To turn your radio on, press the Standby button to be taken to
the home screen or last station being used before standby.
Select Dial/Volume: Rotate the dial clockwise or anticlockwise
to scroll through choices and press down the dial to conrm
selections.
Change the volume when you are on the radio station playing
display screen. The volume will not be altered when you are
navigating around the radio as it will begin to function as the
Select dial.
Menu button: Select the Menu button to browse through your
audio options such as Local Radio, Internet Radio, Media Centre,
Information Centre, AUX, Conguration Settings. Also use the
Menu button to cancel out of settings being made.
Dimmer:
Select Dimmer to choose between the two default
dimmer options. Alter dimmer’s brightness in Conguration
settings.
< and > buttons:
Buttons used to alter settings. Use the
‘previous’ button to go back a step.
Page 9

7
Controls and Funcons
Basic Operation
Please note that the instructions within this manual will refer to
the radio button number e.g (Ref.*number*) in accordance to
the diagrams on pages 2-3. The remote control can also be used
with the relevant buttons as per the diagram on pages 4-5.
Starting up your internet radio
Plug the adaptor connector into the back of the system labelled
‘DC in’ (Ref.) and turn the power on from the mains. Switch
the button at the back of the radio to ‘ON’ (Ref.) to display a
‘Welcome’ screen.
After the Welcome screen, you will be able to select your chosen
language by scrolling with the Select dial (Ref.). Select your
language by pressing down the Select dial.
If this is the rst time of using your radio, you will get the option
to set up your WiFi to stream Internet Radio with the message
“Would you like to congure network now?”. If you select YES,
your radio will begin to scan for nearby networks to connect to.
If you select NO then you can set this up later in conguration
settings.
Page 10

8
Controls and Funcons
Manual WiFi Set-up
If you select YES, you will be able to select your chosen WiFi
network and enter WiFi password in the next display screen.
Type letters/numbers by scrolling with the Select dial (Ref.)
until the correct digit is displayed and click ‘>’ to go to the next
digit. Once nished, press down the Select dial to conrm
Wireless Network (WPS PBC)
When at the “Would you like to congure network now?” stage,
if you select “YES (WPS)” your radio will begin to search for WiFi
connections.
Whilst this has been selected you will have 120 seconds to click
the WPS button on your WiFi modem. This will connect your WiFi
to your radio without manually writing in the passcode.
Enable ‘Check Network when
Power On’?
NOYES
00:00
Would you like to congure
Network now?
Yes (WPS) NOYES
00:00
Please press the WPS button on
the router within 120 Secs.
00:00
Enable ‘Check Network when
Power On’?
NOYES
00:00
Would you like to
congure network now?
00:00
Yes (WPS) NOYES
00:00
Enter Password
1/1
00:00
Move OKInput
Scanning for
Wireless Network...
00:00
Page 11

9
Internet Radio
Main Menu Screen
Go to the main menu screen by selecting ‘Menu’ (Ref.) followed
by selecting ‘Internet Radio’
Select ‘Internet Radio’ on the display screen by turning and
pressing the Select dial (Ref.)
When in the ‘Internet Radio’ screen there will be multiple
options:
My Favourite: Your favourite stations will be saved here for
easy listening.
Radio Station/Music: Select this option to browse internet
radio stations in the categories of: Global Top 20, Genre,
Country/Location, Highlight. Find stations under relevant
categories and select your chosen internet station by selecting
with the Select dial.
Local Radio: The radio is automatically set up to detect your
country’s top DAB stations, Top 10 stations, All Stations, plus a
variety of genres into categories in alphabetical order. Select the
category that you wish to listen to with the Select dial (Ref.)
and continue browsing until you nd your desired station.
Sleep Radio: Choose from multiple relaxation sounds.
History: Browse through recently listened to stations
Page 12

10
Main Menu Screen
Service: Search for an internet radio station or add a new
station. To search a new station, select ‘Search Radio Station’ to
go to the search tool. Turn the Select dial to highlight the chosen
character and click ‘>’ (Ref.) to move to the next character. To
go back to the previous character, press ‘<’ (Ref.) to highlight it.
Press the Select dial (Ref.) to search for the internet station.
Pre-setting your favourite internet stations
When you have found your desired station, hold down ‘Fav’
(Ref.) for a few seconds to go to the ‘Add to my Favourites’
screen. Turn the select dial to choose the preset number and
select your option (Ref.).
To view your preset favourite stations, press the ‘Fav’ button to
scroll through your choices.
Quick use tip: Once presets have been set for Internet Radio,
you can scroll through the main display screen to one of these
options e.g Internet Radio and without selecting it, click ‘Fav’ to
view your preset favourite stations for quick listening.
Page 13

11
Main Menu Screen
Media Centre
Select ‘Media Centre’ on the main display screen by turning the
dial and pressing the Select dial (Ref.)
USB:
Plug in a USB stick (Ref.) with les. Highlight the desired
folder/song with the Select dial (Ref.) and select for your
chosen song to play.
USB port also able to charge your device.
UPnP:
Universal Plug and Play allows you to connect to other devices
to play your music such as personal computers (Windows media
player), mobile (GooglePlay) and other devices.
Once you have selected UPnP, select the radio from your device
to connect and from your phone you may need to select the
radio. Both your device and the Peterhouse Graduate radio
will need to be connected to the same WiFi network.
Select the device with the Select dial you want to play music or
media from on the radio display screen in UPnP settings.
If you have set up folders on your device that is being shared
you can use the Select dial to scroll through your choices and
conrm your selection by pressing the Select dial.
Page 14

12
Main Menu Screen
My Playlist:
You can create a playlist of favourite music or media from UPnP.
When you are playing the media, press and hold the Select dial
from unit or remote control to save it into My Playlist.
Access ‘My Playlist’ from the Media Centre.
Clear My Playlist:
If you have created a playlist via UPnP connection, you can
select this option to clear the playlist. Select the option ‘Clear my
Playlist’ with the select dial.
The radio will then display “Conrm delete?”. Select YES to delete
your playlist with the Select dial.
My Media U
In conguration settings there is the option to connect a MediaU
account via the website http://www.mediayou.net/
Ensure that WiFi is connected to the radio, and then obtain the
wireless MAC address of the radio via Information Centre >
System Information > Wireless Information. Enter this address on
the MediaU website to allow the radio to sync your account.
When this is successfully congured you are then able to save
and view your own MediaU station playlists.
Page 15

13
Main Menu Screen
Spotify Connect
Listen out loud with Spotify Connect
1. Connect your Peterhouse Graduate to your wi network
2. Open up the Spotify app on your phone, tablet or laptop
using the same wi network
3. Play a song and select Devices Available.
4. Select your Peterhouse Graduate and start listing.
The Spotify Software is subject to third party licenses found here:
www.spotify.com/connect/third-party-licenses.
Page 16

14
Go to the main menu screen by selecting ‘Menu’ (Ref.) followed
by selecting ‘Information Centre’.
Weather Information: To select the weather information for
a desired place, rst select the continent by using the Select
dial (Ref.) to scroll and select. Following this, then select the
country, followed by the town/city.
Once you choose a chosen town/city, the following information
will be displayed: current temperature, weather symbol image,
approximate temperature range for the next 5 days.
Financial Information: Select from a range of stock market
index’s from around the world. Scroll and select using the Select
dial.
System Information: View system version and wireless
connection information. If wireless information is selected,
information such as WiFi’s signal strength can be found.
Main Menu Screen
Information Centre
Page 17

15
Connections
AUX-In
Select ‘AUX’ on the main display screen by turning the dial and
pressing the Select dial (Ref.)
Plug an AUX cable into your device and connect cable via AUX-in
port (Ref.) at the back of the radio.
Begin playing audio from your device and this should play on
the radio when in AUX mode.
Select your chosen audio on your device and play.
Line Out
At the back of the radio, the ‘Line Out’ (Ref.) port allows for an
external amplier/stereo.
Simply connect an AUX cord from the ‘Line Out’ port to the
amplier/stereo.
Begin playing audio from the Internet Radio, Media Centre,
Spotify Connect AUX or Bluetooth setting.
Main Menu Screen
Page 18

16
Bluetooth
Main Menu Screen
Select ‘Bluetooth’ on the main display screen by turning the
dial and pressing the Select dial (Ref.) or with the remote
navigation buttons.
Go to your device settings to connect your device to the radio
via Bluetooth.
The internet radio’s device will display as ‘Majority Peterhouse
Graduate’. Select this radio to connect and your radio should
sound “Connected”.
Select your chosen audio on your device and play.
Control the playing audio from your device, rather than with the
radio’s navigation buttons
Page 19

17
Local Radio
Select the option of ‘Local Radio’ on the main display screen with
the Select dial (Ref.).
Browse through a range of radio stations in your region
including top DAB stations in your area, Top 10 stations and a
range of genres put into categories.
Main Menu Screen
Page 20

18
Conguration Settings
Sengs
Go to the main menu screen by selecting ‘Menu’ (Ref.) and
select ‘Conguration’ to browse through a range of settings.
Network: Select this for Wi-Fi and network options
Wireless Network Conguration
On the Network settings, you can set up a Wi-Fi connection by
selecting Wireless Network Conguration (Ref.). The radio will
then start searching for available WiFi connections.
Find your WiFi connection and select it with the Select dial. Once
selected, you may need to type in the WiFi password. To type
letters/numbers, scroll with the Select dial until the correct digit
is displayed and click ‘>’ (Ref.) to go to the next digit. Press ‘<’
(Ref.) if you wish to go back to previous digit. Once you are
nished, press down the Select dial (Ref.) to conrm.
Once your WiFi is connected, you will be taken to the main menu
screen and the WiFi signal will appear in white at the top left
corner. Please note: Wi-Fi password is case sensitive.
Page 21

19
Manual WiFi Set-up
If you select YES, you will be able to select your chosen WiFi
network and enter WiFi password in the next display screen.
Type letters/numbers by scrolling with the Select dial (Ref.)
until the correct digit is displayed and click ‘>’ to go to the next
digit. Once nished, press down the Select dial to conrm.
Wireless Network (WPS PBC)
When at the “Would you like to congure network now?” stage,
if you select “YES (WPS)” your radio will begin to search for WiFi
connections.
Whilst this has been selected you will have 120 seconds to click
the WPS button on your WiFi modem. This will connect your WiFi
to your radio without manually writing in the passcode.
Sengs
Enable ‘Check Network when
Power On’?
NOYES
00:00
Would you like to congure
Network now?
Yes (WPS) NOYES
00:00
Please press the WPS button on
the router within 120 Secs.
00:00
Enable ‘Check Network when
Power On’?
NOYES
00:00
Would you like to
congure network now?
00:00
Yes (WPS) NOYES
00:00
Enter Password
1/1
00:00
Move OKInput
Scanning for
Wireless Network...
00:00
Page 22

20
Sengs
WiFi Connection Complete!
Once your WiFi is connected by manually entering your WiFi
password or via WPS, you will be taken to the main menu screen
and the WiFi signal will appear in white at the top left. Your
internet radio is now set up!
Page 23

21
Date&Time: For manual date and time setup
Manually setting date and time
There is the option to manually set the time and date instead of
using auto-detect to set this up.
Go to ‘Conguration’ settings and select ‘Date&Time’ by scrolling
and selecting with the Select dial (Ref.).
Select ‘Set Date and Time’ with the Select dial and choose
‘Manual Setup’.
Change the day by highlighting the character and using the
Select dial to scroll through to the desired unit. Once you have
got the correct unit, click ‘>’ (Ref.) to go to the month. Continue
this process with the year, the hour and the minutes.
Once the manual set up is complete, press down the Select dial
(Ref.) to Enter.
To change the format of the date and the time, including setting
a 12 hour or 24 hour clock, you can alter these settings under
the ‘Set Time Format’ and ‘Set Date Format’ options within this
Conguration Setting option.
Sengs
Manual Setup
Auto Detect (UTC + 0:00)
00:00
1/2
Set Date and Time
Set Time Format
Set Date Format
00:00
1/3
Set Date and Time
12/01/2018 14 : 13
DD/MM/YYYY HH : MM
00:00
Move OKInput
Page 24

22
Alarm Sengs
Setting Alarm 1/Alarm 2
To set an alarm on your radio, go to ‘Conguration’ settings and
scroll through to select ‘Alarm’ or click the ‘Alarm’ button on the
front of the radio (Ref.).
After this, select Alarm 1 or Alarm 2 and highlight ‘Turn On’ and
select this option (Ref.).
Select ‘Repeat’ to choose the regularity of your alarm with the
Select dial (Ref.). You can choose between Everyday, Once or
select individual days for the alarm to sound. Once you have
made your selection, press the ‘<’ button (Ref.) to go back to
the other alarm settings.
Select ‘Time:’ and turn the dial to highlight the alarm hour.
Once you have found the desired hour, press ‘>’ (Ref.) to then
change the minutes. Once the minutes are at the correct value,
press down the Select dial (Ref.) to conrm and go back to
alarm settings.
Now scroll down and select ‘Sound:’ with the Select dial. You can
now choose between beep, melody, internet radio, or USB. If
you are setting your alarm sound as internet radio, then you will
now be taken through your preset favourite stations. Select your
chosen alarm station with the Select dial.
Alarm Settings
Page 25

23
Alarm Sengs
00:00
Turn On
Turn O
2/2
00:00
Alarm 1 (Turn O)
Alarm 2 (turn O)
NAP Alarm (Turn O)
Alarm Volume
1/4
00:00
Beep
Melody
Internet Radio
USB
2/4
Time
00 : 00
HH : MM
00:00
Move OKInput
Everyday
Once
Mon
Tue
00:00
1/9
Repeat: Everyday
Time: 00:00
Sound: Melody
00:00
1/3
Setting your alarm is now complete and the alarm symbol will
now show on the standby display screen.
Now select the ‘Alarm Volume’ setting. Set the volume that
you wish to have your alarm sound. Please note that the alarm
volume cannot be altered when the alarm is sounding.
Page 26

24
How to cancel your alarm
To cancel your alarm, select ‘Alarm’ in ‘Conguration’ settings or
with the Alarm button (Ref.) and select the alarm you wish to
turn o.
Once the alarm is selected, you will have the option to ‘Turn O’
or ‘Turn On’. Highlight the ‘Turn O’ option and use the Select
dial (Ref.) to conrm.
How to turn o your alarm when sounding
When your alarm is sounding, select the ‘Alarm’ (Ref.) or
‘Standby’ (Ref.) button for alarm to stop. If you have set an
more than ‘Once’, the alarm icon will still remain on the main
display screen.
How to put your alarm on snooze
When your alarm is sounding, press the Select dial (Ref.) or any
other button except ‘Standby’ or ‘Alarm’ to stop the sound and
put into Snooze mode. The Snooze function will make the radio
sound again in 5 minutes.
When the alarm sounds again, stop the Snooze alarm by
pressing ‘Standby’ (Ref.) or ‘Alarm’ (Ref.).
Alarm Sengs
Page 27

25
Nap alarm
After selecting ‘Alarm’ on ‘Conguration’ settings, or the ‘Alarm’
button (Ref.) on the front of the radio, select ‘NAP alarm’.
Choose how many minutes you would like to have the nap alarm
on with the options of: 5, 10, 20, 30, 60, 90, 120 minutes.
Cancel the alarm by going to Nap alarm settings and switching
to ‘OFF’
Alarm volume
Change alarm volume by going to the ‘Alarm’ option in
Conguration Settings or by pressing ‘Alarm’ (Ref.) on the front
of the radio.
Scroll to the option for ‘Alarm Volume’ and use the Select dial
(Ref.) to change your alarm volume. Once the correct sound
volume has been chosen, wait a few seconds and the radio will
automatically revert back to alarm setting options.
Please note: The alarm volume set in this setting will be the
alarm sound and it cannot be changed with the Volume/Select
dial (Ref.) when the alarm sounds.
Alarm Sengs
Page 28

26
Other Functions
The following options are available in Conguration settings:
Timer
In ‘Conguration’ settings, select the option for ‘Timer’ and a
screen with 00:00 will display. To go up in seconds, click the ‘>’
button (Ref.). To go down in seconds, click the ‘<’ button (Ref.).
Hold down the ‘<’ or ‘>’ to move through the timer quickly.
Once you have chosen the correct timer amount, conrm it by
pressing the Select dial (Ref.).
Dimmer
The dimmer button allows you to select two dierent
brightness modes. You can alter the two brightness settings in
‘Conguration’ settings and selecting the option for ‘Dimmer’.
Select ‘Power Save’ mode to set the brightness for when there
is no activity of the radio for 15 seconds. This lower brightness
level will set until a button is clicked and the ‘Turn on’ setting will
activate.
Select ‘Turn On’ mode to set the brightness for when the radio is
active and in use.
To manually switch between the two dimmer settings, click
‘Dimmer’ (Ref.).
Funcons
Page 29

27
Software Update
Will show here if a software update is available for the radio. If
one is available, please select for the update to initiate.
Reset to default
Select this option to reset your radio and revert all of the settings
and presets made.
Conrm that you would like to reset the unit and its settings by
selecting ‘Yes’ with the Select dial (Ref.).
Sleep Timer
To set a sleep timer, select the ‘Sleep’ button (Ref.) and press
repeatedly to switch between sleep times on the top right of the
display screen. There is an option between 15, 30, 60, 90, 120,
150, 180 minutes.
To turn Sleep o, press multiple times until the timer is no longer
there or ‘Turn O’ in conguration settings.
Alternatively, you can set a sleep timer in ‘Conguration’ settings
and select the option for ‘Sleep Timer’ .
Once this has been selected, the timer amount and a sleep
image will show on the top right of the radio screen.
Funcons
Page 30

28
Additional Setting Options
Funcons
Time display - Select Analog or Digital
Language - Select your chosen language within the list
Display - Choose the display to be Colour or Monochrome
Power management - Select this to congure the radio to go
into standby mode automatically after a set time of inactivity or
if there is no WiFi signal. Select turn o to ignore this function.
Buer - Congure the buer time of the music playback: 2/4/8/
seconds.
Weather - Activate/deactivate the weather forecast for the
standby display. Choose your preferred temperature unit and
enter your location. This will then display in the clock display on
the standby screen every 10 seconds.
Local radio setup - Manually set up your location for Local
radio rather than allowing the radio to Auto Detect.
Playback setup - Select the playback mode of the Media
Centre: OFF, Repeat All, Repeat One or Shue.
Device - Default name for DLNA is “AirMusic”. You can rename
the device for DLNA setup.
Equaliser - Default equaliser is normal. You may change it to
Flat, Jazz, Rock, Soundtracks, Classical, Pop, or News.
Resume when power on - Turn o the function for the radio
to resume when powered on. Instead, the screen will remain in
main menu.
Page 31

29
Troubleshoong
Troubleshooting
If the radio does not work properly as desired, please use the
following checklist:
Malfunction Possible causes/measures
No power / function
Check whether the power is switched on or
o at the wall.
Check whether the power adaptor is
properly connected to power outlet or not.
No sound
Check whether unit is set to MUTE or not.
Check whether MODE is correctly selected
or not.
Check whether cables are properly installed
or not.
Function disturbance
Switch o and unplug the unit. Leave it for
minutes and switch it on again.
WiFi not connecting Ensure WiFi mode is selected in settings and
the correct passcode is being entered for
the WiFi modem.
Spotify not connecting to my
device
- Check that your device and your radio
are both connected to the same WiFi
connection.
- Check that no other Spotify Premium
devices are nearby and able to connect to
the radio - this would interfere with the
connection.
- Ensure music is playing and the radio
device has been selected on Spotify.
- Please wait a minute to allow for
connection to be made - there may be a
slight delay in connection.
Page 32

30
Specicaons
Specications
Power Supply
DC 12V/2A
Streaming
UPnP, DLNA
Connections
DC
USB
.mm AUX-In
.mm Line-Out
Input
-V~/Hz, mA
Dimension (WxHxD) . x . x . cm
Net Weight kg
Warranty
All products come with a standard 12 month warranty. All items
must be registered on www.majorityradios.co.uk for the
warranty to be valid. Once on the web page, use the menu to
nd “register your product”. You will also be given the chance
to extend your warranty for an additional 24 months, free of
charge.
Page 33

31
1. Read these instructions.
2. Keep these instructions. Instructions are also
available for download at www.majorityradios.co.uk
3. Heed all Warnings
4. Follow all instructions
5. Do no clean the apparatus near or with water
6. Do not block any ventilation openings. Install in
accordance with the manufacturer’s instructions
7. Do not block any ventilation openings. Install in
accordance with the manufacturer’s instructions.
8. Do not install near any heat sources such as
radiators, heat registers, stoves, or other apparatus
(including ampliers) that produce heat.
9. Protect the power from being walked on or pinched
particularly at plugs, convenience receptacles, and
the point where they exit from the apparatus.
10. Only use attachments/accessories specied by the
manufacturer.
11. Unplug this apparatus during light storms or when
unused for long periods of time.
12. Refer all servicing to qualied service personnel.
Servicing is required when the apparatus has been
damaged in a way, such as power-supply cord or
plug is damaged, liquid has been spilled or objects
have fallen into the apparatus, the apparatus has
been exposed to the rain or moisture, does not
operate normally or has been dropped.
13. No naked ame sources, such as lit candles, should
be placed on the apparatus.
14. Dispose of used electrical products and batteries
safely according to your local authority and
regulations.
ADDITIONAL WARNINGS
The apparatus shall not be exposed to dripping or
splashing and no objects lled with liquid, such as
vases, shall be places on the apparatus.
Main plug is used to disconnect device and it should
remain readily operable during intended use. In order
to disconnect the apparatus from the main mains
completely, the mains plug should be disconnected
from the main socket outlet completely.
Battery shall not be exposed to excessive heat such as
sunshine, re or the like.
RECYCLING ELECTRICAL PRODUCTS
You should now recycle your waste electrical goods and
in doing so help the environment.
This symbol means an electrical product should
not be disposed of with normal household waste.
Please ensure it is taken to a suitable facility for
disposal when nished with.
IMPORTANT: Please read all instructions carefully
before use and keep for future reference.
Risk of electric shock.
Do not open
Read all instructions carefully before use
and keep for future reference
When servicing, use only identical
replacement parts
ATTENTION
RISQUE D’ELECTROCUTION
NE PAS OUVRIR
!
CAUTION
RISK OF ELECTRIC SHOCK
DO NOT OPEN
!
CAUTION
RISK OF ELECTRIC SHOCK
DO NOT OPEN
!
!
Safety Informaon
IMPORTANT: Please read all instrucons carefully
before use and keep for future reference
!
Page 34

Page 35

www.majorityradios.co.uk
 Loading...