

MAJORITY Oakington Instruction Manual
OAK-CDAB-WAL
OAKINGTON
COMPACT MUSIC SYSTEM
Instructions Guide

Controls And Funcons ���������������������������������������������� 1
What’s In The Box? ��������������������������������������������������� 6
Support ���������������������������������������������������������������������7
Instrucons Guide ���������������������������������������������������� 8
Basic Operaon �������������������������������������������������������� 8
DAB/DAB+ Radio ������������������������������������������������������ 10
DAB/DAB+ Sengs ���������������������������������������������������11
FM Radio ������������������������������������������������������������������ 15
FM Radio Sengs ���������������������������������������������������� 16
Connecng to a TV/Music System ��������������������������� 19
CD Funcons ������������������������������������������������������������ 22
Bluetooth and Phone Connecon ���������������������������23
AUX-In ������������������������������������������ ����������������������������24
USB �������������������������������������������������������������������������� 25
Sengs ��������������������������������������������������������������������26
Troubleshoong ������������������������������������������������������30
Specicaons ���������������������������������������������������������� 31
Warranty ����������������������������������������������������������������� 31
Safety Informaon��������������������������������������������������� 32
Watch video tutorials and register
your product for a FREE 3-year warranty
at www.majorityradios.co.uk
Front View
Contents
YEAR
WARRANTY
9
1 2 3
4
5 6
10 11
7 8
12
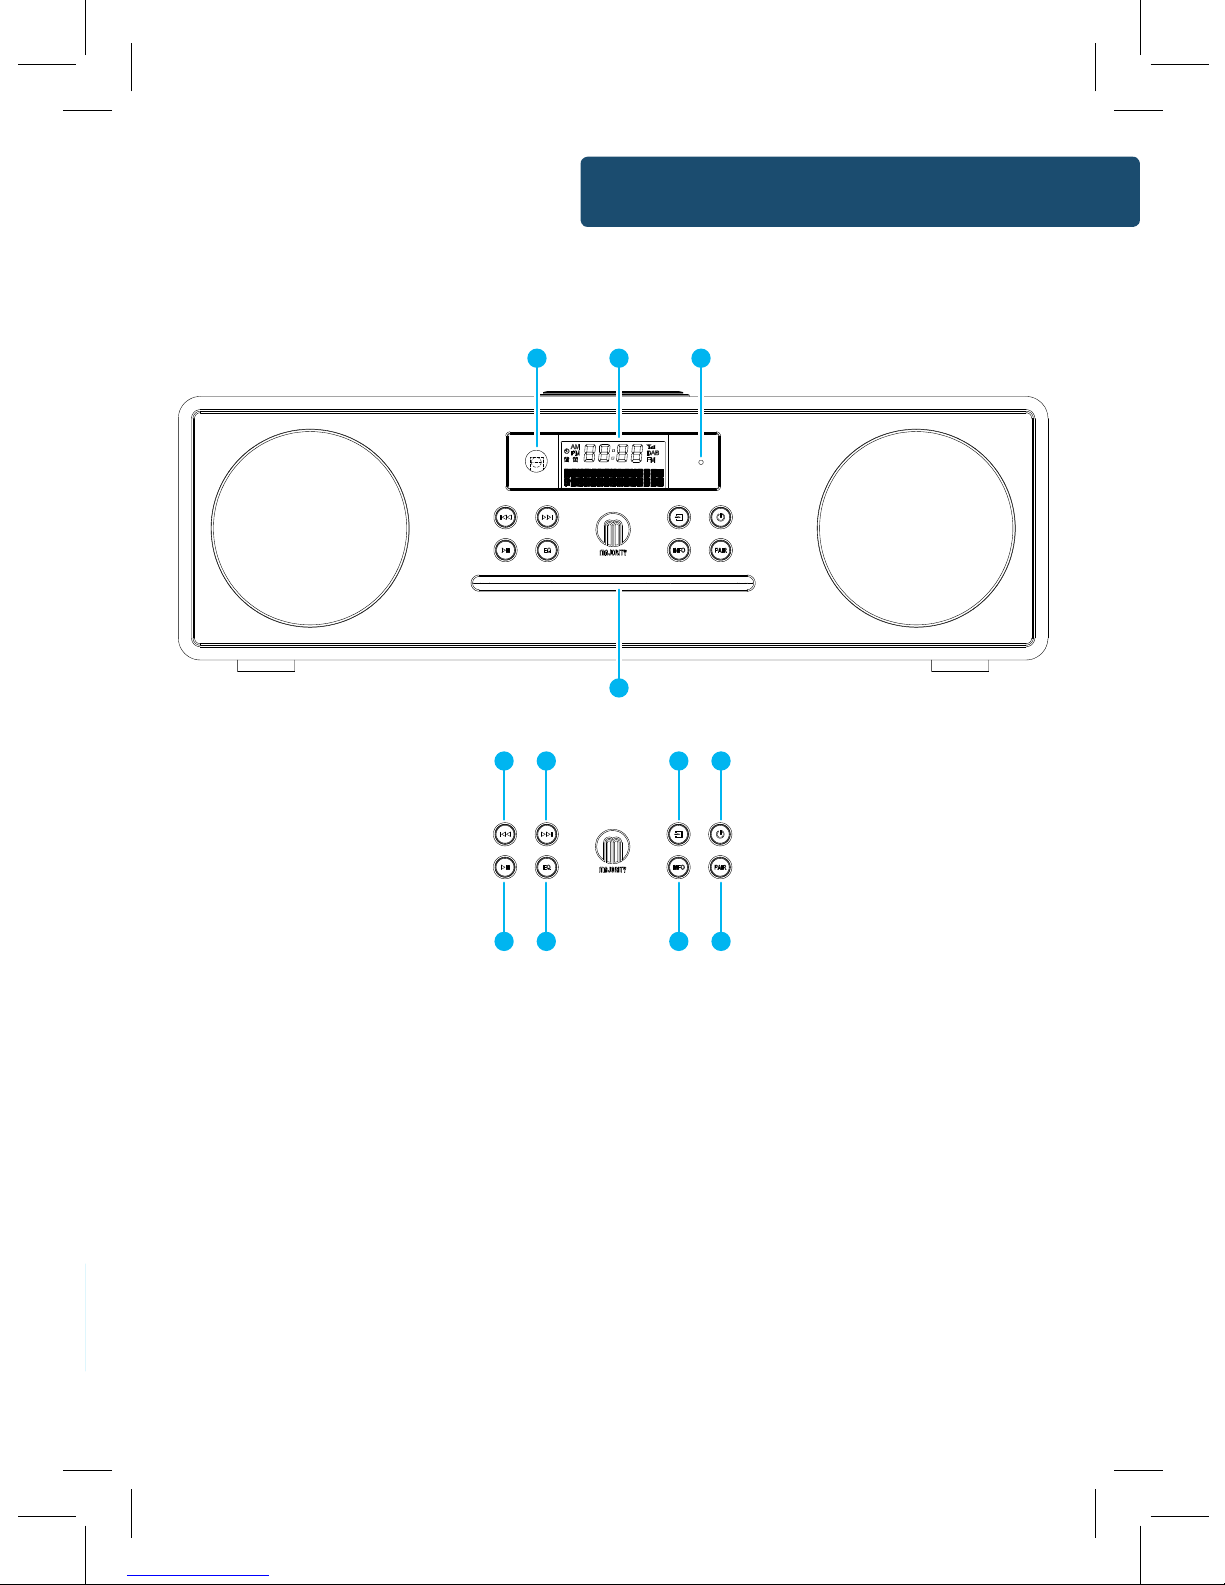
1. Remote Sensor
2. Display Screen
3. Standby Indicator
4. Disc Port
5. Previous
6. Next
1
Controls And Funcons
Front View
9
1 2 3
4
5 6
10 11
7 8
12
1. Remote Sensor
2. Display Screen
3. Standby Indicator
4. Disc Port
5. Previous
6. Next
7. Mode
8. Power/Standby
9. Play/Pause/Menu
10. Equaliser
11. Info
12. Pair Bluetooth/Eject

2
Controls And Funcons
Rear View
13
13. Navigate - Rotate to move up or down the menu screen
when in DAB or FM.
OK: Press to skip to subsequent menu in DAB or FM.
Volume +/- Rotate to increase or decrease the volume level.
14
15
16
17
18
19 20
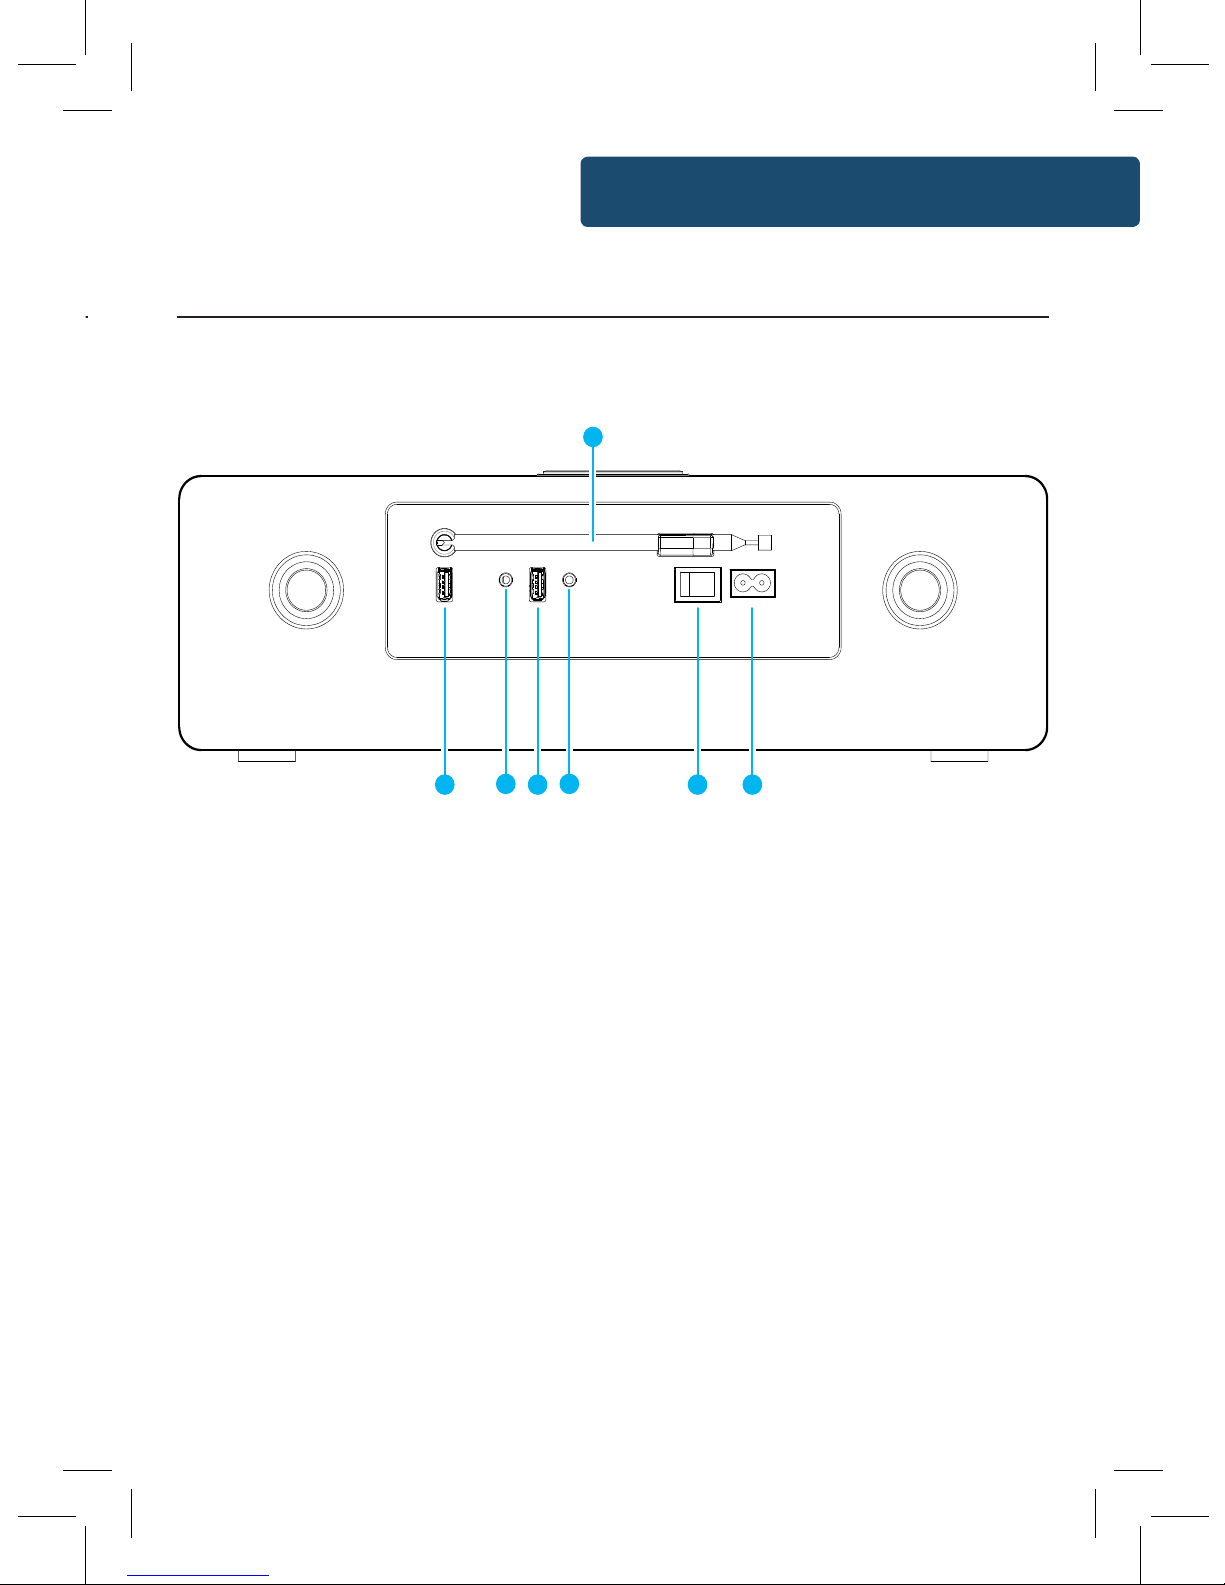
14. Antenna
15. 5V 1A Port for charging
Mobile Device
16. Audio Input
3
Controls And Funcons
Bottom View
14
15
16
17
18
19 20
14. Antenna
15. 5V 1A Port for charging
Mobile Device
16. Audio Input
17. USB Input
18. Earphone Jack
19. Power Switch
20. AC Power Connector

4
Remote Control
Controls And Funcons
8
9
CD
BT
USB
SLEEP
0
MO
TIMER
V
P
DIM
DAB
INFO
1
2
3
4
5
6
7
AUDIO
REPEAT
RANDOM
Bass
USER
Treble
PROGRAM
MENU
PAIR
DISPLAY
CLOCK
ST
AMS
INTRO
EQ
FM
1
2
3
4
5
6
7
8
9
10
11
13
14
15
16
17
18
19
20
21
22
23
24
26
25
12
27
29
28
1. ON/STANDBY
2. MODE (CD/USB/Radio/BT)
3. INTRO/AMS (Automatic Music Scan)
Press to scan all tracks in CD or USB
Press to automatically search for a
channel in FM.
Press again to stop search
4. REPEAT for CD and USB
5. EQUALISER – Press to select sound
characteristics: Classical/Pop/Rock/Jazz/
Normal.
6. BASS +/– (need to press User Mode
(Ref.6) rst)
7. USER Mode
8. MENU for DAB/DAB+ and FM
9. PAIR - Press and hold to activate
the Bluetooth pairing function or to
disconnect.
10. PREVIOUS/RE-WIND (hold button to
re-wind)/Fine Tune FM
11. MONO/STEREO
12. CLOCK (See page 28)
13. P +/- Press to skip to the beginning
of a current/pervious/subsequent album
Press to select next/preset track in DAB
or FM
Press and hold for manual tuning in FM
14. NUMBER KEYS 0 – 9
15. INFO - Press to turn on/o the
Information on CD or USB
- Press to view information on DAB or FM
16. EJECT - Press to put disc in or out
17. AUDIO - Press Audio/CD/USB/DAB/FM/ BT (Bluetooth Connection)
18. SLEEP - Press to set the sleep timer
19. RANDOM - Press to play tracks randomly in CD or USB.
20. TREBLE +/– Press to adjust the treble (need to press User Mode (Ref.7) rst)
21. PROGRAM - Press to programme in CD,USB, DAB & FM.
22. DIM - Press to select dierent levels of brightness for the display.
23. ENTER/PLAY/PAUSE/SKIP – Press to play/pause CD/USB/Bluetooth Device
or use to skip to subsequent menu in DAB and FM.
24. FAST–FORWARD/NEXT
25. STOP
26. MUTE/RESUME Sound
27. VOLUME +/–
28. TIMER (See page 30)
29. DISPLAY - Press to display the date when in power mode.
NOTE: Remote Control Operating distance of up to 5 Meters and operates using
2 x AAA Batteries.

5
Controls And Funcons
16. EJECT - Press to put disc in or out
17. AUDIO - Press Audio/CD/USB/DAB/FM/ BT (Bluetooth Connection)
18. SLEEP - Press to set the sleep timer
19. RANDOM - Press to play tracks randomly in CD or USB.
20. TREBLE +/– Press to adjust the treble (need to press User Mode (Ref.7) rst)
21. PROGRAM - Press to programme in CD,USB, DAB & FM.
22. DIM - Press to select dierent levels of brightness for the display.
23. ENTER/PLAY/PAUSE/SKIP – Press to play/pause CD/USB/Bluetooth Device
or use to skip to subsequent menu in DAB and FM.
24. FAST–FORWARD/NEXT
25. STOP
26. MUTE/RESUME Sound
27. VOLUME +/–
28. TIMER (See page 30)
29. DISPLAY - Press to display the date when in power mode.
NOTE: Remote Control Operating distance of up to 5 Meters and operates using
2 x AAA Batteries.

6
What’s In The Box?
Box Contents
1. Majority Oakington DAB/DAB+ and CD Music System
2. Remote Control
3. UK Standard Power Adapter
4. User Guide
Support
Thank you for your purchase of the Majority Oakington.
Please follow the guidance of the manual to set up your music
system and enjoy its fantastic variety of stations and features.
If you require further assistance with your new radio,
please contact our support team on the Majority website:
https://www.majorityradios.co.uk/support/

7
Support
Thank you for your purchase of the Majority Oakington.
Please follow the guidance of the manual to set up your music
system and enjoy its fantastic variety of stations and features.
If you require further assistance with your new radio,
please contact our support team on the Majority website:
https://www.majorityradios.co.uk/support/
Support

8
Instrucons Guide
Basic Operation
Please note all (Ref.) refer to Page 1 Controls and Functions mapping guide.
Plug the connector into the back of the system labelled AC-
(Ref.) and the power supply into the mains.
Ensure the antenna (Ref.) is extended as far as possible so that
you can rotate it which will enable you to get the best signal you
can.
Switch the button on the rear of the unit to “On” (Ref.). Press
the ‘Power/Standby’ button to turn on the unit (Ref.). It will
automatically take you to DAB/DAB+ radio mode or the previous
mode you were using.
When DAB Radio is activated for the rst time the display will
show “Full Scan”, press the ‘OK’ button on the unit (Ref.) or the
‘Enter/Play’ button (Rem.22) on the remote. The unit will then
scan and store all available stations.
To scroll through the stations use the ‘Previous’ (Ref.) and ‘Next’
buttons (Ref.). Press ‘OK’ (Ref.) to listen to a station.
To change the mode, press the ‘Mode’ button (Ref.) on the unit
to switch between the options. You can also select your option
on the remote (Rem.2).
Standby
To put the music system in standby, press the ‘Power/Standby’
button (Ref.) or the ‘ON/STANDBY’ button (Rem.1) on the
remote.
To turn o fully, switch it o at the mains. The cord must be out
of reach of children.
Language Setting
The default display language is English. You can change to
German (Deutsch) by pressing Menu (Rem.8). When the menu is
open, <Full Scan> will be displayed on the screen.
Press the ‘Next’ button (Rem.23) to get <System>. Press ‘Play/
Pause’ to open Settings (Rem.22). After that, press ‘Next’ to get
Deutsch, then press ‘Play/Pause’ to conrm.

9
Standby
To put the music system in standby, press the ‘Power/Standby’
button (Ref.) or the ‘ON/STANDBY’ button (Rem.1) on the
remote.
To turn o fully, switch it o at the mains. The cord must be out
of reach of children.
Language Setting
The default display language is English. You can change to
German (Deutsch) by pressing Menu (Rem.8). When the menu is
open, <Full Scan> will be displayed on the screen.
Press the ‘Next’ button (Rem.23) to get <System>. Press ‘Play/
Pause’ to open Settings (Rem.22). After that, press ‘Next’ to get
Deutsch, then press ‘Play/Pause’ to conrm.
Instrucons Guide
 Loading...