

Page 1

Majority Longstanton
DAB / DAB+ / FM Radio
LNG-DAB-BLK
User Guide
Page 2

Contents
Controls and Functions .............................................................
What’s in the box? .........................................................................
Instruction Guide ..........................................................................
Basic Operation .............................................................................
DAB Radio ........................................................................................
Set Up of the DAB Radio Preset Stations .........................
FM Radio ....................................................... ....................................
Set Up of the FM Radio Preset Stations ... .........................
Station information for DAB and FM Radio ....................
Clock and Date Setting .............................................................
Dual Alarm Setting and Alarm Snooze .............................
Other Functions .............................................................................
Technical Specications ...........................................................
Warranty .............................................................................................
Trouble Shooting Guide............................................................
Important Safety Information .............................................
1
3
4
4
5
6
7
9
10
12
14
16
19
19
20
21
Page 3
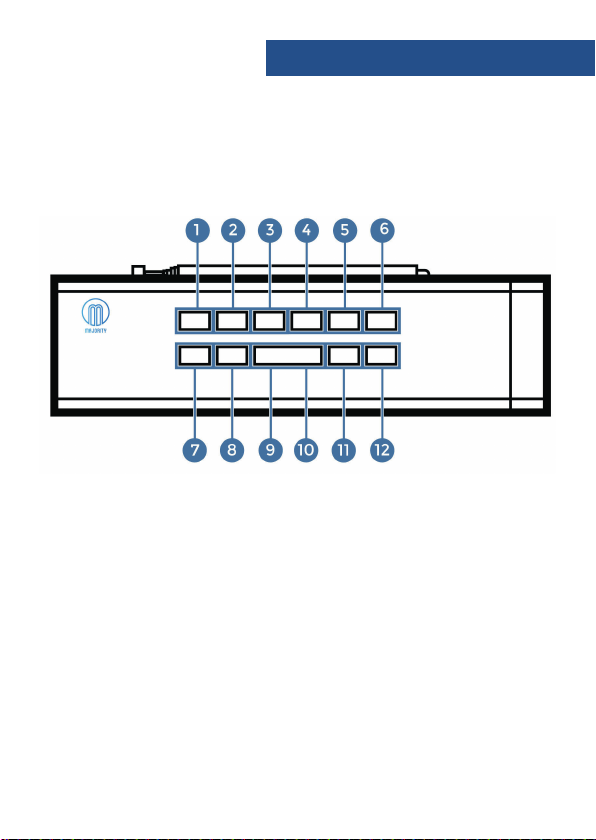
Top View
Controls and Funcons
1. Standby/Mode
2. Info/Menu
3. Preset
4. Previous
5. Enter/Scan
6. Next
7. Alarm
8. Sleep
9. Snooze
10. Dimmer
11. Volume-
12. Volume+
1
Page 4

Controls and Funcons
Back View
13. Antenna
14. Headphone Input
Front View
17. Display Screen
2
15. DC 5V In
16. USB Output
Page 5
What’s in the box?
Majority Longstanton DAB / DAB+ /FM Radio
Clock UK Standard Plug DC5V 2A Power Supply
User Guide
3
Page 6

Instrucons Guide
Please note all (Ref.) refer to Page 1 Controls and Functions mapping guide.
Basic Operaon
Plug the connector into the back of the system labelled DC 5V
(Ref.15) and the power supply into the mains.
Ensure the antenna (Ref.13) is extended as far as possible so
that you can rotate it. This will enable you to get the best signal
possible.
Press the ‘Standby/Mode’ button to turn on the unit (Ref.1). It
will automatically take you to DAB radio mode or to the previous
mode that you were using. When DAB Radio is activated for the
rst time it will automatically start scanning and storing all
stations that have a good signal. If scanning does not
automatically start, press and hold the ‘Enter/Scan’ button
(Ref.5). To scroll through the stations use the ‘Previous’ or ‘Next’
buttons (Ref.4/6). Press the ‘Enter/Scan’ buttons (Ref.5) to listen
to a station.
To change the mode, press the ‘Standby/Mode’ button (Ref.1).
This will switch between DAB Radio, FM Radio.
Standby
To place the music system in standby, press the ‘Standby/Mode’
button (Ref.1). To turn o fully, press and hold the ‘Standby/
Mode’ button (Ref.1) and switch o at the mains. The cord must
be out of reach of children.
4
Page 7

Instrucons Guide
DAB / DAB+ Radio
Press the ‘Standy/Mode’ button (Ref.1) to switch to DAB Radio.
On rst use it will automatically scan all stations and save them.
Fully extend the antenna (Ref.13).
To auto scan, press and hold the ‘Enter/Scan’ button (Ref.5) and
then release. This will start scanning up the frequency band and
store all stations that have good signal.
The radio will automatically save all the stations with a strong
signal, up to 240 MHz. After searching has nished it will
automatically play the rst station stored.
To listen to all stations that have been stored use the ‘Previous’
and ‘Next’ buttons (Ref.4/6) to scroll through. Press the ‘Enter/
Scan’ button (Ref.5) when on the required station.
The radio will display station information when you press the
‘Info/Menu’ button (Ref.2). Press multiple times to view all
information available (See page 10).
When you turn the radio on again after it switching o, it will
automatically tune to the same station (DAB or FM) that was
last selected.
In DAB mode, the radio will synchronize with the time and date
of the station.
5
Page 8

Instrucons Guide
How to store a preset station
Up to 10 stations can be set.
To store a station that you are currently playing:
Press and hold ‘Preset’ button (Ref.3). “<1: (Empty)” will show on
the display.
Use the ‘Previous’ or ‘Next’ buttons (Ref.4/6) to change the “<1”
to the number you want to store the station as. Then press the
‘Enter/Scan’ button (Ref.5) to save. The display will then show
“Preset [1] stored”.
How to play a preset radio station
Press the ‘Preset’ button (Ref.3).
Use the ‘Previous’ or ‘Next’ buttons (Ref.4/6) to scroll through
your preset stations. You can store up to 10.
Press ‘Enter/Scan’ button (Ref.5) to select your choice.
6
Page 9

Instrucons Guide
FM Radio
Press the ‘Stanby/Mode’ button (Ref.1) multiple times to switch
between DAB and FM. The rst time you do this, the FM
frequency “87.5 MHz” will be displayed on the screen.
Fully extend the antenna (Ref.13).
To auto scan, press and hold then release the ‘Next’ button
(Ref.6). This will start scanning up the frequency band and play
the rst station it nds with a strong signal.
To scan down the frequency band, press and hold the ‘Previous’
button (Ref.4) for a few seconds.
The radio will display station information when you press the
‘Info/Menu’ button (Ref.2). Press multiple times to view all
information available (See page 11).
FM Scan Setting
Choose between scanning strong and weak signals (All) or only
the strong stations (Only).
Press and hold the ‘Info/Menu’ button (Ref.2). To make your
choice, use the ‘Previous’ or ‘Next’ buttons (Ref.4/6) to choose
your option.
Select “FM Scan Set” and press the ‘Enter/Scan’ button (Ref.5).
Use the ‘Previous’ or ‘Next’ button (Ref.4/6) to choose between
“All” or “Only”. Press the ‘Enter/Scan’ button (Ref.5) to conrm
your choice.
7
Page 10

Instrucons Guide
To tune a specic frequency manually
To listen to a specic frequency use the ‘Previous’ or ‘Next’
buttons (Ref.4/6) to search forward or back.
Mono and Stereo
In working mode, press the ‘Enter/Scan’ button (Ref.5), press
mutiple times to switch between ‘Set to Mono’ or ‘Set to Stereo.
8
Page 11

Instrucons Guide
How to store a preset radio station
Up to 10 stations can be set.
To store a station that you are currently playing:
Press and hold ‘Preset’ button (Ref.3). “<1: (Empty)” will show on
the display.
Use the ‘Previous’ or ‘Next’ buttons (Ref.4/6) to change the “<1”
to the number you want to store the station as. Then press the
‘Enter/Scan’ button (Ref.5) to save. The display will then show
“Preset [1] stored”.
How to play a preset radio station
Press the ‘Preset’ button (Ref.3).
Use the ‘Previous’ or ‘Next’ buttons (Ref.4/6) to scroll through
your preset stations. You can store up to 10.
Press ‘Enter/Scan’ button (Ref.5) to select your choice.
9
Page 12

Instrucons Guide
Staon informaon for DAB and FM Radio
/ DAB+ Radio
DAB
Press the ‘Info/Menu’ button (Ref.2) repeatedly to show the
different programme information.
Signal Strength: Displays a signal bar with the strength of the
current station.
Bit Error Rate: Provides details of the signal error rate.
Channel and Frequency: Displays the station’s transmission
channel number and frequency.
PTY (Programme Type): Shows the type and description of
the programme provided by the DAB station.
Time and Date: Displays the time and date information
provided by the broadcaster.
Bit Rate: The data rate which the signal is being transmitted.
Dynamic Label Segment (DLS): Displays scrolling text
information supplied by the broadcaster.
10
Page 13

Instrucons Guide
FM Radio
Press the ‘Info/Menu’ button (Ref.2) repeatedly to show the
dierent programme information.
Programme Type: Displays a description of the type of
programme provided by the broadcaster.
Signal Strength: Displays a signal bar with the strength of the
current station.
Time and Date: Displays the time and the date.
Frequency: Displays the station’s transmission frequency.
Audio Type: Displays the audio type of the station you are
listening to. It will either be stereo or mono.
Radio Text: Displays scrolling text information supplied by the
broadcaster.
11
Page 14

Instrucons Guide
Manually Setting the Time
The time will automatically update after the rst use of DAB
Radio. However, you can still set the time manually.
Ensure the unit is turned on.
Press and hold the ‘Info/Menu’ button (Ref.2).
To make your selection, use the ‘Previous’ or ‘Next’ buttons
(Ref.4/6) to choose your option.
Select “Time/Date” and press the ‘Enter/Scan’ button (Ref.5).
The hour will ash on the display screen.
Use the ‘Previous’ or ‘Next’ buttons (Ref.4/6), press until the
required hour is displayed.
To conrm the hour, press the ‘Enter/Scan’ button (Ref.5).
The minutes will ash on the display screen.
Use the ‘Previous’ or ‘Next’ buttons (Ref.4/6), press until the
required minutes is displayed.
To conrm the minute, press the ‘Enter/Scan’ button (Ref.5).
The time is now set.
12
Page 15

Instrucons Guide
Manually Setting the Date
The date can be changed after changing the time.
The year will ash on the display screen. Use the
‘Previous’ or ‘Next’ buttons (Ref.4/6), press until the
required year is displayed.
To conrm the year, press the ‘Enter/Scan’ button (Ref.5).
The month will ash on the display screen. Use the ‘Previous’
or ‘Next’ buttons (Ref.4/6), press until the required month is
displayed.
To conrm the month, press the ‘Enter/Scan’ button (Ref.5).
The day will then ash on the display screen. Use the ‘Previous’ or
‘Next’ buttons (Ref.4/6), press until the required date is
displayed.
To conrm the date, press the ‘Enter/Scan’ button (Ref.5).
13
Page 16

Instrucons Guide
Dual Alarm Setting
Press and hold the ‘Alarm’ button (Ref.7).
To make your selection, use the ‘Previous’ or ‘Next’ buttons
(Ref.4/6) to choose your option.
Select “Alarm 1 Set” and press the ‘Enter/Scan’ button (Ref.5).
To turn the Alarm on or o, use the ‘Previous’ or ‘Next’ buttons
(Ref.4/6) to select “ON” and press the ‘Enter/Scan’ button (Ref.5)
to conrm.
The hour digits for the alarm will ash. Use the ‘Previous’ or ‘Next’
buttons (Ref.4/6) to change the hour and press the ‘Enter/Scan’
button (Ref.5) to conrm.
Use the ‘Previous’ or ‘Next’ buttons (Ref.4/6) to change the
minutes and press the ‘Enter/Scan’ button (Ref.5) to conrm.
Use the ‘Previous’ or ‘Next’ buttons (Ref.4/6) to change the
volume and press the ‘Enter/Scan’ button (Ref.5) to conrm.
Use the ‘Previous’ or ‘Next’ buttons (Ref.4/6) to change between
which sound you would like: Alarm, DAB or FM Radio and press
the ‘Enter/Scan’ button (Ref.5) to conrm.
To set Alarm 2, follow Alarm 1 instructions but scroll through and
select ‘Alarm 2 Set’.
NOTE: You can press the ‘Info/Menu’ (Ref.2) button to go back to
the previous step when programming the alarm.
14
Page 17

Instrucons Guide
To turn o Alarm 1 or Alarm 2
Press and hold the ‘Info/Menu’ button (Ref.2).
To make your selection, use the ‘Previous’ or ‘Next’ buttons
(Ref.4/6) to choose your option.
Select “Alarm 1 Set/Alarm 2 Set” and press the ‘Enter/Scan’ button
(Ref.5).
To turn the Alarm on or o, use the ‘Previous’ or ‘Next’ buttons
(Ref.4/6) to select “OFF” and press the ‘Enter/Scan’ button (Ref.5)
to conrm.
Alarm Sound and Snooze
Snooze/Switch o Alarm when Sounding
When the alarm sounds, press the ‘Snooze/Dimmer’ button
(Ref.9/10) to snooze for 9 minutes. The radio will go into standby
mode.
To turn the alarm o completely when sounding, press any
of the following buttons: ‘Standby/Mode’ (Ref. 1), ‘Info/M enu’
(Ref.2), ‘Preset’ (Ref.3), ‘Previous’ (Ref.4), ‘Enter/Scan’ (Ref.5) or
’Next’ (Ref.6).
15
Page 18

Instrucons Guide
Other Funcons
Sleep Setting
This enables you to programme the radio to switch o at a
specic time, up to 120 minutes from activation.
Press and hold the ‘Sleep’ button (Ref.8).
To make your selection, use the ‘Previous’ or ‘Next’ buttons
(Ref.4/6) to choose your option.
Select “Sleep Set” and press the ‘Enter/Scan’ button (Ref.5).
Choose from 120 mins/90 mins/60 mins/45 mins/ 30 mins/15
mins/5 mins or OFF using the ‘Previous’ or ‘Next’ buttons
(Ref.4/6).
When your choice is displayed press the ‘Enter/Scan’ button
(Ref.5). The system will automatically start the timer.
To turn the sleep timer o, follow the above instructions and
select “OFF” from the choices.
Once the timer has been set, the minutes will countdown on the
display screen. For example, if set to turn o in 5 minutes “S5” will
ash, counting down to “S0” then the radio will go into standby
mode.
16
Page 19

Instrucons Guide
System Reset
Press and hold the ‘Info/Menu’ button (Ref.2).
Use the ‘Previous’ or ‘Next’ buttons (Ref.4/6) to select “Factory
reset” and press the ‘Enter/Scan’ button (Ref.5). The display
screen will show “Factory reset”.
Use the ‘Previous’ or ‘Next’ button (Ref.4/6) to select “Yes” or “No”.
Press the ‘Enter/Scan’ button (Ref.5) to conrm.
System Version – System Version Display
Press and hold the ‘Info/Menu’ button (Ref.2).
Use the ‘Previous’ or ‘Next’ buttons (Ref.4/6) to select “System
Version”.
Press the ‘Enter/Scan’ button (Ref.5) to conrm.
17
Page 20

Instrucons Guide
USB
Mobile devices can be charged via the USB Port (Ref.16) on the
back of the unit (USB lead not supplied).
Brightness
In working mode, press the ‘Snooze/Dimmer’ button (Ref.9/10)
multiple times to change between three dierent brightness
levels or O.
NOTE: If you set the display to O please note that when you
switch into standby and then switch on again the screen will be
o but the radio will still be functioning. Press the ‘Snooze/
Dimmer’ button (Ref.9/10) to view the information on the
screen.
18
Page 21

Instrucons Guide
Technical Specicaons
Power Supply:
Mode:
Output Connector:
Aerial:
DC 5V 2A
FM(87.5MHz – 108MHz
DAB/DAB+ 174-240MHz
Earphone jack
Integral telescopic aerial
Power Supply and Batteries
The unit is powered and charged by UK Standard Plug.
Warranty
All products come with a standard 12 month warranty. All
items must be registered on www.majorityradios.co.uk for
the warranty to be valid. Once on the web page, use the menu
to find “ register your product”. You will also be given the chance
to extend your warranty for an additional 24 months, free of
charge.
19
Page 22

Troubleshoong Guide
Observaon Potenal cause/soluon
No sound
Buttons are not
working
FM: Static sound
DAB: Burbling/
intermittent cut-out
Sound is distorted
Desired station not
found
Display shows
“No Service”
Display is blank
Time and Date not
setting
automatically
The station is not tuned in. Fine tune the station.
The volume is set to a low position. Increase the volume.
Headphones may be connected. Disconnect the
headphones.
Turn o the unit and turn on after a few seconds.
Signal reception is low. Adjust the aerial or move the unit to
a stonger signal location.
Re-scan stations.
The volume is too high. Adjust the volume control.
Weak signal. Use the manual tune function.
There is no DAB coverage in your area, or poor reception.
Adjust the position of the aerial, or move the unit to a
stronger signal location.
This may occur if the broadcaster changes the label of a
service or removes a label while tuned. The radio will try to
retune or perform a scan.
For the time and date to set automatically you need to turn
on the system and switch to DAB radio and let this scan.
Then press the ‘Power Mode’ button and the system will
go into standby. The date and clock will update
automatically.
20
Page 23

CAUTION
RISK OF ELECTRIC SHOCK
DO NOT OPEN
!
Safety Informaon
1. Read these instructions.
2. Keep these instructions. Instructions are also
available for download at www.majorityradios.co.uk
3. Heed all Warnings
4. Follow all instructions
5. Do no clean the apparatus near or with water
6. D not block any ventilation openings. Install in
accordance with the manufacturer’s instructions
7. Do not block any ventilation openings. Install in
accordance with the manufacturer’s instructions.
8. Do not install near any heat sources such as
radiators, heat registers, stoves, or other apparatus
(including ampliers) that produce heat.
9. Protect the power from being walked on or pinched
particularly at plugs, convenience receptacles, and
the point where they exit from the apparatus.
10. Only use attachments/accessories specied by the
manufacturer.
11. Unplug this apparatus during light storms or when
unused for long periods of time.
12. Refer all servicing to qualied ser vice personnel.
Servicing is required when the apparatus has been
damaged in a way, such as power-supply cord or
plug is damaged, liquid has been spilled or objects
have fallen into the apparatus, the apparatus has
been exposed to the rain or moisture, does not
operate normally or has been dropped.
13. No naked ame sources, such as lit candles, should
be placed on the apparatus.
14. Dispose of used electrical products and batteries
safely according to your local authority and
regulations.
CAUTION
RISK OF ELECTRIC SHOCK
DO NOT OPEN
!
ADDITIONAL WARNINGS
The apparatus shall not be exposed to dripping or
splashing and no objects lled with liquid, such as
vases, shall be places on the apparatus.
Main plug is used to disconnect device and it should
remain readily operable during intended use. In order
to disconnect the apparatus from the main mains
completely, the mains plug should be disconnected
from the main socket outlet completely.
Battery shall not be exposed to excessive heat such as
sunshine, re or the like.
RECYCLING ELECTRICAL PRODUCTS
You should now recycle your waste electrical goods and
in doing so help the environment.
This symbol means an electrical product should
not be disposed of with normal household waste.
Please ensure it is taken to a suitable facility for
disposal when nished with.
IMPORTANT: Please read all instructions carefully
before use and keep for future reference.
Risk of electric shock.
Do not open
Read all instructions carefully before use
!
and keep for future reference
When servicing, use only identical
replacement parts
ATTENTION
RISQUE D’ELECTROCUTION
NE PAS OUVRIR
!
20
!
IMPORTANT: Please read all instrucons carefully
before use and keep for future reference
Page 24

AJORITY
tyds
 Loading...