

Majority Imp-dab-wdm User Manual
Majority Impington
DAB / BAB+ / FM Radio Alarm Clock
IMP-DAB-WDM
User Guide

Contents
Controls and Functions .............................................................
What’s in the box? .........................................................................
Instruction Guide ..........................................................................
Basic Operation .............................................................................
DAB Radio ........................................................................................
Set Up of the DAB Radio Preset Stations .........................
FM Radio ....................................................... ....................................
Set Up of the FM Radio Preset Stations ... .........................
Station information for DAB and FM Radio ....................
Clock and Date Setting .............................................................
Dual Alarm Setting and Alarm Snooze .............................
Other Functions .............................................................................
Technical Specications ...........................................................
Warranty .............................................................................................
Trouble Shooting Guide............................................................
Important Safety Information .............................................
1
3
4
4
5
8
9
11
12
14
17
19
22
22
23
24

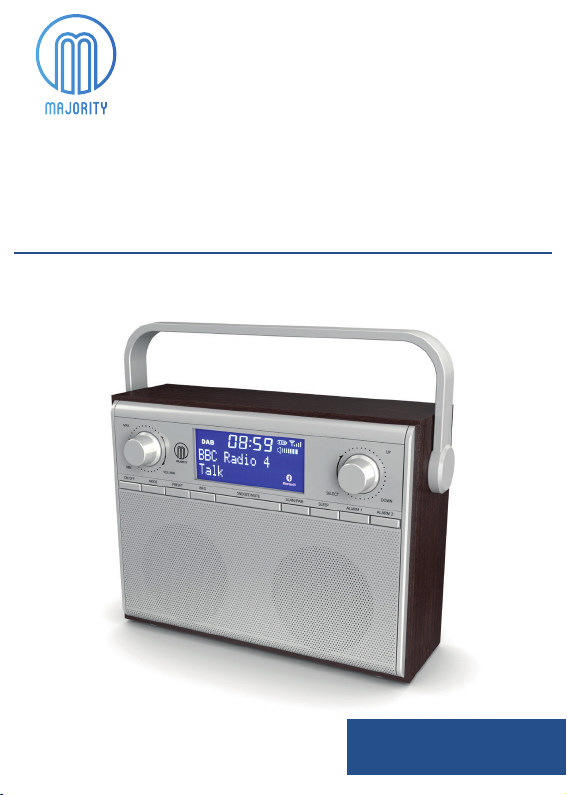
Front View
Controls and Funcons
1. Volume +/-
2. On/O
3. Mode
4. Preset
5. Info
6. Snooze/Mute
7. Scan/Pair
8. Sleep
9. Alarm 1
10. Alarm 2
11. Select/Up or Down
12. Display Screen
1

Controls and Funcons
Back View
13. Battery Compartment
14. DC 5V Port
15. Dual USB Ports
2
16. Earphones jack
17. Aux-In
18. Antenna

What’s in the box?
Majority Impington Radio Alarm Clock
UK Standard Plug DC5V 2A Power Supply
User Guide
3

Instrucons Guide
Please note all (Ref.) refer to Page 1 Controls and Functions mapping guide.
Basic Operaon
Plug the connector into the back of the system labelled DC 5V
(Ref.14) and the power supply into the mains.
Ensure the antenna (Ref.18) is extended as far as possible so that
you can rotate it. This will enable you to get the best signal you
can.
Press the ‘On/O’ button to turn on the unit (Ref.2). It will
take you to DAB radio mode or to the previous mode that you
were using. When DAB Radio is activated for the rst time it will
automatically start scanning and storing all stations that have a
strong signal. If scanning does not start automatically, press the
‘Scan/Pair’ button (Ref.7). To scroll through the stations use the
‘Select’ (Ref.11) dial. Press the ‘Select’ dial (Ref.11) to listen to a
station.
To change the mode, press the ‘Mode’ button (Ref.3). This will
switch between DAB Radio, FM Radio, Bluetooth and Aux in.
The display screen will dim automatically after 10 seconds if left
in standby or working mode.
Standby
To place the music system in standby, press the ‘On/O’ button
(Ref.2). To turn o fully, switch it o at the mains. The cord must
be out of reach of children.
4

Instrucons Guide
DAB / DAB+ Radio
Press the ‘Mode’ button (Ref.3) to switch to DAB Radio.
On rst use it will automatically scan all stations and save them.
Fully extend the antenna (Ref.18).
To auto scan, press the ‘Scan/Pair’ button (Ref.7) and then
release.
This will start scanning up the frequency band and store all
stations that have good signal.
The radio will automatically save all the stations with a strong
signal, up to 240 MHz. After searching has nished it will
automatically play the rst station stored.
To listen to all stations that have been stored use the
‘Select’ dial (Ref.11) to scroll through them.
Press the ‘Select’ dial (Ref.11) when on the required station.
The radio will display station information when you press the
‘Info’ button (Ref.5). Press multiple times to view all
information available (See page 12).
When you turn the radio on again after it switching o, it will
automatically tune to the same station (DAB or FM) that was
last selected.
In DAB mode, the radio will synchronize with the time and date
of the station.
5

Instrucons Guide
Prune
Remove stations that are listed but are unavailable.
Press and hold the ‘Info’ button (Ref.5) when in DAB mode and
use the ‘Select’ dial (Ref.11) to scroll through options. Select
“Prune” and press the ‘Select’ dial (Ref.11).
Use the ‘Select’ dial (Ref.11) to choose “Yes” or “No”. Press the
‘Select’ dial (Ref.11) to conrm. The unavailable station will now
be deleted if you chose “Yes”.
Dynamic Range Compression (DRC)
This function enables you to reduce the dierence between the
maximum and minimum audio volume being broadcast. This
makes quiet sounds comparatively louder, and loud sounds
comparatively quieter. DRC only works if it enabled by the
broadcaster for a specic station.
Press and hold the ‘Info’ button (Ref.5) and use the ‘Select’ dial
(Ref.11) to scroll through options.
Select “DRC” and press the ‘Select’ dial (Ref.11). Use the ‘Select’
dial (Ref.11) to select “DRC [o/high/low]”.
Once you have chosen press the ‘Select’ dial (Ref.11) to conrm.
6

Instrucons Guide
Manual Tuning
As well as an auto tune function, you can manually tune the
receiver. This can help you when aligning your aerial or when
adding stations that were missed while auto tuning.
Press and hold the ‘Info’ button (Ref.5) and use the ‘Select’ dial
(Ref.11) to scroll through options.
Select “Manual Tune” and press the ‘Select’ dial (Ref.11). Use the
‘Select’ (Ref.11) dial to cycle through the DAB channels, which
are from 5A to 13F.
Once you have chosen, press the ‘Select’ dial (Ref.11) to conrm.
7
 Loading...