

Majorcom NTU-200 User Manual
INTERNET RADIO / DAB / DAB+ /
FM RDS / USB READER
USER
MANUAL
Manual to download in PDF format on www.majorcom.fr
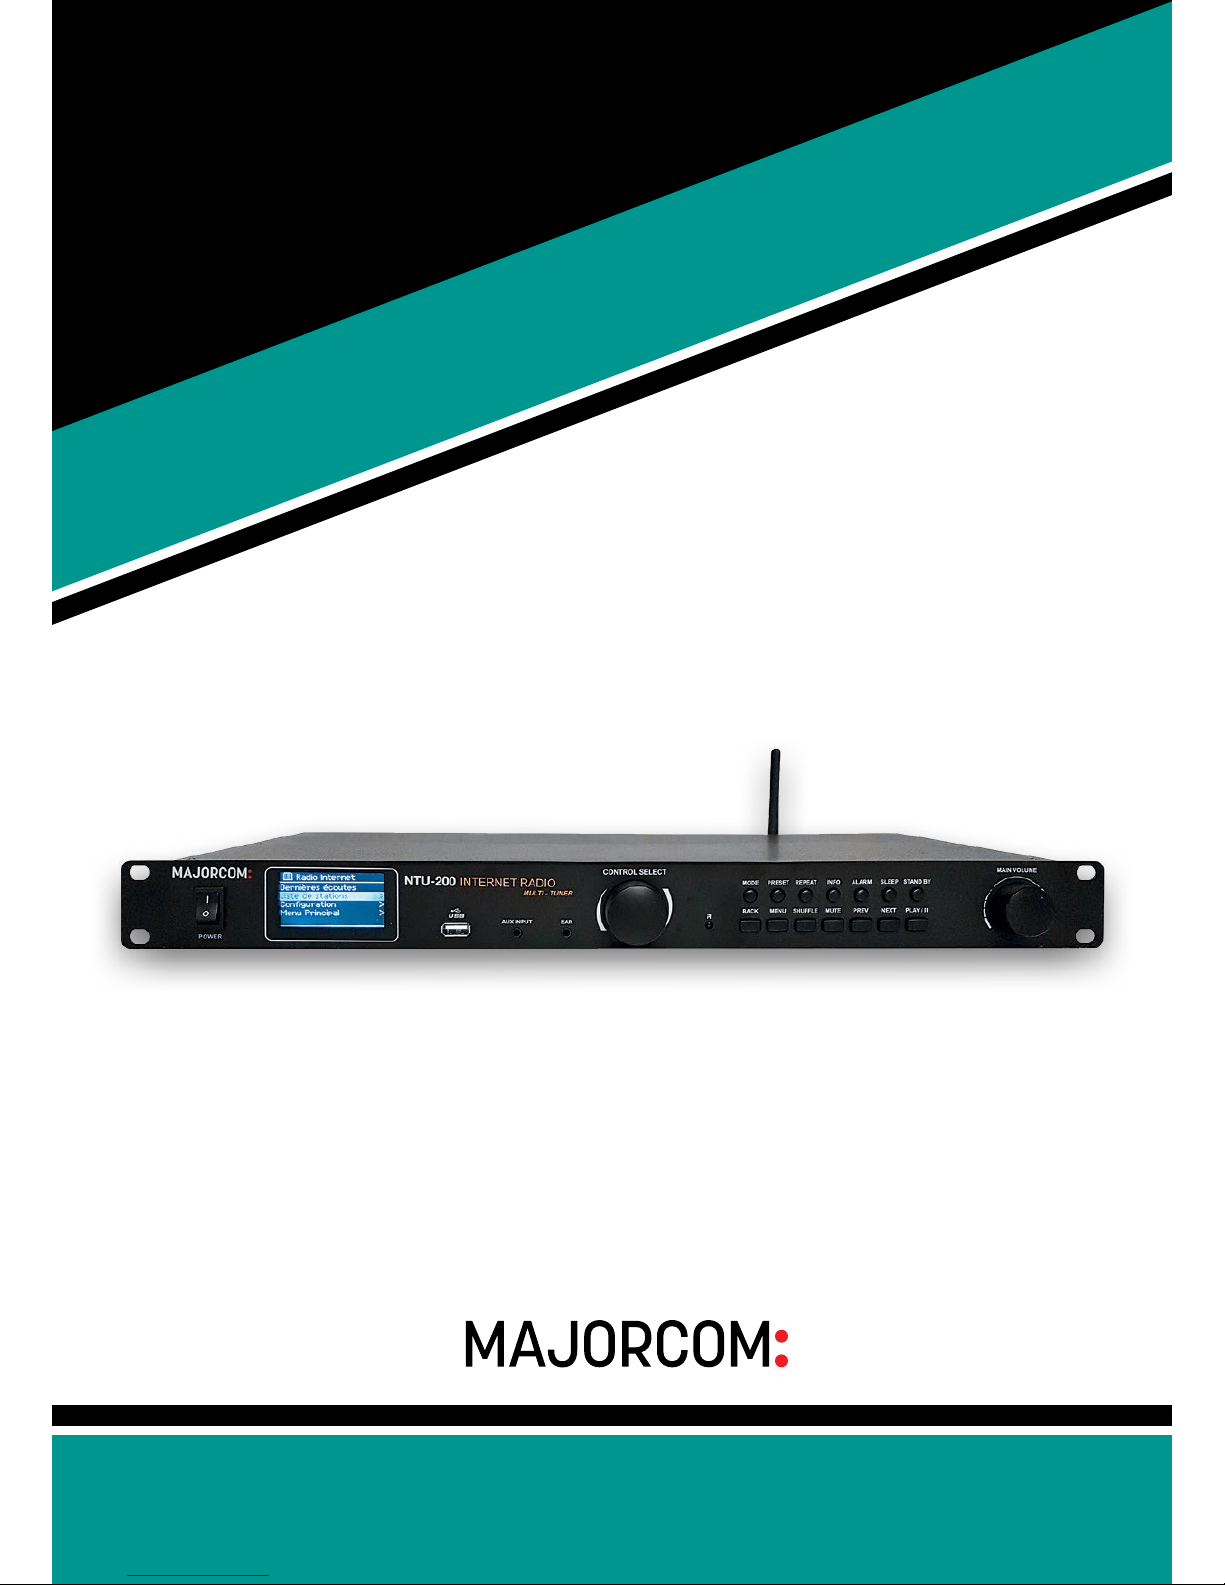
NTU-200
Internet radio / DAB / DAB+ / FM RDS / USB reader NTU-200
56, chemin de la Flambère · 31300 Toulouse · FRANCE · Tél. 33 (0)5 61 31 86 87
Fax 33 (0)5 61 31 87 73 · commercial@majorcom.fr · www.majorcom.fr
User manual
56, chemin de la Flambère · 31300 Toulouse · FRANCE · Tél. 33 (0)5 61 31 86 87
Fax 33 (0)5 61 31 87 73 · commercial@majorcom.fr · www.majorcom.fr
User manual
32
NTU-200 Internet radio / DAB / DAB+ / FM RDS / USB reader
Summary
1Controls,connectorsanddisplay............................................................................................................................ 5
2Screens .............................................................................................................................................................. 8
3 Gettingstarted/setup ...................................................................................................................................... 10
3.1 Setupwizard................................................................................................................................ ............. 10
3.1.1 12/24hourdisplay............................................................................................................................ 10
3.1.2 Time/date ......................................................................................................................................... 10
3.1.3 Network ............................................................................................................................................ 11
3.2 Commonsettings...................................................................................................................................... 13
3.2.1 Equaliser ........................................................................................................................................... 13
3.2.2 Network ............................................................................................................................................ 13
3.2.3 Language .......................................................................................................................................... 14
3.3 Internetradioportal
registration
.............................................................................................................. 14
3.4 Settingupamusicserver.......................................................................................................................... 15
3.5 SharingmediawithWindowsMediaPlayer ......................................................................................... 15
3.6 SettinguptheUnitfor“PlayTo”Windows7streamingmediafeature................................................... 16
4 Internetradiomode ........................................................................................................................................ 17
4.1 Last
listened
.............................................................................................................................................. 18
4.2 Presets...................................................................................................................................................... 18
4.3 Favourites................................................................................................................................................. 18
4.4 Browse...................................................................................................................................................... 18
4.5 Search....................................................................................................................................................... 19
4.6 Myaddedstations................................ .................................................................................................... 20
4.7 Nowplayinginformation .......................................................................................................................... 20
5 Musicplayermode(networkandUSB) ........................................................................................................... 21
5.1 Sharedmedia(fromUPnPmediaserver) ................................................................................................. 21
5.1.1 Wake-on-LAN................................................................ .................................................................... 22
5.1.2 Pruneservers .................................................................................................................................... 22
5.2 USBplayback ............................................................................................................................................ 22
5.3 Playlists................................................................................................ ..................................................... 23
5.4 Repeat/shuffle.......................................................................................................................................... 23
5.5 Nowplayinginformation .......................................................................................................................... 23
6 Usingthe“PlayTo”featureinWindows7tostreammedia ........................................................................... 24
6.1 Use“PlayTo”inWindowsMediaPlayer .................................................................................................. 24
6.2 Use“PlayTo”elsewhereinWindows7.................................................................................................... 25
6.3 Nowplayinginformation .......................................................................................................................... 25
7 DABradiomode............................................................................................................................................... 25
7.1 Scanningforstations ................................................................................................................................ 25
7.2 Selectingstations...................................................................................................................................... 26
7.3 Nowplayinginformation .......................................................................................................................... 26
7.4 Settings................................................................................................ ..................................................... 26
8 FMradiomode ................................................................................................................................................ 27
8.1 Selectingstations...................................................................................................................................... 27
8.2 Nowplayinginformation .......................................................................................................................... 27
8.3 Settings................................................................................................ ..................................................... 28
9 Auxinmode................................
..................................................................................................................... 28
10 Alarms andsleep.............................................................................................................................................. 28
10.1 Alarms....................................................................................................................................................... 28
10.2 Sleep................................................................ ......................................................................................... 29
11 Factoryreset.................................................................................................................................................... 29
Summary
OutwardAppearance
Faceplate:
Rearplate:
SUPPLEMENTS:
FM Antenna Wire x 1 AV Wire x 1
AC Power Cord x 1 2.4G Antenna Remote Controller x 1
External Resources
To operate unit, following external resources are needed:
•
A power source (AC 230 V mains supply)
•
A wired (Ethernet) or wireless (Wi-Fi) network (provided through a router) with appropriate
permissions and password if necessary (for Internet radio and Network Music player modes)
•
Broadband Internet access for Internet radio mode.
•
A music library stored on the network or on a USB mass storage device (for Music player
modes),
•
An external audio source (for Aux in mode)
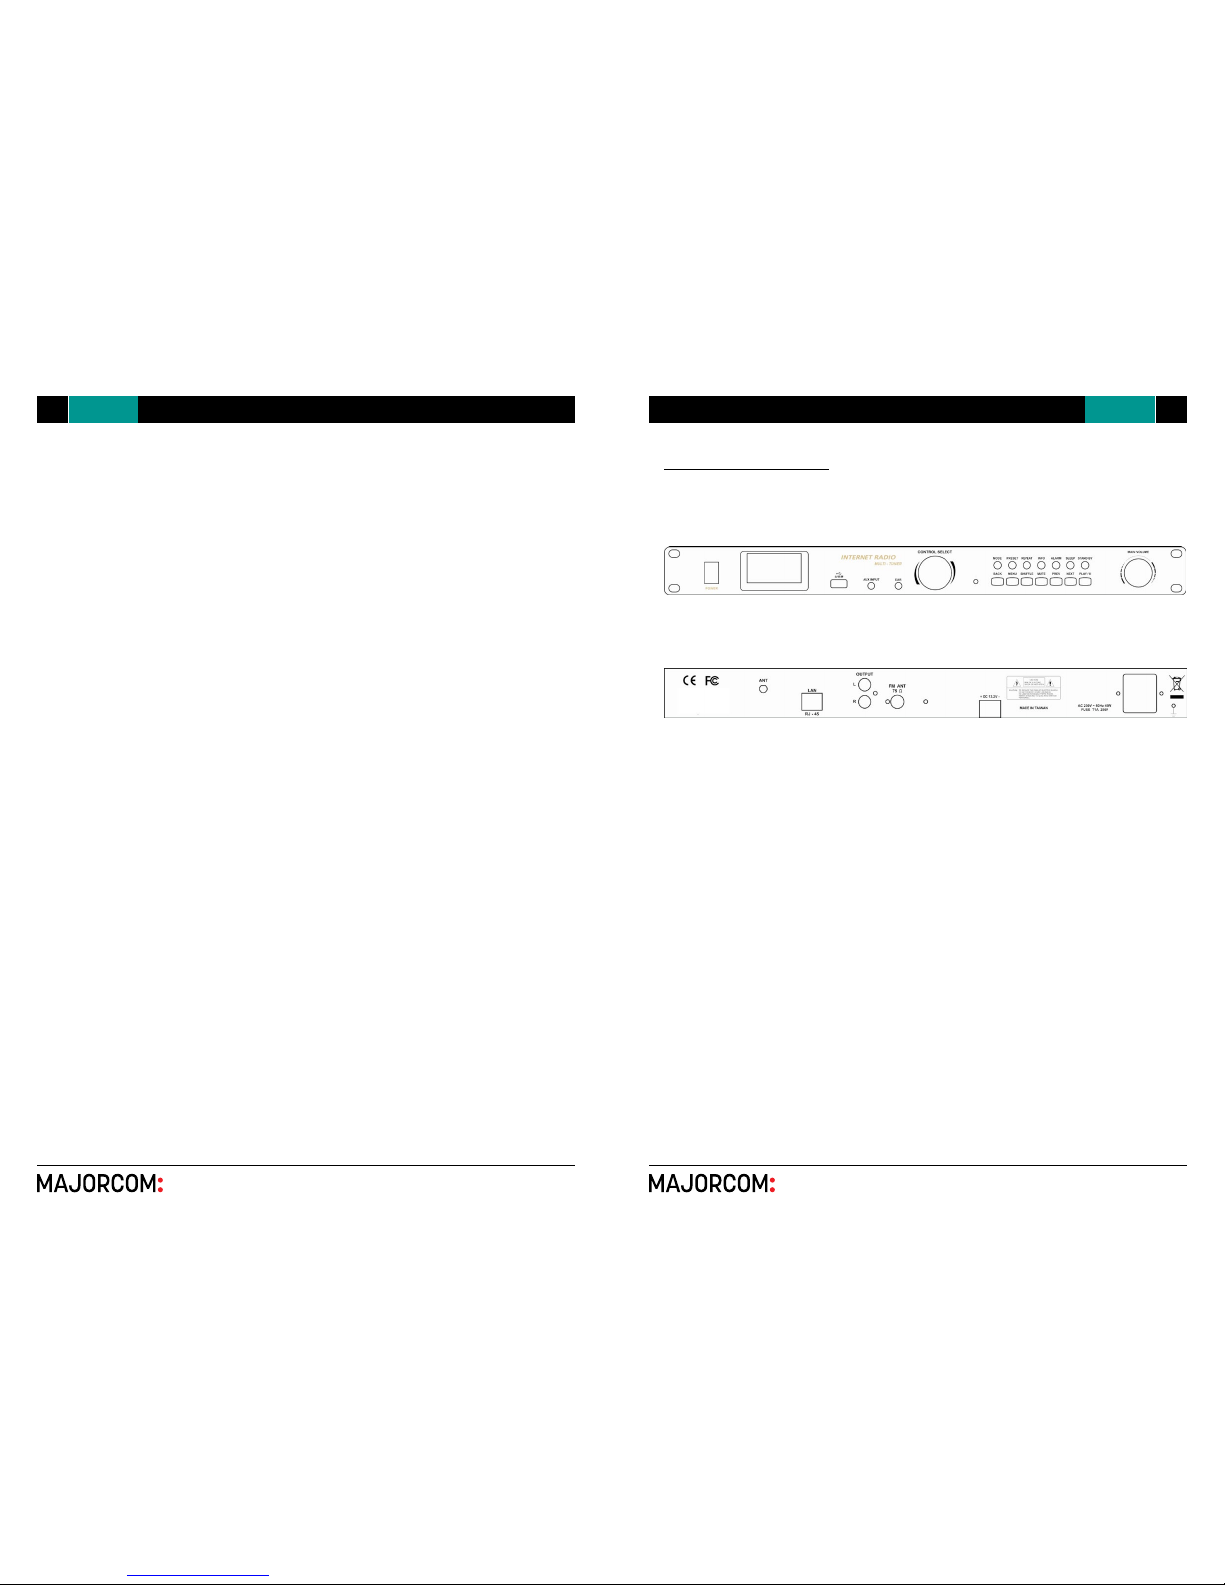
Connectors
•
Ethernet RJ45
•
Audio out
•
Line in
•
Line out
•
Headphones out

Internet radio / DAB / DAB+ / FM RDS / USB reader NTU-200
56, chemin de la Flambère · 31300 Toulouse · FRANCE · Tél. 33 (0)5 61 31 86 87
Fax 33 (0)5 61 31 87 73 · commercial@majorcom.fr · www.majorcom.fr
User manual
56, chemin de la Flambère · 31300 Toulouse · FRANCE · Tél. 33 (0)5 61 31 86 87
Fax 33 (0)5 61 31 87 73 · commercial@majorcom.fr · www.majorcom.fr
User manual
54
NTU-200 Internet radio / DAB / DAB+ / FM RDS / USB reader
Feature
•
Internet Radio with access to over 20,000 stations, ‘Listen again’ broadcasts and podcasts
•
Music player allowing easy navigation and playback through a USB or network-stored library of
music files including AAC/AAC+, MP3, WMA, WAV
•
“Play To” feature allowing media to be pushed from a PC running Windows 7 to the unit
operating in Digital Media Renderer (DMR) mode
•
DAB/DAB+ digital radio with a wide choice of channels and digital quality sound broadcast
•
FM with RDS (Radio Data System)
•
Aux in for external music sources such as MP3 players
•
Large 2.7 inch display for easy control and clear information display, with up to six lines of text plus
status icons
•
Infrared remote control
•
Clock with auto-update capability and dual independent alarms
•
Sleep/snooze
•
Multiple network profiles for easy setup
•
13 languages operation
•
Remote APP / Multi Room
1 Controls, connectors and display
Main controls
Button Function
CONTROL
SELECT
Turn to scroll through a menu of station list. The chosen option is
highlighted in reverse text (dark characters on a white background)
Press to select.
Button Function
STAND BY
Turn on or back to standby mode (showing clock and date).
Cancels sleep function.
SLEEP
Sleep/snooze: When playing, standby after a set time. When alarm is
sounding, snooze for a set time.
ALARM
Enters alarm wizard, turns off alarm (when alarm is sounding) and toggles
between alarms in standby.
MENU
Menu: Show menu for the current mode. Press again to show Now playing
screen.
MODE Cycle through the modes: Internet Radio, Music player, DAB, FM, Aux in
MUTE Mute audio output.
MAIN VOLUME Increase or decrease volume level.
PRESET
Press for the Preset recall/Save menu;
Scroll up/down to select the preset number then press 'Select' to confirm.
There are 10 presets each for Internet radio, DAB and FM
INFO
View more information about the station or track playing. Press again to
cycle through further information screens then return to the normal Now
playing screen.
Previous : Select start of track, previous track or hold to scan down rewind.
Next : Select next track or hold to scan up/fast forward.
Play / Pause / Stop
Repeat Music player repeat songs.
SHUFFLE Music player shuffle songs.
Internet radio / DAB / DAB+ / FM RDS / USB reader NTU-200
56, chemin de la Flambère · 31300 Toulouse · FRANCE · Tél. 33 (0)5 61 31 86 87
Fax 33 (0)5 61 31 87 73 · commercial@majorcom.fr · www.majorcom.fr
User manual
56, chemin de la Flambère · 31300 Toulouse · FRANCE · Tél. 33 (0)5 61 31 86 87
Fax 33 (0)5 61 31 87 73 · commercial@majorcom.fr · www.majorcom.fr
User manual
76
NTU-200 Internet radio / DAB / DAB+ / FM RDS / USB reader
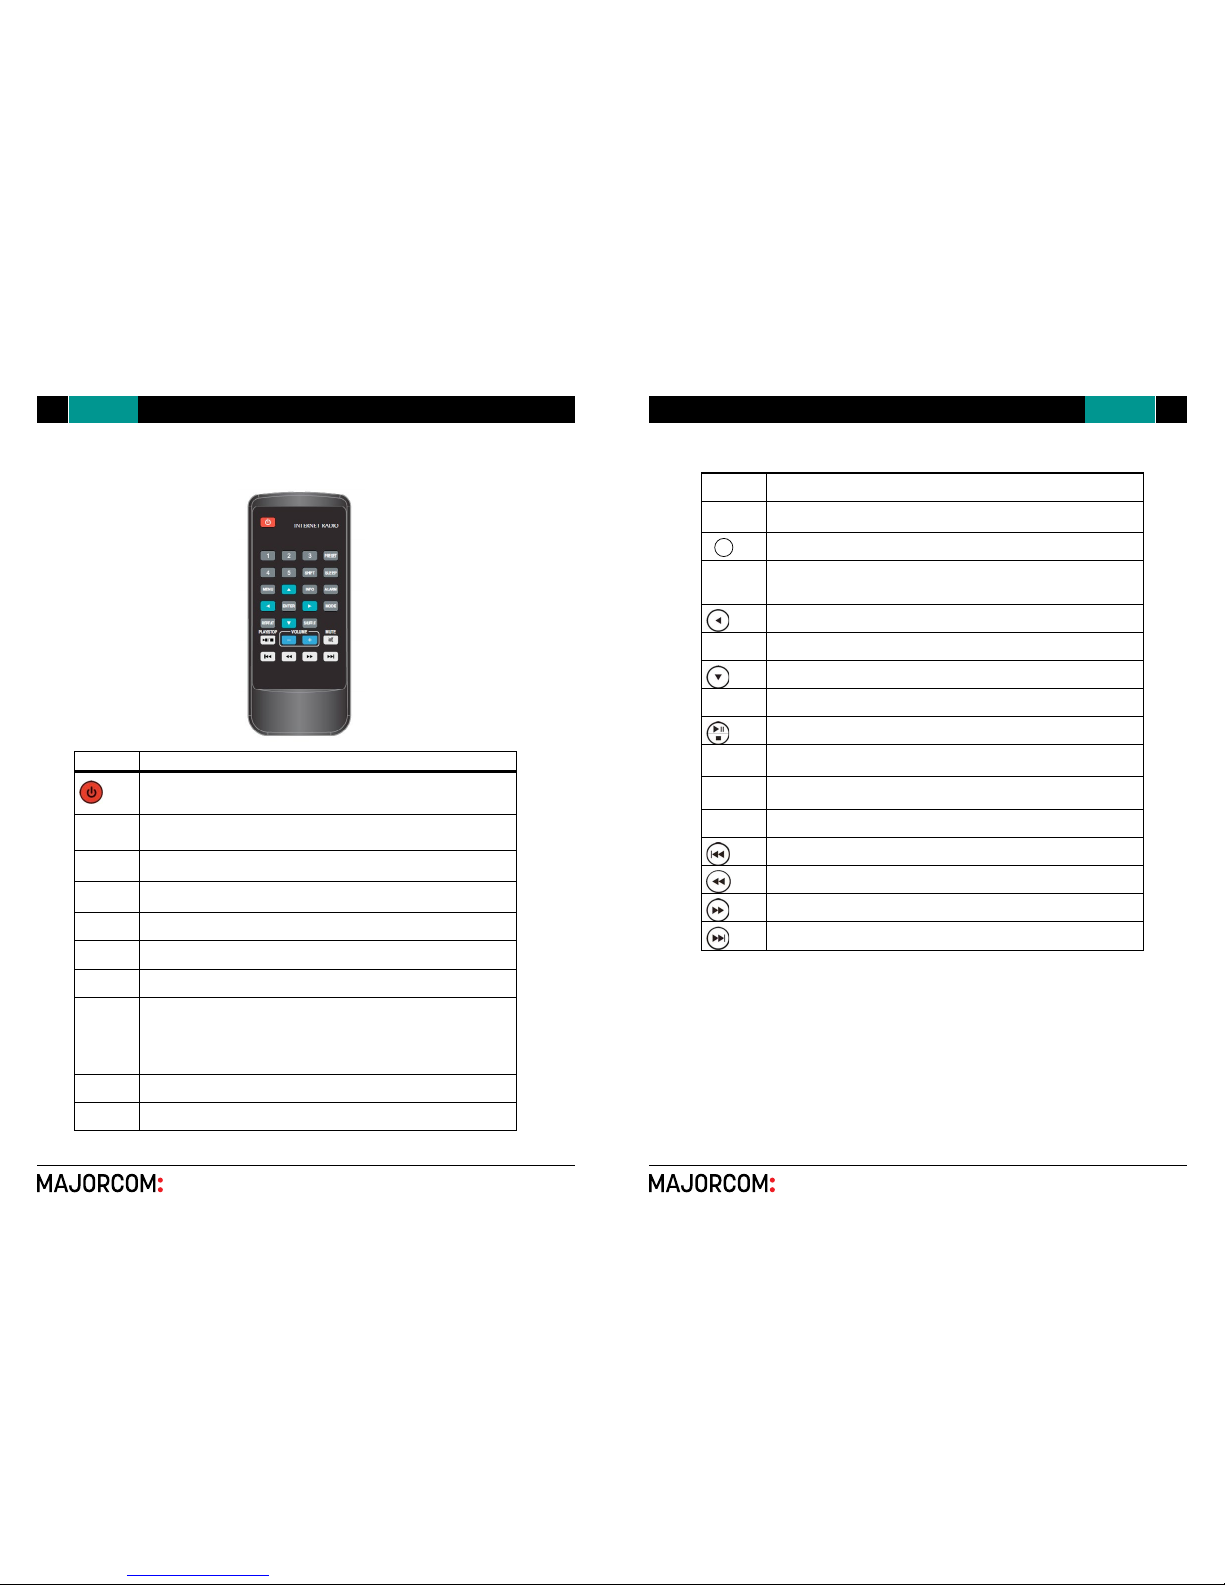
Remote control
The remote control operates in a similar way to the main keypad.
Button
Function
Standby: Turn on or back to standby mode (showing clock and
date). Cancel sleep function.
SLEEP
Sleep/snooze: When playing, standby after a set
time. When alarm is sounding, snooze for a set time.
ALARM Enters alarm wizard, turns off alarm (when alarm is sounding) and
toggles between alarms in standby.
MODE Mode: Cycle through the modes: Internet Radio, Music player, DAB,
FM, Aux in.
1
Set/recall preset 1 or 6.
2
Set/recall preset 2 or 7.
3
Set/recall preset 3 or 8.
Preset
Preset: Press for the Preset recall/Save menu;
Scroll up/down to select the preset number then press 'Select' to
confirm. There are 10 presets each for Internet radio, DAB and FM
modes.
4
Set/recall preset 4 or 9.
5
Set/recall preset 5 or 10.
SHIFT
Press Shift then Preset to access higher preset numbers.
MENU Menu: Show menu for the current mode. Press again to show Now playing
screen.
!
Up: Scroll up through a menu or station list.
INFO
Info: View more information about the station or track playing. Press again
to cycle through further information screens then return to the normal Now
playing screen.
Back.
Repeat
Music player repeat song.
Down: Scroll down through a menu or station list.
SHUFFLE
Shuffle: Music player shuffle songs.
Play/pause/stop.
- VOLUME
Decrease volume.
+ VOLUME
Increase volume.
Mute
Mute.
Previous: Skip back (previous track).
Rewind.
Fast forward.
Next: Skip forward (next track).
Internet radio / DAB / DAB+ / FM RDS / USB reader NTU-200
56, chemin de la Flambère · 31300 Toulouse · FRANCE · Tél. 33 (0)5 61 31 86 87
Fax 33 (0)5 61 31 87 73 · commercial@majorcom.fr · www.majorcom.fr
User manual
56, chemin de la Flambère · 31300 Toulouse · FRANCE · Tél. 33 (0)5 61 31 86 87
Fax 33 (0)5 61 31 87 73 · commercial@majorcom.fr · www.majorcom.fr
User manual
98
NTU-200 Internet radio / DAB / DAB+ / FM RDS / USB reader
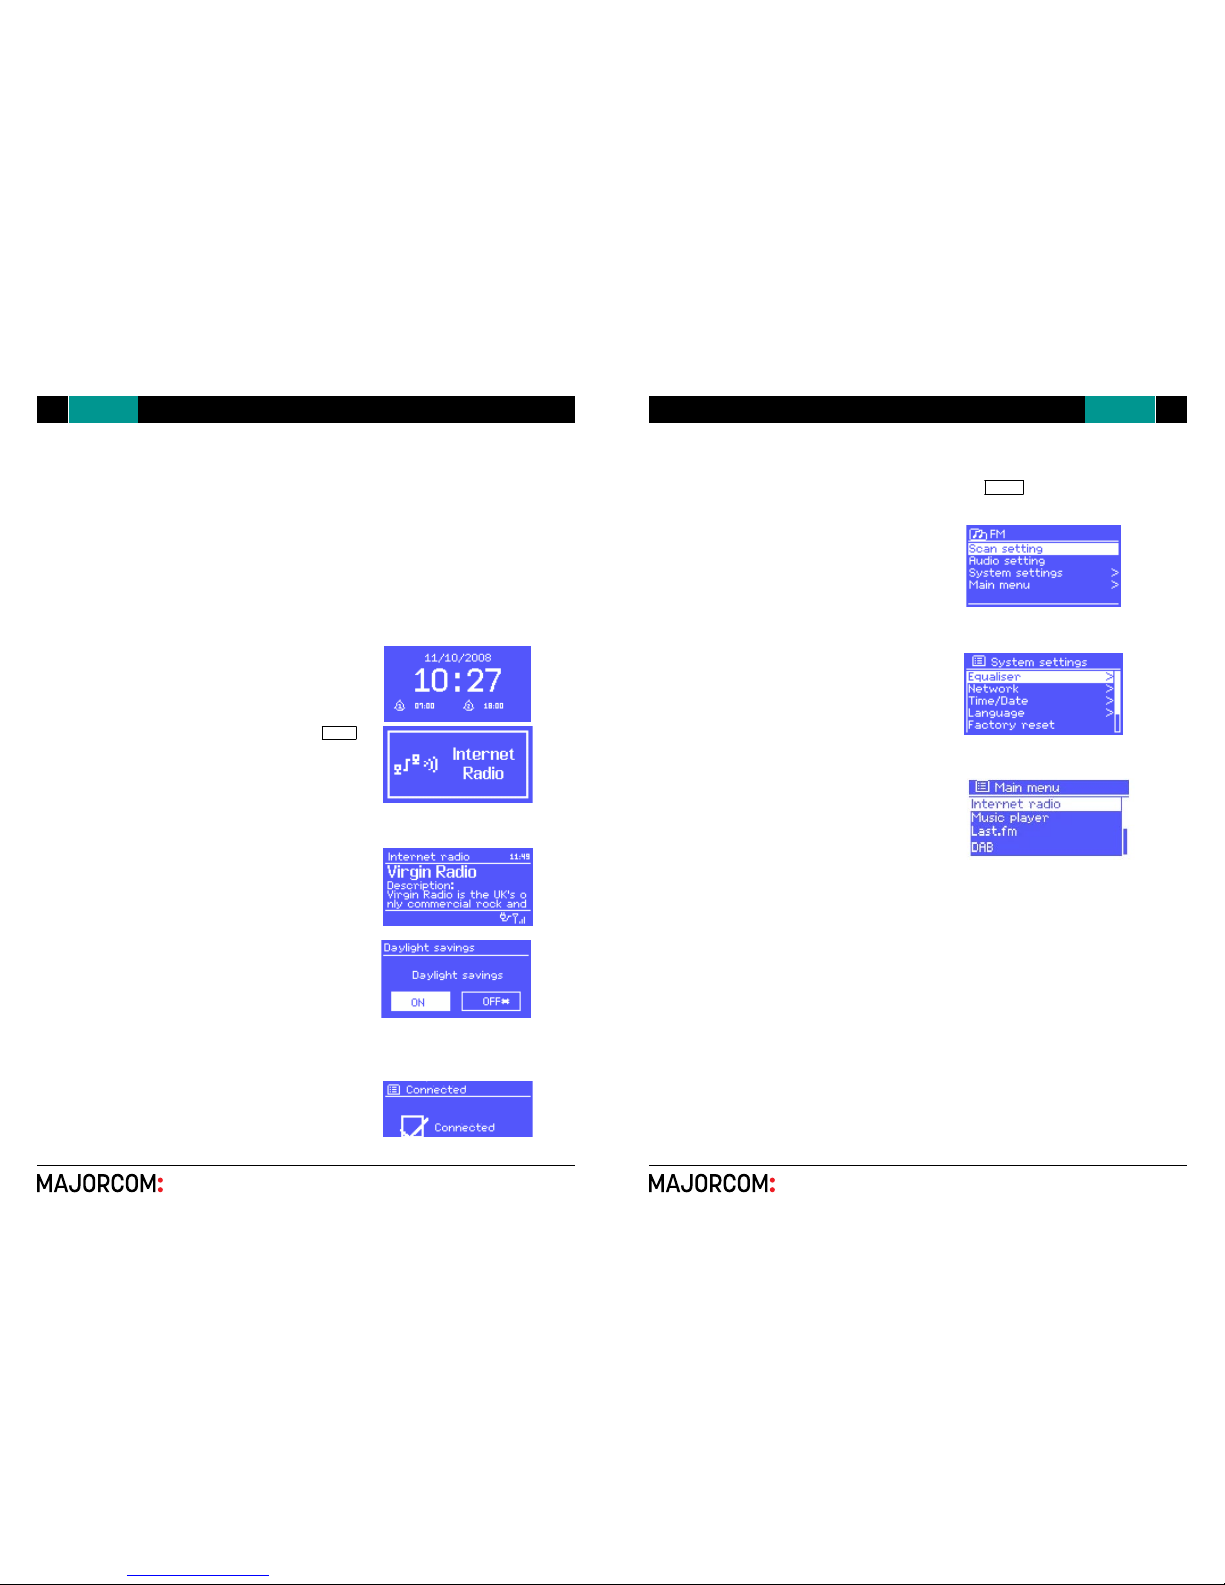
2 Screens
The screen shows various menus, dialogues and displays, as described below.
There are basically six types of screen:
•
Standby (clock)
•
Splash (mode)
•
Now playing
•
Dialogue
•
Error/Information
•
Menu
When text is too long to fit on the screen, it is first shown truncated, then, after a few
seconds, slowly scrolls so that you can read it all.
The Standby screen shows the time, date and any
active alarm times.
As you cycle through the play modes using Mode ,
the unit shows a splash screen for each mode. After
one second, the unit enters the selected mode and
tries to start playing the last station or track that was
playing in that mode. If this is not possible, the unit
tries to connect to the selected source by scanning for
stations, networks, or prompting for user input as
appropriate.
Now playing screens show information about the
audio source and track now playing, where available.
Dialogue screens are shown to allow the user to
change settings. They vary in complexity from simple
Yes/No options up to the scrollable network
password input screen.
As with menus, the selected item is shown with
a
white
background.
Dialogue screens mark the current setting with an
asterisk (*).
Error/Information screens give specific messages
for a few seconds, then change automatically to
another screen.
Menus
The unit has basically three types of menu. Use the Select control to step
through and select options. A scroll bar on the right of the screen shows if there are
further options
above or
below those visible.
Each mode has a Mode menu, with
options specific to that mode. For
example, the FM mode menu has
just two options: Scan setting and
Audio setting.
In addition, each mode menu has two
final options: System settings > and
Main menu >. The ‘>’ indicates
options leading
to
further menus.
The System settings menu
allows access to system settings
and information such as network,
time, language and software
update.
Menus with more options than will fit on
one screen have a scroll bar to the
right.
The Main menu allows access to all modes plus
sleep and timer functions.
some menus, for example the System settings menu, have several submenus.
A menu map of the unit is shown on the last page of this manual book.
Internet radio / DAB / DAB+ / FM RDS / USB reader NTU-200
56, chemin de la Flambère · 31300 Toulouse · FRANCE · Tél. 33 (0)5 61 31 86 87
Fax 33 (0)5 61 31 87 73 · commercial@majorcom.fr · www.majorcom.fr
User manual
56, chemin de la Flambère · 31300 Toulouse · FRANCE · Tél. 33 (0)5 61 31 86 87
Fax 33 (0)5 61 31 87 73 · commercial@majorcom.fr · www.majorcom.fr
User manual
1110
NTU-200 Internet radio / DAB / DAB+ / FM RDS / USB reader
3 Getting started/setup
To set up the unit:
1. Place the unit on a suitable shelf or table
2. Connect the power adaptor between the unit and the mains supply.
3. To receive broadcast radio (DAB and FM), extend the telescopic antenna.
The setup wizard starts.
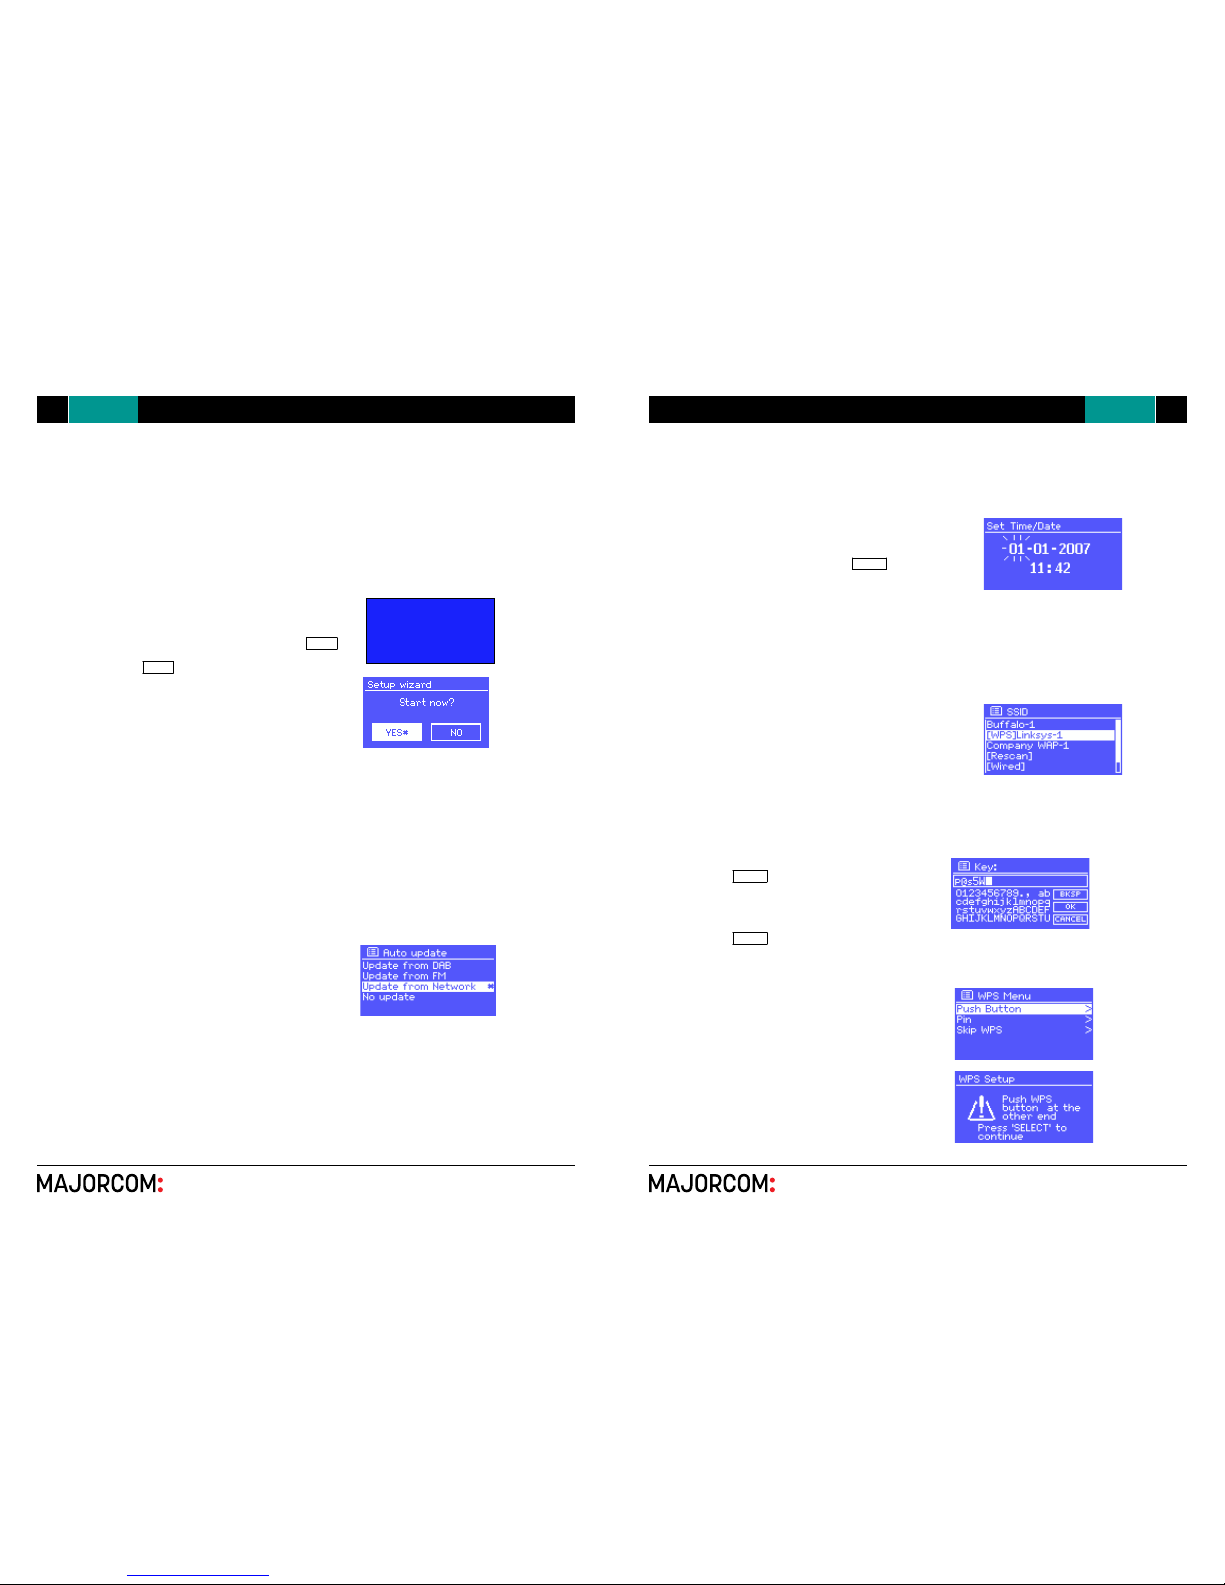
3.1 Setup wizard
When the unit is started for the first time, it runs
through a setup wizard to configure settings
for
date/time
and network. Once this has finished, the
system is ready to use in most modes.
Note: To change these settings later, select Menu >
System settings >. To run the setup wizard again,
select Menu > System se ttings > Setup wizard.
Select Yes to start the setup wizard.
If you choose No, the next screen asks if you would
like to run th e wizard next time the unit is started.
The system then starts without configuring
time/date and network settings and enters the Main
Menu.
Note: If power is removed while the wizard is in
progress, the wizard will run again next time
when the unit is started.
3.1.1 12/24 hour display
To change between 12 and 24 hour display, select Set 12/24 hour and then select your
preference.
3.1.2 Time/date
The time and date can be updated manually or automatically. With auto-update, the time
and date are automatically synchronized with external clocks. Auto-update is generally
more accurate.
Auto-update
Auto-update works with data sent over DAB, FM or
the Internet. The clock is only updated when in a
corresponding mode, so it is best
to select a mode
you use regularly.
DAB and FM use time signals broadcast with radio
transmissions.
Network uses a time signal sent from the Frontier
Silicon Internet radio portal when in any networkconnected mode.
1. Select Update from DAB, Update from FM, Update from Network or No update.
2. If you are updating from the network, set your time zone.
3. If your country uses daylight saving, the automatically updated time from the network
may be wrong by one hour. When daylight savings are in effect (during the winter),
turn on the Daylight savings option to rectify this.
Note that if you are updating the time from DAB or FM, the Daylight savings option
WELCOME
has no effect on the clock’s time.
The unit will auto-update from the selected source when time information is available.
Manual set
If you set No update, the wizard now prompts you to set the time and date manually.
The date and time are displayed as dd-mm-yyyy and
hh:mm AM/PM with the first value, dd, active
(flashing).
Adjust each value with the Select control. As each
value is set, the next value becomes active and
flashes.
3.1.3 Network
The unit is compatible with all common network protocols and encryption methods,
including Wi-Fi Protected Setup (WPS).
To connect the unit to your network, you need one of the following:
•
A wired router and an Ethernet (RJ45 network) cable
•
A Wi-Fi wireless router, together with password key if set
Select WLAN region/country > Wi-Fi network
(SSID), and then select a network from the list.
To connect to a wired network, select [Wired], after
ensuring that the Ethernet cable from the wired router
is connected to the Ethernet socket of the unit.
If the network is open (non-encrypted), the unit connects without any further ado; see
Completion below.
Standard encrypted network
To enter the network’s key (password), use the
Select control to move the cursor through the
characters and select. As each character
is
selected,
the key is built up near the top of the
display.
There are three options accessible by turning
Select back before the first characters
(0123…) – Backspace, OK and Cancel.
WPS encrypted network
WPS encrypted networks are identified by
‘[WPS]’ at the start of the network name, and
have three methods of connection. Select one
and follow the prompts:
•
Push Button >
The unit prompts you to press the
connect button on the router. It then
scans for a ready Push Button
Connect network and connects.
 Loading...