

Major MR150, MR180, MR235 Operator's Manual And Parts List

Operator Manual
and Parts List
MAJOR
FINISHING MOWERS
MR150, MR180 and MR235

Head Ofce
Major Equipment Intl Ltd
Ballyhaunis,
Co. Mayo,
Ireland
Tel.: 09496 30572
Fax: 09496 30788
UK Ofce
Major Equipment Ltd.
Major Industrial Estate.
Middleton Rd
Heysham
Lancs.
LA3 3JJ
Tel.: 01524 850 501
Fax: 01524 850 502
NL & GERMANY OFFICE
Major Equipment Intl Ltd
Postbus 29
NL-7700 AA
Dedemsvaart
Nederland
Tel: + 31 (0) 6389 19585
Web: www.major-equipment.com
We suggest that you record your machine details along with your dealers address & telephone
number for your convenience
MODEL: ______________ SERIAL NO: __________________
DEALER: ________________________________________________________
ADDRESS: ________________________________________________________
________________________________________________________
________________________________________________________
TEL NO: ________________________________________________________
Disclaimer
While every effort has been made in the production of this manual to ensure that the information contained herein is full and
correct, Major assumes no responsibility for errors or omissions.
Major reserves the right to modify the machinery and the technical data contained within the manual without prior notice.
Further to this, Major assumes no liability for any damages which may result from the use of the information contained within this
manual.

Contents
Introduction
Identication Data 2
Main Parts 2
Safety Regulations
General Safety regulations 3
Regulations for use of the driveline 3
Starting regulations 4
Warning and danger plates and stickers 5
Key to safety devices 6
Delivery of the mower 7
Hitching to the tractor
Preliminary instructions on use of the machine 8
Coupling the machine to the tractor 11
Shortening the driveline 12
Use of the Machine
Preparing the implement for work 13
Use of the machine 14
Demounting the implement from the tractor 15
Maintenance
Technician specications 15
Inspections before use 16
Periodical inspections 16
Storage of machine 19
Spare Parts
Spare parts list 20
Trouble shooting 28
Warranty procedure 30

EEC certicate of conformity for machines
(conforming to Directive 98/37/EEC)
Company: Major Equipment Ltd.
Address: Coolnaha,
Ballyhaunis,
Co. Mayo,
Ireland.
Tel. +353949630572
Fax +353949630788
declares in sole responsibility that the product:
FINISHING MOWER
When properly installed, maintained and used only for it’s intended purpose, complies with
all the essential Health & Safety requirements of:
• THE SUPPLY OF MACHINERY (SAFETY) REGULATIONS 2008.
• S.I. No. 299 of 2007, Safety, Health and Welfare at Work (General Application)
Regulations 2007 (Ireland).
• Health & Safety at Work, etc. Act 1974 (c.37) (UK).
• EN ISO 12100:2010, ISO 11684:1995.
• EN ISO 13857:2009, EN 349:2009, EN ISO 4413:2011.
• EN ISO 4254-12:2012, EN ISO 4254-1:2010
I certify on behalf of Major Equipment Int. Ltd., that this machine when properly installed
and operated correctly, complies with all the essential Health & Safety requirements of
all legislation referred to above.
Signature : ______________ Date 11/01/2013
Managing Director

INTRODUCTION
Thank you for purchasing this Major Finishing Mower. Please carefully read this operation manual and strictly
observe these instructions for the safety of you and the personnel around you. In this manner, you will enjoy
long and satisfactory use of this product.
The user of the mower (also called "Implement" or "Machine" in the text) is personally responsible for his own
safety and that of any other people in the vicinity of the machine.
It is therefore essential for the user to possess detailed knowledge about how to use, service and correctly
mount the mower on the tractor. The machine's user must be an operator with a suitable technical background to
enable him to understand the contents of this manual, including the diagrams found herein. The figures and
descriptions in this handbook give both users and maintenance staff all the basic instructions to comply with
when using and servicing the mower.
The user is responsible for ensuring that connection to the tractor and use of the mower complies with the
current provisions in merit. The machine may only be used and serviced by persons who have be come fully
familiar with the contents of this manual, which should always be kept ready to hand. Users should become
particularly familiar with chapter 2 concerning safety precautions.
Always comply with the given instructions. Consult the Major After-Sales Service Centre or your nearest dealer
in case of doubt. In the event of faults or problems which require the assistance of a qualified technician, contact
the manufacturer directly or your nearest dealer.
This machine is consigned according to the warranty conditions valid at the moment of purchase. The user must
not tamper with the machine or make modifications to its parts since such action shall void the guarantee.
The manufacturer reserves the right to modify the machine specifications and performances without advance
warning and declines all responsibility for any errors caused by incorrect installation or improper use of the
equipment.
Contact MAJOR or your nearest dealer if there are substantial differences between the implement and the
indications in this handbook. The standards that govern the guarantee are cited in the "Certificate of Guarantee"
which is supplied to the user with this manual.
This symbol is used in the manual to call the reader's attention to various levels of danger that if not
avoided will result in death or serious injury.
Important: References to this manual to the right side and left side of the machine mean to the right and left
side of the operator seated in the tractors driving seat.
IMPORTANT NOTICE
BEFORE OPERATING THIS MACHINE, BE SURE TO CHECK THE
FOLLOWING CHECK-POINTS (HAVING FIRST STOPPED THE TRACTOR
ENGINE, DISENGAGED THE PTO AND CAREFULLY READ AND
UNDERSTOODF THE OWNER’S MANUAL):
1. Check oil levels (if necessary and SAE 90 EP oil)
2. Grease the driveline spiders
3. Grease all marked points on the machine
4. Check to be sure the nuts/bolts are snug on those parts which are under
the most stress (tines, blades, front linkage bolts, gear box bolts etc)
1
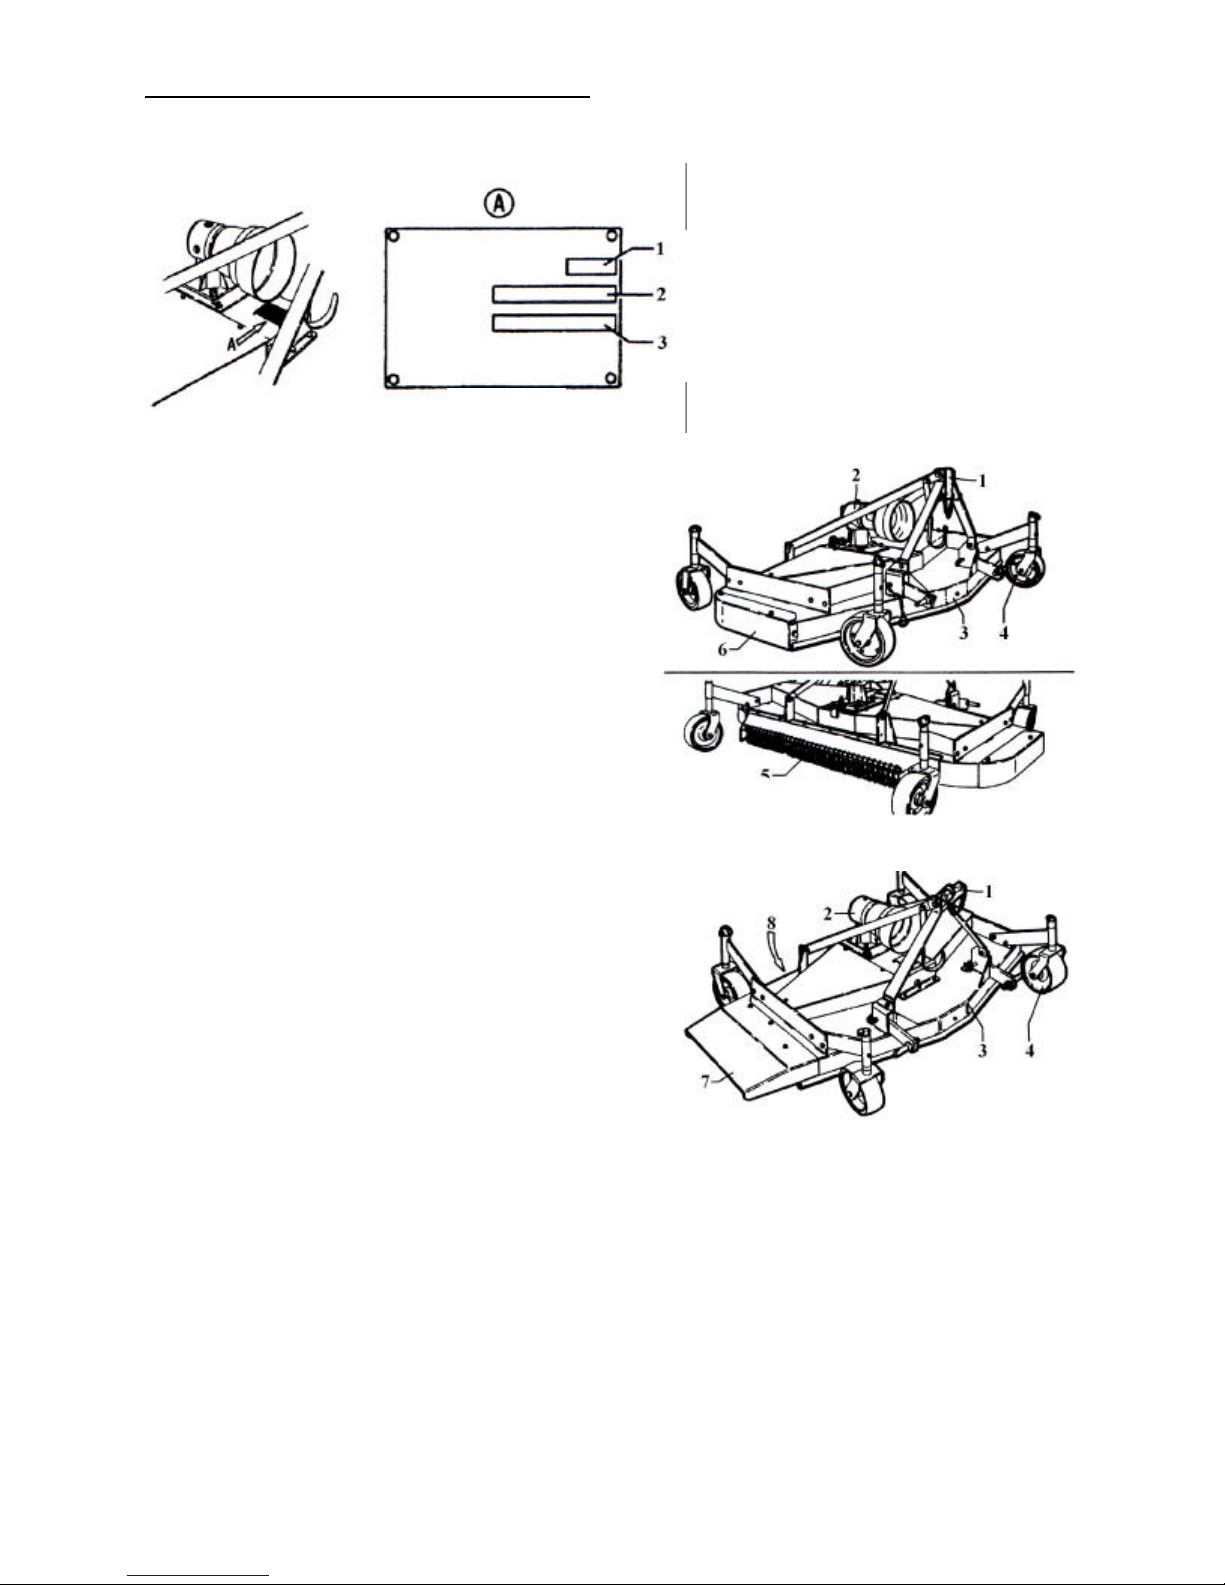
IDENTIFICATION DATA & GUIDE TO MAIN PARTS
Key to the main parts
Fig 2.1
Fig 2.2
The data plate indications must not be altered for any reason. We suggest that you write the data pertaining to
your mower in the spaces below (Fig. 2.1)
1. Year of Manufacture
2. Machine type or model
3. Serial Number
1. Three-point linkage used to couple the
implement to the tractor.
2. Gearbox: Increases the rotation speed
of the tractor PTO.
3. Chassis: This is the bearing structure of
the implement.
4. Pivoting wheels: The machine is
supported by pivoting wheels which can
also be used to adjust the cutting height.
5. Rear discharge conveyor.
6. Side closing part.
7. Side discharge conveyor. (MR150 &
MR180 only)
8. Rear closing part.
(Fig. 2.2)
Side Discharge Mower
The main feature of this machine is its versatility, since the user (if in possession of the transformation kit) can
modify the machine from the rear discharge version to the side discharge version and vice versa. The essential parts
of the machine are as follows: a
1. Kiln-lacquered, electro-welded steel frame;
2. A gearbox unit to be connected to the tractor's power takeoff with a PTO shaft.
3. Four pivoting wheels to support the machine on the ground while it is in use.
4. Three blades with a milled cutting edge.
5. Conveying and discharging set, positioned on the side or the rear of the machine.
2

GENERAL SAFETY & SAFETY REGULATIONS
Fig. 3.1
Fig.
3.2 Fig.
3.3 Fig.
3.4
The mower must only be used with a suitable tractor and driven by an adequate driveline driven from the
tractor PTO. All other use is strictly prohibited. Users should become thoroughly familiar with the contents of this
manual before using, servicing or mounting the implement on the tractor and all other pertinent operations.
Never wear jewellery, loose clothing such as ties, scarves, belts, unbuttoned jackets or dungarees with
open zips which could become caught up in moving parts. Always wear approved garments complying with
accident prevention provisions such as: non-slip shoes, ear muffs, goggles and gauntlets.
Consult your dealer, the "Labour Health Service" or your nearest equivalent authority for information about
the current safety provisions and specific regulations to comply with in order to ensure personal safety. If the
machine is used in the evening, follow the relevant instructions.
REGUALTIONS FOR THE USE OF THE DRIVELINE
The machine maybe supplied with a driveline; the driveline is complete with shields able to ensure the operator's
safety (see Figure 3.6 page 8)
Keep the non-rotation shields efficient and in a good condition. If their condition is poor, they should be changed
before the implement is used. Unless it is correctly protected, the driveline could even cause the user's death
since it can catch on parts of the body or clothing. Always check that the shields are installed and perfectly
efficient before using the machine. Check that they are well fixed and correctly inserted into their housings.
Check that the retaining chains are correctly fixed to the tractor or mower in order to prevent the shields from
turning together with the driveline.
Check that the driveline is free to turn within the shield. Take great care to prevent the shields from being
damaged when the implement is coupled and released from the tractor. Keep the grooved parts perfectly clean
and greased so that they are able to correctly slide.
Besides being described in this manual, the method by which the driveline is coupled must also be checked out
with the instructions in the tractor manufacturer's manual. The correct rotation speed of the tractor PTO is
indicated on the PTO shaft guards of each machine.
This rate is usually 540 or 1000 rpm. Always comply with the indicated speed. The following items are applied to
the driveline (if delivered with the machine):
• A danger sticker on the shaft guard (Fig. 3.1)
• A danger sticker on the driveline which becomes visible if the shield is damaged or missing (Fig. 3.2)
Strictly comply with the instructions on the sticker.
3

STARTING REGULATIONS
1. Always check that any imminently dangerous condition has been appropriately eliminated before using
the implement. Check that all guards and safety shields are installed, efficient and correctly mounted in
place.
2. Never allow inadequately trained personnel to use the implement.
3. Before starting, always check that there are no persons, particularly children and animals, within the
operative range of the implement. Examine the work area in order to become familiar with the type of
soil in question. Check that there are no obstructions or objects in the area that could be caught up by
the implement and thrown up at a distance. Clean all such objects from the area.
4. Never work near roads, paths, housing areas or places potentially frequented by people, vehicles,
animals, etc. If such action is inevitable, check that these areas are deserted be-fore beginning work and
while on the job.
5. Never start the tractor before being correctly seated in the driving position. Never start a faulty
implement, even when such a condition is only suspected. Contact your nearest dealer, or the person in
charge, and ask for the implement to be inspected.
GENERAL OPERATION
1. Never ever use the mower under influence of alcohol or the effect of medicines such as tranquillisers,
sedatives, stimulants, drugs or any other substance as could slow or alter the reflexes or sight.
2. Never ever work when there are persons on the implement .No one must ride on the tractor apart from
the driver unless this is explicitly allowed by the tractor manufacturer. The tractor must be equipped with
a roll-bar and/or all other safety devices prescribed by the current laws in force. To ensure his personal
safety, the operator must use these devices correctly. Consult and strictly comply with the instructions in
the tractor use and maintenance manual.
3. The operator should never allow himself to be distracted when working. He should pay great attention
and concentrate on what he is doing. Constantly keep the vehicle under control and always remember
how to quickly stop and switch off both the tractor and implement.
4. Always check that children, adults and animals keep at an adequate safety distance from the mower
when it is in use.
5. Take great care when working on sloping surfaces. It is preferable to work upwards or downwards rather
than crosswise in order to avoid the risk of over-turning. Always check and comply with the tractor
manufacturer's instructions, particularly in relation to the maximum gradient on which it is possible to
work. When working on slopes, it is advisable to reduce the work speed, gradually varying the speed
and direction of the vehicle during manoeuvres. Never repeatedly stop and start the machine.
6. Never operate on wet, slippery grass or soil or where the tyre grip is precarious. If such action is
inevitable, always work at low speed to ensure the operator's safety. Pay great attention to any
obstructions, stones or other objects which could hit the knives. The tractor engine must always be
turned off, and the ignition key must be removed from the dashboard when intervening on the machine.
For example, when it is necessary to detach the machine from the tractor or if grass or other objects that
might have become tangled up in it must be removed.
7. Before dismounting from the tractor, always disengage the power takeoff (P. T.O.), turn off the engine,
remove the ignition key from the dashboard, insert the brake, and do not approach the machine before
the tools have come to a complete stop.
8. After having hit an obstacle, simultaneously stop the tractor and machine tool, turn off the engine,
remove the ignition key from the dashboard, insert the brake, and check for any possible damage. If the
machine has been damaged, all repairs must be carried out before continuing the working process.
Always carry out any required repairs before continuing work. When the knives are turning, always keep
the limbs well away from moving parts and those which heat during operation such as the over gear unit.
Never ever attempt to check or adjust the belt tension while the implement is operating. Always stop it
before this operation. Never ever lubricate the machine while it is operating, or when the PTO is
engaged.
9. Never smoke while refuelling. Never refuel near smouldering, sparking material or open flames.
10. Always check whether the soil around the tractor is slippery. Clean all mud from the soles of the shoes
before mounting the tractor. Keep the steps, bearing surfaces, handrails, shackles and tractor pedals
(brake, clutch and accelerator) clean and free from all foreign bodies such as oil, grease, mud or snow in
order to prevent all possibility of slipping or tripping.
11. Keep the operator support areas on the tractor free from mud or any thing else that could cause the
operator to slip when the implement is mounted or demounted from the tractor. Never jump on or off the
tractor. Always keep both hands and one foot well anchored. Never use the control levers or hose pipes
as holds. These are mobile parts and do not offer a safe grip. Involuntary activation of a control could
also cause the tractor or implement to accidentally move. Before the machine is released from the
tractor, it should be rested on the ground in a stable position using the support foot where installed.
4

Always check that the machine is balanced and stable, then release it from the tractor, checking again to
ensure that it is firmly positioned.
TRANSIT ON PUBLIC HIGHWAYS
1. When driving on public roads, always comply with the Highway Code provisions in force in the country
where the machine is being used. Pay particular attention near crossroads, underpasses, and level
crossings, when meeting other vehicles, overtaking stationary or slower vehicles. Drive near the edge of
the road and try not to hold up the traffic.
2. Never park the tractor and/or mower near crossroads, bends, level crossings or where the equipment
could be a danger or obstruction to pedestrian traffic.
3. Never drive on public highways when the implement or tractor is particularly dirty since soil, grass and
other items could drop on to the road and obstruct the normal road traffic. Disengage the PTO and
disconnect the driveline when transporting the implement.
INSTRUCTIONS FOR MAINTENANCE TECHNICIANS
1. The implement must be stationary and the tractor PTO disengaged before any work is carried out on the
implement.
2. Routine and extraordinary maintenance operations must be carried out in a specially prepared place
using correct and efficient tools. This place must always be kept clean and dry. There must be sufficient
space around the implement to allow work to be easily carried out. Only trained and specialised
personnel must be allowed to service the implement. Contact your nearest dealer when maintenance
work is required.
3. Comply with the indicated bans and procedures when servicing the implement. Never ever use gasoline,
solvents or other inflammable fluids as detergents. Use the non-flammable and non-toxic commercially
available solvents authorised by the competent authorities. Never use compressed air or highly
pressurised water to clean the implement. When this is absolutely inevitable, protect the eyes using
goggles with side guards and use the lowest possible pressure.
4. At the end of the job, check and inspect the implement while it is still disconnected from the tractor.
Check the cutting blades for wear. Never carry out welding operations without the manufacturer's
permission and instructions. Before welding, always detach the implement from the tractor in order to
prevent damage to the battery. Always wear a protective mask, goggles and gauntlets when welding,
lapping or grinding, hammering or drilling. The implement should be lubricated as described the
maintenance section (page 15).
5. Correctly remount all guards and shields that were removed during the maintenance and repair
operations.
TEST REGULATIONS
1. Always operate the machine outdoors. If the machine connected to the tractor must inevitably be started
in a closed room, e.g. during tests after maintenance, always ensure that there is adequate ventilation to
prevent harmful exhaust gas from accumulating.
2. Carry out various manoeuvres assisted by specialized personnel in order to simulate the different work
conditions and acquire the necessary familiarity with the implement. Before starting, always check that
there are no foreign bodies such as stones, soil or other, clinging to the rotors. When the rotor turns,
such items could detach and be violently thrown notable distances. Always operate within a protective
cage, or at least near a solid wall.
3. Always check that no one is too near or in a potentially dangerous position if the implement is to be
operated raised from the ground, when testing for example.
4. Always disengage the PTO before driving the tractor to transport the implement from one place to the
other.
WARNING DANGER PLATES AND STICKERS
1. Comply with the warnings on the stickers. (See picture for locations & details of warning stickers on the
machine) Failure to comply with the given instructions could cause death or serious personal injury.
2. Check that the stickers are always installed and legible. If this is not the case, contact your nearest
dealer or "MAJOR" in order to obtain replacements (state the code number printed on the left hand side
of each sticker when ordering).
5
STICKER NUMBERS & LOCATIONS
1 2 3
5
6
Fig.
3.5
4
MR150 &
KEY TO SAFETY DEVICES
1. PTO shaft guard.
A cowling where the driveline couples with the
shredder over-drive protects the rotating end
of the driveline itself.
2. Drive belt guard.
Prevents access to the drive belts and
pulleys.
3. Snap Pin.
Prevents the wheel with the fork slipping off
accidentally.
4 Driveline shield.
The driveline is supplied with adequate plastic
shields and relative fixing chains.
5. Guards (only on the rear discharge
version)
Prevents the product leaking out of the side of
the machine
6. Rear Guards
Prevent any solid objects there may be in the
earth from being ejected great distances.
7. Safety Pin
Prevents the pin in the attachment point 3
slipping out accidentally. Fig. 3.5
6
MR180 only

NOISE
Measurements of the noise issued by the machine indicate that the equivalent noise level is such as to maintain
the daily level to which the operators are exposed within a value of less than 70 dBA. This measurement was
made with a sound level meter set at a distance of about 1.6 m from the machine and at a height of 2 m,
operated (no-load) at a PTO rotation rate of 450 rpm on grassy land. Please also note that the machine is
normally used outdoors and that the position occupied by the operator is seated in the driving seat of the tractor.
Also consult the prescriptions listed in the tractor use and maintenance manual.
VIBRATIONS
During normal operation, the machine will not transmit appreciable vibrations to the tractor or, thus, to the
operator. These vibrations are less than 2.5 m/sec2. to the operator's upper limbs and less than 0.5m/sec•'. to
the seated part of the operator's body. Consult the tractor manual for the vibrations transmitted by the tractor
itself.
DISCLAMER
The mower has been built in compliance with the accident prevention regulations in force and therefore the
manufacturer cannot be held responsible for damage resulting from:
• Use of the machine with faulty or missing guards
• Improper use of the machine
• Use of the machine by untrained or unauthorised personnel
• Incorrect assembly of the mower;
• Use of the mower on the wrong tractor;
• Lack of maintenance
• Unauthorised modifications or work carried out on the machine
• Use of non-original spare parts or those which are not specific to the machine
• Failure to observe all or some of the instructions & exceptional weather conditions.
DELIVERY OF THE MOWER
All mowers are tested in our plants to ensure that all moving parts operate correctly. All items are thoroughly
checked before dispatch or delivery. When the implement is received, always check that it has not been
damaged during transport. Contact your dealer if such damage is discovered.
The machine is usually delivered partially disassembled and wrapped in a heat-sealed film. The disassembled
parts are contained inside the packing, attached firmly to the machine
Hoisting & Handling the Packed Machine
Do not place the packed machines on top of each other as the packing is not designed to be piled up.
• Hoisting with a Forklift
Open the forks as wide as possible, hoist the machine using a lift truck, with an adequate carrying capacity to lift
the machine, checking its weight in the table on page 15. Check that the load is stable and well positioned on
the truck forks.
Keep the load as low as possible when moving the implement. This will ensure greater stability and visibility.
• Hoisting with a Crane or Bridge Crane
There is a small eyelet in the upper part of the machine to facilitate its hoisting. When hoisting the machine, only
hook up to this eyelet, not any other part. Take care to avoid swinging the load as this could be hazardous for
the operator and the machine could be damaged. Use chains, cables and hooks whose capacity is greater than
the load to be hoisted. Take particular care to use chains or cables that are intact and show no signs of fraying
or wear, which could put the user's safety at risk.
7
 Loading...