

Maisi M10 Quick Start Manual

QUICK START GUIDE
Maisi Camcorder M10

Page 1 of 17
PRIOR TO USE
* Install the device on your rear-view mirror to obtain the best open-field view. Do NOT install
the camcorder in a location that will obstruct your required driving view.
* Make sure that the lens is within the wiping range of the windscreen wiper to ensure a clear
view even when it rains.
* Do not touch the lens with your fingers. Finger grease may be left on the lens and will result
in unclear videos or snapshots. Clean the lens on a regular basis.
* Make sure that the installation position is not hindered by the tinted window.
CAUTION
* Use the authorized car charger only.
* Never disassemble or attempt to repair of this product. Doing so may damage the camcorder,
cause electric shock and void your product warranty.
* Never short-circuit the battery.
* Set up time and date accurately before you use this camcorder.
* Exposing the camcorder to open flames can cause explosion.
* Due to local laws and vehicles safety considerations, do not manually operate the camcorder
while driving.
* The supplier is NOT responsible for the loss of any data/content during operation.
* Strictly observe relevant laws as this product cannot be used for any illegal purpose. The
user is responsible for any legal matters.
Before you start using the Car Camcorder it is assumed that you agree to the above
statements.
How to contact us?
If you come across any issue, please feel free to drop us a quick email at:
maxtopuk@gmail.com. We answer most emails within 12-24 hours. If you purchase from
Amazon, you can contact us via Amazon Message as well.

Page 2 of 17
1 Introduction
Thank you for purchasing this MAISI camcorder. This camcorder is specifically designed for
real time video and audio recording when driving.
1.1 Features
* High Dynamic Range Imaging (HDR)
* HD Image 2304*1296
* Up to 150 Degree Wide Angle Glass Lens & IR-Filter
* Built-in G-sensor
* Collision Detection
* Emergency Recording File
1.2 Package Contents
The package contains the following items. In case there is any missing or damaged item,
contact us immediately.
* 1× Camcorder
* 2× Elastic Buckle
* 4× Extendable Rod
* 1× Power Charger (4M)
* 1× USB Cable
* 1× Quick Start Guide
Page 3 of 17
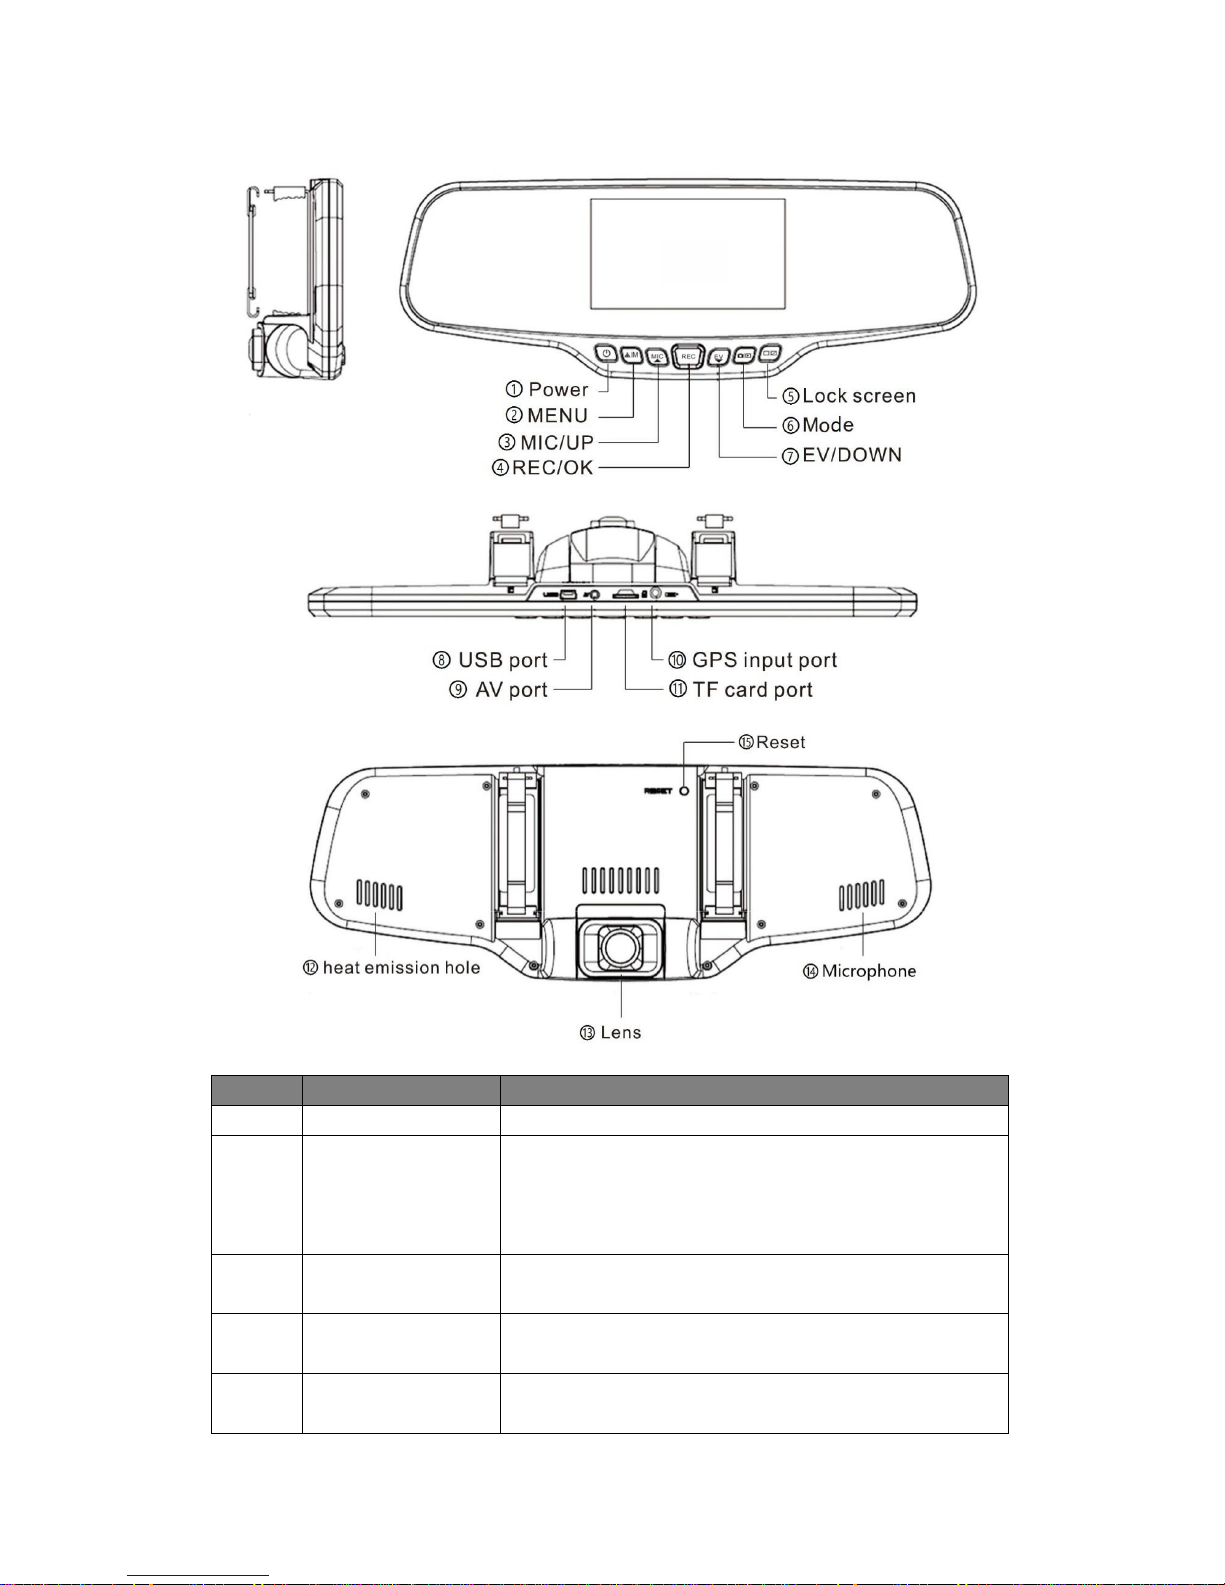
1.3 Product Overview
Button Illustration
Number
Button Name
Button Illustration
①
Power button
Press to turn on/off the device
②
Menu button
1) Press to bring up Recording/Picture/Playback/System
Menu;
2) Press to enable the emergency recording while the
device is recording.
③
MIC/Up button (▲)
1) Press to turn on/off microphone in Recording mode;
2) Press to select upward options.
④
REC/OK button
1) Press to start recording;
2) Press to confirm your selection
⑤
EV/Down button (▼)
3) Press to change the EV value in Recording mode;
4) Press to select downward options.
Page 4 of 17
⑥
Mode button
Press to switch among Recording/Picture/Playback Mode.
⑦
Lock Screen button
Press to enter screensaver mode (screen goes black), but
the recording continues; press again to exit.
⑧
USB Port
For data transmission
⑨
AV Port
For AV signal
⑩
TF Card Slot
To insert the TF card with the gold plate facing the back of
the device
⑪
GPS Input Port
For GPS
⑫
Heat Emission Hole
For heat emission
⑬
Lens
6-layer glass fixed lens
⑭
Microphone
For audio recording
⑮
Reset Button
To reset the dash camcorder in abnormal situations
Note:
* Power Button: Press it once to turn on the camera, long press (2-3s) to turn off the camera.
* To go to Menu, make sure the camera is not recording. If the camera is recording, press REC
button to stop the recording first, then press Menu button to bring up the menu.
* Same rules apply (stop recording first) if you want to change the camera from Recording
Mode to Picture Mode or Playback Mode.
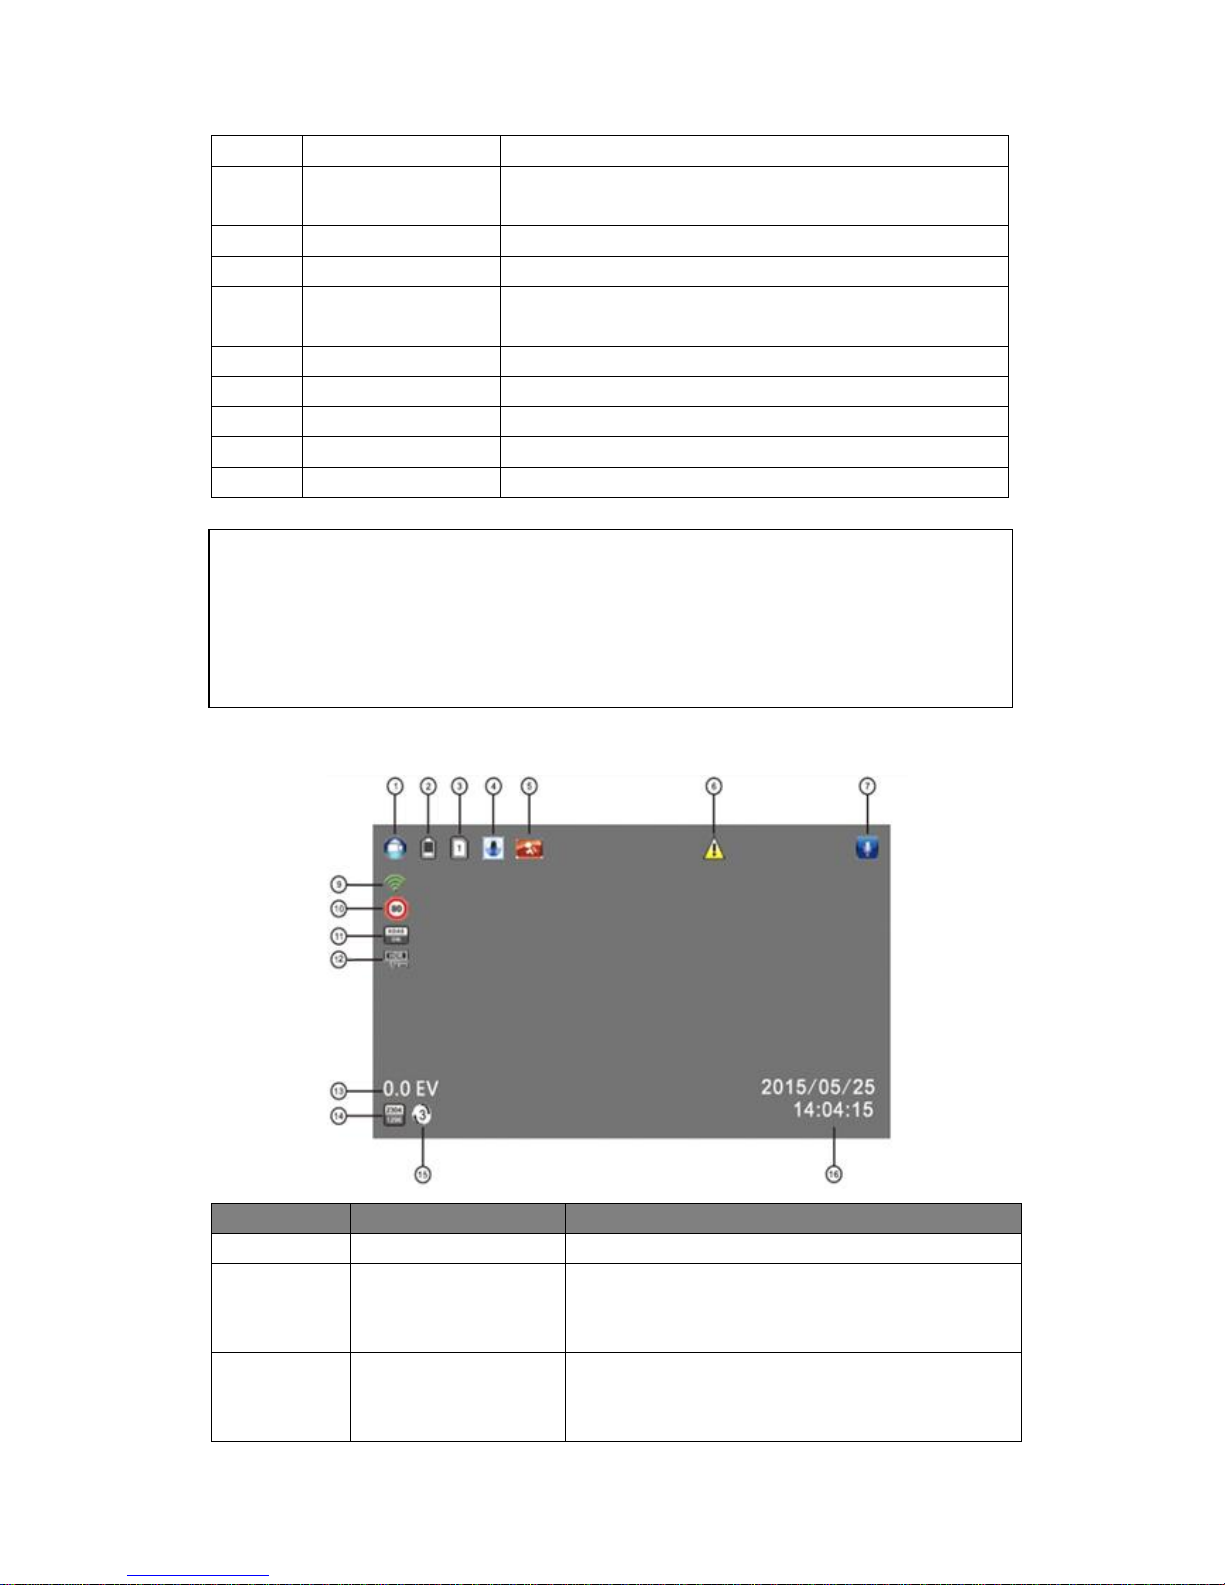
1.4 Screen Interface Illustration
Number
Icon Name
Icon Illustration
①
Movie Camera Icon
Indicating the camcorder is in Recording Mode
②
Battery
Indicating the remaining power for the device. The
average life of the battery is about 30min. Please
charge your camcorder when the power is low.
③
Micro SD Card
When the card is properly inserted and recognized
by the camcorder, this icon will show up. Otherwise
it will be a “X”.

Page 5 of 17
④
G-Sensor
Indicating the sensitivity of the G-sensor you set.
The higher the blue color stands, the more sensitive
it is.
⑤
Motion Detection
This icon shows up only when motion detection is
enabled. Please disable it while driving.
⑥
Emergency Recording
This Icon shows up when collision/vibration occurs
and followed by device mandatory file protection.
You can enable the emergency recording by
pressing the Menu button while recording.
⑦
Microphone
It only shows up in Recording Mode. If enabled, the
audio will be recorded with the footage.
Press MIC button to turn it On/Off.
⑨
GPS
When the GPS model is not inserted, this icon is red;
When the GPS model is inserted and duly
recognized by the camcorder, this icon will turn
green and the camcorder will record route of your
journey as well as the speed with the footage. If the
Date/Time stamp is enabled, you will see the speed
displayed on the right bottom corner of the screen.
⑩
Speed Limit
Please set the value in Speed Warning Setting
⑪
ADAS
Only appears when it is enabled (GPS Module
required for Lane Departure Warning function)
⑫
HDR
When resolution is set to HDR _1920x1080@30P, it
appears. HDR function can achieve more clear
images in dark/dim environment.
⑬
EV
Exposure Value, “+” means brighter, “-“ means
dimmer.
⑭
Video Resolution
The video resolution you set.
⑮
Loop Recording
The loop setting time you chosen will be displayed in
the middle of this icon. For the current setting, the
loop time is 3 Minutes.
⑯
Date/Time Stamp
If enabled, the model number/speed/car plate
number/date/ time will be displayed on the right
bottom corner on the screen, and this info will be
saved on the recording.
Only when the GPS model is inserted and
recognized will the speed info be shown.
 Loading...