

Page 1
The Engine Shed
Top Station Road
Brackley
NN13 7UG
Tel: 0845 1308060
Fax: 01280 845345
Web: www.caterparts.com
All spares available from
Copyright Notice:
All rights reserved. No parts of this manual may be reproduced in any form without
express written permission of Maidaid-Halcyon(A trading name of Buttress Group Ltd)
Installation&User
Guide
Page 2
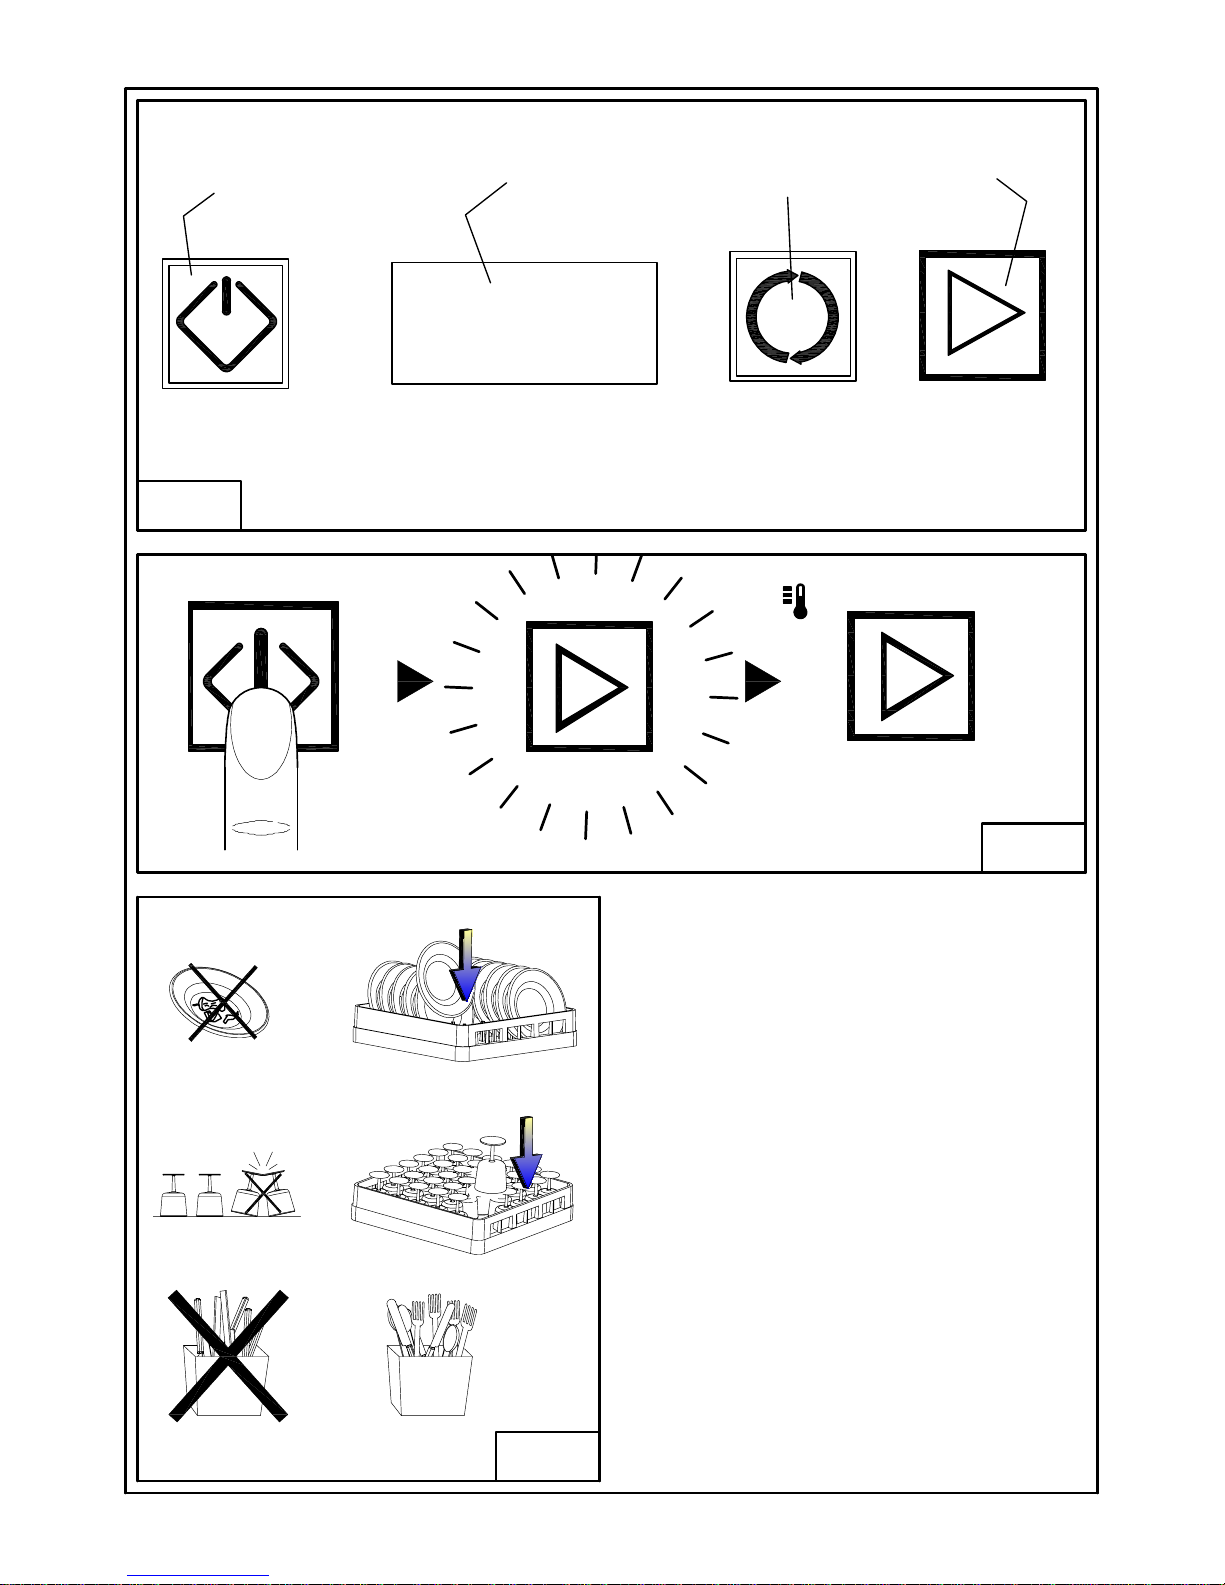
Fig.1
1
2
3
OK
OK
Fig.3
Fig.2
OK
4
OK
Page 3
A
A
A
A
Fig.5
Fig.8
Fig.6
5s
OK
R
Fig.8
OKA
Fig.7
C
Fig.7
R
Page 4

INSTRUCTION MANUAL FOR DISHWASHERS
MDI TT28-26 - 02 Page 1 of 20
UK
CONTENTS
PREFACE ..........................................................................................................3
WARNINGS: ......................................................................................................3
WARRANTY: .....................................................................................................3
CHAP 1 INSTALLATION.................................................................................3
1.1
UNPACKING.........................................................................................................3
1.2
POSITIONING.......................................................................................................4
1.3 ELECTRICAL
CONNECTION.............................................................................4
1.4 PLUMBING
CONNECTION ................................................................................4
1.5 CONNECTION TO THE DRAIN
LINE ...............................................................5
1.6
FIRST START-UP AND SETTING OF DETERGENT DOSING SYSTEM ..6
1.7
CONNECTING DETERGENT LEVEL SENSORS INSIDE TANKS..............6
1.8
MACHINE CORNER OR IN-LINE INSTALLATION .......................................7
CHAP 2 RISKS AND IMPORTANT WARNINGS...............................................8
2.1 NORMAL SERVICE
CONDITIONS....................................................................8
CHAP 3 USE OF THE DISHWASHER..............................................................9
3.1 WASHING
CYCLE................................................................................................9
3.2
LIST OF CONTROL PANEL BUTTONS...........................................................9
3.3
LIST OF DISPLAY SYMBOLS ...........................................................................10
3.4
TURNING THE MACHINE ON AND STARTING A WASHING PROGRAM
..........11
3.5
SELECTING A SPECIAL WASHING PROGRAM ...........................................12
3.6
SPECIAL PROGRAMS DESCRIPTION ............................................................12
3.7
VIEWING TEMPERATURES AND NUMBER OF RUN PROGRAMS ..........13
3.8
ENABLING AND DISABLING AUTOMATIC START ....................................13
3.9 END OF
SERVICE ................................................................................................14
CHAP 4 MAINTENANCE.................................................................................14
4.1 CLEANING AND
HYGIENE ................................................................................15
4.2 MAINTENANCE OF FILTERING
GROUP ........................................................15
4.3 CLEANING OF WASH
ARMS .............................................................................15
4.4
ADJUSTMENTS AND SETTINGS ....................................................................16
CHAP 5 SELF-DIAGNOSIS .............................................................................17
5.1
MACHINE FAILURE LOG DISPLAYING .........................................................18
CHAP 6 DISPOSAL.........................................................................................18
CHAP 7 USE IN THE RESPECT OF THE ENVIRONMENT ............................... 19
The manufacturer reserves legal rights to the property of this document. It is forbidden to reproduce it or distribute it by any means
without prior written authorisation.
The manufacturer reserves the right to introduce changes in order to achieve the improvements it deems necessary without prior notice.
Page 5

INSTRUCTION MANUAL FOR DISHWASHERS
Page 2 of 20 MDI TT28-26 - 02
UK
Page 6
INSTRUCTION MANUAL FOR DISHWASHERS
MDI TT28-26 - 02 Page 3 of 20
UK
PREFACE
Failure to follow the instructions provided in the attached documentation may jeopardize safety of
the appliance and immediately cancel the warranty.
Warnings:
The operator is bound to read, understand and learn the contents of this manual before
starting any handling, installation, use, maintenance, decommissioning activity on the machine.
Keep manual in a safe location, with additional copies – if necessary – for frequent consultation.
The warning messages contained in this manual are an integral part of the machine, and supply
important safety indications for installation, use and maintenance activities.
Machine intended use is the professional washing of dishware, and it has thus to be used by trained
personnel complying with all the instructions specified by the manufacturer.
Warranty:
The manufacturer declines any responsibility and warranty for material damage or personal injury
resulting from failure to comply with the given instructions for use or machine misuse.
Failure to comply with the indications given in the attached documents may affect machine safety
and immediately void the warranty.
Any installation and repair activity carried out by unauthorized staff or the use of non original spare
parts immediately void the warranty.
Storage :
Transport and storage : -10°C to 55°C up to 7 0°C (peak) (for 24 hours max.)
The manufacturer declines all responsibility for damage to property or injuries to persons deriving
from failure to comply with the instructions given or from improper use of the machine.
Chap 1
INSTALLATION
Proper installation is essential in order for the machine to operate properly. Some of the data needed for
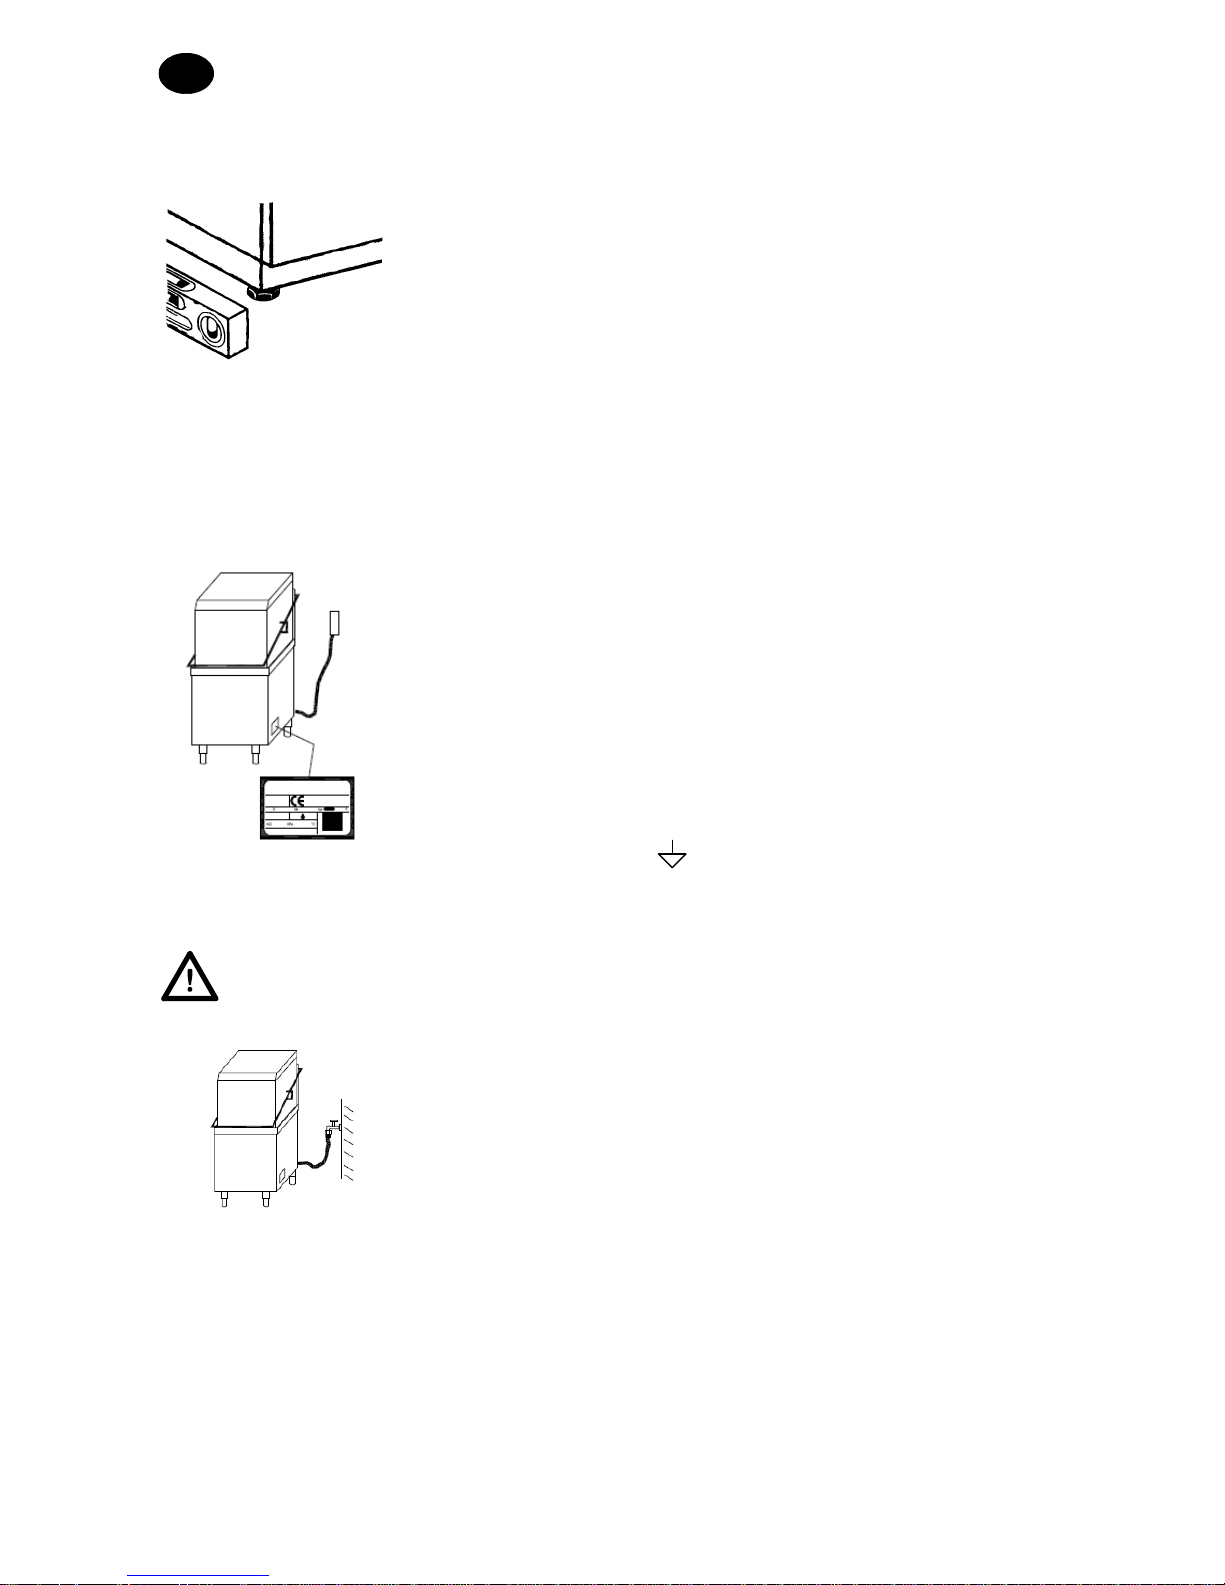
machine installation can be found on the data plate placed on the right side of the machine and in duplicate on
the cover of this manual.
Only qualified, authorised technicians must install the machine.
1.1 UNPACKING
Check that the packing is in perfect condition and write down any damage found on the delivery note. After
you have removed the packing, make sure the appliance is intact. If the machine is damaged, immediately
notify the dealer by fax or by registered letter with advice of receipt and the haulage contractor that
transported it. If the damage is such as to jeopardize machine safety, do not install and/or use it until a
qualified technician services it.
The packing components (plastic bags, foam polystyrene, nails, etc. ...) must not be left
within the reach of children and pets as they may be dangerous.
Page 7
INSTRUCTION MANUAL FOR DISHWASHERS
Page 4 of 20 MDI TT28-26 - 02
UK
1.2 POSITIONING
• Check that there are no objects and materials in the installation area that
can be damaged by steam that may exit the machine during operation, or
at least that they are sufficiently protected.
• In order to ensure stability, install and balance the machine on its four feet.
•
Different installation solutions must be agreed upon and approved by the
manufacturer.
• Before dishwasher positioning, arrange the necessary power, water and
discharge connections.
• Floor or recess size shall be calculated based on dishwasher total weight.
•
This machine can have a fixed connection, only. Different installation
solutions shall be agreed with and approved by the manufacturer.
1.3 ELECTRICAL CONNECTION
• There must be an omnipolar type of main switch that disconnects all
contacts, including the neutral, with a distance of at least 3 mm
between the open contacts and with safety circuit breaker tripping or
connected with fuses, to be sized or calibrated in conformity with the
power indicated on the machine’s data plate.
• The main switch must be located on the electric line close to the place of
installation, and it must serve only one appliance at a time.
• Electric network voltage and frequency must coincide with those given on
the data plate.
• There must be an effective earthing system in conformity with the
prevention standards in force for operator and equipment safety.
• The power supply cable (type H07RN-F only) must not be pulled or
crushed during normal operation or routine maintenance.
• Machine shall also be included in an equipotential system, to be connected
through a screw (symbol . ).
• Equipotential bonding conductor section shall be 10 mm².
• Respect the polarities indicated in the wiring diagram.
•
Consult the enclosed wiring diagram for additional information.
Do not use adaptors, multiple socket outlets or cables of inadequate type and section or with
extension connections not compliant with plant engineering standards in force.
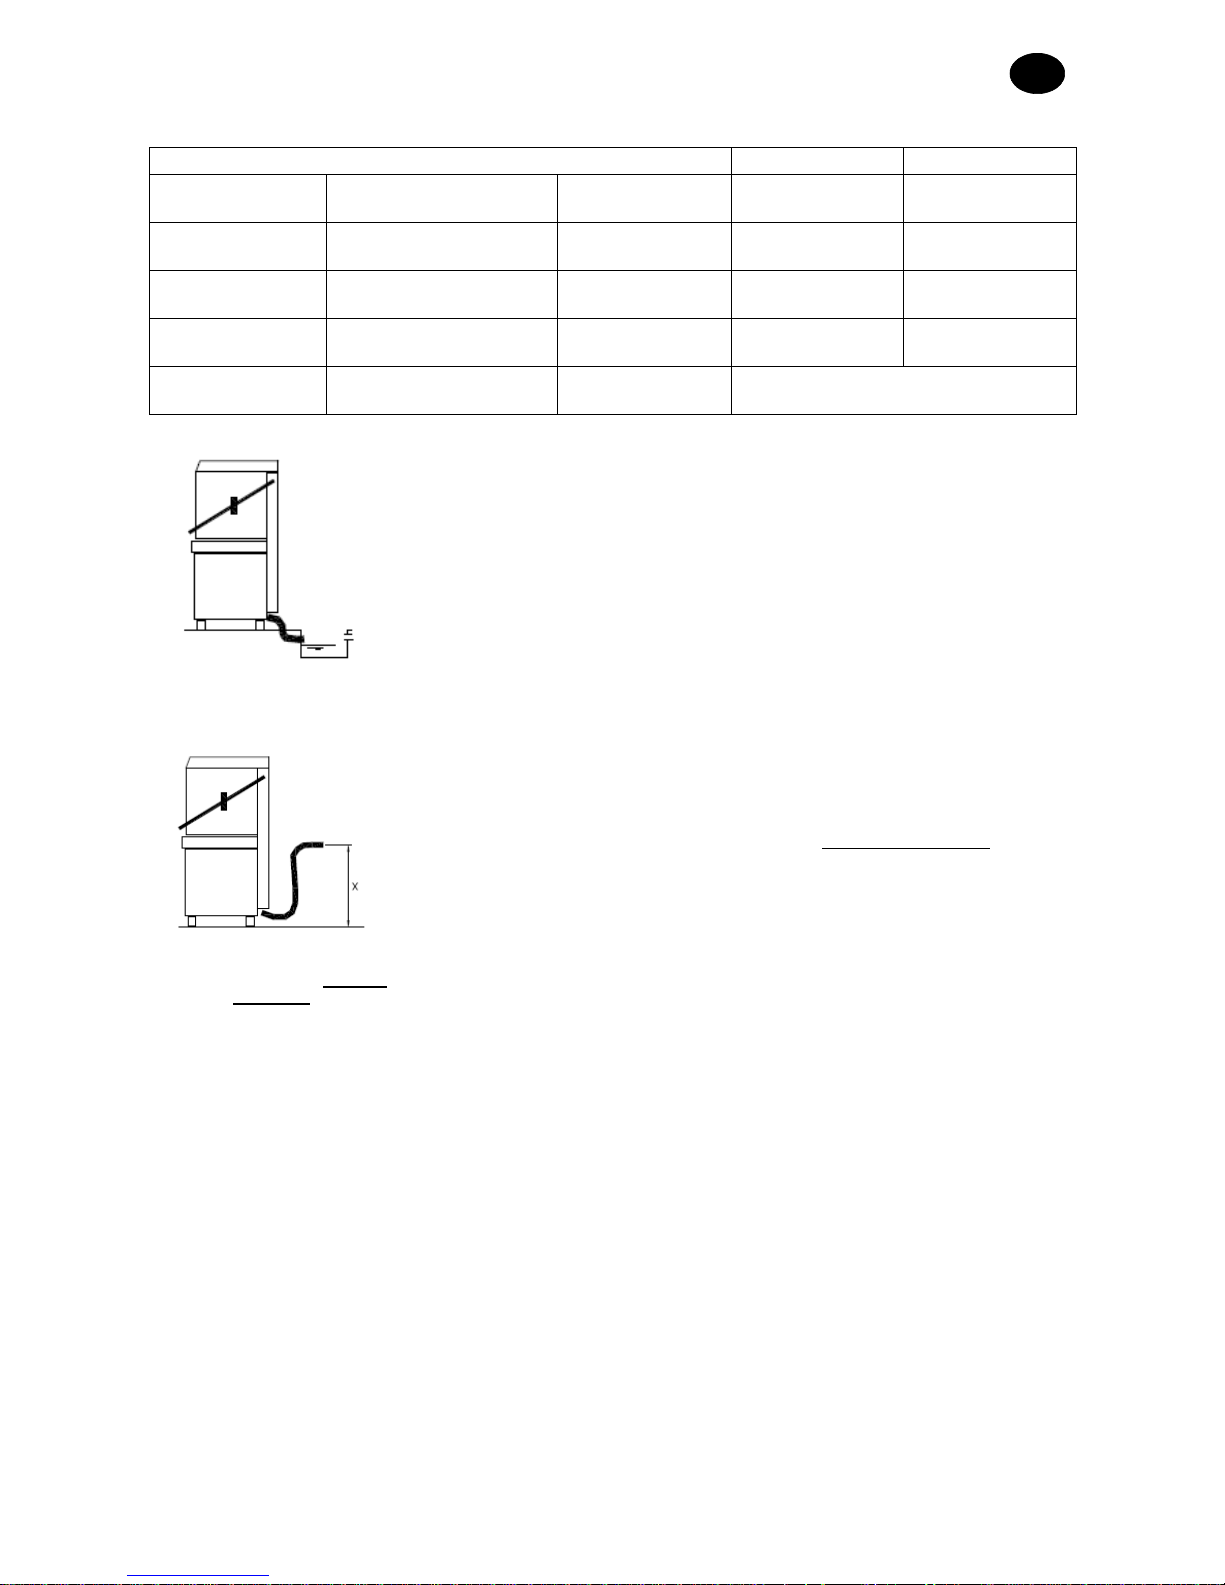
1.4 PLUMBING CONNECTION
The appliance is to be connected to the water network with a hose. There must
be a slide on-off, ball or gate valve able to quickly and completely turn off
the water if necessary between the water network and the appliance’s
solenoid valve. The on-off valve must be on the line near and just before the
appliance.
• If the system is new or nearly so, let the water run a long time before making the connection.
• Using a hose, connect feeding solenoid valve to gate valve, making sure that feeding flow rate is not
below 20 l/min.
• Make sure that supply water temperature and pressure match with the values specified on the technical
specification plate.
• Should water hardness be higher than the value specified on the table, we recommend installing a
softener unit upstream of machine supply solenoid valve.
• Should water feature a very high mineral residue concentration, we recommend installing a demineralizer
calibrated to ensure a residual hardness compliant with the values specified in the table below.
Page 8
INSTRUCTION MANUAL FOR DISHWASHERS
MDI TT28-26 - 02 Page 5 of 20
UK
Characteristic FROM TO
Hardness
French degrees
f 5 10
German degrees
°dH 4 7’5
British degrees
°e 5 9,5
Parts per million
ppm 70 140
Mineral
residues
Maximum
mg/l
300/400
Free drain
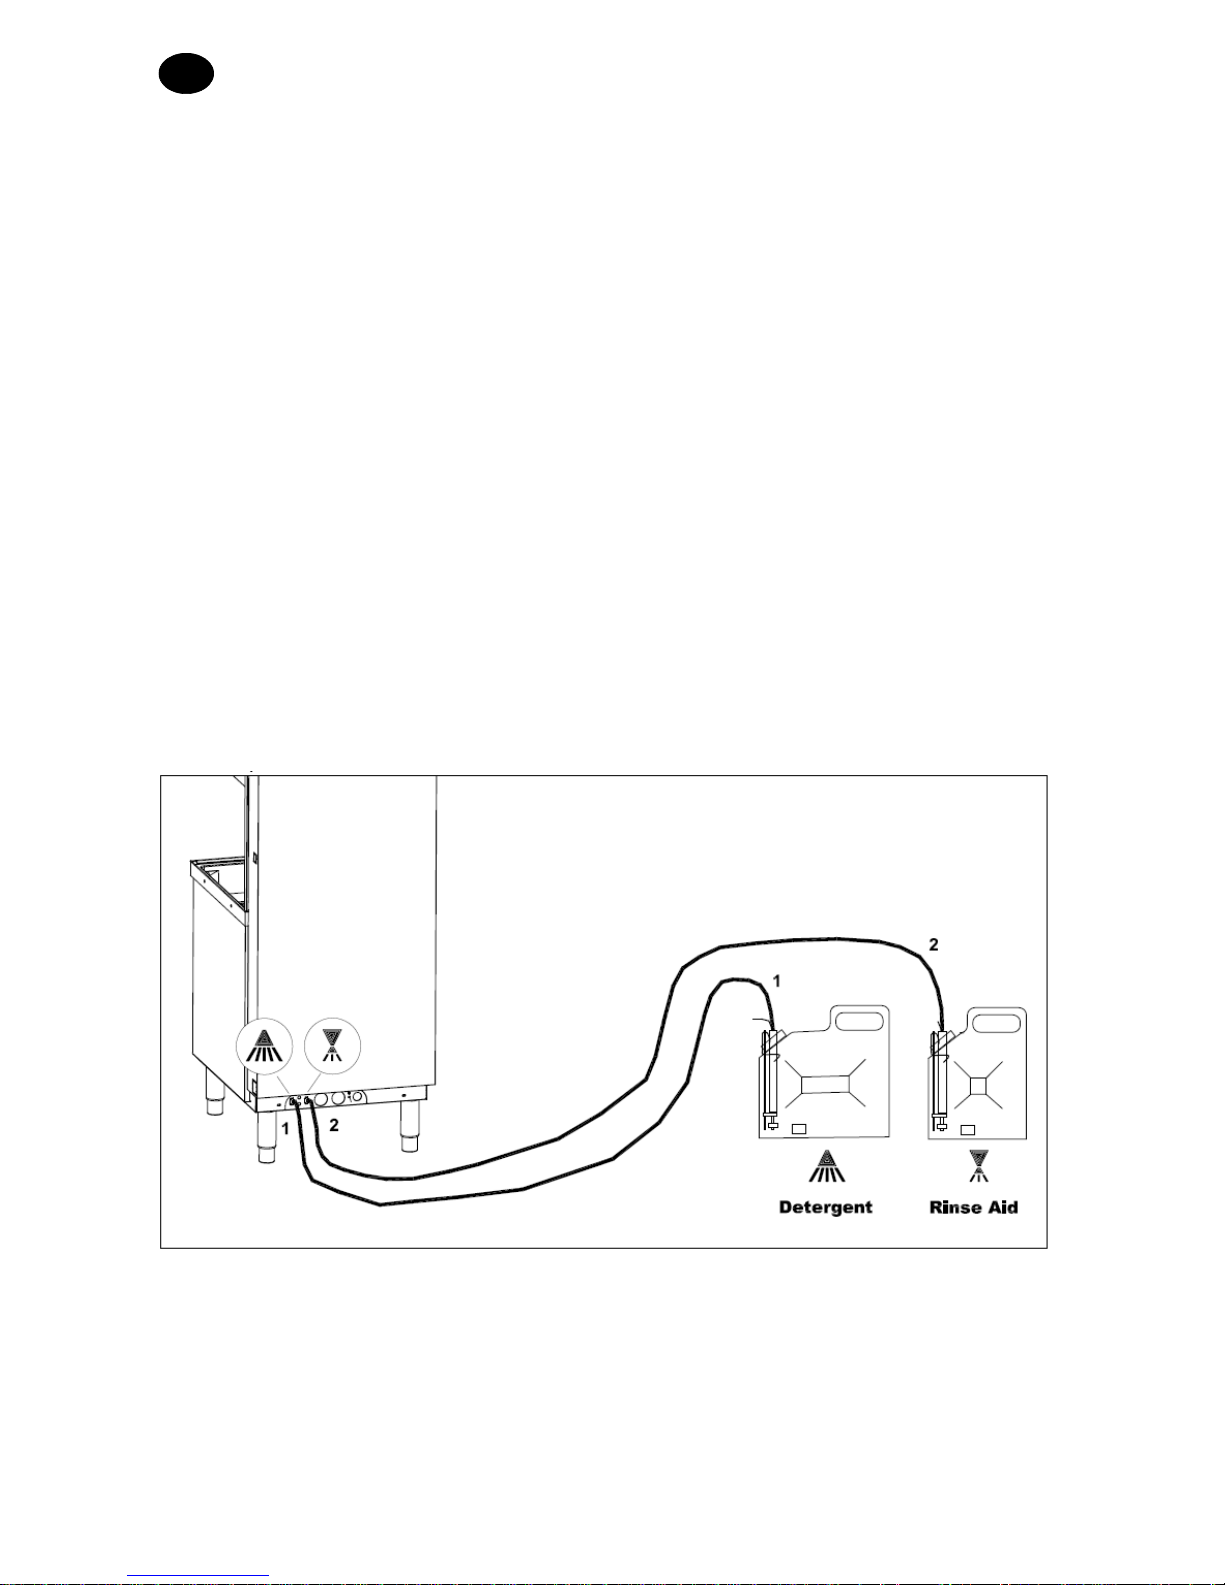
1.5 CONNECTION TO THE DRAIN LINE
• The drain line must be made up of a free water trap of a size
proportionate to the delivery of the drain pipe supplied with the machine.
The pipe must be able to reach the water trap without being pulled,
squeezed, bent, crushed, pressed or forced in any way.
•
The tank empties by gravity, so the drain must be at a lower level than the
base of the machine.
With discharge pump (available
on request)
• If the drain is not at a lower level than the base of the machine, you can use
the version equipped with a discharge pump (available on request).
• In this case the maximum drain height is 1 m.
• Always check that the drain works properly and that it is not clogged.
•
All other solutions must be previously agreed upon and approved by the
manufacturer.
Page 9
INSTRUCTION MANUAL FOR DISHWASHERS
Page 6 of 20 MDI TT28-26 - 02
UK
1.6 FIRST START-UP AND SETTING OF DETERGENT DOSING SYSTEM
(
FOR MACHINES WITH DETERGENT ELECTRODISPENSERS
)
To achieve a good washing result, detergent and rinse aid dosage shall be adjusted based on the
concentrations specified by the manufacturer of the detergent/rinse aid used.
Furthermore, a first activation is required so as to fill up the intake and delivery hoses of detergent dispensers
Electrodispenser Activation
Refer to section 4.4 “ADJUSTMENTS AND SETTINGS”, then access the parameter setup menu, shift to
“detergent pump”, and keep button 4 (fig. 1) pressed: electrodispenser will be steadily activated; keep it
enabled until the intake ducts are full.
Then repeat the same procedure for the rinse aid electrodispenser, selecting “Rinse aid pump” menu option.
Concentration Adjustment
Go to “Dosage Detergent g/l”, and increase or decreases the desired concentration using buttons 3 and 4 (fig.
1). The set concentration and the electrodispenser activation time (in seconds) are shown on the display.
Repeat the same procedure for the rinse aid electrodispenser, selecting the “Dosage rinse aid adjustment”
menu option.
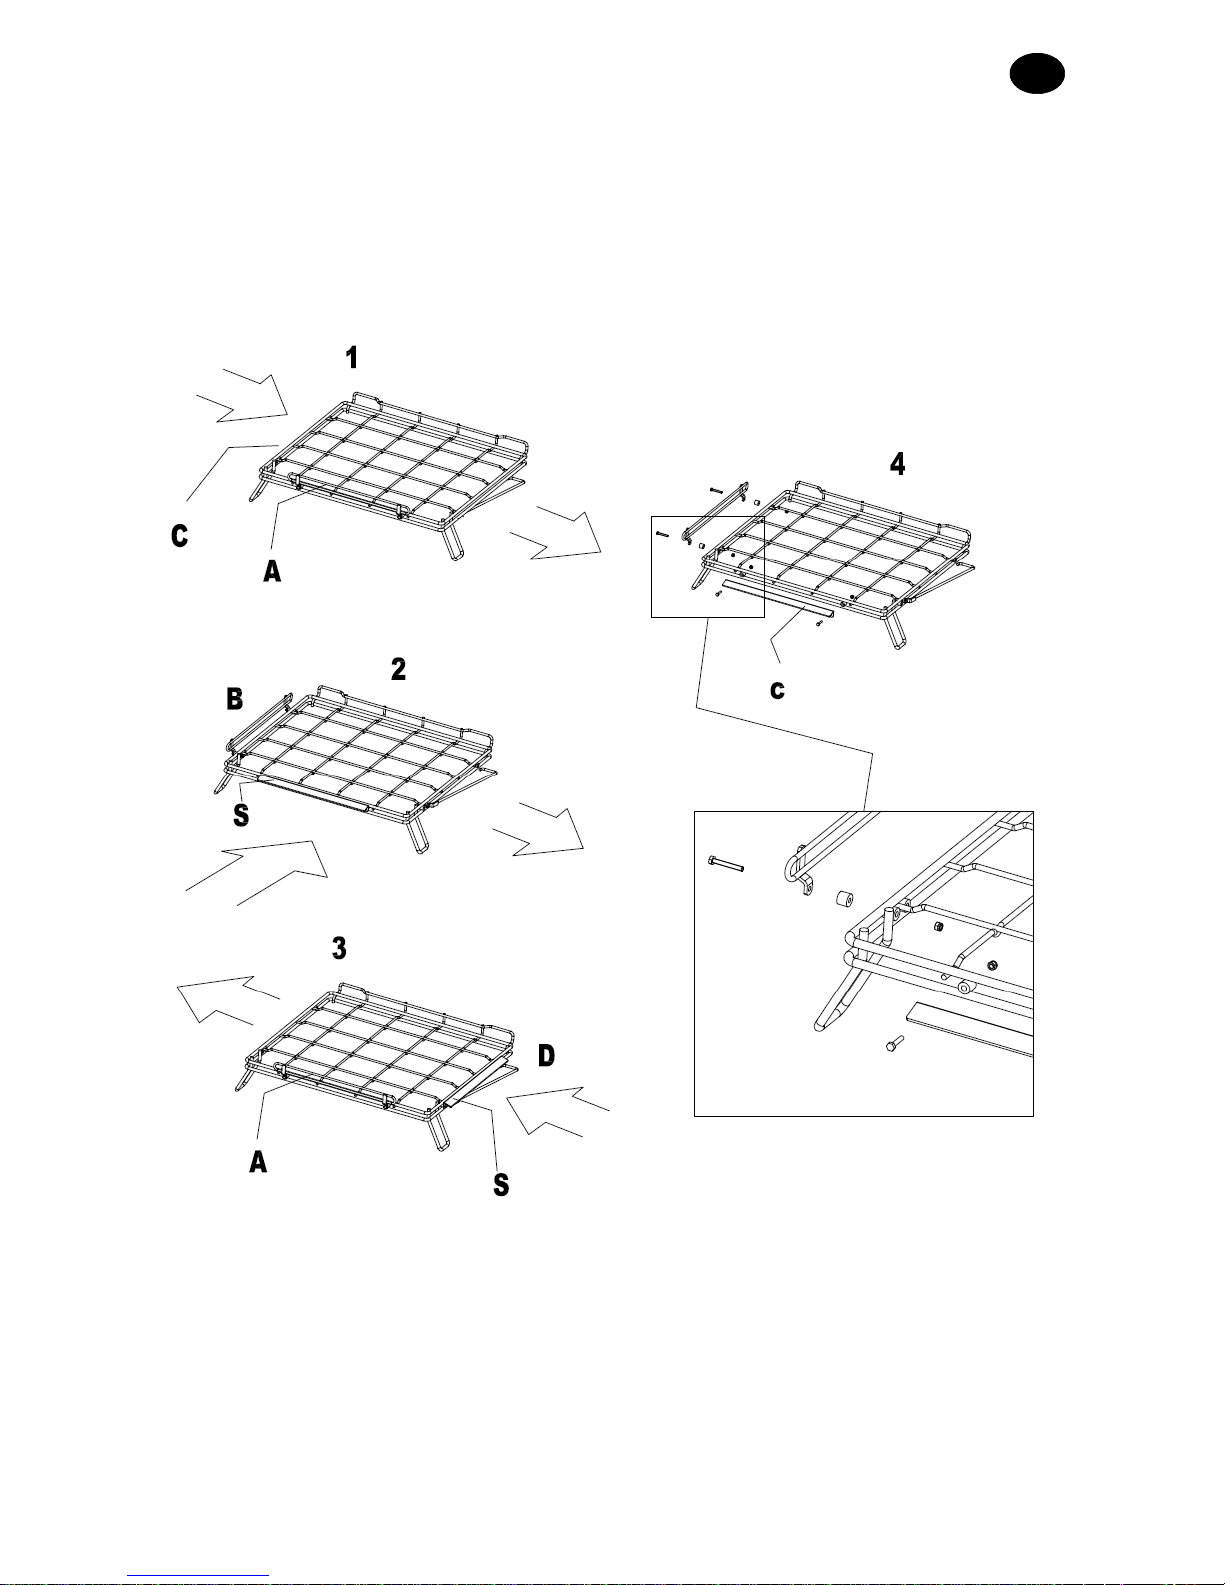
1.7 CONNECTING DETERGENT LEVEL SENSORS INSIDE TANKS
This dishwasher model features special connectors for detergent level sensors inside tank.
These connectors are positioned on the rear side, at the bottom.
For connection, proceed as follows:
- Remove jumper connector
- Connect sensor pin: respect the “Detergent” and “Rinse Aid” symbols
- Insert special sensors inside tanks.
Machine will signal that no detergents are available through the messages specified in section 3
“DISHWASHER USE”.
Page 10
INSTRUCTION MANUAL FOR DISHWASHERS
MDI TT28-26 - 02 Page 7 of 20
UK
1.8 MACHINE CORNER OR IN-LINE INSTALLATION
Basket sliding system on the special slide shall be modified based on dishwasher position
and on dishwasher basket movement (in-line or corner).
Proceed as follows:
For basket movement from the left to the right, move the slider S (fig. 3) to C side, figure 1. Secure in place as
shown in figure 4.
For basket movement from the right to the left, secure slider S on D side, figure 3.
For corner movement, arrange edge A and slider S as shown in figure 2.
Page 11

INSTRUCTION MANUAL FOR DISHWASHERS
Page 8 of 20 MDI TT28-26 - 02
UK
Chap 2
RISKS AND IMPORTANT WARNINGS
• This appliance is to be used only for the use for which it was expressly designed. All other uses are to be
considered unfit and therefore dangerous.
• The specialised personnel who will install the machine are obliged to appropriately instruct the
user on the appliance’s operation and any safety measures that are to be complied with, also by
providing practical demonstrations.
• Any type of service done on the machine, also in case of failure, must be performed only by the
manufacturer or by an authorised service centre and by qualified personnel, using only original spare
parts.
• Always disconnect or separate the machine from the electric and water networks before performing
maintenance, repairs or cleaning.
• Untrained personnel must NOT use the machine.
• The machine must NOT remain powered on when it is not in use.
• NEVER open the machine door quickly if it has not finished the cycle.
• NEVER use the machine without the factory-installed safety attachments.
• NEVER use the machine for washing object of a type, shape, size or material not guaranteed for machine
washing or not perfectly intact.
• NEVER use the appliance or its parts as a ladder or support for people, things or animals.
• NEVER overload the open door of front-loading machines, which are sized to support only the rack loaded
with kitchenware.
• NEVER immerse bare hands in the washing solutions.
• NEVER turn the machine over after installation.
• If you notice a malfunction or leakage of liquids, immediately disconnect the electricity and shut off the
water supply.
THE FOLLOWING IS ALSO IMPORTANT:
• Never start a wash programme without the overflow in the tub. .(Machines with overflow device).
• Before you drain the tub, make sure you shut off the machine.
• Never place magnetic objects near the machine, it may start even when the door is open.
• Do not use the upper part of the machine as a support surface.
• The machine may not be used by persons who are unauthorized or who have not been properly trained.
• The installation technician is required to check for proper earthing.
• When testing is complete, the installation technician must issue a written statement concerning correct
installation and testing in accordance with all standards and acceptable working practices.
2.1 NORMAL SERVICE CONDITIONS
Ambient Temperature : 40°Cmax /4°Cmin ( average 30 °C)
Altitude : until 2000 metrical
Relative humidity : max 30% at 40°C / max 90% at 20°C
Transport and Storage : between -10°C and 5 5°C with peack until 70°C ( max 24 hrs )
Page 12

INSTRUCTION MANUAL FOR DISHWASHERS
MDI TT28-26 - 02 Page 9 of 20
UK
CHAP 3 USE OF THE DISHWASHER
3.1 WASHING CYCLE
With reference to
Fig.3
, for correct operation of the machine, it is advisable to follow these rules:
• Use a suitable rack, filling it without overloading it and without placing the dishes one on top of the other.
Always clean off the dishes beforehand, and do not load dishes with dry or solid residue on them.
•
Place empty containers upside-down on the rack. Put the plates and similar kitchenware into the special
inclined rack, with the internal surface facing upwards.
• Put mixed silverware into the special basket with the handles facing downwards.
• Wash the dishes immediately after use, in order to prevent any residuals from hardening and sticking on
them.
• Load the rack into the machine and close the door.
• To avoid breakage, use only dishes that are intact and guaranteed for machine washing.
Do not place silver and stainless steel cutlery in the same basket, since this would cause the silver to tarnish
and the steel to corrode.
3.2 LIST OF CONTROL PANEL BUTTONS
(fig 1)
1 On/off button
2 LCD
3 Program selection button
4 Start/stop wash light button
• Light blue light: Washing program running
• Green light: Dishwasher ready to run the washing program selected
• Blinking green light: Water load active
Page 13
INSTRUCTION MANUAL FOR DISHWASHERS
Page 10 of 20 MDI TT28-26 - 02
UK
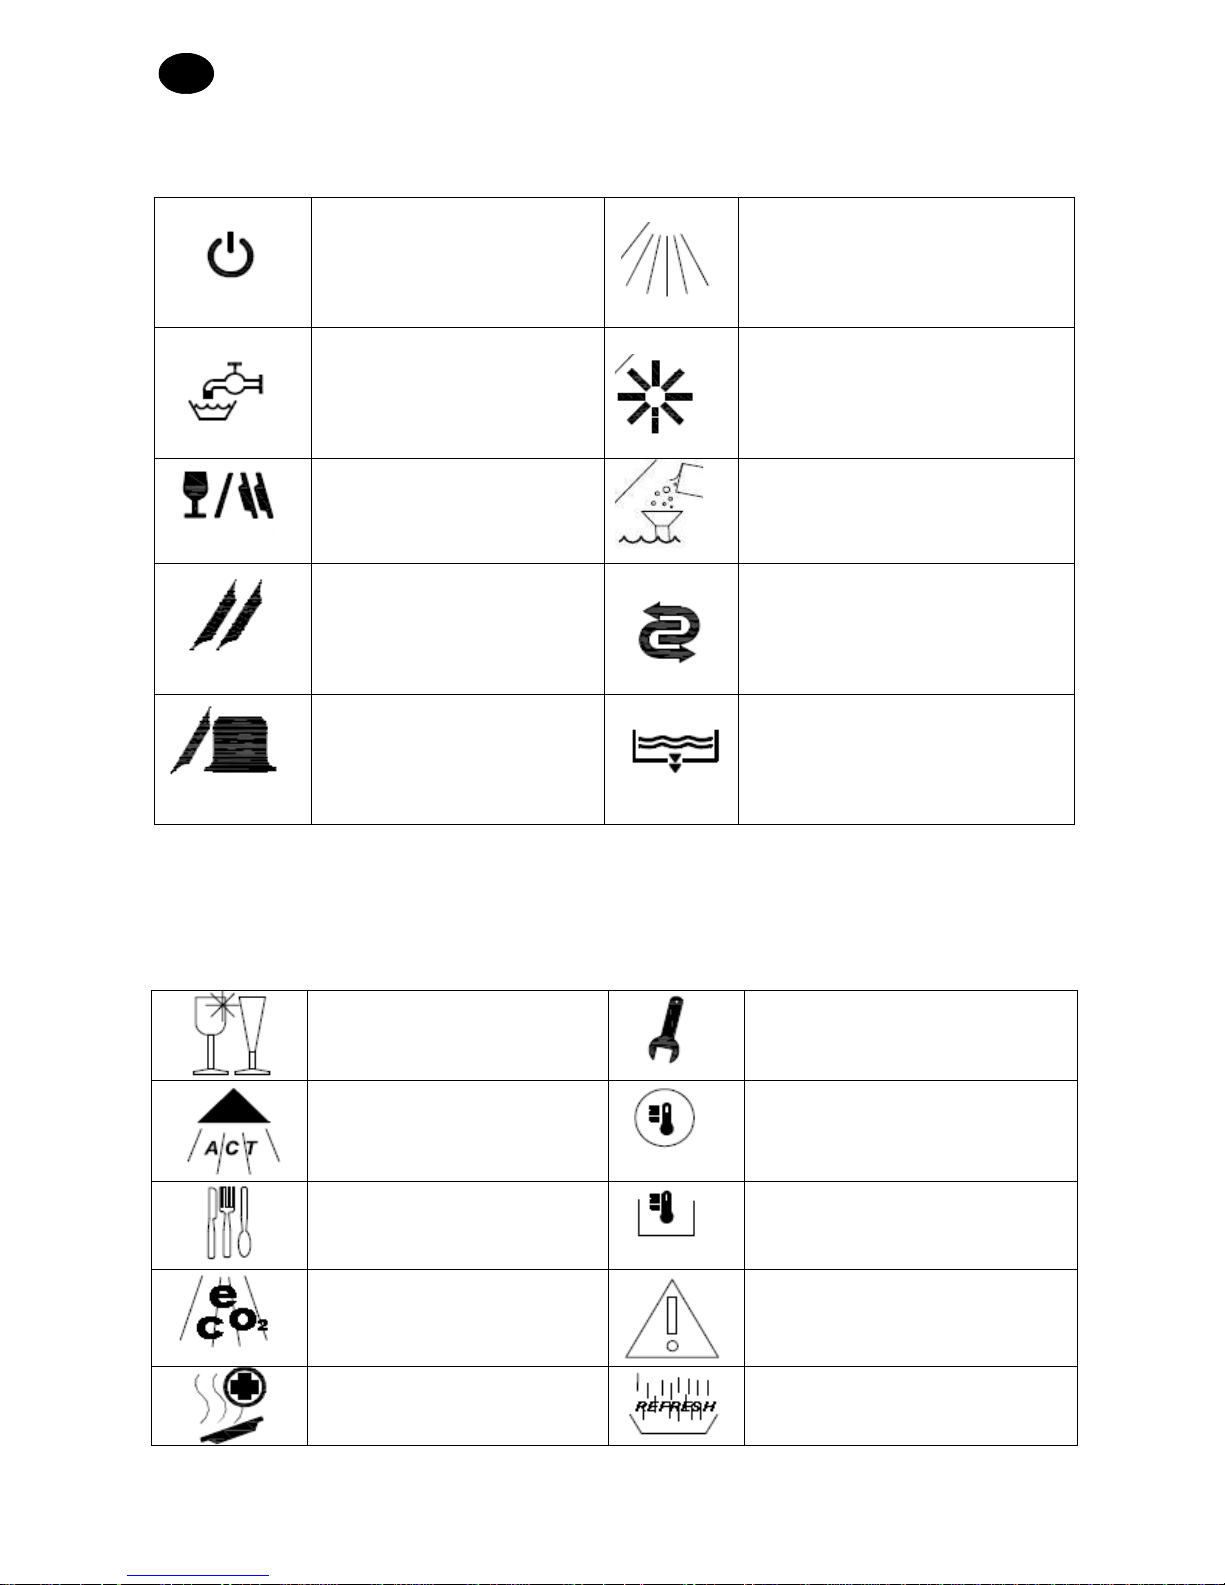
3.3 LIST OF DISPLAY SYMBOLS
Dishwasher in stand by
Detergent missing
Dishwasher loading
Dishwasher rinse aid missing
Short duration washing program
Salt missing
Medium duration washing
program
Active regeneration system
Long duration washing program
Self-cleaning and unloading program
Glasses washing program
Self-diagnosis warning active
Intensive washing program
Rinse boiler temperature
Cutlery washing program
Washing tank temperature
Economic washing programme.
Safety system activated
Sanitizer washing program
Programme with washing water total
change
Page 14
INSTRUCTION MANUAL FOR DISHWASHERS
MDI TT28-26 - 02 Page 11 of 20
UK
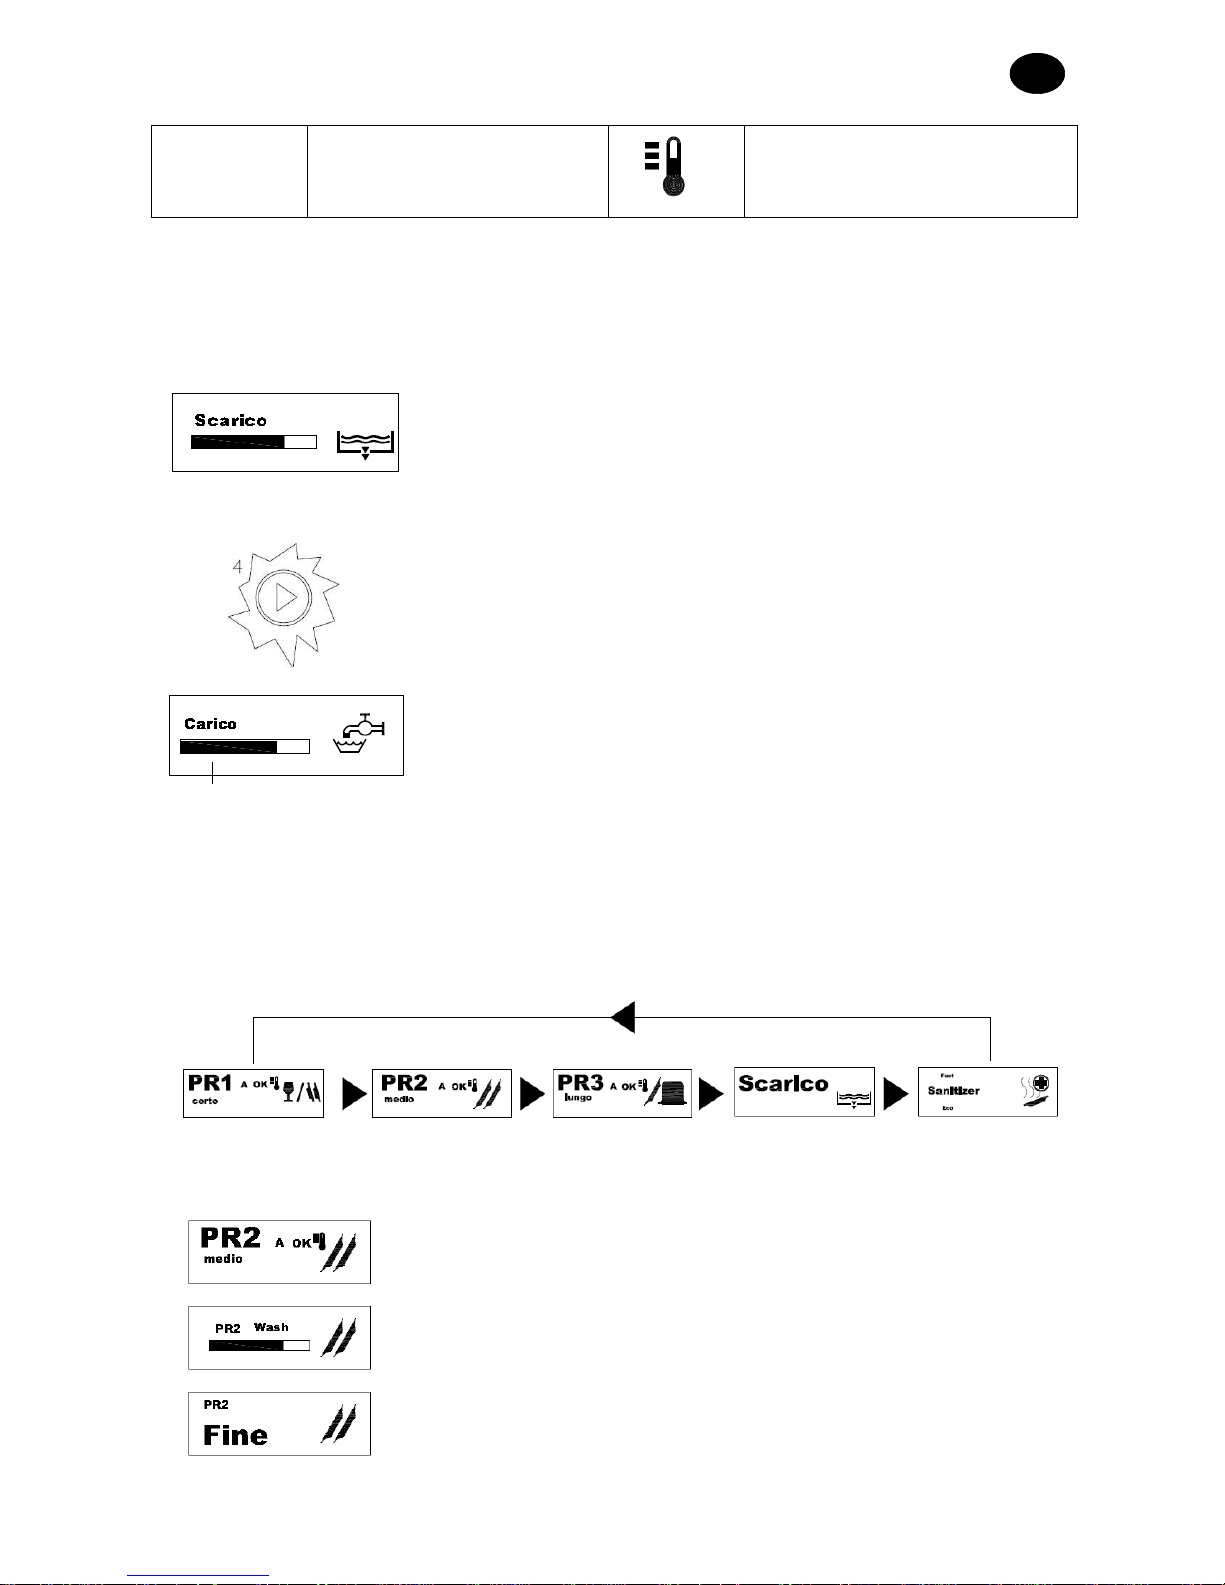
Correct washing temperature.
If warning light flashes: active heating
3.4 TURNING THE MACHINE ON AND STARTING A WASHING PROGRAM
Turn the machine on through on/off button 1
The machine runs a drain cycle even if the tank is empty.
Button 4 blinks with a green light (fig. 2).
Subsequently, the machine starts filling up water and the time bar indicates
the remaining time
When the machine is ready for use, button 4 lights up with a green steady light and the display shows the
selected program. “OK” indicates that washing temperature is correct (fig. 2).
Use button 3 to choose the most suitable program (fig. 1). Among which also the self-cleaning and unloading
programme.
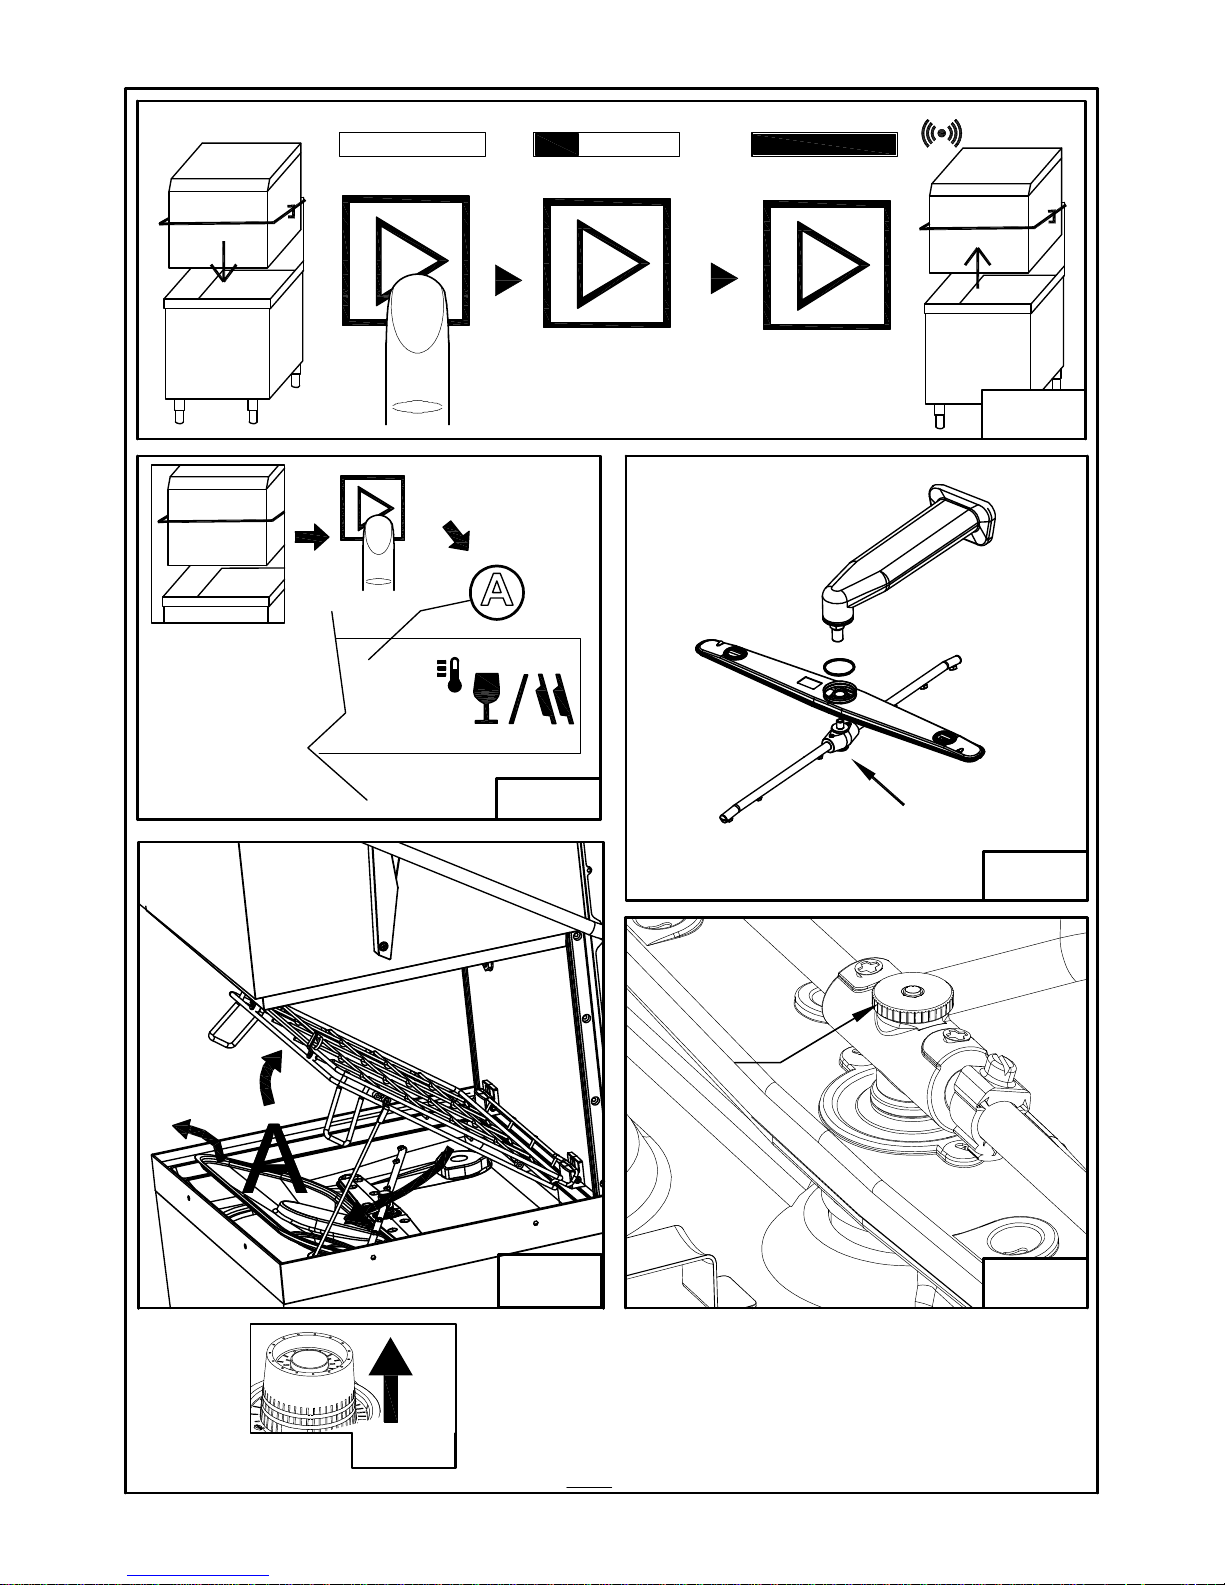
Press button 4 to start washing.
During the current program, it is possible to see the remaining time using the
time bar.
When the program ends, the display will show
“FINE” (END) and the buzzer will beep twice (fig. 5).
Page 15
INSTRUCTION MANUAL FOR DISHWASHERS
Page 12 of 20 MDI TT28-26 - 02
UK
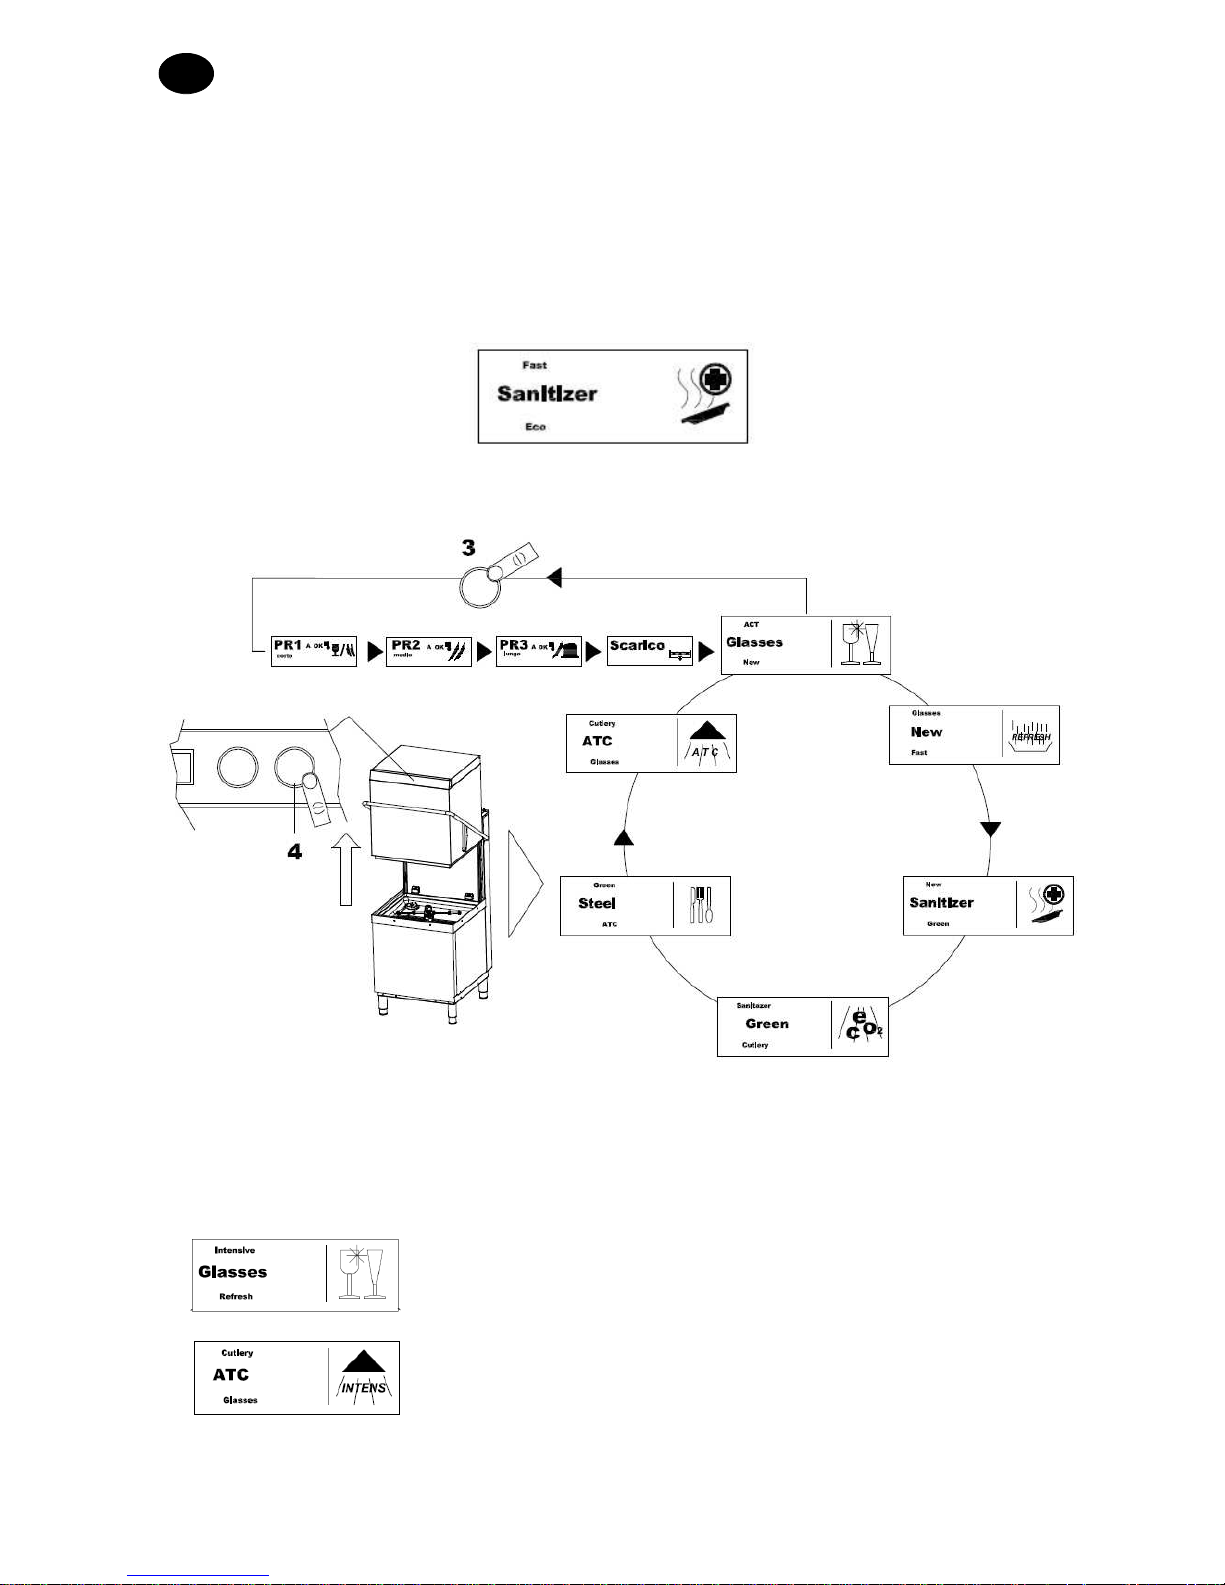
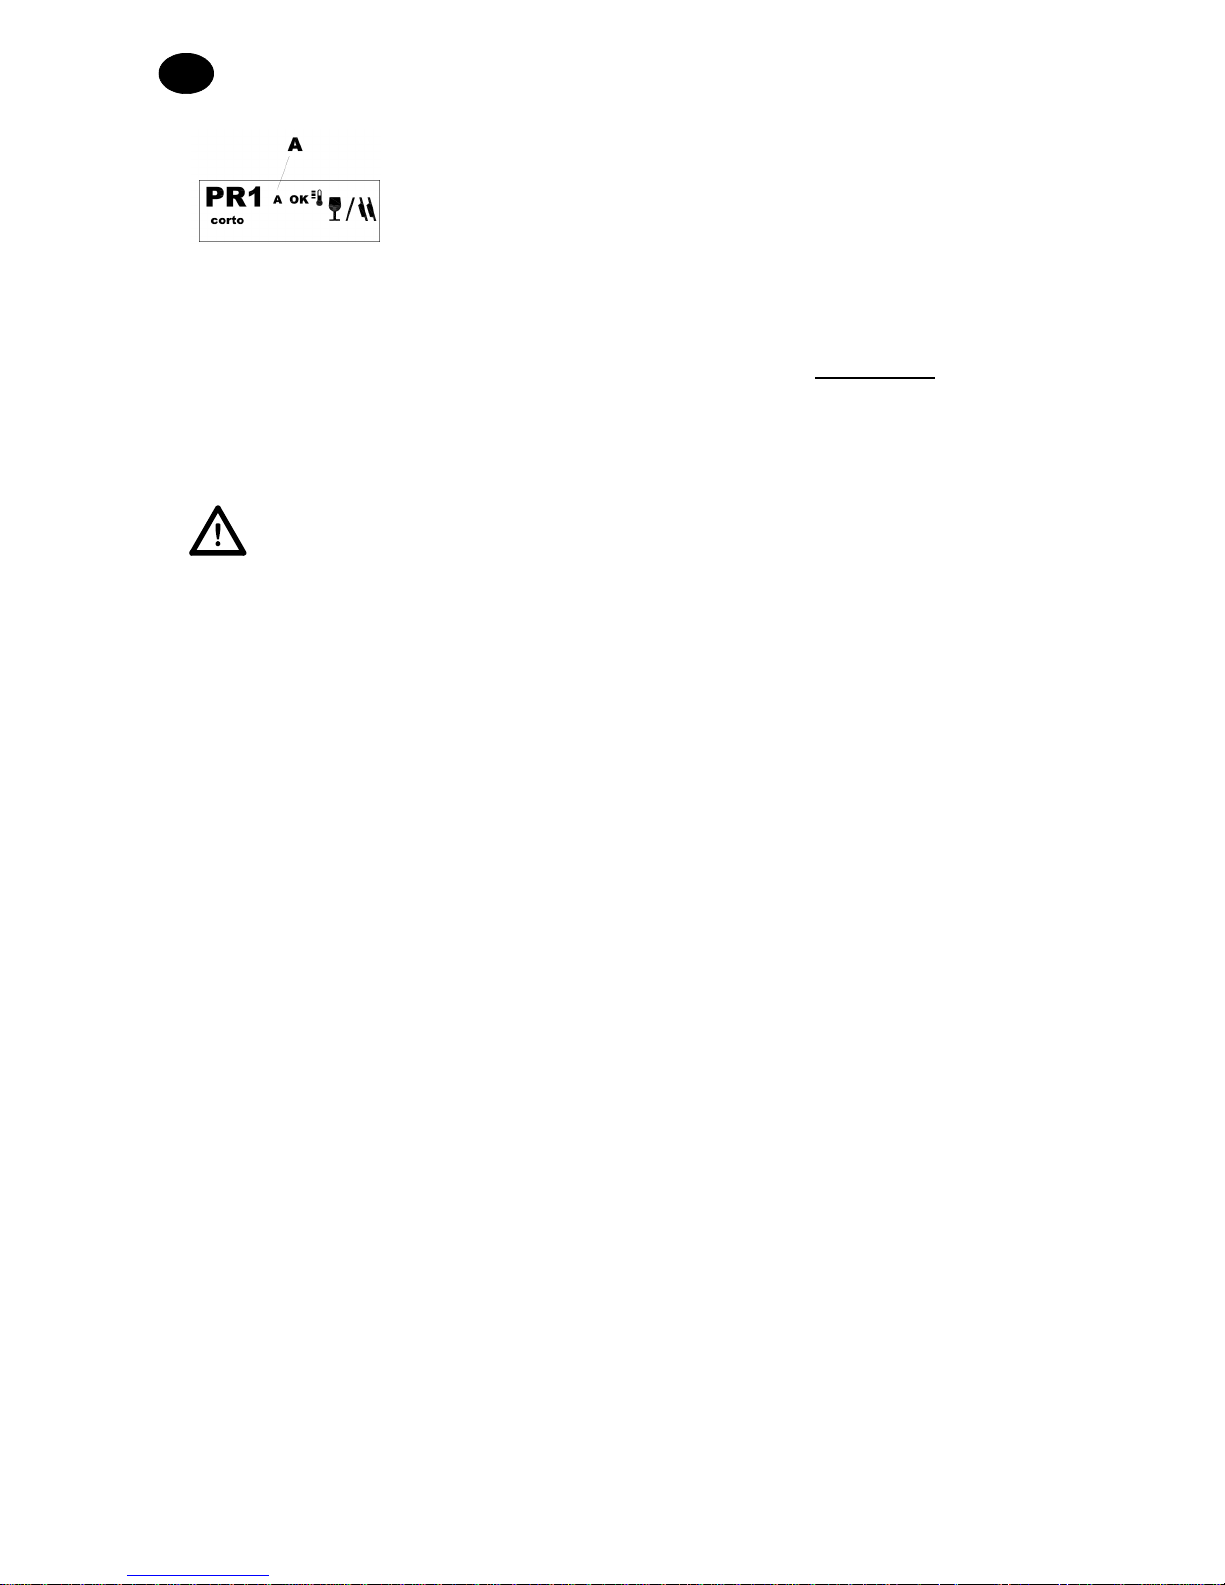
“A” on the display indicates that automatic start is activated, to start the next washing just lower the top.
3.5 SELECTING A SPECIAL WASHING PROGRAM
This dishwasher is equipped with special washing programs. It is possible to choose the most appropriate one
and keep it memorised for future use (see next chapter Special programs description).
Use the select button to go to the special program window choice:
Then, change the special programme using button 4 and with hood open.
The following program sequence will display:
Caution: the availability of special programmes varies based on dishwasher model.
The special program will remain memorised and can be chosen with P3.
3.6 SPECIAL PROGRAMS DESCRIPTION
GLASSES washing program
Glasses program is used to wash glasses of every shape and kind.
This program washes with reduced rinse temperatures and requires a long
drying time.
ATC washing program
Intensive program is designed to wash dishes with plenty of residual dirt,
even if these have been dirty for a long time. The program performs
effectively two washes and two rinses.
Page 16
INSTRUCTION MANUAL FOR DISHWASHERS
MDI TT28-26 - 02 Page 13 of 20
UK
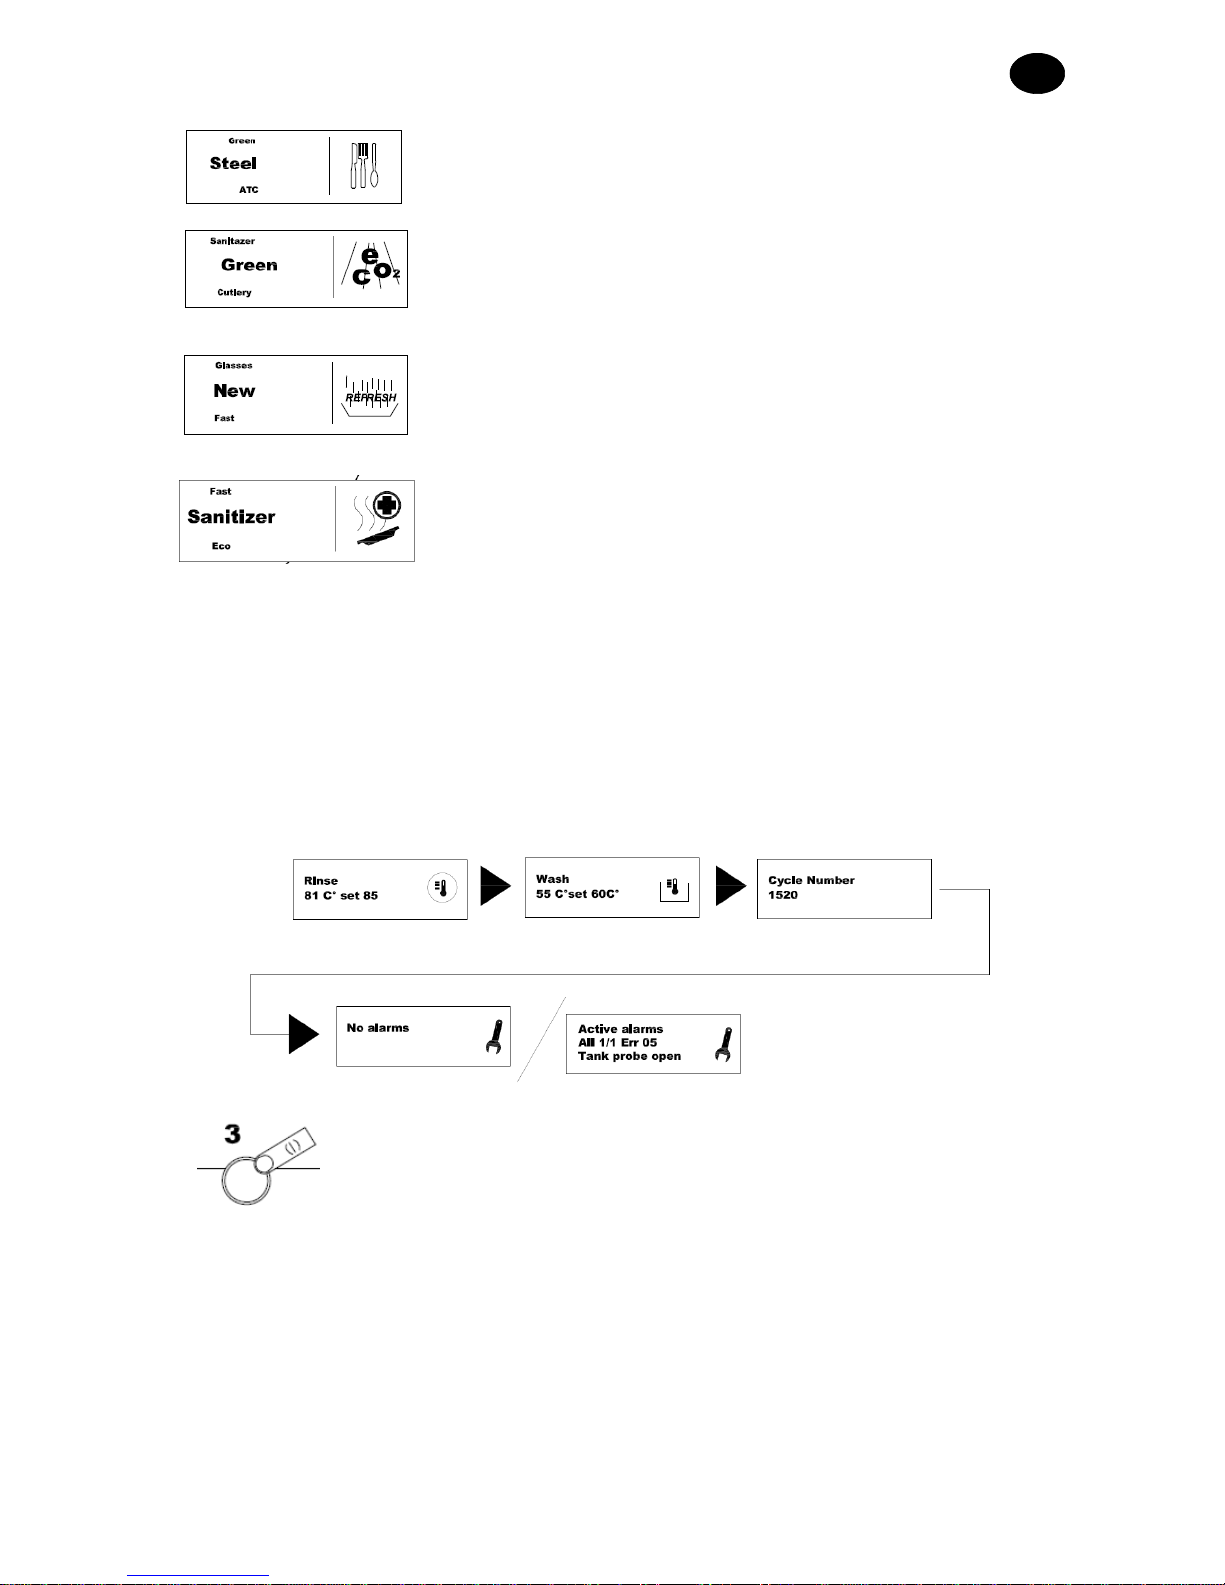
STEEL washing program
The program is suitable for washing forks, spoons, knives and all kinds of
cutlery. This washing program has a longer duration compared to the other
ones.
GREEN washing program
GREEN washing program reduces energy consumption by diminishing
washing temperatures and water consumption compared to the normal
washing program, good washing results are achieved by using a prolonged
mechanical washing action.
NEW washing program
NEW washing program is recommended when you need to completely
replace the water in the washing tank, hence to consecutively wash dishes
with excess fats or oils.
Complete replacement of water in the tank requires a longer cycle.
SANITIZER washing program
Sanitizer program is recommended when you need to ensure sanitation of
the dishes.
This program controls washing temperature and time by calculating the
constant A0. The program ends when the value of A0 is 30.
Therefore, duration is variable, on average it takes about 20 minutes and
the washing temperature reaches about 72 °C.
In the event that you need an A0 value different from 30, contact an
authorized technician, who will make a change on the machine software.
3.7 VIEWING TEMPERATURES AND NUMBER OF RUN PROGRAMS
It is possible to view the operating temperature by pressing button 3 for a few seconds, the information will
appear as follows:
The first screen displays rinse instantaneous temperature showing the correct set of
achievement; through P3 it is possible to display the following screen which shows
washing instantaneous temperature, then the number of machine life cycles, and
finally any alarms in progress.
3.8 ENABLING AND DISABLING AUTOMATIC START
Automatic start is self-enabled every time a washing program starts:
Page 17
INSTRUCTION MANUAL FOR DISHWASHERS
Page 14 of 20 MDI TT28-26 - 02
UK
Letter “A” in the display indicates that automatic start is enabled, the program
selected will start automatically by lowering the top.
If you wish to disable the automatic start, hold P4 start button for a few
seconds until letter “A” disappears (fig. 6).
3.9 END OF SERVICE
• At the end of the day, activate “Drain”, the self-emptying and cleaning program (see Chapter 3 part 3).
• Disconnect the power supply by means of the main switch and close the external water cock.
• Perform routine maintenance and clean the machine as described in the “Maintenance” section.
• If possible, leave the door ajar to prevent the formation of unpleasant smells inside.
Chap 4
MAINTENANCE
Before performing any maintenance, drain all water, disconnect the electrical power
supply, and close the external water cock.
Page 18

INSTRUCTION MANUAL FOR DISHWASHERS
MDI TT28-26 - 02 Page 15 of 20
UK
4.1 CLEANING AND HYGIENE
To ensure machine hygiene, periodically perform the maintenance tasks listed below. Also carry out a
periodical sanitising treatment with suitable non-corrosive products available on the market.
4.2 MAINTENANCE OF FILTERING GROUP
Carry out this procedure at the end of the day when you see residual dirt on the filters:
1. Empty the tank by activating drain self-emptying program.
2. Raise basket mount as shown in Fig. 7A, and use the special support as shown in Fig. 7 to keep it
raised.
3. Remove and clean the baskets and filters.
4. Carefully clean the integral filter.
5. Thoroughly clean the tank and machine with non-abrasive disinfectant products.
6. Remove the standard filter by pulling it upwards as shown in
Fig. 7 C
and clean it carefully.
7. Do not use abrasive products or objects for cleaning the steel tank. Instead use a slightly soapy damp
cloth.
8. Do not use pressurised jets of water because they could damage the electric system.
9.
When finished with the described tasks, carefully reposition each part.
4.3 CLEANING OF WASH ARMS
The wash and rinse arms can easily be removed to allow periodic cleaning of the nozzles so as to prevent
possible clogging and/or deposits.
Proceed as follows (
Fig.8
):
• Unscrew ring nut R and release the arms.
• Wash all parts with running water. Clean the nozzles carefully, using a toothpick or small tools if
necessary.
• Clean the arm rotation pins in the machine and the washing and rinsing water outlet area.
•
Put the arms back in place and check that they rotate freely.
Page 19

INSTRUCTION MANUAL FOR DISHWASHERS
Page 16 of 20 MDI TT28-26 - 02
UK
4.4 ADJUSTMENTS AND SETTINGS
There is a main menu where it is possible to activate or adjust the parameters of the following table.
- Access mode:
Simultaneously hold down buttons 3 and 4 for a few seconds with the machine turned off and the hood
open. The following request will display:
“Password ”
00
Enter “12” using buttons 3 and 4, confirm with button 1 and the first table entry will display.
Activate or adjust each parameter using buttons 3 or 4.
Press button 1 to go to the following entry.
Press button 1 for a few seconds to exit and memorise the new settings.
Language Choose display messages language.
Termostop Termostop function activation/deactivation.
Energy saving Energy saving function activation/deactivation.
Pre-heating Fast initial heating and filling up
activation/deactivation.
Detergent pump Detergent pump manual activation/deactivation.
Rinse aid pump Rinse aid pump manual activation/deactivation.
Manual rinse Rinse electric pump enabling
Dosage Detergent g/l Washing detergent concentration in grams/litre
setting.
Dosage Rinse aid adjustment g/l Rinse aid concentration in grams/litre setting.
Drain pump Drain pump activation/deactivation (only for models
with normal drain system).
Water hardness Only for machines with automatic water-softener.
Set hardness of water to treat
(see number correspondence on “Water hardness“
table).
Cycle for regeneration alarm with external softener External water-softener cycle counter setting and
activation.
Cycle counter Display of machine life cycles.
Buzzer Buzzer activation/deactivation.
Page 20
INSTRUCTION MANUAL FOR DISHWASHERS
MDI TT28-26 - 02 Page 17 of 20
UK
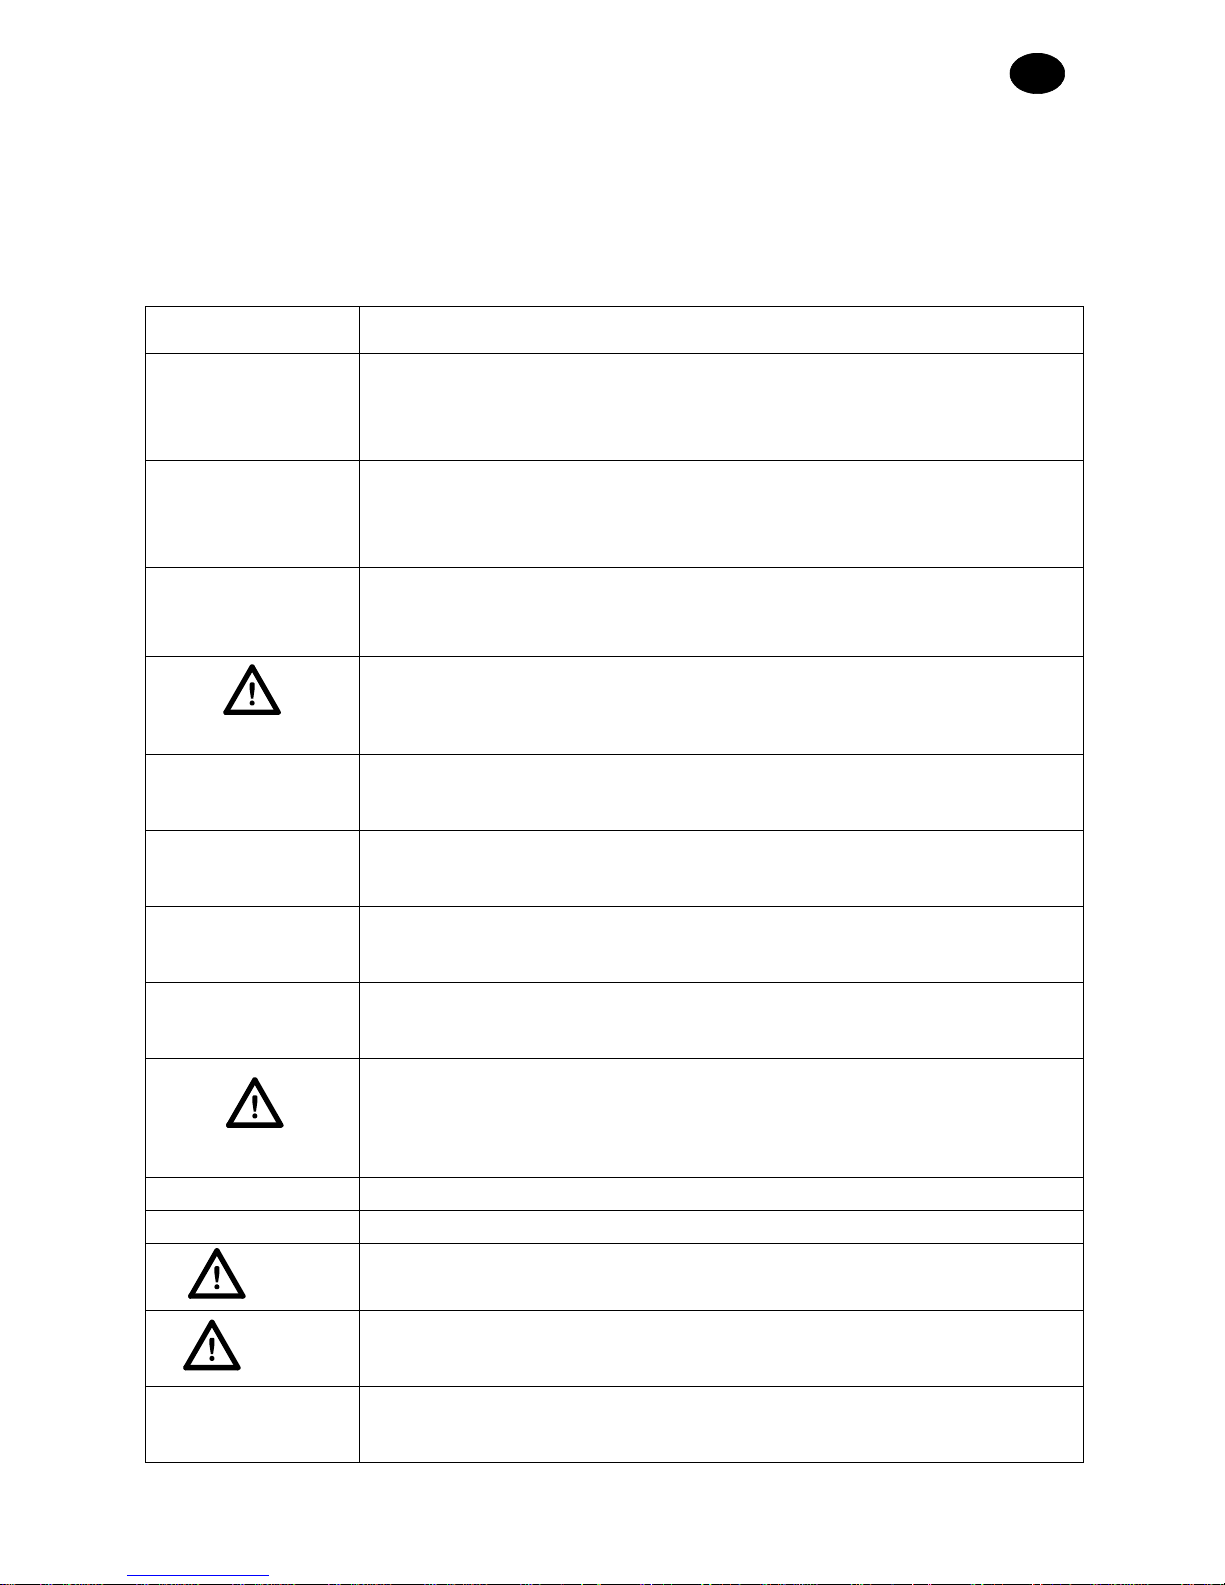
Chap 5 SELF-DIAGNOSIS
The machine is equipped with a self-diagnosis system that can detect and signal a series of malfunctions.
CAUTION! Turning the machine off and then back on resets the signal, which will appear subsequently
only if the problem has not been resolved. If the signal persists, contact a qualified technician.
Message displayed Anomaly or alarm discovered
E01
Rinse not performed (Only versions CRP-SP). This signal appears at the end of
the cycle if the working level in the tub is not correctly restored. Check whether the
plumbing connections are correct, and that the water supply cock is open. If the
problem persists, contact technical service.
E02
Water drainage anomaly. Water does not drain or drains abnormally. Check to see
if the overflow has been removed. Check the drain tube is not bent or crushed, and
that none of the filters are clogged. Run another drain cycle. If the problem persists,
contact technical service.
E03
Boiler temperature reset anomaly. The boiler temperature reset has not occurred
within the time limits set forth in the wash cycle. Turn the machine off and then back
on and run another cycle. If the problem persists, contact technical service.
E04
Tub filling time out: the tub has not filled.
Check whether the plumbing connections are correct, and that the water supply cock
is open. Check the presence of the overflow. If the problem persists, contact
technical service.
E05
Tub thermometer anomaly. (Probe open) The machine does not measure the
temperature in the tub. Turn the machine off and then back on. If the problem
persists, contact technical service.
E06
Tub thermometer anomaly. (Probe shorted out) Interrupt the programme in
progress, and shut off the dishwasheril. Turn it back on after a few minutes and start
the cycle again. If the problem persists, contact technical service.
E07
Boiler thermometer anomaly. (Probe open) The machine does not measure the
temperature in the boiler. Turn the machine off and then back on. If the problem
persists, contact technical service.
E08
Boiler thermometer anomaly. (Probe shorted out) Interrupt the programme in
progress, and shut off the dishwasher. Turn it back on and start the programme
again. If the problem persists, contact technical service.
E09
Boiler fill time out: failure of boiler to fill. Rinsing cannot be performed.
• Check that the water supply tap is open.
• Run another complete cycle.
If the problem persists, disconnect the electricity and contact technical service.
“TANK HIGH TEMP.” Tub temperature too high.
“BOILER HIGH TEMP.”
Boiler temperature too high.
ESF
Electromechanical safety: the safety thermostats of the boiler or tub have tripped,
or the tub safety pressure switch has intervened. Contact a technical service centre.
ESL
Incorrect tub level: the tub pressure switch has detected a level of water in the tub
that is too high or too low. Contact a technical service centre.
E22
Tank heating time out: fault during the heating of washing water. Turn the
dishwasher OFF and back ON again; in case the problem persists contact an
authorised service centre.
Page 21
INSTRUCTION MANUAL FOR DISHWASHERS
Page 18 of 20 MDI TT28-26 - 02
UK
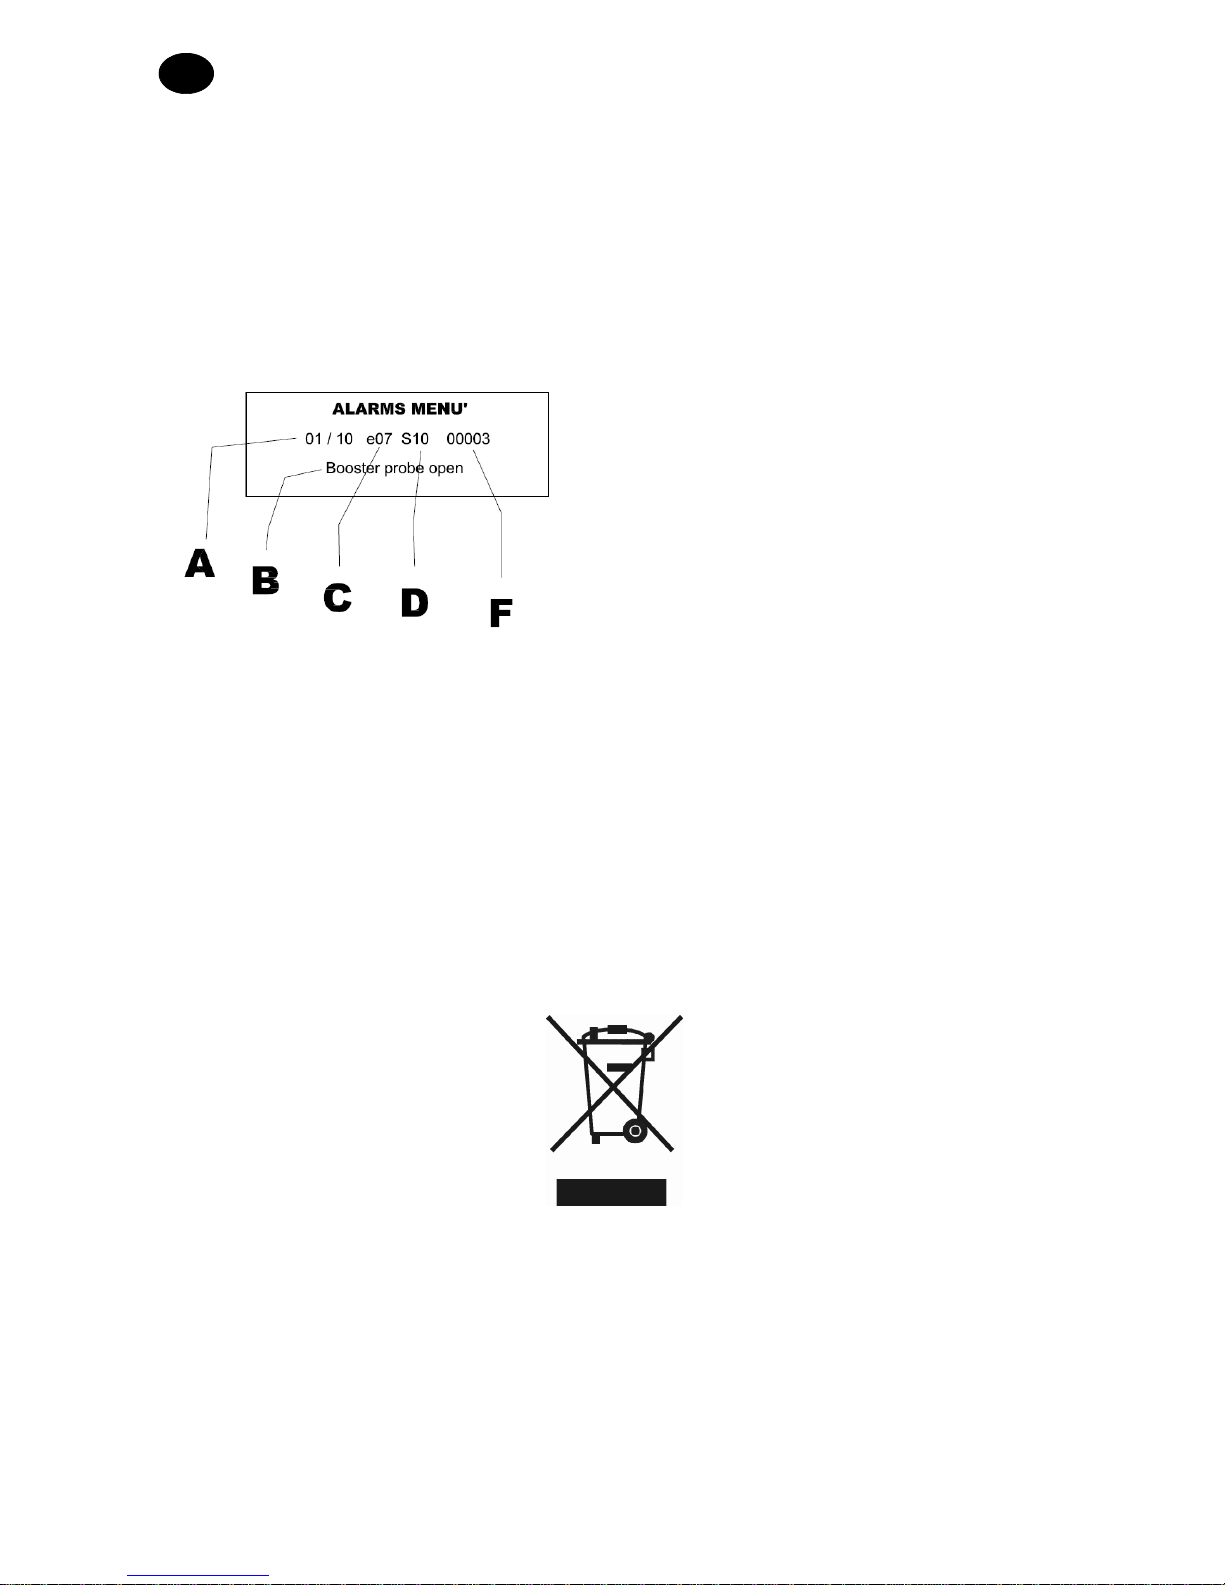
5.1 MACHINE FAILURE LOG DISPLAYING
This machine features a storing system of some types of failures.
Failure log can be displayed by gaining access to a special menu.
Referring to section 4.4 ADJUSTMENTS AND SETTINGS, enter password 91. The following screens will be
displayed, where:
A: number of the occurred alarm. (example: 1 of 10)
B: Alarm description.
C: Alarm code.
D: Machine status
F: Machine life cycle number.
To go back to the previous condition, keep ON/OFF button pressed for a few seconds.
Chap 6 DISPOSAL
Machine Scrapping
Our machines are not composed of material requiring special scrapping procedures.
Product Correct Disposal
(Applicable in the European Union countries and in countries with selective waste collection rules)
The mark appearing on the product or technical documents indicates that product shall not be disposed of
with household waste at the end of its life. To prevent any damage to the environment or to health caused by
a wrong waste disposal, the user shall separate this product from other types of waste, and to recycle it
responsibly in order to favour the sustainable re-use of material resources.
Domestic users shall contact the retailer where product was purchased or the local competent authority for
any information about selective waste collection and recycling of this type of product.
Company users shall contact their supplier and to check the terms and conditions of the purchase agreement.
This product shall not be disposed of together with other commercial waste.
Page 22

INSTRUCTION MANUAL FOR DISHWASHERS
MDI TT28-26 - 02 Page 19 of 20
UK
Chap 7 USE IN THE RESPECT OF THE ENVIRONMENT
A conscious use of the dishwasher can improve the environmental impact, with just some simple daily
behaviour, such as:
Using the dishwasher only when baskets are full.
Turn the dishwasher off when not used.
Keep the machine closed, when it is in stand-by mode.
Use the programmes suitable to the dishware dirtiness.
In case water heating system is gas supplied, connect the machine to hot water.
Make sure that discharge water is drained in a suitable sewage system.
Do not exceed the recommended detergent quantities.
 Loading...