

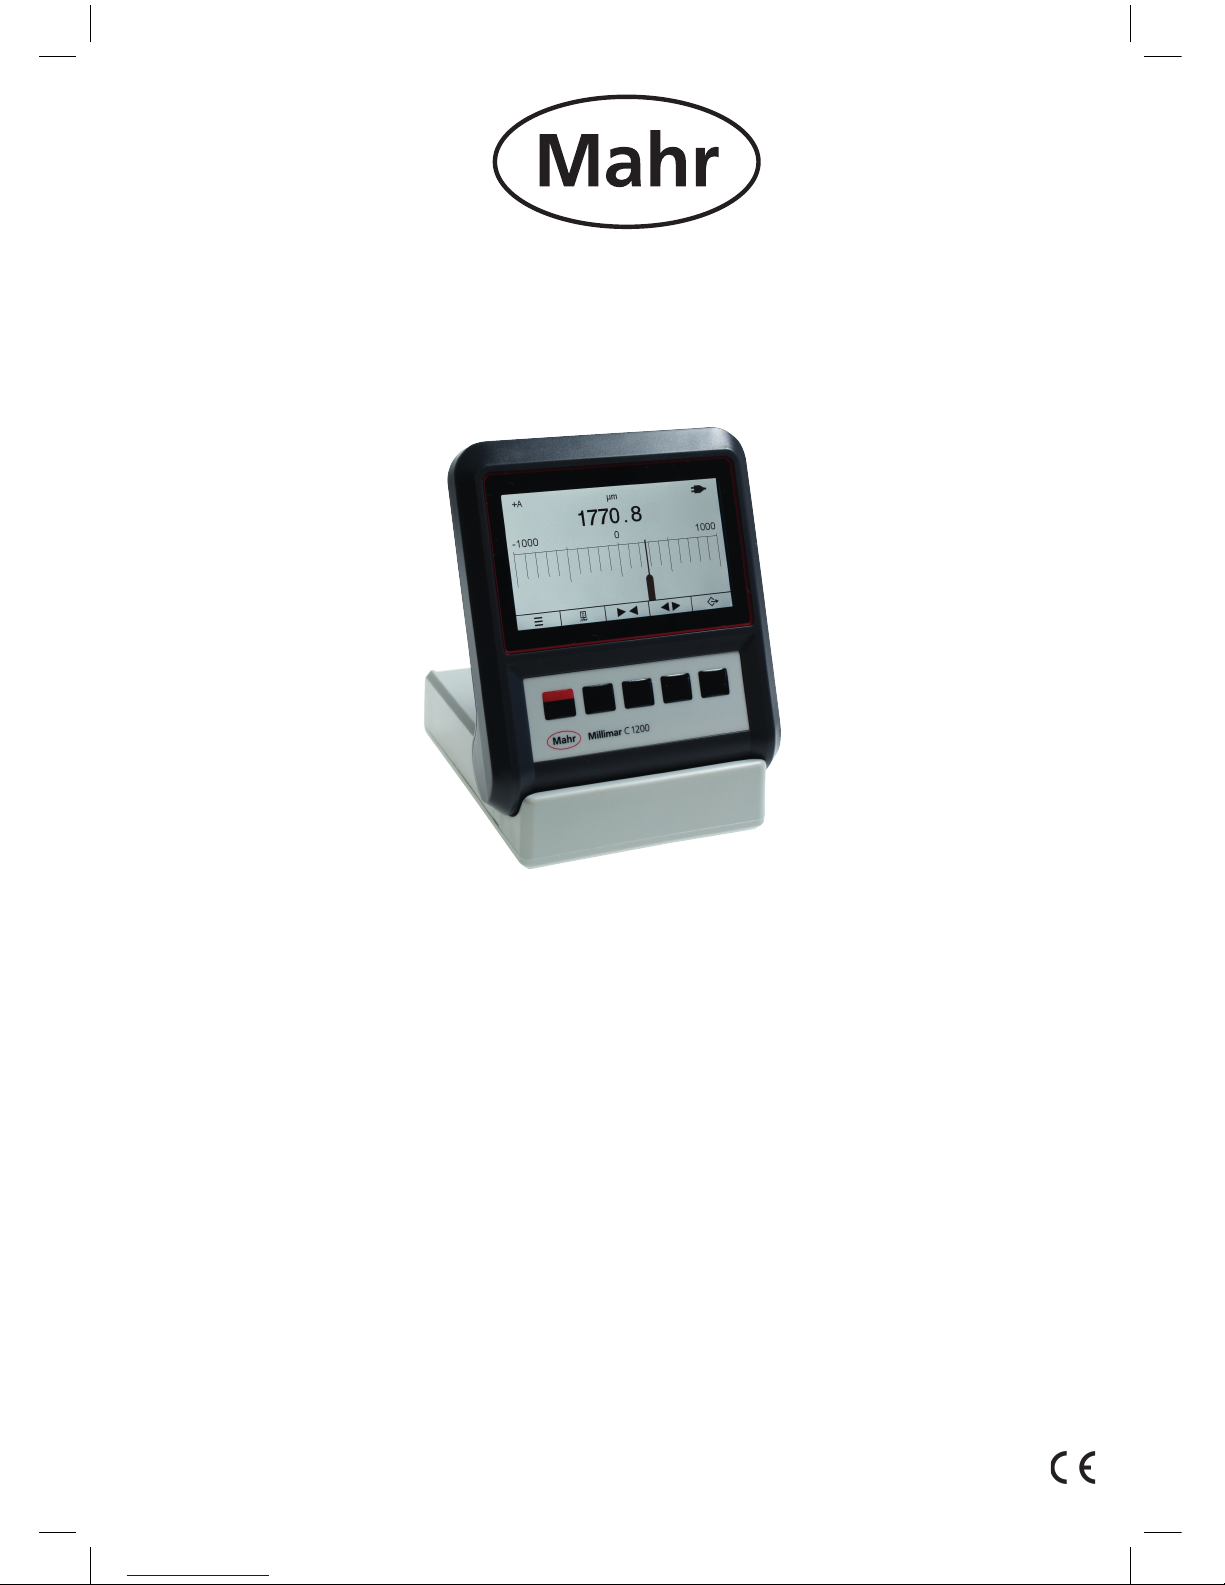
Mahr Millimar C 1200 Operating Instructions Manual
Compact length measuring instrument
3723034
Mahr GmbH
Esslingen Standort
Reutlinger Str. 48, 73728 Esslingen, Germany
Tel. +49 711 9312-600, Fax +49 711 9312-756
mahr.es@mahr.de, www.mahr.de
1016
Millimar C 1200
Operating Instructions
Valid from firmware version 1.3
2
Mahr GmbH • Millimar C1200
Dear customer,
Congratulations on choosing a product by Mahr GmbH. We kindly request that you follow the
instructions below to ensure the long-term precision of your measuring instrument.
We operate a policy of continuous improvement and are constantly developing our products.
Therefore, it is possible that there may be slight differences between the text and illustrations
in this document and the measuring instrument in your possession, especially with regard to
type designations. We reserve the right to make changes to the design and scope of supply,
the right to undertake further technical developments, and all rights relating to translation of
this documentation.
© by Mahr GmbH, Esslingen, Germany
The following symbols are used in these operating instructions:
General information
Important note
Caution, hazard
Failure to follow instructions marked with this symbol can cause inaccurate results and
lead to equipment damage.
Introduction
Permitted uses
The Millimar C 1200 is an electronic length measuring and evaluation instrument for use in
production. An inductive probe can be connected.
The operating, maintenance and repair information detailed in these operating instructions
must be followed.
To bring about the greatest benets from this measuring instrument, you must read the
operating instructions before placing it into operation.
The scope of delivery of the length measuring instrument includes:
- Measuring instrument
- Power supply unit with interchangeable adapter
- Operating instructions
!

3
Mahr GmbH • Millimar C1200
Forfeiture of warranty
Service work caused by viruses that were introduced via a network connection or other data
carrier, are generally excluded from warranty services.
Storage temperatures below -10°C or above +50°C and relative humidity levels above 85%
will invalidate the warranty for the instrument.
Safety information
This measuring instrument complies with the relevant safety regulations. It was dispatched
from our production facility in a awless condition and perfect working order. However, failure
to follow the instructions given below can cause personal injury or death.
1. Before you connect up and use the measuring instrument for the rst time, please
read the accompanying documentation. Follow the safety precautions detailed in the
operating instructions.
2. Keep the documentation close to the measuring instrument ready for quick reference.
3. Follow all safety precautions, accident prevention regulations and internal company rules
and guidelines. If necessary you should request further information from your company
safety ofcer.
4. Before connecting up this measuring instrument, please check the local mains supply
voltage to ensure that it is within the working range of the AC adaptor (100 V - 240 V,
50 Hz - 60 Hz). If they do not match, this measuring instrument must not be connected
under any circumstances!
5. The instrument may only be connected to a grounded power socket which complies with
the regulations of the local power supply company. This also applies to any extension
cables that are used.
6. Only use original and intact AC adapters.
7. When connecting inductive probes ensure that the plugs are rmly screwed onto the
connection sockets.
8. Do not drop the instrument and make sure it is positioned securely.
9. Do not operate the instrument in areas where there is a risk of explosion and do not
expose it to direct sunlight!
10. Do not clean the membrane keypad with solvent-based cleaning agents.
11. Before opening the housing, disconnect the power supply.
12. The test and measuring equipment, for which the Millimar is used, are subject to
inspection equipment monitoring. For this reason, regular inspection equipment
monitoring performed by either the user or Mahr Service must ensure compliance to the
specied error limits for the test and measuring equipment.
!
4
Mahr GmbH • Millimar C1200
Confirmation of traceability
We declare, with sole responsibility, that this
product conforms with standards and technical
data as specified in our sales documents
(operating instructions, leaflet, catalog).
We certify that the testing equipment used to
check this product, and guaranteed by our
Quality Assurance, is traceable to national
standards.
Thank you for placing your trust in us by
purchasing this product.
Important notes prior to using the length measuring instrument
• The measuring instrument may only be used for its intended purpose. No liability will be
accepted for damages caused by other usage or as a result of the incorrect application of
this measuring instrument.
• Should your specic measuring task not be solved with this measuring instrument,
please contact us so we can help solve your measuring task with a different instrument.
Please inform us about your measuring task.
• Battery
• Not rechargeable
• Do not incinerate
• Dispose off as prescribed
!
Do not use an electric marking tool.
Disposal information
Electronic equipment which was purchased from Mahr after March 23, 2006 can be returned to us.
We will dispose of this equipment in an environmentally-friendly way in accordance with EU Directives
2012/19/EU WEEE (Waste Electrical and Electronic Equipment) and the German National - Electrical and
Electronic Equipment Act, ElektroG.

5
Mahr GmbH • Millimar C1200
EU Declaration of Conformity
This measuring instrument conforms to the applicable EU directives.
A copy of the Declaration of Conformity can be requested from the following address:
Mahr GmbH, Standort Esslingen, Reutlinger Str. 48,
73728 Esslingen, Germany, or can be downloaded from:
www.mahr.de/de/Leistungen/Fertigungsmesstechnik/Produkte
6
Mahr GmbH • Millimar C1200
Table of Contents
1. Delivery and connection
1.1 Unpacking ......................................................................................... 8
1.2 Scope of delivery .............................................................................. 9
1.3 Symbols ....................................................................................... 10
1.4 Operating elements and interfaces ................................................. 12
1.4.1 Display and operating keys ............................................................. 12
1.4.2 Interfaces ....................................................................................... 12
1.4.3 Battery compartment ....................................................................... 13
2. Initial operation (basic conguration)
2.1 Switching ON .................................................................................. 14
2.2 Selecting the display language ....................................................... 14
2.3 Setting the measurement unit ......................................................... 14
2.4 Selecting the measuring probe ....................................................... 15
2.5 Scaling the analog display .............................................................. 15
2.5.1 In static measuring mode (standard) .............................................. 15
2.5.2 In dynamic measuring mode (max, min, max-min) ........................ 15
2.6 Connecting the measuring probe .................................................... 16
2.7 Selecting the probe type ................................................................. 16
2.8 Setting up the probe ........................................................................ 17
2.9 Switching OFF ................................................................................ 18
3. Measurement menu
3.1 Selecting the master ....................................................................... 19
3.2 Selecting the nominal value ............................................................ 20
3.3 Selecting the tolerance ................................................................... 21
3.4 Selecting the formula ...................................................................... 23
3.5 Selecting the function ...................................................................... 24
3.6 Selecting the factor ......................................................................... 25
Order no. Last modication Version
3723034 31.10.2016 Valid from rmware version 1.3

7
Mahr GmbH • Millimar C1200
4. Display menu
4.1 Selecting the resolution ................................................................... 26
4.2 Selecting the display style ............................................................... 27
4.3 Selecting the color scheme ............................................................. 28
4.4 Centering the display ...................................................................... 29
4.5 Setting the brightness ..................................................................... 30
5. Setup menu
5.1 Selecting the language ................................................................... 31
5.2 Selecting the unit of measurement ................................................. 32
5.3 Selecting the probe type ................................................................. 33
5.4 Selecting ECO mode ...................................................................... 34
6. System menu
6.1 Selecting absolute mode ................................................................. 35
6.2 Customer calibration ....................................................................... 36
6.2.1 Enabling customer calibration ......................................................... 36
6.2.2 Executing a probe calibration .......................................................... 37
6.2.3 Conducting a factory standard calibration ....................................... 39
6.2.4 Executing a customer calibration reset ........................................... 42
6.3 Activating a factory calibration ........................................................ 43
6.4 Resetting to factory settings ............................................................ 44
6.5 Activating the menu lock ................................................................. 45
6.6 Requesting rmware version and serial number ............................. 47
7. Description of the interfaces
7.1 Suitable data connection cables ..................................................... 48
7.2 Interfaces: Opto RS232C, Digimatic, USB ...................................... 48
7.3 Data transmission parameters ........................................................ 49
8. Technical data
8.1 Compact length measuring instrument Millimar C1200 .................. 50
8.2 Compatible probes for Millimar C1200 ............................................ 51
9. Spare parts
9.1 Available spare parts ...................................................................... 52

8
Mahr GmbH • Millimar C1200
1. Delivery and connection
1.1 Unpacking
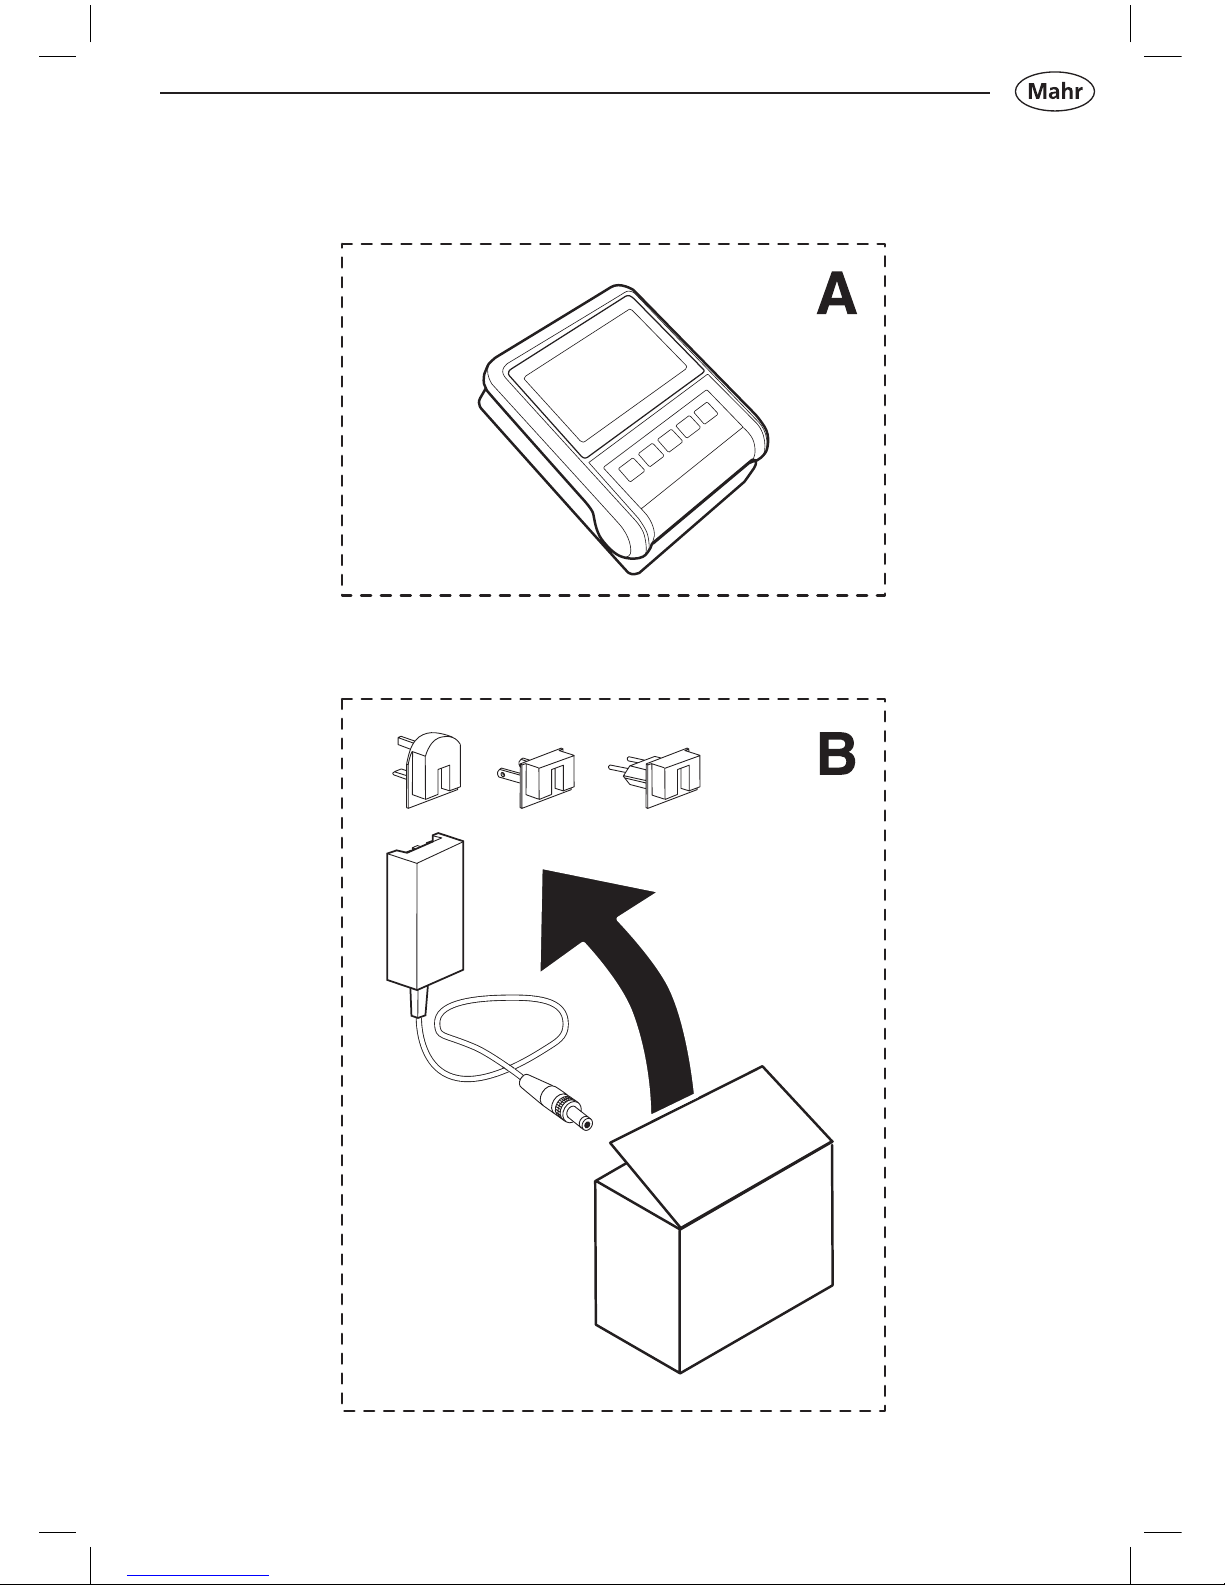
9
Mahr GmbH • Millimar C1200
1.2 Scope of delivery
10
Mahr GmbH • Millimar C1200
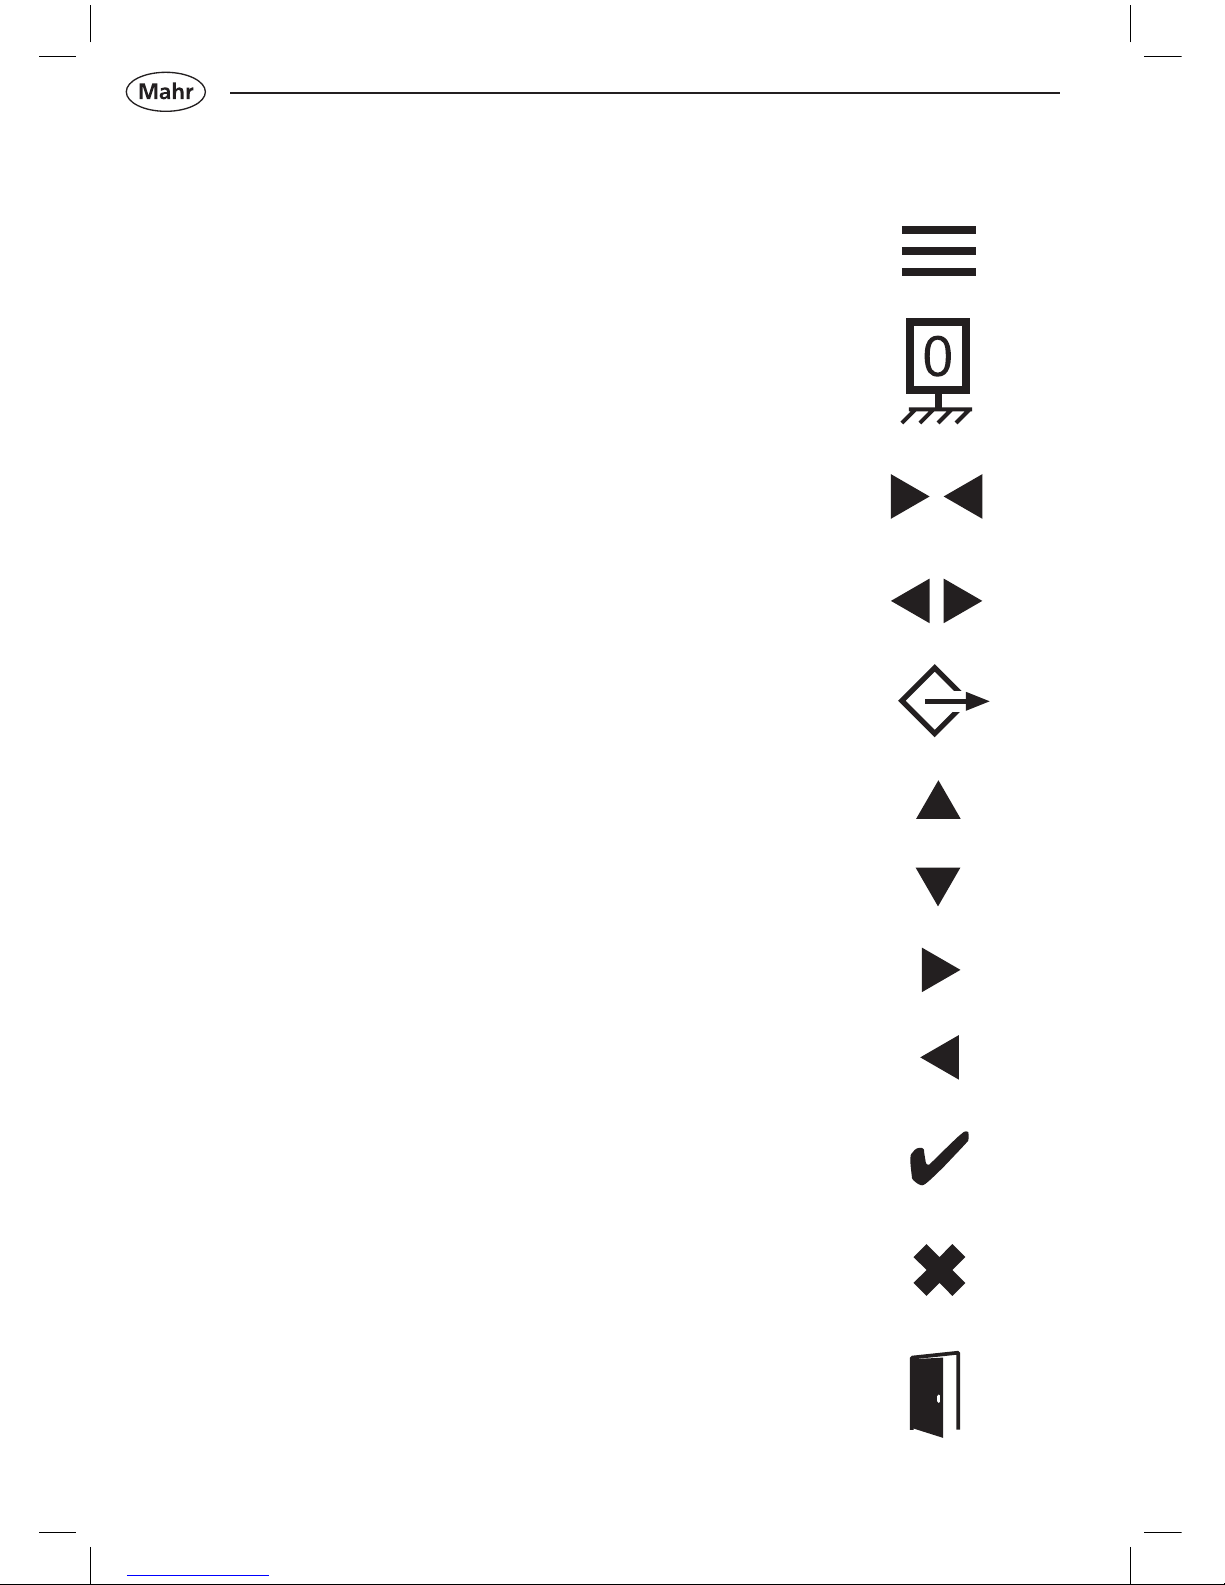
1.3 Symbols
– Select menu
– Set zero point (RESET)
– Reduce the resolution
– Increase the resolution
– Start data transmission
– Scroll up
– Scroll down
– Scroll to the right
– Scroll to the left
– Conrm
– Cancel
– Exit menu
11
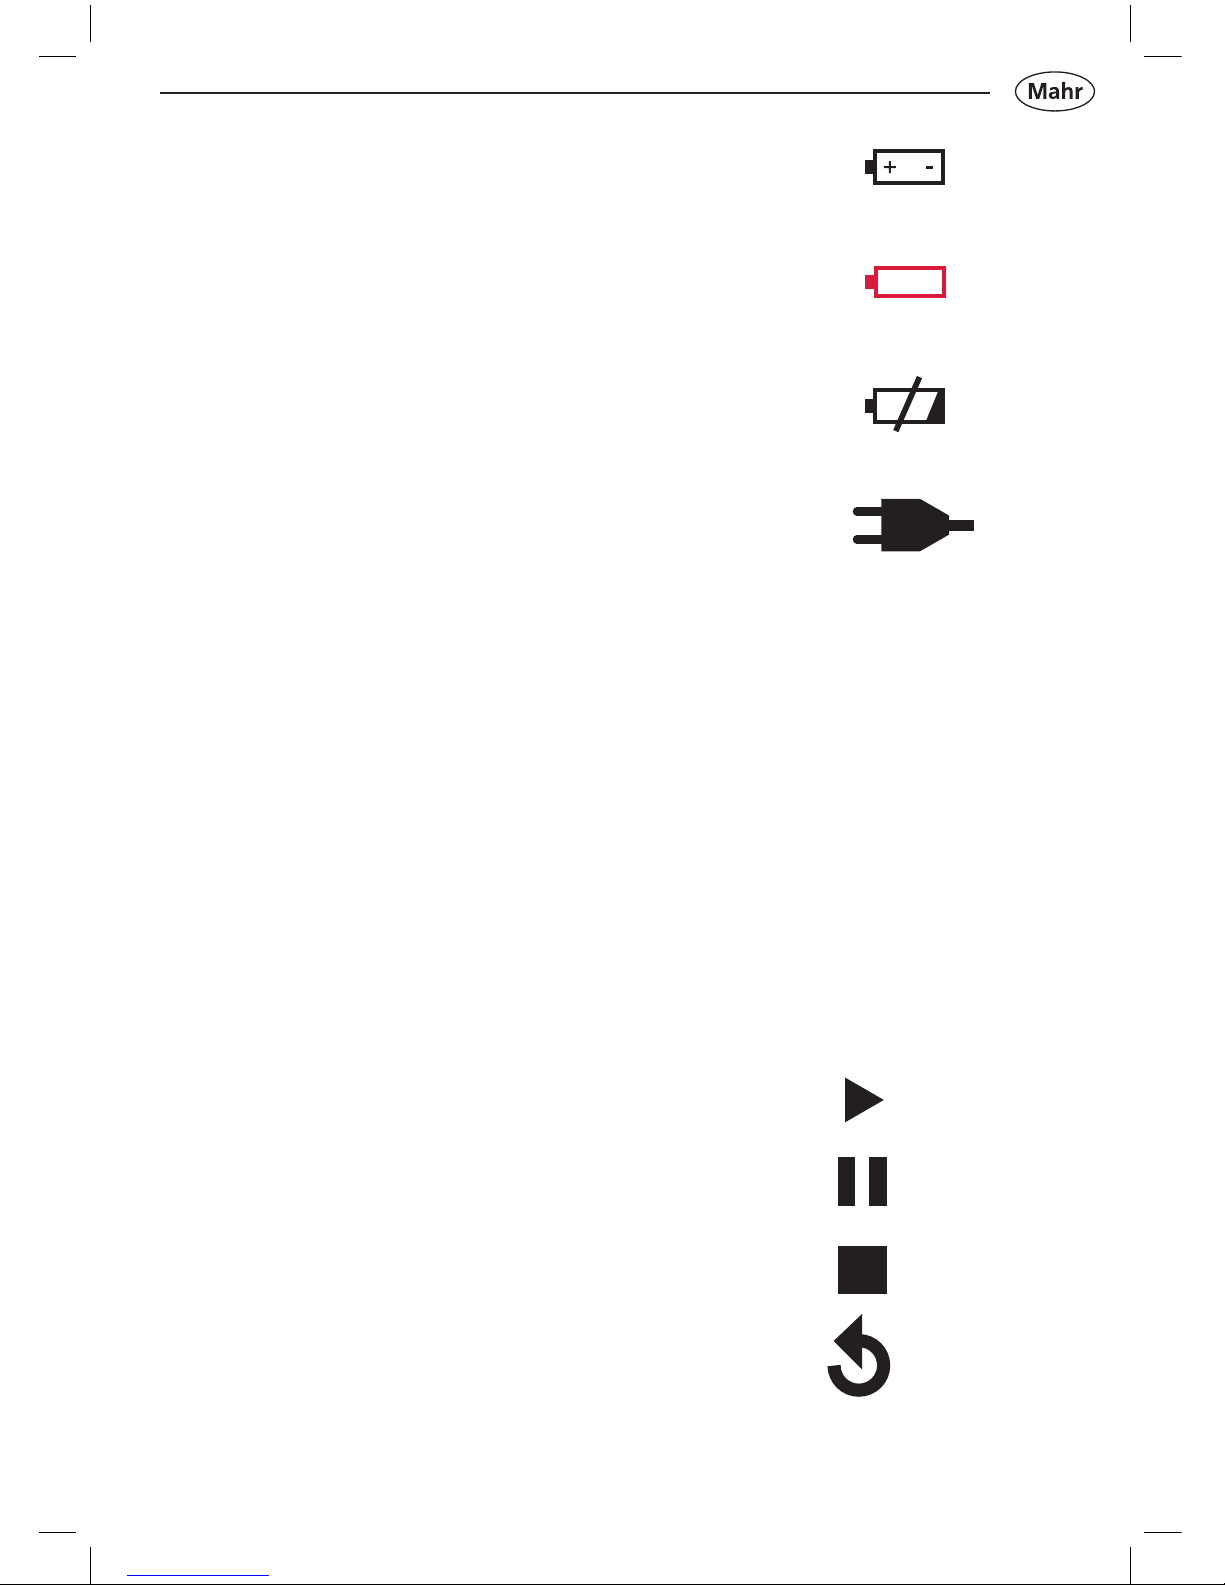
Mahr GmbH • Millimar C1200
– Battery mode
– Change batteries
– Battery low
– Mains power supply mode
– Formula measuring combination
– Data is been transferred
– Factor is not equal to 1
– Activated tolerance
– Dynamic measuring functions
– Start dynamic measurement
– Pause dynamic measurement
– Stop dynamic measurement
– Reset dynamic measurement
+A -A
DATA
FACTOR
TOL
(MAX), (MIN), (MAX-MIN)
12
Mahr GmbH • Millimar C1200
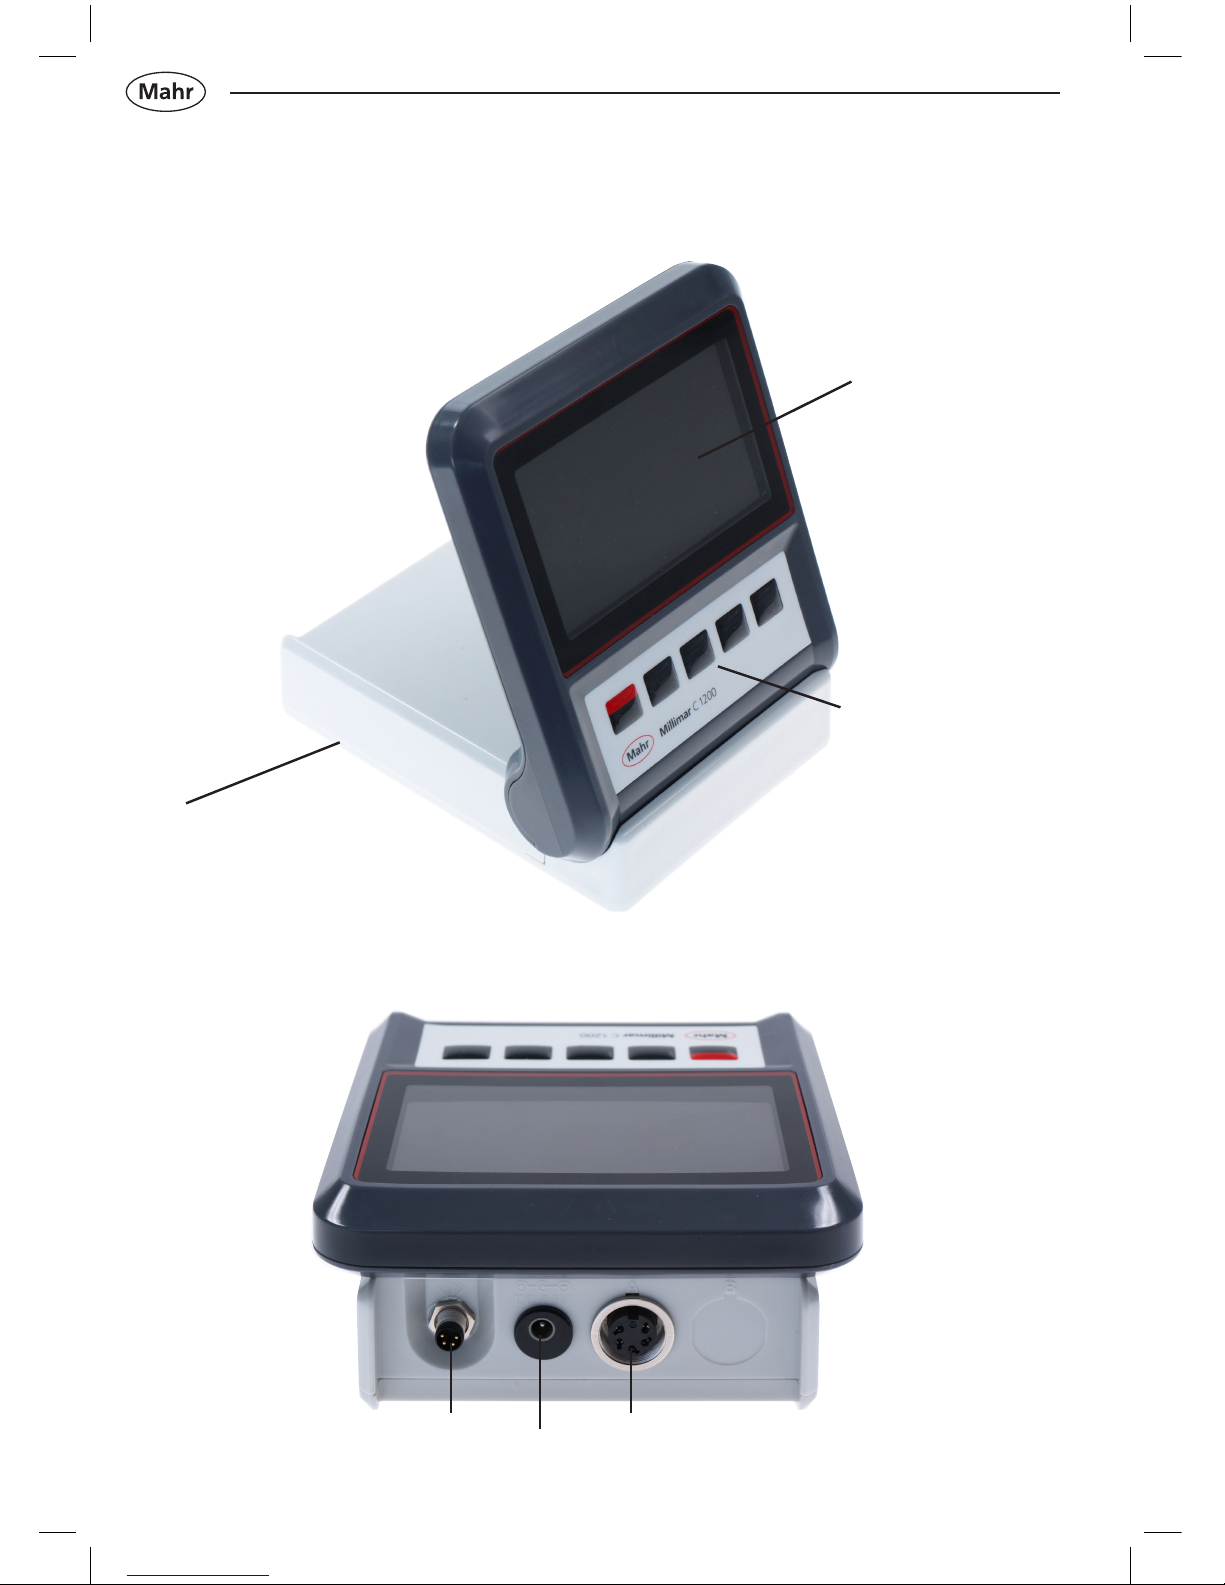
1.4 Operating elements and interfaces
1.4.1 Display and operating keys
Display
Operating keys
Mains connection
1.4.2 Interfaces
Data output Probe input A
Battery compartment
13
Mahr GmbH • Millimar C1200
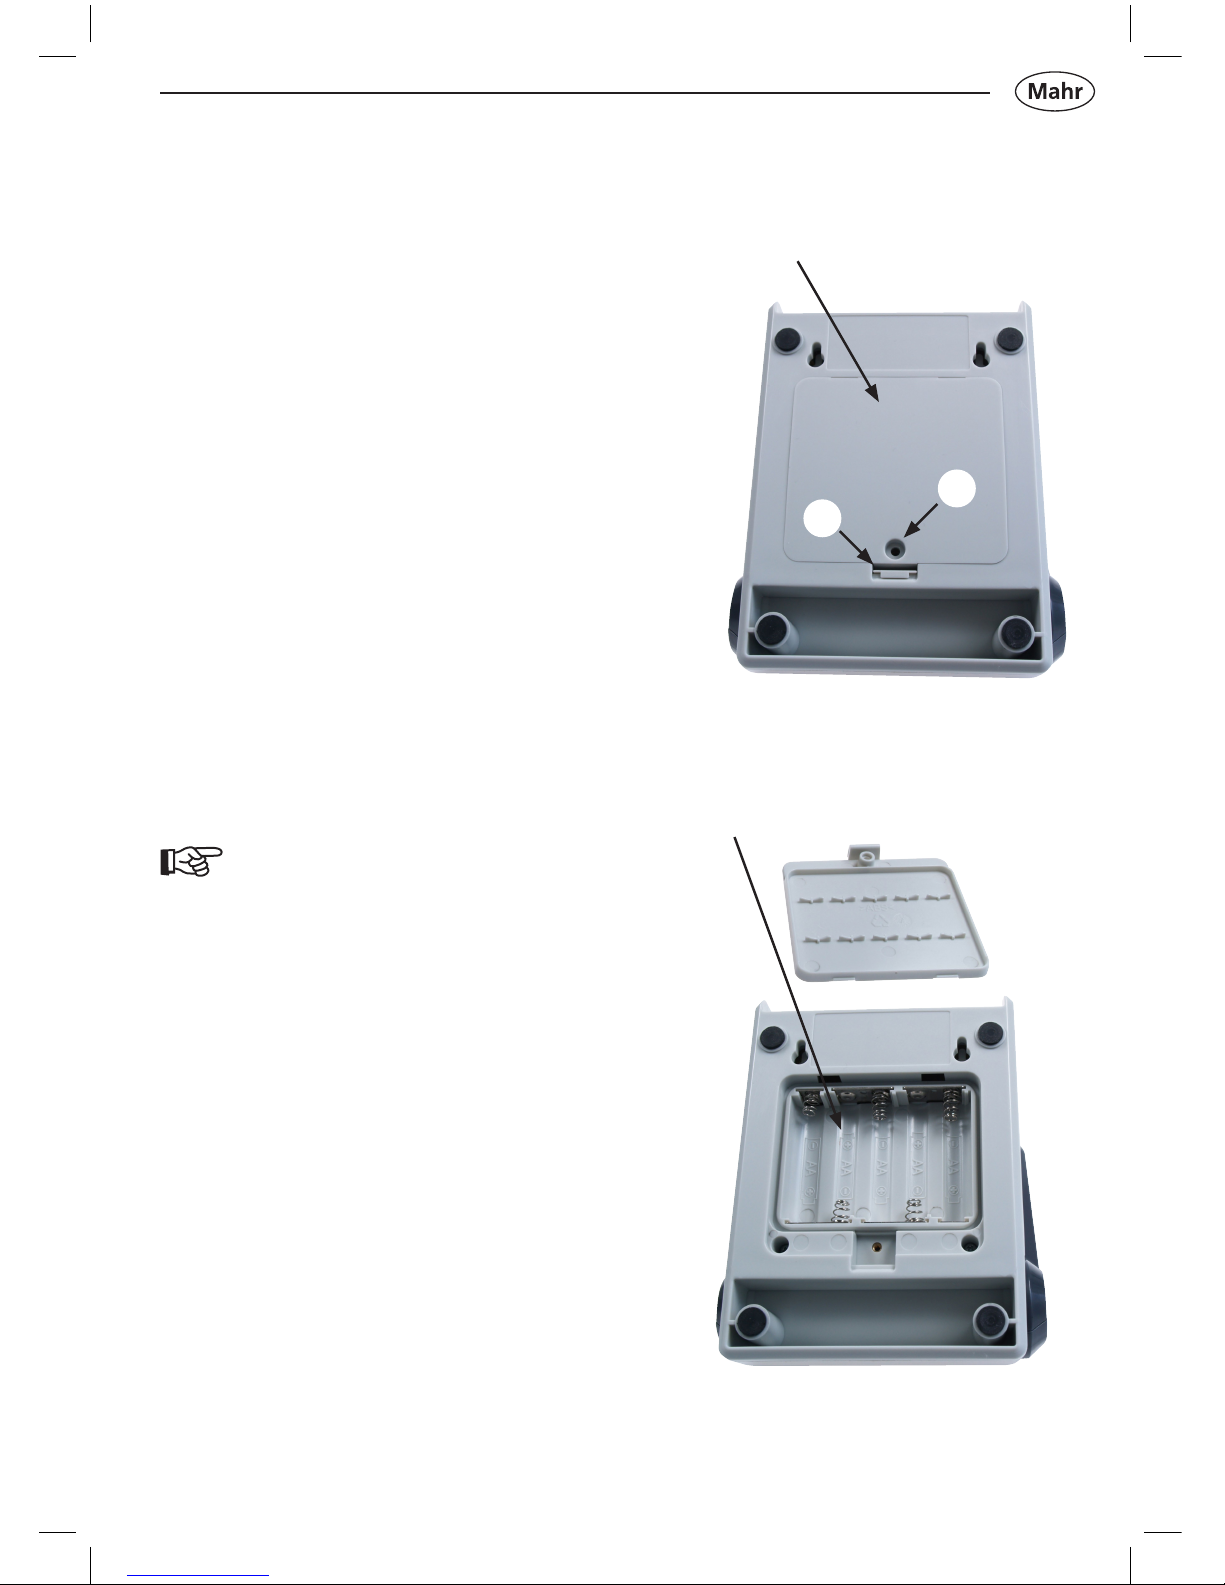
1.4.3 Battery compartment
The battery compartment is
integrated in the base
– Turn the measuring instrument
by 180°
– Remove locking screw 1
– Push in tab 2 on the battery
compartment cover and lift it off
– Correctly insert ve type AA
batteries or rechargeable batteries
Observe polarity of the
batteries!
– Close the battery compartment
cover in reverse order.
If connected to the mains power
supply, the measuring instrument
will automatically switch to mains
power supply.
The rechargeable batteries are
not recharged during mains power
operation.
Battery compartment cover
!
Battery compartment
1
2
14
Mahr GmbH • Millimar C1200
Welcome!
Please select your language:
Deutsch
中文
Čeština
English
Français
Italiano
Polski
ü
q p
Welcome!
Please select the measurement unit:
mm
µm
inch
t
ü
q p
2. Initial operation
2.1 Switching ON
– Connect the mains power supply
unit to the measuring instrument
via the mains power supply
socket and/or insert the batteries
(rechargeable).
– Press the ON / OFF key
=> The following appears on the
display:
Start screen
2.3 Setting the measurement unit
– Select the required measurement
unit with q or p
– Press
ü to conrm
2.2 Selecting the display language
– Select the required language with
q or p
– Press
ü to conrm

15
Mahr GmbH • Millimar C1200
Welcome!
Please select the probe type:
Standard probe
Long probe
t
ü
q p
+A mm
-0.001
-0.1 0 0.1
ut tu
0
+A (MAX) mm
-0.001
-0.1 0 0.1
u tu
Dynamic measuring mode
Static measuring mode
2.5 Scaling the analog display
2.4 Selecting the measuring probe
– Select the required probe type
with q or p.
=> For compatible probes, see
Chapter 8.2, page 47
– Press
ü to conrm
2.5.1 In static measuring mode
(standard)
– Select required resolution
with u t or t u
2.5.2 In dynamic measuring mode
(max, min, max-min)
– Select required resolution
with u t or t u.
– Change the scaling direction by
pressing and holding the t u key
=> Select the functions (max, min,
max-min, standard), see
section 3.5
16
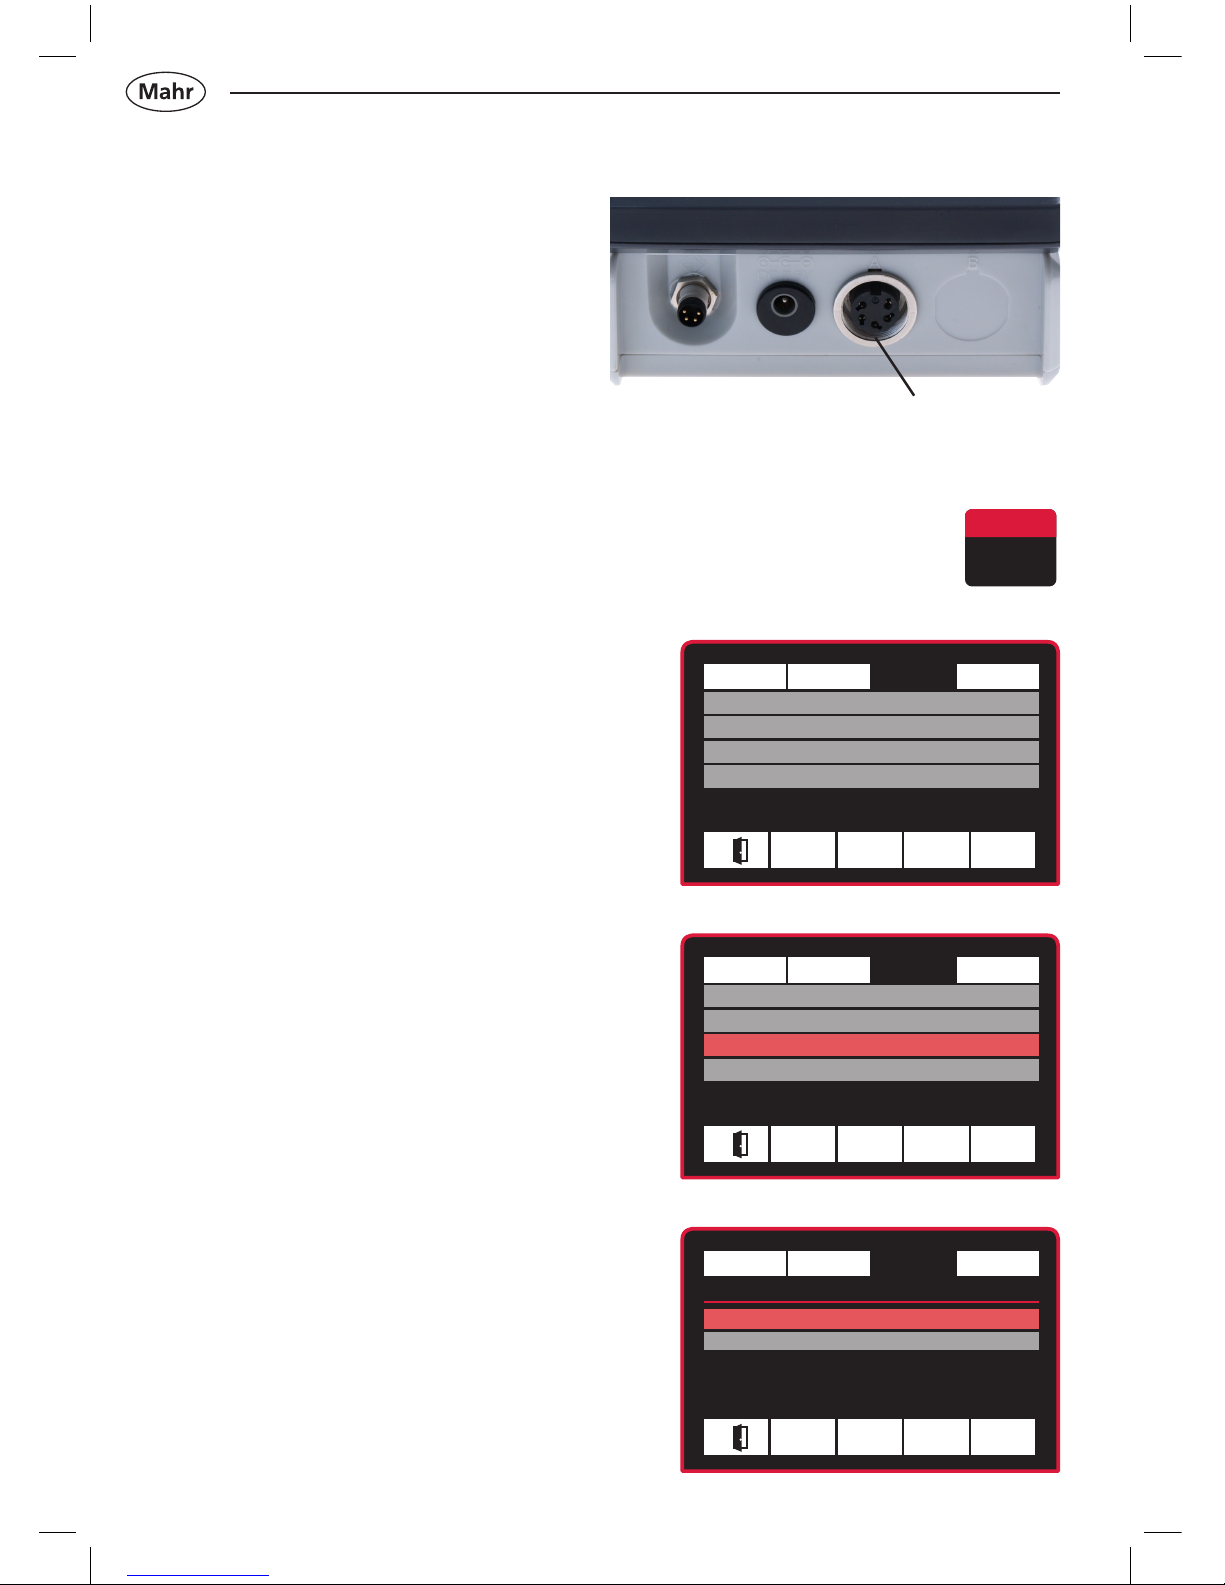
Mahr GmbH • Millimar C1200
Measurement Display Setup System
Language English
Unit mm
Probe type Standard probe
ECO mode On
Ó
ü
q p
Measurement Display Setup System
Language English
Unit mm
Probe type Standard probe
ECO mode On
t u q
Ó
ü
q
Measurement Display Setup
System
Probe type
Standard probe
Long probe
2.6 Connecting the measuring
probe
– Connect the measuring probe to
probe input A
2.7 Selecting the probe type
– Press the ON / OFF key
=> Standard menu appears
– Select the Setup menu
with u or t
– Select the Probe type submenu
with q or p
– Press ü to conrm
or press Ó to cancel the selection
– Select the required probe type
with q or p.
=> For compatible probes, see
Chapter 8.2, page 47
– Press ü to conrm or Ó to cancel
the selection
– Press the ON / OFF key to exit the
input menu.
Probe input A
 Loading...