

Page 1
OPERATION MANUAL
VCX-4
Vacuum Coolant Exchanger
RTI Technologies, Inc
10 Innovation Drive
York, PA 17402
800-468-2321
www.rtitech.com
Manual P/N 035-81446-00
Page 2

Table of Contents
Component Description ........................2
Safety Precautions ...........................3
Home Position ...............................4
Fill New Tank through Hose .................... 5
Empty Radiator .............................. 6
Special Hookups ............................. 8
Fill Radiator ................................. 9
Top Off & Flush Radiator...................... 10
Empty Waste Tank .......................... 11
Empty New Tank ............................ 12
Troubleshooting ............................. 13
Parts Identification ........................... 14
Flow...................................... 15
Page 1
Page 3
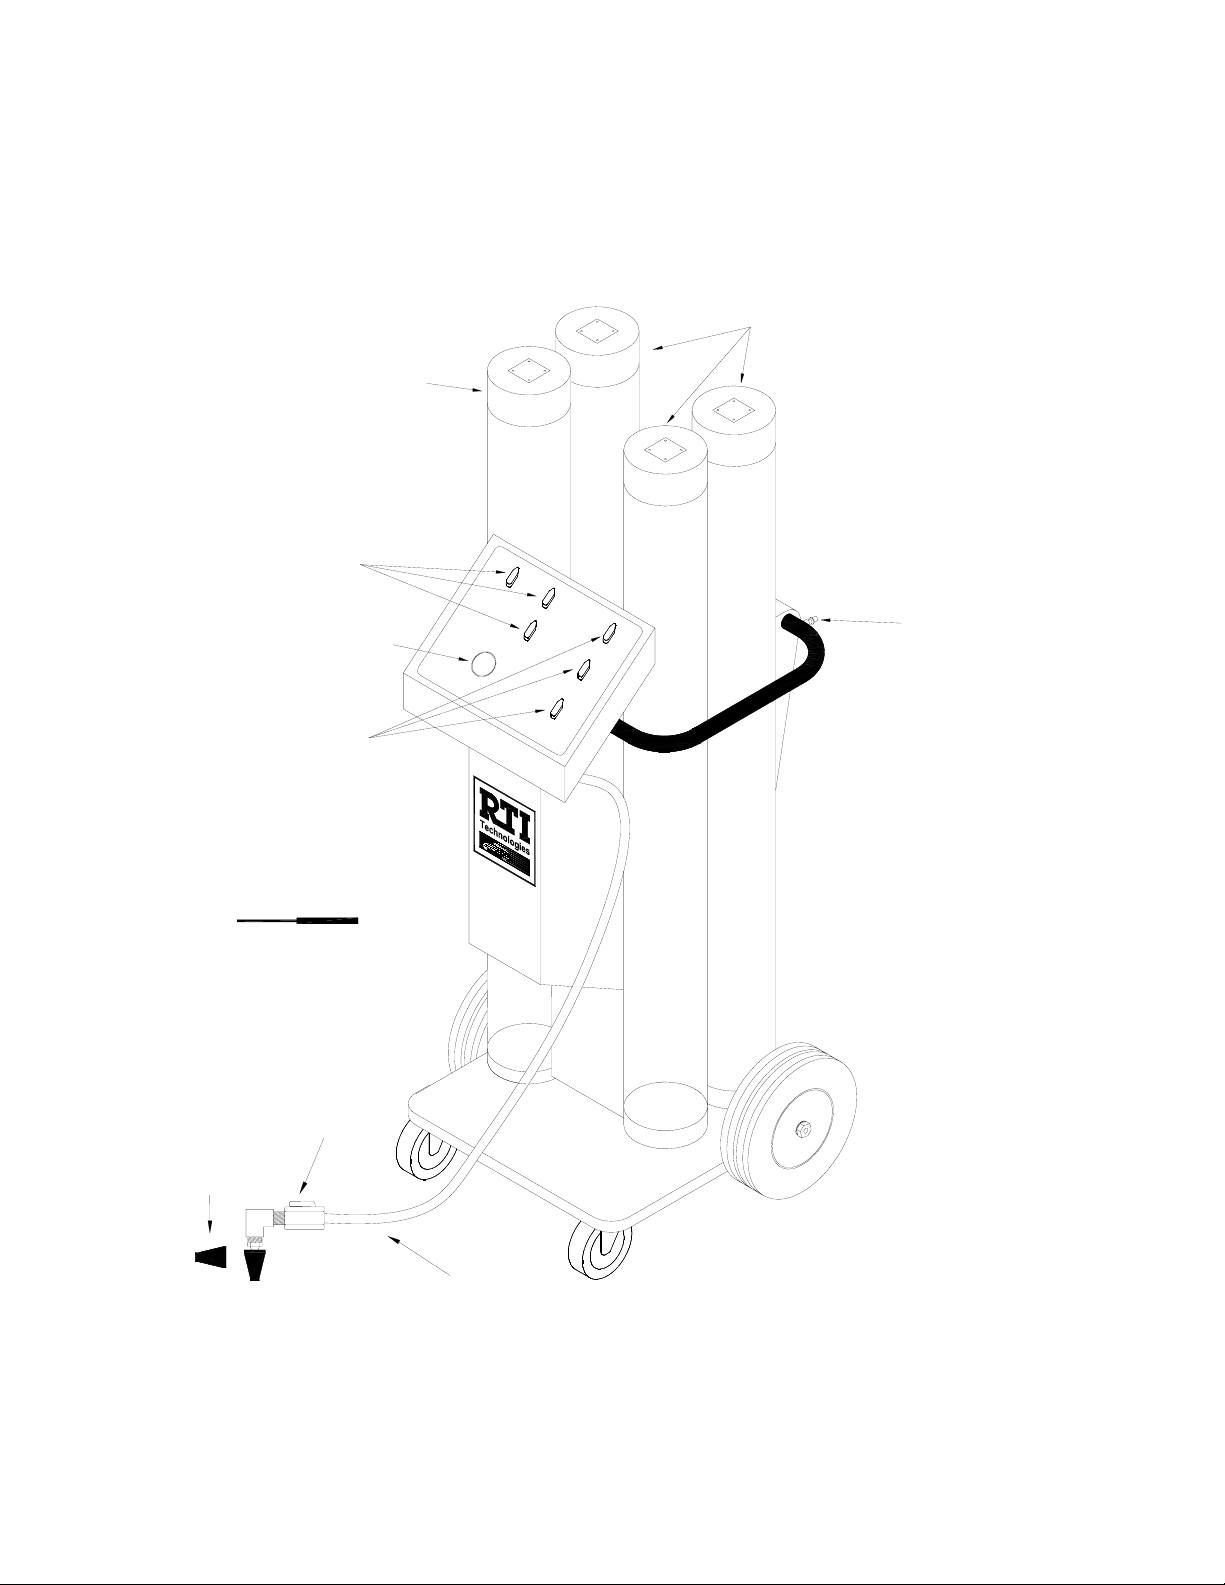
Component Description
Unpack all components and verify quantities per this illustration.
Contact RTI if any items are missing.
NEW COOLANT
TANKS
WASTE COOLANT
DUAL 2-WAY
PANEL VALVE
SYSTEM
VACUUM GAUGE
3-WAY
PANEL VALVE
ADAPTER HOSE
TANK
Waste
3
New
1
New
2
New
SHOP AIR COUPLER
CONE PLUG
ADAPTER
QTY=2
CONE ADAPTER
VALVE
CLEAR REINFORCED
HOSE 12FT
Page 2
Page 4

Safety Precautions
WARNING: Failure to follow these precautions can result in serious injury or death.
• Your VCX Vacuum Coolant Exchanger was developed to provide you with years of trouble-free service in
accordance with the utilization of proper inspection and maintenance techniques. It is important to understand
this machine functions with its coolant cylinders either under pressure or vacuum, so it is imperative all cylinders
receive proper inspection to ensure the proper and safe operation of the equipment is maintained throughout its
life cycle.
• Read and understand the Operation Manual completely before operating this unit.
• Always wear proper skin protection when operating and maintaining this equipment.
• Always wear safety glasses when operating and maintaining this equipment.
• Before any VCX machine use it is required for the operator to visually inspect the coolant cylinders for defects
such as cracks, nicks, gouges, chips, impact marks, fractures, hairline cracks, crazing, severe discoloration,
cloudiness or hazing or other physical damage. VISUAL TUBE INSPECTION IS REQUIRED PRIOR TO EACH
MACHINE USE! IF ANY TUBES EXHIBIT ANY DEFECTS, THEY MUST BE REPLACED BEFORE MACHINE
OPERATION! FAILURE TO COMPLY MAY RESULT IN TUBE FAILURE AND POSSIBLE INJURY!
• Automotive cooling systems can be under pressure and extremely hot. Place a rag over the radiator cap during
removal to avoid injury. Use extreme caution when removing caps.
• Coolants are corrosive and poisonous to people and animals. Clean up any spills immediately.
• Do not allow waste coolant tank to overflow. Immediately clean up any coolant spills. Damage to the vehicle and
equipment can result from the corrosiveness of coolant.
• Continuous monitoring of the coolant exchange process is required.
• Unit is equipped with factory preset pressure regulator. Do not attempt pressure adjustment without RTI
Technical Support authorization.
• If cracks appear in the cylinders, hoses or adapters these parts must be replaced.
• If VCX unit tipped over, resulting in a fall of the machine onto any side, it is mandatory all
replaced immediately before the machine is placed back into service.
• If leaks occur at the bottom or top of the cylinders, contact RTI for troubleshooting instructions.
• The cylinders, hoses and adapters are plastic and rubber products and are in contact with oil and chemicals
which may lessen their durability. Therefore, when soiled, they should be cleaned with water and a mild
detergent. Caution: Do not clean with thinners, solvents or any other chemical cleaners.
• Only disassemble or reassemble unit parts when directed by an RTI representative.
• Take precautions to keep clothing, hair, hands, hoses, etc. away from all moving parts of the vehicle.
• Comply with local, state and federal regulations for fluid disposal.
• Material Safety Data Sheets (MSDS) must be obtained on all chemicals and placed in a shop file for reference.
These are available for down load and printing on the RTI web-site (www.rtitech.com). Go to TECHNICAL HELP
and look under Technical Bulletins.
coolant tubes be
CAUTION: Failure to follow the precautions as outlined in the operation manual can result
in damage to the engine, vehicle or equipment which will not be supported or
covered under warranty.
Page 3
Page 5
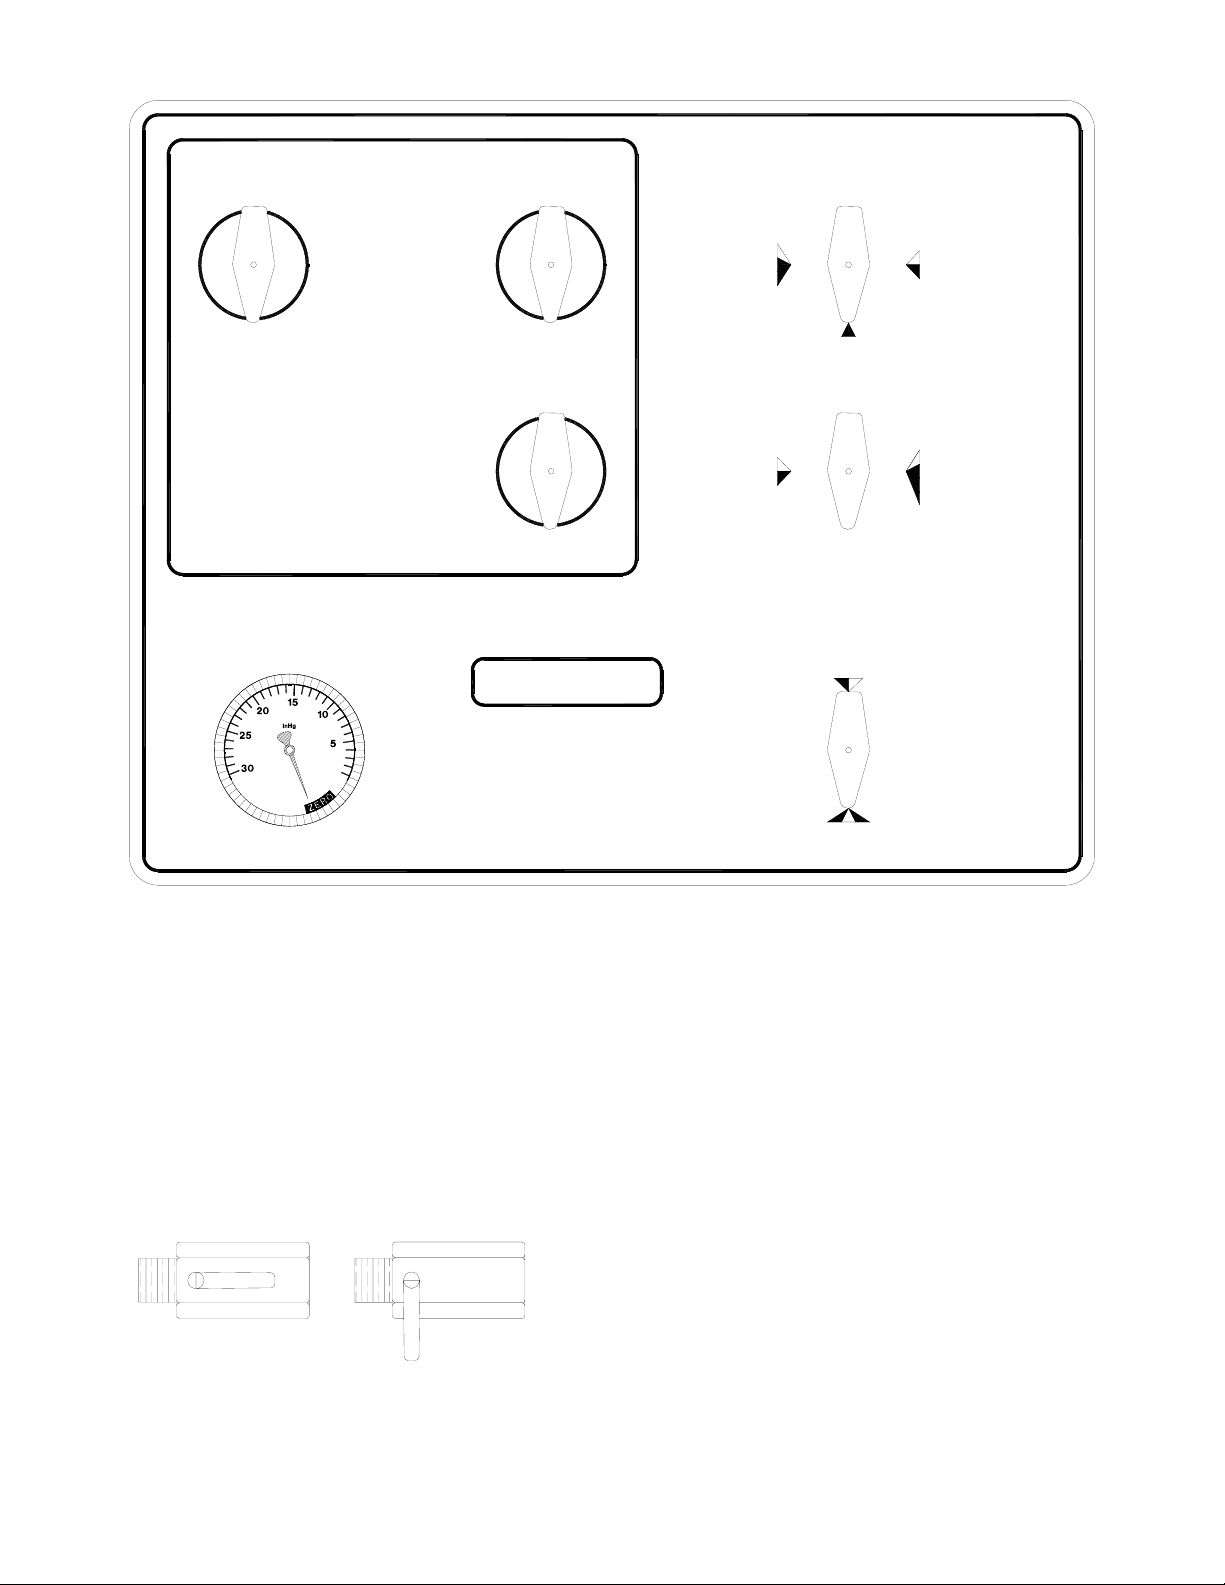
Home Position
NEW 3
ON
HOME
TURN ONE VALVE ON TO
SELECT NEW COOLANT SOURCE
VACUUM GAUGE
NEW 2
ON
HOME
NEW 1
ON
HOME
TURN ALL VALVES TO HOME
AFTER EVERY PROCEDURE
(PRESSURE)
EMPTY WASTE TANK
EMPTY NEW TANK
TOP OFF
EMPTY WASTE TANK
EMPTY RADIATOR
HOME
HOME
FILL NEW TANK
EMPTY NEW TANK
TOP OFF
(VACUUM)
FILL NEW TANK
EMPTY RADIATOR
FILL NEW TANK
FILL RADIATOR
EMPTY NEW TANK
TOP OFF
VCX-4
HOME
The above valve configuration is set before the VCX is connected to the shop air supply. This
is also the position that the valves are returned to after each procedure. To select a procedure
turn all of the valves to the colored triangle that corresponds with the desired procedure. While
performing certain functions the appropriate NEW tank valve must be set to the ON position.
Cone Adapter Valve
Valve Open Valve Closed
This illustration demonstrates the open and
closed position on the Cone Adapter Valve. The
closed position is 90 degrees clockwise from
center.
Page 4
Page 6
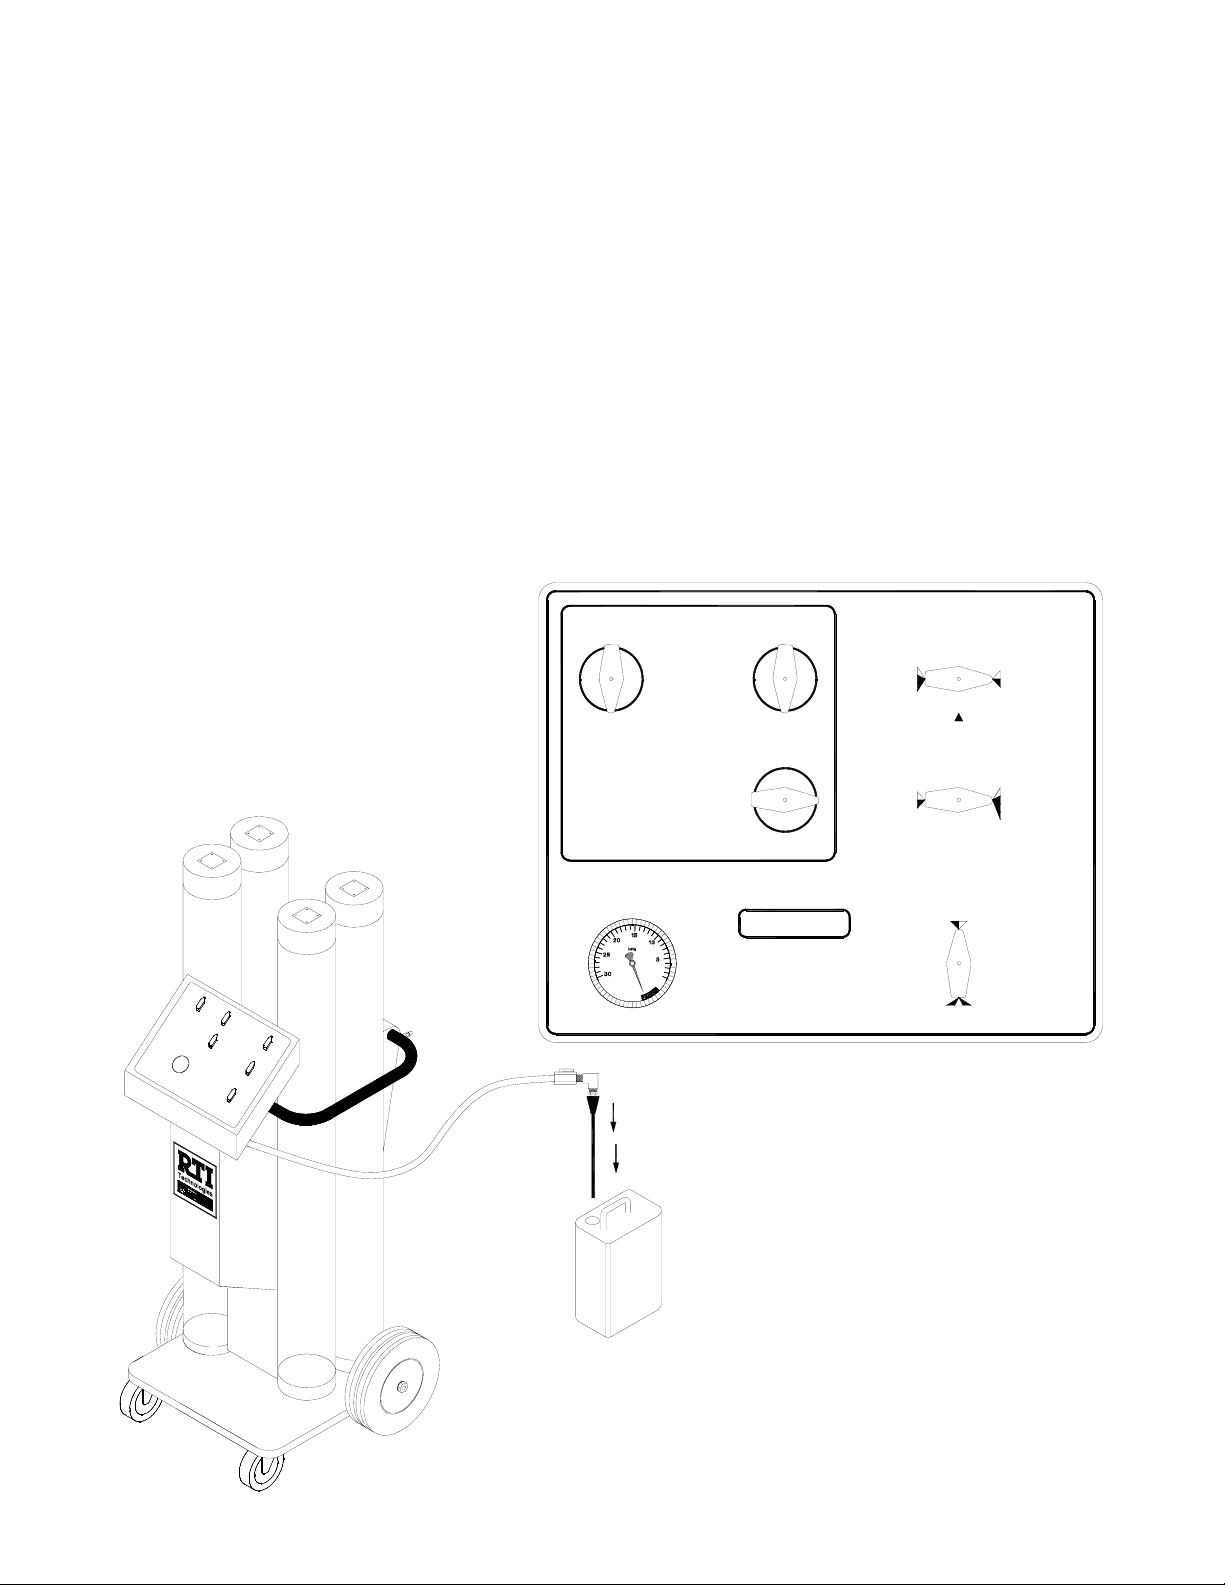
Fill New Tank through Hose
1. Turn all panel valves to the Home position.
2. Connect shop air to VCX Shop Air Coupler.
3. Turn the appropriate New Tank Valve to fill the corresponding tank. Note that New Tank 1
is used in the illustration shown below.
4. Turn the other panel valves to the Fill New Tank position as shown in the illustration below.
This orientation can also be obtained by positioning the panel valves toward the green
highlights closest to each valve.
4. Place the Cone Adapter, with the Adapter Hose attached, into the container of new
coolant. Open the Cone Adapter Valve to draw coolant into the New Coolant Tank.
5. Raise the hose out of the container of new coolant when the desired fluid level is reached
in the New Coolant Tank.
6. Close the Cone Adapter Valve.
7. Turn all valves to the Home position when done.
Note: DO NOT OVERFILL.
3
New
Waste
New
2
New
1
Clear Hose
Adapter Hose
NEW 3
ON
HOME
TURN ONE VALVE ON TO
SELECT NEW COOLANT SOURCE
VACUUM GAUGE
Cone Adapter
NEW 2
EMPTY WASTE TANK
ON
HOME
NEW 1
EMPTY WASTE TANK
ON
HOME
TURN ALL VALVES TO HOME
AFTER EVERY PROCEDURE
VCX-4
(PRESSURE)
EMPTY NEW TANK
TOP OFF
EMPTY RADIATOR
HOME
HOME
FILL NEW TANK
EMPTY NEW TANK
TOP OFF
HOME
(VACUUM)
FILL NEW TANK
EMPTY RADIATOR
FILL NEW TANK
FILL RADIATOR
EMPTY NEW TANK
TOP OFF
50/50 Mix Water/Coolant
Page 5
Page 7

Empty Radiator
1. Run the vehicle with the heater turned on to bring the engine to operating temperature.
Turn the engine off.
2. Turn all panel valves to the Home Position as shown on page 4.
3. Connect shop air to VCX Shop Air Coupler.
4. Turn all panel valves to the Empty Radiator position as shown in the illustration below.
This orientation can also be obtained by positioning the panel valves toward the black
highlights closest to each valve.
5. Insert the Adapter Hose into the Cone Adapter. Insert end of Adapter hose into overflow
tank. Turn the Adapter Hose Valve to the open position to withdraw the coolant.
Waste
3
New
1
New
2
New
NEW 3
HOME
TURN ONE VALVE ON TO
SELECT NEW COOLANT SOURCE
VACUUM GAUGE
Cone Adapter
Valve
Adapter Hose
NEW 2
(PRESSURE)
EMPTY WASTE TANK
EMPTY NEW TANK
HOME
NEW 1
HOME
ON
EMPTY WASTE TANK
ON
EMPTY RADIATOR
TOP OFF
HOME
HOME
FILL NEW TANK
EMPTY NEW TANK
TOP OFF
HOME
ON
TURN ALL VALVES TO HOME
AFTER EVERY PROCEDURE
VCX-4
(VACUUM)
FILL NEW TANK
EMPTY RADIATOR
FILL NEW TANK
FILL RADIATOR
EMPTY NEW TANK
TOP OFF
Clear Hose
Radiator
Overflow
Water
Pump
Engine
Block
Heater
Core
Page 6
Page 8

Empty Radiator continued
6. Connect the Adapter Hose to the radiator overflow port to relieve radiator pressure. Watch
the System Vacuum Gauge and make sure the vacuum level increases and then stays
greater than 20 InHg. Carefully remove radiator cap. Use a shop rag over the cap when
removing to avoid injury in case there is still pressure. Remove the Adapter Hose.
7. Place VCX Cone Adapter snugly into the radiator spout. Do not force the Cone Adapter
into the spout, the suction
pressure from the VCX should
Waste
3
New
1
New
2
New
Clear Hose
PINCH
HOSE
Radiator
Hose
Cone
Plug Adapter
Overflow
Water
Pump
Engine
Block
secure it adequately. Verify that
the Cone Adapter Valve is in the
open position.
8. Start the engine once fluid
starts to move through the
clear hose and into the VCX
Waste Coolant Tank. Verify
that the System Vacuum
gauge reads at least 22
InHg.
9. Once the waste coolant
from the vehicle stops
flowing through the clear
hose, turn all of the panel
valves to Home Position
and turn the engine off.
DO NOT REMOVE CONE ADAPTER FROM THE RADIATOR!
Note: In some cases it may be necessary to pinch off the hose going from the radiator
neck to the overflow container. This is only necessary when the vacuum leaks
through this hose. The hose should be opened only after the Fill Radiator
procedure.
WARNING
Do not overfill the
Waste Tank
Page 7
Page 9

C
Special Hookups
Seal Tight Radiator
1. Insert the Adapter Hose into the end of the Cone Plug Adapter.
2. Place the Cone Adapter snugly into the radiator, coiling the excess length of Adapter Hose at
the bottom.
3. Follow the Empty Radiator procedure steps 1-9.
More Effective Setup for Empty Radiator
During the Empty Radiator procedure clamp off the upper radiator hose and follow steps 1-9 of the
Empty Radiator section.
PINCH
HOSE
Radiator
Hose
Adapter Seal
1. In some cases it may be necessary to cut up to 0.75" off
of the Cone Plug Adapter. This is only necessary when a
tight seal can not be created due to bottoming out against
the inside of a shallow radiator neck.
2. Take care to cut a clean edge free of loose debris.
Overflow
PINCH
HOSE
ut back
0.750
Page 8
Page 10

Fill Radiator
Fill Radiator
1. Turn all panel valves to the Home position.
2. Connect shop air to VCX Shop Air Coupler.
3. Turn all panel valves to the Fill Radiator position shown in the illustration below, this orientation can
also be obtained by positioning the panel valves toward the magenta highlights closest to each valve.
Verify that the Cone Adapter Valve is open.
4. Turn the appropriate New Tank Valve to fill from the corresponding tank. Note that New Tank 1 is
used in the illustration shown below.
5. New coolant is automatically pulled out of the VCX New Coolant Tank and into the vehicle radiator
through the clear hose.
NOTE: IF THE CONE ADAPTER BECOMES DISLODGED BEFORE YOU CAN BEGIN THIS
PROCESS YOU MUST RERUN THE EMPTY RADIATOR FUNCTION, WITHOUT STARTING
THE VEHICLE, TO REGAIN THE VACUUM NEEDED TO FILL THE VEHICLE COOLANT
SYSTEM.
6. Once the coolant stops moving through the clear hose turn all of the panel valves back to the Home
position and remove the Cone Adapter from the radiator.
7. Turn all valves to the Home position.
8. Close the Cone Adapter Valve.
Waste
3
New
1
New
2
New
Clear Hose
Radiator
Hose
NEW 3
ON
HOME
TURN ONE VALVE ON TO
SELECT NEW COOLANT SOURCE
VACUUM GAUGE
NEW 2
EMPTY WASTE TANK
ON
HOME
NEW 1
EMPTY WASTE TANK
ON
HOME
TURN ALL VALVES TO HOME
AFTER EVERY PROCEDURE
VCX-4
Engine
Block
(PRESSURE)
EMPTY NEW TANK
TOP OFF
EMPTY RADIATOR
HOME
HOME
FILL NEW TANK
EMPTY NEW TANK
TOP OFF
HOME
(VACUUM)
FILL NEW TANK
EMPTY RADIATOR
FILL NEW TANK
FILL RADIATOR
EMPTY NEW TANK
TOP OFF
PINCH
HOSE
Cone
Plug Adapter
Overflow
Water
Pump
Page 9
Page 11

Top Off
1. Turn all panel valves to the Home position.
2. Connect shop air to VCX Shop Air
Coupler.
3. Turn the Cone Adapter Valve to the
closed position.
4. Turn the appropriate New Tank Valve to
fill from the corresponding tank. Note
that New Tank 1 is used in the
illustration shown.
5. Turn all panel valves to the Top Off
position as shown in the illustration. This
orientation can also be obtained by
positioning the panel valves toward the
blue highlights closest to each valve.
6. Open the Cone Adapter Valve to fill the
radiator and overflow to the proper
levels.
7. Turn all valves to the Home position.
8. Close the Cone Adapter valve when
done.
9. Replace radiator and overflow caps.
NEW 3
ON
HOME
TURN ONE VALVE ON TO
SELECT NEW COOLANT SOURCE
VACUUM GAUGE
NEW 2
EMPTY WASTE TANK
ON
HOME
NEW 1
EMPTY WASTE TANK
ON
HOME
TURN ALL VALVES TO HOME
AFTER EVERY PROCEDURE
VCX-4
(PRESSURE)
EMPTY NEW TANK
TOP OFF
EMPTY RADIATOR
HOME
HOME
FILL NEW TANK
EMPTY NEW TANK
TOP OFF
HOME
(VACUUM)
FILL NEW TANK
EMPTY RADIATOR
FILL NEW TANK
FILL RADIATOR
EMPTY NEW TANK
TOP OFF
Flush Radiator
1. The New Coolant Tank needs to be filled with water. See Empty Waste Tank and Fill New Tank
procedures.
2. The Empty Radiator function must be run to completion.
3. Run the Fill Radiator procedure.
4. The Empty Radiator function must be run again to extract all of the water inside the cooling system.
5. Repeat steps 3 and 4 until the desired results are achieved. Once completed new coolant needs to
be added to the vehicle system.
Page 10
Page 12

Empty Waste Tank
1. Turn all panel valves to the Home position.
2. Connect shop air to VCX Shop Air Coupler.
3. Close Cone Adapter Valve.
4. Turn all panel valves to the Empty Waste Tank position shown in the illustration below. This
orientation can also be obtained by positioning the panel valves toward the red highlights closest to
each valve.
5. Place the end of the clear hose into a bulk waste container and open the Cone Adapter Valve.
6. Waste coolant will begin leaving the VCX from the Waste Coolant Tank through the clear hose. Be
cautious not to spill waste coolant onto the floor as th e hose may “jump” when the Waste Coolant
Tank is nearing empty. Clean up any spills that may occur immediately.
7. Once the Waste Coolant Tank is empty, close the Cone Adapter Valve and turn all valves to the
Home position.
Waste
3
New
1
New
2
New
Clear Hose
NEW 3
ON
HOME
TURN ONE VALVE ON TO
SELECT NEW COOLANT SOURCE
VACUUM GAUGE
NEW 2
ON
HOME
NEW 1
ON
HOME
TURN ALL VALVES TO HOME
AFTER EVERY PROCEDURE
VCX-4
Cone Adapter
Valve
(PRESSURE)
EMPTY WASTE TANK
EMPTY NEW TANK
TOP OFF
EMPTY WASTE TANK
EMPTY RADIATOR
HOME
HOME
FILL NEW TANK
EMPTY NEW TANK
TOP OFF
HOME
(VACUUM)
FILL NEW TANK
EMPTY RADIATOR
FILL NEW TANK
FILL RADIATOR
EMPTY NEW TANK
TOP OFF
Bulk Waste Container
Page 11
Page 13

Empty New Tank
1. Turn all panel valves to the Home position.
2. Connect shop air to VCX Shop Air Coupler.
3. Close Cone Adapter Valve.
4. Turn the appropriate New Tank Valve to empty from the corresponding tank. Note that New Tank 1
is used in the illustration shown below.
5. Turn all panel valves to the Empty New Tank position shown in the illustration below. This orientation
can also be obtained by positioning the panel valves toward the blue highlights closest to each valve.
6. Place the end of the clear hose into a bulk storage container and open the Cone Adapter Valve.
7. Coolant will begin leaving the VCX from the New Coolant Tank through the clear hose. Be cautious
not to spill coolant onto the floor as the hose may “jump” when the New Coolant Tank is nearing
emptiness. Clean up any spills that may occur immediately.
8. Once the Waste Coolant Tank is empty, close the Cone Adapter Valve and turn all valves to the
Home position.
Waste
3
New
1
New
2
New
Clear Hose
NEW 3
ON
HOME
TURN ONE VALVE ON TO
SELECT NEW COOLANT SOURCE
VACUUM GAUGE
NEW 2
EMPTY WASTE TANK
ON
HOME
NEW 1
EMPTY WASTE TANK
ON
HOME
TURN ALL VALVES TO HOME
AFTER EVERY PROCEDURE
VCX-4
Cone Adapter
Valve
(PRESSURE)
EMPTY NEW TANK
TOP OFF
EMPTY RADIATOR
HOME
HOME
FILL NEW TANK
EMPTY NEW TANK
TOP OFF
HOME
(VACUUM)
FILL NEW TANK
EMPTY RADIATOR
FILL NEW TANK
FILL RADIATOR
EMPTY NEW TANK
TOP OFF
Bulk Waste Container
Page 12
Page 14

Troubleshooting
Problem Solution
Vacuum becomes weak Inside of the VCX, there is a venturi vacuum generator that
may have collected debris during the operation of the unit.
If this occurs, the vacuum will become weak resulting in a
lower vacuum reading on the System Vacuum gauge and poor
performance. Remove the venturi from the line and blow shop
air through it. Use the Parts Identification (page 14) to locate
the venturi. Reconnect to correct lines when done.
There may be a vacuum leak at either the top or bottom
sealing point on the tanks. Fill the tank to the top with water
and turn all valves to the Home position. Close the Cone
Adapter Valve and turn all valves to the Empty (leaking tank)
position. Check for leaks and follow guidelines from the
Leakage section.
Leakage Debris may have collected at the bottom of the tank.
Disassemble tank and clean the base of tank. Take care when
reassembling not to over tighten the hex nut (use 60 lb/in
torque wrench). Do not use pneumatic or power tools.
Over time, the o-ring at the bottom or top of the cylinder may
become worn. Inspect and replace if needed. See part break
down on left.
Tank Overflow If fluid is ever filled to the top of the tank while using the unit
there is a device that will release excess to the inside of the
cabinet.
External Clear Hose Using the VCX to remove coolant from a vehicle creates high
temperatures throughout the unit particularly where the clear
hose connects to the Cone Adapter.
Repeated exposure to these temperatures may cause
deterioration of the hose. If possible cut affect area off and
reconnect Cone Adapter. If replacement of the hose is
required call RTI.
Page 13
Page 15

Parts Identification
P/N Description
1 060-81693-00 Top Cylinder Plate
2 060-81692-00 Bottom Cylinder Plate
3 060-81695-00 Fiberglass Tube (52 inches)
4 035-81433-00 Tank Level Decal
5 028-80465-00 Large O-Ring
6 026-80238-00 Vacuum Gauge 30"-0 PSIG
7 022-80028-00 Ball Valve 3-Way 1/4 FPT (BHD)
8 028-80228-00 Small O-Ring
9 022-80123-00 2-way dual valve
10 022-80153-00 Valve Relief 1/4 MPT X 1/4 FPT
11 370-80095-00 Clear Hose Assy
12 026-80197-00 Vacuum Pump (Venturi)
10
3
13 370-80075-00 Pressure Regulator
1
1/4 FPT X 1/4 FPT (BHD)
New
Waste
2
New
1
New
9
6
7
14 060-81215-00 Cone Plug Adapter
3
15 370-80168-00 Cone Adapter Valve Assy
4
16 370-80095-00 Adapter Hose
8
16
14
15
1
5
3
2
11
Page 14
Page 16

Flow
a ste
3Ne
W
w New12
N e w
Page 15
Page 17

This Page Intentionally Blank
Page 16
 Loading...