

Page 1
ACF-3000
Operation Manual
10 Innovation Drive
York, Pennsylvania 17402 USA
Phone: 717-840-0678
Toll Free: 800-468-2321
Web-site: www.rtitech.com
Manual P/N: 035 81825 00 (REV D)
MAHLE Clevite Inc., RTI Division
Page 2

Table of Contents
Component Description ............................... 2
Safety Precautions ...................................... 3
Flush ........................................................... 4
Purge ........................................................... 5
Empty Solvent Tank .................................... 6
Spin-on Filter Replacement ......................... 7
Charcoal Air Filter Replacement .................. 8
Coalescing Filter Drain ................................ 8
Coalescing Filter Replacement .................... 8
Trouble Shooting Guide ............................... 9
Parts Identification ...................................... 10
Flow Diagram ............................................. 11
Usage Log ............................................... 12-13
Warranty Information .................................. 14
Warranty Disclaimer ................................... 15
1
Page 3
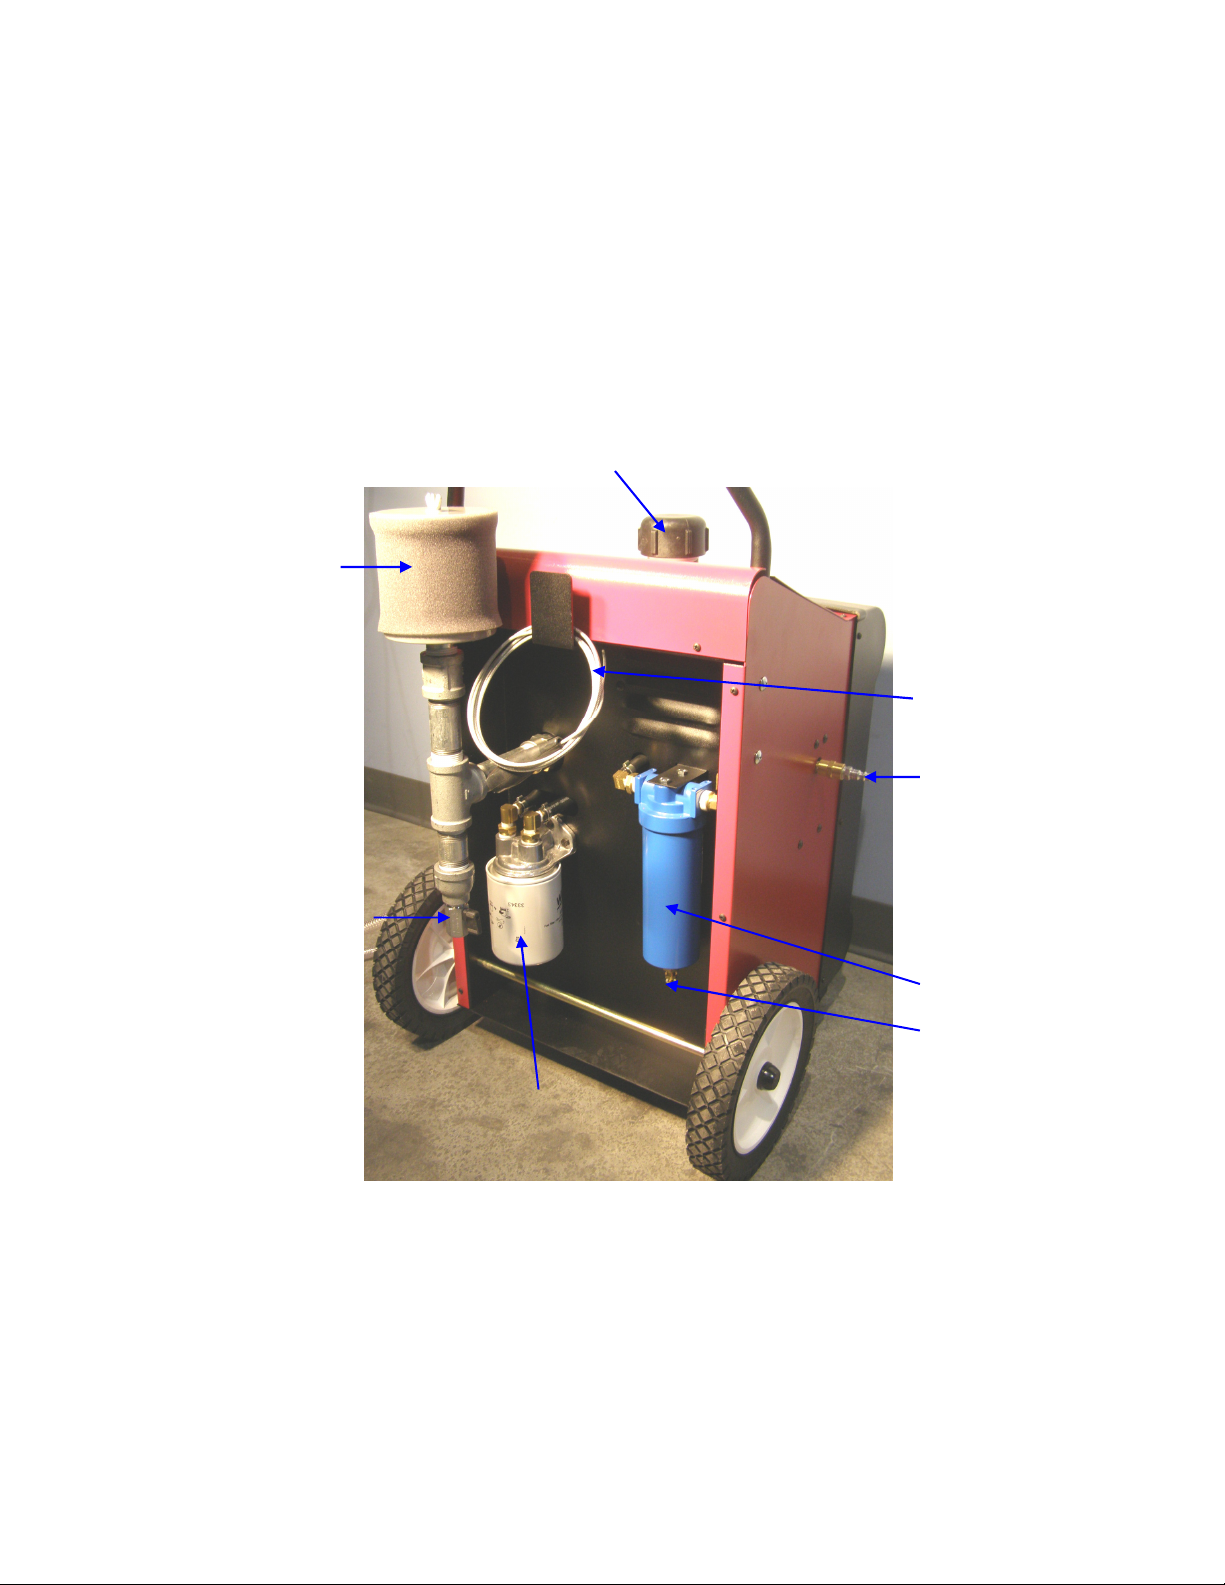
Coalescing Filter
C
harcoal Air Filter
Components Description
Unpack all components and verify quantities per this illustration.
Contact RTI if any items are missing.
with Pre-filter
Fill Cap
Ground Strap
Charcoal Air Filter Drain
Shop Air Coupler
Coalescing Filter
Drain Valve
Spin-On Filter
2
Page 4
Safety Precautions
WARNING: Failure to follow these precautions can result in serious injury or death.
• Read and understand the Operation Manual completely before operating this unit.
• Always wear proper eye and skin protection when operating and maintaining this
equipment.
• Always drain the flushing solvent before transporting the ACF-3000.
• Always keep the unit away from open flames and sparks.
• Only disassemble or reassemble unit parts when directed by an RTI representative.
• Comply with local, state and federal regulations for fluid disposal.
• Material Safety Data Sheets (MSDS) must be obtained on all chemicals and
placed in a shop file for reference. Note: MSDS can be found on the RTI web
site www.rtitech.com.
DO NOT allow the solvent to come in contact with any painted
surfaces. In case of contact, immediately clean the surface with soap
and water.
Failure to follow the precautions as outlined in the Operation Manual
can result in damage to the engine, vehicle or equipment which will not
be supported or covered under warranty.
Always operate unit in a well-ventilated area.
Always make sure unit is grounded properly before operation.
3
Page 5
Flush
1. Verify that both the spin-on filter (WIX® 33343 or equivalent) filter and the Coalescing
Filter are installed.
2. Turn the Control Valve to OFF.
3. Remove the solvent filling cap and pour one gallon (3.6 liters) of flushing solvent
(Motorcraft® YN-23 or equivalent flushing
solvent) into the ACF-3000 internal tank.
Replace the solvent filling cap when done.
-
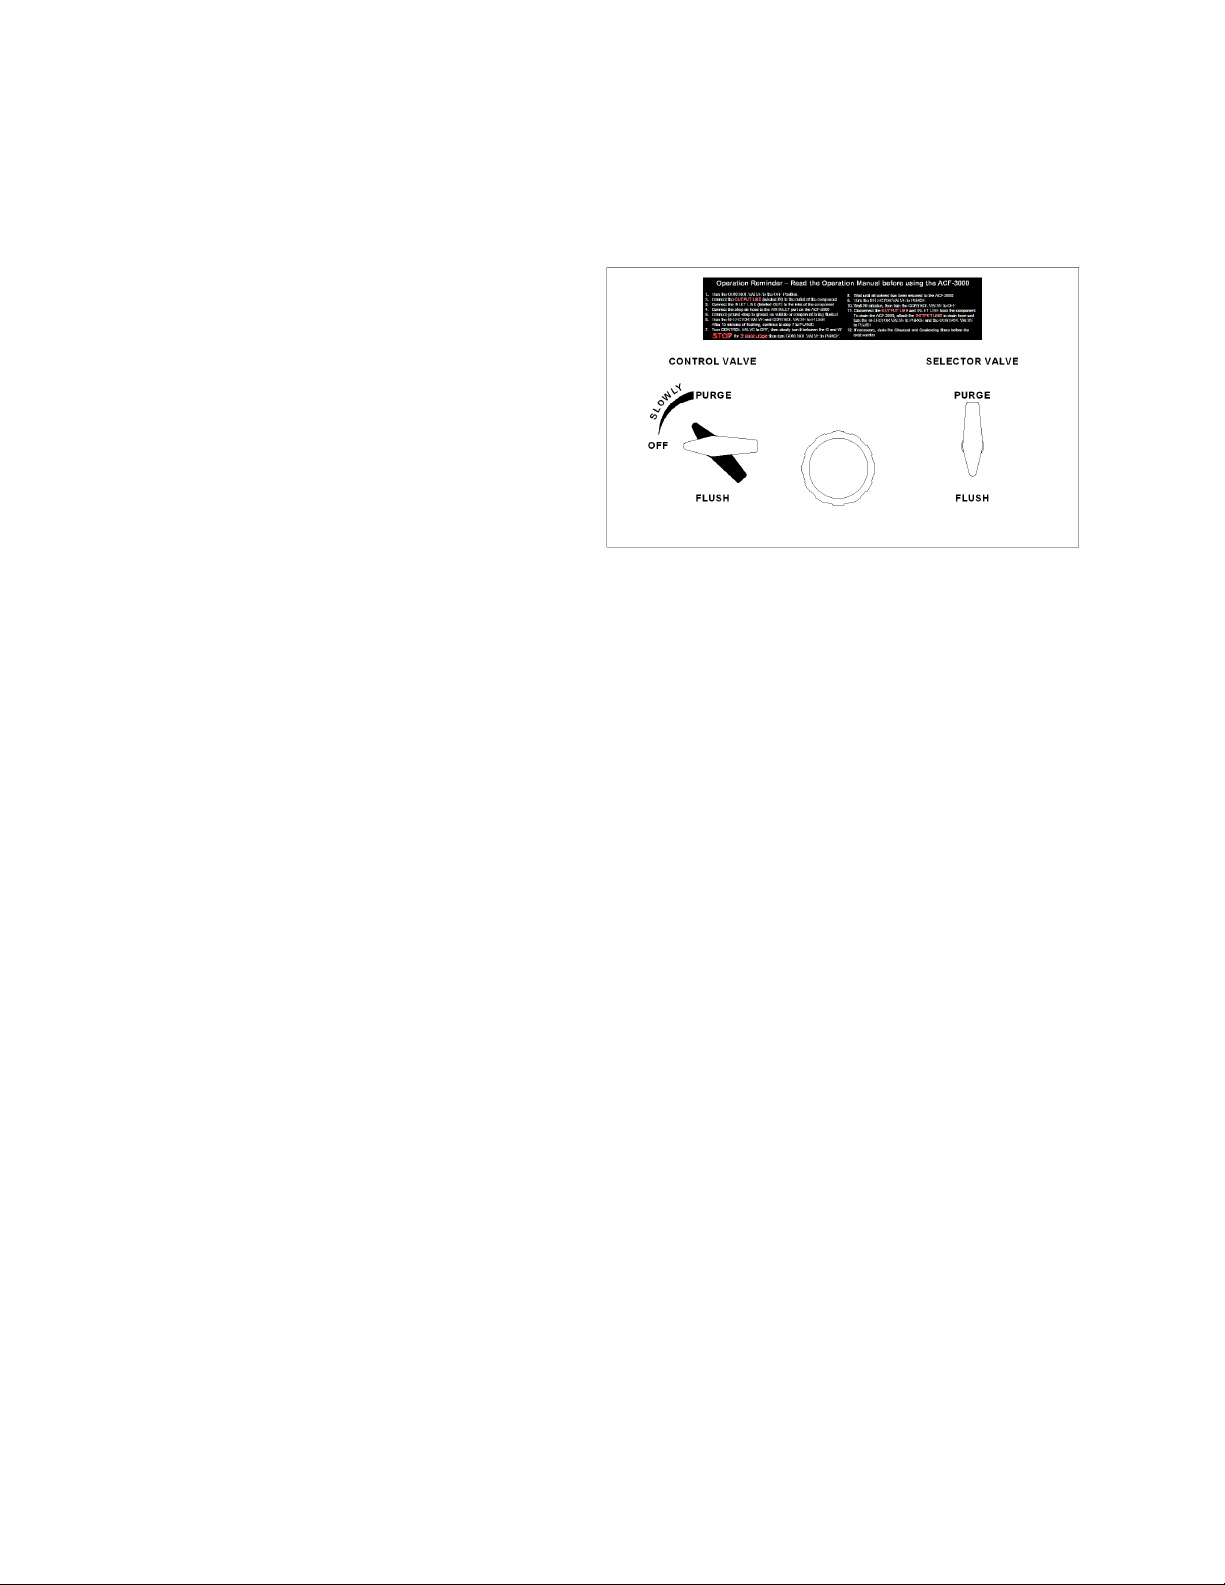
PURGE
ACF 3000
SELECTOR VALVE
PURGE
4. Install proper adapter fittings on the inlet and
outlet ports of the component to be flushed and
connect ground strap to adequate ground on
vehicle or component being flushed.
CONTROL VALVE
Y
L
W
O
L
S
OFF
5. Install fittings to do a reverse flush. Connect
RED OUTPUT line from ACF-3000 to OUTPUT
FLUSH
FLUSH
port on the component. Connect BLACK
RETURN line from ACF-3000 to the INLET port
of the component.
6. Connect shop air to Shop Air Coupler (with a
minimum pressure of 90 psi).
7. Turn the Selector Valve to FLUSH.
Solvent
Filling Cap
8. Turn the Control Valve to FLUSH.
9. Flush the component for a minimum of 15 minutes to ensure a thorough cleaning.
10. Turn the Control Valve to OFF to end the flushing procedure.
The component is now ready to be purged.
4
Page 6
Purge
1. Slowly turn the Control Valve and
stop half way and hold for 3 minutes
as indicated to purge flushing solvent
from component and lines. Proceed
to the next step after 3 minutes.
2. Continue slowly turning the Control
Valve towards PURGE. Wait one
minute before proceeding with the
next step.
3. Turn the Selector Valve to PURGE.
4. Purge the component for a minimum of 30 minutes to ensure that it is completely
dry.
5. Turn the Control Valve to OFF.
6. Disconnect the “IN” and “OUT” hoses from the adapter fittings.
7. Disconnect the adapter fittings from the component.
8. The Coalescing Filter will need to be drained periodically. Turn the drain valve at the
bottom of the filter counter clockwise. A small amount of water may drain. Some
shops may have a coalescing filter already inline. In this case very little moisture
may be present.
Repeat the flush procedure on the next component until all
components have been flushed.
5
Page 7
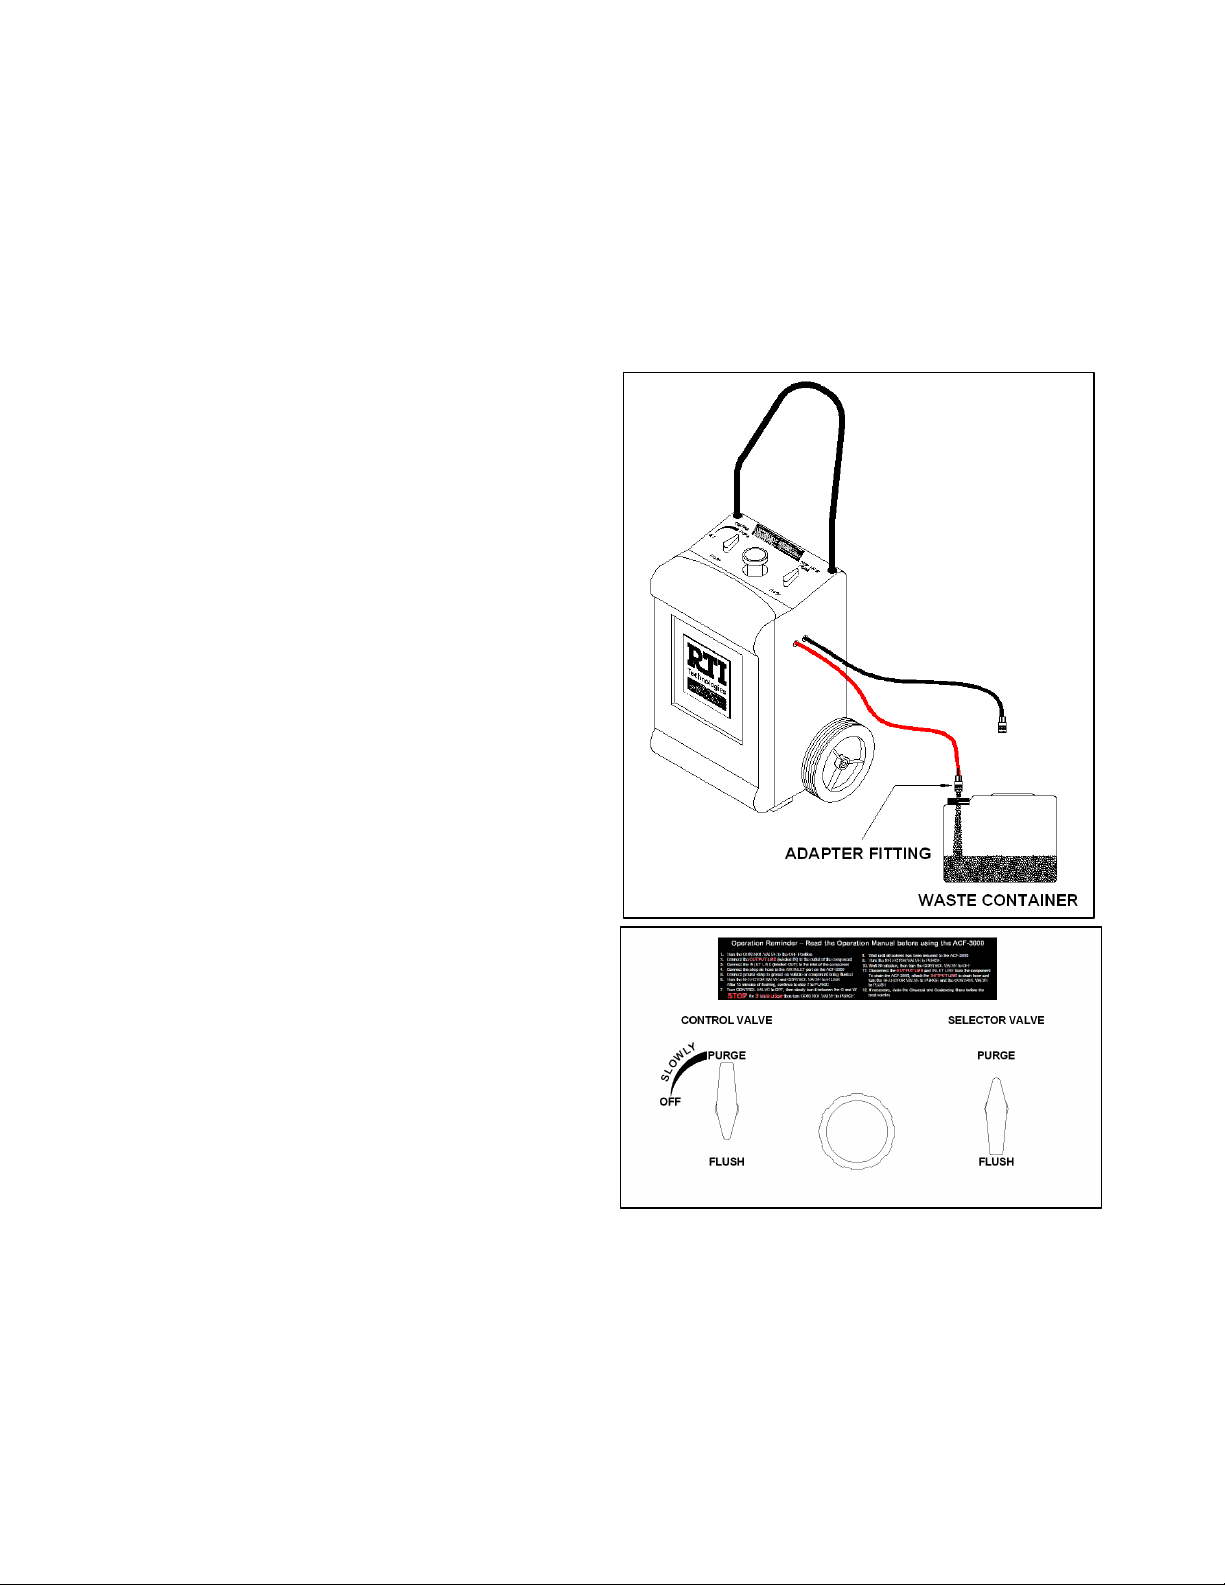
Empty Solvent Tank
INPUT LINE
OUTPUT LINE
The flush solvent can only be used to flush one vehicle A/C system. Remove used
flush solvent from the ACF-3000 as follows:
IMMEDIATELY remove solvent after every system flush. Leaving solvent in
machine will saturate the charcoal filter.
1. Turn the Control Valve to OFF.
2. Attach the drain extension hose on the
“IN” (or output) Hose and place it into a
waste container.
3. Turn the Selector Valve to PURGE.
4. Turn the Control Valve to FLUSH.
5. Verify that the ACF-3000 is completely
drained before continuing.
6. Open charcoal air filter drain until all
moisture is drained and close valve.
7. Turn the Control Valve to OFF.
8. At this point the Spin-on Filter needs to be removed and replaced (Refer to the next
page).
*Follow your local state, municipal or federal waste management authority or
recycler to dispose the used flushing solvent and filters.
6
Page 8
Spin-on Filter Replacement
RTI Part Number: 026 80253 00
NOTE:
A spin-on filter (WIX® 33343 or equivalent) should be replaced after each flushing
procedure. RTI is not responsible for damages caused by use of non-equivalent
spin-on filters!
1. Locate the spin-on filter on the rear of the ACF-3000.
2. Turn the filter counter-clockwise to remove.
3. Apply a small amount of lubricant to the filter gasket and install the new filter. Take
caution to hand tighten only.
Loosen
*Follow your local state, municipal or federal waste management authority or
recycler to dispose the used flushing solvent and filters.
7
Page 9

Charcoal Air Filter Replacement
The charcoal air filter element and Pre-filter (Part Number – includes both filter and
pre-filter: 305 80033 00), located on the rear of the unit, should be replaced after every
25 flush and purge services. It may be necessary to replace the element sooner if the
operator notices a stronger than usual odor emitted from the unit during the purge
process.
1. Remove and clean the pre-filter element.
2. Turn the wing nut on the filter counterclockwise and remove the retaining plate.
3. Remove the old filter element and replace with a new one.
4. Replace retaining plate and finger-tighten the wingnut.
5. Re-install the pre-filter element.
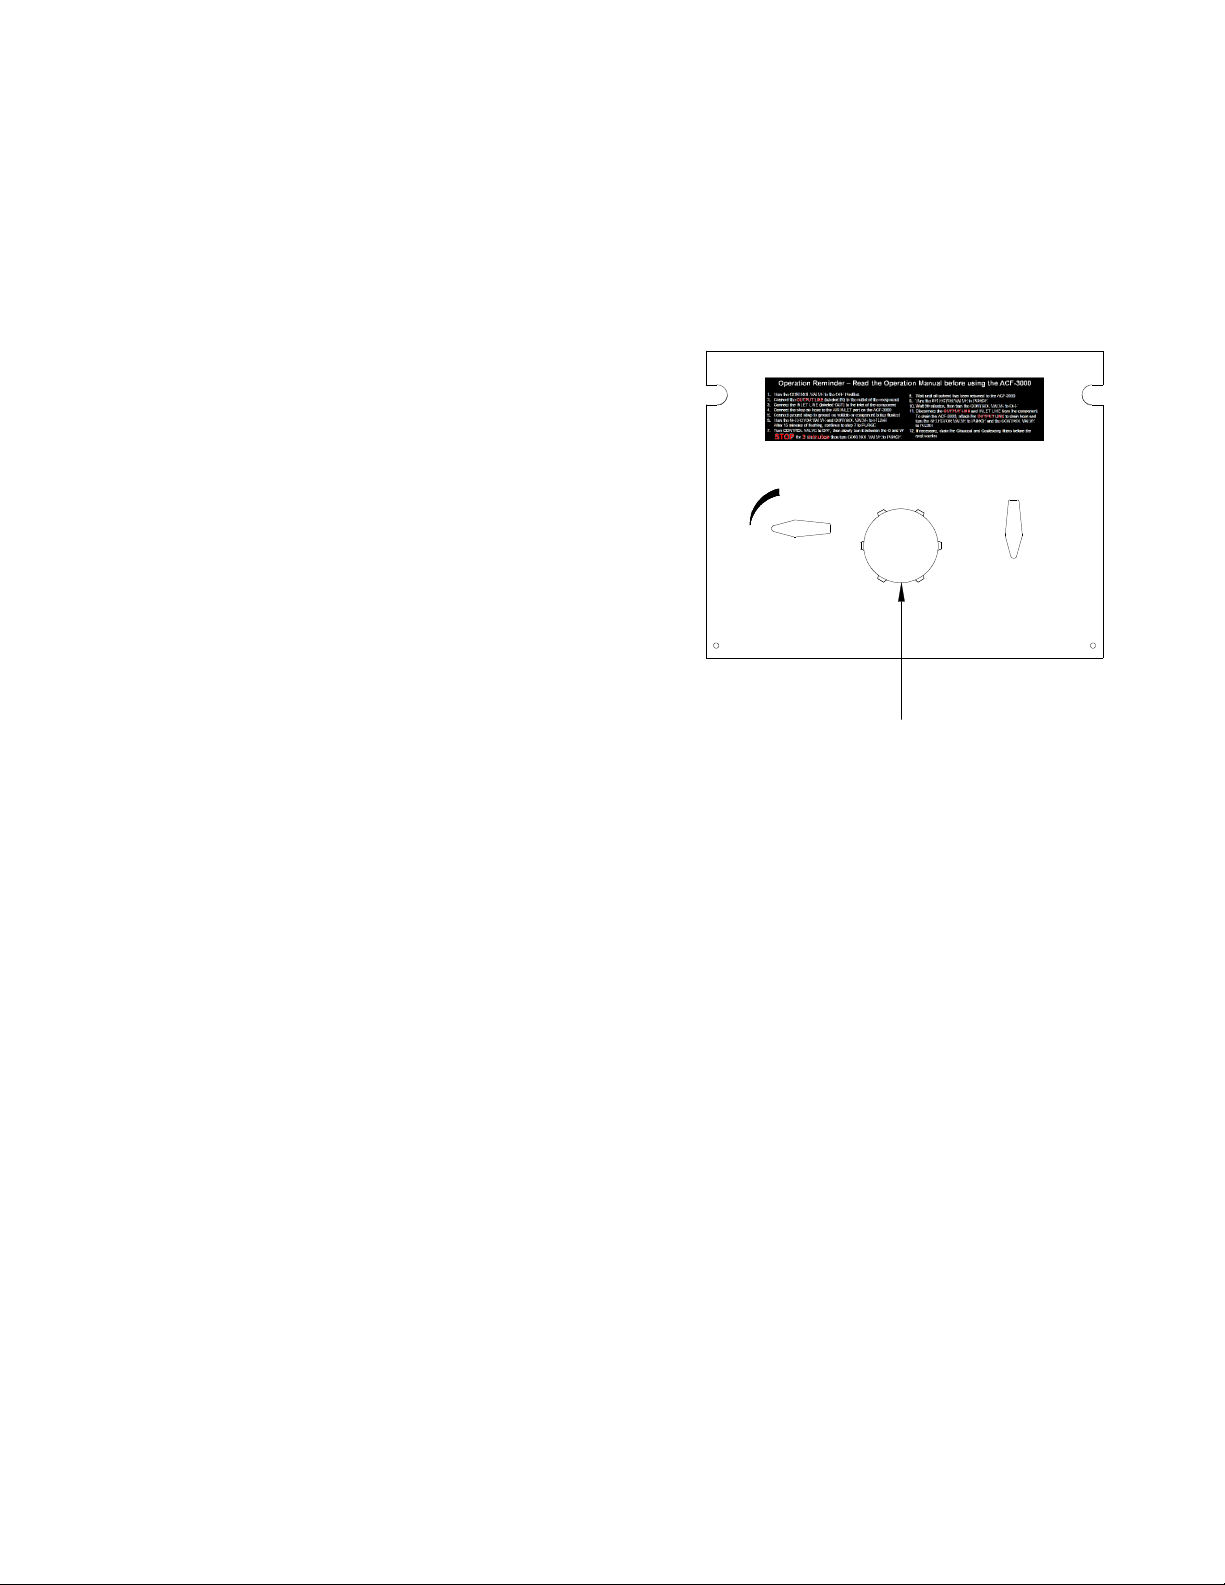
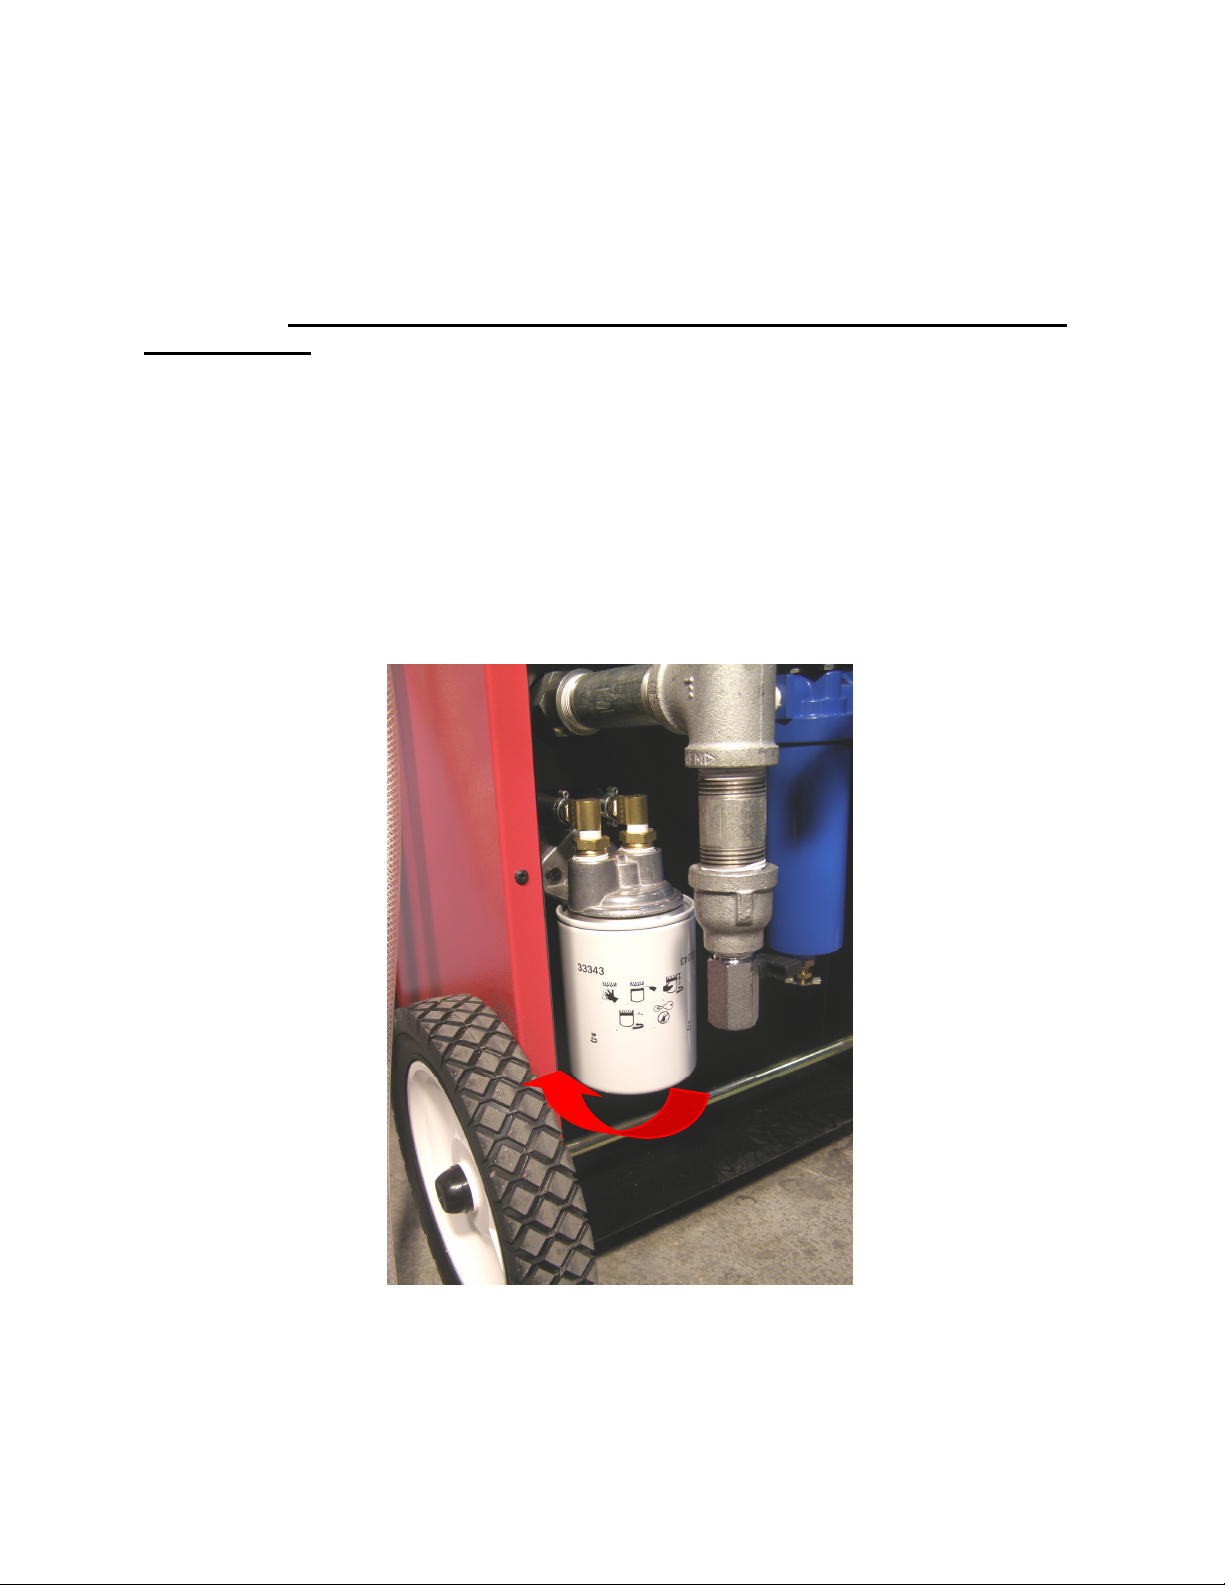
Coalescing Filter Drain
To drain the coalescing filter, turn the drain valve 90
degrees as shown in the figure to the right. Allow the
filter to drain until most of the liquid has drained out.
Loosen
Coalescing Filter Element Replacement
The coalescing filter element (Part Number: 026 80033 00) must be replaced after
every 100 flush and purge services. In some cases the element may need to be
replaced sooner if the shop air supply contains high amounts of moisture, oil, debris,
ect. A clogged element will restrict the airflow in the purge process and should be
replaced immediately.
1. Turn counterclockwise on the filter bowl to remove it.
2. Remove the filter element by turning it counterclockwise.
3. Replace the used element with a new one. Hand-tighten only.
4. Replace the filter bowl by turning it clockwise.
8
Page 10

Troubleshooting Guide
Problem
Possible Solution
The flush solvent does not
pump adequately through
the unit, but the pump
action can be heard.
The flush solvent does not
pump adequately through
the unit, but the pump
action can not be heard.
There is insufficient flush solvent in the supply tank. To fix this
problem simply add the correct amount of flush to the ACF3000 storage tank.
The Spin-on filter may be blocked. A new filter is required.
Refer to page 7 to Replace Spin-on Filter.
The pump may be defective. Remove the front cover and refer
to the Parts Identification section to locate the pump for
replacement (P/N 026 80667 00).
The check valve on the fluid side is not operating properly.
Remove the front cover and refer to the Parts Identification
section to locate the check valve for replacement
(P/N 022 80112 00).
The pump may be defective. Remove the front cover and refer
to the Parts Identification section to locate the pump for
replacement (P/N 026 80667 00).
The ACF-3000 air regulator is malfunctioning. Remove the
front cover and refer to the Parts Identification section to
locate the regulator for replacement (P/N 022 80116 00).
The solvent does not pump
adequately through the
system and escaping air
can be heard.
The purge process was not
adequate.
The shop air is below 90 psi. Adjust the shop air pressure to
at least 90 psi.
The internal air hose supplying the air pump may be leaking.
Re-secure, with a new hose clamp, or replace with a new
hose if necessary.
The shop air is below 90 psi. Adjust the shop air pressure to
at least 90 psi.
The coalescing filter may be clogged and need to be replaced.
Refer to the Coalescing Filter Element Replacement section
for instructions.
The check valve on the air side is not operating properly.
Remove the front cover and refer to the Parts Identification
section to locate the check valve for replacement
(P/N 022 80112 00).
9
Page 11

Parts Identification
Front Cover Removed
1
2
Part Number Description
1 021 80174 00 2” Plastic Cap
2 022 80119 00 3-way ball valve
3 305 80033 00 Charcoal Filter with Pre Filter
4 026 80253 00 Spin-on Filter (WIX® 33343)
5 305 80004 00 Ground Strap Assembly
6 026 80300 00 Coalescing Filter
7 022 80116 00
8 026 80667 00 2.0 GPM Air Pump
9 022 80112 00 1 PSI Check Valve
10
11
023 80284 00 Charcoal Filter Drain
060 81240 00 ACF Storage Tank
Panel-mount Regulator
(regulates down to 55 PSI)
3
10
4
5
6
8
7
9
11
10
Page 12

Flow Diagram
11
Page 13

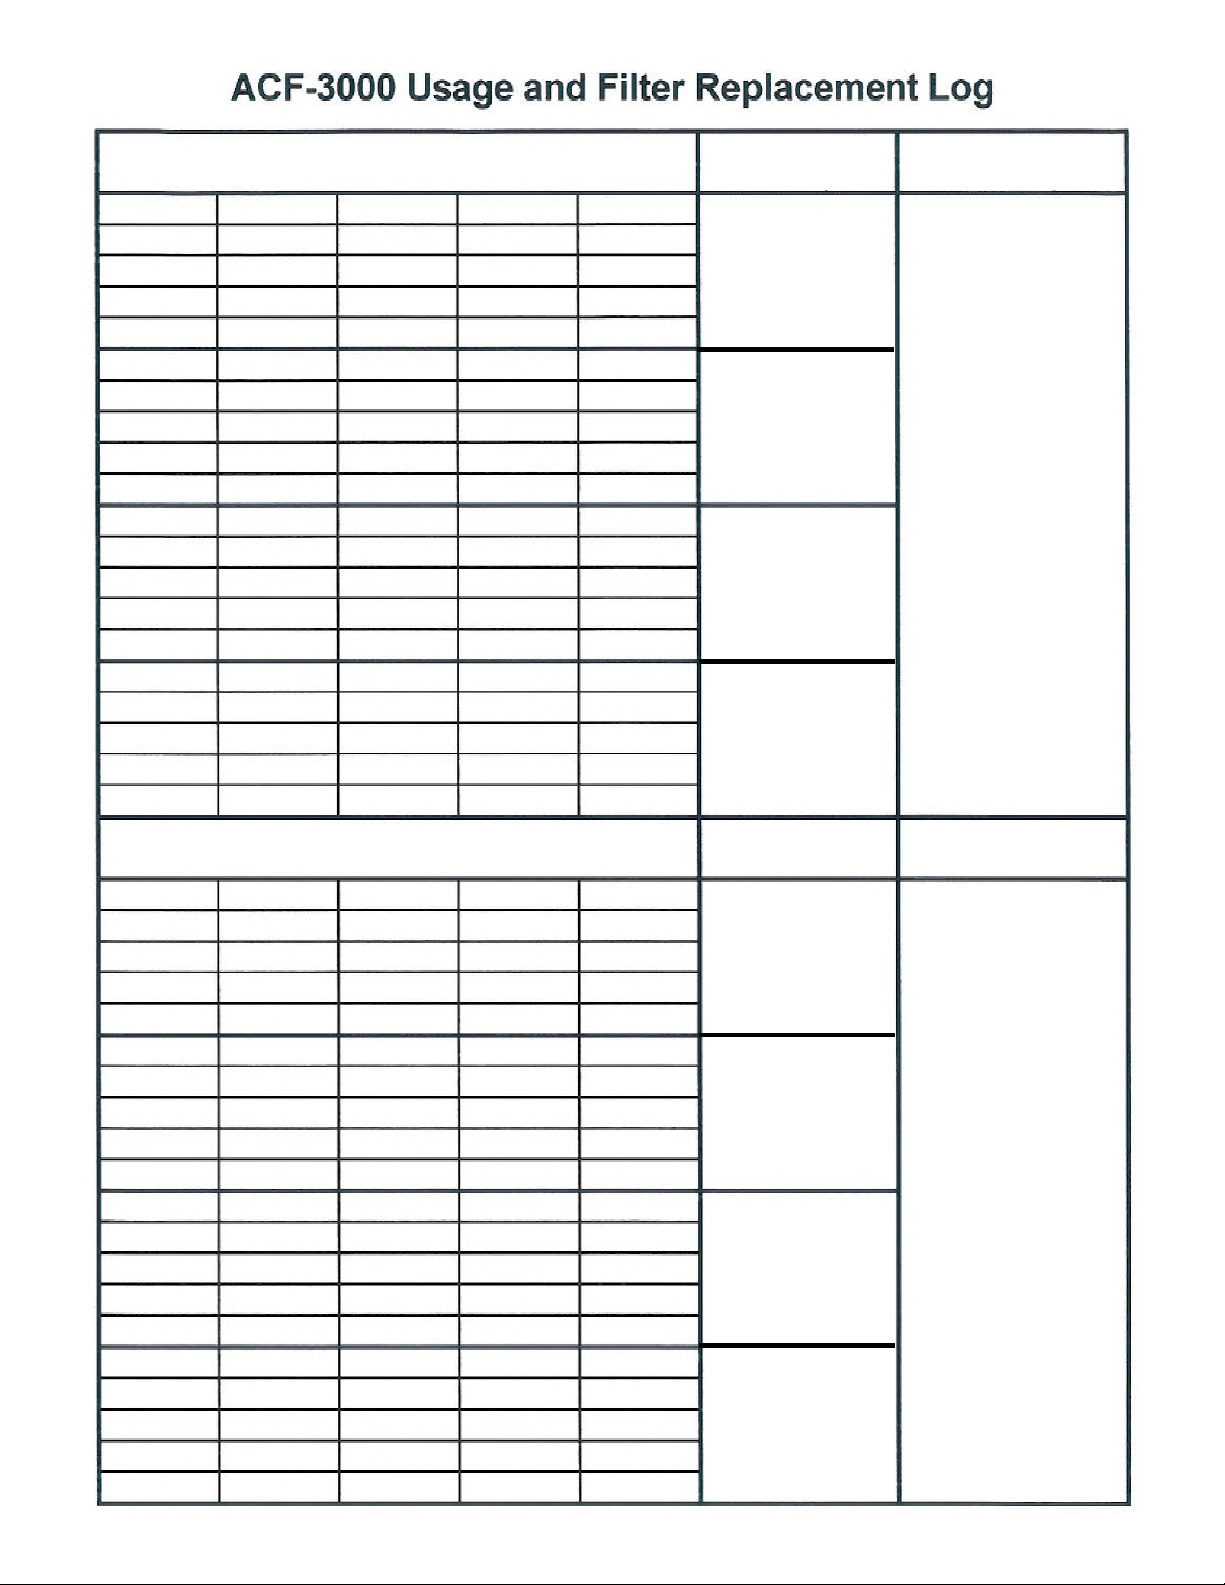
Filter was replaced
Filter was replaced
Record Date of Vehicle Flush and Spin
-
On Filter Replaced
Record Date of Vehicle Flush and Spin
-
On Filter Replaced
Filter was replaced
Filter was replaced
Date Charcoal Air
Date Coalescing
Date Charcoal Air
Date Coalescing
Page 14
Record Date of Vehicle Flush and Spin
-
On Filter Replaced
Filter was replaced
Filter was replaced
Filter was replaced
Filter was replaced
Record Date of Vehicle Flush and Spin
-
On Filter Replaced
Date Charcoal Air
Date Coalescing
Date Charcoal Air
Date Coalescing
Page 15

RTI One-Year Limited Warranty
(Applies only to equipment owned and operated in North America)
During
responsible
in material and/or workmanship. RTI is not responsible for the costs associated with
repairs needed due to improper use or a lack of normal maintenance. RTI’s goal is to
provide a timely turn-around of the covered product requiring warranty repair.
The Customer is responsible to ASSIST AND PARTICIPATE with RTI Technical
Support in the over-the-phone diagnosis process of:
A) Determining that a legitimate failure has occurred and that the complaint is
not just the result of
remedied
B) Determining the nature of the failure and that it is reasonable for RTI
Support
C)
shipped via the appropriate expedited method at the expense of RTI if the failure
is warrantable.
During the One Year Warranty period for failures that are deemed by RTI to be
warrantable, RTI is solely responsible for
reasonable period
generally available in all areas within 150 miles of major metropolitan areas of the US. A
reasonable period of time will depend on the location of the customer and the time of
the year. RTI maintains a large network of Service Providers in the US. When Field
Repair Service is needed, in most locations near a major US metropolitan area, and
during most times of the year, a reasonable period of time for Field Service is 24 to 48
hours after parts are received by the Customer.
Since repair parts from RTI will normally arrive 24 to 48 hours after the Customer
reports a failure, the Customer may at his sole option and discretion, choose to make
the necessary repairs, with over-the-phone support from RTI Technical Support so
as to minimize downtime. In such case, RTI will compensate the Customer or the
Customer’s employee as appropriate for the time necessary to make repairs if the
failure is covered by warranty.
It is the
instructions
the equipment in a commercially reasonable manner as generally described in the
RTI Operation Manual. RTI provides free Technical Support over toll-free telephone
lines in the US to assist the customer in this regard for the life of the covered product.
The Customer should review the legal Warranty Disclaimer for more details
of coverage and limitations.
the
One-Year Warranty period,
for
costs associated with
inadequate training and/or improper use that could be easily
by over-the- phone instructions.
to judge over the phone that the failure is warrantable.
Determining
Customer’s responsibility
the parts
of
in the RTI
necessary
time after a warrantable failure
Operation
MAHLE Clevite Inc., RTI Division
parts and labor for repairs needed due to defects
to make the
providing
to maintain the RTI
Manual for the covered product as well as to operate
repairs
Field
Repair
is
reported. Field
Equipment according
so that
(RTI)
is
Technical
those
Service within a
parts can be
Repair Service is
to
solely
14
Page 16

15
Page 17

 Loading...