

Page 1

Page 2

Breathing diesel engine exhaust exposes you to chemicals known to the State of California to cause cancer and birth defects or
other reproductive harm.
l Always start and operate the engine in a well-ventilated area.
l If in an enclosed area, vent the exhaust to the outside.
l Do not modify or tamper with the exhaust system.
l Do not idle the engine except as necessary.
For more information go to www.P65warnings.ca.gov/diesel
Page 3

CONTENTS
1 Introduction 1
2 Getting Started 2
3 Operator’s Guide 3
8 Riding Gear 20
8.1 Helmets and Eye Protection 20
8.2 Additional Riding Gear 21
9 Prepare to Ride 22
9.1 Pre-Ride Inspection Checklist 22
9.2 Post-Ride Inspection Checklist 24
4 Safety Alert Symbols 4
5 Safety Information/General Precautions 5
5.1 Avoid Carbon Monoxide Poisoning 5
5.2 Avoid Diesel Fuel Hazards 5
5.3 Avoid Hot Part Hazards 6
5.4 Accessories and Modifications 6
6 Safe Operations and Responsibilities 7
6.1 Owner Responsibilities 7
6.2 Operator's Responsibilities 7
6.3 Passenger Responsibilities 8
6.4 Occupant Restraint System 8
6.5 Riding Carefully 8
6.6 Terrain Condition 9
6.7 Stopping the Engine and Parking 10
7 Important On-Product Labels 11
7.1 ANSI/ROHVA Labels 11
7.2 EPA Labels 15
7.3 Manufacturer Labels 17
10 Learning Your Vehicle 25
11 Vehicle Controls 27
11.1 Primary Controls 27
11.2 Keys 27
11.3 Ignition Switch 27
11.4 Headlamp Switch 28
11.5 Multifunction Gauge 28
11.6 Steering Wheel 30
11.7 Accelerator Pedal 30
11.8 Brake Pedal 30
11.9 Clutch Pedal 30
11.10 Gear Shift Lever 31
11.11 Trans fer Case Lever 31
12 Equipment 32
12.1 Seat Belts 32
12.2 Driver’s Seat 32
12.3 Passenger Seat 32
12.4 Rollover Protective Structure (ROPS) 33
12.5 Shoulder Guards 33
© 2018 Mahindra Vehicle Sales and Service, Inc. All Rights Reserved. i
Page 4

12.6 Side Nets 33
12.7 Passenger Handhold 33
12.8 12 Volt Power Outlet 33
12.9 Storage Compartments 33
12.10 Cup Holders 34
12.11 Rear Cargo Area 34
12.12 Tailgate 34
12.13 Fuel Reservoir Cap 34
13 Electrical Distribution 35
14 Fuel (Diesel) 38
14.1 Fuel Requirements 38
14.2 Fueling Procedure 38
15 Break in Period 39
15.1 Operation During Break In 39
15.2 Tips for Maximizing Durability 39
16 Avoiding Accidents 40
17 Off-Road Operation 41
18 General Driving Techniques 42
18.1 Driving Tips 42
18.2 Driving in Reverse 42
18.3 Driving in or on Slippery Surfaces 42
18.4 Driving in or on Sand 43
18.5 Driving in or on Snow or Ice 43
18.6 Driving on Hills and Slopes 43
18.7 Side Hilling 44
18.8 Drop Offs 44
18.9 Crossing Obstacles 44
18.10 Crossing Shallow Water 44
18.11 Crossing Public Streets, Roads, or Highways 45
18.12 Driving on Pavement 45
18.13 Group and Distance Riding 45
18.14 Environment 46
19 Moving Loads and Doing Work 47
19.1 Working with Your ROXOR 47
19.2 Weight & Load Limits 47
19.3 Loading the Rear Cargo Area 47
19.4 Carrying Loads 47
19.5 Hauling and Pulling Loads 48
20 Transporting 49
20.1 Trailering 49
20.2 Towing 50
21 Lifting and Supporting 51
22 Maintenance 52
22.1 Severe Dusty Conditions 52
22.2 Scheduled Maintenance Chart 53
23 Maintenance Procedures 56
23.1 Maintenance Tips and Precautions 56
ii © 2018 Mahindra Vehicle Sales and Service, Inc. All Rights Reserved.
Page 5

23.2 Aim Headlamps 56
23.3 Clean Spark Arrester 56
23.4 Clean and Inspect Brakes 57
23.5 Check Brake Fluid Level & Leak Check 58
23.6 Check Differential Oil Levels & Leak Check 59
23.7 Check Engine Coolant Level & Leak Check 60
23.8 Check Engine Oil Level & Leak Check 61
23.9 Check Power Steering Oil Level & Leak Check 62
23.10 Check Tire Pressure 63
Check Transfer Case Oil Level & Leak Check 64
23.11 Drain Fuel/Water Separator 65
23.12 Lubricate Shift Linkage 66
23.13 Replace Alternator Drive Belt 67
23.14 Replace Power Steering Drive Belt 67
23.15 Replace Engine Air Filter 68
23.16 Replace Engine Oil and Oil Filter 70
23.17 Replace Transfer Case Oil 72
23.18 Rotate Wheels and Tires 73
24 Vehicle Care 74
24.1 Post Operation Care 74
24.2 Vehicle Cleaning and Protection 74
24.3 Metal and Rust Prevention 74
24.4 Storage and Preseason Preparation 74
25 Technical Information 75
25.1 Product Identification Number 75
25.2 Engine Identification Number 75
25.3 Evaporative Emission Control System 75
25.4 Noise Emission Control System 76
25.5 Acts Presumed to Constitute Tampering 76
26 Specifications 77
26.1 Fluid Specifications and Quantities 77
26.2 Vehicle Specifications 77
27 Troubleshooting 79
28 Limited and EPA Warranties U.S. and Canada 81
28.1 Limited Warranty U.S. and Canada 81
28.2 U.S. EPA Emission-Related Limited Warranty (Canada
Excluded) 85
28.3 California Evaporative Emissions Control Warranty Statement 87
29 Contact Us 89
30 Privacy Information 90
31 Change of Address/Ownership 91
32 Stolen Units 92
© 2018 Mahindra Vehicle Sales and Service, Inc. All Rights Reserved. iii
Page 6

Page 7

1 INTRODUCTION
Congratulations on the purchase of your new Mahindra ROXOR
Offroad Side x Side. Please know that Mahindra Vehicle Sales and
Service, Inc. backs this unit with limited and EPAwarranties. A network of ROXOR authorized dealers are ready to provide the parts,
accessories and services to support your needs.
Upon delivery, you were informed of these limited and EPA warranty
coverages and signed the Pre-Delivery Checklist to ensure your new
ROXOR was prepared to your entire satisfaction. Please make sure
you have a copy of the Pre-Delivery Checklist and retain it for your
records. If you have questions or need more information, please contact your ROXOR authorized dealer or visit our website
WWW.ROXOROFFROAD.COM.
Copyright © 2018 Mahindra Vehicle Sales and Service, Inc. All Rights
Reserved.ROXOR is a registered trademark owned by Mahindra &
Mahindra Ltd.
Issued: October 2018
1 Introduction
© 2018 Mahindra Vehicle Sales and Service, Inc. All Rights Reserved. 1
Page 8

2 Getting Started
2 GETTING STARTED
Start by learning how to help reduce the risk of an accident affecting
you, a passenger or bystanders. Read and make sure you fully comprehend and abide by the content of this Operator’s Guide before
you operate the Mahindra ROXOR Offroad Side x Side.
Also, read and become familiar with all safety labels on your
ROXOR. Failure to follow all on-product safety label warnings, and
the warnings contained in this Operator’s Guide may result in severe
injury or death of the operator, passenger and bystanders.
2 © 2018 Mahindra Vehicle Sales and Service, Inc. All Rights Reserved.
Page 9

3 OPERATOR’S GUIDE
This Operator’s Guide has been prepared to familiarize the owner
and any operator with the various controls, maintenance and safe
operating instructions. It is essential for the proper use of the
product.
The information contained in this Operator’s Guide is correct at the
time of publication. Mahindra, however, maintains a policy of continuous improvement of its products without imposing upon itself
any obligation to install them on products previously manufactured.
We reserve the right to change, modify, or cancel specifications,
designs, features, and colors without notice or obligation. Some differences between the manufactured product and the descriptions
and/or specifications may exist.
Keep this Operator’s Guide with the vehicle so you and any other
operator can refer to it for things such as maintenance, troubleshooting and instructing others. To view and/or print extra copies of the
Operator’s Guide, simply visit WWW.ROXOROFFROAD.COM.
3 Operator’s Guide
© 2018 Mahindra Vehicle Sales and Service, Inc. All Rights Reserved. 3
Page 10

4 Safety Alert Symbols
4 SAFETY ALERT SYMBOLS
This safety alert symbol indicates a potential for injury hazard. The categories of safety and informational labels provided on
the ROXOR and in this Operator’s Guide are defined as follows:
potential for an immediate hazard resulting in severe
injury or death to occupants and/or the general public if not avoided.
potential for a hazardous condition exists that could result in severe injury or death of occupants and/or the general public if
not avoided.
potential for a non-immediate hazard presenting a
lesser threat of injury, resulting in minor or moderate injuries to occupants and/or general public if not avoided.
potential for a non-immediate hazard presenting a risk
to property and/or equipment damage.
The entire contents of this Operator’s Guide should be treated as
safety instructions. They should be scrupulously adhered to, and
where specifically warranted, we have called out instructions with
the symbols above. However, failure to use proper care and abide by
the contents of this Operator’s Guide, as well as the applicable laws
and regulations in your area, could result in severe injury, including
death.
4 © 2018 Mahindra Vehicle Sales and Service, Inc. All Rights Reserved.
Page 11

5 Safety Information/General Precautions
5 SAFETY INFORMATION/GENERAL
PRECAUTIONS
5.1 Avoid Carbon Monoxide Poisoning
All engine exhaust contains a deadly gas known as carbon monoxide. Carbon monoxide is a colorless, odorless, tasteless gas that
may exist even though you may not see or smell engine exhaust.
Breathing carbon monoxide can result in headaches, dizziness,
drowsiness, nausea, confusion and could eventually lead to death.
Lethal levels of carbon monoxide can collect quickly and exist for
long periods of time when not properly ventilated. Always run the
ROXOR in a well ventilated or open area.
If you have symptoms that you think could be a result
of carbon monoxide poisoning, leave the area right away, and call or
go to the emergency room. If you keep breathing carbon monoxide
fumes, you may pass out and die.
Avoid running the engine in garages, carports or barns
that do not have proper ventilation. Avoid running the engine anywhere that may allow exhaust gases to be drawn into a building
through open doors, windows or vents resulting in the carbon monoxide poisoning of yourself or others.
5.2 Avoid Diesel Fuel Hazards
Diesel fuel is widely regarded as safe to handle and store in its liquid
form. However, diesel fuel in its vapor form can be dangerous, especially at temperatures above 100°F (38°C). The vaporization rate of
diesel fuel increases as the temperature increases. In the presence of
a vapor accelerant such as fan forced air or oxygen, the diesel fuel
can begin to vaporize even faster. Help reduce the risk of diesel fuel
hazards by following these instructions.
l Strictly adhere to the fueling instructions in section 14.2 Fueling
Procedure.
l Never start or operate the engine if the fuel cap is not properly
installed.
l Use only an approved (yellow) diesel fuel container to store and
transfer diesel fuel.
All fuel handling must take place in a well-ventilated
area. Avoid heat, flames and other sources of ignition, avoid inhalation of vapors and contact with skin and eyes, do not siphon diesel
fuel by mouth, never fill a fuel container inside the ROXOR as the
interior surfaces are coated, acting as an insulator and allowing static
electricity to build up, help guard against static discharges by always
filling approved containers on the ground, do not allow anyone to
remain in the ROXOR while fueling, an occupant may not be able to
leave the area quickly in an emergency, failure to follow these warnings may result in severe injury or death.
© 2018 Mahindra Vehicle Sales and Service, Inc. All Rights Reserved. 5
Page 12

5 Safety Information/General Precautions
5.3 Avoid Hot Part Hazards
The engine, exhaust, transmission, cooling system and other ancillary parts on the ROXOR become very hot during operation. Burns
from touching these parts can happen in less than one second, but
can be very serious. Help reduce the risk of burns by following these
instructions.
l Use cool water on the burned areas. Avoid ice and cold water.
l Clean the burn area immediately, and keep the area clean.
l Cover or wrap the burn with a clean, dry gauze pad, cloth or
towel.
l For severe burns, call 911 and get medical attention right away.
l Do not apply butter, toothpaste, sprays, or other home remedies.
Avoid contact with the engine, exhaust, transmission,
cooling system and other very hot parts, during and shortly after
operation to avoid burns and any other severe injury.
5.4 Accessories and Modifications
It is important to take the time to get familiar with the ROXOR once
authorized and approved modifications are made, to help understand how to adapt your driving behavior accordingly. Mahindra
parts and accessories have been specifically designed for use on the
Mahindra ROXOR Offroad Side x Side. We strongly recommend that
all parts and accessories you add to your ROXOR be genuine
Mahindra parts and accessories, so as not to affect your safety, EPA
compliance or factory limited warranty.
Mahindra Vehicle Sales and Service, Inc. warrants that the Accessories, as further defined below, are free from defects in material and
workmanship:
l For ninety (90) days from the date of purchase, if purchased by
consumer without installation by a ROXOR authorized dealer; or
l If installed by a ROXOR authorized dealer within thirty (30) days
from the date of purchase of the Accessory, the standard Limited Warranty accompanying the ROXOR.
Do not tamper with unauthorized modifications or install equipment
not specifically certified by Mahindra for the ROXOR. These modifications have not been tested by Mahindra and they may increase
emissions, risk of injury, loss of control or render the ROXOR illegal
to use or operate.
As an example, tampering with tire specifications or ride height (lift
kit) may affect the behavior of the ROXOR and increase the risk of
roll over and loss of control. If you have questions, consult your
local authorized dealer for suitable, available accessories for your
ROXOR.
The ROXOR was certified to EPA emissions and voluntary safety standards; including the ANSI ROHVA. Any modifications or addition of accessories may affect the certifications,
emissions, safety and handling resulting in injury or death.
6 © 2018 Mahindra Vehicle Sales and Service, Inc. All Rights Reserved.
Page 13

6 Safe Operations and Responsibilities
6 SAFE OPERATIONS AND RESPONSIBILITIES
The ROXOR is a two seat off-road work horse. Operators must be
responsible and use care to avoid rollovers, tip overs, collisions, and
other accidents. Even with vehicle safety features such as a Rollover
Protective Structure (ROPS), seat belts, shoulder guards, side nets,
doors (if equipped) and protective gear such as helmets and eye protection. There is always a risk of injury or death in these accidents.
To help reduce the risk of severe injury or death, carefully follow the
rules in this section.
6.1 Owner Responsibilities
Read this Operator’s Guide and take advantage of the resources
provided on the Recreational Off-Highway Vehicle Association
(ROHVA) website (http://www.rohva.org). Always inspect and confirm the safe operating condition of your ROXOR prior to a ride.
Always follow the maintenance schedule described in this Operator’s Guide. Never allow anyone to operate your ROXOR unless they
are responsible and can be trusted with an off-road vehicle like the
ROXOR. Consider supervising new operators and setting rules and
limits for anyone using your ROXOR (e.g., whether they can carry a
passenger, what they may do with the vehicle, where they may ride,
etc.). Always discuss the safety information with anyone who will be
using the ROXOR. Be sure that the operator and passenger meet the
qualifications below and agree to follow the safety information
herein. Help users become familiar with the ROXOR and its equipment.
We encourage you to have an Annual Safety Inspection of your
ROXOR. Please contact a ROXOR authorized dealer for further
details. Though not required, it is recommended that a ROXOR
authorized dealer performs the preseason preparation of your
ROXOR. Each visit to your authorized dealer is a great opportunity
for your dealer to verify if your vehicle is included in any campaigns.
We also urge you to visit your authorized dealer in a timely manner
if you become aware of any safety related campaigns.
6.2 Operator's Responsibilities
Read this Operator’s Guide and take advantage of the resources
provided on the ROHVA website [http://www.rohva.org]. Become
completely familiar with the operational controls and the general
operation of the ROXOR. Take a training course if available, contact
a ROXOR authorized dealer to find out about training course availability in your area. New operators of the ROXOR should also perform the exercises in section 10 Learning Your Vehicle. Practice
driving in a suitable area free of hazards and feel the response of
each control. Drive at low speeds. Higher speeds require greater
experience, knowledge and suitable riding conditions.
All operators must have a proper driver's license in accordance with
local laws. Be tall enough to be properly seated: back against the
backrest with the seat belt fastened, hold the steering wheel with
both hands and still be able to reach the full stroke of clutch, brake
and accelerator pedals with the correct foot. Never use the ROXOR
while consuming or under the influence of drugs or alcohol, or if
© 2018 Mahindra Vehicle Sales and Service, Inc. All Rights Reserved. 7
Page 14

6 Safe Operations and Responsibilities
tired or ill. These effectively slow your reaction time and impair judgment.
Operators must be at least 16 years of age or older,
with a valid driver's license. Children under the age of 16 may not
have the physical or psychological capability to operate the ROXOR
without risk of injury or death.
6.3 Passenger Responsibilities
The passenger must be properly seated in the passenger seat. The
passenger must be tall enough to always be properly seated: back
against the backrest with seat belt fastened and feet firmly planted
on floor. Never carry a passenger who is consuming or under the
influence of drugs or alcohol, or is tired or ill. These effectively slow
reaction time and impair judgment. Instruct the passenger to read
the vehicle’s safety labels. Never carry a passenger if you believe
their ability or judgment is insufficient to concentrate on the terrain
conditions and adapt accordingly. More specifically for off-road
vehicles such as the Mahindra ROXOR Offroad Side x Side, the passenger must also pay constant attention to the terrain ahead and be
able to brace for bumps.
Only carry a maximum of one passenger, while properly
seated and safety belted in the passenger seat. Failure could result in
an un-belted passenger being ejected from the vehicle causing
severe injury or death.
6.4 Occupant Restraint System
The ROXOR is designed to carry one operator and one passenger,
both wearing proper protective gear. Refer to section 8 Riding Gear
for more information. The operator and passenger must latch the
side nets or close full doors (if equipped) and wear seat belts at all
times when riding.
If driver's seat belt is not fastened when the ignition is
turned on, the seat belt indicator lamp will flash and the throttle input
will be limited.
6.5 Riding Carefully
The ROXOR handles differently from other vehicles. A collision or
rollover can occur quickly, particularly during abrupt maneuvers
such as sharp turns, hard acceleration or deceleration, and driving
on hills or over obstacles if you fail to take proper precautions.
Never operate at excessive speeds. Always go at a speed that is
proper for the terrain, visibility, and operating conditions, as well as
your experience. Never attempt jumps, side slides, donuts or any
other stunts. Never attempt rapid acceleration or deceleration when
performing a sharp turn. This may result in a roll over. Never
attempt skidding or sliding. If the vehicle starts to skid or slide,
counter steer in the direction of skidding or sliding. On extremely slippery surfaces, such as ice, go slowly and be very cautious in order to
reduce the chance of skidding out of control. Always be sure there
are no obstacles or people behind the vehicle when you operate in
reverse. Pay attention to blind spots. When it is safe to proceed in
8 © 2018 Mahindra Vehicle Sales and Service, Inc. All Rights Reserved.
Page 15

6 Safe Operations and Responsibilities
reverse, go slowly. Never exceed the stated load limits for this
vehicle. Cargo must be properly secured. Reduce speed, allow for
greater braking distance and follow all instructions in section 19
Moving Loads and Doing Work. Always remember that the ROXOR is
heavy! Its pure weight alone may entrap you should it tip or rollover.
6.6 Terrain Condition
The ROXOR is not equipped for, or legal to operate on, public streets,
roads, or highways. If you must use the ROXOR on public streets,
roads, or highways, avoid abrupt inputs to the steering wheel, accelerator pedal and brake pedal. Be alert of motor vehicles that are
equipped for on road use, as the ROXOR is not.
Take the time to learn how the ROXOR performs in different environments by reading and comprehending section 18 General Driving
Techniques. Check the terrain carefully before you start up and
down hills, enter or exit water, or drive through tall grasses when the
surface texture is not visible. Remember that wet brakes may have
reduced stopping ability. Test your brakes after leaving water and if
necessary, apply them several times to let friction dry out the brakes.
Sudden changes in terrain caused by holes, depressions, banks,
softer or harder ground or other irregularities may cause the vehicle
to roll over or become unstable. To avoid this, slow down and
always observe the terrain ahead. If the ROXOR does begin to
rollover, the best advice is to immediately steer in the direction of the
rollover and do not attempt to prevent a rollover with your arms or
legs. Always keep your limbs inside the Rollover Protective Structure
(ROPS).
l Always ensure to properly park the ROXOR on the flattest terrain
section available. Refer to section 6.7 Stopping the Engine and
Parking
l Always go slowly and be extra careful when operating on unfa-
miliar terrain.
l Always be alert to changing terrain conditions.
l Always check for obstacles before operating in a new area.
l Always follow proper procedures for ascending or descending
hills or crossing obstacles.
l Never assume that the ROXOR will go everywhere safely.
l Never operate on excessively rough, slippery or loose terrain.
l Never operate on hills too steep for your abilities. Practice on
small inclines.
l Never go over the top of any hill at high speed.
l Never attempt steep hills or side hill traversing when pulling a
trailer.
l Never operate in fast flowing water or in water deeper than spe-
cified in section 18.10 Crossing Shallow Water
© 2018 Mahindra Vehicle Sales and Service, Inc. All Rights Reserved. 9
Page 16

6 Safe Operations and Responsibilities
6.7 Stopping the Engine and Parking
Release accelerator pedal and use brakes to completely stop the
ROXOR. Turn the ignition key to the OFF position and remove key
from ignition switch. When stopped or parked always put gear shift
lever in first gear and set parking brake by pushing the button in,
pulling straight up and then releasing button. To release parking
brake, pull up slightly, push and hold button in, then release down to
rest position and release button.
This is especially important when parking on a slope, you should
always try to park on the flattest and most stable terrain available.
The nominal ground clearance for the ROXOR is 9" (22.9 cm).
On very steep inclines the wheels should be blocked
using rocks or logs to help prevent sliding, avoid loose wet or slippery slopped terrain to further help prevent the ROXOR from sliding,
avoid stopping or parking in places where hot parts like the engine,
exhaust, transmission or cooling system may start a fire, like tall dry
grass, failure to follow these warnings may result in severe injury or
death.
10 © 2018 Mahindra Vehicle Sales and Service, Inc. All Rights Reserved.
Page 17

7 Important On-Product Labels
7 IMPORTANT ON-PRODUCT LABELS
Replacement labels are free of charge and can be requested from a
ROXOR authorized dealer with a registered Product Identification
Number (PIN).
Removal of, or tampering with any of these important
on-product labels is highly discouraged by Mahindra. Removal of
these labels may result in operators missing critical safety instructions which may result in severe injury or death.
A person who knowingly removes, obliterates, tampers
with, or alters the Product Identification Number (PIN) on the ROXOR,
with intent to further the theft of it pursuant to the Motor Vehicle
Theft Prevention Act, shall be fined under this title, imprisoned not
more than 5 years, or both.
7.1 ANSI/ROHVA Labels
The labels in this section are to comply with the requirements set
forth by the American National Standards Institute (ANSI), specifically standard ANSI Z535.4-2007.
The ROXOR is delivered with several labels containing important
safety information. Some of these labels are affixed to the ROXOR
for the safety of the operator, passenger and bystanders. They need
to be clean and visible at all times. If missing or damaged, they need
to be replaced. Replacement labels are free of charge and can be
requested from a ROXOR authorized dealer with a registered Product
Identification Number (PIN).
Any hang tags shown in this section should only be
removed by the ultimate consumer after purchase. Any person who
operates, or is a passenger in the ROXOR should be provided with
and read and understand the information contained in the on-product
labels before riding.
Label Number – 0003AUA00090N
Name – Roll Over Protection Structure (ROPS)
Location – Left upper ROPS
© 2018 Mahindra Vehicle Sales and Service, Inc. All Rights Reserved. 11
Page 18

7 Important On-Product Labels
Hang Tag Number – 0003AUA00791N
Name – Pre-Sale & Tilt Table Information
Location – Center of front ROPS or rear view mirror (if equipped)
Label Number – 003AUA00100N
Name – Combined Tire Pressure and Overload
Location – Left B-pillar ROPS
12 © 2018 Mahindra Vehicle Sales and Service, Inc. All Rights Reserved.
Page 19

Label Number – 0003AUA00221N
Name – No Passenger in Cargo Area
Location – Right and left seat belt retractors, facing rearward
7 Important On-Product Labels
Label Number – 0003AUA00231N
Name – ROV Complies with ANSI/ROHVA 1-2016
Location – Right upper ROPS
© 2018 Mahindra Vehicle Sales and Service, Inc. All Rights Reserved. 13
Page 20

7 Important On-Product Labels
Label Number – 0003AUA00080N
Name – General Warning Label
Location – Left side of cup holder escutcheon
14 © 2018 Mahindra Vehicle Sales and Service, Inc. All Rights Reserved.
Page 21

7.2 EPA Labels
The labels in this section are to comply with the requirements set
forth by the Environmental Protection Agency (EPA). All EPA onproduct labels with the ROXOR, should be considered a permanent
part of the ROXOR. Upon replacement of parts that have EPA labels
on them, make sure to order the applicable safety warning labels if
not already installed on the replacement part.
The ROXOR is delivered with several labels containing important
safety and emissions information. They need to be clean and visible
at all times. If missing or damaged, they need to be replaced.
Replacement labels are free of charge and can be requested from a
ROXOR authorized dealer with a registered Product Identification
Number (PIN).
7 Important On-Product Labels
Any hang tags shown in this section should only be
removed by the ultimate consumer after purchase. Any person who
operates, or is a passenger in the ROXOR should be provided with
and read and understand the information contained in the on-product
labels before riding.
© 2018 Mahindra Vehicle Sales and Service, Inc. All Rights Reserved. 15
Hang Tag Number – 0003AUA00010N
Name – Consumer Emissions Information
Location – Base of steering column. To be removed by ultimate consumer after purchase.
Page 22

7 Important On-Product Labels
Label Number – 0003AUA00711N
Name – Off Road Use Only
Location – Center of dash panel
16 © 2018 Mahindra Vehicle Sales and Service, Inc. All Rights Reserved.
Label Number – 0003AUA00701N
Name – Vehicle Emissions Control Information (VECI) – 49 States
Location – Engine compartment, on the radiator support
Page 23

Label Number – 0003AUA00130N
Name – Product Identification Number (PIN)
Location – Engine Compartment, on the driver's side of bulkhead
7.3 Manufacturer Labels
The labels in this section are driven by Mahindra’s commitment to
product safety and making sure the operator of the ROXOR is fully
aware of its capacities and limitations.
The ROXOR is delivered with several labels containing important
safety information. Some of these labels are affixed to the vehicle
7 Important On-Product Labels
for the safety of the operator, passenger and bystanders. They need
to be clean and visible at all times. If missing or damaged, they need
to be replaced. Safety labels are free of charge and can be requested
from Mahindra Vehicle Sales and Service, Inc. with a registered
Product Identification Number (PIN).
Any hang tags shown in this section should only be
removed by the ultimate consumer after the vehicle has been purchased. Any person who operates, or is a passenger in this vehicle
should read and understand the information contained in the onproduct labels before riding.
Label Number – 0003AUA00110N
Name – Ultra Low Sulfur Diesel (ULSD) Fuel Only
Location – Fuel fill pocket, right rear side of vehicle
© 2018 Mahindra Vehicle Sales and Service, Inc. All Rights Reserved. 17
Page 24

7 Important On-Product Labels
Label Number – 0003AUA00190N
Name – Shift Pattern and Transfer Case
Location – Dash panel
18 © 2018 Mahindra Vehicle Sales and Service, Inc. All Rights Reserved.
Label Number – 0003AUA00200N
Name – Dimensions and Capacities
Location – Dash panel
Page 25

Hang Tag Number – 0003AUA00251N
Name – Seat Belt Disconnected
Location – Driver’s seat belt buckle end
7 Important On-Product Labels
Label Number – 0003AUA00261N
Name – Don't Do Anything Stupid
Location – Dash panel, right side behind passenger handhold
© 2018 Mahindra Vehicle Sales and Service, Inc. All Rights Reserved. 19
Page 26

8 Riding Gear
8 RIDING GEAR
It is important that the operator and passenger always wears appropriate protective clothing and apparel, including an approved helmet, eye protection, boots, gloves, a long-sleeved shirt or jacket and
long pants. Depending on conditions, anti-fogging eye protection
may be required. Weather conditions should help you decide how to
dress. To maximize comfort and avoid frostbite in winter, dress for
the coldest weather expected. Thermal underwear next to the skin
also provides good insulation. Never wear any loose clothing that
may get entangled in the vehicle or on tree branches and shrubs.
8.1 Helmets and Eye Protection
Helmets protect you from head and brain injuries. Select a helmet
that meets the Department of Transportation (DOT) safety standard
in your state, province or country. A helmet should bear the standards DOT FMVSS 218 and/or ECE 22.05 and should fit snugly and
fasten securely.
A helmet with full face protection is the best choice because it will
protect your face from impacts. Branches, stones, insects and other
flying objects cause injury to you and your passenger, as well as
make you lose control of the ROXOR. For cold weather riding, a stocking cap or face mask will also offer protection from flying objects
and the elements.
If you choose an open-face helmet, a snap on safety shield is preferred. An open-face helmet does not offer the same protection for
the face and chin. The ROXOR's Roll Over Protection Structure
(ROPS) and side nets can not prevent all objects from entering the
cockpit area. In rough terrain conditions, your head may make contact with the ROPS or objects outside the ROXOR. The best helmet is
no guarantee against injury, but statistically a helmet significantly
reduces the risk of injury. Operator and passenger should always
wear a helmet while riding in the ROXOR.
OSHA approved eye protection is also essential to see clearly and
drive safely. Dust, dirt, rocks, bugs and branches not only distract
and obstruct your vision but can permanently damage your eyesight. Most prescription eye glasses and sunglasses will NOT
provide proper protection while driving the Mahindra ROXOR Offroad
Side x Side. The lenses can shatter causing severe eye injury. Protective eye wear, goggles and face shields should bear one of the following standards, z87.1, z87.2, VESC8, V-8, or be made of a hard
coated polycarbonate. Use tinted face shields or eye protection in
the daytime only, use clear eye protection for driving at night.
Do not use tinted lenses at night or in low light conditions as these will limit your ability to see terrain contour, which
may result in severe injury or death.
Do not use tinted lenses if they effect your ability to see
color, this may also result in severe injury or death.
20 © 2018 Mahindra Vehicle Sales and Service, Inc. All Rights Reserved.
Page 27

8 Riding Gear
8.2 Additional Riding Gear
Riding in the ROXOR without the additional riding gear listed below
increases your chances of severe injury in the event of an accident.
Hearing Protection – Check your local laws before using hearing protective devices as they may not be allowed. Hearing protective
devices can help prevent hearing loss but also reduce your ability to
hear the surrounding sounds and may affect your safety.
Gloves – Gloves protect your hands from the elements and flying
objects. Properly fitting gloves will improve your grip on the steering
wheel and reduce fatigue. If gloves do not fit properly they may
make it difficult to operate the ROXOR controls. For cold weather riding, gloves with sufficient insulation are required to protect your
hands from frost bite.
Boots – You should not operate the ROXOR with open toed footwear. An over-the-ankle boot with non-slip soles are preferred and
will help you keep your feet firmly on the floor and foot controls.
Long shoelaces should be avoided, they can get tangled in the foot
controls and prevent you from exiting the ROXOR. For cold weather
riding, avoid oversized boots that may get trapped in the foot controls and prevent the proper operation of the ROXOR.
Clothing – Long sleeve shirts and long pants are preferred when
operating the ROXOR. In the event of a crash the right clothing may
prevent or reduce injury. For cold weather riding, wear sufficient insulation to protect yourself against hypothermia, a condition of
lowered body temperature resulting in a loss of concentration,
slower reaction times and muscle movement. Even in moderate
temperatures, wind chill can make you cold and affect your reaction
time. A windproof outer layer can prevent this. Always dress in layers so that clothing can be added and removed to keep you comfortable during your entire ride.
Rain Gear – On extended rides, carrying rain gear is a good idea. Dry
riders will be much more alert and comfortable.
© 2018 Mahindra Vehicle Sales and Service, Inc. All Rights Reserved. 21
Page 28

9 Prepare to Ride
9 PREPARE TO RIDE
Before a ride, the operator should always perform a Pre-Ride Inspection to confirm the safe operating condition of the ROXOR. Refer to
section 9.1 Pre-Ride Inspection Checklist. Operator and passenger
must be properly seated, with both side nets latched and doors
closed (if equipped) and seat belts fastened. Wear the appropriate
riding gear. Refer to section 8 Riding Gear for more information.
Perform a Pre-Ride Inspection before each ride to help
detect any potential problems that could occur during operation. The
Pre-Ride Inspection can help you monitor component wear and deterioration before they become a problem. Correct any problem that you
discover to help reduce the risk of a breakdown or accident.
Always follow the maintenance schedule described in
this Operator’s Guide to also keep your vehicle in safe working order.
9.1 Pre-Ride Inspection Checklist
What to do before startingthe engine
l Check tire pressure and condition. Recommended cold tire pres-
sure is 28 psi.
l Check wheels for damage and abnormal play. Make sure lug
nuts are torqued to between 71-105 Nm.
l Check cleanliness of radiator cooling fins.
l Check engine oil level. Maintain between the two notches on dip
stick.
l Check engine coolant level. Maintain between HIGH and LOW
lines on the coolant overflow bottle when engine is cold.
l Check brake fluid level. Maintain between MIN and MAX lines on
the brake fluid reservoir with no pedal pressure.
l Check clutch fluid level. Maintain between MIN and MAX lines on
the clutch fluid reservoir with no pedal pressure.
l Inspect the engine air filter, clean or replace if needed.
o
Service engine air filter more often in dusty conditions
l If you are transporting cargo, respect the maximum rear cargo
weight capacity.
o
Ensure cargo is properly secured in the rear cargo area.
o
Ensure maximum vehicle load capacity does not exceed specifications. This includes operator, passenger, added
accessories, trailer tongue weight (if applicable), and rear
cargo.
l Check tailgate is properly latched.
l If you are pulling a trailer or other equipment, respect the trailer
tongue capacity and towing capacity
o
Ensure trailer hitch and trailer ball are properly secured.
o
Ensure trailer is properly secured to trailer hitch and ball.
o
Limit operation to safe level terrain.
22 © 2018 Mahindra Vehicle Sales and Service, Inc. All Rights Reserved.
Page 29

9 Prepare to Ride
l Check underneath vehicle for any debris on chassis or sus-
pension and clean them properly.
l Check operation of indicator lamps.
o
This can be done during the first few seconds of key ON.
l Check operation and cleanliness of headlights and taillights.
l Check operation of high and low beam headlights.
l Check operation of brake lights.
l Check seats are properly latched.
l Check side nets for any damage, fasten both side nets and con-
firm they latch securely. Use the adjustment strap to tighten nets
as required.
l Check seat belts for any damage, fasten seat belts and confirm
they latch securely.
l Press on the accelerator pedal a few times to ensure it operates
freely and it returns to the rest position when released.
l Press on the brake pedal and make sure you feel firm resistance
and it returns to the rest position when released.
l Check the fuel level.
l Adjust mirror(s) to your preferences. (If equipped)
What to do after starting the Engine
l Check if steering wheel operates freely by completely turning it
from side to side.
l Turn the ignition switch to OFF to verify if engine will shut down.
Restart engine.
l Check smooth and free operation of shift lever.
l Check smooth and free operation of 2WD/4WD selector.
l Drive forward slowly a few feet and apply brakes. The brake
pedal must feel firm when applied. The pedal must return to rest
position when released. The brakes must respond adequately to
the operator's input.
l Check parking brake operation.
Damaged or missing seat belts, shoulder guards and
side nets should be replaced immediately to help prevent an occupant from being ejected, resulting in severe injury or death.
Refer to section 26 Specifications for more information
on fluid volumes and specifications.
Refer to section 23 Maintenance Procedures for more detailed
instructions where applicable.
© 2018 Mahindra Vehicle Sales and Service, Inc. All Rights Reserved. 23
Page 30

9 Prepare to Ride
9.2 Post-Ride Inspection Checklist
Always inspect and confirm your ROXOR and safety devices have
not been damaged after a ride. Always follow the maintenance
schedule described in this Operator’s Guide.
What to Do After Stopping the Engine
l Clean the ROXOR and lubricate all moving parts.
l Let drivetrain cool and then check fluid levels, top off as neces-
sary.
l Inspect and remove all dirt and debris from your engine, trans-
mission, exhaust and other components that can get hot during
a ride.
l Check for fluid leaks in the engine compartment and under
ROXOR.
l Properly park the ROXOR on the flattest surface available.
l Put gear shift lever in first gear and set parking brake by pushing
the button in, pulling straight up and then releasing button.
l Remove the ignition key before leaving the ROXOR.
Verify that the ignition key is in the OFF position. If left
in the ACC position for extended periods of time electrical loads can
drain the battery and cause the vehicle to not start when needed.
24 © 2018 Mahindra Vehicle Sales and Service, Inc. All Rights Reserved.
Page 31

10 Learning Your Vehicle
10 LEARNING YOUR VEHICLE
Mahindra recommends that you contact your local ROXOR authorized dealer for information about ROV training courses in your area,
or visit the Recreational Off-Highway Vehicle Association (ROHVA)
website (http://www.rohva.org). All operators should familiarize
themselves with the handling of the Mahindra ROXOR Offroad Side x
Side in a controlled environment before they go off-roading. Find an
area free of obstacles to practice and perform the exercises listed
below. And never perform these exercises with a load in the cargo
area or with a trailer attached.
Starting the Engine – Insert the ignition key into the ignition switch,
depress clutch pedal fully then turn the ignition key to the
STARTposition. Release the ignition key immediately when the
engine has started.
Do not hold ignition key in STARTposition for more than 10
seconds at a time, this can overheat the starter and damage it.
Improper use may result in a limited warranty claim being denied.
Never use an engine starting aid such as ether. Engine
damage will result which would void all of your warranty coverage.
If the engine does not start after repeated attempts,
refer to section 27 Troubleshooting.
is not advisable. A manual transmission requires the operator to
shift gears themselves, with proper timing and coordination. This
activity must become second nature, in a controlled environment,
before operating on difficult terrain.
The clutch pedal is located at the far left and is required to shift
gears. Always fully depress the clutch pedal while shifting gears,
then gradually release the clutch pedal to engage the transmission
while increasing the engine idle to around 1500 RPM. Change one
gear at a time in ascending or descending order. As a general rule,
you should shift gears about every 10 mph increase or decrease in
speed. When switching from a forward gear to reverse, or from
reverse to a forward gear, come to a complete stop.
Never try to start the ROXOR without being seated in the
driver’s seat with the clutch pedal fully depressed and the parking
brake set to help prevent a runaway situation in the event the throttle
is stuck.
Turning – Overly aggressive turning frequently results in accidents.
You should practice turning in both directions at various speeds to
experience the lateral force differences. Speed and steering input will
affect lateral force, you should try to minimize this force for safety.
Decelerate before entering a turn and accelerate slowly as you exit
the turn. You should also practice U-turns and turning while driving
in reverse.
Manual Transmission – If you have never driven a vehicle with a
manual transmission, learning on the ROXOR while driving off-road
© 2018 Mahindra Vehicle Sales and Service, Inc. All Rights Reserved. 25
Page 32

10 Learning Your Vehicle
Braking – It is important to get familiar with the braking response
on the ROXOR. Start at slow speeds and low pedal force. Gradually
increase your speed and pedal force to understand adequate braking distance without locking up the wheels. It may also be a good
idea to practice an emergency stop to see how the ROXOR reacts.
Always brake in a straight line with little to no steering input.
Reverse – Learn how the ROXOR handles in reverse and more importantly how it reacts to steering inputs while driving in reverse. You
should also familiarize yourself with the distance required to see
obstacles behind you. Place an orange cone or other non-destructible item close to the rear bumper and then pull forward until you
can see the item from the driver’s seat. You can even practice backing up to these items without hitting them. Take note of the distances.
Emergency Engine Stop – While driving at a slow speed, turn off the
ignition switch. Take note of how the ROXOR reacts when the engine
stops running. It is a good idea to develop this reflex in case of an
emergency. You may also want to practice an emergency exit, which
will require stopping the engine, immobilizing the ROXOR, removing
the seat belt, detaching the safety net (or opening the door) and exiting the ROXOR.
26 © 2018 Mahindra Vehicle Sales and Service, Inc. All Rights Reserved.
Page 33

11 Vehicle Controls
11 VEHICLE CONTROLS
11.1 Primary Controls
All operators should familiarize themselves with all of the controls
on the Mahindra ROXOR Offroad Side x Side, in a controlled environment, before going off-road. Find a flat area free of obstacles to
practice and perform the exercises listed in section 10 Learning Your
Vehicle. Emphasis should be placed on the development of smooth
and coordinated use of these controls, knowing their locations and
understanding their function.
11.2 Keys
The ROXOR is delivered with four keys. Two rubber booted ignition
keys and two storage compartment keys. There is a lockable storage compartment located under each front seat.
Neither of these two lockable storage compartments is
waterproof. All electronics or other valuables stored in these compartments should be adequately protected by other means.
11.3 Ignition Switch
The ignition switch is located on the dash panel to the right of the
steering wheel.
l ACC position – in this position all lights, horn, radio, 12V outlet
and optional accessories are turned on, but not the instrument
cluster and engine controls.
Leaving the ignition key in the ACC position could
eventually result in a dead battery.
l OFF position – in this position the electrical system is disabled
and the engine will shut off.
You should only be able to insert and remove the
ignition key when the ignition switch is in the OFF position. If this
statement is not true, contact and return your ROXOR to an authorized dealer.
l IGN & ACC position – in this position all ACC functions are activ-
ate as well as the instrument cluster and engine controls. When
starting in cold climates, the ignition key should remain in this
position for several seconds to allow time for the engine intake
heater to aid starting.
The ignition key should automatically return to this
position when released from the start position. If this statement
is not true, contact and return your ROXOR to an authorized
dealer.
© 2018 Mahindra Vehicle Sales and Service, Inc. All Rights Reserved. 27
Page 34
11 Vehicle Controls
l START position – in this position the starter is engaged. You
should only hold the ignition key in this position until the engine
starts, then release the ignition key.
Do not hold the ignition key in the STARTposition
for more than 10 seconds at a time, this can overheat the starter
and damage it. You should allow 10-15 seconds between
attempts to preserve the starter and battery.
If the engine does not start after repeated attempts,
refer to section 27 Troubleshooting.
11.4 Headlamp Switch
A three position switch is used to control the head lights on the
ROXOR.
l Up position – High Beam Headlights
l Middle position – Headlights Off
l Down position – Low Beam Headlights
11.5 Multifunction Gauge
The speedometer and odometer (see Figure 1) are preset at the factory to indicate in miles.
l Speedometer – indicates vehicle speed in miles per hour.
l Odometer – records the total distance traveled in miles.
l Hours Meter – the total hours on your vehicle will display below
the miles when the ignition key is in the ON & ACCposition.
l Indicator Lights:
o
Oil Indicator – red light on steady when the oil pressure is
below a safe level.
o
Seat Belt Indicator – red light on steady when the driver’s
seat belt is unbuckled, the throttle will also be limited.
o
Low Fuel Indicator – yellow light on steady when fuel level is
at two gallons or less. Light flashes when fuel level sensor
has failed to provide a signal.
o
Check Engine Indicator – yellow light on steady when an
emissions related trouble code has been set, return vehicle to
an authorized Mahindra dealer for service.
o
Water In Fuel Indicator – yellow light on steady when water
reached sensor contacts in the fuel filter canister, drain water
from fuel separator.
o
Engine Coolant Temperature Indicator – red light flashes
when engine coolant temperature reaches 230°F (110°C)
and stays on steady at 248°F (120°C) or above. Light will go
off when engine coolant temperature drops below 221°F
(105°C).
o
Charging System Indicator – red light on steady when there
is a charging system failure, check alternator and/or battery.
This light will be on when the ignition key is in the IGN & ACC
position but the engine is not running.
28 © 2018 Mahindra Vehicle Sales and Service, Inc. All Rights Reserved.
Page 35

o
Brake System Indicator – red light on steady when the brake
fluid level is below the minimum level or the parking brake is
set.
o
Wait To Start Indicator – yellow light on steady in IGN & ACC
position. Engine intake air heater is on due to engine temperature, wait for light to go out before cranking.
l Fuel Gauge:
o
4 bars – 87% or more fuel in tank
o
3 bars – 62% or more fuel in tank
o
2 bars – 38% or more fuel in tank
o
1 bar – 13% or more fuel in tank
o
Bottom Bar Outlined Only – 12% or less fuel in tank
11 Vehicle Controls
Figure 1. Multifunction gauge
© 2018 Mahindra Vehicle Sales and Service, Inc. All Rights Reserved. 29
Page 36

11 Vehicle Controls
11.6 Steering Wheel
The steering wheel is located on the driver's side of the vehicle, in
front of the driver's seat. Use the steering wheel to control your direction when moving forward and backward. Grip the steering wheel
with both hands, and never wrap your thumbs around the steering
wheel.
Under rough trail conditions or when crossing an
obstacle, the steering wheel could suddenly jerk in one direction or
the other. Grip the steering wheel with both hands, without having
thumbs wrapped around the steering wheel. Hand and/or wrist injuries may occur if the thumbs are wrapped around the steering wheel.
11.7 Accelerator Pedal
Of the three pedals located on the driver's side floor area, the accelerator pedal is on the far right. The accelerator pedal controls the
engine speed and should be operated smoothly and reasonably.
The accelerator pedal is spring loaded and should return to its rest
position (idle) when not pressed. Take your ROXOR to an authorized
dealer if you are experiencing problems.
The throttle input will be limited if the driver’s seat belt
is not fastened.
11.8 Brake Pedal
The brake pedal is located in the middle of the three pedals on the
driver's floor area. Use the brake pedal slow down or stop the
ROXOR. When driving a manual transmission it is preferred to use
your right foot to operate this pedal. It is spring loaded and should
return to its rest position (little to no rolling resistance) when not
pressed.
If the ROXOR will not move with your foot off of the
brake pedal, first check and release the parking brake. Next make
sure the transmission is in gear. If neither of these work, take your
ROXOR to an authorized dealer.
11.9 Clutch Pedal
Of the three pedals located on the driver's floor area, the clutch pedal
is on the far left. To disengage the clutch, fully depress the clutch
pedal when shifting gears. Don't grind the gears during shifting, this
may result in damage to the gears. Do not allow your foot to rest on
the pedal when not using the clutch. This can overheat the clutch
plates and result in premature clutch failure. You should avoid these
habits as they may result in having a limited warranty claim denied
due to improper use.
30 © 2018 Mahindra Vehicle Sales and Service, Inc. All Rights Reserved.
Page 37

11 Vehicle Controls
Never try to start the ROXOR without being seated in the
driver’s seat with the clutch pedal fully depressed and the parking
brake set to help prevent a runaway situation in the event the throttle
is stuck.
11.10 Gear Shift Lever
The shift pattern is located on top of the gear shift lever knob. Use
the gear shift lever to shift between forward gears and access
reverse. When shifting gears, always depress the clutch fully and let
up on the accelerator pedal before moving the gear shift lever to the
next gear.
Bring the ROXOR to a complete stop with engine running before shifting into reverse to prevent gear damage and ease
engagement.
11.11 Transfer Case Lever
The transfer case shift pattern is located on top of the transfer case
lever knob. Use the transfer case lever to switch between 2WD and
4WD operation. 4WD has a Low range and High range.
4WDLow range allows the vehicle to drive at much slower speeds
while still operating within the usable power band / RPM range of
the engine. This also increases the torque available at the axles. Low
range gears should be used during slow speed or extreme off-road
conditions.
Bring the ROXOR to a complete stop with engine running before shifting the transfer case into 4WD Low Range to prevent
gear damage and ease engagement. The ROXOR can be shifted
between 2WD and 4WD High ranges at any speed.
© 2018 Mahindra Vehicle Sales and Service, Inc. All Rights Reserved. 31
Page 38

12 Equipment
12 EQUIPMENT
12.1 Seat Belts
The ROXOR is equipped with 3-point seat belts to help protect operator and passenger in the event of a collision, roll over, or tip over.
The seat belts can help occupants stay in the cockpit area. The seat
belts are equipped with a semi-cinching tab that locks the lap belt
when the webbing is under tension. To fasten the seat belt, insert the
latch plate into the buckle, then pull the belt to ensure it is properly
fastened. Adjust the seat belt tightly against your body by pulling
the shoulder belt upwards.
Wear seat belts properly and keep side nets secured at
all times. Seat belts help reduce the risk of severe injury in a crash
and help keep limbs inside the cockpit in a roll over or any other
types of accidents.
Do not fasten the driver's seat belt while accelerating,
an unintended sudden acceleration will result, which could cause a
loss of control resulting in severe injury or death.
If driver's seat belt is not fastened when the ignition is
turned ON, the seat belt indicator lamp will flash and the throttle
input will be limited.
12.2 Driver’s Seat
The driver's seat can be adjusted forward and backward. To adjust
seat, move the seat lever up to unlock the seat. Release the lever to
lock the seat into desired position.
To help prevent a loss of control, never adjust the seat
position while driving. A loss of control while driving could result in
severe injury or death.
12.3 Passenger Seat
The passenger's seat can be adjusted forward and backward. To
adjust seat, move the seat lever to unlock the seat. Release the lever
to lock the seat into desired position.
There is no indicator light or message for the passenger
seat belt. The operator is responsible for the passenger's safety and
should ensure the passenger buckles their seat belt, secures their
side net and keeps their limbs inside the vehicle to help prevent
severe injury or death.
Never adjust the seat position while moving, this could
result in personal injury.
32 © 2018 Mahindra Vehicle Sales and Service, Inc. All Rights Reserved.
Page 39
12 Equipment
12.4 Rollover Protective Structure (ROPS)
The ROXOR is equipped with a tubular frame over the cockpit and
rear cargo areas, called the ROPS (Rollover Protective Structure). It is
designed to help keep the operator and passenger restrained and
help provide protection to the cockpit.
The ROPS is an integral part of the safety system and
must not be removed. Removal of the ROPSseverely increases the
risk of injury or death in a rollover or any other accident.
12.5 Shoulder Guards
The ROXOR is equipped with operator and passenger shoulder
guards. They are designed to help restrain the entire body and also
help the operator and passenger to remain inside the cockpit.
The shoulder guards are an integral part of the safety
system and must not be removed. Removal of the shoulder guards
severely increases the risk of injury or death in a rollover or any other
accident.
12.6 Side Nets
The ROXOR is equipped with operator and passenger side nets. They
are designed to help arms and legs remain inside the cockpit. Side
nets can also help keep bush and debris out of the cockpit.
The side nets are an integral part of the safety system
and must not be removed. Removal of the side nets severely
increases the risk of injury or death in a rollover or any other accident.
12.7 Passenger Handhold
The ROXOR is equipped with a hand hold on the passenger side of
the cockpit. It is designed to help keep limbs inside the cockpit.
The passenger handhold is an integral part of the safety
system and must not be removed. Removal of the passenger handhold severely increases the risk of injury or death in a rollover or any
other accident.
12.8 12 Volt Power Outlet
The ROXOR is equipped with one 12 volt power outlet, located on the
right side of the dash panel.
12.9 Storage Compartments
The ROXOR is equipped with two lockable storage compartments,
one under each seat.
Neither of these two lockable storage compartments is
waterproof. All electronics or other valuables stored in these compartments should be adequately protected by other means.
© 2018 Mahindra Vehicle Sales and Service, Inc. All Rights Reserved. 33
Page 40

12 Equipment
12.10 Cup Holders
Two cup holders are located on the floor between the seats.
12.11 Rear Cargo Area
The ROXOR is equipped with a rear cargo area. The rear cargo area
may be used for hauling various types of cargo. Properly secure all
loads in the rear cargo area using the factory supplied cargo tie
downs only. To help reduce the risk of loss of control, or loss of load
use the cargo area in accordance with section19 Moving Loads and
Doing Work.
Never carry any passenger in the rear cargo area. A passenger in this area can not be properly restrained and could be ejected, resulting in severe injury or death.
12.12 Tailgate
The ROXOR is equipped with a swing style tailgate. The tailgate is
designed to ease loading the rear cargo area and also carrying an
optional spare tire. Always close the tailgate before operating to prevent damage to the tailgate, lock mechanism and/or cargo.
Failure to close the tailgate before operating could result in the lose of cargo loads, severely increasing the risk of injury or
death.
12.13 Fuel Reservoir Cap
The fuel reservoir cap is located on the right side behind the rear
wheel.
Refer to 14.1 Fuel Requirements or 14.2 Fueling Procedure for more
on fuel related information.
34 © 2018 Mahindra Vehicle Sales and Service, Inc. All Rights Reserved.
Page 41
13 ELECTRICAL DISTRIBUTION
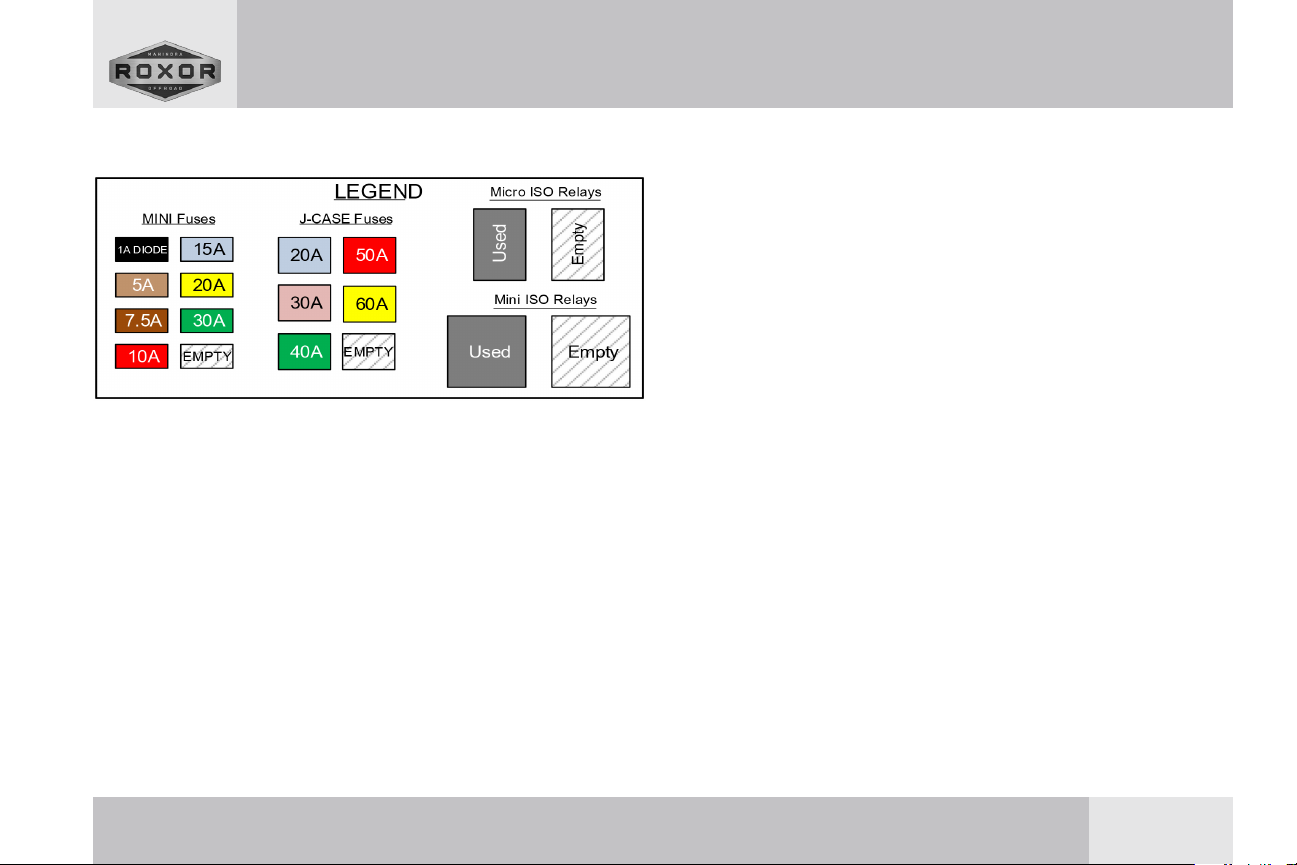
The Distribution Center Legend shown above outlines the types and
sizes of fuses and relays used on the Mahindra ROXOR Offroad Side
x Side.
Main Power Distribution Center – This component is located in the
engine bay on the passenger side. The Main Power Distribution
Center cover contains a similar graphic to the one shown here for
convenience. (see Figure 2)
IP Power Distribution Center – This component is located behind
the dash panel on the passenger side. The IP Power Distribution
Center cover contains a similar graphic to the one shown here for
convenience. This component can be released from its mounting
bracket and lowered down for ease of viewing and access. Use the
tang supplied on the 12 Volt Power Outlet connector or a flat screw
driver to help release the distribution center from the mounting
bracket. (see Figure 3)
13 Electrical Distribution
© 2018 Mahindra Vehicle Sales and Service, Inc. All Rights Reserved. 35
Page 42

13 Electrical Distribution
Main Power Distribution Center
Fuse/
Relay
F1 MainPDC Fuse (60A) F16 Empty
F2 Starter Solenoid (30A) F17 Empty
F3 ECU Auto Shut Down (30A) F18 Empty
F4 IP PDC MINI Fuse (40A) F19 Empty
F5 IP Accessories (40A) F20 Empty
F6 Empty F21 Empty
F7 ECU Power (20A) F22 Empty
F8 Engine Accessories (15A) R1 Engine Auto Shut Down
F9 Brake Pedal (10A) R2 StarterSolenoid
F10 Empty R3 FuelFeed Pump
F11 High Beams (20A) R4 High Beams
F12 FrontLED Lights (20A)* R5 Empty
F13 Reverse Lights (5A) R6 Empty
F14 FrontFenderLEDs (5A) * R7 Front LED Lights *
F15 FuelFeed Pump (15A) R8 See IP-PDC
Circuit
Fuse/
Relay
Circuit
Figure 2. Main Power Distribution Center
* Indicates a circuit dedicated for a factory installed option.
36 © 2018 Mahindra Vehicle Sales and Service, Inc. All Rights Reserved.
Page 43
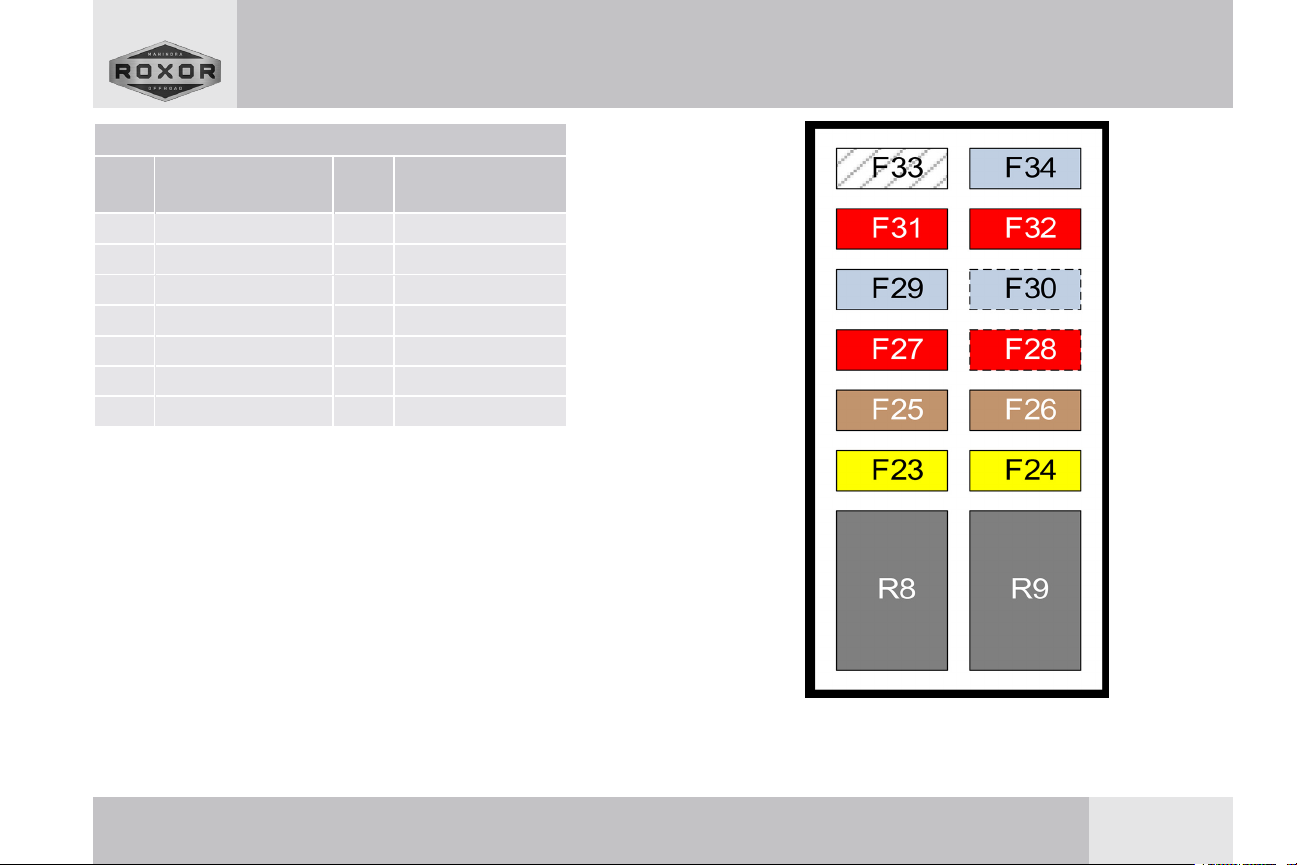
IP Power Distribution Center
Fuse/
Relay
F23 ExteriorLighting (20A) F30 SoundBar (15A)*
F24 PowerOutlets (20A) F31 Instrument Gauges (10A)
F25 Diagnostic Connector(5A) F32 Parking Lights (10A)
F26 HighBeam Control(5A) F33 Empty
F27 Key Switch (10A) F34 Low Beams (15A)
F28 Side/RearLEDs (10A) * R8 Exterior Lighting
F29 Horn(15A) R9 Power Outlet
Circuit
Fuse/
Relay
Circuit
* Indicates a circuit dedicated for a factory installed option.
13 Electrical Distribution
Figure 3. IP Power Distribution Center
© 2018 Mahindra Vehicle Sales and Service, Inc. All Rights Reserved. 37
Page 44

14 Fuel (Diesel)
14 FUEL (DIESEL)
14.1 Fuel Requirements
The EPA has adopted multiple tiers of emission standards to reduce
emissions from non-road diesel engines. From 2007 to 2014, Low
Sulfur Diesel (LSD) fuel and Ultra Low Sulfur Diesel (ULSD) fuel was
phased in for non-road, locomotive, and marine (NRLM) diesel fuel.
This off-road diesel requires ULSD rated fuel that meets the EPA
Non-road Diesel Fuel Standards (https://www.epa.gov/diesel-fuel-
standards).
Damages, performance or service concerns determined to be caused
by the use of non-approved fuels, including any grade of gasoline or
form of bio-diesel fuel not meeting the specifications outlined above
are not considered to be defects in material or factory workmanship
and are not covered under the limited warranty or EPA limited warranty.
Do not use diesel fuel additives in a diesel equipped
ROXOR, this will damage the injectors voiding your warranty coverage.
Do not put gasoline in a diesel equipped ROXOR.
Gasoline will prematurely ignite in a diesel engine which can lead to
engine damage, voiding all of your warranty coverage. Gasoline contamination can also damage the fuel pump and diesel injectors,
which would also void all of your warranty coverage.
14.2 Fueling Procedure
1. Stop the engine.
2. Only fill the fuel tank in a well ventilated area.
3. Have the operator and passenger get out of the ROXOR.
4. Unscrew fuel reservoir cap slowly by turning it counterclockwise
to remove it.
5. Insert the fuel spout into the fuel filler neck.
6. Pour fuel slowly so that air can escape from the tank and prevent fuel flow back and spills.
7. Stop filling before the fuel reaches the bottom of filler neck. Do
not overfill or spill fuel.
8. Fully tighten fuel reservoir cap by turning it clockwise until a
ratchet noise is heard.
All fuel handling must take place in a well-ventilated
area. Avoid heat, flames and other sources of ignition, avoid inhalation of vapors and contact with skin and eyes, do not siphon diesel
fuel by mouth, never fill a fuel container inside the ROXOR as the
interior surfaces are coated, acting as an insulator and allowing static
electricity to build up, help guard against static discharges by always
filling approved containers on the ground, do not allow anyone to
remain in the ROXOR while fueling, an occupant may not be able to
leave the area quickly in an emergency, failure to follow these warnings may result in severe injury or death.
38 © 2018 Mahindra Vehicle Sales and Service, Inc. All Rights Reserved.
Page 45

15 Break in Period
15 BREAK IN PERIOD
15.1 Operation During Break In
A break-in period of 10 operating hours or 300 mi (480 km) is
required for this vehicle. Mahindra recommends that the engine oil
and filter be replaced after this break in period has been completed.
During the break in period it is best to avoid pressing the accelerator
pedal beyond 3/4 of its full stroke. Avoid extended hard accelerations like those required for hill climbing. Avoid extended periods
at steady cruising speeds, it is best to vary your speed as much as
possible during this period. Brief accelerations and speed variations
contribute to a good break-in.
During the break in period you should also shift the transfer case
between 2WD and 4WD High range at low speeds (1-5 mph). This
also contributes to a good break in and will familiarize you with the
effort required to perform this operation while moving.
Bring the ROXOR to a complete stop with engine running before shifting the transfer case into 4WD Low Range to prevent
gear damage and ease engagement. The ROXOR can be shifted
between 2WD and 4WD High ranges at any speed.
15.2 Tips for Maximizing Durability
Riding style and conditions have a direct impact on durability. If riding in any of the following conditions, Mahindra highly recommends
you not maintain wide open throttle (WOT) for more than two (2)
minutes. Examples of wide open throttle (WOT)are high ambient
temperatures above 86°F (30°C), heavy passenger and/or cargo
loads, heavy drags like soft sand and/or hill climbing and mud
bogs. After a few minutes at WOT, partially release the accelerator
pedal and allow the engine and drivetrain to cool down.
© 2018 Mahindra Vehicle Sales and Service, Inc. All Rights Reserved. 39
Page 46

16 Avoiding Accidents
16 AVOIDING ACCIDENTS
Operators must be responsible and use care to avoid roll overs, collisions, and accidents. The ROXOR is designed and manufactured
for off-road use only. The ROXOR does not conform to Federal Motor
Vehicle Safety Standards (FMVSS) and operation on public streets,
roads, or highways is illegal and increases the risk of an accident
involving other vehicles.
Avoid roll overs. The ROXOR handles very different from other
vehicles. A roll over can occur quickly with sudden changes in terrain. Holes, humps, obstacles and soft ground can result in the
ROXOR becoming unstable. Aggressive driving habits can also result in roll overs and loss of control, even on flat terrain. Therefore, it
is particularly important to fasten seat belts and side nets, secure
the doors (if equipped) and wear an approved helmet and riding
gear. Never try to stop a roll over using your arms or legs. Never put
any part of your body outside of the ROXOR for any reason. If you
think or feel the ROXOR may tip or roll, reduce your risk of injury by
keeping a firm grip on the steering wheel or handholds and brace
yourself. Keep feet firmly planted on the floor.
Avoid driving across a slope when possible, instead, drive straight
up and down inclines rather than across them. If driving across a
slope is unavoidable, use extreme caution. If you feel the ROXOR
start to roll over steer downhill if possible.
Avoid speeding. The ROXOR can reach high speeds, particularly in
challenging off-road conditions. At higher speeds there is an
increased risk of losing control, an increased risk of collision and an
increased risk of injury or death. Always drive at a speed that
matches the terrain, visibility and your experience. Slow down on
uneven terrain and allow more distance to stop. The ROXOR also
handles differently when carrying a load or pulling a trailer. Reduce
speed and follow instructions in this Operator’s Guide for carrying a
load or pulling a trailer.
Avoid paved surfaces. If you must drive on paved surfaces, take it
slow and use care when turning. Abrupt steering inputs and hard
acceleration and braking, even at slow speeds can result in an accident. Never attempt to do donuts, skids, slides, fishtails, jumps, or
other stunts with the ROXOR.
The ROXOR does not conform to Federal Motor Vehicle
Safety Standards (FMVSS) or US EPA on- highway exhaust emissions
regulations. And as such, does not have important features and equipment that on road vehicles have, like brake lights and airbags. Driving
on public streets, roads or highways without these important features and equipment can lead to severe injury, including death.
40 © 2018 Mahindra Vehicle Sales and Service, Inc. All Rights Reserved.
Page 47

17 OFF-ROAD OPERATION
Driving off-road or more specifically on unsurfaced roads or two
tracks, made up of materials like sand, gravel, mud, snow, rocks, and
other natural terrain is hazardous and can be dangerous. Any terrain which is not specially prepared to carry vehicles presents an
inherent danger. An operator who ventures off-road should always
exercise the utmost care in selecting the safest path and keeping a
close eye on the terrain ahead of them. This Mahindra ROXOR
Offroad Side x Side should never be operated by someone who is
not very familiar with how to control it.
Persons taking part in this activity have sometimes been met with
criticism for the environmental damage incurred by their vehicles.
Please be courteous and limit your use of the ROXOR to private property or areas specifically designated for off-road activities. Always
practice the "Leave no Trace" and “Tread Lightly!®” principles and
ethics of outdoor conservation. Always respect nature and the rights
of others to enjoy it.
17 Off-Road Operation
© 2018 Mahindra Vehicle Sales and Service, Inc. All Rights Reserved. 41
Page 48
18 General Driving Techniques
18 GENERAL DRIVING TECHNIQUES
18.1 Driving Tips
l Stay alert to changing terrain conditions as slopes and
obstacles can decrease stability.
l Proceed slowly when entering unfamiliar terrain, if in doubt, back
out.
l Power and traction, not speed, are most important in driving off-
road.
l Keeping both hands on the steering wheel is the best way to
maintain control.
l Make every attempt to avoid obstacles that could enter the cock-
pit area and hit you or your passenger.
l Never operate the ROXOR if the controls do not function nor-
mally, instead take it to a ROXOR authorized dealer.
18.2 Driving in Reverse
l Choosing a safe place to turn around is always preferred
whenever possible.
l Be aware that abrupt steering inputs while driving in reverse can
increase the risk of a roll over.
l When operating in reverse, check that the path behind the
ROXOR is free of people and/or obstacles.
l When safe, proceed with care and caution, go slowly and avoid
sharp turns.
l Always maintain a level of alertness to your blind spots when
driving in reverse.
l Pay attention to blind spots. When it is safe to proceed in
reverse, go slowly and avoid sharp turns.
When driving downhill in reverse, gravity can increase
your speed above a safe level. Always use engine and gears to slow
descent rate and prevent over heating the brakes.
18.3 Driving in or on Slippery Surfaces
l Slow down and avoid abrupt steering inputs to prevent sliding
and roll overs.
l Be aware that it may take longer to stop your ROXOR, be cau-
tious and avoid locking the brakes.
l Hard accelerations on these surfaces may result in loose mater-
ial to be thrown rearwards into the path of others.
l Hard accelerations may result in tire spin, the ROXOR to sink,
eventually becoming stuck.
l Use lower gears a nd/or 4WD Low Range to help prevent tire
spin.
42 © 2018 Mahindra Vehicle Sales and Service, Inc. All Rights Reserved.
Page 49

18 General Driving Techniques
18.4 Driving in or on Sand
l Sand and sand dune riding is a unique experience. On sand
dunes it is advisable to equip the ROXOR with an antenna type
safety flag.
l When riding on sand dunes, proceed cautiously if you see
another safety flag and remember vehicles can approach you
from any direction.
l Slow down and avoid abrupt steering inputs to prevent sliding
and roll overs, especially on hills.
l Hard accelerations on these surfaces may result in loose mater-
ial to be thrown rearwards into the path of others.
l Hard accelerations may result in tire spin, the ROXOR to sink,
eventually becoming stuck.
l Use lower gears and/or 4WD Low Range to help prevent tire spin.
18.5 Driving in or on Snow or Ice
l Be aware that snow cover may hide obstacles like holes and
logs that can affect the ROXOR's traction and stability.
l Before driving on frozen waterways, check the ice thickness to
ensure it will safely support the weight of the ROXOR.
l Always keep controls, pedals and floor board free of snow and
ice to prevent loss of control.
l Slow down and avoid abrupt steering and throttle inputs to pre-
vent sliding and roll overs.
l Use lower gears and/or 4WD Low Range to help prevent tire spin.
l Be aware that it may take longer to stop your ROXOR, be cau-
tious and avoid locking the brakes.
l To prevent snow and ice accumulation on brake pads and discs,
which may affect the response time of the braking system, periodically apply the brakes.
18.6 Driving on Hills and Slopes
l Avoid parking on slopes, if unavoidable, put the shift lever in
gear, set the parking brake and block the tires.
l Approach the tops of hills with caution to avoid a collision with
vehicles coming from the other direction.
l It may be necessary to check the terrain conditions on the oppos-
ite side of a hill before proceeding because the ROXOR can
ascend steeper slopes than it can descend.
l Never attempt to turn the ROXOR around on hills and slopes.
l Use lower gears and/or 4WD Low Range to help prevent tire spin.
l While the ROXOR has extremely good traction for ascending
steep slopes, it is possible to tip over before losing traction.
l Always keep the transmission in gear when descending hills and
slopes and choose a gear that will help control your descent.
© 2018 Mahindra Vehicle Sales and Service, Inc. All Rights Reserved. 43
Page 50

18 General Driving Techniques
18.7 Side Hilling
l Side hilling or driving across a slope should be avoided
whenever possible.
l Use extreme caution and avoid obstacles that can raise the
uphill side of the vehicle, this increases the potential for a roll
over.
l Be aware of slippery or unfirm surfaces which can cause uncon-
trollable slides and steer downhill to reduce the chance of a roll
over.
Be aware that cargo can change the center of gravity
affecting the vehicles stability and increasing the risk of a roll over.
Cargo can also shift causing the pedals to become stuck thereby
causing a loss of control.
18.8 Drop Offs
l The ROXOR is not designed to traverse a sheer downward slope,
cliff or drop off.
l If you encounter a sheer downward slope, cliff or drop off, back
up and select a different route.
l If the front or rear wheels are driven off this type of terrain it will
most likely stop moving or roll over.
Attempting to negotiate drop offs as described above
may lead to severe injury or death.
18.9 Crossing Obstacles
l It is best to avoid obstacles whenever possible.
l Operator/Passenger should grip steering wheel/handhold firmly
and keep feet on the floor during all crossings.
l Never try to cross obstacles that are higher than the ground
clearance (9”) of the ROXOR.
l Adjust your speed without losing momentum and try to
approach obstacles head on.
l Be aware that obstacles can be slippery and even move while
crossing them.
Under rough trail conditions or when crossing an
obstacle, the steering wheel could suddenly jerk in one direction or
the other. Grip the steering wheel with both hands, without having
thumbs wrapped around the steering wheel. Hand and/or wrist injuries may occur if the thumbs are wrapped around the steering wheel.
18.10 Crossing Shallow Water
l Water crossings present a unique set of hazards, hidden
obstacles, holes and changes in water depth can cause a loss of
traction, even float the vehicle and cause it to topple over.
l The water depth for this vehicle should not exceed 12 in. (30 cm)
or roughly the center point of the standard OEM wheels.
44 © 2018 Mahindra Vehicle Sales and Service, Inc. All Rights Reserved.
Page 51

18 General Driving Techniques
l Check the water depth, and strength and direction of current,
before you attempt to make a water crossing.
l Cross at right angles at a point where the stream bed is straight
and uniform.
l Never enter the water at high speed, proceed slowly and cau-
tiously watching for obstacles underneath the surface.
l Water will affect the braking ability of your vehicle, always apply
the brakes several times after leaving the water to dry and test
them.
It is your responsibility to check your local laws related
to water crossings. Some rivers and streams are protected from
activities like this.
18.11 Crossing Public Streets, Roads, or Highways
l Obey all sign and traffic signals.
l Do not proceed if complete visibility in both directions is
hindered.
l Choose an exit point on other side of road, then wait for oncom-
ing traffic to pass.
l Drive in a straight line, do not make sharp turns or sudden accel-
erations.
18.12 Driving on Pavement
l The ROXOR is designed and manufactured for off road use only.
l The ROXOR has been designed and validated to ANSI/ROHVA
standards on paved surfaces.
l The ROXOR is not equipped or legal to operate on public streets,
roads or highways.
l If you must drive on pavement, turn gradually, go slowly, and
avoid abrupt acceleration and braking.
The ROXOR does not conform to Federal Motor Vehicle
Safety Standards (FMVSS) or US EPA on- highway exhaust emissions
regulations. And as such, does not have important features and equipment that on road vehicles have, like brake lights and airbags. Driving
on public streets, roads or highways without these important features and equipment can lead to severe injury, including death.
18.13 Group and Distance Riding
l Driving off-road in a group of vehicles can be a lot of fun, it can
also be very dangerous if you do not trust the judgment of those
around you.
l Never use the ROXOR or group ride when you, or members of
your group, have been consuming or are under the influence of
drugs or alcohol, or when feeling tired or ill. These effectively
slow your reaction time and impair judgment.
© 2018 Mahindra Vehicle Sales and Service, Inc. All Rights Reserved. 45
Page 52

18 General Driving Techniques
l Respect the rights, skills and limitations of others by keeping a
safe distance and yielding the right of way to other riders.
l When driving off-road, stay to the right of the trail especially
around corners and over hills, do not zigzag, and do not assume
no other vehicles are on the trail.
l Check the local laws where you plan to ride. The ROXOR may be
prohibited from sharing snowmobile trails, cross country ski
trails, equestrian trails, hiking trails, mountain bike trails or other
public parks and trails.
l Always be prepared to stop quickly and/or pull off the side of the
trail if another vehicle appears in front of you.
l Always tell someone where you are planning to go and when
they should expect you back.
l Always consider bringing additional clothes, tools, emergency
equipment and a first aid kit, and checking the local weather
report.
l Find out where you can get additional fuel.
When group riding, be aware that others in your group
may not have safety equipment, like turn signals or brake lights.
Always keep a safe distance between vehicles.
18.14 Environment
l Always practice the "Leave no Trace" and “Tread Lightly!®” prin-
ciples and ethics of outdoor conservation. Always respect nature
and the rights of others to enjoy it.
l Always get the permission of landowners before riding on
private land, respect property lines, crops and farm animals.
l Never drive your ROXOR in environmentally sensitive areas,
through wetlands, muskeg or tall grass and do not pollute rivers,
streams and lakes.
l Never use your ROXOR to chase wildlife as they can die from
exhaustion. In many areas this activity is illegal.
l It is possible to encounter wildlife while driving off-road, stop
and observe quietly from a distance.
l The ROXOR can develop exhaust and/or other engine hot spots
on long rides, debris build up in these areas resulting in wildfires
if this debris ignites and falls off. Periodically check these areas
before, during and after your ride.
46 © 2018 Mahindra Vehicle Sales and Service, Inc. All Rights Reserved.
Page 53

19 Moving Loads and Doing Work
19 MOVING LOADS AND DOING WORK
19.1 Working with Your ROXOR
A variety of accessories are available from your ROXOR authorized
dealer that can aid you in your work efforts. Contact your local
dealer to learn more about the cost and availability of these
accessories. Be sure to read and follow the instructions, warnings
and limitations of those accessories before using them to do work.
Also familiarize yourself with the weight and load limits of the
Mahindra ROXOR Offroad Side x Side to avoid having a limited warranty claim denied due to improper use.
Every hauling, pulling or winching situation has the
potential for personal injury or death. Make sure anyone using the
ROXOR to do work reads and comprehends the safety instructions
outlined in this section.
19.2 Weight & Load Limits
Gross Vehicle Weight(GVW) 3,750 lbs. 1,701kg
Estimated Base CurbWeight 3,035lbs. 1,377 kg
Maximum Vehicle Load Capacity 715lbs. 324 kg
Maximum Rear Cargo Weight 349 lbs. 158 kg
Maximum Towing Capacity 3,490lbs. 1,583 kg
Maximum Tongue Weight 349lbs. 158 kg
Maximum Person Capacity 2
19.3 Loading the Rear Cargo Area
When loading cargo into the ROXOR, position the cargo toward the
front and center of the cargo area, and as low as possible. Verify the
tailgate is latched before operating.
High heavy loads can change the center of gravity of the ROXOR
increasing the potential for a roll over. Be aware that carrying liquid
loads can add an additional hazard. Avoid carrying loads that block
your ability to see or increase your blind spots.
Use only the tie downs provided to secure a load in the rear cargo
area, never secure a load to the Rollover Protective Structure (ROPS)
except at the two approved tie down points provided, one at the
base of each center side support.
Loads that are not properly secured can become projectiles when stopping, turning or in an accident causing damage to
the ROXOR, as well as severe injury and death to the operator, passenger and/or bystanders.
Never exceed the Maximum Rear Cargo Weight of 349
lbs. (158 kg) as mandated by the EPA.
19.4 Carrying Loads
Be aware that handling and stability will be affected when carrying
loads. Slow down, turn gradually and avoid hills and rough terrain.
Also, be cautious coming to a stop as the braking distance of the
ROXOR may increase with a load, especially on down hill slopes.
© 2018 Mahindra Vehicle Sales and Service, Inc. All Rights Reserved. 47
Page 54

19 Moving Loads and Doing Work
Never exceed the maximum vehicle load capacity as listed. Bear in
mind that the weight of the operator and passenger, any cargo, all
accessories added to the base ROXOR and trailer tongue weight are
all included in this maximum vehicle load capacity value of 715 lbs.
Loads that are not properly secured can become projectiles when stopping, turning or in an accident causing damage to
the ROXOR, as well as severe injury and death to the operator, passenger and/or bystanders.
Be aware that cargo can change the center of gravity
affecting the vehicles stability and increasing the risk of a roll over.
Cargo can also shift causing the pedals to become stuck thereby
causing a loss of control.
19.5 Hauling and Pulling Loads
When hauling a load or pulling a trailer, respect the maximum
vehicle load capacity of the ROXOR. Only use the trailer hitch (if
installed) or winch (if installed) to pull a load. Never try to pull the
ROXOR by wrapping chains or straps around its axles, cargo tie
downs or ROPS. Know the Working Load Limit (WLL) of the strap,
chain or cable you are using. Never stand in the recoil or snap back
area, this is the area that the strap, chain or cable could reach when
"snapping back" if a failure (break) occurs.
When using straps, chains or cables for pulling, cautiously remove
any slack without jerking the load. A sudden jerk on the load can
damage the chain, cable and/or vehicles. Be sure to maintain tension on the load throughout the hauling process.
When pulling another vehicle, the previously mentioned principles
still apply. This activity also requires someone to control the vehicle
being pulled. Slow down and use hand signals to communicate if
necessary and allow more distance for stopping. Never attempt to
pull another vehicle without an operator controlling it.
Before hauling or pulling a load or a trailer be sure to read the manufacturer’s instructions and warning. Never exceed the manufacturer’s maximum load capacities. Always make sure the trailer
load is evenly distributed and secured. An evenly balanced trailer is
easier to control. Make sure there is sufficient tongue weight to prevent a loss of traction at the rear wheels.
It is your responsibility to make sure the hitch on the
ROXOR and the hitch on the trailer are compatible. Never exceed the
manufacturer’s maximum load capacity of the trailer, hitch or the
capacity and limitations of the ROXOR. The trailer and/or hitch could
fail under the excess load and break away from the ROXOR resulting
in personal injury or death.
Driving off-road while pulling a trailer substantially
increases the risk of a roll over, especially on uneven terrain and
slopes. Be aware that if the trailer is involved in a rollover, it may
force the ROXOR to follow, resulting in personal injury or death.
48 © 2018 Mahindra Vehicle Sales and Service, Inc. All Rights Reserved.
Page 55
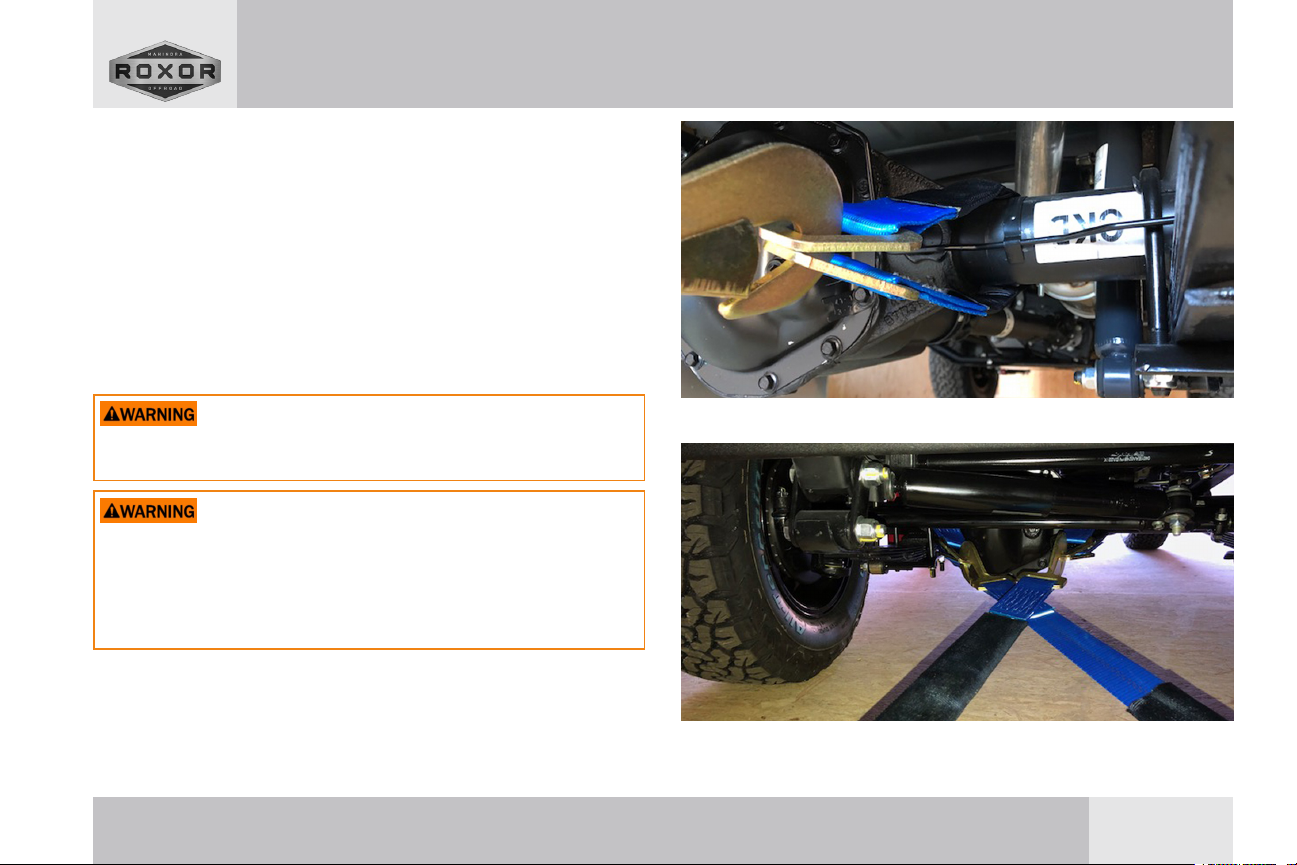
20 TRANSPORTING
20.1 Trailering
If your ROXOR needs to be transported, use the images provided
here to help properly secure the ROXOR to the trailer. At a minimum,
the ROXOR should be secured in this manner at all four corners, with
suitable straps and/or chains, and crossed as shown to help prevent
lateral shifting during transport. (See Figure 4 & Figure 5)
For proper trailer sizing and capacity questions refer to section 26.2
Vehicle Specifications.
20 Transporting
Use extreme caution when securing the axles, do not
wrap straps or chains completely around the axles, so as not to damage the brake lines resulting in severe injury or death.
Make sure no loose objects are present inside the
ROXOR or in the rear cargo area during transportation as they can be
lost or worse become projectiles. Never trailer the ROXOR backwards, always trailer it facing forward. The windshield (if equipped)
could break away, be lost or worse become a projectile resulting in
severe injury or death.
© 2018 Mahindra Vehicle Sales and Service, Inc. All Rights Reserved. 49
Figure 4. Straps around axles
Figure 5. Straps to trailer tie downs
Page 56

20 Transporting
20.2 Towing
For flat/tow bar towing and dolly towing the ROXOR with a manual
transmission, follow the instructions listed here. Check with your
ROXOR authorized dealer for any updates on this subject.
Be advised that Warn Front Locking Hubs are required for this activ-
ity. (Accessory Sold Separately)
Follow the manufactures instructions for installation
and use of all third party towing devices. Only attach towing device
brackets to the 4 bolts (per side) that attach the front bumper.
Secure or remove all loose contents in your ROXOR before attempting to tow it. Failure to follow these warnings may result in severe
injury or death.
The preferred method for extended towing the ROXOR
is to remove the front and rear propeller shafts.
Check your local regulations to determine if the towed
vehicle needs to be licensed and plated. Some states may also
require brake actuation systems.
Instructions:
l Verify tires are inflated to 32 psi.
l Verify vehicle alignment meets manufacturers specification.
l Verify both differentials, the transfer case and transmission fluid
levels are at their recommended levels.
l Verify all grease locations are properly lubricated.
l Do not secure the steering wheel, it must be free to rotate for
vehicle to track correctly.
l Use magnetic safety/tail lights attached to the rear of the
ROXOR in tow.
l Disengage/unlock the Warn Front Locking Hubs per man-
ufacturers instructions.
l Place transfer case in neutral and manual transmission in 1st
gear.
l Limit tow speed to 45 – 50 mph.
l Do not attempt to back up.
Start towing slowly and verify the ROXOR is tracking correctly, check
the hubs for heat buildup after driving for 25 miles and then every
100 miles after that.
50 © 2018 Mahindra Vehicle Sales and Service, Inc. All Rights Reserved.
Page 57

21 LIFTING AND SUPPORTING
Place the ROXOR on a flat, non-slippery surface. For hydraulic jack
lifting, place the hydraulic jack under the center of the axle only.
Once lifted, support the ROXOR with suitable jack stands positioned
under the right and left frame rails. If lifting just the front, or just the
back, be sure to block the opposite wheels using rocks, logs or wheel
chocks.
For hoist lifting, only use the two front locations (see Figure 6) and
the two rear locations (see Figure 7) shown here.
Verify the unit is stable on the hoist before raising all
the way up and going underneath it to help prevent an accident resulting in severe injury or death.
21 Lifting and Supporting
Figure 7. Rear Lifting Location
Figure 6. Front Lifting Location
© 2018 Mahindra Vehicle Sales and Service, Inc. All Rights Reserved. 51
Page 58

22 Maintenance
22 MAINTENANCE
Keep your ROXOR in safe operating condition by performing the regular maintenance as scheduled. Refer to section 22.2 Scheduled
Maintenance Chart.
As required by the EPA we must inform you that a repair shop or person of the owner's choosing may maintain, replace, or repair emission control devices and systems. You are not require to purchase
components or services from a ROXOR authorized dealer, although
a ROXOR authorized dealer has an in-depth technical knowledge
and tools to service the Mahindra ROXOR Offroad Side x Side.
The emission related limited warranty is not conditioned on the use
of a ROXOR authorized dealer or any other establishment with which
Mahindra has a commercial relationship. For more information,
refer to section 28.2 U.S. EPA Emission-Related Limited Warranty
(Canada Excluded). Proper maintenance is the owner’s responsibility. A warranty claim may be denied if, among other things, the
owner or operator caused the problem through improper maintenance or use. You must follow the instructions for fuel requirements in section 14.1 Fuel Requirements.
Failure to properly maintain the vehicle according to the
maintenance schedule and procedures provided in this section can
make the ROXOR unsafe to operate resulting in severe injury or death.
22.1 Severe Dusty Conditions
Air filter maintenance should be adjusted according to riding conditions. Air filter maintenance must be increased in frequency in the
following dusty conditions:
l Riding on dry sand
l Riding on dry dirt covered surfaces
l Riding on dry gravel roads or similar conditions
Riding in a group in these conditions would increase the
air filter maintenance even more.
52 © 2018 Mahindra Vehicle Sales and Service, Inc. All Rights Reserved.
Page 59

22 Maintenance
22.2 Scheduled Maintenance Chart
Perform each maintenance procedure at the interval that occurs first for each item.
Maintenance Interval
Item
A = It is recommended that the maintenance procedure be performed by an Authorized Mahindra Dealer/Service facility.
S = For ATVs subjected to Severe use, perform the maintenance procedure more frequently than the recommended intervals.
A Break In 10 Hrs 300(480)whichever
— DrainWater Separator 10 Hrs 300(480) l Drainregularly.
A Fuel Filter 50 Hrs 6 M 1,500(2,500) NORMAL USE WITH HIGH QUALITY FUEL:
S Engine Oiland Filter 50 Hrs 6 M 1,500(2,500) l Replace oiland oilfilter.
S Air Intake System;
AirCleaner/ Filter
— Battery 100 Hrs 12 M 3,000(5,000) l Inspect terminals for corrosion or loose connectors. Clean
— PropellerShaft 100Hrs 12 M 3,000(5,000) l Lubricate.
— Exhaust Pipe 100Hrs 12 M 3,000(5,000) l Inspect for corrosionor damage. Repairas needed.
(Use interval that occurs first for each item)
Hrs of ATV/SCAR
Operation
100Hrs — 3,000 (5,000) l Inspect fordebris and/or oil.
Calendar Miles (Km)
comes first
l Replace oiland oilfilter.
l Check allfluidlevels.
l Replace FuelFilter.
l Clean or replace.
and test.
Maintenance Procedure
© 2018 Mahindra Vehicle Sales and Service, Inc. All Rights Reserved. 53
Page 60

22 Maintenance
Maintenance Interval
Item
A = It is recommended that the maintenance procedure be performed by an Authorized Mahindra Dealer/Service facility.
S = For ATVs subjected to Severe use, perform the maintenance procedure more frequently than the recommended intervals.
S Radiatorand Cooling
Fan(s)
A Shift Linkage 100Hrs 12 M 3,000 (5,000) l Lubricate.
S Suspension, Front /
Rear
S TurboOilLines 100 Hrs — 3,000(5,000) l Inspect for leaks orloose fittings. Repairas needed.
A Wheel Bearings 100 Hrs 12 M 3,000(5,000) l Inspect bearingforwear and repack. Replace as needed.
— Wiring 100Hrs 12 M 3,000(5,000) l Inspect for wear, routing, or loose or worn connections.
— Fuel System 100Hrs 12 M 3,000(5,000) l Inspect lines and fittingsforleaks and abrasions. Repair or
(Use interval that occurs first for each item)
Hrs of ATV/SCAR
Operation
Calendar Miles (Km)
Maintenance Procedure
100Hrs 12 M 3,000(5,000) l Inspect radiator for damagedfinsor debris obstructingair-
flow. Repairorreplace,as needed.
l Inspect fanfordamage.Repair or replace, as needed.
l Clean externalsurfaces.
l Pressure testthe system.
l Adjust as needed.
100Hrs 12 M 3,000(5,000) l Lubricate leaf spring pivots.
Repairor replace as needed.
l Applydielectric grease toconnectors subjected to water,
mud, etc.
replace as needed.
l TurnIgnition Key toONpositionto pressurize fuel system.
54 © 2018 Mahindra Vehicle Sales and Service, Inc. All Rights Reserved.
Page 61

22 Maintenance
Maintenance Interval
Item
A = It is recommended that the maintenance procedure be performed by an Authorized Mahindra Dealer/Service facility.
S = For ATVs subjected to Severe use, perform the maintenance procedure more frequently than the recommended intervals.
A/S Brake Drumsand Pads 100 Hrs 12 M 3,000(5,000) l Clean and inspect. Replace asneeded.
A Brake Fluid 300Hrs 36 M 9,000(15,000) l Replace fluid.
S Axle Gear Lube, Front
and Rear
S PowerSteering Fluid 300 Hrs 36 M 9,000(15,000) l Replace fluid.
S TransferCase Oil 300Hrs 36 M 9,000(15,000) l Replace fluid.
S Transmission Oil 300Hrs 36 M 9,000 (15,000) l Replace fluid.
— Spark Arrester 300 Hrs 36 M 9,000 (15,000) l Clean.
A Suspension Bushings 300 Hrs 36 M 9,000(15,000) l Inspect for wear ornoise. Replace as needed.
S Coolant — 36M — l Replace fluid.
A Accessory Belt(s) — 60 M — l Replace belts.
S Engine Mounts — 60M — l Inspect for wear or damage. Replace as needed.
A Valve Timing / Clear-
ance
A/S Auxiliary/ Parking
Brake
— Headlight Aim Asneeded l Adjust as needed.
A Wheel Alignment; Toe
Adjustment
(Use interval that occurs first for each item)
Hrs of ATV/SCAR
Operation
300Hrs 36 M 9,000(15,000) l Replace fluid.
— 60M — l Adjust as needed.
As needed l Adjust as needed.
As needed l Adjustas needed. Alignwhenever parts are replacedduring
Calendar Miles (Km)
routine maintenance.
Maintenance Procedure
© 2018 Mahindra Vehicle Sales and Service, Inc. All Rights Reserved. 55
Page 62

23 Maintenance Procedures
23 MAINTENANCE PROCEDURES
23.1 Maintenance Tips and Precautions
Observe the following tips and precautions when performing maintenance on the ROXOR.
l Always wear eye protection and gloves.
l Stay clear of rotating parts when engine is running.
l Stay clear of hot parts, before during and after maintenance.
l Avoid repeated contact with fluids.
l Do not allow fuel, coolant and other fluids to spill over electrical
and hot parts.
l Before removing parts for maintenance, it is best to clean the
outer surface of the parts being replaced.
l Care must be taken when handling the air intake system com-
ponents. Never lift by using their hoses or pipes.
l Ensure that hoses and lines are oriented in their correct position
before tightening the clamps.
l Hoses and lines must not be subjected to any twists or stress.
l Ensure that all clips and supports are replaced.
l Never run the engine in an enclosed area. Exhaust contains car-
bon monoxide which can cause loss of consciousness or death
in a very short time.
l Check to make sure the engine is off and parking brake set
before jacking up the vehicle.
l Never go under the vehicle while it is inclined without proper bra-
cing (approved jack stands).
23.2 Aim Headlamps
Not included in regular maintenance.
Maintenance Interval – As required
23.3 Clean Spark Arrester
Do not perform service on the spark arrester while the system is hot.
Exhaust systems can reach extreme temperatures. Allow components to cool sufficiently before proceeding. Remove any combustible materials from around the spark arrester.
Maintenance Interval – Clean every 300 hours, 36 months, 9,000
miles (15,000 Km)
1. Place the transmission in Neutral and set the Parking Brake.
2. Remove the spark arrester clean-out plug located on the bottom
of the muffler. (see Figure 8)
3. Start the engine.
4. Press and hold the brake pedal, then momentarily rev the engine
several times to increase engine RPM. This will help purge accumulated carbon from the system.
56 © 2018 Mahindra Vehicle Sales and Service, Inc. All Rights Reserved.
Page 63
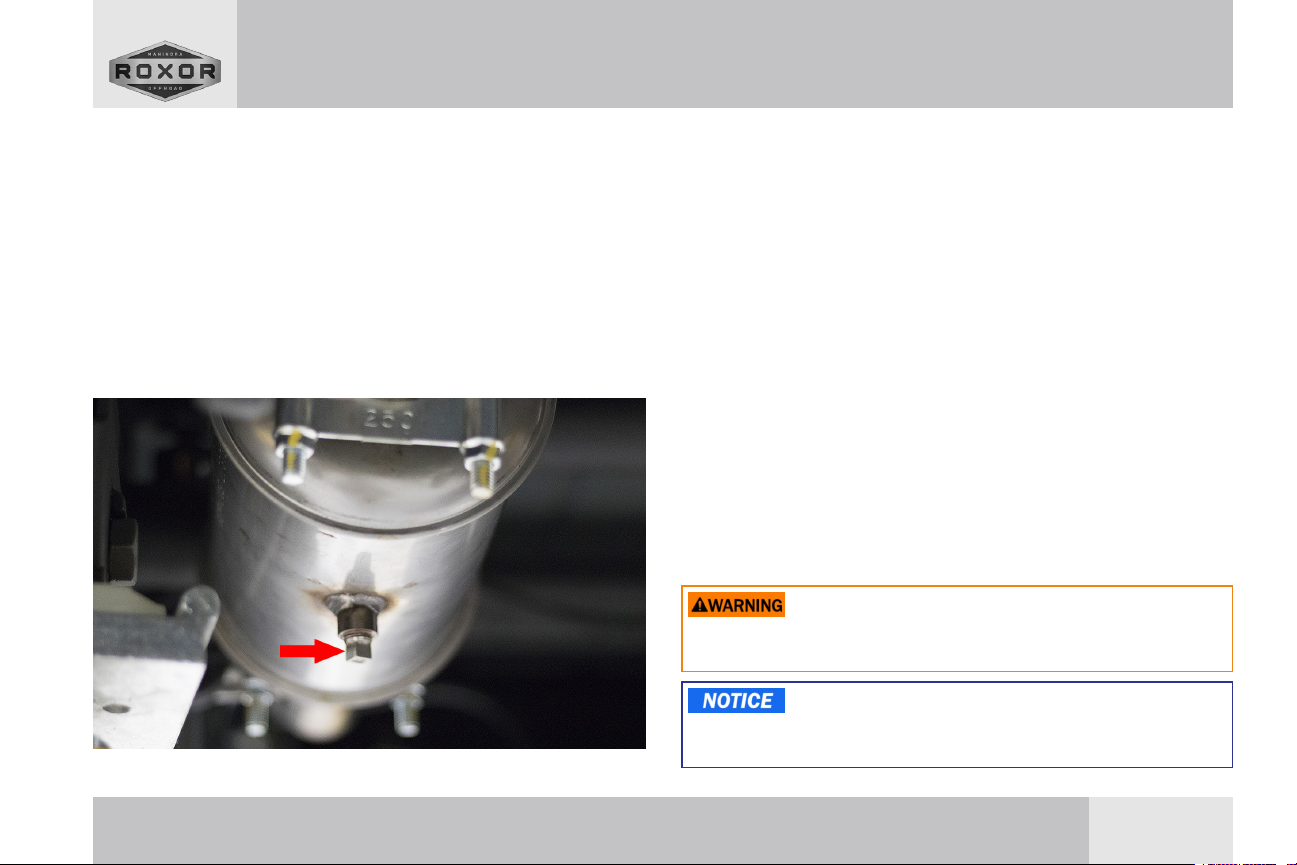
23 Maintenance Procedures
5. If carbon is expelled, partially cover the exhaust outlet and rap
on the pipe around the clean-out plug while revving the engine
several more times.
6. If particles are still suspected to be in the muffler. Block the rear
wheels, then elevate the front of the ROXOR one foot higher than
the rear. Ensure parking brake is set.
7. Repeat steps 4 and 5 until no more particles are expelled when
the engine is revved.
8. Stop the engine. Allow the arrester to cool.
9. Reinstall the spark arrester clean-out plug.
Figure 8. Spark Arrester Clean-Out Plug
23.4 Clean and Inspect Brakes
Brake maintenance is important, not only for the obvious safety reasons, but also to help preserve the wear components.
The brake system consists of six main components that should be
inspected and/or cleaned. They are the brake pads, rotors, calipers,
drums, brake lines, and master cylinder.
The wheels and tires should be remove to perform this procedure
properly. Refer to section 21 Lifting and Supporting for instruction.
Maintenance Interval – Clean and inspect every 100 hours, 12
months, 3,000 miles (5,000 Km)
1. Check the brake system for fluid leaks.
2. Check the brake pedal for excessive travel or a spongy feel.
3. Clean and inspect the pads for wear, damage and looseness.
4. Clean and inspect the brake discs and drums for signs of cracks,
excessive wear or corrosion, warping or other damage.
5. Clean any grease using an approved brake cleaner or alcohol.
Do not apply rust inhibiting penetrating oil or other petroleum based products to brake discs and drums. This could render
your braking system inoperable resulting in severe injury or death.
Generally, there should be at least a 1/4" (6.4 mm) of
brake pad. If you see less than this, you may want to replace the
pads.
© 2018 Mahindra Vehicle Sales and Service, Inc. All Rights Reserved. 57
Page 64
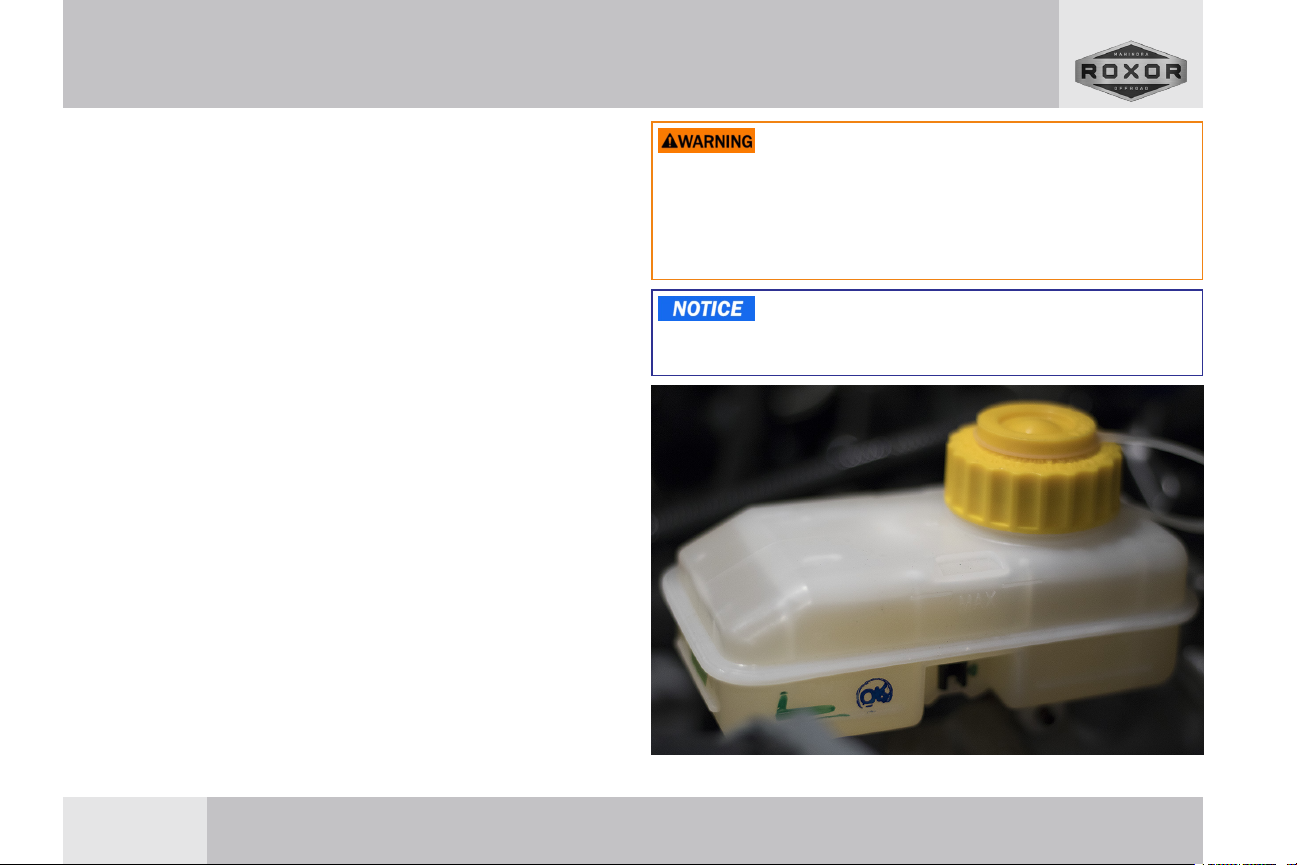
23 Maintenance Procedures
23.5 Check Brake Fluid Level & Leak Check
Inspect the level of the brake fluid before each operation and look
for leaks if the brake fluid is found to be low. The brake fluid reservoir is located at the rear of the engine bay on the driver's side.
Maintenance Interval – Check regularly, replace the brake fluid every
300 hours, 36 months, 9000 miles (15,000 Km)
Fluid Spec. – Only use DOT 3.
1. Position the ROXOR on a flat level surface.
2. Verify the engine is off and parking brake set.
3. Unlatch and lift the hood, then place prop rod.
4. View the brake fluid level on the side of the brake fluid reservoir.
5. The brake fluid level should be between the upper MAX and
lower MIN level lines. (see Figure 9)
6. If the brake fluid level is lower than the MIN level line, remove the
cover by pulling it straight up, then add brake fluid until the fluid
level is near the MAX line.
7. Reinstall the cover then apply pressure to the brake pedal for a
few seconds, next check for fluid leakage around the six main
components and their fittings.
After opening a bottle of brake fluid, always discard any
unused portion. Never store or use a partial bottle. Brake fluid is
hygroscopic, meaning it rapidly absorbs moisture from the air. The
moisture results in the boiling temperature of the brake fluid to drop,
which can lead to early brake fade and result in severe injury or accidents.
Replace brake fluid any time the fluid becomes contaminated, or the type and brand of the fluid in the reservoir is
unknown to prevent system damage.
Figure 9. Brake Fluid Reservoir
58 © 2018 Mahindra Vehicle Sales and Service, Inc. All Rights Reserved.
Page 65

23.6 Check Differential Oil Levels & Leak Check
Before checking the front and rear differential oil levels, warm them
up. This is done by driving the ROXOR for 10-15 minutes.
Only perform when the ROXOR is on level ground or support. Do not
use an impact wrench to remove the differential oil level plugs, this
may damage the threads in the differentials resulting in a leak.
Maintenance Interval – Replace every 300 hours, 36 months, 9,000
miles (15,000 Km)
Fluid Spec. – GL-5 SAE 80W-90
Capacity – 1.6 Quarts (1.5 Liters)
1. Clean the differential oil level plugs and surrounding area.
a. Front Oil Level Plugs (see Figure 10)
b. Rear Oil Level Plugs (see Figure 11)
2. Remove the check/fill oil level plug and check whether oil is dripping out.
3. If oil is not dripping out, oil level must be below the required
level.
4. Add specified oil to bring it to the level when it starts dripping
out.
5. Install and tighten the oil level plug.
23 Maintenance Procedures
Figure 10. Front Oil Level Plugs
© 2018 Mahindra Vehicle Sales and Service, Inc. All Rights Reserved. 59
Page 66
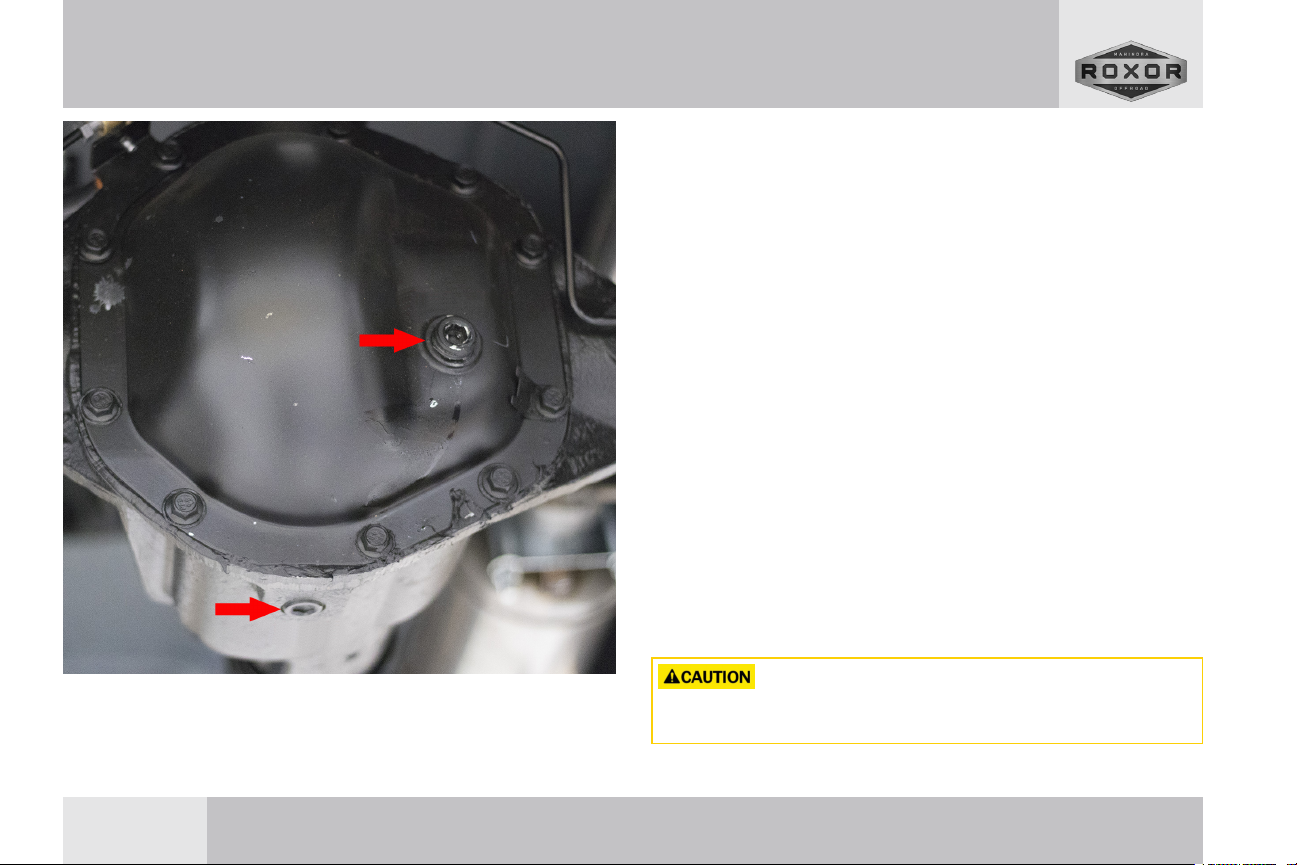
23 Maintenance Procedures
23.7 Check Engine Coolant Level & Leak Check
The engine coolant level should be checked when the engine is at
ambient (room) temperature. Maintain the coolant level between the
HIGH and LOW lines on the coolant overflow bottle (see Figure 12).
If a leak is suspected, open the hood and check the radiator, radiator
hoses and radiator hoses connected to the engine. Pay close attention to the connection points near the hose clamps. You can also
check for coolant on the ground where the ROXOR is parked.
Maintenance Interval – Check regularly, replace every 36 months.
Fluid Spec. – ASTM D3306 or JIS K2234
Capacity – 8.5 Quarts (8.0 Liters)
1. Unlatch and lift the hood, then place prop rod.
2. Use a rag to cover the radiator pressure cap, push down, then
slowly turn the cap counter clockwise.
3. View the coolant level through the radiator pressure cap opening. It should be near the top of the opening.
4. If low, use a funnel and slowly add coolant as needed.
5. Reinstall the radiator pressure cap, push down, then slowly turn
the cap clockwise.
Figure 11. Rear Oil Level Plugs
60 © 2018 Mahindra Vehicle Sales and Service, Inc. All Rights Reserved.
Never remove the radiator pressure cap while the
engine is warm or hot. Always allow the engine to cool before removing the cap as escaping steam can result in burn injuries.
Page 67
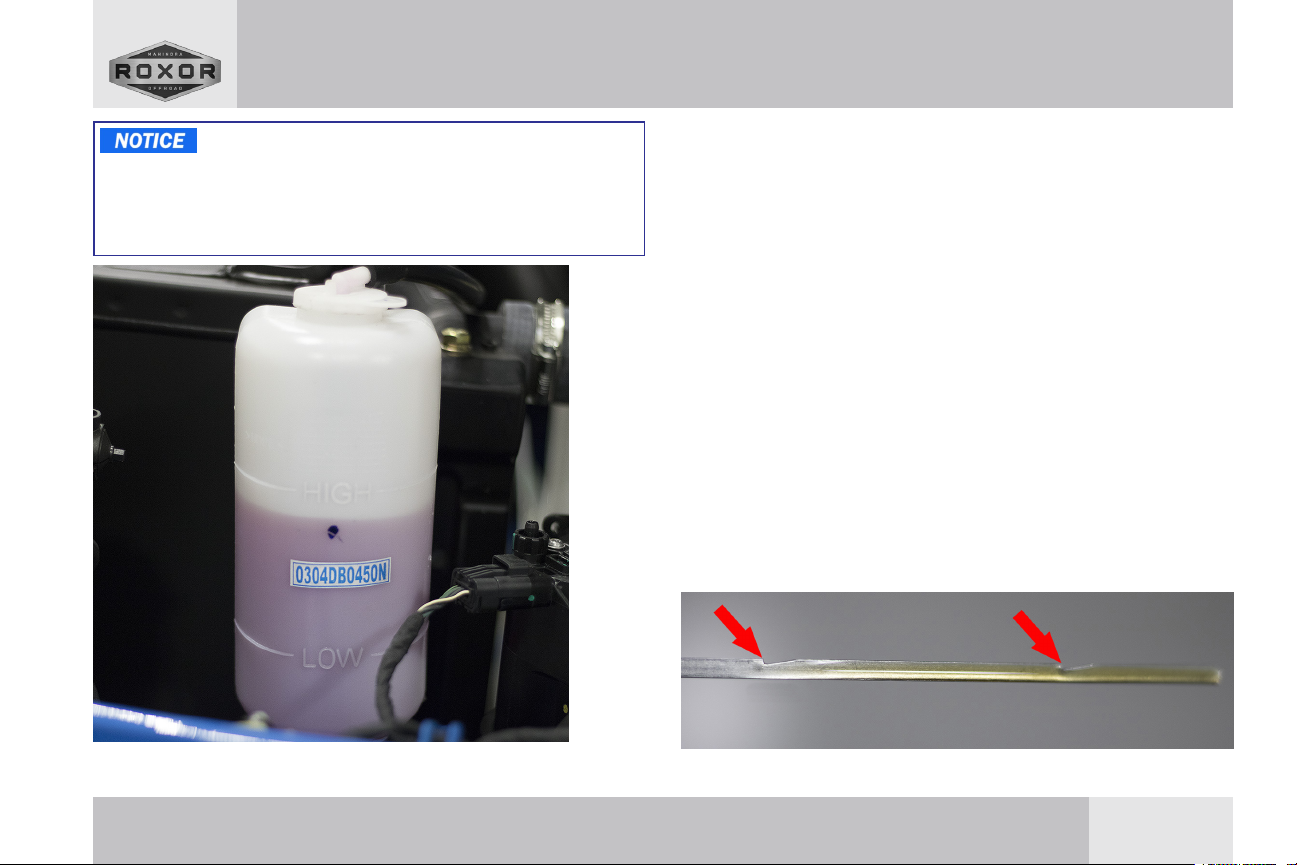
23 Maintenance Procedures
Do not replace the OEMradiator pressure cap with a
non-standard pressure cap. These will not allow the recovery system
to function properly, causing the engine to overheat and a limited warranty claim to be denied. Your ROXOR authorized dealer can provide
the correct replacement part.
23.8 Check Engine Oil Level & Leak Check
The oil dipstick is located on the passenger side of the engine.
Engine oil should be checked on a level surface, with engine cold, or
allow time for the oil to drain back into the oil pan before checking
level to prevent overfilling.
Maintenance Interval – Check regularly, replace the engine oil every
50 hours, 6 months, 1,500 miles (2,500 Km)
Fluid Spec. – API CJ-4 5W/40 (Full Synthetic)
Capacity – 7.4 Quarts (7.0 Liters)
1. Position the ROXOR on a flat level surface.
2. Stop the engine and allow time to cool.
3. Unlatch and lift the hood, then place prop rod.
4. Remove the dipstick. Wipe it dry with a clean cloth.
5. Reinstall the dipstick, then remove it and check the oil level.
6. Maintain the oil level in the safe range, between the two notches.
(see Figure 13) Do not overfill.
Figure 12. Coolant Overflow Bottle
© 2018 Mahindra Vehicle Sales and Service, Inc. All Rights Reserved. 61
Figure 13. Oil Level Safe Range
Page 68

23 Maintenance Procedures
23.9 Check Power Steering Oil Level & Leak Check
The power steering reservoir is in the rear of the engine bay, on the
driver’s side. The fluid level in the reservoir should be checked on a
level surface with the engine OFF to prevent injury from moving
parts and to ensure accurate fluid level reading. Use only the power
steering fluids recommended to help avoid damage to the power
steering system. Replacing the power steering fluid should always
be done by a ROXOR authorized dealer.
Maintenance Interval – Check regularly, replace power steering fluid
every 300 hours, 36 months, 9,000 miles (15,000 Km)
Fluid Spec. – DEXRON III/Mercon
1. Start the engine and let it run until it reaches normal operating
temperature.
2. Put transmission in neutral and set parking brake.
3. Unlatch and lift the hood, then place prop rod.
4. While the engine idles and with power steering cap on, turn the
steering wheel lock (left) to lock (right) a couple of times.
5. Turn the engine off.
6. Check the power steering fluid level in the reservoir.
7. The fluid level should be maintained between the MIN and MAX
lines on the side of the power steering fluid reservoir.
(see Figure 14)
8. If the fluid is low, add fluid in small amounts, remember to
replace the cap and repeat steps 2 through 4.
9. Continue to follow these steps until the level reaches the correct
operating range.
10. Always check for leaks if the fluid level cannot be maintained.
Driving the ROXOR with power steering fluid below the
minimum mark will damage the steering system which would void all
of your warranty coverage.
Clean spillage from all exposed surfaces with a clean
cloth to prevent surface damage.
Figure 14. Power Steering Fluid Level
62 © 2018 Mahindra Vehicle Sales and Service, Inc. All Rights Reserved.
Page 69

23 Maintenance Procedures
23.10 Check Tire Pressure
Keep tires properly inflated. Proper tire inflation pressure is essential
to the safe and satisfactory operation of your ROXOR. Four primary
areas are affected by improper tire pressure:
1. Safety
2. Stability
3. Ride Comfort
4. Fuel Economy
It is recommended to check your tire pressure (including spare if
equipped) when the tire is cold. The recommended cold tire pressure
is 28 psi. If the tire pressure is not correct, drive slowly to the nearest
service station and inflate to the recommended specification.
Always reinstall the valve stem cap after checking or adjusting tire
pressure.
Your ROXOR is originally equipped with tires supplied by a reputable
manufacturer. If you ever have questions regarding your tires, please
refer to the tire warranty and literature supplied by the tire manufacturer. You may also contact the tire manufacturer or Mahindra
directly.
The originally equipped tire size supplied with the ROXOR is
235/70R16.
Improperly inflated tires can adversely affect handling
or fail unexpectedly, resulting in an accident and/or personal injury.
Always inflate to the recommended 28 psi.
Never overload your ROXOR. Overloading can result in
tire failure, affect handling, and increase your stopping distance, resulting in an accident and/or personal injury.
Lost valve stem caps should be replaced as soon as
possible. Missing valve stem caps allow dirt and moisture to get
into the valve stem core and result in air leakage.
© 2018 Mahindra Vehicle Sales and Service, Inc. All Rights Reserved. 63
Page 70

23 Maintenance Procedures
Check Transfer Case Oil Level & Leak Check
Before checking the transfer case oil, it should be warmed up by driving the ROXOR for 10-15 minutes.
Only perform when the ROXOR is on level ground or support. Do not
use an impact wrench to remove the transfer case oil level plugs.
This may damage the threads in the transfer case resulting in a
leak.
Maintenance Interval – Check regularly, replace every 300 hours, 36
months, 9,000 miles (15,000 Km)
Fluid Spec. – GL-4 SAE 80W90
Capacity – 1.7 Quarts (1.6 Liters)
1. Clean the transfer case oil level plug and surrounding area.
(see Figure 15)
2. Remove the transfer case oil level plug and check whether
oil is dripping out.
3. If oil is not dripping out, oil level must be below the required
level.
4. Add specified oil to bring it up to the level that it starts dripping out.
5. Install and tighten the oil level plug.
Figure 15. Transfer Case Oil Level Plug
64 © 2018 Mahindra Vehicle Sales and Service, Inc. All Rights Reserved.
Page 71
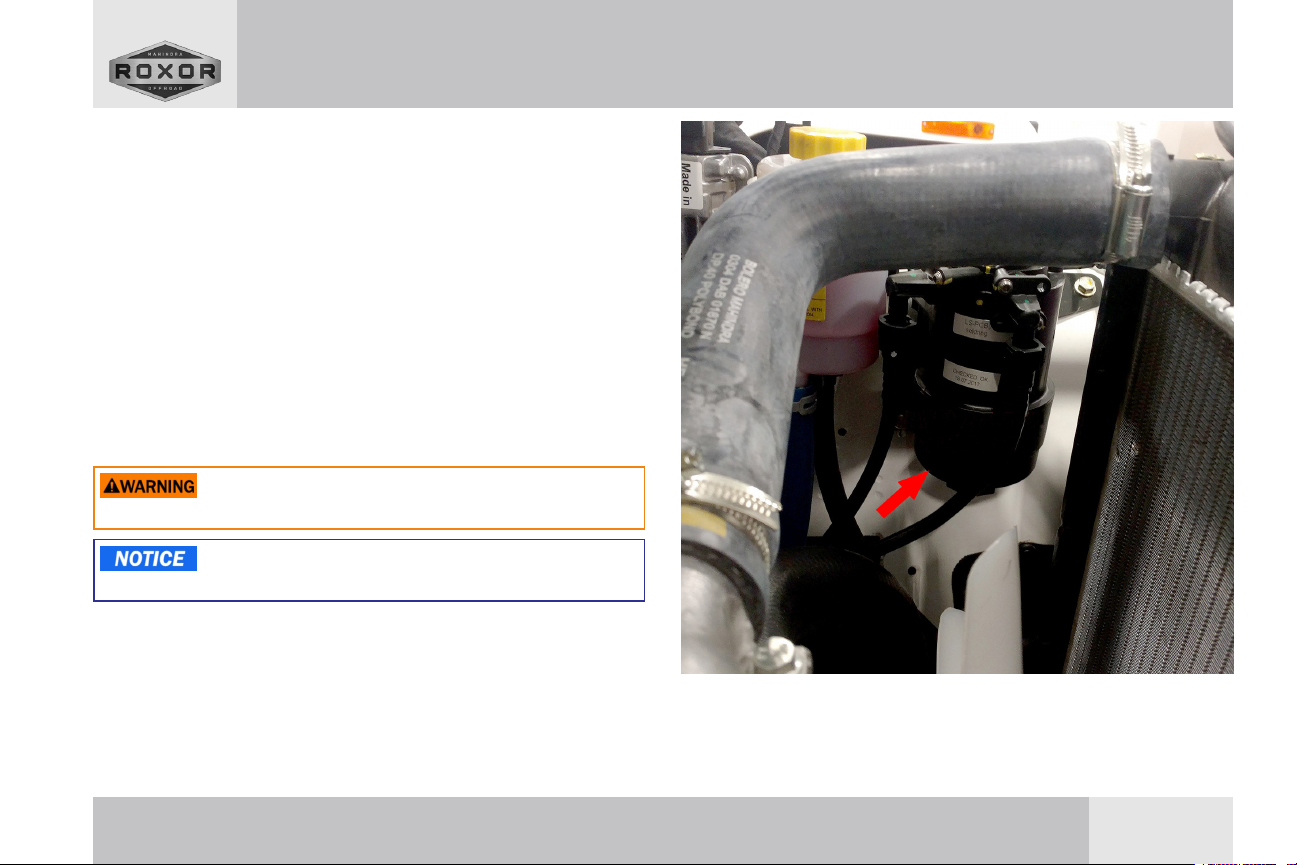
23.11 Drain Fuel/Water Separator
A water in fuel indicator light is provide in the multifunction gauge
on the dash panel. Follow the steps below to drain the fuel/water
separator and turn off the indicator light.
This device is located on the driver’s side of the engine bay, behind
the headlight and radiator support. (see Figure 16)
Maintenance Interval – Check regularly, drain every 10 hours, 300
miles (480 Km)
1. Place a catch basin under the water/fuel separator.
2. Turn the fuel drain petcock counter clockwise until water begins
to come out. (see Figure 17)
3. Turn the petcock clockwise to stop the flow of diesel fuel.
Wear protective gloves and OSHA approved eye pro-
tection when performing this procedure to help prevent injury.
Clean fuel spilled on exposed surfaces with a clean
cloth.
23 Maintenance Procedures
Figure 16. Fuel/Water Separator Location
© 2018 Mahindra Vehicle Sales and Service, Inc. All Rights Reserved. 65
Page 72

23 Maintenance Procedures
23.12 Lubricate Shift Linkage
Maintenance Interval – Lubricate as needed or every 100 hours, 12
months, 3,000 miles (5,000 Km)
As needed means, when shifting becomes difficult, after excessive
water exposure to the undercarriage, or excessive exposure to the
effects of salt air. Apply a quality Fluoropolymer penetrating lubricant or PTFE lubricant to shift linkage pivot points. (see Figure 18)
Figure 17. Fuel Drain Petcock
66 © 2018 Mahindra Vehicle Sales and Service, Inc. All Rights Reserved.
Figure 18. Shift Linkage Pivot Points
Page 73

23.13 Replace Alternator Drive Belt
Inspect the alternator drive belt periodically for cracks and abnormal
wear. It is a good idea to carry an extra belt, especially as your
ROXOR ages, a broken alternator belt can leave you stranded.
Maintenance Interval – Replace every 60 months.
Belt Part Number – 0306GB0022N
1. Position the ROXOR on a flat level surface.
2. Verify the engine is off and parking brake set.
3. Unlatch and lift the hood, then place prop rod.
4. Loosen the jam and adjustment nuts on tension rod. (see Figure
19)
5. Move the alternator toward the engine to loosen belt for
removal.
6. Remove the old belt, then install the new belt.
7. Tighten the adjustment nut, on tension rod until the belt has
about ½" (12.7 mm) of deflection when pushed between pulleys,
then tighten jam nut.
23 Maintenance Procedures
Figure 19. Alternator Adjustment Nut
23.14 Replace Power Steering Drive Belt
Inspect the power steering drive belt periodically for cracks and
abnormal wear. It is a good idea to carry an extra belt, especially as
your ROXOR ages, a broken power steering belt can leave you stranded.
Maintenance Interval – Replace every 60 months.
Belt Part Number – 0306CAB00101N
1. Position the ROXOR on a flat level surface.
2. Verify the engine is off and parking brake set.
© 2018 Mahindra Vehicle Sales and Service, Inc. All Rights Reserved. 67
Page 74

23 Maintenance Procedures
3. Unlatch and lift the hood, then place prop rod.
4. Loosen the jam nut, then turn the adjustment bolt. Clockwise to
tighten, counter clockwise to loosen. (see Figure 20)
5. Move the power steering pump toward the engine to loosen belt
for removal.
6. Remove the old belt, then install the new belt.
7. Turn the adjustment bolt clockwise, until the belt has about ½"
(12.7 mm) of deflection when pushed between pulleys, then
tighten jam nut.
Figure 20. Power Steering Adjustment Nut
23.15 Replace Engine Air Filter
Service the air filter more frequently if the vehicle is operated in
dusty conditions. Refer to section 22.1 Severe Dusty Conditions.
Monitor the air filter indicator with engine running only, if the red
indicator is visible the filter should be replaced. (see Figure 21)
Maintenance Interval – Check regularly, replace every 100 hours,
3,000 miles (5,000 Km)
Filter Part Number – 0313AC0280N
1. Verify the engine is off and parking brake set.
2. Unlatch and lift the hood, then place prop rod.
3. Remove the air filter housing clamp mounting bolt using a 13
mm socket.
4. Swing the air filter housing clamp up and out of the way.
5. Separate the lower air filter housing from the upper air filter housing.
6. Gently remove the air filter by pulling straight out. (see Figure
22)
Operating a turbo diesel engine with a soiled or
damaged air filter can result in engine damage. Do not attempt to
wash the filter. Always replace a soiled or damaged filter with a
new filter.
7. Clean any dirt or deposits from the inside of the air cleaner housings.
68 © 2018 Mahindra Vehicle Sales and Service, Inc. All Rights Reserved.
Page 75
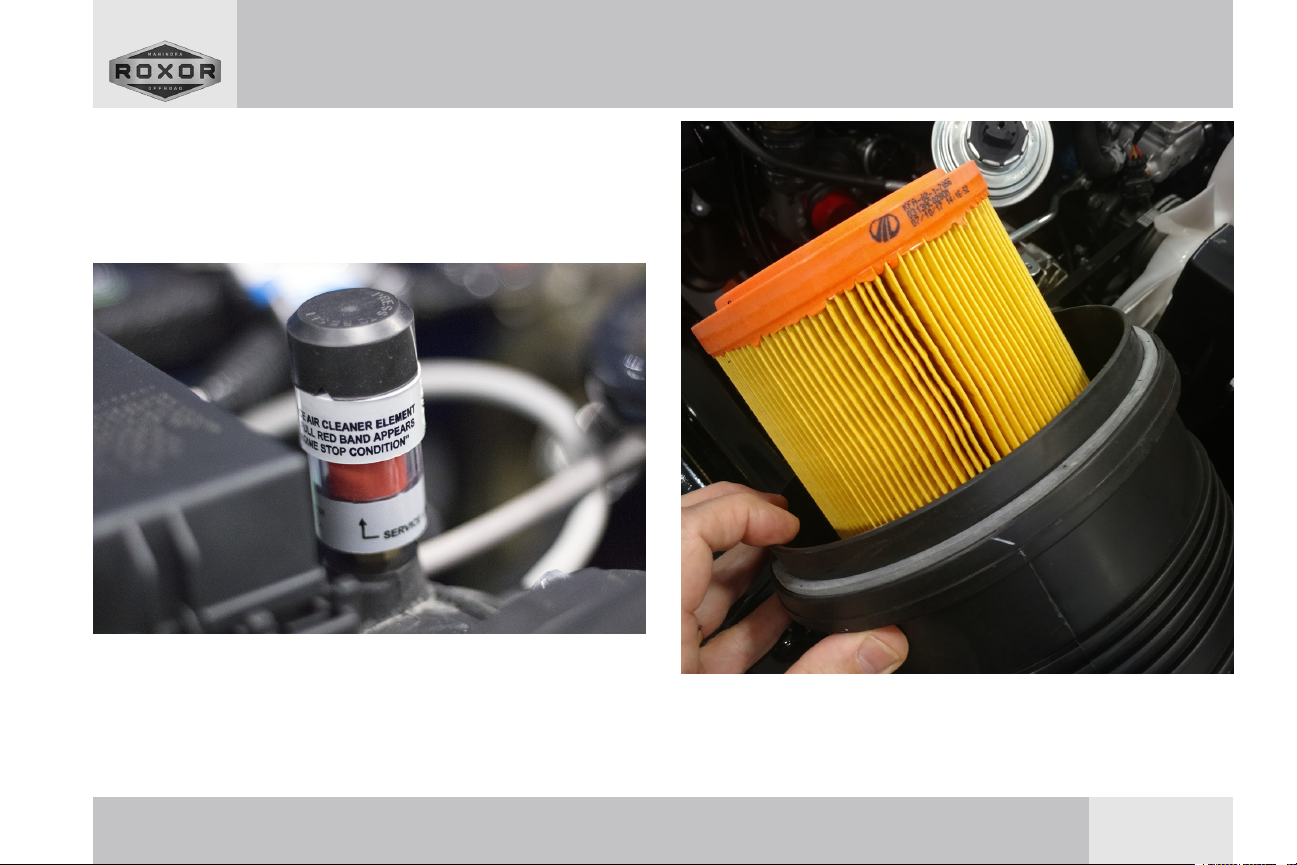
8. Install the new filter into the lower air filter housing, then align
arrows on upper and lower housings on re-assembly.
9. Reinstall the air filter housing into cradle and swing clamp into
position.
10. Position the air filter housing and tighten the mounting bolt.
Figure 21. Air Filter Indicator
23 Maintenance Procedures
Figure 22. Air Filter Housing
© 2018 Mahindra Vehicle Sales and Service, Inc. All Rights Reserved. 69
Page 76

23 Maintenance Procedures
23.16 Replace Engine Oil and Oil Filter
Always change the oil filter whenever changing oil.
Maintenance Interval – Replace every 50 hours, 6 months, 1,500
miles (2,500 Km)
Fluid Spec. – API CJ-4 5W/40 (Full Synthetic)
Capacity – 7.4 Quarts (7.0 Liters)
1. Position the vehicle on a flat level surface.
2. Run the engine for two to three minutes until warm.
3. Stop the engine, place the gear selector in gear and set the parking brake.
4. Clean the area around the drain plug. (see Figure 23)
5. Place a drain pan beneath the engine crankcase.
Contact with hot oil can result in skin burns. Do not
allow hot oil to contact skin.
6. Remove the drain plug. Allow the oil to drain completely.
7. Verify the sealing washer is on the drain plug. The sealing surfaces on drain plug and crankcase should be clean and free of
burrs, nicks or scratches.
8. Reinstall the drain plug. Torque between 30-40 Nm.
9. Place shop towels beneath the oil filter. Using an oil filter
wrench, turn the filter counterclockwise to remove it. (see Figure
24)
10. Using a clean dry cloth, clean the filter sealing surface on the
crankcase. And verify the old o-ring is not stuck to the engine
block.
11. Lubricate the o-ring on the new filter with a film of fresh engine
oil. Check to make sure the o-ring is in good condition.
12. Install the new filter and turn by hand until the filter gasket contacts the sealing surface, then turn an additional 1/2 turn.
13. Unlatch and lift the hood, then place prop rod.
14. Remove the oil fill cap and add up to 7.4 Quarts (7.0 Liters) of
the recommended oil.
15. Reinstall the oil fill cap.
16. Start the engine and check for leaks.
17. Stop the engine and wait for 15 seconds before removing the dipstick. Remove the dipstick. Wipe it dry with a clean cloth.
18. Reinstall the dipstick completely. Remove the dipstick and check
the oil level.
19. Remove the oil fill cap and add oil as needed to bring the level to
the upper mark on the dipstick. Do not overfill.
20. Reinstall the fill cap. Reinstall the dipstick.
21. Dispose of used filter and oil properly.
70 © 2018 Mahindra Vehicle Sales and Service, Inc. All Rights Reserved.
Page 77

Figure 23. Oil Drain Plug Figure 24. Oil Filter
23 Maintenance Procedures
© 2018 Mahindra Vehicle Sales and Service, Inc. All Rights Reserved. 71
Page 78
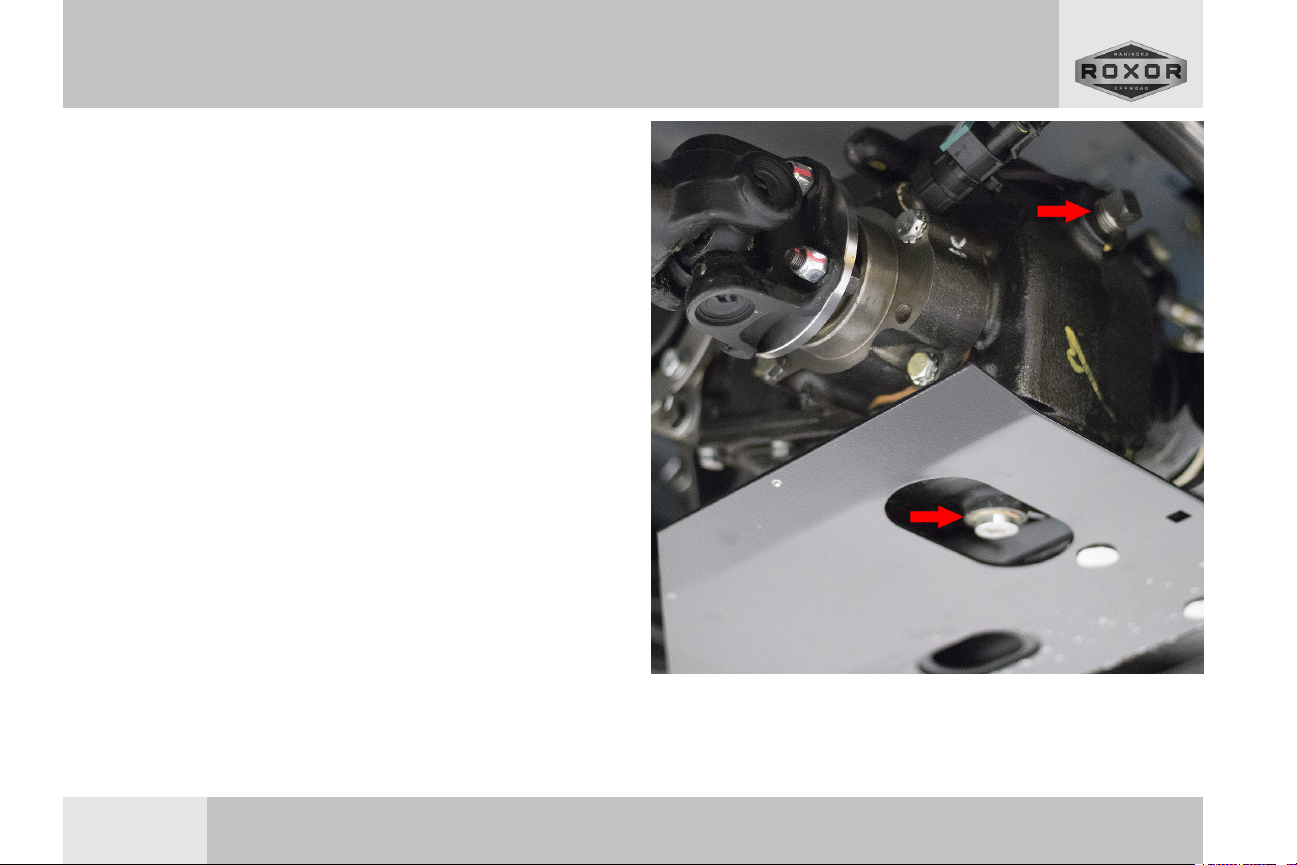
23 Maintenance Procedures
23.17 Replace Transfer Case Oil
Maintenance Interval – Replace 300 hours, 36 months, 9,000 miles
(15,000 Km)
Capacity – 1.7 Quarts (1.6 Liters)
Fluid Spec. – GL-4 SAE 80W90
1. Clean the oil level plug, drain plug and surrounding area.
2. Place a container to collect oil, under the transfer case.
3. Remove the drain plug.
4. Remove the oil level plug. (see Figure 25)
5. Let the oil drain out.
6. Tighten the drain plug.
7. Fill new oil through oil level plug using a funnel until it begins to
drip out.
8. Tighten the oil level plug.
Figure 25. Transfer Drain Plug
72 © 2018 Mahindra Vehicle Sales and Service, Inc. All Rights Reserved.
Page 79

23.18 Rotate Wheels and Tires
When rotating the tires, make sure the ROXOR is on level ground and
properly supported. Never place your body or limbs underneath the
ROXOR when supported. Follow the rotational pattern below. (see
Figure 26)
Maintenance Interval – Every other oil change.
Figure 26. Tire Rotation Pattern
23 Maintenance Procedures
© 2018 Mahindra Vehicle Sales and Service, Inc. All Rights Reserved. 73
Page 80

24 Vehicle Care
24 VEHICLE CARE
24.1 Post Operation Care
You should rinse the dirt and debris off of the ROXOR with fresh
water at the end of each operating day. Apply a rust inhibiting penetrating oil on unpainted metallic parts, excluding belt pulleys and
brake components. When the vehicle is operated in muddy conditions, a complete wash is recommended to help preserve its components.
When the ROXOR is used near salt-water environments,
rinsing the vehicle with fresh water becomes more critical. Never use
a high-pressure washer to clean.
24.2 Vehicle Cleaning and Protection
When required, wash with a soft sponge or cloth, warm water and a
mild detergent. Use low pressure water only (like a garden hose) for
cleaning. High pressure can cause damage to electrical or mechanical components. Certain areas can collect mud and debris, potentially causing abnormal wear, interferences or promote corrosion.
Use a non-abrasive wax to protect (gloss) painted surfaces only.
Never clean plastic parts with strong detergent, degreasing agent, paint thinner, acetone, etc.
24.3 Metal and Rust Prevention
Cover nicked, scratched or damaged areas with touch-up paint or
other suitable rust inhibitor to prevent rust. Keep body drain holes
free from packed dirt. Apply anti-corrosion spray to the underbody
to avoid rusting and corrosion especially for vehicles in coastal
areas.
High pressure water can wash the grease from wheel
bearings, it may also enter the transmission and/or transfer case
reducing the lubricating qualities of the oil. If these components are
submerged in water or found to have water mixed with the lubricant,
replace lubricant to prevent rusting and premature failure.
24.4 Storage and Preseason Preparation
When the ROXOR will not be used for 4 months or longer, proper storage is recommended. See a ROXOR authorized dealer, repair shop, or
person of your own choosing to have it properly prepared and
inspected before and after storage. When bringing the ROXOR out of
storage, it is also recommended to complete the checklist in section
9.1 Pre-Ride Inspection Checklist.
Due to minor parasitic load, the battery should be
removed or disconnected if your ROXOR will be stored for more than
3 months.
74 © 2018 Mahindra Vehicle Sales and Service, Inc. All Rights Reserved.
Page 81

25 Technical Information
25 TECHNICAL INFORMATION
25.1 Product Identification Number
The ROXOR's main components (body, frame and engine) are identified by serial numbers. These numbers are also required to complete a limited warranty claim. We strongly recommend taking note
of these numbers and supply them to your insurance company, in
the event your vehicle is stolen. The Product Identification Number
(PIN) is a 17 digit number, listed on a label located in the engine
compartment, on the driver's side of bulkhead. (see Figure 27)
Figure 27. Product Identification Number
25.2 Engine Identification Number
On the 2.5L (152 c.i.) Turbo Diesel m2DiCR engine provided with the
ROXOR, the engine identification number is a 10 digit number, located on a machined pad, on the front driver's side of the engine
block. (see Figure 28)
Figure 28. Engine Identification Number
25.3 Evaporative Emission Control System
The evaporative emissions control system on the ROXOR may
include parts such as the carburetor or fuel- injection system, fuel
tank, fuel hoses, carbon canister, and engine computer. Also
© 2018 Mahindra Vehicle Sales and Service, Inc. All Rights Reserved. 75
Page 82

25 Technical Information
included may be hoses, belts, connectors and other evaporativerelated assemblies.
Some California models are certified to meet the CARB (California
Air Resources Board) TP-933. These models are equipped with an
evaporative emission control system consisting of an Engine Control Unit (ECU), Exhaust Gas Recirculation Valve (EGR) and a Diesel
Oxidation Catalyst (DOC).
The following statement is required by the CCR (California Code of
Regulation): An add-on or modified part must be compliant with
applicable ARB evaporative emission control standards. A violation
of this requirement is punishable by civil and/or criminal punishment.
25.4 Noise Emission Control System
Tampering with the noise emission control system is prohibited.
U.S. Federal laws and Canadian provincial laws may prohibit the following acts or the causing there of; removal or rendering inoperative
by any person other than for purposes of maintenance, repair or
replacement, of any device or element of design, incorporated in the
ROXOR for the purpose of noise control prior to its sale or delivery to
the ultimate purchaser or, while it is in use or, the use of the vehicle
after such device or element of design has been removed or
rendered inoperative by any person.
25.5 Acts Presumed to Constitute Tampering
As a certifying manufacturer, Mahindra may deny warranty claims
only for failures that have been caused by the owner's or operator's
improper maintenance or use, by accidents for which Mahindra has
no responsibility, or by acts of God.
l Removal or alteration or the puncturing of the muffler or any
engine component which conducts removal of engine exhaust
gases.
l Removal or alteration or the puncturing of any part of the intake
system.
l Replacing any moving parts of the ROXOR or parts of the
exhaust or intake system, with parts other than those specified
by the manufacturer.
l Any other act prohibited by the clean air act and its exacting reg-
ulations, including; modifying after exhaust emissions, control
devices and/or Engine Control Unit (ECU)
76 © 2018 Mahindra Vehicle Sales and Service, Inc. All Rights Reserved.
Page 83

26 Specifications
26 SPECIFICATIONS
26.1 Fluid Specifications and Quantities
Fluid Type FluidSpecification Fluid Quantity
Brake Fluid SAE J1703 Dot 3 .95 Quarts (.90 Liters)
Engine Coolant JIS K2234/ASTM D3306 8.5 Quarts (8.0Liters)
Engine Oil API CJ-4 5W/40
(Full Synthetic)
Front& Rear
Axle Gear Lube
Leaf Spring Pivots NLGI-3 (Multipurpose Lith-
Power Steering Fluid DEXRON III/Mercon .63Quarts (.60 Liters)
ShiftLinkage FluoropolymerPenetrating
Transfer Case Fluid GL-4 SAE 80W90 1.7 Quarts (1.6 Liters)
TransmissionFluid GL-4 SAE 80W90 2.1 Quarts (2.0 Liters)
U-Joints NLGI-2 (EP2 LithiumSoap
WheelBearings NLGI-2 (LithiumComplex
GL-5 SAE 80W-90 1.9 Quarts (1.8 Liters)
ium Grease)
Lubricant
or PTFE Lubricant
Grease)
Grease)
7.4 Quarts (7.0 Liters)
As Required
As Needed
As Needed
As Needed
26.2 Vehicle Specifications
Dimensions and Capacities
Wheelbase 96"(2.44m)
DryWeight 3000lbs. (1360kg)
Length 148"(3.76m)
Width 62" (1.57 m)
Height 75"(1.91m)
Ground Clearance 9" (22.9 cm)
FuelCapacity 12 gal. (45.4 l)
TurningRadius 20'
Rear PayloadCapacity 349 lbs. (158.3kg)
TowingCapacity 3490 lbs. (1583 kg)
Person Capacity 2
Engine
Type TurboDiesel m2DiCR
Turbo Peak BoostPressure 1.61bar(23.7psi Absolute)
Cylinders 4 - 4 Stroke CompressionIgnition
Displacement 2.5L / 152 Cu. In.
Bore and Stroke 35"x 40" (88.9 x 101.6mm)
Power 62 HP @ 3200 rpm
Torque 144ft. lbs. @ 1400-2200 rpm
© 2018 Mahindra Vehicle Sales and Service, Inc. All Rights Reserved. 77
Page 84

26 Specifications
Engine
CompressionRatio 18.6 : 1
CoolingSystem Liquid
FuelSystem Direct Injection
Drivetrain
Transmission 5 SpeedManual
Transfer Case 2 Speed
Driveline 2WD / 4WD
FullFloating Front Axle 3.73 : 1
Semi FloatingRear Axle 3.73 :1
Chassis and Suspension
Chassis Type Box Steel Frame
FrontSuspension Leaf Springw/ Shock Absorbers
Rear Suspension Leaf Spring w/ Shock Absorbers
Shock Absorbers Double Acting Hydraulic
Brakes
DualHydraulicVacuum Assist Standard
ParkingBrake Standard
FrontBrakes 11"Disc
Rear Brakes 11" Drum
Features
Steering HydraulicPower
Instrumentation Single Gauge
Lighting/ Headlights Halogen
Battery 72Ah/ 12v Standard
Alternator 45 to 90 Amps
Power Port 12V Standard
Storage 2 Seat Boxes
Tires 235 / 70R16
Wheel/ Steel 16" - 5 x 5.5 Lug
Wheel/ Aluminum (Optional) 16"- 5 x 5.5 Lug
Performance
Maximum Speed 55 mph
Maximum Towing Speed 15mph
Countryof Assembly USA
78 © 2018 Mahindra Vehicle Sales and Service, Inc. All Rights Reserved.
Page 85

27 Troubleshooting
27 TROUBLESHOOTING
Troubleshooting Table
Possible Cause Solution
Engine Doesn't Turn Over
Low batteryvoltage Recharge the battery
Loose batteryconnections Check batteryconnections,clean and tighten
Loose starter solenoid connection
Loose fuse box connectionsor
blown fuse
Engine Turns Over, Fails to Start
Outof fuel Refuel
Cloggedfuelfilter/waterseparator
Cloggedairfilter Inspect and/or replace air filter
Water is present in fuel Drainthe fuel system and refuel,replacefuelfil-
Oldor non-recommendedfuel Replacewith fresh recommended fuel
Water or fuel in crankcase See yourlocal ROXOR dealer for assistance
Low batteryvoltage Recharge the battery
Mechanicalfailure See your localROXOR dealerforassistance
Check starter connections, clean and tighten
Remove, inspect and reinstallrelatedfuses
Drainwater separator, inspect and/or replace fuel filter
ter/waterseparator
Troubleshooting Table
Possible Cause Solution
Defective fuelpump Inspect and/or replace
Engine Runs Irregularly, Stalls or Misfires
Pooror incorrect fuel Replace with recommended fuel
Low fuel level Refuel
Cloggedfuelfilter Inspect and/orreplace fuel filter
Cloggedairfilter Inspect and/or replace air filter
Water present in fuel Drainwater separator,inspectand/orreplace fuel fil-
ter
Kinked or pluggedfueltank
vent line
Othermechanicalfailure See yourlocal ROXOR dealer for assistance
Inspect and/orreplace
Engine Stops or Loses Power
Pooror incorrect fuel Replace with recommended fuel
Airleak in system after turbocharger
Boost pressure sensor stuck
open
Cloggedfuelfilter Inspect and/orreplace fuel filter
Cloggedairfilter Inspect and/or replace air filter
Inspect forleaks and repairas required
Check sensorconditionand repairor replace
© 2018 Mahindra Vehicle Sales and Service, Inc. All Rights Reserved. 79
Page 86

27 Troubleshooting
Troubleshooting Table
Possible Cause Solution
Water present in fuel Drainwater separator,inspectand/orreplace fuel fil-
ter
Kinked or pluggedfueltank
vent line
Turbocharger damaged Inspect and/orreplaceturbocharger
Othermechanicalfailure See yourlocal ROXOR dealer for assistance
Outof fuel Refuel
Low batteryvoltage Recharge the battery
Overheatedengine Clean radiatorscreen and core, clean engineexterior,
Inspect and/orreplace
operate at lower load
Engine Smokes (Black)
Airleaks between turbocharger/intake manifold
Airintake restriction Inspect and/orreplaceairfilter
Check forleaks in theairintake system, repairleaks
(check o-rings, clamps, hoses)
Excess Oil Consumption
Cloggedairfilter Inspect and/or replace air filter
Obstruction in crankcase ventilation
Intake manifoldmountingface
leak
Airleaks between tur- Check for leaks in the air intake system,repairleaks
Locate and remove the restriction
Changethe manifold gasket orreplace the manifold
Troubleshooting Table
Possible Cause Solution
bocharger/intake manifold (check o-rings, clamps, hoses)
Excessive oil/sludgein turbocharger
Turbocharger damaged Inspect and/orreplaceturbocharger
Changeoilandoilfilter, service the turbochargerand
use recommended engine oil
Whining Noise at 2000 RPM
Airleakagebetween turbocharger/inletmanifold
Check forleaks in theairintake system, repairleaks
(check o-rings, clamps, hoses)
80 © 2018 Mahindra Vehicle Sales and Service, Inc. All Rights Reserved.
Page 87

28 Limited and EPA Warranties U.S. and Canada
28 LIMITED AND EPA WARRANTIES U.S. AND
CANADA
28.1 Limited Warranty U.S. and Canada
2018 ROXOR Scope Of Limited Warranty
Mahindra Vehicle Sales and Service, Inc. (“Mahindra”) warrants its
2018 Mahindra ROXOR Offroad Side x Side (hereinafter “ROXOR”)
sold by authorized Distributors or Dealers (as hereinafter defined) in
the United States of America (“USA”) and Canada is free from
defects in material or workmanship for the period and under the conditions described below. This limited warranty will become null and
void if: (1) the ROXOR was used for racing or any other competitive
activity, at any point, even by a previous owner; (2) the ROXOR has
been altered or modified in such a way so as to adversely affect its
operation, performance or durability, or has been altered or modified
to change its intended use or (3) the ROXOR is not used for its intended purpose, that purpose being for use and operation solely offroad/off-highway.
Non-factory installed parts and accessories are not covered under
this limited warranty. Please refer to the applicable parts and
accessories limited warranty text wherever applicable.
“Distributors” as used herein are authorized centers located throughout Canada having express authority from Mahindra to use Dealers
to sell Mahindra ROXOR Offroad Side x Side. In Canada, the Distributor will have a direct relationship with Dealers.
“Dealers” as used herein are authorized resellers of the ROXOR. In the
United States, the Dealer has a direct relationship with Mahindra. In
Canada, the Dealer has a direct relationship with the Distributor.
TAMPERING WITH THE VEHICLE SPEED SENSOR OF
THE ROXOR WILL LIMIT THROTTLE INPUT AND VOID ALL LIMITED
WARRANTY COVERAGE PERIODS IDENTIFIED HEREIN.
What Is Covered – Limited Warranty
Mahindra, its Distributors or Dealers will, without charge, repair,
replace, or adjust all parts on your ROXOR that malfunction or fail
during normal use during the applicable coverage period due to a
manufacturing defect in factory-supplied materials or factory workmanship. This warranty does not mean that each ROXOR is defect
free. Defects may be unintentionally introduced into vehicles during
the design and manufacturing processes and such defects could result in the need for repairs. Mahindra provides the Limited Warranty
only to remedy manufacturing defects that result in vehicle part malfunction or failure during the warranty period. The remedy under this
written warranty, and any implied warranty, is limited to repair,
replacement, or adjustment of defective parts. This exclusive remedy
shall not be deemed to have failed its essential purpose so long as
Mahindra, through its authorized Dealers, is willing and able to
repair, replace, or adjust defective parts in the prescribed manner.
Mahindra’s liability, if any, shall in no event exceed the cost of correcting manufacturing defects as herein provided and upon expiration of this warranty, any such liability shall terminate.
© 2018 Mahindra Vehicle Sales and Service, Inc. All Rights Reserved. 81
Page 88

28 Limited and EPA Warranties U.S. and Canada
What Mahindra Will Do
Mahindra’s obligations under this warranty are limited to, at its sole
discretion, repairing parts found defective under normal use, maintenance and service, or replacing such parts with new genuine
Mahindra ROXOR parts without charge for parts and labor, at any
ROXOR authorized dealer during the warranty coverage period under
the conditions described herein. No claim of breach of warranty
shall be cause for cancellation or rescission of the sale of the
Mahindra ROXOR to the owner.
In the event that service is required outside of the country of original
sale, the owner will bear responsibility for any additional charges
due to local practices and conditions, such as, but not limited to,
freight, insurance, taxes, license fees, import duties, and any and all
other financial charges, including those levied by governments,
states, territories and their respective agencies.
Mahindra reserves the right to improve or modify products from
time to time without assuming any obligation to modify products
previously manufactured.
LIMITATIONS OF LIABILITY
THIS WARRANTY IS EXPRESSLY GIVEN AND ACCEPTED IN LIEU OF
ANY AND ALL OTHER WARRANTIES, EXPRESSED OR IMPLIED,
INCLUDING WITHOUT LIMITATION ANY WARRANTY OF
MERCHANTABILITY OR FITNESS FOR A PARTICULAR PURPOSE. TO
THE EXTENT THAT THEY CANNOT BE DISCLAIMED, THE IMPLIED
WARRANTIES ARE LIMITED IN DURATION TO THE LIFE OF THE
EXPRESS WARRANTY. INCIDENTAL AND CONSEQUENTIAL DAMAGES
ARE EXCLUDED FROM COVERAGE UNDER THIS WARRANTY, AS ARE
LOSS OF TIME, INCONVENIENCE, LOSS OF USE OF THE ROXOR AND
COMMERCIAL LOSSES. STATES/PROVINCES DO NOT ALLOW FOR
THE DISCLAIMERS, LIMITATIONS AND EXCLUSIONS IDENTIFIED
ABOVE, AND AS A RESULT, THEY MAY NOT APPLY TO YOU. THIS
WARRANTY GIVES YOU SPECIFIC RIGHTS, AND YOU MAY ALSO HAVE
OTHER LEGAL RIGHTS WHICH MAY VARY FROM STATE TO STATE OR
PROVINCE TO PROVINCE.
Neither the distributor, any ROXOR dealer nor any other person has
been authorized to make any affirmation, representation or warranty regarding the product, other than those contained in this Limited Warranty, and if made, shall not be enforceable against
Mahindra. Mahindra reserves the right to modify this Limited Warranty at any time, being understood that such modification will not
alter the warranty conditions applicable to the products sold while
this warranty is in effect.
Exclusions – Items Not Warranted
The following are not warranted under any circumstances:
l Normal wear and tear
l Routine maintenance items, tune ups, adjustments
l Damage caused by failure to provide proper maintenance
and/or storage, as describe in the Mahindra ROXOR Offroad Side
x Side Operator’s Guide
l Damage resulting from removal of parts, improper repairs, ser-
vice, maintenance, modifications or use of parts not
82 © 2018 Mahindra Vehicle Sales and Service, Inc. All Rights Reserved.
Page 89

28 Limited and EPA Warranties U.S. and Canada
manufactured or approved by Mahindra or resulting from
repairs done by a person that is not a ROXOR authorized servicing dealer
l Damage caused by abuse, abnormal use, neglect or operation of
the product in a manner inconsistent with the recommended
operation described in the Mahindra ROXOR Offroad Side x Side
Operator’s Guide
l Damage resulting from accident, submersion, fire, theft, van-
dalism or any act of God
l Operation with fuels, oils or lubricants which are not suitable for
use with the product (see the Operator’s Guide)
l Damages from rust, corrosion or exposure to the elements, other
than Rust Perforation Coverage identified below
l Damage resulting from abuse, including but not limited to water,
snow or dirt/dust ingestion
l Incidental or consequential damages, or damages of any kind
including without limitation towing, storage, telephone, rental,
taxi, inconvenience, insurance coverage, loan payments, loss of
time, or loss of income;
l Paint: Mahindra’s paint system is designed to provide you a dur-
able finish from a one step process. As such, minor imperfections such as fish eye/craters, spot welds, pin holes and
orange peel (“Appearances”) or dust and hair (“Contaminants”)
may be present and visible. This Limited Warranty does not
cover Appearances or Contaminants;
l State and Local Laws: Mahindra does not represent or warrant
that the ROXOR meets applicable state or local laws relative to
Recreational Off-Highway Vehicles however defined in your jurisdiction. It is your responsibility to know and understand all
such laws prior to purchase.
Warranty Coverage Period
This limited warranty will be in effect from (1) the date of delivery to
the first retail consumer or (2) the date the ROXOR is first put into
use, whichever occurs first and for the applicable period below:
n THE EARLIER OF TWENTY-FOUR (24) CONSECUTIVE
MONTHS OR TWELVE THOUSAND MILES.
For emission-related components; please also refer to the US EPA
EMISSION-RELATED WARRANTY contained herein.
n RUST PERFORATION COVERAGE – TWELVE (12)
CONSECUTIVE MONTHS.
This coverage applies to perforation due to corrosion only. Perforation is a rust-through condition, such as an actual hole in a
sheet metal panel. Cosmetic or surface corrosion, such as that
caused by stone chips or scratches in the paint, is not covered under
this limited warranty. This limitation is specifically separate from,
and less than, the above-described Twenty-Four (24) month warranty.
© 2018 Mahindra Vehicle Sales and Service, Inc. All Rights Reserved. 83
Page 90

28 Limited and EPA Warranties U.S. and Canada
The repair or replacement of parts or the performance of service
under this Limited Warranty does not extend the life of this Limited
Warranty beyond its original expiration date.
ALL LIMITED WARRANTY COVERAGE PERIODS
IDENTIFIED HEREIN SHALL BE REDUCED TO NINETY (90) DAYS
FROM (1) THE DATE OF DELIVERY TO THE FIRST RETAIL
CONSUMER OR (2) THE DATE THE ROXOR IS FIRST PUT INTO USE
UNLESS THE PURCHASER FILLS OUT A WARRANTY REGISTRATION
CARD OR OTHER CONTACT PAPERWORK (WITH MAILING ADDRESS,
PHONE, E-MAIL INFORMATION) AS REQUESTED BY MAHINDRA OR
YOUR AUTHORIZED MAHINDRA ROXOR DEALER WITHIN FOURTEEN
(14) DAYS FROM THE DATE THE ROXOR IS PURCHASED.
Conditions To Have Warranty Coverage
This warranty coverage is available only if each of the following conditions has been fulfilled:
The ROXOR must be purchased as new and unused by its first owner
from a Mahindra ROXOR Dealer authorized to distribute Mahindra
ROXOR's in the country in which the sale occurred (“Mahindra
ROXOR Dealer”)
The Mahindra specified pre-delivery inspection process must be completed and documented and signed by the purchaser
The 2018 Mahindra ROXOR Offroad Side x Side must have undergone proper registration by an authorized Mahindra ROXOR Dealer
The 2018 Mahindra ROXOR Offroad Side x Side must be purchased
in the country in which the purchaser resides
Routine maintenance outlined in the Operator’s Guide must be
timely performed in order to maintain warranty coverage. Mahindra
reserves the right to make warranty coverage contingent upon proof
of proper maintenance.
Mahindra will not honor this limited warranty to any private use
owner or commercial use owner if one of the preceding conditions
has not been met. Such limitations are necessary in order to allow
Mahindra to preserve both the safety of its products, and also that
of its consumers and the general public.
What To Do To Obtain Warranty Coverage
The customer must cease using the Mahindra ROXOR upon the
appearance of an anomaly. The customer must notify a servicing
Mahindra Dealer as soon as practicable, but never more than three
(3) consecutive business days of the appearance of a defect, and
provide it with reasonable access to the product and reasonable
opportunity to repair it. The customer must also present to the
ROXOR authorized dealer, proof of purchase of the product and
must sign the repair/work order prior to starting the repair in order
to validate the warranty repair. All parts replaced under this Limited
Warranty become the property of Mahindra.
Transfer
If the ownership of the ROXOR is transferred during the warranty coverage period, this Limited Warranty, subject to its terms and conditions, shall also be transferred and be valid for the remaining
coverage period provided Mahindra or a ROXOR authorized distributor/dealer receives proof that the former owner agreed to the
84 © 2018 Mahindra Vehicle Sales and Service, Inc. All Rights Reserved.
Page 91

28 Limited and EPA Warranties U.S. and Canada
transfer of ownership, in addition to the contact information of the
new owner.
Consumer Assistance
In the event of a controversy or a dispute in connection with this Limited Warranty, Mahindra suggests that you try to resolve the issue at
the dealership level. We recommend discussing the issue with the
authorized dealer's service manager or owner.
If the matter still remains unresolved, contact Mahindra directly by
phone or mail. Refer to section 29 Contact Us of this guide.
28.2 U.S. EPA Emission-Related Limited Warranty (Canada Excluded)
Mahindra warrants to the ultimate purchaser and each subsequent
purchaser that this new vehicle (if purchased in the United States),
including all parts of its exhaust emission control system and its
evaporative emission control system, meets two conditions:
1. It is designed, built, and equipped so it conforms at the time of
sale to the ultimate purchaser with the requirements of 40 CFR
1051 and 40 CFR 1060.
2. It is free from defects in materials and workmanship that may
keep it from meeting the requirements of 40 CFR 1051 and 40
CFR 1060.
Where a warrantable condition exists, Mahindra will repair or
replace, as it elects, any part or component with a defect in materials or workmanship that would increase the engine’s emissions of
any regulated pollutant within the stated warranty period at no cost
to the owner, including expenses related to diagnosing and repairing
or replacing emission-related parts. All defective parts replaced
under this warranty become the property of Mahindra.
For all emission-related warranty claims, Mahindra is limiting the
diagnosis and repair of emission-related parts to a ROXOR authorized dealer, unless for emergency repairs as required by item 2 of the
following list.
Mahindra will not deny emission-related warranty claims based on
any of the following:
1. Maintenance or other service Mahindra or Mahindra's authorized
facilities performed.
2. Engine/equipment repair work that an operator performed to correct an unsafe, emergency condition attributable to Mahindra as
long as the operator tries to restore the engine/equipment to its
proper configuration as soon as possible.
3. Any action or inaction by the operator unrelated to the warranty
claim.
4. Maintenance that was performed more frequently than
Mahindra specifies.
5. Anything that is Mahindra’s fault or responsibility.
6. The use of any fuel that is commonly available where the equipment operates unless Mahindra’s written maintenance instructions or Operator’s Guide state that this fuel would harm the
© 2018 Mahindra Vehicle Sales and Service, Inc. All Rights Reserved. 85
Page 92

28 Limited and EPA Warranties U.S. and Canada
equipment’s emission control system and operators can readily
find the proper fuel.
Emission-Related Warranty – United States (Except California) Only
The emission-related warranty is valid for United States customers
only, and applies to the following period whichever comes first:
Component Type Hours Months Miles/Kilometers
Exhaust emission-related components
Evaporative emission-related components
500 30 3100/5000
N/A 24 N/A
Components Covered
The emission-related warranty covers all components whose failure
would increase an engine’s emissions of any regulated pollutant,
including but not limited to the following listed components.
For exhaust emissions, emission-related components include any
engine parts related to the following systems:
l Air-Induction System
l Fuel System
l Ignition System
l Exhaust Gas Recirculation System
The following parts are also considered emission-related components for exhaust emissions:
l Aftertreatment Devices
l Crankcase Ventilation Valves
l Sensors
l Electronic Control Units
The following parts are considered emission-related components for
evaporative emissions:
l Fuel Tank
l Fuel Cap
l Fuel Line
l Fuel Line Fittings
l Clamps*
l Pressure Relief Valves*
l Control Valves*
l Control Solenoids*
l Electronic Controls*
l Vacuum Control Diaphragms*
l Control Cables*
l Control Linkages*
l Purge Valves
l Vapor Hoses
l Liquid/Vapor Separator
86 © 2018 Mahindra Vehicle Sales and Service, Inc. All Rights Reserved.
Page 93

28 Limited and EPA Warranties U.S. and Canada
l Carbon Canister
l Canister Mounting Brackets
l Carburetor Purge Port Connector
Emission-related components also include any other part whose
only purpose is to reduce emissions or whose failure will increase
emissions without significantly degrading engine/equipment performance.
*As related to the evaporative emission control system
Limited Applicability
Mahindra may deny emission-related warranty claims for failures
that have been caused by the owner’s or operator’s improper maintenance or use, by accidents for which the manufacturer has no
responsibility, or by acts of God. For example, an emission-related
warranty claim need not be honored for failures that have been directly caused by the operator’s abuse of the engine/equipment or the
operator’s use of the engine/equipment in a manner for which it was
not designed and/or not attributable to the manufacturer in any
way.
Notice Specifically For Canada Owners
The provisions contained in this written warranty are not intended to
limit, modify, take away from, disclaim or exclude any warranties set
forth in the operation of The Consumer Products Warranties Act,
1977 (Saskatchewan), the Consumer Protection Act (Quebec), or
any other similar provincial or federal legislation. Your ROXOR
authorized dealer has ensured that all systems and components of
your ROXOR are operating according to manufacturer’s specifications. As part of the delivery of your new ROXOR, your Dealer
has explained maintenance requirements, operations and warranty
conditions assuring that you received all standard items including
your owner’s manual, warranty policy and owner registration form.
Please present your copy of the Owner Registration to your Dealer’s
service department when service or warranty repairs are required.
28.3 California Evaporative Emissions Control Warranty
Statement
Warranty Rights and Obligations
Mahindra Vehicle Sales and Service, Inc. (“Mahindra”), a Delaware
corporation, warrants that its new 2018 Mahindra ROXOR Offroad
Side x Side (“Vehicle’’) is designed, built and equipped to meet California’s stringent anti-smog standards, administered by the California Air Resources Board. Mahindra warrants that the Vehicle’s
evaporative emissions control system complies with these standards for the first Five Thousand (5,000) kilometers (Three Thousand
One Hundred (3,100) Miles) or thirty (30) months, whichever comes
first provided that there has been no abuse, neglect, unapproved
modification or improper maintenance of your Vehicle. When a warrantable condition exists, Mahindra will repair or replace the defective part(s) at no cost, including diagnosis, parts and labor.
The Vehicle’s evaporative emissions control system may include
parts such as the carburetor or fuel- injection system, fuel tank, fuel
© 2018 Mahindra Vehicle Sales and Service, Inc. All Rights Reserved. 87
Page 94

28 Limited and EPA Warranties U.S. and Canada
hoses, carbon canister, and engine computer. Also included may be
hoses, belts, connectors and other evaporative-related assemblies.
Owner's Warranty Responsibilities
The Vehicle’s owner is responsible for the performance of the
required maintenance listed in the Operator’s Guide. Mahindra
recommends that the owner retain all receipts covering maintenance on the Vehicle, but Mahindra cannot deny warranty solely
for the lack of receipts or for failure to ensure the performance of
recommended scheduled maintenance.
The owner is responsible for presenting the Vehicle to a ROXOR
authorized dealer as soon as a problem exists. The warranty repairs
should be completed in a reasonable time, not to exceed thirty (30)
days.
The Vehicle owner should be aware that Mahindra may deny warranty coverage if the Vehicle or a part has failed due to abuse, neglect, improper maintenance or unapproved modifications. Any
questions regarding these warranty rights and responsibilities
should be directed to Mahindra or the California Air Resources
Board at 9528 Telstar Avenue, El Monte, CA 91731.
Vehicle Parts Covered Under Warranty
Parts covered:
l Canister Mounting Bracket(s)
l Carbon Canister
l Purge Port Connector Clamp(s)*
l Electronic Control*
l Fuel Cap with Tether
l Filler Neck
l Filler Neck Hose
l Fuel Line(s)
l Fuel Line Fitting(s)
l Fuel Tank
l Pressure Relief Valve(s)*
l Purge Valve(s)
l Check Valve(s)*
l Vapor Hose(s)
l Flow Reducer
l Filter(s)*
l All other parts not listed that may affect the evaporative emis-
sions control system.
*As related to the evaporative emission control system
88 © 2018 Mahindra Vehicle Sales and Service, Inc. All Rights Reserved.
Page 95

29 CONTACT US
Website: WWW.ROXOROFFROAD.COM
Mahindra Vehicle Sales and Service, Inc.
37 Old Brickyard Road, Fletcher NC 28732
Call Center: (800) 292-0733
Email: CustomerService@roxoroffroad.com
Mahindra Automotive North America Manufacturing
275 Rex Blvd, Auburn Hills, Mi. 48326
Main: (248) 268-6600
29 Contact Us
© 2018 Mahindra Vehicle Sales and Service, Inc. All Rights Reserved. 89
Page 96

30 Privacy Information
30 PRIVACY INFORMATION
Please be informed that Mahindra may use your registration information for safety and limited warranty related purposes. Mahindra
and its partners may also use its customer data to distribute marketing and promotional information about Mahindra and related
products. To verify and correct your data, or to be removed from the
distribution list for direct marketing, please contact Mahindra using
the information below.
Mahindra Vehicle Sales and Service, Inc.
37 Old Brickyard Road, Fletcher NC 28732
Call Center: (800) 292-0733
Email to: CustomerService@roxoroffroad.com
90 © 2018 Mahindra Vehicle Sales and Service, Inc. All Rights Reserved.
Page 97

31 CHANGE OF ADDRESS/OWNERSHIP
If your address has changed or if you are the new owner of the
ROXOR, be sure to complete one of the items below:
l Notifying your nearest ROXOR authorized dealer.
l Call (800) 292-0733 for help locating a ROXOR authorized dealer
in your area.
l Have your ROXOR authorized dealer print a "Change of Address"
from the ROXIT website, then mail that completed form to the
address listed in section 29 Contact Us.
In the case of a change of ownership, please attach proof that the
former owner agreed to the transfer. Notify Mahindra even after the
limited warranty has expired. This is very important, as it enables
Mahindra to reach the new owner if necessary, like when ROXOR
campaigns are initiated. It is the owner’s responsibility to notify
Mahindra.
31 Change of Address/Ownership
© 2018 Mahindra Vehicle Sales and Service, Inc. All Rights Reserved. 91
Page 98

32 Stolen Units
32 STOLEN UNITS
If your ROXOR is stolen, you should notify local law enforcement
immediately. Then notify Mahindra Vehicle Sales and Service, Inc., or
a ROXOR authorized dealer. You will be ask to provide your Name,
Address, Phone Number, the Product Identification Number (PIN)
and the Date it was stolen. Refer to section 29 Contact Us for
Mahindra addresses and phone numbers.
Vehicle PIN Number:
Engine ID Number:
Insurance Information
LocalDealershipContact:
Date of Purchase:
92 © 2018 Mahindra Vehicle Sales and Service, Inc. All Rights Reserved.
Page 99

Page 100

 Loading...