

MAHA AL II, AL II 2.0, AL II 2.0 PH, AL II 2.6 PH, AL II 2.6 PH W Operating Instructions Manual
...Page 1
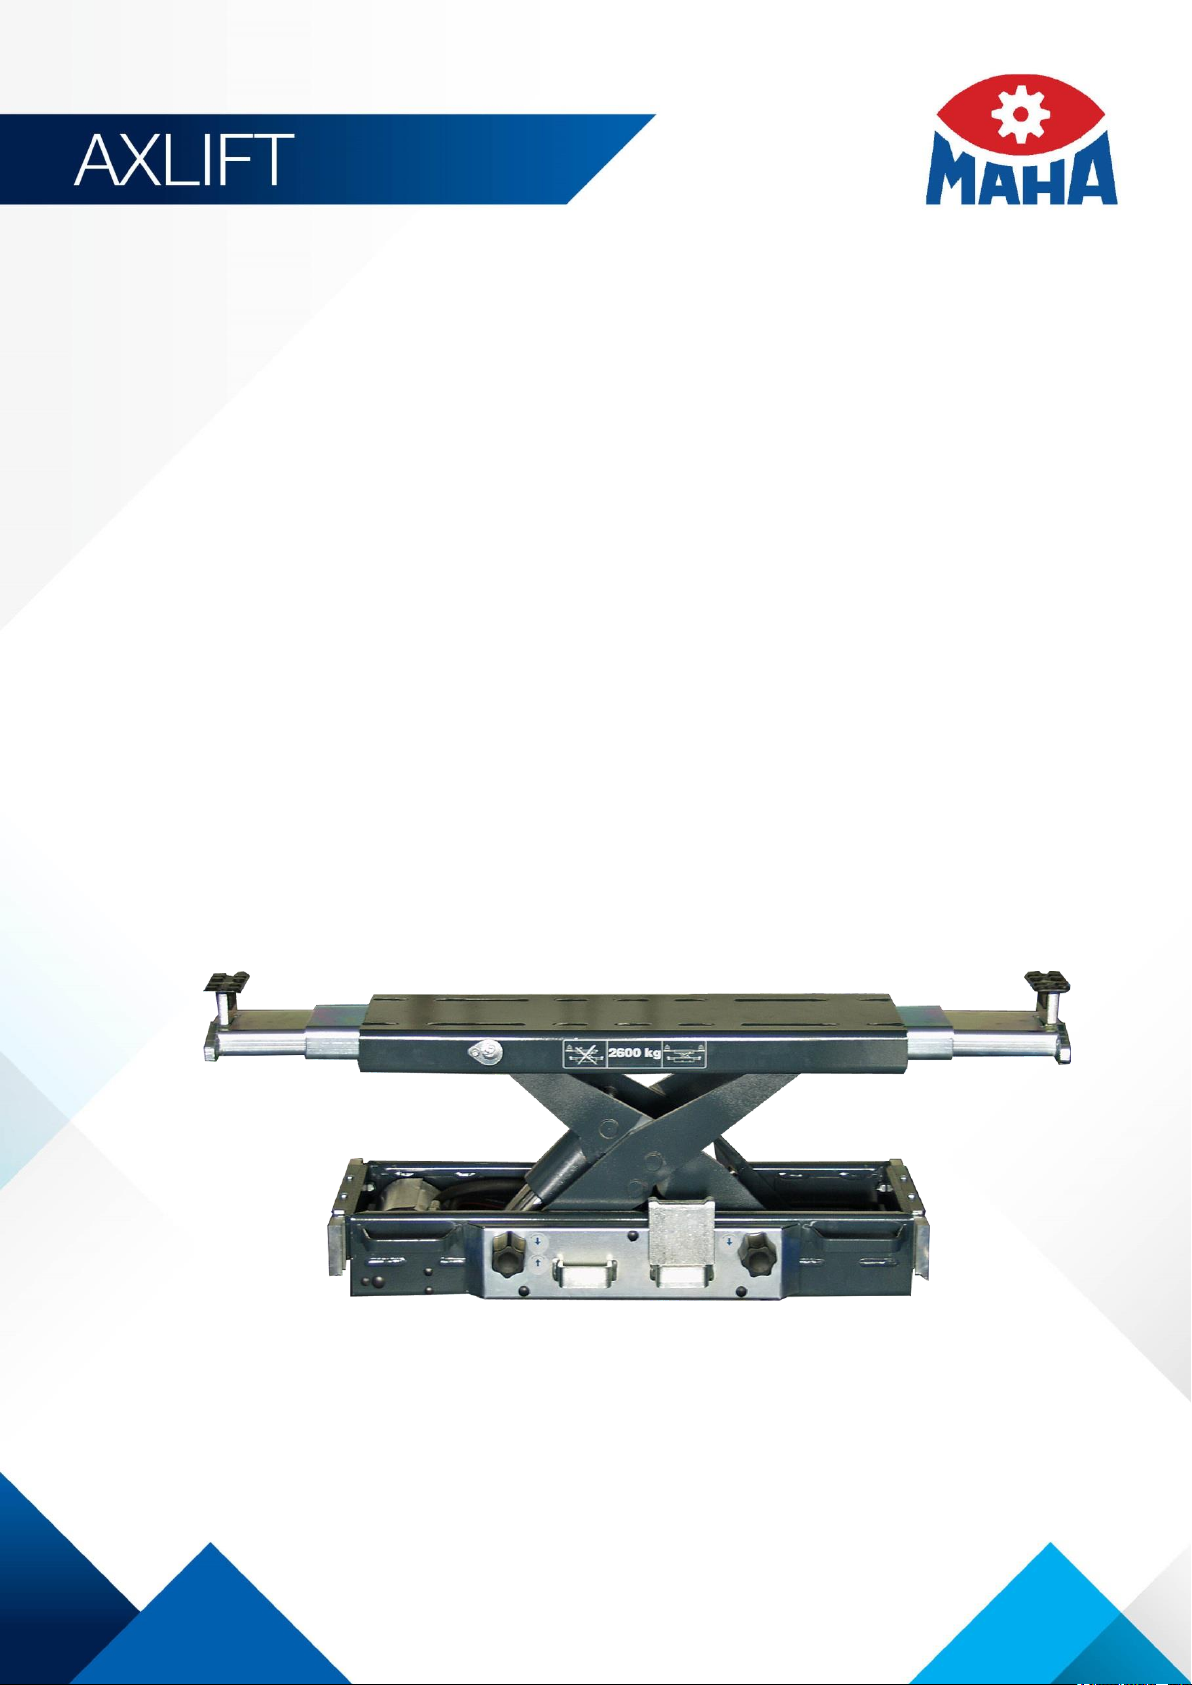
AL II
Axle Jack
Original Operating Instructions
BA082201-en
AL II 2.0
AL II 2.0 PH
AL II 2.6
AL II 2.6 PH
AL II 2.6 PH W
AL II 2.6 PH S
AL II 4.0 PH W
Fehler! Kein Text mit angegebener Formatvorlage im Dokument.Fehler! Kein Text mit angegebener Formatvorlage im Dokument.Fehler!
Kein Text mit angegebener Formatvorlage im Dokument.
Page 2

2
BA082201-en
2018-05-17
© MAHA Maschinenbau Haldenwang GmbH & Co. KG
The reproduction, distribution and utilization of this document as well as the communication of its contents to
others without explicit authorization is prohibited. Offenders will be held liable for the payment of damages. All
rights reserved in the event of the grant of a patent, utility model or design.
The contents of this edition have been checked with great care. However, errors cannot be fully excluded. Subject to technical change without notice.
Manufacturer
MAHA Maschinenbau Haldenwang GmbH & Co. KG
Hoyen 20
87490 Haldenwang
Germany
Phone: +49 8374 585 0
Fax: +49 8374 585 590
Mail: maha@maha.de
Web: www.maha.de
Service
MAHA SERVICE CENTER
Maybachstraße 8
87437 Kempten
Germany
Phone: +49 8374 585 100
Fax: +49 8374 585 491
Mail: service@maha.de
Web: www.mahaservicecenter.de
BA082201-en
Page 3

3
Contents
1 Safety .................................................................................................................... 5
1.1 Introduction .............................................................................................................. 5
1.2 Symbols and Signal Words ...................................................................................... 5
1.2.1 Personal Injury .......................................................................................................... 5
1.2.2 Property Damage ..................................................................................................... 5
1.2.3 Information ............................................................................................................... 5
1.3 Intended Use ........................................................................................................... 6
1.4 Inappropriate Use ..................................................................................................... 6
1.5 Requirements on Operating and Service Personnel .................................................. 6
1.6 Safety Instructions for Commissioning ...................................................................... 7
1.7 Safety Instructions for Operation............................................................................... 7
1.8 Safety Instructions for Servicing ................................................................................ 8
1.9 Safety Instructions for Handling Hydraulic Fluid ......................................................... 8
1.10 What to Do in the Event of an Accident .................................................................... 8
2 Transport and Storage ........................................................................................... 9
3 Installation and Initial Operation............................................................................... 9
4 Specifications....................................................................................................... 10
5 Installation Position ............................................................................................... 11
6 Installation Options ............................................................................................... 11
6.1 Installing the Withdrawal Protection Device ............................................................. 12
6.1.1 Two Post Inground Lifts ......................................................................................... 12
6.1.2 Four Post Inground Lifts ......................................................................................... 12
6.1.3 DUO ...................................................................................................................... 13
6.1.4 CARLIFT ................................................................................................................ 13
6.2 Installing the Spiral Hose ........................................................................................ 14
6.2.1 Two Post Inground Lifts ......................................................................................... 14
6.2.2 Four Post Inground Lifts ......................................................................................... 15
6.2.3 DUO ...................................................................................................................... 16
6.2.4 CARLIFT ................................................................................................................ 17
6.3 Park Position .......................................................................................................... 18
6.3.1 Two Post Inground Lifts ......................................................................................... 18
6.3.2 Four Post Inground Lifts ......................................................................................... 19
6.3.3 DUO ...................................................................................................................... 20
7 Installation Procedure ........................................................................................... 23
8 Operation ............................................................................................................. 25
8.1 Operation of AL II 2.0 / 2.6 ..................................................................................... 25
BA082201-en
Page 4

4
8.2 Operation of AL II 2.0 PH / 2.6 PH / 4.0 PH ............................................................ 25
8.3 Operation of AL II 2.6 PH W / 2.6 PH S .................................................................. 26
8.4 After Usage ............................................................................................................ 26
9 Maintenance ........................................................................................................ 27
9.1 Maintenance Schedule ........................................................................................... 27
9.2 Annual Inspection ................................................................................................... 28
9.3 Care Instructions .................................................................................................... 28
9.4 Refilling with Hydraulic Fluid ................................................................................... 29
9.5 Troubleshooting ..................................................................................................... 29
9.6 Spare Parts ............................................................................................................ 29
9.7 Hydraulic Diagram .................................................................................................. 30
10 Service Lifetime .................................................................................................... 31
11 Dismantling .......................................................................................................... 31
12 Disposal ............................................................................................................... 31
13 Contents of the Declaration of Conformity ............................................................. 31
BA082201-en
Page 5

5
DANGER
indicates an immediate hazard which, if not avoided, will result in death or severe
personal injury.
WARNING
indicates a potential hazard which, if not avoided, could result in death or severe
personal injury.
CAUTION
indicates a potential hazard which, if not avoided, could result in moderate or minor personal injury.
NOTICE
indicates a potentially harmful situation which, if not avoided, could result in damage to the equipment or surrounding objects.
indicates important information notes.
1 Safety
1.1 Introduction
Thoroughly read this manual before operating the equipment and comply with the
instructions. Always display the manual in a conspicuous location.
Personal injury and property damage incurred due to non-compliance with these
1.2 Symbols and Signal Words
1.2.1 Personal Injury
safety instructions are not covered by the product liability regulations.
1.2.2 Property Damage
1.2.3 Information
BA082201-en
Page 6

6
WARNING
Any use other than described is inappropriate, for example:
Climbing on the lift supports
Transporting persons on the lift supports
Usage as mobile work platform or for other lifting operations
WARNING
All persons employed in the operation, maintenance, installation, removal and disposal of the device must
be at least 18 years old,
be mentally and physically suited for these activities,
be demonstrably trained and instructed in writing,
have read and understood the operating instructions, especially the instructions
what to do in the event of defects or malfunctions,
be on record as having been instructed in safety guidelines,
have practical experience in working with vehicle lifts and the hazards inherent
in such equipment.
1.3 Intended Use
This axle jack is to be used exclusively for the safe lifting of motor vehicles. Ob-
serve the rated load capacity.
The axle jack shall not be modified without the express written consent of the
manufacturer. In case of non-compliance the declaration of conformity be-
1.4 Inappropriate Use
comes void.
1.5 Requirements on Operating and Service Personnel
BA082201-en
Page 7

7
WARNING
The axle jack must be installed and commissioned by authorized service per-
sonnel only.
The axle jack must be installed only with a suitable running gear on level, stable
and parallel guide rails or working pits. It must be secured against falling out
and derailment.
The standard axle jack version must not be installed and commissioned in the
vicinity of explosives or flammable liquids, outdoors or in moist rooms (e.g. car
wash).
WARNING
Read the detailed operating instructions.
Lift operation by trained personnel over 18 years only.
The load capacity of the axle jack must not exceed 2/3 of the lift load capacity.
Ensure an unobstructed movement of the axle jack.
After raising the vehicle briefly, stop and check the supports for secure contact.
Make sure the vehicle doors are closed during raising and lowering cycles.
Closely watch axle jack and vehicle during raising and lowering cycles.
Before each lifting procedure, check whether the running gear of the axle jack is
correctly placed.
It is the operator’s responsibility to make sure that operation represents no
danger to persons.
The axle jack is to be used as lifting device only. Never transport the load using
the axle jack.
Before working on the vehicle, lower the axle jack to nearest safety notch.
When lifting a vehicle with two axle jack units, they must have a minimum sepa-
ration of 0.85 m.
Do not allow anyone to stay in lift area during raising and lowering cycles.
Do not allow anyone to climb on the raised vehicle.
Comply with the applicable accident prevention regulations.
Do not exceed the rated load capacity as indicated on the type nameplate.
Only use the vehicle manufacturer's recommended lift points.
Do not use the lift for transporting persons.
Keep the axle jack and the working area clean.
1.6 Safety Instructions for Commissioning
1.7 Safety Instructions for Operation
BA082201-en
Page 8

8
Use caution with operating vehicle engines. Danger of poisoning!
WARNING
Service work may be done by authorized service technicians only.
Ensure that ecologically harmful substances are disposed of only in accordance
with the appropriate regulations.
Do not use high pressure or steam jet cleaners.
Use of caustic cleaning agents may damage the axle jack.
Do not replace or override the lift safety devices.
CAUTION
Neutralize hydraulic fluid spills with binder.
Remove contaminated clothing immediately.
Inhalation: If symptoms persist, seek medical treatment.
Skin contact: Wash skin immediately with soap and water. If skin irritation per-
sists, seek immediate medical advice.
Eye contact: Rinse thoroughly with water and seek medical advice.
Ingestion: Do not induce vomiting. Seek immediate medical attention.
1.8 Safety Instructions for Servicing
1.9 Safety Instructions for Handling Hydraulic Fluid
1.10 What to Do in the Event of an Accident
The injured person is to be removed from the danger area. Find out where
dressing and bandages are kept. Seek first-aid.
Provide first-aid (stop bleeding, immobilise injured limbs), report the accident
and seal off the accident site.
Immediately report any accident to your supervisor. Make sure a record is kept
of every occasion first-aid is provided, e.g. in an accident book.
BA082201-en
Remain calm and answer any questions that may arise.
Page 9

9
NOTICE
Check package to ensure it is complete, in accordance with the order confirmation. Report any transport damage to the carrier immediately.
During loading, unloading and transport always use suitable lifting equipment, material handling equipment (e.g. cranes, forklifts, etc.) and the right load handling
attachments and slings. Always ensure that the parts to be transported are suspended or loaded properly so that they cannot fall, taking into account size,
weight and the centre of gravity.
Store the packages in a covered area, protected from direct sunlight, at a low
humidity and with temperatures between 0...+40 °C (32…104 °F). Do not stack
packages.
When unpacking, take care to avoid any possibility of injury or damage. Keep at a
safe distance when opening the package strapping, do not allow any parts to fall
out.
WARNING
Installation and initial operation of the equipment may be done only by authorized
and trained service technicians provided by the manufacturer, licensed dealers or
service partners.
2 Transport and Storage
3 Installation and Initial Operation
BA082201-en
Page 10

10
AL II
2.0
2.0 PH
Extension length min…max.
780…1610 mm
780…1610 mm
Working pressure min…max.
---
8,5…12 bar
Full travel
250 mm
250 mm
Minimum air flow
---
500 l/min
Load capacity
2000 kg
2000 kg
Protrusion above runway max.
70 mm
70 mm
AL II
2.6
2.6 PH
Extension length min…max.
780…1610 mm
780…1610 mm
Working pressure min…max.
---
8,5…12 bar
Full travel
250 mm
250 mm
Minimum air flow
---
500 l/min
Load capacity
2600 kg
2600 kg
Protrusion above runway max.
70 mm
70 mm
AL II
2.6 PH W
2.6 PH S
4.0 PH
Extension length min…max.
925…1755 mm
780…1610 mm
796 1650 mm
Working pressure min…max.
8,5…12 bar
8,5…12 bar
8.5…12 bar
Full travel
250 mm
250 mm
250 mm
Minimum air flow
500 l/min
500 l/min
500 l/min
Load capacity
2600 kg
2600 kg
4000 kg
Protrusion above runway max.
70 mm
70 mm
70 mm
4 Specifications
The sound pressure level is lower than 85 dB(A) in the working area of the operator.
BA082201-en
Page 11

11
When the axle lift is in park position, the spiral hose must be contracted in order to
be strain-relieved.
5 Installation Position
A Drill holes in side part of Axle jack, centered in longitudinal direction
C Drill holes in side part of Lift, top
6 Installation Options
Inground Two/Four Post Lifts .................. Variant A
DUO ....................................................... Variant A
CARLIFT ................................................. Variant A, if required: Variant B
BA082201-en
Page 12

12
CAUTION
Risk of personal injury and property damage
The installation of the withdrawal protection devices is absolutely necessary. Oth-
erwise the axle jack may fall out of the running rail.
A
A B B
6.1 Installing the Withdrawal Protection Device
6.1.1 Two Post Inground Lifts
Install the withdrawal protection device (A) and the hose fixture (B).
6.1.2 Four Post Inground Lifts
Install the withdrawal protection device (A) and the hose fixture (B).
BA082201-en
Page 13

13
A
B
6.1.3 DUO
Install the withdrawal protection device (A) and the hose fixture (B).
6.1.4 CARLIFT
Install the withdrawal protection devices (four angles per axle jack) as shown.
BA082201-en
Page 14

14
NOTICE
Risk of property damage
Make sure that the spiral hose is installed without kinks.
A B C
6.2 Installing the Spiral Hose
6.2.1 Two Post Inground Lifts
Slide the spiral hose (A) over the wire rope (B).
Tension the wire rope using the ring bolt (C).
Fasten the hose end to the hose fixture using cable ties.
(Bottom view of runway)
BA082201-en
Page 15

15
A B C
6.2.2 Four Post Inground Lifts
Slide the spiral hose (A) over the wire rope (B).
Tension the wire rope using the ring bolt (C).
Fasten the hose end to the hose fixture using cable ties.
(Bottom view of runway)
BA082201-en
Page 16

16
A C B
6.2.3 DUO
Slide the spiral hose (A) over the wire rope (B).
Tension the wire rope using the ring bolt (C).
Fasten the hose end to the hose fixture using cable ties.
BA082201-en
Page 17

17
A
B
C
6.2.4 CARLIFT
Slide the spiral hose (A) over the wire rope (B).
Tension the wire rope using the ring bolt (C).
Fasten the hose end to the hose fixture using cable ties.
BA082201-en
Page 18

18
A B C
6.3 Park Position
6.3.1 Two Post Inground Lifts
Fasten the switch flag including the withdrawal protection device (A) to the side
piece.
After positioning the limit switch (B), drill holes for the guide rail holding the fix-
ture and the stop screw (C). Then install the rail.
BA082201-en
Page 19

19
A
B
C
2…4 mm
D
6.3.2 Four Post Inground Lifts
Install the stop (A) including the withdrawal protection device to the side piece.
Install the lock (B) and the limit switch (C) to the runway. Then install the prox-
imity switch (D) with a distance of 2 to 4 mm to the switch flag and protect it
against collision.
BA082201-en
Page 20

20
6.3.3 DUO
Required Tools
Drilling machine / Cordless screwdriver
Core hole drill Ø 5 mm (for M6)
Tap M6
Hex key A/F 7
Hex key A/F 10
Hex key A/F 13
Hex key A/F 18
Thread locker
Allen key A/F 3
Allen key A/F 5
Axle Jack Lock
BA082201-en
Page 21

21
Liftout guard
End stop
(L) = Left
(R) = Right
(A) = Stop
(B) = Lock
Left liftout guard, left (L) + Stop (A)
Right liftout guard (R) + Lock (B)
Replacement of the Right liftout guard (R) is necessary only on the side with the
Lock (B)!
a
b
a
b
c
Positioned Axle Jack
Workflow (Initial Installation)
1 Install the lift.
2 Install the floor cover.
3 Mount the axle jack.
4 Replace the Right liftout guard (R) with the liftout guard premounted to the axle
jack; see „Positioned Axle Jack“.
5 Position the premounted Lock (B) and Stop (A) so that the axle jack can be
lowered into the floor cover/foundation without collision.
Open screws (a) Adjust (B) + (A) Tighten screws (a).
BA082201-en
Page 22

22
The rubber buffers of lock (B) and stop (A) must bring the axle jack to a halt as far
as possible simultaneously!
Replacement of the Right liftout guard (R) is necessary on the side with the Lock
(B)!
The rubber buffers of lock (B) and stop (A) must bring the axle jack to a halt as far
as possible simultaneously!
6 Install the proximity switch to the lock (B), connect and adjust it (see circuit
diagram: 299.99.L05308).
7 Functional test.
8 Collision test.
9 Mark the position for screw (b) at the runway, drill and tap holes (M6).
10 Fix lock (B) and stop (A) with screw (b) and secure against loosening using a
thread locker.
11 Secure screws (a) against loosening using a thread locker.
12 Mount the cover on the lock (B) and fix it using a screw and nut (c).
Workflow (Retrofitting)
1 Remove the end stops to be replaced (left + right) and the limit switch.
2 Check: side parts must be installed centrally (symmetrically) to the axle jack.
3 Install Left (L) and Right (R) liftout guard, swap if necessary.
4 Position the premounted Lock (B) and Stop (A) so that the axle jack can be
lowered into the floor cover/foundation without collision.
Open screws (a) Adjust (B) + (A) Tighten screws (a).
5 Install the proximity switch to the lock (B), connect and adjust it (see circuit
diagram: 299.99.L05308).
6 Functional test
7 Collision test
8 Mark the position for screw (b) at the runway, drill and tap holes (M6).
9 Fix lock (B) and stop (A) with screw (b) and secure against loosening using a
thread locker.
10 Secure screws (a) against loosening using a thread locker.
BA082201-en
11 Mount the cover on the lock (B) and fix it using a screw and nut (c).
Page 23

23
NOTICE
The axle jack may only be mounted in a suitable lift. The load capacity of the axle
jack must not exceed 2/3 of the lift load capacity.
NOTICE
The support plate and frame may only be lifted if the axle jack is tied together.
Otherwise, the support plate is not supported by the cylinder and the axle jack will
crash when releasing the safety stop.
CAUTION
Risk of personal injury and property damage
With danger of derailment additional safety measures are needed, especially
with lift types as shown in Fig. C (synchronisation of runways!).
The safety technician must decide about the necessary safety measures for
each individual case.
7 Installation Procedure
1 Lift the axle jack out of the packaging and place it at the desired height on
suitable supports between the runways.
2 Mount the side pieces including roller axles with rollers in the holes so that the
axle jack is at the desired height. There are multiple choices for flange and roller
axle mounting. The height can be varied by 12.5 mm by turning the black
extensions in the axle jack (Fig. A).
3 Oil the roller axles while in mounted position.
4 Position in the guide rail of the runway or in the pit.
5 To secure against collapsing, drill an 8.5 hole on both sides directly outside
the frame and mount with a bolt and nut (Fig. B).
6 Check all screws and nuts for tightness. Retighten if necessary.
BA082201-en
Page 24

24
A B C
BA082201-en
Page 25

25
CAUTION
Risk of personal injury and property damage
Before each lifting procedure, check whether the running gear of the axle jack is
correctly placed.
It is the operator’s responsibility to make sure that operation represents no
danger to persons.
The axle jack is to be used as lifting device only. Never transport the load using
the axle jack.
Before working on the vehicle, lower the axle jack to nearest safety notch.
When lifting a vehicle with two axle jack units, they must have a minimum sepa-
ration of 0.85 m.
8 Operation
8.1 Operation of AL II 2.0 / 2.6
Raising
1 Use the pump lever.
2 After reaching the desired lifting height, turn the left-hand lever to the right to
lower the axle jack to the nearest safety notch.
Lowering
1 Slightly raise the axle jack to release the safety lock.
2 Turn both hand levers to the left.
Left-hand lever is used for operating the trigger valve, right-hand lever for
release of safety lock. Both levers return to the original position after release.
8.2 Operation of AL II 2.0 PH / 2.6 PH / 4.0 PH
Raising
1 Turn the left-hand lever to the left.
2 After reaching the desired lifting height, turn the left-hand lever to the right to
lower the axle jack to the nearest safety notch.
Lowering
1 Slightly raise the axle jack to release the safety lock.
2 Turn both hand levers to the left.
Left-hand lever is used for operating the trigger valve, right-hand lever for
release of safety lock. Both levers return to the original position after release.
BA082201-en
Page 26

26
8.3 Operation of AL II 2.6 PH W / 2.6 PH S
Raising
1 Turn the left-hand operating handle in a clockwise direction.
Lowering
1 Verify that there is no danger of pinching.
2 Actuate button on the box.
Arms are retracted automatically, when axle jack reaches preset height. Height
can be set by adjusting the corresponding valve.
Manual Lowering
1 Turn both operating handles in a counterclockwise direction.
Unloaded arms are retracted automatically, when axle jack reaches preset
8.4 After Usage
height.
1 Lower the axle jack into bottom position.
2 Remove the extenders and hang them up at the holders provided.
3 Move the axle jack to its defined park position in order to avoid damage.
BA082201-en
Page 27

27
DANGER
Risk of death or severe personal injury by electric shock
Before doing any maintenance work, turn off the main switch and protect it
against tampering.
Interval
Maintenance points
Procedure
Daily
Axle jack and supports
Visual check.
Monthly
Mechanical parts
Grease all mechanical parts.
3 months
Hydraulic system
Check fluid reservoir and top up if necessary.
Check hydraulic system for leakage.
Check condition of sealing sleeves, replace if necessary.
Check pump for unusual noise during
operation, check fastening screws for
firm fit.
6 months
Hydraulic fluid
Check fluid for dirt and aging, replace if
necessary.
12 months
General inspection
Check all components for damage.
9 Maintenance
9.1 Maintenance Schedule
BA082201-en
Page 28

28
The maintenance interval prescribed by the manufacturer is 12 (twelve) months.
This maintenance interval refers to normal workshop usage. If the equipment is
used more frequently or under severe operating conditions (e.g. outdoors), the
interval must be reduced accordingly.
Maintenance work shall be done only by authorized and trained service techni-
cians provided by the manufacturer, licensed dealers or service partners.
In case of non-compliance the manufacturer's warranty becomes void.
Regular care and maintenance is the key condition for functionality and long life
expectancy of the equipment!
9.2 Annual Inspection
9.3 Care Instructions
Periodically clean the equipment and treat it with a care product.
Repair damage to the paintwork immediately to prevent corrosion.
Do not use caustic cleaning agents or high pressure and steam jet cleaners to
avoid equipment damage.
BA082201-en
Page 29
29
CAUTION
Do not turn the release lever as long as the filling plug is removed. Fluid reservoir is
put under pressure!
The filling quantity is 0.6 l. Use hydraulic fluid with viscosity ISO VG 15.
Error
Diagnosis
Remedy
Axle jack does not raise to
the desired height.
Fluid level too low.
Re-fill hydraulic fluid.
Axle jack locked.
Check whether the safety
stop lever is in neutral position and can be freely
moved.
Axle jack cannot be completely lowered.
Axle jack damaged or
rough-running.
Check for damage, oil
mechanical parts.
Axle jack continues to
lower although the safety
stop lever has been released.
Air in hydraulic system.
Bleed the hydraulic cylinder in unloaded condition.
9.4 Refilling with Hydraulic Fluid
1 Raise axle jack to maximum height.
2 Remove filling plug.
3 Fill hydraulic fluid up to the hole of the fill screw.
9.5 Troubleshooting
4 Re-attach filling plug.
9.6 Spare Parts
To ensure safe and reliable operation, only use original spare parts supplied by the
equipment manufacturer.
BA082201-en
Page 30

30
9.7 Hydraulic Diagram
AL II 2.0 / 2.6
BA082201-en
AL II 2.0 PH / 2.6 PH / 4.0 PH
Page 31

31
10 Service Lifetime
In its standard version, this product is designed for 22,000 load cycles based on
EN 1493. The maximum period of normal use in relation to the possible product
life expectancy shall be evaluated and scheduled by a qualified person during the
11 Dismantling
annual safety inspection.
Decommissioning and dismantling of the equipment may be done only by
specially authorized and trained personnel provided by the manufacturer, licensed
dealers or service partners.
12 Disposal
If you want to dispose of the equipment, please contact your MAHA dealer or the
following address, indicating equipment type, date of purchase and serial number:
MAHA Maschinenbau Haldenwang GmbH & Co. KG
Hoyen 20 | 87490 Haldenwang | Germany
Phone: +49 (0) 8374 585 0
Fax: +49 (0) 8374 585 500
Email: info@maha.de
Alternatively, you may take the equipment to a specialised waste management
plant to ensure that all components and operating liquids are properly disposed
13 Contents of the Declaration of Conformity
of.
MAHA Maschinenbau Haldenwang GmbH & Co. KG
herewith declares as a manufacturer its sole responsibility to ensure that the
product named hereafter meets the safety and health regulations both in design
and construction required by the EC directives stated below.
This declaration becomes void if any change is made to the product that was not
discussed and approved by named company beforehand.
Model: AL II 2.0 / AL II 2.0 PH
AL II 2.6 / AL II 2.6 PH / AL II 2.6 PH W / AL II 2.6 PH S
AL II 4.0 PH / AL II 2.8 PH W MB / AL II 4.0 PH W MB
Designation: Axle Lift; Rated Load Capacity 2000 / 2600 / 4000 kg
Directives: 2006/42/EC
Standards: EN 1494
BA082201-en
 Loading...