

Model DSP6001
Via Paolo Uccello 4 - 20148 Milano
Tel +39 02 48 009 757 Fax +39 02 48 002 070 info@dspmindustria.it www.dspmindustria.it
High Speed Programmable
Dynamometer Controller
User’s Manual

Purchase Record
Please record all model numbers and serial numbers of your
Magtrol equipment, along with the general purchase information.
The model number and serial number can be found on either
a silver identification plate or white label affixed to each unit.
Refer to these numbers whenever you communicate with a
Magtrol representative about this equipment.
Model Number: _____________________________
Serial Number: _____________________________
Purchase Date: _____________________________
Purchased From: _____________________________
While every precaution has been exercised in the compilation of this document to
ensure the accuracy of its contents, Magtrol, Inc. assumes no responsibility for errors or
omissions. Additionally, no liability is assumed for any damages that may result from the
use of the information contained within this publication.
COPYRIGHT
Copyright ©2001-2010 Magtrol, Inc. All rights reserved.
Copying or reproduction of all or any part of the contents of this manual without the
express permission of Magtrol is strictly prohibited.
TRADEMARKS
LabVIEW™ is a trademark of National Instruments Corporation.
Microsoft® is a registered trademark of Microsoft Corporation.
National Instruments™ is a trademark of National Instruments Corporation.
Windows® is a registered trademark of Microsoft Corporation.
1st Edition, revision J – March 2010

Safety Precautions
1. Make sure that all Magtrol dynamometers and electronic products are earth-grounded, to ensure
personal safety and proper operation.
2. Check line voltage before operating the DSP6001.
3. Make sure that dynamometers and motors under test are equipped with appropriate safety
guards.
i

Revisions To This Manual
The contents of this manual are subject to change without prior notice.
REVISION DATE
1st Edition, revision J – March 2010
TABLE OF REVISIONS
Date Edition Change Section(s)
03/01/10 1st Edition - rev. J Added 60 bit encoder to chart for torque transducers 3.3.1
04/16/09 1st Edition - rev. I Added UE commands 5 = 1-bit, 6 = 2-bit and 7 = 6-bit. 8.6.4
05/18/05 1st Edition - rev. H
06/28/04 1st Edition - rev. G Removed DSP6001 resetting procedure 9.4
05/24/04 1st Edition - rev. F Added DIR#, OH1 and IOXX.XX Misc. Command codes 8.6.7, D.6
08/05/03 1st Edition - rev. E Ratings changes for: Operating Temperature, Accuracy,
08/05/03 1st Edition - rev. E Auxiliary Input rating replaced with Input Voltage Range 1.3
08/05/03 1st Edition - rev. E Screen Saver function removed 2.3.2
08/05/03 1st Edition - rev. E Added Power Alarm to priority table 6.1.3
08/05/03 1st Edition - rev. E Deleted DDLXX.XX Ramp Command code 8.6.3, D.3
08/05/03 1st Edition - rev. E Deleted A,B,C,D and E Speed Command codes 8.6.3, 8.6.5, D.3
08/05/03 1st Edition - rev. E Deleted C# Misc. Command code 8.6.7, D.6
05/06/02 1st Edition - rev. D Speed check and decimal point check added to calibration
12/20/01 1st Edition - rev. C Added values for analog filter setup (AF1# and AF2#) 8.6.4
12/20/01 1st Edition - rev. C Added filter cutoff frequency 4.1
08/27/01 1st Edition - rev. B Changed name of chapter titles Chap. 7 & 8
08/27/01 1st Edition - rev. B Changed name and location of Additional Scale Factor Table Appendix F
08/27/01 1st Edition - rev. B Updated Power Analyzers in System Options table 1.3
07/23/01 1st Edition - rev. A Updated Motor Testing Software section and System Options 1.3
07/23/01 1st Edition - rev. A Increased range of PID numbers when using the multiplier 5.4
07/23/01 1st Edition - rev. A Changed Contact Configuration and Manufacturer P/N under
07/23/01 1st Edition - rev. A Air Flow Alarm for Eddy-Current/Powder Brake Dynamometers
07/23/01 1st Edition - rev. A Changed IDN? command to *IDN? command 8.6
07/23/01 1st Edition - rev. A Added alarm condition to explanation of OD command 8.6
07/23/01 1st Edition - rev. A Entered exact figures for reference voltage 9.3.2, 9.3.3
07/23/01 1st Edition - rev. A Defined accepted voltage range in steps 3, 6, 9 & 14 9.3.4
03/27/01 1st Edition Complete re-write of Preliminary Manual entire manual
Changed M-TEST 4.0 references to “M-TEST” or “M-TEST 5.0” throughout
manual
1.3
Temperature Coefficient and Accessory Torque/Speed Output
9.3.5 & 9.3.6
procedure
6.1.1
Relay Specifications
6.1.3
is not available
ii

Table of Contents
SAFETY PRECAUTIONS ......................................................................................................................... I
REVISIONS TO THIS MANUAL ............................................................................................................... II
REVISION DATE ................................................................................................................................................................. II
TABLE OF REVISIONS ...................................................................................................................................................... II
TABLE OF CONTENTS .......................................................................................................................... III
TABLE OF FIGURES ........................................................................................................................................................VII
PREFACE ................................................................................................................................................IX
PURPOSE OF THIS MANUAL .........................................................................................................................................IX
WHO SHOULD USE THIS MANUAL ..............................................................................................................................IX
MANUAL ORGANIZATION ............................................................................................................................................. IX
CONVENTIONS USED IN THIS MANUAL ..................................................................................................................... X
1. INTRODUCTION ................................................................................................................................ 1
1.1 UNPACKING YOUR DSP6001 ..................................................................................................................................... 1
1.2 NEW FEATURES OF THE DSP6001 ........................................................................................................................... 1
1.3 DATA SHEET ................................................................................................................................................................. 2
2. CONTROLS ......................................................................................................................................... 8
2.1 FRONT PANEL .............................................................................................................................................................. 8
2.2 FRONT PANEL CONTROLS AND BUTTONS ........................................................................................................... 8
2.2.1 Enabling Secondary Functions ......................................................................................................................... 8
2.2.2 Enabling Saving Function ................................................................................................................................ 9
2.2.3 How to Use Front Panel Controls and Buttons ................................................................................................ 9
2.3 VACUUM FLUORESCENT DISPLAY (VFD) ........................................................................................................... 10
2.3.1 Contrast Settings ............................................................................................................................................ 11
2.3.2 Screen Saver ................................................................................................................................................... 11
2.3.3 Status Display Messages ................................................................................................................................ 11
2.4 REAR PANEL .............................................................................................................................................................. 12
2.5 REAR PANEL INPUTS AND OUTPUTS................................................................................................................... 12
3. INSTALLATION/CONFIGURATION .................................................................................................. 15
3.1 POWERING UP THE DSP6001 .................................................................................................................................. 15
3.1.1 Setting Unit for Line Voltage ......................................................................................................................... 15
3.1.2 Self-Test ......................................................................................................................................................... 16
3.1.3 Main Menu ..................................................................................................................................................... 16
3.2 TESTING INSTRUMENTATION SETUP .................................................................................................................. 17
3.2.1 Dynamometer Configuration Menu ............................................................................................................... 18
3.2.2 Hysteresis Dynamometer Setup ..................................................................................................................... 19
3.2.3 Hysteresis Dynamometer with Torque Transducer Setup .............................................................................. 20
3.2.4 Hysteresis Dynamometer with Auxiliary Instrumentation Setup................................................................... 22
3.2.5 Hysteresis Dynamometer with Eddy-Current or Powder Brake Setup .......................................................... 24
3.2.6 Eddy-Current or Powder Brake Dynamometer Setup .................................................................................... 26
3.2.7 Eddy-Current or Powder Brake Dynamometer with Torque Transducer Setup ............................................. 27
3.2.8 Eddy-Current or Powder Brake Dynamometer with Auxiliary Instrumentation Setup ................................. 28
3.2.9 Two Eddy-Current/Powder Brake Dynamometers (Independent Setup) ....................................................... 29
3.2.10 Two Eddy-Current/Powder Brake Dynamometers (Tandem Setup) .............................................................. 31
3.2.11 Eddy-Current Dynamometer with Powder Brake Dynamometer (Tandem Setup) ........................................ 33
3.2.12 In-Line Torque Transducer Cross Loop Function .......................................................................................... 35
iii

Magtrol Model DSP6001 Dynamometer ControllerTable of Contents
3.3 SPEED ENCODER SETUP ......................................................................................................................................... 36
3.3.1 Bit Configurations .......................................................................................................................................... 36
3.4 TORQUE/SPEED ANALOG OUTPUTS .................................................................................................................... 37
3.4.1 Torque DAC Scale Factor ............................................................................................................................... 37
3.4.2 Speed DAC Scale Factor ................................................................................................................................ 37
3.4.3 Torque/Speed DAC Setup .............................................................................................................................. 37
4. DIGITAL FILTERS ............................................................................................................................. 38
4.1 FILTER PARAMETERS ............................................................................................................................................. 38
4.2 FILTER SETUP ............................................................................................................................................................ 39
5. PID SETTINGS .................................................................................................................................. 40
5.1 ABOUT THE PID LOOP ............................................................................................................................................. 40
5.1.1 P (Proportional Gain) ..................................................................................................................................... 40
5.1.2 I (Integral) ...................................................................................................................................................... 40
5.1.3 D (Derivative) ................................................................................................................................................. 40
5.2 SETTING PID VALUES .............................................................................................................................................. 40
5.2.1 How To Set P (Proportional Gain) Value ....................................................................................................... 40
5.2.2 How to Set I (Integral) Value .......................................................................................................................... 40
5.2.3 How to Set D (Derivative) Value .................................................................................................................... 40
5.3 HOW THE PID LOOP WORKS .................................................................................................................................. 41
5.3.1 Scale Factors for Hysteresis, Eddy-Current and Powder Brake Dynamometers ........................................... 41
5.3.2 Speed Correction for WB (Eddy-Current Brake) Dynamometer ................................................................... 41
5.3.3 Equations ........................................................................................................................................................ 42
5.4 ADDITIONAL SCALE FACTOR ...............................................................................................................................42
5.4.1 How To Set Additional Scale Factor .............................................................................................................. 42
5.5 SETTING THE CORRECT PID’S FOR YOUR MOTOR .......................................................................................... 43
5.5.1 Setting the PID with an Unknown Motor or System ..................................................................................... 43
5.5.2 Setting the PID for Torque Control ................................................................................................................ 43
5.5.3 Setting the PID for Speed Control ................................................................................................................. 46
5.5.4 Setting the PID for Ramp Down .................................................................................................................... 48
6. ALARM SYSTEM .............................................................................................................................. 50
6.1 GENERAL INFORMATION ....................................................................................................................................... 50
6.1.1 Alarm Relay ................................................................................................................................................... 50
6.1.2 Alarm Operation.............................................................................................................................................51
6.1.3 Alarm Priority ................................................................................................................................................ 52
6.2 POWER ALARM ......................................................................................................................................................... 52
6.2.1 Instructions for Power Alarm Setup ............................................................................................................... 52
6.2.2 Power Alarm Action ....................................................................................................................................... 53
6.2.3 To Reset Power Alarm .................................................................................................................................... 53
6.3 MAXIMUM SPEED ALARM .................................................................................................................................... 53
6.3.1 Instructions for Maximum Speed Alarm Setup .............................................................................................. 53
6.3.2 Maximum Speed Alarm Action ...................................................................................................................... 54
6.3.3 To Reset Maximum Speed Alarm .................................................................................................................. 54
6.4 MAXIMUM TORQUE ALARM ................................................................................................................................ 54
6.4.1 Instructions for Maximum Torque Alarm Setup ............................................................................................ 54
6.4.2 Maximum Torque Alarm Action ....................................................................................................................55
6.4.3 To Reset Maximum Torque Alarm ................................................................................................................. 55
6.5 AIR FLOW ALARM .................................................................................................................................................... 56
6.5.1 Instructions for Air Flow Alarm Setup ........................................................................................................... 56
6.5.2 Air Flow Alarm Action ................................................................................................................................... 56
6.5.3 To Reset Air Flow Alarm ............................................................................................................................... 56
iv

Magtrol Model DSP6001 Dynamometer Controller
Table of Contents
6.6 WATER FLOW ALARM ............................................................................................................................................. 57
6.6.1 Instructions for Water Flow Alarm Setup ....................................................................................................... 57
6.6.2 Water Flow Alarm Action .............................................................................................................................. 57
6.6.3 To Reset Water Flow Alarm ........................................................................................................................... 57
6.7 EXTERNAL ALARM .................................................................................................................................................. 58
6.7.1 Instructions for External Alarm Setup............................................................................................................ 58
6.7.2 External Alarm Action.................................................................................................................................... 58
6.7.3 To Reset External Alarm ................................................................................................................................ 58
6.8 TEMPERATURE ALARM .......................................................................................................................................... 59
6.8.1 Instructions for Temperature Alarm Setup ..................................................................................................... 59
6.8.2 Temperature Alarm Action ............................................................................................................................. 59
6.8.3 To Reset Temperature Alarm .......................................................................................................................... 59
6.9 ELECTRICAL ALARM .............................................................................................................................................. 60
6.9.1 Instructions for Electrical Alarm Setup .......................................................................................................... 60
6.9.2 Electrical Alarm Action .................................................................................................................................. 60
6.9.3 To Reset Electrical Alarm ..............................................................................................................................60
7. MANUALLY CONTROLLED OPERATION ....................................................................................... 61
7.1 HOW TO CHOOSE DESIRED CHANNEL WHEN USING TWO DYNAMOMETERS ......................................... 61
7.2 HOW TO SET DESIRED POWER UNITS ................................................................................................................ 62
7.3 HOW TO SET DESIRED TORQUE UNITS .............................................................................................................. 62
7.4 HOW TO SET TORQUE CONTROL .......................................................................................................................... 62
7.5 HOW TO SET SPEED CONTROL ............................................................................................................................. 63
7.6 HOW TO SET OPEN LOOP CONTROL .................................................................................................................... 64
8. COMPUTER CONTROLLED OPERATION ...................................................................................... 65
8.1 ABOUT THE GPIB INTERFACE ............................................................................................................................... 65
8.1.1 Installing the GPIB (IEEE-488) Connector Cable ......................................................................................... 65
8.1.2 Changing the GPIB Primary Address ............................................................................................................66
8.2 ABOUT THE RS-232 INTERFACE ............................................................................................................................ 66
8.2.1 Connection ..................................................................................................................................................... 66
8.2.2 Communication Parameters ........................................................................................................................... 67
8.2.3 Baud Rate ....................................................................................................................................................... 67
8.3 CHECKING THE DSP6001-TO-PC CONNECTION ................................................................................................. 67
8.4 DATA FORMAT ........................................................................................................................................................... 68
8.5 PROGRAMMING ....................................................................................................................................................... 68
8.5.1 Data Termination Characters .......................................................................................................................... 68
8.5.2 Timeout ..........................................................................................................................................................69
8.6 DSP6001 COMMAND SET ........................................................................................................................................ 69
8.6.1 Alarm Commands .......................................................................................................................................... 69
8.6.2 Communication Commands ........................................................................................................................... 70
8.6.3 Ramp Commands ........................................................................................................................................... 71
8.6.4 Setup Commands ........................................................................................................................................... 72
8.6.5 Speed Commands ........................................................................................................................................... 74
8.6.6 Torque Commands ......................................................................................................................................... 74
8.6.7 Miscellaneous Command ............................................................................................................................... 75
9. CALIBRATION .................................................................................................................................. 76
9.1 CLOSED-BOX CALIBRATION ................................................................................................................................. 76
9.2 CALIBRATION SCHEDULE ...................................................................................................................................... 76
9.3 BASIC CALIBRATION PROCESS ............................................................................................................................. 76
9.3.1 Initial Calibration Procedure .......................................................................................................................... 76
v

Magtrol Model DSP6001 Dynamometer ControllerTable of Contents
9.3.2 TSC1 Offset and Gain .................................................................................................................................... 77
9.3.3 TSC2 Offset and Gain .................................................................................................................................... 78
9.3.4 DAC Output Offset and Gain ......................................................................................................................... 78
9.3.5 Speed Check ................................................................................................................................................... 80
9.3.6 Decimal Point Check......................................................................................................................................81
10. TROUBLESHOOTING ..................................................................................................................... 82
APPENDIX A: LABVIEW PROGRAMMING EXAMPLES
A.1 SIMPLE READ ............................................................................................................................................................ 83
A.2 TORQUE STABILIZED .............................................................................................................................................. 84
A.3 SPEED STABILIZED .................................................................................................................................................. 85
..................................................................... 83
APPENDIX B: INERTIA CORRECTION ............................................................................................... 86
B.1 INERTIAL EFFECT ON MOTOR TEST DATA ......................................................................................................... 86
B.2 PROCEDURE FOR INERTIA CORRECTION ..........................................................................................................86
B.2.1 Key Conditions ............................................................................................................................................... 87
APPENDIX C: FRONT PANEL/DISPLAY MENU FLOW CHARTS ....................................................... 88
C.1 PRIMARY KEY FUNCTIONS.................................................................................................................................... 88
C.2 SECONDARY KEY FUNCTIONS .............................................................................................................................89
C.2.1 Power Units Menu .......................................................................................................................................... 89
C.2.2 Torque Units Menu......................................................................................................................................... 89
C.2.3 Max Speed Menu ...........................................................................................................................................90
C.2.4 Aux Setup Menu ............................................................................................................................................ 90
C.2.5 Com Setup Menu............................................................................................................................................ 91
C.2.6 Dyno Setup Menu .......................................................................................................................................... 92
APPENDIX D: REMOTE CONFIGURATION FLOW CHARTS ............................................................ 101
D.1 ADVANCED CONFIGURATION ............................................................................................................................. 101
D.2 PRE-TEST .................................................................................................................................................................. 102
D.3 RAMP ......................................................................................................................................................................... 103
D.4 SPEED ........................................................................................................................................................................ 104
D.5 TORQUE .................................................................................................................................................................... 105
D.6 MISCELLANEOUS ................................................................................................................................................... 106
D.7 DATA .......................................................................................................................................................................... 106
APPENDIX E: SCHEMATICS .............................................................................................................. 107
E.1 DYNAMOMETER POWER SUPPLY ....................................................................................................................... 107
E.2 DYNAMOMETER DSP & MEMORY ...................................................................................................................... 108
E.3 DSP DYNAMOMETER ANALOG I/O ..................................................................................................................... 109
APPENDIX F: ADDITIONAL SCALE FACTOR TABLE ....................................................................... 110
INDEX
................................................................................................................................................... 111
vi

Magtrol Model DSP6001 Dynamometer Controller
TABLE OF FIGURES
2. CONTROLS
Figure 2–1 Front Panel ..............................................................................................................................................8
Figure 2–2 Secondary Function Menu ........................................................................................................................8
Figure 2–3 Saving Function Menu ..............................................................................................................................9
Figure 2–4 Rear Panel ..............................................................................................................................................12
Figure 2–5 Dynamometer Brake Input .....................................................................................................................12
Figure 2–6 Accessory Torque-Speed Output .............................................................................................................12
Figure 2–7 Dynamometer/TSC1 Connector .............................................................................................................13
Figure 2–8 AUX/TSC2 Connector .............................................................................................................................13
Figure 2–9 Supply 1 Connector ................................................................................................................................13
Figure 2–10 Supply 2 Connector ..............................................................................................................................14
Figure 2–11 RS-232C Interface ................................................................................................................................14
3. INSTALLATION/CONFIGURATION
Figure 3–1 Cover for Voltage Selector, Fuses ...........................................................................................................15
Figure 3–2 Program Download Display ...................................................................................................................16
Figure 3–3 Revision Display .....................................................................................................................................16
Figure 3–4 Alarm Warning Display ..........................................................................................................................16
Figure 3–5 Main Menu .............................................................................................................................................16
Figure 3–6 Dyno Setup Menu ...................................................................................................................................18
Figure 3–7 Dynamometer Configuration Menu ........................................................................................................18
Figure 3–8 Hysteresis Dynamometer Setup ..............................................................................................................19
Figure 3–9 Hysteresis Setup Menu ...........................................................................................................................19
Figure 3–10 Hysteresis Dynamometer with Torque Transducer Setup .....................................................................20
Figure 3–11 Torque Transducer Setup Menu ............................................................................................................21
Figure 3–12 Aux Setup Menu - Display On ..............................................................................................................21
Figure 3–13 TSC1 with TM2XX Output Menu ..........................................................................................................21
Figure 3–14 Hysteresis Dynamometer with Auxiliary Instrumentation Setup ..........................................................22
Figure 3–15 TSC2 Aux Setup Menu ..........................................................................................................................23
Figure 3–16 TSC1 with AUX Output Menu ...............................................................................................................23
Figure 3–17 Hysteresis Dynamometer with Eddy-Current or Powder Brake Setup .................................................24
Figure 3–18 TSC2 Eddy-Current/Powder Brake Setup Menu ..................................................................................25
Figure 3–19 Nominal Speed Setup Menu ..................................................................................................................25
Figure 3–20 Eddy-Current or Powder Brake Dynamometer Setup ..........................................................................26
Figure 3–21 TSC1 Eddy-Current/Powder Brake Setup Menu ..................................................................................26
Figure 3–22 Eddy-Current or Powder Brake Dynamometer with Torque Transducer Setup ...................................27
Figure 3–23 Eddy-Current or Powder Brake Dynamometer with Auxiliary Instrumentation Setup ........................28
Figure 3–24 Two Eddy-Current/Powder Brake Dynamometers (Independent Setup) ..............................................29
Figure 3–25 Tandem Configuration Menu ................................................................................................................30
Figure 3–26 Two Eddy-Current/Powder Brake Dynamometers (Tandem Setup) .....................................................31
Figure 3–27 Eddy-Current Dynamometer with Powder Brake Dynamometer (Tandem Setup) ...............................33
Figure 3–28 TSC1 Eddy-Current Setup Menu ...........................................................................................................33
Figure 3–29 TSC2 Powder Brake Setup Menu ..........................................................................................................34
Figure 3–30 Maximum Speed Excited Menu ............................................................................................................34
Figure 3–31 In-Line Torque Transducer Cross Loop Function ................................................................................35
Figure 3–32 Brake Type Menu ..................................................................................................................................35
Figure 3–33 Brake Type Menu (for WB) ...................................................................................................................36
Figure 3–34 Encoder Menu ......................................................................................................................................36
Figure 3–35 Torque/Speed DAC Setup Menu ............................................................................................................37
Table of Contents
4. DIGITAL FILTERS
Figure 4–1 Transposed Direct Form II Architecture .................................................................................................38
5. PID SETTINGS
Figure 5–1 System Block Diagram............................................................................................................................41
Figure 5–2 Open Loop Control Menu .......................................................................................................................43
Figure 5–3 Initial P Setting for Torque Control at 25% ...........................................................................................44
vii

Magtrol Model DSP6001 Dynamometer ControllerTable of Contents
Figure 5–4 High Initial P Setting for Torque Control .............................................................................................44
Figure 5–5 Initial I Setting for Torque Control .........................................................................................................45
Figure 5–6 Initial D Setting for Torque Control .......................................................................................................45
Figure 5–7 Initial P Setting for Speed Control at 25% ..............................................................................................46
Figure 5–8 Initial I Setting for Speed Control ..........................................................................................................47
Figure 5–9 Initial D Setting for Speed Control .........................................................................................................47
Figure 5–10 Ramp Down Low I ................................................................................................................................48
Figure 5–11 Ramp Down High I ...............................................................................................................................49
Figure 5–12 Ramp Down Dynamic I ........................................................................................................................49
6. ALARM SYSTEM
Figure 6–1 Normal Condition “Energized Relay” ...................................................................................................50
Figure 6–2 Alarm Condition “De-Energized Relay” ...............................................................................................50
Figure 6–3 Typical Application .................................................................................................................................51
Figure 6–4 Alarm Enable/Disable Menu ..................................................................................................................51
Figure 6–5 Max Power Menu ....................................................................................................................................52
Figure 6–6 Power Alarm Display .............................................................................................................................53
Figure 6–7 Speed Alarm Setup Menu........................................................................................................................53
Figure 6–8 -OL- Speed Alarm Display .....................................................................................................................54
Figure 6–9 Over Speed Alarm Message Display ......................................................................................................54
Figure 6–10 Torque Alarm Setup Menu ....................................................................................................................55
Figure 6–11 -OL- Torque Alarm Display ..................................................................................................................55
Figure 6–12 Over Torque Alarm Message Display ...................................................................................................55
Figure 6–13 Air Flow Alarm Setup Display .............................................................................................................56
Figure 6–14 Air Flow Alarm Message Display ........................................................................................................56
Figure 6–15 Water Flow Alarm Setup Display .........................................................................................................57
Figure 6–16 Water Flow Alarm Message Display ....................................................................................................57
Figure 6–17 External Alarm Setup Display ..............................................................................................................58
Figure 6–18 External Alarm Message Display .........................................................................................................58
Figure 6–19 Temperature Alarm Message Display ...................................................................................................59
Figure 6–20 Electrical Alarm Message Display .......................................................................................................60
7. MANUALLY CONTROLLED OPERATION
Figure 7–1 Dynamometer Channel Menu .................................................................................................................61
Figure 7–2 Power Units Menu ..................................................................................................................................62
Figure 7–3 Torque Units Menu .................................................................................................................................62
Figure 7–4 Torque Control Menu ..............................................................................................................................62
Figure 7–5 Max Speed Menu ....................................................................................................................................63
8. COMPUTER CONTROLLED OPERATION
Figure 8–1 GPIB Installation ..................................................................................................................................65
Figure 8–2 Com Setup Menu Display .......................................................................................................................66
Figure 8–3 RS-232 Interface .....................................................................................................................................66
Figure 8–4 Straight Through Pin-to-Pin Cable Connection .....................................................................................67
9. CALIBRATION
Figure 9–1 Calibration Display Analog Inputs ........................................................................................................77
Figure 9–2 TSC1 Input Connector ............................................................................................................................77
Figure 9–3 TSC2 Input Connector ............................................................................................................................78
Figure 9–4 Calibration Output DAC Display Menu .................................................................................................78
Figure 9–5 Supply 1 Connector ................................................................................................................................79
Figure 9–6 Supply 2 Connector ................................................................................................................................79
Figure 9–7 Calibration Accessory Torque DAC Display Menu ................................................................................79
Figure 9–8 Accessory Torque-Speed Output .............................................................................................................80
Figure 9–9 Calibration Accessory Speed DAC Display Menu .................................................................................80
viii

PURPOSE OF THIS MANUAL
This manual contains all the information required for the installation and general use of the Model
DSP6001 Dynamometer Controller. To ensure proper use of the instrument, please read this manual
thoroughly before operating it. Keep the manual in a safe place for quick reference whenever a
question arises.
WHO SHOULD USE THIS MANUAL
This manual is intended for bench test operators who are going to use the Model DSP6001
Dynamometer Controller in conjunction with any Magtrol Hysteresis, Eddy-Current or Powder
Brake Dynamometer, Magtrol In-Line Torque Transducer or auxiliary instrumentation.
MANUAL ORGANIZATION
This section gives an overview of the structure of the manual and the information contained within it.
Some information has been deliberately repeated in different sections of the document to minimize
cross-referencing and to facilitate understanding through reiteration.
Preface
The structure of the manual is as follows:
Chapter 1: INTRODUCTION - Contains the technical data sheet for the DSP6001 Dynamometer
Controller, which describes the unit and provides its technical characteristics.
Chapter 2: CONTROLS - Description of the elements located on the front and rear panels of
the unit.
Chapter 3: INSTALLATION/CONFIGURATION - Provides setup options available with the
DSP6001 Dynamometer Controller. Illustrates and outlines the hardware connection
setup and software configurations for each option.
Chapter 4: DIGITAL FILTERS - Contains theory and setup information pertaining to Digital
Filters.
Chapter 5: PID SETTINGS - Describes the Proportional Integral Derivative (PID) Loop and
provides information on theory, setup and use.
Chapter 6: ALARM SYSTEM - Describes the new built-in alarm feature providing the user
with information on how each different alarm operates along with instructions for
setup and use.
Chapter 7: MANUALLY CONTROLLED OPERATION - How to run a test when the DSP6001
is used as a stand-alone unit. Includes information on setting power and torque
units, torque and speed control and open loop control.
Chapter 8: COMPUTER CONTROLLED OPERATION - How to run a test when the DSP6001
is used with a PC. Includes information on GPIB Interface, RS-232 Interface, data
format, programming and command set.
Chapter 9: CALIBRATION - Provides recommended calibration schedules along with step-
by-step instructions for the calibration procedure.
ix

Magtrol Model DSP6001 Dynamometer ControllerPreface
Chapter 10: TROUBLESHOOTING - Solutions to common problems encountered during setup
and testing.
Appendix A: LABVIEW™ PROGRAMMING EXAMPLES - Magtrol’s comprehensive motor-test
software programs, made specifically to compliment the DSP6001 Dynamometer
Controller.
Appendix B: INERTIA CORRECTION - Describes the inertial effect on motor test data providing
solutions for correction.
Appendix C: FRONT PANEL/DISPLAY MENU FLOW CHARTS - A visual display of various
setup procedures.
Appendix D: REMOTE CONFIGURATION FLOW CHARTS - A visual display of the command
set used when programming the DSP6001.
Appendix E: SCHEMATICS - For Encoder/Switch Board, Power Supply, DSP & Memory and
Analog I/O.
Appendix F: ADDITIONAL SCALE FACTOR TABLE - Provides additional scale factor values
based on test instrument selection.
CONVENTIONS USED IN THIS MANUAL
The following symbols and type styles may be used in this manual to highlight certain parts of the
text:
Note: This is intended to draw the operator’s attention to complementary
information or advice relating to the subject being treated. It
introduces information enabling the correct and optimal functioning
of the product to be obtained.
Caution : this is used to draw the operator's attention to information,
direCtives, proCedures, etC. whiCh, if ignored, may result in damage
being Caused to the material being used. the assoCiated text
desCribes the neCessary preCautions to take and the ConsequenCes
that may arise if the preCautions are ignored.
WARNING! THIS INTRODUCES DIRECTIVES, PROCEDURES,
PRECAUTIONARY MEASURES, ETC. WHICH MUST BE
EXECUTED OR FOLLOWED WITH THE UTMOST CARE
AND ATTENTION, OTHERWISE THE PERSONAL SAFETY
OF THE OPERATOR OR THIRD PARTIES MAY BE PUT
AT RISK. THE READER MUST ABSOLUTELY TAKE NOTE
OF THE ACCOMPANYING TEXT, AND ACT UPON IT,
BEFORE PROCEEDING FURTHER.
x
1. Introduction
MODEL DSP6001
DYNAMOMETER CONTROLLER
POWER
POWER
BRAKE STATUS SET POINT SET POINT P I D
TORQUE SPEED STATUS
DECREASE INCREASE
UPDIP
DYNO SETUP
SHIFT
COM SETUPAUX SETUP
SPEED SET
MAX SPEED
TORQUE SET
TORQUE UNITS
BRAKE ON/OFF
POWER UNITS
DOWN
1.1 UNPACKING YOUR DSP6001
Your DSP6001 was packaged carefully for shipping. Please notify your carrier and Magtrol Customer
Service if you believe your unit was damaged in shipping.
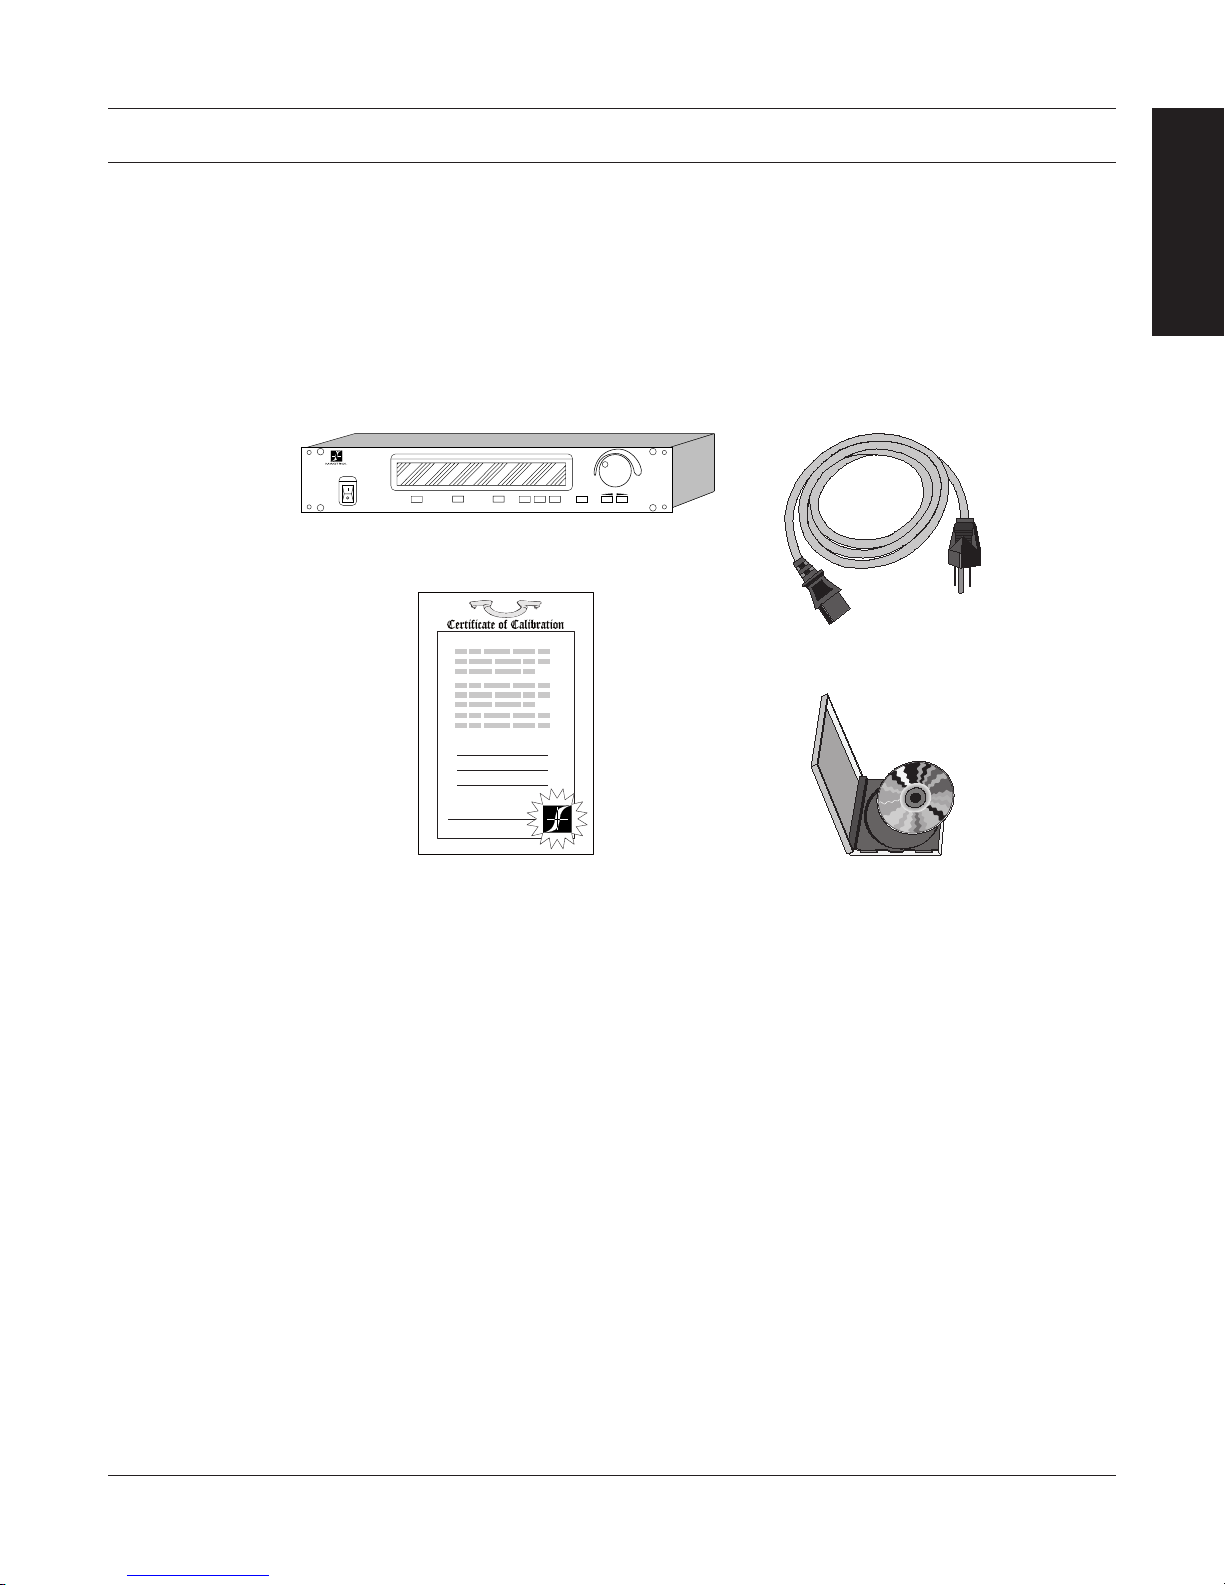
1. Save all shipping cartons and packaging material until you inspect the DSP6001.
2. Inspect the DSP6001 for any evidence of damage in shipping.
3. Make sure the carton contains the following:
DSP6001 Dynamometer Controller
INFORMATION
GENERAL
Line cord
Calibration Certificate
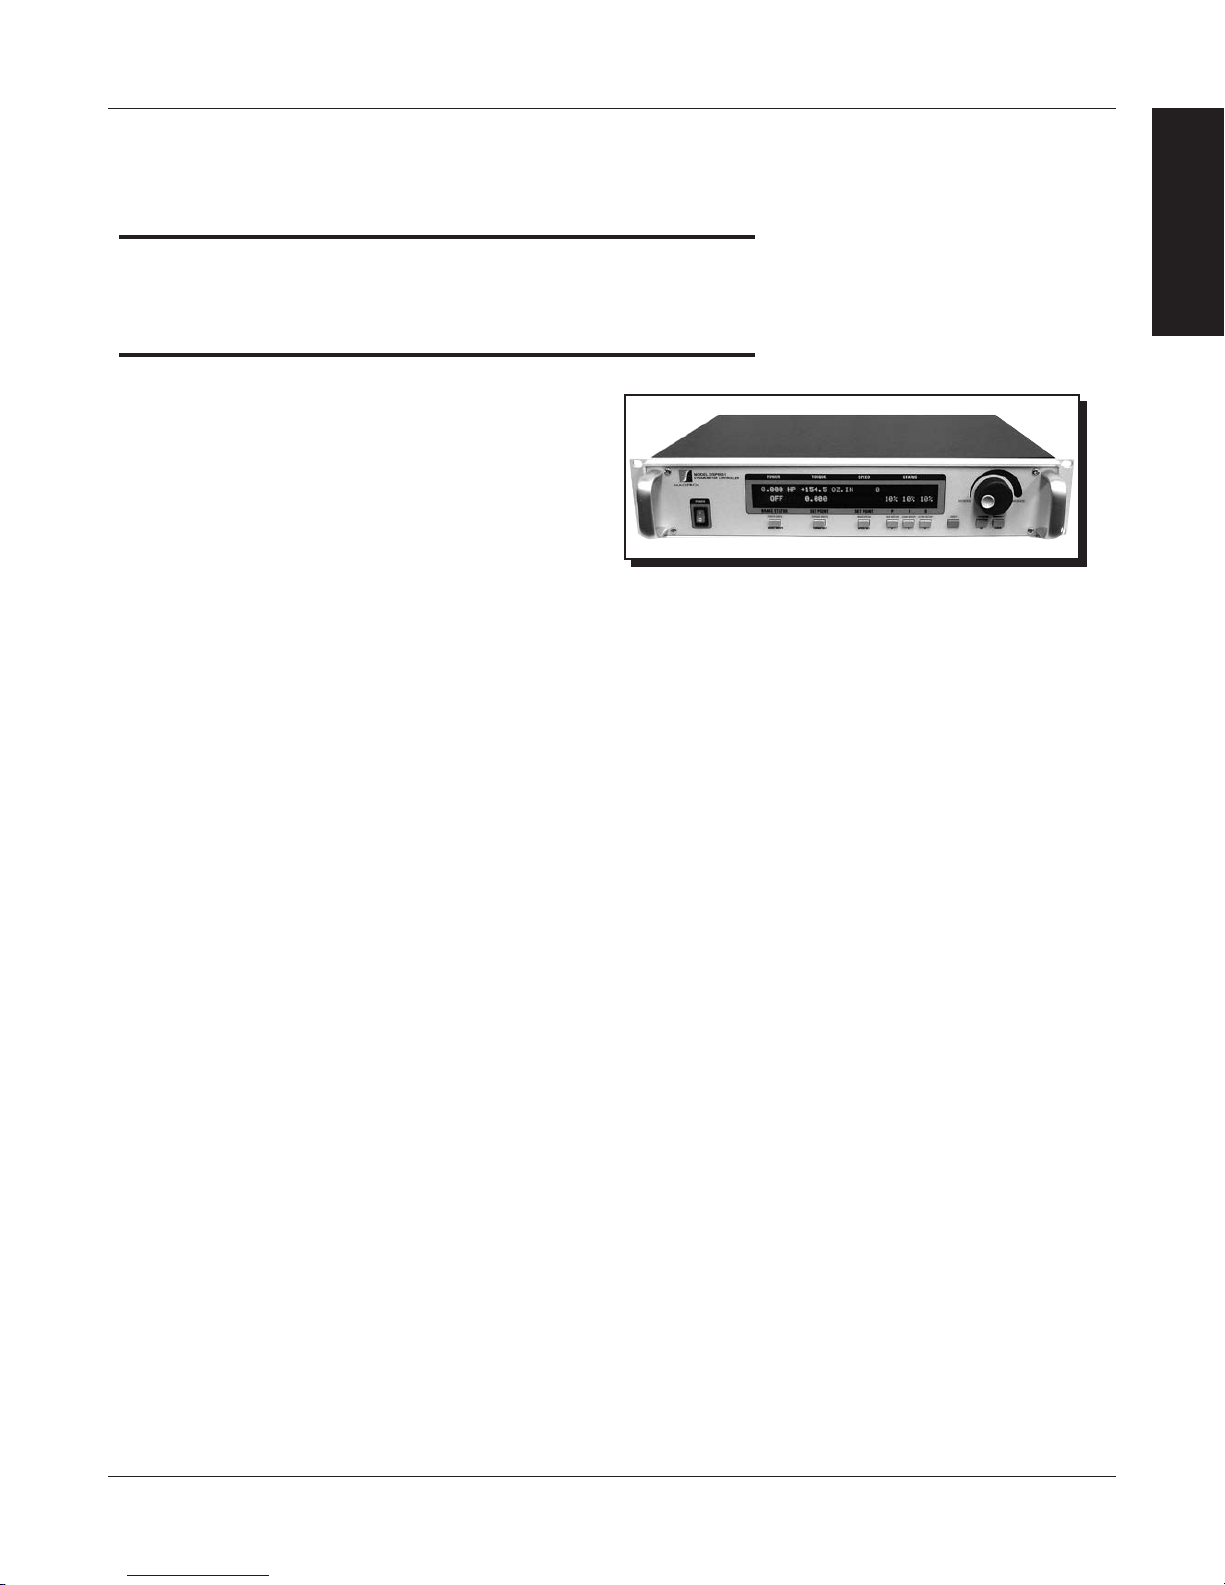
1.2 NEW FEATURES OF THE DSP6001
Magtrol’s new Model DSP6001 Dynamometer Controller is an upgraded version of the DSP6000,
providing superior motor testing capabilities by using state-of-the-art digital signal processing
technology. Designed for use with any Magtrol Hysteresis, Eddy-Current or Powder Brake
Dynamometer, Magtrol In-Line Torque Transducer or auxiliary instrumentation, the DSP6001 both
controls the dynamometer and provides digital readouts on the front panel. The features that make
the DSP6001 unique include:
• TwoChannels-Enablesunittosupportacombinationofuptotwotestinginstrumentswith
independent or tandem configurations.
• Built-InAlarm System - Tocaution the user whenproblems occur,there are automatic
electrical and temperature alarms programmed into the unit. Also inherent to the unit are
optional power, speed, torque, air flow, water flow and external input alarms that become
active when enabled by the user.
• Torque/SpeedAnalogOutputs -Ableto interface with adataacquisitionsystem or strip
chart recorder.
• DigitalFilter-Removesundesirednoisefromtorquesignals.
• CrossLoopFunction-Allowsclosedloopcontrolofabrakeviathetorquetransducer.
• Saving-Allowsusertosaveprogrammedvalueswithintheircongurations.
Magtrol User Manual CD-Rom
1
Magtrol Model DSP6001 Dynamometer ControllerChapter 1 – Introduction
DSP6001
Data Sheet
MAGTROL
SignalProcessingTechnologytoprovidesuperiormotortesting
1.3 DATA SHEET
DSP6001 High-Speed Programmable
Dynamometer Controller
FEATURES
• Two Channels:Enabletheunittosupportupto
twotestinginstrumentswithindependentortandem
configurations.
• Built-in Alarm System:Forpower,speed,torque,
temperature,airflow,waterflow,electricaloverload
andexternalinputs
• Torque/Speed Analog Outputs:Forinterfacewitha
dataacquisitionsystemorstripchartrecorder
• Interfaces:RS-232andIEEE-488
• High Speed Data Acquisition:120torqueandspeed
pointspersecondviaIEEEbus(approx.60/sec.via
RS-232)
• High Quality, Easy-to-Read Vacuum Fluorescent
Readout:Displaystorque,speed,power,auxiliaryand
PID(proportionalgain,integralandderivative)values
• Fast Full-Curve Data Acquisition: Free-runto
lockedrotorinseconds
• Speed & Torque Operating Modes:Provide
independentPIDsettingsforimprovedDynamometer
control
• Built-in Current-Regulated Supply:Forusewith
HysteresisDynamometeronly
• Adjustable Torque Units:English,MetricandSIare
standard
• Dynamometer Overload Protection
• Digital Filter: Removesundesirednoisefromtorque
signals
• Cross Loop Function: Allowsclosedloopcontrolof
brakeviatorquetransducer
• Programmable Digital PID Values:Controlledand
storedviaM-TestSoftwareorcontrolledmanually
• Saving:Savesprogrammedvalueswithin
configuration
• Auxiliary ± 10 V DC Analog Input:Foradditional
transducer
• Single or Multi-point Torque and Speed Stabilized
Testing: ViaM-TEST5.0Software
• Closed Box Calibration
• Rack Mounting: 19"(482.6mm)withhandles
capabilities. Designedfor use withanyMagtrolHysteresis,
Eddy-Current or Powder Dynamometer, Magtrol In-Line
TorqueTransducerorauxiliaryinstrumentation,theDSP6001
canprovidecompletePCcontrolviatheIEEE-488orRS-232
interface.With120readingspersecond,theDSP6001isideally
suitedforboththetestlabandtheproductionline.
APPLICATIONS
Inthe laboratory,the DSP6001’shigh samplerateprovides
superior resolution for data acquisition and curve plotting.
Thisallowsforcapturingmoreusablemotortestdataduring
switching, breakdown and other transitional areas of the
motor test curve. For production and incoming inspection,
theDSP6001displaystorque,speedandpoweratalltimes,
allowingthe Controller to be used as a manualstand alone
unitoraspartofacompletePCsystem.
MOTOR TESTING SOFTWARE
Magtrol’sM-TEST5.0Software(sold separately)isastate-
of-the-artmotortestingprogramforWindows®-baseddata
acquisition. Used with the Magtrol DSP6001 Controller,
MagtrolM-TEST5.0Software providesthe control of any
MagtrolDynamometerandrunstestsequencesinamanner
bestsuitedtotheoverallaccuracyandefficiencyoftheMagtrol
MotorTestSystem.ThedatathatisgeneratedbyMagtrol’s
MotorTestingSoftwarecanbestored,displayedandprinted
intabularorgraphicformats,and
aspreadsheet.
Writtenin LabVIEW™, M-TEST 5.0has the flexibilityto
testamajorityofmotortypesinavarietyofways.Because
ofLabVIEW’sversatility,obtainingdatafromothersources
(e.g.thermocouples),controllingmotorpowerandproviding
audio/visualindicatorsisrelativelyeasy.
INFORMATION
GENERAL
canbeeasilyimportedinto
DESCRIPTION
Magtrol’s Model DSP6001 High Speed Programmable
Dynamometer Controller employs state-of-the-art Digital
Magtrol’sM-TEST5.0Softwareisidealforsimulatingloads,
cyclingtheunitundertestandmotorramping.Becauseitis
easytogatherdataandduplicatetests,thesoftwareis ideal
foruseinengineeringlabs,productiontestingandincoming/
outgoinginspection.
2
Magtrol Model DSP6001 Dynamometer Controller
Specifications
Chapter 1 – Introduction
DSP6001
INFORMATION
GENERAL
MEASUREMENT CHARACTERISTICS
Maximum Torque 10,000 units, ±5 V TSC1, ±10 V TSC2
Maximum Speed 99,999 rpm
Speed: 0.01% of reading from 10 rpm to 100,000 rpm
Accuracy
TSC1: 0.02% of range (±1 mV)
TSC2: 0.02% of range (±2 mV)
ELECTRICAL CHARACTERISTICS
Brake: UL/CSA 1.25 A 250 V SB
Fuses (5 × 20 mm)
IEC 1.00 A 250 V T
Power (120 V): UL/CSA 800 mA 250 V SB
Power (240 V): IEC 315 mA 250 V T
Power Requirements 75 VA
Voltage Requirements 120/240 V 60/50 Hz
Max. Compliance Voltage 45 V DC, Brake Output
INPUTS AND OUTPUTS
Maximum Torque Input
Accessory
Torque/Speed Output
TSC1: ±5 V DC
TSC2: ±10 V DC
Torque: ±10 V DC
Speed: ±10 V DC
Ctrl Out 0–3 V DC
ENVIRONMENT
Operating Temperature 5 ºC to 40 ºC
Relative Humidity < 80%
Temperature Coefficient 0.004% of range/°C of 5 V DC for both channels
DIMENSIONS
Width 19.0 in 483 mm
Height 3.5 in 89 mm
Depth
with handles
12.4 in
13.8 in
315 mm
351 mm
Weight 16.73 lb 7.58 kg
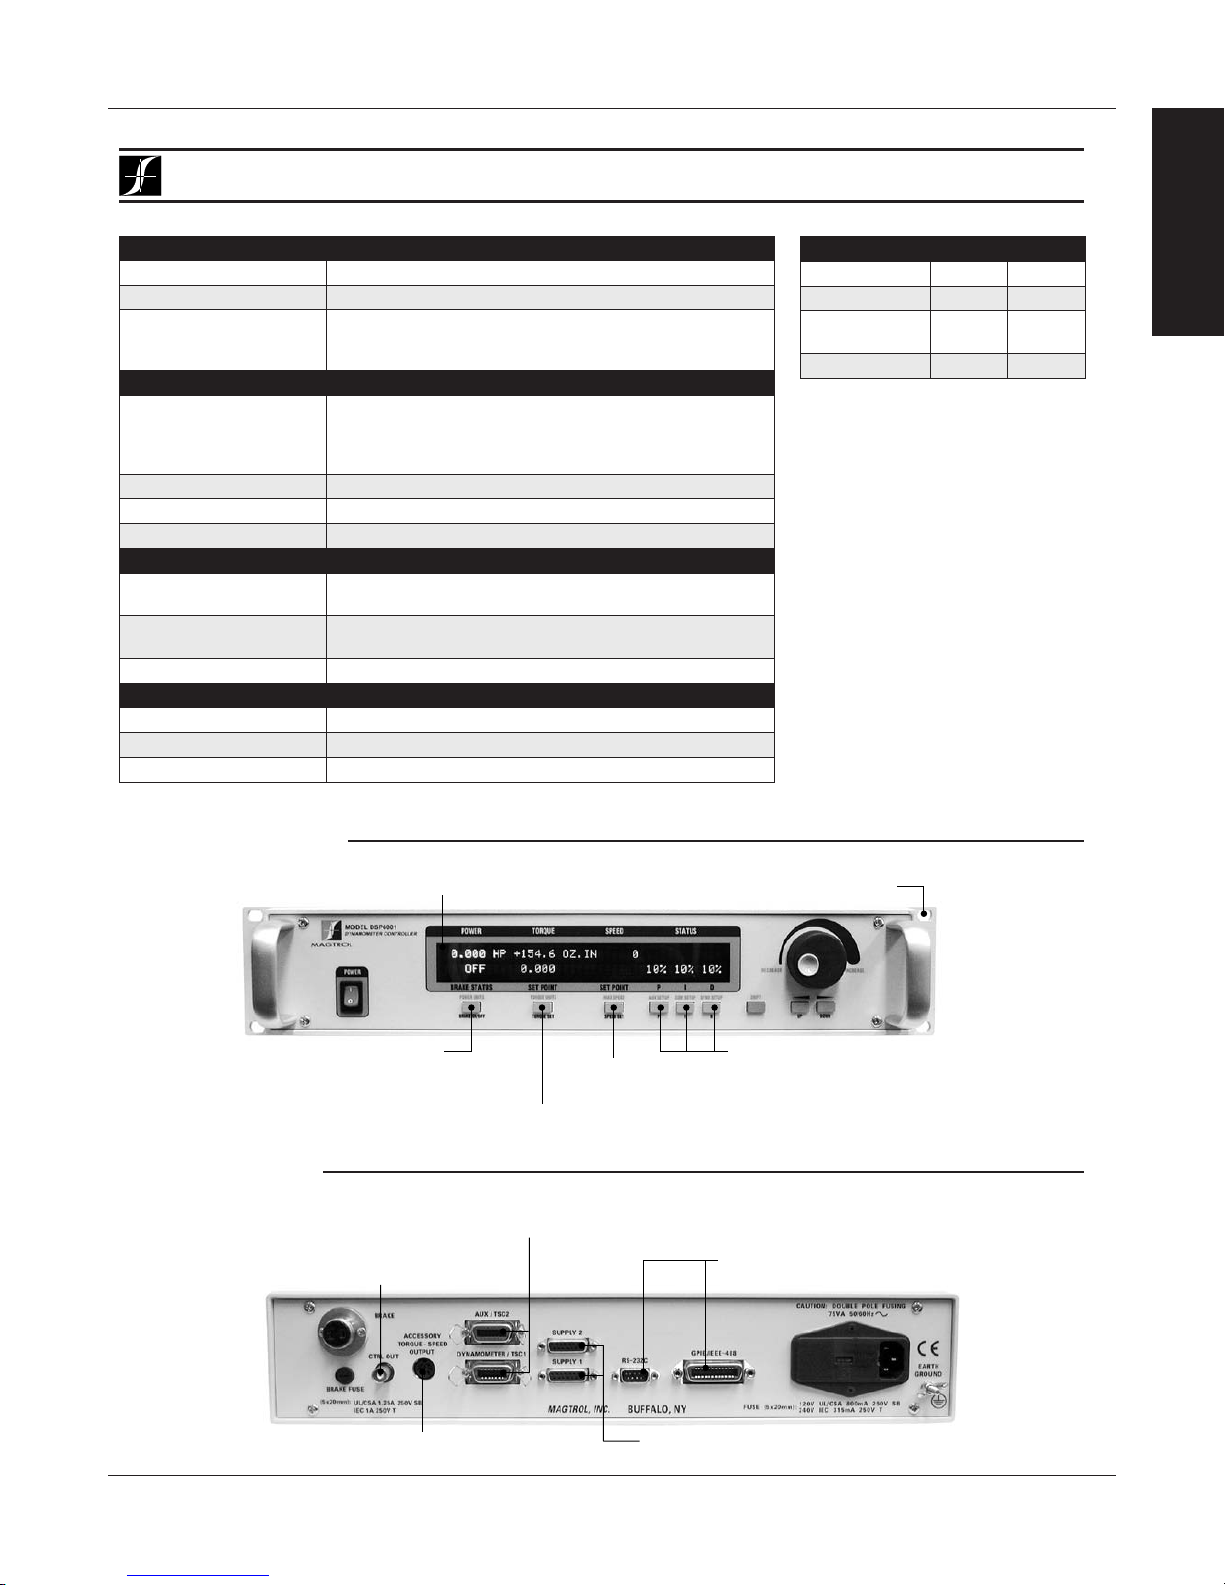
FRONT PANEL
Set Desired Power Units
REAR PANEL
Connector for Model 5241 Power Supply
Displays Torque, Speed, Power,
Auxiliary and PID Values
(W, kW or Hp)
Set Desired Torque Units
(oz.in., oz.ft., lb.in., lb.ft., g.cm, kg.cm, Nmm, Ncm, Nm)
For use with any Magtrol Dynamometer
(Hysteresis, Eddy-Current, Powder Brake),
Magtrol Torque Transducer or auxiliary instrumentation
(for HD-825 Dynamometer only)
Speed Control
(up to 99,000 rpm)
Ready for Rack Mounting
Adjustable PID (Proportional Gain,
Integral and Derivative) settings
provide the best system response
RS-232 and GPIB/IEEE-488
Interfaces for Connection to PC
Torque/Speed Analog Output for Interfacing with
Data Acquisiton System or Strip Chart Recorder
Connectors for Models
DES310/DES311 Power Supplies
3

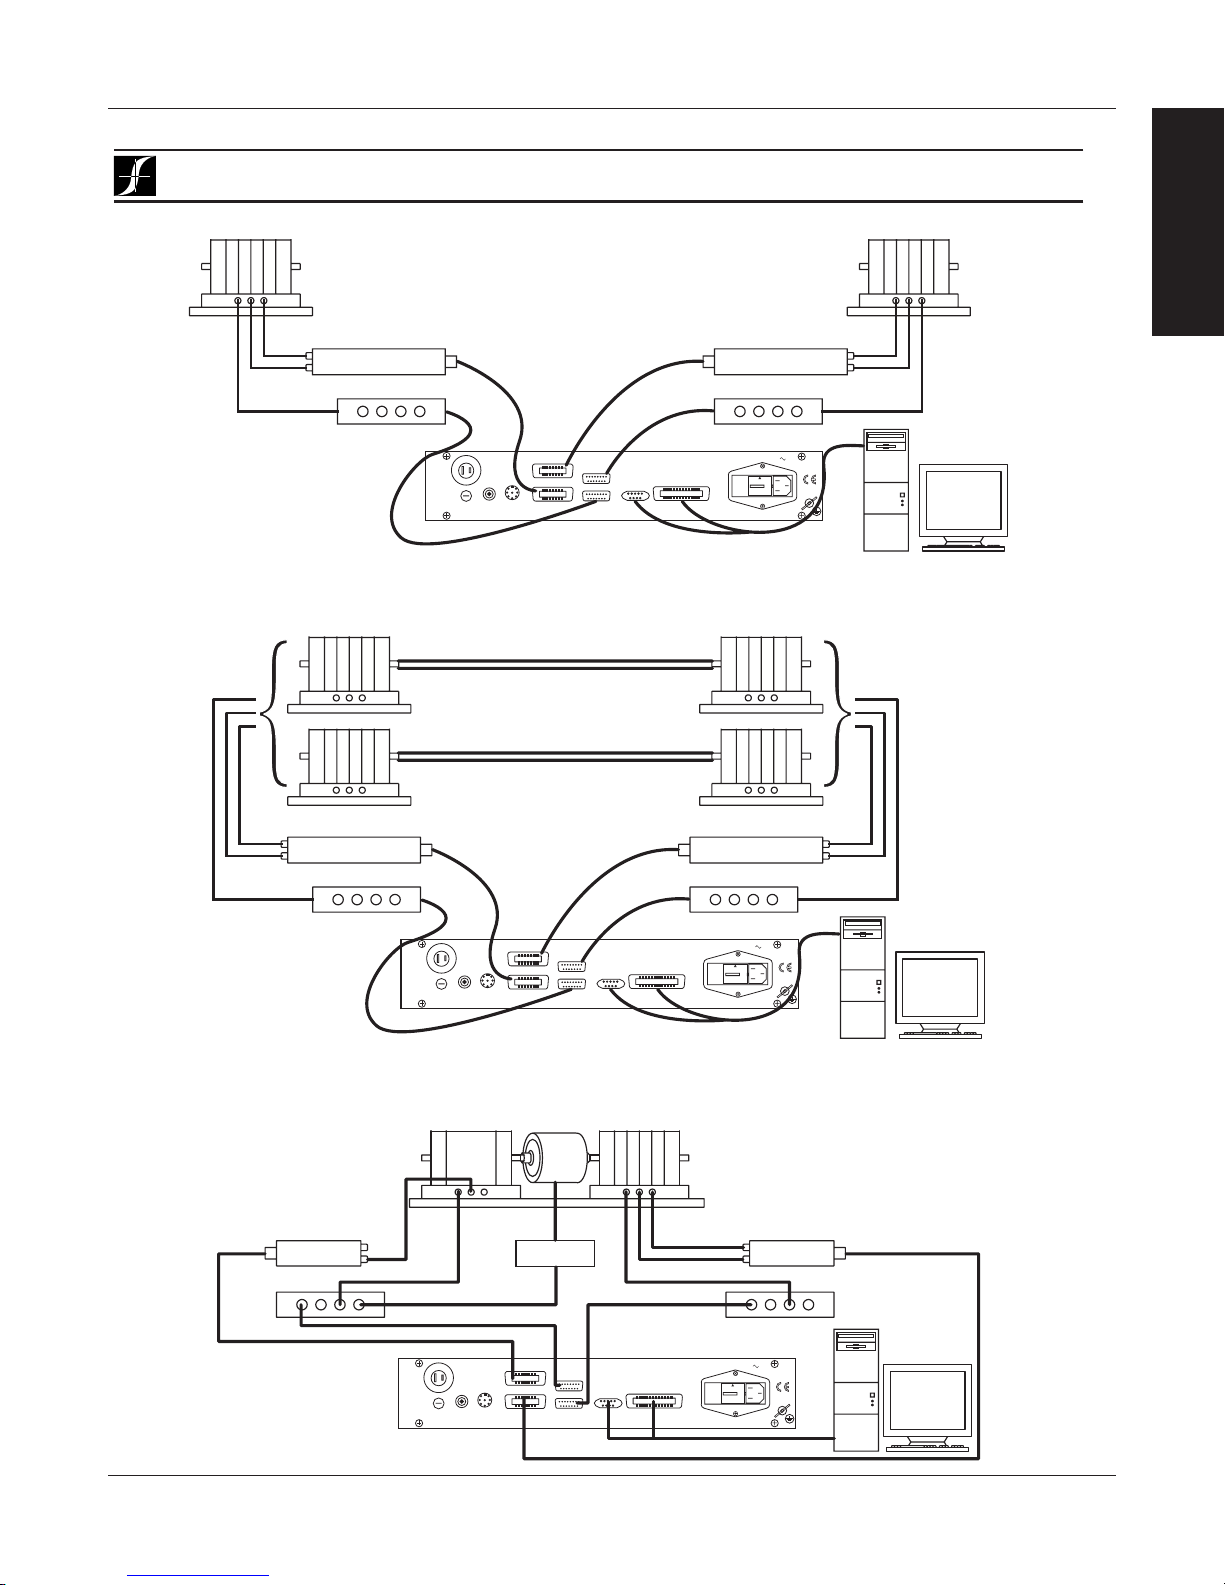
System Configurations
OPTIONAL:
Magtrol Model DSP6001 Dynamometer ControllerChapter 1 – Introduction
INFORMATION
DSP6001
GENERAL
Hysteresis Dynamometer (HD)
AC Mains
DSP6001
DYNAMOMETER
CONTROLLER
BRAKE
TORQUE–SPEED
CTRL OUT
BRAKE FUSE
UL/CSA 1.25A 250V SB
(5×20mm):
IEC 1A 250V T
ACCESSORY
OUTPUT
AUX / TSC2
DYNAMOMETER / TSC1
No Connection
SUPPLY 2
SUPPLY 1
RS-232C
MAGTROL, INC. BUFFALO, NY
GPIB/IEEE–488
Motor
Under
Test
FUSE (5×20mm):
CAUTION: DOUBLE POLE FUSING
75VA 50/60Hz
120V UL/CSA 800mA 250V SB
240V IEC 315mA 250V T
GROUND
EARTH
TM Torque Transducer
GPIB
or
RS-232
PC
– OR –
Auxiliary Input
±10 volts
TSC2 only
14-pin connector
pin 13 = com
pin 14 = signal
M-TEST
Hysteresis on TSC1 only
DSP6001 Connected to Hysteresis Dynamometer with Optional Auxiliary Input or In-Line Torque Transducer
Hysteresis Dynamometer (HD)
AC Mains
DSP6001
DYNAMOMETER
CONTROLLER
BRAKE
ACCESSORY
TORQUE–SPEED
OUTPUT
CTRL OUT
BRAKE FUSE
UL/CSA 1.25A 250V SB
(5×20mm):
IEC 1A 250V T
AUX / TSC2
DYNAMOMETER / TSC1
SUPPLY 2
SUPPLY 1
RS-232C
MAGTROL, INC. BUFFALO, NY
No Connection
Hysteresis on TSC1 only
GPIB/IEEE–488
Motor
Under
Test
FUSE (5×20mm):
CAUTION: DOUBLE POLE FUSING
75VA 50/60Hz
120V UL/CSA 800mA 250V SB
240V IEC 315mA 250V T
EARTH
GROUND
Eddy-Current (WB)
OR Powder Brake (PB)
Dynamometer
TSC 401
Torque-Speed
Conditioner
DES 31x Power Supply
GPIB
or
RS-232
PC
M-TEST
Speed
Torque
Excitation
DSP6001 Connected to Hysteresis Dynamometer and Eddy-Current or Powder Brake Dynamometer
OPTIONAL:
TM Torque
Transducer
– OR –
Auxiliary Input
±10 volts
TSC2 only
14-pin connector
pin 13 = com
pin 14 = signal
BRAKE
ACCESSORY
TORQUE–SPEED
OUTPUT
DYNAMOMETER / TSC1
CTRL OUT
BRAKE FUSE
UL/CSA 1.25A 250V SB
(5×20mm):
IEC 1A 250V T
DSP6001 Connected to Eddy-Current or Powder Brake Dynamometer (WB/PB)
AUX / TSC2
SUPPLY 2
SUPPLY 1
MAGTROL, INC. BUFFALO, NY
Eddy-Current (WB)
OR Powder Brake (PB)
Dynamometer
TSC 401
Torque-Speed
Conditioner
Speed
Torque
Excitation
DSP6001 Dynamometer Controller
GPIB/IEEE–488
RS-232C
FUSE (5×20mm):
CAUTION: DOUBLE POLE FUSING
75VA 50/60Hz
120V UL/CSA 800mA 250V SB
240V IEC 315mA 250V T
GROUND
EARTH
4
DES Power Supply
PC
M-TEST
GPIB
or
RS-232
Magtrol Model DSP6001 Dynamometer Controller
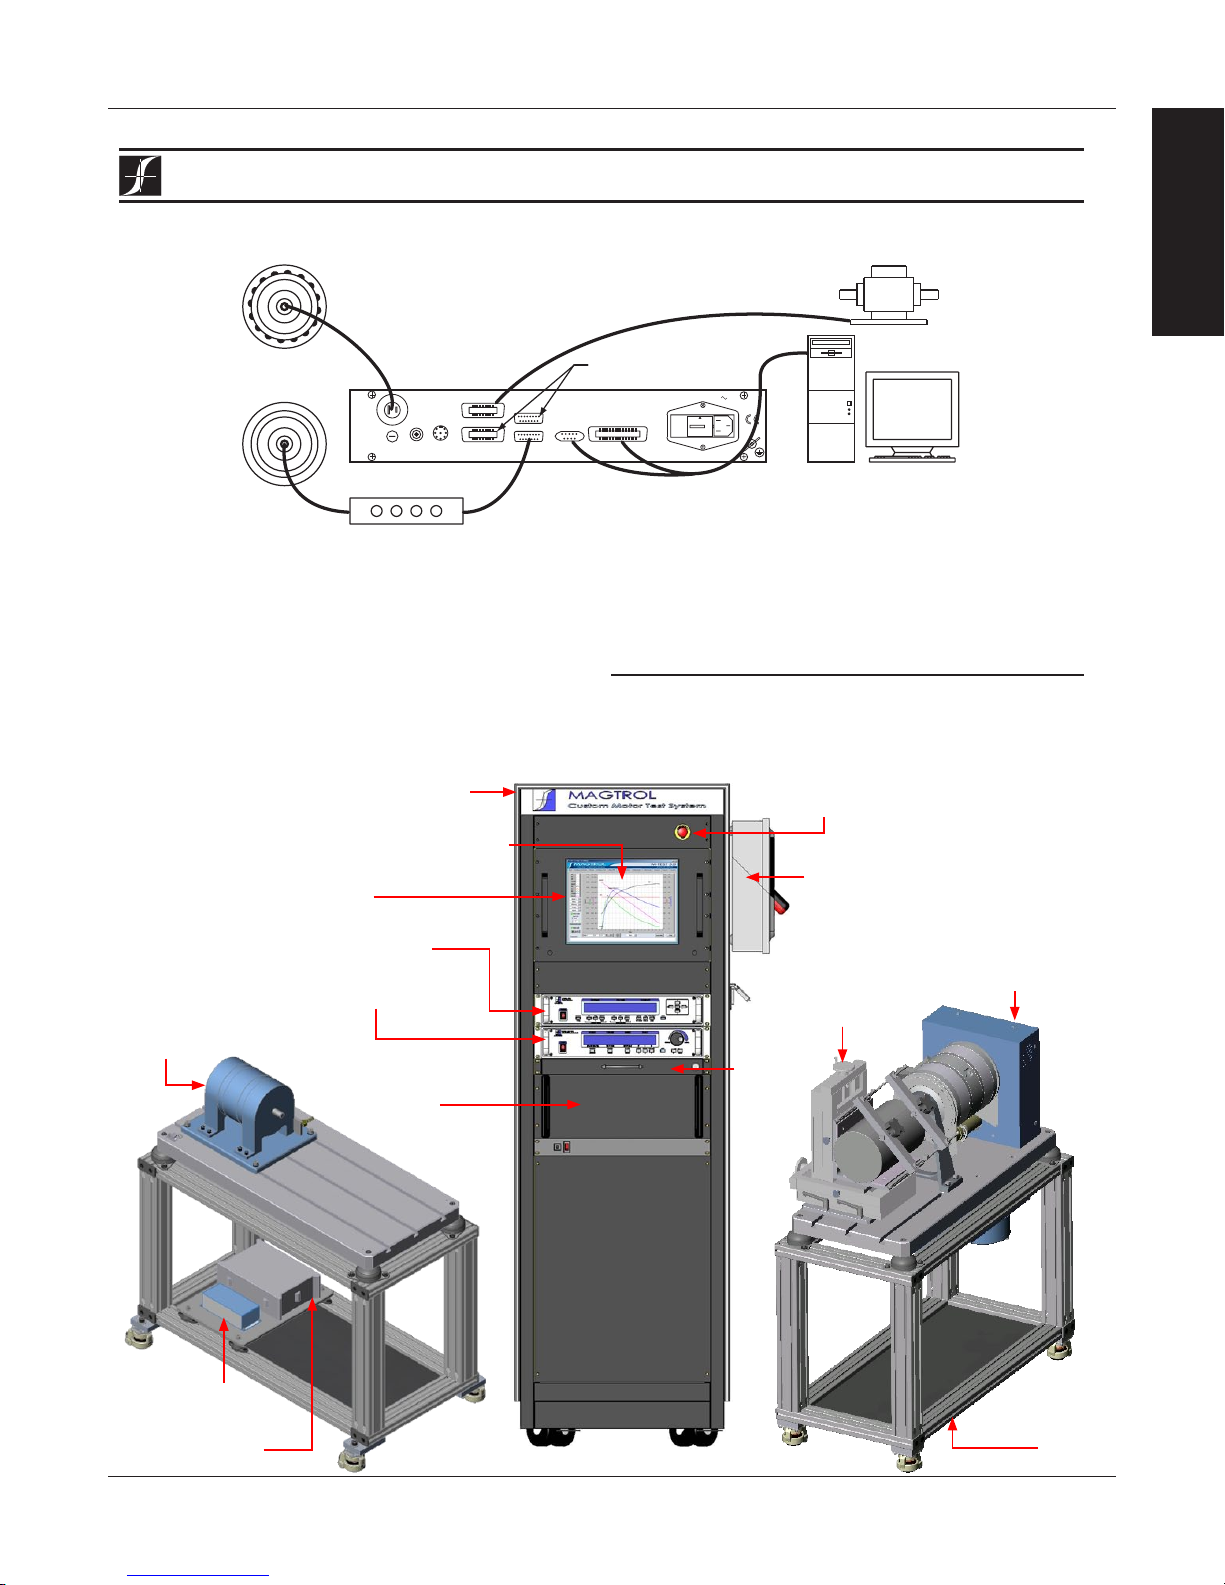
Eddy-Current (WB)
Eddy-Current (WB)
System Configurations
Chapter 1 – Introduction
DSP6001
INFORMATION
GENERAL
OR Powder Brake (PB)
Dynamometer
TSC 401 Torque-Speed
Speed
Torque
Excitation
Conditioner
DES 31x Power Supply
AUX / TSC2
BRAKE
ACCESSORY
TORQUE–SPEED
OUTPUT
DYNAMOMETER / TSC1
CTRL OUT
BRAKE FUSE
UL/CSA 1.25A 250V SB
(5×20mm):
IEC 1A 250V T
DYNAMOMETER CONTROLLER
DSP6001
SUPPLY 2
SUPPLY 1
RS-232C
MAGTROL, INC. BUFFALO, NY
OR Powder Brake (PB)
TSC 401 Torque-Speed
Conditioner
DES 31x Power Supply
CAUTION: DOUBLE POLE FUSING
75VA 50/60Hz
GPIB/IEEE–488
120V UL/CSA 800mA 250V SB
FUSE (5×20mm):
240V IEC 315mA 250V T
Dynamometer
GPIB
RS-232
EARTH
GROUND
Speed
Torque
Excitation
or
PC
M-TEST
DSP6001 Connected to 2 Eddy-Current or Powder Brake Dynamometers (Independent Setup)
Eddy-Current (WB)
Dynamometer
Eddy-Current (WB)
Dynamometer
OR
Powder Brake (PB)
Dynamometer
Torque-Speed Conditioner
DES 31x Power Supply
TSC 401
Speed
Torque
Excitation
Torque-Speed Conditioner
Speed
Torque
Excitation
DES 31x Power Supply
TSC 401
Powder Brake (PB)
Dynamometer
GPIB
GROUND
or
RS-232
PC
EARTH
M-TEST
AUX / TSC2
BRAKE
ACCESSORY
TORQUE–SPEED
OUTPUT
DYNAMOMETER / TSC1
CTRL OUT
BRAKE FUSE
UL/CSA 1.25A 250V SB
(5×20mm):
IEC 1A 250V T
DYNAMOMETER CONTROLLER
SUPPLY 2
SUPPLY 1
RS-232C
MAGTROL, INC. BUFFALO, NY
DSP6001
GPIB/IEEE–488
FUSE (5×20mm):
CAUTION: DOUBLE POLE FUSING
75VA 50/60Hz
120V UL/CSA 800mA 250V SB
240V IEC 315mA 250V T
DSP6001 Connected to 2 Eddy-Current or 2 Powder Brake Dynamometers (Tandem Setup)
Speed
Torque
Excitation
GPIB/IEEE–488
FUSE (5×20mm):
Eddy-Current Brake
Dynamometer (WB)
TSC 401
Torque-Speed
Conditioner
CAUTION: DOUBLE POLE FUSING
75VA 50/60Hz
EARTH
120V UL/CSA 800mA 250V SB
240V IEC 315mA 250V T
GROUND
DES Power Supply
PC
M-TEST
GPIB
or
RS-232
Dynamometer (PB)
TSC 401
Torque/Speed
Conditioner
DES Power Supply
Dynamometer
Powder Brake
Torque
DSP6001
Controller
Excitation
BRAKE FUSE
(5×20mm):
BRAKE
ACCESSORY
TORQUE–SPEED
OUTPUT
CTRL OUT
UL/CSA 1.25A 250V SB
IEC 1A 250V T
Clutch
Transformer
AUX / TSC2
DYNAMOMETER / TSC1
(EK)
SUPPLY 2
SUPPLY 1
RS-232C
MAGTROL, INC. BUFFALO, NY
5
Torque Transducer
Hysteresis
System Configurations
Magtrol Model DSP6001 Dynamometer ControllerChapter 1 – Introduction
INFORMATION
DSP6001
GENERAL
Brake
OR
Eddy-Current/
Powder Brake
DSP6001
DYNAMOMETER
CONTROLLER
BRAKE
ACCESSORY
TORQUE–SPEED
OUTPUT
CTRL OUT
BRAKE FUSE
UL/CSA 1.25A 250V SB
(5×20mm):
IEC 1A 250V T
AUX / TSC2
DYNAMOMETER / TSC1
No Connection
SUPPLY 2
SUPPLY 1
RS-232C
MAGTROL, INC. BUFFALO, NY
GPIB/IEEE–488
FUSE (5×20mm):
CAUTION: DOUBLE POLE FUSING
75VA 50/60Hz
120V UL/CSA 800mA 250V SB
240V IEC 315mA 250V T
EARTH
GROUND
GPIB
RS-232
or
(TM)
PC
M-TEST
DES 31x
In-Line Torque Transducer Cross Loop Function
CUSTOM MOTOR TEST SYSTEM
TheDSP6001canbeincorporatedintoaCustomizedMotorTestSystem.ThesePCbased,turn-keysystemsarecustomdesigned
andbuilttomeetspecificuserrequirements.
heavy-duty equipment rack
emergency stop button
WB Eddy-Current
Dynamometer
TSC Torque Signal
Conditioner
DES Power Supply
M-TEST Motor Testing Software
LCD monitor
6530 Power Analyzer
DSP6001 Dynamometer
Controller
space for rackmounted
third-party power supply
and computer
side panel connectors allow
for easy hook-up
HD Hysteresis
Dynamometer
AMF Adjustable
Motor Fixture
keyboard
drawer
Dynamometer
Table
6

Magtrol Model DSP6001 Dynamometer Controller
Ordering Information
Chapter 1 – Introduction
DSP6001
ORDERING INFORMATION
DSP6001 High-Speed Programmable Dynamometer Controller 120 VAC
DSP6001A High-Speed Programmable Dynamometer Controller 240 VAC
SYSTEM OPTIONS AND ACCESSORIES
CATEGORY DESCRIPTION MODEL / PART #
Hysteresis Dynamometers HD series
TESTING
DEVICES
POWER
ANALYZERS
SOFTWARE
POWER
SUPPLIES
MISC.
CARDS &
CABLES
Eddy-Current Dynamometers WB series
Powder Brake Dynamometers PB series
In-Line Torque Transducers TM/TMHS/TMB series
High-Speed Single-Phase Power Analyzer
High-Speed Three-Phase Power Analyzer 6530
M-TEST 5.0 Motor Testing Software SW-M-TEST5.0-WE
Temperature Testing Hardware HW-TTEST
Closed-Loop Speed Control/Power Supply 6100
Power Supply 5200
Current-Regulated Power Supply 5210
Power Amplifier (required for HD-825 Dynamometer only) 5241
Power Supply for WB & PB Dynamometers series 2.7 and 43 DES 310
Power Supply for WB & PB Dynamometer series 65, 115 and 15 DES 311
Torque/Speed Conditioner
(required for connecting WB/PB Series Dynamometers to DSP6001)
GPIB Interface Card (PCI) 73-M023
GPIB Cable, 1 meter 88M047
GPIB Cable, 2 meters 88M048
Torque Transducer Connector Cable ER 113/01
6510e
TSC 401
INFORMATION
GENERAL
Due to the continual development of our products, we reserve the right to modify specifications without forewarning.
7
2. Controls
MODEL DSP6001
DYNAMOMETER CONTROLLER
POWER
POWER
BRAKE STATUS SET POINT SET POINT P I D
TORQUE SPEED STATUS
DECREASE INCREASE
UPDIP
DYNO SETUP
SHIFT
COM SETUPAUX SETUP
SPEED SET
MAX SPEED
TORQUE SET
TORQUE UNITS
BRAKE ON/OFF
POWER UNITS
DOWN
POWER
BRAKE STATUS SET POINT SET POINT P I D
TORQUE SPEED STATUS
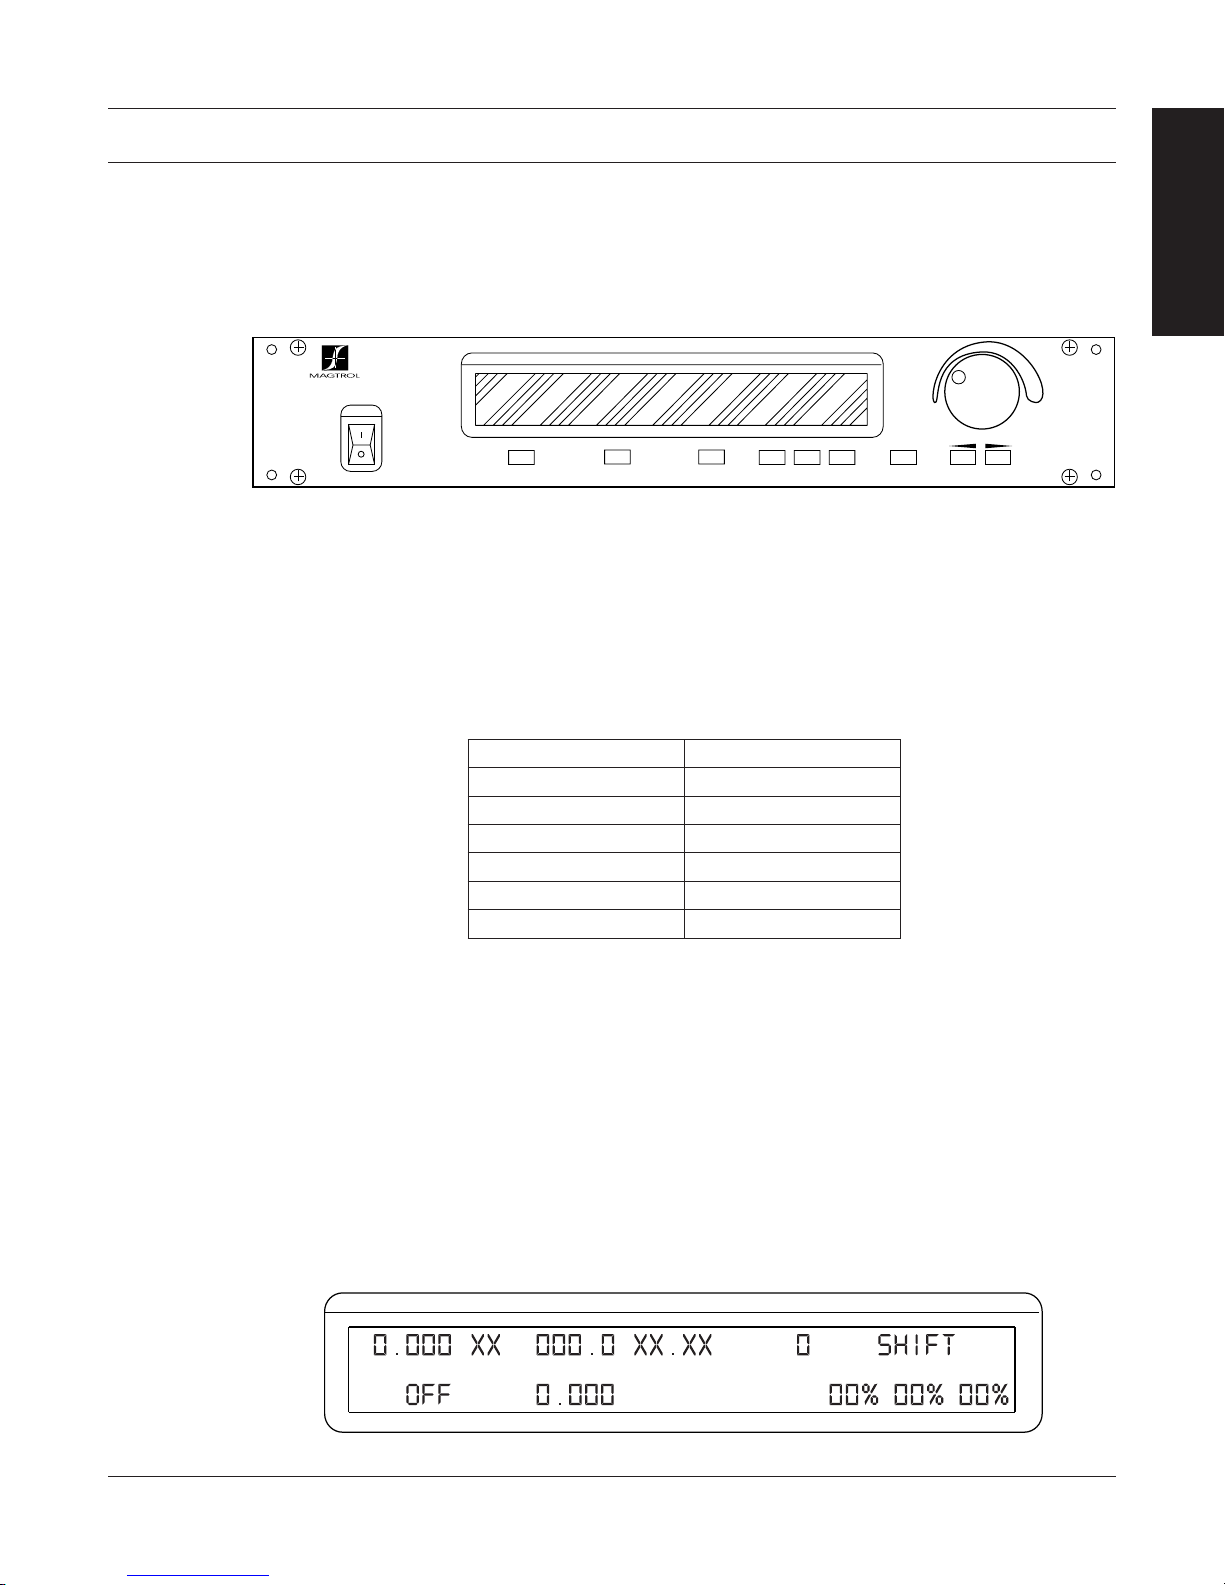
2.1 FRONT PANEL
The front panel provides a power switch, nine control buttons, a Decrease/Increase Dial, and Vacuum
Fluorescent Display (VFD).
Figure 2–1 Front Panel
2.2 FRONT PANEL CONTROLS AND BUTTONS
The front panel controls and buttons, from left to right, are:
• Powerswitch
• Sixdouble-functioncontrolbutton:
INFORMATION
GENERAL
Primary Function Secondary Function
BRAKE ON/OFF POWER UNITS
TORQUE SET TORQUE UNITS
SPEED SET MAX SPEED
P AUX SETUP
I COM SETUP
D DYNO SETUP
• Threesingle-functioncontrolbuttons:
• SHIFT(enablessavingfunctionandsecondaryfunctionsprintedinblueabovecontrol
buttons)
• UP-Leftarrow (moves cursor to the left)
• DOWN-Rightarrow (moves cursor to the right)
• Decrease/IncreaseDial(decreasesorincreasestheselectedparameter)
2.2.1 Enabling SEcondary FunctionS
To enable the secondary function of the double-function control buttons:
1. Press the blue SHIFT button and release it. The word “SHIFT” appears in the display:
Figure 2–2 Secondary Function Menu
8
Magtrol Model DSP6001 Dynamometer Controller
POWER
BRAKE STATUS SET POINT SET POINT P I D
TORQUE SPEED STATUS
Chapter 2 – Controls
2. Press any control button to enable the function shown in blue letters above the button.
3. Press the SHIFT button again to exit the secondary function and return to main menu.
Note: If the brake status is ON, the SHIFT button will be ignored.
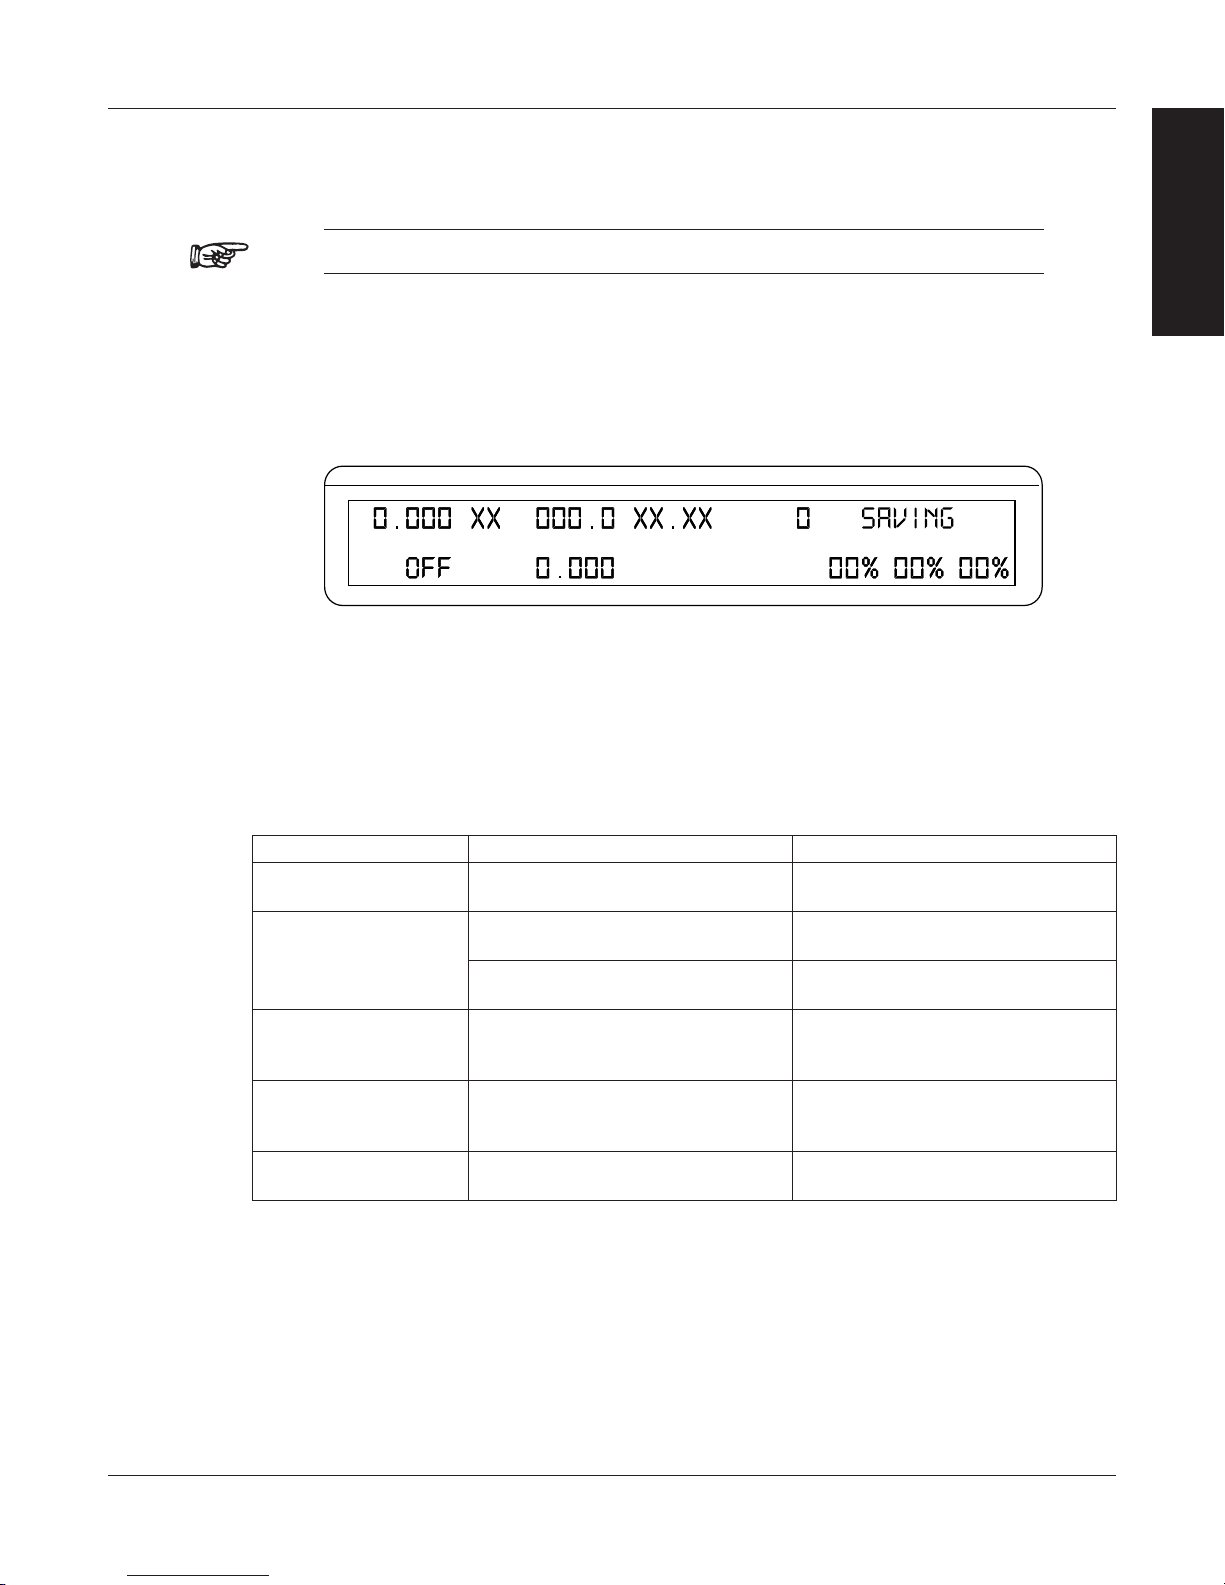
2.2.2 Enabling Saving Function
To save all current programmed settings:
1. Press the SHIFT button two times. The word “SAVING” will appear in the display, as shown
in Figure 2–3 Saving Function Menu.
2. After a few seconds, the menu will automatically return to the main menu display and all
configurations of the unit will be saved into a non-volatile memory.
INFORMATION
GENERAL
Figure 2–3 Saving Function Menu
2.2.3 How to uSE Front PanEl controlS and buttonS
2.2.3.1 Controls/Single-Function Buttons
Button To Use Function
POWER Press I to turn power ON Press O
to turn power OFF.
SHIFT Press this button and release; then
press desired control button.
Press this button two times and
release.
UP/LEFT Press. Increases magnitude of change
DOWN/RIGHT Press. Decreases magnitude of change
DECREASE /
INCREASE DIAL
Turn clockwise or
counterclockwise.
Turns power ON or OFF.
Enables the function written in blue
above control button.
Saves current configuration of unit
to non-volatile memory.
when adjusting a numerical value
(speed, torque or max. speed).
when adjusting a numerical value
(speed, torque or max. speed).
Increases or decreases the
parameter selected.
9

Magtrol Model DSP6001 Dynamometer ControllerChapter 2 – Controls
2.2.3.2 Double-Function Buttons
Button To Use Function
POWER UNITS Press SHIFT and release; then
press this button.
BRAKE ON/OFF Press this button. Turns brake ON or OFF.
TORQUE UNITS Press SHIFT and release; then
press this button.
TORQUE SET Press this button. Enables adjustment of set point for
Press and hold this button until
second beep.
MAX SPEED Press SHIFT and release; then
press this button.
SPEED SET Press this button. Enables adjustment of set point for
AUX SETUP Press SHIFT and release; then
press this button.
P Press this button. Enables adjustment of proportional
COM SETUP Press SHIFT and release; then
press this button.
I Press this button. Enables adjustment of integral
DYNO SETUP Press SHIFT and release; then
press this button.
D Press this button. Enables adjustment of derivative
INFORMATION
GENERAL
Sets desired unit of power. Press
UP or DOWN button to see
options. Press SHIFT to enable
option.
Sets desired unit of measure.
Press UP or DOWN button
to see options. Press SHIFT to
enable option.
torque loading.
Enables Open Loop mode (if brake
is off).
Sets the speed range of the
Controller.
speed loading.
Turns auxiliary/torque transducer
display ON or OFF. Enables
adjustment of scale factors for
torque and speed DAC’S.
term.
Adjusts GPIB primary address and
RS-232 baud rate. Also adjusts
display contrast.
term.
Provides options to set maximum
power, dynamometer settings
(input units, maximum torque and
scale factor), speed encoders and
alarms.
term.
2.3 VACUUM FLUORESCENT DISPLAY (VFD)
The VFD provides information about the control functions, the motor under test, and an auxiliary
input device or In-Line Torque Transducer (if connected). The displays, from left to right, are:
Top Row Bottom Row
POWER BRAKE STATUS (ON or OFF)
TORQUE SET POINT (TORQUE)
SPEED SET POINT (SPEED)
AUX INPUT, TM2XX or
STATUS DISPLAY
10
P
I
D

Magtrol Model DSP6001 Dynamometer Controller
Chapter 2 – Controls
2.3.1 contraSt SEttingS
The DSP6001 is shipped with the Contrast Setting at zero (lowest) in order to prolong display life.
If it is necessary to increase the Contrast for improved readability, execute the following steps:
1. Press SHIFT.
2. Press COM SETUP button.
3. Select CONTRAST until desired brightness is reached.
4. Press SHIFT to return to main menu.
Note: Make sure the lowest possible setting is used to achieve desired
2.3.2 ScrEEn SavEr
In order to help eliminate the possibility of display damage, a Screen Saver has been programmed
into the DSP6001. If the display has been turned on for more than 5 minutes without any activity,
a Screen Saver with moving arrows will appear.
The display can be reactivated by any one of the following actions:
1. Touch any button on the Front Display Panel.
2. Send a command through the GPIB interface.
3. RPM activity in the motor under test.
INFORMATION
GENERAL
result. Using a setting higher than necessary may cause display
segments to burn-in over a period of time, resulting in uneven
illumination from segment to segment.
Note: This function was removed after code revision 7.2.
2.3.3 StatuS diSPlay MESSagES
Message Meaning
SHIFT Shift button was pressed.
AUX Auxiliary unit is attached and enabled.
Nm Torque Transducer attached and enabled.
MAX SPEED Maximum motor RPM.
I/O ERROR Incorrect command was sent from computer.
UNITS Torque unit of measurement.
REMOTE Remote control via PC enabled.
RAMP DOWN Decrease motor speed by increasing load on motor.
RAMP UP Increase motor speed by decreasing load on motor.
SAVING Saves current configuration of unit to non-volatlie memory.
11

Magtrol Model DSP6001 Dynamometer ControllerChapter 2 – Controls
DYNAMOMETER / TSC1
AUX / TSC2
SUPPLY 2
SUPPLY 1
RS-232C
GPIB/IEEE–488
BRAKE
ACCESSORY
TORQUE–SPEED
OUTPUT
CTRL OUT
BRAKE FUSE
CAUTION: DOUBLE POLE FUSING
75VA 50/60Hz
EARTH
GROUND
FUSE (5×20mm):
120V UL/CSA 800mA 250V SB
240V IEC 315mA 250V T
(5×20mm):
UL/CSA 1.25A 250V SB
IEC 1A 250V T
MAGTROL, INC. BUFFALO, NY
(FUSED)
+35V
REGULATION
CURRENT
7 6
3 1
5 4
2
8
8. +5.0 VDC COM
7. EXTERNAL ALARM INPUT
6. ALARM RELAY (COMMON)
5. ALARM RELAY (NORMALLY CLOSED)
4. ALARM RELAY (NORMALLY OPEN)
3. ANALOG GROUND
2. ANALOG SPEED
1. ANALOG TORQUE
2.4 REAR PANEL
The rear panel provides connectors and receptacles for connecting to appropriate equipment.
Figure 2–4 Rear Panel
2.5 REAR PANEL INPUTS AND OUTPUTS
BRAKE Connect dynamometer brake cable here.
INFORMATION
GENERAL
Figure 2–5 Dynamometer Brake Input
BRAKE
FUSE
Contains brake fuse (5 x 20 mm)
(UL/CSA 1.25A 250V SB)
(IEC 1A 250V T)
CTRL OUT Connect to Model 5241 Power Amplifier when using HD-825
Dynamometer.
ACCESSORY
Connect accessory output cable here (optional).
TORQUE/
SPEED
OUTPUT
Figure 2–6 Accessory Torque-Speed Output
12
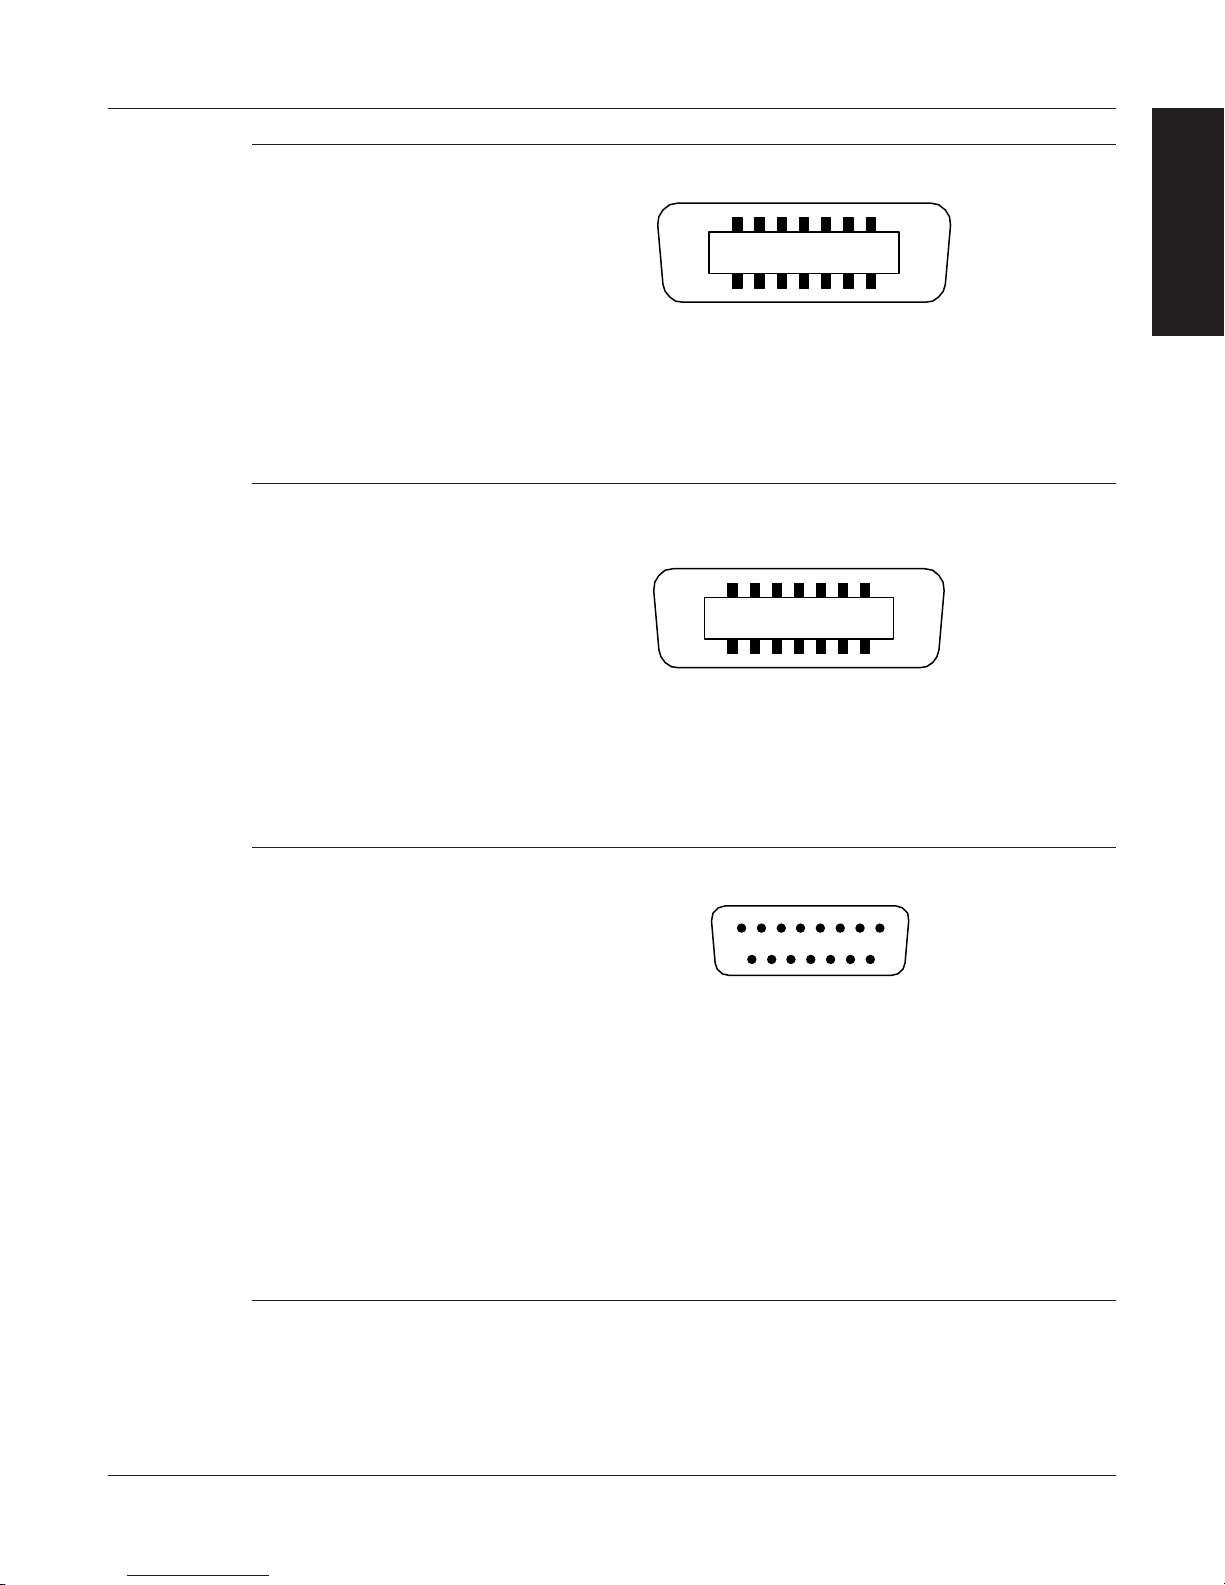
Magtrol Model DSP6001 Dynamometer Controller
14. TORQUE SIGNAL
13. TORQUE COMMON
12. D.P. B
11. INDEX
10. TACH. A
9. D.P. A
8. +5.0 VDC COM
7. +5.0 VDC
6. -24 VDC
5. -24 VDC COM
4. +24 VDC COM
3. +24 VDC
2. TACH. B
1. FLOW/CLUTCH
14 3 2
891011
6 5
1213714
11. N/C
10. TACH. C
9. ROT_SENS
8. +5.0 VDC COM
14. TORQUE SIGNAL
13. TORQUE COMMON
12. BITE
6. -24 VDC
3. +24 VDC
2. N/C
5. -24 VDC COM
4. +24 VDC COM
1. SPARE
7. +5.0 VDC
14 3 2
891011
6 5
1213714
15. N/C
14. CURRENT SET POINT (ANALOG 0V)
13. +5.0 VDC COM
12. SUPPLY +24 VDC
11. STAND-BY CHANNEL 1
10. TEMPERATURE ALARM CHANNEL 1
9. SHIELD (EARTH)
8. W FLOW_1
7. CURRENT SET POINT (SIGNAL)
6. +5.0 VDC COM
5. SUPPLY +24 VDC
4. PRIMARY SUPPLY CONTR. CHANNEL 1
3. N/C
2. ELECTRICAL ALARM CHANNEL 1
1. SHIELD (EARTH)
14 3 25
912 11 10
68 7
14 1315
DYNAMOMETER/
Connect dynamometer signal cable here.
TSC1
AUX/TSC2 Connect signal cables for the dynamometer, TM2XX or auxiliary
instrument here.
Chapter 2 – Controls
INFORMATION
GENERAL
Figure 2–7 Dynamometer/TSC1 Connector
SUPPLY 1 Connect WB/PB DES supply for TSC1.
Figure 2–8 AUX/TSC2 Connector
Figure 2–9 Supply 1 Connector
13
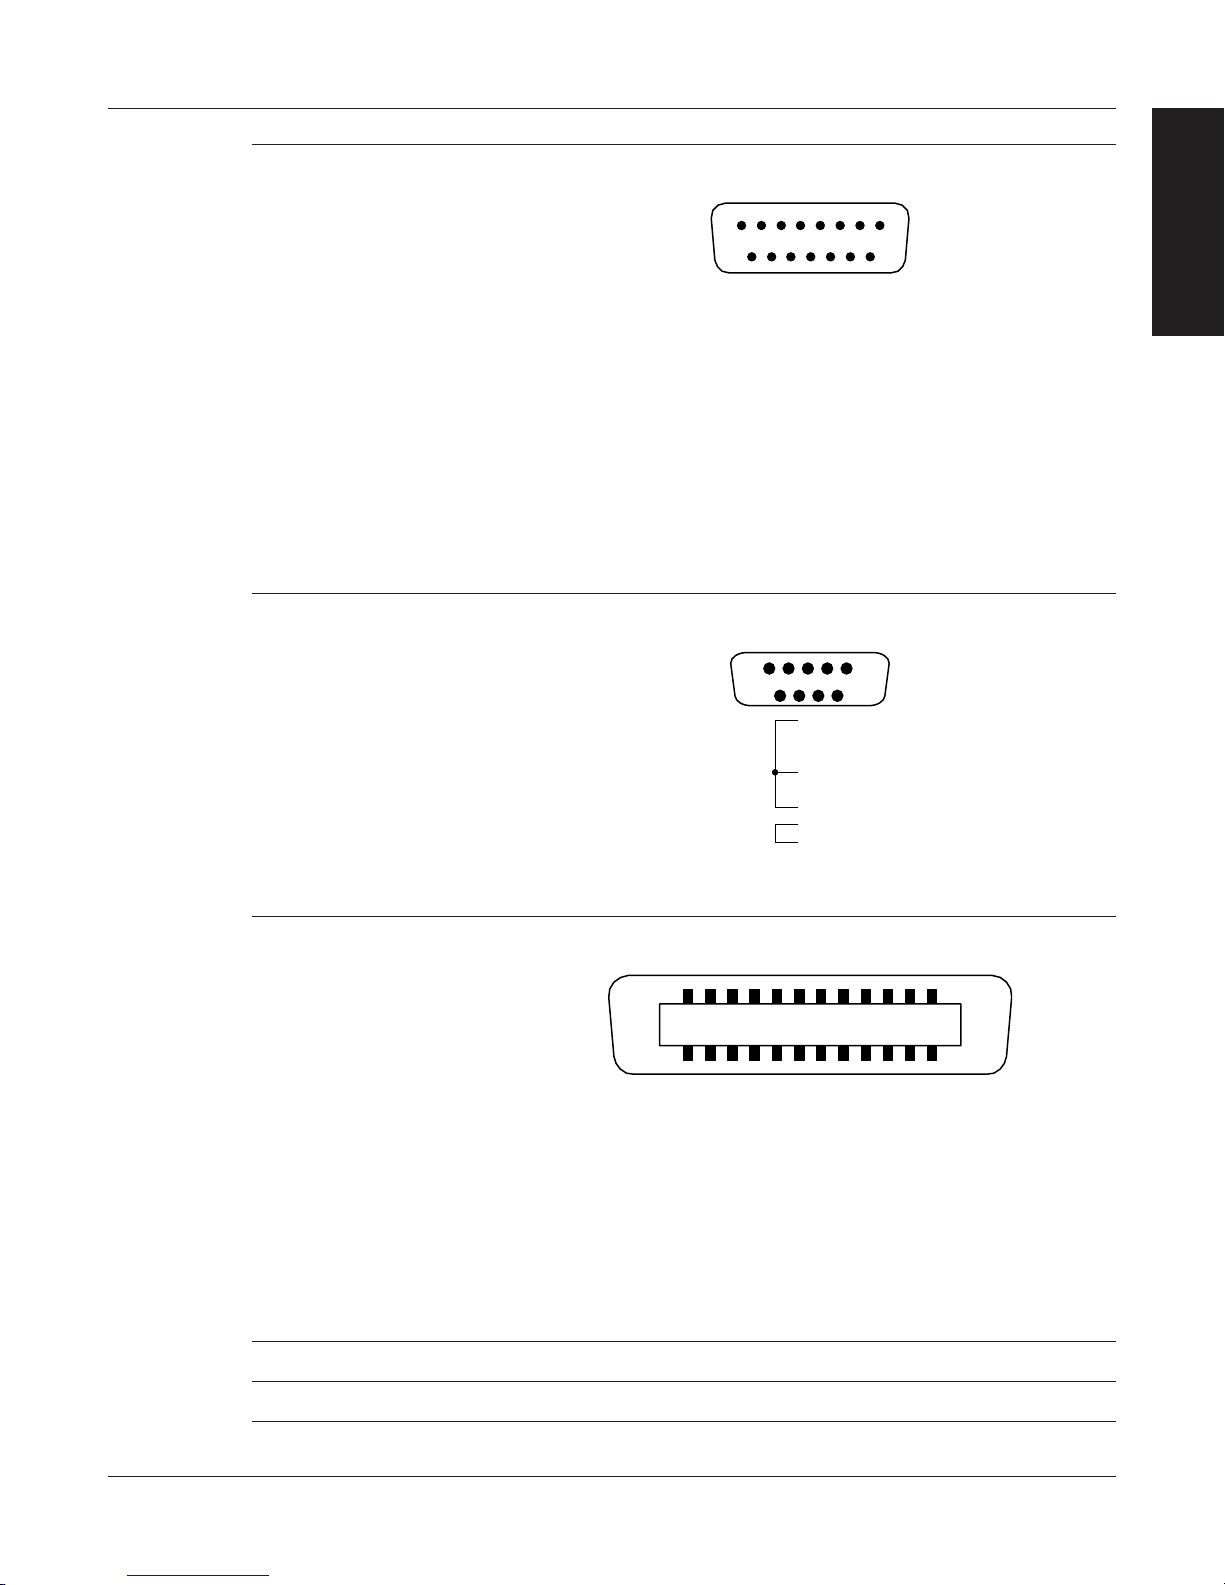
Magtrol Model DSP6001 Dynamometer ControllerChapter 2 – Controls
3. CLUTCH
8. W FLOW_2
11. STAND-BY CHANNEL 2
1. SHIELD (EARTH)
2. ELECTRICAL ALARM CHANNEL 2
4. PRIMARY SUPPLY CONTR. CHANNEL 2
5. SUPPLY +24 VDC
6. +5.0 VDC COM
7. CURRENT SET POINT (SIGNAL)
9. SHIELD (EARTH)
10. TEMPERATURE ALARM CHANNEL 2
15. N/C
13. +5.0 VDC COM
14. CURRENT SET POINT (ANALOG 0V)
12. SUPPLY +24 VDC
14 3 25
912 11 10
68 7
14 1315
5. GND
1.
6.
9. N/C
3. RX
8.
2. TX
4.
7.
14 3 25
69 8 7
24. SIGNAL GROUND
23. ATN-COM
22. SRQ-COM
21. IFC-COM
20. NDAC-COM
19. NRFD-COM
18. DAV-COM
17. REN
16. D8
15. D7
14. D6
13. D5
12. SHIELD
11. ATN
10. SRQ
9. IFC
8. NDAC
7. NRFD
6. DAV
5. E01
4. D4
3. D3
2. D2
1. D1
14 3 2
13141516
6 5
1718719
811 10 9
202122231224
SUPPLY 2 Connect WB/PB DES supply for TSC2.
Figure 2–10 Supply 2 Connector
RS-232C Use this socket for RS-232 connector cable
INFORMATION
GENERAL
GPIB/IEEE-488 Use this socket for GPIB cable (meets IEEE-488 specifications).
POWER Attach power cord here.
EARTH GROUND Attach earth ground here.
Figure 2–11 RS-232C Interface
Figure 2–12 GPIB/IEEE-488 Interface
14
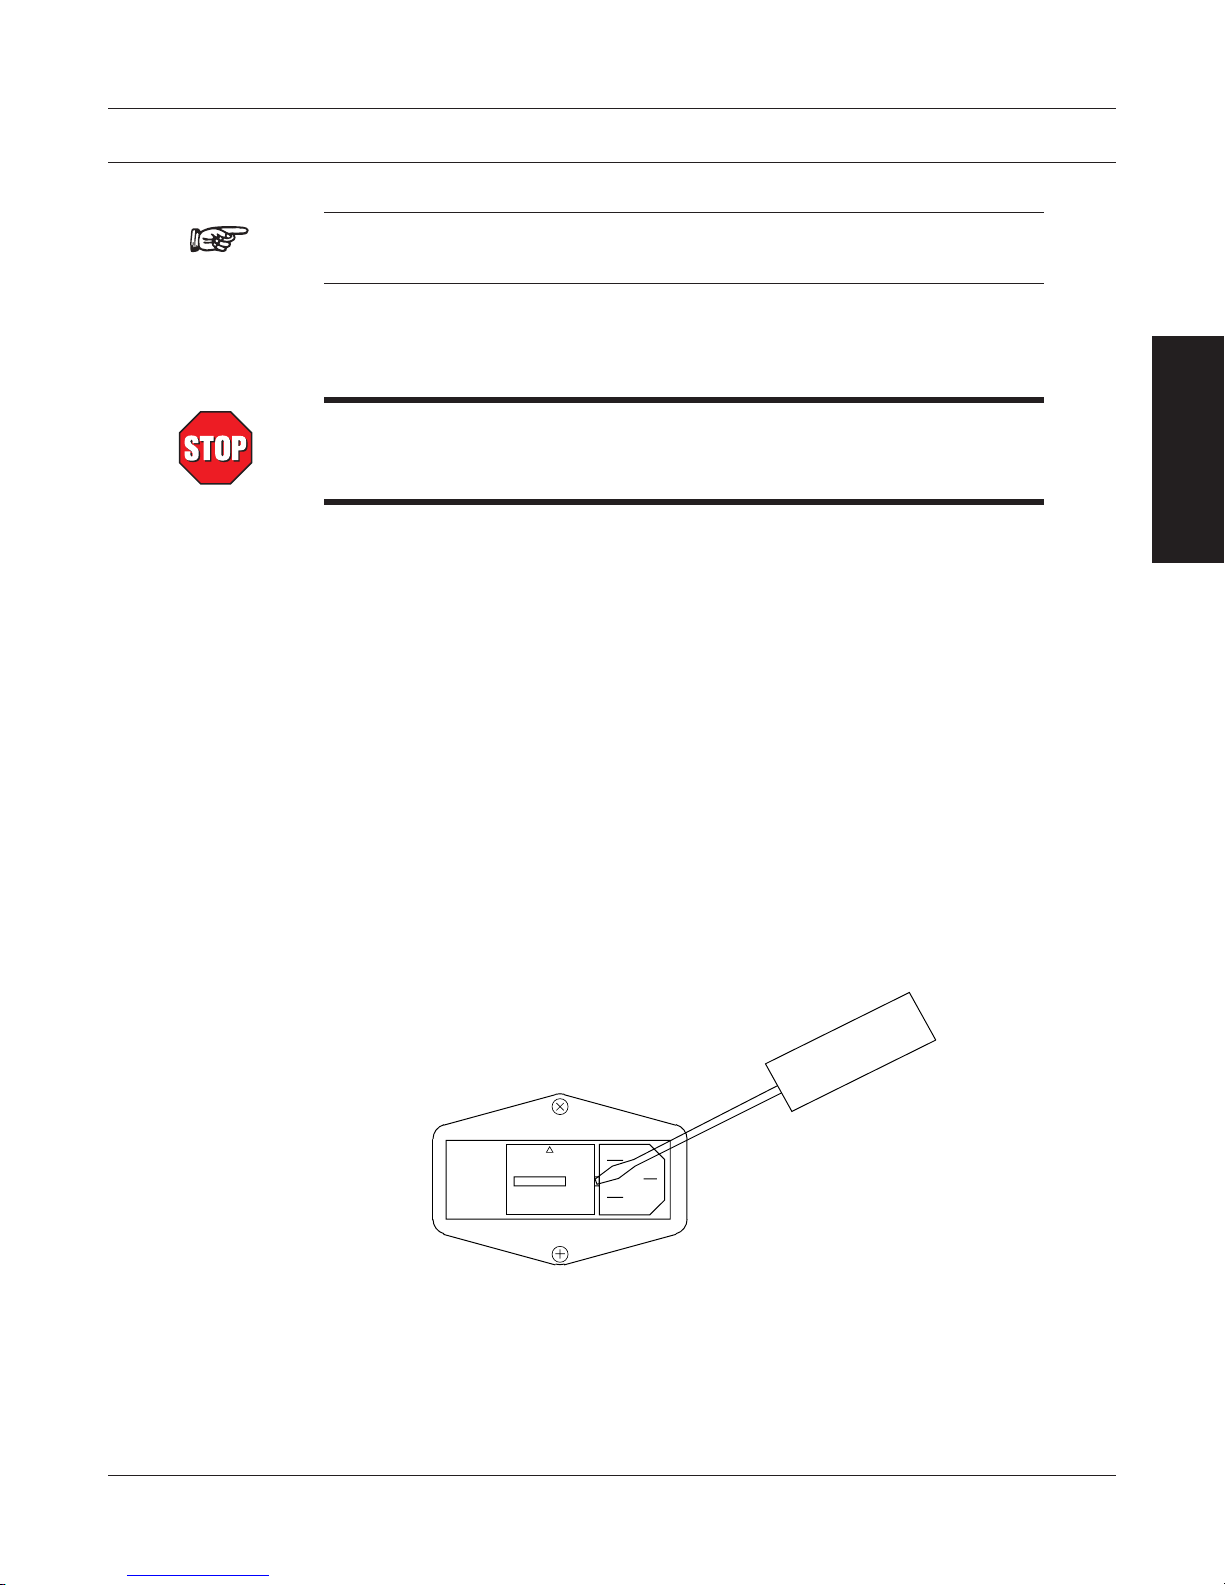
3. Installation/Configuration
Note: Before installing the DSP6001, you should become familiar with
the front and rear panels, as outlined in Chapter 2–Controls.
3.1 POWERING UP THE DSP6001
WARNING! TO REDUCE THE RISK OF ELECTRIC SHOCK, MAKE
SURE THE DSP6001 IS EARTH GROUNDED BEFORE
STARTING!
3.1.1 Setting Unit for Line VoLtage
The DSP6001 will operate with either of the following power sources:
• 120V50/60Hz
• 240V50/60Hz
1. Find the line cord receptacle on rear panel. The line cord is a detachable NEMA Standard
3 wire.
2. Make sure the selector matches the power source (numbers should match the line
voltage).
If not:
• Locatethepowerentrymodule.
• Removethelinecord.
• Insertascrewdriverintotheslotandopenthecover.
• Slidethevoltageselectorsothedesiredlinevoltageappearsinthewindow.
• Installtheappropriatefusesforthatvoltage.
SETUP
Figure 3–1 Cover for Voltage Selector, Fuses
15
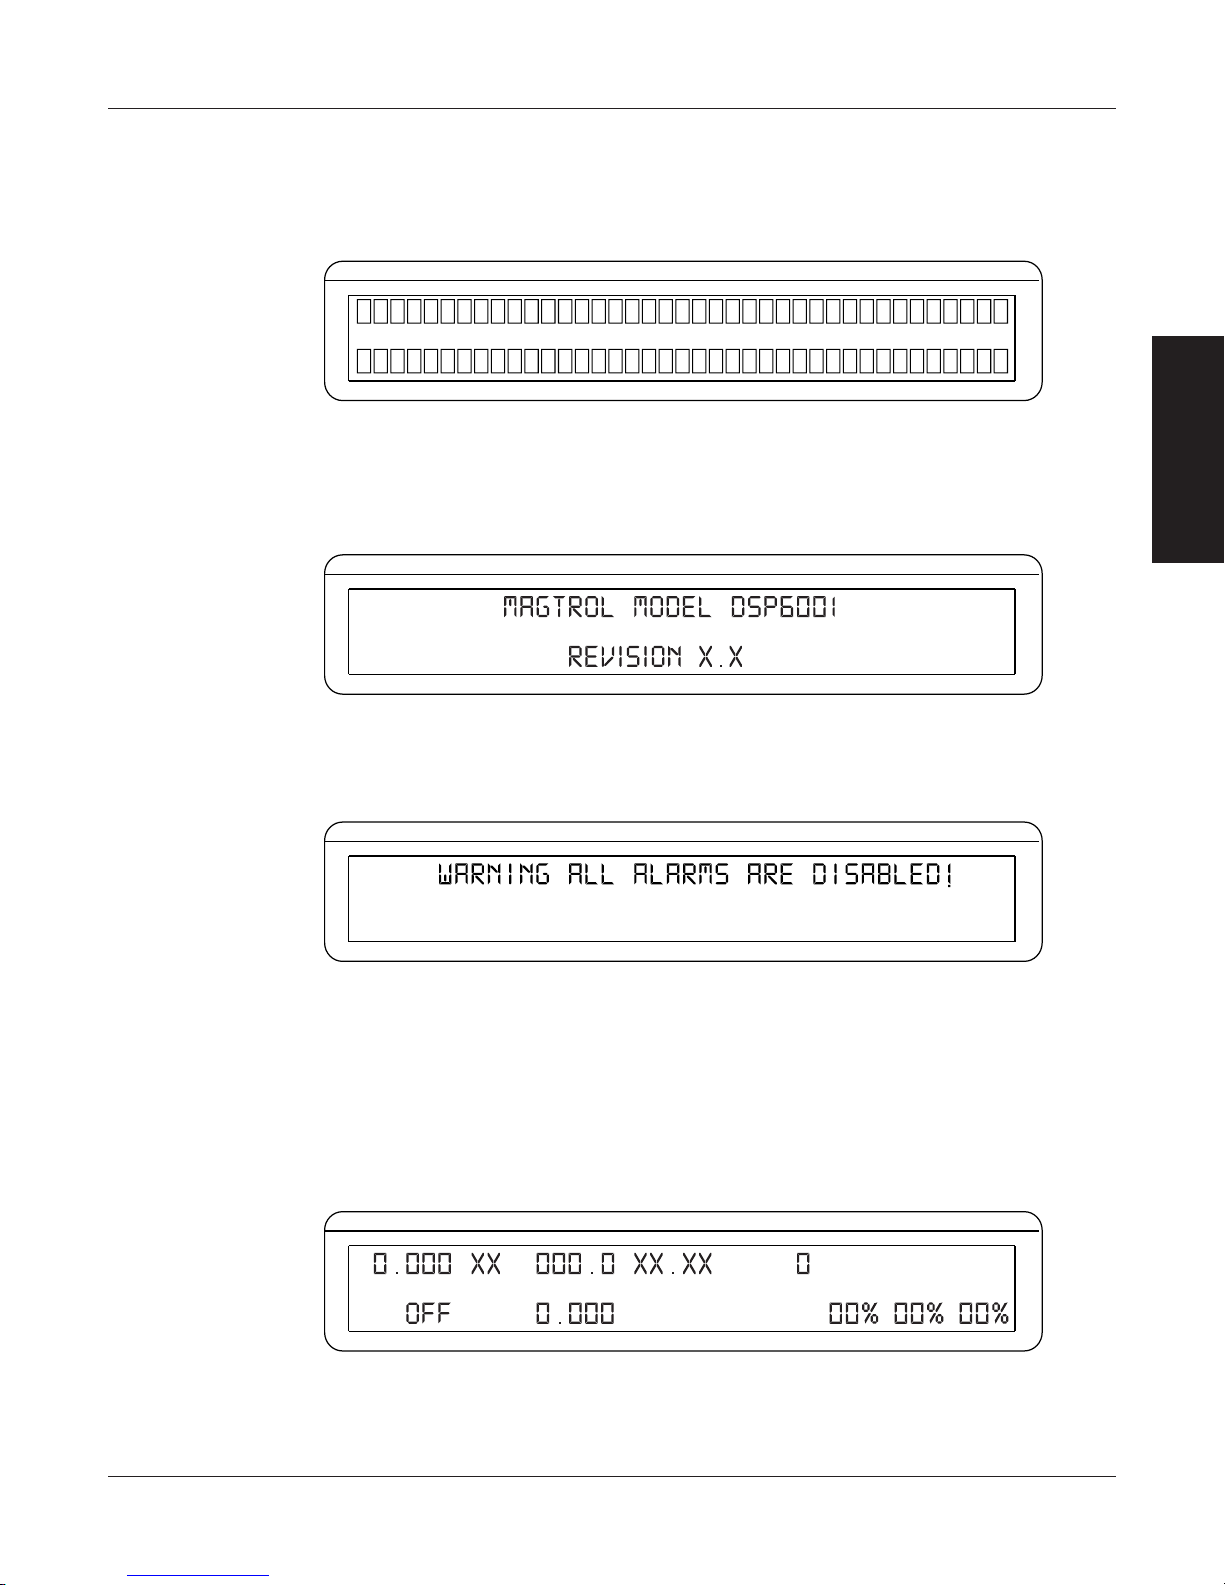
3.1.2 SeLf-teSt
POWER
BRAKE STATUS SET POINT SET POINT P I D
TORQUE SPEED STATUS
POWER
BRAKE STATUS SET POINT SET POINT P I D
TORQUE SPEED STATUS
POWER
BRAKE STATUS SET POINT SET POINT P I D
TORQUE SPEED STATUS
POWER
BRAKE STATUS SET POINT SET POINT P I D
TORQUE SPEED STATUS
After turning the power on to the DSP6001, the display panel will show all segments of the VFD
(series of rectangles), indicating that the DSP6001 is downloading the program.
When the program download is complete, the message “MAGTROL MODEL DSP6001 Revision
X.X” appears.
Magtrol Model DSP6001 Dynamometer ControllerChapter 3 – Installation/Configuration
SETUP
Figure 3–2 Program Download Display
If the alarms are disabled, the following display message will appear at this time.
To activate the alarms, refer to Section 6.1.2.1 – How to Enable/Disable Alarms.
3.1.3 Main MenU
When the DSP6001 is completely powered up and ready for use, the main menu will appear on the
display.
Figure 3–3 Revision Display
Figure 3–4 Alarm Warning Display
Figure 3–5 Main Menu
16

Magtrol Model DSP6001 Dynamometer Controller
3.2 TESTING INSTRUMENTATION SETUP
The DSP6001 has the ability to support a combination of up to two testing instruments with
independent or tandem configurations. Typically used combinations include:
Chapter 3 – Installation/Configuration
WB or PB --- BRAKE = Hysteresis, Eddy-Current or
WB or PB TM2XX --- = no connection
WB or PB AUX
WB or PB WB or PB
BRAKE TM2XX
Notes:
1. Only one Hysteresis Dynamometer, In-Line Torque Transducer or Auxiliary
2. In the TSC1 (WB/PB) and TSC2 (WB/PB) combination, the instruments
3. When there is no connection on TSC1 and TM2XX is connected to TSC2,
TSC1 TSC2
HD --- WB = Eddy-Current Dynamometer
HD TM2XX PB = Powder Brake Dynamometer
HD AUX TM2XX = In-Line Torque Transducer
HD WB or PB AUX = Auxiliary Instrumentation
HD = Hysteresis Dynamometer
Powder Brake
Instrument can be attached to the unit at any one time.
can be configured independently or as a tandem unit.
the TM2XX will control the outputs of TSC1.
SETUP
The setup of your unit will depend on which option you choose. The following sections will
illustrate and outline the hardware connection and software configurations needed to begin your
testing, based on your selection. For additional reference, see Appendix C: Front Panel/Display
Menu Flow Charts.
17
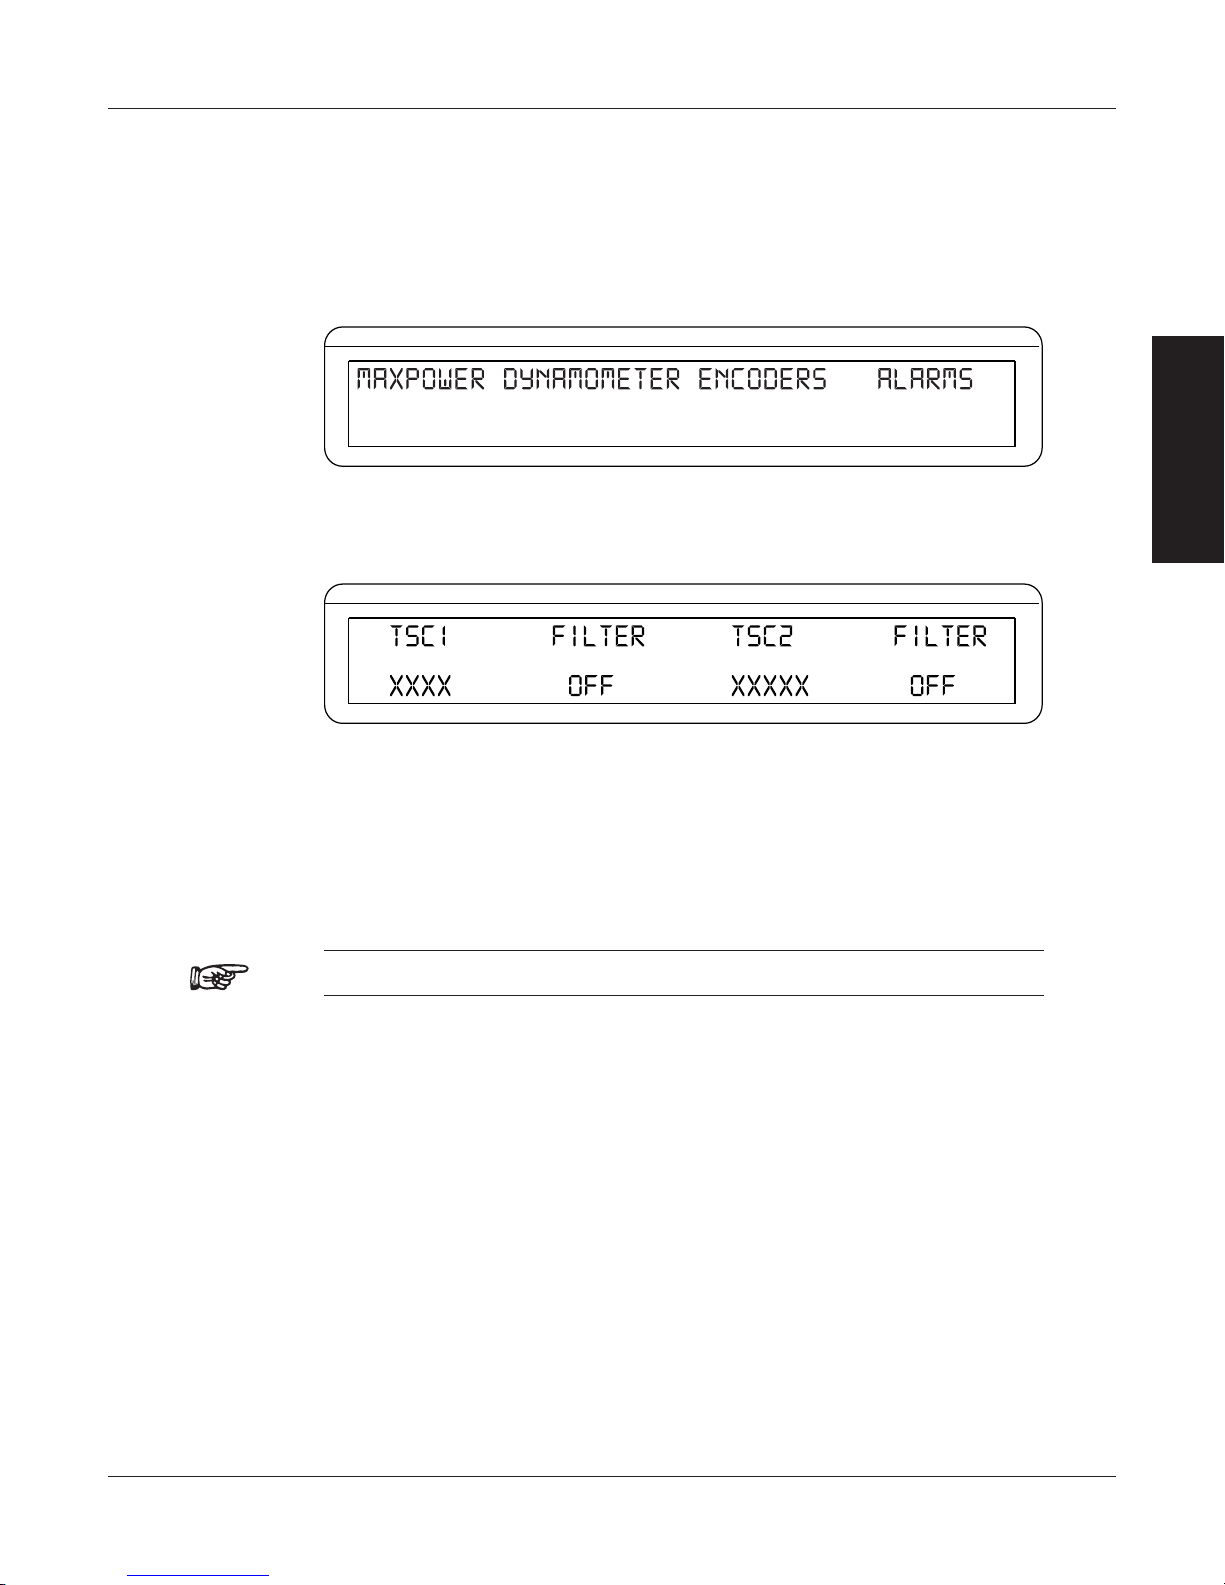
3.2.1 DynaMoMeter ConfigUration MenU
POWER
BRAKE STATUS SET POINT SET POINT P I D
TORQUE SPEED STATUS
↓ ↓ ↓ ↓
POWER
BRAKE STATUS SET POINT SET POINT P I D
TORQUE SPEED STATUS
To reach the dynamometer configuration menu:
1. Turn on DSP6001 power. See Section 3.1 – Powering Up the DSP6001.
2. Press SHIFT. The word “SHIFT” will appear in the display.
3. Press the DYNO SETUP button. The display should appear as follows:
4. Select DYNAMOMETER. The display should appear as follows:
Magtrol Model DSP6001 Dynamometer ControllerChapter 3 – Installation/Configuration
SETUP
Figure 3–6 Dyno Setup Menu
Figure 3–7 Dynamometer Configuration Menu
5. Pressing the POWER UNITS button allows selection of the preferred testing device (HD,
WB, PB or BRAKE) for TSC1. Pressing the MAX SPEED button allows selection of the
preferred testing device (AUX, WB, PB or TM2XX) for TSC2. Refer to the remainder of
this chapter for more detailed instructions on setup and configuration of the different testing
devices.
Note: For information on Filters, see Chapter 4 – Digital Filters.
18

Magtrol Model DSP6001 Dynamometer Controller
DYNAMOMETER / TSC1
AUX / TSC2
SUPPLY 2
SUPPLY 1
RS-232C
GPIB/IEEE–488
BRAKE
ACCESSORY
TORQUE–SPEED
OUTPUT
CTRL OUT
BRAKE FUSE
CAUTION: DOUBLE POLE FUSING
75VA 50/60Hz
EARTH
GROUND
FUSE (5×20mm):
120V UL/CSA 800mA 250V SB
240V IEC 315mA 250V T
(5×20mm):
UL/CSA 1.25A 250V SB
IEC 1A 250V T
MAGTROL, INC. BUFFALO, NY
No Connection
Hysteresis on TSC1 only
AC Mains
Motor
Under
Test
Hysteresis Dynamometer (HD)
DSP6001
DYNAMOMETER
CONTROLLER
GPIB
RS-232
or
PC
M-TEST
POWER
BRAKE STATUS SET POINT SET POINT P I D
TORQUE SPEED STATUS
3.2.2 HyStereSiS DynaMoMeter SetUp
3.2.2.1 Hardware Connection
Figure 3–8 Hysteresis Dynamometer Setup
Chapter 3 – Installation/Configuration
SETUP
3.2.2.2 Software Configuration
1. Turn on the DSP6001 and proceed to the dynamometer configuration menu. See Section
3.2.1 – Dynamometer Configuration Menu.
2. Select TSC1 until HD is reached.
3. Select TSC2 until AUX is reached.
4. Press SHIFT. The display should appear as follows:
5. Press the TORQUE UNITS button until the desired input unit for TSC1 is reached.
6. Press SHIFT 3 times to complete the initial setup and return to the main menu.
Figure 3–9 Hysteresis Setup Menu
19

Magtrol Model DSP6001 Dynamometer ControllerChapter 3 – Installation/Configuration
Motor
Under
Test
DYNAMOMETER / TSC1
AUX / TSC2
SUPPLY 2
SUPPLY 1
RS-232C
GPIB/IEEE–488
BRAKE
ACCESSORY
TORQUE–SPEED
OUTPUT
CTRL OUT
BRAKE FUSE
CAUTION: DOUBLE POLE FUSING
75VA 50/60Hz
EARTH
GROUND
FUSE (5×20mm):
120V UL/CSA 800mA 250V SB
240V IEC 315mA 250V T
(5×20mm):
UL/CSA 1.25A 250V SB
IEC 1A 250V T
MAGTROL, INC. BUFFALO, NY
TM Torque Transducer
AC Mains
Hysteresis Dynamometer (HD)
No Connection
Hysteresis on TSC1 only
DSP6001
DYNAMOMETER
CONTROLLER
GPIB
RS-232
or
PC
M-TEST
3.2.3 HyStereSiS DynaMoMeter witH torqUe tranSDUCer SetUp
3.2.3.1 Hardware Connection
Figure 3–10 Hysteresis Dynamometer with Torque Transducer Setup
SETUP
20

Magtrol Model DSP6001 Dynamometer Controller
POWER
BRAKE STATUS SET POINT SET POINT P I D
TORQUE SPEED STATUS
POWER
BRAKE STATUS SET POINT SET POINT P I D
TORQUE SPEED STATUS
POWER
BRAKE STATUS SET POINT SET POINT P I D
TORQUE SPEED STATUS
3.2.3.2 Software Configuration
1. Turn on the DSP6001 and proceed to the dynamometer configuration menu. See Section
3.2.1 – Dynamometer Configuration Menu.
2. Select TSC1 until HD is reached.
3. Select TSC2 until TM2XX is reached.
4. Press SHIFT to get to the hysteresis setup menu. See Figure 3–9 Hysteresis Setup Menu.
5. Press TORQUE UNITS button until the desired input unit for TSC1 is reached.
6. Press SHIFT. The display should appear as follows:
Figure 3–11 Torque Transducer Setup Menu
7. Press TORQUE UNITS button and use UP and DOWN buttons and Decrease/Increase
dial to set desired scale factor for TSC2.
8. Press SHIFT 3 times to return to the main menu.
9. To display the TSC2 torque transducer information in the main menu STATUS area, press
SHIFT, AUX SETUP and the POWER UNITS button until the display says ON (as shown
in Figure 3–12 Aux Setup Menu - Display On).
Chapter 3 – Installation/Configuration
SETUP
Figure 3–12 Aux Setup Menu - Display On
10. Press SHIFT to complete the initial setup and return to the new main menu. The display
should appear as follows:
Figure 3–13 TSC1 with TM2XX Output Menu
21

Magtrol Model DSP6001 Dynamometer ControllerChapter 3 – Installation/Configuration
Motor
Under
Test
DYNAMOMETER / TSC1
AUX / TSC2
SUPPLY 2
SUPPLY 1
RS-232C
GPIB/IEEE–488
BRAKE
ACCESSORY
TORQUE–SPEED
OUTPUT
CTRL OUT
BRAKE FUSE
CAUTION: DOUBLE POLE FUSING
75VA 50/60Hz
EARTH
GROUND
FUSE (5×20mm):
120V UL/CSA 800mA 250V SB
240V IEC 315mA 250V T
(5×20mm):
UL/CSA 1.25A 250V SB
IEC 1A 250V T
MAGTROL, INC. BUFFALO, NY
No Connection
Hysteresis on TSC1 only
±10 volts
TSC2 only
14-pin connector
pin 13 = com
pin 14 = signal
AC Mains
Hysteresis Dynamometer (HD)
DSP6001
DYNAMOMETER
CONTROLLER
Auxiliary Input (optional)
GPIB
RS-232
or
PC
M-TEST
3.2.4 HyStereSiS DynaMoMeter witH aUxiLiary inStrUMentation SetUp
3.2.4.1 Hardware Connection
Figure 3–14 Hysteresis Dynamometer with Auxiliary Instrumentation Setup
SETUP
22

Magtrol Model DSP6001 Dynamometer Controller
POWER
BRAKE STATUS SET POINT SET POINT P I D
TORQUE SPEED STATUS
POWER
BRAKE STATUS SET POINT SET POINT P I D
TORQUE SPEED STATUS
3.2.4.2 Software Configuration
1. Turn on the DSP6001 and proceed to the dynamometer configuration menu. See Section
3.2.1 – Dynamometer Configuration Menu.
2. Select TSC1 until HD is reached.
3. Select TSC2 until AUX is reached.
4. Press SHIFT to get to the hysteresis setup menu. See Figure 3–9 Hysteresis Setup Menu.
5. Press TORQUE UNITS button until the desired input unit for TSC1 is reached.
6. Press SHIFT. The display should appear as follows:
7. Press TORQUE UNITS button and use UP and DOWN buttons and Decrease/Increase
dial to set desired scale factor for TSC2.
8. Press SHIFT 3 times to return to the main menu.
9. To display the TSC2 auxiliary information in the main menu STATUS area, press SHIFT,
AUX SETUP and the POWER UNITS button until the display says ON. See Figure 3–12
Aux Setup Menu - Display On.
10. Press SHIFT to complete the initial setup and return to the new main menu. The display
should appear as follows:
Chapter 3 – Installation/Configuration
SETUP
Figure 3–15 TSC2 Aux Setup Menu
Figure 3–16 TSC1 with AUX Output Menu
23

Magtrol Model DSP6001 Dynamometer ControllerChapter 3 – Installation/Configuration
DYNAMOMETER / TSC1
AUX / TSC2
SUPPLY 2
SUPPLY 1
RS-232C
GPIB/IEEE–488
BRAKE
ACCESSORY
TORQUE–SPEED
OUTPUT
CTRL OUT
BRAKE FUSE
CAUTION: DOUBLE POLE FUSING
75VA 50/60Hz
EARTH
GROUND
FUSE (5×20mm):
120V UL/CSA 800mA 250V SB
240V IEC 315mA 250V T
(5×20mm):
UL/CSA 1.25A 250V SB
IEC 1A 250V T
MAGTROL, INC. BUFFALO, NY
No Connection
Hysteresis on TSC1 only
Eddy-Current (WB)
OR Powder Brake (PB)
Dynamometer
AC Mains
Hysteresis Dynamometer (HD)
Excitation
Torque
Speed
TSC 401
Torque-Speed
Conditioner
DES 31x Power Supply
Motor
Under
Test
GPIB
RS-232
or
PC
M-TEST
DSP6001
DYNAMOMETER
CONTROLLER
3.2.5 HyStereSiS DynaMoMeter witH eDDy-CUrrent or powDer Brake SetUp
3.2.5.1 Hardware Connection
Figure 3–17 Hysteresis Dynamometer with Eddy-Current or Powder Brake Setup
SETUP
24

Magtrol Model DSP6001 Dynamometer Controller
POWER
BRAKE STATUS SET POINT SET POINT P I D
TORQUE SPEED STATUS
POWER
BRAKE STATUS SET POINT SET POINT P I D
TORQUE SPEED STATUS
3.2.5.2 Software Configuration
1. Turn on the DSP6001 and proceed to the dynamometer configuration menu. See Section
3.2.1 – Dynamometer Configuration Menu.
2. Select TSC1 until HD is reached.
3. Select TSC2 until WB or PB is reached.
4. Press SHIFT to get to the hysteresis setup menu. See Figure 3–9 Hysteresis Setup Menu.
5. Press TORQUE UNITS button until the desired input unit for TSC1 is reached.
6. Press SHIFT. The display should appear as follows:
Figure 3–18 TSC2 Eddy-Current/Powder Brake Setup Menu
7. Press TORQUE UNITS button and use UP and DOWN buttons and Decrease/Increase
dial to set desired scale factor for TSC2.
8.a. If using an Eddy Current Dynamometer, press SHIFT 2 times. The display should appear
as follows:
Chapter 3 – Installation/Configuration
SETUP
Figure 3–19 Nominal Speed Setup Menu
Press the AUX SETUP button and use UP and DOWN buttons and Decrease/Increase
dial to set desired nominal speed. Press SHIFT 3 times to complete the initial setup and
return to the main menu.
8.b. If using a Powder Brake Dynamometer, press SHIFT 3 times to complete the initial setup
and return to the main menu.
25

Magtrol Model DSP6001 Dynamometer ControllerChapter 3 – Installation/Configuration
Eddy-Current (WB)
POWER
BRAKE STATUS SET POINT SET POINT P I D
TORQUE SPEED STATUS
3.2.6 eDDy-CUrrent or powDer Brake DynaMoMeter SetUp
3.2.6.1 Hardware Connection
OR Powder Brake (PB)
Dynamometer
Speed
Torque
Excitation
TSC 401
Torque-Speed
Conditioner
SETUP
DES Power Supply
BRAKE
ACCESSORY
TORQUE–SPEED
OUTPUT
DYNAMOMETER / TSC1
BRAKE FUSE
(5×20mm):
CTRL OUT
UL/CSA 1.25A 250V SB
IEC 1A 250V T
Figure 3–20 Eddy-Current or Powder Brake Dynamometer Setup
3.2.6.2 Software Configuration
1. Turn on the DSP6001 and proceed to the dynamometer configuration menu. See Section
3.2.1 – Dynamometer Configuration Menu.
2. Select TSC1 until WB or PB is reached.
3. Select TSC2 until AUX is reached.
4. Press SHIFT. The display should appear as follows:
AUX / TSC2
SUPPLY 2
SUPPLY 1
MAGTROL, INC. BUFFALO, NY
DSP6001 Dynamometer Controller
GPIB/IEEE–488
RS-232C
FUSE (5×20mm):
CAUTION: DOUBLE POLE FUSING
75VA 50/60Hz
120V UL/CSA 800mA 250V SB
240V IEC 315mA 250V T
EARTH
GROUND
PC
GPIB
or
RS-232
M-TEST
Figure 3–21 TSC1 Eddy-Current/Powder Brake Setup Menu
5. Press TORQUE UNITS button and use UP and DOWN buttons and Decrease/Increase
dial to set desired scale factor.
6.a. If using an Eddy Current Dynamometer, press SHIFT 2 times. The display should appear
as shown in Figure 3–19 Nominal Speed Setup Menu. Press the AUX SETUP button and
use UP and DOWN buttons and Decrease/Increase dial to set desired nominal speed.
Press SHIFT 4 times to complete the initial setup and return to the main menu.
6.b. If using a Powder Brake Dynamometer, press SHIFT 4 times to complete the initial setup
and return to the main menu.
26

Magtrol Model DSP6001 Dynamometer Controller
Eddy-Current (WB)
Chapter 3 – Installation/Configuration
3.2.7 eDDy-CUrrent or powDer Brake DynaMoMeter witH torqUe tranSDUCer SetUp
3.2.7.1 Hardware Connection
OR Powder Brake (PB)
Dynamometer
TM Torque
Transducer
BRAKE
ACCESSORY
TORQUE–SPEED
OUTPUT
DYNAMOMETER / TSC1
BRAKE FUSE
(5×20mm):
CTRL OUT
UL/CSA 1.25A 250V SB
IEC 1A 250V T
Figure 3–22 Eddy-Current or Powder Brake Dynamometer with Torque Transducer Setup
3.2.7.2 Software Configuration
1. Turn on the DSP6001 and proceed to the dynamometer configuration menu. See Section
3.2.1 – Dynamometer Configuration Menu.
2. Select TSC1 until WB or PB is reached.
3. Select TSC2 until TM2XX is reached.
4. Press SHIFT to get to the TSC1 eddy-current/powder brake setup menu. See Figure 3–21
TSC1 Eddy-Current/Powder Brake Setup Menu.
5. Press TORQUE UNITS button and use UP and DOWN buttons and Decrease/Increase
dial to set desired scale factor for TSC1.
6.a. If using an Eddy Current Dynamometer, press SHIFT 2 times. The display should appear
as shown in Figure 3–19 Nominal Speed Setup Menu. Press the AUX SETUP button and
use UP and DOWN buttons and Decrease/Increase dial to set desired nominal speed.
Press SHIFT 2 times to get to the Torque Transducer Setup Menu as shown in Figure 3-
11.
6.b. If using a Powder Brake Dynamometer, press SHIFT 2 times to get to the Torque Transducer
Setup Menu as shown in Figure 3–11.
7. Press TORQUE UNITS button and use UP and DOWN buttons and Decrease/Increase
dial to set desired scale factor for TSC2.
8. Press SHIFT 3 times to return to the main menu.
9. To display the TSC2 torque transducer information in the main menu STATUS area, press
SHIFT, AUX SETUP and the POWER UNITS button until the display says ON. See Figure
3–12 Aux Setup Menu - Display On.
10. Press SHIFT to complete the initial setup and return to the new main menu. See Figure
3–13 TSCI with TM2XX Output Menu.
AUX / TSC2
SUPPLY 2
SUPPLY 1
MAGTROL, INC. BUFFALO, NY
TSC 401
Torque-Speed
75VA 50/60Hz
Conditioner
EARTH
GROUND
Speed
Torque
Excitation
DSP6001 Dynamometer Controller
GPIB/IEEE–488
RS-232C
FUSE (5×20mm):
CAUTION: DOUBLE POLE FUSING
120V UL/CSA 800mA 250V SB
240V IEC 315mA 250V T
DES Power Supply
PC
M-TEST
GPIB
or
RS-232
SETUP
27
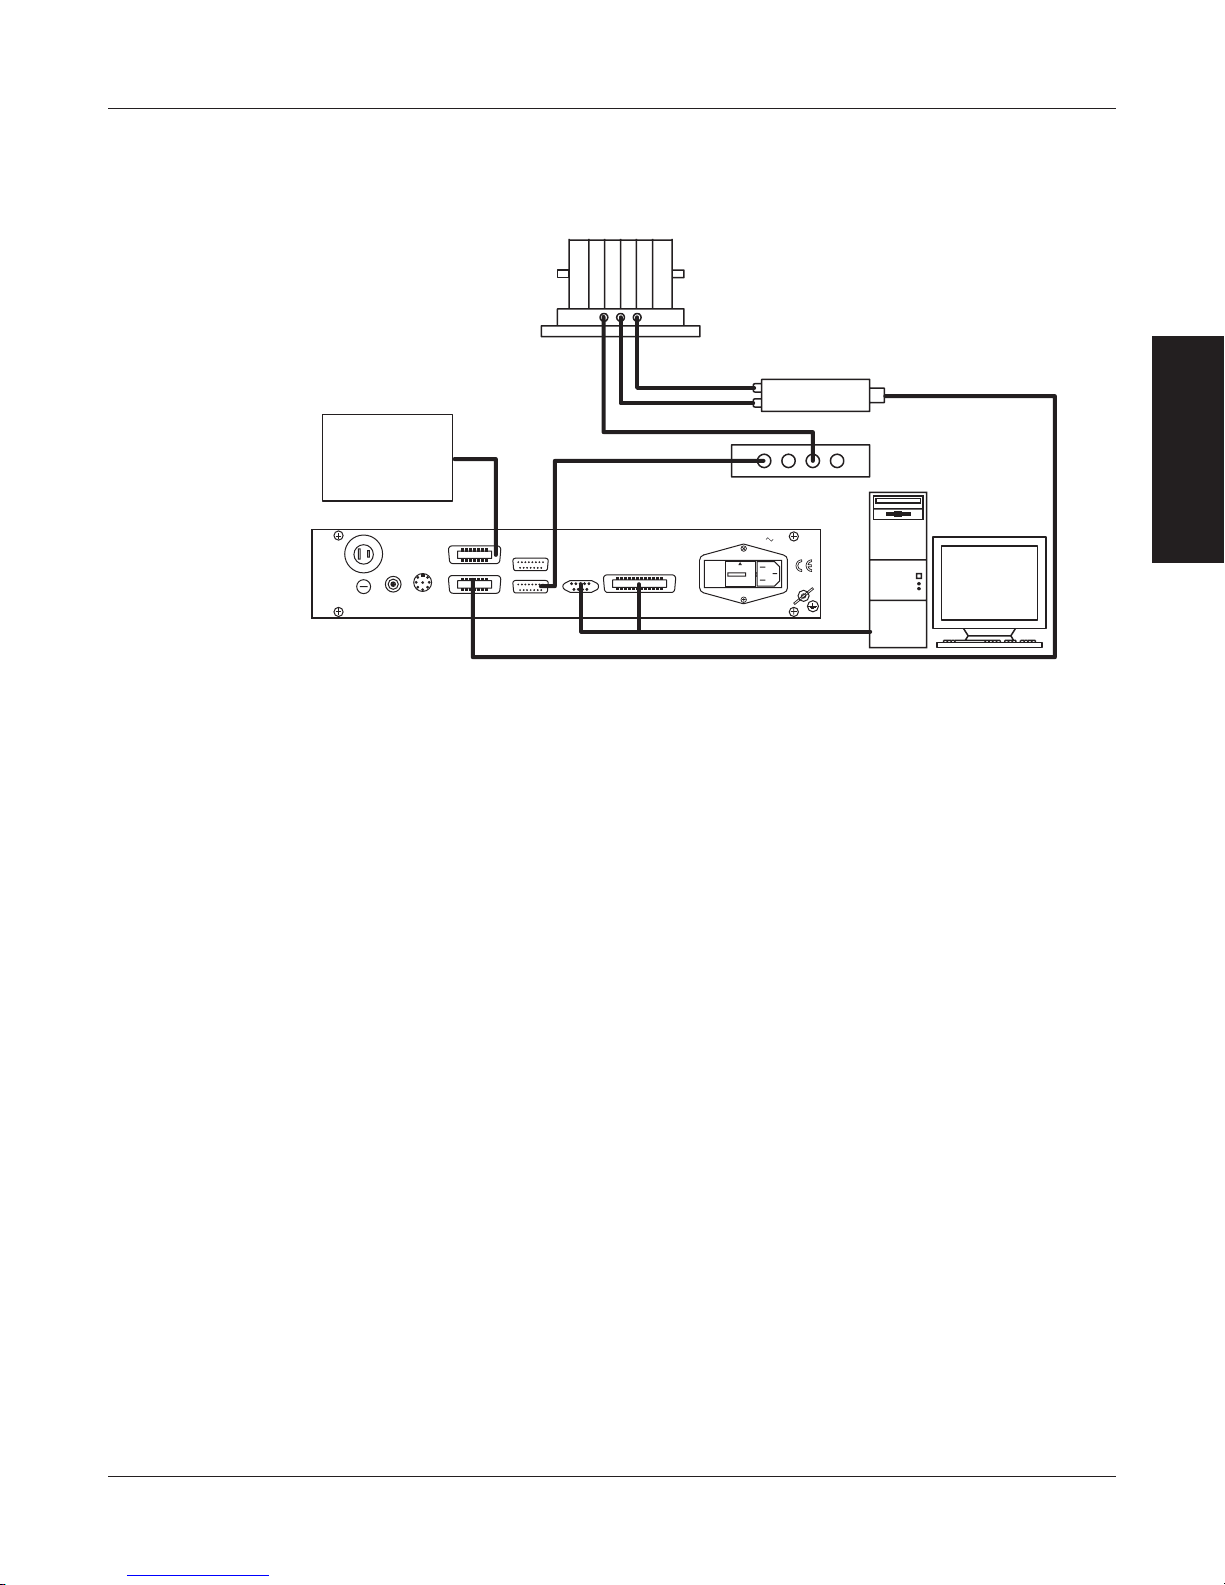
Magtrol Model DSP6001 Dynamometer ControllerChapter 3 – Installation/Configuration
Eddy-Current (WB)
3.2.8 eDDy-CUrrent or powDer Brake DynaMoMeter witH aUxiLiary inStrUMentation SetUp
3.2.8.1 Hardware Connection
OR Powder Brake (PB)
Dynamometer
TSC 401
Torque-Speed
75VA 50/60Hz
Conditioner
EARTH
GROUND
DES Power Supply
PC
M-TEST
GPIB
or
RS-232
OPTIONAL:
Auxiliary Input
±10 volts
TSC2 only
14-pin connector
pin 13 = com
pin 14 = signal
BRAKE
ACCESSORY
TORQUE–SPEED
OUTPUT
CTRL OUT
BRAKE FUSE
UL/CSA 1.25A 250V SB
(5×20mm):
IEC 1A 250V T
AUX / TSC2
DYNAMOMETER / TSC1
Speed
Torque
Excitation
DSP6001 Dynamometer Controller
SUPPLY 2
SUPPLY 1
MAGTROL, INC. BUFFALO, NY
RS-232C
GPIB/IEEE–488
FUSE (5×20mm):
CAUTION: DOUBLE POLE FUSING
120V UL/CSA 800mA 250V SB
240V IEC 315mA 250V T
SETUP
Figure 3–23 Eddy-Current or Powder Brake Dynamometer with Auxiliary Instrumentation Setup
3.2.8.2 Software Configuration
1. Turn on the DSP6001 and proceed to the dynamometer configuration menu. See Section
3.2.1 – Dynamometer Configuration Menu.
2. Select TSC1 until WB or PB is reached.
3. Select TSC2 until AUX is reached.
4. Press SHIFT to get to the TSC1 eddy-current/powder brake setup menu. See Figure 3–21
TSC1 Eddy-Current/Powder Brake Setup Menu.
5. Press TORQUE UNITS button and use UP and DOWN buttons and Decrease/Increase
dial to set desired scale factor for TSC1.
6.a. If using an Eddy Current Dynamometer, press SHIFT 2 times. The display should appear
as shown in Figure 3–19 Nominal Speed Setup Menu. Press the AUX SETUP button and
use UP and DOWN buttons and Decrease/Increase dial to set desired nominal speed.
Press SHIFT 2 times to get to the Auxiliary Instrumentation Setup Menu as shown in Figure
3–15.
6.b. If using a Powder Brake Dynamometer, press SHIFT 2 times to get to the Auxiliary
Instrumentation Setup Menu as shown in Figure 3-15.
7. Press TORQUE UNITS button and use UP and DOWN buttons and Decrease/Increase
dial to set desired scale factor for TSC2.
8. Press SHIFT 3 times to return to the main menu.
9. To display the TSC2 auxiliary information in the main menu STATUS area, press SHIFT,
AUX SETUP and the POWER UNITS button until the display says ON. See Figure 3–13
Aux Setup Menu - Display On.
10. Press SHIFT to complete the initial setup and return to the new main menu. See Figure
3–16 TSC1 with AUX Output Menu.
28

Magtrol Model DSP6001 Dynamometer Controller
DYNAMOMETER / TSC1
AUX / TSC2
SUPPLY 2
SUPPLY 1
RS-232C
GPIB/IEEE–488
BRAKE
ACCESSORY
TORQUE–SPEED
OUTPUT
CTRL OUT
BRAKE FUSE
CAUTION: DOUBLE POLE FUSING
75VA 50/60Hz
EARTH
GROUND
FUSE (5×20mm):
120V UL/CSA 800mA 250V SB
240V IEC 315mA 250V T
(5×20mm):
UL/CSA 1.25A 250V SB
IEC 1A 250V T
MAGTROL, INC. BUFFALO, NY
Eddy-Current (WB)
OR Powder Brake (PB)
Dynamometer
Excitation
Torque
Speed
TSC 401 Torque-Speed
Conditioner
DES 31x Power Supply
Eddy-Current (WB)
OR Powder Brake (PB)
Dynamometer
Excitation
Torque
Speed
TSC 401 Torque-Speed
Conditioner
DES 31x Power Supply
DSP6001
DYNAMOMETER CONTROLLER
GPIB
RS-232
or
PC
M-TEST
Chapter 3 – Installation/Configuration
3.2.9 two eDDy-CUrrent/powDer Brake DynaMoMeterS (inDepenDent SetUp)
3.2.9.1 Hardware Connection
Figure 3–24 Two Eddy-Current/Powder Brake Dynamometers (Independent Setup)
SETUP
29

3.2.9.2 Software Configuration
POWER
BRAKE STATUS SET POINT SET POINT P I D
TORQUE SPEED STATUS
1. Turn on the DSP6001 and proceed to the dynamometer configuration menu. See Section
3.2.1 – Dynamometer Configuration Menu.
2. Select TSC1 until WB or PB is reached.
3. Select TSC2 until WB or PB is reached.
4. Press SHIFT to get to the TSC1 eddy-current/powder brake setup menu. See Figure 3–21
TSC1 Eddy-Current/Powder Brake Setup Menu.
5. Press TORQUE UNITS button and use UP and DOWN buttons and Decrease/Increase
dial to set desired scale factor for TSC1.
6.a. If using an Eddy Current Dynamometer, press SHIFT 2 times. The display should appear
as shown in Figure 3 –19 Nominal Speed Setup Menu. Press the AUX SETUP button and
use UP and DOWN buttons and Decrease/Increase dial to set desired nominal speed.
Press SHIFT 2 times to get to the TSC2 Eddy-Current/Powder Brake Setup Menu as shown
in Figure 3–18.
6.b. If using a Powder Brake Dynamometer, press SHIFT 2 times to get to the TSC2 EddyCurrent/Powder Brake Setup Menu as shown in Figure 3–18.
7. Press TORQUE UNITS button and use UP and DOWN buttons and Decrease/Increase
dial to set desired scale factor for TSC2.
8.a. If using an Eddy Current Dynamometer, press SHIFT 2 times. The display should appear
as shown in Figure 3–19 Nominal Speed Setup Menu. Press the AUX SETUP button and
use UP and DOWN buttons and Decrease/Increase dial to set desired nominal speed.
Press SHIFT 2 times.
8.b. If using a Powder Brake Dynamometer, Press SHIFT 2 times.
9. The menu will appear as follows:
Magtrol Model DSP6001 Dynamometer ControllerChapter 3 – Installation/Configuration
SETUP
Figure 3–25 Tandem Configuration Menu
10. Press the COM SETUP button until the menu says “NO”.
11. Press SHIFT 2 times to complete the initial setup and return to the main menu.
30

Magtrol Model DSP6001 Dynamometer Controller
DYNAMOMETER / TSC1
AUX / TSC2
SUPPLY 2
SUPPLY 1
RS-232C
GPIB/IEEE–488
BRAKE
ACCESSORY
TORQUE–SPEED
OUTPUT
CTRL OUT
BRAKE FUSE
CAUTION: DOUBLE POLE FUSING
75VA 50/60Hz
EARTH
GROUND
FUSE (5×20mm):
120V UL/CSA 800mA 250V SB
240V IEC 315mA 250V T
(5×20mm):
UL/CSA 1.25A 250V SB
IEC 1A 250V T
MAGTROL, INC. BUFFALO, NY
Powder Brake (PB)
Dynamometer
Eddy-Current (WB)
Dynamometer
Excitation
Torque
Speed
TSC 401
Torque-Speed Conditioner
DES 31x Power Supply
Powder Brake (PB)
Dynamometer
Eddy-Current (WB)
Dynamometer
Excitation
Torque
Speed
TSC 401
Torque-Speed Conditioner
DES 31x Power Supply
GPIB
RS-232
or
PC
M-TEST
OR
DSP6001
DYNAMOMETER CONTROLLER
Chapter 3 – Installation/Configuration
3.2.10 two eDDy-CUrrent/powDer Brake DynaMoMeterS (tanDeM SetUp)
3.2.10.1 Hardware Connection
SETUP
Figure 3–26 Two Eddy-Current/Powder Brake Dynamometers (Tandem Setup)
Note: This particular tandem configuration is only applicable to a WB-
WB or PB-PB combination.
31

3.2.10.2 Software Configuration
1. Turn on the DSP6001 and proceed to the dynamometer configuration menu. See Section
3.2.1 – Dynamometer Configuration Menu.
2. Select TSC1 until WB or PB is reached.
3. Select TSC2 until WB or PB is reached.
4. Press SHIFT to get to the TSC1 eddy-current/powder brake setup menu. See Figure 3–21
TSC1 Eddy-Current/Powder Brake Setup Menu.
5. Press TORQUE UNITS button and use UP and DOWN buttons and Decrease/Increase
dial to set desired scale factor for TSC1.
6.a. If using an Eddy Current Dynamometer, press SHIFT 2 times. The display should appear
as shown in Figure 3 –19 Nominal Speed Setup Menu. Press the AUX SETUP button and
use UP and DOWN buttons and Decrease/Increase dial to set desired nominal speed.
Press SHIFT 2 times to get to the TSC2 Eddy-Current/Powder Brake Setup Menu as shown
in Figure 3–18.
6.b. If using a Powder Brake Dynamometer, press SHIFT 2 times to get to the TSC2 EddyCurrent/Powder Brake Setup Menu as shown in Figure 3–18.
7. Press TORQUE UNITS button and use UP and DOWN buttons and Decrease/Increase
dial to set desired scale factor for TSC2.
8.a. If using an Eddy Current Dynamometer, press SHIFT 2 times. The display should appear
as shown in Figure 3–19 Nominal Speed Setup Menu. Press the AUX SETUP button and
use UP and DOWN buttons and Decrease/Increase dial to set desired nominal speed.
Press SHIFT 2 times.
8.b. If using a Powder Brake Dynamometer, Press SHIFT 2 times.
9. The Tandem Configuration Menu will appear as shown in Figure 3–25.
10. Press the COM SETUP button until the menu says “YES”.
11. Press SHIFT 2 times to complete the initial setup and return to the main menu.
Magtrol Model DSP6001 Dynamometer ControllerChapter 3 – Installation/Configuration
SETUP
32

Magtrol Model DSP6001 Dynamometer Controller
Powder Brake
Eddy-Current Brake
POWER
BRAKE STATUS SET POINT SET POINT P I D
TORQUE SPEED STATUS
Chapter 3 – Installation/Configuration
3.2.11 eDDy-CUrrent DynaMoMeter witH powDer Brake DynaMoMeter (tanDeM SetUp)
3.2.11.1 Hardware Connection
Dynamometer (PB)
TSC 401
Torque/Speed
Conditioner
Torque
DES Power Supply
DSP6001
Dynamometer
Controller
Figure 3–27 Eddy-Current Dynamometer with Powder Brake Dynamometer (Tandem Setup)
3.2.11.2 Software Configuration
1. Turn on the DSP6001 and proceed to the dynamometer configuration menu. See Section
3.2.1 – Dynamometer Configuration Menu.
2. Select TSC1 until WB is reached.
3. Select TSC2 until PB is reached.
4. Press SHIFT to get to the TSC1 Eddy-Current Setup Menu as seen below.
Excitation
BRAKE FUSE
(5×20mm):
BRAKE
ACCESSORY
TORQUE–SPEED
OUTPUT
CTRL OUT
UL/CSA 1.25A 250V SB
IEC 1A 250V T
Clutch
Transformer
AUX / TSC2
DYNAMOMETER / TSC1
(EK)
SUPPLY 2
SUPPLY 1
RS-232C
MAGTROL, INC. BUFFALO, NY
GPIB/IEEE–488
Dynamometer (WB)
Speed
Torque
Excitation
CAUTION: DOUBLE POLE FUSING
75VA 50/60Hz
120V UL/CSA 800mA 250V SB
FUSE (5×20mm):
240V IEC 315mA 250V T
TSC 401
Torque-Speed
Conditioner
EARTH
GROUND
DES Power Supply
PC
M-TEST
GPIB
or
RS-232
SETUP
Figure 3–28 TSC1 Eddy-Current Setup Menu
5. Press TORQUE UNITS button and use UP and DOWN buttons and Decrease/Increase
dial to set desired scale factor for TSC1.
6. Press SHIFT 2 times. The display should appear as shown in Figure 3–19 Nominal Speed
Setup Menu.
7. Press the AUX SETUP button and use UP and DOWN buttons and Decrease/Increase
dial to set desired nominal speed.
33

Magtrol Model DSP6001 Dynamometer ControllerChapter 3 – Installation/Configuration
POWER
BRAKE STATUS SET POINT SET POINT P I D
TORQUE SPEED STATUS
POWER
BRAKE STATUS SET POINT SET POINT P I D
TORQUE SPEED STATUS
8. Press SHIFT 2 times to get to the TSC2 Powder Brake Setup Menu as shown below.
Figure 3–29 TSC2 Powder Brake Setup Menu
9. Press TORQUE UNITS button and use UP and DOWN buttons and Decrease/Increase
dial to set desired scale factor for TSC2.
10. Press SHIFT 2 times. The menu will appear as shown in Figure 3–25 Tandem Configuration
Menu.
11. Press the COM SETUP button until the menu says “YES”.
12. Press SHIFT once to reach the Maximum Speed Excited Menu as shown below.
Figure 3–30 Maximum Speed Excited Menu
13. Press the AUX SETUP button and use UP and DOWN buttons and Decrease/Increase
dial to set maximum speed excited of PB.
14. Press SHIFT 3 times to complete initial setup and return to the main menu.
SETUP
34

Magtrol Model DSP6001 Dynamometer Controller
Torque Transducer
Hysteresis
POWER
BRAKE STATUS SET POINT SET POINT P I D
TORQUE SPEED STATUS
3.2.12 in-Line torqUe tranSDUCer CroSS Loop fUnCtion
3.2.12.1 Hardware Connection
Chapter 3 – Installation/Configuration
Brake
OR
Eddy-Current/
Powder Brake
DSP6001
DYNAMOMETER
CONTROLLER
BRAKE
ACCESSORY
TORQUE–SPEED
OUTPUT
CTRL OUT
BRAKE FUSE
UL/CSA 1.25A 250V SB
(5×20mm):
IEC 1A 250V T
AUX / TSC2
DYNAMOMETER / TSC1
No Connection
SUPPLY 2
SUPPLY 1
RS-232C
MAGTROL, INC. BUFFALO, NY
GPIB/IEEE–488
FUSE (5×20mm):
CAUTION: DOUBLE POLE FUSING
75VA 50/60Hz
120V UL/CSA 800mA 250V SB
240V IEC 315mA 250V T
EARTH
GROUND
GPIB
RS-232
or
PC
(TM)
M-TEST
DES 31x
Figure 3–31 In-Line Torque Transducer Cross Loop Function
Note: In the Torque Transducer Cross Loop Function, the TM2XX is
connected to TSC2 while controlling the outputs of TSC1. The
connection allows closed loop control of a brake via the Torque
Transducer.
SETUP
3.2.12.2 Software Configuration
1. Turn on the DSP6001 and proceed to the dynamometer configuration menu. See Section
3.2.1 – Dynamometer Configuration Menu.
2. Select TSC1 until BRAKE is reached.
3. Select TSC2 until TM2XX is reached.
4. Press SHIFT to get to the Torque Transducer Setup Menu as shown in Figure 3-11.
5. Press TORQUE UNITS button and use UP and DOWN buttons and Decrease/Increase
dial to set desired scale factor for TSC2.
6. Press SHIFT 2 times to reach the Brake Type menu as seen below.
Figure 3–32 Brake Type Menu
7. Press POWER UNITS button until desired Brake Type is reached.
35

Magtrol Model DSP6001 Dynamometer ControllerChapter 3 – Installation/Configuration
POWER
BRAKE STATUS SET POINT SET POINT P I D
TORQUE SPEED STATUS
POWER
BRAKE STATUS SET POINT SET POINT P I D
TORQUE SPEED STATUS
8.a. If choosing a Hysteresis or Powder Brake Type, press SHIFT 2 times to complete setup and
return to main menu.
8.b. If choosing an Eddy-Current Brake Type, menu will appear as follows:
Figure 3–33 Brake Type Menu (for WB)
Press AUX SETUP button and use UP and DOWN buttons and Decrease/Increase
dial to set nominal speed. Then press SHIFT 3 times to complete setup and return to main
menu.
3.3 SPEED ENCODER SETUP
1. Starting from main menu, press SHIFT.
2. Press DYNO SETUP.
3. Select ENCODERS. The display should appear as follows:
4. Press TORQUE UNITS button until the desired bit selection for TSC1 is reached.
5. To set bits for TSC2, press POWER UNITS button once, then press TORQUE UNITS button
until the desired bit selection is reached.
6. Press SHIFT 2 times to complete SPEED ENCODER setup and return to the main menu.
SETUP
Figure 3–34 Encoder Menu
3.3.1 Bit ConfigUrationS
Standard bit configurations are as follows:
Test Instrument Encoder
Hysteresis Dynamometer 60 bit*
Eddy-Current Dynamometer 20, 30 and 60 bit*
Powder Brake Dynamometer 20, 30 and 60 bit*
In-Line Torque Transducer 30 and 60 bit
* 600 and 6000 bit also available
36

Magtrol Model DSP6001 Dynamometer Controller
POWER
BRAKE STATUS SET POINT SET POINT P I D
TORQUE SPEED STATUS
3.4 TORQUE/SPEED ANALOG OUTPUTS
Torque and Speed DAC Outputs provide an analog output proportional to the torque and speed of
the system. They are available on the Accessory Torque-Speed Output Connector (as seen in Figure
2–6 Accessory Torque-Speed Output) and are updated every 2 milliseconds. Both of the outputs
have a user definable Scale Factor found under the SHIFT/AUX SETUP key sequence.
3.4.1 torqUe DaC SCaLe faCtor
Torque DAC Scale Factor is scaled in displayed torque units/volt.
Example:
If the displayed torque units are set to oz.in. and the Torque DAC scale is set to 1 unit/volt,
then 1 oz.in. will result in 1 volt at the torque output.
3.4.2 SpeeD DaC SCaLe faCtor
Speed DAC Scale Factor is scaled in rpm/volt.
Example:
If the Speed DAC scale is set to 1000 rpm/volt, then 1000 rpm will result in 1 volt at the
speed output.
Chapter 3 – Installation/Configuration
SETUP
3.4.3 torqUe/SpeeD DaC SetUp
1. Starting from main menu, press SHIFT.
2. Press AUX SETUP. The display should appear as follows:
3. Press TORQUE UNITS button and use UP and DOWN buttons and Decrease/Increase
dial to set desired Torque DAC value.
4. Press SHIFT.
5. Press AUX SETUP button and use UP and DOWN buttons and Decrease/Increase dial
to set desired Speed DAC value.
6. Press SHIFT two times to return to main menu.
Figure 3–35 Torque/Speed DAC Setup Menu
37

4. Digital Filters
Z
-1
+
Z
-1
+
-a
0
b
0
+
b
1
b
2
-a
1
x(n) y(n)
w1
w2
The Digital Filters of the DSP6001 are used to remove undesired noise from the TSC inputs. This
noise could be conducted from an undesired measured signal such as mechanical vibration or other
electrical sources.
4.1 FILTER PARAMETERS
The input to the A/D converter internal to the DSP6001 has a traditional analog filter that is comprised
of the following characteristics:
• -3dbPoint:3.8KHz
• A/DSampleRate:7812.5KHz
• 16AcquiredandAveragedSamples:Averageappliedtolteratarateof488.28125Hz
• FilterCutoffFrequencies:3Hz,10Hz,25Hz,50Hz
• FilterOutput:EquivalenttosecondorderButterworthanaloglter
• TransposedDirectFormIIArchitecture:Thediagrambelowshowsthisarchitecture.
SETUP
Figure 4–1 Transposed Direct Form II Architecture
With a Digital Filter, the DSP6001 is able to solve the following equations:
y(n) = b0 * x(n) + w1
w1 = b1 * x(n) + a1 * y(n) + w2
w1 = b2 * x(n) + a2 * y(n)
The equations are applicable to each channel, occurring every 2.48 milliseconds.
38

Magtrol Model DSP6001 Dynamometer Controller
4.2 FILTER SETUP
Note: Filter setup should take place after hardware installation and software configuration
of the chosen testing instruments has been completed. See Chapter
3 – Installation/Configuration.
There are four different Filter settings to choose from including 10 Hz, 25 Hz, 50 Hz and OFF. The
following instructions show how to select the desired Filter for each channel:
1. Starting from the main menu, press SHIFT.
2. Press DYNO SETUP button.
3. Select DYNAMOMETER.
4. Press TORQUE UNITS button until the desired TSC1 Filter setting is reached.
5. Press COM SETUP button until the desired TSC2 Filter setting is reached.
6. Press SHIFT repeatedly until the main menu is reached. The number of times will vary
depending on testing instrument selection.
Chapter 4 – Digital Filters
SETUP
39

5. PID Settings
5.1 ABOUT THE PID LOOP
The DSP6001 has PID adjustment capability for both the speed and torque modes to provide the
best system response. The PID Loop comprises the following three variables:
P = proportional gain
I = integral
D = derivative
Other important variables include:
• Setpoint-desiredloadorspeed
• Error-differencebetweenthesetpointandtheactualmeasurement
5.1.1 p (proportionaL gain)
With proportional gain, the controller output is proportional to the error or to a change in measurement.
Deviation from the set point is usually present. Increasing the proportional gain will make the PID
loop unstable. Increasing the integral value will eliminate this instability. For best loop control, set
the proportional gain as high as possible without causing the loop to become unstable.
SETUP
5.1.2 i (integraL)
With integral, the controller output is proportional to the amount of time the error is present. Increasing
the integral value eliminates the offset from the set point. If the response becomes oscillatory
increase the derivative value.
5.1.3 D (DeriVatiVe)
With derivative, the controller output is proportional to the rate of change of measurement or error.
Derivative can compensate for a changing measurement. Derivative takes action to inhibit more
rapid changes of the measurement than proportional gain.
5.2 SETTING PID VALUES
5.2.1 How to Set p (proportionaL gain) VaLUe
1. Starting at the main menu press the P button.
2. Use the Decrease/Increase dial until the desired percentage is reached (ranges from 0-99).
5.2.2 How to Set i (integraL) VaLUe
1. Starting at the main menu press the I button.
2. Use the Decrease/Increase dial until the desired percentage is reached (ranges from 0-99).
5.2.3 How to Set D (DeriVatiVe) VaLUe
1. Starting at the main menu press the D button.
2. Use the Decrease/Increase dial until the desired percentage is reached (ranges from 0-99).
40

Magtrol Model DSP6001 Dynamometer Controller
Derivative
Proportional
Integral
Set Point
Reading
-
e(t) Yd(t) Yp(t)
Yi(t)
Yt(t)
Ys(t)
+ +
Scale
A/D
Power
Amplifier
Brake
Coil
TSC
Load
Cell
Amplifier
Amplifier
TORQUE
SPEED
Speed
Correction
Yswb(t)
or
HD & PB
WB
IIR Filter
Yt(t) Ys(t)Scale
Ys(t) Yswb(t)Speed Correction
5.3 HOW THE PID LOOP WORKS
The following diagram demonstrates the correlation between the variables in the PID LoOp.
Chapter 5 – PID Settings
SETUP
Figure 5–1 System Block Diagram
5.3.1 SCaLe faCtorS for HyStereSiS, eDDy-CUrrent anD powDer Brake DynaMoMeterS
TORQUE: TSC1 Ys(t) = Yt(t) / 1.725 * 2
TSC2 Ys(t) = Yt(t) / 1.725 * 2 * 1.6623
SPEED: TSC1 & TSC2 Ys(t) = Yt(t) * 5319.93 / MAX SPEED
5.3.2 SpeeD CorreCtion for wB (eDDy-CUrrent Brake) DynaMoMeter
The WB Dynamometer follows the same scaling as the HYST and PB with the addition of one
calculation for both torque and speed. This calculation is due to the fact that for a given current the
torque changes with speed. This is referred to as speed correction.
Yswb(t) = (Ys(t) + Ys(t) / speed correction factor) / 2
The speed correction factor is calculated on each entry into the PID loop equations.
Speed Correction Factor = - 0.0001 * x * 2 + 0.0203 * x + 0.005 limited to 0.051 to 1
where x = RPM / NOMINAL SPEED * 100
NOMINAL SPEED is set by the user and obtained from the data sheets for the dynamometer or
brake.
41

5.3.3 eqUationS
Where Skp, Ski and Skd are system coefficients…
Yd(t) = (e(t) - e(t-3) + 3 * (e(t-1) - e(t-2))) * (10/Skd) * D%
Yp(t) = (e(t) + Yd(t)) * (10/Skp) * P%
Yi(t) = Yi(t-1) + (e(t) + Yd(t)) * (10/Ski) * I%
Yt(t) = Yp(t) + Yi(t)
Ys(t) = Scale * Yt(t)
Magtrol Model DSP6001 Dynamometer ControllerChapter 5 – PID Settings
5.4 ADDITIONAL SCALE FACTOR
The Additional Scale Factor is a multiplier of the P, I or D term. Due to the fact there are so many
different dynamometer types and motor combinations, this multiplier is needed to extend the range
of the PID. The letters represent the following:
A = 0.001 F = 0.5
B = 0.005 G = 1
C = 0.01 H = 5
D = 0.05 I = 10
E = 0.1
In using the multiplier, the user can input PID numbers from 0.001 (.001 x 1%) to 990 (10.0 x 99%)
with good resolution.
5.4.1 How to Set aDDitionaL SCaLe faCtor
Before following the setup instructions, the values that must be set will need to determined. This
will depend on which testing instrument has been chosen for the configuration. For appropriate
settings, refer to the guide provided in Appendix F: Additional Scale Factor Table. Once the proper
settings have been determined, proceed with the following instructions for setup.
5.4.1.1 Setting Additional Scale Factor for P (Proportional Gain)
1. Starting from the main menu, press and hold the P button. While holding the P button, press
SHIFT.
2. Use the P button to toggle through the letters in the unit (A, B, C, D, E, F, G, H and I).
3. Choose the letter that corresponds with the pre-determined setting provided in the Additional
Scale Factor Table shown in Appendix F.
4. Once the letter is chosen, press SHIFT to return to the main menu.
SETUP
5.4.1.2 Setting Additional Scale Factor for I (Integral)
1. Starting from the main menu, press and hold the I button. While holding the I button, press
SHIFT.
2. Use the I button to toggle through the letters in the unit (A, B, C, D, E, F, G, H and I).
3. Choose the letter that corresponds with the pre-determined setting provided in the Additional
Scale Factor Table shown in Appendix F.
4. Once the letter is chosen, press SHIFT to return to the main menu.
42

Magtrol Model DSP6001 Dynamometer Controller
POWER
BRAKE STATUS SET POINT SET POINT P I D
TORQUE SPEED STATUS
5.4.1.3 Setting Additional Scale Factor for D (Derivative)
1. Starting from the main menu, press and hold the D button. While holding the D button,
press SHIFT.
2. Use the D button to toggle through the letters in the unit (A, B, C, D, E, F, G, H and I).
3. Choose the letter that corresponds with the pre-determined setting provided in the Additional
Scale Factor Table shown in Appendix F.
4. Once the letter is chosen, press SHIFT to return to the main menu.
Chapter 5 – PID Settings
5.5 SETTING THE CORRECT PID’S FOR YOUR MOTOR
Note: Each type of motor will have it’s own optimum PID setting at
different load points.
5.5.1 Setting tHe piD witH an Unknown Motor or SySteM
If the user is unfamiliar with the characteristics of the motor under test, it is recommended to
begin in Open Loop Control mode. In doing so, the user can safely get an idea of the motor’s
performance.
1. To enter Open Loop Control mode, begin with the motor and brake OFF. Press and hold the
TORQUE SET button until a second beep is heard. The display will appear as follows:
Figure 5–2 Open Loop Control Menu
SETUP
2. Set the percent excitation to zero.
3. Start the motor.
4. Slowly increase the excitation current to the brake.
5. Make a note of the torque and speed values of which the motor is capable.
6. To exit the Open Loop Control mode and return to the main menu, turn the motor and brake
OFF and press and hold the TORQUE SET button until a second beep is heard.
5.5.2 Setting tHe piD for torqUe ControL
1. With the motor and brake OFF, set the desired Torque Set Point by pressing the TORQUE
SET button and using the UP and DOWN buttons and Decrease/Increase dial.
2. Set the P, I and D values to zero.
3. Turn the motor ON.
4. Turn the brake ON.
5. Slowly increase the P term until the torque read is about 25% of the desired load point.
43

Magtrol Model DSP6001 Dynamometer ControllerChapter 5 – PID Settings
SETUP
Figure 5–3 Initial P Setting for Torque Control at 25%
6. Turn the brake OFF.
7. Increase the I term to 10%.
8. Turn the brake ON and observe response, then turn the brake OFF. Desired Result is a fast
response with some over shoot.
Figure 5–4 High Initial P Setting for Torque Control
44
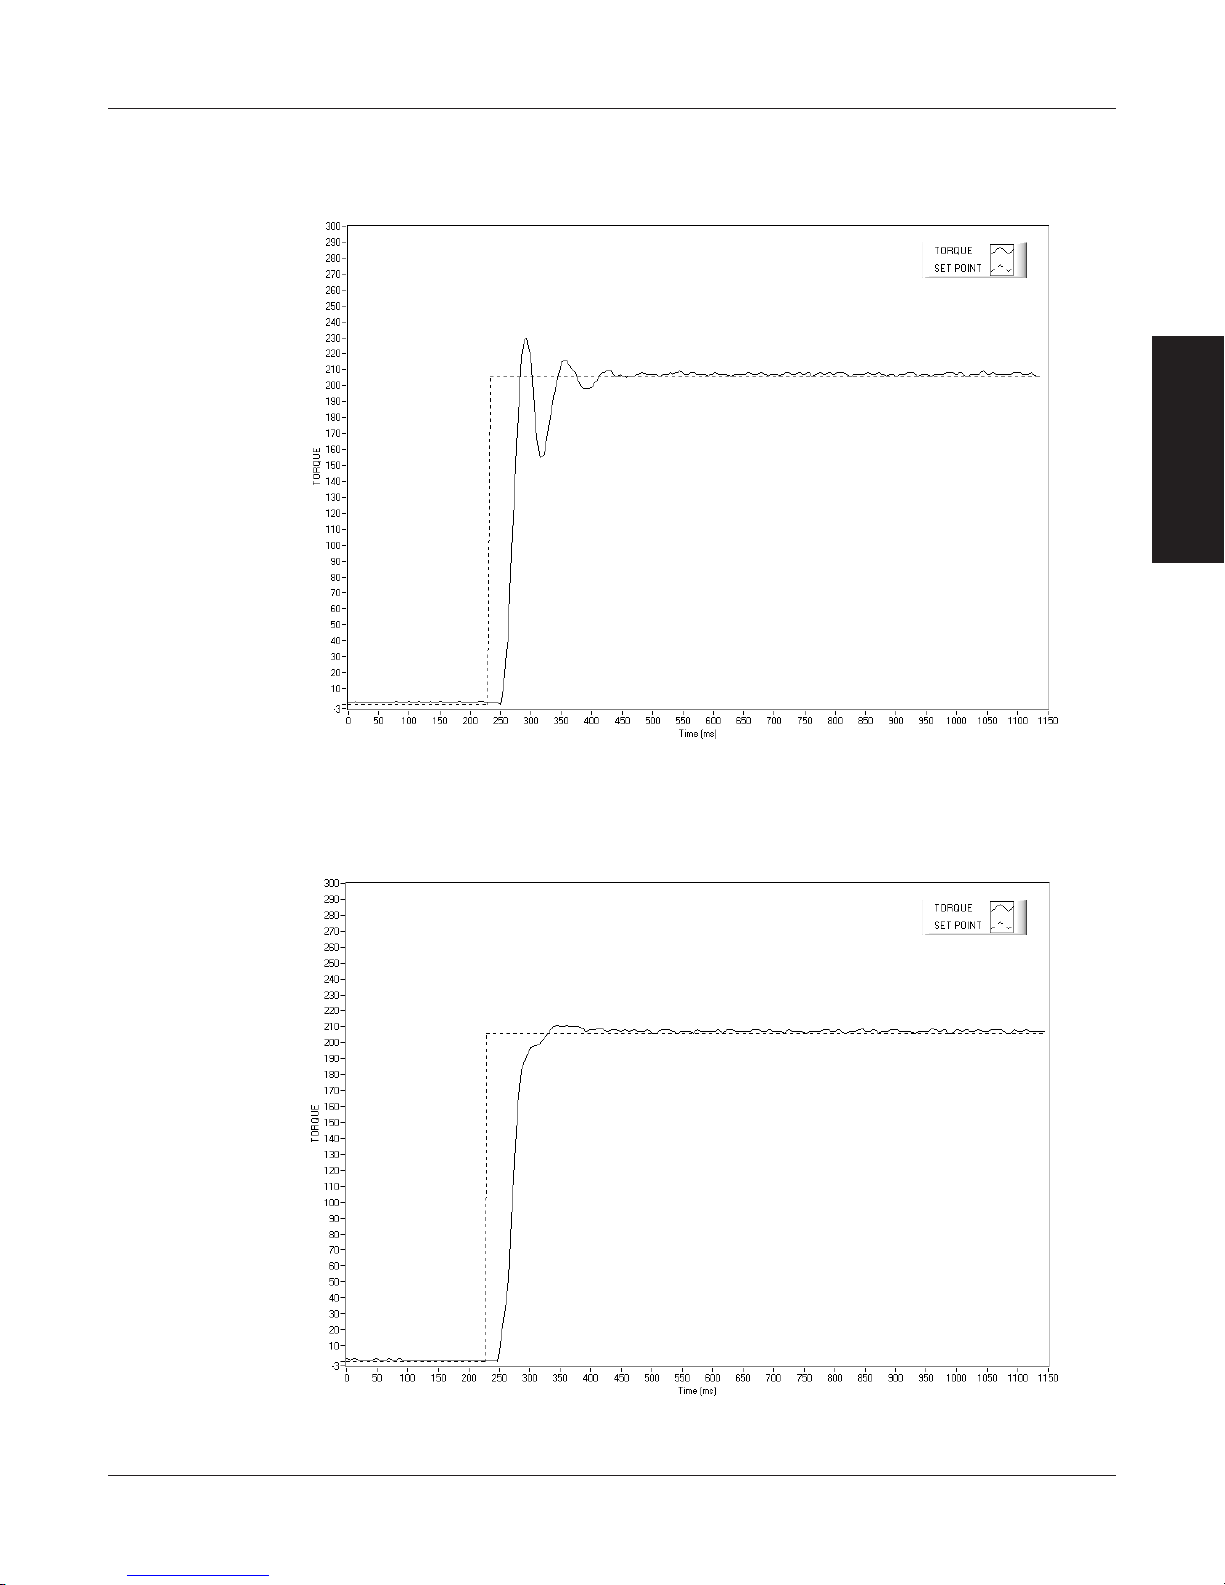
Magtrol Model DSP6001 Dynamometer Controller
a. If the response was too slow, increase the I term in 1-5% increments and repeat #8.
b. If the response was too fast, decrease the I term in 1-5% increments and repeat #8.
Chapter 5 – PID Settings
SETUP
Figure 5–5 Initial I Setting for Torque Control
c. If there is too much over shoot, increase the D term in 1% increments and repeat #8. For
each incremental increase of the D term, reduce the P term by a proportional amount.
Figure 5–6 Initial D Setting for Torque Control
45

5.5.3 Setting tHe piD for SpeeD ControL
1. With the motor and brake OFF, set the desired Speed Set Point by pressing the SPEED SET
button and using the UP and DOWN buttons and Decrease/Increase dial.
2. Set the P, I and D values to zero.
3. Turn the motor ON.
4. Turn the brake ON.
5. Slowly increase the P term until the speed read is about 25% of the desired load point.
Magtrol Model DSP6001 Dynamometer ControllerChapter 5 – PID Settings
SETUP
Figure 5–7 Initial P Setting for Speed Control at 25%
6. Turn the brake OFF.
7. Increase the I term to 10%.
8. Turn the brake ON and observe response, then turn the brake OFF. Desired Result is a fast
response with some over shoot.
a. If the response was too slow, increase the I term in 1-5% increments and repeat #8.
b. If the response was too fast, decrease the I term in 1-5% incremets and repeat #8.
46

Magtrol Model DSP6001 Dynamometer Controller
Chapter 5 – PID Settings
SETUP
Figure 5–8 Initial I Setting for Speed Control
c. If there is too much over shoot, increase the D term in 1% increments and repeat #8. For
each incremental increase of the D term, reduce the P term by a proportional amount.
Figure 5–9 Initial D Setting for Speed Control
47

5.5.4 Setting tHe piD for raMp Down
It is nearly impossible to select a PID value that optimizes the control loop over a wide range of speed.
With Magtrol’s experience in motor test, their engineers have developed a dynamic PID algorithm.
The PID values change with the Speed Set Point. In most cases, the PID values are high when the
motor is lightly loaded and tend to decrease at higher loads.
Magtrol’s M-TEST Software provides a setup PID function in the setup for the ramp test. In the
M-TEST Software, the dynamic scaling can be enabled or disabled and the span of the scaling can
also be selected.
Magtrol Model DSP6001 Dynamometer ControllerChapter 5 – PID Settings
SETUP
Figure 5–10 Ramp Down Low I
Ramp shows low value for I term. Note “bump” at beginning of ramp and good results toward end
of ramp.
48

Magtrol Model DSP6001 Dynamometer Controller
Chapter 5 – PID Settings
SETUP
Figure 5–11 Ramp Down High I
Ramp shows higher value for I term. Note “bump” at beginning of ramp has been reduced but there
are poor results toward end of ramp.
Ramp shows Dynamic Scale effect. Note “bump” at beginning of ramp has been reduced and there
are good results toward end of ramp. DIL was set to .01. At the end of the ramp, the I term is
1/100th of the starting value.
Figure 5–12 Ramp Down Dynamic I
49

6. Alarm System
COMMON
N.O.
N.C.
Normal Operation
“CLOSED”
COMMON
N.O.
N.C.
Alarm Condition
“OPEN”
6.1 GENERAL INFORMATION
New to the DSP6001 is a built-in alarm system, designed to caution the user when problems occur.
An automatic electrical and temperature alarm is programmed into the unit to protect against electrical
overloads and overheating equipment when using a Magtrol DES 3XX Power Supply. There are
also power, speed, torque, air flow, water flow and external input alarms internal to the unit, which
only become active when enabled by the user. Instructions on how to set up and activate these
alarms are included in this chapter.
6.1.1 aLarM reLay
Internal to the DSP6001 is a relay that operates in conjunction with the alarms.
Relay Specifications:
•ContactConguration:1FORMC
•ContactRating:1amp,24VDC
•ManufacturerP/N:OMRONG5V-2-H1-DC24
The relay has normally open and normally closed contacts. Under normal conditions, the relay is
energized as shown in Figure 6–1.
SETUP • OPERATION
In an alarm condition (or power failure), the relay is de-energized as shown in Figure 6–2.
Figure 6–1 Normal Condition “Energized Relay”
Figure 6–2 Alarm Condition “De-Energized Relay”
50

Magtrol Model DSP6001 Dynamometer Controller
COMMON
N.O.
N.C.
24VDC
Contactor coil
AC Mains
Motor
Under
Test
POWER
BRAKE STATUS SET POINT SET POINT P I D
TORQUE SPEED STATUS
The relay contacts are made accessible on the Accessory Torque/Speed Output rear panel connector.
See Figure 2–6.
Chapter 6 – Alarm System
SETUP • OPERATION
Figure 6–3 Typical Application
6.1.2 aLarM operation
The DSP6001 gives the user the ability to enable or disable the alarms in the unit. The default is set
in the OFF position. In order for the alarms to be operative the user must enable them.
6.1.2.1 How to Enable/Disable Alarms
1. Starting from main menu, press SHIFT.
2. Press DYNO SETUP button.
3. Select ALARMS.
4. Press SHIFT 3 times. The display should appear as follows:
Figure 6–4 Alarm Enable/Disable Menu
5. Press COM SETUP button until you reach desired selection (YES or NO).
6. Press SHIFT 2 times to return to the main menu.
Note: Once the alarms are activated, they are only monitored for the
channel that the control loop is closed on. For example, if the
DSP6001 is controlling on TSC1, alarms for TSC2 are ignored.
51

6.1.3 aLarM priority
POWER
BRAKE STATUS SET POINT SET POINT P I D
TORQUE SPEED STATUS
While in an alarm condition, a higher priority alarm will be acknowledged, while lower priority
alarms are ignored. The priority order is as follows.
Priority Alarm
1 Electrical Alarm N/A X
2 Temperature Alarm N/A X
3 External Alarm X X
4 Air Flow Alarm X N/A
5 Water Flow Alarm N/A X
6 Maximum Torque X X
7 Maximum Speed X X
8 Power X X
6.2 POWER ALARM
• Usedtoindicateanoverpowercondition
• Defaultissetat1kW
Magtrol Model DSP6001 Dynamometer ControllerChapter 6 – Alarm System
Hysteresis
Dynamometer
Availability
Eddy-Current/Powder
Brake Dynamometer
SETUP • OPERATION
6.2.1 inStrUCtionS for power aLarM SetUp
1. Starting from main menu, press SHIFT.
2. Press DYNO SETUP button.
3. Select MAXPOWER. The display should appear as follows:
Figure 6–5 Max Power Menu
4. Press MAX SPEED button and use UP and DOWN buttons and Decrease/Increase
dial to set desired maximum power value for TSC1.
5. Press SHIFT.
6. Press POWER UNITS button, then MAX SPEED button and use UP and DOWN
buttons and Decrease/Increase dial to set desired maximum power value for TSC2.
7. Press SHIFT 3 times to complete Power Alarm setup and return to the main menu.
52
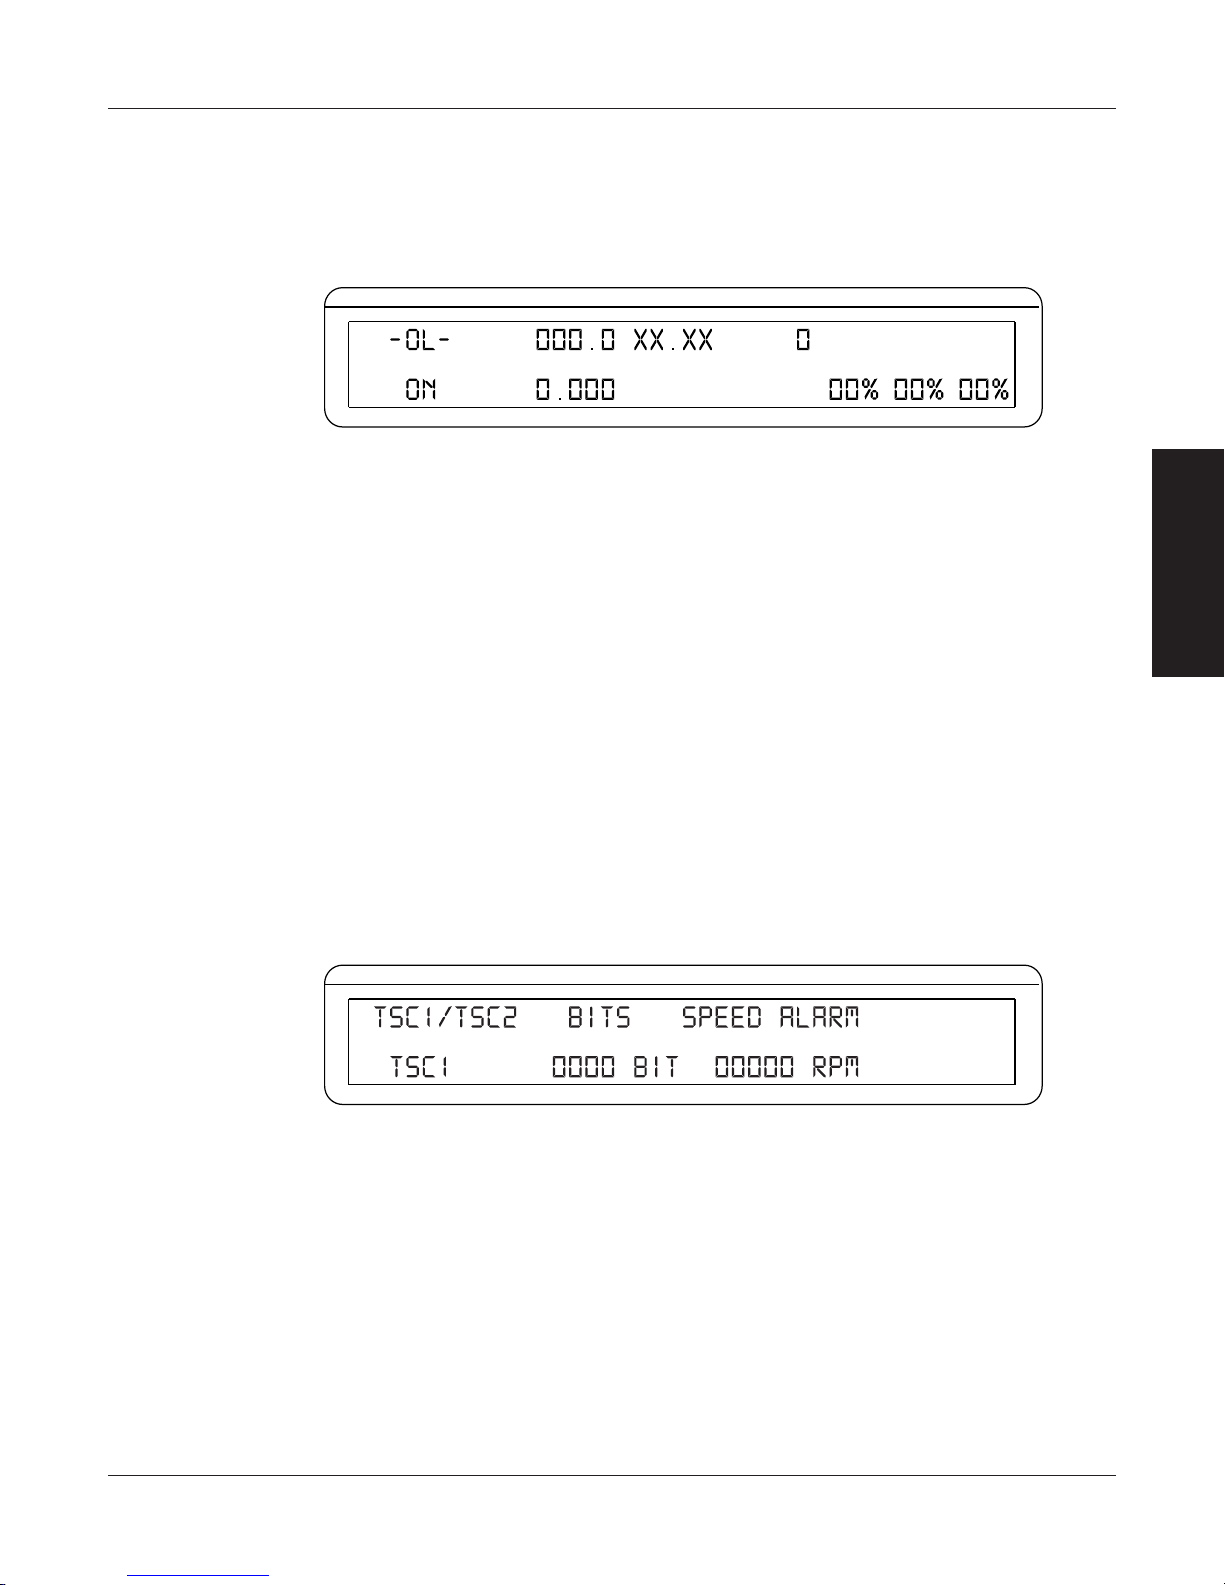
Magtrol Model DSP6001 Dynamometer Controller
POWER
BRAKE STATUS SET POINT SET POINT P I D
TORQUE SPEED STATUS
POWER
BRAKE STATUS SET POINT SET POINT P I D
TORQUE SPEED STATUS
6.2.2 power aLarM aCtion
When the power exceeds that of the maximum power setting, the message -OL- will appear and
blink in the power section of the display accompanied by an audible beeping sound (as indicated
in Figure 6–6).
Chapter 6 – Alarm System
Figure 6–6 Power Alarm Display
Because torque and speed have separate setable limits, no other action will be taken. If condition
persists the temperature sensors will open causing the temperature alarm to activate.
6.2.3 to reSet power aLarM
This is a non-latching alarm. When the condition goes away, the alarm will automatically stop.
6.3 MAXIMUM SPEED ALARM
• Usedtolimitspeedofsystem(motor,dynamometer,couplings,etc.)
• Defaultissetat4000rpm
6.3.1 inStrUCtionS for MaxiMUM SpeeD aLarM SetUp
1. Starting from main menu, press SHIFT.
2. Press DYNO SETUP button.
3. Select ENCODERS. The display should appear as follows:
SETUP • OPERATION
Figure 6–7 Speed Alarm Setup Menu
4. Press MAX SPEED button and use UP and DOWN buttons and Decrease/Increase
dial to set desired maximum speed for TSC1.
5. Press SHIFT.
6. Press POWER UNITS button, then MAX SPEED button and use UP and DOWN
buttons and Decrease/Increase dial to set desired maximum speed for TSC2.
7. Press SHIFT 3 times to complete Maximum Speed Alarm setup and return to the main
menu.
53

6.3.2 MaxiMUM SpeeD aLarM aCtion
POWER
BRAKE STATUS SET POINT SET POINT P I D
TORQUE SPEED STATUS
POWER
BRAKE STATUS SET POINT SET POINT P I D
TORQUE SPEED STATUS
∗∗∗∗ ∗∗∗∗
A. If speed is greater than the maximum speed setting but less than 120%, -OL- will flash on the
display where the speed reading was (as indicated in Figure 6–8) and will be accompanied
by an audible beeping sound.
Magtrol Model DSP6001 Dynamometer ControllerChapter 6 – Alarm System
Figure 6–8 -OL- Speed Alarm Display
B. If speed is greater than 120% of the maximum speed setting or in condition A for greater
than 5 seconds, the display will flash “OVER SPEED ALARM TSCX” (as indicated in
Figure 6–9) and will be accompanied by an audible beeping sound. The alarm relay will
open, excitation current will hold at last value for 3 seconds then drop to zero.
Figure 6–9 Over Speed Alarm Message Display
6.3.3 to reSet MaxiMUM SpeeD aLarM
Press any front panel button other than SHIFT. If the alarm condition is clear, the unit will return
to normal operation. Although not recommended, another option would be to disable the alarm by
following the alarm setup instructions in Section 6.3.1 – Instructions for Maximum Speed Alarm
Setup.
SETUP • OPERATION
6.4 MAXIMUM TORQUE ALARM
• Used to protect the system (motor, dynamometer, couplings, etc.) from over torque
condition
• Defaultissetat1inputunit
6.4.1 inStrUCtionS for MaxiMUM torqUe aLarM SetUp
1. Starting from main menu, press SHIFT.
2. Press DYNO SETUP button.
3. Select DYNAMOMETER.
4. Press SHIFT. The display should appear as follows:
54

Magtrol Model DSP6001 Dynamometer Controller
POWER
BRAKE STATUS SET POINT SET POINT P I D
TORQUE SPEED STATUS
POWER
BRAKE STATUS SET POINT SET POINT P I D
TORQUE SPEED STATUS
POWER
BRAKE STATUS SET POINT SET POINT P I D
TORQUE SPEED STATUS
∗∗∗∗ ∗∗∗∗
Figure 6–10 Torque Alarm Setup Menu
5. Press AUX SETUP button and use UP and DOWN buttons and Decrease/Increase dial
to set desired maximum torque for TSC1.
6. Press SHIFT until Torque Alarm Setup Menu for TSC2 is reached.
7. Press AUX SETUP button and use UP and DOWN buttons and Decrease/Increase dial
to set desired maximum torque for TSC2.
8. To complete Maximum Torque alarm setup, continue pressing SHIFT until main menu is
reached.
6.4.2 MaxiMUM torqUe aLarM aCtion
A. If torque is greater than the maximum torque setting but less than 120%, -OL- will flash on
the display where the torque reading was (as indicated in Figure 6–11), accompanied by an
audible beeping sound.
Chapter 6 – Alarm System
SETUP • OPERATION
B. If torque is greater than 120% of the maximum torque setting or in condition A for greater
than 5 seconds, the display will flash “OVER TORQUE ALARM TSCX” (as indicated in
Figure 6–12) and will be accompanied by an audible beeping sound. The alarm relay will
open, excitation current will hold at last value for 3 seconds then drop to zero.
Figure 6–12 Over Torque Alarm Message Display
6.4.3 to reSet MaxiMUM torqUe aLarM
Press any front panel button other than SHIFT. If the alarm condition is clear, the unit will return
to normal operation. Although not recommended, another option would be to disable the alarm by
following the alarm setup instructions in Section 6.4.1 – Instructions for Maximum Torque Alarm
Setup.
Figure 6–11 -OL- Torque Alarm Display
55
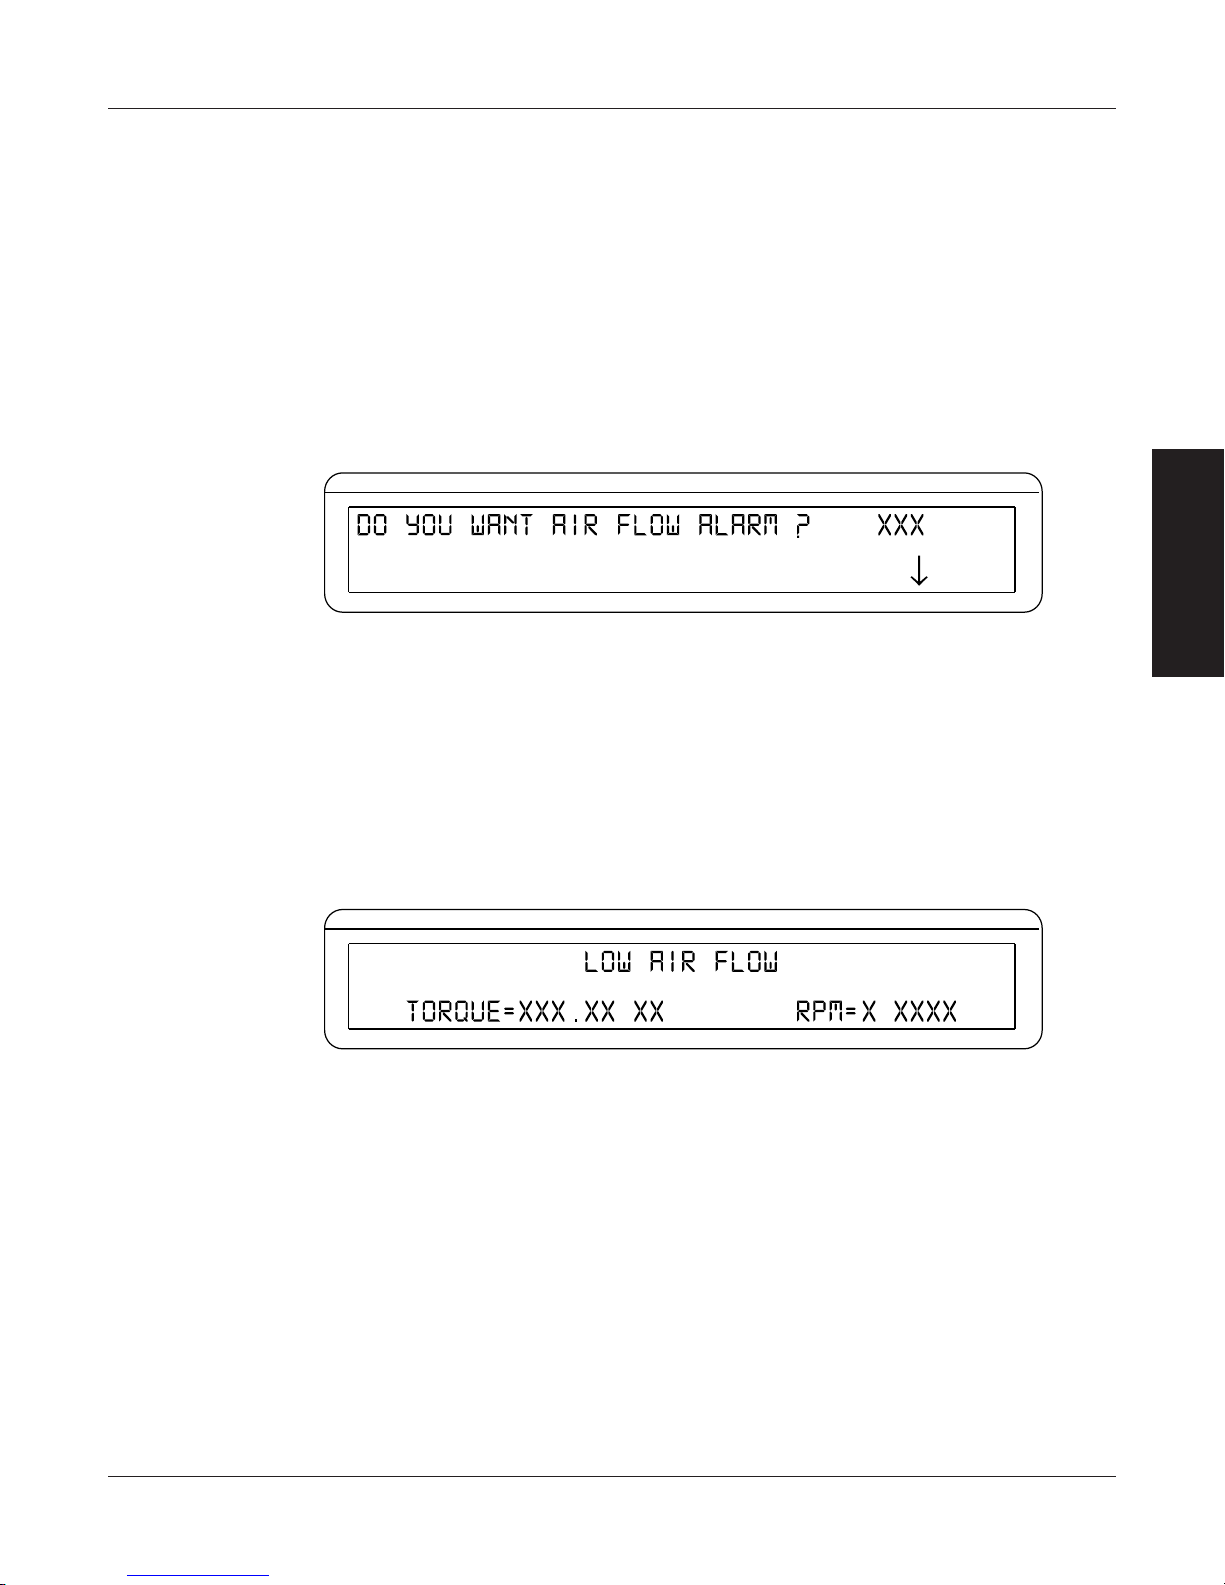
6.5 AIR FLOW ALARM
POWER
BRAKE STATUS SET POINT SET POINT P I D
TORQUE SPEED STATUS
POWER
BRAKE STATUS SET POINT SET POINT P I D
TORQUE SPEED STATUS
∗∗∗∗ ∗∗∗∗
• Usedtoindicatealackofairowfromablowerorairline
• OnlyforusewithHysteresisDynamometers
• MonitoredonlywhenthebrakeisON
• Defaultissetin“OFF”mode
6.5.1 inStrUCtionS for air fLow aLarM SetUp
1. Starting from main menu, press SHIFT.
2. Press DYNO SETUP button.
3. Select ALARMS. The display should appear as follows:
Figure 6–13 Air Flow Alarm Setup Display
Magtrol Model DSP6001 Dynamometer ControllerChapter 6 – Alarm System
SETUP • OPERATION
4. Press COM SETUP button to select YES.
5. Press SHIFT 5 times to complete Air Flow Alarm setup and return to the main menu.
6.5.2 air fLow aLarM aCtion
When there is a lack of air flow, the display will flash “LOW AIR FLOW” (as indicated in Figure
6–14) and will be accompanied by an audible beeping sound. The alarm relay will open and the
excitation current will automatically drop to 10% of the last excitation current.
6.5.3 to reSet air fLow aLarM
Press any front panel button other than SHIFT. If the alarm condition is clear, the unit will return
to normal operation. Although not recommended, another option would be to disable the alarm by
following the alarm setup instructions in Section 6.5.1 – Instructions for Air Flow Alarm Setup.
Figure 6–14 Air Flow Alarm Message Display
56
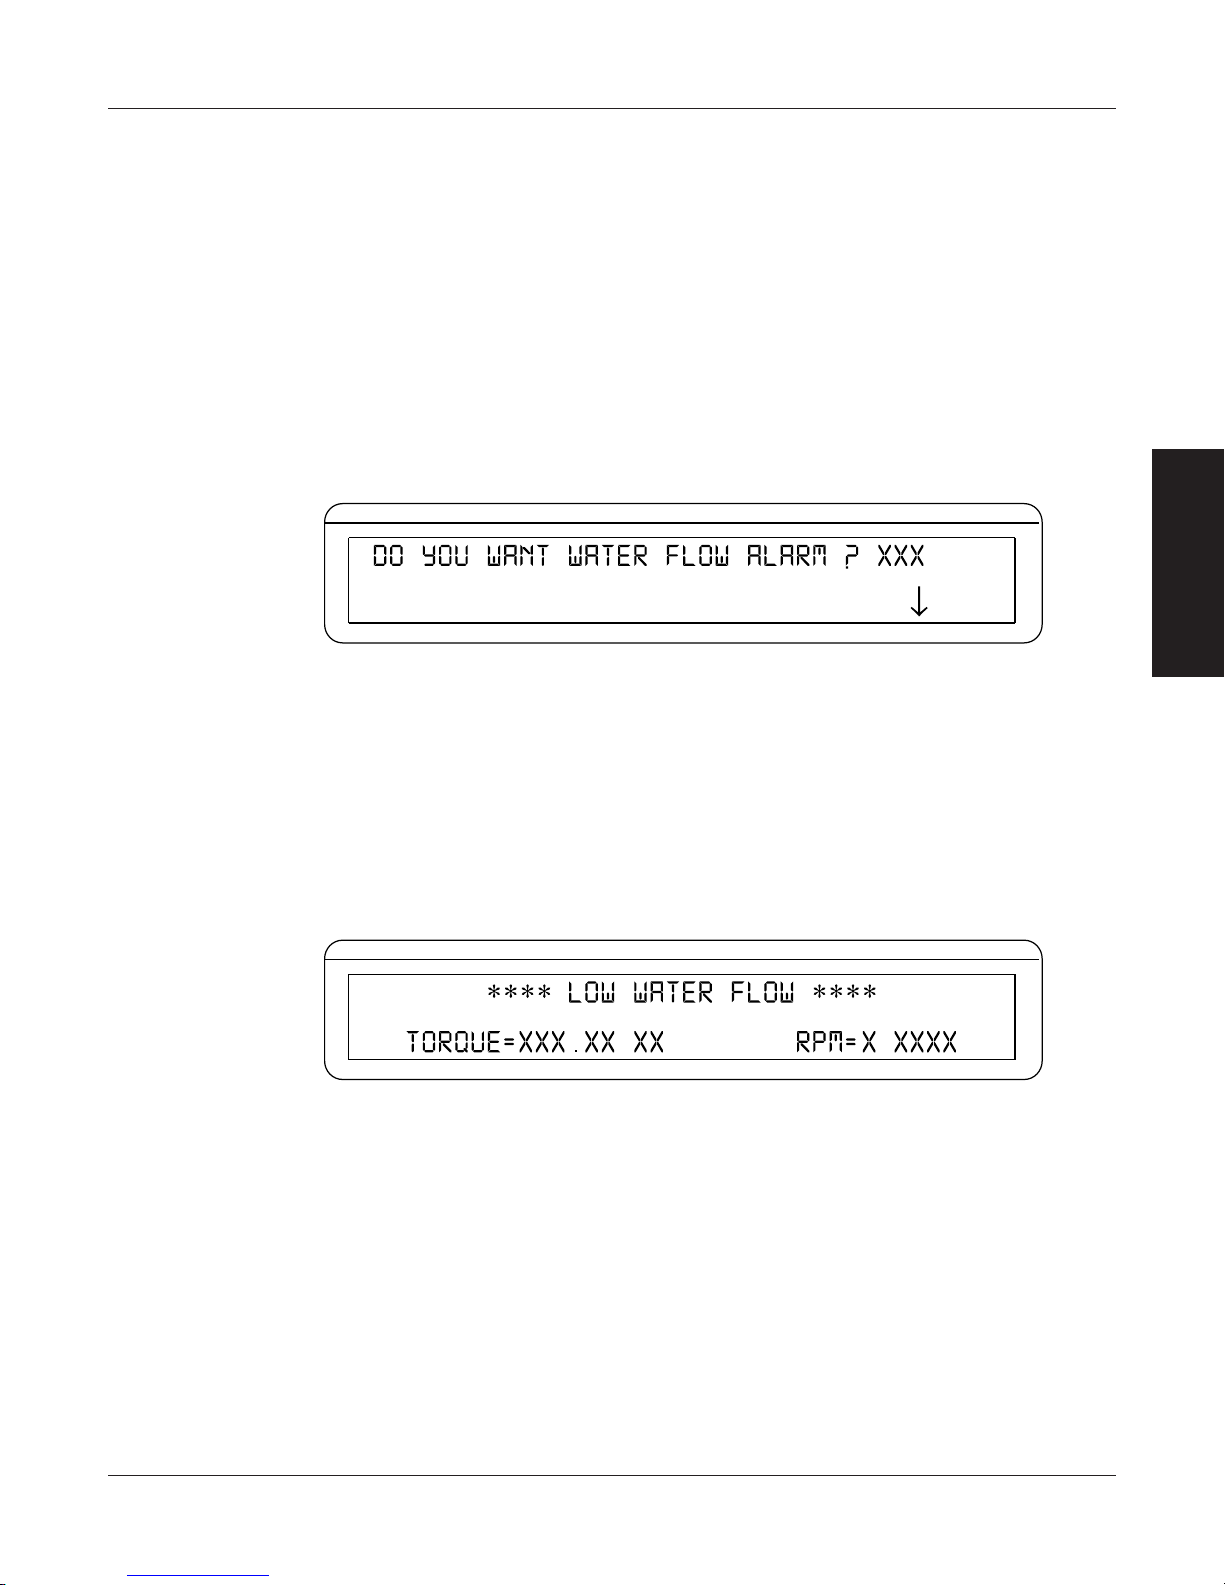
Magtrol Model DSP6001 Dynamometer Controller
POWER
BRAKE STATUS SET POINT SET POINT P I D
TORQUE SPEED STATUS
POWER
BRAKE STATUS SET POINT SET POINT P I D
TORQUE SPEED STATUS
6.6 WATER FLOW ALARM
• Usedtoindicatelackofwaterow
• OnlyforusewithEddy-CurrentorPowderBrakeDynamometers
• Defaultissetin“OFF”mode
• Monitoredonlywhenthebrakeis“ON”
6.6.1 inStrUCtionS for water fLow aLarM SetUp
1. Starting from main menu, press SHIFT.
2. Press DYNO SETUP button.
3. Select ALARMS.
4. Press SHIFT 2 times. The display should appear as follows:
Chapter 6 – Alarm System
SETUP • OPERATION
Figure 6–15 Water Flow Alarm Setup Display
5. Press COM SETUP button to select YES.
6. Press SHIFT 3 times to complete Water Flow Alarm setup and return to the main menu.
6.6.2 water fLow aLarM aCtion
When there is a lack of water flow, the display will flash “LOW WATER FLOW” (as indicated in
Figure 6–16) and will be accompanied by an audible beeping sound. The alarm relay will open and
the excitation current will automatically drop to 10% of the last excitation current.
Figure 6–16 Water Flow Alarm Message Display
6.6.3 to reSet water fLow aLarM
Press any front panel button other than SHIFT. If the alarm condition is clear, the unit will return
to normal operation. Although not recommended, another option would be to disable the alarm by
following the alarm setup instructions in Section 6.6.1 – Instructions for Water Flow Alarm Setup.
57

6.7 EXTERNAL ALARM
POWER
BRAKE STATUS SET POINT SET POINT P I D
TORQUE SPEED STATUS
POWER
BRAKE STATUS SET POINT SET POINT P I D
TORQUE SPEED STATUS
∗∗∗∗ ∗∗∗∗
• Usedtoshutdownsystembasedonadditionaluserinput
• Defaultissetin“OFF”mode
6.7.1 inStrUCtionS for externaL aLarM SetUp
1. Starting from main menu, press SHIFT.
2. Press DYNO SETUP button.
3. Select ALARMS.
4. Press SHIFT. The display should read as follows:
Figure 6–17 External Alarm Setup Display
Magtrol Model DSP6001 Dynamometer ControllerChapter 6 – Alarm System
SETUP • OPERATION
5. Press COM SETUP button to select YES.
6. Press SHIFT 4 times to complete External Alarm setup and return to the main menu.
6.7.2 externaL aLarM aCtion
If the external input is at a high level, the display will flash “EXTERNAL ALARM” (as indicated
in Figure 6–18) and will be accompanied by an audible beeping sound. The alarm relay will open
and the excitation current will automatically drop to 10% of the last excitation current.
6.7.3 to reSet externaL aLarM
Press any front panel button other than SHIFT. If the alarm condition is clear, the unit will return
to normal operation. Although not recommended, another option would be to disable the alarm by
following the alarm setup instructions in Section 6.7.1 – Instructions for External Alarm Setup.
Figure 6–18 External Alarm Message Display
58
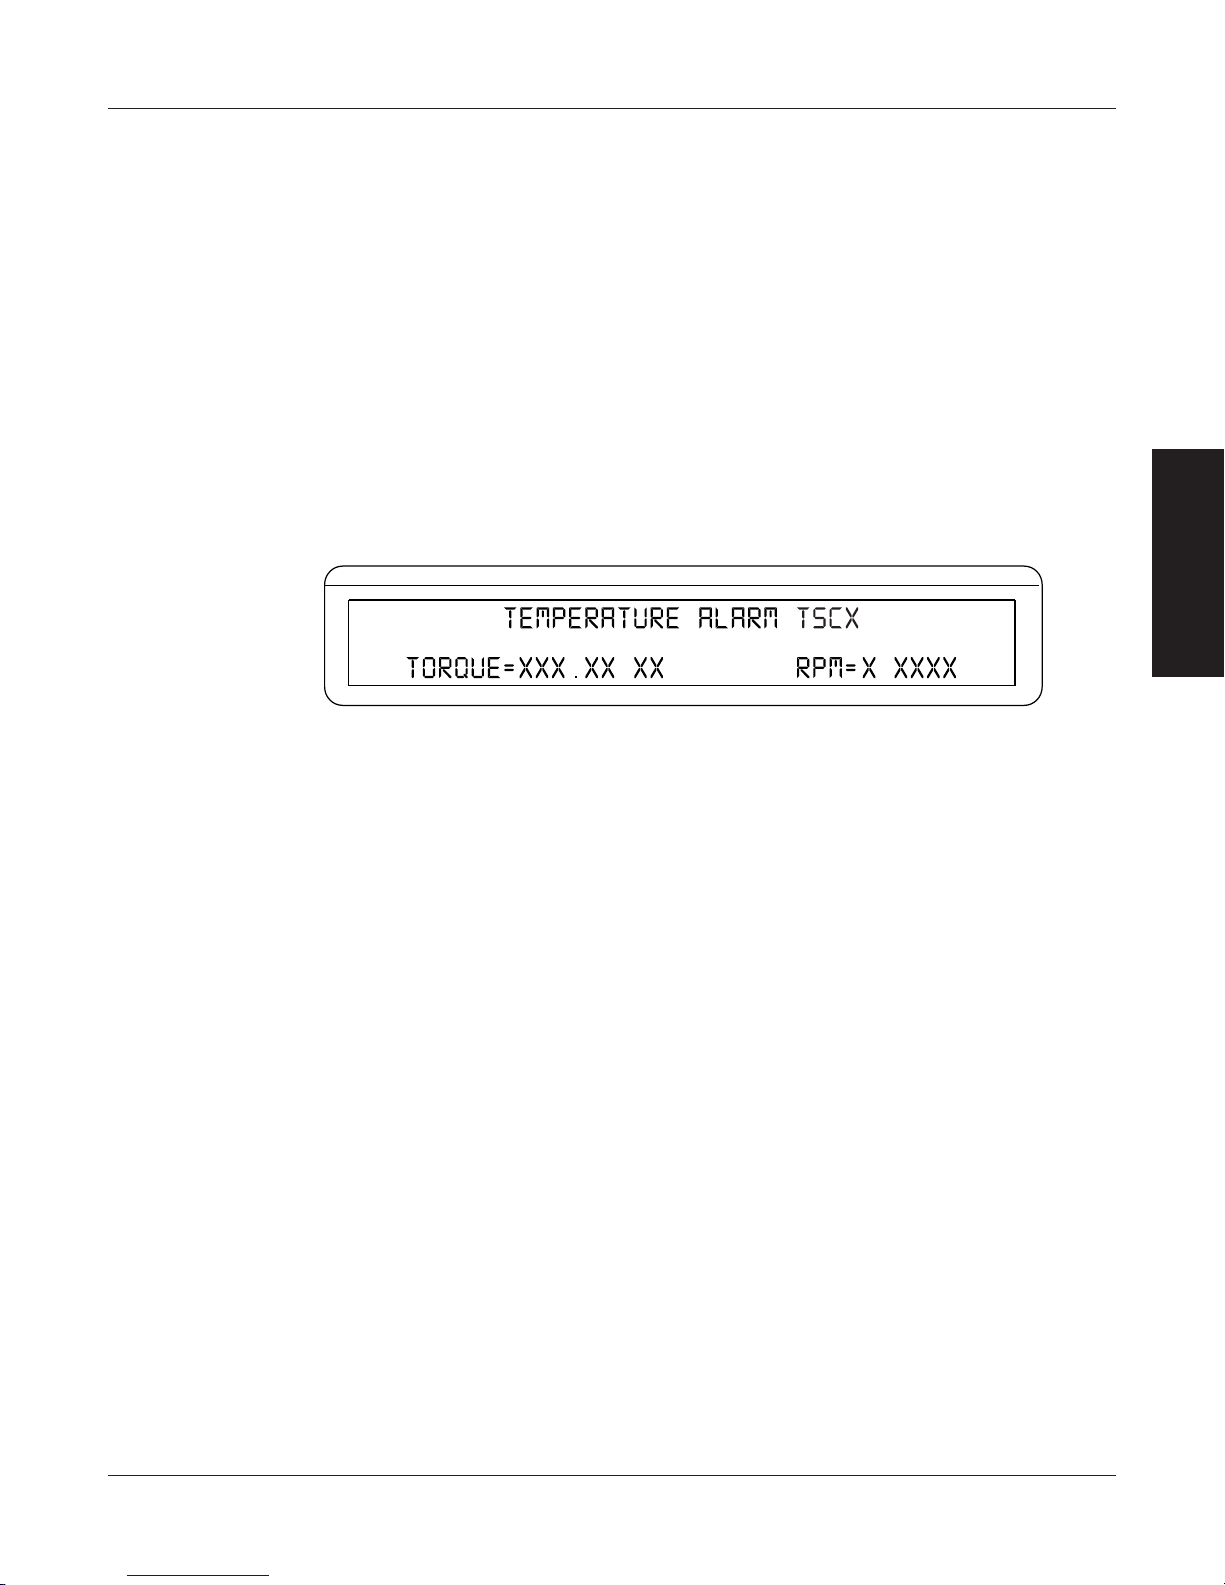
Magtrol Model DSP6001 Dynamometer Controller
POWER
BRAKE STATUS SET POINT SET POINT P I D
TORQUE SPEED STATUS
∗∗∗∗ ∗∗∗∗
6.8 TEMPERATURE ALARM
• Toalertuserwhendynamometergetstoohotandthermalswitchopens
• OnlyavailableforusewithWBorPBdynamometers
• Default-alwaysactive
6.8.1 inStrUCtionS for teMperatUre aLarM SetUp
No setup needed.
6.8.2 teMperatUre aLarM aCtion
Chapter 6 – Alarm System
When the dynamometer in use becomes too hot, the display will flash “TEMPERATURE ALARM
TSCX” (as indicated in Figure 6–19) and will be accompanied by an audible beeping sound.
The alarm relay will open and the excitation current will immediately decrease to 10%. After
approximately 3 seconds, the current wll drop to 0.
Figure 6–19 Temperature Alarm Message Display
6.8.3 to reSet teMperatUre aLarM
Press any front panel button other than SHIFT. The alarm condition must be cleared before the unit
will return to normal operation.
SETUP • OPERATION
59

6.9 ELECTRICAL ALARM
POWER
BRAKE STATUS SET POINT SET POINT P I D
TORQUE SPEED STATUS
∗∗∗∗ ∗∗∗∗
• UsedtoprotecttheDESsupply
• Monitorselectricalinput(mains)andcircuitryoftheDES
• OnlyavailableforusewithWBorPBdynamometers
• Default-alwaysactive
6.9.1 inStrUCtionS for eLeCtriCaL aLarM SetUp
No setup needed.
Magtrol Model DSP6001 Dynamometer ControllerChapter 6 – Alarm System
6.9.2 eLeCtriCaL aLarM aCtion
When there is an electrical overload, the display will flash “ELECTRICAL ALARM TSCX” (as
indicated in Figure 6–20) and will be accompanied by an audible beeping sound. The alarm relay
will open and the excitation current will immediately decrease to zero.
Figure 6–20 Electrical Alarm Message Display
6.9.3 to reSet eLeCtriCaL aLarM
Press any front panel button other than SHIFT. The alarm condition must be cleared before the unit
will return to normal operation.
SETUP • OPERATION
60
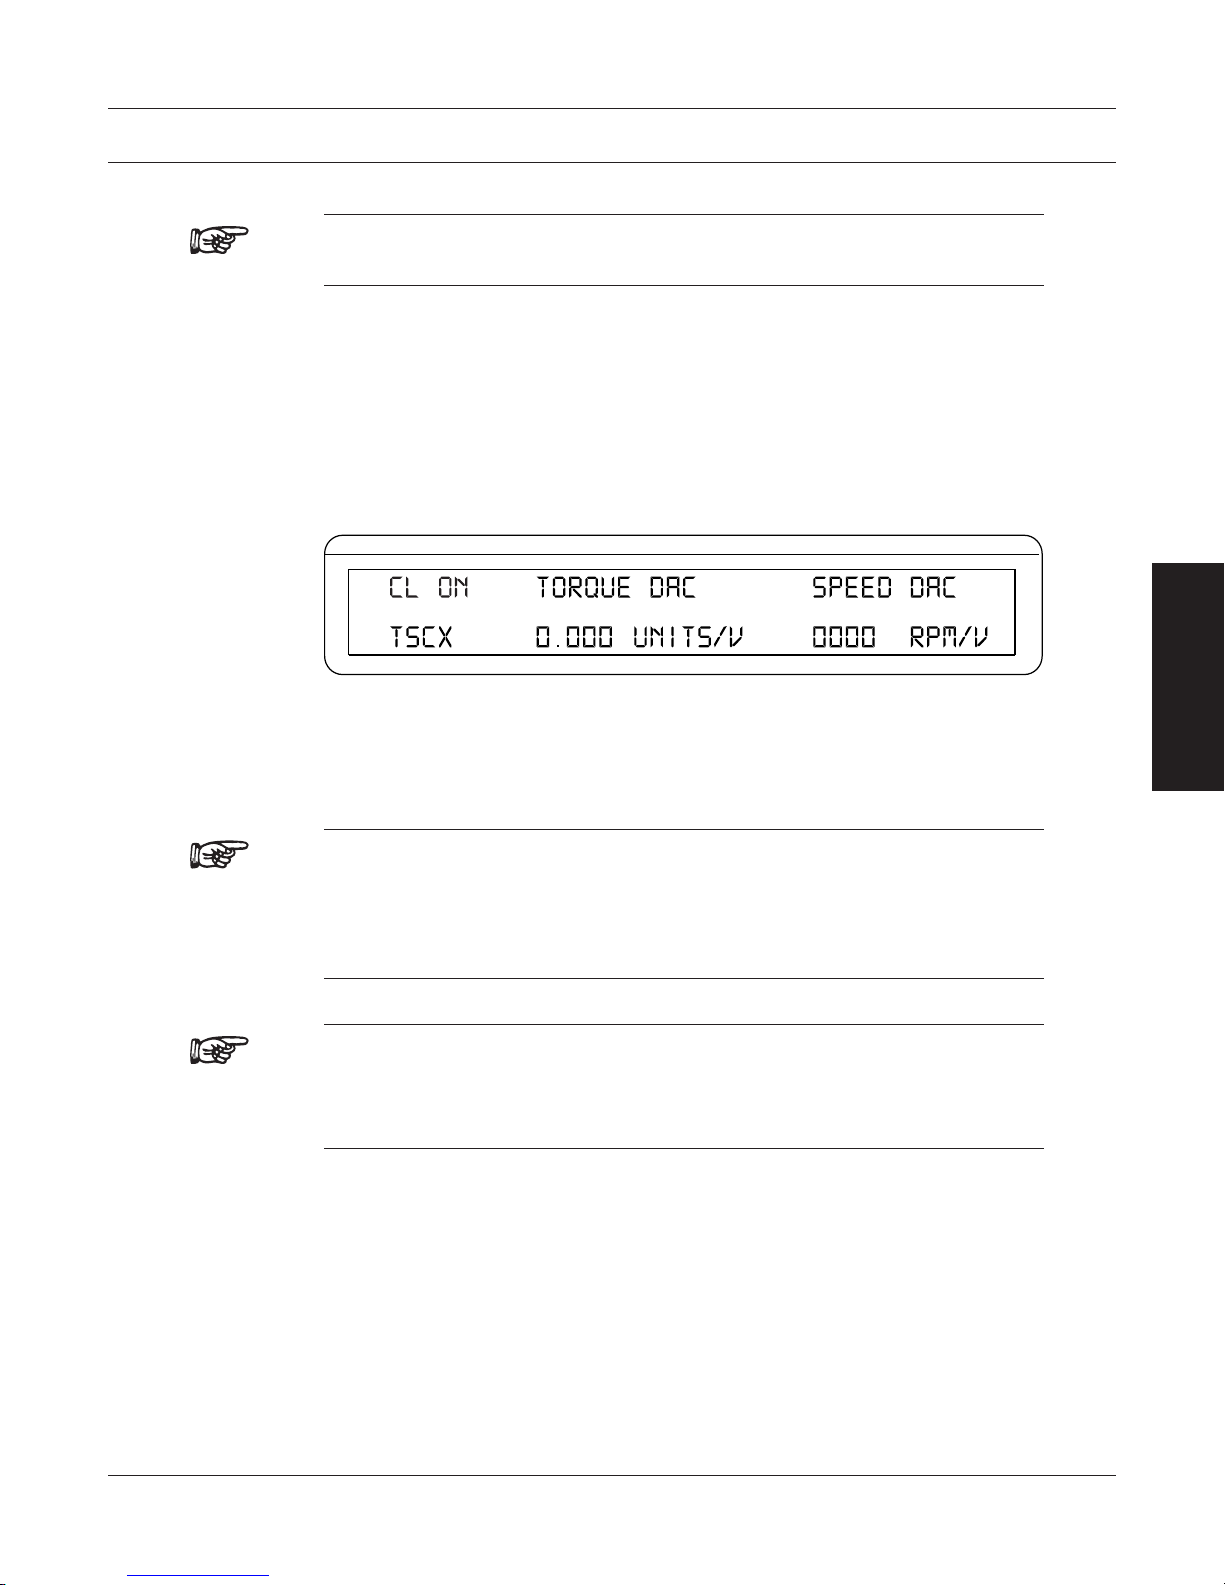
7. Manually Controlled Operation
POWER
BRAKE STATUS SET POINT SET POINT P I D
TORQUE SPEED STATUS
Note: Using the DSP6001 without a computer will limit its testing
capabilities.
7.1 HOW TO CHOOSE DESIRED CHANNEL WHEN USING TWO
DYNAMOMETERS
To select the desired channel (TSC1 or TSC2):
1. Press SHIFT.
2. Press AUX SETUP button. The display should appear as follows:
Figure 7–1 Dynamometer Channel Menu
3. Press POWER UNITS button until the desired channel is reached.
4. Press SHIFT to return to main menu.
OPERATION
Note: The desired dynamometer channel must be chosen in order to
continue with the following steps. All steps that are completed
will be saved within that channel until the information is manually
changed or the DSP6001 is reset. (To reset the DSP6001, refer to
Section 9.4 – Resetting the DSP6001.)
Note: When using a dynamometer with a torque transducer or auxiliary
instrument, the previous instructions will turn your TSC2 channel
display “ON” allowing you to view information for both channels
simultaneously.
61

7.2 HOW TO SET DESIRED POWER UNITS
POWER
BRAKE STATUS SET POINT SET POINT P I D
TORQUE SPEED STATUS
POWER
BRAKE STATUS SET POINT SET POINT P I D
TORQUE SPEED STATUS
POWER
BRAKE STATUS SET POINT SET POINT P I D
TORQUE SPEED STATUS
To select the desired power units (W, kW or HP):
1. Press SHIFT.
2. Press POWER UNITS button. The display should appear as follows:
Figure 7–2 Power Units Menu
3. Use UP and DOWN buttons to select desired Power Units.
4. Press SHIFT to return to main menu.
Magtrol Model DSP6001 Dynamometer ControllerChapter 7 – Manually Controlled Operation
7.3 HOW TO SET DESIRED TORQUE UNITS
To select the desired torque units (N.m, N.cm, N.mm, kg.cm., g.cm., lb.ft., lb.in., oz.ft., oz.in.):
1. Press SHIFT.
2. Press TORQUE UNITS button. The display should appear as follows:
Figure 7–3 Torque Units Menu
3. Use UP and DOWN buttons to select desired Torque Units.
4. Press SHIFT to return to main menu.
7.4 HOW TO SET TORQUE CONTROL
1. Beginning with the brake in the OFF position, press the TORQUE SET button. The display
should appear as follws:
OPERATION
Figure 7–4 Torque Control Menu
2. Use UP and DOWN buttons and the Decrease/Increase dial to adjust the setpoint to
zero.
62

Magtrol Model DSP6001 Dynamometer Controller
POWER
BRAKE STATUS SET POINT SET POINT P I D
TORQUE SPEED STATUS
Chapter 7 – Manually Controlled Operation
Note: PID values should be set at this time. See Section 5.5 – Setting the
Correct PID’s for Your Motor.
3. Use the BRAKE ON/OFF button to turn the brake ON.
4. Start the motor under test.
5. Press the TORQUE SET button and adjust the set point to the desired load.
6. Check the torque display to make sure that the dynamometer loads the motor under test to
that torque load.
Desired Results
The dynamometer should load the motor under test to the load point quickly
with little or no overshoot when the BRAKE function cycles ON or OFF.
Note: If the response is too slow or oscillatory, adjust the values for P,
I and D. (For more detailed instruction, refer to Chapter 5– PID
Settings.)
Caution: do not exCeed the Capabilities of the dynamometer or the power
sourCe in use. motors draw very large Currents when held at
loCked rotor and overheating may result. when using torque
Control, induCtion motors Cannot be tested beyond breakdown,
exCept at loCked rotor. refer to Section 7.5 – How to Set Speed
control.
OPERATION
7.5 HOW TO SET SPEED CONTROL
Note: When using speed control, motors between 0 and 100 rpm cannot
be tested unless the dynamometer is equipped with an optional,
high resolution speed encoder.
1. Beginning with the brake in the OFF position, press SHIFT.
2. Press MAX SPEED button. The display should appear as follows:
3. Use UP and DOWN buttons and the Decrease/Increase dial to set a value equal to or
slightly greater than the free-run speed of the motor under test.
Figure 7–5 Max Speed Menu
63

Magtrol Model DSP6001 Dynamometer ControllerChapter 7 – Manually Controlled Operation
4. Press the SHIFT button to exit the MAX SPEED function.
5. Press the SPEED SET button.
6. Use UP and DOWN buttons and the Decrease/Increase dial to set a speed equal to the
max. speed.
Note: PID values should be set at this time. See Section 5.5 – Setting the
Correct PID’s for Your Motor.
7. Use the Brake ON/OFF button to turn the brake ON.
8. Start the motor under test.
9. Press the SPEED SET button and adjust the set point to the desired speed.
Desired Results
The dynamometer should load the motor under test to the desired speed quickly
with little or no overshoot when the BRAKE button is cycled ON or OFF.
Note: If the response is too slow or oscillatory, adjust the values for P,
I and D. For more detailed instruction, refer to Chapter 5 – PID
Settings.
7.6 HOW TO SET OPEN LOOP CONTROL
1. Beginning with the brake in the OFF position, press and hold the TORQUE SET button
until a second beep is heard. The open loop control menu should appear. See Figure 5–2
Open Loop Contol Menu.
2. Use UP and DOWN buttons and the Decrease/Increase dial to set a value of current
equal to the percent of full scale output.
3. If needed, POWER UNITS and DISPLAYED UNITS can be changed while in OPEN
LOOP mode. (For further instruction, refer to Section 7.2 – How to Set Desired Power
Units.)
4. Use the BRAKE ON/OFF button to turn the brake ON. (Note: When the brake is on, the
only thing that can be adjusted is the set point. There are no other active settings at this
time.)
5. To exit the Open Loop Control mode and return to the main menu, turn the brake OFF and
press and hold the TORQUE SET button until a second beep is heard.
OPERATION
Desired Results
The dynamometer should load the motor under test. Because the mode is
open loop, the controller will not stabilize on speed or torque, but will apply
a constant current to the dynamometer brake. The actual loading will change
as the brake heats up or as other external factors change. The PID’s have no
effect in this mode.
64

8. Computer Controlled Operation
The DSP6001 can be used with a computer to control a dynamometer and to transmit data from the
motor testing device directly to the computer. Using the DSP6001 with a computer enables the unit
to perform at its full capacity.
8.1 ABOUT THE GPIB INTERFACE
(General Purpose Interface Bus)
Magtrol instruments use the GPIB (IEEE-488 Standard) for computer-to-instrument interfacing
because:
• TheGPIBparallelinterfaceisfasterthanserialinterfaces.
• TheGPIBenablestesterstoaccessupto15instrumentsononeport.Becausetypicalmotor
testing requires that at least five separate parameters be synchronized, a system of easy, fast
access to more than one instrument is essential.
• TheGPIBhasrigiddataformattingandhardwarestandards.Thesestandardshelptoensure
that all functions will work properly when the hardware and software are installed.
OPERATION
Note: The GPIB interface is not standard on most computers. An interface
card and driver software must be installed. An IEEE-488 cable
must also be installed between the computer and the DSP6001.
Magtrol recommends National Instruments Corporation hardware
and software.
8.1.1 inStaLLing tHe gpiB (ieee-488) ConneCtor CaBLe
Caution: make sure both the Computer and dsp6001 are turned off
before installing the gpib ConneCtor Cable.
1. Connect one end of a high-quality, double-shielded cable to the DSP6001 GPIB
connector.
2. Connect the other end to the GPIB interface in your PC
BRAKE FUSE
(5×20mm):
BRAKE
ACCESSORY
TORQUE–SPEED
OUTPUT
CTRL OUT
UL/CSA 1.25A 250V SB
IEC 1A 250V T
AUX / TSC2
DYNAMOMETER / TSC1
SUPPLY 2
SUPPLY 1
RS-232C
MAGTROL, INC. BUFFALO, NY
GPIB/IEEE–488
FUSE (5×20mm):
CAUTION: DOUBLE POLE FUSING
75VA 50/60Hz
120V UL/CSA 800mA 250V SB
240V IEC 315mA 250V T
EARTH
GROUND
PC
M-TEST
Figure 8–1 GPIB Installation
65

8.1.2 CHanging tHe gpiB priMary aDDreSS
POWER
BRAKE STATUS SET POINT SET POINT P I D
TORQUE SPEED STATUS
5. GND
1.
6.
9. N/C
3. RX
8.
2. TX
4.
7.
14 3 25
69 8 7
Each instrument serviced by the GPIB has its own Primary Address code, which enables the computer
to obtain readings from the instrument. The factory default of the setting on the DSP6001 is 09.
Some PC interfaces can access from one to fifteen 4-bit primary addresses. Other interfaces can
access as many as thirty-one 5-bit primary addresses. The DSP6001 uses the 4-bit format. For
setup, follow the steps below.
1. Press the SHIFT button and release.
2. Press the COM SETUP button. The display should appear as follows:
Magtrol Model DSP6001 Dynamometer ControllerChapter 8 – Computer Controlled Operation
Figure 8–2 Com Setup Menu Display
3. Press the button below the GPIB display until the desired primary address is reached (range
0-15).
4. Press SHIFT to exit and return to main menu.
8.2 ABOUT THE RS-232 INTERFACE
The DSP6001 is equipped with an RS-232 (serial) interface that communicates with the host computer
through a DB-9 interface connector. The connector pin-out consists of 2-TX, 3-RX and 5-GND.
Figure 8–3 RS-232 Interface
OPERATION
8.2.1 ConneCtion
The RS-232 connection includes null modem wiring internal to the unit. To install, use a straight
through pin-to-pin connector cable, which can be purchased from your local electronics store.
66

Magtrol Model DSP6001 Dynamometer Controller
DSP6001 PC
Chapter 8 – Computer Controlled Operation
DIGITAL GROUND
Figure 8–4 Straight Through Pin-to-Pin Cable Connection
8.2.2 CoMMUniCation paraMeterS
• Noparity
• 8databits
• 1stopbit
8.2.3 BaUD rate
There are several different baud rates to choose from including 300, 600, 1200, 2400, 4800, 9600
and 19200. To set up the desired baud rate, follow the instructions below.
1. Press SHIFT and release.
2. Press the COM SETUP button. The display will appear as shown in Figure 8–2 Com Setup
Menu Display.
3. Press the button under the RS-232 BAUD display until the desired baud rate is reached.
4. Press SHIFT to return to main menu.
TX
RX
GND
N/C
1.
2.
3.
4.
5.
6.
7.
8.
9.
1. DCD (DATA CARRIER DETECT)
2. RX (RECEIVE DATA)
3. TX (TRANSMIT DATA)
4. DTR (DATA TERMINAL READY)
5. GND (SIGNAL GROUND)
6. DSR (DATA SET READY)
7. RTS (REQUEST TO SEND)
8. CTS (CLEAR TO SEND)
9. RI (RING INDICATOR)
OPERATION
8.3 CHECKING THE DSP6001-TO-PC CONNECTION
Note: Make sure that the DSP6001 and its host computer are communicating
before acquiring data.
1. Make sure the primary GPIB address is set correctly for the DSP6001.
2. Set the input variable to 15 characters (13 variable characters and the two required data
termination characters CR and LF. See Section 8.5 – Programming.)
3. Issue output data command “OD” and read 15 characters according to the instructions for
your GPIB interface or serial.
Desired Results
• Torque/speeddatawillbereturned.
• TheerrormessageI/OERRORdoesnotappearonthedisplaypanel.
Note: If the desired results did not occur, please see Chapter 10
– Troubleshooting.
67

8.4 DATA FORMAT
Speed-torque data is a fixed-length string in ASCII format with a floating point decimal. Use the
following string format:
Where…
S = Speed in rpm. (No leading zeroes are used.)
d = Decimal digit 0 through 9.
T = Torque in units selected during setup. (The torque value always contains a decimal
point.)
L = Counterclockwise dynamometer shaft rotation (left).
R = Clockwise dynamometer shaft rotation (right).
. = Decimal point. (The decimal point location depends on the specific dynamometer and
torque range in use.)
Magtrol Model DSP6001 Dynamometer ControllerChapter 8 – Computer Controlled Operation
SdddddTdddd.R(cr)(lf)
Or
SdddddTdddd.L(cr)(lf)
OPERATION
Note: When an “A” is in the R/L position (e.g. SdddddTdddd.A(cr)(lf)),
Note: The (cr) and (lf) characters will not display.
If a motor is running at 1725 rpm clockwise, with the dynamometer loading the motor to
22.6 oz.in., the DSP6001 will return:
By manipulating the string, the speed-torque and shaft direction (if required) can be extracted.
Then separate numerical variables can be assigned to them for data processing.
8.5 PROGRAMMING
Note: Check t h e ma n u a l pr ovided with your so f t ware for full
it is an indication that the unit is in an alarm condition.
EXAMPLE
S 1725T22.60R
instructions.
8.5.1 Data terMination CHaraCterS
Use the following information to answer the formatting questions asked when installing
your GPIB software. All GPIB data acquisition systems require the use of data termination
characters. The DSP6001 uses the GPIB standard termination characters Carriage Return
(CR) and Line Feed (LF). Provide them in that order.
68

Magtrol Model DSP6001 Dynamometer Controller
8.5.1.2 Codes for CR - LF
CR =
LF =
8.5.2 tiMeoUt
Set the timeout for at least one second if asked to set a communication fault delay timeout.
Chapter 8 – Computer Controlled Operation
BASIC HEX DEC
CHR$(13) 0D 13
CHR$(10) 0A 10
Note: If the communication fault delay timeout is too short, or if the
computer resets the interface too quickly, the host instrument may
stop responding.
8.6 DSP6001 COMMAND SET
When entering a command code:
1. Type all characters in uppercase ASCII format.
2. End all commands with a CR-LF (hex 0D-0A).
3. Do not string multiple commands together in one line.
The character # represents a floating-point numerical value following the command. Leading zeroes
are not required.
8.6.1 aLarM CoMManDS
ALA# Enables or disables air flow
ALE# Enables or disables external
ALL# Enables or disables all alarms. Values for # are:
ALP# Sets power alarm. Sets maximum power in kilowatts. Range is 0
ALS# Sets speed alarm point. Sets maximum speed in rpm. Range is 0 to
ALT# Sets torque alarm point. Sets maximum torque in input units. Range is 0
ALW# Enables or disables water flow
Note: If a command is not recognized, the I/O ERROR message will
appear in the Status Display accompanied by a beep.
Command
Code
alarm.
alarm.
alarm.
Function Explanation
OPERATION
Values for # are:
0 = disable
1 = enable
Values for # are:
0 = disable
1 = enable
0 = disable
1 = enable
to 99,999. Setting is applied to current channel.
99,999. Setting is applied to current channel.
to 10,000. Setting is applied to current channel.
Values for # are:
0 = disable
1 = enable
69

8.6.2 CoMMUniCation CoMManDS
Magtrol Model DSP6001 Dynamometer ControllerChapter 8 – Computer Controlled Operation
Command
Code
Function Explanation
*IDN? Returns Magtrol Identification
and software revision.
OA Prompts to return to auxiliary
input data string.
OD Prompts to return speed-
torque-direction data string.
OR Prompts to return direction bit
of TM2XX.
Output Auxiliary prompt to return the value at
the AUX INPUT x AUX SCALING factor with
this format:
Axxxxxxcrlf
Output Data prompt to return data string with
this format:
SxxxxxTxxxxxRcrlf
or
SxxxxxTxxxxxLcrlf
or
SxxxxxTxxxxxAcrlf
R or L is the shaft direction indicator, as viewed
looking at the dynamometer shaft where:
R = right; clockwise (CW)
L = left; counterclockwise (CCW)
A = alarm condition
The speed will equal the displayed value
and the torque will be in the same units as
displayed on the front panel.
“Output Rotation” prompt to return the value at
the direction input with this format:
0crlf = clockwise
1crlf = counterclockwise
OPERATION
70

Magtrol Model DSP6001 Dynamometer Controller
8.6.3 raMp CoMManDS
Chapter 8 – Computer Controlled Operation
Command
Function Explanation
Code
DILXX.XX Sets dynamic scale coefficient. When using dynamic scaling, XX.XX is
multiplied by the I term to give the end I value.
DPLXX.XX Sets dynamic scale coefficient. When using dynamic scaling, XX.XX is
multiplied by the P term to give the end P value.
DS# Enable or disables dynamic
scaling.
Values for # are:
0 = disable
1 = enable
PD# Sets ramp down rate to #RPM
per second.
Specify speed range (F#) AND a stop speed
(S#) before using this command. This
command programs a decreasing shaft speed
at a rate of #rpm per second. Once initiated,
the Controller will load to locked rotor unless
instructed to do otherwise.
PR • Resets ramp up or down.
• Sets speed to maximum
speed.
This command resets the ramp function, halting
the ramp’s progress, and returns the motor to
free run.
• Turns brake off.
PU# Sets ramp up rate to #RPM per
second.
Specify speed range (F#) AND a start speed
(S#) before using this command. This
command increases the shaft speed at a rate
of #rpm per second.
S# Sets start or stop speed for
ramp to #RPM.
When this command is used with the PD
(Program Down) command, the Controller will
ramp down to this speed and halt. When this
command is used with the PU (Program Up)
command, the Controller will load immediately
to this speed and ramp up to free-run.
OPERATION
71

8.6.4 SetUp CoMManDS
Magtrol Model DSP6001 Dynamometer ControllerChapter 8 – Computer Controlled Operation
Command
Code
Function Explanation
AF1# Sets the analog filter for TSC1. Values for # are:
0 = OFF
1 = 10 Hz
2 = 25 Hz
3 = 50 Hz
4 = 3 Hz
AF2# Sets the analog filter for TSC2. Values for # are:
0 = OFF
1 = 10 Hz
2 = 25 Hz
3 = 50 Hz
4 = 3 Hz
BT# Sets the brake type for TSC1. Values for # are:
0 = HD
1 = WB
2 = PB
DIN1# Selects instrument type
connected to TSC1.
Values for # are:
0 = HD
1 = WB
2 = PB
3 = BRAKE
DIN2# Selects instrument type
connected to TSC2.
Values for # are:
0 = AUX
1 = WB
2 = PB
3 = TM2XX
M# Enables or disables front panel
controls.
Values for # are:
0 = disable
1 = enable
NOTE: The brake ON/OFF switch on the front
panel still functions.
NS# Sets nominal speed for WB
Dynamometer.
R Resets as follows:
• Manual control ON.
• Brake OFF.
Range is 0 to 99,999. Setting is applied to
current channel.
Use this command to cancel any previous
commands.
Note: These settings are the power-on default
settings.
SFC# Enables or disables cross loop
function.
Values for # are:
0 = disable
1 = enable
SFT# Enables or disables tandem
function.
Values for # are:
0 = disable
1 = enable
TSC1 Selects TSC1 to be the
channel that the control loop
closes on.
TSC2 Selects TSC2 to be the
channel that the control loop
The TSC1 or TSC2 command should be
the first command sent during testing. All
commands thereafter will be applied to that
channel.
closes on.
TSF1# Sets scale factor for TSC1. Range is 0 to 99,999.
TSF2# Sets scale factor for TSC2. Range is 0 to 99,999.
OPERATION
72

Magtrol Model DSP6001 Dynamometer Controller
Chapter 8 – Computer Controlled Operation
Command
Code
Function Explanation
UA# Sets auxiliary input scaling to #.This command sets the scaling factor for the
auxiliary input to # units/volt. The range is 0.0
to 10000.0. Programmed value # is not saved
at power down.
UE# Sets encoder pulse count to #. This command selects the pulse count option
for speed transducing.
Values for # are:
0 = 60-bit
1 = 600-bit
2 = 6000-bit
3 = 20-bit
4 = 30-bit
5 = 1-bit
6 = 2-bit
7 = 6-bit
Programmed value # is not saved at power
down.
UI# Sets dynamometer torque
units to #.
NOTE: For Hp and watts calculations to be
correct, the correct dynamometer torque units
must be specified.
Values for # are:
0 = oz.in.
1 = oz.ft.
2 = lb.in.
3 = lb.ft.
4 = g.cm.
5 = kg.cm.
6 = N.mm.
7 = N.cm.
8 = N.m.
Torque units default to 0 (oz.in.) if out of range.
Programmed value # is not saved at power
down.
UR# Sets readout torque units to #. This command sets the torque unit conversion
for the torque readout.
Values for # are
0 = oz.in.
1 = oz.ft.
2 = lb.in.
3 = lb.ft.
4 = g.cm.
5 = kg.cm.
6 = N.mm.
7 = N.cm.
8 = N.m.
Torque units default to 0 (oz.in.) if out of range.
Programmed value # is not saved at power
down.
OPERATION
73

8.6.5 SpeeD CoMManDS
Magtrol Model DSP6001 Dynamometer ControllerChapter 8 – Computer Controlled Operation
Command
Code
Function Explanation
F# Sets maximum speed to # rpm. Sets a speed range for the Controller. Must
be specified before using the speed or ramp
mode.
G# Sets maximum speed excited
Range is 0 to 10,000.
of PB.
N • Resets speed point to
maximum speed.
• Sets speed mode OFF.
Use this command, sent alone, to reset
any previous speed-stabilized setting to the
maximum speed range.
• Sets brake OFF.
N# • Sets speed point to #.
• Sets brake ON.
Use this command to load the motor under
test to a specific speed value #. Issue a speed
range command (F#) first for best dynamic
response. The Controller is functioning with the
dynamometer as a closed loop system. Adjust
the speed PID values to tune the response.
ND# Sets speed derivative to #. Derivative value # can be any number from 0
to 99.
NDS# Used as a multiplier for the D
coefficient in the PID equation.
Values for # are A, B, C, D, E, F, G, H or I. (See
Appendix F: Additional Scale Factor Table.)
NI# Sets speed integral to #. Integral value # can be any number from 0 to
99.
NIS# Used as a multiplier for the I
coefficient in the PID equation.
NP# Sets speed proportional to #
gain.
NPS# Used as a multiplier for the P
coefficient in the PID equation.
Values for # are A, B, C, D, E, F, G, H or I. (See
Appendix F: Additional Scale Factor Table.)
Proportional gain value # can be any number
from 0 to 99.
Values for # are A, B, C, D, E, F, G, H or I. (See
Appendix F: Additional Scale Factor Table.)
OPERATION
8.6.6 torqUe CoMManDS
Command
Code
Q • Resets torque to 0.0.
• Turns torque mode OFF.
• Turns brake OFF.
Q# • Sets torque point to #.
• Turns brake ON.
QD# Sets torque derivative to #. Derivative value # can be any number from 0
QDS# Used as a multiplier for the D
coefficient in the PID equation.
QI# Sets torque integral to #. Integral value # can be any number from 0 to
QIS# Used as a multiplier for the I
coefficient in the PID equation.
QP# Sets torque proportional to #
gain.
QPS# Used as a multiplier for the P
coefficient in the PID equation.
Function Explanation
This command resets any previous torquestabilized command, and returns the motor to
free run.
This is a closed loop command with its own set
of PID parameters. The units defined will be
the same as those displayed by the Controller.
to 99.
Values for # are A, B, C, D, E, F, G, H or I. (See
Appendix F: Additional Scale Factor Table.)
99.
Values for # are A, B, C, D, E, F, G, H or I. (See
Appendix F: Additional Scale Factor Table.)
Proportional gain value # can be any number
from 0 to 99.
Values for # are A, B, C, D, E, F, G, H or I. (See
Appendix F: Additional Scale Factor Table.)
74

Magtrol Model DSP6001 Dynamometer Controller
8.6.7 MiSCeLLaneoUS CoMManD
Chapter 8 – Computer Controlled Operation
Command
Code
DIR# Selects/Deselects the quadrature
input circuitry. User has access
to up/down counter via OH1
Function Explanation
Values for # are:
0 = for single frequency
1 = for quadrature input
command. The displayed rpm
is sent to the GPIB/RS-232 and
applied to the PID Loop.
NOTE: Only applies to DSP6001
Revision 7.5 and later versions.
I# Sets current output to #. The power supply outputs a fixed value of
current. Use any value # between 0 and
99.99%. (99.99% = 1 Amp).
IOXX.XX Applies an offset to the output DAC
Values for # range from 0 to 99.99.
on channel 1 only. Used to clamp
motor speed prior to testing.
NOTE: Only applies to DSP6001
Revision 7.6 and later versions.
OH1 Returns quadrature counter
information.
Two 24-bit hex values are returned. The
first value is the up/down count. The
second value is an unused value.
SAVE Saves present configuration of unit
to non-volatile memory.
X Prompts to return % current output. This command returns the % current value
in the format “I##.##”. The value will be
between 0 (no loading) and 99.99 (full
loading).
OPERATION
Note: For further reference, see Appendix F – Remote Configuration Flow
Charts.
75

9. Calibration
9.1 CLOSED-BOX CALIBRATION
The DSP6001 features closed-box calibration. The advantage of closed-box calibration is that the
user does not have to disassemble the case or make mechanical adjustments.
9.2 CALIBRATION SCHEDULE
Calibrate the DSP6001:
• Afteranyrepairsareperformed.
• Atleastonceayear;morefrequentlytoensurerequiredaccuracy.
9.3 BASIC CALIBRATION PROCESS
The basic calibration process consists of four procedures which must be performed in the following
order:
1. Initial Calibration Procedure
2. TSC1 Offset and Gain
3. TSC2 Offset and Gain
4. DAC Output Offset and Gain
5. Speed Check
6. Decimal Point Check
Items needed for calibrating the DSP6001:
• Externalvoltagereferenceof0to5voltsDC
• Digitalmultimeter(DMM)
Both instruments should have a VDC accuracy of 0.05% or better.
9.3.1 initiaL CaLiBration proCeDUre
1. Allow the DSP6001 to stabilize in an environment with:
• Anambienttemperatureof18°Cto25°C.
• Relativehumiditylessthan80%.
2. Turn on the DSP6001.
3. Allow the DSP6001 to warm up for at least 30 minutes.
4. Enable the calibration mode as follows:
• TurninstrumentpowerOFF.
• PressinandholdtheUP and DOWN buttons simultaneously.
• TurninstrumentpowerON.
• ContinuepressingtheUP and DOWN buttons until the display shows the software
revision date then release.
The front panel displays the actual correction factors above the ZERO and GAIN readouts (see
Figure 9–1 Calibration Display Analog Inputs).
MAINTENANCE
76

Magtrol Model DSP6001 Dynamometer Controller
POWER
BRAKE STATUS SET POINT SET POINT P I D
TORQUE SPEED STATUS
14. TORQUE SIGNAL
13. TORQUE COMMON
12. D.P. B
11. INDEX
10. TACH. A
9. D.P. A
8. +5.0 VDC COM
7. +5.0 VDC
6. -24 VDC
5. -24 VDC COM
4. +24 VDC COM
3. +24 VDC
2. TACH. B
1. FLOW/CLUTCH
14 3 2
891011
6 5
1213714
Figure 9–1 Calibration Display Analog Inputs
Chapter 9 – Calibration
Note: To exit CALIBRATE mode without making any changes, press the
9.3.2 tSC1 offSet anD gain
1. Connect the external voltage reference common to Pin 13 of the TSC1 input connector.
2. Connect the external voltage reference high to Pin 14 of the TSC1 input connector.
3. Apply +0.000 VDC.
4. Press the ZERO button.
5. Adjust the ZERO by turning the Decrease/Increase Dial until the displayed voltage equals
the reference voltage (within 00.10 mV).
SHIFT button 8 times.
Figure 9–2 TSC1 Input Connector
Note: The magnitude of change per revolution can be increased by pressing
the UP button or decreased by pressing the DOWN button.
6. Apply 5.0 VDC.
7. Press the GAIN button.
8. Adjust the Decrease/Increase Dial until the displayed voltage equals the reference voltage
within 00.10 mV.
9. Press SHIFT to proceed to Section 9.3.3 – TSC2 Offset and Gain.
MAINTENANCE
77

9.3.3 tSC2 offSet anD gain
11. N/C
10. TACH. C
9. ROT_SENS
8. +5.0 VDC COM
14. TORQUE SIGNAL
13. TORQUE COMMON
12. BITE
6. -24 VDC
3. +24 VDC
2. N/C
5. -24 VDC COM
4. +24 VDC COM
1. SPARE
7. +5.0 VDC
14 3 2
891011
6 5
1213714
POWER
BRAKE STATUS SET POINT SET POINT P I D
TORQUE SPEED STATUS
1. Connect the external voltage reference common to Pin 13 of the TSC2 input connector.
2. Connect the external voltage reference high to Pin 14 of the TSC2 input connector.
3. Apply +0.000 VDC.
4. Press the ZERO button.
5. Adjust the ZERO by turning the Decrease/Increase dial until the displayed voltage equals
the reference voltage (within 00.10 mV).
Magtrol Model DSP6001 Dynamometer ControllerChapter 9 – Calibration
Figure 9–3 TSC2 Input Connector
Note: The magnitude of change per revolution can be increased by pressing
the UP button or decreased by pressing the DOWN button.
6. Apply 5.0 VDC.
7. Press the GAIN button.
8. Adjust the Decrease/Increase dial until the displayed voltage equals the reference voltage
within 00.10 mV.
9.3.4 DaC oUtpUt offSet anD gain
1. Beginning in the TSC2 Offset and Gain screen, press SHIFT to proceed to the Calibration
Output DAC Display Menu. The display should appear as follows:
Figure 9–4 Calibration Output DAC Display Menu
2. Connect meter to Pin 14 (negative) and Pin 7 (positive) of SUPPLY 1 connector.
MAINTENANCE
78

Magtrol Model DSP6001 Dynamometer Controller
15. N/C
14. CURRENT SET POINT (ANALOG 0V)
13. +5.0 VDC COM
12. SUPPLY +24 VDC
11. STAND-BY CHANNEL 1
10. TEMPERATURE ALARM CHANNEL 1
9. SHIELD (EARTH)
8. W FLOW_1
7. CURRENT SET POINT (SIGNAL)
6. +5.0 VDC COM
5. SUPPLY +24 VDC
4. PRIMARY SUPPLY CONTR. CHANNEL 1
3. N/C
2. ELECTRICAL ALARM CHANNEL 1
1. SHIELD (EARTH)
14 3 25
912 11 10
68 7
14 1315
3. CLUTCH
8. W FLOW_2
11. STAND-BY CHANNEL 2
1. SHIELD (EARTH)
2. ELECTRICAL ALARM CHANNEL 2
4. PRIMARY SUPPLY CONTR. CHANNEL 2
5. SUPPLY +24 VDC
6. +5.0 VDC COM
7. CURRENT SET POINT (SIGNAL)
9. SHIELD (EARTH)
10. TEMPERATURE ALARM CHANNEL 2
15. N/C
13. +5.0 VDC COM
14. CURRENT SET POINT (ANALOG 0V)
12. SUPPLY +24 VDC
14 3 25
912 11 10
68 7
14 1315
POWER
BRAKE STATUS SET POINT SET POINT P I D
TORQUE SPEED STATUS
3. Using the Decrease/Increase dial, adjust the value so that the meter reading is 0.000 volts
or within 00.20 mV.
4. Press SHIFT once.
5. Connect meter to Pin 14 (negative) and Pin 7 (positive) of SUPPLY 2 connector.
Chapter 9 – Calibration
Figure 9–5 Supply 1 Connector
6. Using the Decrease/Increase dial, adjust the value so that the meter reading is 0.000 volts
or within 00.20 mV.
7. Press SHIFT once. The display should appear as follows:
Figure 9–7 Calibration Accessory Torque DAC Display Menu
Figure 9–6 Supply 2 Connector
79
MAINTENANCE

Magtrol Model DSP6001 Dynamometer ControllerChapter 9 – Calibration
7 6
3 1
5 4
2
8
8. +5.0 VDC COM
7. EXTERNAL ALARM INPUT
6. ALARM RELAY (COMMON)
5. ALARM RELAY (NORMALLY CLOSED)
4. ALARM RELAY (NORMALLY OPEN)
3. ANALOG GROUND
2. ANALOG SPEED
1. ANALOG TORQUE
POWER
BRAKE STATUS SET POINT SET POINT P I D
TORQUE SPEED STATUS
8. Connect volt meter to Pin 3 (negative) and Pin 1 (positive) of ACCESSORY TORQUESPEED OUTPUT.
Figure 9–8 Accessory Torque-Speed Output
9. Using the Decrease/Increase dial, adjust the value so that the meter reading is 0.000 volts
or within 00.20 mV.
10. Press SHIFT once.
11. Using the Decrease/Increase dial, adjust the value so that the meter reading is 9.000 volts
or as close as possible.
12. Press SHIFT once. The display should appear as follows:
Figure 9–9 Calibration Accessory Speed DAC Display Menu
13. Connect volt meter to Pin 3 (negative) and Pin 2 (positive) of the ACCESSORY TORQUESPEED OUTPUT.
14. Using the Decrease/Increase dial, adjust the value so that the meter reading is 0.000 volts
or within 00.20 mV.
15. Press SHIFT once.
16. Using the Decrease/Increase dial, adjust the value so that the meter reading is 9.000 volts
or as close as possible.
17. Press SHIFT once to end calibration and return to main menu.
9.3.5 SpeeD CHeCk
1. Connect a function generator with square wave TTL output to pins 10 (TACH. A) and 8
(+5.0 VDC COM) of the 14-pin TSC1 connector. For reference, see Figure 9–2 TSC1 Input
Connector.
2. Verify that the speed display reads the same value as the function generator frequency.
3. If the speed display does not read the same value as the function generator, call Magtrol
customer service.
Note: There are no adjustments for speed calibration.
MAINTENANCE
80

Magtrol Model DSP6001 Dynamometer Controller
9.3.6 DeCiMaL point CHeCk
1. Connect a 0.5 VDC source to pins 14 (TORQUE SIGNAL) and 13 (TORQUE COMMON)
of the 14-pin TSC1 connector. For reference, see Figure 9–2 TSC1 Input Connector.
2. Verify that the torque display reads 500.0.
3. Connect pin 9 (D.P. A) to pin 8 (+5.0 VDC COM).
4. Verify that the torque display reads 50.0.
5. Disconnect pin 9 from pin 8.
6. Connect pin 12 (D.P. B) to pin 8 (+5.0 VDC COM).
7. Verify that the torque display reads 5.000.
8. If the torque display does not show correct readings, call Magtrol Customer Service.
Chapter 9 – Calibration
Note: There are no adjustments for decimal point location.
MAINTENANCE
81

10. Troubleshooting
Problem Reason Solution
Display indicates I/O
ERROR.
Speed command sent,
but Controller does not
respond.
Mechanical power reads
much higher or lower than
expected
No GPIB communication. Setup error and/or
No RS-232
communication.
Dynamometer shaft does
not turn smoothly when
BRAKE is OFF.
Dynamometer loads too
quickly causing motor to
stall.
Speed not reading
correctly.
Command does not match
the unit’s programmed set
of instructions.
Communication occurred
but the Controller is not
loading the motor.
Torque units are incorrect. Set torque input units to match the
hardware fault.
Setup error and/or
hardware fault.
Salient poles were set
up on the rotor by having
brake current applied with
no shaft rotation.
Input units are improperly
set up.
Speed encoder is
improperly set up.
Use correct command and format.
Adjust PID values.
specifications on dynamometer
nameplate.
Check:
• GPIB address of Controller.
• GPIB cable - should be functioning
and attached to Controller and
computer interface card.
Check:
• Baud rate of Controller.
• Pinout of serial cable.
• Cable attachment to Controller and
serial interface port of computer.
Start the motor and bring up to speed.
Press BRAKE button ON. Adjust
output current up to a value at least
25% of the maximum torque rating of
the dynamometer in use (if possible).
Reduce output current to 0.
Set torque input units to match
specifications on dynamometer
nameplate.
Set speed encoder bits to match
specifications on dynamometer
nameplate.
If you require additional assistance, please contact Magtrol Customer Service at 1-716-668-5555.
MAINTENANCE
82

Appendix A: LabVIEW Programming Examples
0 [0..1]
1 [0..1]
Magtrol offers a comprehensive motor testing software program to satisfy most of your programming needs. To order
your software, call Magtrol Sales at 1-716-668-5555.
A.1 SIMPLE READ
APPENDICES
83

0 [0..2]
1 [0..2]
1 [0..2]
2 [0..2]
A.2 TORQUE STABILIZED
Magtrol Model DSP6001 Dynamometer ControllerAppendix A: LabVIEW Programming Examples
APPENDICES
84
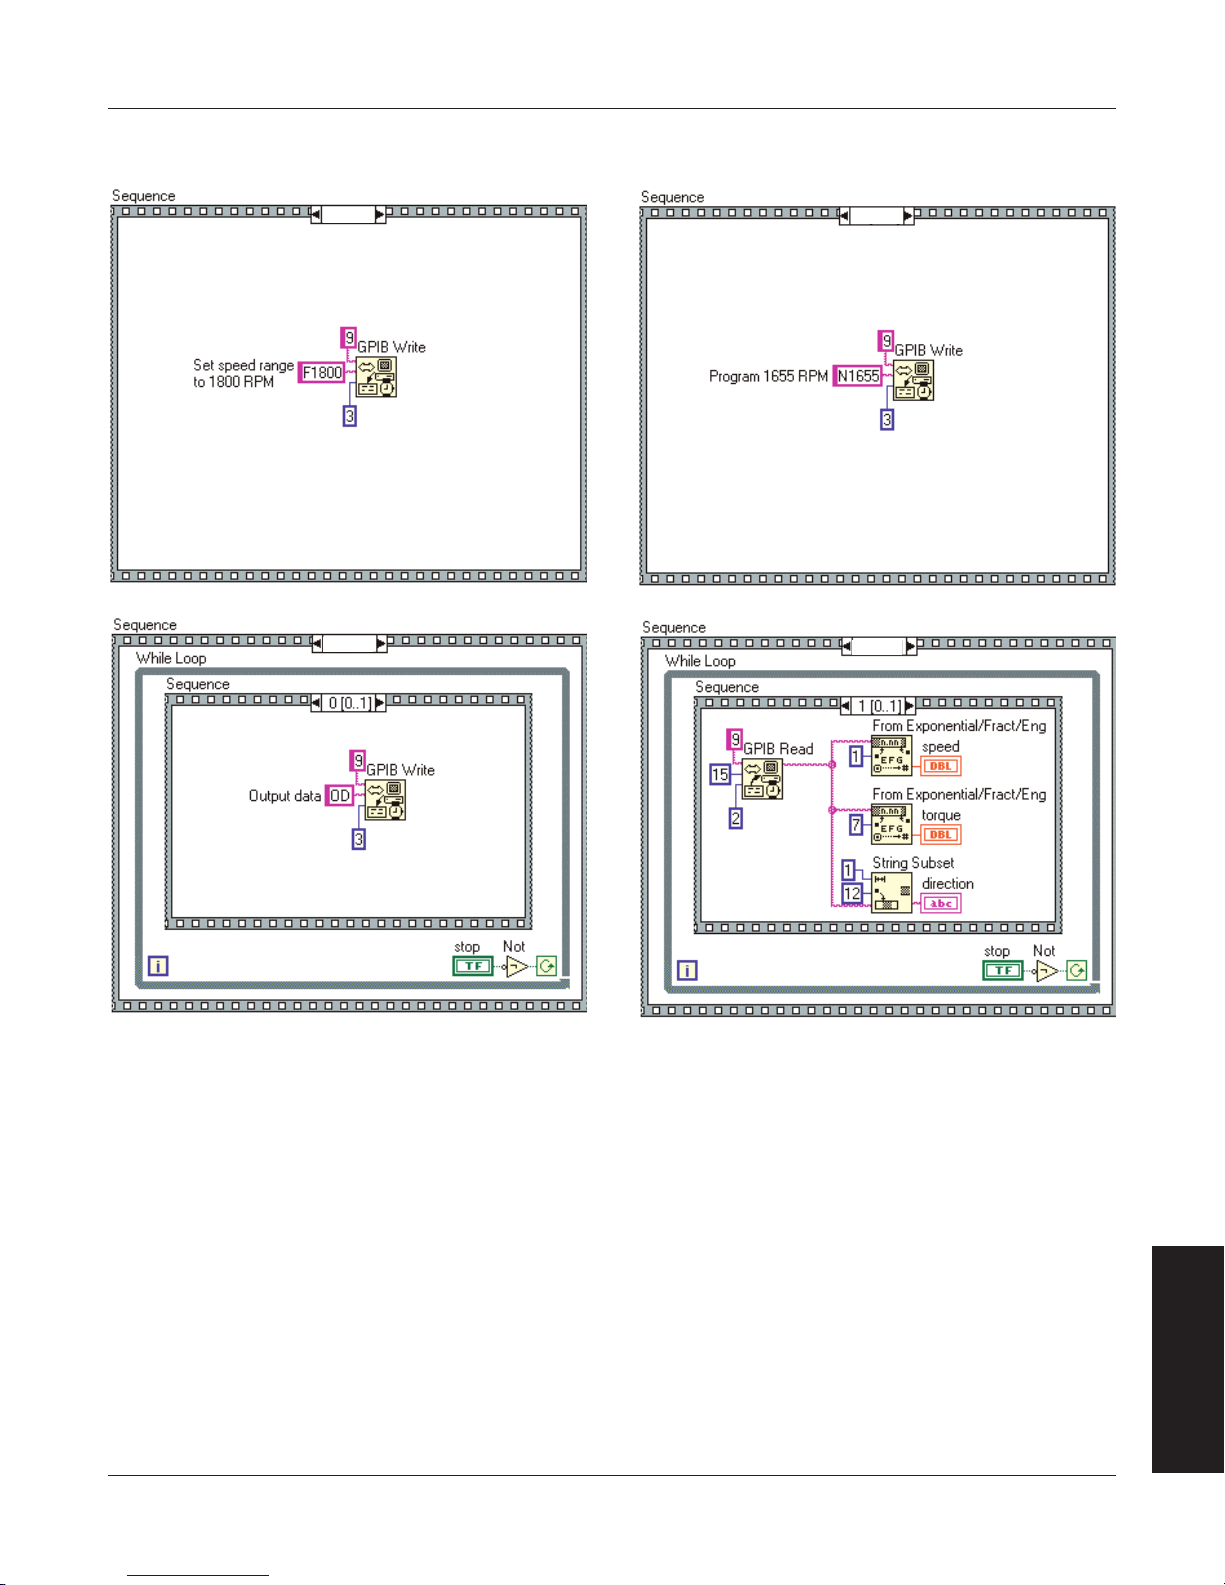
Magtrol Model DSP6001 Dynamometer Controller
0 [0..2]
1 [0..2]
2 [0..2]
2 [0..2]
A.3 SPEED STABILIZED
Appendix A: LabVIEW Programming Examples
APPENDICES
85

Appendix B: Inertia Correction
FR
0
TORQUE
DYNAMIC
TORQUE VALUE
SPEED VS TORQUE
CURVE WITH CONSTANT
DECELERATION
78% OF FR
STATIC TORQUE
VALUE
CF = DIFFERENCE IN TORQUE
S
P
E
E
D
DIFFERENCE IN TORQUE
B.1 INERTIAL EFFECT ON MOTOR TEST DATA
A major advantage of the DSP6001 is its ability to obtain full motor performance data (free run
to locked rotor) by continuous load application with an absorption dynamometer. Data acquisition
is fast, resulting in minimal motor I2R losses, and loading characteristics simulate actual end-use
applications.
When a motor is accelerating or decelerating, the measured torque is the sum of the true motor
torque ± the inertial torque or stored energy of the system. Unless inertial torque is excluded, motor
performance will vary in proportion to the rate of acceleration or deceleration.
This type of error can produce problematic test results. For example, during rapid deceleration,
system inertia can produce apparent efficiency greater than 1.0. This error may occur if output power
is divided by input power without extracting the stored energy in the system.
Since “inertial effect” is only a factor when speed is changing, and because inertial torque is
proportional to the rate of change, inertial value may be expressed as a unit of torque per change
in rpm in a given period of time. With the DSP6001, properly adjusted PID values yield constant
change in rpm so that the inertial torque can be expressed as a constant.
B.2 PROCEDURE FOR INERTIA CORRECTION
1. Determine the torque Correction Factor (CF) as follows:
• AdjustthePIDloopproperly
• Establishatorquevalueequaltotheinertialtorque.
2. Use the “Program Down” command (PD#) to ramp to 75% of the free-run speed.
3. Select a data point on the performance curve where speed will be approximately 78% of the
free-run speed. Let this represent the dynamic speed-torque value.
4. Immediately program your DSP6001 (Nddddd) to a speed equal to the dynamic speed value.
When the speed stabilizes, use this as the static torque value.
CF = Dynamic Torque - Static Torque
To correct your data, subtract the CF from each torque point obtained during the ramp.
Example:
APPENDICES
86

Magtrol Model DSP6001 Dynamometer Controller
B.2.1 key ConDitionS
• Select appropriate value. The test point selection of 78% is typical for an induction motor.
Use a value in the linear portion of the motor curve where there is a substantial torque change
with speed.
• Acquire data rapidly. Rapid data acquisition is necessary so that motor heating does not
degrade performance by adding a false difference between the static and dynamic torque
values.
• Use a regulated power source. The input line voltage must be stable for the time necessary
to perform the test. Torque varies by the square of the change in line voltage.
• Obtain new CF value for various deceleration/ acceleration rates. The CF is only valid
for its specific ramp rate. To calculate other CF rates, use the following equation:
CF
new
= (CF
/ramp rate) × new ramp rate
old
Appendix B: Inertia Correction
APPENDICES
87

Appendix C: Front Panel/Display Menu Flow Charts
MODEL DSP6001
DYNAMOMETER CONTROLLER
POWER
POWER
BRAKE STATUS SET POINT SET POINT P I D
TORQUE SPEED STATUS
DECREASE INCREASE
UPDIP
DYNO SETUP
SHIFT
COM SETUPAUX SETUP
SPEED SET
MAX SPEED
TORQUE SET
TORQUE UNITS
BRAKE ON/OFF
POWER UNITS
DOWN
The following flow charts are a reference for navigating through the key functions of the DSP6001 Dynamometer
Controller. For step-by-step setup instructions, refer to the corresponding chapters in this manual.
C.1 PRIMARY KEY FUNCTIONS
ON
1.
2.
3.
4.
5.
BRAKE
ON/OFF
TORQUE
SET
SPEED
SET
P 0–99%
I 0–99%
OFF
0.000–
99,999
0.000–
99,999
6.
D 0–99%
88
APPENDICES
 Loading...