

Page 1
iOS
Made for
iPad Air*
iPad with Retina Display*
iPad mini with Retina Display*
iPad mini*
iPhone 5c*
iPhone 5s*
iPhone 5*
(5th* generation)
iPod touch
iDynamo 5 Lightning connector
iOS
Setup Guide
Made for
(3rd generation)
iPad
iPad 2
iPad
iPhone 4s
iPhone 4
iPhone 3GS
iPod touch
(3rd and 4th generation)
iDynamo with 30-pin connector
1
Sign up for your Subscription
If you haven’t already done so, please set up a QwickPAY subscription
and Merchant Account.
Go to www.qwickpay.com and click on ACTIVATE. Click on the button
“I have an active merchant account,” if you can already accept credit
cards elsewhere, and on “I need to setup a merchant account,” if you
need to be able to accept credit cards. Complete the online form and
SUBMIT. A representative will contact you to complete the process.
Demo QwickPAY
You can demo QwickPAY even before signing up for a subscription by
using demo mode.
Virtual Terminal Demo Mode:
Go to https://myQwickPAY.com and use these credentials.
QwickPAY Merchant ID: demo
QwickPAY Merchant Pwd: Go4QwickPAY!!!
Mobile Device Demo Mode
Download the QwickPAY application for free from the App Store to your
mobile device. Then tap on the MENU button and then on MERCHANT
INFO>. You only need to enter your email address.
2
Virtual Terminal & Custom Receipts
If you already have your QwickPAY subscription credentials and
Merchant Account you are ready to login. Go to the virtual terminal
rst to setup your custom receipts using your Windows PC or Mac and
open a browser* (Chrome, Safari, Firefox, or Internet Explorer).
Custom receipts brand your business and enable you to create
receipts with your address, return policies and any other message you
would like.
• Go to https://myQwickPAY.com
• Click on LOGIN and enter your credentials.
• Under ACCOUNT go to RECEIPT SETTINGS.
• Add your logo, a header, a footer and signature line if you will be
printing receipts directly from the virtual terminal.
• Be certain to SAVE your updates.
The next time you login to your virtual terminal or mobile App the latest
version of the custom receipt will automatically load.
In the Virtual Terminal you can make sales*, create reports, change your
password, access documentation, and view sales history.
Password Change Note:
If you change your password at the virtual terminal, you will also need to change it on
your mobile device.
*Virtual Terminal Note:
If you will be using your virtual terminal to perform transactions, you will need to use
a current Windows or Mac based OS, and install and run a Java Applet.
Support
For assistance related to processing, transactions and settlement, please
contact the vendor that provided you with your Login credentials or directly
contact your processor (the entity that supplied your Merchant Account).
Most Merchant Account providers have 365/24/7 support.
For assistance directly related to your reader or application, please contact
MagTek Monday through Friday from 8:00 a.m. to 7:00 p.m. Central Time.
After hours and weekend support is available through e-mail at support@
qwickpay.com. Please have your reader plugged in and the QwickPAY
application downloaded before you call for faster service.
Technical Specications
Optional stylus is available at http://tenonedesign.com/stylus.php
Card Speed: 6 to 60 ips
Electrical Current: 50mA maximum
Operating Temperature: 0°C to 35°C (32°F-95°F)
Operating Humidity: 5% to 90% noncondensing
“Made for iPod” and “Made for iPhone” and “Made for iPad”
mean that an electronic accessory has been designed to
connect specically to iPod or iPhone or iPad respectively,
and has been certied by the developer to meet Apple
performance standards. Apple is not responsible for the
operation of this device or its compliance with safety and
regulatory standards. iPod touch, iPhone and iPad are
trademarks of Apple Inc., registered in the U.S. and other
countries.
iPod, iPhone and iPad not included.
MagTek® Inc., 1710 Apollo Court, Seal Beach, CA 90740
p 562.546.6335 | f 562.546.6569 I www.QwickPAY.com | www.magtek.com
Registered to ISO 9001:2008 © Copyright 2014 MagTek, Inc. PN 99800095 rev. 9.01 3/14
Page 2
3
Download and Sign in
Download the QwickPAY application for free from the App Store on iTunes.
Launch the mobile App and tap on MENU and then MERCHANT INFO> and enter your QwickPAY Merchant ID, QwickPAY
Merchant Password (reenter for conrmation) and enter the e-mail you wish to be associated with your credit card transactions.
4
5
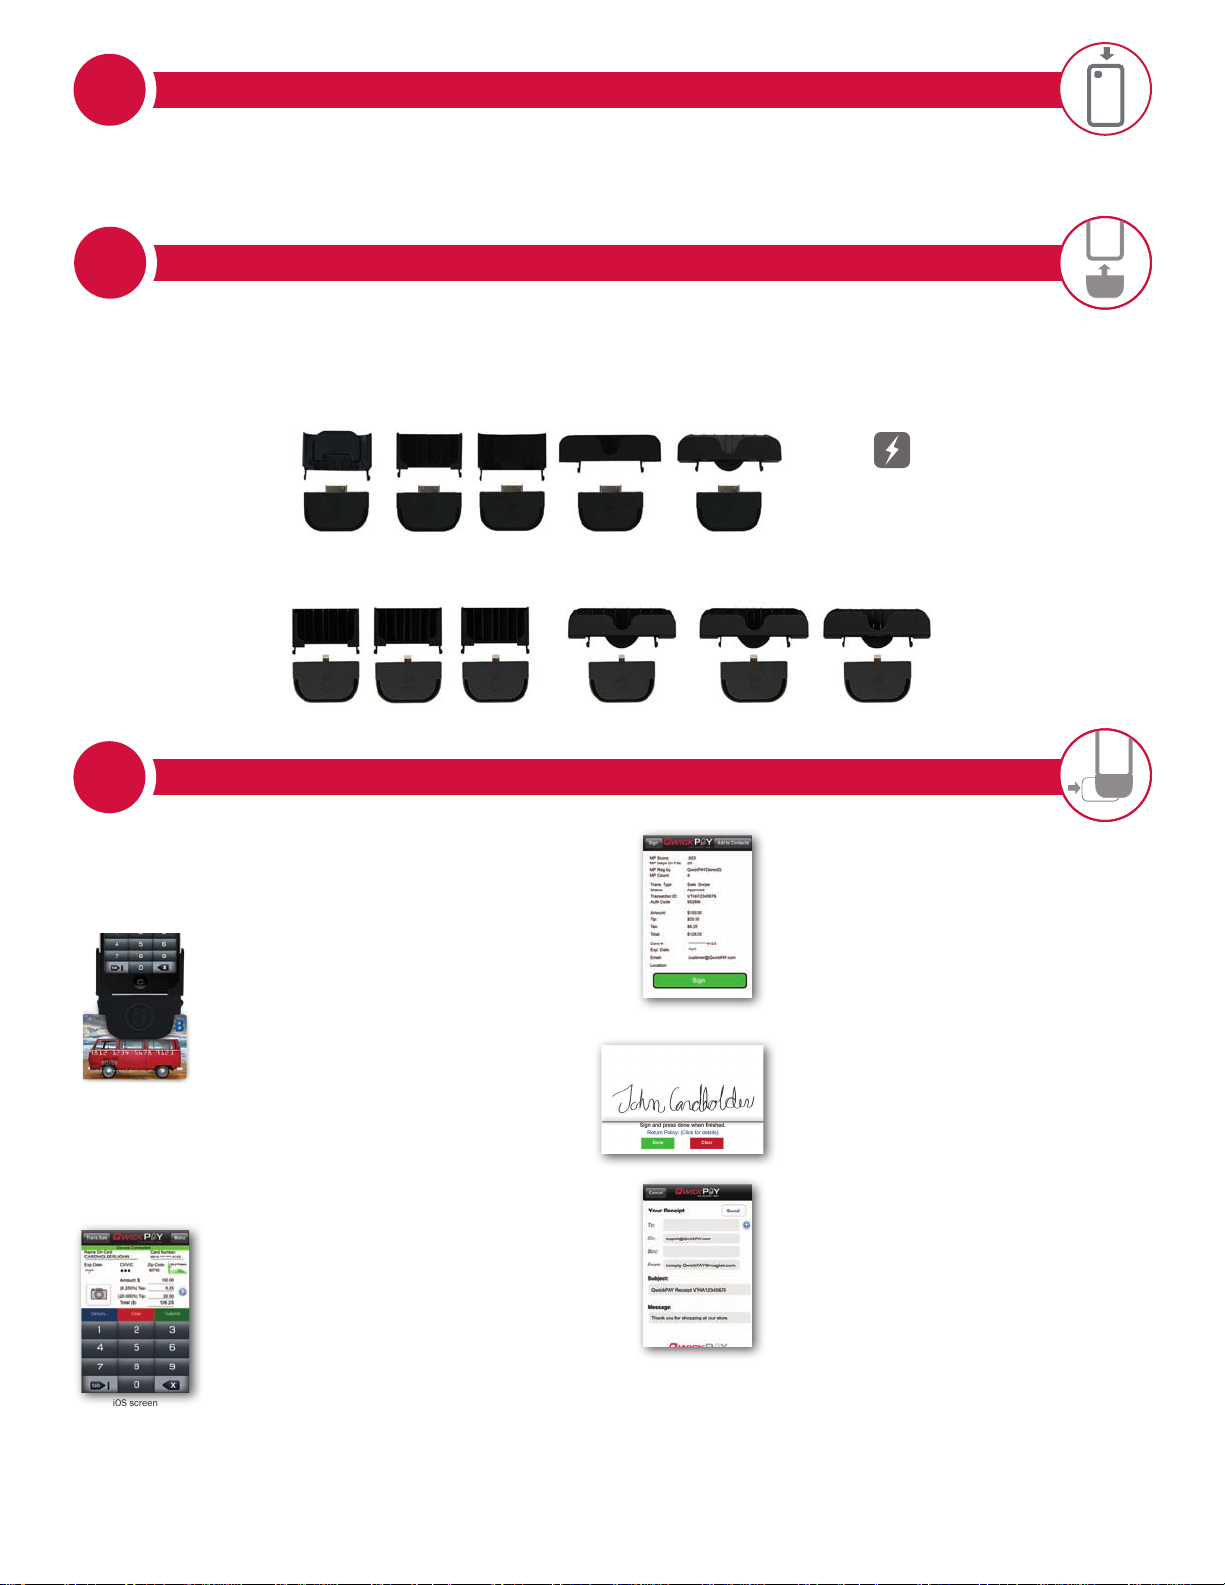
Connect your SCRA (MagTek delivers adapters for better stability)
MagTek supplies adapter kits with the respective iDynamo devices to make attaching to your different iOS devices simple. The
iDynamo adapter kits are available for iPod touch 3rd and 4th generation (using an insert that slips into the iPhone 3GS adapter),
iPhone 4s/iPhone 4, iPhone 3GS, iPad, and iPad 3rd generation/iPad 2. The iDynamo 5 adapter kits are available for iPod touch
5th generation, iPhone 5c, iPhone 5s/iPhone 5, iPad Air, iPad with Retina Display, iPad mini with Retina Display, and iPad mini.
Connect the iDynamo via the 30-pin or iDynamo 5 via the Lightning connector
QWICKPAY SETTINGS. Select the iDynamo device (“On”). Then press the DONE button.
iDynamo
30-pin connection
iPhone 3GS iPadiPhone 4s
iPhone 5s
iPhone 5
iPad mini iPad with
iDynamo 5
Lightning adapter
iPod touch
3rd and 4th generation
(This uses the iPhone 3GS
adapter and a small insert that
slips in. Be sure to position
the insert so the inside name
matches your iOS device.)
iPod touch
5th generation
iPhone 4
iPhone 5c
. Launch QwickPAY and tap on MENU. Then tap on
The iDynamo is powered
through the iOS device. It
only uses power during a
transaction.
iPad
3rd generation
iPad 2
iPad Air
iPad Mini with
Retina Display
Retina Display
QwickPAY provides a power
and connected indicator
within the application.
Make a Sale on Your Mobile Device
Select Transaction Type
Starting from QwickPAY’s main transaction screen,
touch the TRANS.SALE button in the upper left corner.
Select SALE-SWIPE to accept a payment card.
Transaction Authorization & Authentication
The transaction is sent to the QwickPAY Payment
Protection Gateway and a response will appear
almost immediately.
iOS screen
simulations shown.
1. Swipe the Card
Swipe the payment card through the iDynamo
(magstripe facing down). The card data is masked so
that full card data is never displayed. The customer
name and account automatically appear from the card
swipe. You can tap DETAILS to add information to your
customer contact (including e-mail and address).
You can perform a Manual Entry (CNP) transaction by
pressing the Transaction Menu and choosing Manual
Entry. You will be re-directed to the QwickPAY Virtual
Terminal at https://MyQwickPAY.com
For complete details please see the user manual.
2. Enter the Details
Enter the CVV2/CVC2 and a ZIP CODE to better
validate the card (optional).
Enter the dollar amount, tax and tip (these are
automatically calculated, but can be changed by
pressing the blue arrow button).
Take a picture using the camera function to include a
photo of the customer or the goods being purchased
(optional).
Submit the Sale
Press the SUBMIT button when you are ready to
process the sale.
(An error alert will appear if the card could not be properly
authenticated due to a poor MagnePrint® score.)
Press ADD TO CONTACTS to save the customer
details (optional).
3. Obtain Signature
Customers may sign the receipt with their nger or
use an optional stylus. Press DONE to automatically
open an e-mail message.
4. Send Receipt
Send your custom receipt via e-mail to the customer.
The e-mail will automatically contain the receipt,
your merchant e-mail address (CC’d) and the subject
header containing the receipt number.
Tap Send to send the e-mail now.
Print Receipt
After you e-mail the receipt you can also optionally
print the receipt to any available AirPrint printer.
Under QWICKPAY SETTINGS change RECEIPT
PRINTING to ON and QwickPAY will automatically
prompt you to print a receipt after each transaction.
 Loading...