

Page 1
THE SAFEST WAY
DESIGNED FOR BUSINESS ON THE MOVE
Android Nexus One, Android Samsung Galaxy and
Windows OS and Mac OS PC not included.
iPod, iPhone and iPad not included.
User Guide
Mobile Merchant and Virtual Terminal
Powered by Magensa
Registered to ISO 9001:2008 © Copyright 2014 MagTek, Inc. PN 99800094 rev. 15.02 6/14
Page 2

Copyright and About MagTek
Copyright© 2014 MagTek®, Inc.
Printed in the United States of America
Information in this document is subject to change without notice. No part of this document may be reproduced or transmitted
in any form or by any means, electronic or mechanical, for any purpose, without the express written permission of MagTek, Inc.
MagTek® is a registered trademark of MagTek, Inc.
MagnePrint® is a registered trademark of MagTek, Inc.
MagneSafe™ is a trademark of MagTek, Inc.
Magensa™ is a trademark of MagTek, Inc.
USB (Universal Serial Bus) Specication is Copyright© 1998 by Compaq Computer Corporation, Intel Corporation, Microsoft
Corporation, NEC Corporation.
About MagTek
Founded in 1972, MagTek is a leading manufacturer of electronic systems for the reliable issuance, reading, transmission and
security of cards, checks, PINs and identication documents. Leading with innovation and engineering excellence, MagTek is
known for quality and dependability. Its products include secure card reader/authenticators, encrypting check scanners, PIN
pads and distributed credential personalization systems. These products are used worldwide by nancial institutions, retailers,
and processors to provide secure and efcient payment and identication transactions.
Today, MagTek continues to innovate. Its MagneSafe™ hardware architecture leverages strong encryption, secure tokenization,
dynamic card authentication, and device/host validation enabling users to assess the trustworthiness of credentials and
terminals used for online identication, payment processing, and high-value electronic transactions.
MagTek is headquartered in Seal Beach, CA. For more information, please visit www.magtek.com.
Manufactured by:
MagTek® Inc.,
1710 Apollo Court
Seal Beach, CA 90740
p 562.546.6335
f 562.546.6569
www.magtek.com
2
www.qwickpay.com
Page 3

Table of Contents
QwickPAY delivers a broad range of compatibility, allowing your browser-based, iOS, and Android devices to evolve into a highly
secure payment system. Any variations between platforms are noted herein.
Mobile Business
A. About
i. About QwickPAY 1
ii. Using the Demos 2
iii. Contact Support 3
B. Managing my Account for my Mobile Device
1. Account a. Request subscription 4
2. Setup a. Custom receipts: setup on virtual terminal 5
3. App a. Download 6
b. Security and GPS tracking 7
c. App Login 8
d. Save QwickPAY Credentials in Safari 9
e. Change e-mail 10
f. Change password 10
g. Overview 11
h. Change and update tax and tip 12
4. Connect a. Connect iDynamo/iDynamo 5 to iOS 13
b.i. Connect BulleT to Android device 14
b.ii. Connect BulleT to newer Android versions 15
c. Connect uDynamo to audio jack 16
5. Make a Sale a. Transaction authentication and authorization 17
b. Make a sale - swipe 18
c. Make a sale - QwickCode 19
6. Other Transactions a. Void - before settlement 20
b. Refund - after settlement 21
7. Administrative a. Reports 22
b. History 22
C. Managing my account in my Virtual Terminal
1. Account a. Request subscription 23
2. Setup a. Setup Custom Receipts 24
3. Cloud Application a. Requirements and Specications 25
b. Login and Device Selection 26
c. Change password, change nickname 27
d. Change and update tax and tip defaults 27
e. Overview 28
4. Connect a. USB and Bluetooth connection 29
5. Make a Sale a. Card present sale uDynamo and Dynamag USB HID 30
b. Card present sale using BulleT USB HID 31
c. Card present sale using BulleT KB 32
d. Card present sale using Flash USB HID 33
e. MagTek PCI PED via USB HID connection 34
card present, card not present
f. Card not present manual enytry 35
6. Other Transactions a. Void - before settlement 36
b. Refund - after settlement 36
7. Administrative a. History and reports 37
D. Appendix
Codes: i. Pay by Swipe 38
ii. Pay by Manual Entry 39
iii. Pay by Qwick Code 40
Error: iv. SMTP port 25 error 41
Limited warranty 42
FCC warning statement 43
3
www.qwickpay.com
Page 4

A. About
i. Overview of QwickPAY
From the company that invented the rst hand card-swipe reader comes QwickPAY, a complete mobile payment solution
that uses the most reliable and safest card swipe reader (secure card reader authenticator, SCRA). QwickPAY is made for
businesses that need an easy solution to take credit card transactions while on the go. All you need is the QwickPAY App, a
merchant account, and the SCRA and you can easily accept credit cards including Visa, MasterCard, Amex, and Discover from
almost anywhere.
QwickPAY delivers a broad range of compatibility, allowing your browser-based, iOS, and Android devices to evolve into a
highly secure payment system. QwickPAY provides a payment processing platform, an account management system, a virtual
terminal, reporting, encryption, card and device authentication, counterfeit card detection and card tokenization.
Key Features
• E-mail receipts
• Create custom receipts
• Easy to use transaction reporting
• Capture digital signatures
• Capture images of cardholder or goods purchased
• Auto calculate Tip and Tax
• Fill customer contact info from address book
• Card-present ONLY transactions
• Visa, MasterCard, Amex, Discover
• Protects data and surpasses the PCI DSS standards
with the MagneSafe™ Security Architecture
• Immediate encryption (Triple DES) of all cardholder
data with a derived unique key per transaction
(DUKPT)
• Immediate tokenization or “substitution” of all
cardholder data
• Immediate authentication of the card to ensure it is
not a fraudulent copy
• Dynamic payment card data with every transaction for
maximum cardholder protection
SCRA Features
• Bi-directional card reading
• Reads encoded data that meets ANSI/ISO/AAMVA/JIS
Type 2 standards
• Reads up to three tracks of card data
• Supplies 54 byte MagnePrint® value
• Unique, non-changeable serial number which allows
individual tracking
• Encrypts all track data and MagnePrint value
• Provides clear text conrmation data including card
holder’s name, expiration date, and a portion of the
PAN as part of the masked track data
• Mutual authentication mode
• Affordable and exible
• Lowers the cost of card acceptance by offering
authentic, card present transactions
• Reduces the scope of PCI compliance by eliminating
sensitive card data from App
• Eliminates charge back process by declining
counterfeit cards
QwickPAY provides unmatched security for cardholders and merchants with DETA transaction security.
DETA = Transaction Security.
• Dynamic: payment card data.
• Encryption: within the head – decrypted data delivered only to a PCI DSS certied payment processor or gateway.
• Tokenization: of sensitive data (3 types - Card, PAN, and Transaction) & QwickPAY QwickCode exchange.
• Authentication: of card, cardholder data, device, host, and session - eliminates the costs and hassles related to the
charge back process by identifying counterfeit cards.
1
www.qwickpay.com
Page 5
ii. Using the Demos
QwickPAY provides demos within the App. Simply download the App from the App Store or Google Play Android Market and tap on
Menu then Merchant Info> and choose your demo mode (with or without a secure card reader authenticator, for iOS the SCRA is
called an iDynamo/iDynamo 5). The demo credentials will automatically complete, you just need to enter your e-mail address.
Credentials
Credentials are case sensitive.
DEMO With
Merchant ID
SCRA
Demo QwickPayDemoID demo
Without
SCRA
Virtual
Terminal
Merchant
Password
After you enter your e-mail address tap Done.
You can then use real credit cards to perform demo transactions. Please be certain to enter in your live credentials once you
are ready to make live transactions. You cannot perform actual transactions for settlement in demo mode.
QwickPayDemoPwd QwickPayDemoPwd Go4QwickPAY!!!
ATTEMPTING LIVE TRANSACTIONS IN DEMO MODE WILL NOT TRANSFER FUNDS.
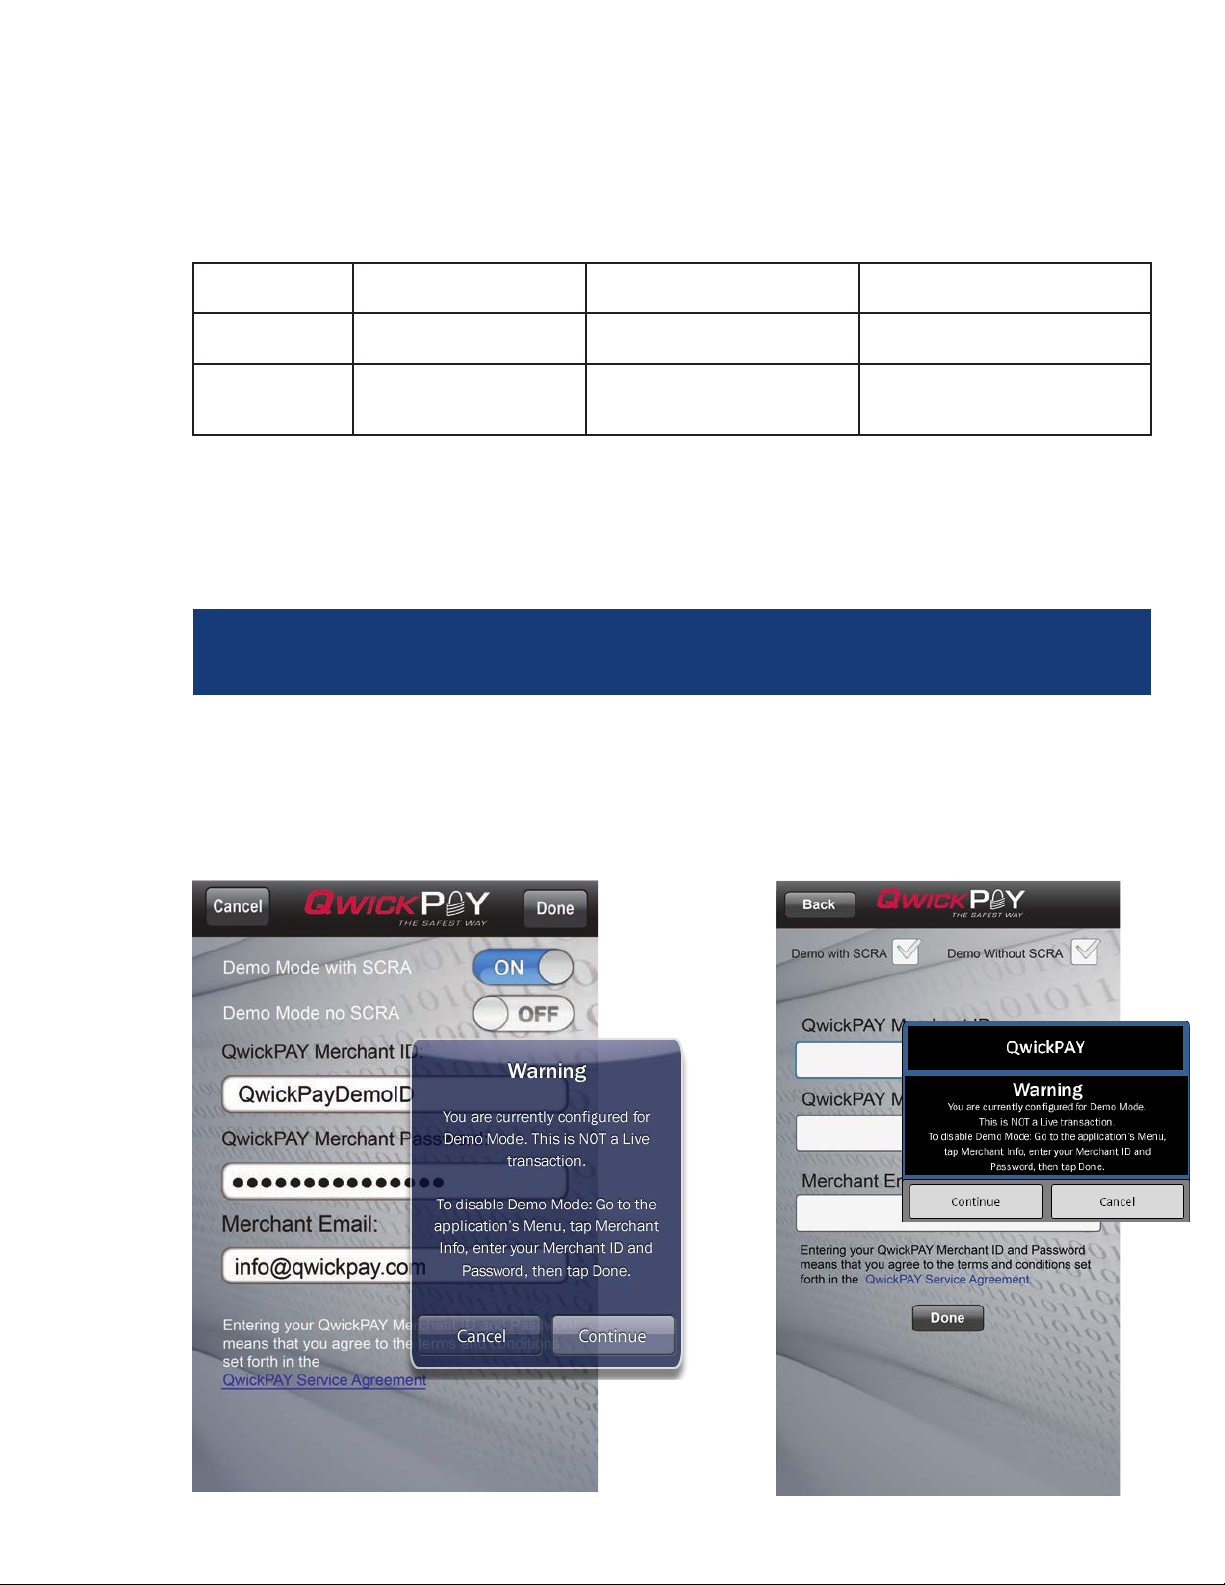
If you are in Demo Mode and try to make a Live transaction and hit Submit you will get the following warning:
Warning
You are currently congured for Demo Mode. This is NOT a Live transaction. To disable Demo Mode: Go to the Application’s
MENU, tap Merchant Info, enter your Merchant ID and Password, then tap DONE.
Monies will not be transferred in Demo mode.
Additionally the e-mail receipt message will state:
“You are currently congured for Demo Mode. This is NOT a live transaction.”
Sample iOS Device Screen Shot
Sample Android Screen Shot
2
www.qwickpay.com
Page 6

iii. Contact Support
Contact
For assistance related to processing, transactions, applications, and settlement, please contact the MagTek vendor that
provided you with your Login credentials or directly contact your processor (the entity that supplied your merchant account).
They will be able to provide you with the best possible service. Most merchant account providers have 365/24/7 support. For
additional assistance, please contact your QwickPAY supplier or email us at support@qwickpay.com.
Please have your reader charged (if required) and have the part number and serial number available before you call for faster
service. Your serial number is on the reader itself or launch the App and tap on Menu then iDynamo/MagneSafe SCRA to view
the serial number and rmware version.
A note on your merchant account
Your merchant account is separate from your QwickPAY subscription. Your merchant account provides an agreement between you,
a merchant bank and a payment processor for the settlement of credit card and/or debit card transactions. Most transactions
settle within 24 hours.
Merchant service providers deliver the nancial linkage between you, your customers, your bank and the credit card companies.
Fees and fee structures will vary, but you can expect that every merchant processing account will include a Discount Rate. This
is the percentage of the transaction amount you will be billed for the transactions you process. Rates vary based on certain risk
criteria usually categorized into “Qualied”, “Mid-Qualied” and “Non-Qualied” tiers. In addition, rates vary depending on your
type of business, whether or not you swiped the customer’s card through the reader and other factors that can be explained in
further detail by your merchant account provider. To ensure that you get the lowest fees possible, always swipe the customer’s
card through the SCRA, and be sure to include all the required information whenever processing a transaction.
3
www.qwickpay.com
Page 7

B. Managing my account for mobile devices.
B. Managing my account on my mobile devices
1
Getting a QwickPAY Account
Request a Subscription
Request a Subscription
You can go to the QwickPAY web site www.qwickpay.com and click on Activate to get a subscription with QwickPAY (“Get
QwickPAY” brings you to the online shop and allows you to purchase secure card reader authenticators).
A merchant account is required to use QwickPAY. If you already have a merchant account (meaning you can already accept
credit cards) or if you need to establish a merchant account, you can select the appropriate form to complete online. A
representative will contact you to complete the subscription process.
Account Activation
Once your account has been activated, you will be sent your credentials, Merchant ID (Username) andQwickPAY Merchant
Passord for login. The credentials are case sensitive. Please enter the credentials exactly.
Go to https://myqwickpay.com with your account credentials and setup your custom receipts.
4
www.qwickpay.com
Page 8

B. Managing my account for mobile devices.
2
Setting up Account
Custom Receipts
QwickPAY allows you to create your own custom receipts.
1. Locate your credentials.
2. Go to https://myqwickpay.com/login.aspx.
3. Enter your QwickPAY Merchant ID and Password.
4. Under SETTINGS go to CUSTOM RECEIPTS.
5. Add your Logo, a header, and a footer; you can also add a signature line for the virtual terminal receipts, allowing you to print
out receipts for hard copy signature after transactions are completed. [See items 1- 5 below]
6. SAVE your updates.
In order for the virtual terminal and mobile application to be synchronized with updates to the custom receipts, you will need
to completely close and restart the QwickPAY App on your mobile device. The receipt formatting updates are saved locally on
your device and each time you start the App it will check for the most recent revision. If updates are available, they will be
automatically downloaded and saved.
Logo Image
1
The logo must be in PNG, GIF or JPG
format and can’t be more than 40
kilobytes in size, 250 pixels wide
and 100 pixels high. You can access
photos on your PC or mobile device.
1
TIP: If you want the logo background
to blend in with the background of the
receipt, you should put the logo on a
white background with the hex color set
to #FFFFFF.
Header
2
The header is the information
located at the top of the receipts just
under the logo. It is always centered.
Most commonly the header consists
of address and contact details.
Signature Line (Virtual
3
Terminal ONLY)
Check the box to add a signature
line for virtual terminal receipts so
customers can sign a printed copy.
This eld will not show or populate with
signatures taken on mobile devices.
Footer Information
4
The footer information is located
after the receipt information and is
left justied. It is commonly used for
thanking customers, URL information
and return policies.
2
3
4
5
Save
5
Be certain to SAVE your receipt
updates. To view the updates on your
mobile devices be certain to close
and re-open the App on your device.
5
www.qwickpay.com
Page 9

B. Managing my account for mobile devices.
3
Application
a. Download the QwickPAY App for free
iPhone, iPad, and iPod touch Users
1. iOS users tap on App Store icon on the main screen of
your mobile device.
2. Enter your account password and user name. If you do
not already have an account you will need to establish
one with iTunes.
3. You can then enter the link information below or do a
search for QwickPAY: http://itunes.Apple.com/us/App/
qwickpay/id371172197?mt=8
4. Select QwickPAY from the list.*
5. Tap on Install. The App will automatically start to install
on your mobile device.
6. Once it is installed you will see the icon on your main screen.
Android Users
1. Android users tap on Google Play Store icon on the main
screen of your mobile device.
2. Enter your account password and user name. If you do
not already have an account you will need to establish
one with Google Play.
3. You can then enter the link information below or do a
search for QwickPAY: https://play.google.com/store/
Apps/details?id=com.magtek.mobile.android.QwickPAY
4. Select QwickPAY from the list.*
5. Tap on Install. The App will automatically start to install
on your mobile device.
6. Once it is installed you will see the icon on your main screen.
6
www.qwickpay.com
Page 10
3
B. Managing my account for mobile devices.
b. Security and GPS Tracking
SECURITY
1
SET GPS TRACKING
2
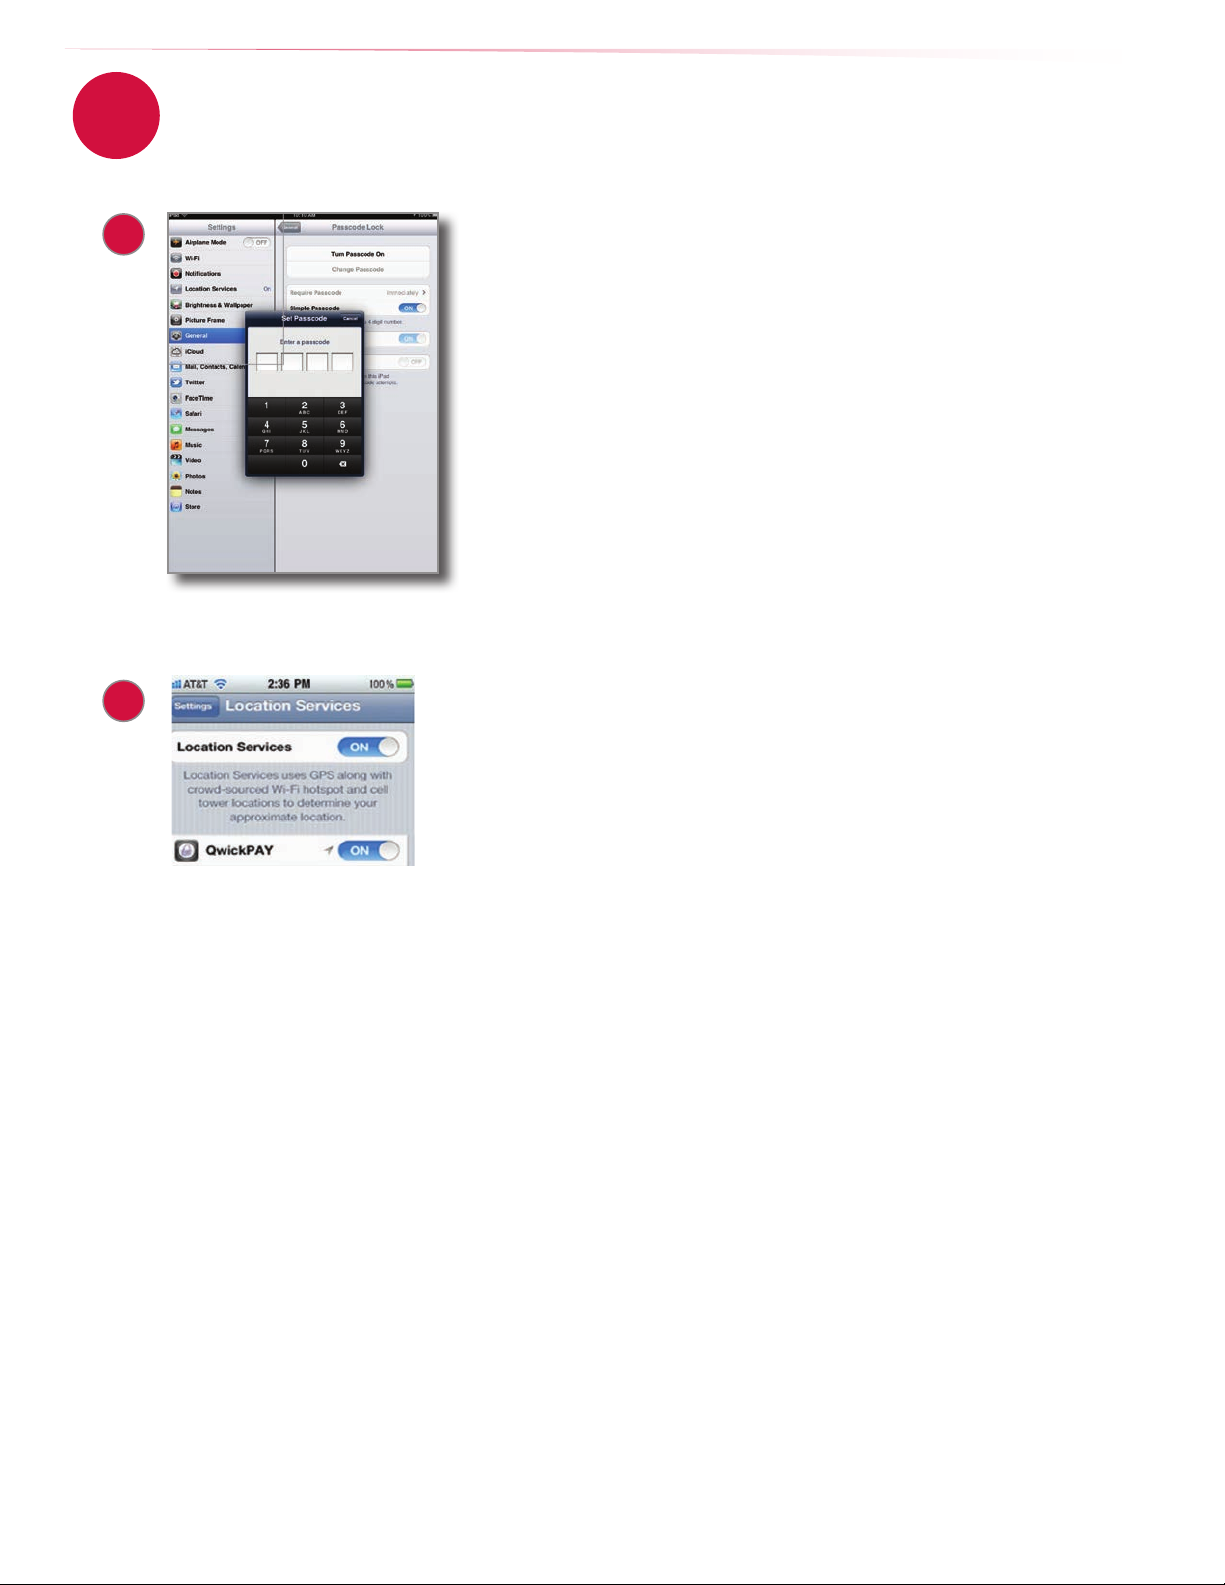
Protect your device with a passcode.
For added protection, be certain to protect your device with a passcode.
Set your GPS tracking to ON or OFF
GPS tracking is currently only supported on Apple iOS devices. When you rst Install
QwickPAY, the App will ask you if you wish to allow the QwickPAY App you are installing
to use your current location. This feature provides a record of where the transaction
took place. If you tap OK, the GPS coordinates will appear on all the QwickPAY
transaction receipts.
If you tap Don’t Allow, these coordinates will not appear on your QwickPAY transaction
receipts.
If you decide to change your settings on your iOS device:
1. Tap on Settings on your main screen
2. Next tap on Location Services.
3. Once in Location Services look for the QwickPAY App. Turn the location services on
or off for the App.
4. Return to Settings or exit out and the new settings will be saved. The feature will
then be enabled or disabled.
7
www.qwickpay.com
Page 11

3
B. Managing my account for mobile devices.
c. App Login
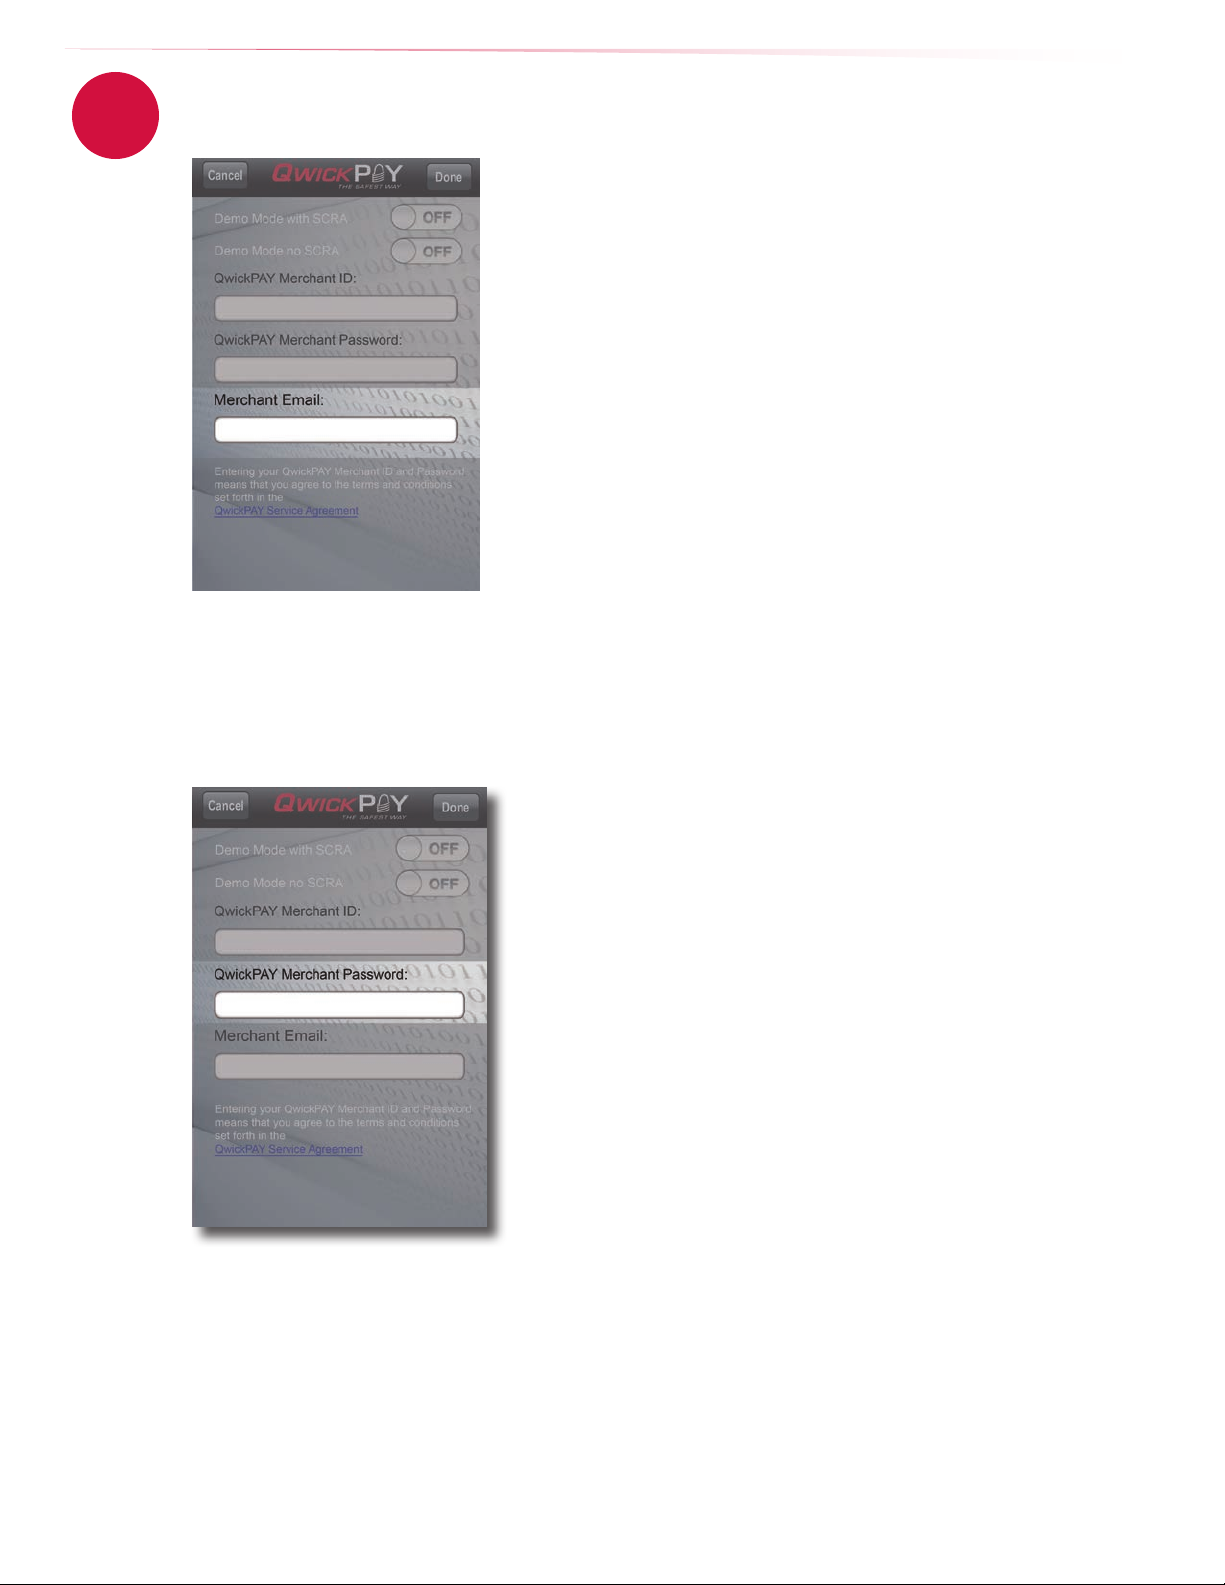
Enter your credentials - Make sure you are NOT in Demo mode
Once your subscription is processed you will receive your login credentials; these may come direct from QwickPAY or from your
merchant account card processor. LAUNCH the Application. Tap on the splash screen and then tap on the MENU button in
top right corner. Tap on MERCHANT INFO>. Enter your credentials and the e-mail address you wish to be associated with this
subscription and tap DONE to save your completed details.
1 2
LAUNCH MENU
4 5
3
MAIN MENU
MERCHANT INFO ENTER DETAILS
8
Make certain demos
are OFF when your are
ready to perform real-world
LIVE transactions.
www.qwickpay.com
Page 12
3
d. SaveQwickPAYCredentialsinSafarionaniOS7AppleDevice
In order to have the QwickPAY Credentials saved in the QwickPAY VT, you must rst enable Apple’s Passcode Feature for
security reasons. Below are the steps on how you can congure any Apple Device with the new iOS7 from Apple to save the
QwickPAY Credentials.
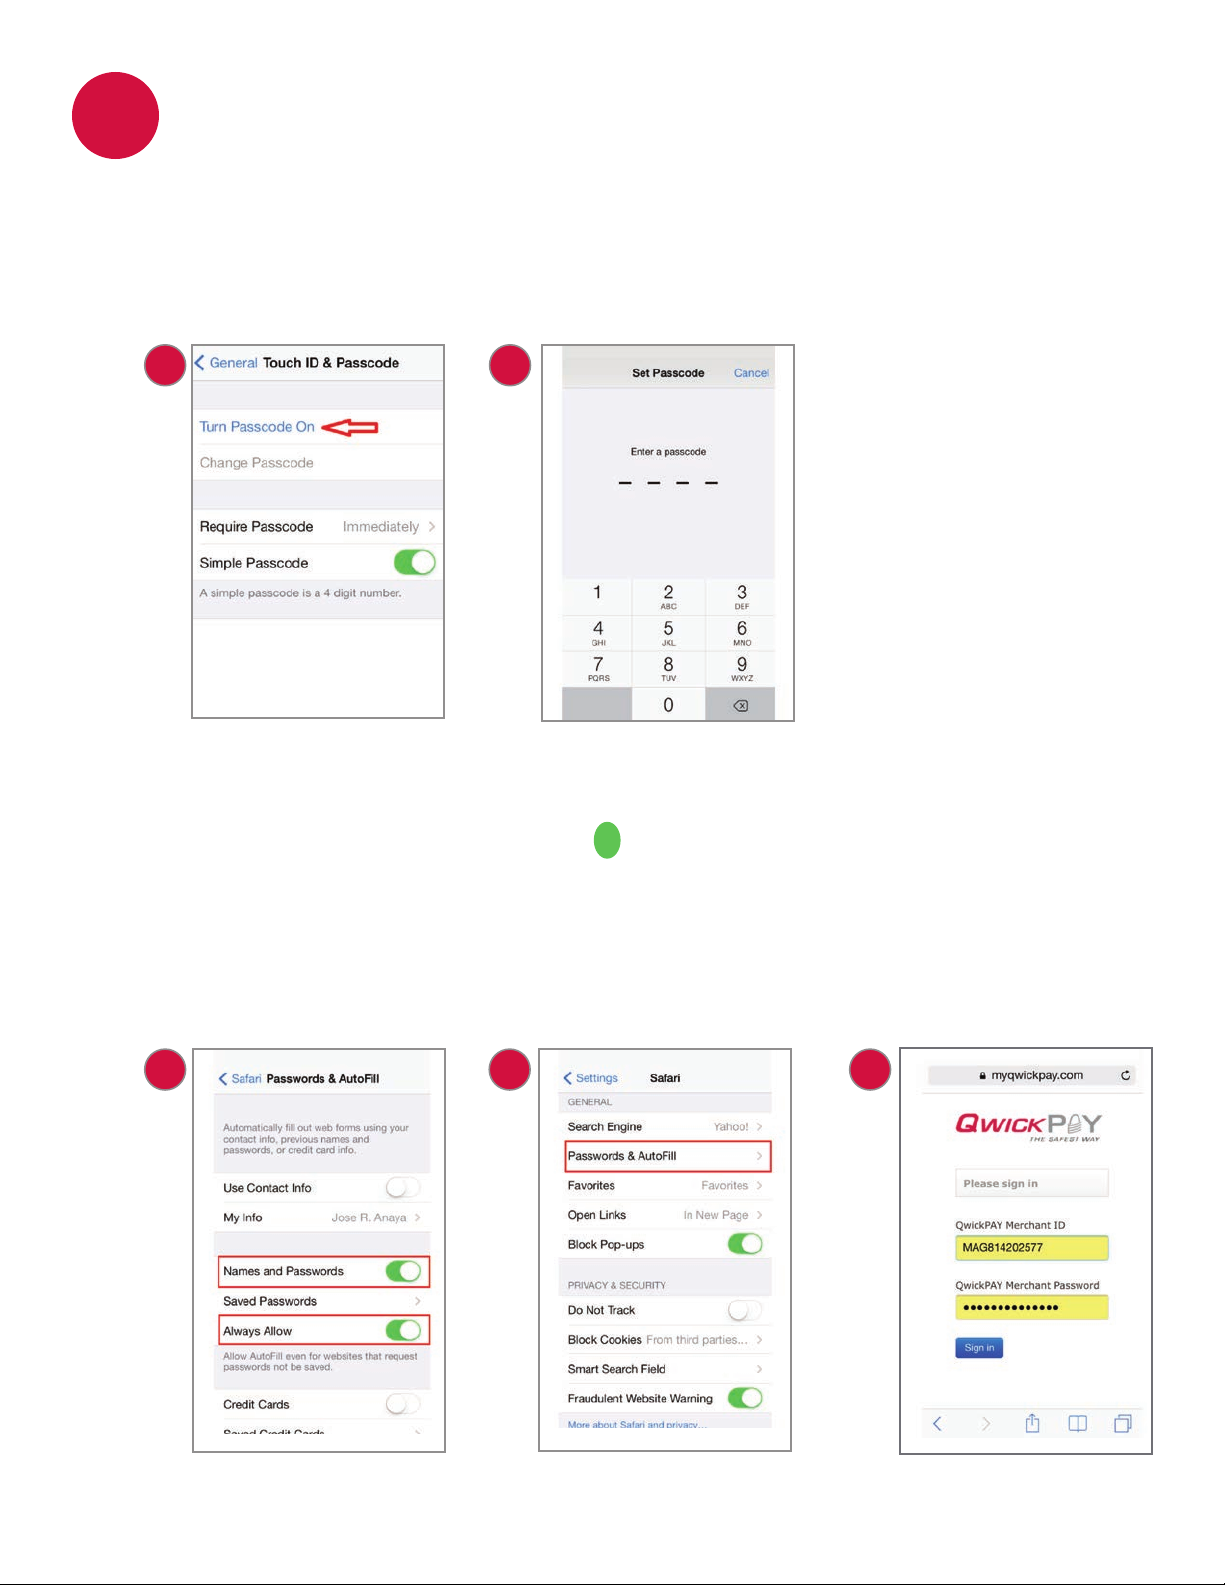
Set Passcode for the Apple Device:
1. Go into Settings/General/Touch ID & Passcode on the Apple device.
2. Tap on Turn Passcode On and set a four digit code to activate the Passcode feature on your Apple device.
1 2
Go To Settings Passcode
Set and congure Safari:
Go into Settings/Safari/Passwords & AutoFill (3) and turn On the Names and Passwords & Always Allow (4) features on the Apple device.
Now push your Home button once to go to your Home Screen and then launch Safari and type myqwickpay.com in the URL bar
to go to MyQwickPAY.com site. Once you are there, type in your QwickPAY Credentials and then tap the Sign in button and you
will receive a message like the one shown below asking if you wish to save the password, please tap on Save Password.
Next time you visit this site, it will automatically ll in your QwickPAY Credentials without showing what the Password is and will look similar
to the picture below. Tap the Sign in button and you are in and ready to conduct any task you wish to do on your QwickPAY Account.
43 5
9
www.qwickpay.com
Page 13
3
B. Managing my account for mobile devices.
e. Change e-mail
Changing e-mail on your account
To change e-mail address or credentials in the QwickPAY App:
1. Launch the QwickPAY App and tap on the screen to get in.
2. Once you are in the main page of QwickPAY, tap on the Menu button on the top
right hand corner.
3. Now that you are in the menu screen, tap on the Merchant Info> option.
4. At the bottom of the Merchant Info screen, you can enter in a new e-mail
address in the Merchant Email eld.
5. Tap Done to save the update.
NOTE: Please do NOT adjust or touch the Merchant ID or Merchant Password
already in use unless you need to change it. Also make sure that the Demo Mode’s
are OFF.
f. Change password
If you change your QwickPAY Password in your virtual terminal, you must also update the QwickPAY App running on any mobile
device in order for the passwords to match.
Mobile Device
1. Launch and open the QwickPAY App.
2. Once you are in the main page of QwickPAY, tap on the Menu button on the
top right hand corner.
3. Tap on the Merchant Info> button.
4. Make certain that the Demo Mode’s are OFF.
5. Clear or tap on the X next to the QwickPAY Merchant Password elds to
remove the old password.
6. Type in the new password you just created on your virtual terminal in these
two middle elds. (No need to touch the Merchant ID because that will
never change.) You can update the merchant e-mail address here as well;
where all copies of the QwickPAY transaction receipts go.
7. Then tap on the Done button at the bottom of the page to save these
settings.
If the credentials took properly, it will take you back one page and then tap on
the Back button to take you back to the main QwickPAY page and you’ll be ready
to start processing card transactions.
[Make the password easy for you to remember, but too hard for anyone
else to surmise.
NOTE: MagTek/QwickPAY does not save nor store these custom
passwords, so please make sure you remember it or write it down and
store in a safe place.]
10
www.qwickpay.com
Page 14
g. App overview
3
QwickPAY allows you to turn your browser-based Windows or Macintosh-based PC or mobile device into a POS terminal. It also
provides the administrative architecture you need to run your business. The default landing screen for QwickPAY is the transaction
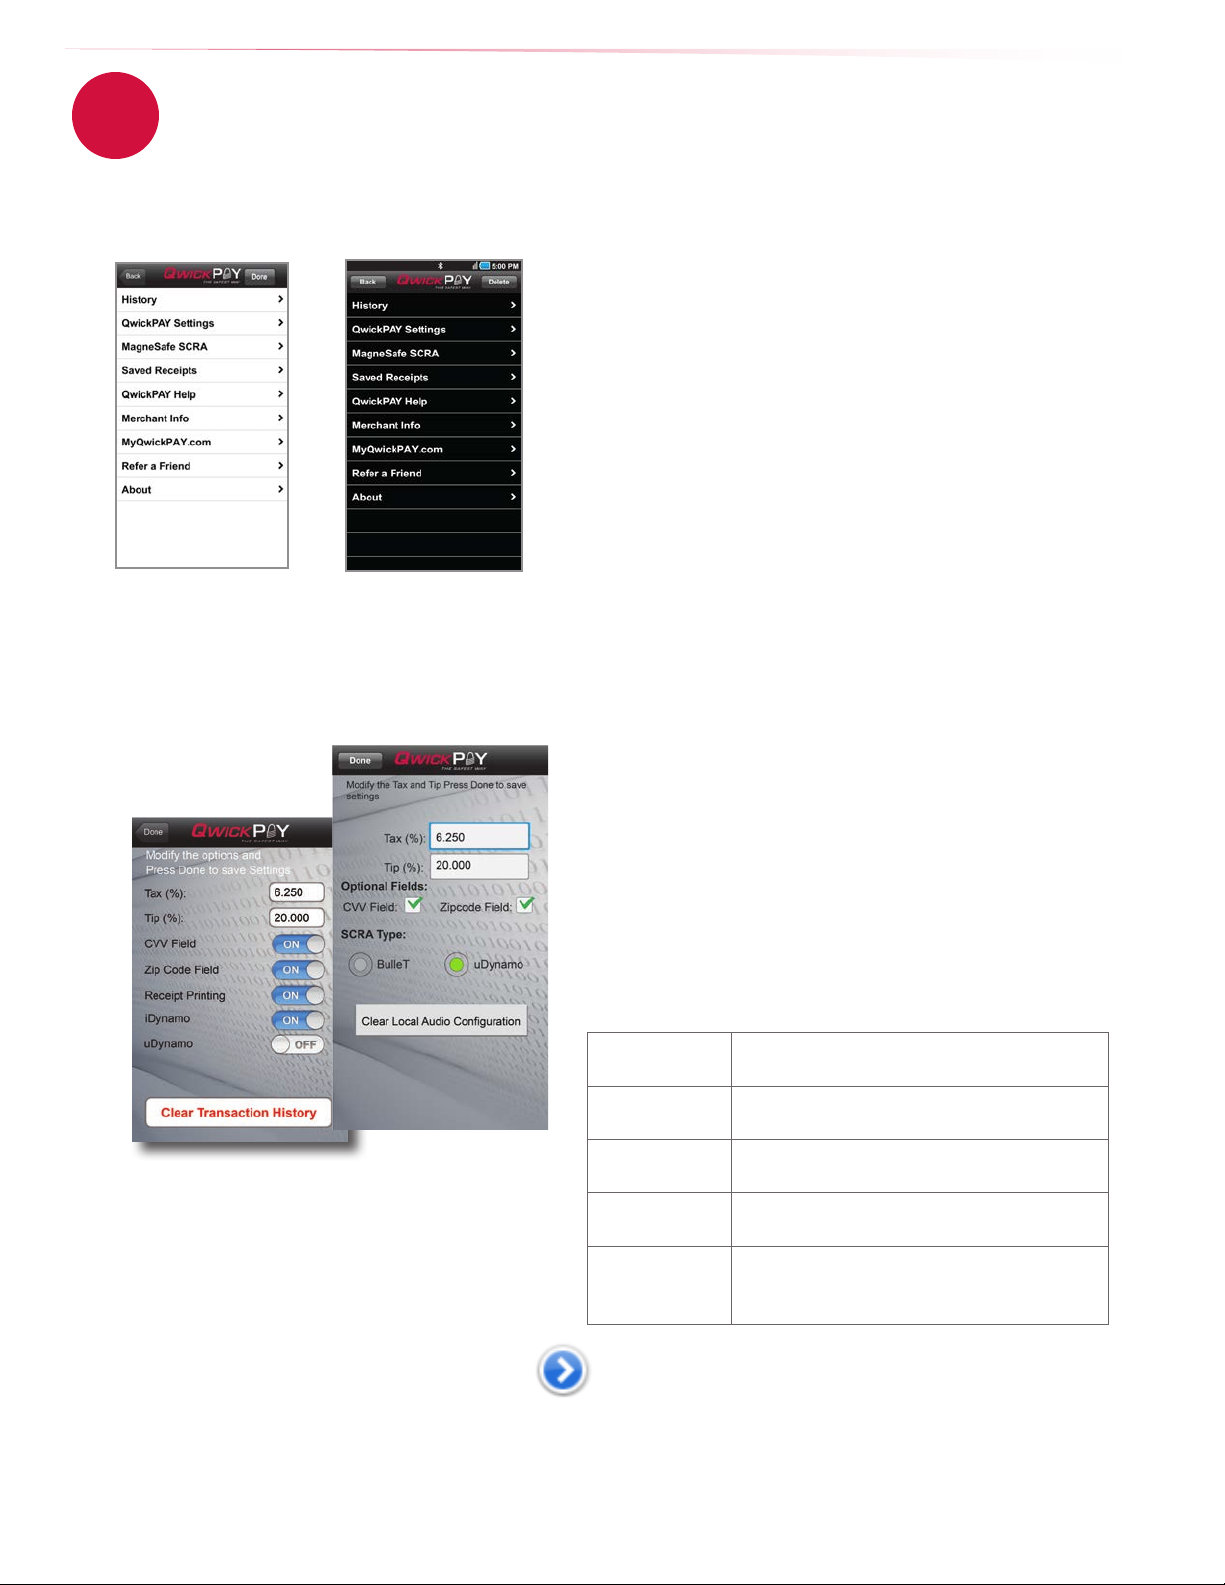
screen. If you tap the Menu button you can view history and more.
Simulated iOS screen Simulated Android screen
B. Managing my account for mobile devices.
QwickPAY Menu
History
QwickPAY Payment Protection Gateway provides all the reporting you need
to run the sales-end of your mobile business.
• Transaction search functionality
• Transaction detail viewing
• Allows you to easily pull up transactions for Voids and Refunds
MagneSafe SCRA
Tap this to see the SCRA’s unique serial number and rmware version.
The serial number will always be 7 digits and begin with a letter. The
rmware version will always be numeric.
Saved Receipts
Tap here to view receipts; useful when the network connection is lost or if
you do not have an e-mail account set up on the device.
QwickPAY Help
Tap here to launch the QwickPAY web site support page.
Merchant info
Tap here to Login and enter your credentials and e-mail. This information
does not synchronize with your virtual terminal and will need to be
updated at both locations.
QwickPAY Promos
Check here for updates on QwickPAY promotions.
Refer a Friend
Tap here to send a populated e-mail to friends and colleagues about
QwickPAY.
About
Touch here for version and Application information.
QwickPAY Settings
QwickPAY allows you to enter default settings for Tax and Tip values; CVV Field
on or off; Zip Code Field on or off; and Receipt Printing on or off (iOS only).
Tax and Tip
CVV Field
Zip Code Field
Receipt
Printing
Clear
Transaction
History
You can override the Tax and Tip manually at the point of sale by tapping
on the blue arrow and editing the values on the Tax and Tip screen.
11
Set your default calculations for tax and tip.
Set the default to require or not to require by
selecting ON or OFF.
Set the default to require or not to require by
selecting ON or OFF.
Available only with iOS. ON enables you to print
a hard copy receipt to an AirPrint printer.
Clears the transaction history on your phone.
The data is aggregated and remains in your
virtual terminal.
www.qwickpay.com
Page 15
h. Setting tax and tip
3
iOS screen simulations
Android screen simulations
B. Managing my account for mobile devices.
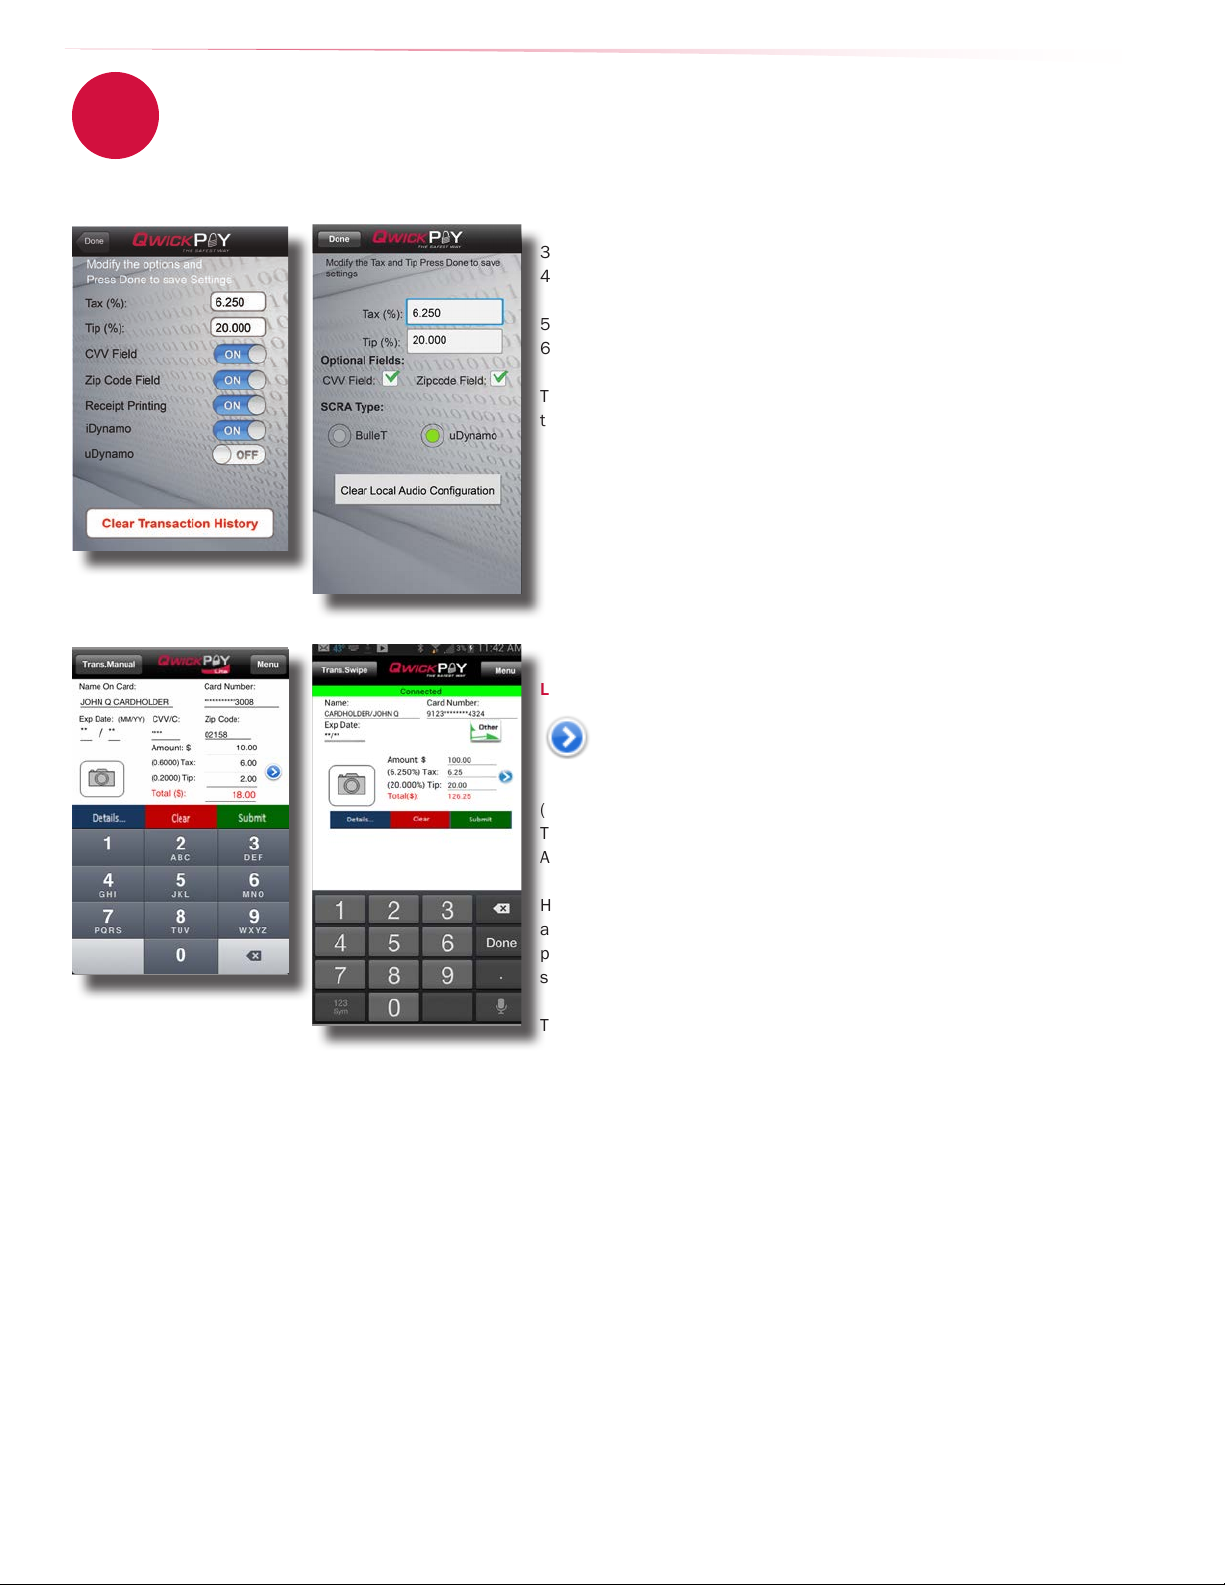
Default tax and tip settings
This sets a default tax and tip calculated percentage of the sale amount.
1. Launch the App.
2. Tap on Menu.
3. Tap QwickPAY Settings.
4. Set the tax and tip default calculation settings percentages. In this example the
tax is set to 6.250% and the tip is set to 20.000%.
5. Tap Done to save changes.
6. Tap Back to go to the transaction screen.
The next time you go to make a sale the tax and tip will automatically calculate to
this default setting.
At the point of sale alter the tax and tip amounts
This allows you to edit the tax and tip amount at the point of sale.
Launch the App
After you enter an Amount in the Amount eld can you edit the Tax and Tip.
Once you enter the Amount, you can tap on the blue arrow and the Tax and
Tip override screen will slide into view.
(The Amount eld is carried over from the prior screen and cannot be edited here.
To edit the Amount, tap Next and go back to the Trans.Sale/Swipe page to adjust the
Amount.)
Here you can select to enter either the Tax and Tip percentages or the Tax and Tip
amounts. Change any of the elds using the keyboard for input. (Changing the
percentages will show how the amounts change and changing the amounts will
show how the percentages change.)
Tap Next to save your changes for this sale.
Tax and Tip will revert back to default settings for subsequent transactions.
12
www.qwickpay.com
Page 16

B. Managing my account for mobile devices.
4
Connect
a. Connect iDynamo/iDynamo 5 to iOS device
MagTek Adapters for Better Stability
MagTek supplies adapter kits with the respective iDynamo devices to make attaching to your
different iOS devices simple. The iDynamo adapter kits are available for iPod touch 3rd and
4th generation (using an insert that slips into the iPhone 3GS adapter), iPhone 4s/iPhone 4,
iPhone 3GS, iPad, and iPad 3rd generation/iPad 2. The iDynamo 5 adapter kits are available
for iPod touch 5th generation, iPhone 5c, iPhone 5s/iPhone 5, iPad Air, iPad with Retina Display,
iPad mini with Retina Display, and iPad mini.
Connect the iDynamo via the 30-pin or iDynamo 5 via the Lightning connector. Launch QwickPAY
and tap on MENU. Then tap on QWICKPAY SETTINGS. Select the iDynamo device (“On”). Then
press the DONE button.
iDynamo
iPod touch
3rd and 4th generation
(This uses the iPhone 3GS adapter
and a small insert that slips in.
Be sure to position the insert so
the inside name matches your
iOS device.)
iPhone 4
iPhone 3GS iPadiPhone 4s
iPad
3rd generation
iPad 2
Made for
iPad Air*
iPad with Retina display*
iPad mini with Retina display*
iPad mini*
iPad
(3rd generation)
iPad 2
iPad
iPhone 5c*
iPhone 5s*
iPhone 5*
iPhone 4s
iPhone 4
iPhone 3GS
iPod touch
(3rd, 4th and 5th* generation)
* iDynamo 5 Lightning connector
iDynamo with 30-pin connector
iDynamo 5
iPod touch
5th generation
iPhone 5c
iPhone 5s
iPhone 5
iPad mini iPad with
iPad Air
iPad mini with
Retina display
Retina display
Sub header
Your will see the App sub header change from Disconnected to Armed and Ready to Device Connected.
“Made for iPod” and “Made for iPhone” and “Made for iPad” mean that an electronic accessory has been designed to connect specically to iPod or iPhone or respectively, and has been
certied by the developer to meet Apple performance standards. Apple is not responsible for the operation of this device or its compliance with safety and regulatory standards. iPod touch,
iPhone and iPad are trademarks of Apple Inc., registered in the U.S. and other countries.
iPod, iPhone and iPad not included.
13
www.qwickpay.com
Page 17

4
Made for
OS 2.3.3 or higher
B. Managing my account for mobile devices.
b. Pair and Connect BulleT via Bluetooth
i. Android
The MagTek BulleT secure card reader authenticator uses Bluetooth technology to connect and communicate with your
Android device. The BulleT uses an internal, rechargeable battery.
USB HID connection
Insert the Micro-B end of the cable into Micro-B port on the bottom of the reader and the Standard-A
connector into a USB port on the PC/Mac. USB connection will automatically detect your device.
Charge
Attach the USB cable. It takes approximately 2.5 hours to fully charge the battery and it will stay charged for
approximately 100 card swipes. The LED will slowly blink amber while the battery is charging and then turn
solid amber when the battery is fully charged (for best results, allow the battery to fully charge).
LED Indicator (Charging)
Power Switch
The power switch is located on the front of the reader.
Press to turn ON (default is 120 seconds).
Hold 1 second to extend ON.
Hold 3 seconds to turn OFF.
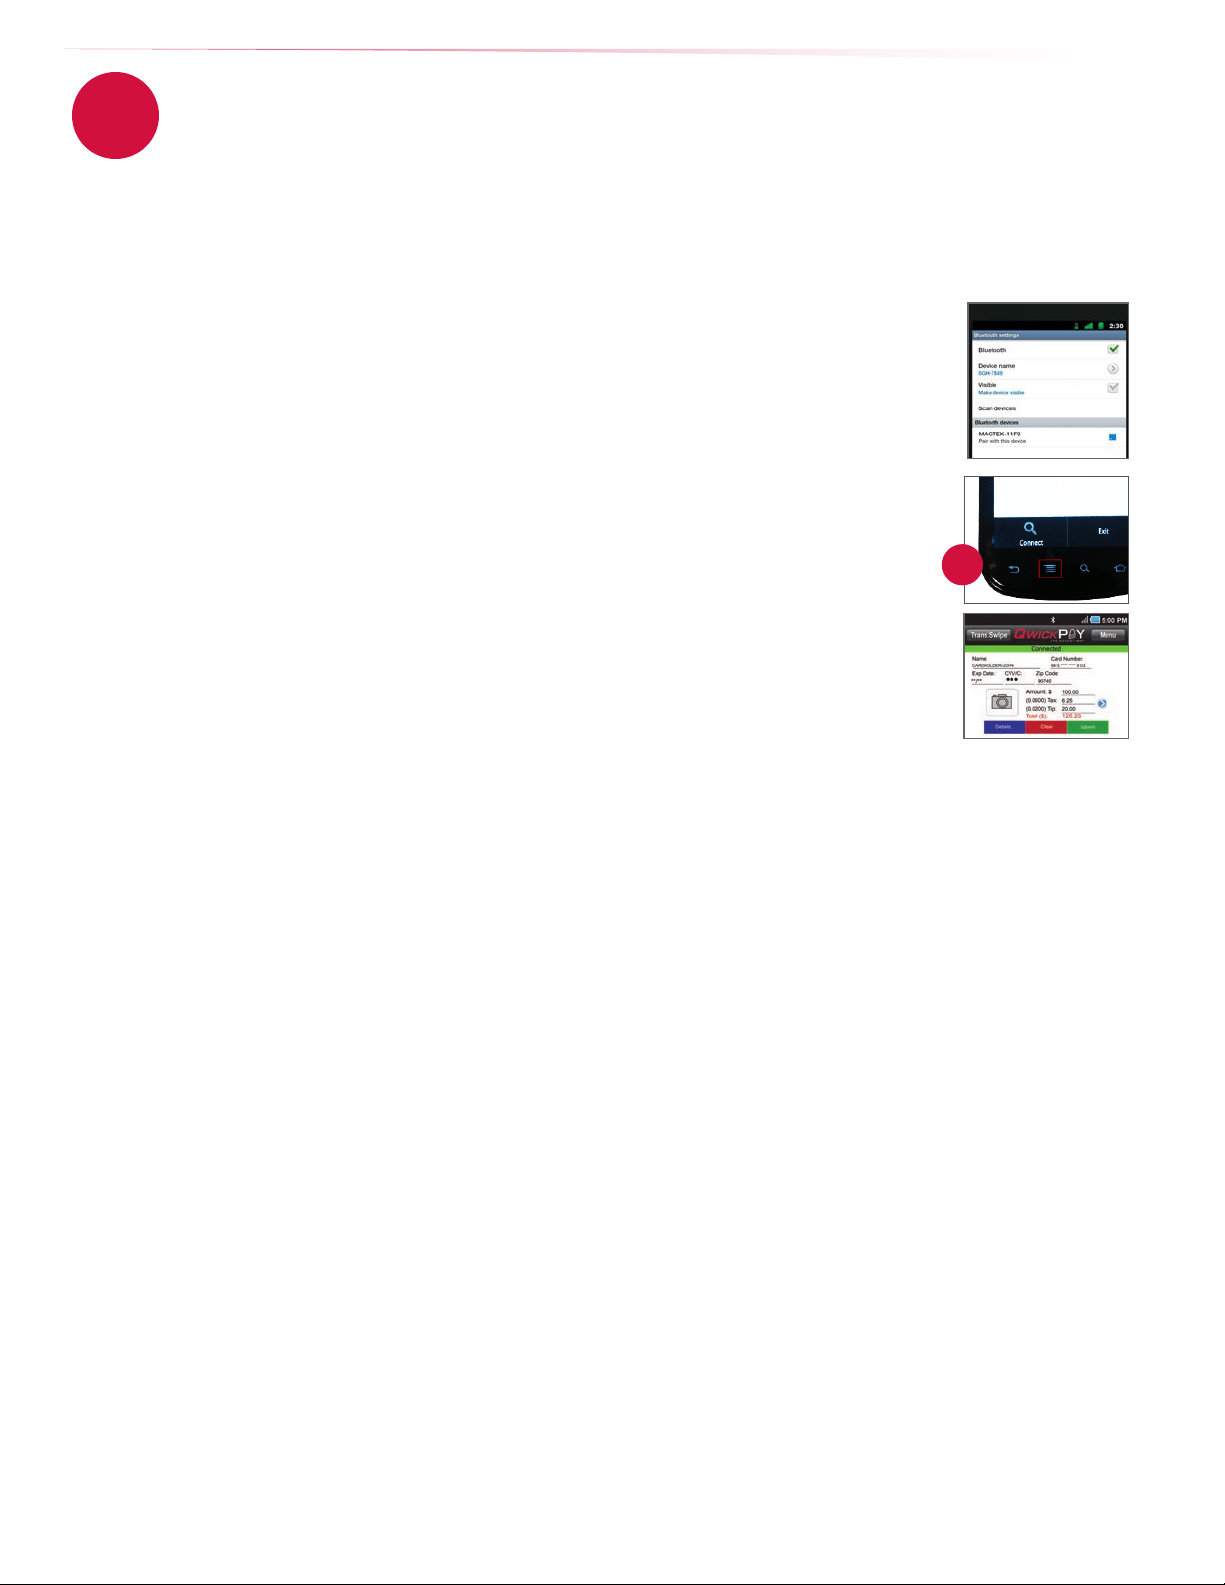
Pairing and Connecting
1. On your Android device pull up APPLICATIONS or MENU (depending on your
Android device) and select SETTINGS.
2. Select WIRELESS AND NETWORK.
3. Select BLUETOOTH SETTINGS.
4. Turn on the BulleT reader; a green light will ash when the device is trying to
connect.
5. On your Android device select SCAN FOR DEVICES.
6. Select the MAGTEK DEVICE when it appears on the screen.
7. The screen will prompt you for a PIN (the default is 1234).
8. At this point the device is PAIRED BUT NOT CONNECTED to QwickPAY.
9. Go to the QwickPAY Application on your device.
10. In the App, the top red bar shows the device is not connected.
11. Press the ‘Android MENU’ button on your Android device and choose CONNECT.
12. Connect to the desired MAGTEK BLUETOOTH device.
13. The top green bar shows the device is now connected.
14. The device is now ready to use.
LED Indicators
LED Color LED Condition USB Connection Meaning
Off Off n/a No power
Green Steady On -- Ready to read a card - after power button pushed
11
Green Rapid Flashing No Searching for Bluetooth connection
Green Slow Blinking -- Authentication has been established -
Green On 2 seconds -- Good Read
Amber Steady On Yes Battery fully charged
Amber Short Flash No After power button is pushed
Amber Slow Blinking Yes Battery charging
Red Steady On -- Authentication failed
Red Short Flash -- Following amber after power button is pushed
Red Rapid Flashing Yes Battery voltage too low to operate normally
Red On 2 seconds -- Bad card swipe
14
ready to read a card
www.qwickpay.com
Page 18
4
B. Managing my account for mobile devices.
b. Connect BulleT via Bluetooth
ii. For Newer Android devices
In newer versions of the Android OS customers may experience an issue when they are trying to discover and pair the BulleT
when scanning for available Bluetooth Devices in their Android Phone/Tablet. Previously they would nd and pair very easily
because it would display and identify the BulleT as MAGTEK – A0123D4, but in newer Android OS’s it is displaying as a MAC
Address in this format of NC-2H-KM-7G-KW.
Here is a procedure to nd the correct MAC Address and Pair the Android device with the BulleT
reader:
1. On your Android device pull up APPLICATIONS or MENU (depending on your Android device)
and select SETTINGS.
2. Select WIRELESS AND NETWORK.
3. Select BLUETOOTH SETTINGS.
4. Turn on the BulleT reader; a green light will ash when the device is trying to connect.
5. On your Android device select SCAN FOR DEVICES.
6. Start selecting found devices one by one.
7. The screen will prompt you for a PIN (the default is 1234).
8. Enter the PIN code and see which one locks the connection with the BulleT and displays a
solid green LED light.
9. Write down that MAC Address and save this Bluetooth name for future reference.
10. At this point the device is PAIRED BUT NOT CONNECTED to QwickPAY.
11. Go to the QwickPAY Application on your device.
12. In the App, the top red bar shows the device is not connected.
13. Press the ‘Android MENU’ button on your Android device and choose CONNECT.
14. Connect to the desired MAGTEK BLUETOOTH device.
15. The top green bar shows the device is now connected.
16. The device is now ready to use.
11
15
www.qwickpay.com
Page 19

4
c. Connect uDynamo
The uDynamo can be used with Android or iOS devices.
Charging
To charge the battery, connect the device to a USB host interface. Ensure the LED indicator shows that the
battery is charging (ashing amber and green). The uDynamo is powered by rechargeable internal lithium-
ion batteries. The uDynamo can process up to 300 swipes on a single battery charge. If the reader is left on
awaiting a card swipe, the battery will deplete in 3.5 hours. Recharging can take up to 6 hours.
Charging and Powering On/Off LED Indicators
LED Meaning Notes
Steady Green Fully Charged State Ready for a card swipe.
Blinking Green Authenticated While the reader is authenticated, no charging or battery level informa-
Steady Red Authentication Failed After an authentication failure, the LED remains red until a power cycle
Blinking Green
and Amber
Blinking Short
Red and Long
Green
Fast Blinking Red Reader is in Critically Low Battery
Solid Amber Charging in Critically Low Battery
Charging in Healthy Battery State The reader is in the Healthy State when the batter voltage is in between
Reader in Low Battery State The read is fully operational.
State
State
B. Managing my account for mobile devices.
Waiting for authentication.
tion is indicated.
or successful authentication.
No charging or battery level information is indicated.
the Fully Charged State and the Low Battery State.
Recommend charging the reader until the battery reaches the Healthy
State.
Card swipe disabled. Stop using the reader. If the reader is connected
to a mobile device, disconnect it before charging.
Card swipes and most commands are unavailable. Allow the reader to
charge to at least the Low Battery State before using again.
LED Indicator (Charging)
Card transactions may be performed using either the audio jack or USB interface while the uDynamo is
charging.
USB connection
Using the included Micro-USB cable (Micro-B), connect the uDynamo to a host USB port on your computer
or mobile phone/tablet. Then launch QwickPAY. The device is now connected and ready to use.
Audio jack connection:
When using the uDynamo’s audio jack connection, make certain to set up QwickPAY to communicate with the audio
device. Plug the uDynamo into the audio jack. Then launch QwickPAY and tap on MENU. Then tap on QWICKPAY
SETTINGS. Select the uDynamo device (‘On’). Then press the DONE button. Updating SETTINGS will enable
QwickPAY to automatically:
1. The volume of the device will be automatically turned up to max when the uDynamo is plugged in. (If
you have a physical mute button on your device, QwickPAY cannot automatically detect this and you
will need to turn mute OFF.);
2. Turn the device ON and OFF automatically, to save on battery usage. (QwickPAY will turn on
automatically only while you are on a transaction swipe screen and power off as soon as you go to
another screen in order to decrease the frequency of recharging.)
The device is now connected and ready to use.
Protect the uDynamo’s audio jack by folding it in when not in use.
Note: The uDynamo has no user controls. It requires QwickPAY to control the operation of the card reader.
16
www.qwickpay.com
Page 20

B. Managing my account for mobile devices.
5
Make a Sale - Transactions
a. Transaction authentication and authorization
Once you Submit your transaction, a transaction authorization and authentication screen appears.
Authentication
You may not be familiar with authentication since this is something that is unique to QwickPAY and the
MagneSafe™ Security Architecture (MSA). Only secure card reader authenticators (SCRAs) use the MSA
and can perform real-time counterfeit card detection and encrypt the card data within the read head.
SCRAs use the MSA to deliver instant encryption so your customers’ sensitive card details never enter
your phone and are sent securely over SSL connections for decryption, authentication and processing.
This lowers the scope and cost of PCI audits, saving you more time and money. A key feature of
MagneSafe is MagnePrint® card authentication, a patented, proven technology which reliably identies
counterfeit credit cards. MagnePrint is a dynamic card authentication technology based on the unique
physical properties of the magnetic stripe, also referred to as the stripe’s digital identier or (DI). It
provides validation that the card itself is genuine and that its encoded data has not been altered.
Authorization
You are probably familiar with transaction authorization: the process of conrming payment with the credit card company. The
card data and amount are sent securely for processing with the customer’s credit card account. Processing involves conrming
card number, expiration, CVV values, name on the card, zip codes and available funds.
No Authentication data is present when using manual card
entry, since the card is not read.
1. Authentication Data
MP Score - aka Authentication Value
This is MagnePrint® score from the transaction. The score
will range anywhere from -1 to +1 and be represented as 3
decimal places (ex - .856). The higher the score, the more
likely the card is authentic and not a copied card. The lower
the score, the more likely it is a fraudulent card and may incur
a charge back. If the MagnePrint score is below a 0.3, then
QwickPAY will display the following alert:
COUNTERFEIT ALERT
Examine the card carefully,
it is likely a counterfeit.
If you suspect fraud, make
a Code 10 call.
1.
2.
MP Count
The quantity of times the MagnePrint has been read.
2. Authorization
Trans Type
The type of transaction. Examples can be: Sales – Swipe,
Sale – Qwick Code, Void or Refund.
Status
The status of the transaction as it is returned from the
cardholder’s nancial institution, i.e., approved, declined, etc.
Transaction ID
An alpha/numeric code returned from the QwickPAY Payment
Protection Gateway that is unique to the specic transaction.
Auth Code
The authorization code that is returned from the cardholder’s
nancial institution when a transaction is authorized for sale.
VISIT
QwickPAY Support FAQs
and go to Security for more
info on Code 10.
If you press Proceed, you
can continue with the
transaction.
MP Days on File
This is the number of days that the MagnePrint has been on le.
MP Reg by
The party that initially registered the MagnePrint; examples
can be: Merchant, Gateway, Processor, Brand or Financial
Institution.
17
Total Charge/Amount
The total amount charged for a specic transaction (with
applicable tax and tip).
Tip Amount
The amount of dollars charged as Tip.
Tax Amt
The amount of dollars charged as Sales Tax.
Card #
The primary account number (or PAN) from the card used to
initiate the transaction. This number will be partially masked.
Exp date
The expiration date of the card used to initiate the
transaction.
E-mail
The customer e-mail address where the receipt will be sent.
Location
The geographical location where the transaction was made.
This can be set to ON or OFF on your device settings.
www.qwickpay.com
Page 21

B. Managing my account for mobile devices.
5
Sale Transactions
b. Make a sale - swipe
iOS Android
Select Transaction Type
Starting from QwickPAY’s main transaction screen, touch the Trans.Sale button in the
upper left corner. Select Sale-Swipe to accept a credit card.
1. Swipe the Card*
Swipe the payment card through the SCRA. The card data is masked so that full card
data is never displayed. The customer name and account automatically appear from
the card swipe. You can tap Details to add information to your customer contact
(including e-mail and address). Details are stored in your virtual terminal.
Manual Entry (CNP) Transactions:
• Press Trans.Sale and choose Sale - Manual Entry
• QwickPAY will automatically open a browser and log the merchant into the
QwickPAY Virtual Terminal with no additional prompt for QwickPAY Merchant ID and
Password. The merchant will be able to perform Manual Entry Transactions only.
All other Virtual Terminal functionality will require full login via a separate browser
session and full login using the QwickPAY Merchant ID and Password. (See page
35, Virtual Terminal Card not present for details.)
2. Enter the Details
Enter the CVV2/CVC2 and a ZIP code to better validate the card (no need to require
CVV and zip if card is swiped - optional).
Enter the dollar amount, tax and tip (these are automatically calculated, but can be
changed by pressing the blue arrow button).
Take a picture using the Camera function to include a photo of the customer or the
goods being purchased (optional). You can also select an image from your Photo
Library (size is 78x70 pixels), which could include an inventory of your products.
Submit the Sale
Press the green Submit button, when you are ready to process the sale.
Transaction Authorization
The transaction is sent to the QwickPAY Payment Protection Gateway and a response
will appear almost immediately.
(An error alert will appear if the card could not be properly authenticated due to a poor MagnePrint score.)
Press Add to Contacts to save the customer details (optional).
3. Take Signature
Customers may sign the receipt with their nger or use an optional stylus.
4. Send Receipt
Press Send to send your custom receipt via e-mail to the customer. A copy will
automatically go to your merchant e-mail address.
QwickPAY mobile stores Saved Receipts locally on your phone (50 KB). You can
delete the saved receipts at your discretion. QwickPAY virtual terminal stores a
history of all transaction receipts, e.g., under Account there are Saved Receipts;
there you can click on the saved receipts to view details and print. These are
securely stored with the QwickPAY Payment Protection Gateway.
Print Receipt (only available with iOS)
After you e-mail the receipt you can also optionally print the receipt to any available
AirPrint printer. Under QwickPAY Settings change Receipt Printing to On and
QwickPAY will automatically prompt you to print a receipt after each transaction.
18
www.qwickpay.com
Page 22

5
B. Managing my account for mobile devices.
c. Make a sale - QwickCode
A Sale - Qwick Code transaction sends the 8-digit alpha Qwick Code to the QwickPAY Payment Protection Gateway whereby the
Qwick Code is securely exchanged for decrypted card data which is then transmitted on to a PCI certied processor and used for
authorization. The funds available on the customer’s credit/debit card will then be reduced by the amount of the transaction, and
the transaction will be placed in a queue for settlement later in the day.
iOS Android
Select Transaction Type
Starting from QwickPAY’s main transaction screen, touch the Trans.Sale button in the
upper left corner. Select Sale-QwickCode to accept a Qwick Code.
1. Enter the Qwick Code
Enter the 8-digit Qwick Code.
2. Enter the Amount
Enter the dollar amount(s), tax and tip (they are automatically calculated, but can be
changed by pressing the blue arrow button).
Take a picture using the Camera function to include a photo of the customer or the
goods being purchased (optional). You can also select an image from your Photo
Library (size is 78x70 pixels), which could include an inventory of your products.
Submit the Sale
Press the green Submit button, when you are ready to process the sale.
Transaction Authorization
The transaction is sent to the QwickPAY Payment Protection Gateway and a response
will appear almost immediately.
(An error alert will appear if the card could not be properly authenticated due to a poor MagnePrint score.)
Press Add to Contacts to save the customer details (optional).
3. Take Signature
Customers may sign the receipt with their nger or use an optional stylus.
4. Send Receipt
Press Send to send your custom receipt via e-mail to the customer. A copy will
automatically go to your merchant e-mail address.
QwickPAY mobile stores Saved Receipts locally on your phone (50 KB). You can
delete the saved receipts at your discretion. QwickPAY virtual terminal stores a
history of all transaction receipts, e.g., under Account there are Saved Receipts;
there you can click on the saved receipts to view details and print. These are
securely stored with the QwickPAY Payment Protection Gateway.
Print Receipt (only available with iOS)
After you e-mail the receipt you can also optionally print the receipt to any available
AirPrint printer. Under QwickPAY Settings change Receipt Printing to On and
QwickPAY will automatically prompt you to print a receipt after each transaction.
19
www.qwickpay.com
Page 23

B. Managing my account for mobile devices.
6
Other Transactions
a. Void - before settlement
You can perform a void on any sale transaction that has been submitted for payment but has not yet been settled.
iOS Android
QwickPAY
The easiest way to perform a void is to:
• Launch the mobile App.
• Press the Menu button in the upper right hand corner of the screen.
• Then select History. The most recent transactions are listed rst. (Note: You will
only see transactions that were performed in the App you are currently in.)
• Next, select the transaction to be voided and its details will display.
• Tap the Void button in the upper right hand corner of the screen and it will
automatically launch the Trans.Void screen where it will populate the transaction
ID to be voided.
• When ready, press the Submit button to void the transaction.
If preferred, you can have the customer sign the receipt indicating the transaction
was voided and have an optional receipt sent to them by e-mail.
Another way to perform a Void is to:
• Launch the mobile App.
• Choose the Trans.Void transaction from the transaction options listed in the
upper left corner of the screen.
• Next, enter the original transaction ID from the transaction you wish to void.
(Note: You can enter any QwickPAY transaction ID)
• When ready, press the Submit button to void the transaction.
If preferred, you can have the customer sign the receipt indicating the transaction
was voided and have an optional receipt sent to them by e-mail.
Saved Receipts
QwickPAY mobile stores Saved Receipts locally on your phone (50 KB). You can delete
the saved receipts at your discretion.
QwickPAY virtual terminal stores a history of all transaction receipts, e.g., under
Reports there are Saved Receipts; there you can click on the saved receipts to view
details and print. These are securely stored with the QwickPAY Payment Protection
Gateway.
20
www.qwickpay.com
Page 24

B. Managing my account for mobile devices.
6
Other Transactions
b. Refund - after settlement
You can perform a refund on any sale transaction that has been settled.
iOS Android
QwickPAY
The easiest way to perform a Refund is to:
• Launch the mobile App.
• Then press the Menu button in the upper right hand corner of the screen.
• Then select History. The most recent transactions are listed rst. (Note: You will
only see transactions that were performed in the App you are currently in.)
• Next, select the transaction to be Refunded and its details will display.
• Tap the Refund button in the upper right hand corner of the screen and it
will automatically launch the Trans.Refund screen where it will populate the
transaction ID to be refunded.
• Enter the original sale amount or adjust by pressing the amount eld and
launching the keyboard.
• When ready, press the Submit button to refund the transaction.
Please require the customer to sign the receipt indicating the transaction was
Refunded and have an optional receipt sent to them by e-mail.
Another way to perform a Refund is to:
• Launch the mobile App.
• Choose the Trans.Refund transaction from the transaction options listed in the
upper left corner of the screen.
• Next, enter the original transaction ID from the transaction you wish to refund.
(Note: You can enter any QwickPAY transaction ID).
• Enter the amount you wish to refund.
• When ready, press the Submit button to refund the transaction.
If preferred, you can have the customer sign the receipt indicating the transaction
was refunded and have an optional receipt sent to them by e-mail.
Saved Receipts
QwickPAY mobile stores Saved Receipts locally on your phone (50 KB). You can delete
the saved receipts at your discretion.
QwickPAY virtual terminal stores a history of all transaction receipts, e.g., under
Reports there are Saved Receipts; there you can click on the saved receipts to view
details and print. These are securely stored with the QwickPAY Payment Protection
Gateway.
21
www.qwickpay.com
Page 25

B. Managing my account for mobile devices.
7
Administrative
a. Reports
To view reports for your QwickPAY subscription please visit your virtual terminal.
b. History
On your Mobile Device
Only the transactions performed on your mobile device can be seen on your mobile device.
All transaction history is stored in the virtual terminal.
History should be cleared from your phone at the discretion of the user; a warning message will appear when the memory is
near the limit (each transaction takes about 20 KB of storage space without a receipt and with a receipt it takes approximately
50KB of storage space).
22
www.qwickpay.com
Page 26

C. Virtual terminal
Getting a QwickPAY Account
1
Request a Subscription
Request a Subscription
You should use the same account for your Mobile Devices that you use for your Virtual
Terminal. Some users may prefer to only use one or the other - but no matter where you access
QwickPAY from, you are accessing the same account. If you have not yet requested a QwickPAY
account, follow the directions below. If you already have a QwicKPAY subscription skip to the
Virtual Terminal Step 2 for Setup.
You can go to the QwickPAY web site www.qwickpay.com and click on Activate to get a subscription with QwickPAY (“Get
QwickPAY” brings you to the online shop and allows you to purchase secure card reader authenticators).
A merchant account is required to use QwickPAY. If you already have a merchant account (meaning you can already accept
credit cards) or if you need to establish a merchant account, you can select the appropriate form to complete online. A
representative will contact you to complete the subscription process.
C. Managing my account in the Virtual Terminal
Account Activation
Once your account has been activated, you will be sent your credentials, Merchant ID (Username) andQwickPAY Merchant
Passord for login. The credentials are case sensitive. Please enter the credentials exactly.
Go to https://myqwickpay.com with your account credentials and setup your custom receipts.
23
www.qwickpay.com
Page 27

C. Virtual terminal
C. Managing my account in the Virtual Terminal
2
Setting up Account
Custom receipts - receipt settings
QwickPAY allows you to create your own custom receipts.
1. Locate your credentials.
2. Go to https://myqwickpay.com/login.aspx.
3. Enter your QwickPAY Merchant ID and Password.
4. Under SETTINGS go to CUSTOM RECEIPTS.
5. Add your Logo, a header, and a footer; you can also add a signature line for the virtual terminal receipts, allowing you to print
out receipts for hard copy signature after transactions are completed. [See items 1- 5 below]
6. SAVE your updates.
In order for the virtual terminal and mobile application to be synchronized with updates to the custom receipts, you will need to completely
close and restart the QwickPAY App on your mobile device. The receipt formatting updates are saved locally on your device and each time
you start the App it will check for the most recent revision. If updates are available, they will be automatically downloaded and saved.
Logo Image
1
The logo must be in PNG, GIF or JPG
format and can’t be more than 40
kilobytes in size, 250 pixels wide and
100 pixels high. You can access photos
on your PC or mobile device.
TIP: If you want the logo background to blend
in with the background of the receipt, you
should put the logo on a white background
with the hex color set to #FFFFFF.
Header
2
The header is the information located
at the top of the receipts just under
the logo. It is always centered. Most
commonly the header consists of
address and contact details.
Signature Line (Virtual
3
Terminal ONLY)
Check the box to add a signature line for
virtual terminal receipts so customers
can sign a printed copy. This eld will not
show or populate with signatures taken on
mobile devices.
1
2
3
4
5
Footer Information
The footer information is located
4
after the receipt information and is
left justied. It is commonly used for
thanking customers, URL information
and return policies.
Save
Be certain to SAVE your receipt updates.
5
To view the updates on your mobile
devices be certain to close and re-open
the App on your device.
24
www.qwickpay.com
Page 28
C. Virtual terminal
Cloud Application
3
a. Requirements and Specications
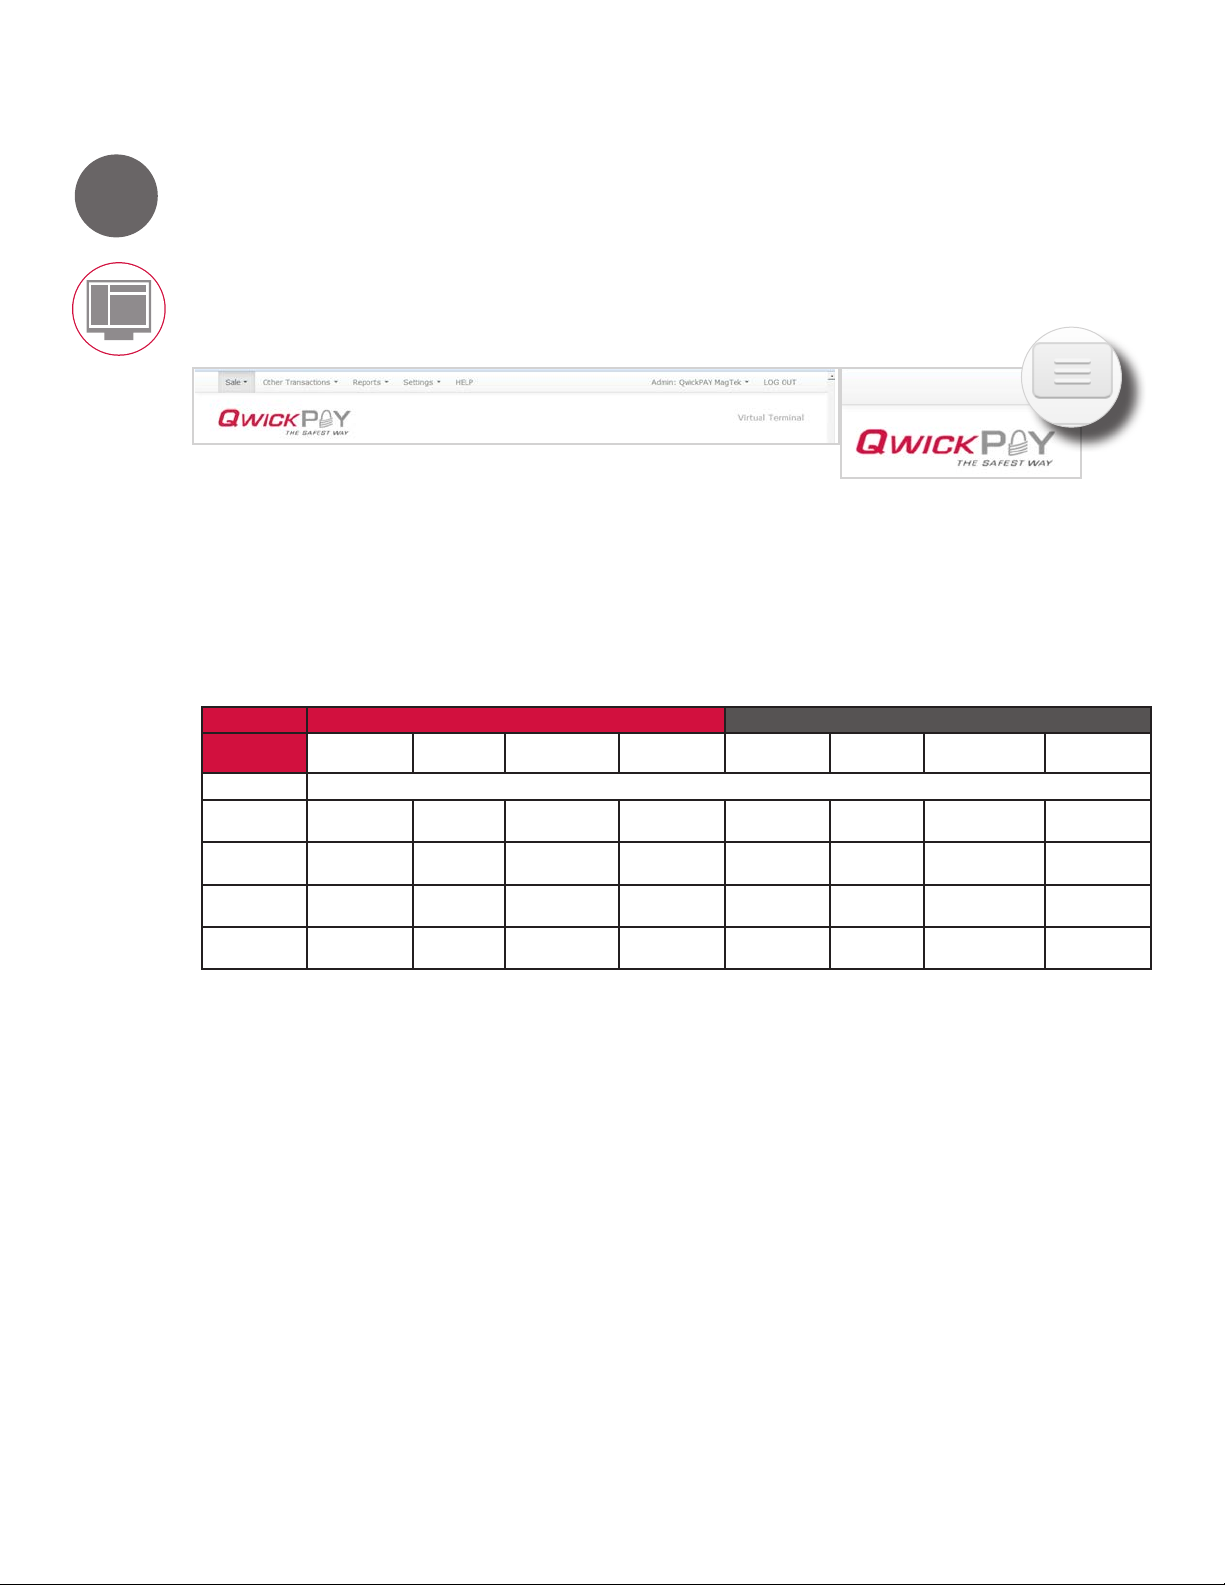
Mobile responsive, virtual terminal for QwickPAY. The Virtual terminal Navigation is either horizontal across the
top of the page on a full size browser window or as a drop down list in the top right corner on a mobile browser.
Sale transactions are grouped under the heading of SALE.
In order to provide access to the virtual terminal from almost any computing platform, QwickPAY works BEST
with Firefox 24.0 as a browser (PC or Mac) and using a mobile browser on iOS or Android devices.
C. Managing my account in the Virtual Terminal
Browser Requirements
OS Windows - Win 7 and 8 64-bit Mac OS X - 10.8.5
Browser Chrome
Device
HID Swipe
29.0.1547.76 m
Firefox
ver. 24.0
Internet Explorer
9 and 10
Opera
ver 16.0
Chrome
30.0.1599.66 beta
Firefox
ver. 24.0
Safari
ver. 6.0.5
Opera
ver 16.0
HID PIN Pad
HID Flash
HID KB Swipe
Works with
Not functional at this time
Settings
Cookies must be enabled in the browser’s settings.
MUST launch the browser the rst time as “Run As Administrator” to successfully download and install the MagTek Java Applet(s).
Java 7 or newer must be installed and running.
To determine the version of Java that you have, please go to http://www.java.com/en/ and click the link “Do I Have Java?”
25
www.qwickpay.com
Page 29

C. Virtual terminal
b. Login and Device Selection
3
C. Managing my account in the Virtual Terminal
1. Login
Go to https://MyQwickPAY.com
and enter your login credentials.
2. Select Device
While visiting for the rst time, you can select your default Virtual Terminal Device.
3. Install
When you go to make a transaction you will be asked to download the Applet(s). Click
RUN to continue the process.
26
www.qwickpay.com
Page 30

C. Virtual terminal
c. Change your password
3
If you change your QwickPAY Password in your virtual terminal, you must also update the QwickPAY App running on any mobile
device in order for the passwords to match.
C. Managing my account in the Virtual Terminal
Virtual Terminal Change Password
1. Locate your credentials. (This will come from the company where you
purchased QwickPAY). It will contain your QwickPAY Merchant ID and
QwickPAY Merchant Password. The credentials are case sensitive.
Please enter the credentials exactly.
2. Go to https://myqwickpay.com/login.aspx and login.
3. Select ADMIN: JOHN CARDHOLDER.
4. Under ADMIN select CHANGE PASSWORD/NICKNAME.
5. Enter the original QwickPAY password onto the top eld (you can copy
and paste).
6. Then create a new password in the lower eld.
7. Reenter for verication.
8. Click on CHANGE PASSWORD.
9. Your password is now reset. Be sure to update the new password on
any mobile device that is using QwickPAY (iOS or Android).
d. Setting tax and tip
[Make the password easy for you to remember, but too hard for anyone else
to surmise. NOTE: MagTek/QwickPAY does not save nor store these custom
passwords, so please make sure you remember it or write it down and store
in a safe place.]
Virtual Terminal - Merchant Nickname
The Merchant Nickname is a new feature that lets the merchant choose
a unique nickname name that can be used login into QwickPAY instead
of using the system generated QwickPAY Merchant ID. Enter a Merchant
Nickname and press the Update button. If the Nickname is already in use,
a message will direct the user to try another Nickname. If the Nickname is
available, it will be saved to your QwickPAY prole and ready for use with
future login.
Set Tax and Tip on the Virtual Terminal
You can access the Virtual Terminal using your mobile device’s browser or
from your PC. There you can select SETTINGS and then select TAX & TIP
from the drop down menu.
This Default Tax and Tip will be pre-populated on any Sale transaction. To
override, simply use your keyboard to override any Default values.
27
www.qwickpay.com
Page 31

C. Virtual terminal
e. Terminal Name
3
If you want to track and report the name of a computer/browser where a Virtual Terminal-based transaction was performed (ex - Joe’s
Front Desk Computer), users can now give that computer a “Terminal Name”. Go to Settings/Terminal Name in the Virtual Terminal and
once set, you will be able to view transaction history and sort the transactions by Terminal Name using the Standard or Custom Reports.
Note: Android and iOS Device Names will also be saved in the Terminal Name eld in the database for unied transaction reporting.
This will give users the ability to track and sort transactions from multiple QwickPAY platforms.
f. Overview
The virtual terminal is your ofce in the cloud; this is where you can access all aggregated transactions, create reports, perform
administrative tasks and create customized receipts.
SALE Turn your computer into a POS terminal and make sales.
Swipe Use a MagTek SCRA to securely swipe in custom cardholder information.
QwickCode Use a token created by QwickCodes for secure transactions.
Manual Entry Card not present, manual entry allows you to enter card data (PAN, Name and Exp Date) when
Barcode Upload a QwickCode (barcode image) to QwickPAY and submit payment.
OTHER TRANSACTIONS Issue credits to your customers.
REFUND Enter in the transaction ID to refund a sale after settlement.
REPORTS
STANDARD The Standard Report is designed to act as a “Daily Report”. The merchant should run this report every
CUSTOM Allows you to create a custom report of your aggregated transactions.
SAVED RECEIPTS These are your aggregated saved receipts from all devices using this QwickPAY subscription.
SETTINGS
READER CONFIGURATIONS Allows you to select the conguration of yoru reader.
TERMINAL NAME If you want to track and report the name of a computer where a transaction was performed (ex - Joe’s
RECEIPT SETTINGS This allows you to build your own branded and customized receipts. See the next page for complete
TAX & TIP Set your default tax and tip settings.
READER CONFIGURATIONS Pick your point of sale device
HELP Brings you to www.qwickpay.com/support
ADMIN: QWICKPAY
CHANGE PASSWORD Allows your to change your password on your virtual terminal.
MERCHANT NICKNAME The Merchant Nickname is a new feature that lets the merchant choose a unique nickname name that
LOGOUT Securely logout
C. Managing my account in the Virtual Terminal
necessary. You can securely enter the data into the keyboard or for more secure entry and possible
reduced PCI scope, you can use a MagTek IPAD.
VOID Enter in the transaction ID to void a sale prior to settlement.
day and it will report on that day’s transactions. It has a defaulted “From Date” of TODAY (which can
be overridden to any date back as far as 90 days) and an implied “To Date” of TODAY which cannot be
changed. (This requires very few buttons or options to click to run the report).
The Custom Report is designed to let the merchant get more granular with what to show/not show and
for what data range (as long as it does not exceed 90 days). Reports go as far back as 90 days for a
Start Date (FROM) with an End date (TO) of any day up until and including TODAY.
Front Desk Computer), please give this computer a “Terminal Name”. Once set, you will be able to view
transaction history and sort the transactions by Terminal Name using the Standard or Custom Reports.
Please choose a Terminal Name that is between 1 and 64 alphanumeric characters.
details.
If you change your password, it will only change the password from the device you are using and does
not change your subscription password. If you want all of your devices to have a matching password, you
will need to update them all accordingly.
can be used to login into QwickPAY instead of using the system generated QwickPAY Merchant ID.
28
www.qwickpay.com
Page 32

C. Virtual terminal
Connect
4
Connecting via USB HID
QwickPAY offers a variety of MagneSafe card readers that can be used with the Virtual Terminal. Using the included Micro-USB
cable (Micro-B), connect the uDynamo, Dynamag, BulleT, Flash, or IPAD to a host USB port on your computer or mobile phone/
tablet. The uDynamo, Dynamag, BulleT, Flash and IPAD allow you to swipe card data into the virtual terminal. The IPAD also
allows card data to be manually entered into its secure keypad where the data can be encrypted and secured prior to the card
data entering the Virtual Terminal. This may allow for greater reduced PCI scope.
It is required to do the following to drive the USB HID MagneSafe Devices:
Cookies must be enabled in the browser’s settings; MUST launch the browser the rst time as “Run As Administrator” to successfully
download and install the MagTek Java Applet(s); Java 7 or newer must be installed and running. (To determine the version of Java
that you have, please go to http://www.java.com/en/ and click the link “Do I Have Java?”)
C. Managing my account in the Virtual Terminal
uDynamo
USB HID connection
Dynamag
USB HID connection
Flash
mobile storage of data
USB HIB connection
IPAD® DynaPro DynaPro
Mini
PIN entry/SCRA devices with USB HID connection
Connecting BulleT (USB HID or Bluetooth keyboard connection)
Charging and Power
It takes approximately 2.5 hours to fully charge the battery and it will stay charged for approximately 100 card swipes. The
LED will slowly blink amber while the battery is charging and then turn solid amber when the battery is fully charged (for best
results, allow the battery to fully charge).
USB HID connection for transactions
Attach the Micro-USB cable to a USB port to process transactions using USB HID connection.
Bluetooth keyboard (KB) connection
1. Go to Control Panel for Windows or System Preferences for a Mac
2. Select Bluetooth Settings
3. Add a Bluetooth Device
BulleT
USB HID or
Bluetooth keyboard
connection
4. Turn on the BulleT KB reader; a green light will ash when the device is trying to connect
5. Select Scan for devices
6. Select the MagTek Keyboard device when it appears on the screen
7. Computers and smart phones/tablets should automatically pair with the reader
8. At this point the BulleT KB is paired and ready for use
29
www.qwickpay.com
Page 33

C. Virtual terminal
Sale
5
a. Card present sale using uDynamo or Dynamag via USB HID
uDynamo and Dynamag, when connected via USB, operate in the same manner.
Dynamag
USB HID connection
C. Managing my account in the Virtual Terminal
Sale Transaction
Connect the uDynamo or Dynamag with the supplied USB cable to a USB port on the PC.
Go to https://myqwickpay.com and log into your QwickPAY virtual terminal account.
1. Select SALE from the menu.
Select SWIPE from the drop down menu.
2. You will be asked to “Please swipe card”.
Swipe the customer’s card. the card data will automatically populate and the
card is authenticated.
3. Type in the amount you want to charge, including tax and/or tip. (You can set Tax
and Tip with Default values saved in Settings/Tax & Tip.)
If you want to email a copy of the receipt, make sure to click or tap on the
DETAILS button and enter in the email address.
uDynamo
USB HID connection
4. Click/tap on the SUBMIT button once you are ready to process this transaction.
Once charged, you will see the approval or decline message.
Click/tap on View Receipt if you wish to view, print or email the receipt.
30
www.qwickpay.com
Page 34

C. Virtual terminal
b. Card present sale using the BulleT via USB HID connection
5
BulleT
USB HID connection
C. Managing my account in the Virtual Terminal
Sale Transaction
Connect the BulleT with the supplied USB cable to a USB port on the PC.
Go to https://myqwickpay.com and log into your QwickPAY virtual terminal account.
1. Select SALE from the menu.
Select SWIPE from the drop down menu.
2. Then turn on the BulleT. Once you have this connection, it will stay connected
with a solid green light until you either disconnect it from the PC or reboot the
PC. NOTE: The LED must be solid green on the BulleT in order for it to swipe
credit cards into the QwickPAY Virtual Terminal.
3. You will be asked to “Please swipe card”.
Swipe the customer’s card. the card data will automatically populate and the
card is authenticated.
4. Type in the amount you want to charge, including tax and/or tip. (You can set Tax
and Tip with Default values saved in Settings/Tax & Tip.)
If you want to email a copy of the receipt, make sure to click or tap on the
DETAILS button and enter in the email address.
5. Click/tap on the SUBMIT button once you are ready to process this transaction.
Once charged, you will see the approval or decline message.
Click/tap on View Receipt if you wish to view, print or email the receipt.
31
www.qwickpay.com
Page 35

C. Virtual terminal
c. Card present sale using the BulleT KB via Bluetooth keyboard connection
5
BulleT
Bluetooth keyboard
connection
C. Managing my account in the Virtual Terminal
Sale Transaction
Make sure the BulleT KB is paired with your computer or mobile device.
Go to https://myqwickpay.com and log into your QwickPAY virtual terminal account.
Select SCRA USB KeyBoard under Settings/Reader Congurations.
Press Submit to Save.
1. Select SALE from the menu.
Select SWIPE from the drop down menu.
2. You will be asked to “Please swipe card.” (Make sure to power the BulleT KB on.)
Swipe the customer’s card. A blue status bar will display as the card data
is being transmitted by the reader to the Virtual Terminal. When done, the
card data will automatically populate the necessary elds and the card is
authenticated.
3. Type in the amount you want to charge, including tax and/or tip. (You can set Tax
and Tip with Default values saved in Settings/Tax & Tip).
If you want to email a copy of the receipt, make sure to click or tap on the
DETAILS button and enter in the email address.
4. Click/tap on the SUBMIT button once you are ready to process this transaction.
Once charged, you will see the approval or decline message.
Click/tap on View Receipt if you wish to view, print or email the receipt.
32
www.qwickpay.com
Page 36

C. Virtual terminal
d. Card present sale using the Flash via USB HID connection
5
Flash
mobile storage of data
USB HIB connection
C. Managing my account in the Virtual Terminal
Transaction
The Flash reader securely stores card swipes. These securely stored swipes can then
be downloaded to the QwickPAY app.
You may connect the Flash to any USB port on your PC.
Go to https://myqwickpay.com and log into your QwickPAY virtual terminal account.
1. Select SALE from the menu.
Select SWIPE from the drop down menu.
2. Turn on the Flash.
3. The Download Transaction button will apear with a message displaying how many
pending transactions the Flash reader holds. If there are transactions, simply click
or tap the Download Transaction button. If there are no transactions stored the
message will display, “There are no transactions on your Flash reader.”
The stored transactions will download with the oldest swipe saved (rst in, rst
out). The card data will automatically populate and the card is authenticated.
4. Type in the amount you want to charge, including tax and/or tip. (You can set Tax
and Tip with Default values saved in Settings/Tax & Tip.)
If you want to email a copy of the receipt, make sure to click or tap on the
DETAILS button and enter in the email address.
5. Click/tap on the SUBMIT button once you are ready to process this transaction.
Once charged, you will see the approval or decline message.
Click/tap on View Receipt if you wish to view, print or email the receipt.
33
www.qwickpay.com
Page 37

C. Virtual terminal
e. MagTek PIN Entry Device (PED) via USB HID connection
5
Card present sale
IPAD® DynaPro DynaPro
Mini
PIN entry/SCRA devices with USB HID connection
C. Managing my account in the Virtual Terminal
Card Data Swiped on a Secure Card Reader Authenticator/PED
Connect the MagTek PED to a USB port on the Windows-based PC.
Go to https://myqwickpay.com and log into your QwickPAY virtual terminal account.
1. Select SALE from the menu.
Select SWIPE from the drop down menu.
Instructions on the MagTek PED’s screen will ask you to “Swipe Card”. Please
swipe the payment card.
2. Swipe the customer’s card. The card data will automatically populate and the
card is authenticated.
3. Type in the amount you want to charge, including tax and/or tip. (You can set Tax
and Tip with Default values saved in Settings/Tax & Tip.)
If you want to email a copy of the receipt, make sure to click or tap on the
DETAILS button and enter in the email address.
4. Click/tap on the SUBMIT button once you are ready to process this transaction.
Once charged, you will see the approval or decline message.
Click/tap on View Receipt if you wish to view, print or email the receipt.
Card-not-present sale - MANUAL ENTRY PIN Pad
Card Data Manually Entered into a Secure PIN Entry Device (PIN Pad)
Connect the MagTek PED to a USB port on the PC.
Go to https://myqwickpay.com and log into your QwickPAY virtual terminal account.
1. Select SALE from the menu.
2. Select MANUAL ENTRY (PIN Pad) from the drop down menu.
For best security, Merchants can use a MagTek PED to enter the card data into the
QwickPAY Virtual Terminal. You would need to select MANUAL ENTRY (PIN Pad). Card
data is encrypted in the PED before being sent over secure SSL network connections.
Instructions on the MagTek PED’s screen will ask you to enter the card data.
3. Enter the Account Number of the card, its Expiration Date and the Card
Verication Code (CVV2). In this case, CVV2 is not being checked so any 3-4
digits entered into the MagTek PED device will be ignored.
You can additionally add the customer’s contact information by clicking on DETAILS
(these are optional elds). This allows you to keep a record of the customer’s
contact information and if an email address is collected, will also allow you to send
a copy of the receipt to the customer after the transaction is processed.
4. Press the GREEN ENTER button on the MagTek PED device.
34
www.qwickpay.com
Page 38

C. Virtual terminal
Sale
5
f. Card-not-present sale - MANUAL ENTRY Keyboard
C. Managing my account in the Virtual Terminal
Sale Transaction
It is possible to make a sale where the card is not present and the merchant
manually enters the card data into the QwickPAY Virtual Terminal using their key pad
or keyboard.
Go to https://myqwickpay.com and log into your QwickPAY virtual terminal account.
Login using your QwickPAY Merchant ID and password.
1. SELECT SALE from the menu and MANUAL ENTRY (Keyboard) from the drop down
menu. Merchants can key enter the card number using their key pad or key board.
You will see a CAUTION message warning you that card not present transactions
are less secure. Tap or click CONTINUE to make the sale.
2. ENTER manually the necessary card data and the amount you wish to charge.
You can additionally add the customer’s contact information by clicking on DETAILS
(these are optional elds). This allows you to keep a record of the customer’s
contact information and if an email address is collected, will also allow you to send
a copy of the receipt to the customer after the transaction is processed.
3. SUBMIT Tap or click on the SUBMIT button once you are ready to process this
transaction. Once charged, you will see the approval or decline message.
4. EMAIL Tap or click on VIEW RECEIPT if you wish to view, print or email the
receipt.
Personal Computer Browser Apple Browser Personal Computer Browser
35
www.qwickpay.com
Page 39

C. Virtual terminal
Other Transactions
6
a. Void - before settlement
You can perform a void on any sale transaction that has been submitted for payment but has not yet been settled.
C. Managing my account in the Virtual Terminal
Virtual Terminal
You can also perform a void at your virtual terminal..
Launch https://myqwickpay.com.
Enter your login credentials.
Under OTHER TRANSACTIONS select VOID.
1. Enter the transaction ID.
2. Click or tap on SUBMIT to submit the void.
b. Refund - after settlement
You can perform a refund on any sale transaction that has been settled.
Virtual Terminal
You can also perform a Refund at your virtual terminal.
Launch https://myqwickpay.com.
Enter your login credentials.
Under OTHER TRANSACTIONS select REFUND.
1. Enter the transaction ID.
2. Enter the amount for the refund.
3. Click or tap on SUBMIT to submit the refund.
36
www.qwickpay.com
Page 40
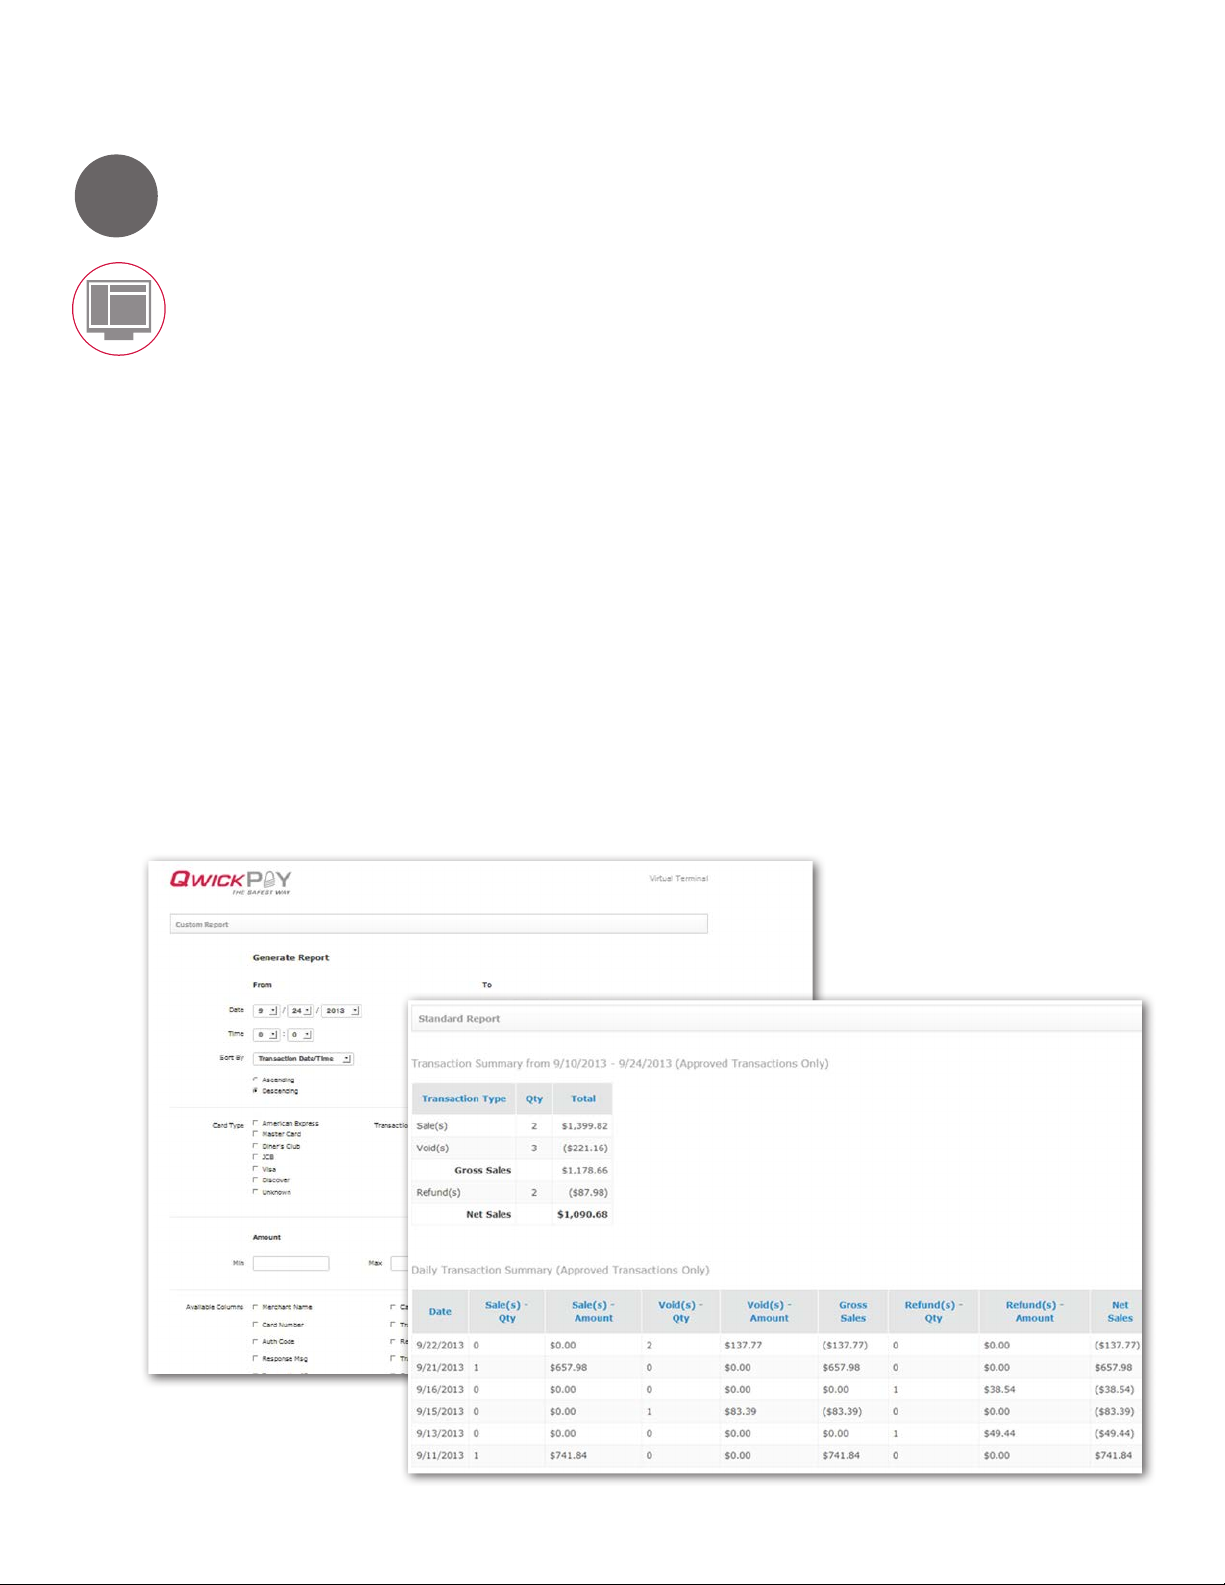
C. Virtual terminal
Administration
7
a. History and Reports
Transactions from your QwickPAY subscription (from any of your devices), are all aggregated on your virtual terminal, located at
https://myqwickpay.com/REPORTS. The virtual terminal reporting functions (Standard and Custom) summarize all approved
transactions by Date Range and individual days. This delivers the merchant a better understanding of the “cash impact” to
their business as a result of how SALES are offset by VOIDS and REFUNDS. If there are no approved transactions for a given
Date Range, the summary tables (Transaction Summary and Daily Transaction Summary) will not display, but the Transaction
Log will still report any line item transactions that took place for the given Date Range. The Transaction Log can be exported
as a CSV le (this export will not include the new summary tables of Approved Transactions) for easier integration.
The instructions below explain how to run custom transaction reports for days, weeks, or up to 3 months of transaction history.
NOTE: Each daily batch may take 1-3 business days before showing up in your bank account. If you believe there was an error
with settlement and processing of any of your transactions, please contact your processor.
1. Log into the Virtual Terminal at https://myqwickpay.com/login.aspx using your QwickPAY merchant account credentials.
These are the same username and password you received via e-mail when you originally signed up for QwickPAY.
2. Once you have logged into the Virtual Terminal, select REPORTS and then select CUSTOM.
3. Select the duration range for the report.
The Standard Report is designed to act as a “Daily Report”. The merchant should run this report every day and it will
report on that day’s transactions. It has a defaulted “From Date” of TODAY (which can be overridden to any date back as
far as 90 days) and an implied “To Date” of TODAY which cannot be changed. (This requires very few buttons or options to
click to run the report).
The Custom Report is designed to let the merchant get more granular with what to show/not show and for what data
range (as long as it does not exceed 90 days). Reports go as far back as 90 days for a Start Date (FROM) with an End
date (TO) of any day up until and including TODAY.
4. When you have selected the desired elements, click on GET REPORT at the bottom of the page.
C. Managing my account in the Virtual Terminal
Sample of report:
37
www.qwickpay.com
Page 41

D. Appendix - Codes
i. Pay by Swipe
Successful Transaction
StatusCode StatusMsg Notes
1000 OK Successful Transaction
Internal Errors
StatusCode StatusMsg Notes
IXXX Service is unavailable code: X Internal Error - Where: 001 <= XXX <= 999
Input Validation Errors
StatusCode StatusMsg Notes
H001 MerchantID has incorrect length - Input Validation Input Validation
H002 MerchantID has incorrect format - Input Validation Input Validation
H003 MerchantPWD has incorrect length - Input Validation Input Validation
H004 MerchantPWD has incorrect format - Input Validation Input Validation
H005 MerchantPWD is incorrect Input Validation
H176 EncTrack1 has incorrect format – Input Validation Input Validation
H177 EncTrack1 has incorrect length – Input Validation Input Validation
H178 EncTrack2 has incorrect format – Input Validation Input Validation
H179 EncTrack2 has incorrect length – Input Validation Input Validation
H180 EncTrack3 has incorrect format – Input Validation Input Validation
H181 EncTrack3 has incorrect length – Input Validation Input Validation
H182 EncMP has incorrect format – Input Validation Input Validation
H183 EncMP has incorrect length – Input Validation Input Validation
H186 KSN has incorrect format – Input Validation Input Validation
H187 KSN has incorrect length – Input Validation Input Validation
H188 MPStatus has incorrect format – Input Validation Input Validation
H189 MPStatus has incorrect length – Input Validation Input Validation
H211 Invalid EncryptionBlockType – Input Validation Input Validation
H251 Invalid DeviceSN – Input Validation Input Validation
H334 Invalid ForATM Flag (Format: Y/N) - Input Validation Input Validation
H350 PCExpdt has incorrect length - Input Validation Input Validation
H351 PCExpdt has incorrect format (Format: CCYYMMDD) - Input Validation Input Validation
H360 Invalid DollarLimit (Format: [Dollar Amount].CC )- Input Validation Invalid DollarLimit
(Format: [Dollar Amount].CC )- Input Validation
Other Errors
StatusCode StatusMsg Notes
L001 No PAN Found in Track2 Data
L093 Invalid MagnePrint” ‘Error Scoring Card against a Zero
Reference.
L094 Invalid MagnePrint” ‘Neg2 Obtained when Scoring Card
against a Zero Reference.
L095 Error Scoring Card. Occurs whenever an error occurs while Scoring card.
L096 This occurs whenever the Card has an inactive
MagnePrint Reference.
L097 This occurs when the DUKPT KSN and Counter is replayed.
L098 Problem with Reader Data. This occurs if there is a problem while decrypting the Data.
L099 Error Validating Credentials. Error Validating (MerchantID and MerchantPWD) against
38
Error obtained while Scoring Transaction MagnePrint against a
Reference MagnePrint made up of Zeroes.
“Negative 2 - Invalid Transaction CRC / PAN” Obtain when
Scoring Transaction MagnePrint against a Reference MagnePrint
Made up of Zeroes.
assigned DB or Operation.
www.qwickpay.com
Page 42

D. Appendix - Codes
ii. Pay By Manual Entry
Successful Transaction
StatusCode StatusMsg Notes
1000 OK Successful Transaction
Internal Errors
StatusCode StatusMsg Notes
IXXX Service is unavailable code: X Internal Error - Where: 001 => XXX => 999
Input Validation Errors
StatusCode StatusMsg Notes
H001 HostID has incorrect length Input Validation
H002 HostID has incorrect format Input Validation
H003 HostPW has incorrect length Input Validation
H004 HostPW has incorrect format Input Validation
H005 MerchantID has incorrect length Input Validation
H006 MerchantID has incorrect format Input Validation
H007 MerchantPW has incorrect length Input Validation
H008 MerchantPW has incorrect format Input Validation
H320 Invalid Amount Input Validation
H321 Invalid Transaction Type Input Validation
H322 Invalid AuthCode Input Validation
H380 CVV has incorrect length Input Validation
H381 CVV has incorrect format Input Validation
H385 ZIP has incorrect length Input Validation
H386 ZIP has incorrect format Input Validation
H400 Invalid Tax Amount Input Validation
H401 PAN has incorrect length Input Validation
H402 PAN has incorrect format Input Validation
H405 Invalid CHName Input Validation
H410 CardExpDt has incorrect length Input Validation
H411 CardExpDt has incorrect format Input Validation
Other Errors
StatusCode StatusMsg Notes
K089 Error Validating Error Validating (MerchantID and MerchantPW) against assigned DB
or Operation.
K099 Error Validating Credentials Error Validating (HostID and HostPW) against assigned DB or
Operation.
39
www.qwickpay.com
Page 43

D. Appendix - Codes
iii. Pay By Qwick Code
Successful Transaction
StatusCode StatusMsg Notes
1000 OK Successful Transaction
Internal Errors
StatusCode StatusMsg Notes
IXXX Service is unavailable code: X Internal Error - Where: 001 => XXX => 999
Input Validation Errors
StatusCode StatusMsg Notes
H001 MerchantID has incorrect length. Input Validation
H002 MerchantID has incorrect format. Input Validation
H003 MerchantPWD has incorrect length. Input Validation
H004 MerchantPWD has incorrect format. Input Validation
H251 Invalid DeviceSN. Input Validation
H320 Invalid Amount. Input Validation
H323 Invalid Transaction Type. Input Validation
H330 Qwick Code has incorrect length. Input Validation
H331 Qwick Code has incorrect format. Input Validation
H332 Invalid IP address. Input Validation
H333 Invalid GeoLocation. Input Validation
(Format: [Dollar Amount].CC e.g. 100.00, 1.00, 0.00, etc)
Other Errors
StatusCode StatusMsg Notes
P021 Invalid Qwick Code - Not Found. Qwick Code is not in the Database.
P022 No Previous Transaction Found. To Void. No previous transaction has been performed with that Qwick
Code (Nothing can be voided).
P023 This Transaction has been previously
Voided.
P024 This Qwick Code has already been
redeemed.
P025 Amount to Credit must be provided for
the PCode used.
P026 Access to this PCode is not allowed. PCode can only be used by Merchant who originally redeemed it.
P027 Several TransactionIDs are associated
to this PCode.
L098 Problem with Reader Data. This occurs if there is a problem while decrypting the Data.
P099
Error Validating Credentials. Error Validating (MerchantID and MerchantPWD) against assigned DB
This Qwick Code has been previously used in a VOID transaction.
This Qwick Code has been previously used to perform a Payment
Transaction.
Null Credit Amount is not accepted when no previous Sale has taken
place.
OrigTransactionID must be provided.
or Operation.
40
www.qwickpay.com
Page 44

D. Appendix - Error
iv. SMTP Port 25 Error
If you experience an SMTP Port 25 error message in the QwickPAY Application, this is due to the Port 25 being
blocked in the Wireless Router you are using to access the Internet from your Smart Phone or Tablet.
Here are the resolutions to this matter:
1. The quickest and easiest one is to turn off the Wi-Fi connection on your Smart Phone or Tablet and use the
Data Plan from your cellular service to access the Internet. Once this is done, you can now use the QwickPAY
App and process the complete transaction and send off the Transaction Receipts via e-mail from the
QwickPAY Application.
2. Process the Transactions with the error and once you get to a different Wi-Fi connection or use the Data Plan
Carrier Service, launch the QwickPAY App and then go into Menu/Saved Receipts and look into one at a time
and then click on Send and sent the Transaction Receipts from this different connection.
3. Go into the Wi-Fi Router settings and open Port 25 to allow Internet Access through there. These settings come
open on most Wi-Fi Routers, but some may have them off/blocked from Internet Access and that’s what causes
the issue with the QwickPAY App because we use Port 25 to send the transaction receipt e-mails.
41
www.qwickpay.com
Page 45

Limited Warranty
MagTek warrants that the products sold pursuant to this Agreement will perform in accordance with
MagTek’s published specications. This warranty shall be provided only for a period of one year from the
date of the shipment of the product from MagTek (the “Warranty Period”). This warranty shall apply only
to the “Buyer” (the original purchaser, unless that entity resells the product as authorized by MagTek, in
which event this warranty shall apply only to the rst repurchaser).
During the Warranty Period, should this product fail to conform to MagTek’s specications, MagTek will, at
its option, repair or replace this product at no additional charge except as set forth below. Repair parts
and replacement products will be furnished on an exchange basis and will be either reconditioned or new.
All replaced parts and products become the property of MagTek. This limited warranty does not include
service to repair damage to the product resulting from accident, disaster, unreasonable use, misuse,
abuse, negligence, or modication of the product not authorized by MagTek. MagTek reserves the right to
examine the alleged defective goods to determine whether the warranty is applicable.
Without limiting the generality of the foregoing, MagTek specically disclaims any liability or warranty for
goods resold in other than MagTek’s original packages, and for goods modied, altered, or treated without
authorization by MagTek.
Service may be obtained by delivering the product during the warranty period to MagTek (1710 Apollo
Court, Seal Beach, CA 90740). If this product is delivered by mail or by an equivalent shipping carrier, the
customer agrees to insure the product or assume the risk of loss or damage in transit, to prepay shipping
charges to the warranty service location, and to use the original shipping container or equivalent. MagTek
will return the product, prepaid, via a three (3) day shipping service. A Return Material Authorization
(“RMA”) number must accompany all returns. Buyers may obtain an RMA number by contacting Technical
Support at (888) 624-8350.
EACH BUYER UNDERSTANDS THAT THIS MAGTEK PRODUCT IS OFFERED AS IS. MAGTEK MAKES NO
OTHER WARRANTY, EXPRESS OR IMPLIED, AND MAGTEK DISCLAIMS ANY WARRANTY OF ANY OTHER KIND,
INCLUDING ANY WARRANTY OF MERCHANTABILITY OR FITNESS FOR A PARTICULAR PURPOSE.
IF THIS PRODUCT DOES NOT CONFORM TO MAGTEK’S SPECIFICATIONS, THE SOLE REMEDY SHALL BE
REPAIR OR REPLACEMENT AS PROVIDED ABOVE. MAGTEK’S LIABILITY, IF ANY, SHALL IN NO EVENT
EXCEED THE TOTAL AMOUNT PAID TO MAGTEK UNDER THIS AGREEMENT. IN NO EVENT WILL MAGTEK
BE LIABLE TO THE BUYER FOR ANY DAMAGES, INCLUDING ANY LOST PROFITS, LOST SAVINGS, OR OTHER
INCIDENTAL OR CONSEQUENTIAL DAMAGES ARISING OUT OF THE USE OF, OR INABILITY TO USE, SUCH
PRODUCT, EVEN IF MAGTEK HAS BEEN ADVISED OF THE POSSIBILITY OF SUCH DAMAGES, OR FOR ANY
CLAIM BY ANY OTHER PARTY.
LIMITATION ON LIABILITY
EXCEPT AS PROVIDED IN THE SECTIONS RELATING TO MAGTEK’S LIMITED WARRANTY, MAGTEK’S LIABILITY
UNDER THIS AGREEMENT IS LIMITED TO THE CONTRACT PRICE OF THIS PRODUCT.
MAGTEK MAKES NO OTHER WARRANTIES WITH RESPECT TO THE PRODUCT, EXPRESSED OR IMPLIED,
EXCEPT AS MAY BE STATED IN THIS AGREEMENT, AND MAGTEK DISCLAIMS ANY IMPLIED WARRANTY,
INCLUDING WITHOUT LIMITATION ANY IMPLIED WARRANTY OF MERCHANTABILITY OR FITNESS FOR A
PARTICULAR PURPOSE.
MAGTEK SHALL NOT BE LIABLE FOR CONTINGENT, INCIDENTAL, OR CONSEQUENTIAL DAMAGES TO
PERSONS OR PROPERTY. MAGTEK FURTHER LIMITS ITS LIABILITY OF ANY KIND WITH RESPECT TO THE
PRODUCT, INCLUDING ANY NEGLIGENCE ON ITS PART, TO THE CONTRACT PRICE FOR THE GOODS.
MAGTEK’S SOLE LIABILITY AND BUYER’S EXCLUSIVE REMEDIES ARE STATED IN THIS SECTION AND IN THE
SECTION RELATING TO MAGTEK’S LIMITED WARRANTY.
42
www.qwickpay.com
Page 46

FCC Warning Statement
This equipment has been tested and was found to comply with the limits for a Class B digital device pursuant to Part
15 of FCC Rules. These limits are designed to provide reasonable protection against harmful interference when the
equipment is operated in a residential environment. This equipment generates, uses, and can radiate radio frequency
energy and, if not installed and used in accordance with the instruction manual, may cause harmful interference with
radio communications. However, there is no guarantee that interference will not occur in a particular installation.
FCC COMPLIANCE STATEMENT
This device complies with Part 15 of the FCC Rules. Operation of this device is subject to the following two conditions:
(1) this device may not cause harmful interference, and (2) this device must accept any interference received,
including interference that may cause undesired operation.
CANADIAN DOC STATEMENT
This digital apparatus does not exceed the Class B limits for radio noise from digital apparatus set out in the Radio
Interference Regulations of the Canadian Department of Communications.
Le présent appareil numérique n’émet pas de bruits radioélectriques dépassant les limites applicables aux appareils
numériques de la classe B prescrites dans le Réglement sur le brouillage radioélectrique édicté par le ministère des
Communications du Canada.
This Class B digital apparatus complies with Canadian ICES-003.
Cet appareil numériqué de la classe B est conformé à la norme NMB-003 du Canada.
CE STANDARDS
Testing for compliance with CE requirements was performed by an independent laboratory. The unit under test was
found compliant with standards established for Class B devices.
UL/CSA
This product is recognized per Underwriter Laboratories and Canadian Underwriter Laboratories 1950.
RoHS STATEMENT
When ordered as RoHS compliant, this product meets the Electrical and Electronic Equipment (EEE) Reduction of
Hazardous Substances (RoHS) European Directive 2002/95/EC. The marking is clearly recognizable, either as written
words like “Pb-free”, “lead-free”, or as another clear symbol .
43
www.qwickpay.com
 Loading...