

Page 1
kDynamo
Secure Card Reader Authenticator
Quick Installation Guide
www.magtek.com
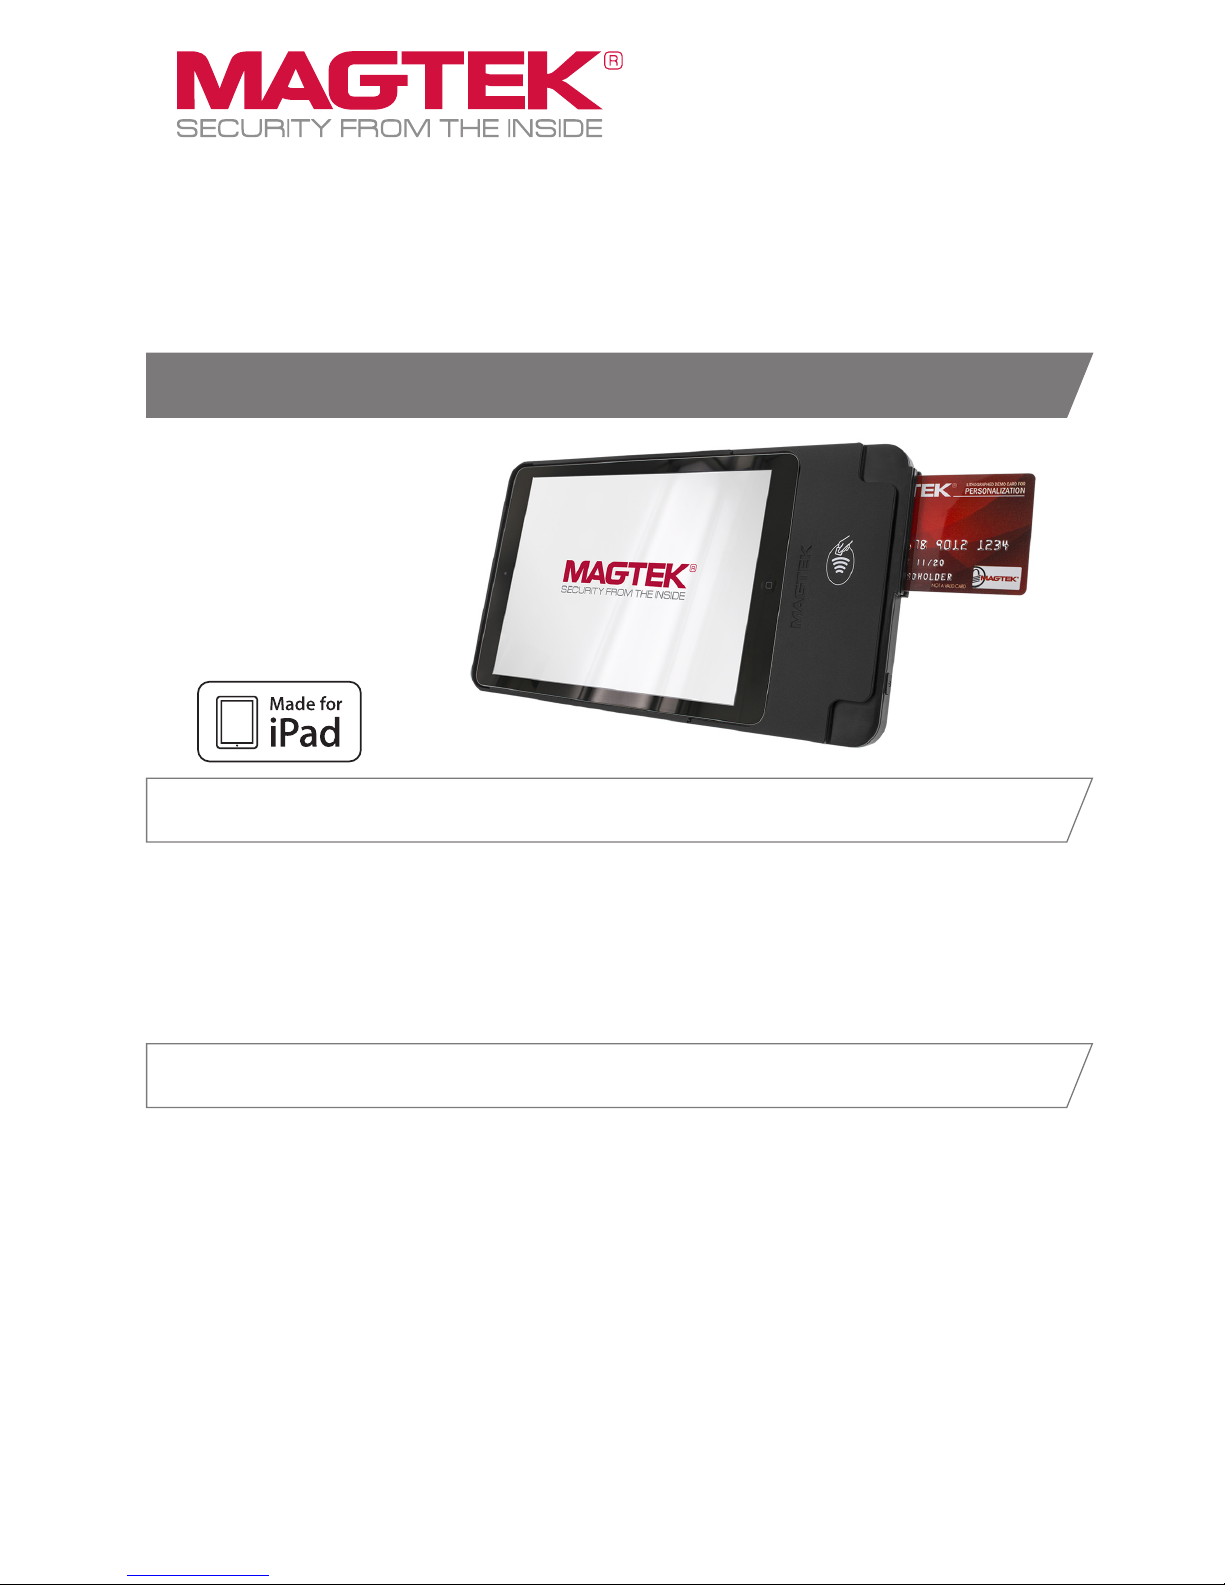
kDynamo makes mobile payments and card reading easier than ever and adds EMV contactless/
NFC and contact EMV chip card reading capabilities while maintaining its small footprint. There
are two models for kDynamo: kDynamo Air and kDynamo mini. kDynamo Air is Made for iPad
(4th, 5th, and 6th generation), iPad Pro (9.7 inch), iPad Air, and iPad Air 2. kDynamo mini is
Made for iPad mini (2, 3, and 4). See the Installation and Operation Manual for complete details.
kDynamo Overview
Installing kDynamo is a straightforward process since the kDynamo uses user host controls.
kDynamo mini keeps you on the go with its smaller size and handheld ease-of-use. kDynamo Air
features a 100mm VESA (Video Electronics Standards Association) standard mounting pattern
that provides xed mounting for greater security and convenience, allowing users to deploy
kDynamo Air in a variety of off the shelf semi-mobile or permanent mounts, and eliminating the
need for expensive customization.
Mounting options are further detailed in the complete Installation and Operation Manual.
• kDynamo mini: Handheld with iPad mini (2, 3, and 4). Supports third-party adhesive-
mounted hand strap.
• kDynamo Air with iPad (4th, 5th, and 6th generation), iPad Pro (9.7 inch), iPad Air, and iPad Air 2
• Handheld
• 100mm VESA mount points for third-party stands or hand straps
Installation
MAGTEK RECOMMENDS
CHARGING EVERY 6 MONTHS TO
MAXIMIZE OPERATION.
STORAGE TEMPERATURE:
32°F TO 113°F (0°C TO 45°C)
Page 2
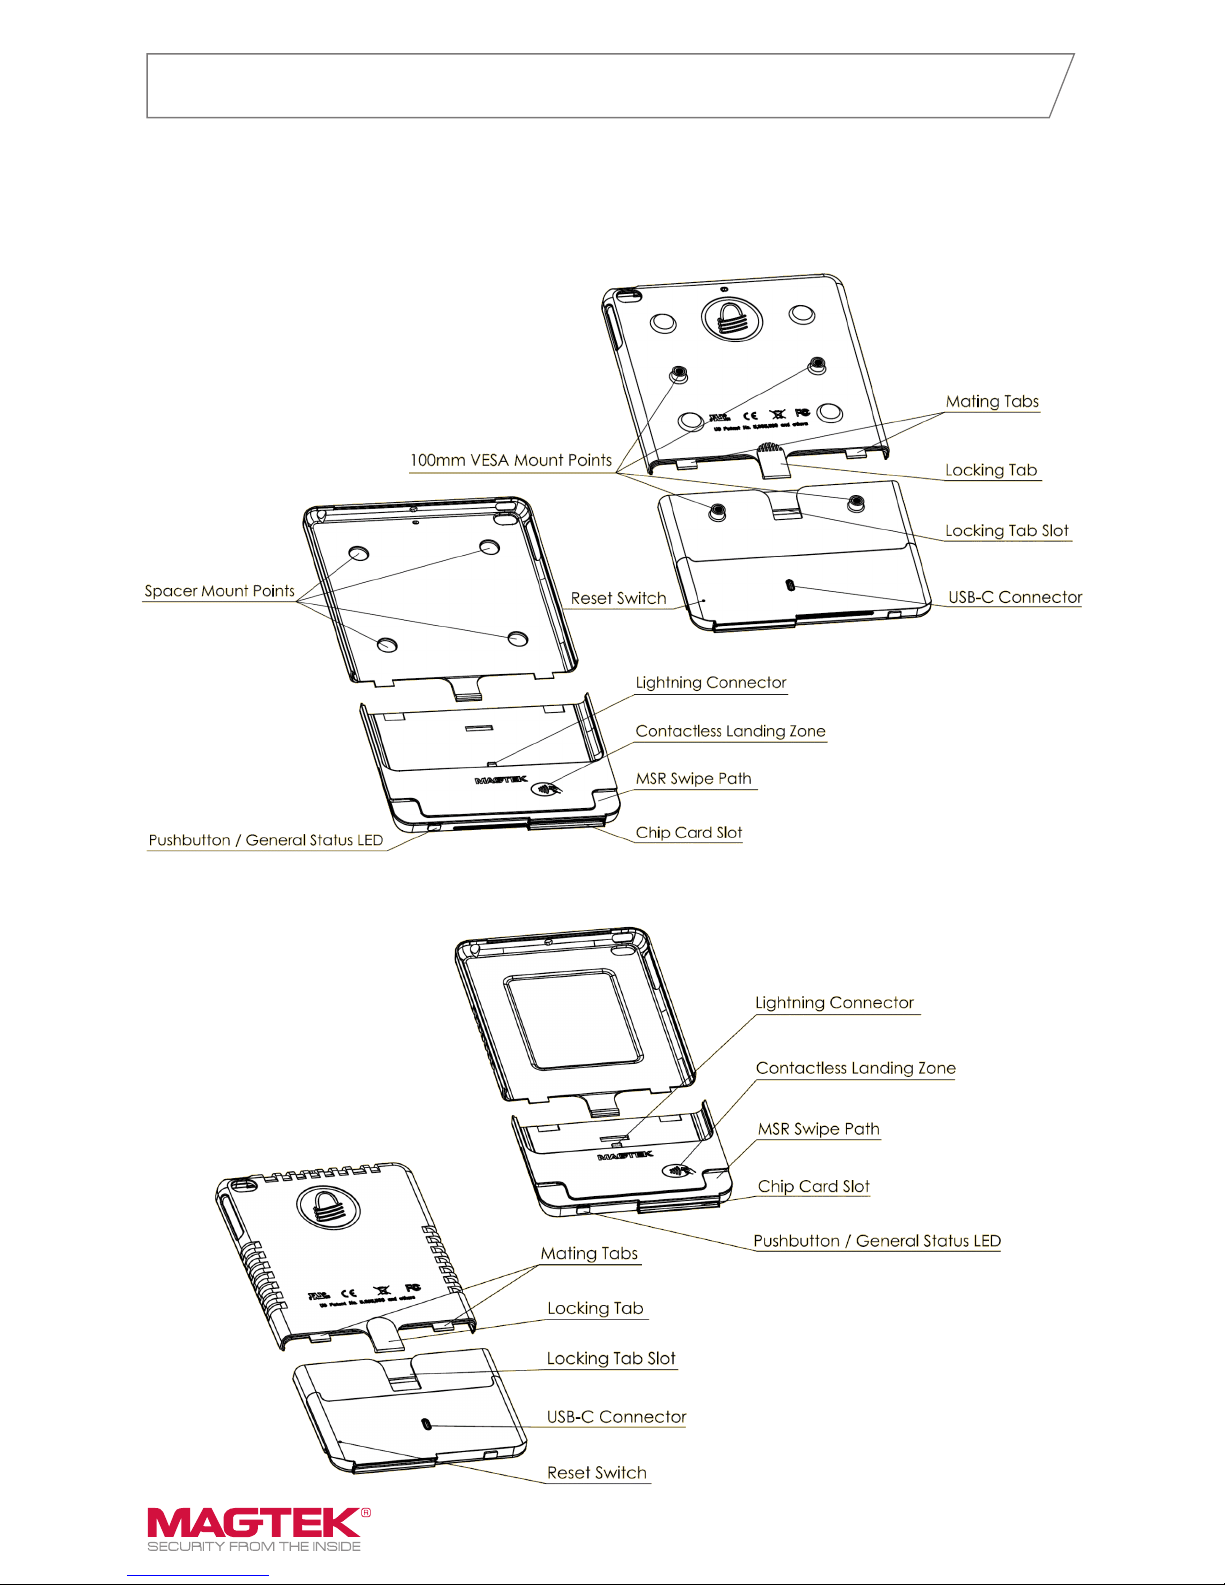
Major Components Overview
Figure 2 - kDynamo mini Major Components
Figure 1 - kDynamo Air Major Components
kDynamo connects to an iPad host via the Lightning connector. An additional adapter shell,
which is included with each device and which varies based on the iPad model being used, snaps
on to kDynamo to secure and surround the host.
Page 3

Connecting to a Host
www.magtek.com
To connect kDynamo to an iPad host, follow these steps:
1. Make sure you have the correct adapter shell for the model of iPad you are connecting to.
2. If you are connecting kDynamo Air to iPad Pro 9.7 inch or iPad Air 2, install the four included spacers in
the spacer mount points inside the adapter shell
3. Plug the main body of kDynamo into the host’s Lightning connector.
4. Slide the iPad into the bottom of the adapter shell, then slide it all the way in until the adapter shell mates
with the kDynamo main body. The locking tab should engage on its own.
5. Pull gently on the two halves to make sure they are secured.
6. On the host, install and congure the host software you intend to use with kDynamo. If you do not yet
have host software, you can download a test tool from the App Store called MagTek Test, published by
MagTek, Inc., to perform simple tests.
To disconnect kDynamo from the host, follow these steps:
1. Make sure all installed apps that use kDynamo are either closed or disconnected.
2. Power off kDynamo (see section 3.4.4 How to Power On / Wake Up from Sleep Mode / Power Off).
3. Turn off the iPad host’s display to avoid accidentally launching or interacting with apps.
4. Use your ngernail or gently use a slotted screwdriver to lift the locking tab.
5. Pull kDynamo’s adapter shell and main body in opposite directions.
6. Disconnect kDynamo from the Lightning connector and slide the iPad host out of the adapter shell.
Power and Charging
This device incorporates a built-in Lithium-ion rechargeable battery, which requires very little maintenance. It
is not subject to “charge memory” and therefore does not require deep discharge cycles to restore its charge
capacity like many other battery technologies. When properly powered through its USB port, the device
powers on automatically, recharges the battery, powers the connected iPad host through the Lightning port,
and remains powered on. The device stops charging the battery when it determines it is optimally full, to
prevent overcharging. If the device is not connected to USB power, or if the USB connection does not provide
enough power, the device primarily powers itself using the rechargeable battery.
Periodically recharge kDynamo’s battery and the connected iOS host by using the included USB-C cable to
connect it to the Apple USB power adapter included with the iPad host. The device requires a USB connection
that can provide at least 2.4A @ 5V (12W). A full recharge cycle for a completely drained battery, regardless of
whether kDynamo is pass-through charging a connected iPad host, takes approximately 4 to 5 hours.
How to Power On / Wake Up from Sleep Mode / Power Off
In Powered Off mode (General Status LED is off) or in Sleep Mode (General Status LED is lit solid), power on
or wake the device by tapping the pushbutton. In response, the device lights the General Status LED, then
beeps once, and transitions to either Idle Mode or Connected Mode.
To power off the device, press and hold the pushbutton for 2 to 3 seconds until the General Status LED
turns off and the device beeps twice.
LED Status
Color Flashing Pattern Meaning
Off Off The device is powered off, or the battery is completely drained and needs to be
recharged.
Blue Off / Flash 1 Time The device is not charging, and its battery is fully charged. Recharge if desired.
Blue Off / Flash 2 Times The device is not charging, and its battery is at medium charge. Recharge soon.
Blue Off / Flash 3 Times The device is not charging, and its battery is critically low, and it can not process
transactions. Recharge immediately.
Blue On / Flash Off 4 Times The device is charging, and its battery is charged to below 50% capacity.
Blue On / Flash Off 3 Times The device is charging, and its battery is charged to between 50% and 70% capacity.
Blue On / Flash Off 2 Times The device is charging, and its battery is charged to between 70% and 90% capacity.
Blue On / Flash Off Once The device is charging, and its battery is charged to above 90% capacity.
Blue Solid On There are three conditions where the General Status LED turns solid on: Sleep Mode,
rmware update, pushbutton is being held.
Page 4

Compliance
EMV® is a registered trademark in the U.S. and other countries and an unregistered trademark elsewhere. The EMV trademark is owned by EMVCo, LLC.
The Contactless Indicator mark, consisting of four graduating arcs, is a trademark owned by and used with permission of EMVCo, LLC.
Apple®, Apple Pay®, OS X®, iPhone®, iPad®, iPad Air®, iPad Pro®, Lightning®, and Mac® are trademarks of Apple Inc., registered in the U.S. and other countries. App Store® is a service mark of Apple Inc.,
registered in the U.S. and other countries. iPad mini™ is a trademark of Apple, Inc. IOS is a trademark or registered trademark of Cisco in the U.S. and other countries and is used by Apple Inc. under license.
MAGTEK: Registered to ISO 9001:2015 © Copyright 2018 MagTek, Inc. PN D998200222 rev 10 11/18
MagTek ® Inc., 1710 Apollo Court, Seal Beach CA 90740 p 562-546-6400 | support: 651.415.6800 | support@magtek.com
FCC INFORMATION
This device complies with Part 15 of the FCC Rules. Operation is subject to the following two conditions: (1) This device may not cause harmful
interference, and (2) This device must accept any interference received, including interference that may cause undesired operation.
Note: This equipment has been tested and found to comply with the limits for a Class B digital device, pursuant to part 15 of the FCC Rules. These
limits are designed to provide reasonable protection against harmful interference in a residential installation. This equipment generates, uses and
can radiate radio frequency energy and, if not installed and used in accordance with the instructions, may cause harmful interference to radio
communications. However, there is no guarantee that interference will not occur in a particular installation. If this equipment does cause harmful
interference to radio or television reception, which can be determined by turning the equipment off and on, the user is encouraged to try to correct the
interference by one or more of the following measures:
• Reorient or relocate the receiving antenna.
• Increase the separation between the equipment and receiver.
• Connect the equipment into an outlet on a circuit different from that to which the receiver is connected.
• Consult the dealer or an experienced radio/TV technician for help.
Caution: Changes or modications not expressly approved by MagTek could void the user’s authority to operate this equipment.
CE STANDARDS
Testing for compliance with CE requirements was performed by an independent laboratory. The unit under test was found compliant with standards
established for Class B devices.
UL/CSA
This product is recognized per UL 60950 1, 2nd Edition, 2011 12 19 (Information Technology Equipment - Safety - Part 1: General Requirements), CSA
C22.2 No. 60950 1 07, 2nd Edition, 2011 12 (Information Technology Equipment - Safety - Part 1: General Requirements).
ROHS STATEMENT
When ordered as RoHS compliant, this product meets the Electrical and Electronic Equipment (EEE) Reduction of Hazardous Substances (RoHS)
European Directive 2002/95/EC. The marking is clearly recognizable, either as written words like “Pb-free,” “lead-free,” or as another clear symbol( ).
How to Swipe Magnetic Stripe Cards
Cardholders should swipe magnetic stripe cards in the MSR
swipe path with the magnetic stripe facing away from the
cardholder and into the device, as shown. Cardholders may
swipe in either direction along the path.
How to Insert Contact Chip Cards
Cardholders should insert chip cards into the chip card slot with
the chip facing the cardholder and toward the slot.
How to Tap Contactless Cards / Devices
Cardholders should tap contactless cards or devices on the landing
zone, indicated by the EMVCo Contactless Indicator symbol on the
device’s face. After successfully communicating with the card or
device, kDynamo beeps once. The cardholder may then remove the
card or device from the contactless landing zone. If the cardholder is
using an electronic payment device, ensure the payment device has
NFC turned [On]. Please note, NFC antenna vary by make & model.
Accepting Payments
 Loading...