

Page 1
ExpressCard 2000
Instant Issuance Card Personalization System
Preventive Maintenance Procedure
June 2014
Manual Part Number:
99875651-2.01
REGISTERED TO ISO 9001:2008
MagTek I 1710 Apollo Court I Seal Beach, CA 90740 I Phone: (562) 546-6400 I Technical Support: (888) 624-8350
www.magtek.com
Page 2

Copyright © 2006 - 2014 MagTek, Inc.
Rev Number
Date
Notes
1.01
01/14/2014
Initial release derived from 99875607-2.01-DRAFT
2.01
06/27/2014
General updates to tipper heater replacement.
Printed in the United States of America
Information in this publication is subject to change without notice and may contain technical inaccuracies
or graphical discrepancies. Changes or improvements made to this product will be updated in the next
publication release. No part of this document may be reproduced or transmitted in any form or by any
means, electronic or mechanical, for any purpose, without the express written permission of MagTek, Inc.
MagTek® is a registered trademark of MagTek, Inc.
MagnePrint® is a registered trademark of MagTek, Inc.
Magensa™ is a trademark of MagTek, Inc.
MagneSafe™ is a trademark of MagTek, Inc.
ExpressCard 2000 is a trademark of MagTek, Inc.
Microsoft® and Windows® are registered trademarks of Microsoft Corporation.
All other system names and product names are the property of their respective owners.
Table 0.1 - Revisions
ExpressCard 2000| Instant Issuance Card Personalization System | Preventive Maintenance Procedure
Page 2
Page 3

SAFETY
This product has been evaluated by multiple safety certification agencies, including
Underwriters Laboratories (UL) and the United States Federal Communications
Commission (FCC Class A and Class B), and is designed to protect both the user and the
device. This document is written specifically to work in conjunction with these safety and
integrity features to protect the user and the device. It is very important to follow all steps
in the product documentation carefully, in the order in which they are described, and at
the recommended times. Failure to do so could result in personal injury, and / or cause
damage to the device, and / or void the product warranty.
The information within this manual has been prepared for use by trained professional
service personnel and is not intended for general use. To maintain the safety and integrity
of the machine, follow the procedures described in this manual carefully.
For your personal safety and to prevent damage to the device, disconnect power from the
device before you connect or disconnect any cable, electronic board, or assembly.
SAFETY REQUIREMENTS
Caution: Never do any of the following:
DO NOT use a ground adapter plug to connect equipment to a power socket-outlet that lacks a ground
connection terminal.
DO NOT attempt any maintenance function that is not specifically described in this manual or in
other ExpressCard 2000 instructional documents published by MagTek.
DO NOT override or “cheat” electrical or mechanical interlock devices.
DO NOT use EC2000 supplies or cleaning materials for other than their intended purposes.
DO NOT operate the equipment if you or anyone else have noticed unusual noises or odors.
Consider the following before operating the ExpressCard 2000:
Connect the EC2000 to a properly grounded AC power socket-outlet. If in doubt, have the socket-
outlet checked by a qualified electrician. Improper connection of the device’s grounding conductor
creates a risk of electric shock.
Place the EC2000 on a solid surface that can safely support the device’s weight support the weight of
the EC2000 PLUS the weight of a person leaning against the device (such as a service technician).
Be careful when moving or relocating the device. Use proper lifting techniques.
Use materials and supplies specifically designed for MagTek devices. Using unsuitable materials
may result in poor performance, and in some cases may be hazardous.
ExpressCard 2000| Instant Issuance Card Personalization System | Preventive Maintenance Procedure
Page 3
Page 4

1 - Table of Contents
Table of Contents
Table of Contents ............................................................................................................................... 4
1 Required Tools, Materials, and Documents ........................................................................... 5
1.1 Required Tools ..................................................................................................................... 5
1.2 Suggested Tools .................................................................................................................. 5
1.3 Required Materials ............................................................................................................. 5
1.4 Suggested Materials ........................................................................................................... 5
1.5 Required Software and Documents ................................................................................. 5
2 Introduction ................................................................................................................................. 6
3 Preventive Maintenance Procedure ........................................................................................ 6
3.1 Prepare the Device for Preventive Maintenance ........................................................... 6
3.2 Clean the Card Path ............................................................................................................ 6
3.3 Clean All Transport Rollers ................................................................................................ 7
3.4 Update the Software ........................................................................................................... 9
3.5 Update the Firmware ........................................................................................................ 10
3.6 Service the Hopper Module ............................................................................................. 11
3.7 Service the XY Transport Module ................................................................................... 12
3.8 Power Down the Device / Cool the Tipper Heater ....................................................... 13
3.9 Clean Inside the Device .................................................................................................... 14
3.10 Clean the Card Cleaning Roller ................................................................................... 14
3.11 Clean the Image Print Head ........................................................................................ 15
3.12 Service the Embosser Module ..................................................................................... 16
3.13 Service the Electronics ................................................................................................. 17
3.14 Service the Cover ........................................................................................................... 17
4 Perform Final Tests .................................................................................................................. 18
ExpressCard 2000| Instant Issuance Card Personalization System | Preventive Maintenance Procedure
Page 4
Page 5
1 - Required Tools, Materials, and Documents
Part Number
Quantity
Description
33011008
1 ea.
ASM TOOL KIT,FIELD SERVICE,EC2000
67800019 or equiv.
1 ea.
Small USB keyboard with touchpad mouse
N/A
1 ea.
Small diagonal side cutters
N/A
1 ea.
USB thumb drive with required software and documentation
Part Number
Quantity
Description
N/A
1 ea.
Laptop with available Ethernet port
22350302 or equiv.
1 ea.
10 ft. Ethernet cable (COM ETHERNET CAT5E BLK 10')
N/A
1 ea.
Flashlight
Part Number
Quantity
Description
97200153
1 ea.
ASM KIT,PREVENTIVE MAINTENANCE,EC2000
Part Number
Quantity
Description
33011009
1 ea.
ASM KIT,STARTER,SPARE,FIELD SERVICE,EC2000
93400047
1 ea.
PRI RIBBON, COLOR YMCKOK EV (R3314)
33070896
1 ea.
ASM RIBBON ASSY,TIP FOIL,SILVER
33070621
1 ea.
AAY ASSY,INDENT CARTRIDGE
Part Number
Quantity
Description
99875600
1 ea.
MNL USER INSTALL & OPERATION MANUAL,EC2000
99875607
1 ea.
MNL HARDWARE SERVICE MANUAL,EC2000
99875651
1 ea.
REF PROCEDURE,PREVENTIVE MAINTENANCE,EC2000
99875646
1 ea.
REF CHECKLIST,PREVENTIVE MAINTENANCE,EC2000
N/A
1 ea.
Passwords and factory defaults for the device being serviced
1 Required Tools, Materials, and Documents
1.1 Required Tools
1.2 Suggested Tools
1.3 Required Materials
1.4 Suggested Materials
1.5 Required Software and Documents
MagTek recommends loading the following required software and documents on the USB thumb drive or
service laptop before visiting the customer site.
ExpressCard 2000| Instant Issuance Card Personalization System | Preventive Maintenance Procedure
Page 5
Page 6
3 - Introduction
Part Number
Quantity
Description
VARIOUS
0 or more
EC2000 software patch .CAB files provided by MagTek Support
Services, loaded onto USB thumb drive or service laptop
2 Introduction
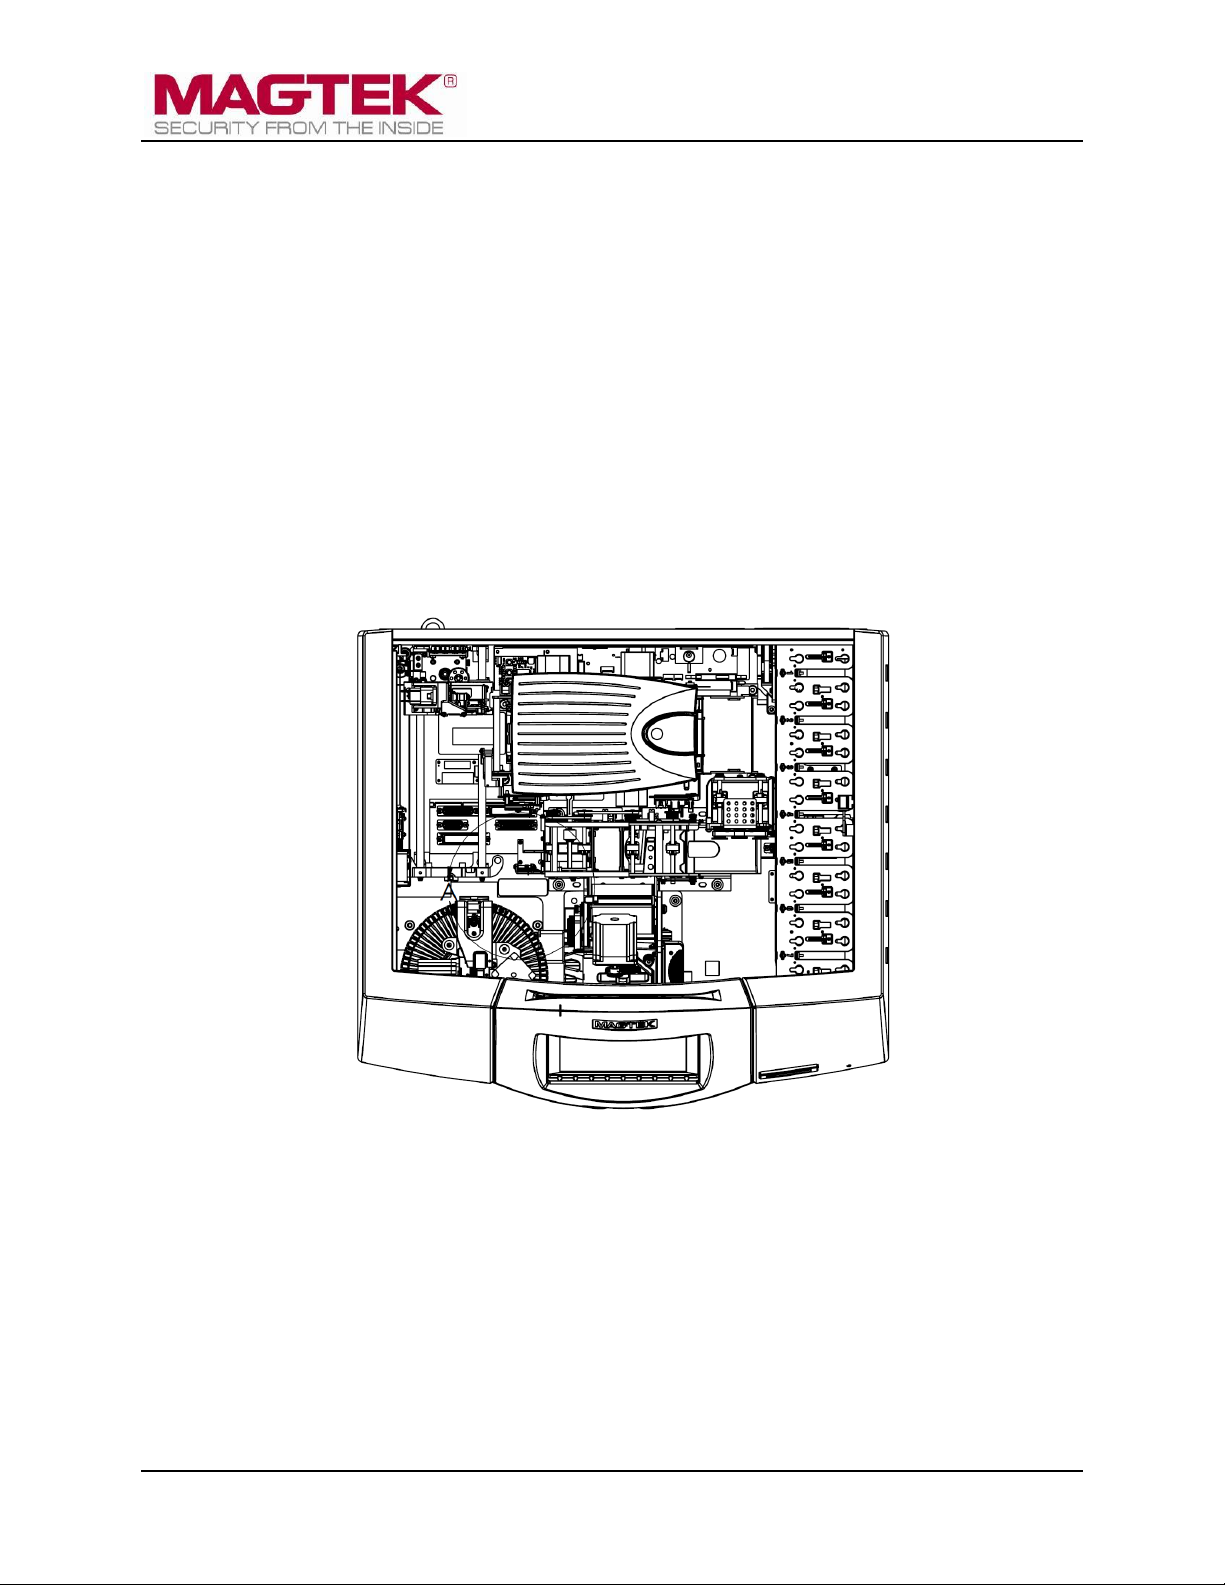
This document contains the preventive maintenance procedure for the ExpressCard 2000 (EC2000),
extracted from 99875607 ExpressCard 2000 Hardware Service Manual. It assumes the reader is
familiar with basic operation of the ExpressCard 2000’s user and maintenance functions, so many of the
cross-references to deeper “how-to” procedures from that manual have been removed for brevity. For
details about performing any procedure described in this document, see that manual and 99875600
ExpressCard 2000 User Installation and Operation Manual.
The information in this document is intended for use by trained professional service
personnel only. It is not intended for general use. To maintain the safety and integrity of
the device, it is important to follow the procedures laid out in this manual as-written and in
the order provided.
CAUTION: For your personal safety, and to prevent damage to the device, disconnect
power from the ExpressCard 2000 before you connect or disconnect any cable, electronic
board, or assembly.
3 Preventive Maintenance Procedure
3.1 Prepare the Device for Preventive Maintenance
Prepare the device for preventive maintenance by following these steps:
1) Offer the customer the opportunity to remove any proprietary or security-sensitive consumables from
the device, including card stock, image printer ribbons, indent cartridges, and tipper foils. Some
consumables contain negative imprints of cardholder data and must be handled securely.
2) Make sure the device is powered up and connected to the network.
3) Open the top access door.
4) Open the two side access doors.
5) Inspect the device for any items that do not belong inside the cover, and remove them (examples
include loose mechanical parts, cards, insect or animal leavings, or jewelry).
6) Inspect the mechanical parts inside the device and inside the image printer, paying special attention to
belts, cables, and plastic gears to see if there are signs of wear or damage.
3.2 Clean the Card Path
Clean the card path using a cleaning card by following these steps:
1) Obtain a cleaning card from the kit.
2) Remove the cleaning card from its package and let it dry for one minute.
3) Remove the image printer ribbon and set it aside in a secure location, or offer it to the customer for
temporary storage or secure disposal.
4) Using the touchscreen, navigate to Menu > Maintenance to open the Maintenance Menu page.
5) Press the Clean Printer… button to launch the Printer Utility page.
ExpressCard 2000| Instant Issuance Card Personalization System | Preventive Maintenance Procedure
Page 6
Page 7

3 - Preventive Maintenance Procedure
6) Press the Clean Printer (Manual Feed) button to begin the cleaning process. The EC2000 will
show a popup dialog box. Leave it there for now.
7) Insert the cleaning card into the image printer’s input slot on the right side (see Figure 3-1) and press
OK to close the dialog box. The EC2000 will run the cleaning card through the card path and eject it
into the card output hopper when done.
8) If the cleaning card sticks in the manual feed slot, let it dry for one more minute and try again.
Figure 3-1 - Inserting the Cleaning Card
9) Remove and dispose of the cleaning card.
3.3 Clean All Transport Rollers
Follow these steps to clean the rollers on the hopper transport, XY transport, and exit transport. Use the
white cleaning cards:
1) Remove hoppers 1 and 2.
2) Remove the tipper foil cartridge and set it aside in a secure location, or offer it to the customer for
temporary storage or secure disposal.
3) On the touchscreen, navigate to Menu > Settings > Service > MCP Cmds to open the
Controller Commands page.
4) Use the white cleaning card and do not let the rollers take it out of your hand as you clean each set
of rollers as follows:
a) Feed the card partly into the hopper transport and press the Roller Consume button. Hold the
card there until the rollers stop moving.
ExpressCard 2000| Instant Issuance Card Personalization System | Preventive Maintenance Procedure
Page 7
Page 8

3 - Preventive Maintenance Procedure
Figure 3-2 - Cleaning the Hopper Transport Rollers (TOP VIEW FROM FRONT)
b) Feed the card partly into the left side of the exit transport and press the Exit Eject button. Hold
the card there until the rollers stop moving.
Figure 3-3 - Cleaning the Left Side of the Exit Transport (TOP VIEW FROM FRONT)
c) Feed the card partly into the right side of the exit transport and press the Exit Reject button.
Push inward to keep the card from being pushed out until the rollers stop moving.
ExpressCard 2000| Instant Issuance Card Personalization System | Preventive Maintenance Procedure
Page 8
Page 9

3 - Preventive Maintenance Procedure
Figure 3-4 - Cleaning the Right Side of the Exit Transport (TOP VIEW FROM FRONT)
d) Feed the card partly under the exit ramp rollers and press the Exit Eject button. Hold the card
there until the rollers stop moving.
Figure 3-5 - Cleaning the Exit Ramp Rollers (TOP VIEW FROM FRONT)
5) Press the Status button to return to the Status page.
6) Re-install the tipper foil spool assembly with the original tipper foil roll, or obtain and install a new
one from the customer.
7) Re-install hoppers 1 and 2.
3.4 Update the Software
If MagTek Support Services has supplied .CAB files to apply EC2000 software patches, follow these
steps to install them:
1) Use the Ethernet cable to connect the service laptop to the EC2000. If necessary, you may instead
use the customer’s instant issuance workstation, provided it has Microsoft Internet Explorer and a
USB port with security settings that allow you to read from the USB thumb drive.
ExpressCard 2000| Instant Issuance Card Personalization System | Preventive Maintenance Procedure
Page 9
Page 10

3 - Preventive Maintenance Procedure
2) Launch the Internet Explorer web browser and navigate to https://ec-xxxxxxx, where xxxxxxx is the
device’s serial number. The browser should show an ExpressCard 2000 web interface page.
3) Open the Software Upload link on the left side of the page to display a File to Upload page.
4) Press the Browse… button to launch the Choose File to Upload dialog box.
5) Navigate to the folder that contains the .CAB files you want to apply (such as the field service
laptop’s hard drive or the USB thumb drive).
6) Select the .CAB file you want to apply, and press the Open button to return to the File to Upload
page.
7) Press the Send button to upload the .CAB file to the device. The browser will display a status
message telling you when the patch will be applied (for example, “File Copied Successfully. Update
will be performed during next reboot.”). The device’s touchscreen may also go blank.
8) Restart the device by powering it off, then powering it on. Wait until the touchscreen once again
displays the ExpressCard 2000 Status page.
9) In the web browser, open the Upload Status link on the left side of the page. If the browser reports
“SUCCESS,” repeat these steps for any additional patch .CAB files you need to apply, or continue to
the next section.
3.5 Update the Firmware
Follow the steps in this section to determine whether the EC2000 firmware needs to be updated, and to
update it if necessary.
3.5.1 Check Firmware Revision Numbers
To check whether the EC2000 has the latest main logic board (MLB) and image printer firmware
installed, follow these steps:
1) Install any software updates MagTek Support Services has provided, using the instructions in section
3.4 Update the Software. This is a very important first step, because new revisions of firmware files
are distributed to the EC2000 via software updates.
2) From the EC2000 touchscreen, press the Help button to open the Help page.
3) In the Version Information list, note the Controller Firmware and Printer Firmware entries.
ExpressCard 2000| Instant Issuance Card Personalization System | Preventive Maintenance Procedure
Page 10
Page 11

3 - Preventive Maintenance Procedure
4) Press the Menu button to launch the Main Menu page.
5) Press the Settings button to launch the Settings Menu page.
6) Press the Load F/W button to launch the Firmware Download password page.
7) Use the on-screen keyboard to enter the password 1234567, then press the E key to launch the
second Firmware Download password page.
8) Use the on-screen keyboard to enter the password 7654321, then press the E key to launch the
Firmware Download page.
9) Note the revision numbers listed for each .hex file in the list. If any revision number does not match
the revision numbers you found on the Help page, update the firmware for that component using the
steps in the following sections.
3.5.2 Update the Main Logic Board (Controller) Firmware
To update the controller (main logic board / MLB) firmware, follow these steps:
1) From the Firmware Download page, select the Controller radio button.
2) In the list of .hex files, select the file that corresponds to the new revision.
3) Press the Download button to download the .hex file to the controller. The system will report
“Loading the firmware. Please wait….”
4) Wait about 5 minutes for the firmware to finish downloading. Do not power off the device.
5) After the firmware update is complete, the device will make sounds as the MLB resets. Wait until the
sounds stop and the touchscreen reports “Finished loading the firmware.”
3.5.3 Update the Printer Firmware
To update the printer firmware, follow the steps from section 3.5.2, but select the Printer radio button
and select the .hex file appropriate to the revision of the image printer firmware you want to install, before
pressing the Download button.
3.6 Service the Hopper Module
Follow these steps to service the hopper transport:
ExpressCard 2000| Instant Issuance Card Personalization System | Preventive Maintenance Procedure
Page 11
Page 12

3 - Preventive Maintenance Procedure
1) Use the MCP Commands page to move the hopper transport from the front to the rear of the device
to verify the movement is smooth and there is no belt slippage.
2) Only if the hopper transport rods are dirty, wipe off the dirt with a soft, lint-free cloth.
3) Check the hopper transport drive belt for signs of damage. If it is damaged, contact MagTek Support
Services for a replacement.
3.7 Service the XY Transport Module
Do not lubricate the EC2000’s gears or bearings. They are made of self-lubricating powder
metal, and lubricants can damage their surfaces.
Follow these steps to lubricate the one shaft that requires lubrication. Do not use Tri-Flow lubricant on
any shaft other than the one shown below.
1) If there is dirt, dust, or debris on the XY transport rods, wipe it off using a soft, lint-free cloth.
2) Use the MCP Commands page to move the XY transport from the front to the rear of the device to
verify the movement is smooth and there is no belt slippage. Leave the transport at the rear of the
device.
3) Check the XY transport drive belt for any signs of damage. If it is damaged, contact MagTek Support
Services for a replacement.
4) Stand at the front of the device and locate the XY transport shaft closest to the image printer. It is the
only shaft that has a blue bearing around it (see Figure 3-6).
Figure 3-6 - Blue Bearing On XY Transport (FRONT LEFT VIEW)
5) Shake the bottle of Tri-Flow lubricant and remove the cap.
6) Run a thin 3-4 inch long bead of Tri-Flow along the top of that one shaft.
ExpressCard 2000| Instant Issuance Card Personalization System | Preventive Maintenance Procedure
Page 12
Page 13

3 - Preventive Maintenance Procedure
Figure 3-7 - Run a Thin Bead of Tri-Flow Along the Top of the Shaft (TOP LEFT VIEW)
7) Use the drive belt to move the XY transport to the front of the device, then to the rear again to spread
the Tri-Flow along the length of the shaft.
8) If you have applied too much Tri-Flow to the shaft, some may drip off the shaft. If this happens, dab
off the excess with a clean, lint free cloth.
3.8 Power Down the Device / Cool the Tipper Heater
1) Navigate to Menu > Settings > Tipper to open the Tipper page.
2) Press the Set Heater OFF button to turn off the tipper heater.
3) Note the value under Current Tipper Temp. If the tipper temperature is 50 degrees Centigrade or
hotter, the tipper heater is not safe to touch.
4) Take note of the current time, and plan your work to allow enough time for the tipper heater to cool,
which can take up to 15 minutes. You may be able to use compressed air to cool it more quickly.
5) Power down the device.
ExpressCard 2000| Instant Issuance Card Personalization System | Preventive Maintenance Procedure
Page 13
Page 14

3 - Preventive Maintenance Procedure
3.9 Clean Inside the Device
Caution: Do not use alcohol wipes, liquids, or chemicals on the touchscreen.
Clean the device in phases to avoid blowing dirt, dust, or debris into sensitive components:
1) Remove all remaining consumables from the device (stock cards, image printer ribbon, indent
cartridge[s], tipper foil, etc.) and set them aside in a secure location or give them to the customer for
temporary storage or secure disposal.
2) If there is a large, visible amount of dirt, dust, or debris in the device, wipe the worst of it out with a
clean, dry cloth.
3) Wipe remaining dirt, dust, and debris off the base plate and main components with alcohol wipes.
4) Used compressed air to blow out any remaining dirt, dust, or debris from between components and re-
wipe as necessary.
5) Use compressed air to clean each of the sensors (see Figure 3-8).
Figure 3-8 – All EC2000 Sensors Shown In Red (FRONT VIEW)
6) Use compressed air to clean out the electronics in the bottom between the side access doors, with
special attention paid to the power supply in the rear left corner.
3.10 Clean the Card Cleaning Roller
Clean the card cleaning roller by following these steps:
1) Remove any jewelry or accessories that could touch the print head during cleaning.
2) Open the image printer.
ExpressCard 2000| Instant Issuance Card Personalization System | Preventive Maintenance Procedure
Page 14
Page 15

3 - Preventive Maintenance Procedure
Figure 3-9 - Removing the Card Cleaning Roller
3) Remove the cleaning roller (see Figure 3-9).
4) Unwrap the roller wipe from the kit and rub it gently over the entire surface of the roller. Pay special
attention to spots that feel uneven, which may be dirt or dust stuck to the roller. If there are any
uneven or rough spots you can not wipe off, contact MagTek Support Services for assistance.
5) When the card cleaning roller has dried, re-install it into the image printer.
3.11 Clean the Image Print Head
Be cautious when following the steps in this section:
Avoid contact between the print head and any metal, sharp, or rough objects.
Avoid touching the print head directly with your fingers, as it could affect print quality
or permanently damage the print head.
Clean the image print head by following these steps:
1) Obtain a print head cleaning pen from the kit.
Figure 3-10 - Cleaning the Image Print Head
2) Locate the print head (see Figure 3-10). The area you want to clean is the front face of the thin
brown glass layer closest to the ceiling.
ExpressCard 2000| Instant Issuance Card Personalization System | Preventive Maintenance Procedure
Page 15
Page 16

3 - Preventive Maintenance Procedure
3) Take the cap off the cleaning pen.
4) Gently swipe the cleaning pen back and forth along the print head 10-15 times, until the head feels /
looks clean. The print head is slightly textured, so if you are making proper contact you should feel a
very slight vibration or “squeak” during each swipe.
5) Wipe the cleaning pen on a piece of clean paper, then put the cap back on the cleaning pen.
6) Wait until the print head has completely dried (approximately two minutes).
7) Close the image printer.
3.12 Service the Embosser Module
Service the embosser by following these steps. If you discover any issues you can not resolve, contact
MagTek Support Services to procure a replacement embosser module.
1) Use compressed air to clean the embosser bridge (the metal block between the daisy wheels that
supports the indent cartridge ribbon).
2) Inspect the top and bottom embosser daisy wheels for missing or worn characters and replace them if
possible. After installing, make sure the tine is still intact and holds the character tightly.
3) Inspect the top and bottom embosser daisy wheels for missing, bent, or broken tines. Install any
missing characters on other tines and re-map them after preventive maintenance is complete and the
device is powered up.
4) Inspect the characters on the top embosser wheel to identify any broken or bent cones.
5) Use the inspection mirror and a flashlight to inspect the characters on the bottom embosser wheel to
identify any broken or bent cones (see Figure 3-11 and Figure 3-12).
Figure 3-11 - Using Inspection Mirror to Check Tine / Hammer Alignment (TOP VIEW FROM FRONT)
ExpressCard 2000| Instant Issuance Card Personalization System | Preventive Maintenance Procedure
Page 16
Page 17

3 - Preventive Maintenance Procedure
Figure 3-12 - Bad Embosser Wheel Alignment (Figure 3-11 MAGNIFIED)
6) If any cones are broken or bent, replace the characters in the same location if possible. If replacement
is not feasible, cut off the top and bottom tines using the diagonal side cutters, remove the character
from the tines, and install it to another set of tines, and re-map the character to another tine after
preventive maintenance is complete and the device is powered up.
7) Check the daisy wheel alignment by standing in front of the device and looking straight down at the
embosser. Use an inspection mirror as shown in Figure 3-11 so you can see the cone on the bottom
of the current character and the hole in the embosser hammer. Figure 3-12 shows a cone and hole
that are not properly aligned.
8) Check embossed character heights, and adjust them if necessary to account for normal wear. Pay
special attention to any characters you have replaced or re-mapped.
3.13 Service the Electronics
Visually inspect all wires and cables, checking for insulation breakage or wear on moving cables.
3.14 Service the Cover
After completing all other service, service the cover as follows:
1) Inspect the cover for damage.
2) Clean the black and gray portions of the outside of the cover with alcohol wipes.
3) Clean fingerprints off the touchscreen with a soft, clean, dry cloth.
ExpressCard 2000| Instant Issuance Card Personalization System | Preventive Maintenance Procedure
Page 17
Page 18

4 - Perform Final Tests
4 Perform Final Tests
After completing preventive maintenance, follow these steps to test the device and restore it to its original
state:
1) Re-connect the power and network cables.
2) Re-attach any security hardware.
3) Re-install consumables.
4) Close all open doors.
5) Power up the device.
6) Re-synchronize the image printer ribbon.
7) Create a sample card using customer card stock.
8) Check image print quality and embosser alignment, and adjust components as necessary.
9) Fill out the checklist included with the preventive maintenance kit, and return it and the tipper heater
to MagTek.
ExpressCard 2000| Instant Issuance Card Personalization System | Preventive Maintenance Procedure
Page 18
 Loading...