

Page 1
DynaPro Mini
PIN Encryption Device
Installation and Operation Manual
October 2018
Document Number:
D99875642-13
REGISTERED TO ISO 9001:2015
MagTek I 1710 Apollo Court I Seal Beach, CA 90740 I Phone: (562) 546-6400 I Technical Support: (888) 624-8350
www.magtek.com
Page 2

Copyright © 2006 - 2018 MagTek, Inc.
Printed in the United States of America
INFORMATION IN THIS PUBLICATION IS SUBJECT TO CHANGE WITHOUT NOTICE AND
MAY CONTAIN TECHNICAL INACCURACIES OR GRAPHICAL DISCREPANCIES. CHANGES
OR IMPROVEMENTS MADE TO THIS PRODUCT WILL BE UPDATED IN THE NEXT
PUBLICATION RELEASE. NO PART OF THIS DOCUMENT MAY BE REPRODUCED OR
TRANSMITTED IN ANY FORM OR BY ANY MEANS, ELECTRONIC OR MECHANICAL, FOR
ANY PURPOSE, WITHOUT THE EXPRESS WRITTEN PERMISSION OF MAGTEK, INC.
MagTek® is a registered trademark of MagTek, Inc.
MagnePrint® is a registered trademark of MagTek, Inc.
MagneSafe® is a registered trademark of MagTek, Inc.
Magensa™ is a trademark of MagTek, Inc.
DynaPro™ and DynaPro Mini™, are trademarks of MagTek, Inc.
IPAD® is a trademark of MagTek, Inc.
IntelliStripe® is a registered trademark of MagTek, Inc.
AAMVA™ is a trademark of AAMVA.
American Express® is a registered trademark of American Express Marketing & Development Corp.
MasterCard® is a registered trademark of MasterCard International Incorporated.
Visa® is a registered trademark of Visa International Service Association.
ANSI®, the ANSI logo, and numerous other identifiers containing "ANSI" are registered trademarks,
service marks, and accreditation marks of the American National Standards Institute (ANSI).
EMVCo™ and EMV™ are trademarks of EMVCo and its licensors.
ISO® is a registered trademark of the International Organization for Standardization.
PCI Security Standards Council® is a registered trademark of the PCI Security Standards Council, LLC.
UL™ and the UL logo are trademarks of UL LLC.
The Bluetooth® word mark and logos are registered trademarks owned by Bluetooth SIG, Inc. and any
use of such marks by MagTek is under license.
Microsoft®, Windows®, and .NET® are registered trademarks of Microsoft Corporation.
“Made for iPod” and “Made for iPhone” and “Made for iPad” mean that an electronic accessory has been
designed to connect specifically to iPod or iPhone or iPad respectively, and has been certified by the
developer to meet Apple performance standards. Apple is not responsible for the operation of this device
or its compliance with safety and regulatory standards. iPod®, iPod touch®, iPhone®, iPad™, and
Mac® are trademarks of Apple Inc., registered in the U.S. and other countries. App StoreSM is a service
mark of Apple Inc., registered in the U.S. and other countries. IOS is a trademark or registered trademark
of Cisco in the U.S. and other countries and is used by Apple Inc. under license.
iPod, iPhone and iPad not included.
All other system names and product names are the property of their respective owners.
DynaPro Mini| PIN Encryption Device | Installation and Operation Manual
Page 2 of 28 (D99875642-13)
Page 3

Table 0.1 - Revisions
Rev Number
Date
Notes
1.01
Nov 7, 2013
Initial Release, derived from 99875586-1.01
1.02
Jun 16, 2014
Update Appendix A Electrical Characteristics, Reliability and
Enhance Battery Life
13
Oct 30, 2018
Update format and standardize terminology; In 4.2 Power
Management, provide more battery information and migrate
device usage information from programmer’s manual; Add
section 2 Handling and Storage; Update Appendix A
Technical Specifications; Remove obsolete 30-pin model;
Misc. clarifications and corrections
DynaPro Mini| PIN Encryption Device | Installation and Operation Manual
Page 3 of 28 (D99875642-13)
Page 4

LIMITED WARRANTY
MagTek warrants that the products sold pursuant to this Agreement will perform in accordance with
MagTek’s published specifications. This warranty shall be provided only for a period of one year from
the date of the shipment of the product from MagTek (the “Warranty Period”). This warranty shall apply
only to the “Buyer” (the original purchaser, unless that entity resells the product as authorized by
MagTek, in which event this warranty shall apply only to the first repurchaser).
During the Warranty Period, should this product fail to conform to MagTek’s specifications, MagTek
will, at its option, repair or replace this product at no additional charge except as set forth below. Repair
parts and replacement products will be furnished on an exchange basis and will be either reconditioned or
new. All replaced parts and products become the property of MagTek. This limited warranty does not
include service to repair damage to the product resulting from accident, disaster, unreasonable use,
misuse, abuse, negligence, or modification of the product not authorized by MagTek. MagTek reserves
the right to examine the alleged defective goods to determine whether the warranty is applicable.
Without limiting the generality of the foregoing, MagTek specifically disclaims any liability or warranty
for goods resold in other than MagTek’s original packages, and for goods modified, altered, or treated
without authorization by MagTek.
Service may be obtained by delivering the product during the warranty period to MagTek (1710 Apollo
Court, Seal Beach, CA 90740). If this product is delivered by mail or by an equivalent shipping carrier,
the customer agrees to insure the product or assume the risk of loss or damage in transit, to prepay
shipping charges to the warranty service location, and to use the original shipping container or equivalent.
MagTek will return the product, prepaid, via a three (3) day shipping service. A Return Material
Authorization (“RMA”) number must accompany all returns. Buyers may obtain an RMA number by
contacting MagTek Support Services at (888) 624-8350.
EACH BUYER UNDERSTANDS THAT THIS MAGTEK PRODUCT IS
OFFERED AS-IS. MAGTEK MAKES NO OTHER WARRANTY, EXPRESS OR
IMPLIED, AND MAGTEK DISCLAIMS ANY WARRANTY OF ANY OTHER
KIND, INCLUDING ANY WARRANTY OF MERCHANTABILITY OR FITNESS
FOR A PARTICULAR PURPOSE.
IF THIS PRODUCT DOES NOT CONFORM TO MAGTEK’S
SPECIFICATIONS, THE SOLE REMEDY SHALL BE REPAIR OR
REPLACEMENT AS PROVIDED ABOVE. MAGTEK’S LIABILITY, IF ANY,
SHALL IN NO EVENT EXCEED THE TOTAL AMOUNT PAID TO MAGTEK
UNDER THIS AGREEMENT. IN NO EVENT WILL MAGTEK BE LIABLE TO
THE BUYER FOR ANY DAMAGES, INCLUDING ANY LOST PROFITS, LOST
SAVINGS, OR OTHER INCIDENTAL OR CONSEQUENTIAL DAMAGES
ARISING OUT OF THE USE OF, OR INABILITY TO USE, SUCH PRODUCT,
EVEN IF MAGTEK HAS BEEN ADVISED OF THE POSSIBILITY OF SUCH
DAMAGES, OR FOR ANY CLAIM BY ANY OTHER PARTY.
DynaPro Mini| PIN Encryption Device | Installation and Operation Manual
Page 4 of 28 (D99875642-13)
Page 5

LIMITATION ON LIABILITY
EXCEPT AS PROVIDED IN THE SECTIONS RELATING TO MAGTEK’S LIMITED WARRANTY,
MAGTEK’S LIABILITY UNDER THIS AGREEMENT IS LIMITED TO THE CONTRACT PRICE OF
THIS PRODUCT.
MAGTEK MAKES NO OTHER WARRANTIES WITH RESPECT TO THE PRODUCT, EXPRESSED
OR IMPLIED, EXCEPT AS MAY BE STATED IN THIS AGREEMENT, AND MAGTEK
DISCLAIMS ANY IMPLIED WARRANTY, INCLUDING WITHOUT LIMITATION ANY IMPLIED
WARRANTY OF MERCHANTABILITY OR FITNESS FOR A PARTICULAR PURPOSE.
MAGTEK SHALL NOT BE LIABLE FOR CONTINGENT, INCIDENTAL, OR CONSEQUENTIAL
DAMAGES TO PERSONS OR PROPERTY. MAGTEK FURTHER LIMITS ITS LIABILITY OF ANY
KIND WITH RESPECT TO THE PRODUCT, INCLUDING NEGLIGENCE ON ITS PART, TO THE
CONTRACT PRICE FOR THE GOODS.
MAGTEK’S SOLE LIABILITY AND BUYER’S EXCLUSIVE REMEDIES ARE STATED IN THIS
SECTION AND IN THE SECTION RELATING TO MAGTEK’S LIMITED WARRANTY.
FCC INFORMATION
This device complies with Part 15 of the FCC Rules. Operation is subject to the following two
conditions: (1) This device may not cause harmful interference, and (2) This device must accept any
interference received, including interference that may cause undesired operation.
Note: This equipment has been tested and found to comply with the limits for a Class B digital device,
pursuant to part 15 of the FCC Rules. These limits are designed to provide reasonable protection against
harmful interference in a residential installation. This equipment generates, uses and can radiate radio
frequency energy and, if not installed and used in accordance with the instructions, may cause harmful
interference to radio communications. However, there is no guarantee that interference will not occur in a
particular installation. If this equipment does cause harmful interference to radio or television reception,
which can be determined by turning the equipment off and on, the user is encouraged to try to correct the
interference by one or more of the following measures:
Reorient or relocate the receiving antenna.
Increase the separation between the equipment and receiver.
Connect the equipment into an outlet on a circuit different from that to which the receiver is
connected.
Consult the dealer or an experienced radio/TV technician for help.
Caution: Any changes or modifications not expressly approved by the party responsible for
compliance could void the user’s authority to operate this equipment.
CUR/UR
This product is recognized per Underwriter Laboratories and Canadian Underwriter Laboratories 1950.
CANADIAN DOC STATEMENT
This digital apparatus does not exceed the Class B limits for radio noise from digital apparatus set out in
the Radio Interference Regulations of the Canadian Department of Communications.
DynaPro Mini| PIN Encryption Device | Installation and Operation Manual
Page 5 of 28 (D99875642-13)
Page 6

Le présent appareil numérique n’émet pas de bruits radioélectriques dépassant les limites applicables aux
appareils numériques de la classe B prescrites dans le Règlement sur le brouillage radioélectrique édicté
par le ministère des Communications du Canada.
This Class B digital apparatus complies with Canadian ICES-003.
Cet appareil numérique de la classe B est conformé à la norme NMB-003 du Canada.
CE STANDARDS
Testing for compliance with CE requirements was performed by an independent laboratory. The unit
under test was found compliant with standards established for Class B devices.
UL/CSA
This product is recognized per UL 60950-1, 2nd Edition, 2011-12-19 (Information Technology
Equipment - Safety - Part 1: General Requirements), CSA C22.2 No. 60950-1-07, 2nd Edition,
2011-12 (Information Technology Equipment - Safety - Part 1: General Requirements).
ROHS STATEMENT
When ordered as RoHS compliant, this product meets the Electrical and Electronic Equipment (EEE)
Reduction of Hazardous Substances (RoHS) European Directive 2002/95/EC. The marking is clearly
recognizable, either as written words like “Pb-free,” “lead-free,” or as another clear symbol ( ).
DynaPro Mini| PIN Encryption Device | Installation and Operation Manual
Page 6 of 28 (D99875642-13)
Page 7

1 - Table of Contents
Table of Contents
Table of Contents .............................................................................................................................................. 7
1 Introduction ............................................................................................................................................... 8
1.1 About DynaPro Mini ......................................................................................................................... 8
1.2 Protection for All Points Within the Payment Infrastructure ..................................................... 9
1.3 About DynaPro Mini Components ............................................................................................... 11
1.4 About Solution Planning................................................................................................................ 12
1.5 About Terminology ......................................................................................................................... 12
2 Handling and Storage ............................................................................................................................ 13
2.1 Handling to Avoid Damage ........................................................................................................... 13
2.2 Handling to Avoid Accidental Tamper ......................................................................................... 13
3 Installation ............................................................................................................................................... 14
3.1 About Software ............................................................................................................................... 14
3.2 About Connecting DynaPro Mini .................................................................................................. 14
4 Operation ................................................................................................................................................. 16
4.1 Overview........................................................................................................................................... 16
4.2 Power Management....................................................................................................................... 18
4.3 Card Reading .................................................................................................................................. 20
4.4 How to Enter PINs........................................................................................................................... 23
4.5 How to Verify the Transaction Amount ....................................................................................... 23
4.6 About Status Codes........................................................................................................................ 24
5 Maintenance ............................................................................................................................................ 25
6 Developing Custom Software ............................................................................................................... 26
6.1 USB-Based Custom Software ....................................................................................................... 26
6.2 Bluetooth LE-based Custom Software and Apps ....................................................................... 26
6.3 For More Information ..................................................................................................................... 26
Appendix A Technical Specifications ....................................................................................................... 27
DynaPro Mini| PIN Encryption Device | Installation and Operation Manual
Page 7 of 28 (D99875642-13)
Page 8

1 - Introduction
1 Introduction
1.1 About DynaPro Mini
MagTek's DynaPro Mini is a handheld device that combines a secure PCI PTS 3.x, SRED-compliant PIN
Encryption Device with a MagneSafe secure card reader authenticator (SCRA) and an EMV chip card
reader. This versatile device is ideal for credit, ATM, prepaid, gift, and debit cards for mobile point-ofsale applications where you need unmatched convenience and security. Reduce your interchange rates,
reduce chargebacks, and increase your customer satisfaction and sales with DynaPro Mini.
DynaPro Mini provides a mobile solution that is convenient without sacrificing security. DynaPro Mini
meets and exceeds PCI PTS 3.x and SRED security requirements, includes the MagTek MagneSafe™
Security Architecture (MSA), is a Tamper-Responsive Secure Cryptographic Device (SCD), and includes
EMV chip card technology. Any attempts to penetrate or modify the unit will cause all keys to be cleared
and will stop the device from functioning.
DynaPro Mini can be used with a variety of computing platforms including iOS, Android, and PC and
Mac computers. DynaPro Mini can interface through its onboard USB port or its optional Bluetooth 4.0
(Bluetooth Low Energy or Bluetooth LE) antenna. The display module is a full dot-matrix graphics unit
with an LCD display, and the twelve-key keypad consists of well-contoured buttons with tactile feedback
for convenient entry of PINs or other data.
DynaPro Mini product features include:
PCI PTS 3.x, SRED (pre-release)
Meets EMV level 1 and 2 requirements
Triple DES encryption
DUKPT key management
Device/mutual authentication
Card data authentication
Tokenization and masked data
Bluetooth 4.0 (Bluetooth LE) connection, with Micro-USB connectivity
Ergonomic and ruggedized design
Secured by MagneSafe Security Architecture
MagnePrint card authentication
Generates dynamic payment card data with each swipe
Reads ANSI/ISO/AAMVA cards plus custom formats
EMV chip card reader
Fast and reliable magnetic stripe reading
LCD graphical display
Reads up to 3 tracks of card data
Bi-directional read
DynaPro Mini| PIN Encryption Device | Installation and Operation Manual
Page 8 of 28 (D99875642-13)
Page 9

1 - Introduction
1.2 Protection for All Points Within the Payment Infrastructure
DynaPro Mini exemplifies engineered design and delivers a PIN encryption device that combines best
practices for mobility and security. The DynaPro Mini uses the MagneSafe Security Architecture (MSA)
and is built for durability.
In addition to meeting the requirements established by PCI PTS v3.x, which incorporates secure reading
and exchange of data (SRED) features, DynaPro Mini uses the MagneSafe Security Architecture
(MSA), a digital identification and authentication architecture that safeguards consumers and their
personal data. Designed to exceed PCI regulations, MSA leverages strong encryption, secure
tokenization, counterfeit detection, tamper recognition, data relevance and integrity, and dynamic digital
transaction signatures, which together validate and protect the entire transaction and each of its
components.
A key feature of MSA is MagnePrint card authentication, a patented, proven technology which reliably
identifies counterfeit credit cards, debit cards, gift cards, ATM cards and ID cards at the point of swipe,
before fraud occurs.
MSA's multi-layer security provides unmatched protection and flexibility for safer online transactions.
1.2.1 Security and Ease of Integration by Design
The MagneSafe Security Architecture also secures clear text card data. DynaPro Mini uses a 32-bit
secure processor which incorporates flexible data formatting and masking capabilities for compatibility
with existing software and payment applications, eliminating the need for recertification.
DynaPro Mini supports Device Authentication so the retailer, processor, and acquirer have the
confidence of knowing that a rogue reader has not been substituted, and provides transparency to the
processor, acquirer, or ISO if the device is changed. It also supports Mutual Authentication through a
secure challenge/response sequence, which eliminates both the potential of being redirected to an
illegitimate site and the ability to substitute a compromised PIN encryption device.
1.2.2 Read Head Security Features
DynaPro Mini contains a MagneSafe card reader that encrypts card data at the point of swipe to
safeguard personal information encoded on the magnetic stripe. The reader incorporates MagTek’s 3track encrypting IntelliHead, a magnetic read head with encapsulated and securely-potted electronics that
reads, decodes, and encrypts card data within the head, eliminating the chance of intercepting clear text
data. This secures the magnetic stripe data at the earliest point in the transaction chain—the initial swipe.
DynaPro Mini’s data encryption scheme uses the industry standard TDEA (3DES) algorithm and
DUKPT key management, which offers merchants, processors, issuers, and acquirers the flexibility to
manage decryption services themselves or to outsource, thereby avoiding the risk imposed by unproven,
proprietary encryption algorithms.
In addition, as a card is swiped through the reader, through the use of MagnePrint technology the card
can be authenticated immediately, either by Magensa or by another system, to determine whether the card
is counterfeit or has been altered.
The card reader is capable of reading any ISO or AAMVA encoded magnetic stripe data, and includes an
EMV chip card (ICC) reader on the front of the device under the keypad.
DynaPro Mini| PIN Encryption Device | Installation and Operation Manual
Page 9 of 28 (D99875642-13)
Page 10

1 - Introduction
1.2.3 Tamper Responsiveness
The DynaPro Mini enclosure and its associated electronics have been designed to form a TamperResponsive Secure Cryptographic Device (SCD). The covers are securely attached and incorporate
sensing circuits to detect any attempts to open the unit. Internal spaces within DynaPro Mini have been
minimized to reduce the possibility of unauthorized modifications.
In addition, any attempt to penetrate or modify the device electronically will cause the unit to
permanently erase its stored encryption keys, after which the device will cease to function.
1.2.4 Liquid Crystal Display
The Liquid Crystal Display (LCD) is a 128 x 32 pixel array capable of showing static or animated
messages. Animation includes horizontal scrolling for longer prompt text, and animations on the Swipe
Card and Insert Card pages.
1.2.5 10-Digit Numeric Pad
During normal operation, cardholders use the device’s numeric keypad to enter PINs. An audible tone
provides feedback when entering the PIN digits. There are three additional function keys cardholders
may press during a transaction:
Cardholders can press the green ENTER (“OK”) key to indicate they have finished their input.
Cardholders can press the yellow BACKSPACE (“Correction”) key to clear any entered data and
continue the current operation.
Cardholders can press the red CANCEL (“X”) key to halt the current operation. Depending on the
context, it may cancel the entire transaction.
Cardholders can press the Up Arrow and Down Arrow keys to scroll display content when required.
1.2.6 Low-Power Standby Mode
When the communication channel (such as the USB bus) goes into suspend mode, or when the device is
disconnected from a host and power source, DynaPro Mini enters a low-power standby mode. Any
current transactions are terminated and all caches are flushed. The device resumes normal operation
when the connection resumes normal operation.
DynaPro Mini| PIN Encryption Device | Installation and Operation Manual
Page 10 of 28 (D99875642-13)
Page 11

1 - Introduction
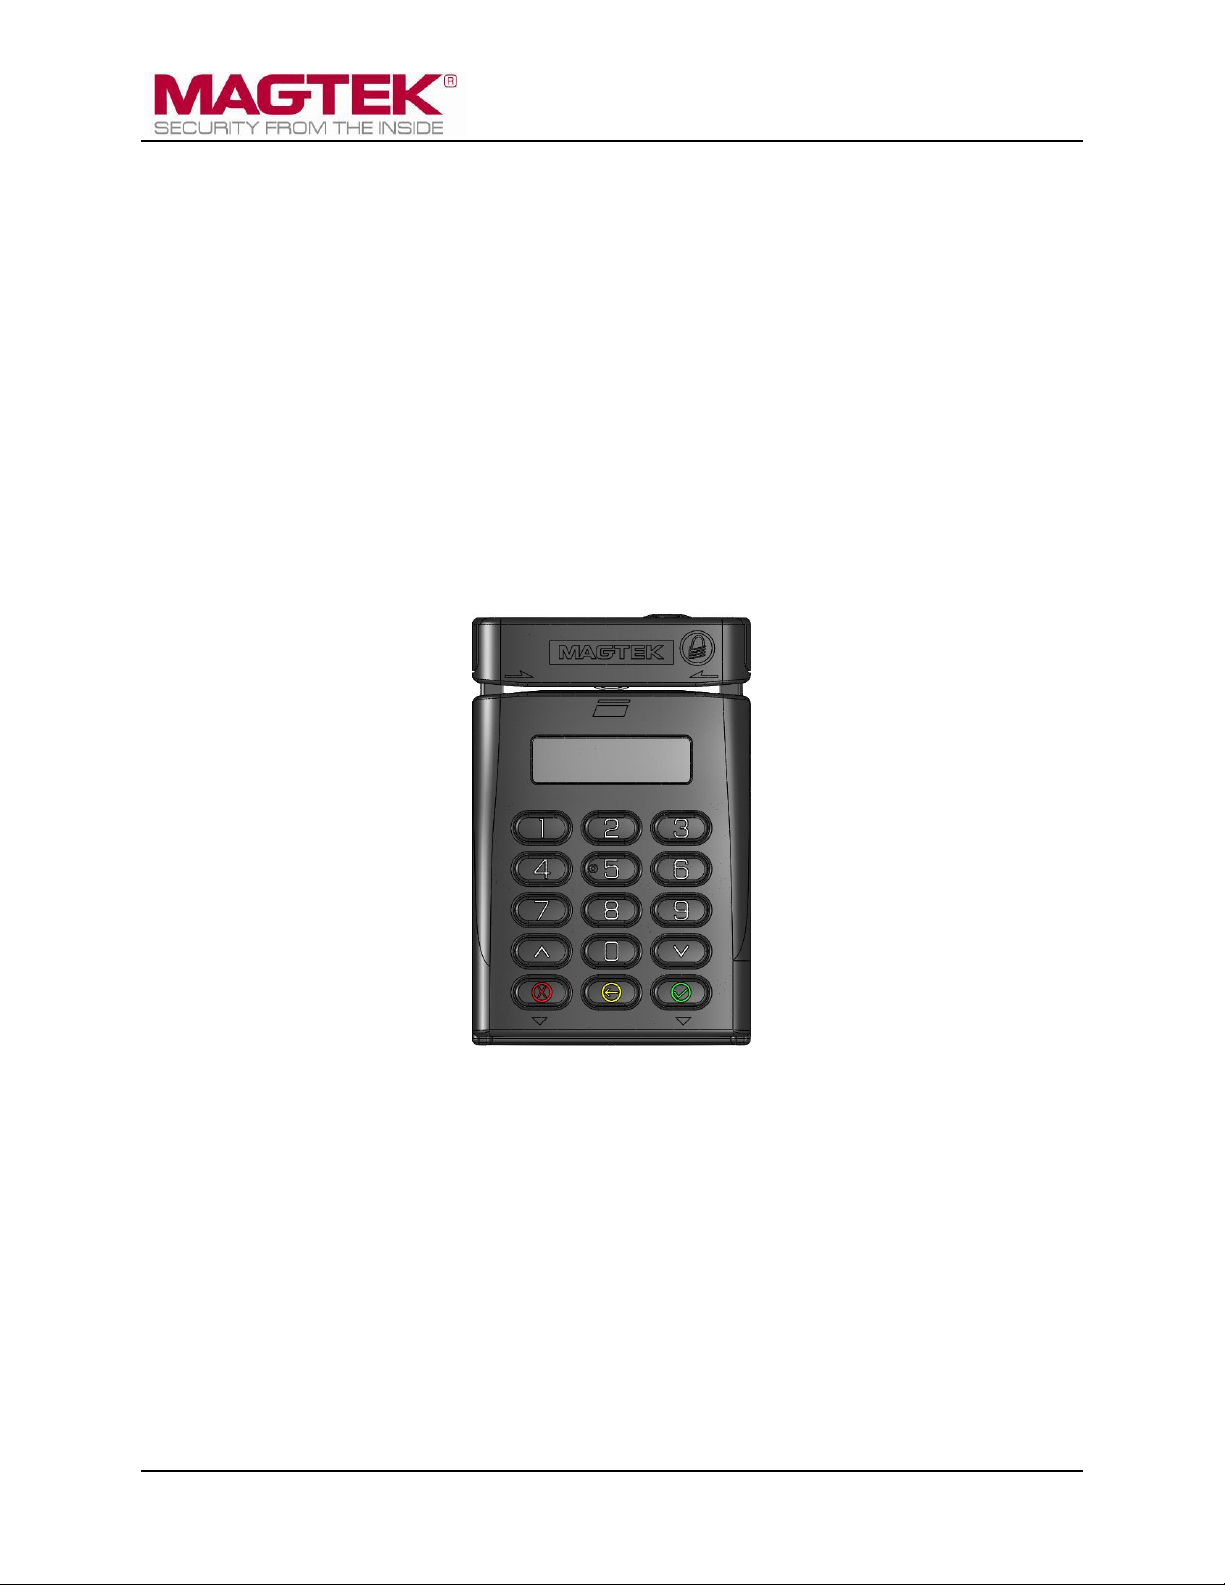
1.3 About DynaPro Mini Components
The major components of DynaPro Mini are shown in Figure 1-1. In addition to the components shown,
the device has the following additional features:
DynaPro Mini with Bluetooth LE has a Bluetooth transceiver power button on the back.
All models have a reset button on the bottom intended for manufacturer use only. Do not press the
reset button! Doing so will activate the tamper feature and erase all injected keys; the device
will stop functioning and will have to be returned to the manufacturer for re-configuration.
Figure 1-1 - DynaPro Mini Major Components
DynaPro Mini| PIN Encryption Device | Installation and Operation Manual
Page 11 of 28 (D99875642-13)
Page 12

1 - Introduction
1.4 About Solution Planning
A smooth deployment of a DynaPro Mini solution requires some up-front planning and decision-making:
Determine what type of host DynaPro Mini will connect to. This can be a computer or portable
device with a USB port or with Bluetooth 4.0 hardware that supports Bluetooth LE. When planning,
include any additional support or devices required by the host and DynaPro Mini, such as physical
locations, mounting, power connections, and charging stations.
Determine what software will be installed on the host and how it will be configured. Software can
include operating system, transaction processing software, security software, and so on. Include any
additional support required by the software, such as network connections.
Determine how DynaPro Mini will be physically presented to the cardholder.
Select which connection type the solution will use. DynaPro Mini has a Bluetooth LE transceiver
and a Micro-USB connector.
Determine how DynaPro Mini should be configured, and specify that when you order devices.
Determine the charging schedule(s) and location(s). For example, in high-traffic mission-critical
solutions, it may be most appropriate to keep multiple devices charging for fast swap-out.
1.5 About Terminology
In this document, DynaPro Mini is referred to as the device. It is designed to be connected to a host,
which is a piece of general-purpose electronic equipment which can send commands and data to, and
receive data from, the device. Host types include PC and Mac computers/laptops, tablets, and
smartphones. Generally, the host must have software installed that communicates with the device and is
capable of processing transactions. During a transaction, the host and its software interact with the
operator, such as a cashier or bank teller, while the device interacts with the cardholder.
DynaPro Mini| PIN Encryption Device | Installation and Operation Manual
Page 12 of 28 (D99875642-13)
Page 13

2 - Handling and Storage
Proper handling of the device throughout delivery, assembly, shipping, installation, usage,
and maintenance is very important. Not following the guidelines in this document could
damage the device, render it inoperable, and/or violate the conditions of the warranty.
2 Handling and Storage
2.1 Handling to Avoid Damage
Upon receiving the device, inspect it to make sure it originated from an authentic source and has not been
tampered with.
From device delivery through assembly, shipping, installation, usage, and maintenance, the device must
not be exposed to conditions outside the ratings in Appendix A Technical Specifications.
If the device is exposed to cold temperatures, adjust it to warmer temperatures gradually to avoid
condensation, which can interfere with the operation of the device or cause permanent damage.
Do not drop or shake the device.
For information about ongoing maintenance of the device, such as cleaning, see section 5 Maintenance.
2.2 Handling to Avoid Accidental Tamper
This device implements active tamper detection, which uses a small amount of electricity even when the
device is completely powered off. The device ships with the battery charged to approximately 60%,
which provides a shelf life of at least 6 months, and up to a year. Storage conditions (such as storage
above 77°F / 25°C) strongly affect this duration. If the rechargeable battery is allowed to completely
discharge, the device’s tamper detection feature uses the device’s non-rechargeable backup battery. If
both batteries are allowed to completely discharge, the device interprets this as tampering.
Upon detecting tampering, the device locks down and must be returned to the manufacturer to reset. To
avoid accidental tamper events, follow these precautions:
Charge the device for 12 hours immediately upon receipt to extend its shelf life.
Before storing the device, make sure the battery is charged to at least 40%.
Before storing the device, power it OFF by activating Airplane Mode (wireless not advertising). See
section 4.2.3 How to Turn Bluetooth LE Advertising On and Off.
When stored, recharge the device for 12 hours at least every 6 months.
Do not drop or shake the device.
Do not attempt to disassemble the device.
Do not expose the device to excessive heat or cold (see Appendix A Technical Specifications).
DynaPro Mini| PIN Encryption Device | Installation and Operation Manual
Page 13 of 28 (D99875642-13)
Page 14

3 - Installation
3 Installation
Installing DynaPro Mini is a straightforward process; the acquirer configures the Certificate Authority,
public keys, terminal and payment brand settings before deployment; end users need only set up a host
with appropriate software, configure the software, and connect the device to the host. This section
provides general information about solutions that incorporate DynaPro Mini, including host software,
connecting the device, and charging the device.
3.1 About Software
In any solution, DynaPro Mini is connected to a host, which must have software installed that knows how
to communicate with the device, and which is capable of processing transactions. To set up the host to
work with DynaPro Mini, follow the installation and configuration instructions provided by the vendor of
the host or the host software.
3.2 About Connecting DynaPro Mini
The following sections provide steps for connecting DynaPro Mini to a host via the various available
physical connection types.
3.2.1 How to Connect DynaPro Mini to a Host via USB
To connect DynaPro Mini to a host computer or charger using the Micro-USB port, follow these steps:
1) Make sure the host is powered off.
2) Connect the small end of the USB cable to DynaPro Mini as shown in Figure 3-1.
3) Connect the large end of the USB cable to the charger or to the host computer’s USB port.
4) Power on the host computer.
Figure 3-1 - Connecting DynaPro Mini to a Computer
3.2.2 How to Connect DynaPro Mini to a Host via Bluetooth LE
To connect DynaPro Mini with Bluetooth LE to a host that has Bluetooth 4.0 hardware and supports
Bluetooth LE:
1) On the host, install and configure the software you intend to use with DynaPro Mini. If you do not
yet have that software, you can download a tool from the App Store called “Light Blue,” which
provides functions to detect the device, connect to the device, and view the device’s services and
characteristics. See https://itunes.apple.com/us/app/lightblue/id639944780.
2) Make sure the device is powered on and advertising by briefly pressing and releasing the power
button or connecting the device to USB power. Note that it is not always necessary to explicitly turn
DynaPro Mini| PIN Encryption Device | Installation and Operation Manual
Page 14 of 28 (D99875642-13)
Page 15

3 - Installation
on the device before using it; if the device is not powered on but is still advertising (not in Airplane
Mode), it starts powering on when the host establishes a connection.
3) Make sure the device’s battery is adequately charged.
4) Use the host software to scan for Bluetooth devices, and select the device you want to pair to.
5) If the device was not powered on before the host connected, it starts powering on when the host
establishes a connection. The power-on sequence takes about 10 seconds.
6) When prompted, enter the device’s passkey. The default passkey is 000000.
7) The device stays powered on until the host terminates the Bluetooth LE connection, or until an
operator or cardholder powers it off using the power button. Powering off causes the device to
terminate the Bluetooth LE connection. To conserve power, always power off the device when it is
not in use. You can then explicitly power on the device using the power button.
DynaPro Mini| PIN Encryption Device | Installation and Operation Manual
Page 15 of 28 (D99875642-13)
Page 16

4 - Operation
4 Operation
4.1 Overview
When DynaPro Mini is ready to begin a new transaction, it shows Welcome on its display.
Figure 4-1 - Example of Welcome Screen (Ready for a New Transaction)
During normal operation, an operator initiates a transaction from the host, and the cardholder enters data
on DynaPro Mini’s keypad in response to prompts on its display. Transaction types depend on the host
software, and may include new accounts, teller window applications, checking, savings, mortgages, retail
transactions, or any other option where there is interaction between the cardholder and the operator.
After the operator initiates the transaction, the device prompts the cardholder to insert or swipe a card. If
the device can not read the card data, the device may request the cardholder repeat the action, or request
the cardholder use the magnetic stripe reader instead of the chip card insertion slot, or may ask the
cardholder to enter card data manually. The device may also prompt the cardholder to identify the card
type, such as debit or credit. If the transaction requires a PIN (such as in banking or debit card
transactions), the device prompts the cardholder to enter one. In the case of an EMV transaction with a
successful chip read, DynaPro Mini uses the transaction amount and the chip card’s on-chip risk
management to decide whether to process the transaction offline or require online approval.
A typical transaction sequence looks like this:
DynaPro Mini| PIN Encryption Device | Installation and Operation Manual
Page 16 of 28 (D99875642-13)
Page 17

4 - Operation
or
DynaPro Mini| PIN Encryption Device | Installation and Operation Manual
Page 17 of 28 (D99875642-13)
Page 18

4 - Operation
4.2 Power Management
4.2.1 About Power
This device incorporates a built-in Lithium-ion rechargeable battery, which requires very little
maintenance. It is not subject to “charge memory” and therefore does not require deep discharge cycles
to restore its charge capacity like many other battery technologies.
When properly powered through its USB port, the device powers on automatically, remains powered on,
and draws power both for operation and for recharging the battery (see section 4.2.2 How to Charge the
Battery). While charging, the device consumes more power from the USB connection than when the
battery is fully charged. The device stops charging the battery when it determines it is optimally full, to
prevent overcharging.
If the device is not connected to USB power, or if the USB connection does not provide enough power,
the device powers itself using the rechargeable battery. When the battery discharges to a critically low
level, the device powers down automatically. In this state, the device continues to power its active tamper
detection circuitry using the device’s non-rechargeable backup battery. If both batteries are allowed to
completely discharge, tamper detection engages, and the device must be returned to the manufacturer to
reset. To minimize battery drain and prevent this from occurring:
When charging, make sure the device is receiving enough power from the USB connection (battery
level should increase even when device is in use).
Power the device OFF when not in use (see section 4.2.3 How to Turn Bluetooth LE Advertising
On and Off).
The device’s rechargeable battery is designed to last hundreds of charging cycles, but with time and / or
with use, its charge capacity will naturally degrade. To maintain the battery’s charge capacity as much as
possible, follow these guidelines:
Do not discharge the battery to 0%. Create a charging schedule that recharges the battery well before
it is fully depleted.
Store the device at the lowest reasonable temperatures within its specified storage temperature range
(see Appendix A Technical Specifications; below 77°F / 25°C is optimal). Temperature is the most
critical factor in extending battery life.
Store the device with the battery charged to less than 100% (40% is optimal).
DynaPro Mini| PIN Encryption Device | Installation and Operation Manual
Page 18 of 28 (D99875642-13)
Page 19

4 - Operation
4.2.2 How to Charge the Battery
When the battery is discharged to a critical level, the device shows a Please Recharge warning message
on the display.
Figure 4-2 - "Please Recharge" Warning
The device’s battery must be periodically recharged by connecting it to either a USB port or stand-alone
power supply. The device requires a USB connection that can provide at least 2A @ 5V. A full recharge
cycle for a completely drained battery takes approximately 5 hours.
4.2.3 How to Turn Bluetooth LE Advertising On and Off
In its default configuration, the device’s Bluetooth LE module can be toggled between advertising and not
advertising to save power or to stop radio emissions for airline travel. The device’s processor and display
also power down when it is not advertising. This state is known as Airplane Mode, and can also be
considered the device’s “Off” state. Operators can toggle Airplane Mode as follows:
To Turn Airplane Mode On: If the device is advertising, press and hold the power button for 7
seconds or longer to reset the Bluetooth LE module and turn advertising off. The device also resets to
this state if the battery completely discharges.
To Turn Airplane Mode Off: If the device is not advertising, briefly press and release the power
button or connect the device to USB power to turn advertising on.
For information about reconfiguring the device to behave differently from defaults, see the references
provided in section 6 Developing Custom Software.
DynaPro Mini| PIN Encryption Device | Installation and Operation Manual
Page 19 of 28 (D99875642-13)
Page 20

4 - Operation
4.3 Card Reading
4.3.1 How to Swipe Magnetic Stripe Cards
To swipe a card with a magnetic stripe, cardholders should wait until the appropriate prompt appears on
the display (see Figure 4-3 for an example), then swipe the card with the magnetic stripe facing away
from DynaPro Mini’s keypad as shown in Figure 4-4. If the device can not read the card’s magnetic
stripe data, the device may prompt the cardholder to swipe the card again.
Figure 4-3 - Example of Swipe Card Screen
Figure 4-4 - Swiping a Card Through DynaPro Mini
DynaPro Mini| PIN Encryption Device | Installation and Operation Manual
Page 20 of 28 (D99875642-13)
Page 21

4 - Operation
4.3.2 How to Use Contact Chip Cards
To use a contact chip card, cardholders should wait until the appropriate prompt appears on the display
and the LED on the front of the device turns on, then insert the card as follows:
1) Locate the slot on the front of the device shown in Figure 4-5.
2) Orient the chip card so the chip faces the ceiling and toward the slot.
3) Insert the chip card into the slot, then push gently on the card until it stops. There should not be any
substantial resistance until the chip card is fully inserted.
If the device can not communicate with the chip card, it may prompt the cardholder to insert the card
again, or to use the magnetic stripe reader, or to enter card data manually.
Figure 4-5 - Inserting a Chip Card Into DynaPro Mini
DynaPro Mini| PIN Encryption Device | Installation and Operation Manual
Page 21 of 28 (D99875642-13)
Page 22

4 - Operation
4.3.3 How to Enter Card Information Manually
If the swiped or inserted card is damaged or unreadable, DynaPro Mini may prompt the cardholder to
enter card data manually, as shown in Figure 4-6. During manual entry, the device expects the account
number to be between 16 and 19 digits long, the expiration date to be 4 digits long, and the card
verification code (generally found on the rear of the card for MasterCard and Visa, or the front of the card
for American Express) to be 3-4 digits long.
Figure 4-6 - Example of User Screen to Manually Enter Card Data
4.3.4 How to Select the Card Type
In a retail setting, the transaction might require the cardholder to select the card type (e.g. “Debit or
Credit”). In the following example, the application prompts the cardholder to press a number on the
keypad to select Credit or Debit (see Figure 4-7).
Figure 4-7 - Example of User Screen to Select Card Type
DynaPro Mini| PIN Encryption Device | Installation and Operation Manual
Page 22 of 28 (D99875642-13)
Page 23

4 - Operation
4.4 How to Enter PINs
When PIN entry is required, the display prompts the cardholder to enter one (see Figure 4-8) as required
by the financial institution. The device expects the PIN to be between 4 and 12 digits long. After
entering the PIN, the cardholder must press the ENTER button.
.
Figure 4-8 - Example of User Screen to Enter PIN
If the double PIN entry option is enabled, the display prompts the cardholder to enter the PIN a second
time. The process for re-entry is identical to the process for the first entry.
4.5 How to Verify the Transaction Amount
In a retail setting when the customer selects “Credit” they are then prompted to verify the amount of the
transaction. The customer can select “Yes “or “No” as shown in Figure 4-9.
Figure 4-9 - Example of User Screen to Verify Amount
DynaPro Mini| PIN Encryption Device | Installation and Operation Manual
Page 23 of 28 (D99875642-13)
Page 24

4 - Operation
Code
Description
A
An offline code beginning with "A" indicates the device is awaiting authentication. This
is a normal condition when a device is configured to require authentication (security level
4). Authentication by the host is required to return it to the Welcome screen.
C
An offline code beginning with "C" indicates the device is missing a certificate. MagTek
recommends repairing or replacing the device.
H
An offline code beginning with "H" indicates a hardware problem. MagTek recommends
repairing or replacing the device.
K
An offline code beginning with "K" indicates a problem with either the magnetic stripe
reader or PIN key. If the device is new, it is likely it has not been loaded with a PIN Key,
and should be returned to the supplier for key loading. If a K-code appears after the
device has been deployed and used for a long period of time, the K-code indicates one or
both DUKPT keys have been exhausted. MagTek recommends contacting the supplier for
a replacement.
S
An offline code beginning with "S" indicates a security element failure. This code can be
triggered by severe handling of the device or strong interference by a nearby source of
electromagnetic (EMF) interference. Try moving the device away from any suspected
EMF source; if the error persists, the device should be repaired or replaced.
4.6 About Status Codes
The Device Offline screen indicates that the device is not ready for normal operation. There is also a
code in the lower right corner that can help explain the cause of the offline state. Codes that start with H,
S, C, or K indicate the problem requires the device be returned to the supplier for service or replacement.
DynaPro Mini| PIN Encryption Device | Installation and Operation Manual
Page 24 of 28 (D99875642-13)
Page 25

5 - Maintenance
To avoid damaging the read head, only clean the card path with approved cleaning cards.
DO NOT use liquid cleaning products or insert any other objects into the device.
5 Maintenance
Periodic cleaning of DynaPro Mini’s exterior may be required. To clean the outside of DynaPro Mini,
wipe down the device with a soft, damp cloth and then wipe with a dry cloth.
DynaPro Mini| PIN Encryption Device | Installation and Operation Manual
Page 25 of 28 (D99875642-13)
Page 26

6 - Developing Custom Software
6 Developing Custom Software
Custom software uses the same underlying device command set for all DynaPro Mini connection types
(USB HID or Bluetooth LE). The device commands are wrapped differently depending on the connector.
The following sections give high-level information about communicating with the device via the various
physical connection types in various software development frameworks, and provide pointers to select
API references and sample code.
6.1 USB-Based Custom Software
MagTek produces software development kits (SDKs) with API libraries that provide higher-level
functions wrapped around HID USB communication protocols. These libraries simplify the development
of custom applications that use DynaPro Mini, and include an SDK for the Microsoft .NET Framework,
and an SDK for non-managed Windows executable images, such as.exe or DLL files.
In addition to the SDK API libraries, custom software on any operating system can communicate directly
with the device using the HID USB libraries and protocols.
If you are developing a point-of-sale (POS) application for Windows, you might also consider using the
service objects for .NET POS (UPOS 1.12), available from Microsoft.
6.2 Bluetooth LE-based Custom Software and Apps
When DynaPro Mini is connected via Bluetooth LE to a host with Bluetooth 4.0 hardware that supports
Bluetooth LE, the device acts as a server/peripheral, and the host acts as a client/central. The custom
software wraps commands in simple Get/Set wrappers, and should use whatever Bluetooth LE library is
appropriate for the chosen software development framework. For example, iOS custom apps use Apple’s
CoreBluetooth Framework, for which sample code is available in the form of Apple’s Temperature
Sensor app; see
https://developer.apple.com/library/IOS/samplecode/TemperatureSensor/Introduction/Intro.html.
6.3 For More Information
For more information about developing custom applications that integrate with DynaPro Mini, see the
MagTek web site or contact your reseller or MagTek Support Services.
DynaPro Mini| PIN Encryption Device | Installation and Operation Manual
Page 26 of 28 (D99875642-13)
Page 27

Appendix A - Technical Specifications
DynaPro Mini Technical Specifications
Reference Standards and Certifications
Magnetic stripe: ISO Type B, AAMVA
Encryption: TDEA (3DES)-CBC using DUKPT
PCI PTS v3.x
EMV ICC Specifications for Payment Systems Version 4.3
Physical Characteristics
Dimensions (L x W x H)
3.82 in. (97.0 mm) x 2.46 in. (62.5 mm) x 1.05 in. (26.6 mm)
Weight (with Bluetooth LE)
10.9 oz. (309 g)
User Interface Characteristics
Display Type
Dot Matrix LCD
Display Size (viewable area)
1.42 in. (36.1 mm) x 0.392 in. (9.95 mm)
Display Resolution
128 x 32 pixels
4 lines of up to 21 characters
Keypad
Rubber dome switches:
10 digits, 3 data entry keys, up/down arrows
Card Reader
3 track encrypting IntelliHead reader with MagnePrint
Acceptable Swipe Speeds
10 to 50 inches per second
Electrical Characteristics
Data Connections
Bluetooth Low Energy wireless (select models)
Micro-USB, compatible with USB 1.1 and USB 2.0
Battery Capacity
1000 mAh nominal (rated)
Battery Capacity, Airplane
Mode
6 months minimum
Battery Capacity, Standby
2 weeks minimum (new device)
Battery Capacity, Active
200 transactions per day minimum (new device)
Power Input
USB powered via Micro-USB cable
Maximum current draw
500 mA
Voltage Requirement
5VDC
Battery Type
Rechargeable Battery: Lithium-ion (“LiPo” / “Li-ion”) for main power
Tamper Backup Battery: Lithium coin cell
Flash Memory
256 MBit
Appendix A Technical Specifications
DynaPro Mini| PIN Encryption Device | Installation and Operation Manual
Page 27 of 28 (D99875642-13)
Page 28

Appendix A - Technical Specifications
DynaPro Mini Technical Specifications
Software Characteristics
Tested Operating System(s)
USB: Windows 7, Windows 8 and 8.1, Windows 10, Android 4.4.2 and
above with USB OTG support
Bluetooth LE: iOS 7.1 and above, Android 5.0, 5.1, 5.1.1, Windows 8.1
and above on hosts with Bluetooth 4.0 hardware and above
Environmental Tolerance
Operating temperature
32°F to 113°F (0°C to 45°C)
Operating relative humidity
10% to 90% without condensation at 23°C
Storage temperature
32°F to 113°F (0°C to 45°C)
Storage relative humidity
5% to 90% without condensation
Reliability
Mechanical Life
1,000,000 card swipes
500,000 chip card insertions
Battery Shelf Life
At least 6 months without depleting coin cell backup
2 years maximum coin cell backup over device lifetime
Rechargeable Battery Life
2-3 years or 300 full discharge cycles, 500 cycles or more if device is not
run to complete discharge
DynaPro Mini| PIN Encryption Device | Installation and Operation Manual
Page 28 of 28 (D99875642-13)
 Loading...