

Page 1
1
Sign up for your Subscription
If you haven’t already done so, please set up a QwickPAY subscription
and Merchant Account.
Audio Jack
Setup Guide
Made for
iOS 4.3 or higher
Android 2.3.3 or higher
iOS
Go to www.qwickpay.com and click on ACTIVATE. Click on the button
“I have an active merchant account,” if you can already accept credit
cards elsewhere, and on “I need to setup a merchant account,” if you
need to be able to accept credit cards. Complete the online form and
SUBMIT. A representative will contact you to complete the process.
Demo QwickPAY
You can demo QwickPAY even before signing up for a subscription by
using demo mode.
Virtual Terminal Demo Mode:
Go to https://myQwickPAY.com and use these credentials.
QwickPAY Merchant ID: demo
QwickPAY Merchant Pwd: Go4QwickPAY!!!
Mobile Device Demo Mode
Download the QwickPAY application for free from the App Store or
Google Play to your mobile device. Then tap on the MENU button and
then on MERCHANT INFO>. You only need to enter your email address.
2
Virtual Terminal & Custom Receipts
If you already have your QwickPAY subscription credentials and
Merchant Account you are ready to login. Go to the virtual terminal
rst to setup your custom receipts using your Windows PC or Mac and
open a browser* (Chrome, Safari, Firefox, or Internet Explorer).
Custom receipts brand your business and enable you to create
receipts with your address, return policies and any other message you
would like.
• Go to https://myQwickPAY.com
• Click on LOGIN and enter your credentials.
• Under ACCOUNT go to RECEIPT SETTINGS.
• Add your logo, a header, a footer and signature line if you will be
printing receipts directly from the virtual terminal.
• Be certain to SAVE your updates.
The next time you login to your virtual terminal or mobile App the latest
version of the custom receipt will automatically load.
In the Virtual Terminal you can make sales*, create reports, change
your password, access documentation, and view sales history.
Password Change Note:
If you change your password at the virtual terminal, you will also need to change it on
your mobile device.
*Virtual Terminal Note:
If you will be using your virtual terminal to perform transactions, you will need to use
a current Windows or Mac based OS, and install and run a Java Applet.
Support
For assistance related to processing, transactions and settlement, please
contact the vendor that provided you with your Login credentials or directly
contact your processor (the entity that supplied your Merchant Account). Most
Merchant Account providers have 365/24/7 support.
For assistance directly related to your reader or application, please contact
MagTek Monday through Friday from 8:00 a.m. to 7:00 p.m. Central Time.
After hours and weekend support is available through e-mail at support@
qwickpay.com. Please have your reader plugged in and the QwickPAY application
downloaded before you call for faster service.
Technical Specications
Interface: USB and Audio Jack
Power: Battery powered; battery is charged from a
5V source, e.g., USB bus
Card Speed: 4 to 60 ips
Electrical Current: 100mA maximum during charge
Operating Temp.: 32°F - 113°F ( 0 - 45°C)
Operating Humidity: 10% to 90% noncondensing
MagTek® Inc., 1710 Apollo Court, Seal Beach, CA 90740
p 562.546.6335 | f 562.546.6569 I www.QwickPAY.com | www.magtek.com
Registered to ISO 9001:2008 © Copyright 2013 MagTek, Inc. PN 99800065 rev. 5.01 8/13
Page 2
3
Download and Sign in
Download the QwickPAY application for free from the App Store or Google Play.
Launch the mobile App and tap on MENU and then MERCHANT INFO> and enter your QwickPAY Merchant ID, QwickPAY Merchant
Password (reenter for conrmation) and enter the e-mail you wish to be associated with your credit card transactions.
4
5
Connect your uDynamo
Card transactions may be performed using either the audio
jack or USB interface while the uDynamo is charging.
AUDIO JACK CONNECTION
When using the uDynamo’s audio jack connection, make certain
to set up QwickPAY to communicate with the audio device. Plug the
uDynamo into the audio jack. Then launch QwickPAY and tap on
MENU. Then tap on QWICKPAY SETTINGS. Select the uDynamo
device (‘On’). Then press the DONE button. Updating SETTINGS will
enable
1. The volume of the device will be automatically turned
up to max when the uDynamo is plugged in. (If you
have a physical mute button on your device, QwickPAY
cannot automatically detect this and you will need to
turn mute OFF.);
2. Turn the device ON and OFF automatically, to save on
battery usage. (QwickPAY will turn on automatically
only while you are on a transaction swipe screen and
power off as soon as you go to another screen in order
to decrease the frequency of recharging.)
The device is now connected and ready to use.
Protect the uDynamo’s audio jack by folding it in when not in use.
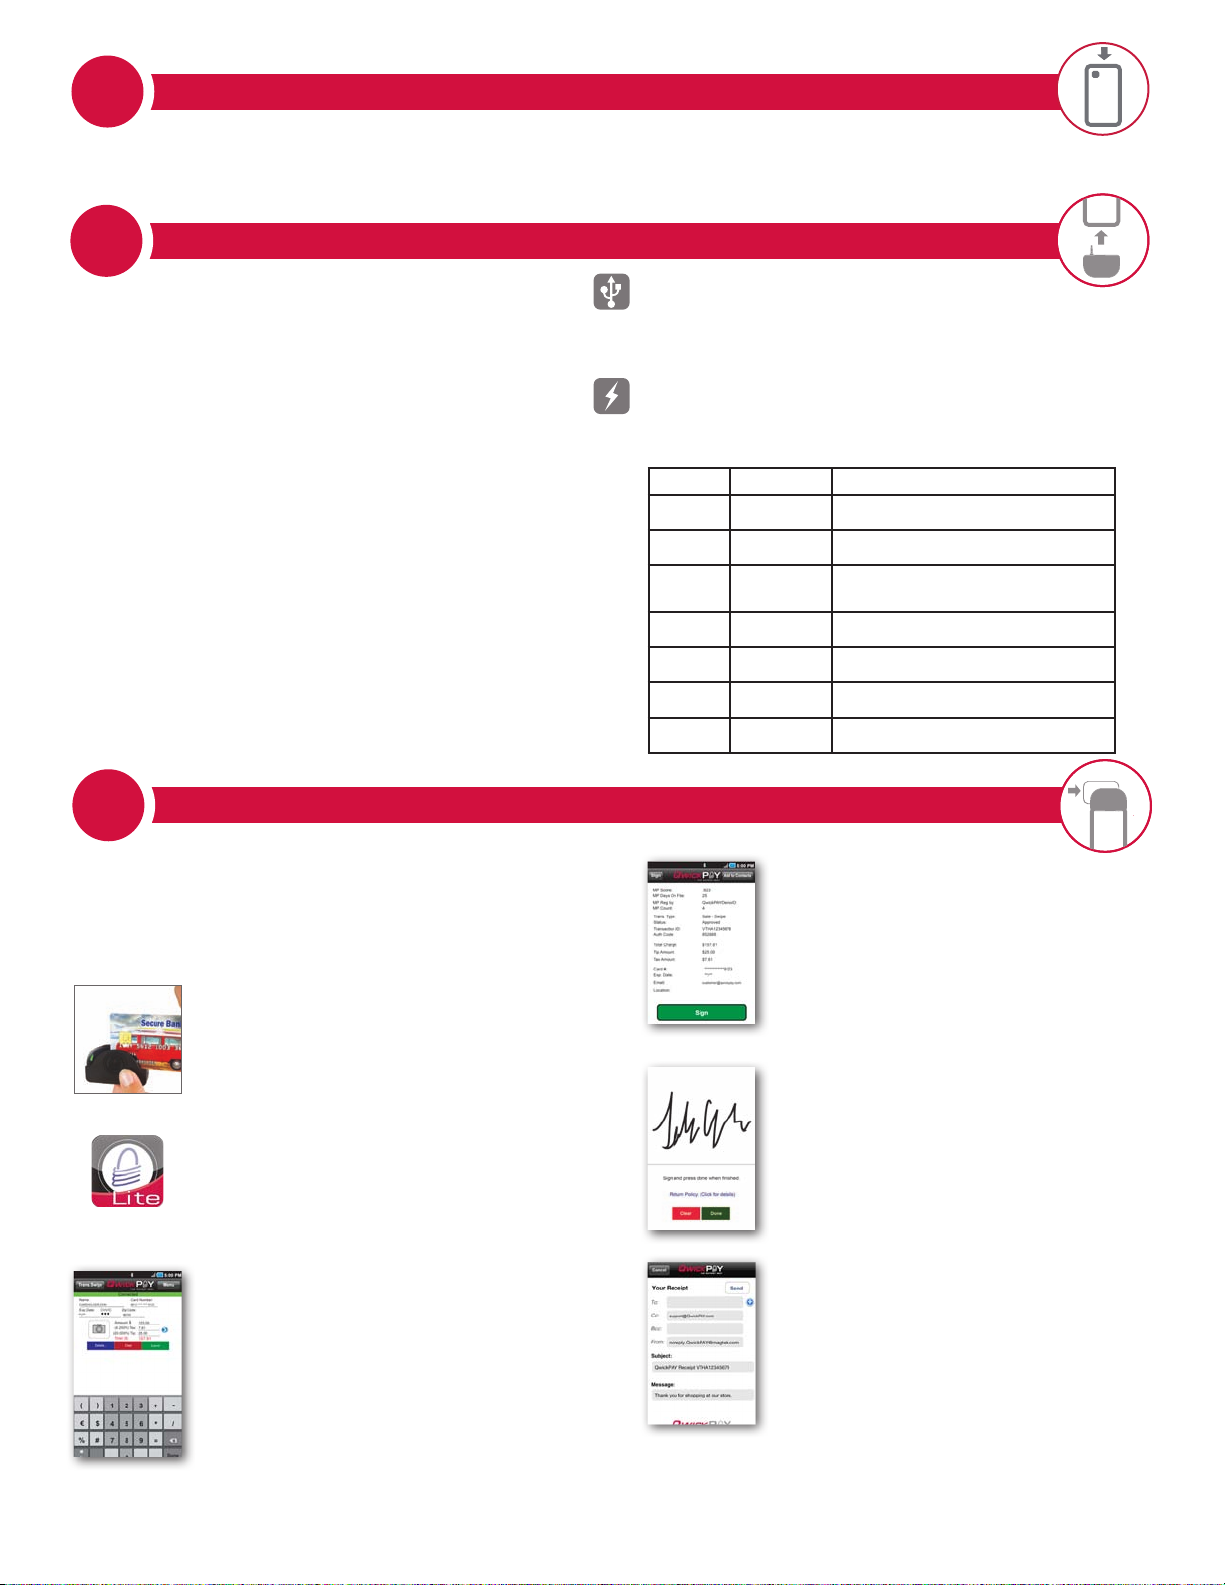
Make a Sale on Your Mobile Device
USB CONNECTION
Using the included Micro-USB cable (Micro-B), connect the uDynamo to
a host USB port on your computer or mobile phone/tablet. Then launch
QwickPAY. The device is now connected and ready to use.
CHARGING AND POWER
Charge the battery by connecting the device to a USB host interface.
Ensure it is recharging.
(The uDynamo is powered by rechargeable internal lithium-ion batteries. The uDynamo can process up to 300 swipes
on a single battery charge. If the reader is left on awaiting a card swipe, the battery will deplete in 3.5 hours. Recharging
can take up to 6 hours.)
LED Meaning Notes
Steady Green Fully Charged State Ready for a card swipe.
Blinking Green Authenticated While the reader is authenticated, no charging or battery level
Steady Red Authentication
Blinking Green
and Amber
Blinking Short Red
and Long Green
Fast Blinking
Red
Solid Amber Charging in Critically
Failed
Charging in Healthy
Battery State
Reader in Low Battery
State
Reader is in Critically
Low Battery State
Low Battery State
Waiting for authentication.
information is indicated.
After an authentication failure, the LED remains red until a
power cycle or successful authentication.
No charging or battery level information is indicated.
The reader is in the Healthy State when the battery voltage is in
between the Fully Charged State and the Low Battery State.
The read is fully operational. Recommend charging the reader
until the battery reaches the Healthy State.
Card swipe disabled. Stop using the reader. If the reader is connected to a mobile device, disconnect it before charging.
Card swipes and most commands are unavailable. Allow the reader
to charge to at least the Low Battery State before using again.
Android screen
simulations shown.
Select Transaction Type
Starting from QwickPAY’s main transaction screen,
touch the TRANS.SWIPE (Android) or TRANS.SALE
(iOS) button in the upper left corner. Select SALESWIPE to accept a payment card.
1. Swipe the Card
Swipe the payment card through the uDynamo
(magstripe facing down). The card data is masked so
that full card data is never displayed. The customer
name and account automatically appear from the card
swipe. You can tap DETAILS to add information to your
customer contact (including e-mail and address).
QwickPAY Lite allows you to take hand-keyed card data.
CAUTION: Hand keyed transactions are expensive, less
secure and more likely to result in chargebacks. If you must
hand key a transaction, you should also take an imprint
of the card and obtain a wet ink signature in case of a
chargeback dispute. When you swipe a card, the full version
of QwickPAY “the Safest Way” is a better choice for you.
2. Enter the Details
Enter the CVV2/CVC2 and a ZIP CODE to better
validate the card (optional).
Enter the dollar amount, tax and tip (these are
automatically calculated, but can be changed by
pressing the blue arrow button).
Take a picture using the camera function to include a
photo of the customer or the goods being purchased
(optional).
Submit the Sale
Press the SUBMIT button when you are ready to
process the sale.
Transaction Authorization & Authentication
The transaction is sent to the QwickPAY Payment
Protection Gateway and a response will appear
almost immediately.
(An error alert will appear if the card could not be properly
authenticated due to a poor MagnePrint® score.)
Press ADD TO CONTACTS to save the customer
details (optional).
3. Obtain Signature
Customers may sign the receipt with their nger or
use an optional stylus. Press DONE to automatically
open an e-mail message.
4. Send Receipt
Send your custom receipt via e-mail to the customer.
The e-mail will automatically contain the receipt,
your merchant e-mail address (CC’d) and the subject
header containing the receipt number.
Tap Send to send the e-mail now.
 Loading...