

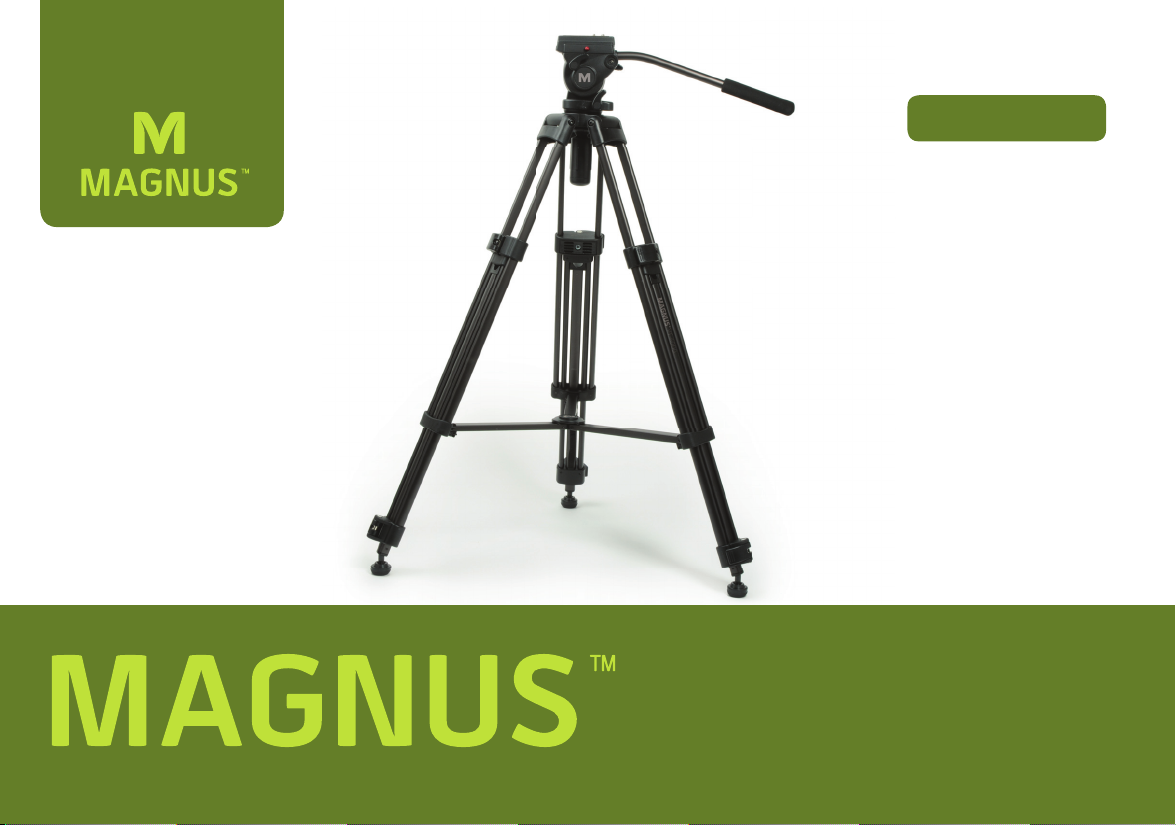
VT-4000
Owner’s
Manual
Video Tripod
Congratulations
on your
purchase
of the VT-4000
Video Tripod by
Magnus.
All Magnus tripods are designed
to balance features professionals
want with the affordability they
need, yet be durable enough to
provide many years of trouble-free
service and enjoyment. Please
carefully read these instructions for
setting up and breaking down your
tripod.
Key Features
• 65 mm leveling ball
• Bubble level for accurate setup
• Two-way fluid head for smooth motion
• Three-section legs break down to a compact
30.0˝ (76.2 cm)
• Passive counterbalance for stability
• Separate pan and tilt locks
• Left and right pan bar mounts
• Mid-level spreader for stability on uneven
surfaces
• Ground spikes for outdoor use and convenient
retractable rubber feet for delicate floor
surfaces
• Full 360° pan range
• Anodized aluminum construction
• 8.8 lb (4.0 kg) load capacity
• 59.0˝ (150 cm) to 27.6˝ (70.1 cm) height
range
• 30.3˝ (77 cm) folded length
• 7.9 lb (3.6 kg) weight
Safety Warnings
• Never set up or pull down a tripod while a
camera is mounted
• Do not move the tripod or adjust the legs
while a camera is mounted
• Do not exceed the maximum weight
capacity of the tripod
• Never leave a camera unattended on the
tripod
• The camera should be securely fastened
to the quick-release mounting plate before
mounting onto the tripod
• Never mount a camera to the tripod until all
tripod legs are locked and stabilized
• Do not stand on, rest on, or hang anything
from the mid-level spreader
• Do not attempt to remove the mid-level
spreader
• Do not lift or move the tripod by the head
• Keep hands clear of the inside of the legs, to
avoid trapping fingers
• The safe operation of the tripod is the
responsibility of the user
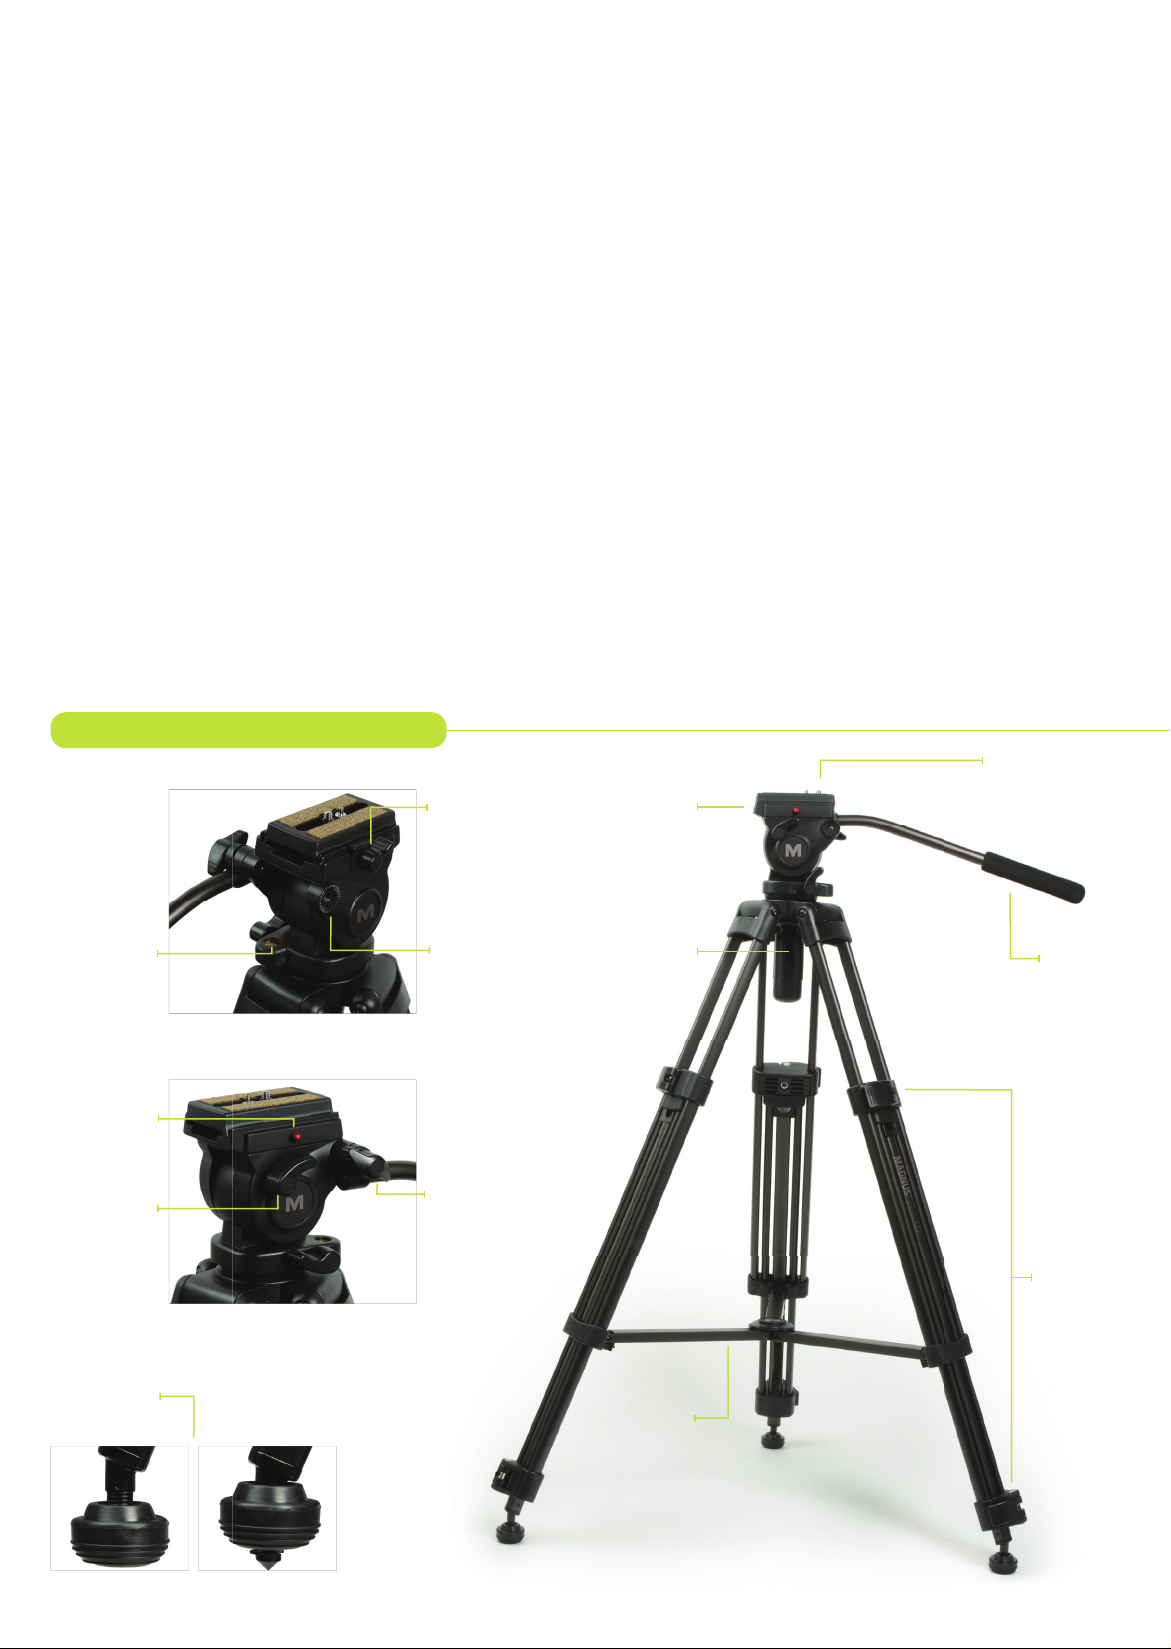
Video Tripod Components
Tilt/Pan
Bar
Universal ¼-20
Mounting Screw
Retractable
Ground Spikes
Mid-Level
Spreader
Ball Level
Locking Knob
Quick-Release
Mounting Plate
Bubble
Level
Mounting Plate
Locking Knob
Tilt/Pan Bar
Mount
Mounting Plate
Capture Release
Tilt Lock
Knob
Pan Lock
Knob
Leg
Flip-Lock

Quick-Release Plate for VT-4000 Tripod
Flip-Lock Adjustment
Magnus offers a spare or replacement quick-release
plate for the VT-4000 tripod head. Having a quick-
release plate attached to the camera’s base at all
times allows you to attach or remove the camera
from the tripod without having to waste time
fumbling with the threaded mount. Your VT-4000
Tripod includes one quick-release plate, but you may
want to have spares for other cameras. The Magnus
VT-QRP400 has a 1/4˝-20 mounting stud and a
retractable register pin for correct camera positioning.
The anti-skid mounting surface stabilizes the camera.
ONE (1) YEAR LIMITED WARRANTY
Magnus provides a limited warranty that this product is free from defects in materials and
workmanship to the original purchaser under normal use for a period of one (1) years
from the original purchase date Or thirty (30) days after replacement whichever occurs
later. Magnus’ responsibility with respect to this limited warranty shall be limited solely to
repair or replacement, at its option, of any product which fails during normal consumer
use. This warranty does not extend to damage or failure which results from misuse,
neglect, accident, alteration, abuse, improper installation or maintenance. To obtain a
replacement during the time of this warranty, please return the defective item with proof
of purchase along with an RMA number to the place of purchase. This warranty gives you
specific legal rights, and you may also have other rights which vary from state to state.
To adjust
locking lever
tension, use
the supplied
allen wrench.
To tighten, with
the lock in a
closed position,
turn the
adjustment screw (clockwise) ¼ turn at a
time until desired locking tension is reached.
To loosen turn the adjustment screw (counter
clockwise)
¼ turn at a time until desired locking tension
is reached.
Caution:
Do not over tighten the adjustment screw as
this may cause improper operation.
www.SupportsByMagnus.com

4
Extend Legs
Always extend the legs from the top flip-locks
first. Pull up on each flip-lock and extend the leg
to its desired height. Relock each leg.
10
Mount Camera to Plate
Attach the mounting plate to your camera.
Be certain that the retractable alignment pin
sets into its pocket on the camera. Screw the
threaded stud on the plate into the bottom of
the camera, making certain that the plate is
placed at the camera’s center of gravity.
Unmount the camera from the tripod head
by pressing the mounting plate release button
and sliding the camera out. Bring the tripod
legs together, collapsing the mid-level spreader.
Release the flip-locks on the legs and slide the
leg extensions back to their closed position.
Secure the flip locks. Extend the rubber feet
back over the ground spikes, if necessary. Fix the
transport clip over the legs and store the tripod
in its carry case.
Tearing Down Your Tripod
Setting Up Your Tripod
6
Set the Tilt
Release the tilt lock, if necessary, and set the tilt
so that the head is flat and ready for mounting
your camera. Retighten the tilt lock.
12
Install Pan/Tilt Bar
The pan/tilt bar can be installed on the left or
right. Fit the threaded stud into the mount and
tighten the lock knob. The mount serrations
allow you to mount the pan/tilt bar at any
angle securely.
1
Assess Needs
To set up your tripod, begin by removing the
tripod and its pan arm from the box and/
or carry case. Decide whether you will need
the ground spikes or the rubber feet. If you
are shooting outdoors and setting up on soft
ground, the spikes can give you more stability.
7
Set the Pan Angle
Release the pan lock, if necessary, and rotate
the head to set the head in the direction you
will be shooting. Retighten the pan lock.
13
Start Shooting
If you do not need to pan or tilt during your
shot, keep the pan and tilt knobs locked.
3
Release Transport Clip
The tripod legs can be held together for safe
transport by fixing the transport clip. Pull the
loop to release the clip and free the legs.
9
Remove the Mounting Plate
Release the mounting plate lock, if necessary.
Remove the mounting plate by pressing the
release button and sliding the plate free.
15
Tilt
Release the tilt lock knob. Using the pan/tilt bar,
move the tripod up or down to tilt.
Tilt Lock
Pan Lock
2
Adjust Feet
Extend the ground spikes by rotating the rubber
pads clockwise until the spikes are exposed.
Or turn the rubber pads counter-clockwise to
retract the spikes.
8
Level the Head
Release the ball level lock. Balance the tripod
head by referring to the bubble level. Retighten
the ball level lock.
PanLock
14
Pan
Release the pan lock knob. Using the pan/tilt
bar, move the tripod left or right to pan.
5
Spread the Tripod
Plant the front leg of the tripod. Lift the back
two legs and pull back to spread the tripod to
the full extension of the mid-level spreader.
11
Mount Camera to Tripod
Make certain that your tripod legs are locked
and the tripod is stable and ready for mounting
your camera. Slide the mounting plate onto the
tripod head. Set its position where the camera
is the most balanced. Retighten the mounting
plate lock firmly.
 Loading...