

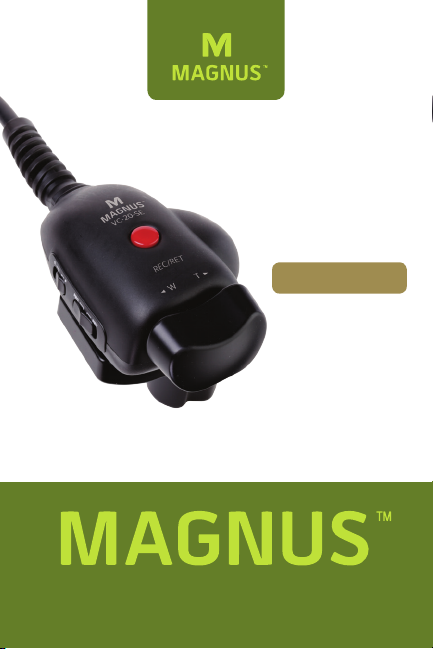
VC-20-SE
Owner’s
Manual
Zoom Controller

Thank you for choosing Magnus.
Thank you for choosing the Magnus VC-20-SE
Zoom Controller. This lightweight, compact
ENG device has a built-in 8-pin ENG cable
that gives you control of Record and Zoom
functions. The VC-20-SE is compatible with a
variety of Canon and Fujinon lenses.
A built-in clamp allows you to mount the
VC-20-SE to the pan handle of your tripod or
to a jib, tube, pipe, or bar. A pressure-sensitive
rocker switch easily regulates the zoom
speed—this allows you to maintain control
over your camcorder while zooming and
panning at the same time without taking your
hand off of the pan handle. If you press the
zoom switch with more force, the lens will
zoom faster. If you press the switch with less
force, the lens will zoom more slowly.
A built-in Return switch allows you to review
video footage in your camera and then return
to the point at which you stopped recording.
This can prevent a break in the time-code after
reviewing your footage. The VC-20-SE will help
you achieve a more polished, fluid look with
2
your video productions.
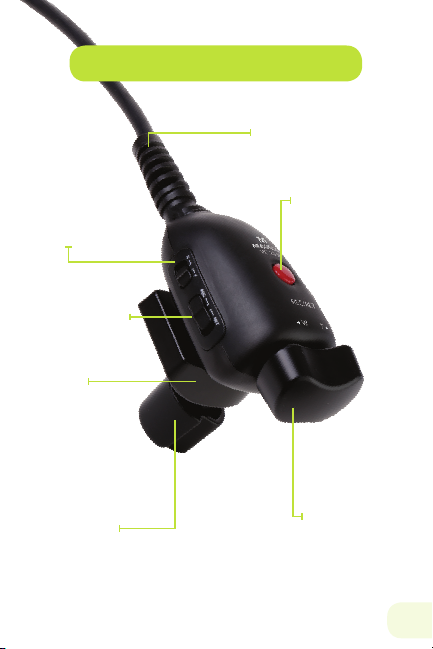
Controller Components
Selector Slider
Switch
Record/Return
Function
Selector Slider
Switch
Clamp
Clamp Knob
Built-in 8-pin ENG Cable
REC/RET Button
Zoom Control
Rocker Switch
.Image is for illustration purposes only
3
Includes:
• Magnus VC-20-SE Zoom Controller
• Built-in 8-pin ENG cable for use with Canon or
Fujinon lenses
• User instruction manual
• One-year limited warranty
Mount the controller to the pan handle
1
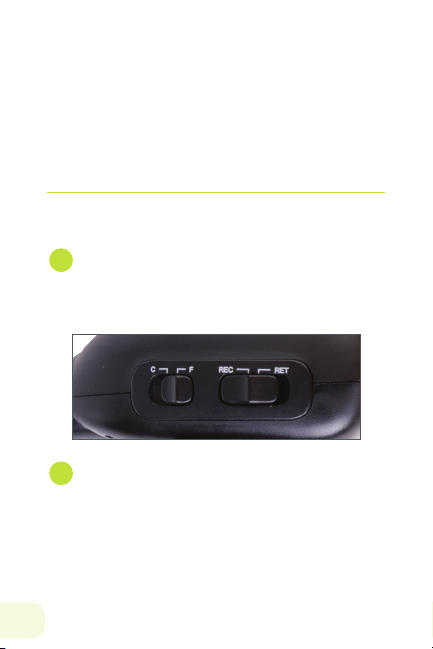
If you’re using the built-in ENG cable,
move the selector slider to the correct
position—“C” for Canon or “F” for Fujinon.
2
If you’re using the optional Magnus
Accessory Cable AC-ESX for ENG to Sony
EX, carefully align the pins and slide the
metallic end of the adapter cable firmly
onto the ENG cable. Set the selector slider
to the “C” position.
4

3
Loosen the clamp using the clamp knob.
4
Place the controller on the pan handle, with
the handle centered in the clamp’s V shape.
5
Hand-tighten the clamp securely.
5

Attach the ENG control to the lens
1
Be certain that the camcorder is turned off.
2
Move the REC/RET selector slider to REC.
3
Carefully insert the control cable plug into
the lens’s ENG socket.
Note: When plugging or unplugging the control
cable, always hold the plug firmly—don’t
pull the cable.
6

Operation
1
Press the red REC/RET button to begin
recording; to stop recording, press the red
button again.
2
Use the variable-speed zoom rocker switch
to control the zoom function.
7

3
Press the side of the switch marked “W” to
zoom out to a more wide-angle view; press
the “T” side to zoom into a more telephoto
view.
4
Pressing the switch with more force
increases the speed of the zoom; pressing
with less force decreases the speed of the
zoom.
8

5
You can stop recording to check your
footage. After reviewing your footage,
move the REC/RET selector slider to RET.
Push the red REC/RET button. This will
return the tape to the point at which you
stopped recording and prevent a break in
the time code.
6
After the tape returns to the point at which
you stopped recording, move the selector
slider back to REC, and push the red REC/
RET button to resume recording.
Specifications
• Cable length: Built-in ENG cable--31″ (78.7 cm)
• Clamp size (open): 1.25″ (31.75 mm)
• Dimensions: 3.58 × 2.22 × 3.28″ (90.9 × 56.4
× 83.3 mm)
• Weight: 4 oz. (113.4 g)
9

Warnings
• Please read and follow these instructions, and keep
this manual in a safe place.
• Make sure the item is intact and that there are no
missing parts.
• Keep this unit away from water and any
flammable gases or liquids.
• Do not attempt to disassemble or repair the
equipment—doing so will void the warranty, and
Magnus will not be responsible for any damage.
• Handle the unit with care.
• Keep cable socket and mini jack clean.
• Keep unit away from children.
• Use only parts provided by the manufacturer.
• Do not store unit in direct sunlight or in hot
environments.
• Use compatible cables only.
• Use care when inserting or removing a cable to
avoid damage to the unit.
• Disconnect unit from lens when not in use.
• All photos are for illustrative purposes only.
10

ONE (1) YEAR LIMITED WARRANTY
Magnus provides a limited warranty to the original purchaser
that this product is free from defects in materials and
workmanship under normal consumer use for a period of one
(1) year from the original purchase date or thirty (30) days after
replacement, whichever occurs later. Magnus’s responsibility
with respect to this limited warranty shall be limited solely
to repair or replacement, at Magnus’s discretion, of any
product that fails during normal consumer use. Inoperability
of the product or part(s) shall be determined by Magnus. If
the product has been discontinued, we reserve the right to
replace it with a model of equivalent quality and function.
To obtain warranty coverage, contact Magnus to obtain
a return merchandise authorization (“RMA”) number,
and return the defective product to Magnus, along with
the RMA number and proof of purchase. Shipment of
the defective product is at the purchaser’s own risk.
This warranty does not cover damage or defect caused
by misuse, neglect, accident, alteration, abuse, improper
installation or maintenance. EXCEPT AS PROVIDED HEREIN,
MAGNUS MAKES NEITHER ANY EXPRESS WARRANTIES
NOR ANY IMPLIED WARRANTIES, INCLUDING BUT NOT
LIMITED TO ANY IMPLIED WARRANTY OF MERCHANTABILITY
OR FITNESS FOR A PARTICULAR PURPOSE. This warranty
provides you with specific legal rights, and you may
also have additional rights that vary from state to state.
TM
MAGNUS
A Gradus Group Brand
www.MagnusTripods.com
© Copyright 2013 Gradus Group LLC
11

www.MagnusTripods.com
© Copyright 2013 Gradus Group LLC
 Loading...