

Page 1
CSW-RS Owner’s Guide
Remote Switch
Magnum Energy, Inc.
2211 West Casino Road
Everett, WA, USA 98204
www.magnumenergy.com
Introduction
The CSW-RS Remote Switch is designed for use with Magnum Energy’s
CSW1012 inverter. This remote switch is simple to install and use; allowing
easy inverter ON/OFF control and a quick indication of the inverter’s ON/OFF
status from a more convenient location.
Installation
WARNINGS:
• All wiring should be performed by a certifi ed technician or elec-
trician in compliance with all applicable electrical safety wiring
regulations and installation codes.
• Before installing or using this remote, read this entire manual
and adhere to all cautionary markings located on the inverter and
on the batteries.
Pre-Installation
1. Determine a suitable location to mount the remote switch. It must be
located in a clean, dry, and protected place.
2. Plan the cable route from the remote to the inverter before you do any
cutting or drilling to ensure there are no obstructions that can’t be overcome.
3. Allow ample room to access the remote switch and view the LED indicator.
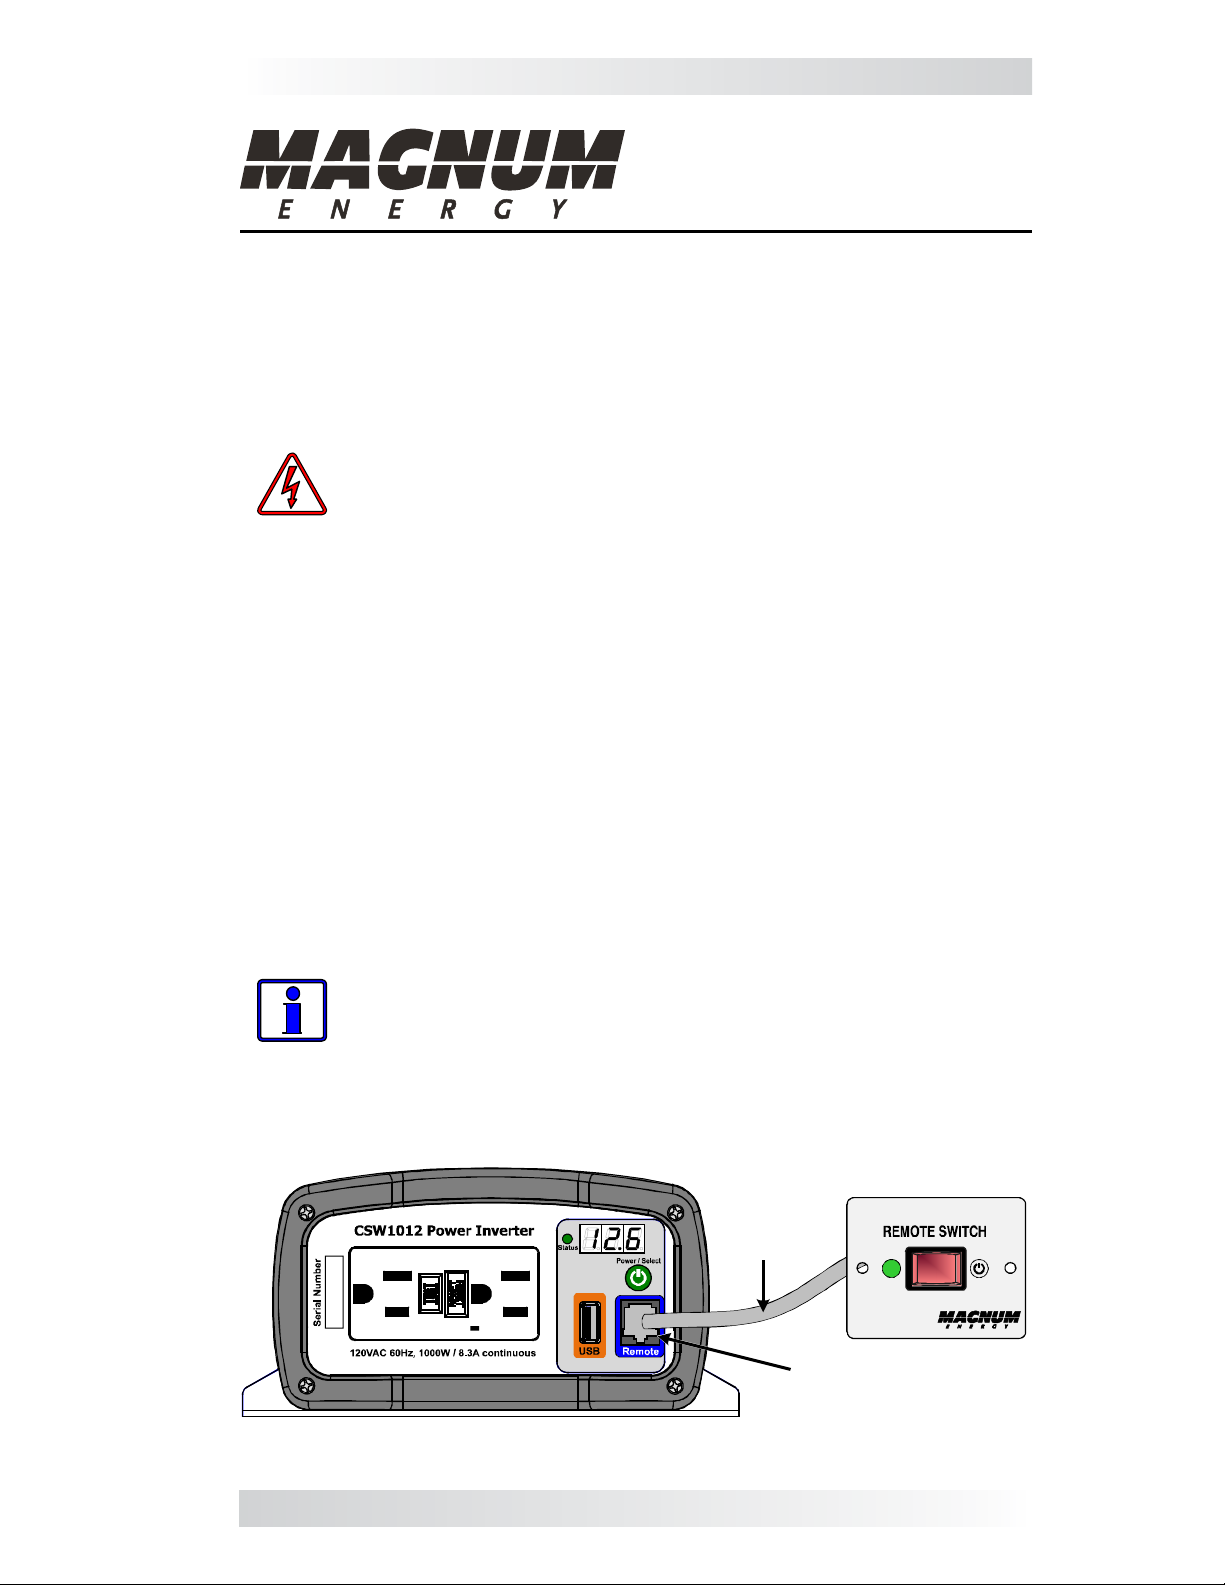
Connecting the Remote Cable
The remote cable is hardwired to the back of the remote switch and is a
20-foot, 4-conductor cable (wired like a normal telephone type cable). This
cable connects to the Remote port located on the front of the inverter, as
shown in Figure 1.
Info: If the 20-foot remote cable length is not enough, it may
be extended up to 50 feet using a standard 4-conductor male to
female telephone extension cable.
CSW1012 Inverter
CSW-RS
Remote
cable
(20')
Remote port
(RJ11 connection)
Figure 1, Remote Cable Connection
Part Number: 64-0065 Rev A 1
Page 2
CSW-RS Owner’s Guide
1/8
2
(53 mm)
"
CSW-RS
Face Plate
Ø3.8
1/2
2
(64 mm)
"
"
2
(50.5 mm)
Figure 2, Remote Switch Face Plate Dimensions
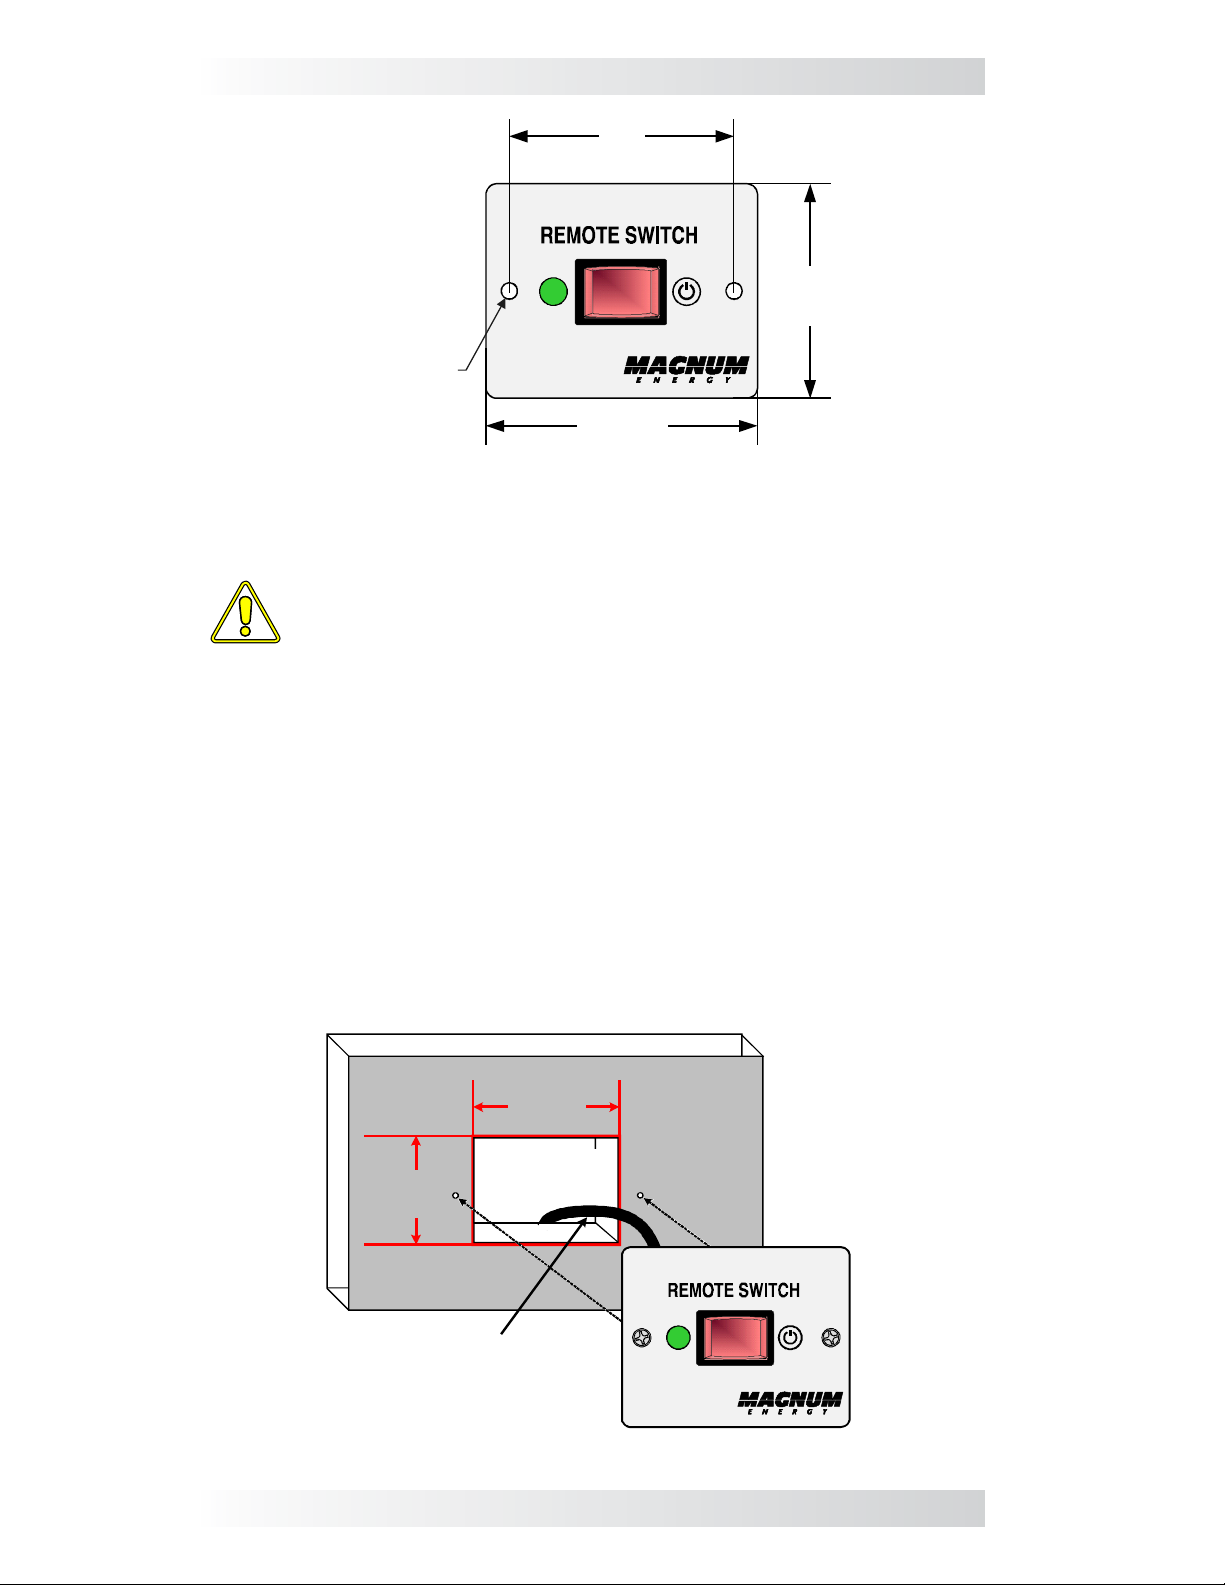
Mounting
CAUTION: Always check for hidden electrical wires, pipes, and
cables BEFORE drilling, cutting, or screwing into walls or cabinets.
To mount the remote on a wall, the remote’s display panel will need to be
placed into an opening. This opening must have at least a 1” depth to allow
room for the remote’s rear switch and wires/cable.
1. Cut an opening in a wall – see Figure 3 to determine the correct opening
dimensions. DO NOT cut the opening too big. Ensure there are no openings
around the display, and that there is enough material for the screws to secure
the display. Remove any wall insulation (if applicable) that may contact the
back of the remote.
2. Route the remote cable thru the opening in the wall to the inverter location.
3. Position the remote into the opening in the wall and secure with two screws.
4. After ensuring the inverter is OFF, plug the remote cable into the Remote
port on the front of the inverter as shown in Figure 1.
1"
25.4mm
1 1/2"
36.7mm
Remote cable
(routed in the wall)
CUT THIS
AREA OUT
Figure 3, Remote Switch Mounting
2 © 2013 Magnum Energy, Inc.
Page 3

CSW-RS Owner’s Guide
Functional Test
After installing and connecting the remote, use the following steps to ensure
the remote functions correctly.
1. Turn the inverter on using the inverter’s Power/Select button.
2. Verify the Status indicator light on the inverter and the green indicator light
on the remote both come on.
3. Press the switch on the remote to turn the inverter off, and then verify the
green indicator light on the remote and the status indicator on the inverter
both go off.
4. Press the switch on the remote again to turn the inverter on, and verify
the green indicator light on the remote comes on.
If the remote passes all the above steps, it’s ready for use.
If the remote fails any of the steps, check all the connections at both ends of
the remote cable and ensure the inverter is operational. If the status indicator
on the inverter comes on red (error), refer to the Troubleshooting section in
the CSW1012 Owner’s Manual to help clear the error condition.
Operation
The CSW-RS uses a momentary rocker switch that duplicates the Power/Select
button on the inverter, and functions by momentary pressing for one second
and releasing. This remote switch also provides a green LED indicator to show
whether the CSW1012 inverter is ON or OFF.
To turn the inverter ON: Press and hold the rocker switch on the remote for
approximately one second. When the green light on the remote switch comes
on, the inverter is ON.
To turn the inverter OFF: Turn the inverter off by pressing and holding the rocker
switch on the remote for approximately one second. When the green light on
the remote switch turns off, the inverter is OFF.
WARNING: The remote switch turns the inverter’s control circuit
on and off. This switch is not a power disconnect switch and will
not remove the DC power from the inverter. Disconnect all power
to the inverter before working on the inverter.
© 2013 Magnum Energy, Inc. 3
Page 4

CSW-RS Owner’s Guide
Limited Warranty
Magnum Energy, Inc., warrants the CSW-RS Remote Switch to be free from
defects in material and workmanship that result in product failure during
normal usage, according to the following terms and conditions:
1. The limited warranty for this product extends for a maximum of 12 months
from the product’s original date of purchase.
2. The limited warranty extends to the original purchaser of the product
and is not assignable or transferable to any subsequent purchaser.
3. During the limited warranty period, Magnum will repair or replace at our
option any defective parts, or any parts that will not properly operate
for their intended use, with factory new or remanufactured replacement
items if such repair or replacement is needed because of product
malfunction or failure during normal usage. The limited warranty does
not cover defects in appearance, or cosmetic, decorative, structural or
non-operative parts. Magnum’s limit of liability under this warranty shall
be the actual cash value of the product at the time the original purchaser
returns the product for repair, determined by the price paid by the original
purchaser. Magnum shall not be liable for any other losses or damages.
4. Upon request from Magnum, the original purchaser must prove the
product’s original date of purchase by a dated bill of sale, itemized receipt.
5. The original purchaser shall return the product prepaid to Magnum.
After the completion of service under this limited warranty, Magnum
will return the product prepaid to the original purchaser via a Magnum
selected non-expedited surface freight within the contiguous United
States and Canada; this excludes Alaska and Hawaii.
6. If Magnum repairs or replaces a product, its warranty continues for
the remaining portion of the original warranty period or 90 days from
the date of the return shipment to the original purchaser, whichever is
greater. All replaced products and parts removed from repaired products
become the property of Magnum.
7. This limited warranty is voided if:
• the product has been modifi ed without authorization.
• the serial number has been altered or removed.
• the product has been damaged from abuse, neglect, accident, high
voltage or corrosion.
• the product was not installed/operated according to instructions.
How to Receive Warranty Service
If your product requires warranty service, contact Magnum at:
• Telephone: 425-353-8833, or
• Email: warranty@magnumenergy.com
If returning your product directly to Magnum, you must:
1. Return the unit in the original, or equivalent, shipping container.
2. Receive a Return Materials Authorization (RMA) number from Magnum
prior to the return of the product for service.
3. Place RMA numbers clearly on the shipping container or the packing slip.
When sending your product for service, please ensure it is properly packaged.
Damage due to inadequate packaging is not covered under warranty.
We recommend sending the product by traceable and insured service.
BEFORE RETURNING ANY UNIT TO MAGNUM,
A RETURN MATERIAL AUTHORIZATION (RMA) NUMBER IS REQUIRED.
4 © 2013 Magnum Energy, Inc.
 Loading...