

Magnum Mx-ILS2 Installation Manual
1
Magnum Innovations 5675 Hudson Industrial Pkwy, Suite 3 Hudson, OH 44236 phone 330.915.2382 fax 330.529.5279 www.magnum-innovations.com info@magnum-innovations.com
Product Installation Guide
Integrated Rocker Switch
Mx-ILS2
1] Description
2] Features
4] Installation (continued)
The Mx-ILS2 Rocker Switch is designed to use wireless communication (902 MHz) and provide remote control
of your lighting. The relay will turn the load ON when the top button is pressed and OFF when the bottom button
is pressed. The Indicator LED will blink Red when a message is received fro m a learned wireless dev ice such
as an occupancy sensor or remote switch. NOTE: The no-neutral version of the WSS20 has a minimum load
requirement of 25 watts.
Devices can be learned directly into the Mx-ILS2 via the Programming Mode Selection Menu or via airConfig
Tool. The Mx-ILS2 rocker switch has a 100-150 ft. reception range depending upon the environment and
transmission device. Range will be reduced by signals having to transmit through walls. Transmit range for
Mx-ILS2, when utilized as a repeater or for initial setup/ commissioning is approximately 50ft.
INSTALLING YOUR ILS2 SWITCH
Step 1: WARNING: TO AVOID FIRE SHOCK OR DEATH; TURN OFF POWER at circuit breaker or fuse and test
that power is o before wiring!
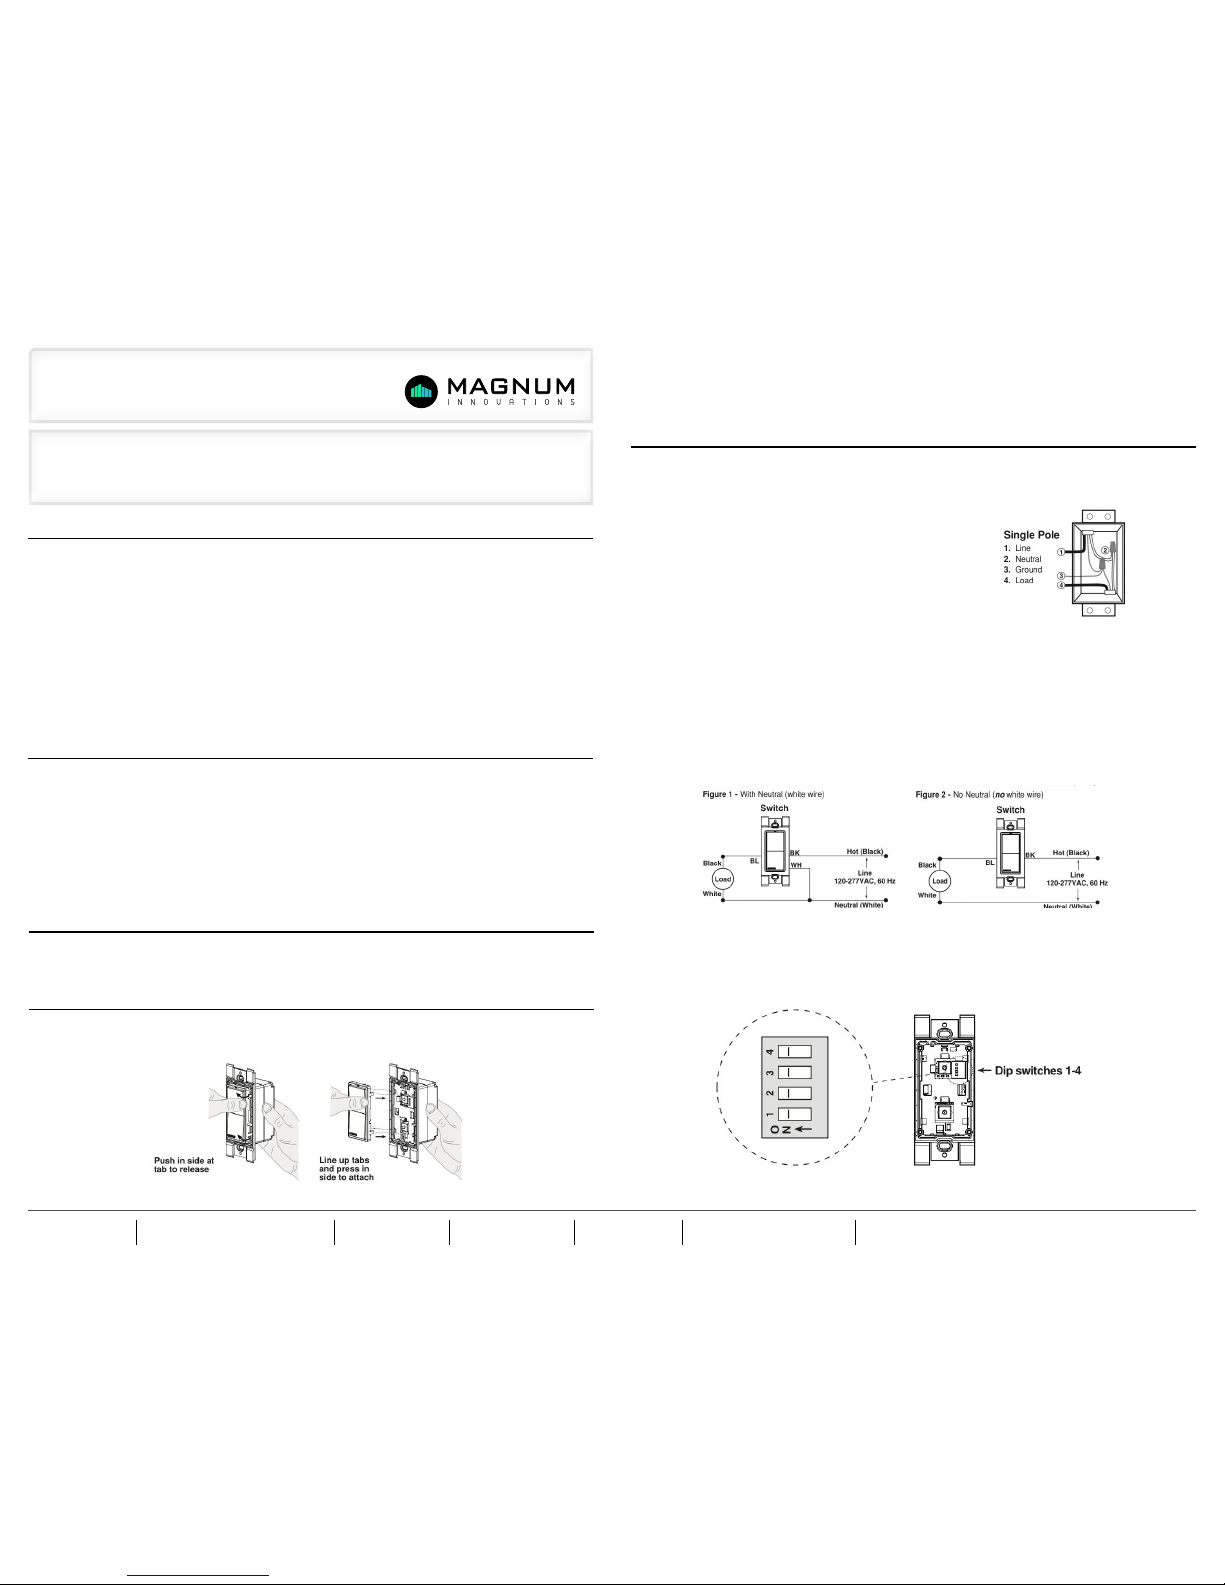
Step 2: Identifying your wiring application (most common):
NOTE: If the wiring in your wall box does not resemble this
configuration, consult an electrician.
Step 3: Single Pole Wiring Application
• ILS2 Receiver Control Switch is only intended as a Single Pole device.
Multiple Location Wiring Application:
• Wireless remote switch can be used for additional switches (3-way and 4-way), no wires necessary.
Wiring Switch:
Connect wires per WIRING DIAGRAM below as follows:
• Connect (Hot) wire from wall box to black wire on switch.
• Connect (Load) wire in wall box to blue wire on switch.
• Connect (Neutral) wire in wall box to white wire on switch. (NOTE: For No Neutral model, white wire will not be
available (Figure 2).
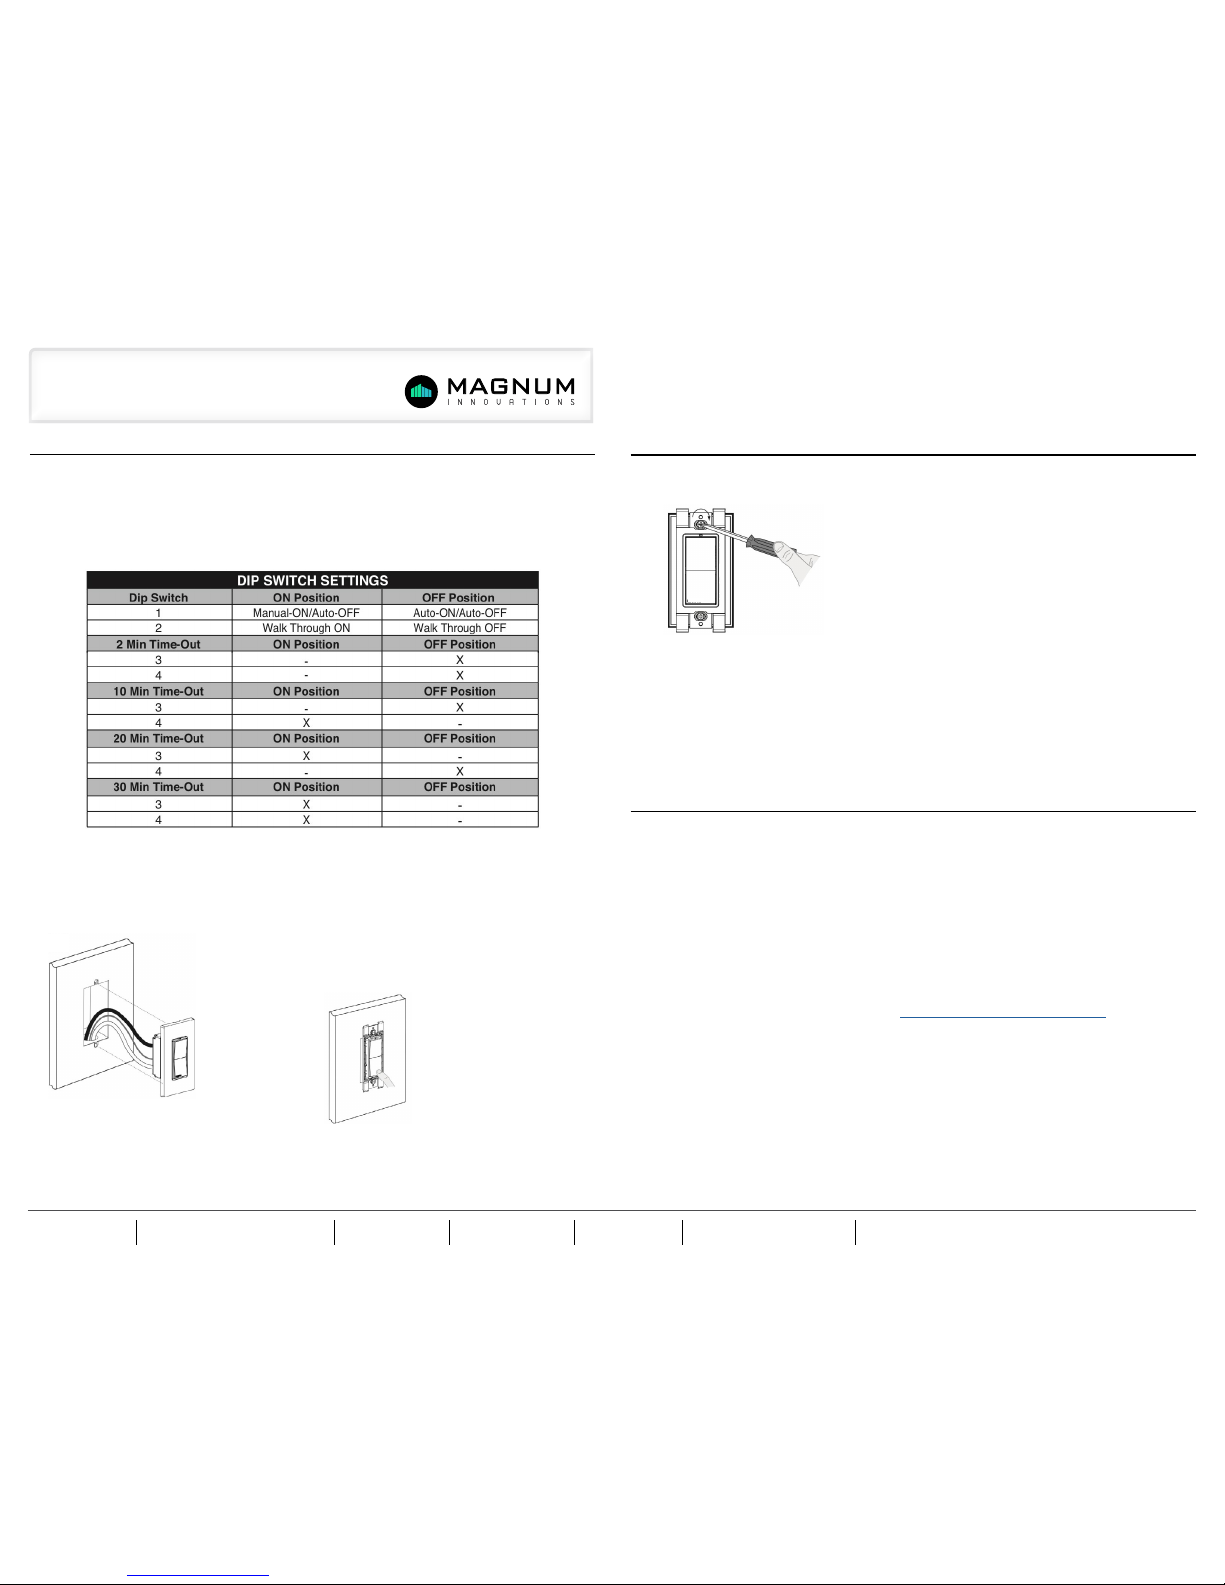
Step 4: Dip Switch Settings:
NOTE: Dip switch settings, the switch frame and paddle will need to be
removed. Refer back to the “Changing the color of your ILS2 switch” section for removal instructions of the
switch frame. This can only be done with the wall plate removed.
• Able to switch single load ON/OFF remotely
• Scene Capable
• Green Locator LED when device is OFF
• Can be remotely configured and commissioned using the airConfig Tool
• Includes repeater function to increase wireless reception to other devices
• Ease of installation - no new wiring
• Title 24 Vacancy Mode (Manual ON/Auto OFF) supported when paired with occupancy sensor
Mx-ILS2 has built in air-gap switch to disable current flowing to the load for replacing bulbs
3] Equipment Needed For Installation
4] Installation
• Slotted/Phillips Screwdriver • Pencil • Electrical Tape
• Cutters • Pliers • Ruler
Changing the color of your ILS2:
Your ILS2 switch includes three color options. The ILS2 switch ships with the white frame attached. To change
color of the frame, proceed as follows:
2
Magnum Innovations 5675 Hudson Industrial Pkwy, Suite 3 Hudson, OH 44236 phone 330.915.2382 fax 330.529.5279 www.magnum-innovations.com info@magnum-innovations.com
Product Installation Guide
4] Installation (continued)
5] General Operation
4] Installation (continued)
Auto-ON / Auto-OFF mode: Auto mode can be enabled using the dip switches, product comes from the factory
in Manual-ON/Auto-OFF.
Walk-through: Can be used only in Auto-ON mode. It is recommended to only use this setting when wireless
occupancy sensors with batteries have been installed.
Timeout: 2 (test), 10, 20, 30min; (Longer time delay is recommended for continuous self-powering of the occu-
pancy sensor and to ensure packets are sent to the WSS20 receiver switch.
Step 6: Switch Mounting:
TURN OFF POWER AT CIRCUIT BREAKER OR FUSE:
The locator LED will illuminate GREEN when the load is in the OFF position to facilitate access in the dark.
Push Pad (Default settings)
- Turn ON from OFF position: Push the top of the switch.
- Turn OFF from ON position: Push the bottom of the switch.
- Cleaning: Clean with a damp cloth. DO NOT use chemical cleaners.
If there is a power outage, when the power is restored, the lights will return to the last known state so long as
the device was in that state for 30 seconds or more.
INSTALLING AIRCONFIG SOFTWARE (OPTIONAL)
Please refer to the Magnum AirConfig tool available at http://download.magnum-innovations.net.
Programming Instructions:
All devices are learned in a “reduced sensitivity” mode to avoid interference from other devices which may be
active in areas close by. This reduction of sensitivity reduces the range so devices learned to the ILS2 Rocker
Switch should be within 10 ft when learning.
Factory settings:
ILS2: Manual ON/Auto OFF, Walk Through mode OFF (disabled), Occupancy Time-Out delay = 20min, Key
Card/Momentary Time-Out delay = 0s, Repeater = disabled.
Step 7: Wall Plate Mounting:
Place plastic/nylon Decora® wallplate over device and secure in place with screws provided.
Note: Usage of a metal wall plate may result in reduction, or loss of receiving range for ILS2 wall switch.
Step 8: Restore Power:
Restore power at circuit breaker or fuse.
Installation is complete.
Tighten mounting screws to secure the device to the wall box.
Step 5: Testing your ILS2 prior to mounting in wall box:
• Position all wires to provide room in outlet wall box for WSS20.
• Ensure that the locator LED is facing up on WSS20.
• Partially screw in mounting screws in wall box mounting holes.
NOTE: Dress wires with a bend as shown in diagram in order to relieve
stress when mounting ILS2
• Restore power at circuit breaker or fuse.
• Press pad at the TOP until locator LED is OFF. Lights should turn ON.
If lights do not turn ON, refer to the TROUBLESHOOTING section.
 Loading...