

Page 1

BACnet / IP Gateway
Setup Manual
Mx-EBOX
5675 Hudson Industrial Pkwy, Suite 3
Hudson, Ohio
44056 USA
Revision 1.5
11052018
Page 2

Contents
What’s in the box? .............................................................. 3
EBOX Device ........................................................................ 3
Backplate ............................................................................ 3
Optional Power Supply (upon request) .................................. 3
Device Overview .............................................................. 3
LED Overview ....................................................................... 3
Device Dimensions .............................................................. 3
Port Overview ...................................................................... 3
What you need before you begin ...................................... 3
Mounting Instructions ...................................................... 4
Backplate Mounting ............................................................. 4
Connecting Device to Backplate ........................................... 4
Configuration ................................................................... 5
Page 3
Hardware Overview
5.10
1.24
The product package should contain the following items:
• EBOX Device
• Backplate
• 24V Power supply (optional upon request)
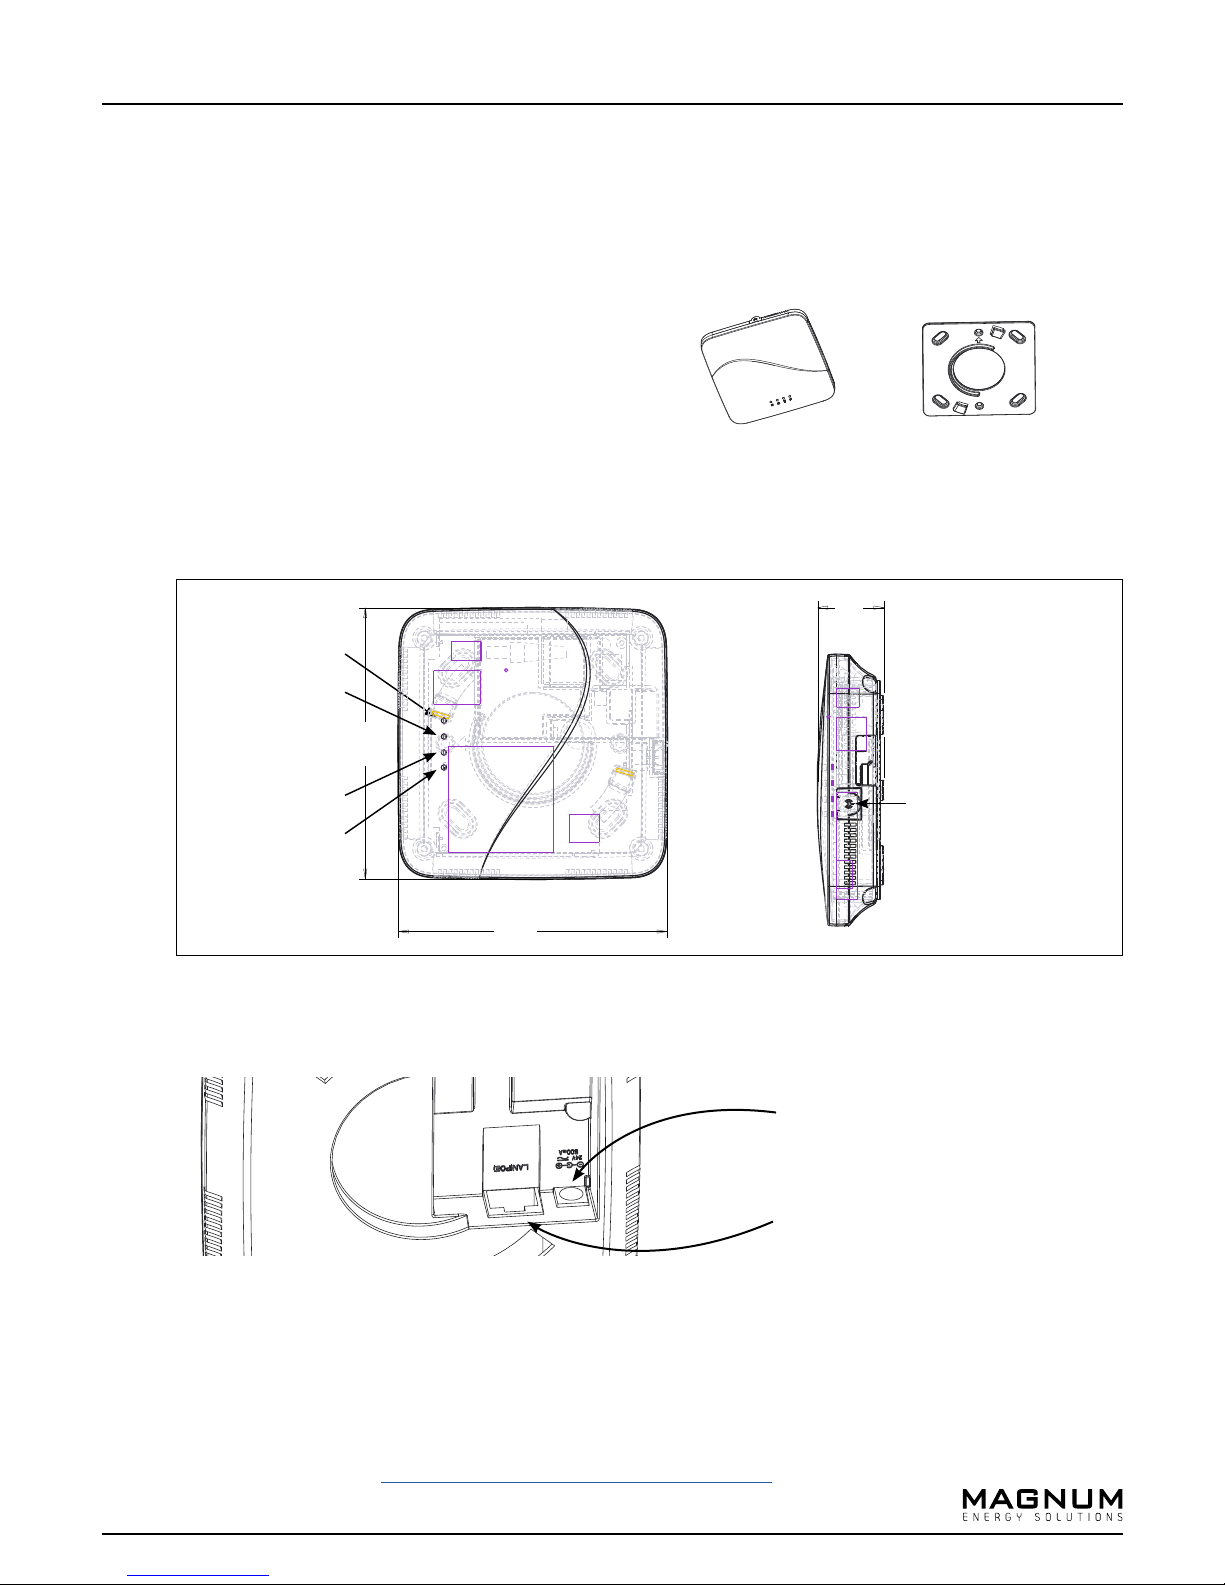
Device Overview
• LED Overview & Dimensions
Power Indicator LED
EnOcean Indicator LED
EBOX Device Device Backplate
1.24
1.24”
3
5.10”
Network Indicator LED
Update Indicator LED
• Port Overview (back of device)
What you need before you begin
5.05”
Available port for
external antenna
5.05
24V Power Port
(Only applicable with use of optional 24V power supply)
LAN(POE) Cable Port
• PoE Cable
• 4 screws
• Screwdriver
• airConfig Software (http://download.magnum-innovations.net)
Page 4
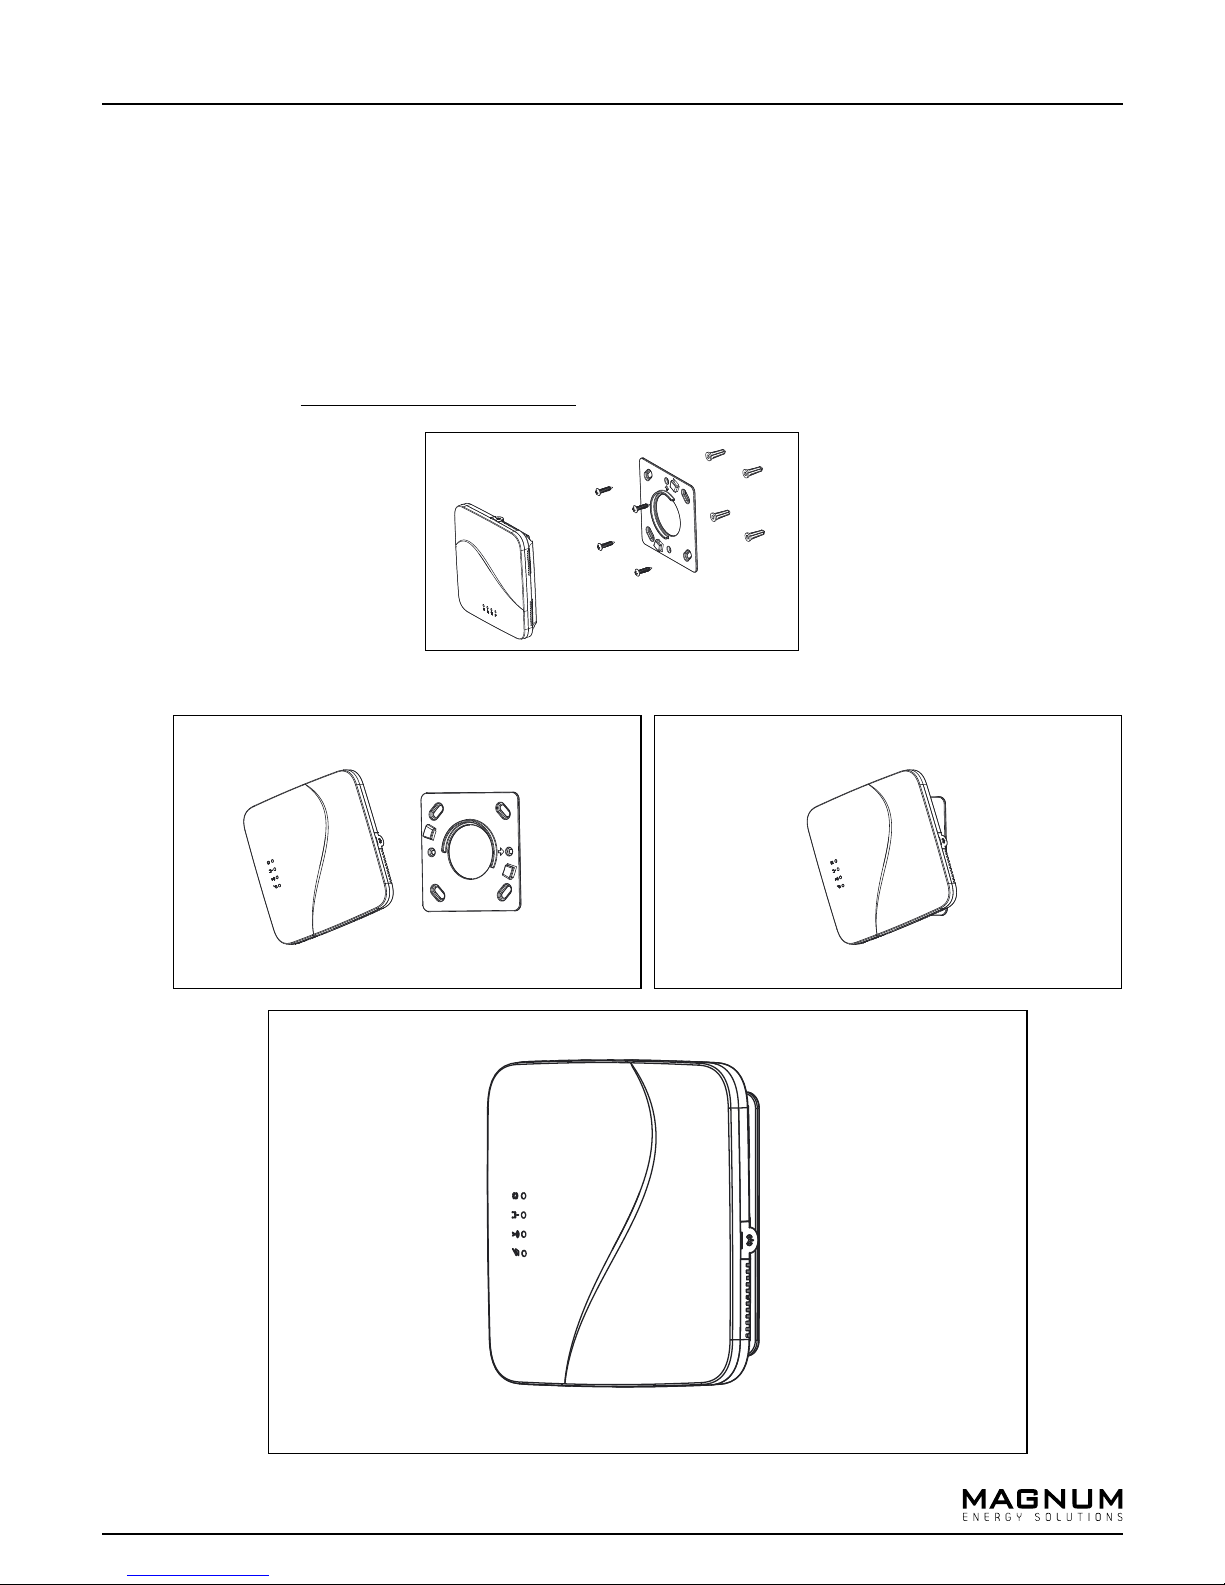
Mounting Instructions
• Screw backplate to wall or ceiling
NOTE: Optimal mounting is at or below ceiling height and in conditioned environment.
NOTE: Range can vary greatly based on building materials, device positioning, interferance, etc.
Reference the EnOcean Range Planning Guide prior to installation.
• Attach device to backplate by aligning tabs and twisting / locking into place (see below)
4
Page 5
5
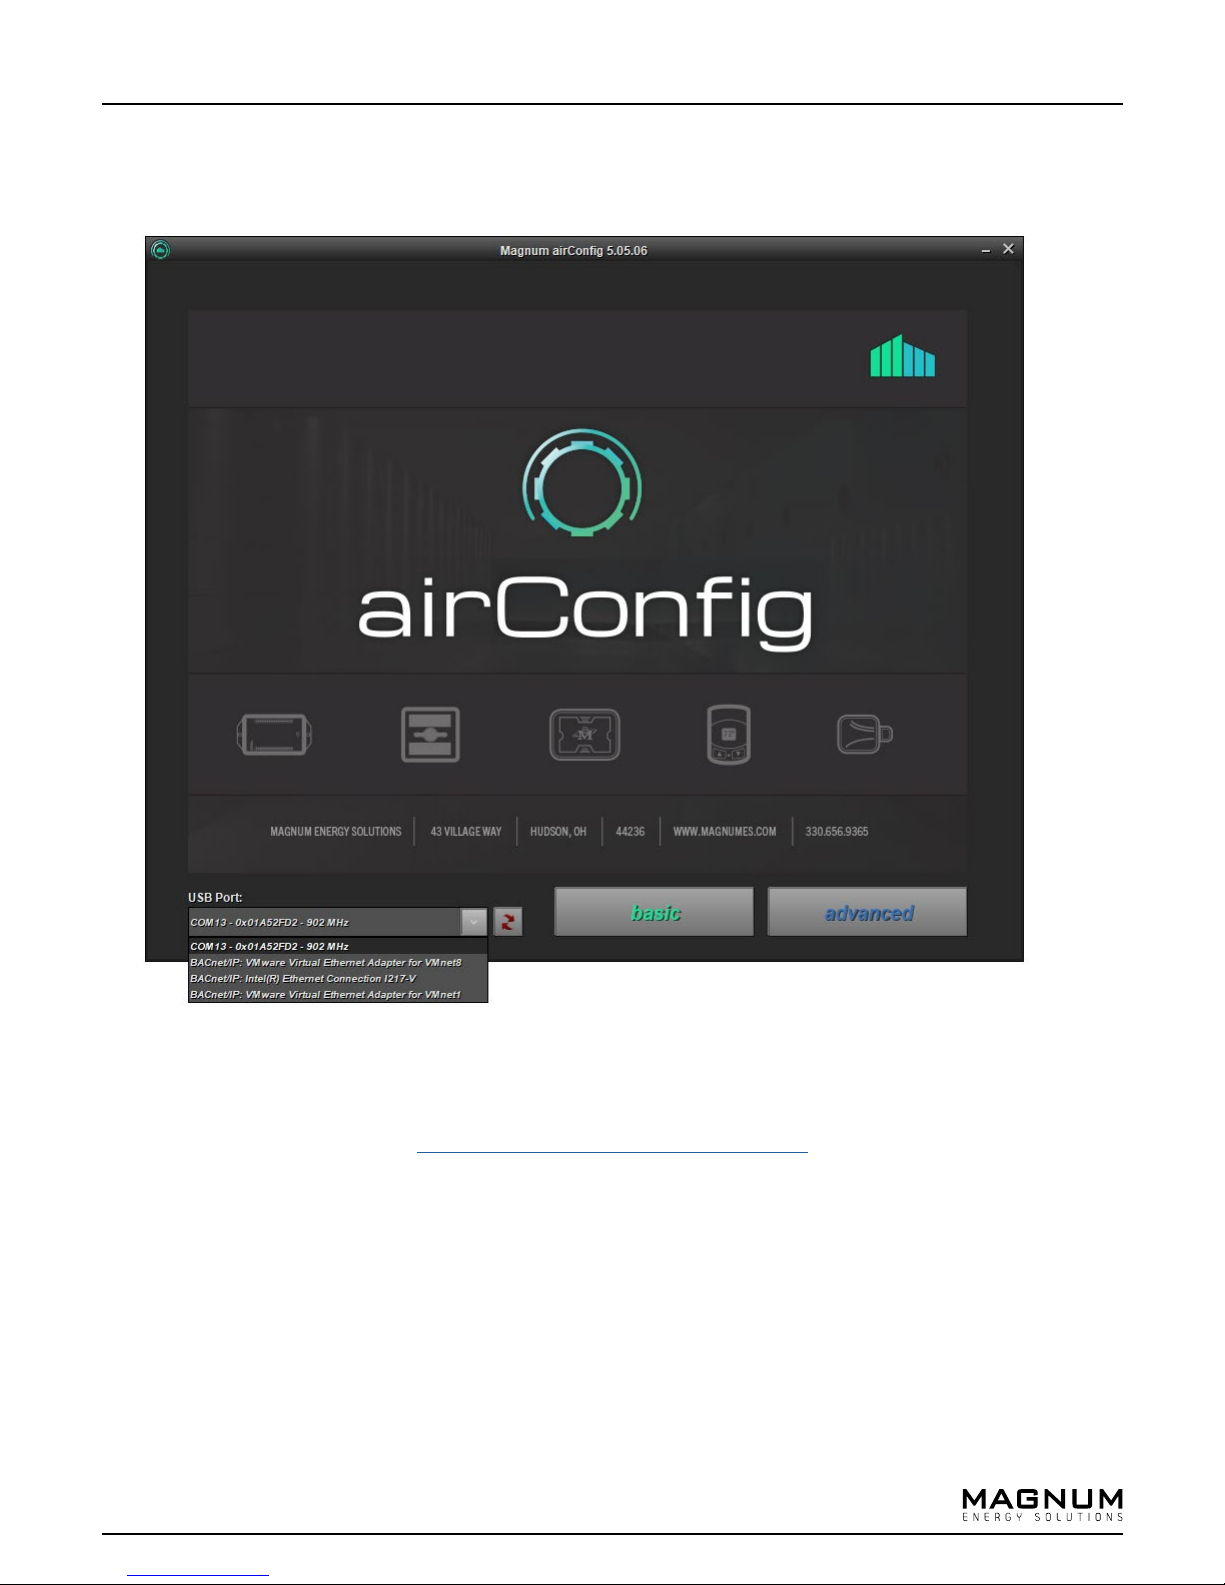
Configuration Process
• Download and install airConfig (http://download.magnum-innovations.net)
- Select USB port with USB-transceiver or network card.
- The eBox may be configured without the USB-Tranceiver when it can be reached on the network.
- The eBox factory default is DHCP, so it will receive and IP Address if a DHCP server is available.
- If your computer running airConfig is on the network, you will be able to configure the device without the USB-transceiver.
Page 6

Configuration Process
• Please find the airConfig panel overview below.
6
Drivers for smart devices
Queried smart devices
Cloud connection icon
Main configuration panel
Smart sensor information Debug output
Sensor information
Sensors in radio range
Page 7

Configuration Process
7
Radio query
(with EnOcean USB-Transceiver)
IP query when IP address is
(does not require USB-Transceiver)
• If airConfig is started without the USB-Transceiver, it will identify EBOXES on the same network automatically.
The EBOXES will not need to be queried.
unknown
Page 8

Configuration Process
8
Network Settings
• DHCP
• WLAN
• IP Address
• MAC Address of the EBOX
Active TCP/IP Connection
• Without an active connection, only
the network settings can be adjusted.
• airConfig requires a network connection
to the EBOX for full configuration.
Control / Security
• Reboot - Reboots the EBOX
• Reset - Factory reset that deletes all current configuration as well as inputs and outputs
• Change ID - Changes the Base ID of the radio Chip. CAN ONLY BE DONE 10 TIMES!
• EDE - See page 14
• Key - Configuration keys to lock the device.
Page 9

Configuration Process
9
Information on the radio chip of
the EBOX
• XML and Firmware Version (1)
• BACnet Location
•BACnet ID and port
• XML Type (2)
• Firmware Update
The EBOX can automatically check for
new firmware. You can specify the
frequency of how often the EBOX
check for new firmware. This feature
requires internet access for the EBOX.
(1) Actual firmware version of the EBOX and XML file. airConfig will prompt if there is a new firmware
version available. In a case where the EBOX has direct internet access, it will also have a BACnet
point that indicates a new firmware’s availability.
The XML file contains all EnOcean profiles and is updated regularly.
(2) EBOX points are created based on the XML file. The standard XML file shows temperature values
in °C. This can be changed to °F. Since all sensors send in °C, this is the recommended unit.
Page 10

Configuration Process
10
FDR Settings
FDR Settings - In a case where a BBMD server is present on the network, the EBOX can be configured as a
foreign device.
The EBOX is NOT a BBMD server!
Page 11

Configuration Process
Drag and drop Sensors to
the Input panel
11
Sensors can be added to the EBOX by simply dragging and dropping sensors from the Sensor panel to the
Inputs panel.
You can rename, delete and change the BACnet ID of the sensors. You will need to send the configuration to
the EBOX first and read it again.
Page 12

Configuration Process
12
To add outputs to the EBOX, select profile and manufacturer and click on the “+”.
Options:
- Rename: Renames the output. Renaming allows you to add additional information to
each BACnet point that a device creates. You are able to add text to the
beginning / end of the Name or Description to provide additional identifiers
(Room numbers, Oce names, etc.).
- Delete: Deletes the output.
- Add to sensor list: Adds output to the sensor list so it can be used as an input for the device it is
supposed to control
- Destination / MsgServer: Some devices need to be addressed (instead of using broadcast messages).
Others may only be able to receive commands in a very short window, after
they have sent a message themselves. Both can be configured here. Please
refer to the device manual.
- Send LRN: Sends a learn telegram to the sensor. LRN sends 1 4BS learn telegram
- LRN(3x): Sends 3 consecutive learn telegrams.
- LRN(UTE): Sends 1 UTE telegram (please refer to device manual)
- Change BACnet ID: Take from input
Page 13

Configuration Process
13
Backup Type
Local or Cloud
airConfig can backup and restore all of its configuration, including inputs and outputs either to your local
HDD or to the Cloud.
Change base ID will also change the Base ID of the new EBOX if the destination device is dierent from the
source. This will allow the new EBOX to control all the devices that the old one did.
A Base ID can only be changed 10 times.
Page 14

Configuration Process
14
Drag Magnum Auto Learn
Compatible Devices from
the “Sensors” panel into
the “Auto Learn” panel.
Auto Learn
Magnum Auto Learn compatible devices enable the EBOXs to learn in devices based on signal strength. In
installations where the devices fall into multiple EBOXs range, Auto Learn will allow the EBOXs to study the
signal strength for the devices. After a 5-6 hour period, the EBOXs will use that information to assign the
devices to the ideal EBOX.
You are able to Save / Load these Auto Learn lists and apply them to multiple EBOXs.
Page 15

Configuration Process
Project Information
15
Save EDE
Save XLS
Activate / Deactivate &
Rename Data Points
Renamed points are shared
in the EBOX and will visible in
the BACnet system.
Select inputs / outputs and EBOX points.
Since data points are created in the EBOX, you will need to send / receive the configuration before you can
edit the EDE file.
Page 16

Configuration Process
16
- Sort: Sort EBOXES by RSSI, name, location and EnOcean ID
- Rename: Rename the EBOX
- Delete: Delete the EBOX
- Requestion Configuration: Request configuration from the EBOX
- Send Configuration: Send configuration to the EBOX
- Start / End Learn Mode: Start / end learn mode toggle
- Load Device: Load a single EBOX from disc
- Save Device: Save a device
- Load Device List: Load an EBOX list from a disc
- Save Device List: Save selected EBOXES as a list to a disc
- Copy: Copy the configuration
- Paste: Paste without inputs and outputs
- Paste All: Paste with all inputs and outputs
- Read Error Log: Request error log from EBOX
- Delete Error Log: Delete error log from EBOX
- Radio Pass-Through: Activating radio pass-through causes the EBOX becomes the radio of airConfig.
All radio messages will be forwarded from the EBOX to airConfig. All commands
are being sent through the EBOX
- Select All: Select all EBOXES
 Loading...