

Page 1
PORT ABLE GENERA T OR
MPG 3800 • MPG 3800C
OPERA TING/PARTS MANUAL
Page 2

INTRODUCTION
This manual provides information and procedures to safely operate and maintain the portable generator . For your
own safety and protection from physical injury , carefully read, understand, and observe the safety instructions
described in this manual. The information contained in this manual was based on machines in production at the
time of publication. Magnum Products LLC reserves the right to change any portion of this information without
notice.
DO NOT MODIFY or use this equipment for any application other than which it was designed for .
Magnum Products LLC recommends that a trained and licensed professional perform all electrical wiring and testing
functions. Any wiring should be in compliance with the United S tates National Electric Code (NEC), st ate and local
codes and Occupational Safety and Health Association (OSHA) guidelines.
Keep a copy of this manual with the unit at all times. Additional copies are available from Magnum Product s LLC or
can be found at www.m-p-llc.com. An engine operator’s manual was also supplied with the unit at the time of
shipment from the factory . The manual provides detailed operation and maintenance procedures for the engine.
Additional copies of this manual are available from the engine manufacturer.
MAGNUM PRODUCTS LLC
215 Power Drive • Berlin, WI 54923
U.S.A.
Phone: 920-361-4442
Fax: 920-361-4416
Toll Free: 1-800-926-9768
www.m-p-llc.com
For technical or parts QUESTIONS, please contact Magnum Products’ Customer Support or
Technical Support team at 920-361-4442. Please have your serial number available.
T o ORDER SER VICE PARTS, please contact the dealer from which you purchased the unit,
or call Magnum Products to locate a dealer in your area.
Unit Model Number:
Unit Serial Number:
CALIFORNIA PROPOSITION 65 WARNING:
Engine exhaust and some of its constituents are known to the state
of California to cause cancer, birth defects and other reproductive harm.
2
WARNING
Page 3

TABLE OF CONTENTS
INTRODUCTION ..............................................................................................................................2
T ABLE OF CONTENTS ...................................................................................................................3
SAFETY NOTES.............................................................................................................................4
OPERA TING SAFETY.....................................................................................................................4
ENGINE SAFETY ...........................................................................................................................5
ELECTRICAL SAFETY....................................................................................................................5
UNIT SERIAL NUMBER LOCA TION ................................................................................................6
SAFETY SYMBOL SUMMARY.......................................................................................................6
SPECIFICA TIONS ...........................................................................................................................7
COMPONENT LOCA TIONS.............................................................................................................8
CONTROL P ANEL COMPONENTS.................................................................................................9
GROUNDING THE GENERATOR..................................................................................................10
CONNECTING ELECTRICAL LOADS ............................................................................................10
GFCI TEST INSTRUCTIONS .........................................................................................................10
PREVENTION OF OVERLOAD.....................................................................................................10
WA TT AGE CONSUMPTION OF EQUIPMENT............................................................................... 11
USE OF EXTENSION CORDS ...................................................................................................... 11
EXTENSION CORD SELECTION CHART ......................................................................................12
ADDING ENGINE OIL ...................................................................................................................12
ADDING GASOLINE .....................................................................................................................12
ST ARTING THE ENGINE...............................................................................................................13
POWERING THE LOADS .............................................................................................................13
STOPPING THE ENGINE .............................................................................................................14
MAINTENANCE SCHEDULE ........................................................................................................15
DAIL Y MAINTENANCE CHECKS AND TIPS .................................................................................15
LIFTING THE GENERAT OR ..........................................................................................................15
UNIT DECALS...............................................................................................................................16
CONTROL P ANEL ASSEMBLY.....................................................................................................17
FRAME AND FUEL TANK ASSEMBL Y ....................................................................................18-19
ENGINE AND GENERATOR ASSEMBL Y................................................................................. 20-21
AC WIRING DIAGRAM..................................................................................................................22
DC WIRING DIAGRAM..................................................................................................................23
Page
3
Page 4
SAFETY NOTES
This is the safety alert symbol. It is used to alert you to potential personal injury hazards.
Obey all safety messages that follow this symbol to avoid possible injury or death.
This manual contains DANGERS, WARNINGS, CAUTIONS, NOTICES and NOTES which must be
followed to prevent the possibility of personal injury or death, damage to equipment, or improper service.
The following formatting options will apply when calling the readers attention to the DANGERS, WARNINGS, CAUTIONS, NOTICES and NOTES.
Indicates a hazardous situation which, if not avoided, may result in minor or moderate injury.
DANGER
INDICATES A HAZARDOUS SITUATION WHICH, IF NOT AVOIDED,
WILL RESULT IN DEATH OR SERIOUS INJURY.
WARNING
Indicates a hazardous situation which, if not avoided,
could result in death or serious injury.
CAUTION
NOTICE
Indicates a hazardous situation which, if not avoided,
may result in property or equipment damage.
Note: Notes contain additional information important to a procedure and will be found within the regular
text body of this manual.
OPERATING SAFETY
Before using the generator be sure you read and understand all of the instructions! This equipment was
designed for specific applications; DO NOT modify or use this equipment for any application other than
which it was designed for. Equipment operated improperly or by untrained personnel can be dangerous!
Read the operating instructions and familiarize yourself with the location and proper use of all instruments
and controls. Inexperienced operators should receive instruction from someone familiar with the equipment before being allowed to operate or set up the generator. The following points should be practiced at
all times:
• The area immediately surrounding the generator should be dry, clean, and free of debris.
• NEVER start a unit in need of repair.
• NEVER operate unit on a combustible surface.
• NEVER operate the generator if any of the following conditions exist during operation:
1. Noticeable change in engine speed.
2. Loss of electrical output.
3. Equipment connected to the generator overheats.
4. Sp arking occurs.
5. Engine misfires or there is excessive engine/generator vibration.
6. Protective covers are loose or missing.
7. If the ambient air temperature is above 1 10° F .
4
Page 5

ENGINE SAFETY
Internal combustion engines present special hazards during operation and fueling! Failure to follow the
safety guidelines described below could result in severe injury or death. Read and follow all safety
warnings described in the engine operator’s manual. A copy of this manual was supplied with unit when it
was shipped from the factory.
• DO NOT run engine indoors or in an area with poor ventilation unless exhaust hoses are used.
Engine exhaust contains carbon monoxide, a deadly, odorless and colorless gas which, if inhaled,
can cause nausea, fainting or death. Make sure engine exhaust cannot seep into closed rooms or
ventilation equipment.
• DO NOT fill fuel tank near an open flame, while smoking, or while engine is running. DO NOT fill tank
in an enclosed area with poor ventilation.
• DO NOT operate with the fuel tank cap loose or missing.
• DO NOT touch or lean against hot exhaust or engine parts.
• DO NOT clean air filter with gasoline or other types of low flash point solvents.
• Keep hands, feet and loose clothing away from moving parts on the generator and engine.
• If equipped, batteries contain sulfuric acid which can cause severe injury or death. Sulfuric acid can
cause eye damage, burn flesh or eat holes in clothing. Protective eye wear and clothing are necessary when working on or around the battery. Always disconnect the NEGATIVE (-) battery cable from
the corresponding terminal before performing any service on the engine or other components.
ELECTRICAL SAFETY
While the engine is running, potentially lethal voltages are present at the outlets located on the control
panel. Failure to follow the safety guidelines described below could result in severe injury or death.
• Only a qualified and licensed electrician should make connections to the generator.
• NEVER wash the unit with any high pressure hoses or power washers.
• NEVER allow water to accumulate around the base of the unit. If water is present, DO NOT service!
• NEVER service electrical components if clothing or skin is wet. If the unit is stored outside, check the
engine and generator for any moisture and dry the unit before use.
• NEVER start the engine with any of the circuit breakers switched on or with any loads connected to
the control panel. Serious generator damage will result.
• ALWAYS disconnect the NEGATIVE (-) battery cable from the corresponding terminal before performing any service on the engine, generator or any other components. Remove the NEGATIVE (-) battery
cable from the corresponding terminal if the unit is to be stored or transported.
5
Page 6
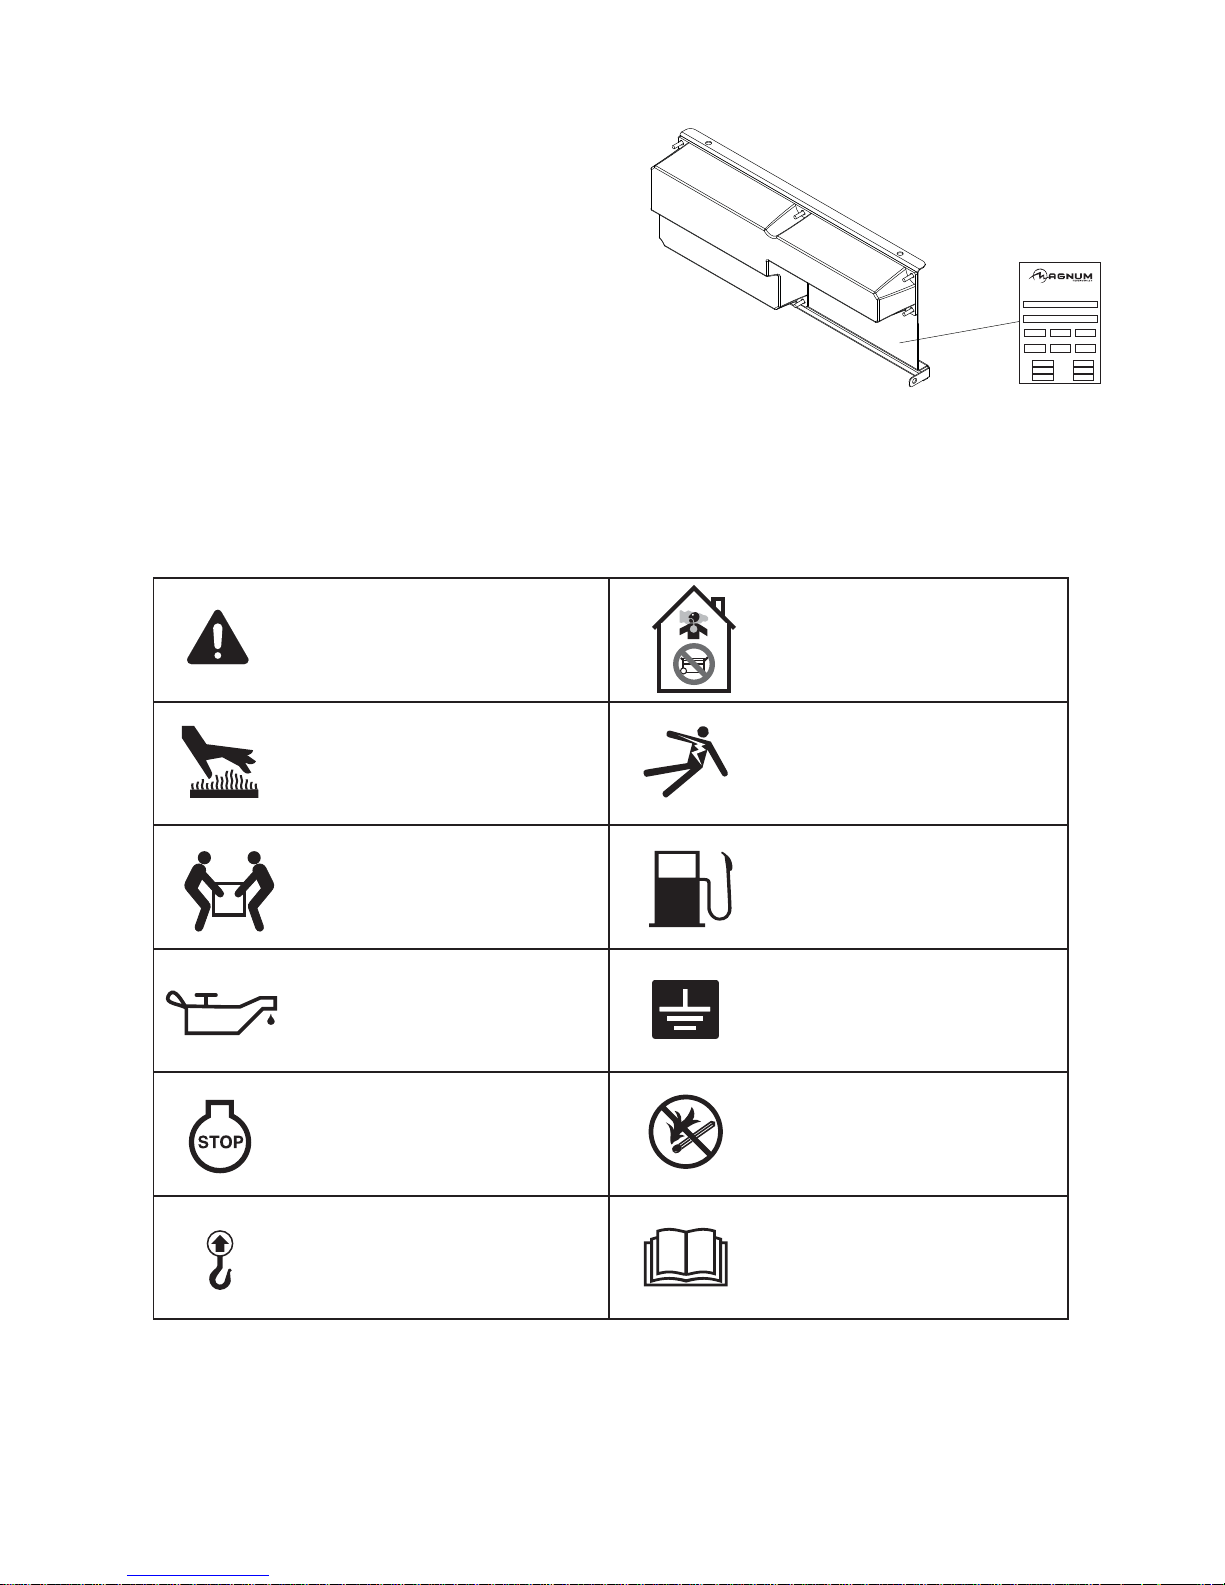
UNIT SERIAL NUMBER LOCATION
Refer to the location illustrated at right to find the unit ID
tag. Important information, such as the unit serial
number and model number are found on this tag. Record
the information from this tag, so it is available if the tag is
lost or damaged. When ordering parts or requesting
technical service information, you may be asked to
specify this information.
SAFETY SYMBOL SUMMARY
This equipment has been supplied with numerous safety and operating decals. These decals provide important
operating instructions and warn of dangers and hazards. Replace any missing or hard-to-read decals and use care
when washing or cleaning the unit. Decal placement and part numbers can be found in the parts section of this
manual. Below is a summary of the intended meanings for the symbols used on the decals.
Unit ID Tag
215 Power Drive • Berlin, WI 54923
1-800-926-9768
MODEL
MPG 5600
SERIAL NUMBER
000000
kglbs. amb. temp.
rpm hz phase
CONTINUOUS
kW
kW
120/240 120/240
V
A
41.7/20.8
1 Ø
MAXIMUM
V
A
46.7/23.3
Safety alert symbol; Used to
alert you to potential personal
injury hazards.
Hot surface(s) nearby.
Two-person lift only.
Check oil level daily.
Stop engine before fueling.
Asphyxiation hazard; Operate
in well ventilated area.
Dangerous voltage may be
present. Disconnect battery
before servicing.
Use unleaded gasoline only.
G
Unit electrical ground.
Fire/explosion hazard; Keep
open flames away from unit.
Lift here only.
6
Read and understand the
supplied operator’s manual
before operating unit.
Page 7

SPECIFICATIONS
Read this manual carefully before attempting to use this generator. The potential for property damage, personal
injury or death exists if this equipment is misused or installed incorrectly. Read all of the manuals included with this
unit. Each manual details specific information regarding items such as set-up, use and service requirements.
MAGNUM MODEL MPG 3800 MPG 3800C
Engine
Engine Make....................................................... Honda .............................................. Honda
Engine Model ...................................................... GX240 .............................................. GX240
Power-net prime*................................................. 7.1 hp (5.3 kW)................................ 7.1 hp (5.3 kW)
Fuel Consumption - net prime ............................. 0.68 gph (2.57 Lph).......................... 0.68 gph (2.57 Lph)
Displacement ...................................................... 15 in3 (242 cm3)................................ 15 in3 (242 cm3)
Recoil Start ......................................................... Yes .................................................. Yes
Generator
Generator Frequency .......................................... 60 Hz ............................................... 60 Hz
Maximum Output Watts ...................................... 3800 ................................................ 3800
Continuous Output Watts.................................... 3400 ................................................ 3400
Maximum Amps.................................................. 32A.................................................. 3 2A
Electrical
Main Circuit Breaker............................................ 16 Amp-2 pole.................................. 16 Amp-2 pole
Volt age (Receptacles) ......................................... 120/240V ......................................... 120/240V
120V , 20A Duplex - qty........................................ 2...................................................... 2
120/240, 20A T wist Lock - qty ............................. 1 ...................................................... 1
120/240, 30A T wist Lock - qty ............................. 1 ...................................................... 1
Capacities
Fuel T ank ............................................................ 6.6 gal. (25 L)................................... 6.6 gal. (25 L)
Approximate Run time......................................... 9.7 hours.......................................... 9.7 hours
Weights and Dimensions
Dry Weight.......................................................... 185 lbs. (84 kg)................................ 185 lbs. (84 kg)
Operating Weight ................................................ 226 lbs. (103 kg) .............................. 226 lbs. (103 kg)
Dry Weight, w/Wheel Kit Option.......................... 212 lbs. (96 kg) ................................ 212 lbs. (96 kg)
Operating Weight, w/Wheel Kit Option ................ 253 lbs. (115 kg) .............................. 253 lbs. (115 kg)
Dimensions (L x W x H) ...................................... 36.8 x 21.4 x 21.5 in. ....................... 36.8 x 21.4 x 21.5 in.
934.7 x 543.6 x 546.1 mm ............... 934.7 x 543.6 x 546.1 mm
Dimensions, Wheel Kit Option (L x W x H) ......... 36.8 x 27.0 x 27.0 in. ....................... 36.8 x 27.0 x 27.0 in.
934.7 x 686.0 x 686.0 mm ............... 934.7 x 686.0 x 686.0 mm
* The power rating of the engine indicated in this document is the net power output tested on a production engine for
the engine model and measured in accordance with SAE J1349 at 3600 rpm. Mass production engines may vary
from this value. Actual power output for the engine inst alled in the final machine will vary depending on numerous
factors, including the operating speed of the engine in application, environmental conditions, maintenance, and other
variables.
SPECIFICA TIONS ARE SUBJECT TO CHANGE WITHOUT NOTICE.
7
Page 8
A
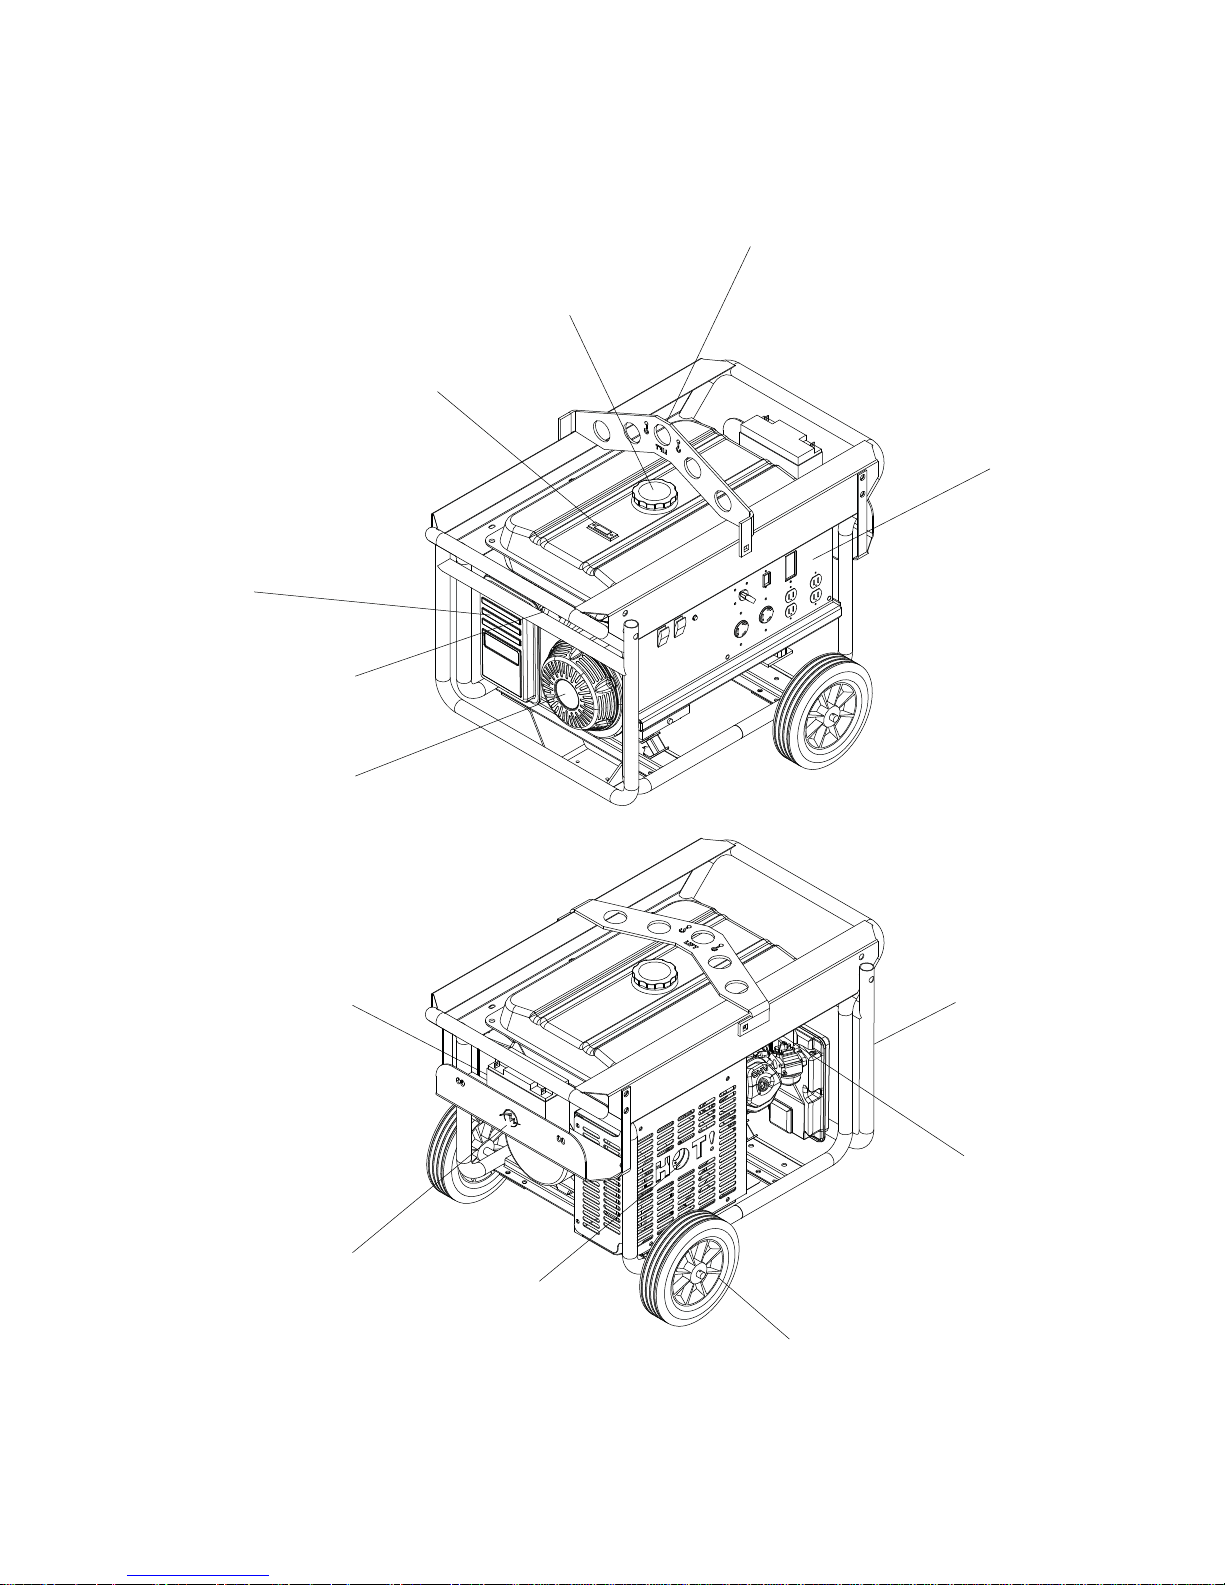
COMPONENT LOCATIONS
FUEL LEVEL
GAUGE
IR FILTER
HOUSING
CENTRAL
LIFTING EYE
FUEL TANK
CAP
CONTROL
PANEL
FUEL SHUT
OFF VALVE
(UNDER TANK)
RECOIL
STARTER
ENGINE
STARTING
BATTERY
HANDLE -
WHEEL KIT
(OPTIONAL)
ENGINE CHOKE
(UNDER TANK)
BATTERY
TRAY
(OPTIONAL)
8
ENGINE
EXHAUST
WHEEL KIT
(OPTIONAL)
Page 9

CONTROL PANEL COMPONENTS
A
B
C
D
GROUND FAULT
SENSING MODULE
P
O
W
E
R
RESET
WARNING
TEST BEFORE EACH USE
SEE INSTRUCTIONS
RESET
E
F
A
U
L
T
MPG 3800
FG H
A. ENGINE START SWITCH: This switch must be in the ON position to start the engine. To stop the engine,
place switch in OFF position.
B. AUTO IDLE SWITCH: When this switch is engaged, the engine speed will return to idle whenever the
generator is not under load.
C. VOL T AGE SWITCH: This switch changes voltage on the L14-30R outlet from 120V to 240V .
D. MAIN CIRCUIT BREAKER: This unit contains a 16A circuit breaker .
E. GFCI TEST MODULE: This module is the ground fault circuit interrupter to protect all electrical outlets.
F. 120/240V TWIST-LOCK CONVENIENCE OUTLET : This L14-30R outlet is used to connect additional loads or
equipment to the generator.
G. 120V TWIST-LOCK CONVENIENCE OUTLET : This L5-30R outlet is used to connect additional loads or
equipment to the generator.
H. 120V DUPLEX CONVENIENCE OUTLETS: These 120V outlets are used to connect additional loads or
equipment to the generator.
9
Page 10

GROUNDING THE GENERATOR
The National Electrical Code (NEC) requires that the
generator be properly connected to an approved ground
source. The ground connection for this unit is located on
the generator support leg.
CONNECTING ELECTRICAL LOADS
Allow the engine to warm-up before connecting any
devices to the unit. Connect the desired 120 or 240 volt
AC, single phase, 60 Hz electrical loads.
GFCI TEST INSTRUCTIONS
NOTICE:
ALWA YS test GFCI outlet s before connecting any loads to the generator .
The device green LED is “ON” and circuit breaker is at “ON” position.
GROUND SOURCE
LOCATION
1. Press the “TEST” button. The green LED should go out and red LED should come on. The circuit breaker
should trigger to the off position.
2. If the LED does not change state, or the breaker does not trip, DO NOT USE! Consult an electrician for
assistance.
3. Press the “RESET” button. The red LED should turn off and green LED should turn on.
4. Manually reset the circuit breaker to the on position to restore circuit power.
PREVENTION OF OVERLOAD
Exceeding wattage capacity can result in damage to the generator and to the connected electrical devices. Adhere
to the following to prevent exceeding wattage capacities:
• Calculate the total wattage of all electrical devices to be connected at one time to the generator.
• The total should NOT be greater than the generator’s wattage capacity .
• The wattage from various devices can be found on the device’s data plate or decal. See the Wattage
Consumption of Equipment section on page 1 1 for a listing of devices and their running watts.
• If you cannot locate the running wattage for a device, multiply volts times ampere rating.
10
Page 11

WATTAGE CONSUMPTION OF EQUIPMENT
DEVICE APPROXIMATE RUNNING WATTS
Air Conditioner (12,000 BTU)** ........................................................................................................................... 1700
Air Conditioner (24,000 BTU)** ........................................................................................................................... 3800
Air Conditioner (40,000 BTU)** ........................................................................................................................... 6000
Battery Charger (20 Amp).....................................................................................................................................500
Belt Sander (3”).................................................................................................................................................. 1000
Chain Saw.......................................................................................................................................................... 1200
Circular Saw (6-1/2”)................................................................................................................................ 800 to 1000
Compressor (1 hp)**........................................................................................................................................... 2000
Compressor (3/4 hp)**........................................................................................................................................ 1800
Compressor (1/2 hp)**........................................................................................................................................ 1400
Disc Sander (9”) ................................................................................................................................................. 1200
Edge Trimmer ......................................................................................................................................................500
Electric Nail Gun................................................................................................................................................ 1200
Electric Range (per element) .............................................................................................................................. 1500
Furnace Fan (3/5 hp)** .........................................................................................................................................875
Garage Door Opener**............................................................................................................................... 500 to 750
Hand Drill .................................................................................................................................................250 to 1 100
Hedge Trimmer..................................................................................................................................................... 450
Impact Wrench.....................................................................................................................................................500
Jet Pump**........................................................................................................................................................... 800
Lawn Mower ....................................................................................................................................................... 1200
Light Bulb.............................................................................................................................................................100
Oil Burner on Furnace ..........................................................................................................................................300
Oil Fired Space Heater (140,000 BTU)..................................................................................................................400
Oil Fired Space Heater (85,000 BTU)....................................................................................................................225
Oil Fired Space Heater (30,000 BTU)....................................................................................................................150
Paint Sprayer , Airless (1/3 hp)** ........................................................................................................................... 600
Paint Sprayer , Airless (handheld).......................................................................................................................... 150
Radio ..........................................................................................................................................................50 to 200
Submersible Pump (1-1/2 hp)** .......................................................................................................................... 2800
Submersible Pump (1 hp)** ................................................................................................................................ 2000
Submersible Pump (1/2 hp)** ............................................................................................................................. 1500
Sump Pump** ......................................................................................................................................... 800 to 1050
T able Saw (10”)**................................................................................................................................... 1750 to 2000
Weed Trimmer ..................................................................................................................................................... 500
**Allow three times the listed watts for starting these devices.
USE OF EXTENSION CORDS
Long extension cords used to connect devices to the generator result in a loss of voltage. The longer the extension
cord, the greater the voltage loss. Refer to the chart on page 12 to help select proper cable size when using extension cords.
Damaged extension cords can cause electrical shock, resulting in serious injury or death.
• DO NOT use split, frayed or worn cords.
• AL WA YS replace damaged cords immediately.
WARNING
11
Page 12

EXTENSION CORD SELECTION CHART
CURRENT
(AMPS)
5
10
15
20
Keep extension cords as short as possible, preferably less than 15 feet long, to prevent voltage drop and possible
overheating of wires. Use only high quality , well-insulated, three-wire, grounded cord sets to connect equipment to
the generator.
LOAD IN
WATTS
600
1200
1800
2400
VOLTS
120
240
120
240
120
240
120
240
MAXIMUM CABLE LENGTH (FT)
#10 #12 #14 #16
225
115
75
57
140
455
70
225
47
151
36
110
285
140
95
70
90
180
45
90
30
60
-
-
60
120
-
-
-
-
-
-
OPERATING THE GENERATOR
Before operating the generator, the engine oil level will need to be checked and gasoline will need to be added to the
unit.
ADDING ENGINE OIL
1. Place the generator on a firm, level surface.
2. Remove the oil fill cap/dipstick. Clean the area
around the oil fill cap and wipe the dipstick
clean.
3. Insert the dipstick in oil filler neck. Do not thread
into filler neck. Remove the dipstick, and check
the oil level.
3. If oil is needed, carefully add oil to the bottom of
the oil filler neck, below the threads. While
filling, stop to check oil level. DO NOT overfill.
4. Insert oil fill cap/dipstick and secure tightly.
5. Check engine oil level before each use of the generator.
UPPER
LIMIT
LOWER
LIMIT
ADDING GASOLINE
1. Remove the gasoline cap.
2. Carefully fill the fuel tank with UNLEADED gasoline. DO NOT use premium gasoline. DO NOT overfill. Allow
approximately 1/2” tank space for fuel expansion.
WARNING
DO NOT fill fuel tank near an open flame, while smoking, or while engine is running. DO NOT fill tank
in an enclosed area with poor ventilation, doing so may result in serious personal injury or death.
3. Tighten gasoline cap after filling the fuel tank.
12
Page 13

STARTING THE ENGINE
WARNING
Never start or stop engine with electrical devices plugged into the receptacles OR with
devices turned on, doing so may result in property damage, serious personal injury, or death.
1. Unplug all electrical loads from the unit’s receptacles before starting the engine.
2. Make sure the generator is on a firm, level surface, away from any overhangs, open windows, vents or doors.
3. Check the fuel and engine oil levels.
4. Turn the main circuit breaker off.
5. Open the fuel shut-off valve.
6. Turn the engine start switch on.
7. If the engine is cold or has not been run recently , locate the choke lever , just above the air cleaner housing on
the left side of the generator . Pull the choke lever toward you to engage.
8. On recoil start engines, grasp the t-handle of the pull rope and pull the rope in a rapid, steady motion to start
the engine. On electric start models, push the engine start push-button located on the control panel to start the
engine.
9. If the choke was used, allow the engine to run with it on for a few moments before pushing the lever back in.
POWERING THE LOADS
CAUTION
Never connect any equipment in need of repair to the generator. DO NOT use extension cords that
are worn, cut or damaged. Doing so may result in property damage or personal injury.
1. Connect any equipment directly to the generator outlets or extension cords. For the 120/240V NEMA L4-30A
outlet, select the proper output voltage for the outlet and the equipment that will be connected to it.
NOTICE
DO NOT connect 240 volt loads to 120 volt receptacles. DO NOT connect 3-phase loads or 50 Hz loads
to the generator, doing so may result in equipment damage and property damage.
2. Switch the main circuit breaker on. The equipment connected to the generator is now ready to use.
3. If the main circuit breaker is overloaded, it will “trip” or switch off. V erify that the loads connected to the
generator are within the generator’s output range. Refer to the unit specifications on page 7 for maximum and
continuous output watts.
4. Reset the breaker by switching it on. If the breaker trips again, reduce the load to the generator and reset the
circuit breaker.
13
Page 14

STOPPING THE ENGINE
1. Shut off all loads and unplug electrical loads from the control panel receptacles.
CAUTION
NEVER start or stop the engine while electrical devices are plugged in and turned on,
doing so may result in property damage or personal injury.
2. Turn the idle control switch off.
3. Switch the main circuit breaker to the off position.
3. Let the unit run for 3-5 minutes with no load to allow stabilization of the internal temperatures of the engine and
generator.
4. Turn the unit off.
5. Close the fuel shut-off valve.
14
Page 15

MAINTENANCE SCHEDULE
The following maintenance schedule should be followed to ensure proper performance of the unit.
ITEM DAILY
Visual walk around inspection
Check engine oil level
Check air filter
Change engine oil
Clean air filter
Check and adjust spark plug
Clean muffler/spark arrester
Replace spark plug
Check and adjust idle speed
Check and adjust valve clearance
Replace air filter
Clean combustion chamber
Clean fuel tank and filter
Check fuel tube
* After initial break-in, change the engine oil and filter. Oil change interval can then be extended to 100 hours.
DAILY MAINTENANCE CHECKS AND TIPS
20
HRS.
*
50
HRS.
Every 500 hours
Every 1 year
Every 2 years
100
HRS.
300
HRS.
WARNING
DO NOT service the generator unless you have the proper tools and are mechanically proficient.
Improper repairs may result in equipment damage or serious personal injury!
• Check the engine oil level daily before starting engine.
• DO NOT start the generator if the oil level is low! The normal operating level for the engine oil is when oil is
present on the crosshatch pattern of the dipstick. Add oil to the engine if it does not st art or if oil is not
present on the dipstick when tested.
• DO NOT overfill the crankcase.
• Consult the engine OPERA TION AND MAINTENANCE MANUAL for the proper grade of oil, including special operating conditions such as a change in season or climate.
• Service the generator more frequently when used in dusty areas.
LIFTING THE GENERATOR
A large central lifting eye is located on the top of the generator and
the eye is connected to the frame of the unit. Attach a sling or hook
directly to the lifting eye only if the devices are in good condition and
the equipment being used to raise the unit has sufficient capacity .
Approximate weights can be found on page 7. Always remain aware
of others around you when moving or lifting the generator .
15
Page 16

UNIT DECALS
2 3 4 5 1 2 3
1
G
ON
ENGINE SWITCH
OFF
CHECK FUEL
ON
ON
MAIN
MAIN
TURN FUEL
BREAKER
CHECK OIL
BREAKER
ON
WARNING
ADVERTENCIA
AVERTISSEMENT
ON
OFF
ON
MAIN
ENGINE
TURN FUEL
BREAKER
SWITCH
OFF
OFF
OFF
OFF
PN: 26298
Decal, Patent Pending
GFCI TESTING INSTRUCTIONS TEST BEFORE EACH USE!
GROUND FAULT
SENSING MODULE
Normal operating state - sensing device green led is “on”
and circuit breaker is at “on” position.
Step 1: press “test” button. Green led should go “out” and
red led should come “on” and circuit breaker should trigger
P
F
to “off” position.
O
A
W
U
E
L
Step 2: if sensing device led or breaker does not trip or
R
T
change state, “do not use”. Consult an electrician for
assistance.
RESET
RESET
Step 3: press “reset” button. Red led should turn “off” and
green led should turn “on”.
WARNING
TEST BEFORE EACH USE
Step 4: manually reset (switch) circuit breaker to “on”
SEE INSTRUCTIONS
position to restore circuit power.
OFF
GFCI QUE PRUEBA INSTRUCTIONSTEST
ANTES DE QUE CADA ESTADO DE FUNCIONAMIENTO DE USE!
Normal - el dispositivo de detección led verde es "on" y el
interruptor está en "on" position.
Step 1: presione el botón de la "prueba". El led verde debe ir
"fuera de" y el led rojo debe venir "on" y el interruptor debe
accionar a "off" position.
Step 2: si el dispositivo de detección led o el triturador no
dispara ni cambia el estado, "no utilice". Consulte a electricista
para assistance.
Step 3: presione el botón del "reset". El led rojo debe dar vuelta
a "off" y el led verde debe dar vuelta a "on".
Step 4: reajuste manualmente el interruptor (del interruptor) a la
posición de "on" para restaurar energía del circuito.
GFCI EXAMINANT INSTRUCTIONS
TEST AVANT QUE CHAQUE ÉTAT DE FONCTIONNEMENT D'USE!
Normal - le dispositif de sensation led verte est "on" et le
disjoncteur est à "on" position.
Step 1 : appuyez sur le bouton d'"essai". La led verte devrait
aller "hors de" et la led rouge devrait venir "on" et le disjoncteur
devrait déclencher à "off" position.
Step 2 : si le dispositif de sensation led ou le briseur ne se
déclenche pas ou ne change pas l'état, "n'employez pas".
Consultez un électricien pour assistance.
Step 3 : appuyez sur le bouton de "reset". La led rouge devrait
tourner "off" et la led verte devrait tourner "on".
Step 4 : remettez à zéro manuellement le disjoncteur (de
commutateur) dans la position de "on" pour reconstituer la
puissance de circuit.
PN: 26560
Magnum Red Stripe - PG
MPG 3800
PN: 26334
Decal, control panel MPG3800
MPG 3800C
PN: 27084
Decal, control panel MPG3800C
WARNING
ADVERTENCIA
AVERTISSEMENT
PN: 26298
Decal, Patent Pending
Use only in well ventilated area!
Do not use in any enclosed space or near open
doors, windows or ducting. Fumes can cause
death!
¡Cutilice solamente en área bien ventilada!
o utilice en ningún espacio incluido ni cerque a las
puertas abiertas, a windows al ducting.
¡Clos humos pueden causar muerte!
Employez seulement dans le secteur bien aéré!
N'employez dans aucun espace inclus ou ne vous
approchez pas des portes ouvertes, du windows
ou de la canalisation. Les vapeurs peuvent causer
la mort!
Improper connection of generator to a building’s electrical system can allow electrical current from the generator to
backfeed into utility lines. This may result in electrocution of utility workers, fire or explosion. Connections to a
building’s electrical system must be made by a qualified electrician and comply with all applicable laws and
electrical codes.
La conexion incorrecta de un generador al sistema electrico de un edificio puede conducir a un retorno de la
corriente electrica desde el generador al sistema de distribuicion electrico publico. Esto puede conducir a la
electrocucion de los obreros del servicio publico, incendios o explosiones. Solo un tecnico electricista
capacitadopodra efectuar la conexion al sistema electrico del edificio. La conexion electrica a debera cumplir con
las leyes y codigos electricos pertinentes.
Le branchement non conforme du generateur au reseau de distribution electrique d’un immeuble peut provoquer la
reinjection du courant electrique du generateur dans les lignes du reseau public. Ceci peut provoquer une
electrocution des employes du service public, un incendie ou une explosion. Les branchements au reseau
electrique. Immeuble doivent etre effectues par un electricien qualifie et doivent etre conformes a toutes les lois ou
tous les codes electriques applicables.
WARNING
ADVERTENCIA
AVERTISSEMENT
PULL TO
CHOKE
ENGINE
G
Note: All safety and operating decals shown above are located on decal sheet 26332, unless otherwise noted.
16
Page 17

CONTROL PANEL ASSEMBLY
17
1
TO
FRAME
16
13
9
8
7
20
6
15
12
5
20
18
9
14
11
4
19
11
3
10
18
2
ITEM NO. PART NO. QTY DESCRIPTION
1 26213 1 Panel, control - rear housing
2 24986R 1 Panel, control
3 65888 2 Receptacle, 120V/20A duplex-black
4 65878 1 Module, auto idle
5 65487 1 Receptacle, 120V/30A twist (L5-30R)
6 65488 1 Receptacle, 240V/30A twist (L14-30R)
7 65886 1 Module, GFI sensing
8 65941 1 Breaker, 16A, 240V
9 26233 1 Switch, 120V/240V
10 60398 4 Screw, 10-32X.500 pan phil 316 SS
11 60181 4 Screw, M3-0.50X5 pan phil
12 60091 4 Screw, M4-0.70X12 pan phil G4.8
13 60051 4 Nut, M4-.70 nylock G8.8
14 65874 1 Switch, rocker - idle select
15 65873 1 Switch, rocker - on/off
16 19211 1 Tether, cable - 10.50 long
17 60161 7 Nut, .250-20 sflg G5
18 60046 5 Screw, 6-32X.750 pan phil G2
19 60290 5 Nut, 6-32 nylk 18-8 SS
20 60061 4 Nut, 10-32 nylk G5
17
Page 18

FRAME AND FUEL TANK ASSEMBLY
27
19
26
37
17
16
20
15
18
13
21
19
28
29
10
20
22
12
1
23
24
2
22
19
28
6
3
4
5
6
7
6
8
29
33
14
30
27
13
34
36
35
25
11
10
9
31
8
32
27
13
18
Page 19

ITEM NO. PART NO. QTY DESCRIPTION
1 26123 1 Valve, fuel tank
2 26122 1 Gauge, fuel tank
3 28495 1 Cap, fuel tank
4 28494 1 Tank, fuel
5 60393 4 Screw, .250-20X1.000 hx hd
6 60243 9 Washer, flat .250 USS
7 24916B 1 Weldment, frame
8 60144 6 Nut, .250-20 nylock
9 60690 2 Screw, .375-16X1.000 hx hd SS
10 60698 4 Washer, flat .375 SS
11 61120 2 Spacer, shoulder-.375 ID .500 OD .750 SH
12 61088 2 Washer, .500 nylon .750/.062
13 60358 18 Nut, .375-16 nylock
14 26115 1 Assembly, control panel
15 60028 2 Screw, .312-18X1.000 hx hd
16 60271 2 Washer, split lock .312
17 60119 2 Washer, flat .312
18 61142 2 Screw, .500-13X1.500 carriage square
19 60309 6 Washer, flat .500 SAE
20 61152 4 Washer, .500 flat .03TH nylon
21 24920B 1 Bracket, lift eye
22 60307 4 Nut, .500-13 nylock
23 61147 2 Nut, .312-18 U-clip G5 ZY long type
24 60168 1 Screw, .312-18X.750 hx hd G5
25 60095 1 Nut, .312-18 ser flg G5 case hardened
- 50380 .521 ft. Hose, fuel - .250 ID MPG carb certified (not shown)
- 14216 2 Clamp, hose - SAE (.21-.62) miniature (not shown)
OPTIONAL FEATURES:
26 26088B 1 Weldment, lifting handle
27 60328 2 Screw, .500-13X2.500 hx hd G5
28 60205 16 Screw, .375-16X1.000 hx hd G5
29 60386 32 Washer, flat .375
30 26085B 1 Bracket, leg - wheel kit
31 26084B 1 Weldment, bracket - wheel kit
32 60321 2 Pin, cotter - .156X1.75
33 24998 2 Wheel, 10 in.
34 60696 2 Washer, .250 flat .625/.050 SS
35 26274 2 Isolator, rubber
36 61025 2 Screw, .250-20X1.500 hx hd SS
37 26271 2 Fitting, plug-1.000 tapered polyethylene
19
Page 20

ENGINE AND GENERATOR ASSEMBLY
36
35
34
33
32
31
39
37
28
18
TO
FRAME
19
33
MUFFLER
18
18
29
TO
27
25
6
17
19
24
38
39
30
17
3
26
TO
FRAME
20
22
23
17
18
21
24
40
19
8
1
2
2
1
3
4
5
9
2
7
1
10
TO
FRAME
2
3
11
12
14
13
15
16
20
Page 21

ITEM NO. PART NO. QTY DESCRIPTION
1 60028 8 Screw, .312-18X1.000 hx hd
2 60271 10 Washer, split lock .312
3 61147 8 Nut, .312-18 U-clip G5 ZY long type
4 24922R 1 Muffler guard front
5 24954 1 Muffler
6 60119 2 Washer, .312 flat .875/.070
7 60080 2 Nut, M20-2.50 hex G10.9
8 60358 2 Nut, .375-16 nylock G5
9 26114BH 1 Bracket, muffler
10 60168 2 Screw, .312-18X.750 hx hd
11 61131 4 Screw, M6 X 120
12 26416 1 Cover, rear - gen end
13 26463 1 Coupler assembly
14 26417 1 Brush holder assembly, generator
15 26418 1 Diode assembly
16 26419 1 Voltage regulator assembly
17 60140 4 Nut, .375-16 hx
18 60206 8 Washer, split lock .375
19 60386 6 Washer, flat .375
20 15241 1 Compression mount
21 60309 1 Washer, flat .500 SAE
22 60276 1 Washer, split lock .500
23 60275 1 Screw, .500-13X1.000 hx hd
24 60478 2 Screw, .375-16X2.000 hx hd G5
25 24923B 1 Bracket, mount
26 60205 2 Screw, .375-16X1.000 hx hd
27 - Terminal, ground
28 12927 1 Nut, .375-16 wing 316 SS
29 60352 4 Screw, .375-16X1.250 hx hd
30 28492 1 Generator (MPG3800)
27083 1 Generator (MPG3800C)
31 26411 1 Housing, front
32 60972 2 Screw, .312-18X1.500 hx hd
33 60020 6 Nut, M8 ser flg lock
34 28483 2 Isolator, engine
35 60095 2 Nut, .312-18 ser flg
36 28482 1 Engine, 8 hp
37 24956BH 1 Weldment, muffler pipe
38 24921B 1 Weldment, muffler guard rear
39 24988 2 Honda, gasket - exhaust GX240-390
40 61134 1 Screw, rotor 170mm
- 26601 1 Honda, air cleaner element ( not shown)
- 26602 1 Honda, air cleaner seal (not shown)
- 26603 1 Honda, solenoid valve assembly (not shown)
- 26604 1 Honda, carb gasket set (not shown)
- 26605 1 Honda, spark plug (not shown)
- 26606 1 Honda, starter return spring (not shown)
- 26607 1 Honda, recoil starter rope (not shown)
21
Page 22

AC WIRING DIAGRAM
GRN/YEL
BLU
GRN
PRINT
SEE DC
RD/WT
BLK
WHT/BLK
RED
WHT
BLK
BLU
WIRES MUST BE TWISTED
TOGETHER GOING THRU CT
BLU
BLU
BLK
BLK
RED
RED
WHT
WHT
WHT
BLK
YEL
1
(Y)
2
(R)
3
(B)
4
(G)
WHT
WHT
W
120
RECP #2
120
RECP #1
X
RED
WHT
W
X
X
X
120
TWIST
TWIST
120/240
Y
BLK
W
X
RED
BLK
WHT
W
G
BLK
RED
WHT
WHT
WHT
RED
Y
G
GRN/YEL
BLK
BLK
BLK
LINE
LOAD
COM
N/O
13
ORN
YEL
RED
24
BLK
BLK
BLK
RED
2,6,10,14
120 ONLY
BLK
WHT
BLU
BLK
8
4
3
7
2
6
BLK
BLU
BLU
3,7,11,15
COMMONS
BLK
12
11
10
16
15
14
120/240
4,8,12,16
RD/WT
GRN
BLU
22
Page 23

DC WIRING DIAGRAM
STARTER
+ -
GENERATOR
OIL ALERT
CHARGE COIL
UNIT
WHT/BLK
BLK
RECTIFIER
ORN
BLU
RED
GRN
START SWITCH
IDLE/RUN MODULE
OIL LEVEL SWITCH
COIL
SHUTDOWN
SOLENOID
IDLE/RUN
SOLENOID
GRY
ORN
RED
GRN
GRY
BLK
1
2
IDLE/RUN SWITCH
WHT/BLK
3
4
1
2
ON/OFF SWITCH
23
Page 24

REV: B
P ART NO: 26126
02.04.09
 Loading...