

Magnum MI-77100 Operating Manual

MODEL NO.:
MI-77100
OPERATING MANUAL
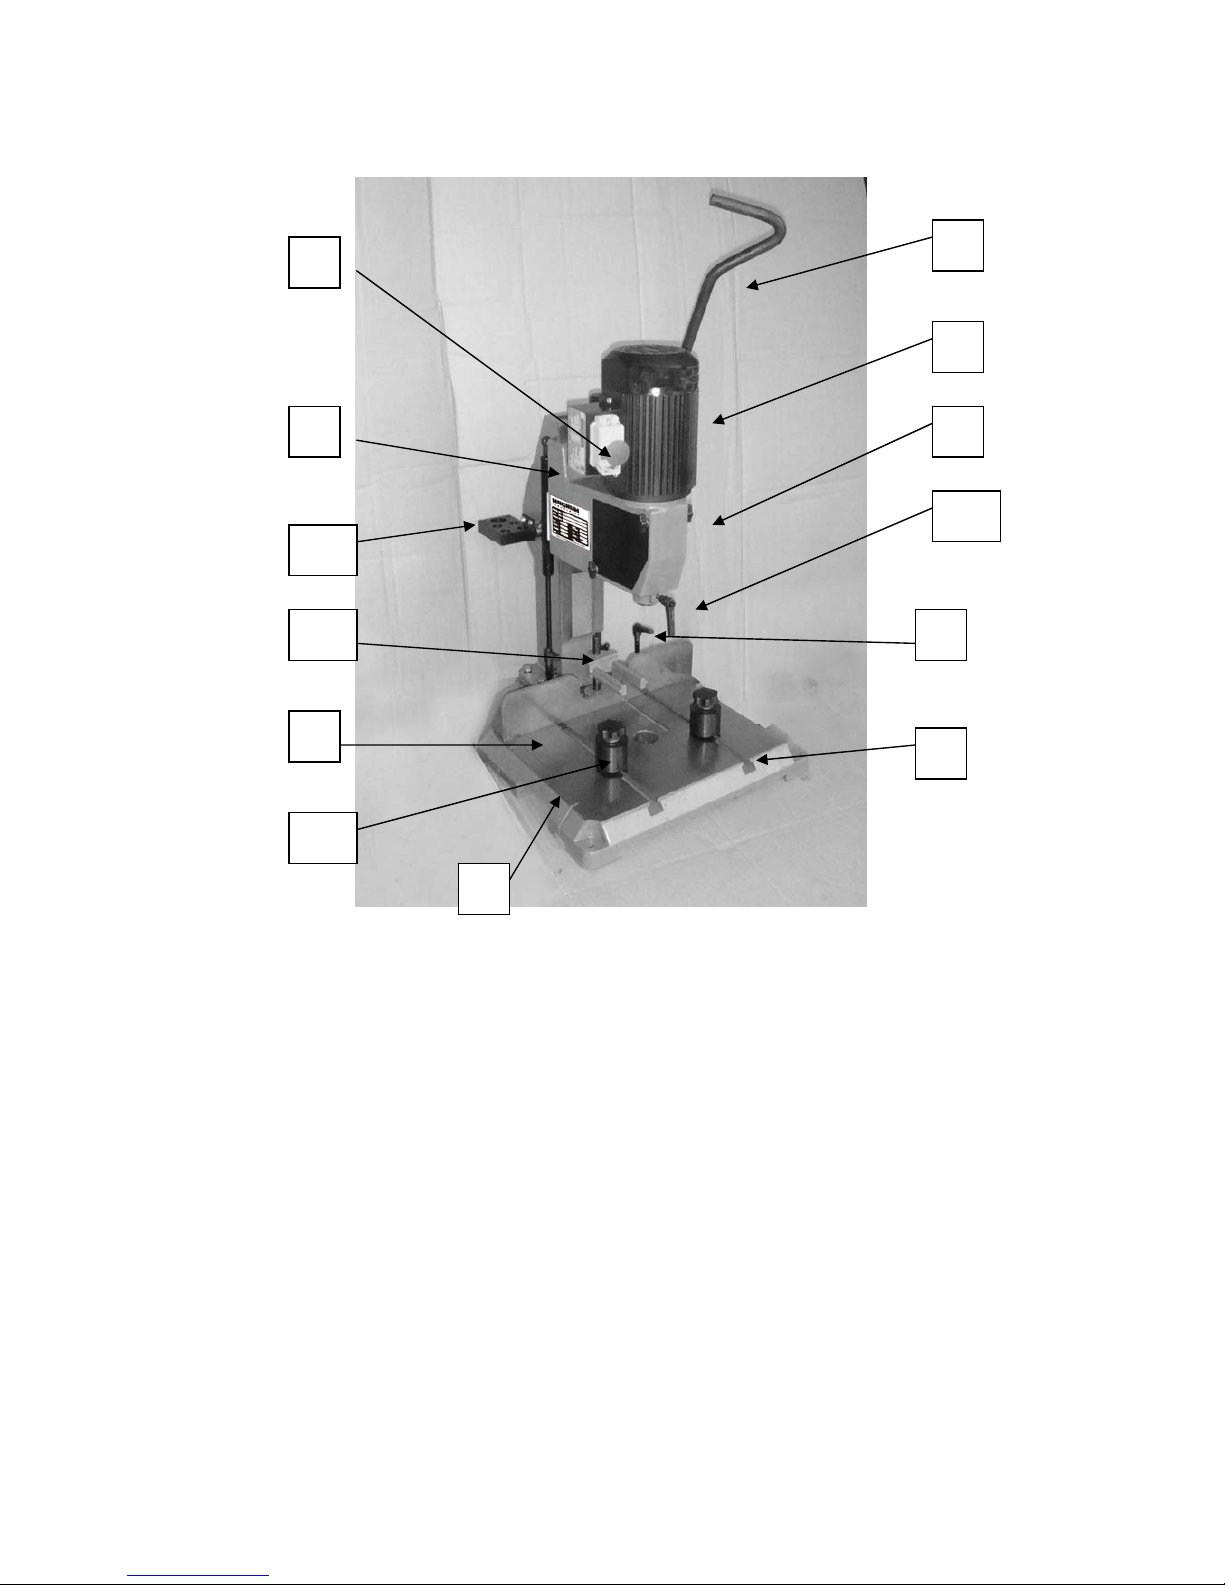
IDENTIFICATION OF MAIN PARTS AND COMPONENTS
1. DOWNFEED HANDLE
2. MOTOR
3. ON/OFF SWITCH
4. GAS HEAD-CYLINDER
5. EXTENSION WING
6. FENCE
7. BASE
8. FENCE LOCKING LEVERS
9. HEAD
10. WORKPIECE HOLD-DOWN
11. TABLE ROLLER
12. CHISEL LOCKING LEVER
13. CHUCK KEY AND CHISEL HOLDER
1
2
3
4
6
7
8
12
13
11
5
9
10
BASIC FUNCTIONS
This hollow chisel mortiser is designed to cut 90° in solid wood as well as other wood based stock.
The mortiser is designed to tackle a wide range of mortising applications suited to both hobbyist
and professional users. Ideal for use in any furniture making or cabinet making applications that
require mortise and tenon joinery, the unit is supplied with a set of 4 different sized chisel and bits
to help the user cut mortises of varying widths to suit the application.
The unit is also supplied with 2 different sized chisel bushings, allowing the user to install chisel
and bit sets of either 5/8" (4 supplied) or 3/4" (commonly available from other after-market sources)
shank diameter. This mortiser is designed to acommodate chisel and bit set sizes ranging from a
minimum of 1/4" up to a maximum of 5/8".
UNPACKING
Carefully unpack and remove the mortiser and its components from the box and check for
damaged or missing items as per the list of contents below.
NOTE: Please report any damaged or missing items to your distributor immediately.
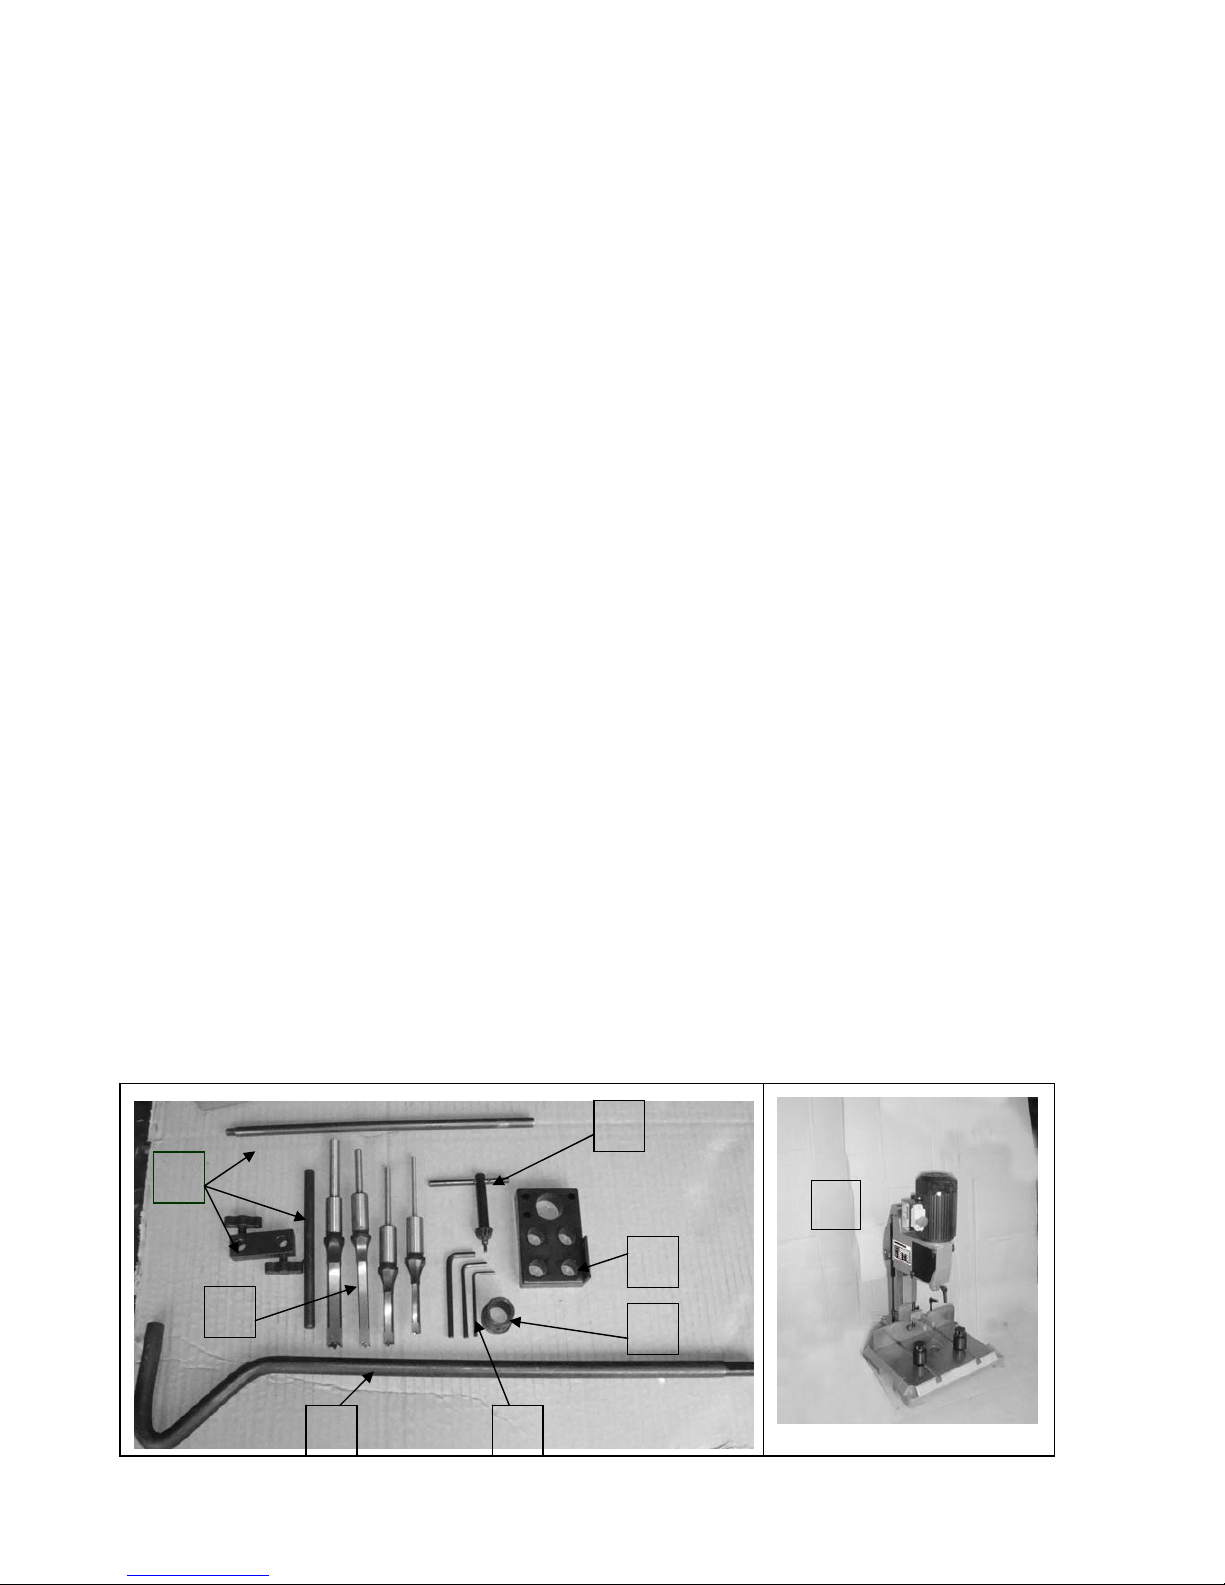
LIST OF CONTENTS QTY
A MORTISER.......................................................................1
B WORKPIECE STOP..........................................................1
C 3/4” SHANK BUSHING ADAPTER...................................1
D CHUCK KEY......................................................................1
E 3 ,4,5MM ALLEN KEY .......................................................1
F CHISEL HOLDER ..............................................................1
G HANDLE .....................................................................1
H 1/4” CHISEL AND BIT........................................................1
5/16” CHISEL AND BIT....................................................1
3/8” CHISEL AND BIT......................................................1
1/2” CHISEL AND BIT......................................................1
A
B
C
D
E
F
G
F
ASSEMBLY INSTRUCTIONS
For your convenience this mortiser is shipped from the factory partially assembled and requires
only minimal assembly and set up before being put into service.
ATTACH THE WORKPIECE STOP
The workpiece stop can be installed on the mortiser to suit
your needs or personal work preferences.
1. Thread the workpiece stop (A) into the threaded hole in
the fence.
2. Secure it on the fence.
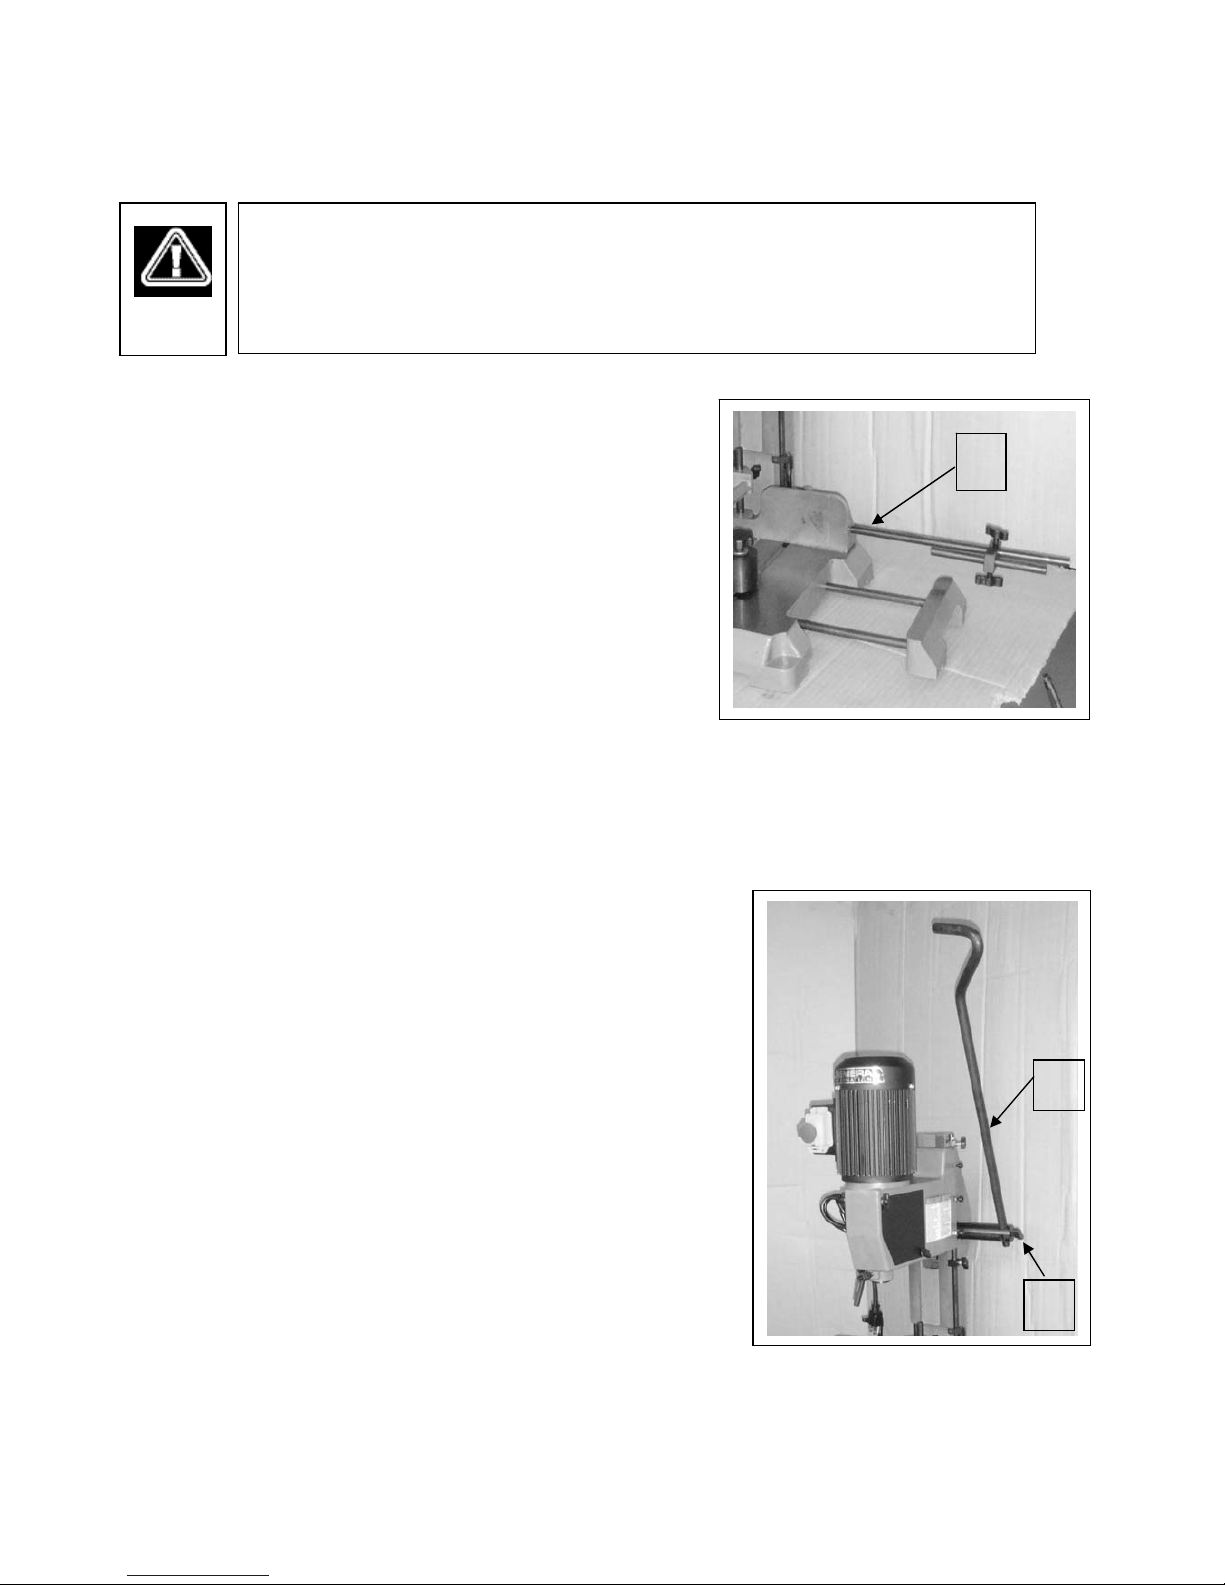
INSTALL THE DOWN FEED HANDLE
The four holes in the down feed shaft allow you to
reposition the handle in the holes for better comfort
and convenience.
1. Loosen the lock knob (A).
2. Remove the handle (B) and reposition it as needed,
choosing the hole that provides the most comfortable
handle angle.
3. Re-tighten the lock knob(A) to secure the down feed
handle in position
SERIOUS PERSONAL INJURY COULD OCCUR IF YOU CONNECT THE
MACHINE TO THE POWER SOURCE BEFORE YOU HAVE COMPLETED
THE ASSEMBLY STEPS. DO NOT CONNECT THE MACHINE TO THE
POWER SOURCE UNTIL INSTRUCTED TO DO SO.
A
B
A

INSTALL A CHISEL AND BIT SET
This unit is supplied with a set of four different sized chisel and bits to help the user cut
mortises of varying widths to suit the application.
1. Select the appropriate size of chisel and bit.
The unit is also supplied with 2 different sizes chisel support bushing adapters allowing the user to
install chisel and bit sets of either 5/8" or 3/4" shank diameter, to accommodate bit sizes (some of
which are available as optional accessories) ranging from a minimum of 1/4" up to a maximum of
5/8”:
NOTE: The 5/8” shank diameter bushing is already installed at the factory.
2. Select the appropriate bushing, if not already installed, unscrew and remove the locking lever
then slip the bushing into the quill assembly as shown (A, B).
3. Loosen either of the two lock knobs on the chuck cover (C) and slide the corresponding slide
plate out of the way.
4. Insert the supplied chuck key (E) and turn counterclockwise to open the chuck jaws and allow a
drill bit to fit in.
5. With a piece of plastic, carboard or wood held between the tip of the bit and your finger (E),
install the chisel and bit with the chip clearing slot facing either left or right and tighten the bit in the
chuck so that the tip of the bit juts out approximately 1/16" to 3/16" (2 mm to 5 mm) from the tip of
the chisel.
6. While still holding the chisel in place, tighten the locking lever to secure the chisel in the bushing
(F).
TURN OFF AND UNPLUG THE MORTISER FROM THE POWER
SOURCE BEFORE PERFORMING ANY MAINTENANCE,
ADJUSTMENTS OR BIT CHANGES.
CHISEL AND BIT TIPS ARE VERY SHARP – HANDLE WITH CARE.
TO AVOID PERSONAL INJURY USE A PIECE OF CARDBOARD,
PLASTIC OR OTHER MATERIAL BETWEEN YOUR FINGER AND
THE TIP OF THE BIT WHENEVER HOLDING OR HANDLING THE
CHISEL AND BIT BY THE TIP.
A B C
 Loading...