

Magnum MI-76150, MI-76100 Operating Manual
OPERATING MANUAL
MODEL NO.:
MI-76100 MI-76150

RULES for SAFE OPERATION
MAGNUM INDUSTRIAL MI-76100 and MI 76150 DRILL PRESSES
To help ensure safe operation, please take a moment to learn the how to operate the machine and understand its
applications and limitations, as well as potential hazards. KMS Tools and Equipment disclaims any real or implied warranty
and holds itself harmless for any injury that may result from the improper use of its equipment.
• Do not operate the drill press when tired, distracted or
under the eects of drugs, alcohol or any medication that
impairs reexes or alertness.
• Ensure your working area well lit, clean and free of debris.
• Keep children and visitors at a safe distance when the drill
press is operating. Do not permit them to operate the drill
press.
• Prevent unauthorized or unsupervised use by child
proong and tamper proong your shop and all machinery
with locks, master electrical switches and switch keys.
• Stay alert! Give your work your undivided attention. Even a
momentary distraction can lead to serious injury.
• Fine particulate dust is a carcinogen that can be hazardous
to health. Work in a well-ventilated area and whenever
possible use a dust collector. Wear face, eye, ear,
respiratory and body protection devices.
• Do not wear loose clothing, gloves, bracelets, necklaces or
other jewelry while the drill press is in operation.
• Remove adjusting wrenches, tools and other clutter
from the machine and the table surface before using the
machine.
• Keep hands well away from the bit, chuck and all moving
parts. Use a brush, not hands, to clear away chips and
dust.
• Always use a clean, sharp drill bit. Dirty or dull bits are
unsafe and can lead to accidents.
• Ensure that the key and adjusting wrenches have been
removed before turning power on.
• Use suitable workpiece support if the workpiece does not
have a at surface.
• Hold material rmly against the table.
• Do not work on long stock without adequate support on
the either side of the table.
• Do not force the drill press. e drill press will perform
better and more safely when working at the rate for which
it was designed.
• Avoid working from awkward or o balance positions. Do
not overreach and keep both feet on oor.
• Keep guards in place and in working order. If a guard must
be removed for maintenance or cleaning, properly reattach it before using the tool again.
• Never leave the machine unattended while it is running or
with the power on.
• Never stand on machinery. Serious injury could result if the
tool is tipped over or if the cutting tool is unintentionally
contacted.
• Always disconnect the machine from the power source
before servicing or changing accessories such as blades, or
before performing any maintenance or cleaning, or if the
machine will be le unattended.
• Ensure the switch is in the OFF position before plugging in
the power cord.
• Make sure the tool is properly grounded. If equipped with
a three-prong plug it should be used with a three-pole
receptacle. Never remove the third prong.
• Do not use this drill press for other than its intended use.
If used for other purposes, KMS Tools and Equipment
disclaims any real or implied warranty and holds itself
harmless for any injury that may result from that use.
1

ASSEMBLY INSTRUCTIONS
MAGNUM INDUSTRIAL MI-76100 & MI-76150 DRILL PRESSES
• Before you assemble your drill press, review the parts breakdown and keep it ready for reference.
• Start by removing the parts from the packaging.
• Carefully check the packaging for small pieces before you continue.
• Lay out the parts on a large, clear and unobstructed area and ensure that all parts are accounted for.
• If you have any questions or require further information, please contact the KMS Tools Service Department at 604.395.4134
or email repairs@kmstools.com
ASSEMBLING THE DRILL PRESS
1. Bolt the BASE FLANGE (4) and COLUMN (19) to the BASE (1).
2. Carefully remove the RACK COLLAR (21) from the COLUMN (19). Apply even pressure and gently slide the COLLAR. Using
too much force can cause the COLLAR to bind. If it is tight, try gently tapping the COLLAR.
3. Ensure that the WORM GEAR (10) and HELICAL GEAR (9) are installed in the TABLE BRACKET (7) and have not fallen out
during unpacking.
4. Place the RACK (18) into the TABLE BRACKET (7). e tapered end of the RACK faces upward and the square end faces
downward.
5. Lower the RACK (18) and the TABLE BRACKET (7) onto the COLUMN (19). Take care to hold the two pieces together. is
may require two people.
6. Fit the bottom lip of the RACK (18) in the friction ring on the BASE FLANGE (4). Secure the top of the rack by installing the
RACK COLLAR (21). Tighten the SET SCREW (20) in the RACK COLLAR (21). Take care not to over tighten.
7. Slide the CRANK SLEEVE HANDLE (6) on the WORM GEAR (10) and secure it with the SET SCREW (5).
8. Lower the HEAD (26) to the COLUMN (19) and secure the HEAD (26) by tightening two SET SCREWS (26-1). is may
require two people.
9. Secure the TABLE (17) onto the TABLE ARM (12).
10. Attach a HANDLE KNOB (23) to each of the three FEED HANDLES (22). en secure the HANDLES (22) to the PINION
SHAFT (24).
11. read a light bulb (maximum 40 watts) into the LAMP HOLDER (32). (Light bulb sold separately.)
12. Remove the protective coating from all surfaces using a rag dipped in environmentally safe degreaser
INSTALLING THE CHUCK
1. Degrease all pieces. Slide the ARBOR (53) into the SPINDLE (51), at end up.
2. Slide the CHUCK (54) over the tapered end of the ARBOR (53) and, using a wooden mallet, give the CHUCK a good tap. e
taper is designed to hold the CHUCK securely in place.
2
OPERATING INSTRUCTIONS
FOR MI-76100 and MI 76150 DRILL PRESSES
DRILLING
• Always secure workpiece with hold-downs or clamps.
• Never hold the workpiece only by hand.
• Use clean, sharp bits. Using a damaged or broken bit could result in serious injury.
• When drilling a at workpiece, place it on a wooden base and clamp it to the table.
• Use machine spur bits for drilling wood. Do not use hand bits with screw tips. At drill
press speeds, these bits rotate into the workpiece so rapidly that they can spin and li
the workpiece o the table.
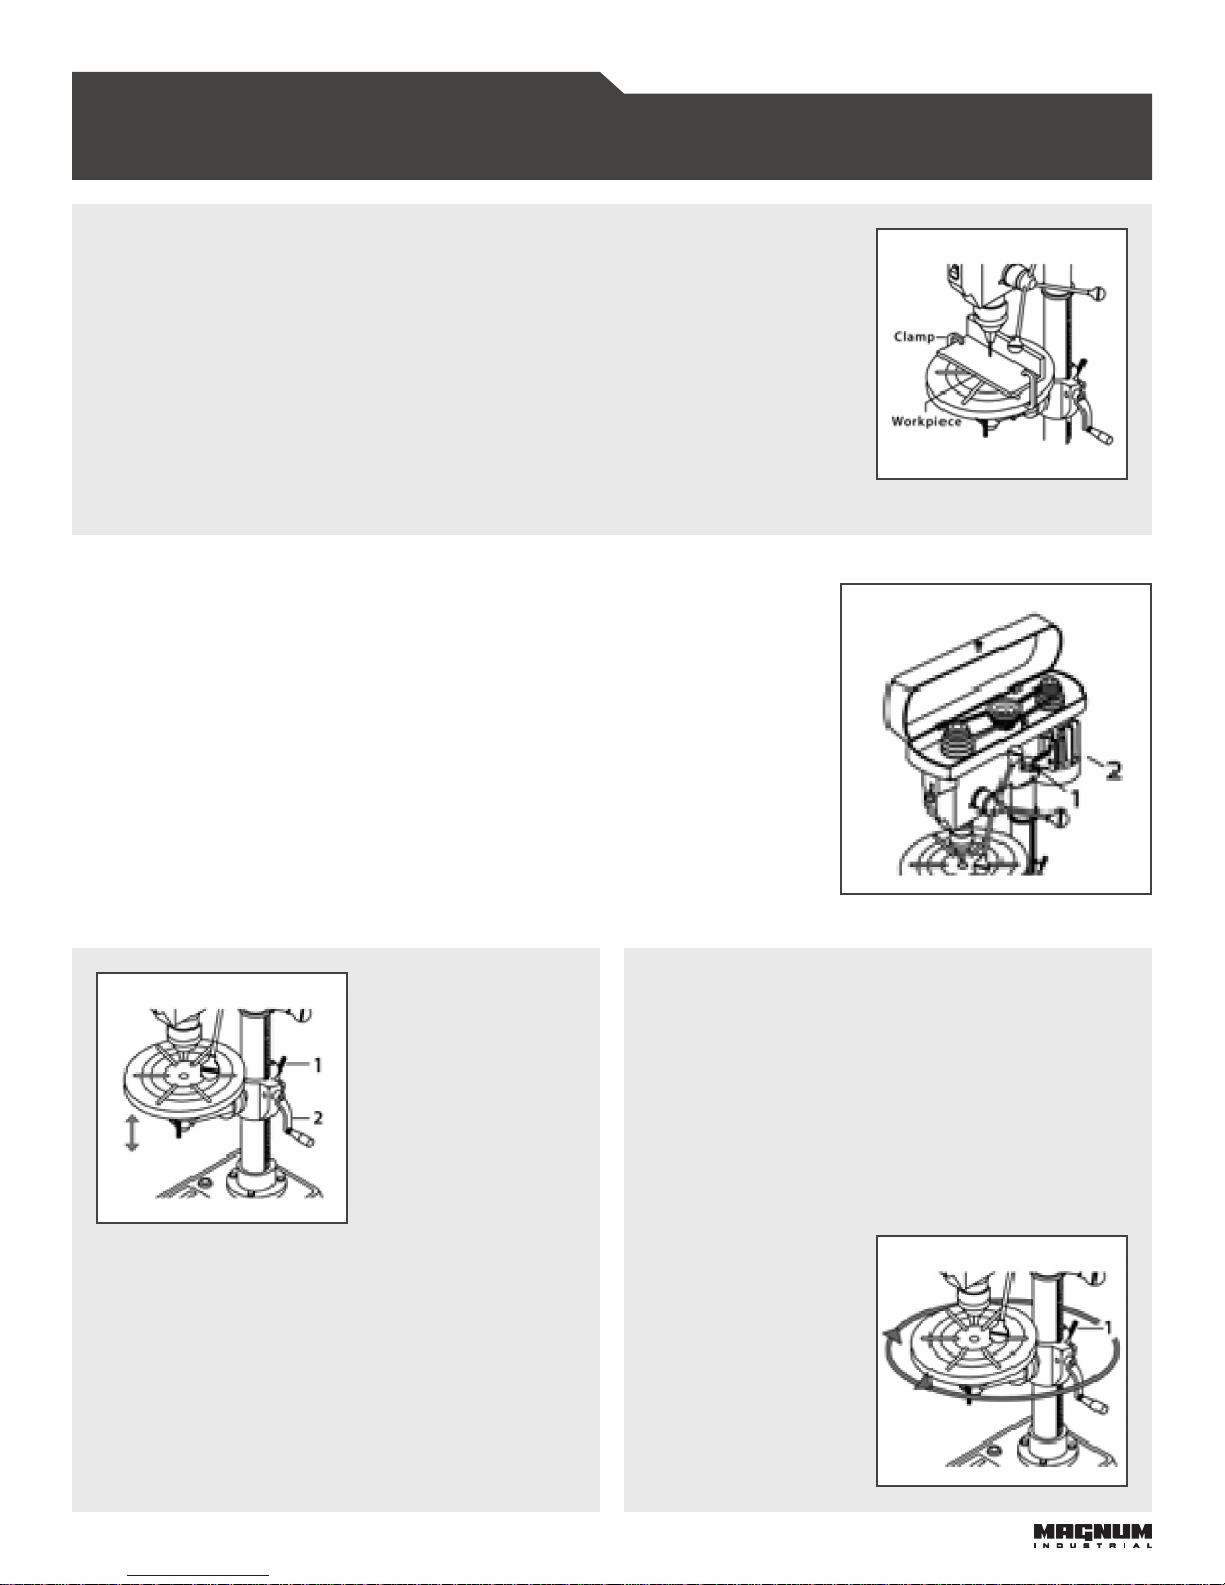
CHANGING SPEEDS
Make sure the drill press has come to a complete stop before changing speeds. Refer to
the spindle speed selection chart located on the inside of the spindle cover.
1. Disconnect the drill press from the power source.
2. Loosen the slide bar bolt (1) located on the right side of the head.
3. Pull the motor (2) in towards the head to loosen the belts.
4. Relocate belts to the desired pulleys to select a new spindle speed.
5. Push the MOTOR (2) back, away from the head.
6. Retighten the SLIDE BAR BOLT (1) and check the belt tension.
TABLE SWING ADJUSTMENT
1. Loosen COLUMN LOCK HANDLE (1).
2. Swing the table arm bracket and the table to the
3. Retighten COLUMN LOCK HANDLE (1).
When working with taller work pieces, swing the table
out of the way and use
ADJUSTING THE TABLE HEIGHT
1. Loosen the COLUMN LOCK HANDLE (1).
the drill press base as a
table.
desired position.
2. Turn the CRANK HANDLE (2) until the table is at the
desired height.
3. Retighten the COLUMN LOCK HANDLE (1) to secure
the table in position.
3
 Loading...