

Page 1
Page 2

Page 3
Dear customer!
We congratulate you on purchasing home appliance of “MAGNIT” trademark. We
are sure that this unit will correspond to the highest requests for the quality and will
become the real reliable support in your home cares. Before starting using this
appliance, please carefully read the instruction manual and follow the rules of using.
In this case the trademark “MAGNIT” will assure the long life of the equipment you
have bought.
Thank you for choosing us!
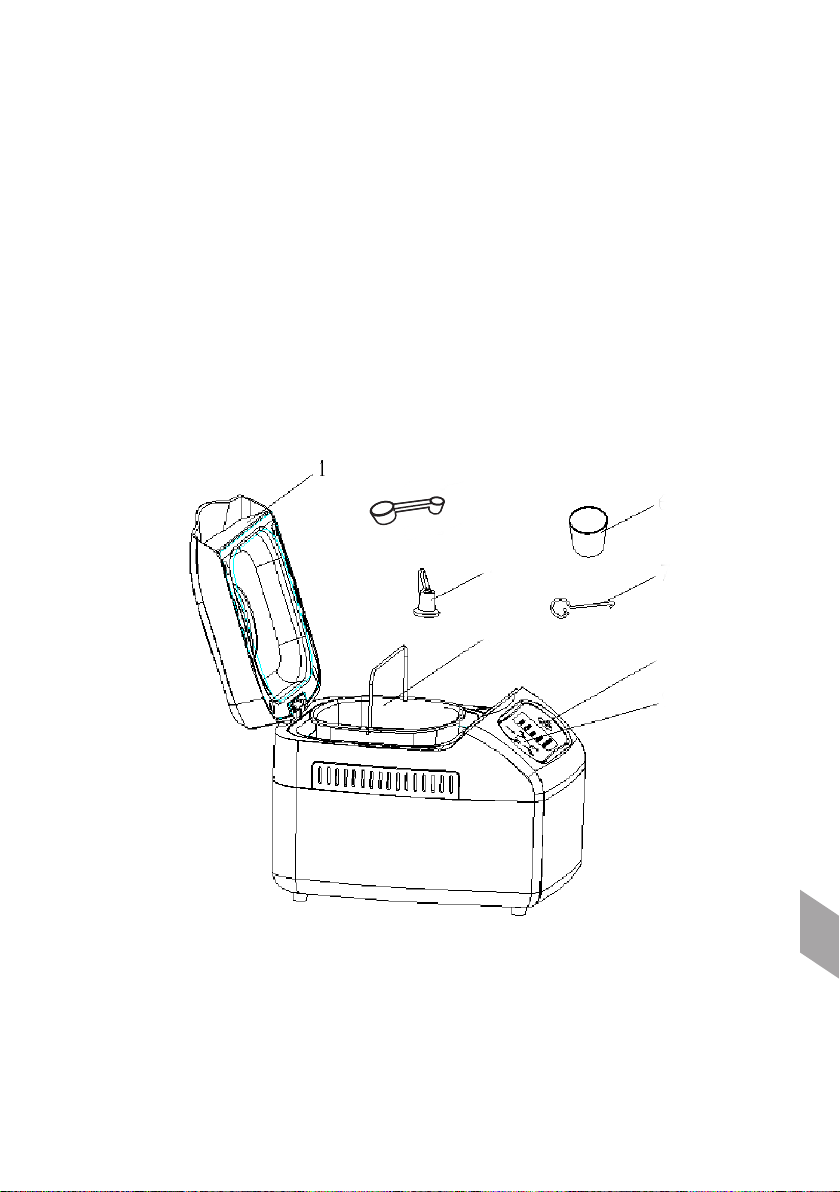
DESCRIPTION
2.
3.
4.
1. Lid system
2. Мeasuring spoon
3. Kneading arm
4. Inner barrel
5. Measuring cup
6. Hook
7. Control panel (coved with transparent PP paper,
You can tear off when using)
5.
6.
7.
7.
EN
3
Page 4

Notice:
1. Before you use it, please read this manual in detail.
2. This bread maker is for home use, not for commercial use.
3, When roasting for the first time, it's normal that some smoke fume from
radiator tube
4. After use or when cleaning and installing parts, you should pull out the plug.
5. It can't be used outdoors or in wet place.
6. This bread maker (not including inner barrel and blending vane), power
wire and plug can't be dipped into water or other liquid.
7. You should not put it in the place which is near water heater, electric stove
or other heating source.
8. Don't let children operate the product, and place it out of children's reach.
9. Leave enough room around the bread maker, at least a distance of 11cm.
10. Before operation, please make sure the inner barrel is installed correctly;
don't put stone and other hard or flammable substance into the inner
barrel.
11. After the plug is plugged to the socket, don't use brush that with tinsel to
swab or clean the bread maker.
12. When it is operating, don't open the cover or put your hand into the inner
barrel.
13. If the power wire is damaged please send it to professional repairer, don't
change wire personally to avoid
electric shock.
14. When it is operating, don't touch other surface of the cover except the
control panel buttons.
15.This appliance is not intended for use by person(including children) with
reduced physical,sensory or mental capabilities,or lack of experience
and knowledge,Unless they have been give supervision or instruction
concerning use of the appliance,by a person responsible for their safety.
Children should be supervised to ensure that they do not play with the
appliance
16. This appliance cann't be worked by an external timer or the individual
remote control.
EN
4
Page 5

Ingredients
Ingredients are the most important step in making bread. By choosing proper
ingredients, you can make top grade bread, in order to save time; we have
summarized some valuable experience as reference for you.
1) Flour
The flour tendon is the most important confect material in making bread. Flour
tendon of the can keep the state of paste and save the carbon dioxide brought by
baking powder. The term “puissant flour” means the flour with high tendon
content. This kind of flour is made from high grade wheat, very proper for making
bread. Therefore, make sure the flour you bought is high tendon content.
2) Flour/black wheat flour
Black flour includes 85% kernel without dusk, the chaff content of most of kernel
is small. The bread made from black flour is smaller than the bread that made
from white flour, because the tendon content of the black flour is low, but the taste
of black bread is better.
3) Whole wheat flour
This flour with kernel includes plenty of fiber. This fiber can prevent from the
losing of the tendon, so bread that made from whole-wheat flour is smaller than
the white flour bread, the crust is thicker as well. But this kind of bread tastes
excellent. Our have designed programs, especially for this whole wheat flour,
which takes longer time in blending and fermenting.
4) Ferment powder
The ferment powder is the live organization in paste. The carbon dioxide bobbers
of the ferment powder let the paste fermenting. You'd better use “atom shape” to
dry ferment powder. This dry powder comes from sachet, which is independent
on sugar when fermenting. It contains low sugar content, good for your health.
The unused baking powder should be kept in low temperature and dry place in
airproof.
5) Salt
Salt can add taste; also can reduce the speed of fermenting.
6) Butter
It can add taste, and make the bread softer, also can use man-made butter and
olive oil,
7) Sugar
Sugar can adjust the color and taste of bread, it's will cook lure bread.
Notice: if you add sugar, many kinds of sachet and baking powder can't not be
actived easily.
8) Water
you can use daily use water, temperature at around 20℃ will be better.
9) Other ingredients.
You should choose ingredients according your own taste, such as cheese, dry
fruit, egg, nut, black wheat flour, herb, flavor, etc, but you should notice the
content of the water, for example, cheese, milk, fresh fruit have a high water
content, the water may make the paste too wet, so you should adjust it according
EN
5
Page 6

is a good, general-purpose program for white or brown bread. Most of the recipes
use this program..
2)Whole wheat: this mode spreads the kneading and rising steps to give better
results with the low gluten content whole wheat/whole meal flour.
3)Dough: After blending, it will be stop after fermenting. The fermented paste
can be made of different kuchen,,and the barrel will not heat, needn't choose
crust and weight program
4)Rapid bread : this mode is similar to the quick program in that the steps are
shorter for a faster process time
Note: loaf size and bread color cannot be altered in this mode;
5)Bake: program is specially designed for reheating finished bread. The
program setting time is one hour. You can adjust time according to need. But the
longest baking time is four hours. Press start/stop button to select; if you need to
set delay time, adjust to the proper time, press start/stop button to select. The
longest delay setting time is sixteen hours.
Making method.
Please follow the items below:
1) Please measure the ingredients before putting it into the inner barrel.
2) Use warm(21℃ - 28℃ ) water.
3) Put in the inner barrel and turn it 30 degree deasil ,then cover the lid.
4) Plug the power plug,
5) Choose proper program, press “start” button.
6) When the bread is well made, the machine will sound 12 times, and go into
heat preservation for one hour; if you don't need to, hold “start/stop” button for
three seconds to stop working.
7) When finish toast, turn barrel 30 degree widdershins,then use the hook to pull
out the barrel.
8) Pull out the bread and kneading arm, use the hook to bring out the kneading
arms.
9) Slice up the bread when the bread is cool.
EN
6
Page 7

to specific condition, also can use dry cheese, and dry milk instead, when you
familiar with this bread maker, you will know if the water content is too more or too
less, you can add water and flour to adjust it, but you should remember how
much salt you have add in, it will reduce the speed of fermenting, some ingredients can mixed at the beginning ,such as dry milk and yogurt ,but some should
wait for the buzz of the maker, such as paste, nut, dry fruit. Referring to the time
form, you can know when the maker will buzz.
10) Circumstance
The working circupmstance is very important, the size distance of the bread
between heat circupmstance and cold condition is 15%. Don't place the bread
maker in place with drought, above all the anti wind function is limited, if the
house is too wet, it also effect the bread.
11) Bread storage
The bread that you make by yourself does not include antiseptic. However, if you
deposit the bread in clean and closed container, then put it into the refrigerator,
like this, the bread can save for 5-7days. Besides, you can have the bread iced,
but you'd better put it into a plastic bag after cooling down.
12) Check components
When you open the bread maker, you can find following components:
2 kneading arms, put them over the axis after cleaning.
1 measuring cupp, you may use this sp to measure the liquid ingredients;
2 measuring sp, the reference of the confect material in this manual are all
according to these two sp (5ml, 15ml).
Open the lid of the bread maker, then familiar with the installation of the inner
barrel.
Notice: you should connect the gear to the kneading arm correctly, so that you
can install the inner barrel to the maker.
13) Control buttons.
- Start/stop: press the button to start, hold it for 3 seconds to stop working.
- Time∧ /∨ : Use these two buttons to set the delay timer.
- Color: press to select crust color between light, medium & dark. The arrow on
the LCD-display will indicate the color you select.
- Select: main selection control button, press to cycle through each program.
14) Select buttons
Turn on the power, basic program selected, screen indicates the loaf is 1.5LB,
EN
the color is medium, this program is 2 hours and 53 minutes; press the “select”
button, choose the proper program; press “color” button to select color for your
bread; press “time” button to set proper delay time. E.g. it is 6:00 pm, if you want
to have your bread on the following day 6:00 am; you can press “time” button to
set delay time to “12:00”, then press “start” button.
15) Programs
1)Basic: this is the program shown when the machine is first powered on. This
7
Page 8

Instructions
1) The material should be put into the maker in order.
2) The content of the yeast should differ depending on the circumstance
temperature, above prescription is based on 25℃ house temperature, if the
house temperature is higher than 25℃ ,you'd better to reduce some yeast, if
the house temperature is lower than 25℃ ,you'd better to add some yeast ,
3)The flour should be white, and can throng the 100- bolt, not including sands, no
mold, and not agglomerating, also with good flexibility.
4) You should especially protect the perfect of the non-steak inner barrel. Don't
use metal tool to clean it,
5) The hole in the middle of the kneading arms should be thorough cleaned then
drip some butter on it, lest to stick the kneading arm.
6) When clean the inner part of the maker, please cut off the electric first,
7) Don't put the inner barrel into water for long time, it will affect the function of the
axis of rotation. if the kneading arm was sticked to the barrel, you can use
warm water to marinate it about 30 minutes, so that it is very easy to put it out.
Cleaning
Unplug the bread maker and let it to cool down fully before cleaning.
1) If the kneading arm has stuck on to the shaft, fill the loaf tin with warm water
and let it soak, this should soften any dough residues and allow the kneading
arm to be removed.
2) If the inside of the kneading arm gets clogged with flour, soak it in warm water,
then dig out the flour with a wooden cocktail stick,
3) Wash the measuring cupp, sp, barrel, and kneading arm in hot soapy water,
rinse, then dry thoroughly.
4) Wipe all other surface, internal and external, with a damp cloth. Use a little
washing-up liquid if necessary, but be sure to clean it all off, otherwise it might
taint the next lot of bread.
5) Make sure everything is dry before re-using the bread maker or storing it away.
Don't immerse the bread maker in water or any other liquid
Don't use harsh or abrasive cleaners or solvents
Don't put any of the part in a dishwasher.
EN
The life-time of the product is 2 years.
You can find full information about the appliances of “MAGNIT” trademark on
www.magnit.net
8
Rating voltage: 220~240V/50Hz
Rating Power: 580W
Page 9

Уважаемый покупатель!
Поздравляем Вас с приобретением техники торговой марки «MAGNIT».
Мы уверены, что приобретенный товар будет соответствовать самым
высоким запросам, предъявляемым Вами к бытовой технике и станет
настоящим надежным помощником в Ваших домашних хлопотах. Перед
началом эксплуатации, пожалуйста, внимательно ознакомьтесь с
инструкцией и соблюдайте правила эксплуатации. В этом случае
торговая марка «MAGNIT» гарантирует продолжительное бесперебойное
функционирование приобретенной Вами бытовой техники.
Спасибо за Ваш выбор!
ОПИСАНИЕ
2.
3.
4.
1. Крышка со смотровым отверстием
2. Мерная ложка
3. Лопатка для замешивания теста
4. Форма для выпечки
5. Мерный стаканчик
6. Крючок
7. Панель управления
5.
6.
7.
7.
RUS
9
Page 10

ПАНЕЛЬ УПРАВЛЕНИЯ
1. Выбор программы
2. Световой индикатор мощности (если прибор в сети)
3. Кнопка СТАРТ/ СТОП для начала, либо окончания работы
RUS
10
3
1
2
Page 11

ОБЩИЕ УКАЗАНИЯ И МЕРЫ БЕЗОПАСНОСТИ
· Хлебопечь предназначена исключительно для бытового использования
(выпечка хлеба в бытовых условиях). Не используйте устройство вне дома и на
открытом воздухе.
· Включая устройство в сеть, удостоверьтесь, что напряжение и иные характеристики вашей системы электроснабжения соответствуют характеристикам,
указанным в пункте «Технические данные» или на информационной наклейке
на дне устройства.
· Не оставляйте включенное устройство без присмотра.
· Следите за тем, чтобы шнур питания не свешивался с края стола и не
касался горячих поверхностей.
· Во избежание поражения электрическим током и возгорания, не погружайте
прибор в воду или другие жидкости. Если это произошло, не беритесь за
изделие, немедленно отключите его от электросети и обратитесь в сервисный
центр для проверки.
· Не используйте прибор с поврежденным шнуром питания и/или вилкой. Не
пытайтесь также самостоятельно отремонтировать устройство. При неполадках или для замены принадлежностей обращайтесь в авторизованный сервисный центр.
· Используйте и храните прибор в недоступном для детей месте. Устройство
не предназначено для использования детьми или немощными людьми без
постоянного наблюдения.
· Выключайте устройство из розетки после использования, а также перед
чисткой. Перед проведением чистки или иных действий по уходу дайте устройству остыть.
· Не ставьте прибор на другие электроприборы.
· Не пользуйтесь хлебопечь в качестве нагревательного прибора.
· Никогда не помещайте в прибор бумагу, картон или пластмассу, и ничего не
кладите сверху.
· По окончании работы программы всегда пользуйтесь кухонными перчатками для манипуляций с чаном или горячими частями хлебопечки. Хлебопечь во
время работы сильно нагревается.
· Никогда не закрывайте вентиляционные отверстия.
· Будьте внимательны — при открытии крышки по окончании работы програм-
мы или во время её работы из хлебопечь может вырываться струя пара.
· Внимание! Тесто, вываливающееся при переполнении чана на нагрева-
тельный элемент, может воспламениться, поэтому никогда не превышайте
количество ингредиентов, указанных в рецептах.
· Форма для выпекания имеет антипригарную поверхность. Не используйте
металлические средства для очистки формы. Лучше всего для очистки использовать деревянную лопатку.
RUS
11
Page 12

ИНГРЕДИЕНТЫ
Все использованные ингредиенты должны иметь температуру окружающего
воздуха (если не указано иное) и тщательно отвешены. Измеряйте жидкости с
помощью прилагаемого градуированного стакана. Отмеряйте жидкости с
помощью прилагаемого мерного стакана. Пользуйтесь двойной дозировочной
ложкой, со столовой ложкой и чайной ложкой.
1. Мука: вес муки сильно зависит от её вида. В зависимости от качества муки,
может меняться и получаемая выпечка. Храните муку в герметичной упаковке,
поскольку она может реагировать на колебания температуры и влажности,
поглощая, или, наоборот. отдавая влагу. Используйте, предпочтительно, так
называемую «сильную», «хлебную» или «пекарную» муку, а не муку
стандартного типа. Добавление овсяной муки, отрубей, проростков
пшеничного зерна, ржаной муки, и, наконец, цельных зёрен, к тесту, даёт более
тяжёлый и менее пышный хлеб. На результаты влияет также то, насколько
просеяна мука — чем более она цельная (то есть, если в ней имеются частицы
оболочки пшеничных зёрен), тем меньше поднимается тесто, и тем плотнее
получается хлеб.
2. Дрожжи: дрожжи обеспечивают подьём теста. Используйте активные сухие
дрожжи в пакетиках. Качество дрожжей может быть разным, они не всегда
расширяются одинаково. Таким образом, качество хлеба может различаться в
зависимости от используемых дрожжей. Старые дрожжи или неправильно
хранившиеся дрожжи работают не так хорошо, как свежеоткрытые сухие
дрожжи. Все пропорции в рецептах указаны для обезвоженных дрожжей. В
случае, если Вы используете свежие дрожжи, следует взять их тройное (по
весу) количество и развести их небольшим количеством тёплой слегка
подсахаренной воды для более эффективного их действия.
3. Соль: соль придаёт вкус выпечке, и позволяет регулировать деятельность
дрожжей. Она не должна соприкасаться с дрожжами. Благодаря соли, тесто
получается твердым, компактным, и поднимается не очень быстро. Соль также
улучшает структуру теста.
4. Жиры и растительное масло: жиры придают хлебу пышность и вкус. Такой
хлеб также дольше хранится. Излишек жиров замедляет подъём теста. Если
Вы используете сливочное масло, порежьте его маленькими кусочками для
более равномерного распределения в тесте, или предварительно размягчите
его.
5. Сахар: предпочтительнее использование сахарозы, сахара-сырца или
мёда. Никогда не используйте сахар-рафинад или кусковой сахар. Сахар
RUS
питает дрожжи, придаёт хлебу вкус, и улучшает румяный цвет корочки.
6. Вода: вода насыщает и активирует дрожжи. Она также насыщает крахмал,
содержащийся в муке, и обеспечивает образование мякиша. Воду можно
12
Page 13

заменить, частично или полностью, молоком или другими жидкостями.
Жидкости должны быть, при их добавлении, комнатной температуры.
7. Яйца: яйца обогащают тесто, улучшают цвет хлеба и способствуют
образованию вкусного мякиша. Если Вы используете яйца, сократите
количество жидких ингредиентов. Разбейте яйцо и добавьте жидкости до
объема, указанного для жидкости в рецепте. Рецепты предусматривают
использование среднего яйца в 50 граммов; для более крупных яиц добавьте
немного муки, для более мелких яиц уменьшите количество муки.
8. Молоко: можно использовать свежее или порошковое молоко. Если Вы
используете порошковое молоко, добавьте воды до первоначально указанного
обьема. Если Вы используете свежее молоко, можно также добавить воды —
общий объем жидкости должен быть равен объему, указанному в рецепте.
Молоко также обладает эффектом образования эмульсии, что позволяет
обеспечивать более равномерные полости и более красивый вид мякиша
9. Добавки: можно использовать свои собственные рецепты, добавляя
любые желаемые добавки; при этом, однако, следует:
· строго соблюдать время, указываемое звуковым сигналом, для ввода
добавок, в особенности самых нежных,
· иметь в виду, что самые твёрдые зёрна (например, льняные зёрна или
зёрна кунжута) можно добавлять в самом начале замешивания, чтобы
облегчить пользование хлебопечкой (например, при ручной установке
времени),
· тщательно сливать влагу с очень влажных ингредиентов (оливок),
· слегка обваливать в муке жирные ингредиенты для получения более
однородного теста
· не добавлять их в слишком большом количестве - это может повредить
тесту.
ПОДГОТОВКА К РАБОТЕ, НАЧАЛО РАБОТЫ
1. Вставьте форму для выпечки и поверните её на 30º, убедитесь, что она
зафиксирована.
2. Пожалуйста, взвешивайте ингредиенты до того, как положить их в форму
для выпечки. Закладывайте все ингредиенты в том порядке, в котором они
указаны в рецепте. Используйте теплую (20ºС- 28ºС) воду.
3. Включите сетевой шнур в розетку. Автоматически будет выбрана базовая
программа (вес 500 гр., цвет корочки средний).
4. Для начала выпечки нажмите кнопку СТАРТ.
5. Когда Ваша выпечка будет готова, звуковой сигнал прозвучит 12 раз и
автоматически включится система поддержания температуры на 60 минут, для
отмены удерживайте кнопку СТАРТ/ СТОП в течение 3 секунд.
6. Выньте хлеб и лопатку для замешивания теста с помощью крючка.
7. Порежьте хлеб, когда он остынет.
RUS
13
Page 14

РЕЦЕПТЫ ДЛЯ ВЫПЕЧКИ, ПРОГРАММЫ
1. Классический хлеб (Основной режим)
При включении прибора программа устанавливается автоматически.
Идеально подходит для выпечки белого и ржаного хлеба.
вес
ингредиенты
2. Хлеб из муки грубого помола.
Более тщательный замес теста с использованием данной программы позволяет
выпекать хлеб с наименьшим количеством клейковины.
ингредиенты
RUS
14
Вода
Соль
Сахар
Масло
Белая мука
Сухое молоко
Разрыхлитель
Сухие дрожжи
Порядок
приготовления
Белая мука
Сухое молоко
Разрыхлитель
Сухие дрожжи
приготовления
вес
Вода
Соль
Сахар
Масло
Порядок
500 гр
150 гр
1
/3
маленькой мерной ложки
2
/4
1
больших мерных ложки
2
/3
1
больших ложки
3
/4
1
мерных стаканчика (296 гр.
Налейте воду в форму для выпекания, добавьте сахар, соль,
масло, сухое молоко, разрыхлитель, сухие дрожжи. Лучше
насыпать соль и сахар на дно формы для выпечки, сделать не
большую выемку в муке и засыпать туда дрожжи, для того, чтобы
Налейте воду в форму для выпекания, добавьте сахар, соль,
масло, сухое молоко, разрыхлитель, сухие дрожжи. Лучше
насыпать соль и сахар на дно формы для выпечки, сделать
не большую выемку в муке и засыпать туда дрожжи, для того,
они не контактировали с водой и солью.
1 больших мерных ложки (22 гр
1
/2
чтобы они не контактировали с водой и солью.
3
/4
1
большой мерной ложки
1
/2
маленькой мерной ложки
3
/4
маленькой мерной ложки
500 гр
150 гр
1
/3
маленькой мерной ложки (2 гр
2
/3
2
/3
1
больших ложки (25 гр
3
/4
1
мерных стаканчика (296 гр
3
/4
1
большой мерной ложки (12 гр
маленькой мерной ложки (1 гр
3
/4
маленькой мерной ложки (3 гр
2 гр.
)
(
22 гр.
(
25 гр.
(
(
(
12 гр.
1 гр.
3 гр.
(
)
)
)
)
)
)
)
)
)
)
)
)
)
Page 15

4. Дрожжевое тесто (Тесто для выпечки)
Можно использовать различные ингредиенты для приготовления теста с помощью
данной программы.
5. Быстрый режим
Для того, чтобы ускорить процесс приготовления программой установлен
фиксированный вес (500 гр)
Ингредиенты
Вес
500 гр
Горячая вода ( 50ºС- 60ºС)
Соль
Сахар
Масло
Белая просеянная мука
Сухое молоко
Сухие дрожжи
6.Подогрев
Программа используется для быстрого подогрева хлеба и хрустящей корочки.
-
150 гр
¼ маленькой мерной ложки (1.5 гр)
2 больших мерных ложки
2 больших мерных ложки
2 мерных стаканчика (296 гр)
2
большие мерные ложки
/3
1
маленькой мерной ложки
3/4
(28 гр)
(32 гр)
(1
(3
2
гр
гр)
)
RUS
15
Page 16

Номер Неисправность
1
2
3
4
RUS
16
УСТРАНЕНИЕ НЕИСПРАВНОСТЕЙ
Хлеб оседает
посередине, нижняя
корка слишком
толстая
Сложно вынуть хлеб Лопатки для
Неравномерное
замешивание и плохо
пропеченный хлеб
Во время нажатия
кнопки СТАРТ/ СТОП
ЖК дисплей
показывает ”H: HH”
Причина
Оставили хлеб в
режиме
поддержания тепла
на долгое время,
испарилось слишком
много воды
замешивания теста
слишком плотно
прилипли к оси в
форме для выпечки
1. Неправильно
выбрана программа
2. Во время работы
хлебопечки Вы
несколько раз
прерывали
программу нажатием
кнопки СТАРТ/ СТОП
3. Вы открывали
крышку несколько
раз в начале
приготовления, хлеб
был сухим, корочка
непропеченной
4. Слишком большое
сопротивление
движению, что
лопатки для
замешивания теста
почти не могут
вращаться
Температура формы
для выпечки
слишком высока,
нельзя приступить к
выпечке
Устранение
Выньте хлеб, когда он
готов
После того, как вынете
хлеб, налейте
небольшое количество
горячей воды в форму
для выпечки и оставьте
на 10 минут, затем
выньте лопатки для
замешивания теста и
промойте их
Выбирайте программу
правильно
Нажмите кнопку СТАРТ
для того, чтобы
позволить прибору
закончить выбранную
программу
Старайтесь не
открывать крышку во
время последнего
подъёма теста
Проверьте отверстие в
лопатках, извлеките
форму для выпечки и
попробуйте
понаблюдать за
работой лопаток для
замешивания
вхолостую. Если видны
неполадки, обратитесь
в авторизованный
сервисный центр.
Нажмите кнопку
СТАРТ/ СТОП,
вытащите вилку из
розетки, выньте форму
для выпечки оставьте
крышку открытой, всё
должно охладиться
Page 17

5
6
7
8
9
10
11
12
Электромотор
работает, но тесто не
замешивается
Объём теста
настолько большой,
что поднимается
крышка
Теста слишком много,
оно выходит за края
формы
Хлеб не поднимается Положили
Сердцевина хлеба
пустая
Хлеб очень тяжёлый.
Его структура
слишком плотная
Сердцевина хлеба
пустая при нарезании
К поверхности хлеба
прилип сухой порошок
Форма для выпечки
неправильно
зафиксирована, либо
объем теста слишком
большой
Слишком много
дрожжей или муки,
слишком высокая
температура
Слишком большое
количество жидких
ингредиентов, либо
большое количество
дрожжей
недостаточное
количество дрожжей,
либо дрожжи
неактивны из-за
слишком высокой
температуры воды,
если дрожжи
перемешались с
солью
1. Скорость подъёма
теста и температура
слишком высоки
2. Слишком много
жидких ингредиентов
1. Слишком много
муки недостаточно
воды
2. Слишком много
фруктовых
ингредиентов или
цельнозерновой муки
1. Слишком много
воды, не положили
соль
2. Температура воды
слишком высокая
1. В хлебе слишком
много клейких
ингредиентов, таких
как масло, бананы и
т.д.
2. Тесто плохо
замешалось из-за
нехватки воды
Проверьте, чтобы
форма для выпечки
правильно
зафиксирована, тесто
приготовлено с
соблюдением
пропорций
Проверьте неполадки и
устраните их в
зависимости от
причины
Сократите количество
жидких ингредиентов
или дрожжей
Проверьте количество и
активность дрожжей,
увеличьте температуру
в помещении
Хлебопечка должна
работать при
комнатной температуре
Сократить количество
воды
Сократить количество
муки, увеличить
количество воды
Сократить количество
фруктовых
ингредиентов, добавить
немного дрожжей
Уменьшите количество
воды или дрожжей.
Проверьте наличие
соли
Проверьте температуру
воды
Либо исключите
клейкие ингредиенты,
либо измельчите их как
можно сильнее
Проверьте количество
воды и работу лопаток
для замешивания теста
RUS
17
Page 18

Page 19

ОЧИСТКА
Выньте вилку из розетки, дайте прибору охладиться перед очисткой.
1. Если лопатка для замешивания теста слишком тяжело вынимается,
налейте в форму для выпечки горячей воды, дайте отмокнуть, затем
лопатку можно вынуть и очистить.
2. Если отверстие в лопатке для замешивания теста забито мукой,
залейте её водой и с помощью небольшой деревянной палочки выньте
загрязнение.
3. Вымойте мерный стаканчик, мерные ложки, форму для выпекания и
лопатку для замешивания теста в мыльной воде, затем прополощите и
высушите.
4. Вытрите другие внутренние и внешние поверхности хлебопечи с
помощью влажной ткани.
5. Убедитесь, что все части хлебопечи сухие перед следующим
использованием, либо хранением.
6. Не помещайте хлебопечь в воду и другие жидкости
7. Не используйте жёсткие и абразивные металлы для чистки.
8. Не мойте части хлебопечи в посудомоечной машине
КОМПЛЕКТАЦИЯ
1. Хлебопечь в сборе – 1 шт.
2. Форма для выпечки – 1 шт.
3. Мерный стаканчик – 1 шт.
4. Лопатка для замешивания теста – 1 шт.
5. Мерная ложка – 1 шт.
6. Инструкция по эксплуатации с
гарантийным талоном внутри – 1 шт.
7. Крючок – 1 шт.
ТЕХНИЧЕСКИЕ ДАННЫЕ
Максимальная мощность – 580 Вт
Напряжение – 220 - 240В
Частота – 50 Гц
Класс защиты от поражения электрическим током – 2
Срок службы товара: 2 года.
RUS
Самую полную информацию о товарах торговой марки «MAGNIT» Вы всегда сможете найти на веб
сайте: www.magnit.net
Фирма-производитель оставляет за собой право вносить изменения в дизайн, конструкцию и комплектность поставки
продукции без дополнительного уведомления.
19
Page 20

УСЛОВИЯ ГАРАНТИЙНОГО ОБСЛУЖИВАНИЯ
1. Настоящая гарантия имеет силу при соблюдении следующих
условий:
- правильное и четкое заполнение гарантийного талона с указанием
наименования модели, ее серийного номера, даты продажи и печати
фирмы-продавца в гарантийном талоне и отрывных купонах;
- наличие оригинала квитанции (чека), содержащего дату покупки.
2. Фирма «MAGNIT» оставляет за собой право на отказ в гарантийном
обслуживании в случае не п редоставления вы ш еуказанных
документов, или если информация в них будет неполной,
неразборчивой, противоречивой.
3. Гарантия не включает в себя периодическое обслуживание, установку,
настройку изделия на дому у владельца.
4. Не подлежат гарантийному ремонту изделия с дефектами, возникшими
вследствие:
- механических повреждений;
- несоблюдения условий эксплуатации или ошибочных действий
владельца;
- неправильной установки, транспортировки;
- стихийных бедствий (молния, пожар, наводнение и т. п.), а также других
причин, находящихся вне контроля продавца и изготовителя;
- попадания внутрь изделия посторонних предметов, жидкостей,
насекомых;
- ремонта или внесения конструктивных изменений неуполномоченными
лицами;
- использования аппаратуры в профессиональных целях;
- отклонений от Государственных Технических Стандартов
питающих, телекоммуникационных и кабельных сетей;
- при выходе из строя деталей, обладающих ограниченным сроком
службы.
5. Настоящая гарантия не ущемляет законных прав потребителя,
предоставленных ему действующим законодательством.
20
Page 21

21
Page 22

Page 23

Page 24

 Loading...