

Magnimage MIG-H8 User Manual

MIG-H8 Console
User Manual V1.1
△!
MIG-H8
Before using the product, please read this manual and
keep it for future reference.

Without the written permission, any corporation or
personnel could not copy, imitate, plagiarize or translate
this book or part of it. Also could not transmit it in any
form or any way(electronic, mechanical, photocopying,
recording or other ways) for any business and profitable
purpose.
The product specifications and information mentioned in
this manual is just for reference, will not give prior notice if
there is any update. Unless there is a special agreement, it
is just used as a guideline. All the statements or
information in this manual shall not constitute any form of
guarantee.
Statement

BRIEF··················································································································· 1
TRADE MARK ··········································································································· 1
ABOUT THE SOFTWARE ······························································································ 1
KEY FEATURES ·········································································································· 2
USING DIRECTIONS ····························································································· 3
ACCESSORIES INCLUDED ····························································································· 3
SAFETY INSTRUCTIONS ······························································································· 4
UNIT SPECIFICATIONS ································································································ 4
MIG-H8 FRONT & BACK ······················································································· 5
THE FRONT ·············································································································· 5
Touch Screen ····································································································· 5
Preset Section ··································································································· 5
Output Section·································································································· 7
Layer Section ···································································································· 8
Input Sources Section ······················································································· 9
Switching Section ··························································································· 10
Function Section 1 ·························································································· 11
Function Section 2 ·························································································· 12
THE BACK ·············································································································· 14
The Lamp Port ································································································ 14
Network Port and USB 1-3 Port ······································································ 14
DVI Port 1-2, USB 4-6 and DIP Switch ····························································· 15
Others ············································································································· 16
MIG-H8 SOFTWARE ··························································································· 17
PROFILE ················································································································ 17
SOFTWARE FUNCTION ····························································································· 18
PROJECT ·········································································································· 18
DESTINATION ·································································································· 19
OUTPUT ·········································································································· 20
LAYER ·············································································································· 22
PRESETS ·········································································································· 23
INPUT SETTING ······························································································· 24
AUX SETTING ·································································································· 27
Directory

TRANSITION EFFECT ······················································································· 30
COLOR KEYER ·································································································· 31
BACKGROUND ································································································ 33
MISC ··············································································································· 34
WARRANTY ······································································································· 41
THE WHOLE UNIT WARRANTY ·················································································· 41
NON-WARRANTY PROVISIONS ··················································································· 41

1
Thanks for your purchasing our MIG-H8 console. Do hope you can enjoy the
experience of the product performance. The design of the switcher conforms to
international and industry standards. But if with improper operation, there will be
a personal injury and property damage. In order to avoid the dangerous, please
obey the relevant instructions when you install and operate the product.
Trade Mark
VGA and XGA are the trademarks of IBM.
VESA is a Video Electronics Standards Association's trademark.
HDMI、 HDMI mark and High-Definition Multimedia Interface are all from HDMI
Licensing LLC.
Even if not specified company or product trademarks, trademark has been fully
recognized.
About the Software
Any acts such as change, decompile, disassemble, decrypt or reverse engineer the
software installed in the product are illegal.
Brief

2
Key Features
Two 18.5 inch HD touch screens
300 presets
Touch/mouse/button controls
Real time monitoring for inputs/outputs/presets
T-BAR switch with multiple transition effects
2 Gigabit LAN, one for the system connections, and the other for IP video
monitoring
USB ports for mouse, keyboard and USB drive
Supports connecting 2 monitors to show the same signal of the touch
screen
Works with one or more units of MIG-V8、MIG-V6、MIG-V5 switcher
Internal PC host for running the control software
3
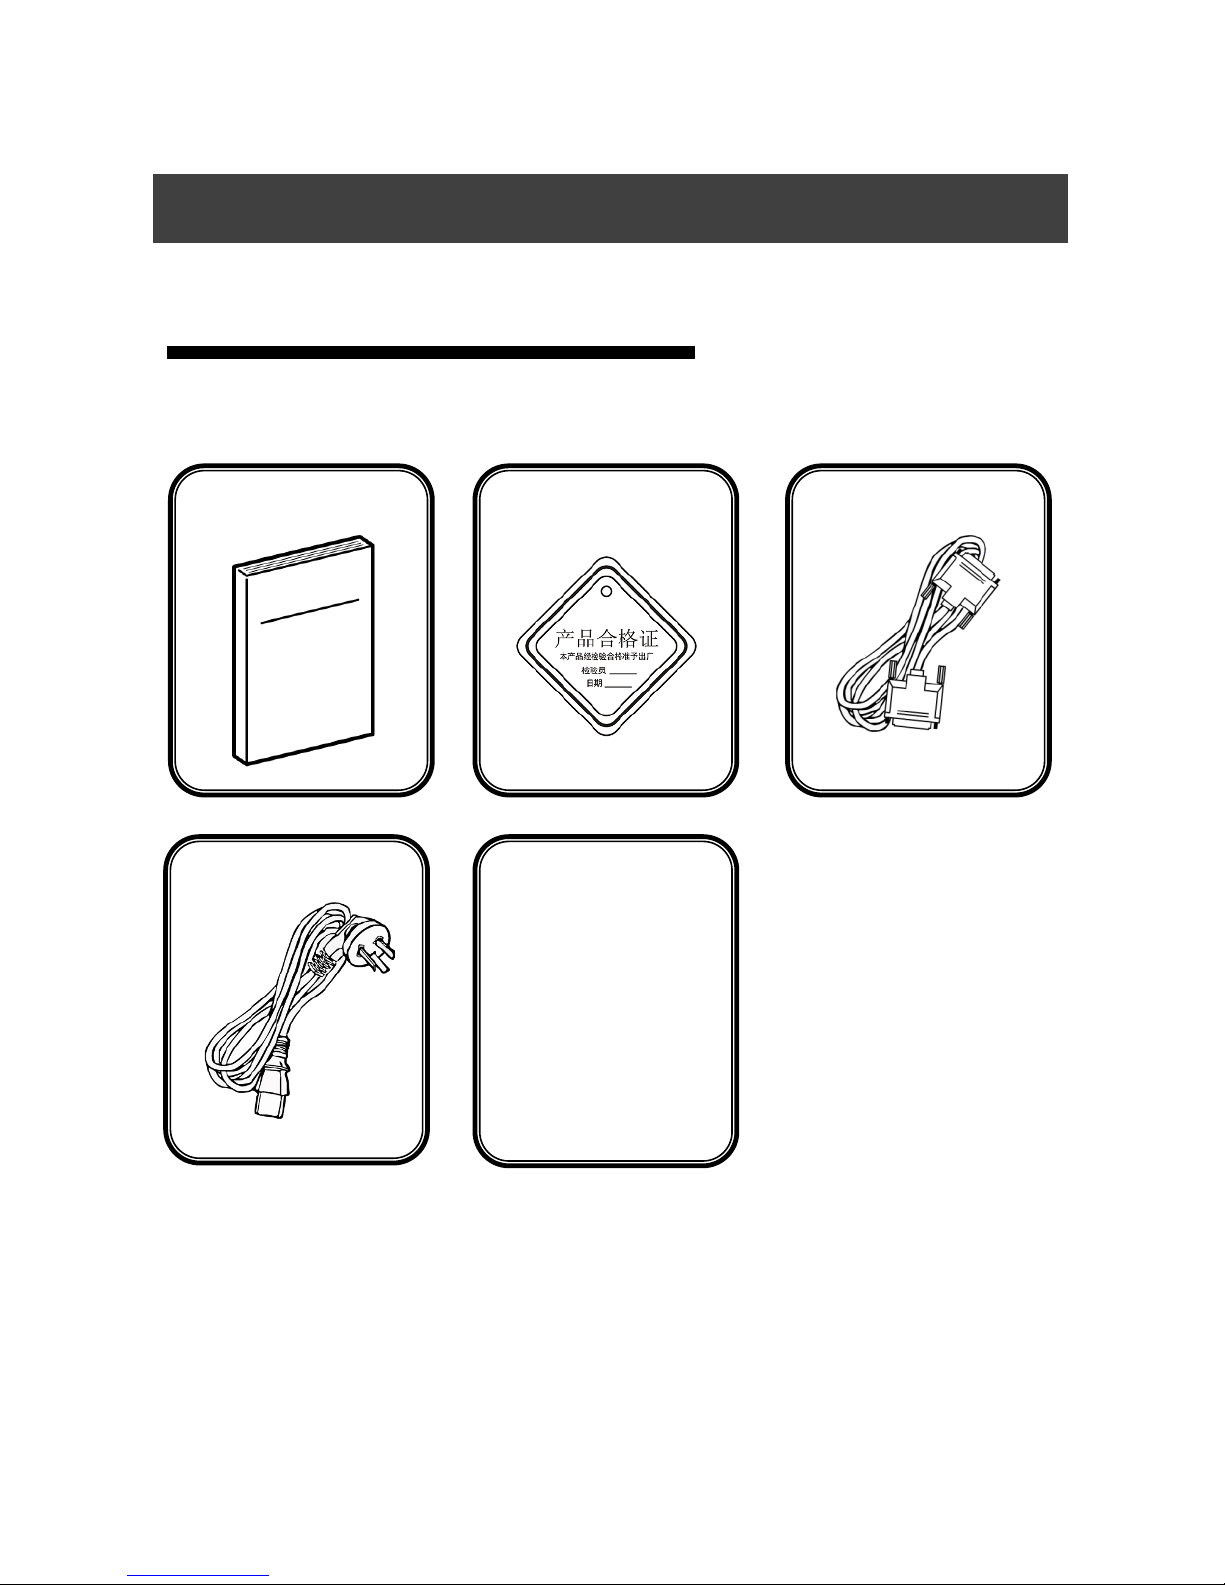
Accessories Included
MIG-H8 accessories
Using Directions
User manual
Power line ×1
Certificate
DVI line×1
USB disk×1
Network cable×2
Goose lamp ×2
4
Please use the correct power voltage, ranging 100~240V AC, 50/60Hz.
Make sure the power is cut whenever pull out any cable from the
machine
Make sure the power is off and the signal cables are out before you plug
in or pull out any hardware device.
Before you use the product, please cut the power and discharge your
static electricity by touching the ground surfaces.
Please use the machine in clean, dry and ventilated environment. Never
use the machine in hot or humid environment.
Keep the product away from fire, water or any dangerous environment.
Please do not repair the machine yourself by opening the machine’s
box.
If there is any unusual smell or smoke, please turn off the machine at
once and contact the seller.
Safety Instructions
Unit Specifications
Unit Specifications
Power standard
100~240V AC,50/60Hz
Power consumption
120W
Dimensions
953.0×617.3×369.5 mm
Net weight
31.5KG
5
The Front
Touch Screen
Touch screen: single-touch for any setting; real-time monitor for inputs and
outputs
Preset Section
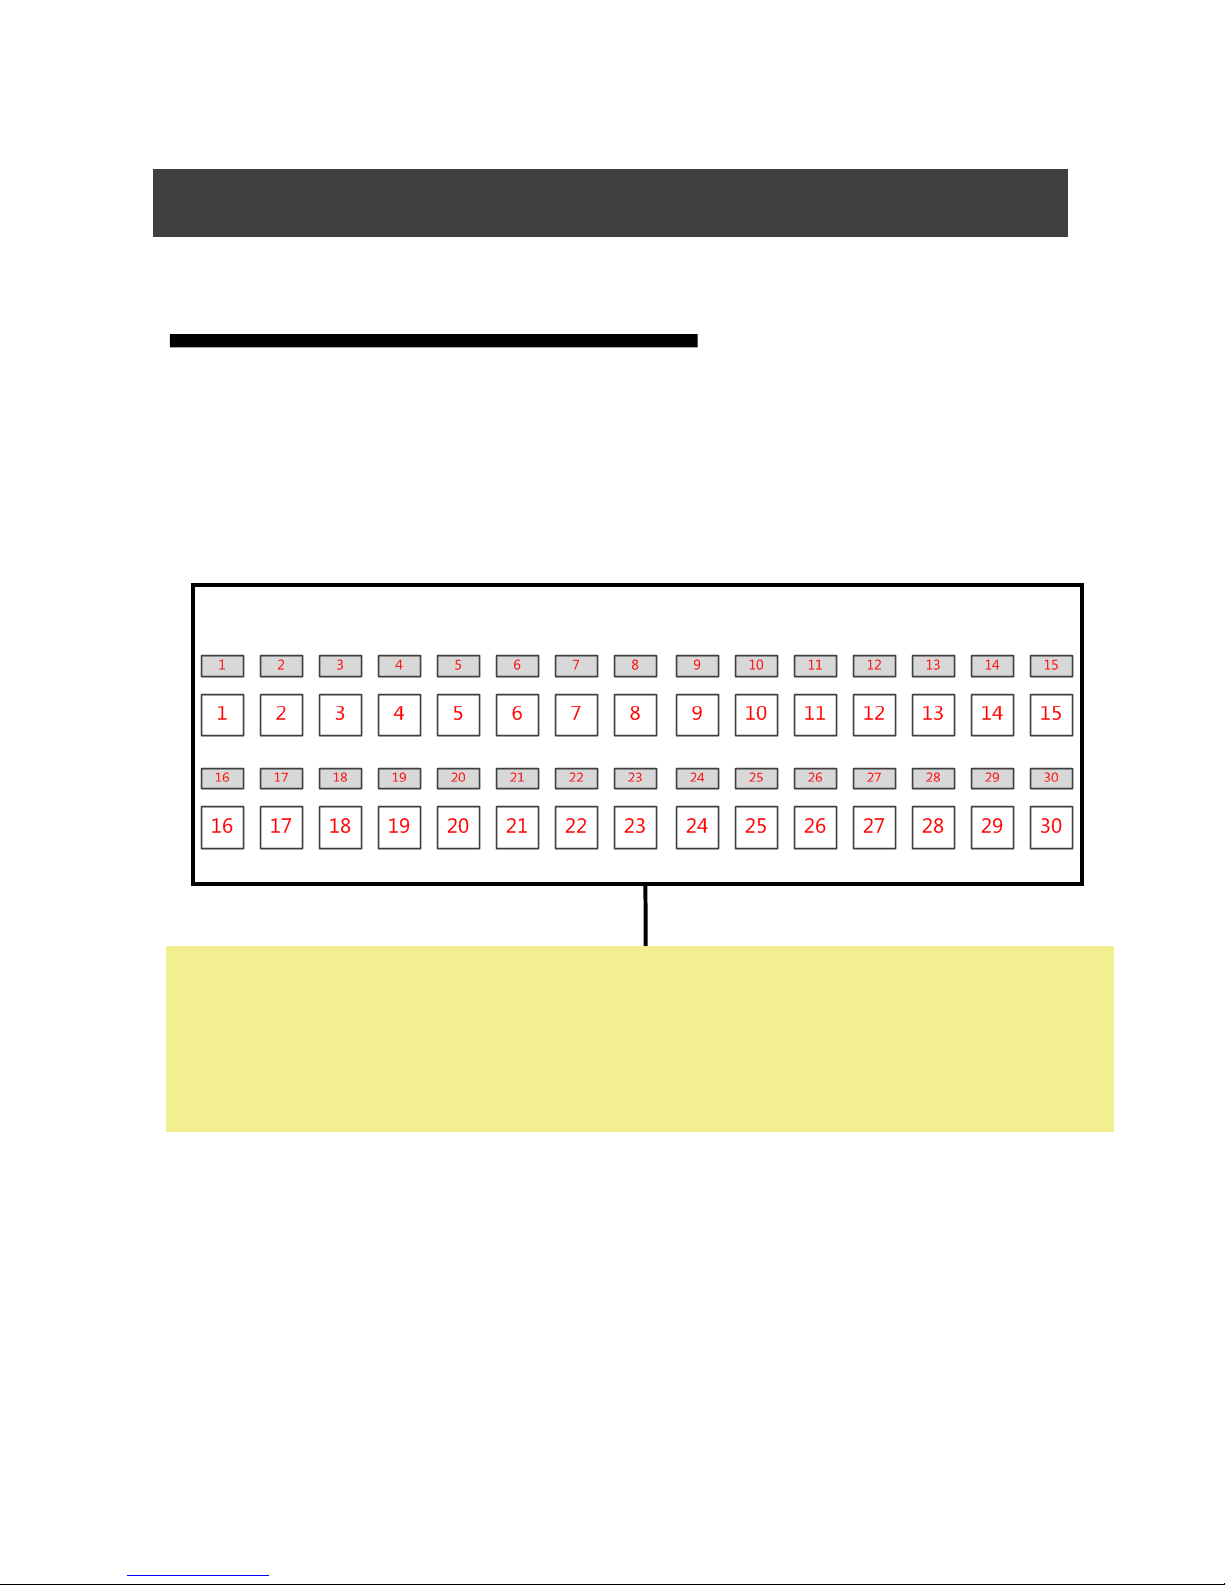
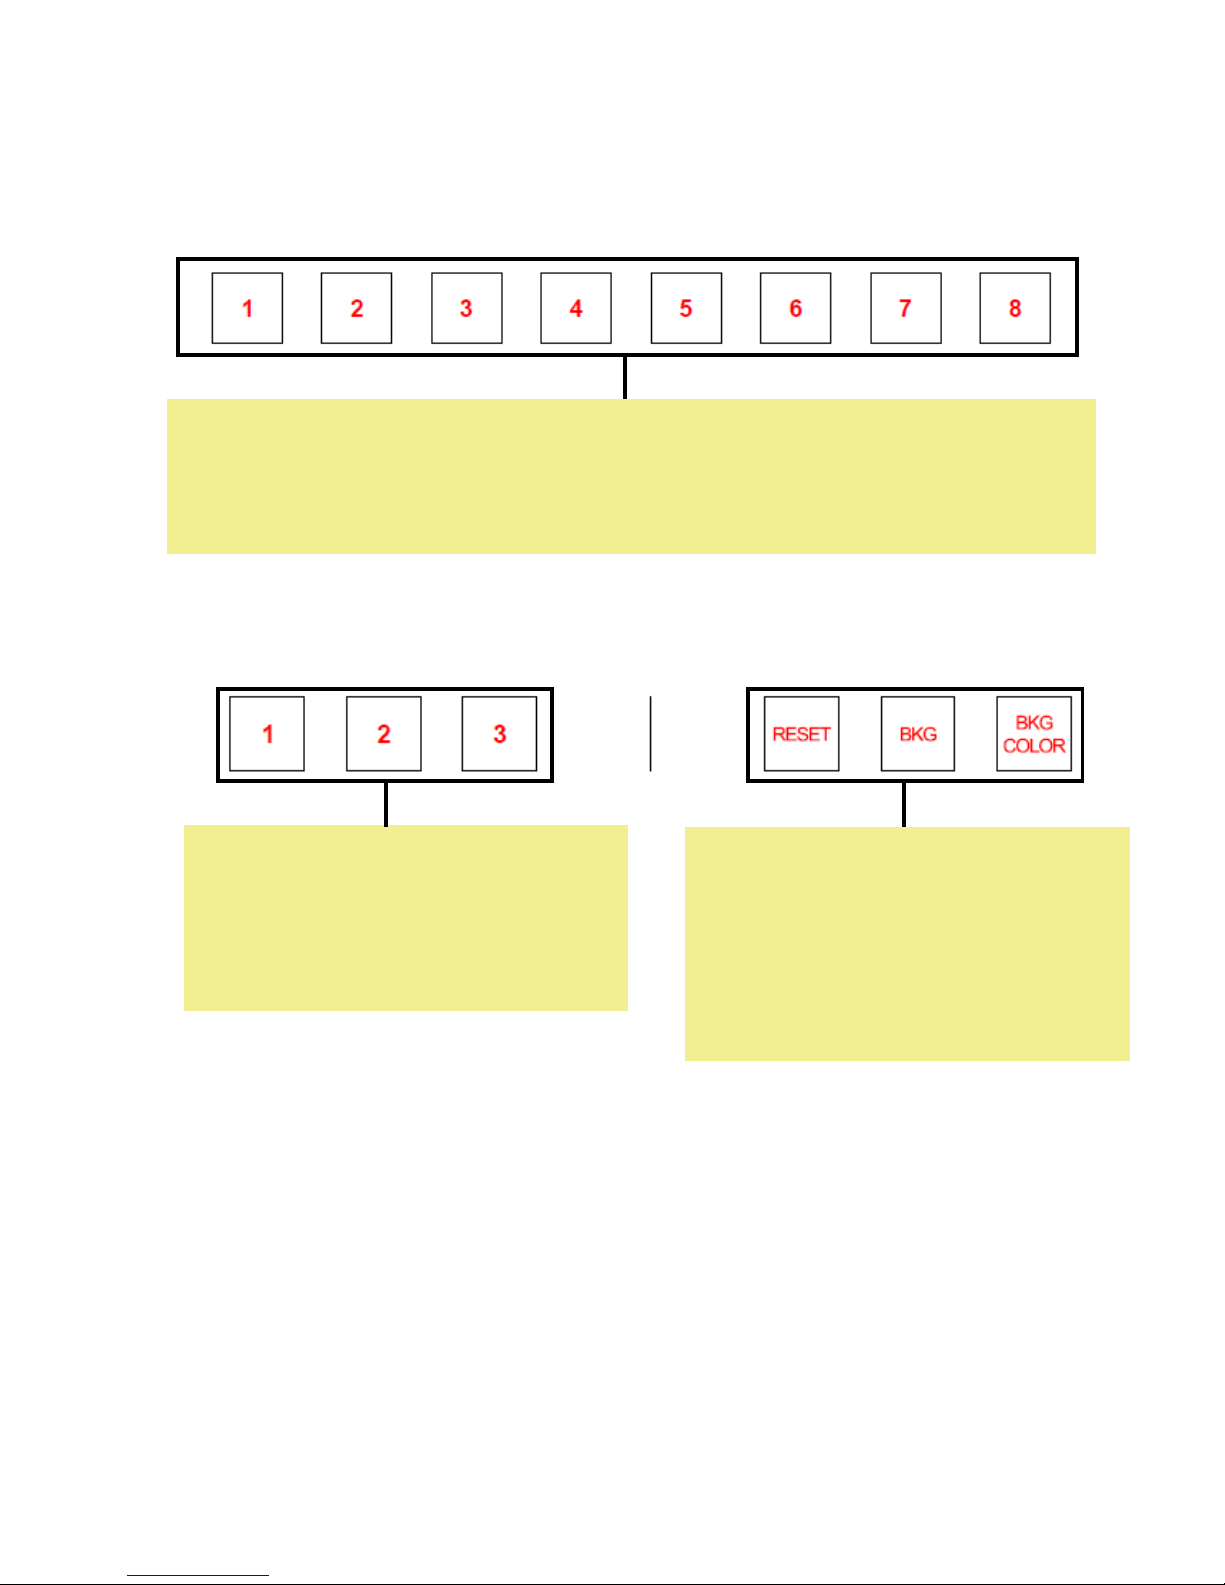
MIG-H8 Front & Back
Each button is for one preset, 30 presets/page, 10 pages in total. The top of the
buttons are LED screens to display the names of the presets.
If there is a preset, the button will be green. If the button is red, then it means
there is no preset. When using it, please work with the right section for editing.
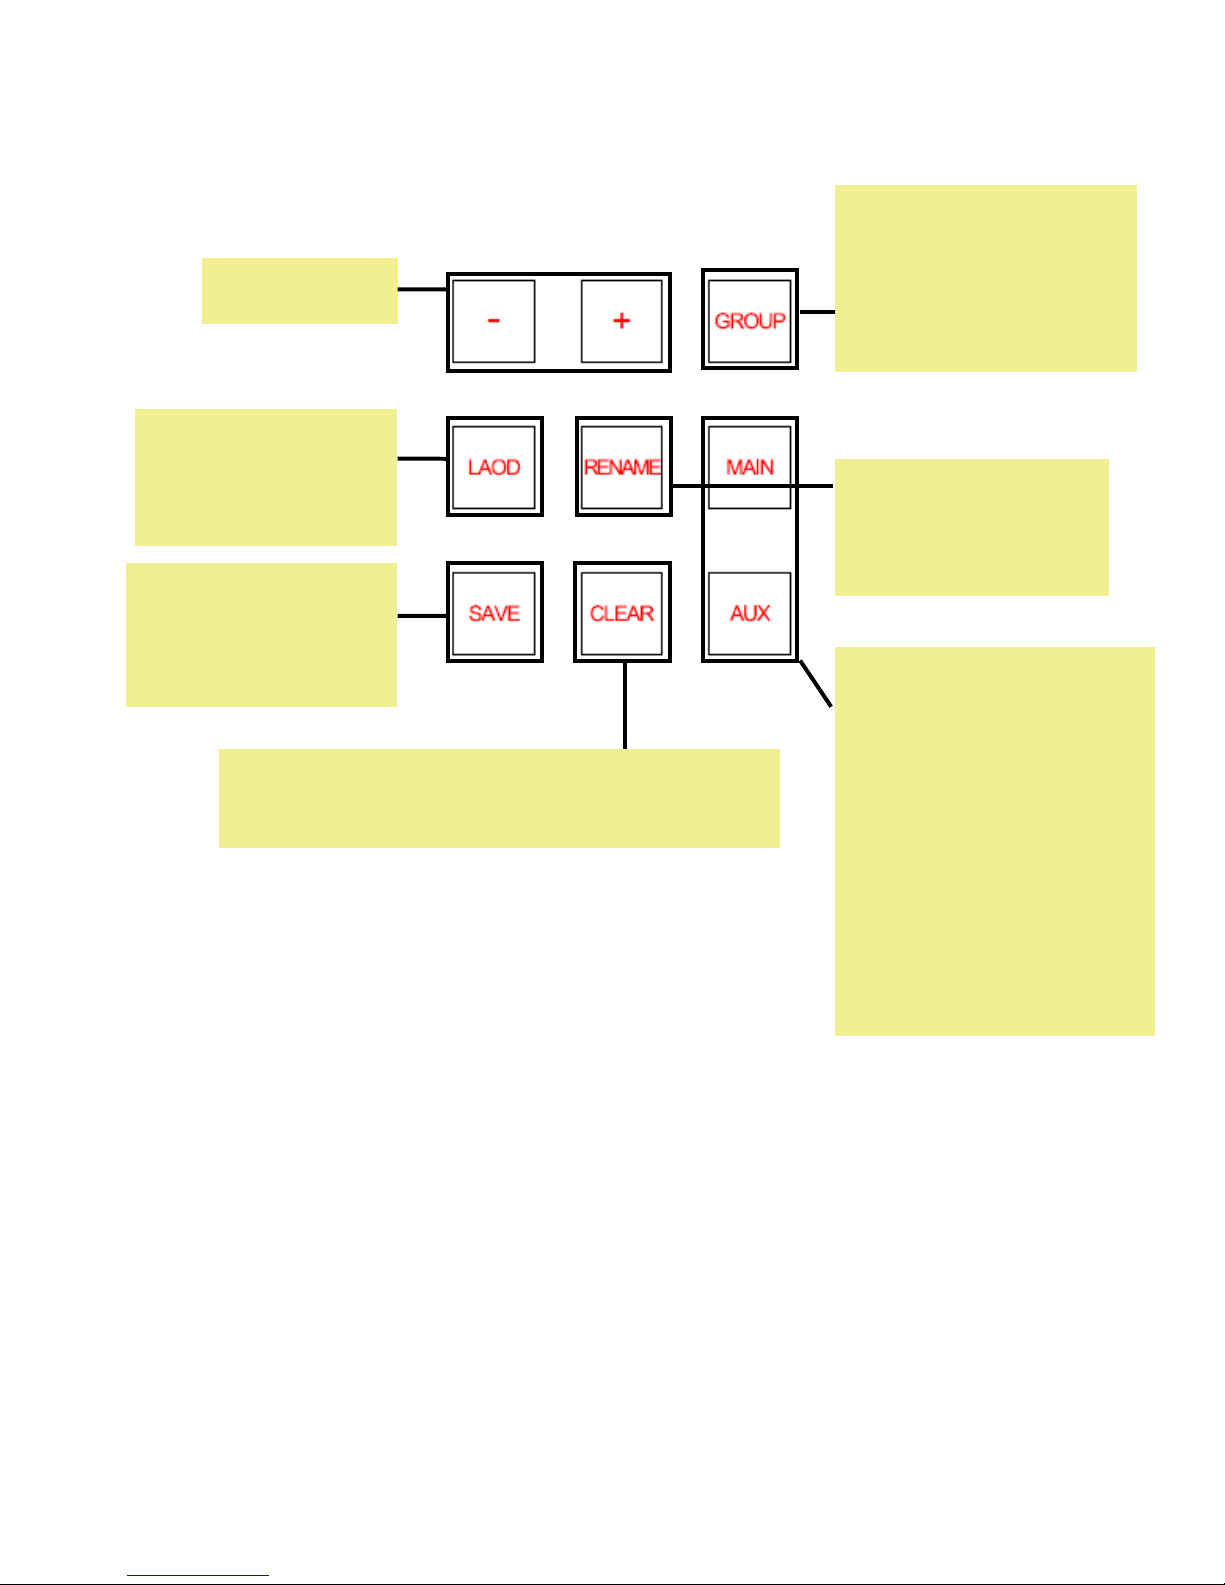
6
Press LOAD +
preset number to
load the preset
Preset page
For controlling many
units of MIG-V8 or
MIG-V6 by dividing
into different groups.
It is used when saving
presets:
MAIN light on:save
MAIN as a preset only
AUX light on:save AUX
as a preset only
MAIN & AUX lights on:
save both of them as a
preset
Press RENAME to
remark the name of
preset
Long press CLEAR+ preset number to delete
the preset
Long press SAVE+
preset number to
save the preset
7
Output Section
Each button stands for each output port. It works with the MAIN and AUX
button. When MAIN is on, the buttons are PGM outputs. When AUX is on, the
buttons are AUX outputs.
AUX LOOP
3 AUX LOOP
Press any button, and then select
the input source
RESET: set the output size and
position back to factory setting
BKG: load the background which is
saved
BKG COLOR: pure color background
8
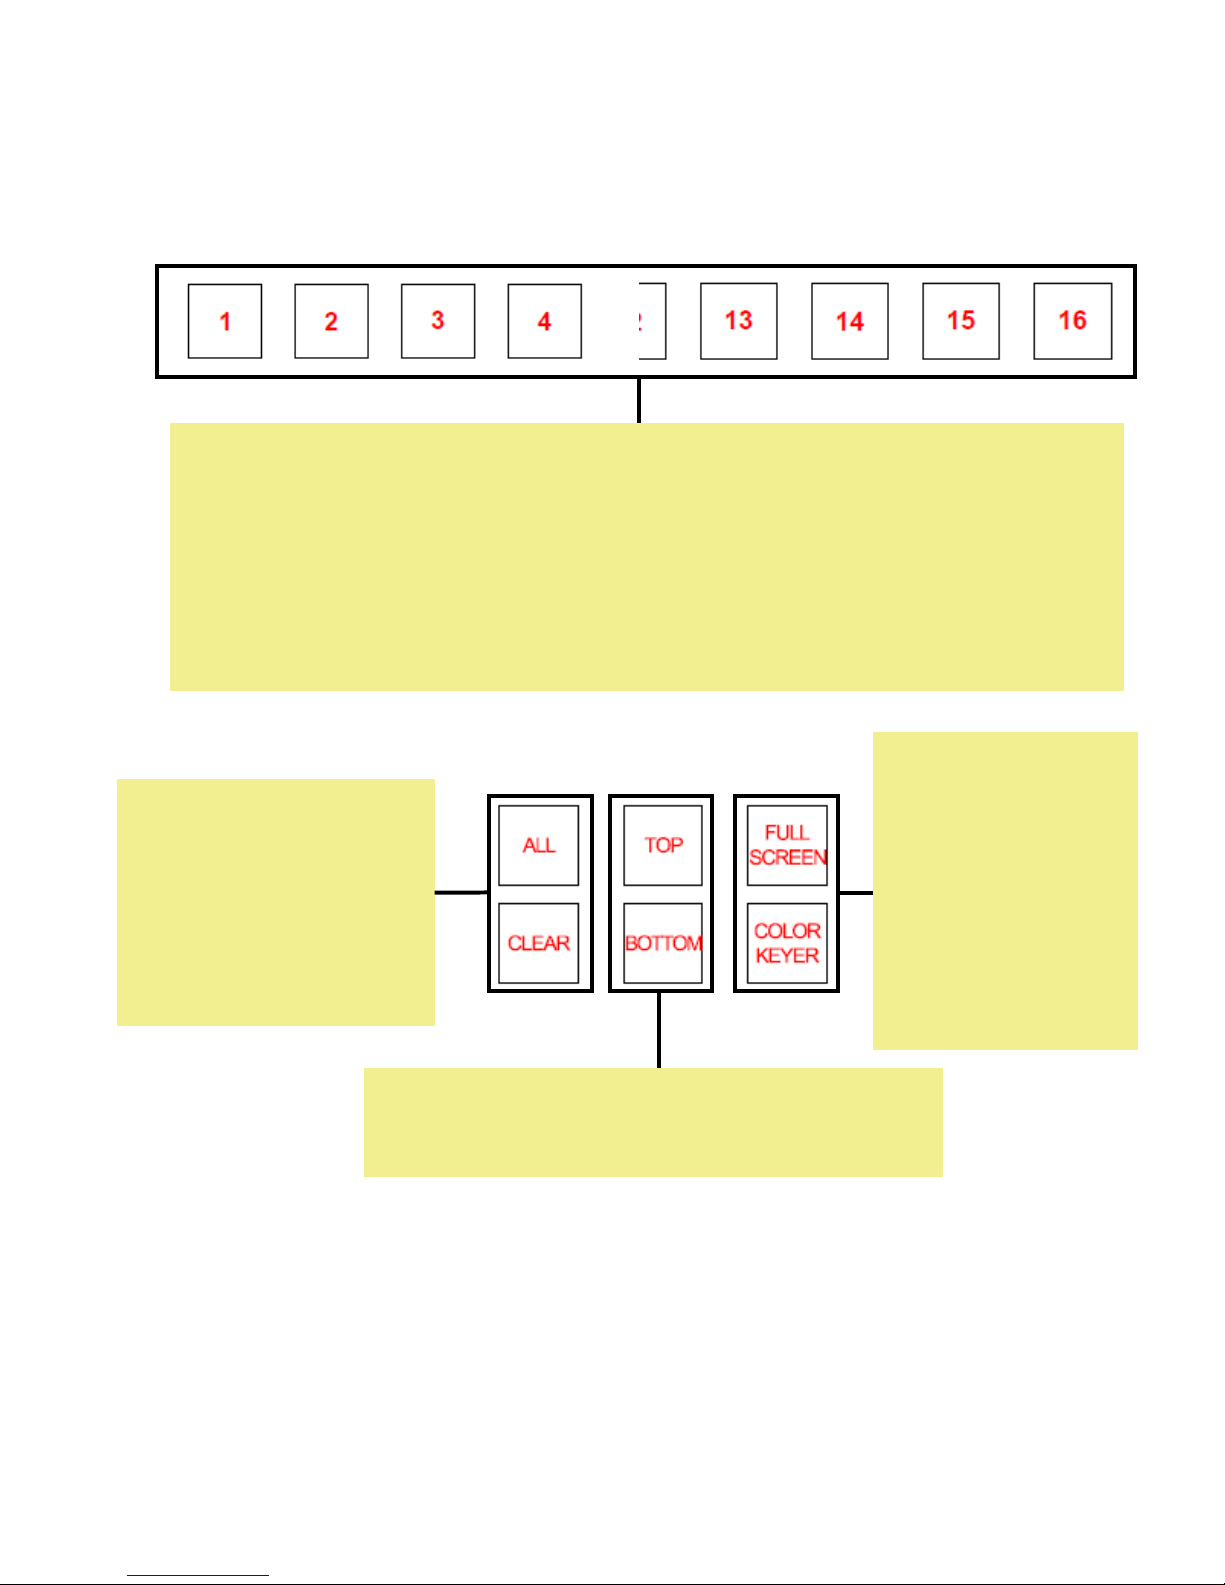
Layer Section
TOP:set the current layer on the top;
BOTTOM:set the current layer on the bottom
FULL SCREEN:
stretch the layer to
the whole screen;
COLOR KEY:
for text overlay and
color key
Clear + layer number:
clear the layer of
choosing;
Clear + All:clear all the
layers.
Stands for 16 active layers (PIP). Light becomes green when the layer is on. Light
becomes blinking when the layer is under setting. If there is no light, then the
layer is off.
Works with MAIN and AUX buttons.
MAIN on:1-16 stands for the 1-16 layers in MAIN.
AUX on:1-8 stand for the 1-8 layers in AUX.
9
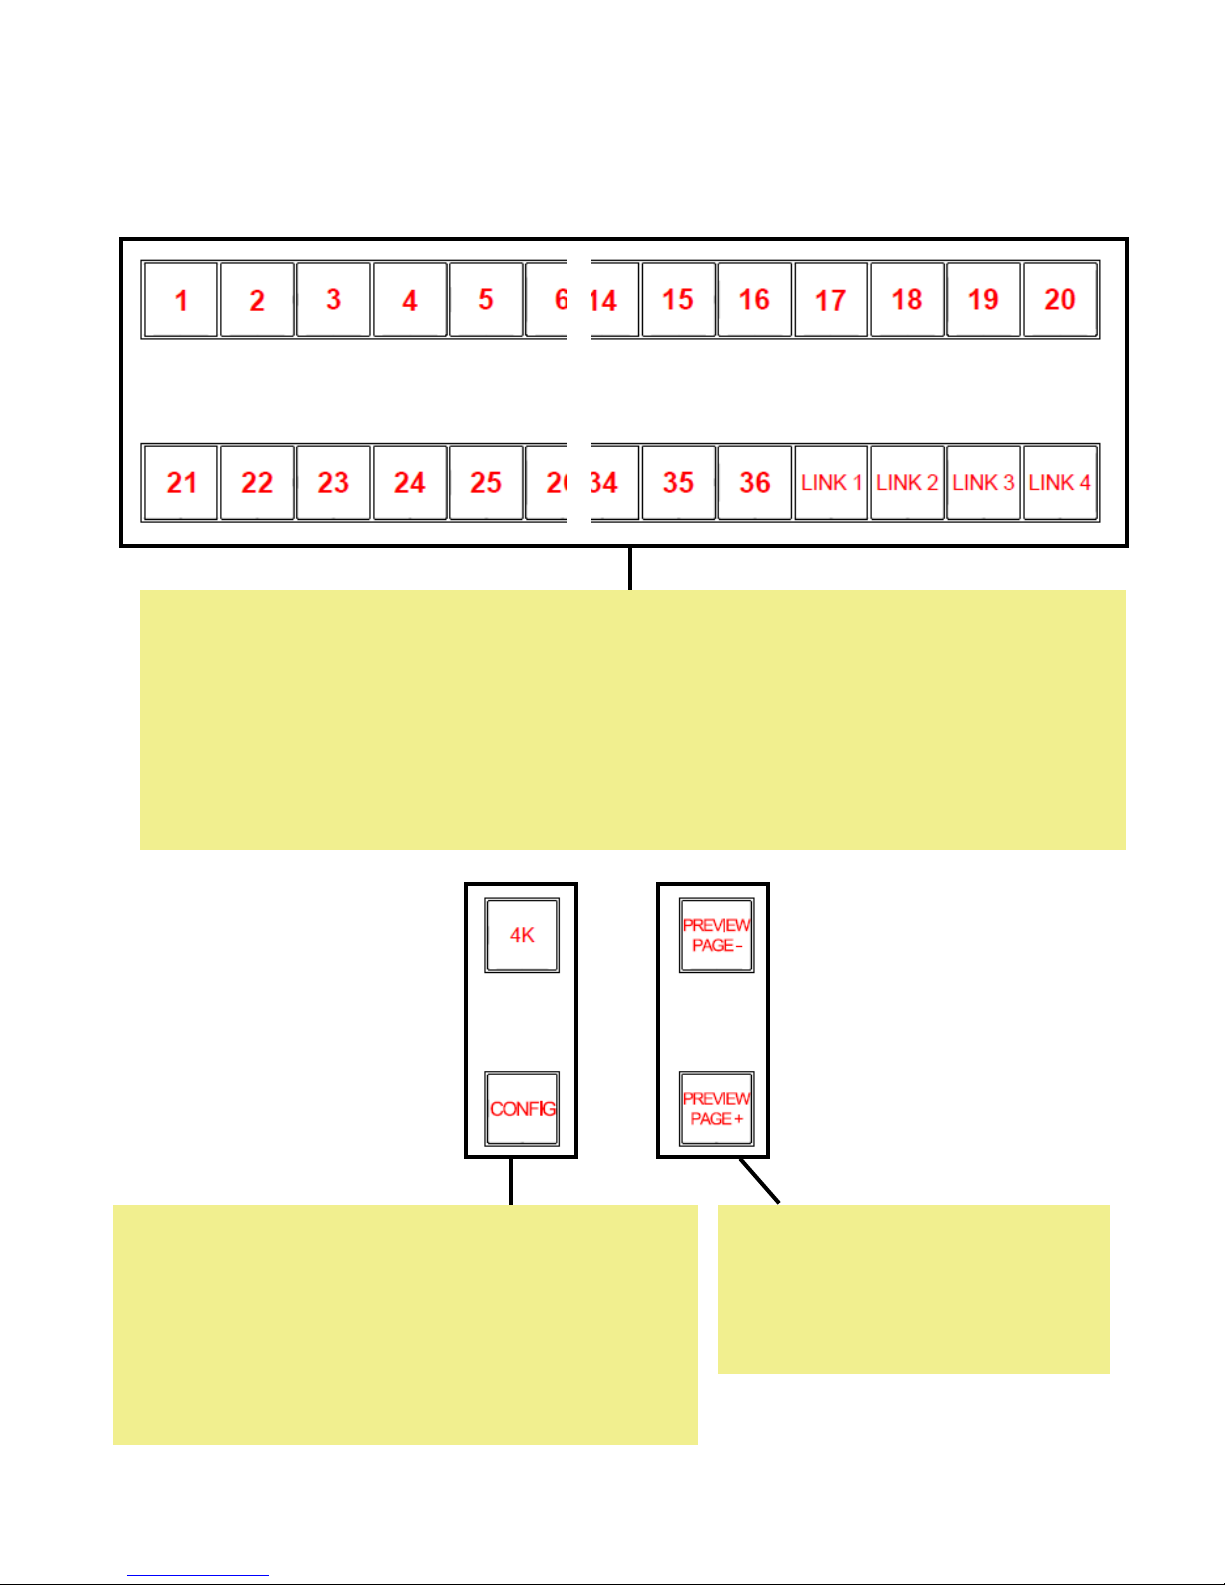
Input Sources Section
Button 1-36 stands for input sources of MIG-V8 , 1-24 stand for input sources of
MIG-V6.
Whenever there is an input source, the light will become green, otherwise it is red.
The light will blink when the input source is using.
LINK 1-4 stands for the 4 input channel of link board.
Change the input source by touching different button.
Press 4K button will show the 4K input source;
Press 4K button+4K input source number
button will show the compressed 4K input
signal to the current layer;
CONFIG:a shortcut to the input setting menu;
PREVIEW PAGE+ and PREVIEW
PAGE-switch the page of input
sources
10
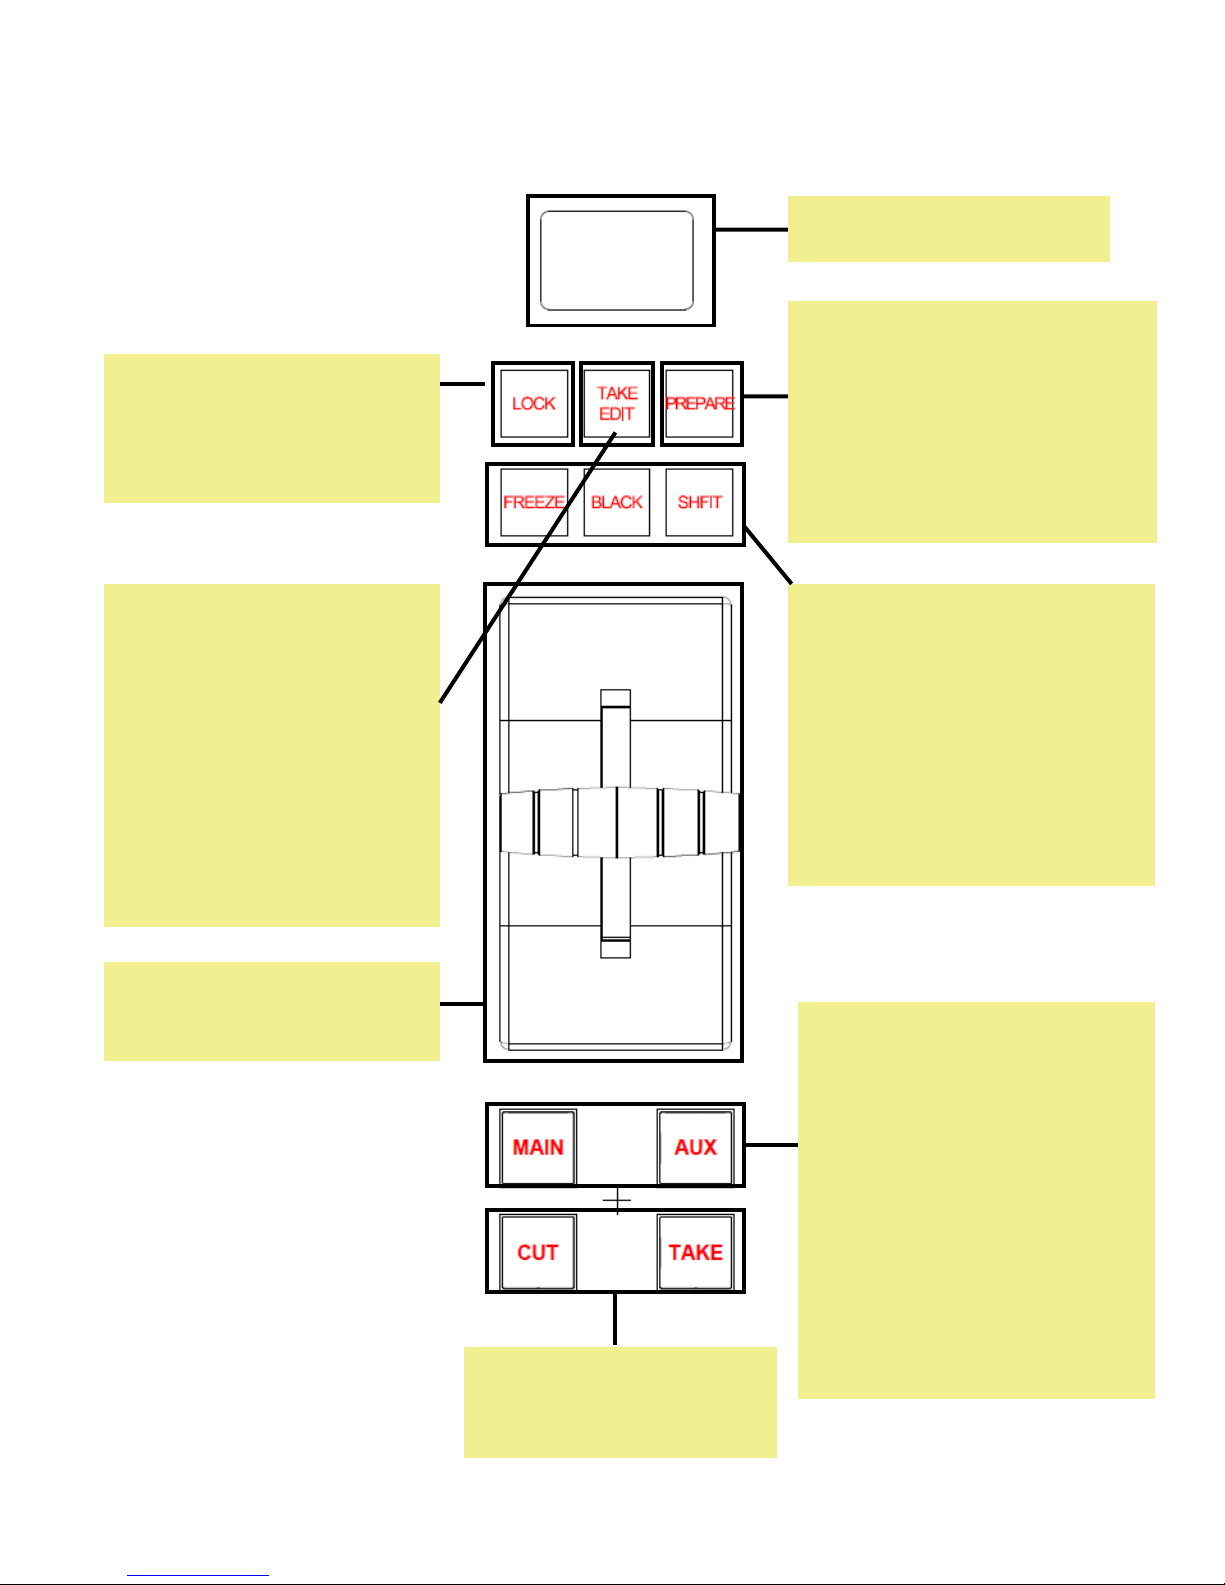
Switching Section
T-Bar:manual bar for
switching
Long press Shift + Black:The
PGM will become black;
Long press Shift + Freeze:
The PGM will be frozen at
the last frame.
Long press SHIFT+LOCK,
it will lock all the buttons,
including T-Bar;
Press SHIFT+TAKE EDIT:
At this mode, the PVW
and PGM will be the
same. Whenever you do
any setting on PVW, the
PGM will be changed at
the same time.
Cut:fast switching
Take: fade in & fade out
When switching, you can
switch only PGM, only AUX,
or both.
Press MAIN,it will only
switch PGM;
Press AUX,it will only
switch AUX;
When MAIN+AUX are on, it
will switch both.
PREPARE:When it is on, it
allows switching.
When it is off,it
does not allow
switching.
The switching status
 Loading...