


The innovating Windows Mobile™-based Telematic
CONTENTS
Solution for the car
OVERVIEW .............................................................................. 3
The hands-free kit .................................................................... 3
Message reader ......................................................................... 5
Media player ............................................................................. 6
Road safety ............................................................................... 7
DISPLAY AND BUTTONS ON THE STEERING
WHEEL....................................................................................... 8
HANDS-FREE KIT QUICK REFERENCE GUIDE............. 10
Prepare your mobile phone phonebook ............................ 10
Try out the voice commands ............................................... 11
Pair your mobile phone ......................................................... 11
Make a phone call .................................................................... 12
MESSAGE READER QUICK REFERENCE GUIDE ............ 13
MEDIA PLAYER QUICK REFERENCE GUIDE ................ 13
HOW TO USE Blue&Me™ ................................................ 14
Steering wheel controls ......................................................... 14
Voice commands ..................................................................... 14
Display ....................................................................................... 17
Audio ......................................................................................... 17
Blue&Me™ function menu ................................................. 17
HANDS-FREE KIT FUNCTIONS......................................... 18
Making a phone call ................................................................. 19
Incoming calls ........................................................................... 22
Managing phone calls .............................................................. 23
Conference call function ........................................................ 23
MESSAGE READER FUNCTIONS....................................... 24
How to read the last SMS text received............................. 24
Inbox ........................................................................................... 25
Managing messages................................................................... 25
Deleting all messages............................................................... 26
Signal types................................................................................. 26
MEDIA PLAYER FUNCTIONS ............................................ 27
How to connect the USB device to Blue&Me™............ 27
How to manage the media library ....................................... 27
- Selection by folder ............................................................... 28
- Selection by artist ................................................................. 29
- Selection by genre ................................................................ 29
- Selection by album ............................................................... 30
- Selection by playlist .............................................................. 30

Playing audio tracks ................................................................ 31
- Shuffle playback of the whole media library ..................... 31
- Now playing (track data) .................................................... 31
- Audio play .............................................................................. 31
- Pause ....................................................................................... 31
- Play ........................................................................................... 31
- Stop ......................................................................................... 32
- Next track .............................................................................. 32
- Previous track ....................................................................... 32
- Changing audio source ........................................................ 32
iPod™ ........................................................................................ 32
Practical hints for using the media player............................ 33
- Scrolling .................................................................................. 33
- Organizing media files .......................................................... 33
- Building the media library on Blue&Me™ .................... 33
- Building playlists for Blue&Me™ .................................... 33
Blue&Me™ SUPPORTED MOBILE PHONES ............... 43
Mobile phones with Bluetooth
®
wireless technology ...... 43
- “Pull” phones
(phonebook automatically downloaded) ......................... 44
- “Push” phones
(phonebook not automatically downloaded) ................. 44
- Mobile phones with message reader................................. 44
Supported USB memory devices ......................................... 44
- USB memory devices ........................................................... 44
- Supported digital audio files ............................................... 45
- Supported playlist formats................................................... 46
VOICE COMMANDS (KEYWORDS) - SUMMARY ...... 47
Always available voice commands......................................... 47
Hands-free phone kit voice commands............................... 48
Message reader voice commands (keywords) ................... 50
Media player voice commands............................................... 51
Settings function voice commands........................................ 54
SETTINGS FUNCTIONS ....................................................... 34
Pairing a mobile phone ........................................................... 34
Managing user data .................................................................. 37
Advanced options ................................................................... 40
- Accessing the device ID ....................................................... 40
- Changing the GPRS code .................................................... 40
Media player settings .............................................................. 41
- Autoplay ................................................................................. 41
- Shuffle ...................................................................................... 42
- Loop ........................................................................................ 42
Exit the settings menu ............................................................ 43
TROUBLESHOOTING........................................................... 55
Hands-free kit .......................................................................... 55
- General - display screen ...................................................... 55
Message reader ......................................................................... 63
Media player .............................................................................. 65
iPod™ ........................................................................................ 69
PERSONAL DATA PROTECTION .................................... 71
SYSTEM SOFTWARE USE NOTICE .................................. 72

Hands-free kit with Bluetooth®wireless technology,
message reader and media player
OVERVIEW
Windows Mobile™-based Fiat Blue&Me™
is a personal telematic system enabling to
use communication and entertainment applications expressly designed for use in the
car.
The Blue&Me™ system installed on your
car is equipped with hands-free kit, message reader and media player, and it is preset for future installation of additional services.
The Blue&Me™ system, fully integral
with voice commands, buttons on the
steering wheel and multifunction display
messages, gives you the possibility of interacting with your Bluetooth
technology mobile phone (even if you
keep it in your pocket or bag) without having to take your eyes off the road or removing your hands from the steering
wheel. To use voice commands you are
not required to train the voice recognition
system to recognize your voice. This implies that the system is nearly equally performing with different persons, i.e.: the
voice recognition system is of the “speaker independent” type.
®
wireless
With this system you can also play your
favourite music stored on USB device and
select tracks and playback modes with
both voice commands or buttons on the
steering wheel.
THE HANDS-FREE KIT
The basic characteristic of this hands-free
kit is voice recognition with Bluetooth
wireless technology. With this system you
can make and receive calls safely and securely using either voice commands or
buttons on the steering wheel under whatever driving condition without having to
take your eyes off the road or removing
your hands from the steering wheel, as required by current law regulations.
Bluetooth
wireless connection between your mobile
phone and the hands-free kit installed on
your car.
®
wireless technology enables
®
To use the hands-free kit, you need a
Bluetooth®wireless technology enabled
mobile phone. This hands-free kit gives
you the possibility of interacting vocally
with your mobile phone while driving,
even if your mobile device does not feature this capability. You can also interact
with your mobile phone manually and visually using the steering wheel controls
and the instrument panel multifunction display.
For further details on the mobile phones
supported by Blue&Me™, refer to section Blue&Me™ SUPPORTED MOBILE
PHONES.
To get started with Blue&Me™ hands-
free kit with voice recognition, you have
to simply pair your Bluetooth®wireless
technology enabled mobile phone with the
system.
Pairing is an operation that has to be made
only once.
3

Note
During the mobile phone pairing procedure, Blue&Me™ attempts to detect a
phone equipped with Bluetooth®wireless technology within range and then establishes the connection using a Personal
Identification Number (PIN).
Once your phone is paired, you have the
option to transfer your mobile phone contacts to the hands-free kit, to make a
phone call either by using the contacts list
or directly pronouncing the phone number, to answer a call and also to answer
another incoming phone call.
To interact with Blue&Me
either buttons on the steering wheel and
voice commands. With voice recognition,
you can perform system function by
speaking voice commands, also identified
as “keywords”. When the system recognizes a keyword, it will respond with the
appropriate action. Voice recognition is an
easy and convenient way to use
Blue&Me™.
™
you can use
All the system functions are available within the Blue&Me
car is not moving, you can surf through the
menu using either buttons on the steering
wheel and voice commands. When you
are travelling, you can interact with
Blue&Me
ing wheel or voice commands relevant only to phone functions (LAST CALLS and
PHONEBOOK) and media player. To
activate settings when travelling you can
only use voice commands.
The hands-free kit enables the following
operations:
❒
Contact calling by voice - you can call
a contact in your mobile phone phonebook using your voice. You can also call
a contact in your phonebook by scanning through the entries on the multifunction display.
(To use this option you have to transfer
your mobile phone contacts to the handsfree kit phonebook).
™
Main Menu. When the
™
using buttons on the steer-
❒
Digit-dialling by voice - you can dial a
phone number by speaking the digits to
be dialled.
❒
To call the SMS text sender - call directly the last SMS text sender or the
sender of a message received and stored
yet in the Blue&Me™inbox.
❒
To answer a call - you can answer an
incoming call by pressing the key
/MAIN on the steering wheel.
ß
❒
Conference Call - you can call another contact while you are engaged in a
phone conversation (with Bluetooth
phones supporting this option)
❒
Call waiting - while engaged in a phone
conversation, you can receive notification of another incoming phone call, answer the other incoming phone call, and
switch between two ongoing phone conversations. (Call waiting is only supported by a subset of compatible mobile
phones).
®
4

After you place your mobile phone in the
car environment and create a pairing relationship with Blue&Me™, you can make
phone calls by speaking keywords or pressing buttons on the steering wheel. When
using the hands-free phone, the audio output of a phone conversation is heard
through your car sound speakers.
MESSAGE READER
The Blue&Me™ message reader enables
automatic reading, through the car sound
system, of the SMS texts you receive on
your Bluetooth
®
wireless technology
mobile phone. The message reader will also interpret any abbreviation and emoticon contained in the SMS text.
Message reader functions are managed by
the control buttons on the steering wheel
or by the Blue&Me™ voice commands.
The Blue&Me™ message reader enables
the following operations:
❒
To display on the instrument panel
multifunction display a visual notification signal indicating that you have
received a new SMS text on your
Bluetooth®wireless technology
mobile phone, with sender’s number/name;
Blue&Me™ will also pro-
pose you to read the message received
❒
To manage the list of SMS texts received on your Blue&Me™ paired
mobile phone
❒
To read again the messages received
and stored
❒
To call the SMS text sender using the
buttons on the steering wheel or voice
commands
❒
To delete individual messages or the
entire inbox using the buttons on the
steering wheel or voice commands.
The Blue&Me™ system can also recognize and read abbreviations, if any (e.g.
“ILUVU” will be read like “I love you”) and
interpret the most usual emoticons (e.g.
:-) will be read like “Smile”), adopted
nowadays to write SMS texts.
5

MEDIA PLAYER
With the Blue&Me™ media player you
can play, via the car sound system, the digital audio files stored on a USB device by
simply connecting it to the USB port located in the car.
In this way, while you are driving you can
play your favourite personal music collections.
❒
iPod™ player - see dedicated paragraph.
The media player enables the following operations:
❒
Digital audio playback - you can play
all your digital audio files (.mp3, .wma,
.wav, .aac) or play a customized playlist
(.m3u or .wpl format).
❒
Audio file selection by category you can play all audio files of a certain
category, e.g.: album, artist or genre.
❒
Playback options - while playing tracks
you can select the following options: Play,
Stop, Next track, Previous track, Shuffle and
Loop track.
Note
The media player does not support audio
files compressed with other formats and
DRM (Digital Right Management) protected audio files. Non-supported audio
files that may be present on the USB device will be ignored.
To use the media player, you have to simply connect (directly or by an extension
lead) your USB device to the car USB
port. Turning the ignition key to MAR,
Blue&Me™ will start building your media library. At the end of this operation
you can surf the whole library and scroll
its categories as required using the buttons on the steering wheel or voice commands. Blue&Me™ will then play your
selection via the car sound system.
6
ROAD SAFETY
WARNING
Operating certain parts of this system while driving can distract your attention away from the road, and possibly cause an accident or other serious consequences; for this reason certain functions shall only be used when
driving conditions are secure and, if required, only when the car is stopped.
WARNING
Read and Follow Instructions: before using your system, read and follow all instructions and safety information provided in this
sequences.
Keep User’s Guide in the car: when kept in the car, the User’s Guide will be a ready reference for you and other users unfamiliar with the
system. Please make certain that before using the system for the first time, all persons have access to the User’s Guide and read its instructions
and safety information carefully.
WARNING: Operating certain parts of this system while driving can distract your attention away from the road, and possibly
cause an accident or other serious consequences. Do not change system settings or enter data non-verbally (using your
hands) while driving. Stop the car in a safe and legal manner before attempting these operations. This is important since
while setting up or changing some functions you might be required to distract your attention away from the road and remove your hands from the wheel.
Voice Command Control: functions within the system may be accomplished using only voice commands. Using voice commands while dri-
ving allows you to operate the system without removing your hands from the wheel.
Prolonged Views of Screen: do not access any function requiring a prolonged view of the screen while you are driving. Pull over in a safe
and legal manner before attempting to access a function of the system requiring prolonged attention. Even occasional short scans to the screen
may be hazardous if your attention has been diverted away from your driving task at a critical time.
Volume Setting: do not raise the volume excessively. Keep the volume at a level where you can still hear outside traffic and emergency signals while driving. Driving while unable to hear these sounds could cause an accident.
Use of Speech Recognition Functions: speech recognition software is inherently a statistical process which is subject to errors. It is your
responsibility to monitor any speech recognition functions included in the system and address any errors.
Distraction Hazard: any features may require manual (non-verbal) setup. Attempting to perform such set-up or insert data while driving can
seriously distract your attention and could cause an accident or other serious consequences. Stop the vehicle in a safe and legal manner before
attempting these operations.
end user manual (“User’s Guide”). Not following precautions found in this User’s Guide can lead to an accident or other serious con-
GENERAL OPERATION
7
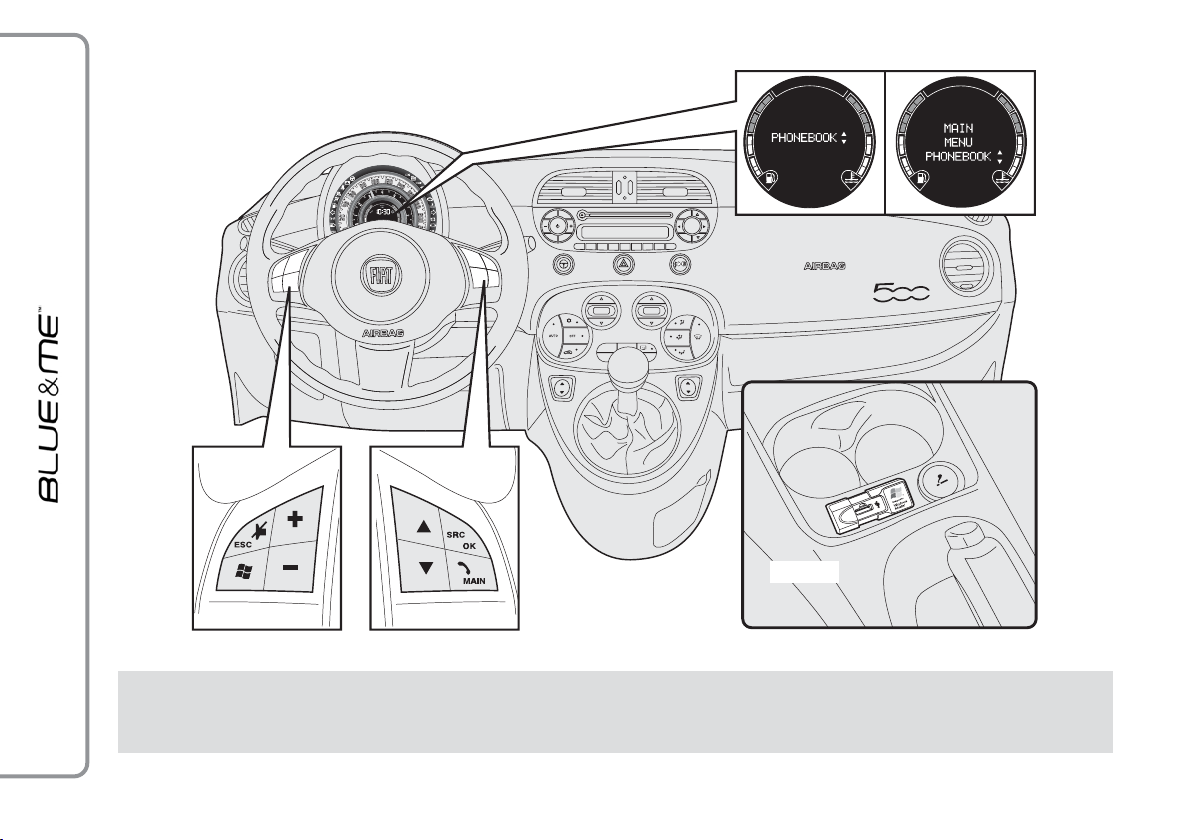
DISPLAY AND BUTTONS
ON THE STEERING WHEEL
Multifunction display Reconfigurable multifunction display
CD
USB port
F0S1000g
In this manual, the descriptions of the menu entries refer to the multifunctional display, which visualises some entries
in abbreviated form compared to the version with reconfigurable multifunctional display.
The reconfigurable multifunctional display visualises the menu entries in full.
fig. 1
8

Button
Short press function
(less than 1 second)
Long press function
(more than 1 second)
/MAIN
ß
/ESC
&
‘
+/
–
N/O
SRC/OK
Notes
❒
For many tasks, the steering wheel buttons SRC/OK and ß/MAIN can be used interchangeably, and you can use the key that is more convenient for you to press.
❒
For both operating modes of steering wheel buttons (short or long press), the function chosen will be activated when you release the button.
– Launch Blue&Me™ Main Menu
– Confirm selected menu option
– Accept an incoming phone call
– Switch between two ongoing phone conversations (call waiting)
– Select displayed message
– Cancel voice recognition
– Cancel a voice announcement
– Interrupt message reading
– Exit Blue&Me™ Main Menu
– Exit the sub-menu and return to the previous menu option
– Exit current menu option without storing settings
– Turn the microphone on/off during a phone conversation
– Mute the ring tone of an incoming call
– Media player Pause on/off
– Activate voice recognition
– Interrupt voice announcement to provide a new voice command
– Adjust the volume of Blue&Me™ functions: hands-free kit, message reader
and media player, voice announcements
– Scroll Blue&Me™ menu items
– Select media player tracks
– Scroll inbox messages
– Confirm manually selected menu option
– Switch phone conversation from the hands-free phone to your mobile phone
and vice versa
– Select audio sources (Radio, CD, CD Changer, Media Player)
– Select displayed message
– Reject an incoming phone
call
– End a phone call (hang up)
–
– Repeat the last utterance
in a voice interaction
–
–
–
9

HANDS-FREE KIT
QUICK REFERENCE
GUIDE
To quickly get started with using the
Blue&Me™ hands-free kit with voice
recognition and Bluetooth®wireless
technology:
❒
Prepare your mobile phone phonebook
❒
Turn the ignition key to MAR
❒
Try out the voice commands
❒
Pair your mobile phone
❒
Make a phone call.
Instructions for each of the above func-
tions are given in the following paragraphs.
PREPARE YOUR MOBILE
PHONE PHONEBOOK
Before creating a pairing relationship
between your mobile phone and
Blue&Me™,
you have contact entries in your mobile
phone phonebook so that you can use
them with the hands-free phone.
If your phonebook is empty, quickly
create several new entries for frequently
dialled phone numbers. For further details,
consult your mobile phone owner’s manual.
To enter properly contacts in your mobile phone phonebook, refer to section
SETTING FUNCTIONS - PAIRING
YOUR MOBILE PHONE.
you should make sure that
IMPORTANT NOTES
❒
The phonebook copied to Blue&Me™
can only be used when the corresponding mobile phone is paired.
❒
Entries stored in SIM card or mobile
phone memory can be transferred to
Blue&Me™ with different procedures, according to your mobile phone
model.
10

TRY OUT THE VOICE
COMMANDS
At each stage of your dialogue with the
system, you can always use the voice command “Help”, to get detailed indications
about the voice commands available at the
current dialogue stage.
To try out the “Help” function, proceed
as follows:
❒
Press the steering wheel button ‘.
❒
After Blue&Me™ plays a tone indicating that voice recognition is active,
pronounce “Help”. Blue&Me™ will
speak the list of voice commands available.
❒
After the general help message is finished, pronounce “Settings” and then
“Help”. Blue&Me™ will speak again
the list of voice commands available for
the SETTINGS menu.
❒
You can then pronounce one of the
available commands and proceed with
the dialogue as you like.
❒
If you need further help, press ‘and
pronounce again “Help”.
PAIR YOUR MOBILE PHONE
IMPORTANT Carry out this operation
only with the car stopped.
To pair your mobile phone, proceed as
follows:
❒
Press ‘and pronounce “Settings”
then, at the end of the Blue&Me™
message say “Pairing”.
❒
The system will show the phone pairing PIN number on the multifunction
display. For the next two steps, consult
your mobile phone owner’s manual
about Bluetooth®pairing.
❒
On your mobile phone, query for devices equipped with Bluetooth®wireless technology (the setting on your
mobile phone might be called Discover
or New Device). In this list you will find
“Blue&Me” (name identifying the
Blue&Me
lect it.
™
system on your car): se-
❒
When prompted by the mobile phone,
enter the PIN number shown on the instrument panel display using your mobile phone keypad. If pairing is successful, the system will say “Connecting”
and at the end the display will show as
confirmation message, the ID of the
paired mobile phone.
It is essential to wait until you see this confirmation message on the display. Pressing
/MAIN or &/ESC before the message
ß
is displayed may cancel the pairing process.
If the pairing process fails, an error message will be displayed: in this event repeat
the pairing procedure.
❒
At first pairing, Blue&Me™ will say
“Welcome” immediately after connecting. This message will no longer be heard
at next pairing procedures.
11

❒
Blue&Me™ will ask if you would like
to copy your paired phone phonebook
to Blue&Me™. It is recommended to
copy it. To start copying the phonebook
say “Yes”, otherwise say “No”.
❒
For certain mobile phones the phonebook is not copied automatically, in this
case you must transfer the phonebook
contacts using your mobile phone keypad. If Blue&Me™ asks you to do this,
then perform this procedure following
the instructions specific to your mobile
phone and press ß/MAIN when you
have finished.
MAKING A PHONE CALL
Assume that “John” is one of the contacts
stored in your phonebook.
To call John, proceed as follows:
❒
Press the steering wheel button ‘and
pronounce “Call John”.
❒
If the name is recognized, the system
will display the recognized contact’s information on the display screen.
If there is just one phone number for John
in your phonebook, the system will ask if
you would like to call John. To start the
call say “Yes”, otherwise say “No”.
If John has several phone numbers, the
system will ask which phone number you
would like to call (e.g.: “Call John (at)
Work or (at) Home?”). Answer with
the type of required phone number (e.g.:
“(at) Home”).
If John has several phone numbers but the
“location” (i.e.: the type of phone number
like work, home, etc.) is missing, the system will display the selected contact and
a list of related phone numbers. The
hands-free phone system will ask if you
would like to call the phone number displayed. To respond with “yes”, pronounce
“Yes”, otherwise pronounce “No”. If this
is the correct contact but the wrong number, say “Forward” or “Backward” to
navigate to the phone number you’d like
to call. To call the displayed phone number, pronounce “Call”. You can also surf
the phone number list manually by pressing the buttons on the steering wheel
or Ountil you find the required number.
Now, press ß/MAIN or SRC/OK to
start the call.
❒
To end the phone call, press ß/MAIN
for longer than 1 second.
If you encounter difficulties with any of
the voice recognition operations, consult
section HANDS-FREE KIT - TROUBLESHOOTING.
N
12

MESSAGE READER
QUICK REFERENCE
GUIDE
(with compatible
mobile phones only)
If your mobile phone with Bluetooth
wireless technology supports the message
reader function, at the arrival of a new
SMS text, Blue&Me™ plays a tone and it
will ask if you would like to read it.
❒
pronounce “Yes” or press ß/MAIN
or SRC/OK to read the last message
received
❒
pronounce “No” or press &/ESC, the
system will store the message so you
can read it later
For further details on the message reader SMS, refer to section “MESSAGE
READER FUNCTIONS”.
If you encounter difficulties with any of
the message reader settings, consult section “MESSAGE READER – TROUBLESHOOTING”
®
MEDIA PLAYER QUICK
REFERENCE GUIDE
To start playing the digital audio files
stored on your USB device, proceed as
follows:
❒
Copy tracks to your USB device
(Blue&Me™ recognizes .wma, .mp3
.wav and aac formats for audio files and
.wpl and .m3u formats for playlists).
❒
USB devices without USB wire: just
connect the USB device (directly or by
an extension lead) to the USB port on
the car (see fig. 1).
❒
USB devices with USB wire: use the
wire to connect the USB device to the
USB port on the car (see fig. 1).
❒
Turn the ignition key to MAR.
Blue&Me™ will start automatically to
play your digital tracks selecting them
from the library built at the moment the
USB device is connected.
❒
After Blue&Me™ has built the library
containing your digital audio files, you can
select and play tracks, albums, artists and
playlists by interacting manually or verbally with Blue&Me™. Building the library may require a few minutes if your
USB device contains several files.
❒
iPod™ player - see dedicated paragraph.
13

❒
You can also decide whether to play audio files automatically when connecting
the USB device or to play them upon
your command.
For further details on media player, refer
to section MEDIA PLAYER FUNCTIONS.
If you encounter difficulties with any of
the voice recognition operations, consult
section MEDIA PLAYER - TROUBLESHOOTING.
HOW TO USE
Blue&Me™
CONTROLS STEERING WHEEL
Buttons on the steering wheel (see fig. 1)
are used to perform functions on the
hands-free kit, activating voice recognition,
using the media player functions or selecting a Blue&Me™ menu option.
Certain buttons have multiple functions
which depend on the current state of the
system.
The function chosen in response to a key
press is in some cases controlled by the
duration of the key press (short or long).
For further information read chapter
DISPLAY AND BUTTONS ON THE
STEERING WHEEL.
Note
Instructions concerning manual controls
are identified in the text by symbol ?.
VOICE COMMANDS
Voice commands can be pronounced by
the driver, which does not need to change
his/her normal driving position to be heard
by the system, since the microphone is
properly located and oriented to this purpose.
Voice commands, which are words recognized by the system, are identified as
“keywords”.
The hands-free phone system recognizes
and responds to a preset list of voice commands. The list of available voice commands depends on the keyword level that
you are currently on. The current list is always available by pressing
nouncing “Help” or, pronouncing “Help”
after whichever question of the system.
Blue&Me™ also recognizes personalized
versions of voice commands like the name
of a contact in your phonebook.
There is no voice training required for using voice commands with this system.
‘
and pro-
14

To issue a voice command to the system,
press
that voice recognition is active. Then,
speak the command in your natural voice
at a moderate pace. When the system recognizes the command, it will acknowledge
your command by speaking a response or
acting on your command.
Voice commands are organized according
to three increasing levels: 1
el and 3rdlevel.
When a valid* 1
nounced, the system will activate 2ndlevel keywords; when a valid 2ndlevel keyword is pronounced, the system will activate 3rdlevel keywords.
If the user pronounces a valid 1stlevel keyword, then the submenu relevant to that
command will remain active until a keyword leading to another level is given or
the interaction is interrupted; the same
rule applies for the other lower levels (2
and 3rdlevel).
and wait for the tone indicating
‘
st
level, 2ndlev-
st
level keyword is pro-
nd
For the list of available keywords, re-
fer to section VOICE COMMANDS
(KEYWORDS) - SUMMARY.
To repeat the last system voice announcement, press
second or press shortly
nounce “Repeat”.
The system can issue voice announcements. A voice announcement is a spoken
message initiated by the system. To cancel a voice announcement, press
or press
A voice interaction is a two-way communication/spoken exchange between system
and user. To initiate a voice interaction,
press
rupt a conversation and start a new one,
press ‘at any time during the conversation and pronounce a vocal command.
To stop an ongoing interaction press
/ESC. You will hear a tone indicating
&
when voice recognition is deactivated.
and pronounce “Cancel”.
‘
and issue a command. To inter-
‘
for longer than 1
‘
‘
and pro-
&
/ESC,
The hands-free kit help option can speak
the list of commands available to you at
any time, depending on the keyword level that you are currently on. To use the
help system, say “Help Listen to the list
of currently available commands and decide on which command you’d like to issue to the system.
Adjust the volume of phone calls to a level that is comfortable and safe while the
car is in motion. To adjust the default volume of Blue&Me™, see paragraph “EXTERNAL AUDIO VOL function” in the
sound system owner handbook. To temporarily adjust the volume of the current
phone call, press + or – or adjust the position of the radio knob. After the phone
call is disconnected, the volume will revert
back to the original level.
You can press + or – also to adjust the
volume of the current Blue&Me™ voice
announcement.
Please remember that to interrupt a voice
announcement, you can always press
at any time during a voice interaction and
give a new voice command.
‘
* Valid means that the keyword pronounced is included in the Blue&Me™ “dictionary” and that can therefore be recognized by
the system for the concerned level.
15

Notes
❒
Instructions concerning voice commands are identified in the text by sym-
.
bol
}
❒
After you press ‘, if you do not issue a voice command within a few seconds, the system will prompt you to
pronounce a voice command. If you do
not respond, then voice recognition
shuts off. It is the same case with not
responding to a question during a voice
interaction. You will hear a tone indicating when voice recognition is deactivated.
❒
When the system fails to recognize
your voice command, it will give you another opportunity to re-pronounce the
voice command. If you are unsure of
whether the voice command is appropriate for the given context, pronounce
“Help”.
Using voice recognition
The voice recognition system may occasionally misrecognize a voice command.
To ensure that your voice commands are
always recognized by the system, use the
following guidelines:
❒
After pressing ‘, pronounce the voice
command after the system plays a tone
indicating that voice recognition is active.
❒
After the system asks a question, wait
for one second before pronouncing the
response to ensure that voice recognition is active.
❒
If you want to pronounce a command
without waiting that the system has finished its announcement or question,
you can press again shortly ‘to interrupt what the system is saying and
pronounce your command.
❒
Speak at a normal volume.
❒
Pronounce words clearly, in your natural voice at a moderate pace, without
stops.
❒
If possible, try to minimize background
noise in the car.
❒
Ask the other passengers to keep silent
while you are pronouncing voice commands to prevent misunderstanding
since the system could recognize other words (in addition to or different
from your voice command) if several
people are speaking.
❒
If your car has a convertible top, close
it before using voice recognition.
Notes
As concerns countries where the version
in native language is not available, voice
recognition of the different commands and
phonebook contacts could be difficult.
You are therefore recommended to adopt
a pronunciation/accent meeting the language present on Blue&Me™.
To change the voice recognition language
contact Fiat Dealership or consult the dedicated site at www.fiat.com.
16

DISPLAY
The different Blue&Me
™
Main Menu op-
tions are displayed on the instrument panel multifunction display (see fig. 1).
The display shows the following information:
❒
Status information for the Bluetooth
®
wireless technology-enabled mobile
phone.
❒;indicates that Blue&Me™is cur-
rently connected with a Bluetooth
®
wireless technology-enabled mobile
phone.
❒
NO BLUETOOTH - the connection
is disconnected (versions with multifunction display).
❒
The absence of symbol ;indicates that
connection is disconnected (versions
with multifunction display).
❒
Symbol Ãindicates that current call
is the first incoming one, symbol present only with call waiting (versions
with reconfigurable multifunction display).
❒
Symbol Àindicates that current call
is the second incoming one, symbol
present only with call waiting (versions
with reconfigurable multifunction display).
❒
Symbol ‰indicates the Conference
Call (versions with reconfigurable multifunction display).
❒
Name of your current mobile phone
carrier (“- - - - - - - -” displayed if not
available).
❒
Info about message received, message
sender phone number or name
(if stored in the phonebook).
❒
Data concerning the track being played
by the media player.
❒
Current Blue&Me™information or
current menu option.
AUDIO
Blue&Me™ uses your in-car audio equip-
ment to deliver audio output (hands-free
phone conversation, media player, voice
announcements and tone signals). For this
purpose, the current audio program is
muted for the time needed.
You can always adjust the audio volume
either through the radio or the steering
wheel controls.
When the audio system is used by
Blue&Me™, the radio display will show
dedicated messages.
Blue&Me™ FUNCTION MENU
Blue&Me™ Main Menu displays options
within a structured list. Each option (item)
in the menu can be viewed on the instrument panel multifunction display. Available
options enable to activate the different
functions or to change the settings of your
Blue&Me™ system.
17

The Main Menu includes the following options:
❒
LAST CALLS - this submenu allows
you to view a list of the recent calls
made or received. This list is either
downloaded from your mobile phone
memory, or accumulated via use of the
hands-free phone, or both.
❒
PHONEBOOK - this submenu allows
you to view the phone numbers in
your phonebook and to select one to
dial. If there is a large amount of entries
in your phonebook, then the items will
be contained in groups within alphabetical submenus indicating the contacts
within that group. The number of contacts within a group depends on the
amount of entries in your phonebook.
❒
MESSAGE READER - This submenu
enables to read the last message received, to call the message sender or to
delete the last message received. It
is possible to store up to 20 received
messages in the dedicated inbox and to
play them later, to call the message
sender or to delete the messages.
It is possible to select notification signals for the arrival of a new SMS text.
❒
MEDIA PLAYER - this submenu allows to scroll the digital audio tracks in
the library by folder, artist, genre, album or by playlist. This sub-menu is to
be used to select and play tracks.
iPod™ player - see dedicated paragraph.
❒
SETTINGS - this submenu allows you
to perform tasks such as managing your
phonebook entries, creating a pairing
relationship, or setting a connection ID.
Launching the Main Menu
To launch the Blue&Me™ Main Menu,
press ß/MAIN, you can then interact with
the system through the buttons on the
steering wheel.
Navigating the menu options
To navigate through the items in a menu,
press NorO.
When the number of characters in a display message is too long for the allowable
number of display characters, the text in
the display message will be cut to fit the
display size.
To select the option shown on the display,
press SRC/OK or
To quit the selected option or to exit a
submenu, press &/ /ESC.
/MAIN.
ß
HANDS-FREE KIT
FUNCTIONS
Blue&Me™ lets you make and receive
phone calls on your Bluetooth®wireless
technology-enabled mobile phone using
voice commands (keywords) or steering
wheel buttons.
By using voice commands, you can make
calls to people in your phonebook by pronouncing their first and/or last name, or
you can make phone calls to numbers not
stored in your phonebook by pronouncing the digits of the phone number or call
the last message sender.
By using steering wheel buttons, you can
make phone calls to people in your phonebook or call history list by selecting the associated item in the LAST CALLS or
PHONEBOOK submenus.
In addition, you can use other calling features such as responding to incoming calls,
redial, callback, call waiting, read a message or delete it.
If you encounter difficulties with any of
the voice recognition operations, consult
section HANDS-FREE KIT - TROUBLESHOOTING.
18

Notes
❒
Before you can make and receive
phone calls using the hands-free kit, you
must create a pairing relationship for
your mobile phone.
For further information read chapter
SETTING FUNCTIONS – PAIRING
YOUR MOBILE PHONE.
❒
To activate the hands-free kit, the ignition key shall be at MAR.
❒
If during a phone call you turn the ignition key to STOP, you can continue your conversation through the
hands-free kit for other 15 minutes.
MAKING A PHONE CALL
You can make a phone call using one of
the following methods:
❒
Calling a contact in your phonebook
❒
Dialling a phone number using voice
commands
❒
Dialling a phone number using the mobile phone keypad
❒
Calling a phone number using call history (last calls)
❒
Call the sender of a received SMS message
For further information refer to chap-
ter FUNCTIONS OF SMS MESSAGES
READER, paragraph SMS MESSAGES
MANAGEMENT
Calling a contact in your
phonebook
It is a requirement that you create a pairing relationship and download your mobile phone phonebook to the hands-free
phone system to use this dialing feature.
To call a contact in your phonebook
using manual interaction, proceed as
?
follows:
Press ß/MAIN to open the Main
Menu.
Select PHONEBOOK and then
press SRC/OK or ß/MAIN.
Press NorOto select the alphabetical grouping which your contact’s name belongs to, press
SRC/OK or ß/MAIN and then select the required contact.
If the contact has just one phone
number, press SRC/OK or
/MAIN to start the call.
ß
If the contact has multiple phone
numbers, press SRC/OK or
/MAIN to view the different
ß
phone numbers and then select the
required one by NorOand press
SRC/OK or ß/MAIN to start the
call.
To end the phone call, press
/MAIN for longer than 1 second.
ß
19

Or, using voice interaction:
}
Assume you would like to call the
contact “John” in your mobile
phone phonebook.
Press
John” or “Call John (on/at) Mobile“ (in the previous statement, the
keyword “Mobile” represents the
type of phone number you would
like to call. The phone number type
can either be “(at) Home”, “(at)
Work”, or “(on/at) Other”).
If the name is recognized, the system will display the recognized contact’s information (John, in the example) on the display screen.
If John has just one phone number,
the system will ask if you would like
to call John. To start the call say
“Yes”, otherwise say “No”.
If John has several phone numbers,
the system will ask which phone
number you would like to call (e.g.:
“Call John (at) Work or (at)
Home?”). Answer with the type of
required phone number (e.g.: “(at)
Home”).
and pronounce “Call
‘
If John has several phone numbers
but the “location” (i.e.: the type of
phone number like work, home,
etc.) is missing, the system will display the selected contact and a list
of related phone numbers.
To call the displayed phone number,
pronounce “Call”.
If the contact is correct but the
phone number is wrong, you can
surf the phone number list manually by pressing NorO. When you
find the required number, press
/MAIN or SRC/OK to start the
ß
call.
To end the phone call, press
/MAIN for longer than 1 second.
ß
Practical hint
When you call a contact with multiple
phone numbers, use the “at location” portion of the voice command (e.g.: “(at)
Home”, “(at) Work”, “(on/at) Mobile”). This will shorten the amount of
steps required to make the phone call.
Dialling a phone number using
voice commands
To dial a phone number using voice
interaction, proceed as follows:
}
Press
The system will respond with
“Number, please”.
Pronounce the phone number as a
sequence of single digits (e.g.: “0”,
“1”, “2”, “3”, “4”, “5”, “6”, “7”, “8”,
“9”, “+” (plus), “#” (pound) or “*”
(star).
For example, 0113290103 has to be
pronounced as: “zero, one, one,
three, two, nine, zero, one, zero,
three”.
The system will repeat the complete
phone number and display it.
If the number is complete, pronounce “Dial”. If you have not finished speaking the phone number,
then pronounce the remaining digits and then pronounce “Dial”.
and pronounce “Dial”.
‘
20

The system will start the call to the
displayed phone number.
To end the phone call, press
/MAIN for longer than 1 second.
ß
You can pronounce the sequence of
phone number digits in “digit
groups” which allows you to verify
the recognized number in several
small portions. Digit groups are created by the pauses you use while
pronouncing the sequence of digits.
If you pause after pronouncing several digits, a digit group is created.
The system will repeat the recognized digits.
If the spoken digits are correct, you
can continue pronouncing the phone
number. If the spoken digits are incorrect, you can delete the digit
group by pronouncing “Delete”.
The system will delete the last group
of numbers and display the partiallydialled phone number. Then, you can
re-pronounce the digit group and also the remaining phone number digits.
To cancel the phone call, pronounce
“Cancel”.
To cancel the phone call and start
dialling again, pronounce “Start
over”.
To ask the system to repeat the recognized phone number, pronounce
“Repeat”. If no phone number was
dialled, the system says “No num-
ber available”.
If the repeated phone number is
correct, pronounce “Dial” to start
the call.
Note
When dialling a phone number by voice
commands, it is essential to minimize
background noise in the car and to ask the
other passengers to keep silent while you
are speaking digits. Since the system is of
the speaker independent type it can recognize also other voices; there is therefore the risk that some numbers are accidentally recognized, added to correct
numbers or not recognized.
Dialling a phone number using
the mobile phone keypad
Alternatively, you can dial a phone
number using your mobile phone
?
keypad and then continue your conversation using the hands-free
phone system.
It is a requirement that you create
a pairing relationship and that the
mobile phone is within range of the
hands-free phone system of your
car.
To dial a phone number using your
mobile phone keypad, proceed as
follows:
❒
Dial the phone number on your
mobile phone keypad and connect the phone call following the
procedure required by your mobile phone.
❒
Conduct the conversation using
the hands-free phone system.
❒
To end the phone call, press
/MAIN for longer than 1 sec-
ß
ond, or end the phone call from
your mobile phone keypad.
21

Calling a phone number using
call history (last calls)
LAST CALLS option is a list of the re-
cent calls made or received. It can consist of up to ten incoming calls, up to ten
outgoing calls and up to five missed calls.
To dial a phone number using
manual interaction, proceed as fol-
?
lows:
❒
Press ß/MAIN to open the Main
Menu.
❒
Select LAST CALLS and then
press SRC/OK or ß/MAIN.
❒
The system will present a list of
phone numbers. Use
select the required phone number. Then press SRC/OK or
/MAIN to start the call.
ß
❒
To end the phone call, press
/MAIN for longer than 1 sec-
ß
ond.
Or, using voice interaction:
}
To call back the last incoming phone
number, press ‘and pronounce
“Callback”.
NorO
to
The system will display information
about the last caller and ask if you
would like to call back this contact.
To respond with “yes”, pronounce
“Yes”, otherwise say “No”.
To redial the last phone number you
called, pronounce “Redial”. The
system will display information
about the last contact you called and
will ask if you would like to redial
this phone number. To redial the
last phone number called, say
“Yes”, otherwise say “No”.
INCOMING CALLS
With the hands-free phone system you
can respond to incoming phone calls using steering wheel buttons. When a phone
call is received, the system will display information about the caller’s identity if
available.
The incoming phone call will have customized ring tone (if this function is available on your mobile phone).
Answering a phone call
❒
To answer the phone call, press
/MAIN.
ß
❒
To end the phone call, press ß/MAIN
for longer than 1 second.
Rejecting a phone call
❒
To reject the phone call, press
/MAIN for longer than 1 second.
ß
Ignoring a phone call
❒
To ignore the phone call and mute the
phone call ring tone, press &/ESC.
22

Answering an incoming phone call
during an active phone conversation
To answer an incoming phone call while
another phone conversation is active,
press ß/MAIN. The system will switch
to the incoming phone call and put the
current phone conversation on hold.
Note
Certain mobile phones support the ability to transmit your contacts’ ring tones to
the hands-free phone system and play customized ring tones for incoming phone
calls. In this case the incoming phone calls
will have your mobile phone customized
ring tones.
MANAGING PHONE CALLS
Transferring a phone conversation
from your mobile phone to the
hands-free phone system
If you enter the car during a phone conversation from your mobile phone and you
want to continue the conversation using
the car hands-free phone system, you can
transfer the phone conversation to it.
Proceed as follows:
❒
Get into he car and turn the ignition
key to MAR, to activate the hands-free
phone system.
❒
The system will send a message to your
mobile phone offering hands-free
phone support.
❒
To transfer the conversation to the
hands-free phone, enter the information required by your mobile phone.
(This process is different for each mobile phone).
❒
The phone conversation is transferred
to the system.
Transferring a phone conversation
from the hands-free phone to your
mobile phone
To transfer a phone conversation from
the hands-free phone to your mobile
phone, press SRC/OK.
You can talk on your mobile phone and
still use buttons on the steering wheel.
Specifically, you can press ß/MAIN to
switch between two phone calls on your
mobile phone, or press ß/MAIN for
longer than 1 second to end the phone
conversation.
Putting a phone call on hold
To put a phone call on hold and disable
the microphone so that you can talk without being listened to by the caller, press
/ESC.
&
CONFERENCE CALL
FUNCTION
(only with Bluetooth
supporting this function)
With the Conference Call function you
can call another contact while you are engaged in a phone conversation yet. In this
way you can speak with both contacts at
the same time.
To start a Conference call while you are
still engaged in a phone conversation, call
the second required contact as described
in section MAKING A PHONE CALL.
When Conference Call option is active
the display will show “CONFERENCE”.
To end both calls, press button
for long.
®
phones
/MAIN
ß
23

MESSAGE READER
FUNCTIONS
If your mobile phone with Bluetooth
wireless technology supports the message
reader function, at the arrival of a new
SMS text, Blue&Me™ plays a tone and it
will ask if you would like to read it (according to set signal types.
To consult the list of mobile phones and
functions supported, consult the dedicated website www.fiat.com Blue&Me™ or
Customer Services on 00800.3428.0000.
For information on signal types refer to
paragraph Signal types.
If you want Blue&Me™ Nav to
read the SMS message received by
?
manual interaction press SRC/OK
or ß/MAIN. The message will be
read taking into account any abbreviation or emoticon contained in the
text.
Otherwise press &/ESC,
Blue&Me™ will not read the message but it will store it so you can read
the message later (for further information refer to paragraph How to
read the last SMS text received).
®
Or, using voice interaction:
}
if you pronounce “Yes”, Blue&Me™
will read the message, taking into account any abbreviation contained in
the text, otherwise say “No”, the
system will store the message so
you can read it later (for further information refer to paragraph How
to read the last SMS text received).
HOW TO READ THE LAST SMS
TEXT RECEIVED
After receiving a message, Blue&Me™
will store it (both read or not read message) in the inbox (refer to paragraph In-
box).
To read the last message received,
open Blue&Me™ Main menu and
?
select option MESS. READER,
then press SRC/OK or ß/MAIN.
Select the option READ LAST and
press SRC/OK or ß/MAIN,
Blue&Me™ will read the last message received.
Or, using voice interaction:
}
Press ‘and pronounce “Read
last one”, Blue&Me™ will read
the text of the last message received.
24

INBOX
Blue&Me™ will store up to 20 received
messages (in the event of linked messages,
the number of stored messages could be
lower) when your mobile phone is paired
with Bluetooth
the new incoming message will delete the
oldest message received (also if not read
yet). It is also possible to delete just one
message or to delete the entire inbox (refer to paragraph Managing messages).
To read a particular message stored
in the inbox, open the Blue&Me™
?
Main menu and select the option
MESS. READER, then press
SRC/OK or ß/MAIN.
Select option INBOX, then press
SRC/OK or ß/MAIN. Scroll
stored messages and select the
required one, the system will
display the SMS text sender’s data,
if available. Select READ and
press SRC/OK or ß/MAIN,
Blue&Me™ will read the selected
message.
®
. When the inbox is full,
Or, using voice interaction:
}
Press
reader”, after the acoustic signal
pronounce “Inbox”; Blue&Me™
will display the first message contained in the inbox (and also the
phone number of the SMS text
sender, if stored in the phonebook).
To scroll the Inbox pronounce
“Previous” or “Next”; when the
required message is displayed, say
“Read”, Blue&Me™ will read the
selected message.
Pronounce “Delete” to delete the
selected message.
and pronounce “Message
‘
MANAGING MESSAGES
For every message received, Blue&Me™
enables to:
❒
read it
❒
call directly the sender
❒
delete it
To do this when reading the message
open the Blue&Me™ Main menu
?
and then press buttons SRC/OK or
/MAIN to select the required op-
ß
tion.
Or, using voice interaction:
}
Press ‘and pronounce “Read” or
“Call” or “Delete”, the system will
select the required option.
25

DELETING ALL MESSAGES
Blue&Me™ can store max 20 messages,
a new incoming message will delete the
oldest one received from the inbox. All
messages stored by Blue&Me™ can be
deleted by one single command.
To delete all messages, open the
Blue&Me™ Main menu and select
?
DELETE ALL, then press
SRC/OK or ß/MAIN, the system
will ask DEL. MESS.?, press
SRC/OK or ß/MAIN to delete all
messages, otherwise press &/ESC.
Or, using voice interaction:
}
Press ‘and pronounce “Message
reader”.
After the acoustic signal say
“Delete all”; Blue&Me™ will ask
“Delete all messages from the
vehicle now ?”, say “Yes” to
delete all messages, otherwise say
“No”.
SIGNAL TYPES
With the Blue&Me™ message reader it
is possible to set three notification signals
for the arrival of a new SMS text:
❒
VIS.+ACOUST.:
Blue&Me™ will warn you of a new
incoming message through a visual signal on the instrument panel display and
through an acoustic signal.
Blue&Me™ will also ask if you would
like to read the message.
❒
VIS. SIGNAL:
Blue&Me™ will warn you of a new
incoming message through a visual signal on the instrument panel display.
The message received can also be read
later (see paragraphs How to read the
last SMS text received and Inbox).
❒
READER OFF:
Blue&Me™ deactivates the Message
reader; a new incoming message will
not be signalled and will not be transmitted to the system.
Open the Blue&Me™ Main menu,
select the option MESS. READER,
?
and then press SRC/ OK or
/MAIN. Select the option SIG-
ß
NAL TYPE and scroll the three
available options using buttons Nor
O
, select the required option and
then press SRC/OK or ß/MAIN.
Or, using voice interaction:
}
Press ‘and pronounce “Message
reader”, after the acoustic
signal say “Signal type”;
Blue&Me™ will list the available
options and then you can select the
required one by pronouncing
“Reader off” or “Visual and
acoustic signal”or “Visual signal
only”.
26

MEDIA PLAYER
FUNCTIONS
The MEDIA PLAYER menu enables the
following:
❒
to display tracks stored on your USB
device
❒
to play audio files stored on your USB
device.
Note
Before using the player, read the section
on COMPATIBLE USB STORAGE DEVICES or on using an iPod™ to check that
your USB memory device is compatible
with Blue&Me™.
HOW TO CONNECT THE USB
DEVICE TO Blue&Me™
To connect your USB device to
Blue&Me™, proceed as follows:
❒
Copy tracks on your USB device
(Blue&Me™ recognizes .wma, .mp3
and .wav, .aac formats for audio files and
.wpl and .m3u for playlists).
❒
USB devices without USB wire: just
connect the USB device (directly or by
an extension lead) to the USB port on
the car (see fig. 1).
❒
USB devices with USB wire: use the
wire to connect the USB device to the
USB port on the car (see fig. 1).
The multimedia player does not play audio files covered by digital rights (DRM)
and MP4.
❒
Turn the ignition key to MAR.
Blue&Me™ will start automatically to
play your digital tracks selecting them
from the library built at the moment
the USB device is connected.
❒
If AUTOPLAY is set to“ON”,
Blue&Me™ will start playback auto-
matically.
For further information read chapter
SETTINGS FUNCTION - MEDIA PLAYER.
When building the media library is over, it
will be possible to use Blue&Me™ to to
select and play tracks.
HOW TO MANAGE
THE MEDIA LIBRARY
With the media player you can select the
audio files stored on your USB device, using voice commands or steering wheel
buttons.
You can scroll audio files by folder, artist,
genre, album or playlist and then select the
required category using voice commands.
After selecting the required category, select the required file using manual controls.
Enter track data (e.g.: title, artist, album,
genre) for surfing your media library
friendly.
Note
Not all formats require to enter media info. Formats .mp3 and .wma, .aac recognized by Blue&Me™ require media info
whereas .wav not. If no media info is entered, audio files can only be selected by
folder.
For further details, refer to section
PRACTICAL HINTS FOR USING THE
MEDIA PLAYER.
27

Selection by folder
Track folders on your USB device are displayed in the FOLDERS menu.
To select tracks through manual interaction, proceed as follows:
?
Launch the Main Menu and select
MEDIA PLAYER, then press
SRC/OK or ß/MAIN.
Select FOLDERS, then press
SRC/OK or ß/MAIN.
Scroll folders. To play all folders, select PLAY ALL and then press
SRC/OK or ß/MAIN. To display
folder tracks, press SRC/OK or
/MAIN.
ß
Scroll the selected folder tracks.
To play the required track, select
the title and then press SRC/OK or
/MAIN.
ß
Or, using voice interaction:
}
Press ‘and pronounce “Folders”.
Scroll folders. To play all folder, select PLAY ALL and then press
SRC/OK or ß/MAIN. To display
folder tracks, press SRC/OK or
/MAIN.
ß
Scroll the selected folder tracks. To
play the required track, select the title and then press SRC/OK or
/MAIN.
ß
For further details on FOLDERS,
menu customization, see section
PRACTICAL HINTS FOR USING
THE MEDIA PLAYER.
28

Selection by artist
To select the tracks of a special
artist using manual interaction, pro-
?
ceed as follows:
Launch the Main Menu, select ME-
DIA PLAYER, and then press
SRC/OK or
Select ARTISTS and then press
SRC/OK or ß/MAIN.
Scroll artists. To select the required
artist, press SRC/OK or ß/MAIN.
Scroll the artist’s albums. To play all
the albums of the required artist, select PLAY ALL and press
SRC/OK or
To play an album, select the required album and then press
SRC/OK or ß/MAIN.
To play a track, select the title and
then press SRC/OK or ß/MAIN.
/MAIN.
ß
/MAIN.
ß
Or, using voice interaction:
}
Press ‘and pronounce “Artists”.
Scroll the artist’s albums. To play all
the albums of the required artist, select PLAY ALL and then press
SRC/OK or ß/MAIN. To play an
album, select the required album
and then press SRC/OK or
/MAIN.
ß
To play a track, select the title and
then press SRC/OK or ß/MAIN.
Note
If your USB device contains many audio
files, the ARTISTS menu can be subdivided into alphabetical sub-menus. Alphabetical sub-menu can display just the first
letter of the tracks it contains (e.g.: A-F),
or it can display the first two letters (e.g.:
Aa-Ar).
Selection by genre
To select the tracks of a special
genre using manual interaction, pro-
?
ceed as follows:
Launch the Main Menu, select ME-
DIA PLAYER, and then press
SRC/OK or
Select GENRES and then press
SRC/OK or ß/MAIN.
Scroll genres. To play all the tracks
of the displayed genre, press
SRC/OK or ß/MAIN.
Or, using voice interaction:
}
Press
‘
Scroll genres. To play all the tracks
of the displayed genre, press
SRC/OK or ß/MAIN.
Note
If your USB device contains many audio
files, the GENRES menu can be subdivided into alphabetical sub-menus. Alphabetical sub-menu can display just the first letter of the tracks it contains (e.g.: A-F), or
it can display the first two letters (e.g.: AaAr).
/MAIN.
ß
and pronounce “Genres”.
29

Selection by album
To select an album using manual interaction, proceed as follows:
?
Launch the Main Menu, select MEDIA PLAYER, and then press
SRC/OK or
Select ALBUMS and then press
SRC/OK or ß/MAIN.
Scroll albums. To select the displayed album, press SRC/OK or
/MAIN.
ß
Scroll the album tracks. To play all
the tracks in the album, select
PLAY ALL and press SRC/OK or
/MAIN. To play an album, select
ß
it and then press SRC/OK or
/MAIN.
ß
To play just one track, select the
track title and press SRC/OK or
/MAIN.
ß
/MAIN.
ß
Or, using voice interaction:
}
Press
bums”.
Scroll albums. To select the displayed album, press SRC/OK or
/MAIN.
ß
Scroll the album tracks. To play all the
tracks in the album, select PLAY
ALL and press SRC/OK or
/MAIN.
ß
To play just one track, select the
track title and press SRC/OK or
/MAIN.
ß
Note
If your USB device contains many audio
files, the ALBUMS menu can be subdivided into alphabetical sub-menus. Alphabetical sub-menu can display just the first
letter of the tracks it contains (e.g.: A-F), or
it can display the first two letters (e.g.: AaAr).
and pronounce “Al-
‘
Selection by playlist
Playlists stored in your USB device can be
displayed with the PLAYLISTS menu.
To select a playlist using manual interaction, proceed as follows:
?
Launch the Main Menu, select MEDIA PLAYER, and then press
SRC/OK or ß/MAIN.
Select PLAYLISTS and press
SRC/OK or ß/MAIN.
Scroll playlists. To play the displayed
playlist, press SRC/OK or
/MAIN.
ß
Or, using voice interaction:
}
Press ‘and pronounce “Playlists”.
Scroll playlists. To play the displayed
playlist, press SRC/OK or ß/MAIN.
For further details on how to build
playlists, refer to section PRACTICAL
HINTS.
30

PLAYING AUDIO TRACKS
Shuffle playback of the whole
media library
Option “PLAY ANYTHING” shall be
used to play quickly the whole content of
your media library at random.
To start “PLAY ANYTHING” using manual interaction, proceed as
?
follows:
Launch the Main Menu, select ME-
DIA PLAYER, and then press
SRC/OK or ß/MAIN.
Select PLAY ANYTHING and
press SRC/OK or
Or, using voice interaction:
}
Press ‘and pronounce “Play
anything”.
For further details on digital audio
files playback, refer to section “DIGITAL AUDIO SELECTION”.
/MAIN.
ß
Now playing (track data)
With the NOW PLAYING option you
can display current track data for 15 seconds.
To start this option using manual interaction, proceed as follows:
?
Launch the Main Menu, select MEDIA PLAYER, and then press
SRC/OK or ß/MAIN.
Select NOW PLAYING and then
press SRC/OK or ß/MAIN.
Or, using voice interaction:
}
Press
playing”.
Note
When the playback of a digital audio track
is started, the relevant track data will be
automatically displayed for 15 seconds.
and pronounce “Now
‘
Audio play
To start playing an audio file using
manual interaction, proceed as fol-
?
lows:
If “AUTOPLAY” option is on,
connect your USB device to
Blue&Me
start automatically.
PLAYER.
You can also select the required audio file and then press SRC/OK or
/MAIN to start playing it.
ß
Or, using voice interaction:
}
Press
anything”.
Pause
To pause the track being played: Press
/ESC or button MUTE on sound sys-
&
tem front panel.
Play
To resume playback of the paused track:
Press &/ESC or button MUTE on
sound system front panel.
™
: track playback will
SETTINGS FUNCTION -
and pronounce “Play
‘
MEDIA
31

Stop
To stop playing a track: Pronounce
“Stop”.
Next track
To play next track using manual interaction, proceed as follows:
?
While playing a digital track press
N
.
Or, using voice interaction:
}
While playing a digital track press
and pronounce “Next”.
‘
Previous track
To play the previous track using
manual interaction, proceed as fol-
?
lows:
While playing a track press O.
Or, using voice interaction:
}
While playing a digital track press
and pronounce “Previous”.
‘
32
Note
If “Previous track” (manual or voice) command is given after playing the first 3 seconds of the track, the track will be played
again. If it is given within the first 3 seconds, the previous track will be played.
Changing audio source
To change the current sound source (Radio, CD, CD Changer, Media player),
press SRC/OK or buttons FM, AM, CD
on sound system front panel.
Note
For further details on voice commands
(keywords) to be used with the media
player, refer to section VOICE COMMANDS (KEYWORDS) - SUMMARY.
iPod™
To improve the connection of your
iPod™ with Blue&Me™ Nav, it is usu-
ally necessary to carry out these few simple operations on your iPod™ :
❒
configure the iPod™ for use an an external disc, referring to the iPod™ instruction manual;
❒
if the configuration has been made on
an Apple PC, make the configuration in
Windows format:
❒
memorize the music tracks as MP3 files
not protected from copying.
These operations do not compromise listening quality or the accessability of tracks managed by the
iPod™
iPod™ compatibility
What I can do
❒
Listen to MP3 tracks with digital quality
❒
Select tracks (by Artist, Album, Genre
etc.) by voice control or using the controls on the steering wheel
❒
Store music
❒
Display information about the track being played (song title, artist, etc.) on the
instrument panel.
❒
Recharge the iPod™ via USB connection.

What I cannot do
❒
Play audio tracks in m4a, m4p, and mp4
formats
❒
Play audio tracks purchased on digitally protected tracks (DRM)
❒
Play audio tracks from iPod™ touch
devices or iPhones (without Mediaplayer adapter, see note below).
Note
A Lineaccessori Fiat Mediaplayer is available for playing tracks stored on iPod™
and iPhone models which cannot be configured as an external disk.
PRACTICAL HINTS FOR USING
THE MEDIA PLAYER
Scrolling
❒
To optimize scrolling of the FOLDERS menu, organize folders on your
USB device before connecting it to
Blue&Me™. To facilitate and to optimize FOLDERS menu selection, organize your tracks in folders with
prompt names for you.
Organizing media files
❒
In order to make the musical selection
on Blue&Me™, based on predefined
selection criteria (author, album, type,
etc.) information contained in multimedia files must be catalogues and updated. To update file data, follow the instructions given on your software instruction manual.
❒
If certain items in your library have no
Artist, Album, Title and Genre,
Blue&Me™ will show UNKNOWN
in ALBUMS and GENRES menus.
To enter the required data, follow the
instructions given on your software instruction manual.
Building the media library on
Blue&Me™
❒
Building the media library may require
a few minutes. If the time required is
excessive, you can intervene by reducing the number of audio files stored on
your USB device.
❒
While building the library, it is however possible to play a selection of tracks.
Blue&Me™ will build the library while
playing music.
33

Building playlists for Blue&Me™
For building .m3u or .wpl playlist for
Blue&Me™ using Microsoft®Windows
Media®Player, proceed as follows:
❒
Copy required tracks into a new folder or to your USB memory device.
❒
Open Microsoft®Windows Media
®
Player. Select File, Open from the
menu.
❒
Scroll the content of the USB device
connected to your computer and select
the audio files to be entered in the
playlist.
❒
Click on Open.
❒
Move to “File” and select “Save Now
Playing List As” .... In field “File
Name” enter the required name and
in field “Save as type” set the type:
.wpl or .m3u.
❒
Click on Save.
When the above steps are over, the new
file .m3u or .wpl will be built.
SETTINGS FUNCTIONS
The SETTINGS menu enables you to
perform the following functions:
❒
Pairing a mobile phone
❒
Managing user data
❒
Media player settings
❒
Advanced Options.
To perform functions and adjustments in
the SETTINGS menu, you may use buttons on the steering wheel or voice commands at car standstill. When the car is
moving, you can use voice commands only. Instructions are provided for both
methods.
If you encounter difficulties with any of
the Blue&Me™ settings, consult section
TROUBLESHOOTING.
PAIRING A MOBILE PHONE
Before you can use your mobile phone
with the hands-free phone function on
your car, you must create a pairing relationship between the mobile phone and
the hands-free phone system.
During the pairing procedure, the handsfree phone system attempts to detect a
phone equipped with Bluetooth
®
wireless technology within range, and then establishes the connection using a Personal
Identification Number (PIN). After a pairing relationship is established, you can use
the hands-free phone system to make and
receive phone calls, and do other operations via your wirelessly-connected mobile phone.
IMPORTANT The mobile phone pairing
PIN number is a special PIN generated
randomly at each new pairing and used
just for this operation. It is not your SIM
PIN and therefore it is not required to
store or to keep it in mind; loosing it will
not impair the hands-free phone system
operation.
The pairing procedure will only need to
be performed once for your mobile
phone. After this procedure Blue&Me™
will automatically connect to your phone
each time you get into the car and turn
the ignition key to MAR.
34

You can create a pairing relationship using the PAIRING option in the SET-
TINGS menu.
To create a pairing relationship using manual interaction, proceed as
?
follows:
Press
Menu, then select SETTINGS by
pressing SRC/OK or ß/MAIN.
Select PAIRING and then press
SRC/OK or ß/MAIN. The system
will start the pairing procedure.
The system shows the mobile
phone pairing PIN on the instrument panel display and repeats it.
Please note that this is a PIN used
just for this operation, it is not your
SIM PIN.
For the next two steps, consult your
mobile phone owner’s manual about
Bluetooth
/MAIN to open the Main
ß
®
pairing.
On your mobile phone, query for
devices equipped with Bluetooth
wireless technology that are within
range (this option on your mobile
phone might be called Discover,
New Device, etc.). View the list of
Bluetooth®wireless technology
enabled devices and select
“Blue&Me” (item that identifies
Blue&Me™ on your car).
When prompted by the mobile
phone, enter the PIN number
shown on the instrument panel display. If pairing is successful, the system will say “Connecting” and
then the display will show the paired
mobile phone ID.
It is of vital importance to wait until this confirmation message is displayed since pressing
/ESC at this time may cancel the
&
pairing process. If pairing fails, an error message will be displayed and
the pairing procedure shall be repeated.
/MAIN or
ß
®
At first pairing, the system will say
“Welcome” immediately after
connecting. This message will no
longer be heard at next pairing procedures.
The system asks if you would like to
copy your paired phone phonebook. It is recommended to copy it.
To start copying the phonebook,
press SRC/OK or ß/MAIN; otherwise press &/ESC. You can
download your phonebook at a later time using the menu option SET-
TINGS, USER DATA, PHONEBOOK.
For certain mobile phones the
phonebook is not copied automatically, in this case you must send the
contacts in your mobile phone
phonebook to the hands-free phone
system using your mobile phone
keypad. If the hands-free phone system asks you to do this, then perform this procedure following the
instructions specific to your mobile
phone and press
you have finished.
/MAIN when
ß
35

Or, using voice interaction:
}
Press ‘and pronounce “Settings”, wait shortly for feedback
and then pronounce “Pairing”.
The system shows the mobile
phone pairing PIN on the instrument panel display and repeats it.
For the next two steps, consult your
mobile phone owner’s manual about
Bluetooth®pairing.
On your mobile phone, query for
devices equipped with Bluetooth
wireless technology that are within
range (this option on your mobile
phone might be called Discover,
New Device, etc.). View the list of
Bluetooth®wireless technology
enabled devices and select
“Blue&Me” (item that identifies
the hands-free kit in your car).
When prompted by the mobile
phone, enter the PIN number
shown on the instrument panel display using your mobile phone keypad. If pairing is successful, the system will say “Connecting” and
then the display will show the paired
mobile phone ID.
It is of vital importance to wait until this confirmation message is displayed since pressing ß/MAIN or
/ESC at this time may cancel the
&
pairing process. If pairing fails, an error message will be displayed and
the pairing procedure shall be repeated.
At first pairing, the system will say
“Welcome” immediately after
connecting. This message will no
longer be heard at next pairing pro-
®
cedures.
The system asks if you would like to
copy your paired phone phonebook. It is recommended to copy it.
To start copying the phonebook,
pronounce “Yes”; otherwise say
“No”.
For certain mobile phones the
phonebook is not copied automatically, in this case you must send the
contacts in your mobile phone
phonebook to the hands-free phone
system using your mobile phone
keypad. If the hands-free phone system asks you to do this, then perform this procedure following the
instructions specific to your mobile
phone and press ß/MAIN when
you have finished.
Practical hints
To improve both the voice recognition of
your phonebook entries and Blue&Me™
pronunciation accuracy when repeating
the entries, please try to enter contact entries and memorize them using the following criteria:
❒
Avoid abbreviations.
❒
Write foreign names according to the
way in which they are pronounced according to the rules of the
Blue&Me™ language set on your car.
For example, enter “Tanja” as “Tanya”,
to improve recognition accuracy and also to obtain the correct pronunciation
by the system.
❒
When adding or editing contact entries,
insert the appropriate accent marks
when the name requires these marks
to be properly pronounced and recognized by the system. For example enter “Nicolo Rebora” as “Nicolò Rébora” to obtain the correct pronunciation.
❒
When adding or editing contact entries,
bear in mind that certain isolated block
letter may be read as Roman numerals (e.g.: V may be read as fifth).
❒
When calling contacts by voice, do not
include the middle names or middle initials of your contacts.
36

Notes
❒
You are only required to pair your mobile phone a single time.
❒
You can pair up to five mobile phones,
to be used one at a time.
❒
On your paired mobile phone, the
Bluetooth®setting must be turned on
in order to connect your mobile phone
with Blue&Me™.
❒
Before transferring your mobile phone
contacts to the hands-free system,
make sure that each contact first and
last name is unique and distinctly recognizable so that the voice recognition
system will function properly.
❒
The system will download only valid
contact entries. A valid contact entry
must include both a name and at least
one phone number.
❒
If you would like to re-pair your mobile
phone, delete the old pairing relationship
first. During this operation all user data
will be deleted. To delete the old pairing relationship, use the menu option
USER DATA, DELETE USERS. On
your mobile phone, delete “Blue&Me”
from the list of Bluetooth®devices following the specific instructions for your
mobile phone (refer to your mobile
phone owner’s manual).
❒
If you download a phonebook with a
contacts list including more than 1000
contacts, the system may operate slower than expected and voice recognition
of the names in your phonebook may
degrade.
❒
If the pairing relationship is accidentally deleted, the pairing procedure shall
be repeated.
MANAGING USER DATA
You can make adjustments to the user data used by the hands-free phone system.
Specifically, you can reset all user data for
paired phones, delete the phonebook or
reset both user data and phonebook
downloaded. In this way the system is
brought back to initial conditions. You can
also download either the phonebook or
single contacts from your mobile phone
to the system, if you chose not to download the phonebook during the phone
pairing procedure. You can make adjustments to the user data used by the system
using the option USER DATA.
To open the USER DATA menu
using manual interaction, proceed as
?
follows:
Press ß/MAIN to open the Main
Menu, then select SETTINGS by
pressing SRC/OK or ß/MAIN.
Select USER DATA and then press
SRC/OK or ß/MAIN.
37

Or, using voice interaction:
}
Press ‘and pronounce “Settings” wait shortly for feedback and
then pronounce “User data”.
In the USER DATA menu you can
perform the functions described below.
Delete user data
In the USER DATA menu you can delete
the pairing relationships. After you delete
the pairing relationship, you cannot use an
unpaired phone with the hands-free phone
system, nor its phonebook, until you create a pairing relationship for it. Always remember that this operation deletes all the
pairing relationships.
To delete user data using manual interaction, proceed as follows:
?
Select DELETE USERS and then
press SRC/OK or
The system will display the message
DELETE USERS?. To confirm,
press SRC/OK or ß/MAIN.
/MAIN.
ß
Or, using voice interaction:
}
Press ‘, pronounce “Settings”,
wait shortly for feedback and then
pronounce “Delete users”.
The system will ask “Delete all
paired users?”. To confirm, pronounce “Yes”.
Notes
❒
Always remember that, if a mobile
phone is paired with the system while
another phone is connected yet, connection with the current phone is interrupted to establish the connection
with the new phone.
❒
It is not possible to delete a pairing, unless it is the only one.
❒
Deleting all paired users will entail a
new pairing procedure.
Delete the phonebook
In the USER DATA menu you can
delete the phone that was downloaded to
the system.
To delete the phonebook using
manual interaction, proceed as fol-
?
lows:
Select DEL. PHONEBOOK and
then press SRC/OK or ß/MAIN.
The system will display the question
DEL. PHONEBOOK?. To confirm, press SRC/OK or ß/MAIN.
Or, using voice interaction:
}
Press
wait shortly for feedback and then
pronounce “Delete phone book”.
The system will ask “Delete copy
of phonebook from the system?” To confirm, pronounce
“Yes”.
, pronounce “Settings”
‘
38

Download the phonebook
If you chose not to download the phonebook during the phone pairing procedure,
or if you recently deleted the current
phonebook, the USER DATA item will
be available in the PHONEBOOK menu.
To download a paired mobile phone
phonebook using manual interaction,
?
proceed as follows:
Select PHONEBOOK. and then
press SRC/OK or ß/MAIN.
Or, using voice interaction
}
Press ‘, pronounce “Settings”,
wait shortly for feedback and then
pronounce “Download phone
book”.
Add contacts
If your mobile phone does not support automatic downloading during phone pairing, the USER DATA item will be available in the ADD CONTACTS menu.
To copy contacts from your mobile
phone to the hands-free phone sys-
?
tem using manual interaction, proceed as follows:
Select ADD CONTACTS and
then press SRC/OK or ß/MAIN.
Or, using voice interaction:
}
Press ‘, pronounce “Settings”,
wait shortly for feedback and then
pronounce “Add Contacts”.
Then follow the instructions given on your
mobile phone owner’s manual for transferring contacts.
Reset user data
To reset all user data and phonebooks/contacts for paired phones to
?
the default values using manual interaction, proceed as follows:
Select DELETE ALL and then
press SRC/OK or
The system will display the question
Delete all?. To confirm, press
SRC/OK or ß/MAIN.
Or, using voice interaction:
}
Press ‘, pronounce “Settings”,
wait shortly for feedback and then
pronounce “Reset all”.
The system will ask “Delete all da-
ta saved by users from the system?”. To confirm, pronounce
“Yes”.
/MAIN.
ß
39

ADVANCED OPTIONS
To navigate to the ADV. OPTIONS, menu using manual inter-
?
action, proceed as follows:
Press
Menu then select SETTINGS by
pressing SRC/OK or ß/MAIN.
Select ADV. OPTIONS and then
press SRC/OK or ß/MAIN.
Or, using voice interaction:
}
Press ‘, pronounce “Settings”
and then “Advanced Options”.
Within the ADV. OPTIONS
menu you can access the SYS
CODE.
Note
This code is an 8-digit number (device ID)
which uniquely identifies the Blue&Me™
system installed on your car and cannot be
changed.
/MAIN to open the Main
ß
Accessing the device ID
For certain operations, it might be necessary to know the Blue&Me™ system
code.
To access the system code by manual interaction, proceed as follows:
?
Select SYS CODE and then press
SRC/OK or ß/MAIN.
The instrument panel display will
show your Blue&Me™ system
code.
Press SRC/OK or ß/MAIN or
/ESC to quit.
&
Or, using voice interaction:
}
Press ‘, pronounce “Settings”,
wait shortly for feedback and then
pronounce “Device ID”.
The instrument panel display will
show your Blue&Me™ system
code.
Press SRC/OK or
/ESC to quit.
&
/MAIN or
ß
Changing the GPRS code
If your mobile phone carrier requires to
change the GPRS code, you can perform
this operation via the ADV. OPTIONS
menu.
To change the GPRS code using
manual interaction, proceed as fol-
?
lows:
Go to the GPRS CODE menu and
press SRC/OK or ß/MAIN.
The display will show GPRS:, and a
list of digits (1, 2, 3, 4, 5, 6, 7, 8, 9),
DEFAULT, and DISABLE. To
select the new GPRS code, press
and Ountil choosing the required
option, then press SRC/OK or
/MAIN. To store the default val-
ß
ue, select DEFAULT. To disable
the connection code, select DIS-
ABLE.
After setting the new GPRS code,
Blue&Me™ will display the message GPRS CODE SET.
N
40

To set the GPRS code using voice
interaction, proceed as follows:
}
Press
and then “Connection code”.
Blue&Me™ will prompt “The current GPRS connection code is value.
To change code say a number from
1 to 9 or say “Default”. To disable
the connection code say “Disable”.
To change the code, say a number
from 1 to 9 or say “Default”. To disable the connection code say “Dis-
able”. (In previous text, value is the
GPRS connection code set at that
moment).
After setting the new connection
code, Blue&Me™ will say “The
Connection Code is set to value”
(here value corresponds to the new
GPRS code set).
, pronounce “Settings”
‘
MEDIA PLAYER SETTINGS
Autoplay
When the Autoplay option is on,
Blue&Me™ will start to play the audio
files on your USB device as soon as you
turn the ignition key MAR. Once you activate this option, the first time you use the
player, playback will start automatically.
The Autoplay option shall be disabled
(when required) before connecting your
USB device to the USB port and building
or updating the media library.
To change Autoplay setting using
manual interaction, proceed as fol-
?
lows:
Open the Main Menu, select , ME-
DIA PLAYER, SETTINGS, AUTOPLAY and then press
SRC/OK or ß/MAIN.
To activate Autoplay, select AUTOPLAY ON and press SRC/OK
or ß/MAIN. To deactivate Autoplay select AUTOPLAY OFF and
press SRC/OK or ß/MAIN.
41

Or, using voice interaction:
}
Press ‘and pronounce “Autoplay on” or “Autoplay off”.
Note
If you change the Autoplay settings after
connecting the USB device, new setting
will be activated the next time you connect a different USB device (or the same
USB device with updated track library).
Shuffle
Use the Shuffle option to change the
playback sequence. With Shuffle option
on, Blue&Me™ will play digital audio files
at random.
To change Shuffle setting using
manual interaction, proceed as fol-
?
lows:
Open the Main Menu, select
MEDIA PLAYER, SETTINGS,
SHUFFLE and then press
SRC/OK or ß/MAIN.
To activate the Shuffle option, select SHUFFLE ON and press
SRC/OK or ß/MAIN. To deactivate it, select SHUFFLE OFF and
press SRC/OK or ß/MAIN.
Or, using voice interaction:
}
Press ‘and pronounce “Shuffle
on” or “Shuffle off”.
Loop
Use the Loop option to repeat a track.
To activate the Loop option using
manual interaction, proceed as fol-
?
lows:
Open the Main Menu, select
MEDIA PLAYER, SETTINGS,
LOOP and then press SRC/ OK
or ß/MAIN.
To activate the Loop option, select
LOOP ON and press SRC/OK or
/MAIN. To deactivate it, select
ß
LOOP OFF and press SRC/OK
or ß/MAIN.
42

Or, using voice interaction:
}
Press
‘
and pronounce “Loop
on” or “Loop off”.
Note
With Loop option on, previous and next
track playback will pass to the previous or
next audio track, that will start to be repeated.
EXIT THE SETTINGS MENU
At the end of any of the operations described above, you can exit the settings
menu as described below.
To exit the SETTINGS menu using manual interaction:
?
Select EXIT and then press
SRC/OK or ß/MAIN.
Or, using voice interaction:
}
Press ‘and pronounce “Exit”.
Blue&Me™
SUPPORTED
MOBILE PHONES
Blue&Me™ supports your personal devices via the Bluetooth®wireless technology and USB.
To get updated information about the devices supported by Blue&Me™, contact
Fiat Dealership or consult the dedicated
site at www.fiat.com.
MOBILE PHONES WITH
Bluetooth®WIRELESS
TECHNOLOGY
Blue&Me™ supports most of the mobile
phones supporting Bluetooth®1.1 and
HandsFree 1.5 profile (refer to Blue-
tooth®wireless connection specifications
given on your mobile phone owner’s manual).
Due to the different marketed software
versions for mobile phones, certain auxiliary functions (e.g.: answering a second incoming phone call, transferring phone call
from hands-free phone system to mobile
phone and vice versa, etc.) could not exactly correspond to what described in this
manual. In any case, phone conversation using the hands-free phone kit is not impaired.
43

“Pull” phones (phonebook
automatically downloaded)
“Pull” phone means that your mobile
phone supports phonebook automatic
download with Bluetooth®wireless technology, your whole phonebook will be automatically downloaded to Blue&Me™
during phone pairing procedure.
To consult the list of mobile phones and
functions supported, consult the dedicated website www.fiat.com
Blue&Me™ or Customer Services on
00800.3428.0000.
You will also find:
❒
a quick guide with advice on usage;
❒
a guide for using your mobile phone for
recording:
❒
advice on connection to an iPod™;
❒
files in the 9 voice recognition languages
available that can be downloaded onto
Blue&Me™ Nav (Italian, French, English, German, Spanish, Portoguese,
Dutch, Polish, Brazilian Portoguese).
“Push” phones (phonebook not
automatically downloaded)
“Push” phone means that your mobile
phone supports the single contact download with Bluetooth®wireless technology. During the pairing procedure you will
be required to send phonebook contacts
from your mobile phone (your phonebook is not automatically downloaded
during the phone pairing procedure).
Mobile phones with message
reader (not all mobile phones
support listening to incoming SMS
messages)
If your mobile phone can send messages
through the Bluetooth®wireless technology, it is possible to read incoming
messages through the Blue&Me™ handsfree kit, to store them in the dedicated inbox or to delete them.
SUPPORTED USB MEMORY
DEVICES
USB memory devices
The media player supports most of the
USB memory devices: 1.0, 1.1 or 2.0. With
Blue&Me™ media player the following
USB devices are recommended:
❒
Memorex®Travel Driver 256 MB USB
2.0
❒
Memorex®Travel Driver 1 GB USB 2.0
❒
SanDisk®Cruzer™ Micro 256 MB USB
2.0
❒
SanDisk®Cruzer™ Mini 256 MB / 1 GB
USB 2.0
❒
Lexar™ JumpDrive®2.0 512 MB
❒
PNY®Attaché 256 MB USB 2.0
❒
Sony®Micro Vault
®
44

Note
It is advisable not to use USB devices
equipped with the “password” function. If
the USB device is equipped with this function, always ensure that the function is disabled.
The media player supports just one media
library. When connecting a new USB device, Blue&Me™ will build a new library
replacing the existing one.
Supported digital audio files
The media player supports audio files with the following formats:
Extension Audio coding
.wma
.mp3
.wav
.aac
Note
The media player does not support audio files compressed with other formats (e.g.:
.aac) and DRM (Digital Right Management) protected audio files. Non-supported audio files that may be present on the USB device will be ignored.
It supports standards WMA release 1 and WMA release 2.
(WMA2 = 353, WMA1 = 352). It supports audio formats WMA
Voice.
file MPEG–1 Layer 3 (sampling frequencies: 32 kHz, 44.1 kHz and
48 kHz) and MPEG–2 layer 3 (16 kHz, 22.05 kHz e 24 kHz). The
following bit rates are supported: 16 kbps, 32 kbps, 64 kbps, 96
kbps, 128 kbps, and 192 kbps.
It also supports Fraunhofer extension MP2.5
(sampling frequencies: 8 kHz, 11.025 kHz and 12 kHz).
digital audio file, without data compression.
file MPEG-4 e M4A
(sampling frequencies: 22,05 kHz ÷ 48 kHz)
The following bit rates are supported: 8Kbps ÷ 529 kbps
45

Supported playlist formats
The media player supports the following
playlist formats:
❒
.m3u – file containing a list of tracks.
(release 1 and 2)
❒
.wpl – Windows®-based file containing
a playlist. (playlist capacity limit for this
format is 300Kb). Playlists with extension .wpl can be built with Microsoft
®
Windows Media®Player.
The media player does not support nested or linked playlists. Playlist tracks relative and absolute paths are supported.
The media player does not support
playlists built by application software based
on specific criteria.
The media player will play playlists with
paths leading to digital audio files in folders.
For further details on how to build
playlists for Blue&Me™, refer to section
PRACTICAL HINTS FOR USING THE
MEDIA PLAYER.
Microsoft
Orange
™ is an Orange Personal Communications Services Limited registered trade-mark.
®
and Windows®are Microsoft Corporation registered trade-marks.
®
is a Sony Corporation registered trade-mark.
Sony
Ericsson®is a Telefonaktiebolaget LM Ericsson registered trade-mark.
Motorola®is a Motorola, Inc. registered trade-mark.
Nokia®is a Nokia Corporation registered trade-mark.
Siemens®is a Siemens AG registered trade-mark.
Audiovox®is an Audiovox Corporation registered trade-mark.
Bluetooth®is a Bluetooth®SIG, Inc registered trade-mark.
Lexar
™ and JumpDrive
SanDisk®and Cruzer
The other trade-marks are proprietary of the respective Companies.
iPod™, iTunes, iPhone are Apple Inc. registered trade-marks.
™ are SanDisk Corporation registered trade-marks.
Trade-marks
®
are Lexar Media, Inc. registered trade-marks.
46

VOICE COMMANDS (KEYWORDS) - SUMMARY
The following tables list the voice commands available on Blue&Me™. For each voice command is shown the “Keyword” (i.e.: the
main voice command) and synonyms that may be used.
ALWAYS AVAILABLE VOICE COMMANDS
• Help
• Menu
• Cancel
• Repeat
Activates the “Help/Menu” function, that gives a list of voice commands available for the current context
Cancels voice interactions and deactivates the voice recognition system
Repeats the last spoken utterance
47

HANDS-FREE KIT VOICE COMMANDS
• Dial
• Dial a number
Activates the voice
recognition of a phone number
• One
• Two
• Three
• Four
• Five
• Six
• Seven
• Eight
• Nine
• Zero
• O
• Plus
Dials the digit “1”
Dials the digit “2”
Dials the digit “3”
Dials the digit “4”
Dials the digit “5”
Dials the digit “6”
Dials the digit “7”
Dials the digit “8”
Dials the digit “9”
Dials the digit “0”
Equivalent to pressing “+”
• Pound
• Delete
• Start over
• Repeat
• Call
• Dial
Equivalent to pressing “#”
Deletes the last group of
numbers
Deletes the phone number that you
pronounced and you can
restart dialling
The system repeats the number that
you pronounced
Dials the phone number that you
pronounced
48
• Star
Equivalent to pressing “*”
continues
➯

➯
continued
• Call [Name]
• Call [Name]
[(at) Work /
(at) Home /
(on/at) Mobile / (on/at)
Cellular /
(on/at) Cell]
Starts the process to call a
contact in the phonebook,
transferred to the
hands-free kit
• Telephone
• Phone
• Callback
• Redial
• (at) Work
• Nome• Name
Calls a contact.
In this keyword, Name
represents the full name
of acontact in your
phonebook
Activates the phone function and speaks helpful information for using the hands-free phone
Dials the phone number of the last caller
Dials the phone number of the last person called
• (at) Home
• (on/at) Mobile
• (on/at) Cellular
• (on/at) Cell
Calls a contact “(at) Work”
Calls a contact “(at) Home”
Calls a contact “(on/at) Mobile / (on/at)
Cellular / (on/at) Cell
49

MESSAGE READER VOICE COMMANDS (KEYWORDS)
• Read last one
• Read last
• Read last message
• Read message
• Read last SMS text
• Read last text
• Read text
• Read SMS texts
To read the last message received
• Message reader
• Messages
• SMS messages
• SMS texts
• SMS
• Texts
To open the MESSAGE READER
• Read last one
• Read last
• Read last message
• Read message
• Read last SMS text
• Read last text
• Read text
• Read SMS texts
To read the last message received
• Inbox
• Messages received
• Incoming messages
• Texts received
• Incoming texts
• Received
To display the inbox;
the system will display the first message
contained in the inbox.
• Delete all
• Delete messages
• Delete texts
• Delete
To delete all the messages
contained in the inbox; the system
will ask for confirmation before deleting
the messages.
• Signal type
• Signal
• Type of signal
To set the Signal type
• Read
• Read again
• Call
• Dial
• Delete
• Delete message
• Next
• Forward
• The one after
• Previous
• Back
• Backwards
• The one before
• Reader off
• Switch off reader
• Switch reader off
• Deactivate reader
• Visual and acoustic
signal
• Visual and acoustic
• Acoustic
• Visual plus acoustic
• Visual signal only
• Visual
• Visual only
To read the selected message in the
inbox
To start a call to the phone number of
the message selected
To delete the call to the phone
number of the message selected
To read next message
To read previous message
To switch the message reader off;
new incoming message will not be
signalled and will not be
transmitted to the system
The arrival of a new message
will be both indicated through a
visual signal on the instrument
panel display and through an acoustic
signal (the system will sound a beep)
The arrival of a new message will only be
indicated through a visual signal on the
instrument panel display
50

MEDIA PLAYER VOICE COMMANDS
• Media player
• Media
• Music
• Play
• Play music
• Play media
• Stop
• Stop music
• Stop media
• Next
• Next track
• Next song
• The one after
• Previous
• Previous track
• Previous song
• The one before
Enters the MEDIA PLAYER menu
Activates playback
Stops playback
Plays next track
Plays previous track
• Shuffle on
• Random order on
• Shuffle off
• Random order off
• Loop on
• Loop track on
• Cycle on
Activates random track playing
Deactivates random track playing
Activates track repeat
continues
➯
51

continued
➯
• Loop off
• Loop track off
• Cycle off
• Now playing
• What’s playing
• What is playing
• What’s this track
• Folders
• Folder
• Browse folders
• Artists
• Artist
• Browse artists
• Genres
• Genre
• Browse genres
• Type of music
• Styles
• Music styles
• Types
• Music types
• Albums
• Album
• Browse albums
Deactivates track repeat
Displays current track data
Enters media player FOLDERS menu
Enters media player ARTISTS menu
Enters media player GENRES menu
Enters media player ALBUMS menu
52
• Playlists
• Playlist
• Browse playlists
Enters media player PLAYLISTS menu

continued
➯
• Autoplay on
• Autoplay media on
• Autoplay music on
• Autoplay off
• Autoplay media off
• Autoplay music off
Activates automatic playback when connecting the USB device to the relevant port in the car
Deactivates automatic playback when connecting the USB device to the relevant port in the car
• Play anything
• Play something
• Media settings
Activates playback of all digital audio tracks
Enters MEDIA PLAYER menu
53

SETTINGS FUNCTION VOICE COMMANDS
• Setup
• Setup menu
• Settings
Enters the SETTINGS menu
• Media settings
Enters the MEDIA
PLAYER menu
• Shuffle
• Random order
Shuffle on/off
• Cycle
• Autoplay
• Autoplay media
• Autoplay music
Autoplay on/off when connecting
the USB device to the relevant
port in the car
• User data
Enters the USER DATA menu
• Pairing
Starts the process to create
a pairing relationship
• Advanced Features
• Advanced Options
Enters the ADVANCED OPTIONS menu
• Exit
Exits the SETTINGS menu
• Delete users
• Delete phone book
• Download phone book
• Add Contacts
• Reset all
• Device ID
• Connection code
• Connection ID
(*) Pull” phone means that your mobile phone supports phonebook automatic download
with Bluetooth®wireless technology, your whole phonebook will be automatically downloaded to the hands-free kit during phone pairing procedure.
(**) “Push” phone means that your mobile phone supports the single contact download
with Bluetooth
to send phonebook contacts from your mobile phone (your phonebook is not automatically downloaded during the phone pairing procedure).
®
wireless technology. During the pairing procedure you will be required
Deletes user data for pairing
relationships
Deletes the current phonebook
Downloads phonebook from mobile phone to
hands-free phone system
Note “Pull” phones only (*)
Adds contacts from mobile phone to
hands-free phone system
Nota “Push” phones only (**)
Deletes all paired phone user data
and phonebooks/contacts and restores default values
Displays the device ID
Enters the GPRS CODE menu
54

TROUBLESHOOTING
HANDS-FREE KIT
General - display screen
Problem Probable Cause Possible Solution
Display screen shows:
NO PHONEBOOK
Or the system says:
“As requested, the phonebook has not
been copied. To copy the phonebook
onto the system go to
SETTINGS menu and select
“USER DATA”. To dial a phone
number, say “Dial”.”
For “pull” phones
❒
When the system asked “The data
from the phonebook will now be
copied onto the system. Continue?”,
you responded with “No”
❒
You have not downloaded your
phonebook via the SETTINGS
menu
❒
The downloaded phonebook was
deleted
For “push” phones
❒
When the system asked “The data
from the phonebook will now be
copied onto the system. Continue?”,
you responded with “No”.
❒
You have not sent contacts to the
system using the ADD
CONTACTS procedure
❒
The downloaded phonebook was
deleted
For “pull” phones
❒
Use the option PHONEBOOK
in the SETTINGS menu to download
the phonebook again
❒
Enter contact information in the
phonebook on your mobile phone
and then download the phonebook
again
SETTING FUNCTIONS -
MANAGING USER DATA AND
PHONEBOOK
For “push” phones
❒
Use the option ADD
CONTACTS in the SETTINGS
menu to send contacts in the
phonebook on your mobile phone
to the system
SETTING FUNCTIONS -
MANAGING USER DATA AND
PHONEBOOK
55

Problem Probable Cause Possible Solution
Display screen shows:
PH/BOOK EMPTY
Or the system says “Phonebook empty.
To add contacts to the phonebook, go
to the SETTINGS menu and select
“USER DATA”. To dial a phone number,
say “DIAL.”
For “pull” phones
❒
You answered “Yes” to “The data
from the phonebook will now be
copied onto the system. Continue?”
but the downloaded phonebook
does not include any valid contacts
❒
You have used the option
PHONEBOOK in the
SETTINGS menu, but the mobile
phone phonebook does not include
any valid contacts
For “push” phones
❒
When the system asked “The data
from the phonebook will now be
copied onto the system. Continue?”,
you answered “Yes” but did not
send any valid contacts during the
ADD CONTACTS procedure
❒
You used the ADD CONTACTS
option but did not send any valid
contacts to the system
For “pull” phones
❒
Enter valid contact information
(name and one phone number at
least) in the phonebook on your
mobile phone, then download the
phonebook again
SETTING FUNCTIONS -
MANAGING USER DATA AND
PHONEBOOK
For “push” phones
❒
Download the phonebook again and
make sure to send valid contacts to
the system, using your mobile phone,
when prompted
❒
Use the option ADD CONTACTS
in the SETTINGS menu to send
contacts from your mobile phone
to the system
SETTING FUNCTIONS -
MANAGING USER DATA AND
PHONEBOOK
56

Problem Probable Cause Possible Solution
Display screen shows: NO PHONE
Or the system says
“There’s no bluetooth phone connected”
Display screen shows: TEL DISCONN.
Display screen shows: PAIR. FAILED
Or the system says “Pairing failed.
Please try again”
❒
The paired mobile phone is turned
off
❒
The paired mobile phone is not
within range of the system
(the mobile phone should be located
within approximately 10 m of the
system)
❒
Bluetooth®wireless technology
connection has been disabled on
your mobile phone
(“Blue&Me” ID)
❒
A technical error occurred
with the mobile phone
Bluetooth®wireless technology
capabilities
❒
During an ongoing phone
conversation,
the mobile phone
was taken out of the system range
❒
A technical error occurred during
the pairing procedure
❒
Turn the paired mobile phone on
❒
Make sure that your phone is paired
❒
Make sure that the Bluetooth
®
wireless technology connection on
your mobile phone is enabled
(“Blue&Me” ID)
❒
Make sure that the mobile phone
you paired with the system is within
range
❒
Reset Blue&Me™ by turning
the mobile phone off and on
❒
Reset Blue&Me™ by turning the
ignition key to STOP and then to
MAR again
❒
Verify the correct PIN number, and
try entering it again
❒
Reset the mobile phone by turning it
off and on, and then retry the pairing
procedure
SETTING FUNCTIONS -
PAIRING YOUR MOBILE PHONE
57

Problem Probable Cause Possible Solution
Display screen shows: PAIR. FAILED
Or the system says “Bluetooth pairing
timed out. Please try again later.”
Display screen shows:
PRIVATE NUMBER
Display screen shows: ONLY AT REST
Or the system says:
“This function is only available
when the vehicle is stationary”
After three minutes, each attempt to
enter the PIN number fails since
pairing timed out
❒
The caller is not recognized as a
name stored in the phonebook,
and the paired mobile phone does
not have a called ID feature
❒
The caller has blocked caller ID
to prevent the system from
displaying the caller’s name
and/or phone number
Even occasional short viewings of the
car display may be hazardous if your
attention has been diverted away from
your driving tasks. Certain Blue&Me™
functions, which require the user to
give attention to the car display, are
only available when the car is stopped
Retry the pairing procedure. During the
PIN entering step, verify that the PIN
number you are entering on the mobile
phone is the same number that
on the instrument panel display
is shown
SETTING FUNCTIONS -
PAIRING YOUR MOBILE PHONE
Enter a contact in your mobile
phonebook for the incoming call,
and then download your phonebook/
contact again
In this case, nothing can be done and
the message will always appear
Stop your car and attempt to perform
the function again manually,
or continue driving and perform the
function using the voice recognition
system
58

Problem Probable Cause Possible Solution
The system did not respond to voice
command or key press
❒
If you do not speak soon enough
after pressing ‘, the system
will interrupt voice interaction
❒
If you are speaking too far from
the in-car microphone (for example,
you are sitting in the back seat), the
system may not hear your voice
command
❒
If you don’t wait for the tone after
pressing ‘, the system will get
only a portion of the keyword
and will misrecognize it
❒
If you don’t press ‘before
pronouncing a voice command,
the system will not activate voice
recognition and therefore recognize
your voice commands
❒
If you don’t press ß/MAIN to
enter the Main Menu, it will not be
possible to access manually the
Blue&Me™ menu
❒
If after pressing ß/MAIN, you
don’t take action within approx.
eight seconds, the system will not
respond to your key press
❒
Press ‘and pronounce the voice
command again
Make sure that you face forward and
speak clearly at a normal volume
if
❒
Press ß/MAIN and try the operation
again. Make sure to take action within
approximately eight seconds after
pressing ß/MAIN
59

Problem Probable Cause Possible Solution
The system prompted to enter a PIN
number, but no phone pairing
procedure was running
When in close proximity of the car,
answering a phone call directly using
the mobile phone “answer” button, will
automatically activate the free-hands
phone function (the caller’s voice is
played through the car speakers)
After you delete the pairing-related
user information on your mobile
phone, the Bluetooth
relationship between your mobile
phone and Blue&Me™ will no
longer work
Some types of mobile phones require
you to set the phone to choose
between automatic incoming call
transfer to the system or
non-automatic incoming call transfer
(you will transfer the call using the
mobile phone keypad, as required)
®
pairing
Select option DELETE USERS on
the system and delete all pairings; then,
pair the phone again
SETTING FUNCTIONS MANAGING USER DATA AND
PHONEBOOK
SETTING FUNCTIONS - PAIRING
YOUR MOBILE PHONE
Refer to your mobile phone owner’s
manual to find out how to set up the
default location for phone audio when a
phone call is received
60

Problem Probable Cause Possible Solution
Pairing a paired mobile phone,
the display screen shows:
Pair. failed
Or the system says
“Pairing failed. Please try again”
After downloading the phonebook
from the mobile phone contacts’ middle
names/initials, prefixes or suffixes
are not recognized by the voice
recognition system
Before re-pairing with a mobile phone,
information for the first pairing on
Blue&Me™ must be deleted
The system does not support the use
of prefixes, suffixes, or middle
names/initials when calling
contacts by voice
Remember that the pairing procedure
will only need to be performed once for
your mobile phone. After this
procedure, Blue&Me™ will
automatically connect to your phone
each time you get into the car and turn
the ignition key to MAR.
To pair the phone again, select
DELETE USERS and then re-pair
the phone
SETTING FUNCTIONS MANAGING USER DATA AND
PHONEBOOK
SETTING FUNCTIONS - PAIRING
YOUR MOBILE PHONE
When calling contacts by voice,
pronounce the contact’s name without
using prefixes, suffixes or, middle
names/initials.
If you have two entries with similar first
and/or last name in your phonebook,
modify one of the entries in the mobile
phone to make it unique.
Then, re-download the phonebook to
the hands-free phone system
61

Problem Probable Cause Possible Solution
Phone numbers containing
international dialling codes
(e.g.: +39 Italy, +44 UK,
+33 France, etc.) are difficult to call
To consult the list of mobile phones and functions supported, consult the dedicated website www.fiat.com Blue&Me™ or Customer Services on 00800.3428.0000.
You will also find:
❒
a quick guide with advice on usage;
❒
a guide for using your mobile phone for recording:
❒
advice on connection to an iPod™;
❒
files in the 9 voice recognition languages available that can be downloaded onto Blue&Me™ Nav (Italian, French, English, German, Spanish, Portoguese, Dutch, Polish, Brazilian Portoguese).
On certain mobile phones, when
downloading names and/phone
numbers to the hands-free system,
the sign “+” is omitted
Replace “+” with “00”
(e.g.: +39 becomes 0039).
62

MESSAGE READER
Problem Probable Cause Possible Solution
I receive SMS messages on the
cellular telephone but not on
Blue&Me™
SMS texts received from your phone
carrier service center show abnormal
displaying of sender's name or number
Blue&Me™ stopped receiving
messages from your cellular
telephone
You cannot display some SMS
messages, present on your cellular
telephone, on Blue&Me™ SMS
message list
Not all cellular telephones support
SMS messages transfer to Blue&Me™
Not all mobile phones support correct
transfer of the phone carrier's name
sending the SMS text to Blue&Me™
You might have set by mistake
the option NOT ACTIVE from menu
notification settings
Blue&Me™ is capable to read and
store last 20 received SMS messages
while the telephone set is connected to
the system. Messages received in other
contexts are not transferred to
Blue&Me™
Check that your cellular telephone
supports the function for transmitting SMS
Messages by Bluetooth technology or, for
further information, see chapter “LIST OF
TELEPHONE SETS
SUPPORTED BY Blue&Me™”,
or site www.fiat.com
–
Set, on menu notification settings,
either VISUAL+ACOUSTIC notification
or NOT VISUAL notification
READER FUNCTIONS
SMS MESSAGES, paragraph
NOTIFICATION SETTINGS
SMS messages stored by Blue&Me™ can
be deleted
READER FUNCTIONS SMS
MESSAGES, paragraphs SMS MESSAGES
MANAGEMENT AND DELETING ALL
SMS MESSAGES
63

Problem Probable Cause Possible Solution
Some SMS messages or part of
them are not read, or are not
correctly read by Blue&Me™
hands-free kit
Blue&Me™ SMS messages reader
displays sender telephone number
instead of sender name
Sometimes received SMS message
sender cannot be called
Some “special” characters within
received SMS message, cannot be
interpreted by Blue&Me™
Probably, during portable phone
registration step, you chose not to
download the telephone book, or, if
your portable phone only supports the
management of single contacts, you
chose to download some contacts only
Some SMS messages, e.g. the ones sent
by telephone operator, have no associated sender telephone number, so option CALL cannot be used
–
To download your cellular telephone
book, refer to special item on menu
Settings
SETTING FUNCTIONS, paragraphs
CELLULAR TELEPHONE
REGISTRATION and USER DATA MANAGEMENT
–
64

MEDIA PLAYER
Problem Probable Cause Possible Solution
Displayed message:
NO MEDIA
Or Blue&Me™ says:
“No media found”
After connecting your USB device and
turnin the ignition key to MAR, no music
is played
After inserting a USB device
and turning the car key to the MAR
position, Blue&Me™ malfunctions
occur. (e.g. failure to reproduce musical
tracks or no voice messages)
❒
No USB device connected to the
USB port in the car.
❒
No digital audio file stored on the
USB memory device.
❒
If power supply is interrupted,
(e.g.: car battery disconnection),
Blue&Me™ will loose power temporarily. In this event media library
shall be rebuilt
❒
Your USB memory device is not
supported by Blue&Me™.
Building the media library may require
a few minutes.
You may have used a USB device with
the PASSWORD function enabled.
❒
Follow the instructions to connect
your USB device to Blue&Me™.
❒
Store digital audio files on your USB
memory devices following the
instructions given by your media file
software.
❒
Remove the USB device from the
USB port and refit it to
build again the media library.
❒
Check whether your USB device
is supported by Blue&Me™.
Wait for library building.
If the time required to build the library
is excessive, you can intervene by
reducing the number of audio files
stored on your USB device.
Disable on the USB device such
function.
65

Problem Probable Cause Possible Solution
Displayed message:
NO PLAYLISTS
Or Blue&Me™ says:
“No playlist found”
Displayed message:
INVALID
Displayed message:
EMPTY PLAYLIST
Or Blue&Me™ says:
“Empty playlist.”
Displayed message: BAD MEDIA
Indication on sound
system display:
MEDIAPLAYER
in absence of USB device
connected to the car USB port
No playlist is stored on the USB
device connected
Playlist is damaged or invalid
❒
No media file is contained
in the playlist
❒
The .wpl file is too large for
Blue&Me™ memory capacity
❒
The playlist does not contain
references to media files on your
USB device
Digital audio file is damaged or invalid
The USB device has been removed
from the car USB port with the
ignition key at STOP
Build a playlist on your computer using your
media file software and then copy it to your USB
device
❒
Make sure the playlist is in .m3u or .wpl format.
❒
Build the playlist again following the instructions
given in section BUILDING PLAYLISTS FOR
Blue&Me™ - PRACTICAL HINTS.
❒
If the problem persists, delete the playlist from
your USB device.
❒
Delete the playlist from your
USB device or copy media files to the playlist
using your media file
software.
❒
Reduce the number of tracks
in the playlist, using your media file software.
Delete bad media from your USB device
❒
To change the current audio source, press button
SRC/OK or the dedicated buttons FM, AM, CD
on the sound system front panel.
❒
With ignition key at MAR, insert and then
remove the USB device from the car USB port.
❒
To avoid displaying of MEDIAPLAYER
indication in absence of USB device, always
remove the USB device when the ignition key is
at MAR, or stop playback (with voice command
STOP) before removing the USB device from
the car USB port.
66

Problem Probable Cause Possible Solution
Displayed message:
PROTECTED
Or Blue&Me™ says:
“Protected content”.
Blue&Me™ does not play all the digital
audio files in the playlist
The media library does not show
all the digital audio files stored
on the USB device
After pronouncing a command,
Blue&Me™ says:
“Command not available”, although
the command you prompt is a first
level voice command
The track selected is DRM-protected
and it cannot be played by
the media player
Your playlist contains DRM-protected
files that cannot be played; or it
contains references to invalid media
files
❒
Your playlist contains DRMprotected files that are ignored
during playback
❒
Your playlist contains more than
20.000 tracks, that is the max.
number of files that can be copied
to the media library.
❒
The playlist stored on your USB
device contains more than 20
nested folders.
Nested folders files will not be
copied to the media library.
Certain commands are not available
when the track is paused or the CD
player is playing a track
–
For further details see section
“SUPPORTED USB MEMORY DEVICES”
–
If the track is paused, resume
playback by pressing &/ESC.
Then pronounce the voice command
again.
67

Problem Probable Cause Possible Solution
The same USB memory device
previously connected takes
more than 10 seconds to restart
playback on Blue&Me™
You removed the USB memory device
from the PC before it was ready
To reset the USB memory device using
Microsoft®Windows®XP, click on My
Computer in the Start menu, click
rightwards on the USB memory device,
select Properties, select Tools, click
on key
“Check Now...” in field
“Error-checking”,
file system errors” and then click Start.
To avoid future problems, remove the
USB device using the option “Secure
hardware removal”.
select “Automatically fix
68

iPod
TM
Problem Probable Cause Possible Solution
iPod™ not working
❒
The iPod™ could have beeno
updated with software that is not
compatible with Windows Mobile™
(as Blue&Me™ is a
system developed in partnership
with Microsoft only systems that
support Windows Mobile™ are
compatible)
❒
The iPodTMhas not been enabled
for use as a disc
❒
It has been enabled for use as a disc
but there are tracks inside in
Mp4 format (these formats are not
supported by Blue&Me™)
❒
There are tracks on the iPodTMpurchased from the iTunes site (the
system does not support protected
tracks such as those in DRM format
that can be purchased from the
iTunes store site)
❒
It is a “Touch” version.
❒
iPod/iPhone cannot by configured as
an external disk (e.g. iPod Touch,
iPhone, etc.)
❒
Use an alternative USB memory
stick or reset the iPod™ for
Windows
❒
UEnable usage as a disc
(this function cannot be selected with
iPod™ touch and iPhones)
❒
Modify the track format to one that
is compatible with Blue&Me™
❒
Use the Lineaccessori Fiat
Mediaplayer adapter.
69

Problem Probable Cause Possible Solution
With iPod™s or USB memory sticks the
system continues playing the same track
or the “forward” button has to be pressed
to move on to the next track
The iPod™ connected to the
Blue&Me™ is not charged
The repetition function for each individual track may have inadvertently been
activated
When the ignition is ON the vehicle
recharges the iPod™ unless the iPod
TM
is completely run down
There is a specific item in the menu,
like “continuous play”
or “individual track repetition”,
which must be deactivated.
Proceed with the deactivation:
❒
press the controls activation button
on the steering wheel
❒
when requested by the system, say
“DEACTIVATE CONTINUOUS
PLAY”
in a clear tone
❒
wait for voice confirmation by the
system which will say “CONTINUOUS PLAY DEACTIVATED”
Remember that your iPod™ must have
some charge or wait a few minutes until the system recharges it
70

PERSONAL DATA PROTECTION
Blue&Me™ functions entail personal data handling. In order to protect and to prevent non-authorized access to personal data,
Blue&Me™ has been implemented with the following criteria:
❒
Personal data connected to hands-free kit functions (phonebook and last calls) can only be accessed after automatic recognition
of your Bluetooth®wireless technology enabled mobile phone;
❒
Stored personal data can be deleted using the specific Blue&Me™ functions.
For further details on how to delete personal data, refer to section SETTINGS FUNCTION - MANAGING USER DATA.
IMPORTANT Take into account that when leaving your car at a service centre, personal data stored on Blue&Me™ (phonebook
and last calls) may be disclosed or may be subject to improper use. Before leaving your car at the service centre you can delete stored
data and phonebook from Blue&Me™.
For further details on how to delete personal data and phonebook, refer to section SETTINGS FUNCTION - MANAGING USER
DATA.
71

SYSTEM SOFTWARE USE NOTICE
This system contains software that is licensed to Manufacturer pursuant to a license agreement. Any removal, reproduction, reverse
engineering or other unauthorized use of the software from this system in violation of the license agreement is strictly prohibited
and may subject you to legal action.
WARNING Hacking the Blue&Me™ device or installing unapproved software may lead to warranty void and compromises of
safety and of the security of stored information.
END USER LICENSE AGREEMENT (“EULA”)
– You have acquired a device (“DEVICE”) which includes software licensed by Fiat Auto S.p.A. from one or more software licen-
sors (“Fiat Auto S.p.A.’s Software Suppliers”). Such software products, as well as associated media, printed materials, and “online” or electronic documentation (“SOFTWARE”) are protected by international intellectual property laws and treaties. The SOFTWARE is licensed, not sold. All rights reserved.
– IF YOU DO NOT AGREE TO THIS END USER LICENSE AGREEMENT (“EULA”), DO NOT USE THE DEVICE OR COPY
THE SOFTWARE. INSTEAD, PROMPTLY CONTACT FIAT AUTO S.p.A. FOR INSTRUCTIONS ON RETURN OF THE UNUSED DEVICE(S). ANY USE OF THE SOFTWARE, INCLUDING BUT NOT LIMITED TO USE ON THE DEVICE,
WILL CONSTITUTE YOUR AGREEMENT TO THIS EULA (OR RATIFICATION OF ANY PREVIOUS CONSENT).
GRANT OF SOFTWARE LICENSE. This EULA grants you the following license:
– You may use the SOFTWARE as installed on the DEVICE.
DESCRIPTION OF OTHER RIGHTS AND LIMITATIONS
– Speech Recognition. If the SOFTWARE includes speech recognition component(s), you should understand that speech recog-
nition is an inherently statistical process and that recognition errors are inherent in the process. Neither Fiat Auto S.p.A. nor its
suppliers shall be liable for any damages arising out of errors in the speech recognition process.
– Limitations on Reverse Engineering, Decompilation and Disassembly. You may not reverse engineer, decompile, or
disassemble the SOFTWARE, except and only to the extent that such activity is expressly permitted by applicable law notwithstanding this limitation.
72

– Single EULA. The end user documentation for the DEVICE may contain multiple versions of this EULA, such as multiple trans-
lations and/or multiple media versions (e.g., in the user documentation and in the software). Even if you receive multiple versions
of the EULA, you are licensed to use only one (1) copy of the SOFTWARE.
– No Rental. Except as authorized by Fiat Auto S.p.A., you may not rent, lease, or lend the SOFTWARE.
– SOFTWARE Transfer. You may permanently transfer all of your rights under this EULA only as part of a sale or transfer of
the DEVICE, provided you retain no copies, you transfer all of the SOFTWARE (including all component parts, the media and printed materials, any upgrades, this EULA and, if applicable, the Certificate(s) of Authenticity), and the recipient agrees to the terms
of this EULA. If the SOFTWARE is an upgrade, any transfer must include all prior versions of the SOFTWARE.
– Termination. Without prejudice to any other rights, Fiat Auto S.p.A. or Fiat Auto S.p.A.’s Software Suppliers may terminate
this EULA if you fail to comply with the terms and conditions of this EULA. In such event, you must destroy all copies of the SOFTWARE and all of its component parts.
– Consent to Use of Data. You agree that Fiat Auto S.p.A.’s Software Suppliers, their affiliates and/or their designated agent may
collect and use technical information gathered in any manner as part of product support services related to the SOFTWARE. Fiat Auto S.p.A.’s Software Suppliers, their affiliates and/or their designated agent may use this information solely to improve their
products or to provide customized services or technologies to you. Fiat Auto S.p.A.’s Software Suppliers, their affiliates and/or
their designated agent may disclose this information to others, but not in a form that personally identifies you.
– Internet-Based Services Components. The SOFTWARE may contain components that enable and facilitate the use of cer-
tain Internet-based services. You acknowledge and agree that Fiat Auto S.p.A.’s Software Suppliers, their affiliates and/or their designated agent may automatically check the version of the SOFTWARE and/or its components that you are utilizing and may provide upgrades or supplements to the SOFTWARE that may be automatically downloaded to your DEVICE.
73

– Additional Software/Services. The SOFTWARE may permit Fiat Auto S.p.A., Fiat Auto S.p.A.’s Software Suppliers, their affil-
iates and/or their designated agent to provide or make available to you SOFTWARE updates, supplements, add-on components,
or Internet-based services components of the SOFTWARE after the date you obtain your initial copy of the SOFTWARE (“Supplemental Components”).
– If Fiat Auto S.p.A. provides or makes available to you Supplemental Components and no other EULA terms are provided along
with the Supplemental Components, then the terms of this EULA shall apply.
– If Fiat Auto S.p.A.’s Software Suppliers, their affiliates and/or their designated agent make available Supplemental Components,
and no other EULA terms are provided, then the terms of this EULA shall apply, except that the Fiat Auto S.p.A.’s Software
Suppliers or affiliate entity providing the Supplemental Component(s) shall be the licensor of the Supplemental Component(s).
– Fiat Auto S.p.A., Fiat Auto S.p.A.’s Software Suppliers, their affiliates and/or their designated agent reserve the right to discon-
tinue any Internet-based services provided to you or made available to you through the use of the SOFTWARE.
– Links to Third Party Sites. The SOFTWARE may provide you with the ability to link to third party sites through the use of
the SOFTWARE. The third party sites are not under the control of Fiat Auto S.p.A.’s Software Suppliers, their affiliates and/or
their designated agent. Neither Fiat Auto S.p.A.’s Software Suppliers nor their affiliates nor their designated agent are responsible for (i) the contents of any third party sites, any links contained in third party sites, or any changes or updates to third party sites, or (ii) webcasting or any other form of transmission received from any third party sites. If the SOFTWARE provides
links to third party sites, those links are provided to you only as a convenience, and the inclusion of any link does not imply an
endorsement of the third party site by Fiat Auto S.p.A.’s Software Suppliers, their affiliates and/or their designated agent.
UPGRADES AND RECOVERY MEDIA
– If the SOFTWARE is provided by Fiat Auto S.p.A. separate from the DEVICE on media such as a ROM chip, CD ROM disk(s) or
via web download or other means, and is labeled “For Upgrade Purposes Only” you may install one (1) copy of such SOFTWARE onto the DEVICE as a replacement copy for the existing SOFTWARE, and use it in accordance with this EULA, including
any additional EULA terms accompanying the upgrade SOFTWARE.
74

INTELLECTUAL PROPERTY RIGHTS
All title and intellectual property rights in and to the SOFTWARE (including but not limited to any images, photographs, animations, video, audio, music, text and “applets,” incorporated into the SOFTWARE), the accompanying printed materials, and any copies
of the SOFTWARE, are owned by Fiat Auto S.p.A.’s Software Suppliers, their affiliates or suppliers. The SOFTWARE is licensed,
not sold. You may not copy the printed materials accompanying the SOFTWARE. All title and intellectual property rights in and
to the content which may be accessed through use of the SOFTWARE is the property of the respective content owner and may be
protected by applicable copyright or other intellectual property laws and treaties. This EULA grants you no rights to use such content. All rights not specifically granted under this EULA are reserved by Fiat Auto S.p.A.’s Software Suppliers, their affiliates and
suppliers. Use of any on-line services which may be accessed through the SOFTWARE may be governed by the respective terms of
use relating to such services. If this SOFTWARE contains documentation that is provided only in electronic form, you may print
one copy of such electronic documentation.
EXPORT RESTRICTIONS
You acknowledge that the SOFTWARE is subject to U.S. and European Union export jurisdiction. You agree to comply with all
applicable international and national laws that apply to the SOFTWARE, including the U.S. Export Administration Regulations, as well
as end-user, end-use and destination restrictions issued by U.S. and other governments.
– TRADEMARKS. This EULA does not grant you any rights in connection with any trademarks or service marks of Fiat Auto S.p.A.,
Fiat Auto S.p.A.’s Software Suppliers, their affiliates or suppliers.
– PRODUCT SUPPORT. Product support for the SOFTWARE is not provided by Fiat Auto S.p.A.’s Software Suppliers, or
their affiliates or subsidiaries. For product support, please refer to Fiat Auto S.p.A. support number provided in the documentation for the DEVICE. Should you have any questions concerning this EULA, or if you desire to contact Fiat Auto S.p.A. for any
other reason, please refer to the address provided in the documentation for the DEVICE.
– No Liability for Certain Damages. EXCEPT AS PROHIBITED BY LAW, FIAT AUTO S.p.A’S SOFTWARE SUPPLIERS AND
THEIR AFFILIATES SHALL HAVE NO LIABILITY FOR ANY INDIRECT, SPECIAL, CONSEQUENTIAL OR INCIDENTAL DAMAGES ARISING FROM OR IN CONNECTION WITH THE USE OR PERFORMANCE OF THE SOFTWARE. THIS LIMITATION SHALL APPLY EVEN IF ANY REMEDY FAILS OF ITS ESSENTIAL PURPOSE. IN NO EVENT SHALL FIAT AUTO S.p.A’S
SOFTWARE SUPPLIERS AND/OR THEIR AFFILIATES BE LIABLE FOR ANY AMOUNT IN EXCESS OF U.S. TWO HUNDRED
FIFTY DOLLARS (U.S.$250.00).
– FOR APPLICABLE LIMITED WARRANTIES AND SPECIAL PROVISIONS PERTAINING TO YOUR PARTIC-
ULAR JURISDICTION, PLEASE REFER TO YOUR WARRANTY BOOKLET INCLUDED WITH THIS PACKAGE OR PROVIDED WITH THE SOFTWARE PRINTED MATERIALS.
75

Trade: MAGNETI MARELLI
Changes or modification not expressly approved by the party responsable for compliance could void the user's autority
to operate the equipment
Dear customer to ensure a healthy RF exposure please keep a distance of al least 20 cm from the device.
For any other reuqest regarding RF exposure compliance in Canada, please refer to our local representative in Canada:
Renaissance Consulting
11 Parson Ridge Road, Kanata, Ottawa
Ontario, Canada K2L 2M1
Model: C1L (Blue&Me)
FCC ID: RX2C1L
IC: 4983A-C1L
This device complies with Part 15 of the FCC rules subject to the following two conditions:
1) This device may not cause harmful interference.
2) This device must accept all interference received, including interference that may cause undesired operation.

NOTES
..................................................................................................................................................................................................................................
..................................................................................................................................................................................................................................
..................................................................................................................................................................................................................................
..................................................................................................................................................................................................................................
..................................................................................................................................................................................................................................
..................................................................................................................................................................................................................................
..................................................................................................................................................................................................................................
..................................................................................................................................................................................................................................
..................................................................................................................................................................................................................................
..................................................................................................................................................................................................................................
..................................................................................................................................................................................................................................
..................................................................................................................................................................................................................................
..................................................................................................................................................................................................................................
..................................................................................................................................................................................................................................
..................................................................................................................................................................................................................................

..................................................................................................................................................................................................................................
..................................................................................................................................................................................................................................
..................................................................................................................................................................................................................................
..................................................................................................................................................................................................................................
..................................................................................................................................................................................................................................
..................................................................................................................................................................................................................................
..................................................................................................................................................................................................................................
..................................................................................................................................................................................................................................
..................................................................................................................................................................................................................................
..................................................................................................................................................................................................................................
..................................................................................................................................................................................................................................
..................................................................................................................................................................................................................................
..................................................................................................................................................................................................................................
..................................................................................................................................................................................................................................
..................................................................................................................................................................................................................................

..................................................................................................................................................................................................................................
..................................................................................................................................................................................................................................
..................................................................................................................................................................................................................................
..................................................................................................................................................................................................................................
..................................................................................................................................................................................................................................
..................................................................................................................................................................................................................................
..................................................................................................................................................................................................................................
..................................................................................................................................................................................................................................
..................................................................................................................................................................................................................................
..................................................................................................................................................................................................................................
..................................................................................................................................................................................................................................
..................................................................................................................................................................................................................................
..................................................................................................................................................................................................................................
..................................................................................................................................................................................................................................
..................................................................................................................................................................................................................................

..................................................................................................................................................................................................................................
..................................................................................................................................................................................................................................
..................................................................................................................................................................................................................................
..................................................................................................................................................................................................................................
..................................................................................................................................................................................................................................
..................................................................................................................................................................................................................................
..................................................................................................................................................................................................................................
..................................................................................................................................................................................................................................
..................................................................................................................................................................................................................................
..................................................................................................................................................................................................................................
..................................................................................................................................................................................................................................
..................................................................................................................................................................................................................................
..................................................................................................................................................................................................................................
..................................................................................................................................................................................................................................
..................................................................................................................................................................................................................................

Fiat Group Automobiles S.p.A. - Customer Services - Technical Services - Service Engineering
Largo Senatore G. Agnelli, 5 - 10040 Volvera - Torino (Italia)
st
Print no. 603.97.078 - 02/2009 - 1
edition

 Loading...