

Page 1
USER MANUAL
www.magnerinternational.com
User Manual
Version 0
Production date:
© MAGNER International 2014
EBKM.00D800.00.00.001-03UM_Magner
Pantone 7502C Pantone 294C
VALUE COUNTER
VALUE
COUNTER
Page 2

Contents
Introduction....................................................................... 4
Specifications..................................................................... 4
Safety Precautions.............................................................. 4
Delivery Set....................................................................... 5
Appearance....................................................................... 5
Control panel..................................................................... 7
External Sensors, Path Sensors and Pocket Switch.................. 8
Preparing for Operation....................................................... 12
Operation.......................................................................... 14
Setup Menu........................................................... 17
Detection.......................................................................... 18
Speed............................................................................... 18
Information....................................................................... 18
Pockets capacity................................................................. 19
Factory reset..................................................................... 20
Extended visual mode......................................................... 22
Sound Volume ................................................................... 23
LCD Brightness .................................................................. 23
Theme selection ................................................................ 20
Language ......................................................................... 20
Operating Keys................................................................... 24
Messages ........................................... 38in course of operation
Error Messages.................................................................. 38
Info messages................................................................... 39
Maintenance...................................................................... 41
Troubleshooting.................................................................. 41
Transportation and Storage.................................................. 43
Support and Warranty......................................................... 43
Firmware Upgrade.............................................................. 44
Warranty Conditions............................................................ 47
3
MAGNER PRB VALUE COUNTERMAGNER PRB VALUE COUNTER
Page 3

5
Specifications
Hopper capacity, not more than....................................... 500 banknotes
Stacker capacity, not more than........................................ 200 banknotes
Reject pocket capacity, not more than …………............... 100 banknotes
Value counting speed (±10%)................. 600/900/1200/1500 note/min
Banknote size.......................................... 100—190 mm (width),
58—90 mm (length),
0,05—0,2 mm (thickness)
Batch select...................................................................... 1—999
Banknotes feed system.......................... roller system of a friction type
Sensors ............................ a line of photosensitive elements with an
infrared and visible lighting, (CIS). Ultraviolet
sensors (2 pcs. for transmitted light and 2 pcs.
for reflected light). Multichannel magnetic
sensors (1 pc. at the centre, 2 pcs. at the sides).
Display.................................................... Color TFT LCD 4.3" (11cm) with
resistive touch sensor.
Power supply........................................... 100-240 VAC, ~50/60 Hz
Current consumption, not more than....... 2A (100 V) -1A (240 V)
Operating temperature range.............................................10°C to 35°C
Relative air humidity at +25°C................ 40% to 80%
Atmospheric pressure............................. 84 to 107 kPa (630 to 800 mm Hg)
Overall dimensions:
Height........................................................................................ 345 mm
Width ........................................................................................ 305 mm
Depth ........................................................................................ 295 mm
Net weight.................................................................................. 10 kg
Gross weight.............................................................................. 13 kg
Average lifespan…………………………………………………… 7 years
4
Introduction
Dear Customer,
We would like to thank you for purchase of Magner PRB, two pocket
banknote counter that recognizes value and authenticity of banknotes of
different currencies, and sort them by orientation or by denomination.
The machine is intended for counting and sorting of US dollars, Euros and
other world and local currencies (depending on client's choice and availability
of certain currency's software). Authenticity verification is based on visible and
infrared images of both sides of banknotes, and their magnetic and ultraviolet
response as well.
Delivery Set:
Banknote counter Magner PRB.......................................................… 1 pc.
Power cord........................................................................................… 1 pc.
Stylus…................................................................................................ 2 pcs.
USB cable (A-B type)…........................................................................ 1 pc.
User manual…...................................................................................... 1 pc.
Package…............................................................................................ 1 set.
Banknote guide.................................................................................… 2 pcs.
Safety Precautions
To ensure long lifespan and a reliable operation of the counter, user should
meet the following operation requirements and observe the below-mentioned
safety precautions:
1 The counter's rotating parts are potentially hazardous for the user. Do not
touch the gear as it may cause an injury. We highly recommend that the
user avoid wearing any jewelry and loose clothes, and cover long hair when
operating the machine.
2 Do not touch by wet hands the counter, the power supply plug and the
power cord as it may cause an electric shock.
3 When closing the top cover, mind your fingers as you may squeeze them.
At operation with an open top cover, make sure about its steady state. A
sudden closing of the cover may cause an injury.
4 Avoid getting of any metal object or liquid into the counter.
5 Use an electric outlet with a protective earth contact (PE) to connect the
counter to the power supply. The outlet should be located close to user's
workplace.
6 Avoid usage of the power other thanincluded in the delivery set; do not
pull the power cord to disconnect it from the outlet, neither bend it nor twist.
7 If you do not use the counter for a long time, its power switch shall be in
the «O» position. Upon work completion, disconnect the machine from the
power supply.
8 The counter shall be installed on an even horizontal surface.
9 Do not use the machine at extremely high or low temperatures; avoid
humidity and the exposition to direct sunlight.
10 When the counter is working, do not switch it off, do not pull the power plug
out of outlet, do not open machine's cover. It may cause a damage of the
counter.
11 Before cleaning the sensors of the path, make sure the counter is switched
off.
12 When you are choosing the place of counter's installation, avoid the areas
with high level of dust content.
13 At installation and use of the counter, keep some space sufficient for
opening its upper part and getting access to the path.
14 To avoid any inflammation or short circuit, do not install the device in places
where it may be at risk of a soot or steam exposure.
MAGNER PRB VALUE COUNTERMAGNER PRB VALUE COUNTER
Page 4
17
9
16
15
14
13
12
2
2
3
4
5
6
7
8
9
10
11
1
4
76
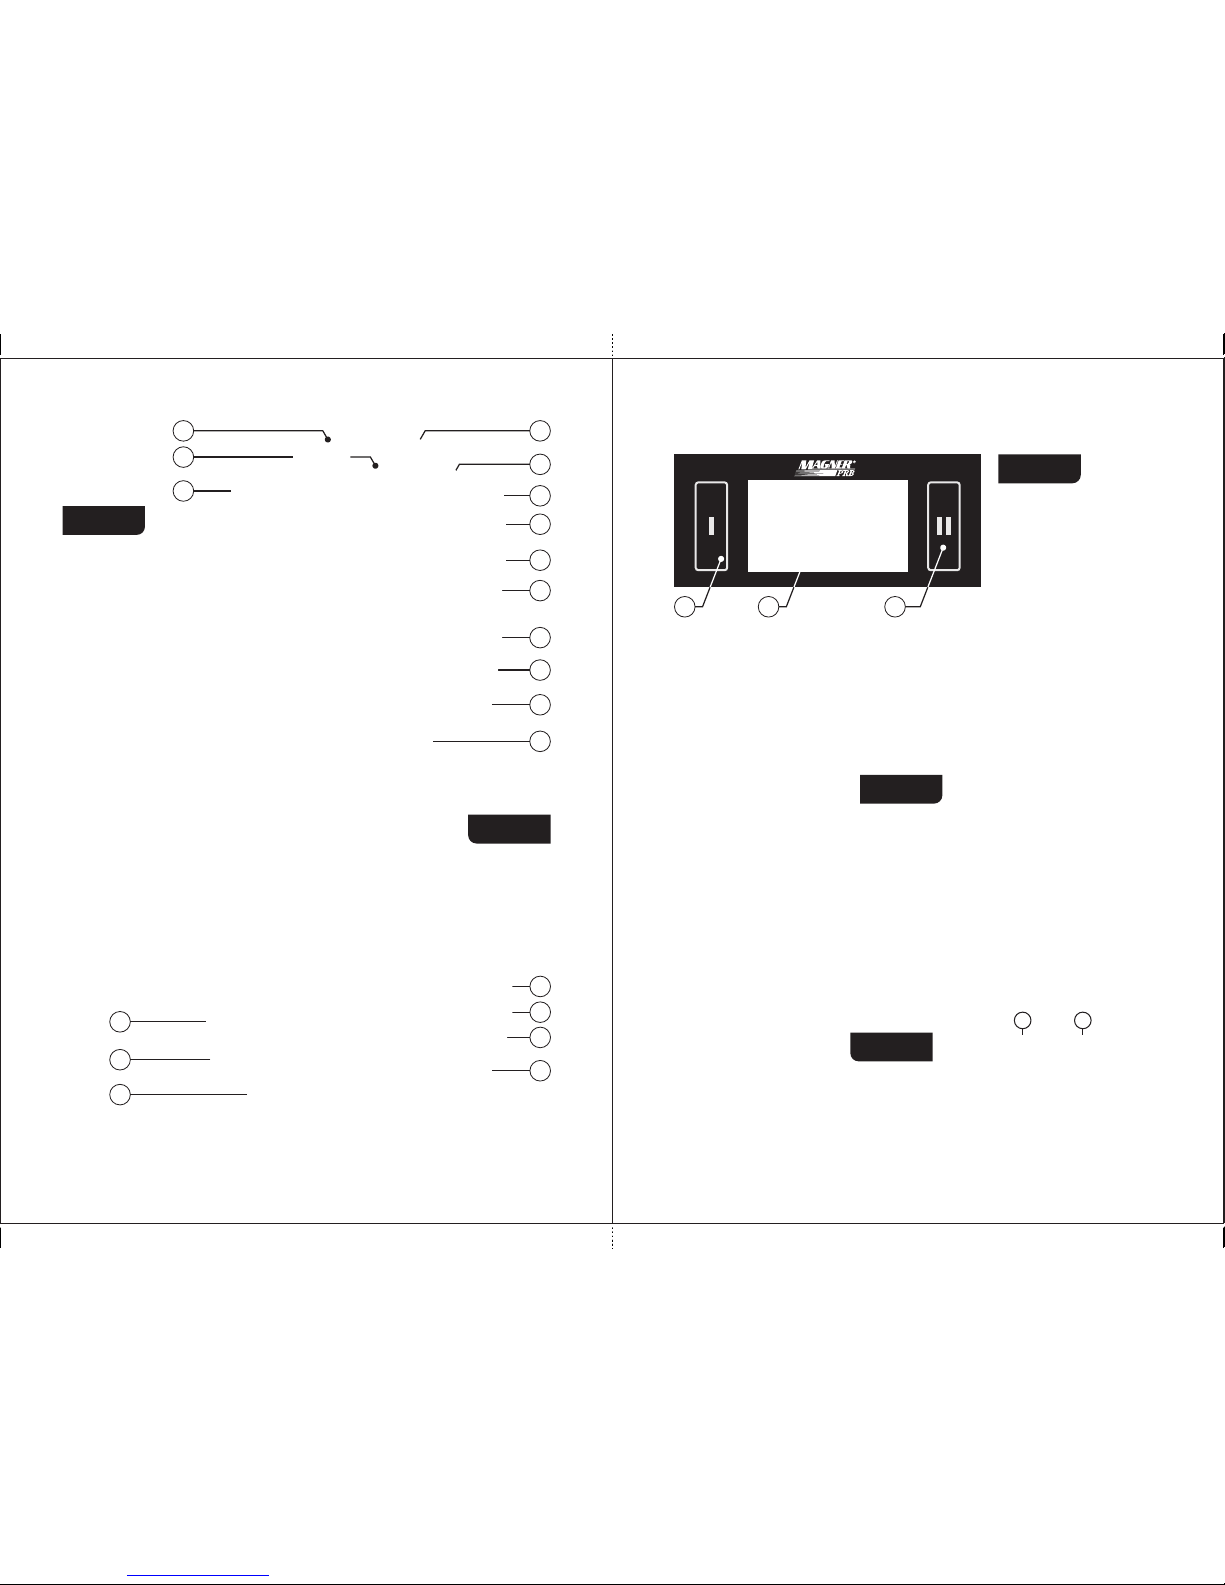
Appearance
Figure 1
Figure 2
1 Screw to
adjust a gap between
hopper's rollers.
2 Banknote guides.
3 Hopper.
4 Locks providing
access to
mechanism.
5 Control panel.
6 Reject pocket.
7 Stacker.
8 Stacker wheels.
9 Carrying handles.
10 Upper part.
11 Base.
12 Power switch.
13 Fuse.
14 Power connector.
15 Connector for an e xternal printer
or a video surveillance
device.
16 USB port for PC connection.
17 Socket for external display.
External Sensors, path sensors and pocket switch
To open the path, press simultaneously the fixing an upper part (see locks
Figure 1,item 4), and then, holding the the case,pull the upper part hollows of
of the (see Figure 2, item 10) up to the stop. To close the path, push counter
the upper part up to a click.
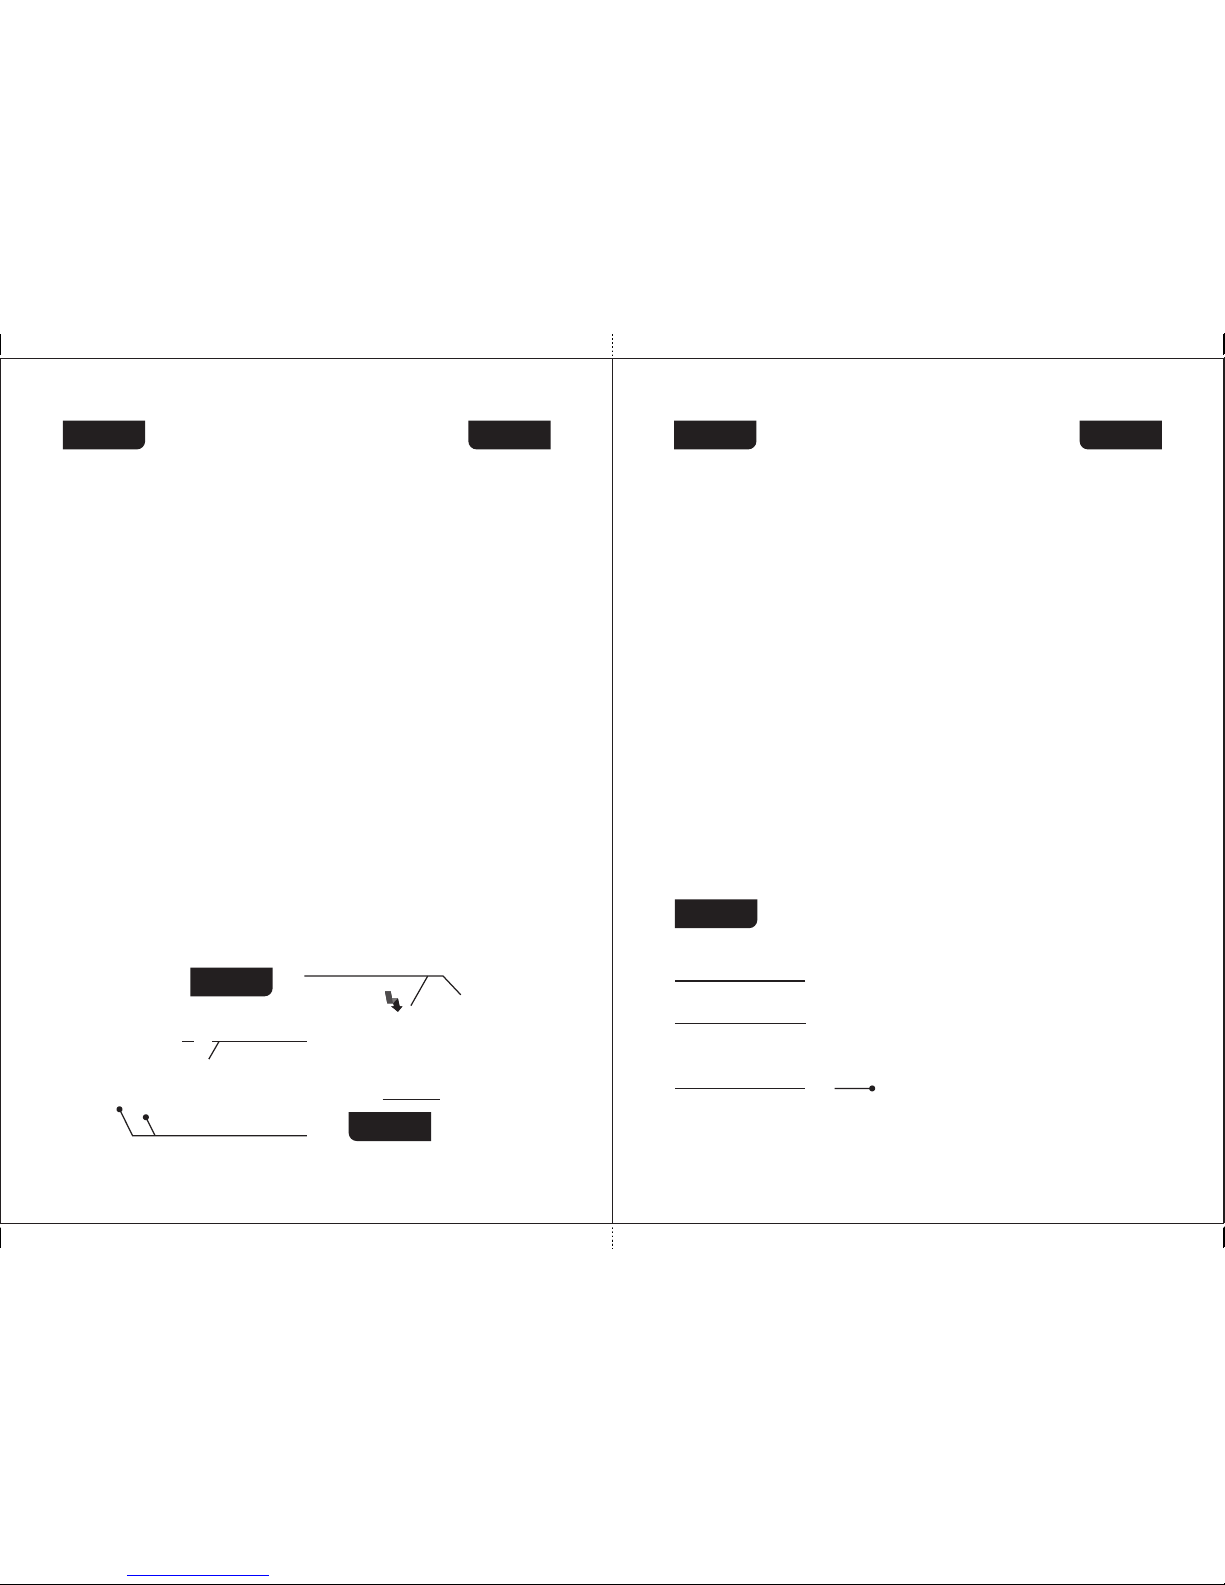
Figure 5, Figure 6, and Figure 7 show the external sensors, the path
sensors and the .pocket switch
Control panel
Figure 3
1 The softkeys for the
start and user
selection.
2 Touch screen display.
1 Hopper sensors
2 Reject pocket sensor
3 Stacker sensors
11 2
4 The UV transmission sensors/the
input path sensors
5 Contact image sensor (CIS)
Figure 4
Figure 5
5
44
2
1
3
MAGNER PRB VALUE COUNTERMAGNER PRB VALUE COUNTER
Page 5
98
6 UV reflection sensors
7 Magnetic sensors
5
6
4
7
Figure 7
8 Counting sensors
9 Pocket switch
8
9
Figure 6
Preparing for Operation
1 Make sure that the safety precautions mentioned in the relevant section of
the manual are kept.
2 Install the banknote guide (Figure 1, item 2) included in the delivery set:
2.1 Take one banknote guide (Figure 1, item 2) and match the tabs of the
guide (see Figure 8) with the slots of the banknote guide holder (see
Figure 9).
2.2 Push the guide into the holder (see Figure 10).
2.3 To fasten the guide on the holder, move it down up to the stop (see
Figure 11).
Repeat points for the second banknote guide.2.4 2.1-2.3
2.5 T o check that the banknote guides are installed properly, move the
guides manually aside, to the maximum and minimum; the
movement shall be synchronous and without jerks.
To remove the guide (for example, before transportation), take the upper
part of the guide, press it slightly and then pull it up.
Figure 8
Clamps
Tabs
Figure 9
BanknoteBanknote
guide holderguide holder
Banknote
guide holder
Slots
Figure 10
Figure 11
3. Connect the counter to electric outlet by power cord.
Operation
1 Make sure that the safety precautions mentioned in the relevant section of
the manual are kept.
2 Use a power switch (Figure 2, item 12) to switch the counter on. After you
have done it, a process of the firmware loading and self-testing is activated
and an image (see Figure 12) appears on the graphical display (Figure 3,
item 2). During self-test the loading indicator is moving, the stacker wheels
(Figure 1, item 8) and the hopper rollers (Figure 1, item 3) are rotating.
SW version
Loading
indicator
Figure 12
After self-testing is over, you hear an audio signal, and the display shows
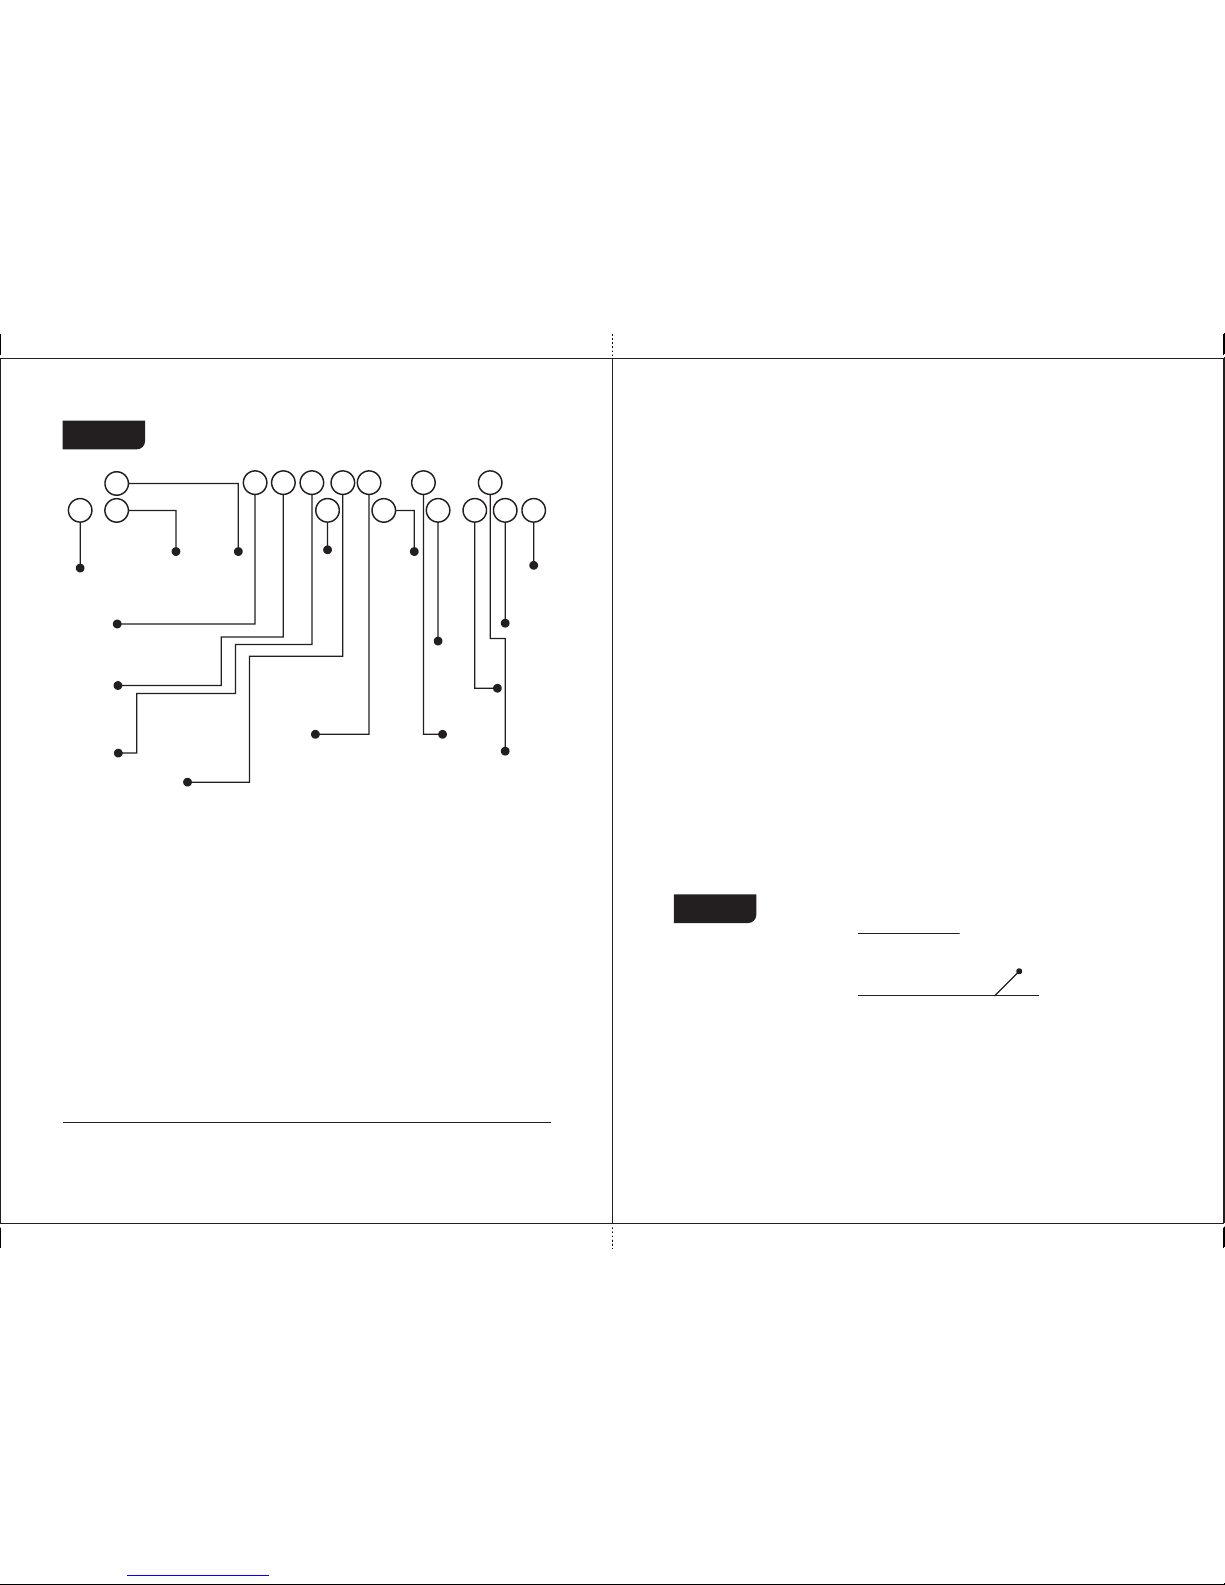
the following picture (see Figure 13):
Currency
database version
MAGNER PRB VALUE COUNTERMAGNER PRB VALUE COUNTER
Page 6
4. A dj ust th e b an kno te
guides according to the
le ngth of the lo ng es t
ba nk note in the bat ch being coun te d,
a l i gn the b a tc h ed g e s ( se pa rat e
ban kno tes sh all no t prot rud e from th e ba tc h ), an d pl ace it in th e
mid dle of the hopper avoi ding its skew. The counter will start opera tion
automatically. The count is stopped when the number of the notes equal to
the stacker capacity has been counted. After the bankn otes have been
removed out of the stacker, the counter automatically resumes operation.
1110
Figure 13
1
2
6
4
5
3
7
9
8
10
11
12
13
14
15
16
1. Key/indicator of counting mode;
2. Key/indicator of counting speed;
3. Key/indicator of sorting mode;
4. Key/indicator of batch mode;
5. Currency selection key;
6. Batch size/stacker capacity selection
key;
7. Counting results clear key;
8. Counted/ rejected banknotes report key;
9. Accumulation mode key;
10. Automatic/ manual start key;
11. UV and MG detection ON/OFF key;
12. Settings menu key;
13. Currency indicator/ currency
selection hot key;
14. Number of counted banknotes;
15. Number of rejected banknotes;
16. Amount of counted banknotes.
1
Now the counter is ready to work under the factory settings as follow :
— Interface language is English.
— Currency is automatic currency detection by the fi rst bankn ote in a
batch.
— Counting mode is MIX.
— Start mode is automatic.
— Accumulation mode is off.
— Batch mode is off (because in MIX mode it's always disable).
— Counting speed is 1,200 banknotes per minute.
— Ultraviolet detection (UV) is off.
1
If required, the factory settings may be replaced by user settings.
3. Adjust the feeder gap. The manufacturer presets the gap in accordance
with the currencies to be counted.
However, if the counter often rejects the known-good banknotes and the
report (see subsection «Operating Keys», «Key «REPORT» , Figure 52
and Figure 53) indicates «Small Notes Gap» and «Double Note» as the
reason of the banknotes rejection, it is necessary to slightly turn screw 1
clockwise (toward «–») to reduce the gap (see Figure 1). If the rejection
report indicates «Skew Error» and «Feed Error», it is necessary to slightly
turn screw 1 counterclockwise (toward «+») to increase the gap (see
Figure 1). The gap between separating rollers and feeding rollers should
make one note to pass free between the rollers but to prevent two notes put
together from passing (see Figure 14).
Figure 14
— Magnetic features detection (MG) is off.
— Banknote density detection (DENSITY) is off.
— Orientation sorting (ORIENT) is off.
— Extended visual mode is off.
— Sound volume is 50%.
— Screen brightness is – 100%.
— Theme selection is by default.
— Stacker capacity is 200 banknotes.
— Reject pocket capacity is 50 banknotes.
— User’s profile is «I».
Separating
rollers
Feeding rollers
MAGNER PRB VALUE COUNTERMAGNER PRB VALUE COUNTER
Page 7
Note:
Pre pare the banknotes to be count ed
as s ho w n in Fi gure 1 5 , rem ov e the
bankn otes that are tor n, we t, grea se or
dirty.
Advice: For customer's convenience
we suggest to use a stylus, a pen-shaped
accessory designed to control the devices with a touch interface. The stylus
will facilitate your work with the counter.
Two styluses for the resistive
touch screens are the part of delivery
set (see Figure 16).
1312
5. In case of an error, follow the advices of the «Error Messages» section.
Figure 15
Figure 16
Setup Menu
To enter the user’s settings menu, press the «MENU» key (see Figure 13).
The user’s settings menu appears on the screen. In its left part, there are
the submenu keys, in the right part there are the corresponding parameters. To
save the changes and exit the menu, press the key. After the exit, the
scr een show s the selected sett ings. To exit the men u without saving the
changes, press the key.
1 Submenu « COMMON » (see Figure 17).
It includes two categories: «Detection» and «Speed», keys
«POCKETS’ LIMIT», «INFORMATION», «FACTORY RESET» are
also available.
Detection
UV is ultraviolet detection mode. When it's activated ( ), and a
banknote with an increased UV fluorescence has been found (for example, a
counterfeit printed on plain paper), the banknote goes to the reject pocket (the
rejection causes are available in the «REPORT» submenu).
MG is magnetic features detection. When it's activated ( ), and a
banknote without magnetic marks has been found, the banknote goes to the
reject pocket (the rejection causes are available in the «REPORT» submenu).
DENSITY is banknote density detection that available only for COUNT
mode. When it's activated ( ) and a very dark banknote has
been found (or two notes passed together) or a very transparent one, the
banknote goes to the reject pocket (the rejection causes are available in the
«REPORT» submenu).
Figure 17
Speed
User can choose any of four counting speeds (600, 900, 1200, and 1500
banknotes per minute). The check-box opposite the selected speed is
highlighted in blue. For counting of worn notes we suggest low speed (600 or
900 notes/min).
Attention : if UV detection is activated ( ), only two counting
speeds (600 and 900 notes/min) are available.
Information
This screen is contained the info on the device identifier (UIN), the firmware
(FW) versions, the supported languages, the supported currencies, and the
currency database version (see Figure 18, Figure 19). To view the text given
below, move your finger across the screen from the bottom upwards and for
the text above - from the top downwards.
MAGNER PRB VALUE COUNTERMAGNER PRB VALUE COUNTER
Page 8
1514
Figure 18 Figure 19
1
2
POCKETS CAPACITY
Press the « » key to open the submenu of the pocket capacities
selection (see Figure 20).
The stacker limit is the maximum number of banknotes that can be placed
into the stacker. The limit has two possible values: 100 and 200 banknotes; as
soon as the selected value is reached, the count er stops and res umes its
operation after the banknotes are removed from the stacker (and pressing the
«start» key , if the counter is in the manual start mode). The selected value of
the stacker limit is highlighted in blue (see Figure 20). To change the setting,
just press the required value (it became highlighted in blue).
The reject pocket has an adjustable limit value. As soon as the specified
li mit is reached, the cou nt er sto ps and res umes its operat io n af te r th e
banknotes have been remo ved from the reject pock et (a nd pr ess ing the
«start» key, if the counter is in the manual start mode). The default (optimal)
value of the reject pocket limit is 50 banknotes. The user can change the limit
within the range of 25 to 100 banknotes. To change the limit, move a slider
Figure 20
to the required value. The slider moves by steps of 5 notes each (25 - 30 - 35 etc.).
Attention! For counting of worn notes we suggest the reject pocket limit
would be not more than 50 notes, otherwise it may cause unsmooth stacking
or jamming of notes.
Note: All the banknotes that do not match to the counting/sorting criteria
get into the reject pocket, including the notes with tears and other mechanical
damages. To prevent any banknote damage, please choose such capacity of
reject pocket that corresponds to physical condition of the counting notes.
FACTORY RESET
After the key is pressed, all the current user’s settings are reset
and the factory settings restored (see article 2 of section «Operation»). To
exclude an accidental reset of the settings, you will be asked to confirm it (see
Figure 49).
Att enti on: the settings are resetted only for the current user, while the
settings of another user remain unchanged.
2 Submenu «Orientation sorting» (see Figure 21)
Orientation sorting is available for modes MIX and DEN. The selected
mode of orientation sorting is displayed on the key/display . The
banknotes may be sorted with the following settings:
OFF: The banknotes are counted regardless their orientat ion (see
Figure 21).
Figure 21
MAGNER PRB VALUE COUNTERMAGNER PRB VALUE COUNTER
Page 9
1716
FACE: The banknotes placed into the hopper with their faces up will get
into the stacker (see Figure 22). The remained banknotes will be placed
into the reject pocket. N.B.: to understand which side of certain
currency's banknote is the face, refer to the web site of relevant Central
Bank.
Figure 22
ORIENT: the banknotes placed into the hopper with their faces up and
readable from the left to the right serial number (upside up) will get into
the stacker (see Figure 23). The other banknotes will be transferred into
the reject pocket.
Figure 23
AUTO: The banknotes with the same orientation as the first counted
banknote in a batch (see Figure 24) will get into the stacker. The other
banknotes will be transferred into the reject pocket.
To get an access to the orientation sorting, press the hot keys « » (see
Figure 25). By pressing ORT key, the dropdown menu «orientation sorting»
appears. The required orientation may be selected by a repetitive pressing of
the key ; in this case, the modes will be selected in turn:
, , , .
Af t er the req uir ed m od e ha s be en s el e ct e d, the dro pdo wn m en u
automatically disappears in 7 seconds or at the moment when a count starts
(automatic or manual). It is also possible to select a sorting mode by pressing
directly the corresponding icon; in this case, the dropdown menu automatically
disappears and the selected setting is displayed on the indicator.
Figure 24
Figure 25
3 Submenu «ADVANCED»
It contains the settings of brightness and the sound volume as well as
selection of the extended visual mode (see Figure 26).
MAGNER PRB VALUE COUNTERMAGNER PRB VALUE COUNTER
Page 10
19
18
Figure 26
We suggest to use this mode if you work with the counter continuously and
do not switch frequently between different modes.
When extended visual mode is activated (see Figure 27), the hot keys by
the sides of the screen are removed and the font size for amount of counted
notes become bigger (see Figure 28).
To get an access to the menu, press the key. To recall the hot keys by the
sides of the screen, press the middle area of the screen; a repeated pressing
will hide the keys again.
EXTENDED VISUAL MODE.
Figure 27
SOUND VOLUME
Moving the slider from the minimum (MIN) to the maximum (MAX), you
increase the sound volume (see Figure 26). At extreme left position (MIN), the
sound is off.
LCD Brightness
Moving the slider from the minimum (MIN) to the maximum (MAX), you
increase the brightness of LCD screen (see Figure 26).
Figure 28
THEME SELECTION
You can choose one of the preset themes of graphic user interface (GUI).
Chosen theme is marked by blue check-box at the left of theme (see Figure
29).
Figure 29
LANGUAGE
You can choose one of the preset languages. To select the language, press
its name. The check-box at the left of the chosen language became blue
instead of grey (see Figure 30).
Availability of the certain languages is depended on the software version
of your counter.
MAGNER PRB VALUE COUNTERMAGNER PRB VALUE COUNTER
Page 11
2120
Figure 30
1. Keys and (START, USER PROFILE SELECTION,
USER SELECTION)
1.1 The counter is able to save two various profiles with the unique settings.
You can switch between them by pressing keys «I» and «II» (see
Figure 3).
The profiles may be used by one user or by two users (it's the operation
mode «Two tellers»).
According to the tasks to be solved and personal preferences, each
user has possibility to choose any setting and any counting/sorting
mode.
Indication of the selected profile is depended on the main screen's
visual mode.
In the standard visual mode, the ope rat ing keys nex t to the
active user key are highlighted in green. The figures given below show
the control panel appearance for various users: at Figure 31 is for 1st
user (I), at Figure 32 is for 2nd user (II).
Operating Keys
Green highlight
Figure 31
Green highlight User «I»
Green highlight
Figure 32
In the extended visual mode, the highlighted parts are not only the active
user's key but also the check-box in the upper corner of the screen.
The figures given below show the control panel appearance for various
users: at Figure 33 is for 1st user (I), at Figure 34 is for 2nd user (II).
Figure 33
MAGNER PRB VALUE COUNTERMAGNER PRB VALUE COUNTER
Page 12
2322
Green highlight User «II»
Figure 34
1.2 Keys «I» or «II» are used for the start of count in the manual start
mode. To start, press the button of the active user.
Figure 35
2 Key/indicator of the counting mode
The counter is counted banknotes in three modes: «COUNT», «MIX»,
«DEN». A mode is selected by a repetitive pressing of the mode key. At the
s ame time this key is the indicator of the se lected operation mode.
2.1 «COUNT» is a piece counting mode. The notes are counted without
recognition of their denominations and counterfeit detection, the display
is shown the number of the counted and rejected banknotes (see
Figure 35).
2.2 Is the counting mode for mixed denominations of certain currency with
their authentication, calculation of the total amount, the number of
counted banknotes and amounts of each denomination.
The display is shown the total amount of the counted banknotes, the
numbers of rejected and accepted banknotes (see Figure 36). The
detailed report on each denomination's number and amount is
available by pressing the key «REPORT» (submenu «Batch Report»,
see Figure 37). For more d etai ls o n sub me n u «R EP O RT», se e
subsection Operating Keys (Key «REPORT»).
Figure 36
Figure 37
2.3 «DEN» is the counting mode for the certain denomination of banknotes
with their authentication, calculation of the total amount and the number
of counted banknotes. The denomination is recognized by the first
banknotes in the batch. It's possible to choose the denomination
manually (see submenu «CURRENCY»).
The display is shown the total amount of counted banknotes, the
MAGNER PRB VALUE COUNTERMAGNER PRB VALUE COUNTER
Page 13
2524
number s of rejecte d an d ac cepted banknote s (see Figure 38).
The detailed report on number and amount of counted notes for each
denomination is available by pressing the «REPORT» key (see Figure
39, submenu «SUM Report»).
Figure 38
Figure 39
3 Key «CURRENCY»
3.1 By pressing the CURRENCY key, the CURRENCY submenu is
appeared (see Figure 40), and a user can choose the currency to be
counted and denomination. (The set of supported currencies is
depended on the software version.) Currency selection is available only
for modes «MIX» and «DEN», denomination selection is available only
for mode «DEN».
By default, the automatic mode of currency recognition is activated; it
means that the currency is recognized by the first banknote in the batch
– the key is highlighted in blue.
Figure 40
By pressing the AUTO key, the mode of manual currency selection is
activated, the key highlighted in blue appears (see Figure 41).
The list of hot currencies (up to 10) is appeared. These currencies can
be counted with recognition of denominations and counterfeit detection.
The check-box of selected currency is highlighted in blue. To select
another currency, press its name and the color of the check-box at the
left of this currency is switched to blue. The counter's memory can store
more than 10 currencies that can be included into user's list of hot
currencies. When the required currency is selected press the key,
and the counter will be ready to count this currency; while the banknotes
of other currencies will be transferred to the reject pocket.
Figure 41
3.2 To select a new set of hot currencies, press the key, and submenu
2
«FAST ACCESS Currencies» will appear (see Figure 42, Figure 43).
2
Another way to enter the FAST ACCESS CURRENCIES menu is to press any check-box and
hold it for 2 seconds.
MAGNER PRB VALUE COUNTERMAGNER PRB VALUE COUNTER
Page 14
2726
Figure 42
Figure 43
Keys allow scrolling of the list of available currencies. If scrolling
is available these keys are blue, otherwise they are grey.
To create a currencies set, press one by one the check-boxes at the left
of the required currencies (the color of the boxes will become blue), then
press the confirmation key, after that you come back to the
«Currency» submenu. If it is required to cancel selection and exit
the submenu without saving the changes, press the key.
3.3 In the «DEN» mode it is poss ible to count bankn otes of the selecte d
cur rency with a manually chosen denomination value. In submenu
«CURRENCY», all possible denominations of the selected currency
are shown below the the list of hot currencies (Figure 41). By default the
«auto denomination» mode is activated, i. e. a denomination is detected
by the first note in the batch; in this case the check-boxes at the left of
denominations are highlighted in blue. If it's required that the banknotes
of th e c e rt a i n de nom i n at i o n g e t in t o th e st a cke r, p res s the
the required denomination; in this case, the check-box at the left of
selected value become blue while the other check-boxes become grey
(se e Figure 44). For the user’s convenien ce, the selected value of
denomination in mode «DEN» is shown on the main screen at the right
of the selec te d cu rrency (s ee Fig ure 45). To ret ur n to automa ti c
denomin ation mode, pr ess the «AUTO» key at th e rig ht of th e
denominations list (see Figure 44).
Figure 44
Figure 45
The indica tor of the selected currency (or the AUTO mode) is in the
bottom left corner of the main screen (see Figure 13, Figure 45).
This indicator is also a hot key for submenu «CURRENCY» (it's useful
for extended visual mode where side buttons are hidden). To the right of
the indicator the couples of (denomination - number of counted notes)
are presented (available for MIX and DEN modes); the counted
denominations are marked by bold text (see Figure 46).
MAGNER PRB VALUE COUNTERMAGNER PRB VALUE COUNTER
Page 15
2928
Figure 46
4 Key «BATCH»
Press the «BATCH» key to call the BATCH submenu that is available for
modes «DEN» and «COUNT» (an d unavailable in mod e «MIX») (see
Figure 47) whic h provid es possibility to sele ct the batch siz e and the
stacker limit.
Figure 47
You can enter BATCH mode by pressing the key (for the batch size >0)
and disabled by pressing the key. By pressing the key you cancel
t he un sa ve d cha ng es and ex it to the main men u. The b atc h siz e i s
set with the numerical keys. Any batch size since 1 until 999 is available.
Key is used to clear the current batch size. Single pressing of the key
deletes the digit from the right to the left.
There is an information bar below the batch size which contains the main
information from the ma in screen (the n umbe r of the counted banknotes,
the current b atch size (if it was s elected ), the s tacker capacity, the rejec t
pocket capacity). The fast access key to BATCH mode is available on the
main screen in the top right corner (see Figure 13). means that batch
mode is off. means that batch mode is on.
T he ba tc h siz e i s indic at ed on the ma in sc reen in th e b ot to m rig ht
corner (see Figure 48). Once the batch size is reached, the indic ator is
s tar ted to blink , and in 10 se conds message «BATCH IS READ Y» is
appeared on the screen. If the number of the banknotes in the stacker is
less than the batch size, the message is: «add X», where X is the number of
b ankno tes required for th e batch of the select ed size , in 10 second s
message «ADD BANKNOTES» is appeared on the screen.
Note : The batch size indicator is also the hot key for a quick access to the
«BATCH» submenu.
Figure 48
In the BATCH su bmenu a us er ca n cha nge the stacker capa city. The
current value of the stacker capacity is highlighted in blue(see Figure 47).
To change the setting, it is sufficient to press the required value (new value
become highlighted in blue).
In the middle of the scree n (see Figure 47) the re is the information bar
which contains info on the counted and rejected banknotes, the curr ent
batch size and the stacker capacity.
5 Key «RESET»
Key is used to clear the counting results of the stacker after it has been
emptied (the reject pocket shall also be empty). To avoid an accidental data
reset, confirmation is required. (see Figure 49).
A long pressing (about two seconds) on the center of main menu is cleared
the resu lts without conf irmatio n (the function is the most useful for the
extended visual mode).
MAGNER PRB VALUE COUNTERMAGNER PRB VALUE COUNTER
Page 16
31
30
Figure 49
6 Key «REPORT»
By pressing the «REPORT» key, the REPORT submenu is appeared (see
Figure 50), it makes you to look through the information on the counted and
rejected banknotes.
Figure 50
The report on the counted banknotes is available in two versions:
– Batch report ;
– Sum report .
For both versions, there are the columns of «denomination»,
«count», «sum».
D en om in at io n is the column whe re all denominations of cou nt ed
banknotes are listed
Count is the list of banknotes number for all listed denominations.
Sum is the total amounts for all denominations.
Total is the total number and the total amount of all counted banknotes.
The batch report (see Figure 50) shows all the counted banknotes that got
into the stacker during the last counting.
If the accumulation mode (ADD) is on , the batch report will include
the total amount of the banknotes counted in this mode.
The sum report (see Figure 51) is listed all the banknotes counted since
the moment the counter's switched on (see article 2 of subsection Operation).
The key is used to clear the reports. To avoid an accidental clearing of
the results, confirmation is required (see Figure 49).
Key is used for exit from the submenu.
Figure 51
A report on the rejected banknotes is available in two versions:
– reject pocket report (Blue ; highlight)
– Advanced reject pocket report ( .Green highlight)
The reject pocket report (see Figure 52) is contained possible reasons of
reje ction and the number of banknotes reje cted due to eac h of these
reasons.
«Counting mode mismatch» means banknotes do not correspond to the
selected settings and the operation modes (for example, a mix of various
denominations is counted in the DEN mode or user tried to count different
currencies in one batch).
«Mechanical errors» means a banknote skew in the path which prevents
their correct recognition.
«Suspect banknotes» means banknotes do not corre spond to the key
features of the specified currency.
MAGNER PRB VALUE COUNTERMAGNER PRB VALUE COUNTER
Page 17
33
32
Figure 52
The advanced reject pocket report (see Figure 53) is contained more exact
reason of rejection for each rejected note.
T he nu mb er (N O) me an s the number of the ba nk no te in th e rejec t
pocket.
The REJECT REASON column is included the reason of rejection and the
s equen ce numb er of eac h rejec te d note in the coun ted bat ch (in th e
brackets).The complete list of reject reasons is given in Table 1.
The key is used to clear the reports. To avoid an accidental clearing of
the results, confirmation is required (see Figure 49).
Figure 53
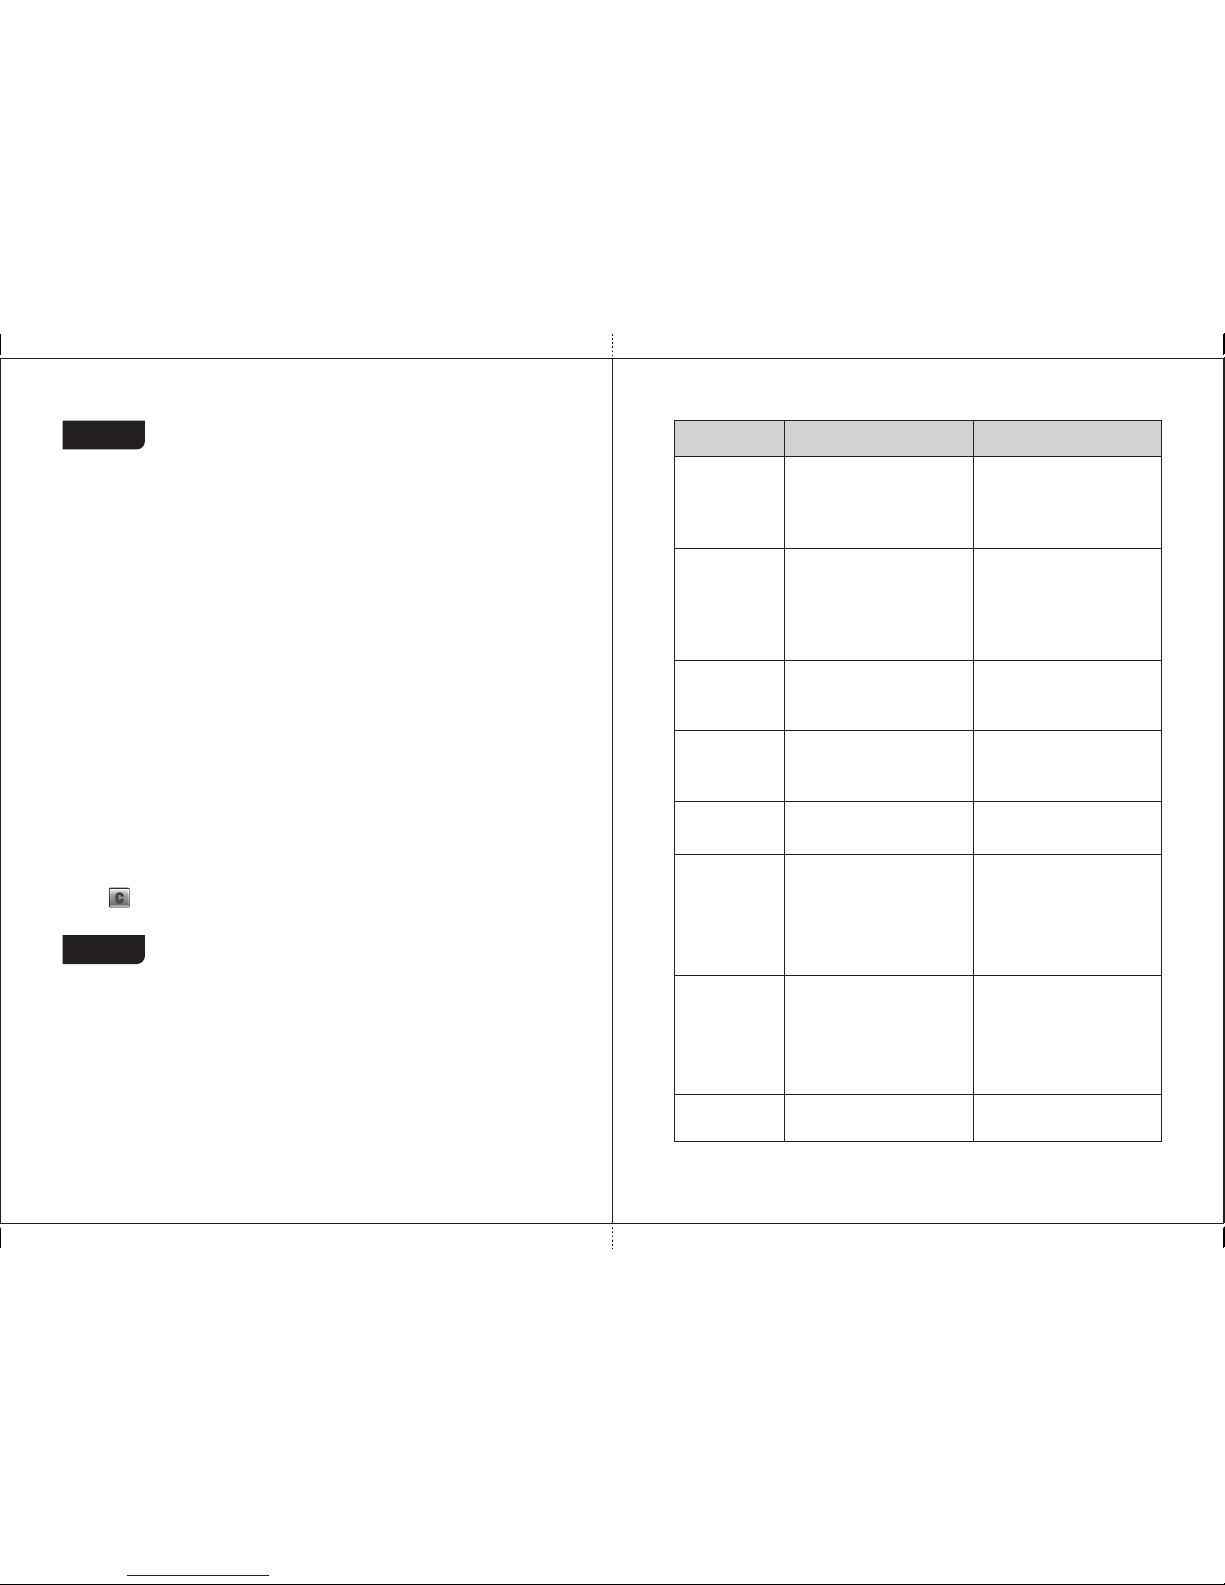
Table 1
Rejection
reason
Description
Teller's actions
Unknown
note
Banknote does not match the
main currency features,
currency and denomination
cannot be recognized.
Remove the banknote and
recount it. In case of repeated
rejection, verify the authenticity of
the banknote using currency
reference book and
multifunctional detector like DORS
1250 or DORS 1300.
Currency (X Y)
where
X – currency,
Y – denom.
In MIX or DEN modes the
currency of banknote does not
match the specified one.
Remove the banknote.
Remove the banknote.
denom (X Y)
where
X – currency,
Y – denom.
In DEN mode the
denomination of banknote
does not match the specified
one.
Orientation
Banknote orientation does not
match the specified one.
Place the banknote into the
hopper according to the
specified orientation.
Small notes
gap
Continuous chain (short side
of note is too long or the gap
between two notes is too
short).
Remove the banknotes that
got stuck together. Adjust the
feeder gap («-» means gap
decrease) for operation with
the thinner banknotes. To get
the required gap, turn screw 1
(Figure 1) clockwise.
Double note
A double banknote or a very
dark banknote has been
detected.
Remove the banknote. If
required, adjust the feeder
gap («-» means gap
decrease) for operation with
thinner banknotes. To get the
required gap, turn screw 1
(Figure 1) clockwise.
Transparent
note
A very transparent banknote
has been detected.
Remove the banknote.
Suspect
note
Currency and denomination
are detected, but authenticity
is suspected.
Remove the banknote and recount
it. In case of repeated rejection,
verify the authenticity of the
banknote using currency reference
book and multifunctional detector
like DORS 1250 or DORS 1300.
MAGNER PRB VALUE COUNTERMAGNER PRB VALUE COUNTER
Page 18
Table 1
Rejection
reason
Description Teller's actions
Dimensions
A banknote has difference
with the average dimensions
of the first five notes in a
batch (the difference is
exceeded 20 mm by the long
side of note or 10% of its short
side).
Remove the banknote. Adjust
the feeder gap (if required)
according to article 3 of
section «Operation».
Skew error
The banknote skew angle
exceeds 14˚.
Adjust the hopper's guides in
accordance with the length of the
longest note in the batch. If
required, adjust the banknote
feeder gap («+» means gap
increase) for operation with thicker
banknotes. To get the required gap,
turn screw 1 (Figure 1)
counterclockwise.
UV error
A banknote with an increased
level of UV luminescence is
found.
Remove the banknote and
recount it. If the high level of
UV luminescence is a feature
of this type of banknotes,
switch off UV detection.
MG left,
MG center,
MG right
A banknote with wrong MG
marks is found.
Remove the banknote.
Scanner error
Banknote scanning error. Place the banknote into the
hopper and recount.
Feed error
Short side of the banknote is
exceeded 120mm (for
example, a banknote has
passed with a large skew, the
banknotes got stuck
together.
Remove the banknotes
and recount them. If
required, adjust the feeder
gap.
Couldn't sort
Banknote feed error.
Remove the banknotes and
recount them.
Note quota
overflow
There are more banknotes fed
than required by the current
mode (batch size, stacker
capacity).
Remove the banknotes and
recount them.
35
34
7 Key «ADD»
By pressing the «ADD» key, the accumulation mode is switched on or
switch off . The accumulation mode is intended for summing up of the
number of the counted banknotes by denominations and calculation of their
total amount; the new counting result will be added to the number counted
before. To clear the results, press the « RESET» key.
Please pay attention that in the course of a count you see on the screen the
number and the amount of current batch (in MIX and DEN modes) while
when a count is finished you see the total number and total amount of all the
banknotes counted since the start of accumulation mode.
8 Key «AUTO/MAN»
K ey «AUTO /M AN» (se e Fi gu re 13 ) sw it ches th e co un ter bet we en
automatic start mode and manual start mode .
A n au t o ma t i c s t art m od e mea n s th e co u nte r is s tar t ed t o co u nt
automatically as soon as the banknotes have been placed into the hopper.
A manual start mo de mea ns the us er hav e to push or ke ys
(depending on the selected user profile) to start a count.
9 Key «DETECTION»
Key «DETECTION» has three status:
means the detection is off.
means UV detection is on (in COUNT mode).
means UV detection and / or MG detection (according to the user's
settings in the «Detection» submenu) is on (in MIX or DEN mode).
MAGNER PRB VALUE COUNTERMAGNER PRB VALUE COUNTER
Page 19
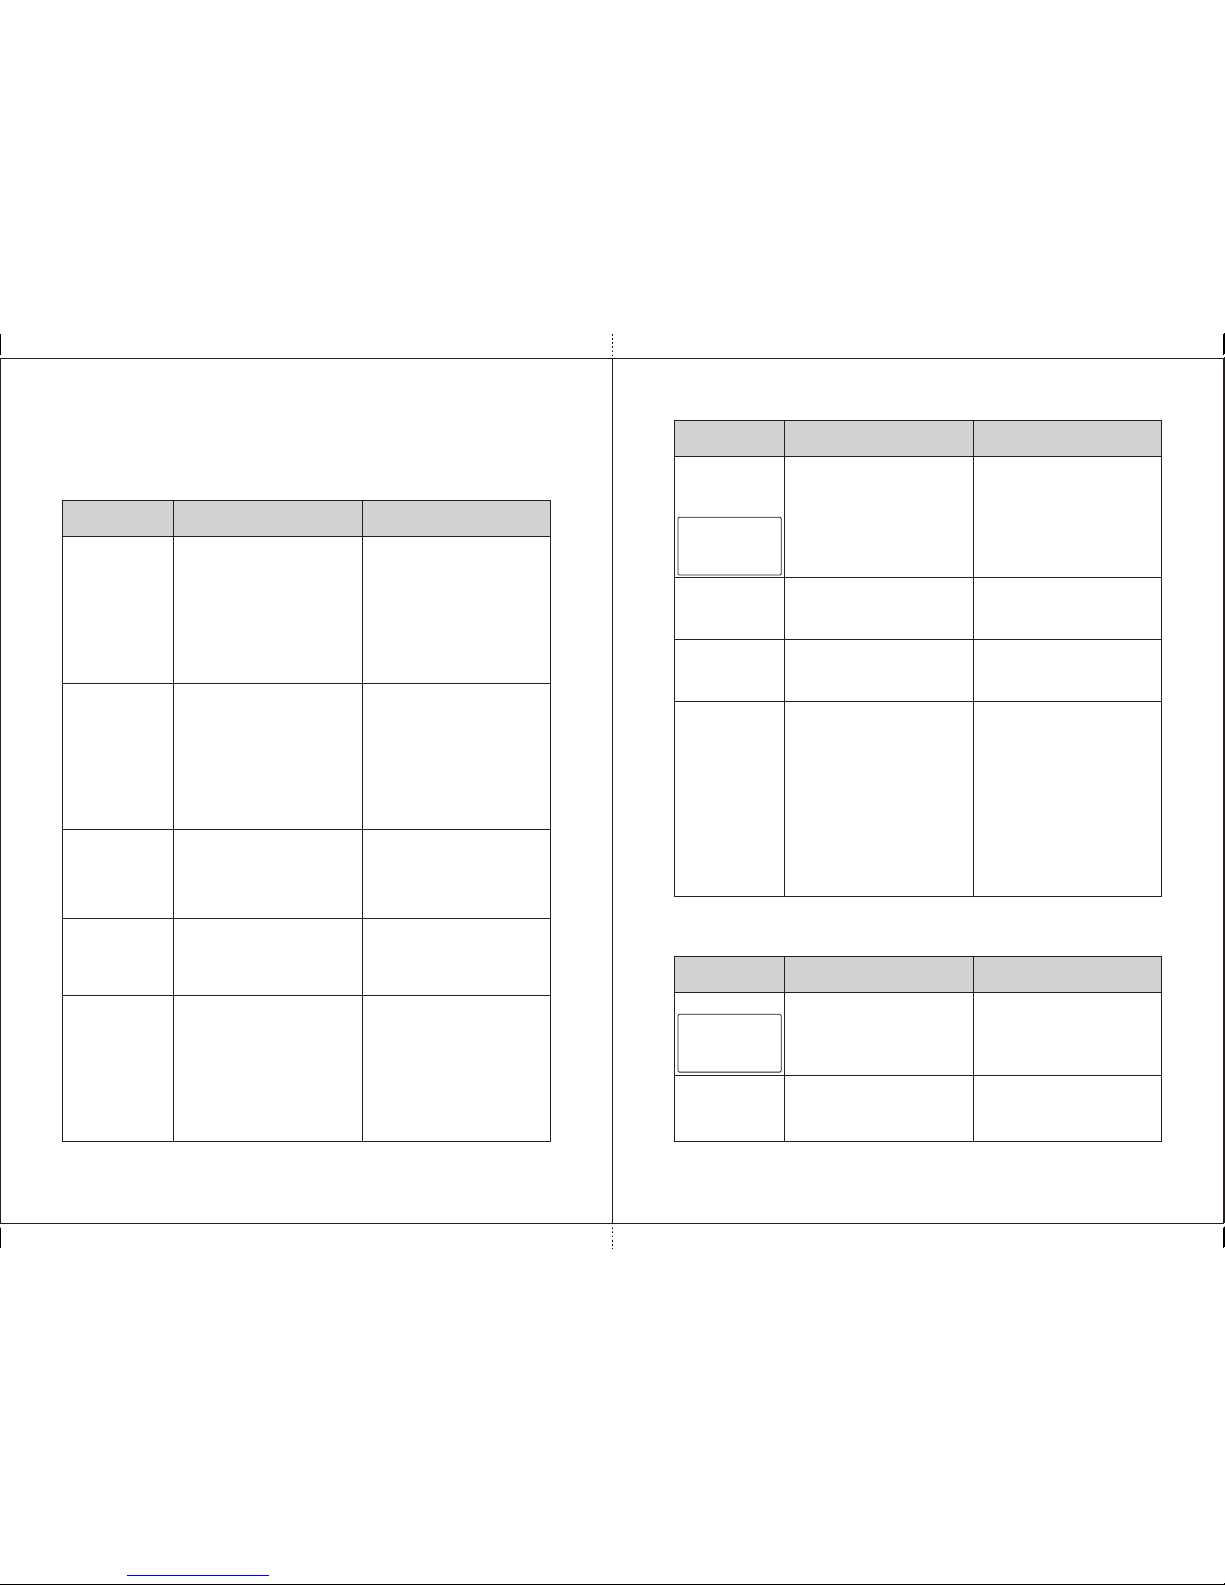
MESSAGES IN COURSE OF OPERATION
Table 2. Error messages
Error
Messages
P.O.S.T.
ERROR
An error occurred during selftesting of the counter (at its
switching on), the sensors are
covered by foreign object.
An error occurred during selftesting of the counter (before
the start of a count), the
sensors are covered by
foreign object.
Switch off the machine.
Remove banknotes and/or
foreign objects from the
hopper, the stacker, the reject
pocket, and the path. Then
switch on again. If the error is
reappeared, call a technician.
Switch off the machine.
Remove banknotes and/or
foreign objects from the
hopper, the stacker, the reject
pocket, and the path. Then
switch on again. If the error is
reappeared, call a technician.
Reason Teller's actions
S.M.A.R.T.
ERROR
The banknotes are jammed. A
foreign object in the path
blocks the gear and causes
the overcurrent.
Switch off the machine. Open
the path, and remove the
jammed banknotes, the
foreign objects.
Overcurrent
The banknotes get jammed.
Foreign object in the path
blocks the switch between the
hopper and the reject pocket.
Open the path, remove the
jammed banknotes, foreign
objects from switch area.
Switch
error
The calibration error is
occurred during the self-test.
Switch off the machine. Open
the path and remove the
banknotes, the foreign objects
blocking CIS (see item 3,
Figure 5, Figure 6). Then
switch on again. If the error is
reappeared, call a technician.
Calibration
error
37
36
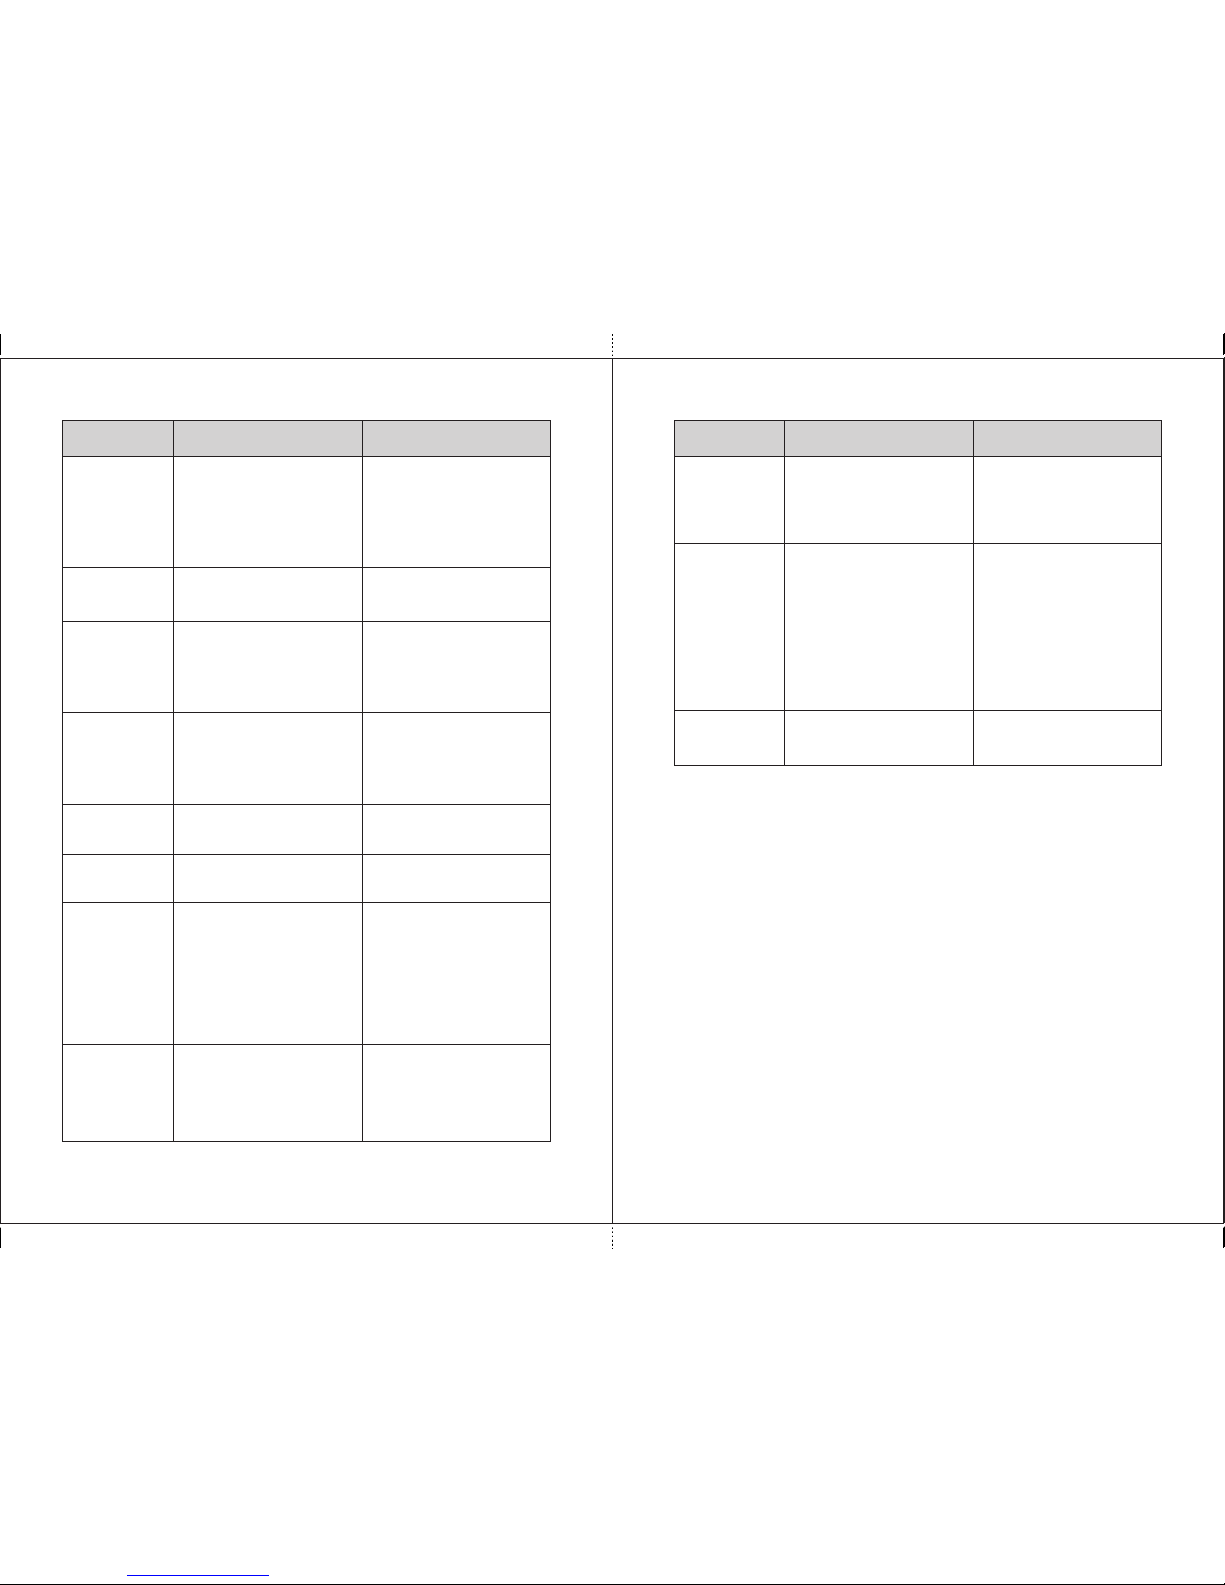
Table 2
Error
Messages
Note's jam,
clean the
path!
A banknote is jammed in the
path during counting.
More banknotes than required
were placed into the stacker in
the batch mode
Remove banknotes from the
hopper, open the path and
remove the banknotes from
there.
The red circles on the picture
are marked the places of
possible jams.
Remove the banknotes from
the stacker, and recount the
batch.
Reason Teller's actions
Batch
error
Counting error Clean the stacker, and
recount the banknotes.
Counting
error please,
re-count
Incorrect feeding of the
banknotes.
Remove banknotes from the
hopper, open the path and
remove the banknotes from
there.
Adjust the hopper's guides
according to the length of the
longest banknote in the batch,
level the batch edges
(separate banknotes shall not
to protrude from the batch),
and place them in the hopper
avoiding their skew.
Feed
error
Table 3. Info messages
Path's open
The path is open, the upper
part is open.
Close the path.
Messages
Path's closed
Path cleaning
After the path is closed, the
self cleaning of the path is in
progress.
Wait till cleaning of the path is
over.
Reason Teller's actions
MAGNER PRB VALUE COUNTERMAGNER PRB VALUE COUNTER
Page 20
39
38
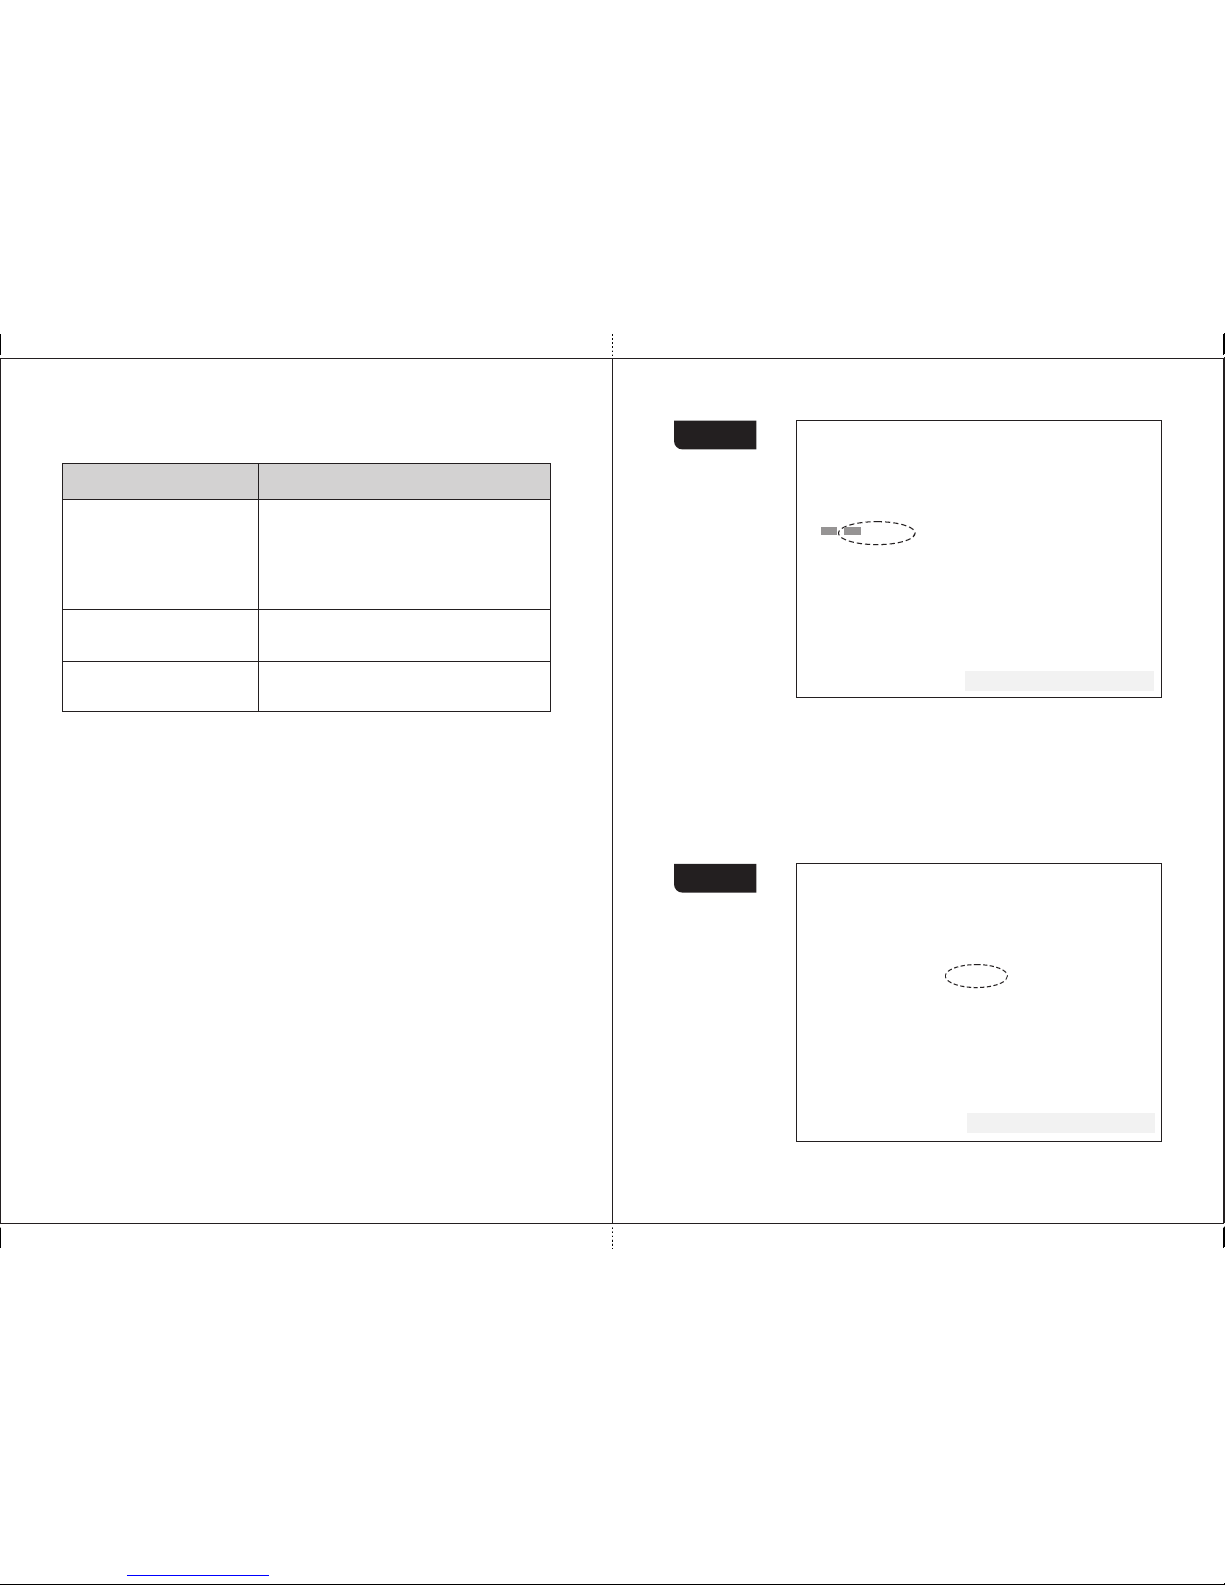
Table 3
Remove
notes from
the stacker
The number of notes in the
stacker is equal to the stacker
capacity.
Remove the banknotes from
the stacker. The machine
resumes counting
automatically (in the automatic
start mode) or after key I (II) is
pressed (in the manual start
mode).
Messages
Remove
notes from
reject pocket
The number of notes in the
reject pocket is equal to its
capacity.
Remove the banknotes from
the reject pocket.
Add
banknotes
The hopper is empty while the
number of notes in the stacker
is less than the required batch
size (in the AUTOMATIC
START mode).
Add banknotes to the hopper,
the machine resumes
counting automatically.
Add
banknotes
and
press start
The hopper is empty while the
number of notes in the stacker
is less than the required batch
size (in the MANUAL START
mode).
Add banknotes to the hopper,
press key I (II).
Clean
the pockets
Counting settings/modes were
changed after a count is
finished.
Remove the banknotes from
the stacker and the reject
pocket.
Batch
is ready
A batch of required size is
counted.
Remove the banknotes from
the stacker and resume
counting.
Function
is unavailable
You tried to choose the
function unavailable for the
current counting mode (for
example, tried to choose a
currency in the COUNT mode
or a batch size in the MIX
mode).
Switch to the correct counting
mode and then choose the
required function.
Self-testing.
Please,
wait till
operation
completion
The self testing is in progress. Wait till the message box is
disappeared.
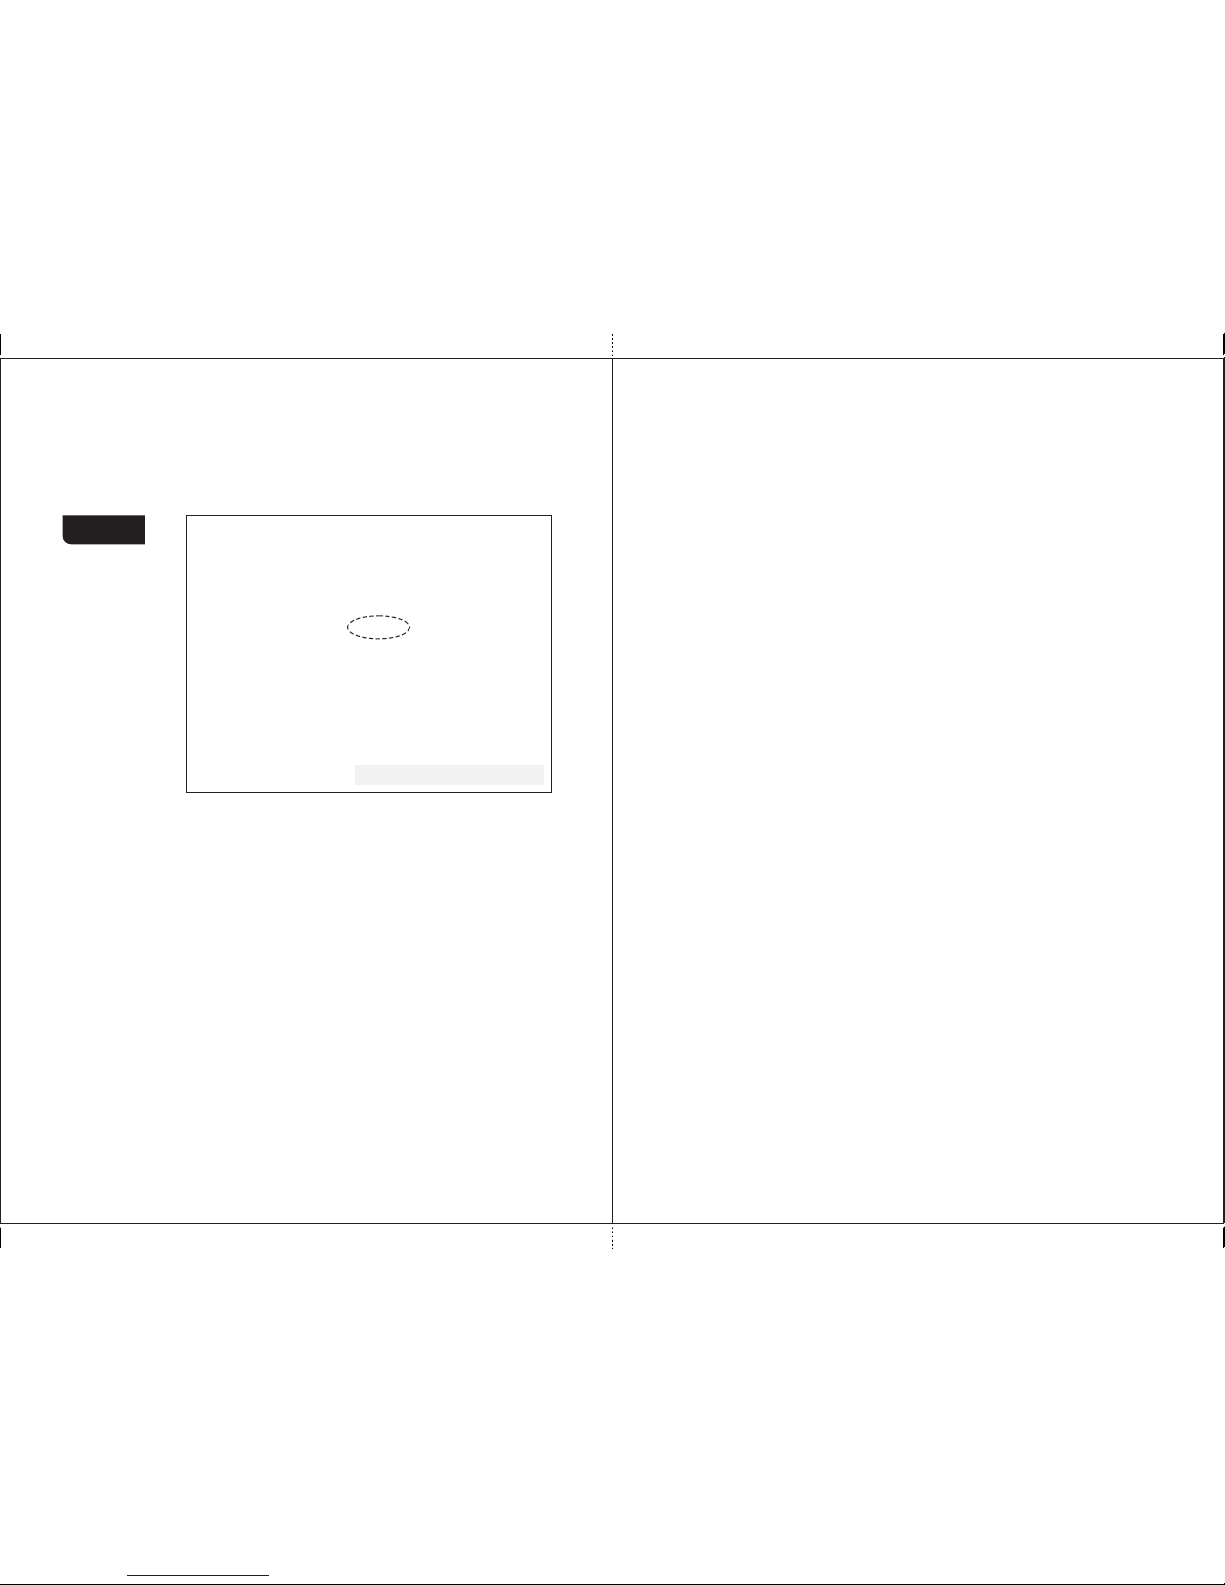
Table 3
Calibration.
Please, wait
till operation
completion
The sensors are in course of
calibration (the calibration is
ran automatically at the
moment of switching on and
then every 30 minutes).
It is impossible to take
banknotes out of the hopper.
Wait till the message box is
disappeared.
Adjust the hopper's guides
according to the length of the
longest note in the batch.
Adjust the feeder gap if
required («+» means gap
increase) for operation with
thicker banknotes. To get the
required gap, turn screw 1
(Figure 1) counterclockwise.
There are no
banknotes.
Feed error
The machine is going to be
reset to the factory setting.
Confirm or cancel the reset to
the factory setting.
Reset
confirmation
Messages
MAINTENANCE
Acco rding to experi ence of th e wor ld vendors , we sugge st to call the
technician for the professional mainten ance every 90 day s. If you use the
machine more than one shift a day and the most of counted banknotes are dirty
and soiled, more frequent maintenance is required.
On a daily basis:
1 Switch off the banknote counter if you do not use it.
2 Wipe the counter external parts with a dry clean lint-free tissue.
3 After work is completed and the counter switched off, clean the sensors
from dust and fine particles with a soft lint-free tissue or a soft bristle
br us h. The sen so rs 1-8 sho wn on Figure 4, Figure 5, Fig ur e 6,
Figure 7 shall be cleaned. In case of strong soiling, it is allowed to wipe
the sensor with the lint-free tissue wetted with isopropyl alcohol.
A tt en ti on ! Be fo re cle an in g th e sensors, make sure th at cou nt er is
switched off and the power cord disconnected from the power supply!
Reason Teller's actions
Reason Teller's actions
MAGNER PRB VALUE COUNTERMAGNER PRB VALUE COUNTER
Page 21
41
40
TROUBLESHOOTING
Table 4
The counter fails
to switch on
Make sure about the counter connection to the
power supply and the power cord plugging into
the connector on the back of the machine.
Make sure that the power switch is in position
«I».
If these terms are observed but the machine
still fails to switch on, call the technician
Failure
Elimination method
The display shows the
message not described in
the «Error Messages» table
Switch off the counter and then switch it on. if
the counter still doesn't work, call the
technician.
An abnormal noise
level or foreign sounds
inside the machine
Switch off the machine. Call the technician.
TRANSPORTATION AND STORAGE
The machine in the original package can be shipped by sea (in containers),
by railway (in closed wagons), by air (in the pressurized modules) and by cargo
(in covered truck or in container with water-resistant top) along the paved
roads. The tra nsportation conditions: temperat ure - 30 to + 50°C, relative
hum idity up to 98% witho ut wat er con densation at 25°C and atmos phere
pressure 84 to 107 kPa (630 to 800 mm Hg).
The machine in the original package can be stored in a heated and
ventilated warehouse, at the temperature of +5°C to +40°C and a relative
humidity not exceeding 80% at +25°C. A warehouse should be free of the
agressive agents (acid and alkali vapors) that might cause corrosion.
Figure 54
4 Use the mouse left button to select the connected counter, and press
the «Update device firmware» key (see Figure 54), the process of
upgrading starts, and the progress bar is appeared in the Update
column (see Figure 55). The progress bar will also appeared on the
screen of the counter.
Attention! Do not disconnect USB cable from the counter, do not
switch off the counter, and do not disconnect the power cord
during upgrading.
EBKM.COM
MPRB MPRB
It may cause serious injury of the counter and make impossible the
further updates outside your supplier's workshop.
Figure 55
MPRB MPRB
EBKM.COM
MAGNER PRB VALUE COUNTERMAGNER PRB VALUE COUNTER
Page 22
43
42
5 Wait till the «Updates download successfully completed!» message
appears in the program window, the counter is started its self-testing
( s e e
article 2 of subsection «Operation»). Then the application requests
the update server again and shows the message «not required» in the
Figure 56
6 Close the application «BVS Update».
7 Wait till self-testing is over, and switch off the counter.
8 Disconnect the USB cable.
9 Switch on the counter again, wait till self-testing is over, and the updated
machine is ready for operation.
MAGNER PRB VALUE COUNTERMAGNER PRB VALUE COUNTER
MPRB MPRB
EBKM.COM
 Loading...