

Page 1
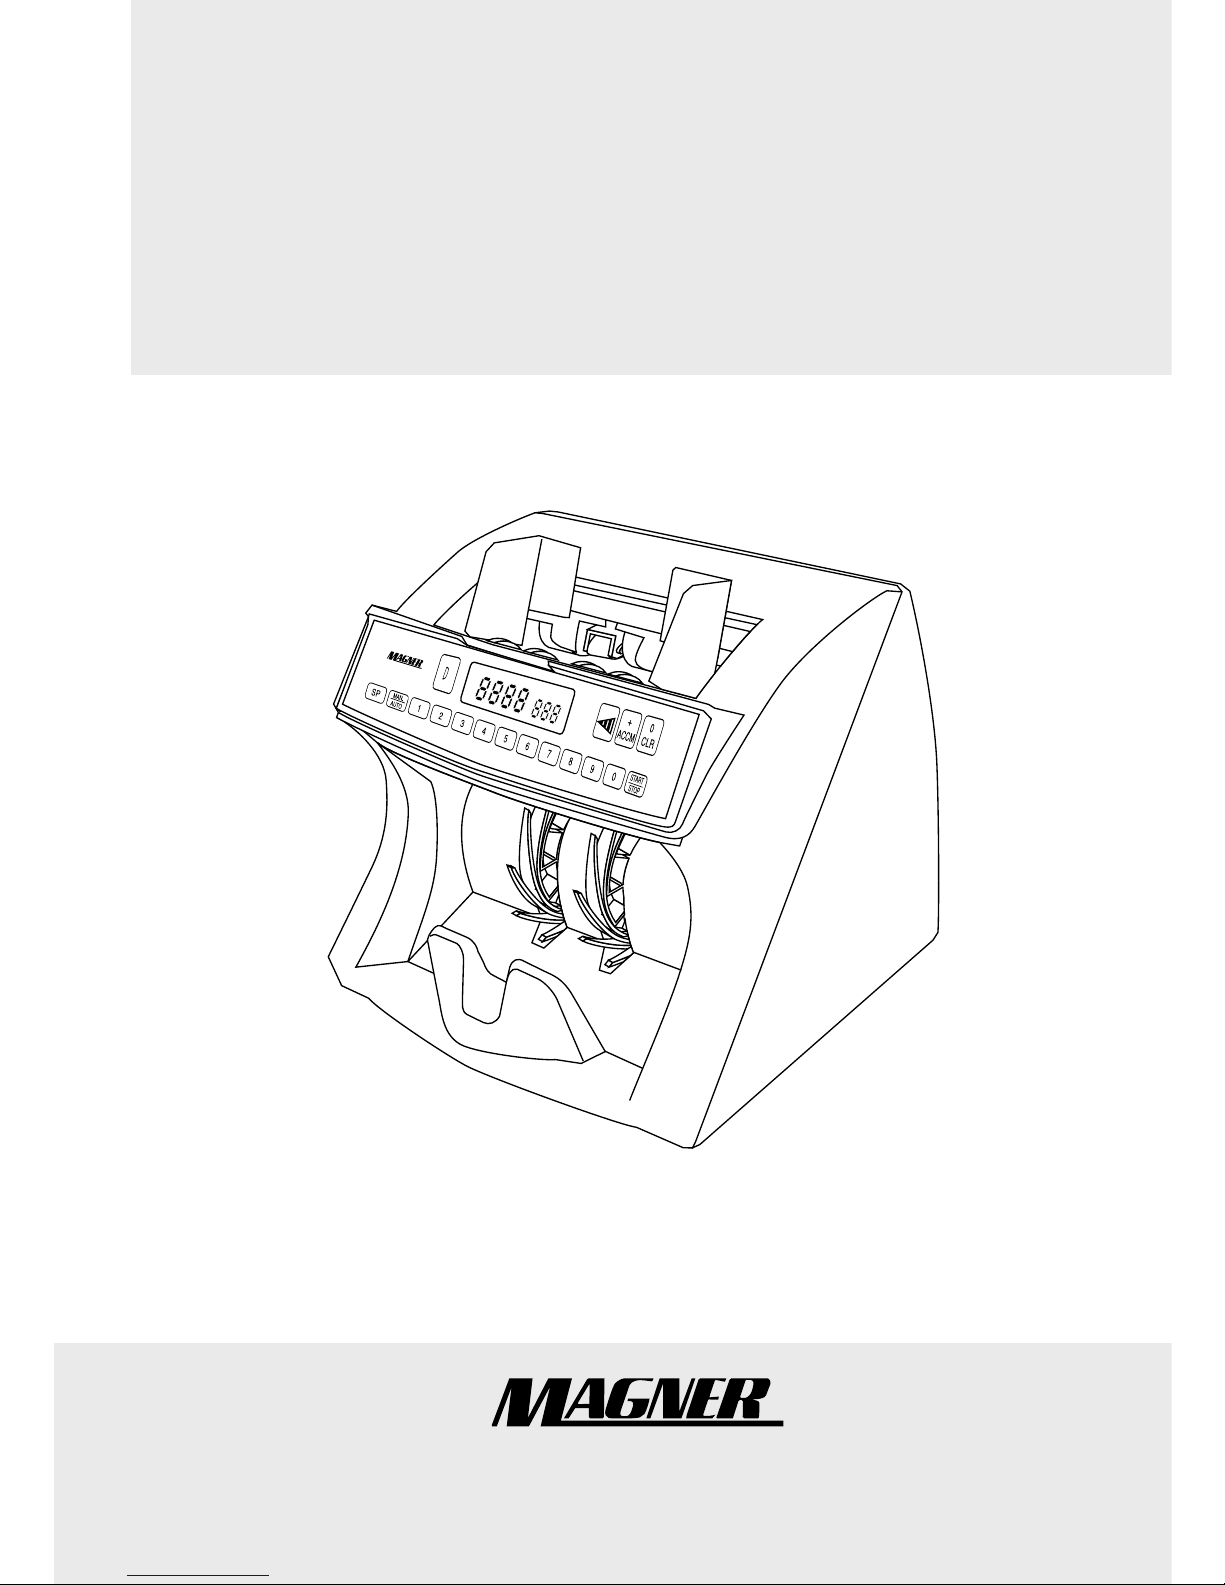
Magner 35-2003/35-3
Series Currency Counter
Operator's Manual
Page 2

Page 3

1
Magner 35-2003 / 35-3 Series
Introduction.
The MAGNER 35-2003 / 35-3 is the most advanced Currency Counter
available today.
MAGNER's Design Engineer's have gathered input from experienced
Currency Counter experts to develop a machine that is as compact as possible
yet fast and extremely accurate.
This instruction sheet for the MAGNER 35-2003 / 35-3 will provide the
essential information to operate the MAGNER 35-2003 / 35-3 Currency
Counter.
Table of Contents
Introduction. - - - - - - - - - - - - - - - - - - - - - - - - - - - - - - - - 1
I. Safety Instructions. - - - - - - - - - - - - - - - - - - - - - - - - - - 2
II. Installation. - - - - - - - - - - - - - - - - - - - - - - - - - - - - - - - -3
III. Parts Description. - - - - - - - - - - - - - - - - - - - - - - - - - - 4
IV. Function of Parts. - - - - - - - - - - - - - - - - - - - - - - - - - - 6
V. Operating Procedure - - - - - - - - - - - - - - - - - - - - - - - 11
VI. Troubleshooting - - - - - - - - - - - - - - - - - - - - - - - - - - 12
VII. Error Codes - - - - - - - - - - - - - - - - - - - - - - - - - - - - - 13
VIII. Cleaning Jams Manually - - - - - - - - - - - - - - - - - - - - - 14
IX. Preventive Maintenance - - - - - - - - - - - - - - - - - - - - - 15
X. Specifications - - - - - - - - - - - - - - - - - - - - - - - - - - - - 16
Page 4

2
I. Safety Instructions.
WARNING
The currency counter automatically starts operating in certain
circumstances. Consequently, it is important to always follow these
precautions:
1. Do not wear loose clothing or jewelry while operating the currency
counter.
2. Make sure that your hair does not touch the currency counter.
3. Do not touch currency that has been placed in the stacker while the motor
is running.
4. Turn off the power before perfor ming any maintenanc e or er ror
corrections that require you to put your hands into the machine.
5. When replacing fuses, use only the same type and rating. A fire hazard can
be created by using a higher rate fuse.
6. Do not operate the currency counter if it is wet. Also, do not touch the
currency counter if you are wet. Operating the currency counter around
water creates an electrical shock hazard, which might result in serious injury.
CAUTION
Keep drinks, food and other foreign objects away from
the currency counter. Placing foreign objects on or into the
currency counter can disable it.
Page 5

3
Magner 35-2003 / 35-3 Series
II. Installation.
Unpacking
After unpacking the currency counter, store the box and packing materials
for future shipping. Failure to ship the currency counter in the original box and
packing will void the warranty.
Installation
1. Select an appropriate workspace. Make sure that the work surface is flat
and level, away from bright sunlight, and as free of dust, dirt and smoke
as possible. This will ensure proper operation and prevent damage to the
rubber components of the machine.
2. Connect the power cord to the back of the currency counter.
3. Plug the cord into the wall outlet.
WARNING
Ensure that the outlet and the currency counter voltage settings
match before performing step 2. If the settings are not correct, a
fire hazard could be created or the machine could be damaged. If
you have any questions about the power supply, do not connect it
into the currency counter.
Page 6
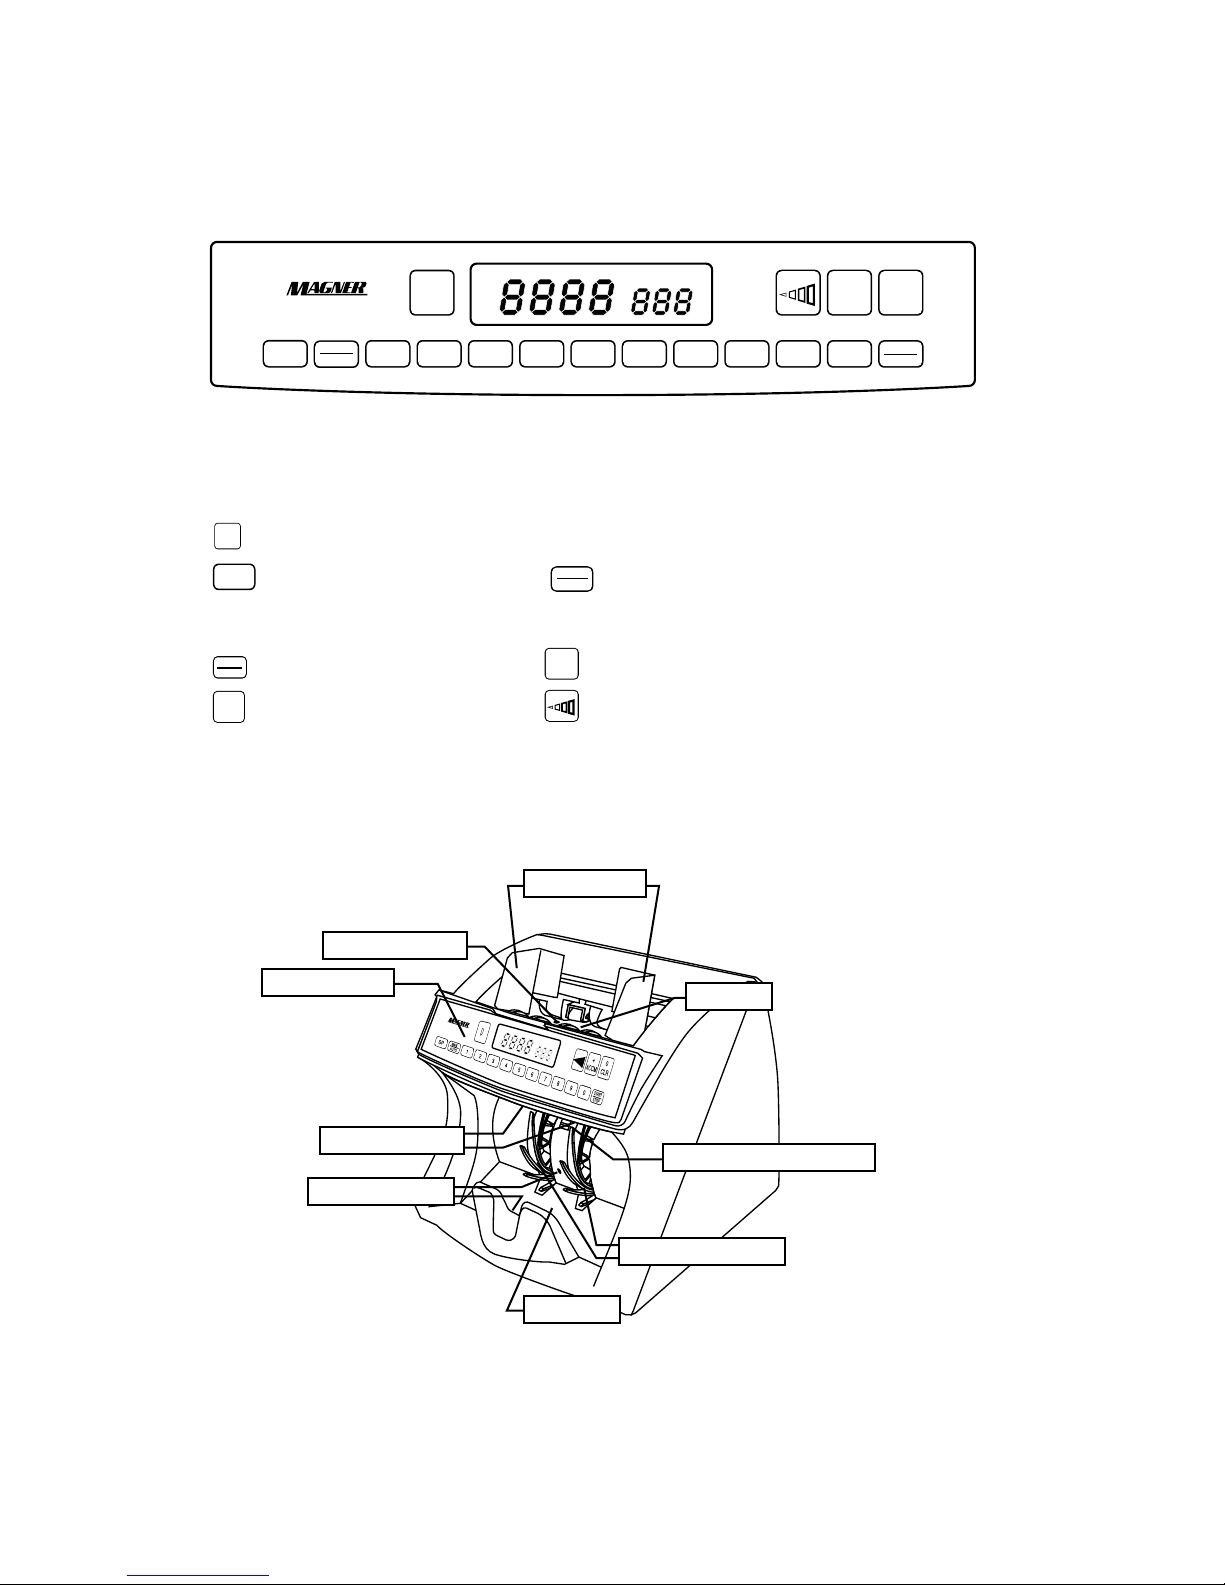
III. Parts Description.
SP
MAN.
AUT
O
1
2
3
4
5
6
7
8
9
0
START
STOP
+
ACCM
0
CLR
D
Figure 1 : Sheet key
D
Size Detection Key (35-2003 only)
SP
Speed Selection Key
MAN.
AUTO
Manual/Auto Start Key
Numeric Keys
START
STOP
Start/Stop Key
0
CLR
Clear Key
+
ACCM
Accumulation Key Density Key
LCD Display (4-digit/Total Display + 3 digit/Batch Display)
Sheet Key
Stacker
Stacker Wheels
Stacker Sensor
Hopper
Note Jam Relese Lever
Hopper Sensor
Count Sensor
Note Guides
Figure 2 : Front view
4
Page 7
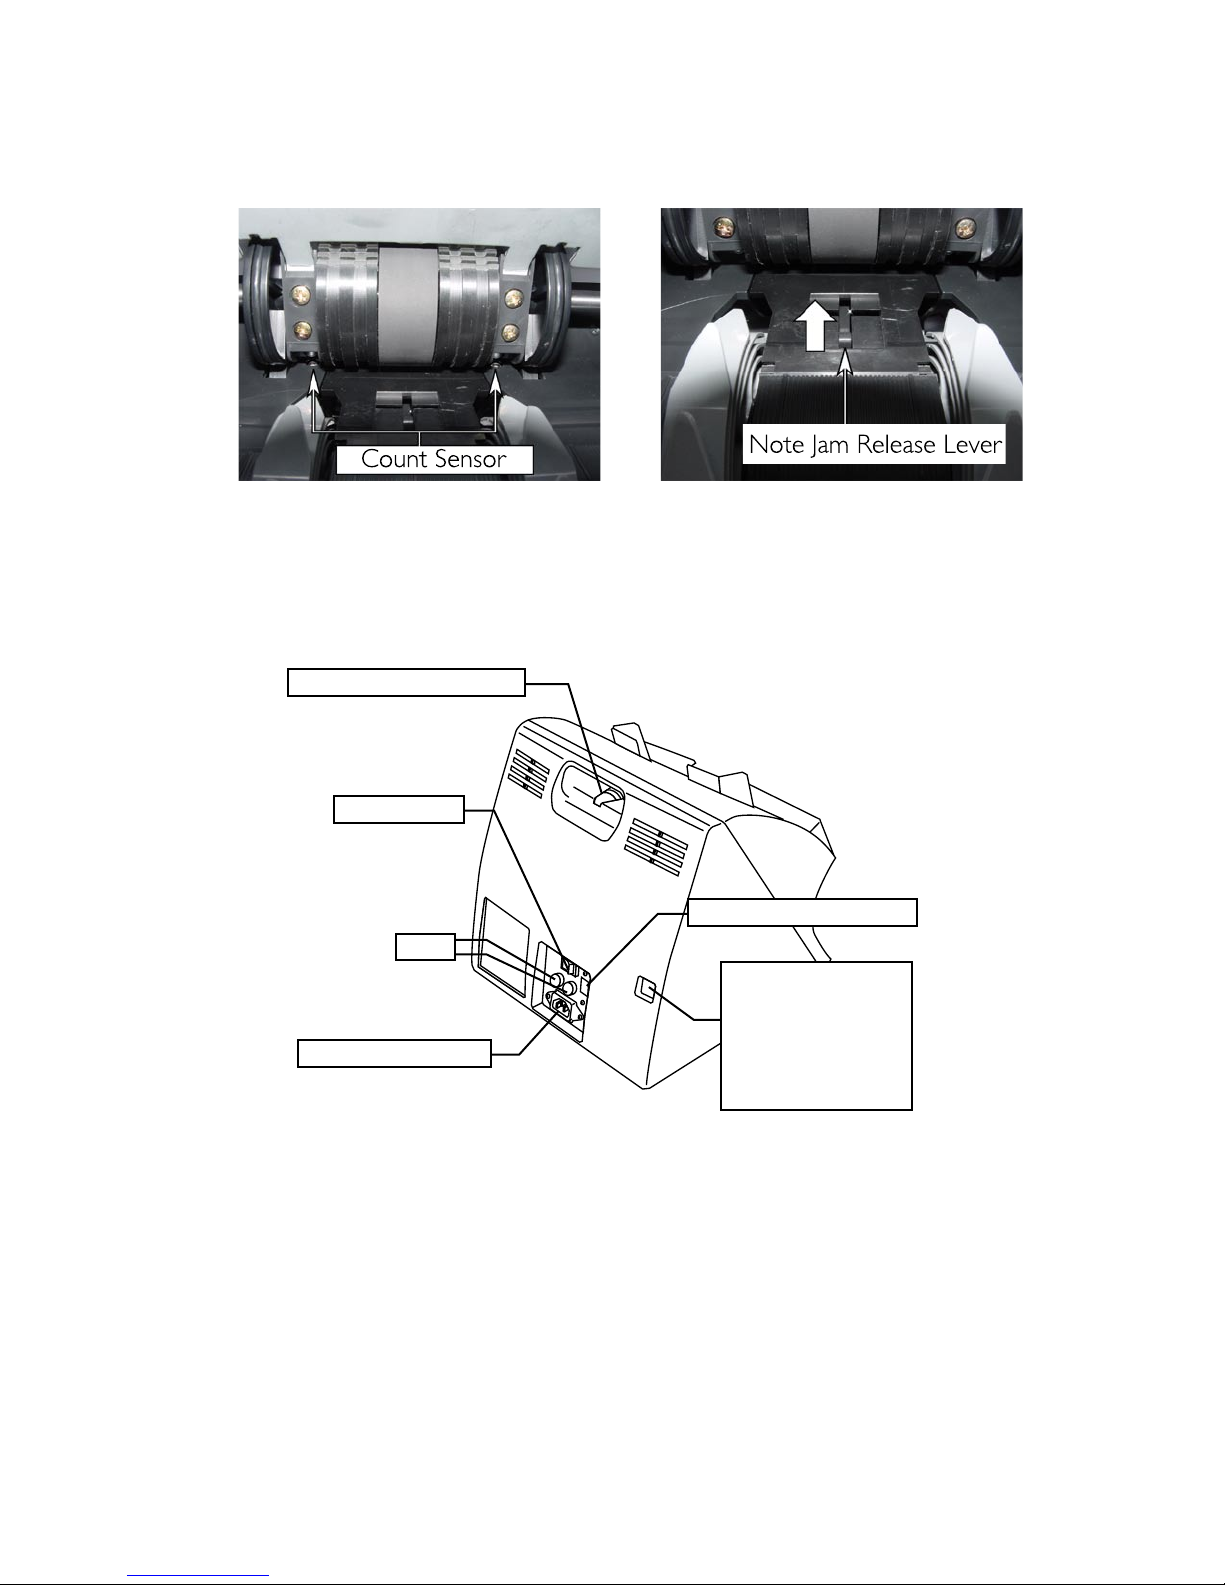
Figure 3 : Count Sensor Figure 4 : Note Jam Release Lever
Thickness Adjustment Dial
Interface Connector
(RS-232C / Option)
or
External Display
Connector (Option)
Power Switch
Fuse
AC Input Receptacle
Voltage Selection Switch
Figure 5 : Rear view
5
Magner 35-2003 / 35-3 Series
Page 8
IV. Function of Parts.
1. Sheet Key and Function of each key
D
Size Detection Key (35-2003 only)
This function is available with the mode 35-2003.
- Press
D
key. "D" appearing on the display indicates that this function is on.
- The counting speed is automatically set at SPEED - 2 when this function is
in use.
- Adjust the position of the Note Guides so that notes are centered in the
hopper. When setting these Guides, allow enough clearance to enable the
notes to move freely.
- When a note of different length is detected, the machine stops and
"dS1" appears on the display. Pressing of
+
ACCM
key can include the note into
the batch. Pressing of
0
CLR
key can exclude the note from the batch. The
remove the note from the staker.
- To turn the size check Function (length) off, press
D
key again.
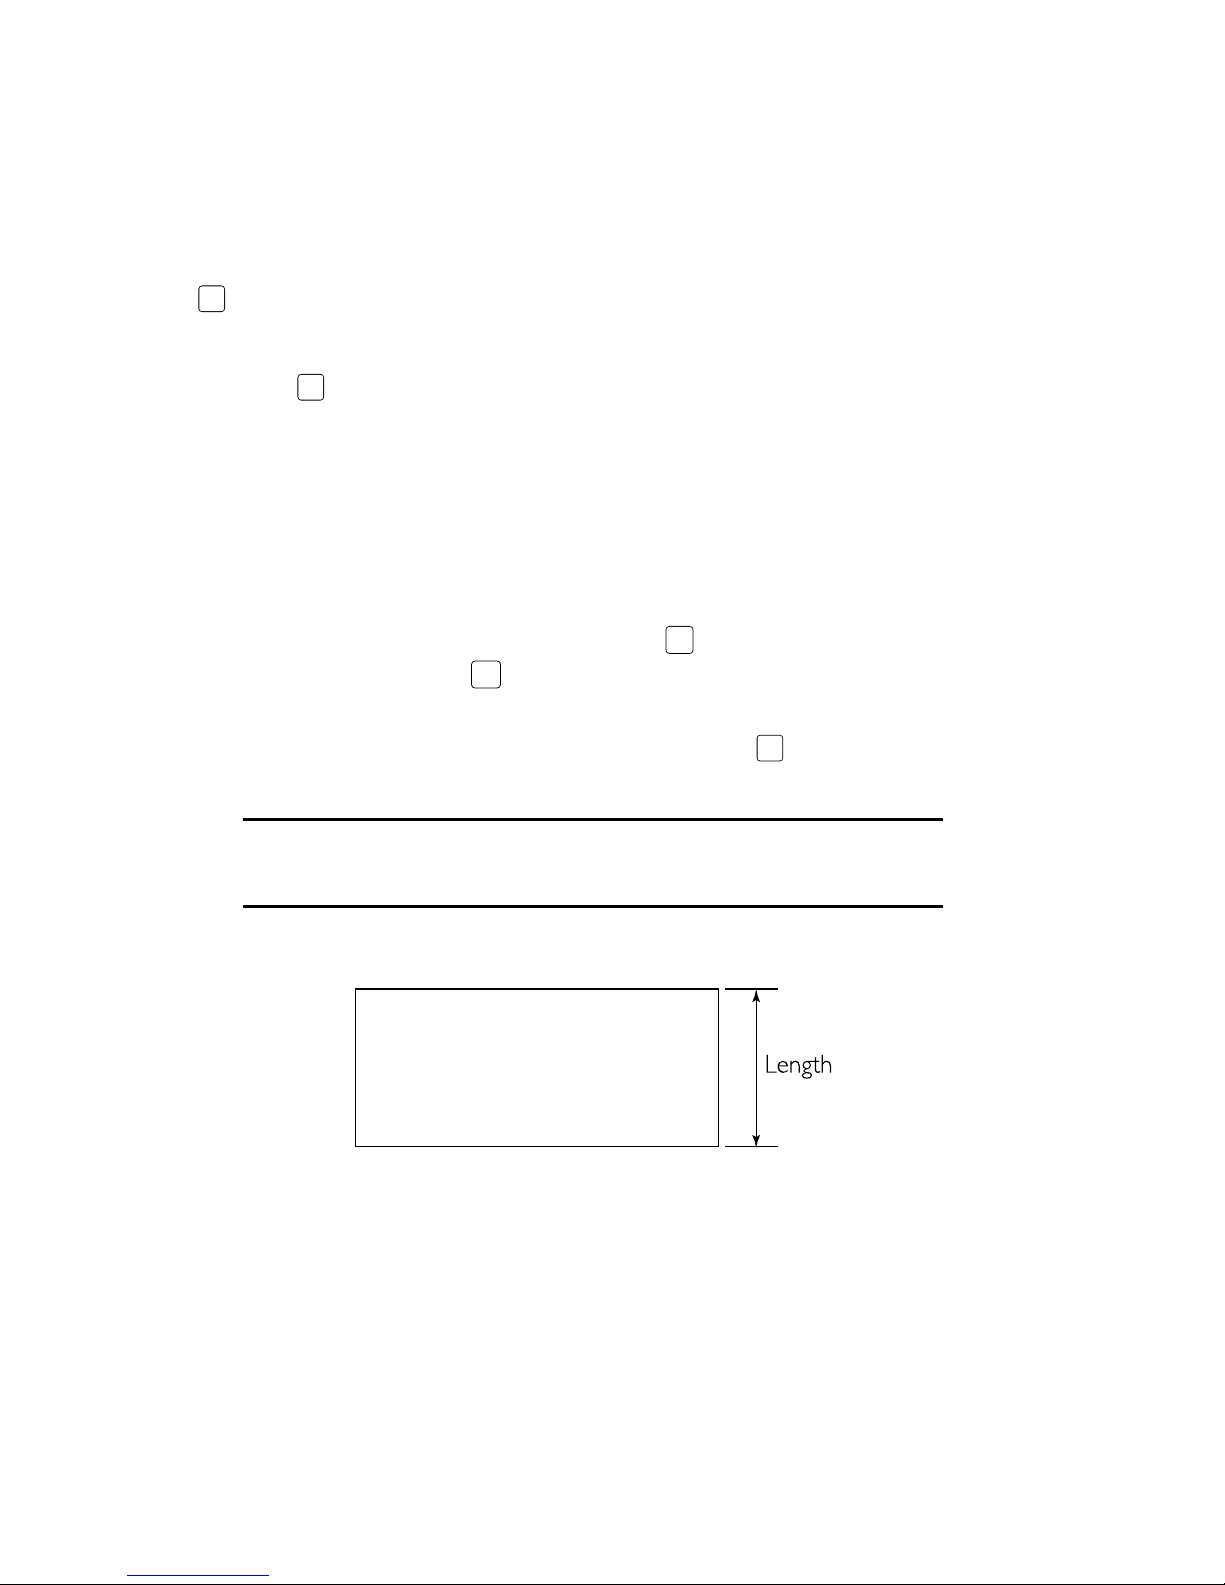
NOTE
Manufacturer recommend users to set the 5mm detection level.
( = setting value : 0.010 )
Figure 6 : Note Length
6
Page 9
SP
Speed Selection Key
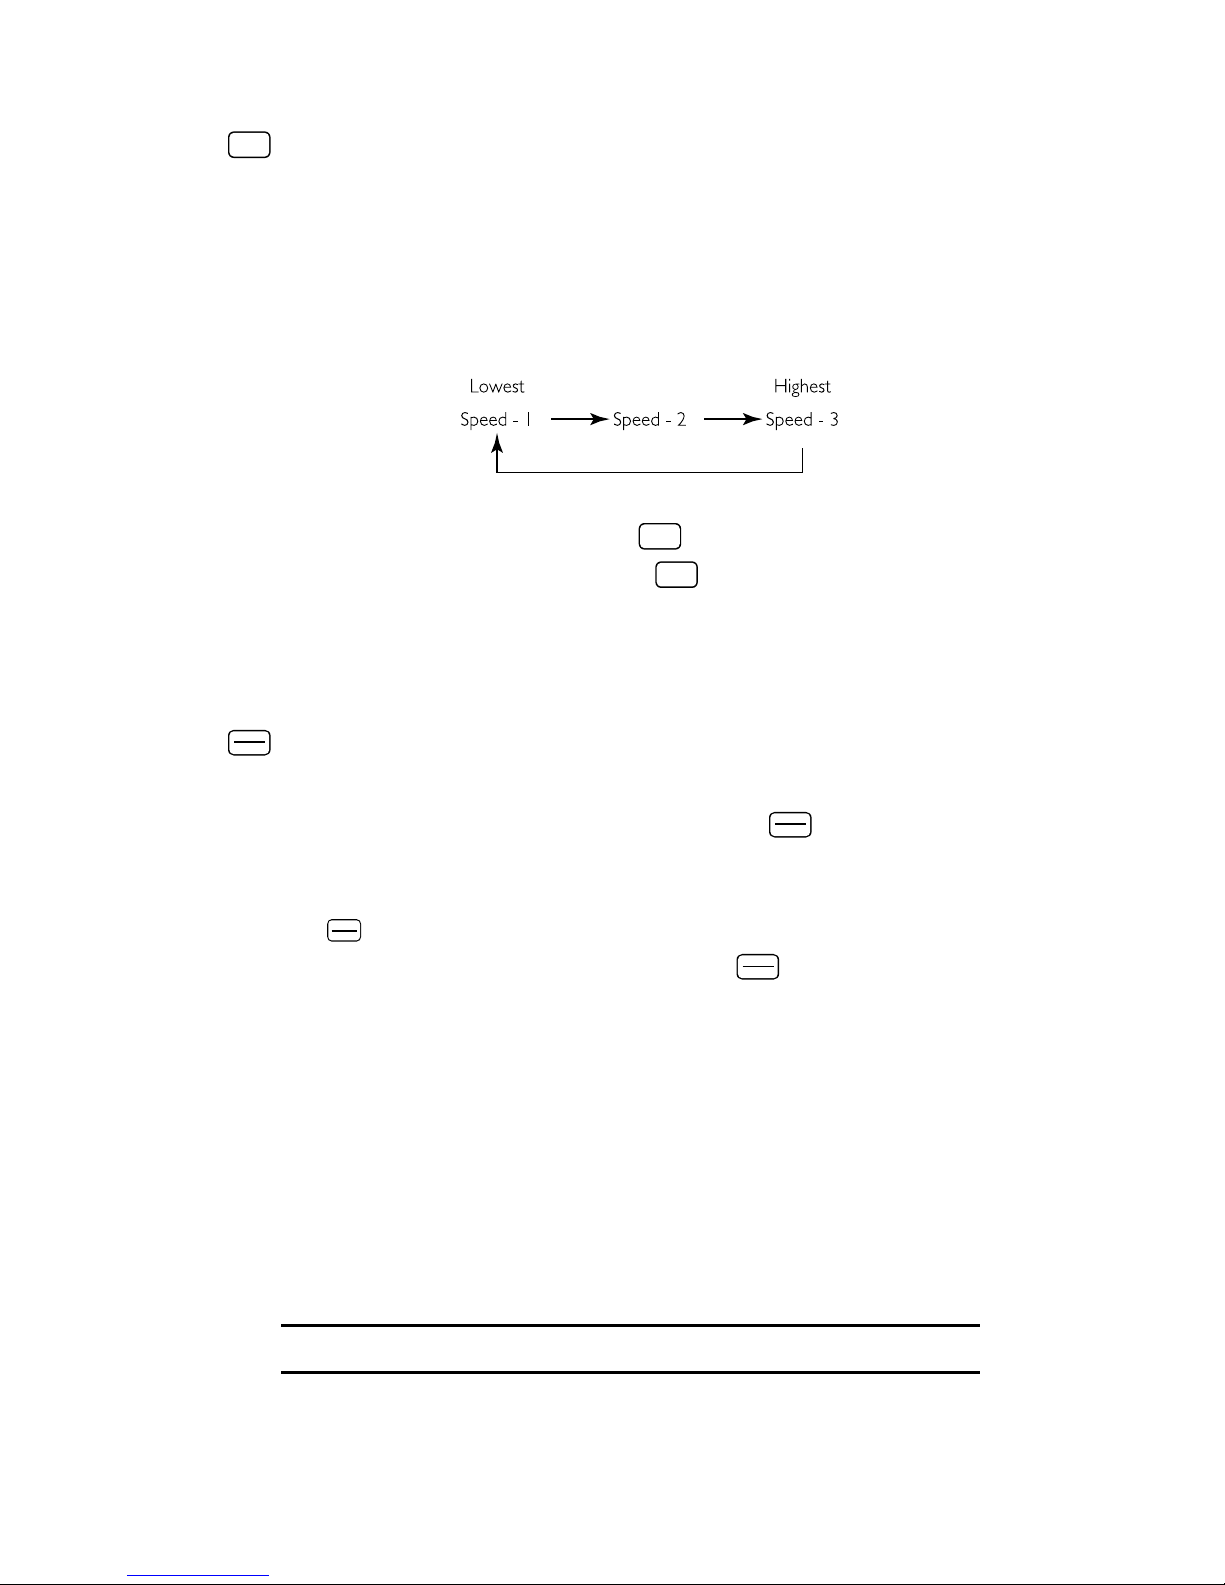
- Three counting speeds are available on this machine:
SP 1: Counts approximately 600 notes per minute.
SP 2: Counts approximately 1,200 notes per minute.
SP 3: Counts approximately 1,500 notes per minute.
- To display the counting speed, press
SP
key.
- To change the counting speed, press
SP
key again to the desired counting
speed. Once a speed has been selected, the machine will always goes back
to the selected setting until another change is made.
MAN.
AUTO
Manual/Auto Start Key
- This key sets the machine at either manual or auto start mode.
- To turn the manual start mode on, press the
MAN.
AUTO
key. "MAN" appearing
on the display indicates that this function is on. The machine does not start
automatically when notes are placed in the hopper. To start counting notes,
press
START
STOP
key.
- To turn the manual start mode off, press the
MAN.
AUTO
key. "MAN" on the display
goes out. The machine star ts counting automatically when the notes are
placed in the hopper.
Numeric Keys (Variable Batch Setting Keys)
You can preset a desired number of notes, from o through 999, to be
counted in a batch before the machine pauses, so that the operator can
remove the notes.
NOTE
The factory default setting is 200.
7
Magner 35-2003 / 35-3 Series
Page 10

To set a batch:
- Touch the desired number using the numeric key.
- A 3-digit display indicates the preset batch number.
- The machine is now ready to count in the preset batch mode.
To clear the current preset batch number and batch setting:
- Press 0 key until the 3-digit display indicates "0".
- Press the desired number again.
START
STOP
Start/Stop Key
- This key can be activated when the manual start mode is on.
- The machine starts counting when this key is pressed.
- The machine stops counting when this key is pressed during the counting.
(The note count for the batch may be inaccurate.)
0
CLR
Clear Key
Press the key to clear the count figures on the display and reset errors.
+
ACCM
Accumulation Key
This function keeps a running total of the number of noes counted.
- To start the running total function, press
+
ACCM
key.
"ACCM" appearing on the display indicates this function is on.
IMPORTANT
Any batch that has an error is not counted in total. Any batch
count that is interrupted by an error must be counted again.
To turn off this function, press
+
ACCM
key again. The “ACCM” in the display will
go out. When counting begins again, the display will start from zero.
Density Key
Five different density levels are available.
Currency that is light or dark colored can be counted with fewer errors by
changing the density settings.
LEVEL 1: This is the most sensitive level to catch double notes that have a
very similar level to single notes.
8
Page 11
LEVEL 2: More sensitive than LEVEL 3
LEVEL 3: More sensitive than LEVEL 4
LEVEL 4: Default level from the factory
LEVEL 5: The machine accepts any density of notes. When level 5 is in use,
in the display will flash.
The factory default setting is set at level 4.
- To display the density level, press
key once.
- To change the density level, press
key again to the desired density level.
Once a density has been selected, the machine will always goes back to the
selected setting until another change is made.
LCD DISPLAY
- 4-Digit Display: Counts and error messages are displayed.
- 3-Digit Display: A preset batch number is displayed.
2. Hopper
The “Hopper” is capable of accommodating up to approximately 300
circulating bank notes.
3. Note Guides
- When counting 5, 10 and 20EURO denominations, move the note guides
to the middle.
- When counting 50, 100, 200 and 500EURO denominations, move the note
guides to the outside end.
NOTE
The note guide adjustment is more cr itical on the lower
denomination. The 5 and 10EURO notes need to be centered on
the hopper when counted.
4. Stacker and Stacker Wheels
- The machine automatically stops after 200 notes are counted and stacked in
the stacker.
- In batch mode, the machine automatically resumes counting as soon as the
previously batched notes are removed from the stacker.
9
Magner 35-2003 / 35-3 Series
Page 12

- Two stacker wheels ensure neat stacking of notes at all times.
5. Note Jam Release Lever
This lever is used to release the note(s) jammed inside the currency counter.
6. Thickness Adjustment Dial
- This dial is used for adjusting the gap between the feeding and separating
rollers so that only one note may pass through at a time.
- For new(thinner) notes, adjust to a lower number: 4, 3, 2 and 1
- For used(thicker) notes, adjust to a higher number. 6, 7, 8 and 9
- Should error signals, “dBL" or “CH”, occur frequently, turn the dial to the left
to adjust the gap for proper thickness.
7. Power Switch
- When the power switch is turned on, “8888" will appear on the display. The
machine will stop automatically after the start-up sequence is performed.
The display will show “0" which indicates the machine is ready for counting.
- If a
"Sensor Error Code" (see page 10) appears on the display instead of
"0", take corrective actions in accordance with the instructions on page 12.
- The Power Switch should be turned “OFF” if the machine is not used for an
extended period of time.
8. Fuse
Use only recommended fuse: 2A
9. AC Input Receptacle
10. Interface Connector (RS-232C/option or External Display/option)
- As an optional par t, the RS-232C interface is available to interface the
currency counter with PC.
- External display is also available as an optional part.
11. Voltage Selection Switch
Please make sure that switch is set at the correct position for the available
voltage.
USA, Canada & Mexico : 120V
European countries & others : 230V
10
Page 13

11
Magner 35-2003 / 35-3 Series
V. Operating Procedure
For trouble-free operation, perform the following steps in the order given.
1. Prepare the currency
A. Remove and discard clips, rubber bands and tags from the notes to be
counted.
B. Fan each group of notes before counting as shown in Figure6, and remove
the following:
- Torn, wet, oily or soiled notes
- Notes of incorrect denomination
- Any other foreign matter attached to, or inserted between the notes.
C. Put the notes aside. Do not place them in the currency counter hopper
until you set the desired functions.
WARNING
The currency counter runs momentarily when you first turn it
on.Figure 6 : Fanning the stack
Figure 7 : Fanning the stack
2. Turn the power switch to “ON”
A. Be sure that the machine does the following:
- The motor turns the hopper and stacker wheels.
- The display reads “8888” to test all of the display segments.
- Each function key turns on in sequence to show that it is operational.
B. When “0” appears on the LCD display, the currency counter is in the ready-
Page 14
to-count mode.
- If a “Sensor Error Code” (see page 10) appears on the display instead of “0”,
take corrective actions in accordance with the instructions on page 12.
3. Adjust the thickness adjustment Dial
The thickness adjustment dial is set at 5 as the standard setting.
- For new(thinner) notes, adjust to a lower number: 4, 3, 2 and 1
- For used(thicker) notes, adjust to a higher number. 6, 7, 8 and 9
WARNING
Trial and error is recommended before you make the final
adjustment. Small adjustment of 1/2 number or less works best.
VI. Troubleshooting
If you experience an operational error while using the currency counter, the
following section will help you identify the problem and provide a possible
corrective action.
Should an error occur, a code will appear on the display Refer to the error
code chart on page 11 to determine the cause of the error and its possible
resolution.
In some situations, a problem occurs in the actual operation of the machine
without displaying an error code. If this happens, refer to the operation faults
chart on page 11 to determine the corrective action.
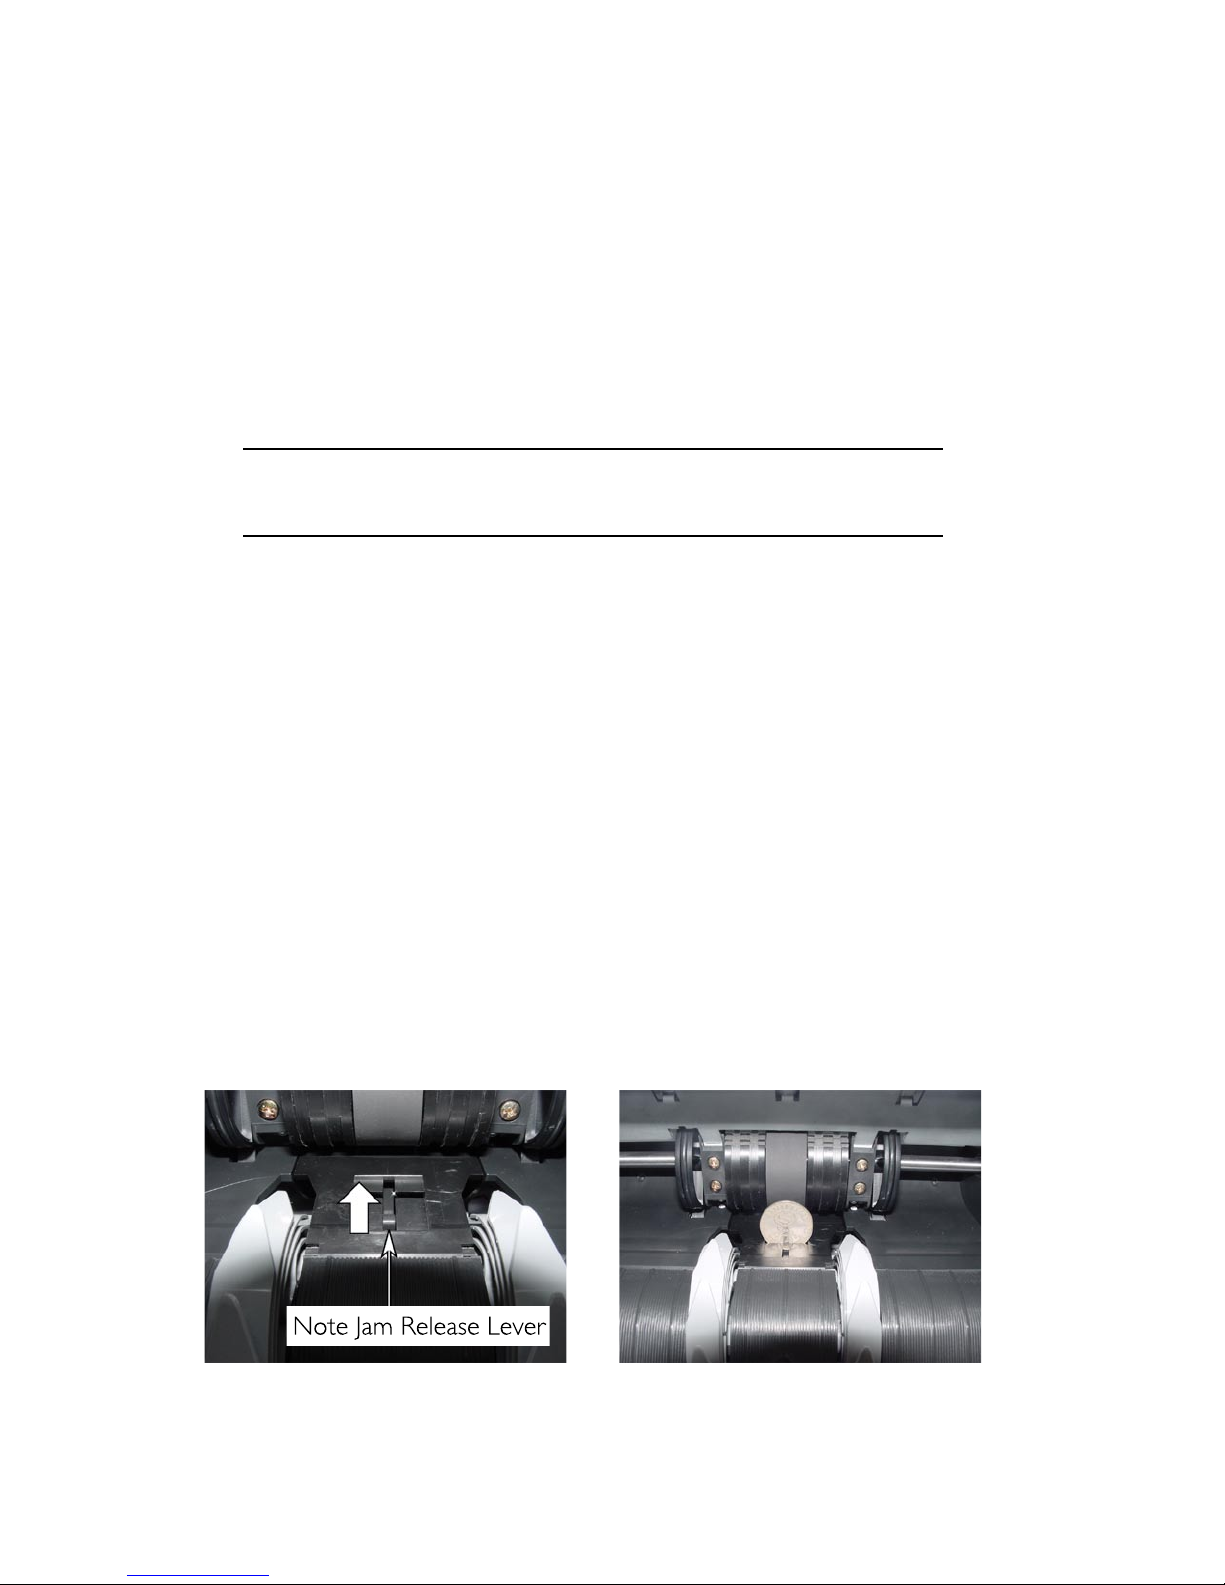
Figure 8 : Note Jam Release Lever Figure 9 : To lockup the Note Jam
Release Lever.
12
Page 15
VII. Error Codes
When an error occurs, the machine immediately stops and produces an
electric “beep” while the display alternately flashes the error code and count
figure.
The note count for the batch in which the error occurred may be inaccurate.
NOTE
To ensure an accurate count, recount the last batch in the stacker
after correcting the error and pressing
0
CLR
key.
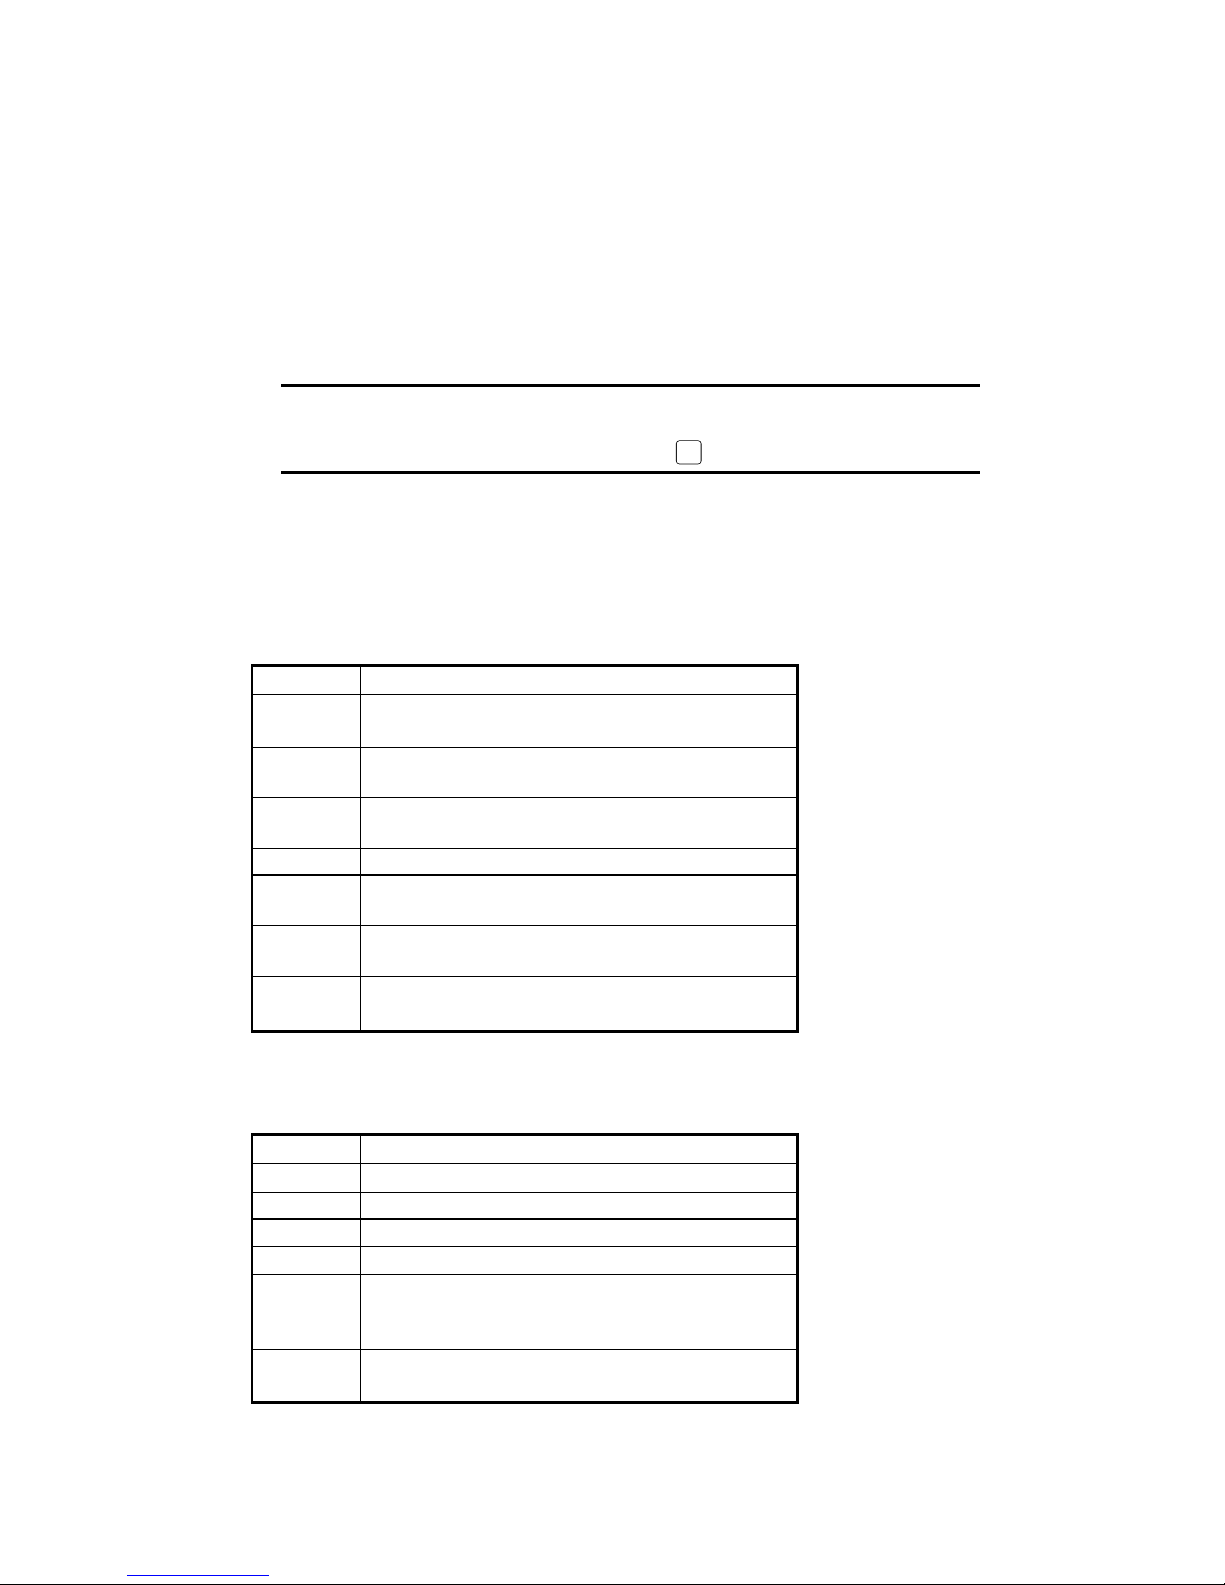
Use tables on the following pages to find the error code, possible causes and
corrective actions.
1. Sensor Error Codes
Error Code Corrective Action
HJ Hopper sensor is blocked - Remove the note(s) from
the hopper to restart.
SJ Stacker sensor is blocked - Remove the note(s) from
the stacker to restart.
JA Count sensor is detecting note(s) in the machine -
Remove the note(s) to restart.
FEEd Feed motor is not working.
CSE Count sensor(both left and right) error - Clean the
sensors to restart.
CSE1 Count sensor(left) error - Clean the left side sensor
to restart.
CSE2 Count sensor(Right) error - Clean the right side
sensor to restart.
2. Counting Error Codes
Error Code Corrective Action
HF Half note detected - Press <CLR> key to restart.
CH Chained note detected - Press <CLR> key to restart.
dbL Double note detected - Press <CLR> key to restart.
SE Skewed - Press <CLR> key to restart.
SC Short count when batching. When the notes on the
hopper were not enough to reach the desired
number.
SF Stacker is full(notes in the stacker reach 200 pieces) -
Remove the notes from the stacker.
13
Magner 35-2003 / 35-3 Series
Page 16
3. Operation Fault
Corrective Actions:
1. Make sure that the currency counter is
plugged into a wall outlet and that the
power cord is plugged into the back of
the machine.
2. Check that the voltage selection switch
matches power input.
Call for service.
Turn off and unplug the currency counter.
Call for service.
CAUTION
• DO NOT insert tools into the currency
counter. Doing so many damage the
machine.
• DO NOT use oil on any part of the
currency counter. Oil on sensors or
internal mechanisms can prevent
correct operation.
Fault
Currency counter
does not power up
when machine is
turned on.
Self-test failure.
Electrical burn orders.
Loud buzzing slapping
or other unusual
noises during the
operation.
IMPORTANT
If the corrective actions suggested here do not solve the problem,
call your service representative.
VIII. Cleaning Jams Manually
- Record the running and grand totals.
- Turn the power switch off.
NOTE
Turning off the currency counter clears the memory of totals.
- Remove all notes from the hopper and stacker. Also, remove notes from
inside the currency counter by using the Note jam release lever.
- Push the Note jam release lever all the way up.
- If it is necessar y to keep locking up the Note jam release lever to
release jam note(s), inser t a coin into the slot.
- Make sure that the Note jam release lever is returned to the original
position after jam note(s) is cleared.
14
Page 17

IX. Preventive Maintenance
Preventive maintenance, requiring partial disassembly by service technicians,
is recommended every 180 days. With heavy usage(more than one shift per
day, continuous service, etc.), this service will be needed more often. To make
sure the operation is as trouble-free as possible, perform the following steps:
<Daily>
Perform the following steps on a daily basis:
1. Turn off the currency counter when not in use.
2. Use the protective cover(dust cover) when the currency counter is not in
use.
3. With a clean, lint-free, dr y cloth, dust hopper and stacker areas.
<Weekly>
Perform the following steps on a weekly basis:
1. Turn off the currency counter and disconnect the power source.
2. Use a vacuum, lint-free cloth or dry air to remove dust from the bill
passages and sensors.
<Sensor Locations>
1. Count Sensors 2. Hopper Sensors 3. Stacker Sensors
See Figure 2 ~ 4 Page 4 and 5
15
Magner 35-2003 / 35-3 Series
Page 18

X. Specifications
Counting Speed: Approximately 600 / 1200 / 1500 notes per minute
Display Type: LCD: 4-digit total display / 3-digit batch display
Document Size Limits: 110x185 ~ 50x85 (mm)
4.33x7.28 ~ 1.97x3.35(inches)
Input Hopper Capacity: Approximately 300 circulated notes
Output Stacker Capacity: Approximately 200 circulated notes
Batching: variable 1 to 999 (maximum)
Error Detection: Double/Chain/Half-note/Jam
Document Feed Mechanism: Friction, intermittent roller type
Overall Dimensions: 255(H)x280(W)x245(D) mm 10.04(H)x11.02(W)
x9.69(D) inches
Net Wight: 5.5Kgs./12.1Lbs.
Power Source: AC120V±10%, 60/50HZ / AC230V±10%, 60/50HZ
Power Consumption: 40W
Temperature Limits: Operating: 0ºC ~ 40ºC / 32ºF ~ 104ºF
Storage: -30ºC ~ 85ºC / -22ºF ~ 185ºF
Density Setting: Adjustable 5 levels
Accessories: Power Code
NOTE
Specifications and design are subject to change without prior
notice.
16
Page 19

17
Magner 35-2003 / 35-3 Series
Page 20

EHF-00069 012706
 Loading...