

Page 1
Page 2

Contents
Safety Instructions
General Instructions 3
Operation Circumstances 4
Banknotes Avoidance 5
Caution For Operators 6
Operation
Reject Reason 32
Detail 33
Count Mode 34
Display 40
----1111----
User Settings
Select currency 14
Add Up 15
Function 16
Settings 24
Installation Guide
At Installation 7
Machine Overview 8
Page 3

Error & Guide
When Errors Occur 53
Error Code List 54
Supplement
Product Specifications 57
List of Attachments 58
----2222----
Daily Maintenance
Maintenance 47
Guide for Components 48
Page 4

Safety Instructions
General Instructions
Do not place the product near heat sources such as a stove or a heater.
Do not try to disassemble or repair the product if you are not trained and
authorized. Such an unauthorized activity may cause accident or critical
damage to the product and it would not be covered with the warranty.
Do not place heavy objects or liquid containers, such as a beverage can,
on the product.
Do not apply excessive force to the product.
Do not try to open or operate the product by force.
Make sure to apply proper grounding through the plug. Short-circuit may
cause sudden electrical shock.
Before maintenance or repairing activity, make sure to turn its power off
and then start to replace with a fuse or to check the components.
Do not pull out the power cord when unplugging. Such action may cause
electric shock or fire.
----3333----
Page 5

Operation Circumstances
Safety Instructions
Do not expose the product to the direct sunlight for normal operation
and life cycle.
Avoid dusty location and place the product on the stable and nonvibrating desk.
Keep and use the product under the optimal conditions as follows:
-Temperature: 5℃~45℃(41F~113F)
-Humidity: 0%~85%(no condensation)
Do not press the LCD screen or control keys with sharp objects such as a
pen or a pin.
In case of safekeeping for long period, put the cover on the product.
----4444----
Page 6
Banknotes Avoidance
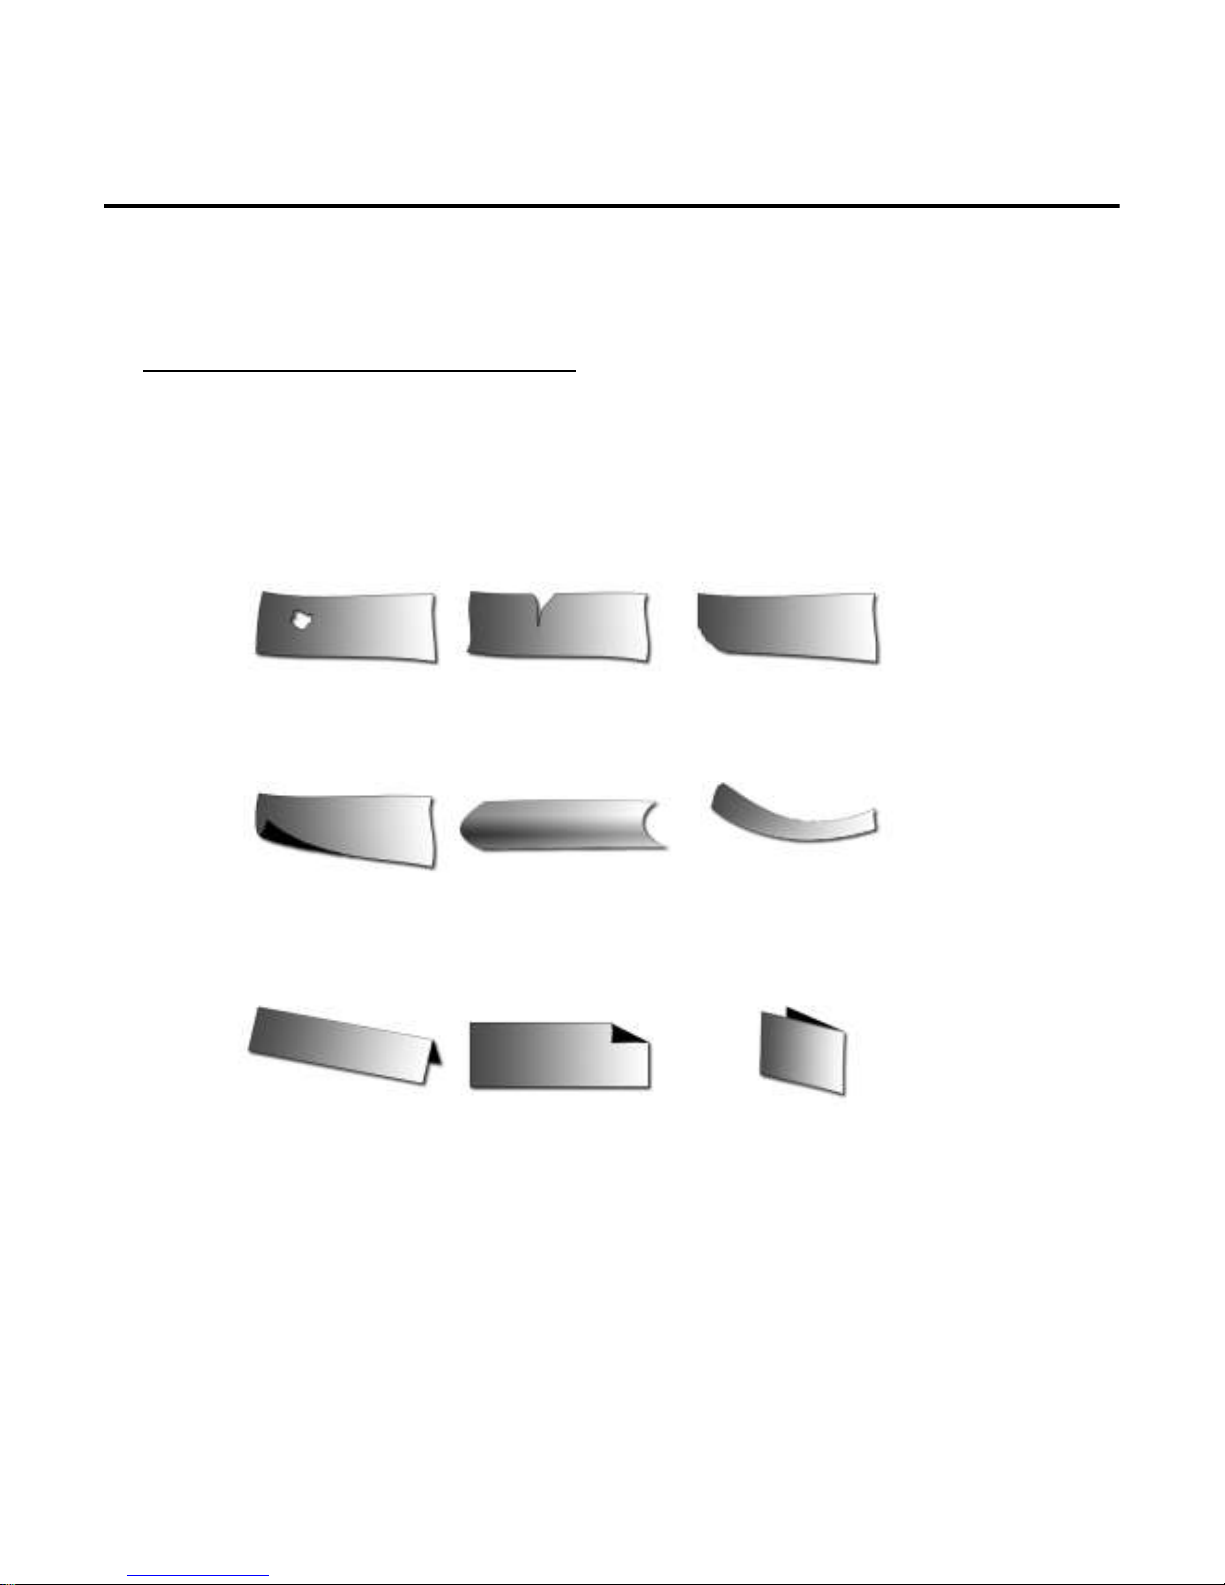
Do not count the wet or significantly worn notes.
Do not count the torn or deformed notes. Otherwise, it may cause jam.
Damaged Banknotes
Curled Banknotes
Folded or Partial Banknotes
Safety Instructions
----5555----
Page 7
Caution for Operators
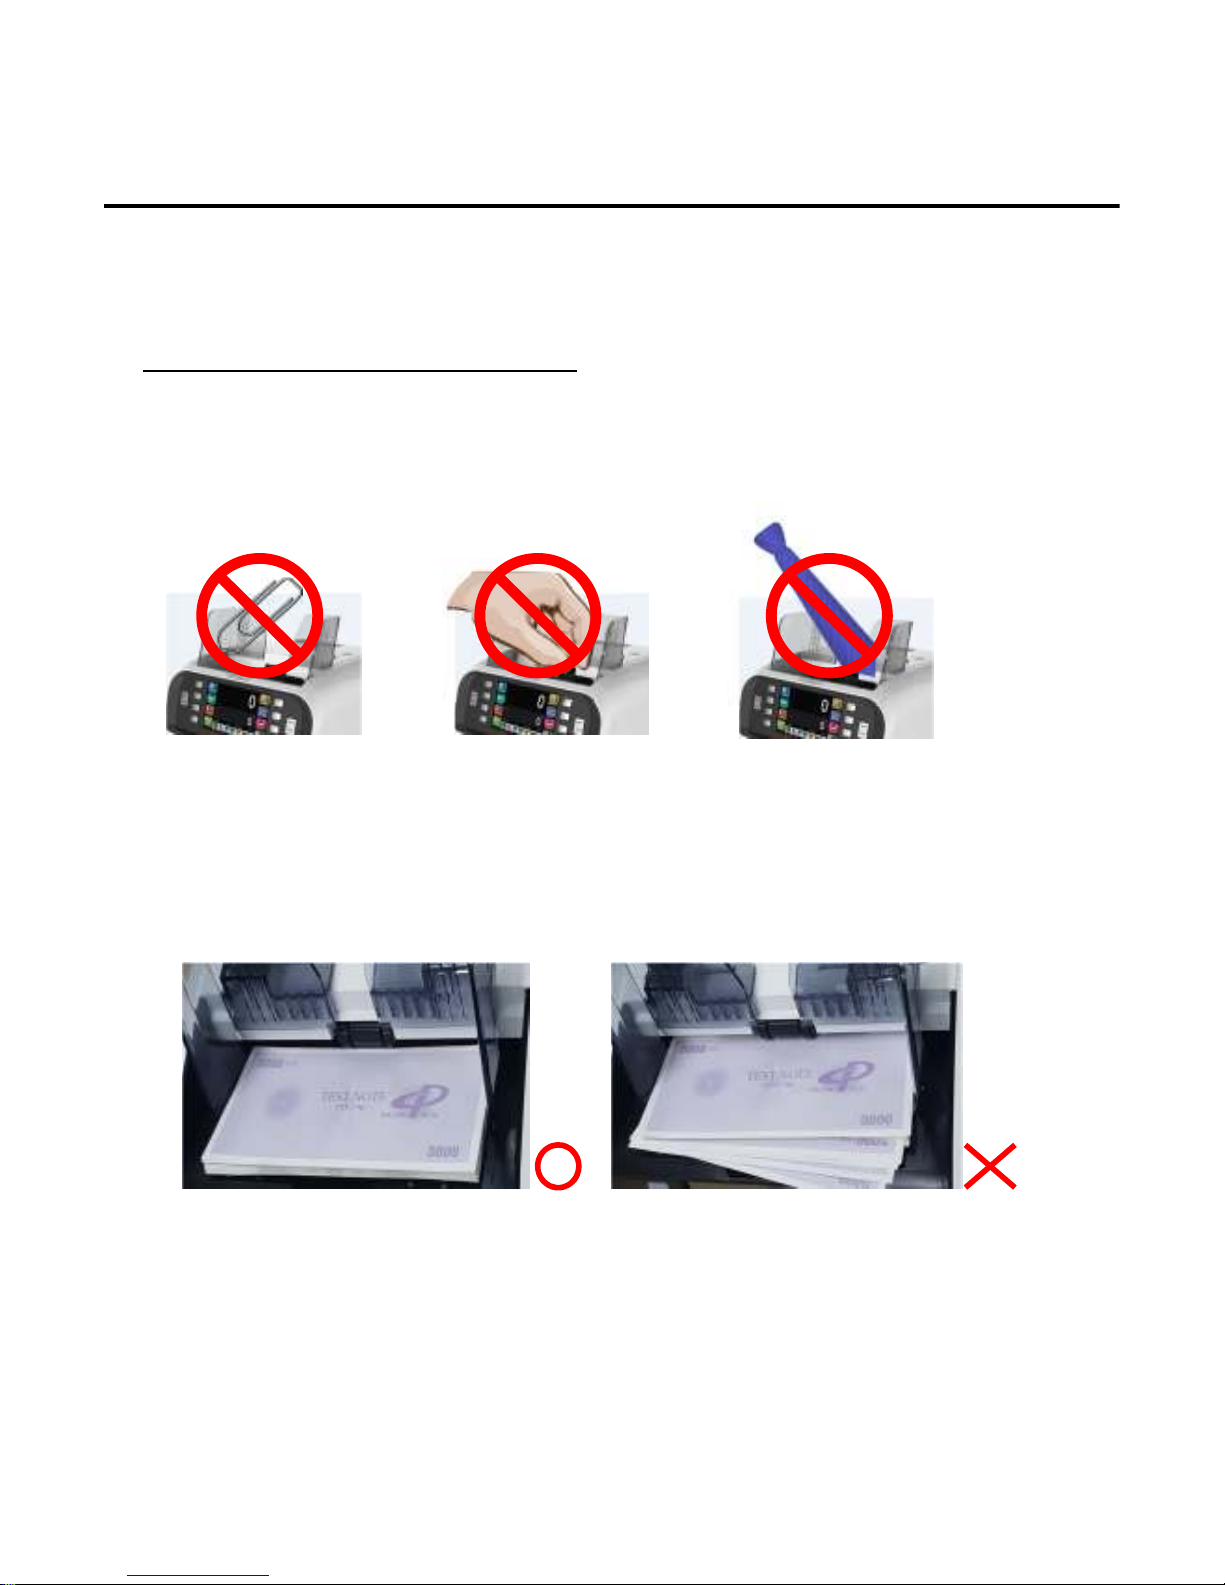
During operation, never put anything like clips or any other stuff except
banknotes on the hopper. Surely be careful that the operator’s hair, clothes
or necktie would not be picked and absorbed into machine.
Straighten the folds or corners of banknotes before insertion.
Banknotes should be properly arranged and then put on the hopper as
shown below for efficient operation.
Safety Instructions
----6666----
Page 8
Installation Guide
Installation Space
For normal installation, contact to the designated sales agent near to you.
· This product is allowed only for indoor use. Do not install outdoors.
· The product should be installed in the stable place enough to endure the
weight and operation. Avoid unstable, slanting or uneven position.
· After installation, daily attention and management for the product is
strongly recommended for normal and reliable operation.
The product should be installed at the proper place having enough space for
loading notes, opening/closing with ease and even simple maintenance
activity.
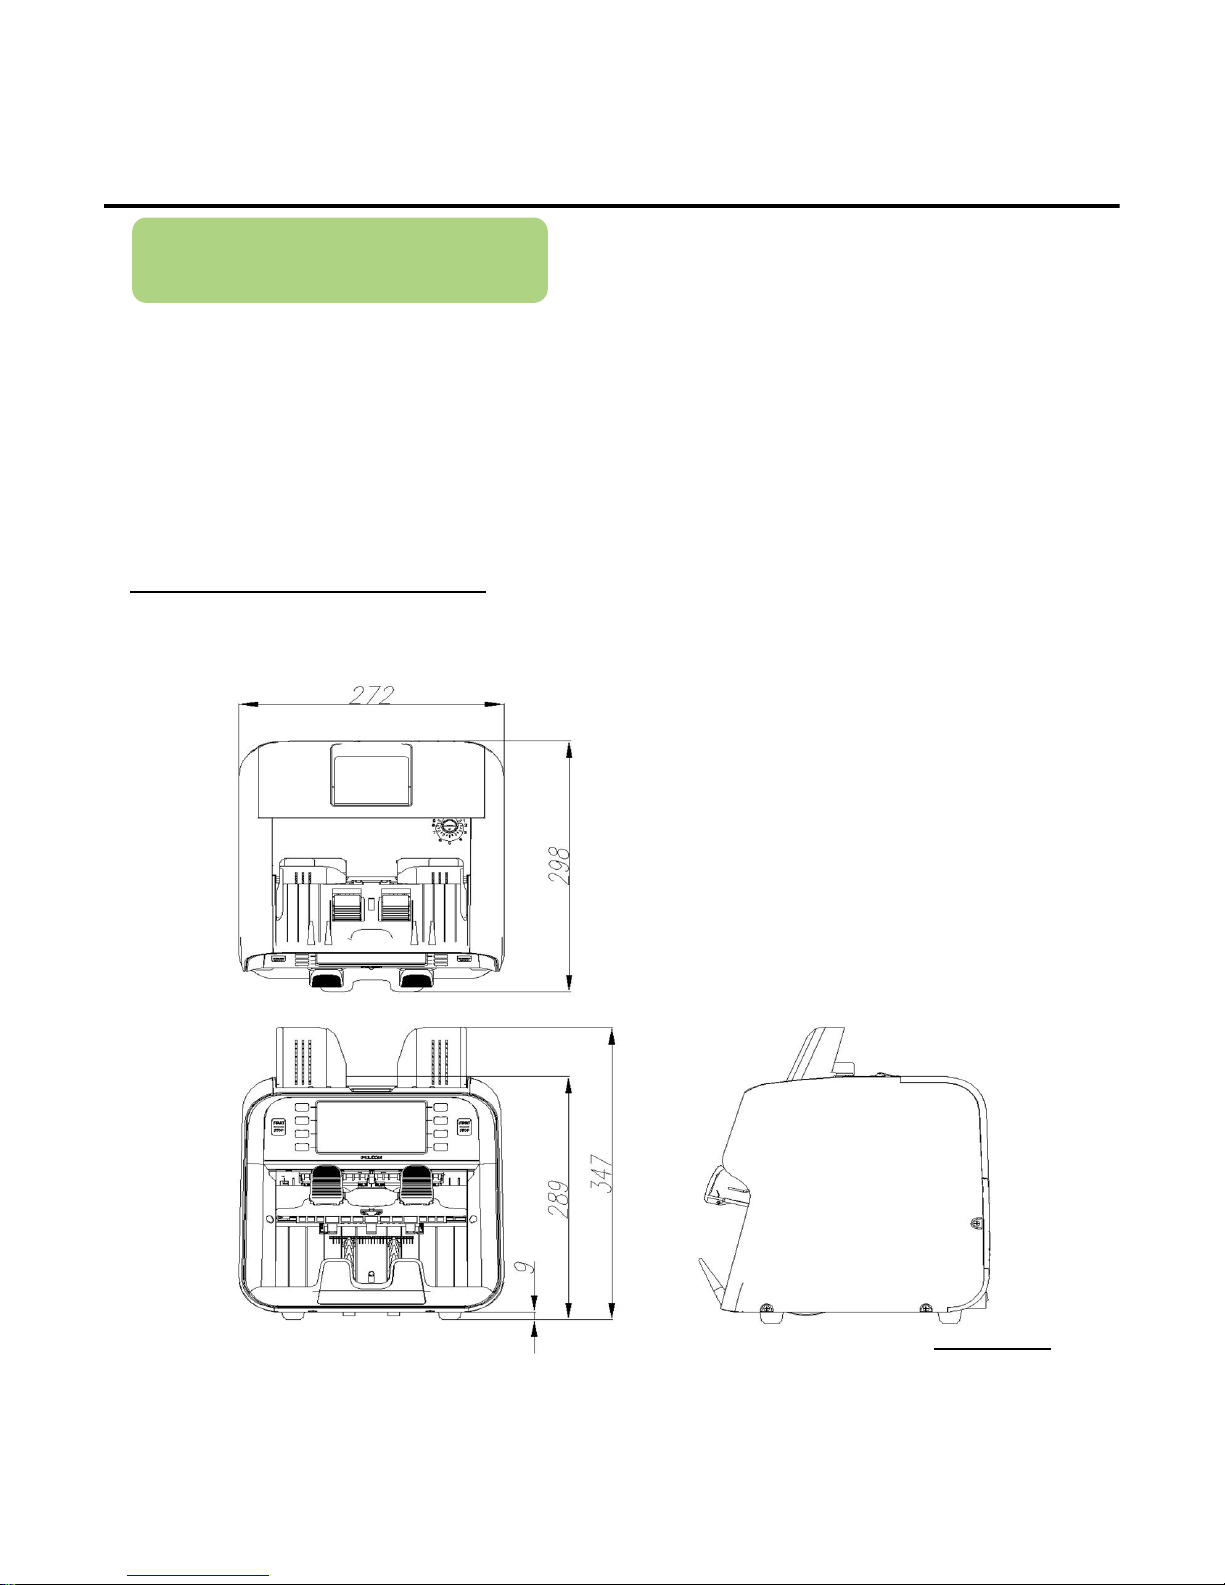
At installation
Unit : mm
----7777----
Page 9
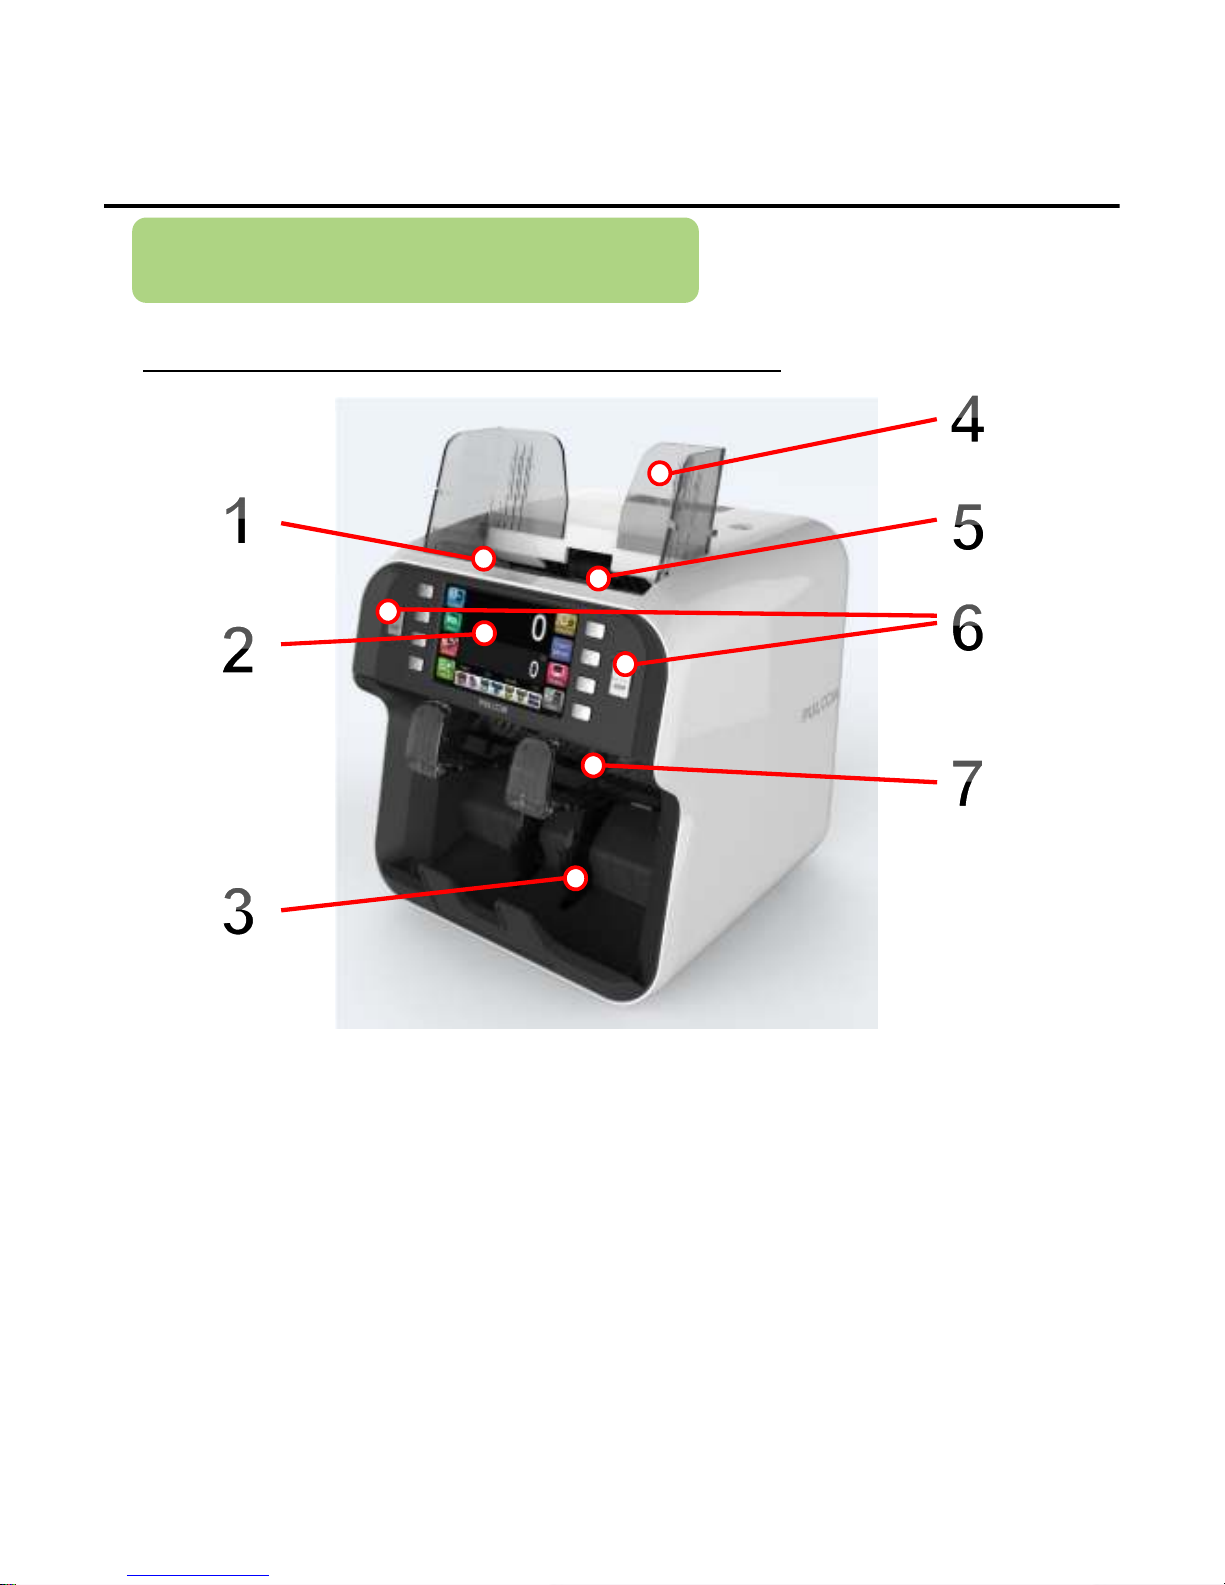
Name of Each Part (Front View)
1 Hopper
2 Display Panel
3 Stacker
4 Hopper guide
5 Pickup Roller
6 Operation buttons
7 Reject Stacker
Space for Loading Notes
Direct U/I by Full Color Touch Screen
Space for Counted Notes
Adjustable Guides to Note Size
Pick-up Roller to Feed Notes for Counting
Start/Stop Keys for Counting
Space for Rejected Notes
Machine Overview
Installation Guide
----8888----
Page 10
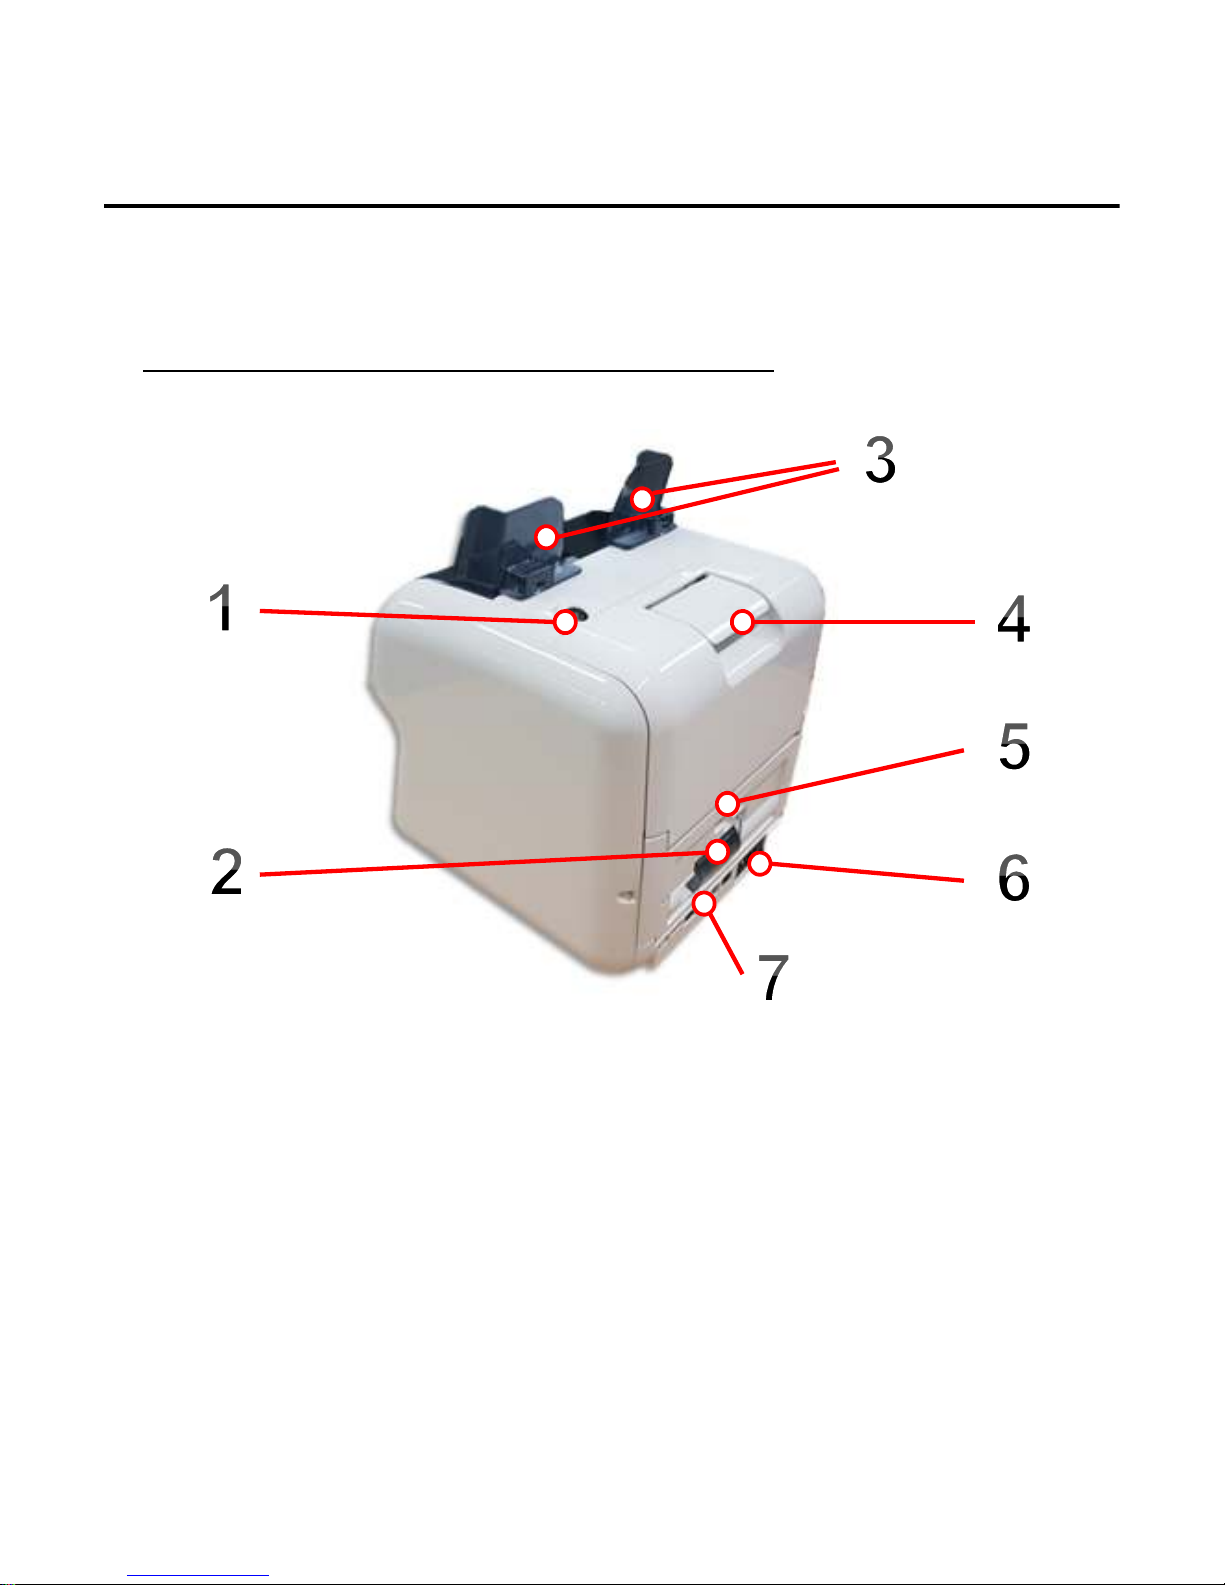
1 Feed gap Adjustment
2 Dust Pocket
3 Hopper guide
4 Upper cover lever
5 Low cover lever
6 Power switch
7 I/O port
Adjustment screw for feed gap size
Pocket for Colleting Dust on Operation
Adjustable Guides to Note Size
Latch Handle to Open Upper Cover
Latch Handle to Open Lower Cover
Switch for Power On/Off
I/O port (Refer to “I/O port” on 11 page)
Installation Guide
Name of Each Part (Rear View)
----9999----
Page 11
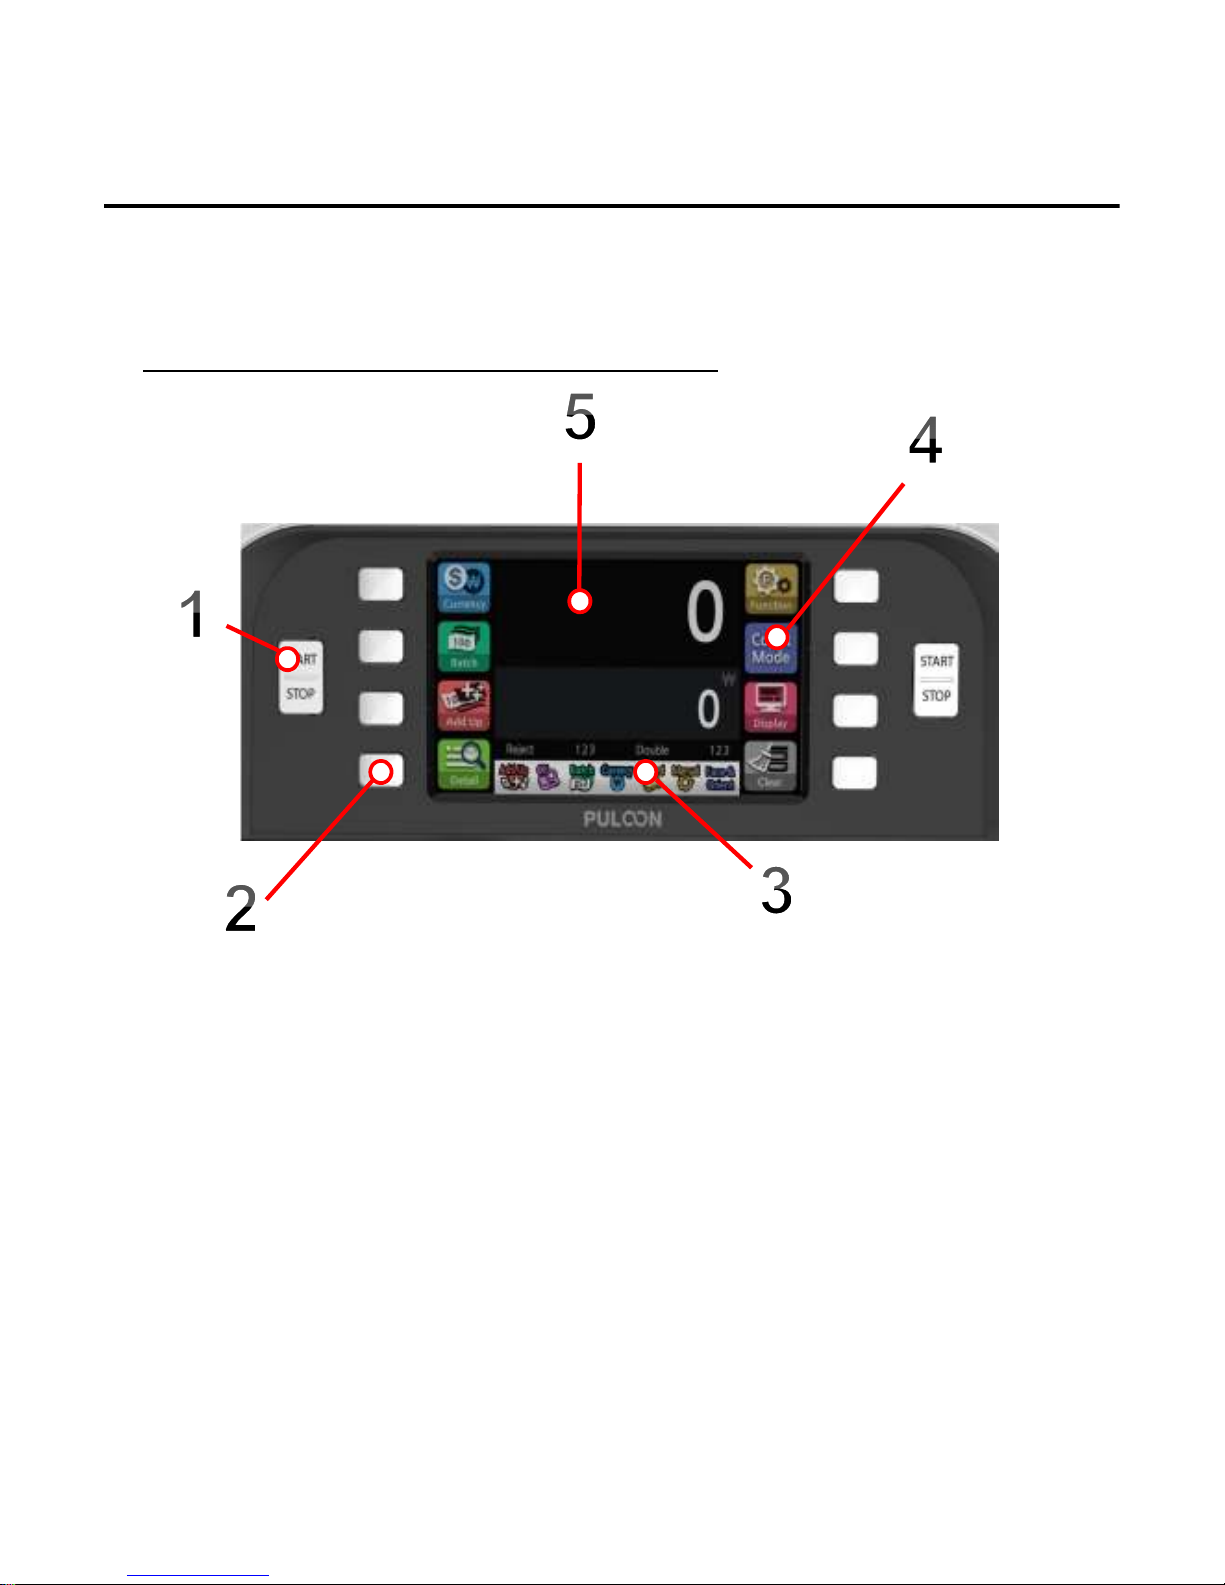
Description on Control Panel
1 Start/Stop Button
2 Function Keys
3 Status Band
4 Menu icons
5 LCD Screen
To Start/Stop
To select the function (equal to using
touch key)
To show current settings
To show the menu available
To show the number and the amount of
notes
Installation Guide
----10
1010
10----
Page 12
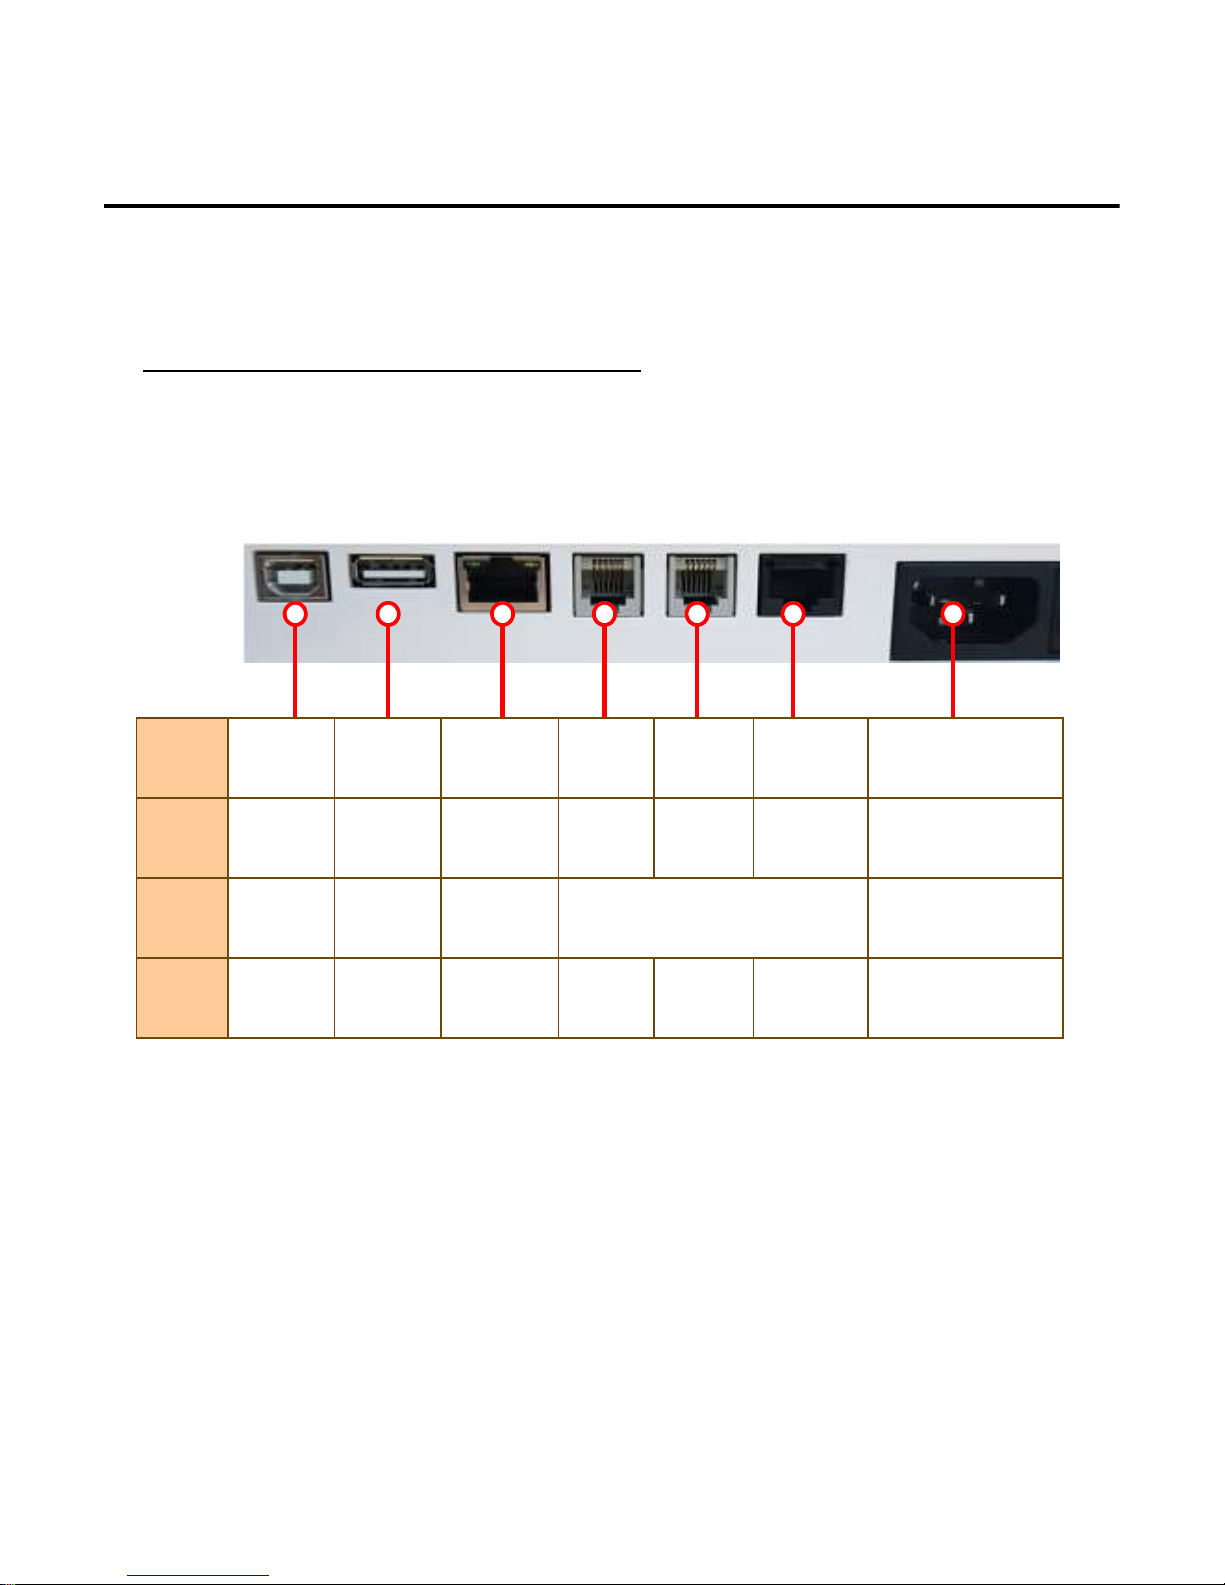
Description on I/O PORT
Port
No.
CON6 CON4 CON5 CON3 CON2 CON1 Input Power
Pin 4 4 8 6 6 8 3
Spec. USB2.0 USB2.0 LAN Serial communication 100~240V AC
USE Device Host Ethernet Printer Display Display2
*Recommended Printers are STP-103 III, IDP-3550, TSP-600, TM-881V
Installation Guide
----11
1111
11----
Page 13
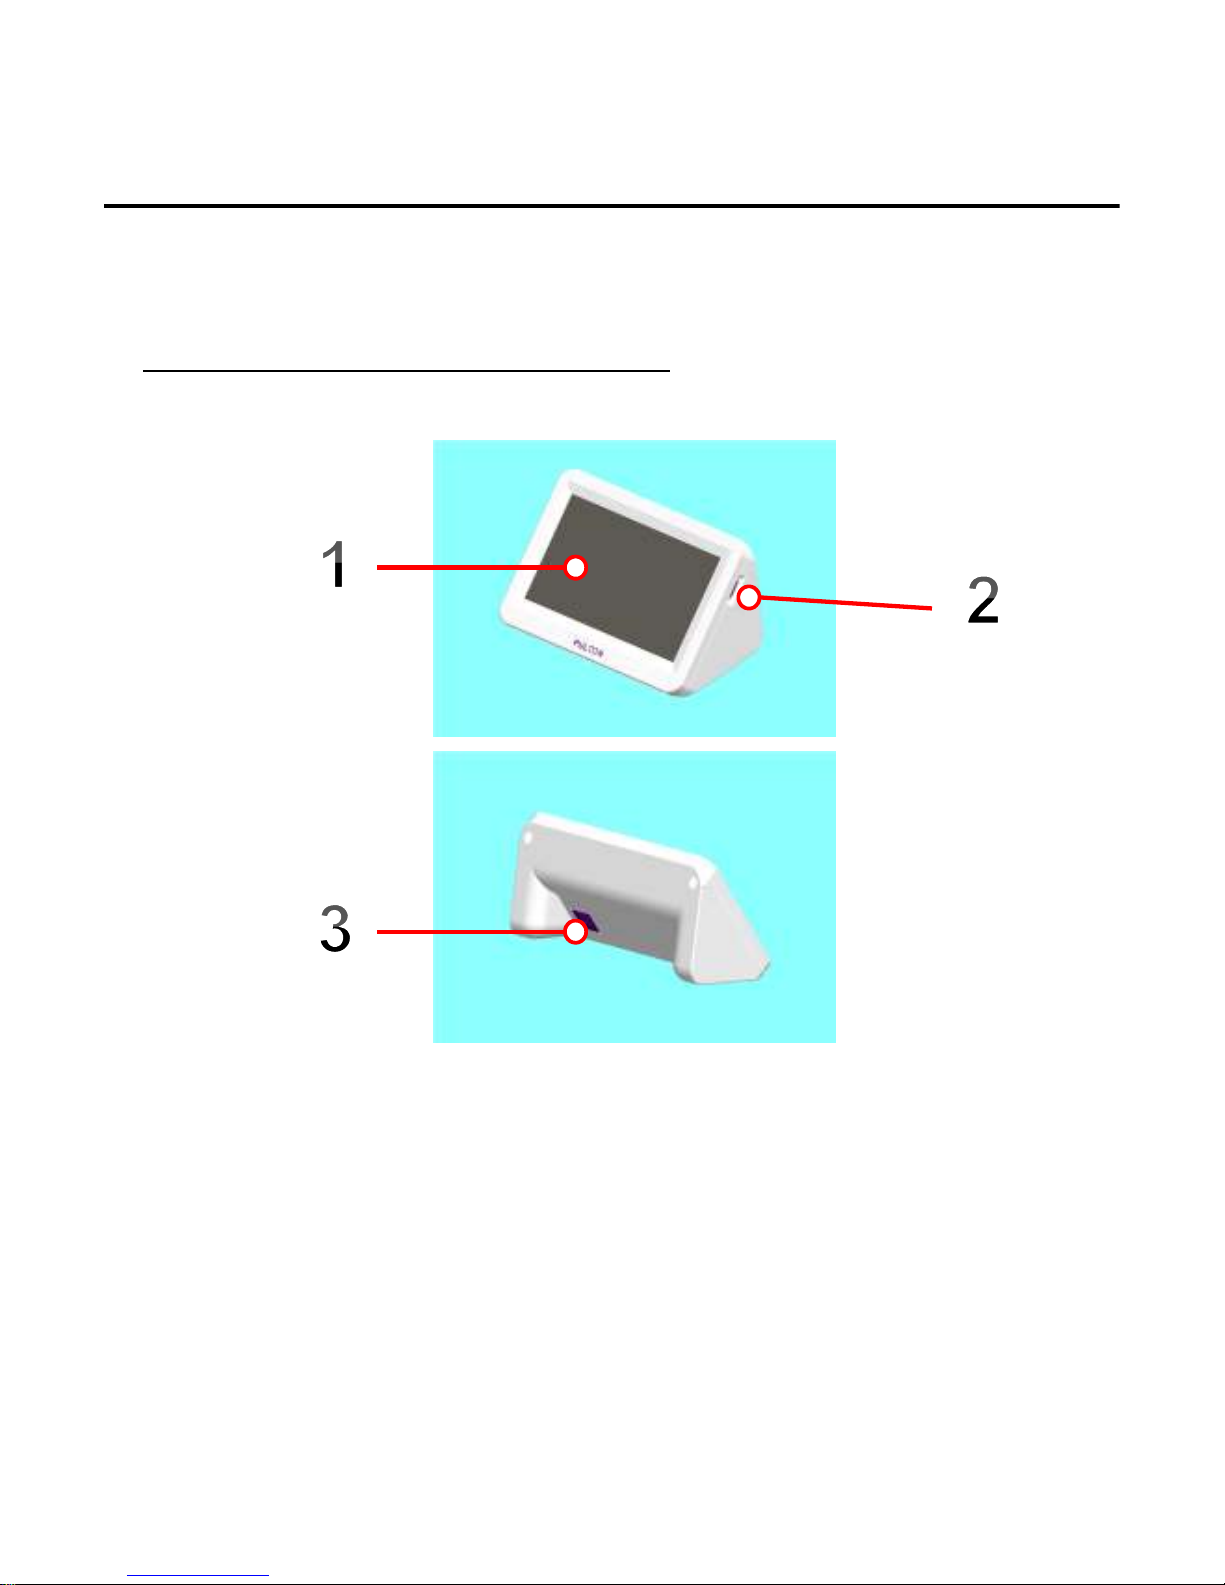
External Display (optional)
1 Display Panel
2 Micro SD port
3 EE7 interface port
Full color graphical display.
Micro SD saves icon & background data
Port is linked to the EE7
Installation Guide
----12
1212
12----
Page 14
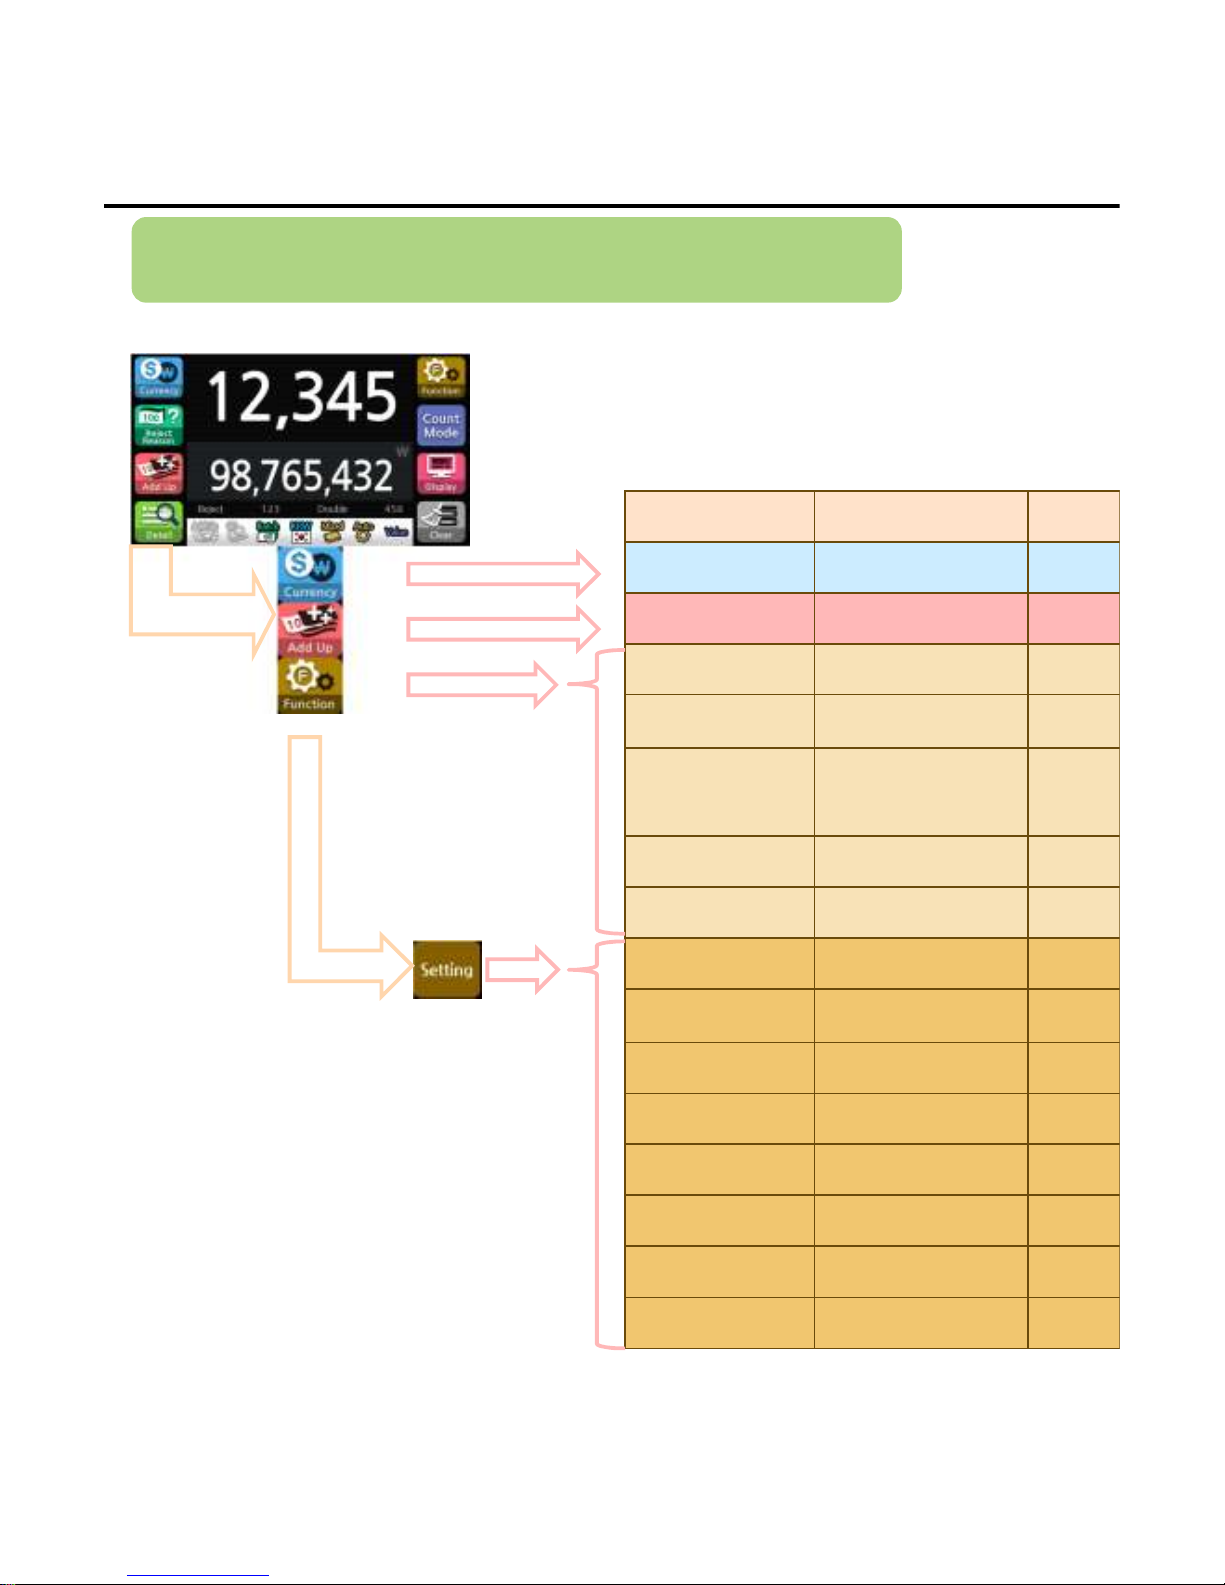
Summary of Each Setting
Description of each setting can be found on the following pages
Default setting
Default settingDefault setting
Default setting Page
PagePage
Page
Currency 14
Add up Add up 15
CF CF Run 18
Single/mix Mix 18
Auto/ManualAuto 19
Batch 100 19
Service 20
Language English 26
Digit mark 1,000 26
Beep On 27
Time Present time 27
Old/New OLD&NEW 28
Capacity S-100, R-50 28
Speed 1000 29
Cyclone On 29
User Settings
----13
1313
13----
Page 15
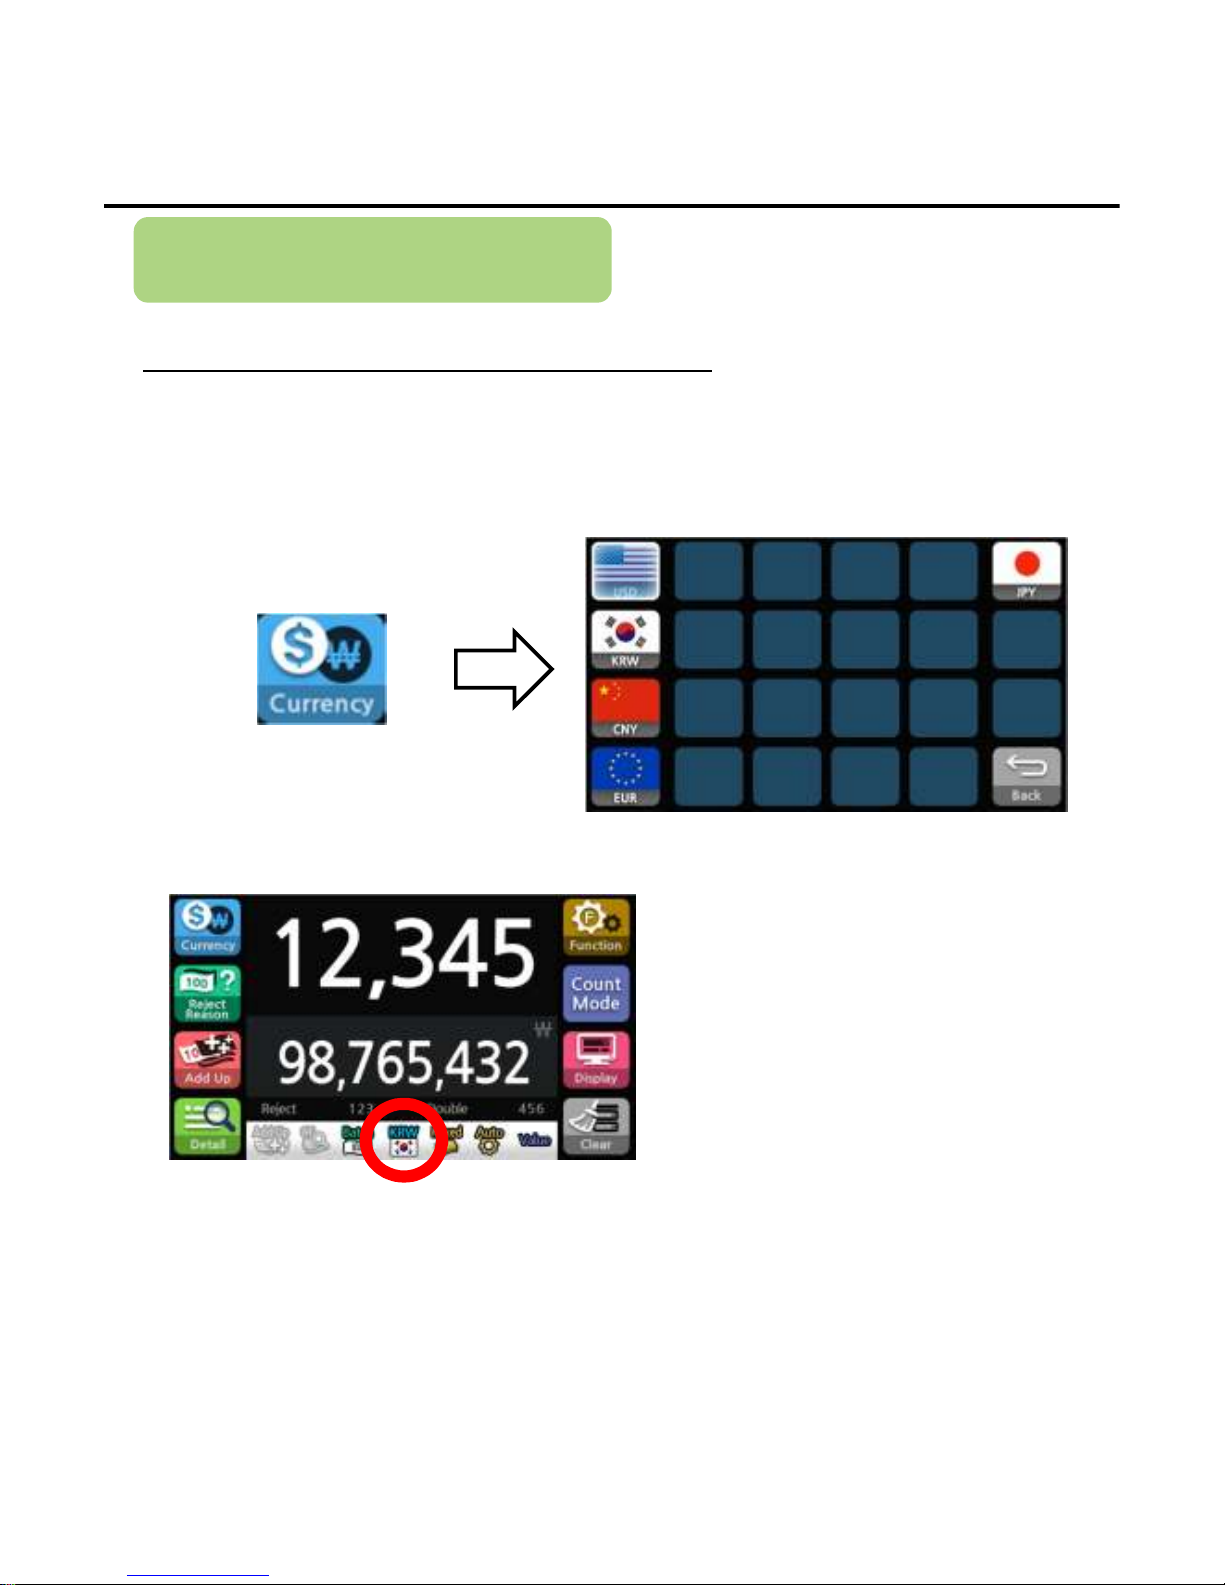
Select Currency
Select Currency for counting
A range of currencies registered within the EE7 firmware are displayed but
the currency with active data table could be counted and evaluated.
1)Press the button below to enter the currency select menu.
2)Press national symbol to select currency.
*The currency name and icon will be shown in the Status Band to indicate the selected currency
User Settings
----14
1414
14----
Page 16
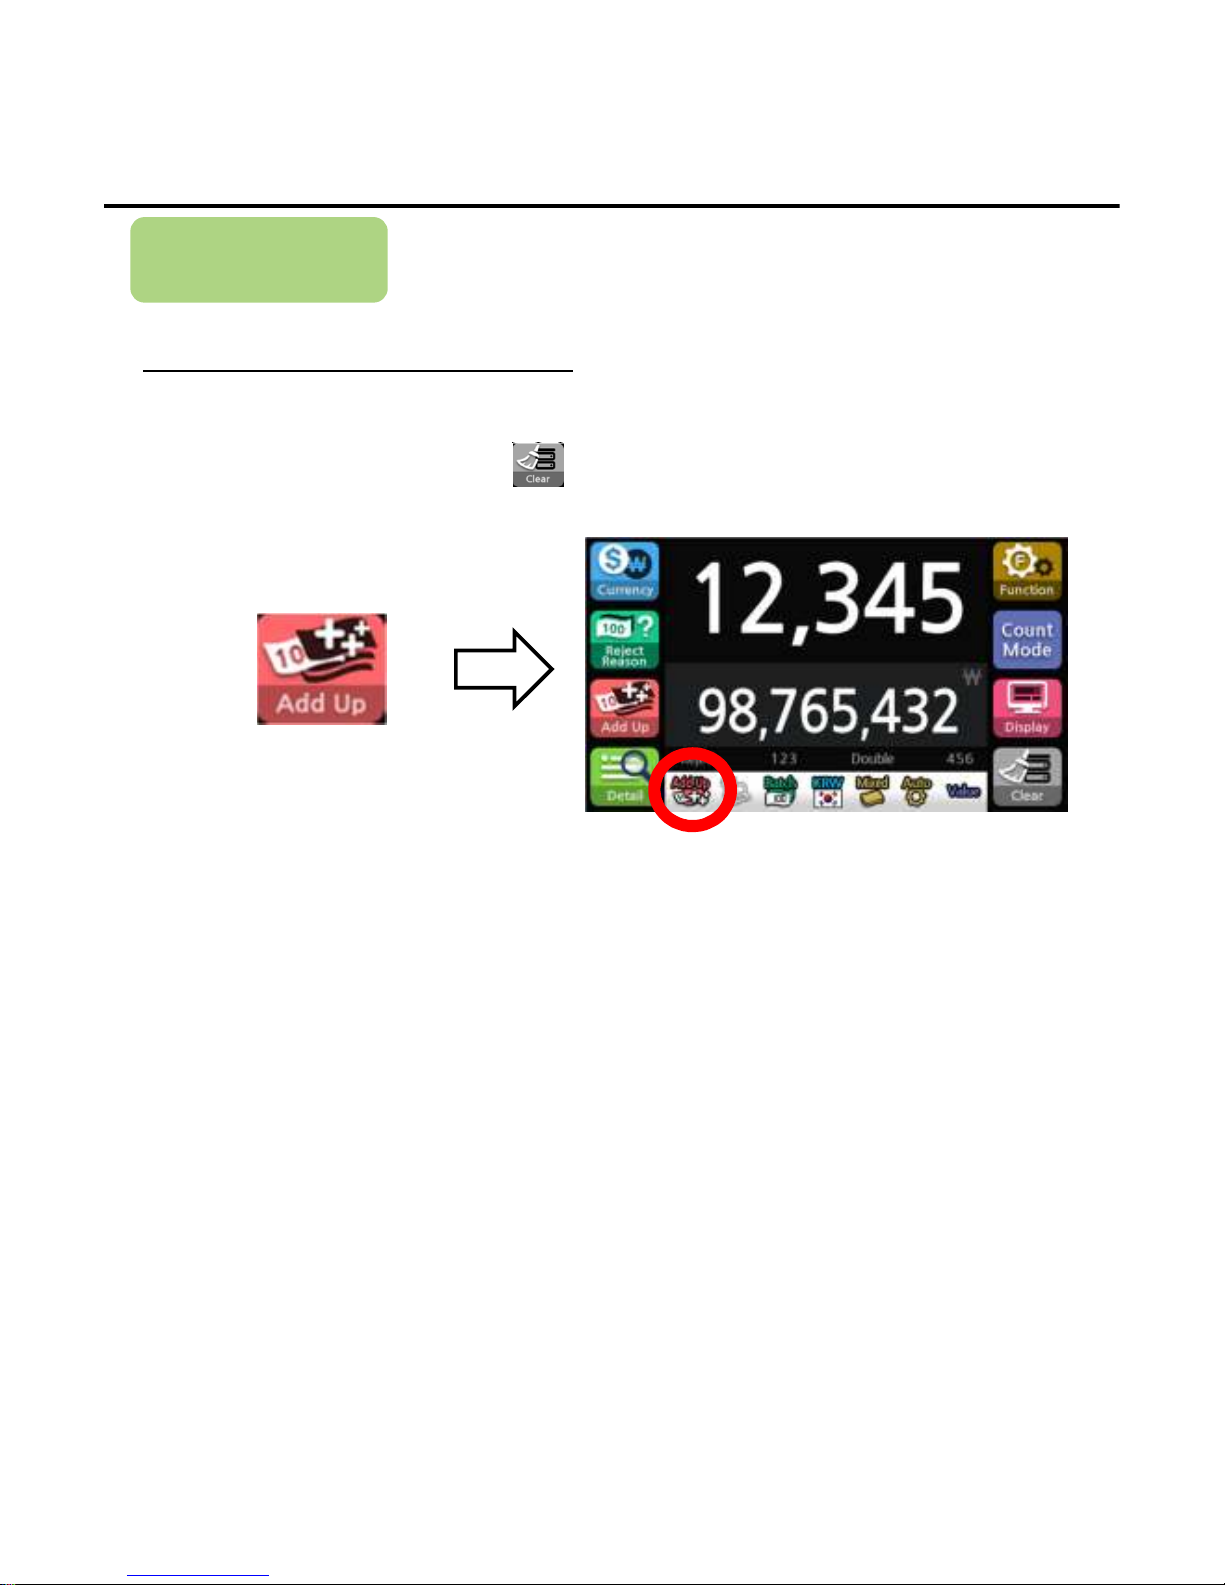
When activated, the current amount and number of banknotes are added up to
the total counting. Even though the banknotes are removed from the pocket, it
is still displayed until the button, , is pressed.
1)Press the button below to operate the EE7 in a accumulative count mode.
ADD UP
Select ADD UP mode
*The Accumulative count mode symbol will change on the screen to indicate the selected mode
User Settings
----15
1515
15----
Page 17
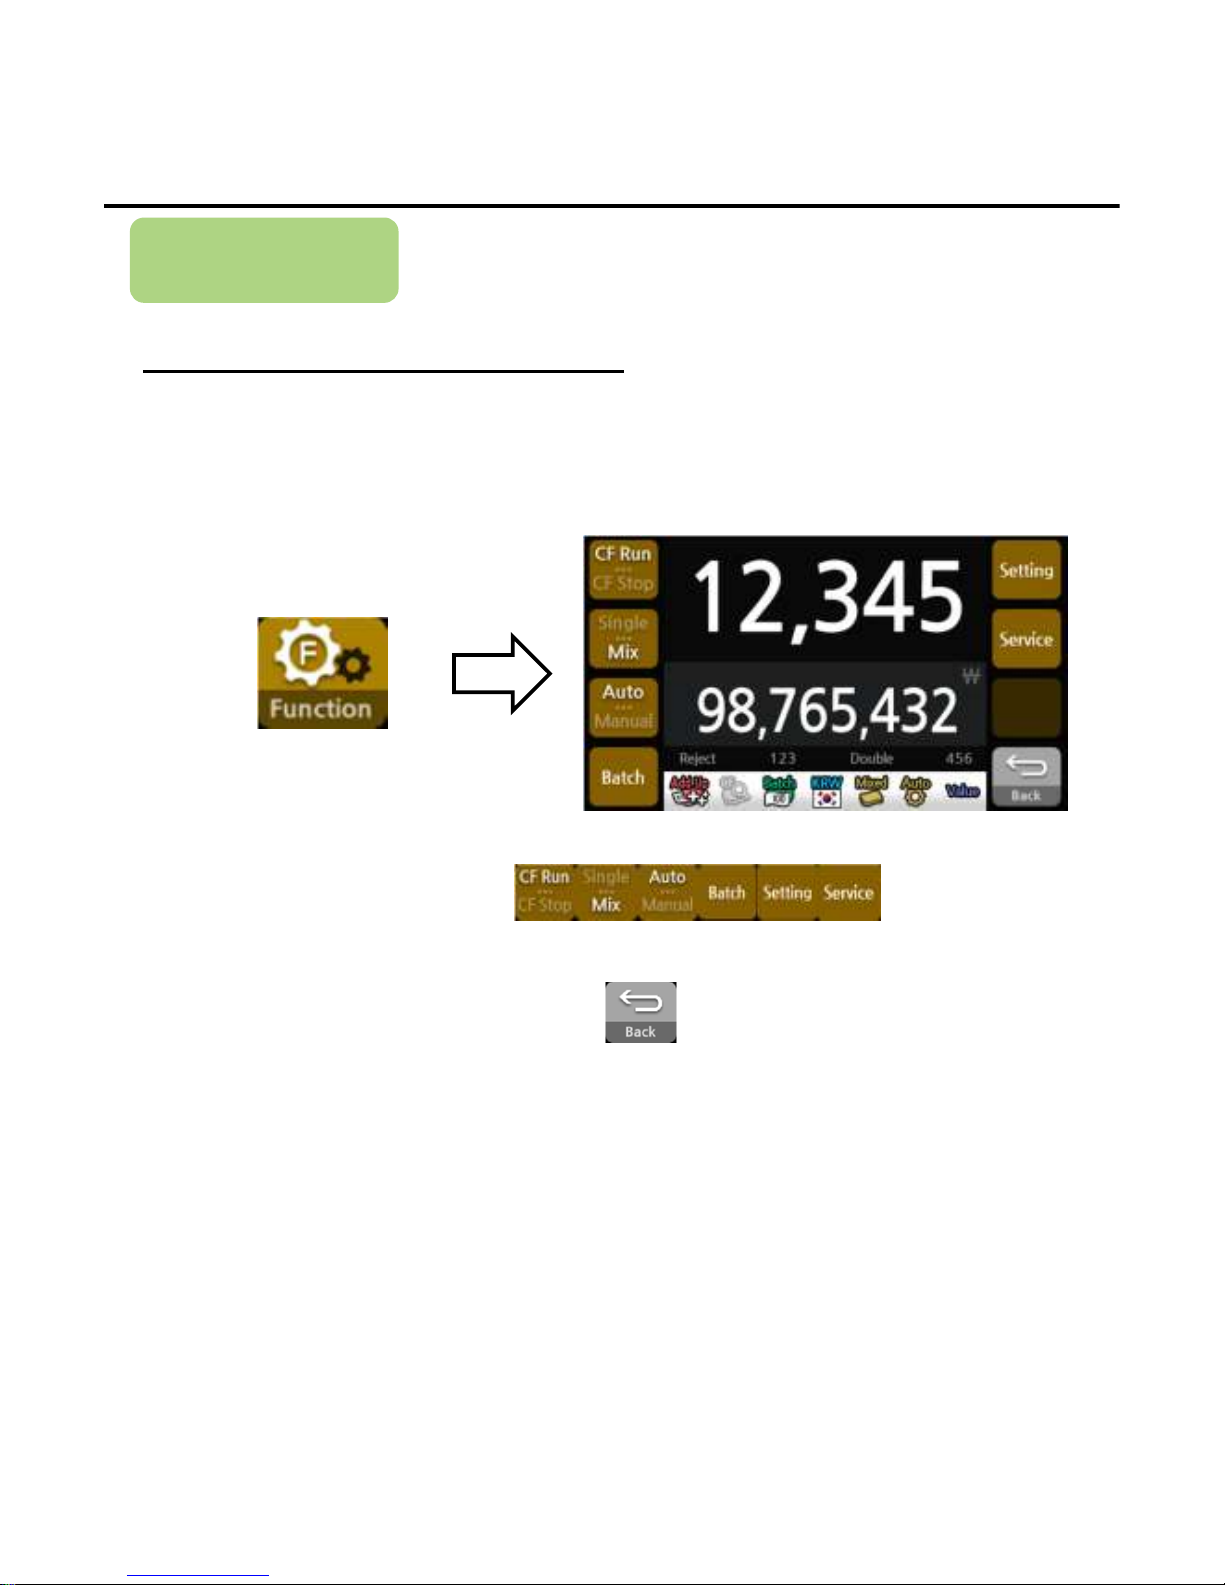
Function
How to Set the Function
Each setting item has to be set prior to use
1)Press the button below to enter the function menu
3)When finishing the selection of the function, press button to exit the function selection mode.
2)Press the function button to use among .
User Settings
----16
1616
16----
Page 18
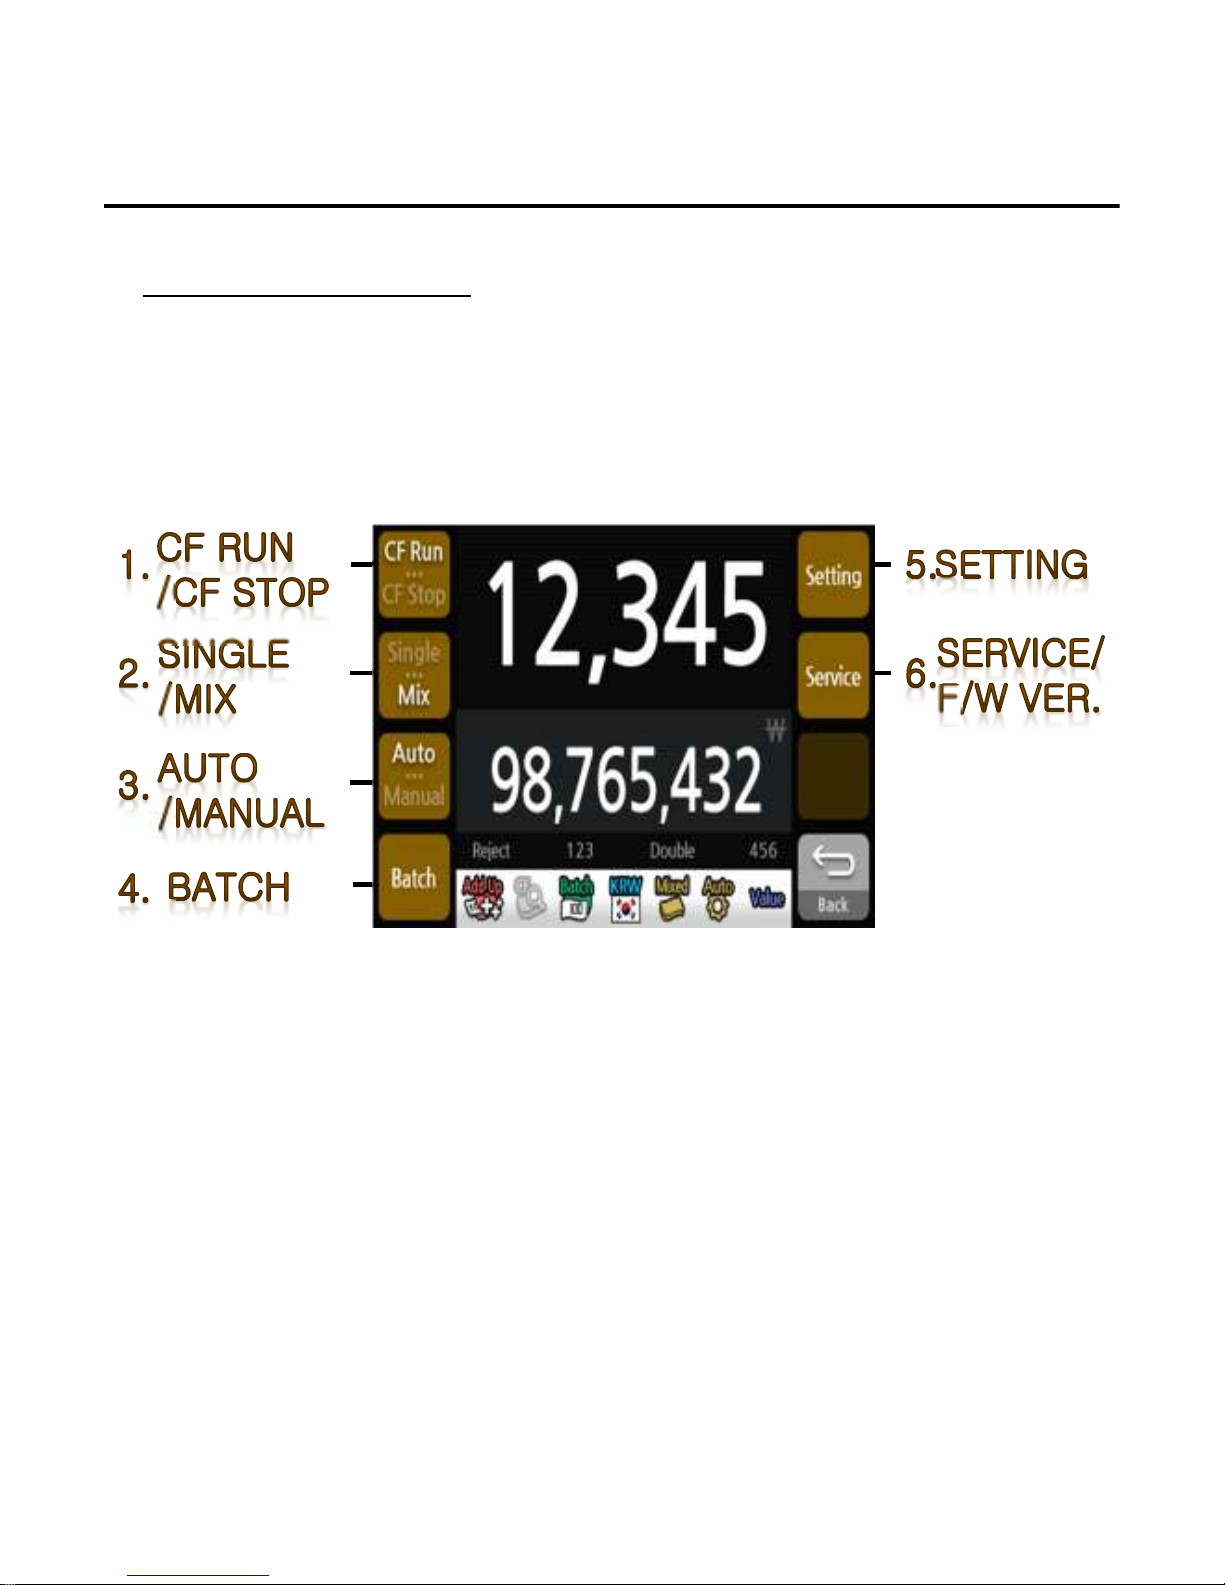
List of Functions
User Settings
----17
1717
17----
Page 19
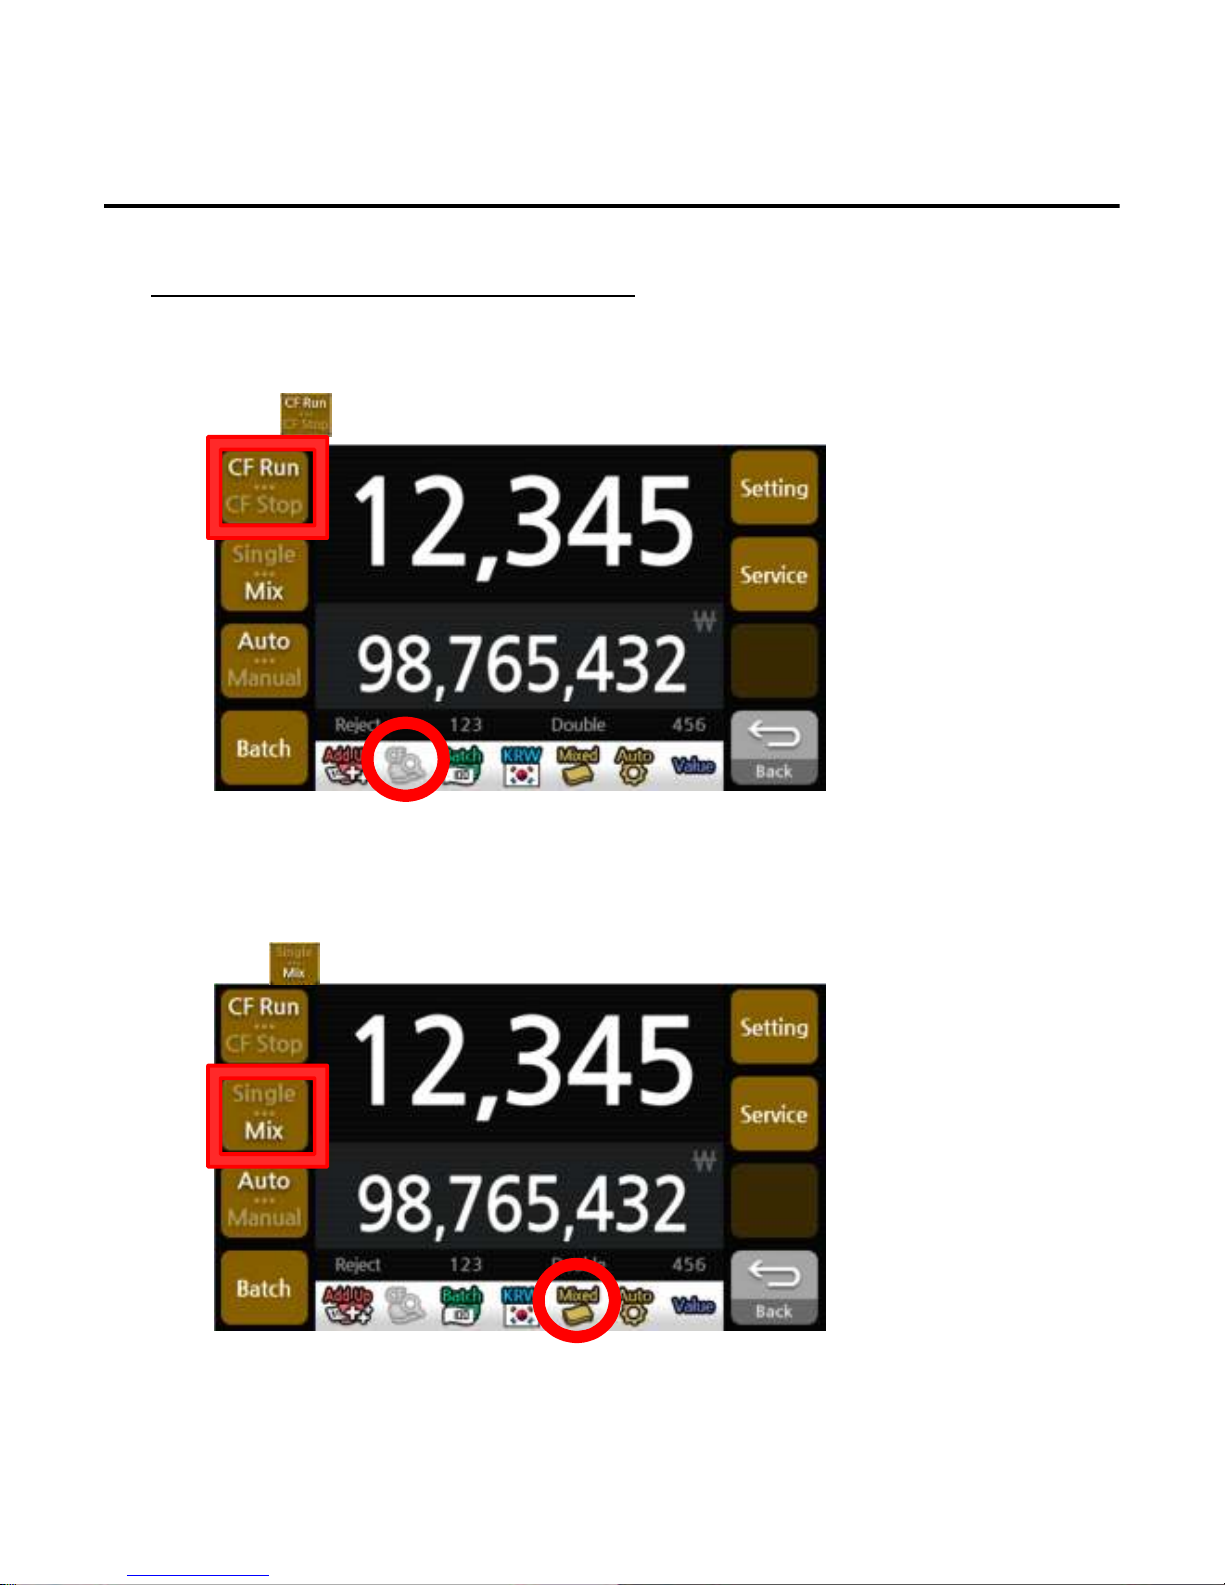
Description of Functions
1. CF (Counterfeit)
2. Single / Mix
Single mode is to count the designated denomination only, which is recognized for the first time. If the
notes are different from the designated denomination, the machine will send other notes to the reject
pocket under Single Mode.
1)Press button to select the single or mix.
*The CF symbol will appear/disappear on the screen when a counterfeit is detected.
*The Single/Mix symbol will appear on the screen to indicate the selected state.
Decides to run or stop when a counterfeit is detected.
1)Press button to select setting.
User Settings
----18
1818
18----
Page 20
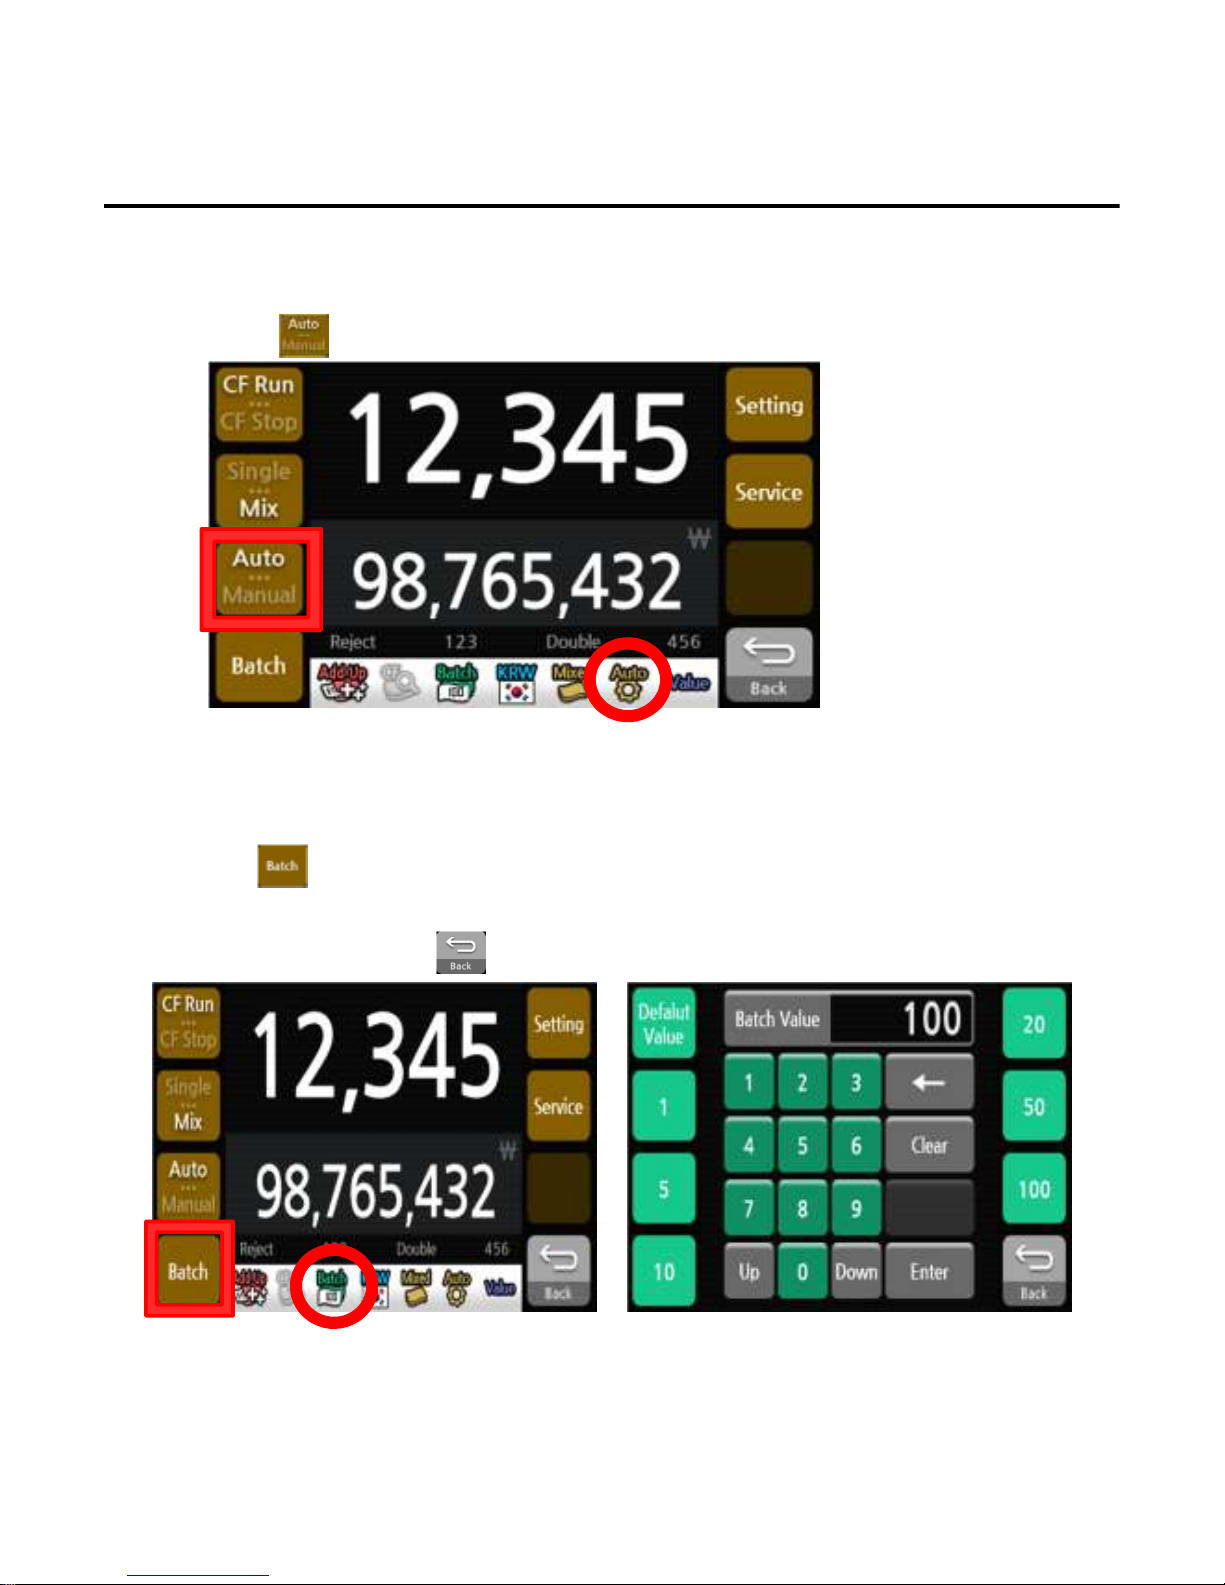
The number of notes could be counted by specifying the batch size.
1)Press button.
2)Set the batch size by putting the wanted number.
3)When finishing, press the button to exit the batch setting menu.
3. Auto / Manual
Automatic counting would be started when the notes are set in the hopper under AUTO mode. In case
of Manual, the counting would start only when press the START button.
1)Press button to select setting.
4. Batch
*The Auto/Manual symbol will change on the screen to indicate the selected state.
*The Batch number will change on the screen to indicate the batch number.
User Settings
----19
1919
19----
Page 21
5. Setting
Refer to “Setting” on 24 page.
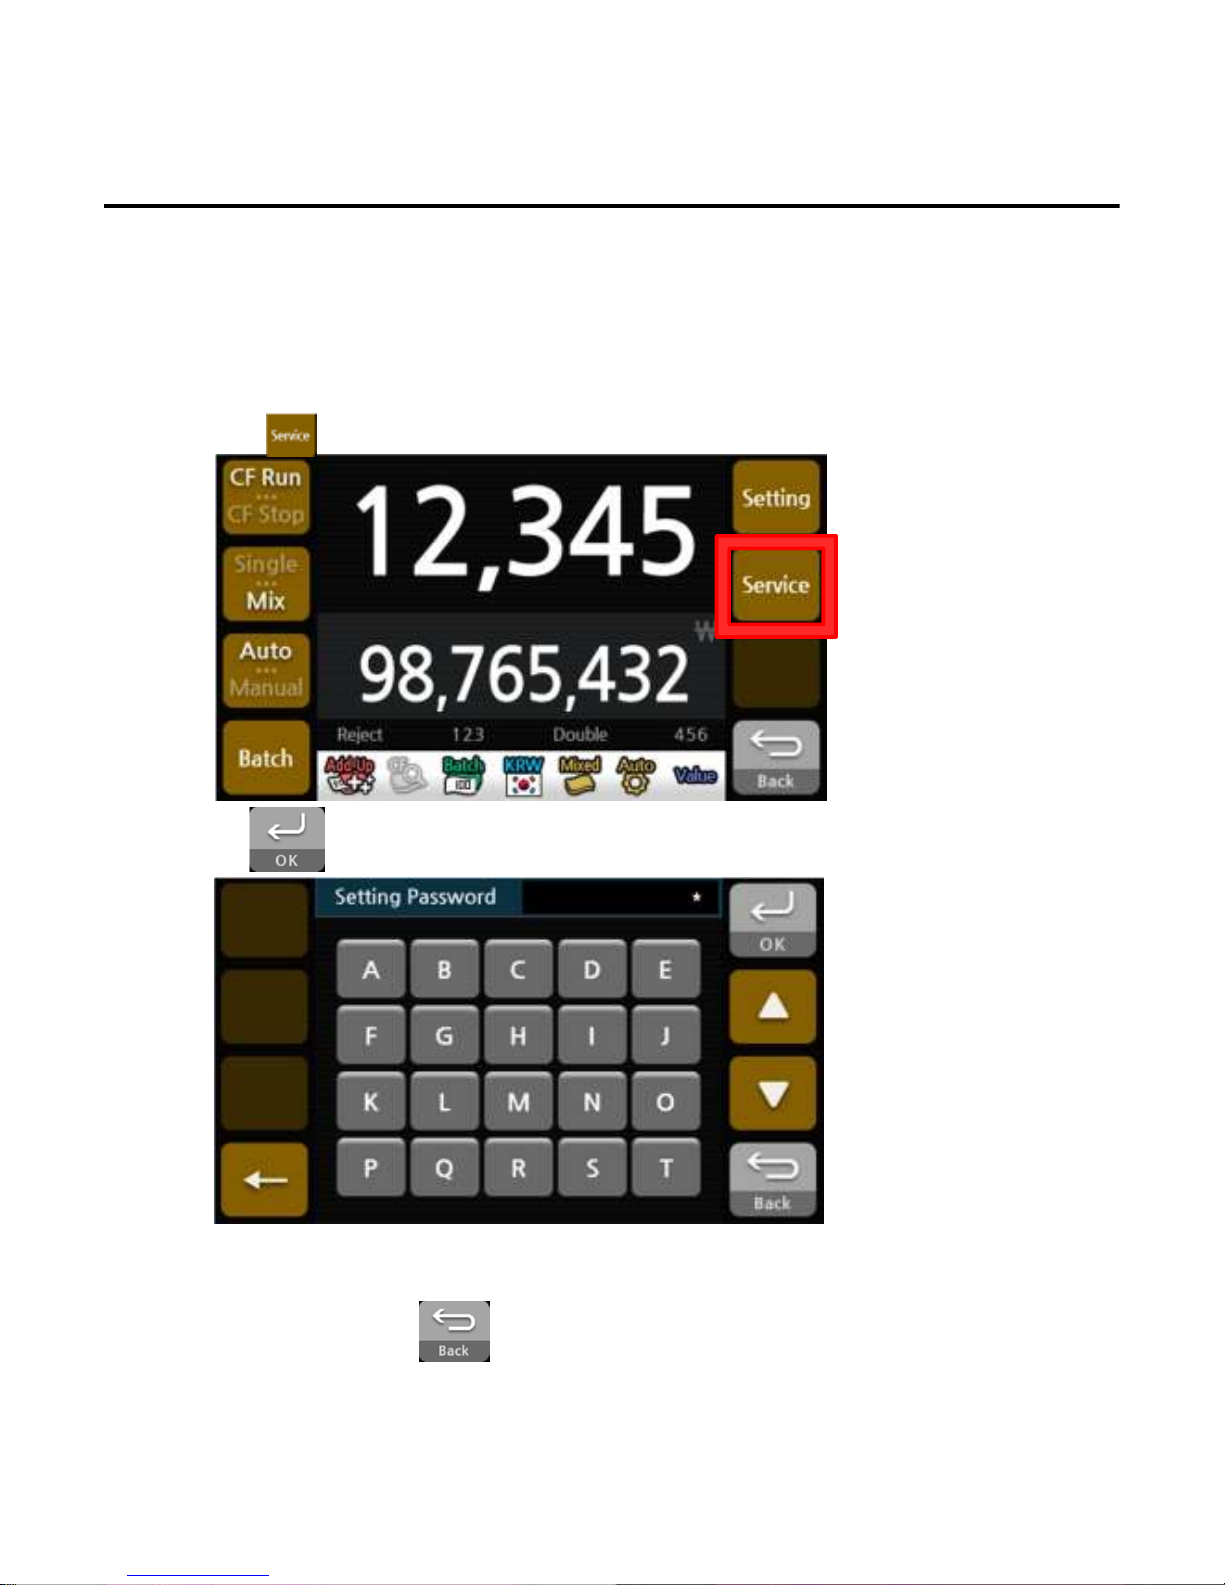
6. Service and F/W versions check
Check and adjust the EE7
1)Press button.
User Settings
2)Press after press passwords.
4)When finishing, press the button to exit the service menu.
3)Press Service buttons to set the each setting.
----20
2020
20----
Page 22
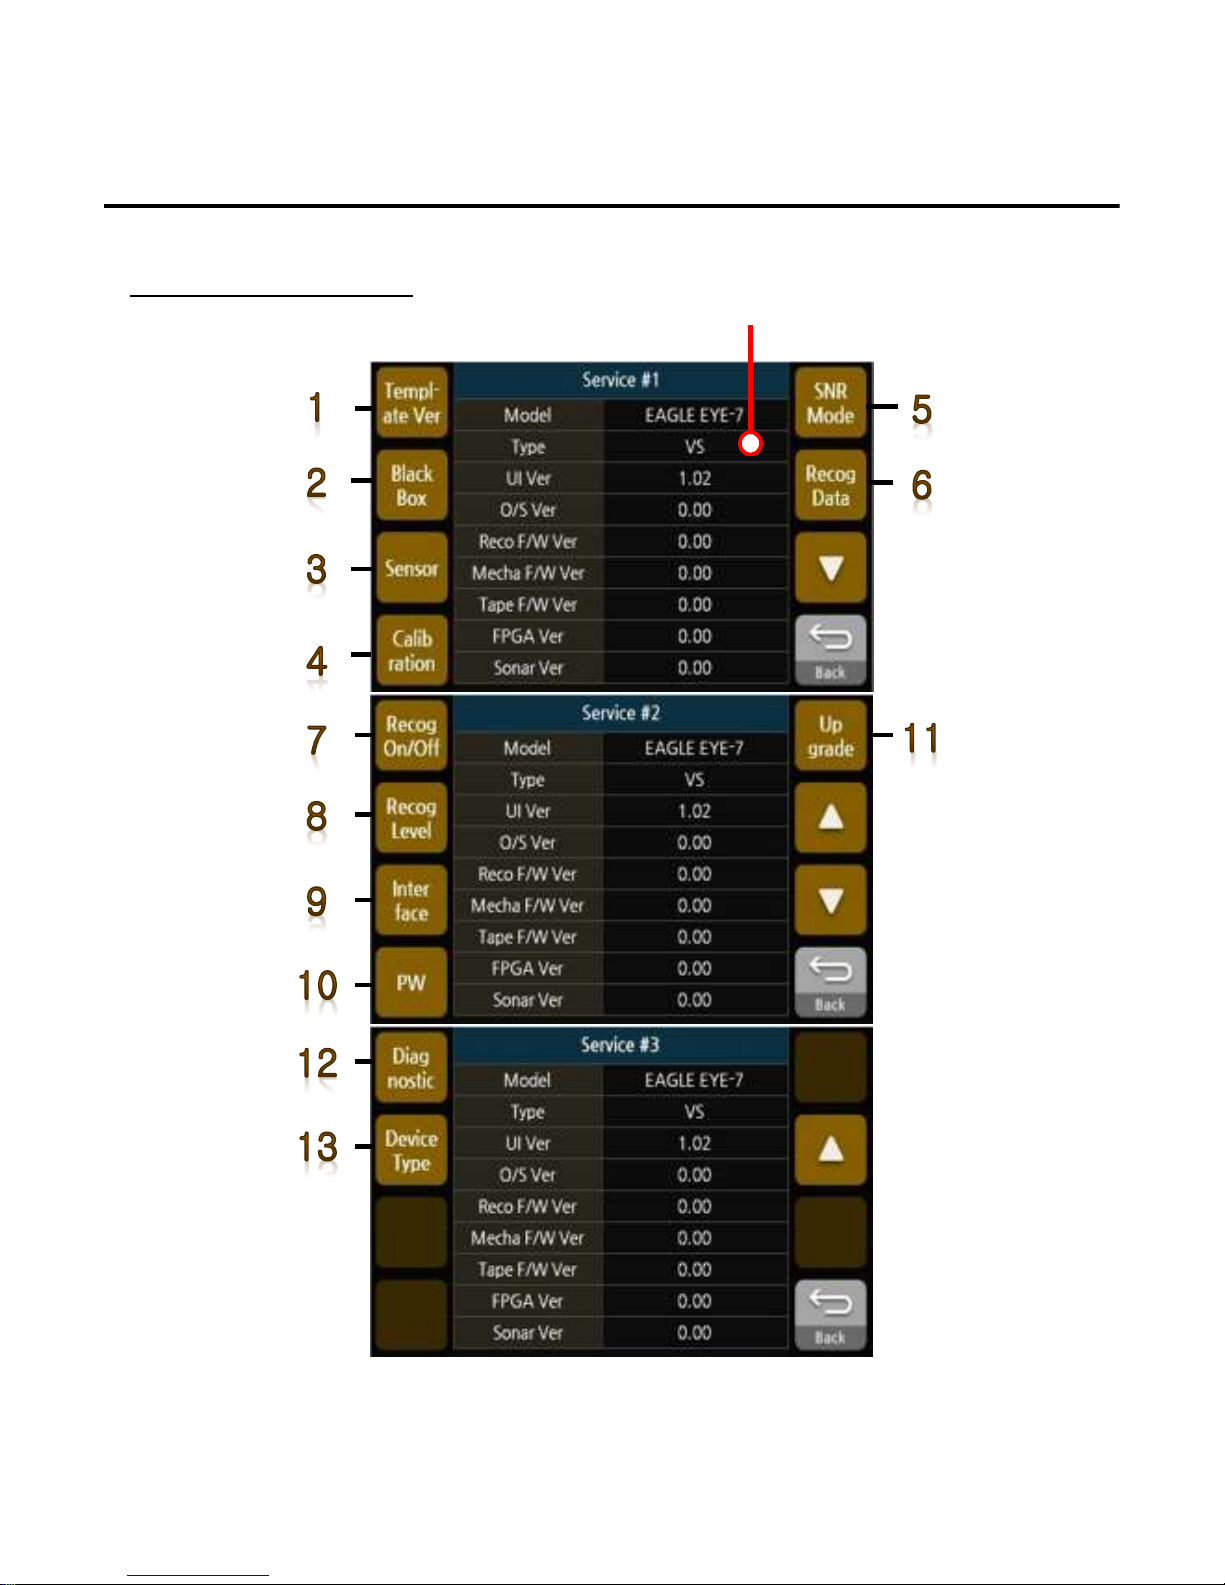
List of Service
User Settings
Versions of F/W
----21
2121
21----
Page 23
User Settings
No.
No.No.
No. Service Menu
Service MenuService Menu
Service Menu Sub Menu
Sub MenuSub Menu
Sub Menu
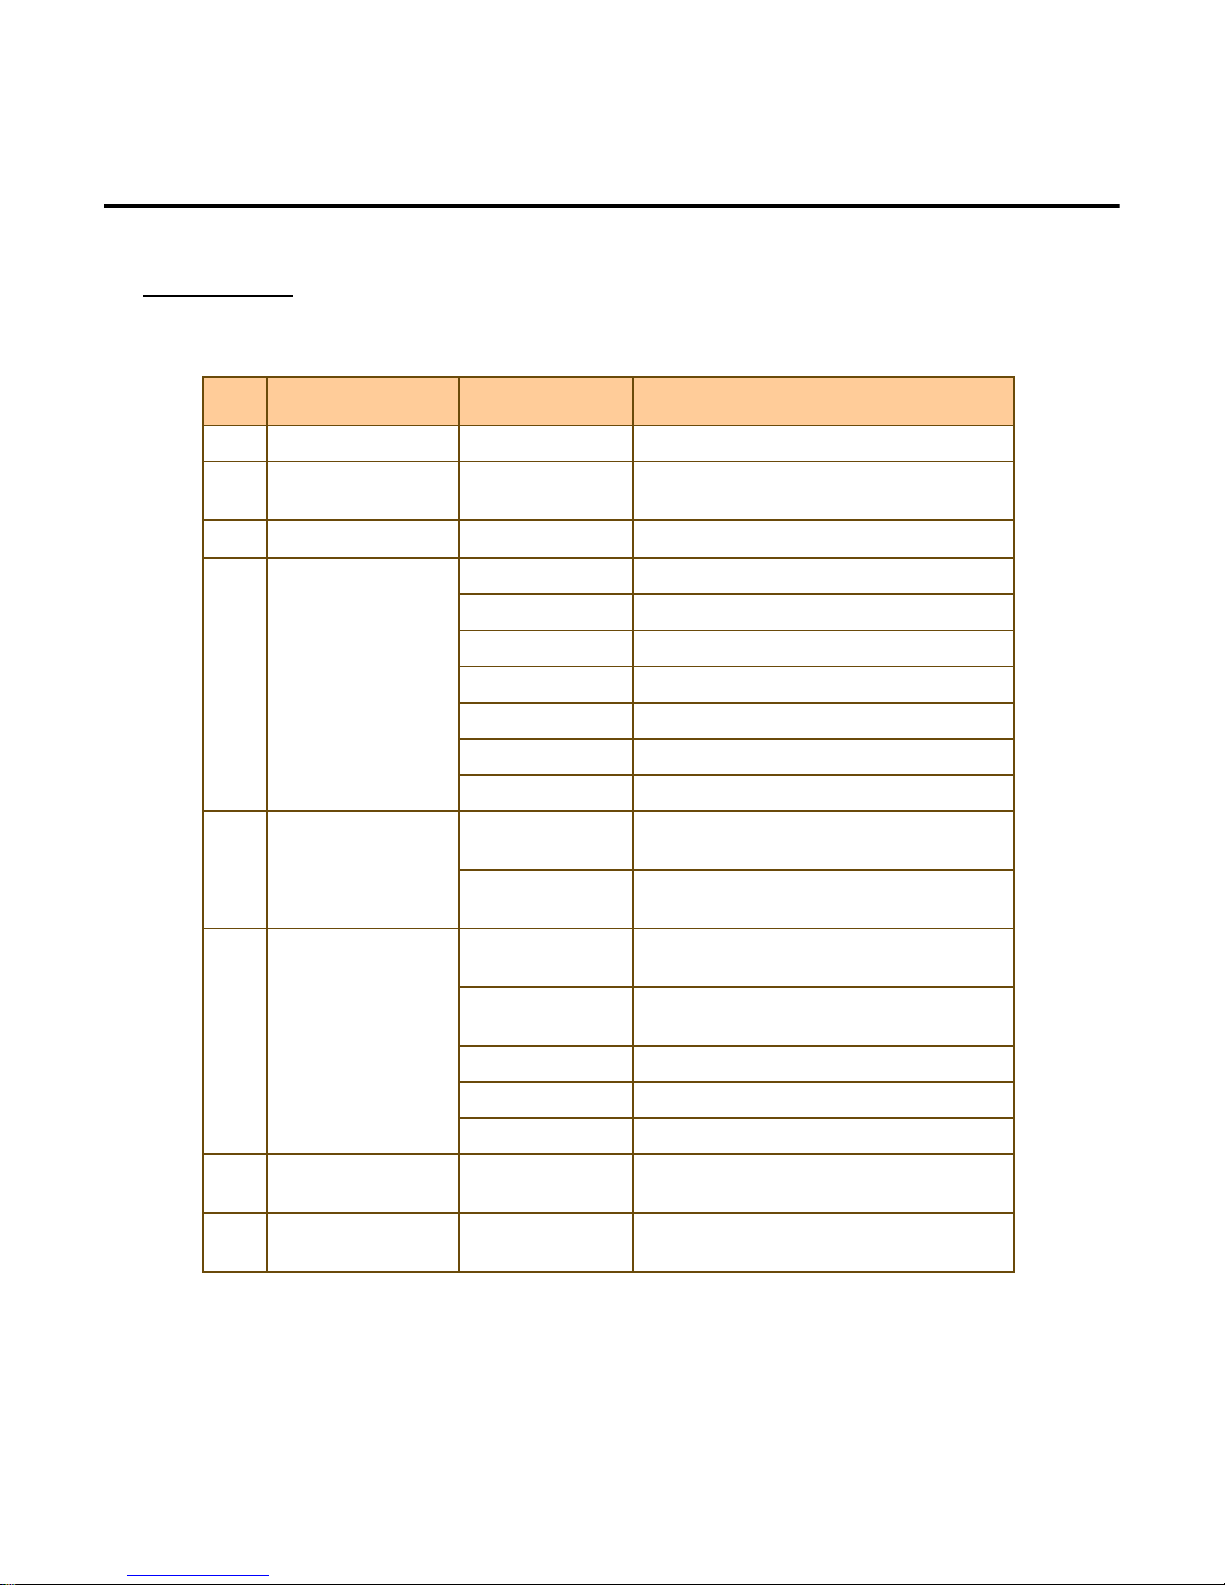
1 Template Version To obtain Template Version
2 Black Box Display the history of this machine
since factory shipment.
3 Sensor To check sensors state
4 Calibration CIS CIS Calibration
CIS-R CIS Calibration
MR
UV UV Sensor Calibration
Tape Tape Sensor Calibration(FS,FSD-only)
Sonar Sonar Sensor Calibration(VS,VSD-only)
Touch screen Touch screen Calibration
5 SNR Mode Normal Displays the more accurate of the serial
numbers in the banknote
Compare Make sure that the serial numbers in the
banknote are the same
6 Recognition Data Image Data To obtain Image Data using USB
(100DPI)
Dimage Data To obtain saved Image Data using
USB(25 DPI)
MR Data To obtain MR Data using USB
Tape Data To obtain Taped Notes Data using USB
UV Data To obtain UV Data using USB
7 Recognition
On/OFF
Turn on/off for CF,MR,UV,IMAGE
8 Recognition Level To set MR, UV, Image, Double, Fitness
Level from 1 to 100 Levels
Service
----22
2222
22----
Page 24
User Settings
No.
No.No.
No. Service Menu
Service MenuService Menu
Service Menu Sub Menu
Sub MenuSub Menu
Sub Menu
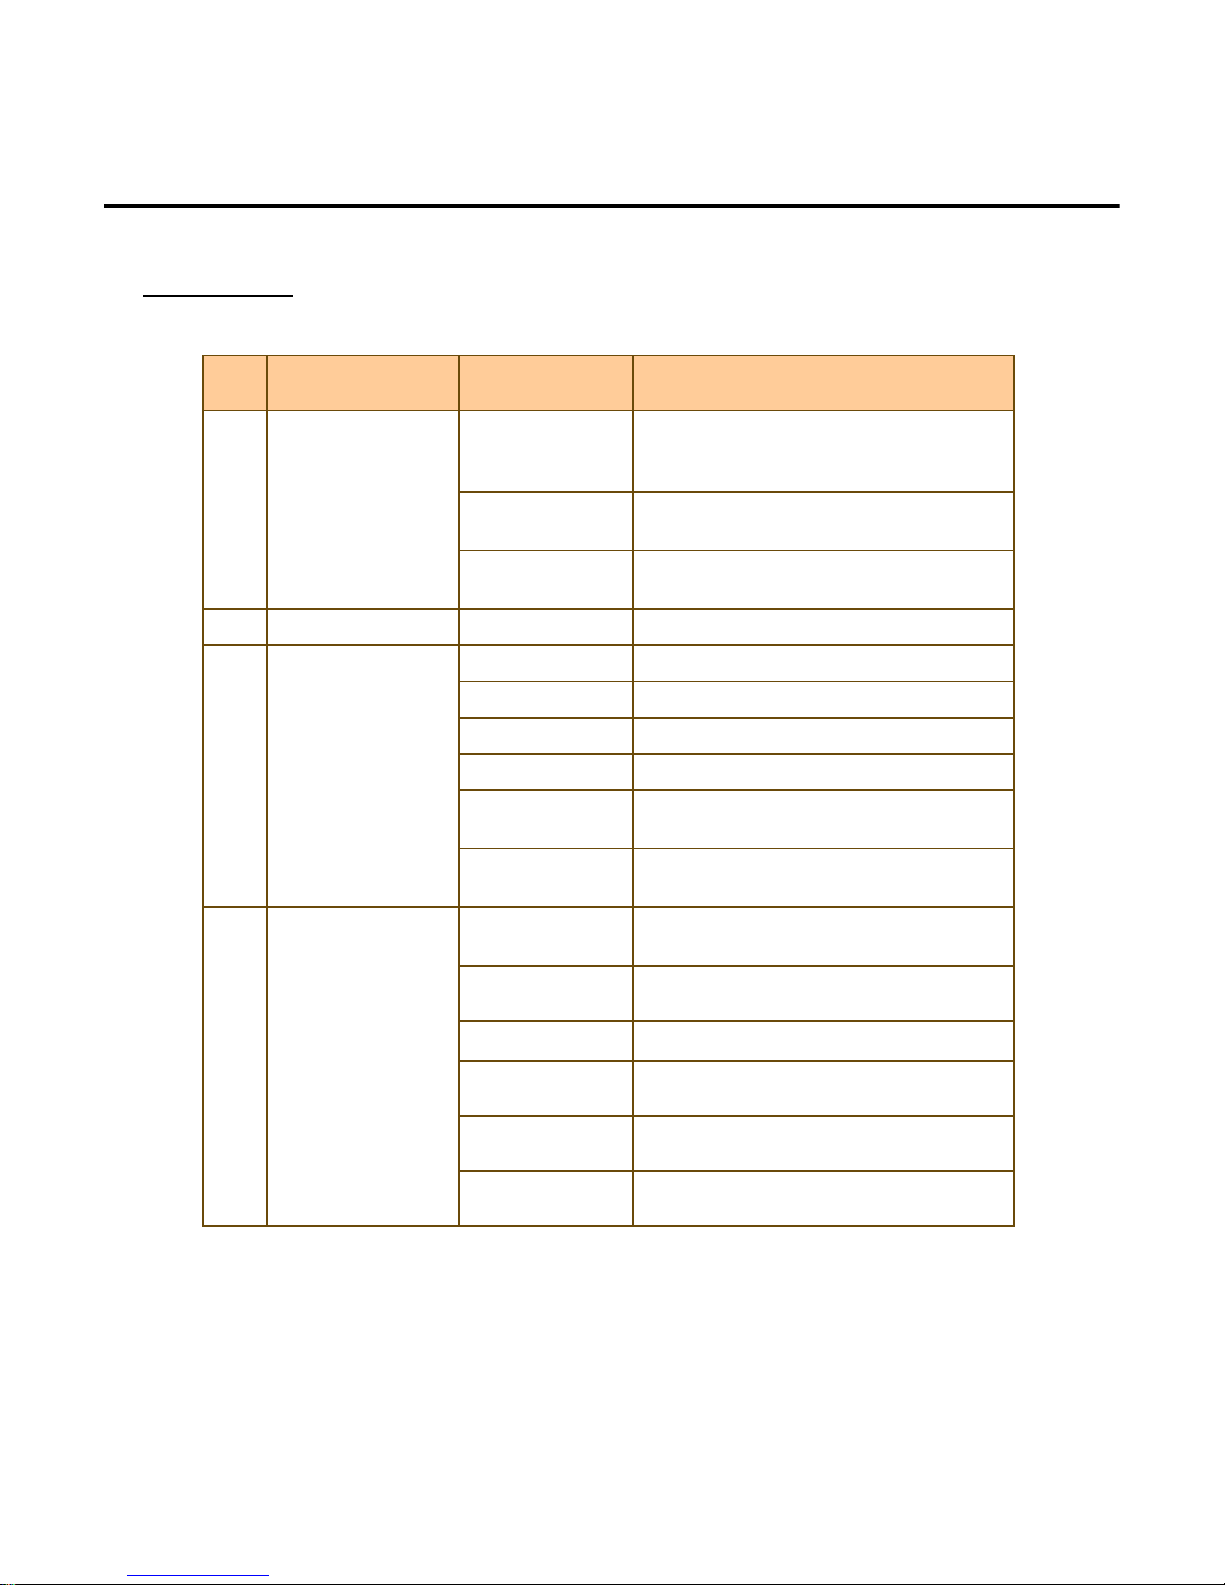
9 Interface Print To set Baud rate, Data Bit, Stop Bit,
Parity. Column, Cutting Code about
Print
Network To set IP, Subnet mask, Gate Way,
DNS, Port, Fixed IP
External Display To set 7 Segment, LCD Single, LCD
Double
10 PW Setting the ID/Password
11 Upgrade Mecha F/W To Upgrade Mecha firmware using USB
Recog F/W To Upgrade Recog firmware using USB
UI S/W To Upgrade UI software using USB
Template To Upgrade Template using USB
Tape F/W To Upgrade Tape firmware using USB
(FS,FSD-only)
Sonar F/W To Upgrade Sonar firmware using USB
(VS,VSD-only)
12 Diagnostic Pick-up Motor To drive the Pick-up motor during 10
sec.
Feed Motor To drive the Feed motor during 10 sec.
Fan Motor To drive the Fan motor during 10 sec.
Swing Selector Turn it on and off repeatedly 5 times.
Circulation To drive every motor.
Count Emit notes with Stack or Reject
Service
----23
2323
23----
Page 25
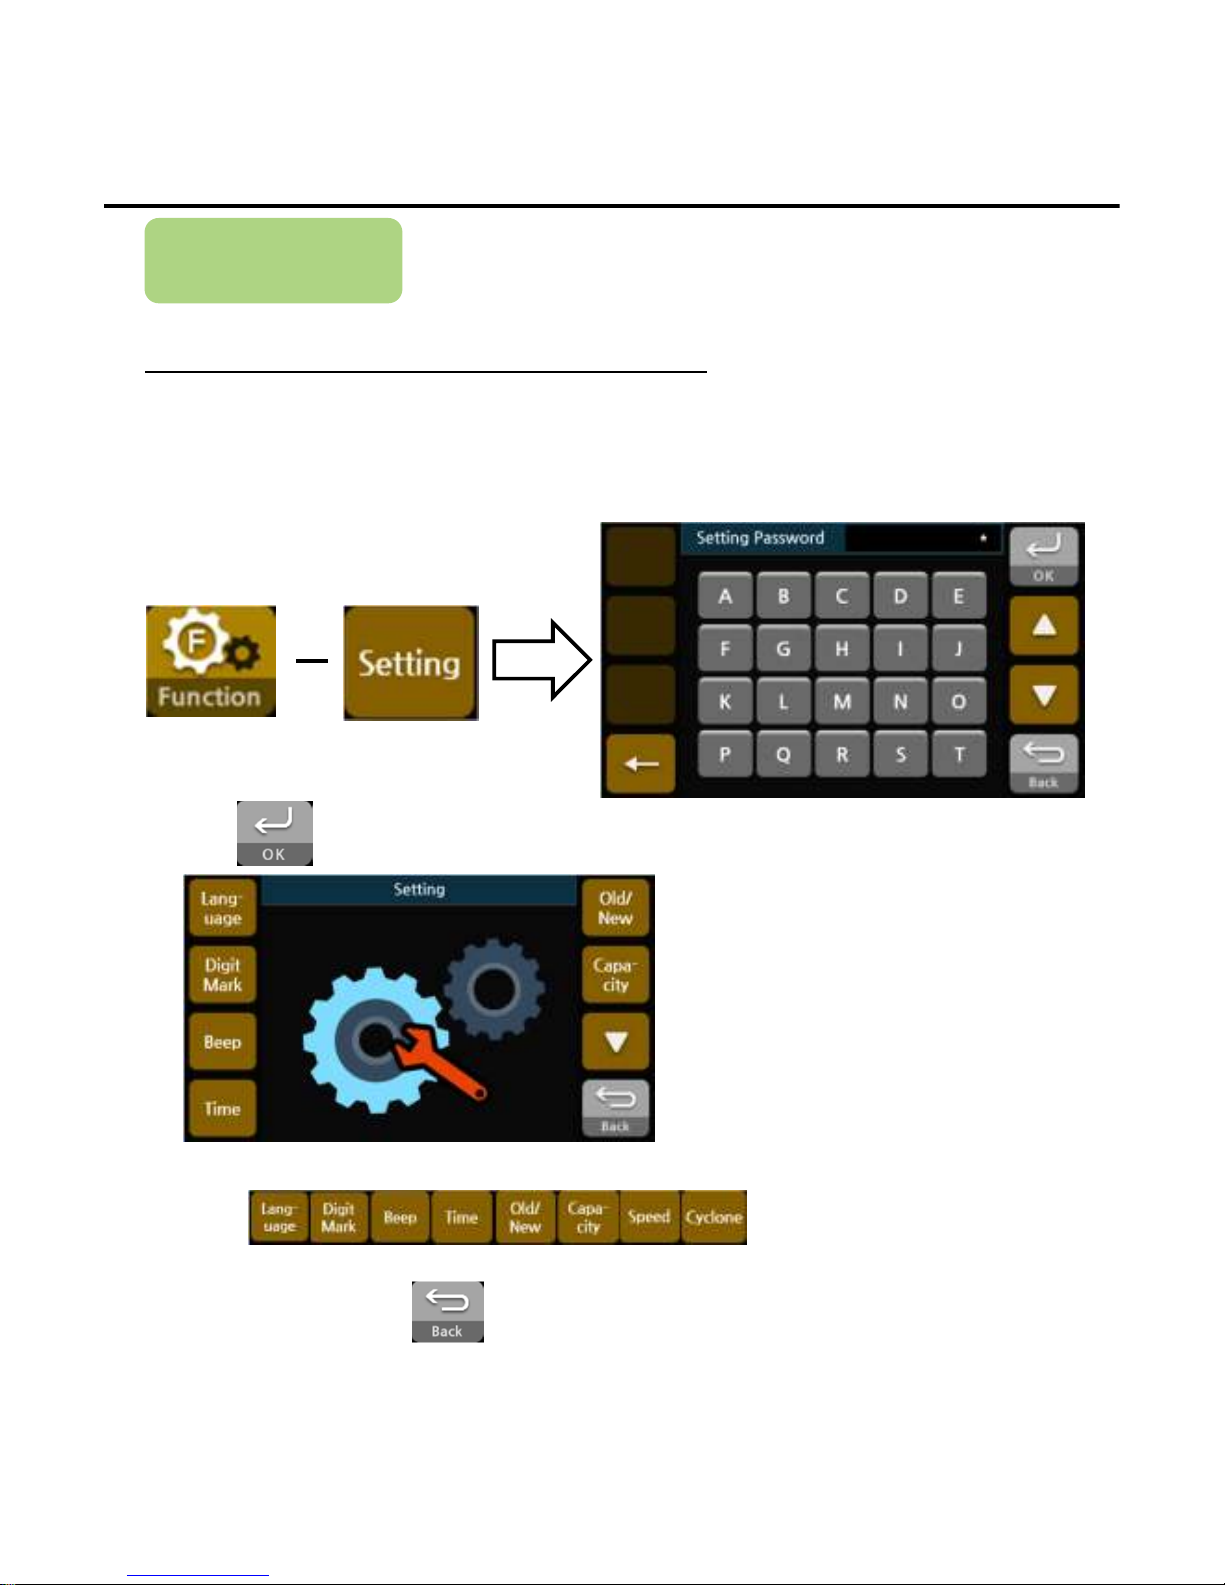
Settings
How to Change the Settings
Each setting item has to be set prior to use
1) Press the buttons below to enter the setting password menu
2)Press after press passwords.
4)When finishing, press the button to exit the setting menu.
3)Press button to set the each setting.
User Settings
----24
2424
24----
Page 26
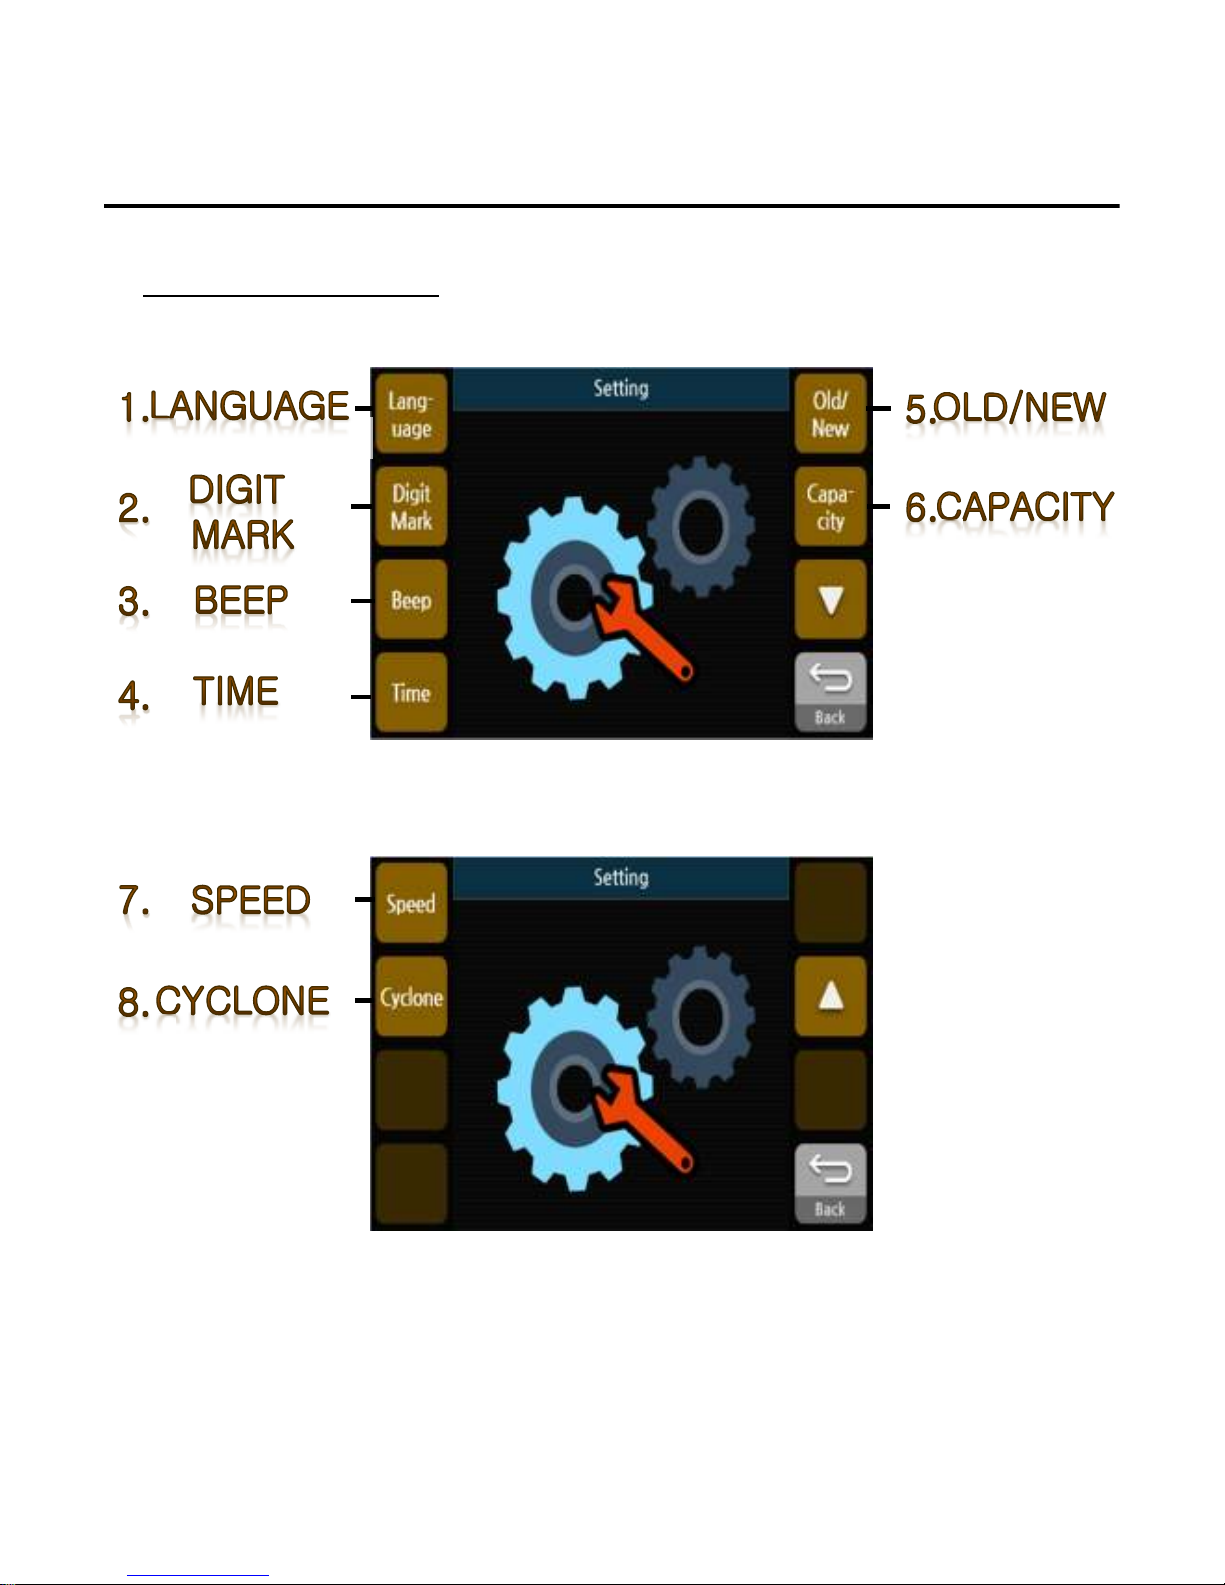
List of Settings
User Settings
----25
2525
25----
Page 27
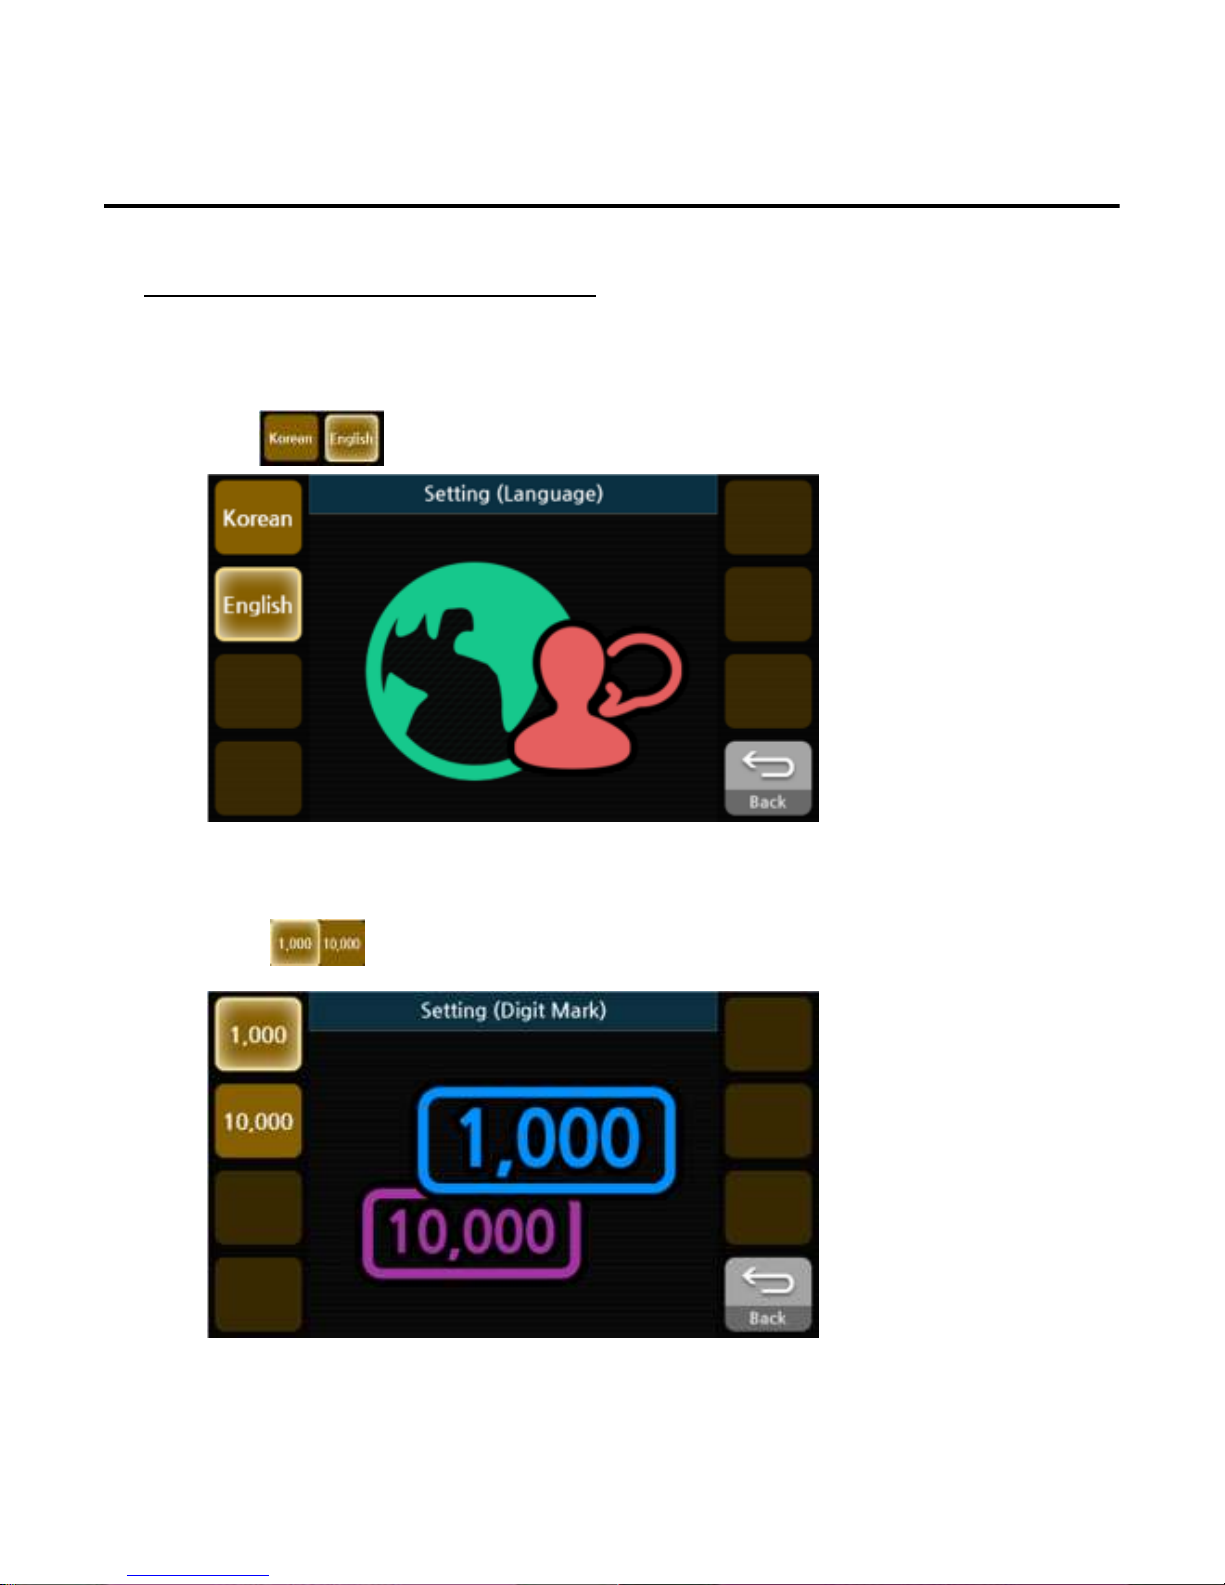
Description of Settings
1. Language
Select language for the display. Choose from English or, another registered language.
1)Press button to select language.
2. Digit Mark
Select the digit mark to display the amount of money.
1)Press button to select digit mark style.
User Settings
----26
2626
26----
Page 28
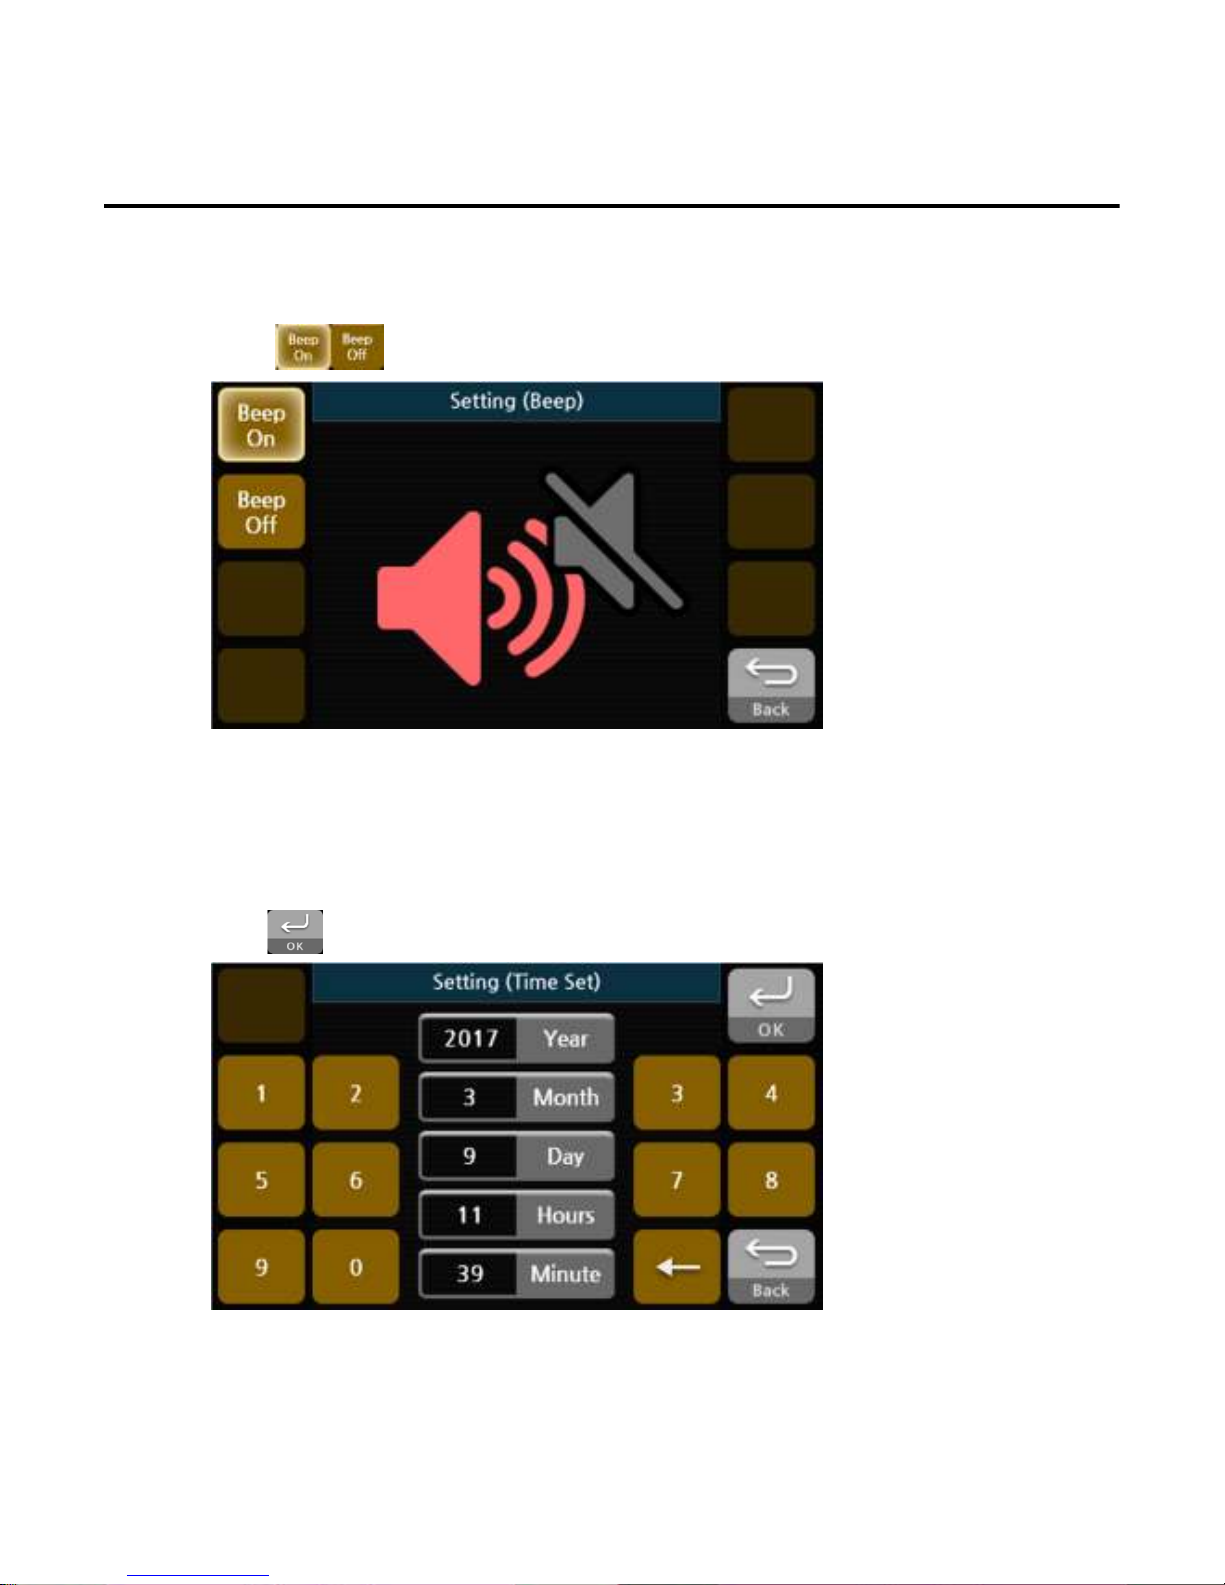
3. Beep
4. Time
Turn ON or OFF the Beep. If beep setting is ON, the beep tone will be generated when button is
pressed.
1)Press button to select turn on or off.
Setting the date and time.
1)Press date or time button to select item.
2)Press numbers to adjust data or time.
3)Press button to set.
User Settings
----27
2727
27----
Page 29
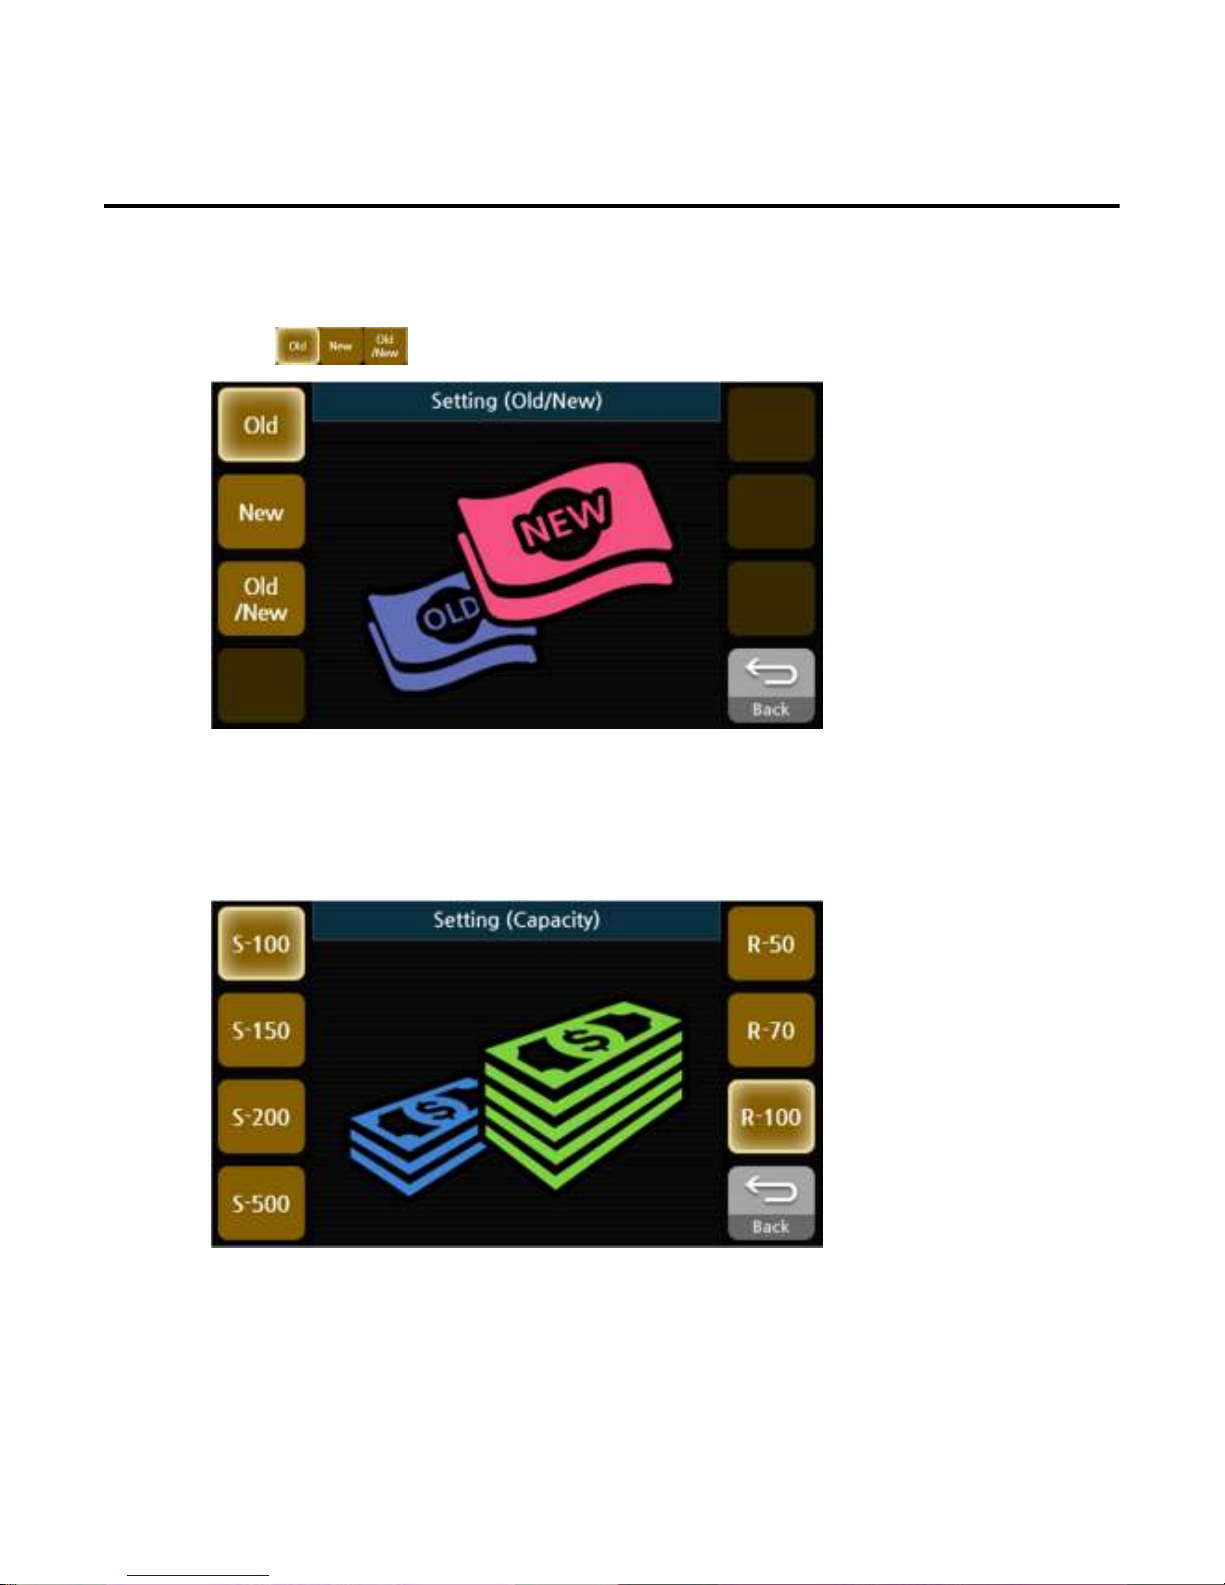
5. Setting Old/New
6. Setting Capacity
Counts separately between the old banknotes and the new ones.
1)Press button to select setting.
Sets the maximum capacity of the stacker and reject.
1)Press stacker capacity button and reject capacity button.
User Settings
*If select S-500 ,stacker should be emptied every 200 notes.
----28
2828
28----
Page 30
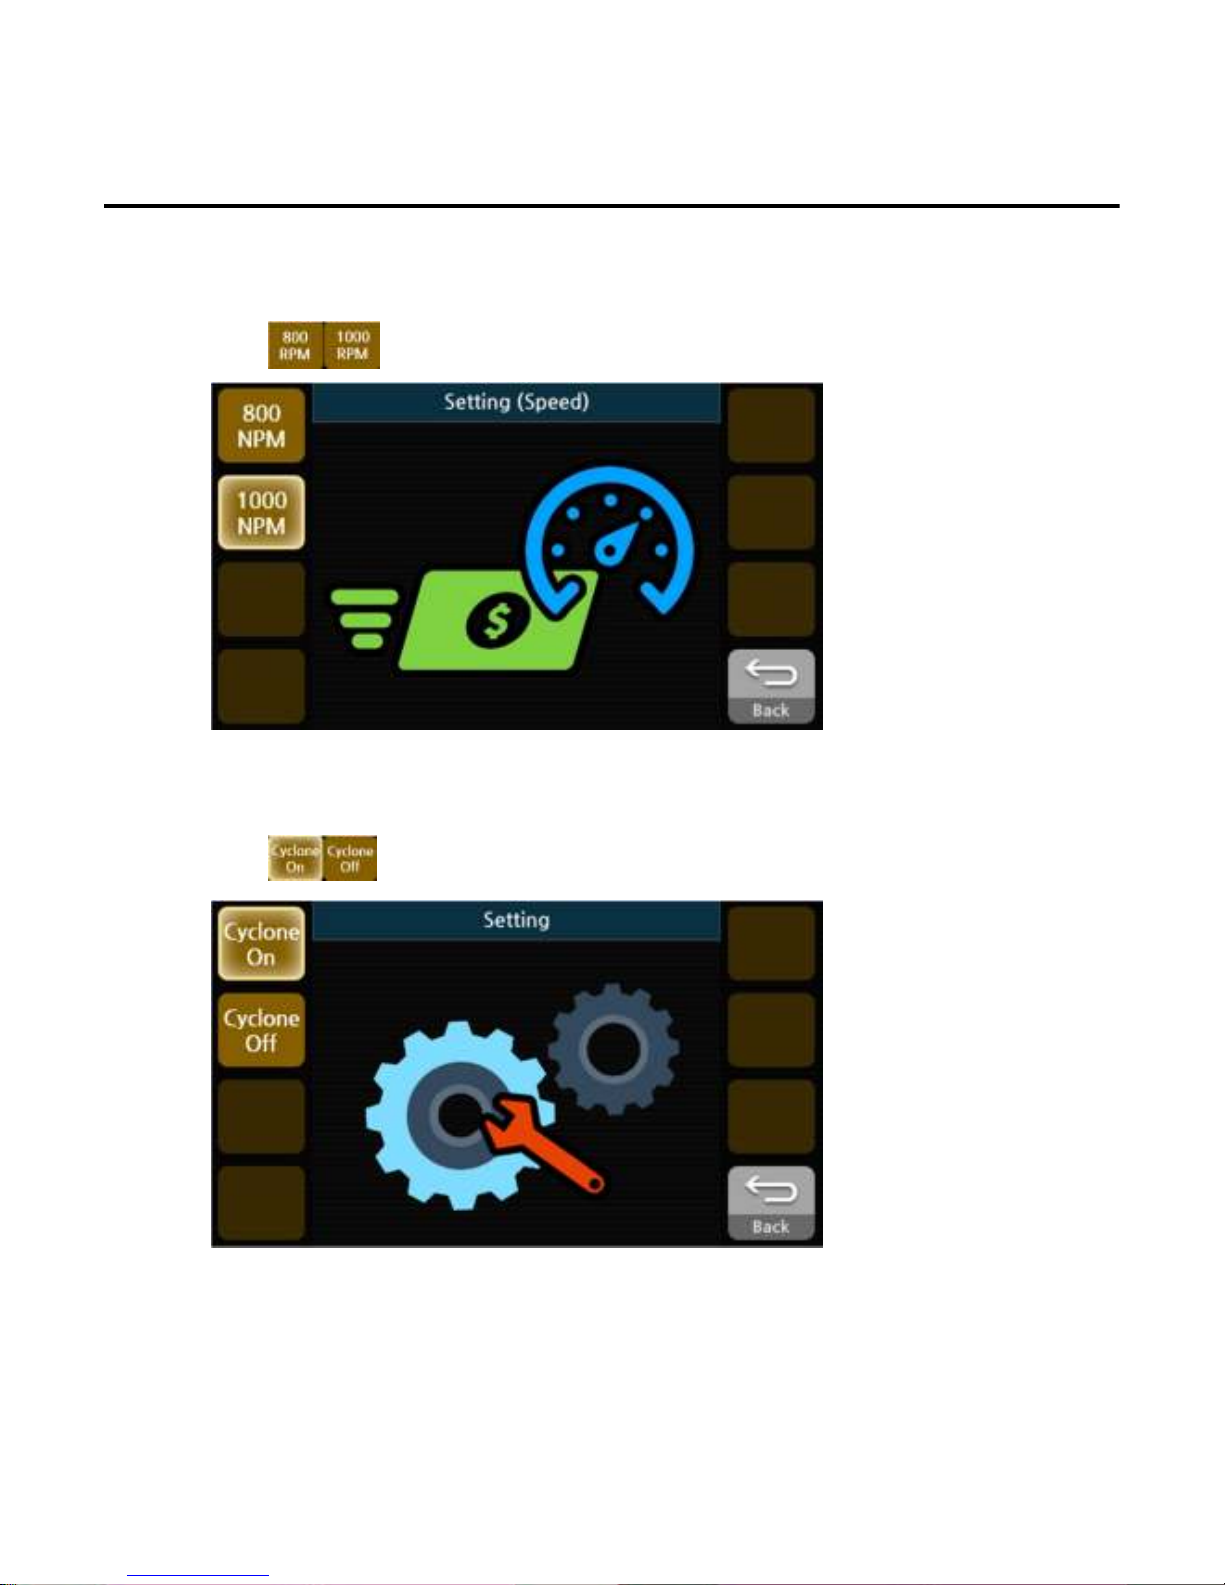
7. Setting Speed
8. Setting Cyclone
The EE7 offers with three speeds; 800 / 1000 NPM (Notes per Minute)
1)Press button to select EE7 speed.
Turn ON or OFF the Cyclone. If Cyclone setting is ON, dusts collected in dust pocket during the
operation.
1)Press button to select turn on or off.
User Settings
----29
2929
29----
Page 31

User Settings
----30
3030
30----
Page 32
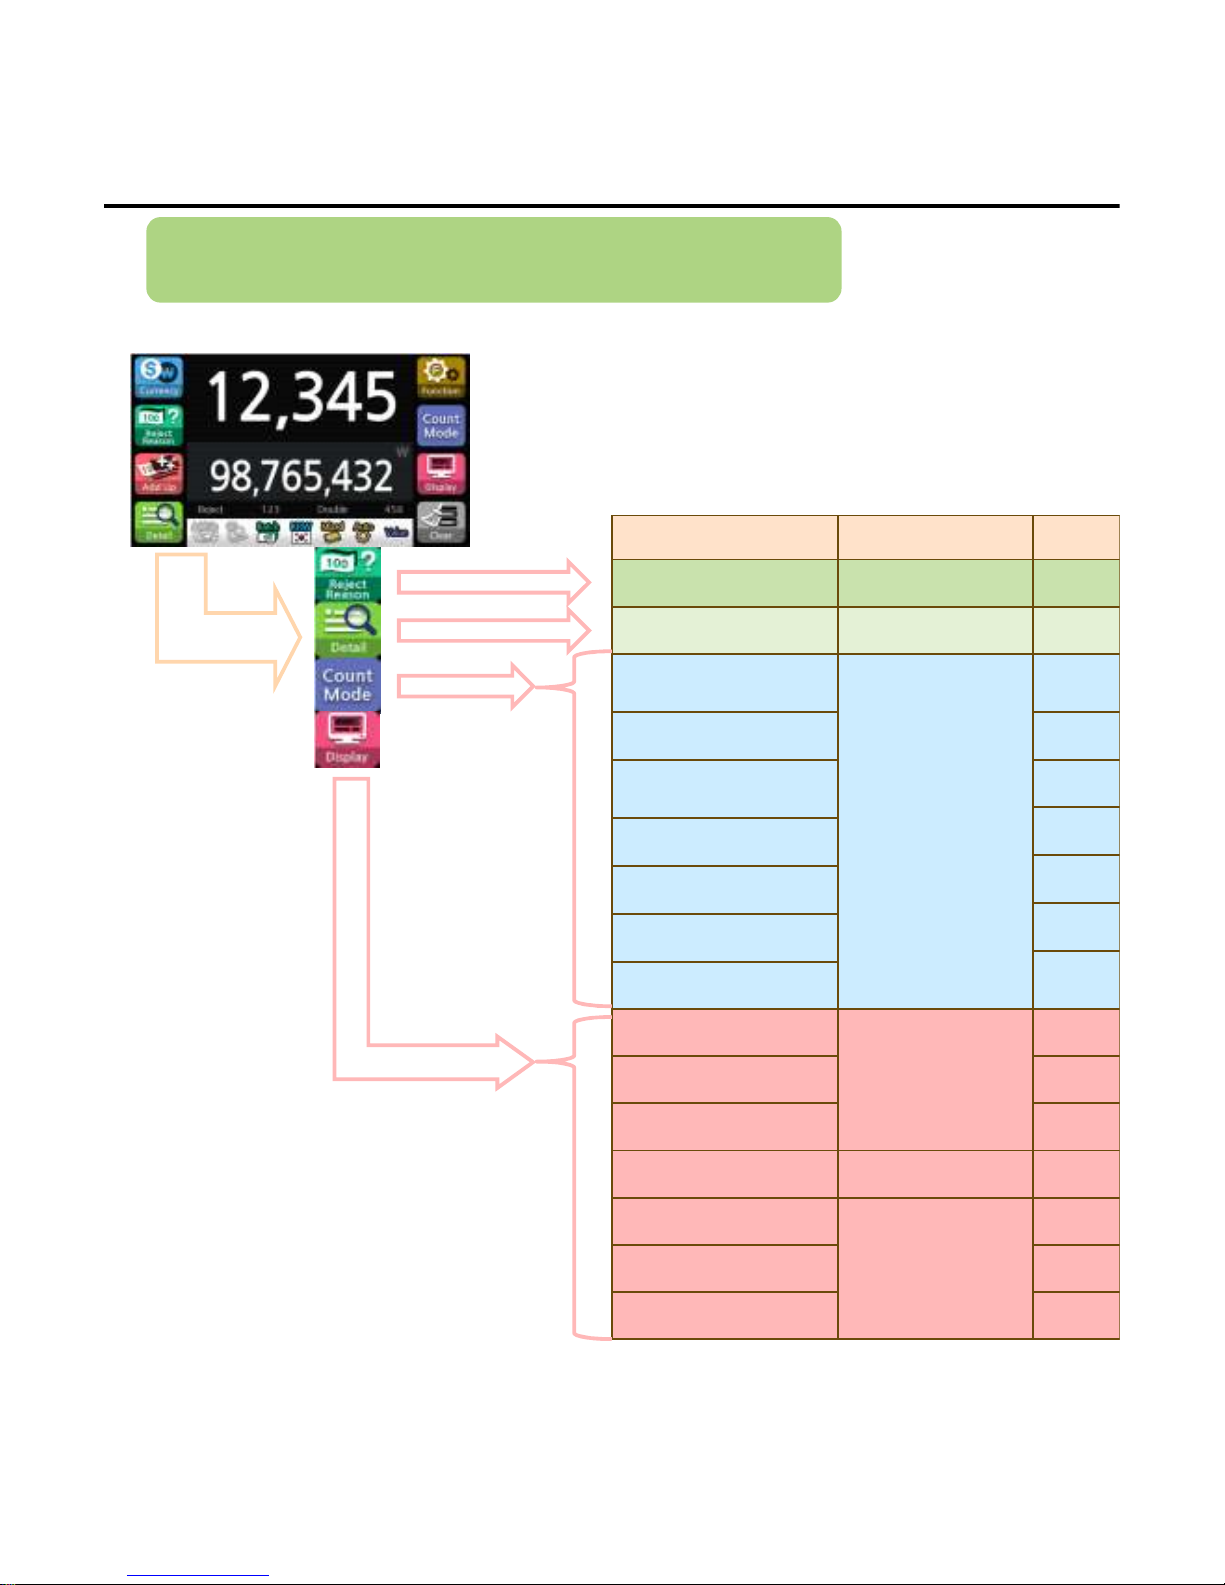
Description of each setting can be found on the following pages
Default setting
Default settingDefault setting
Default setting page
pagepage
page
Reject reason none 32
Detail none 33
Count
Value
36
Value 36
Face 37
37
Orient
38
Face & Orient
38,39
Fitness Sort
39
Serial Number
Serial No info.
none
42
Black List 43
Count Log 44
Sort up/down down 44
Total
none
45
Sub Total 45
Grand Total 46
Summary of Operation
Operation
----31
3131
31----
Page 33
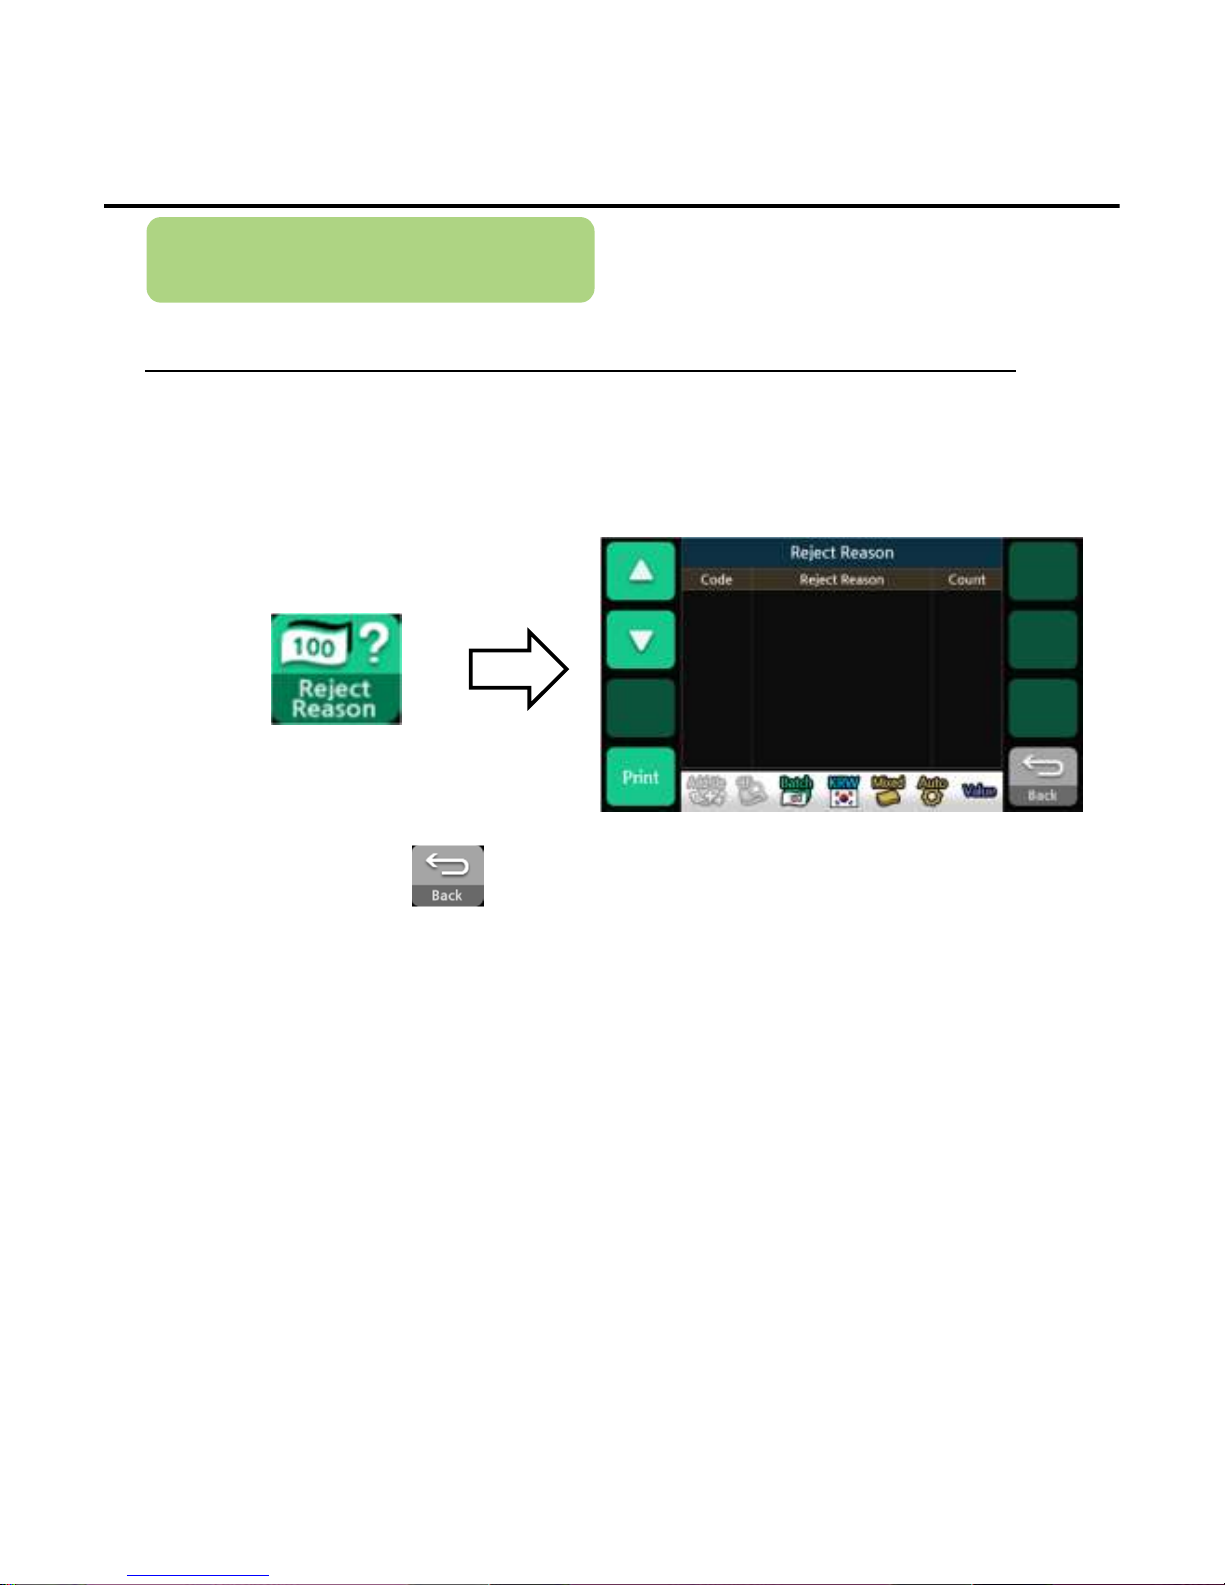
Reject Reason
To display the reason of rejected banknotes
2) When finishing, press the button to exit the reject reason menu.
*If an external printer is connected and enabled, pressing Print button will transmit the reject reason data to the
printer
It displays the reject codes, reject reasons and the number of the rejected up
to the reject code
1) Press the button below to enter the reject reason menu.
Operation
----32
3232
32----
Page 34
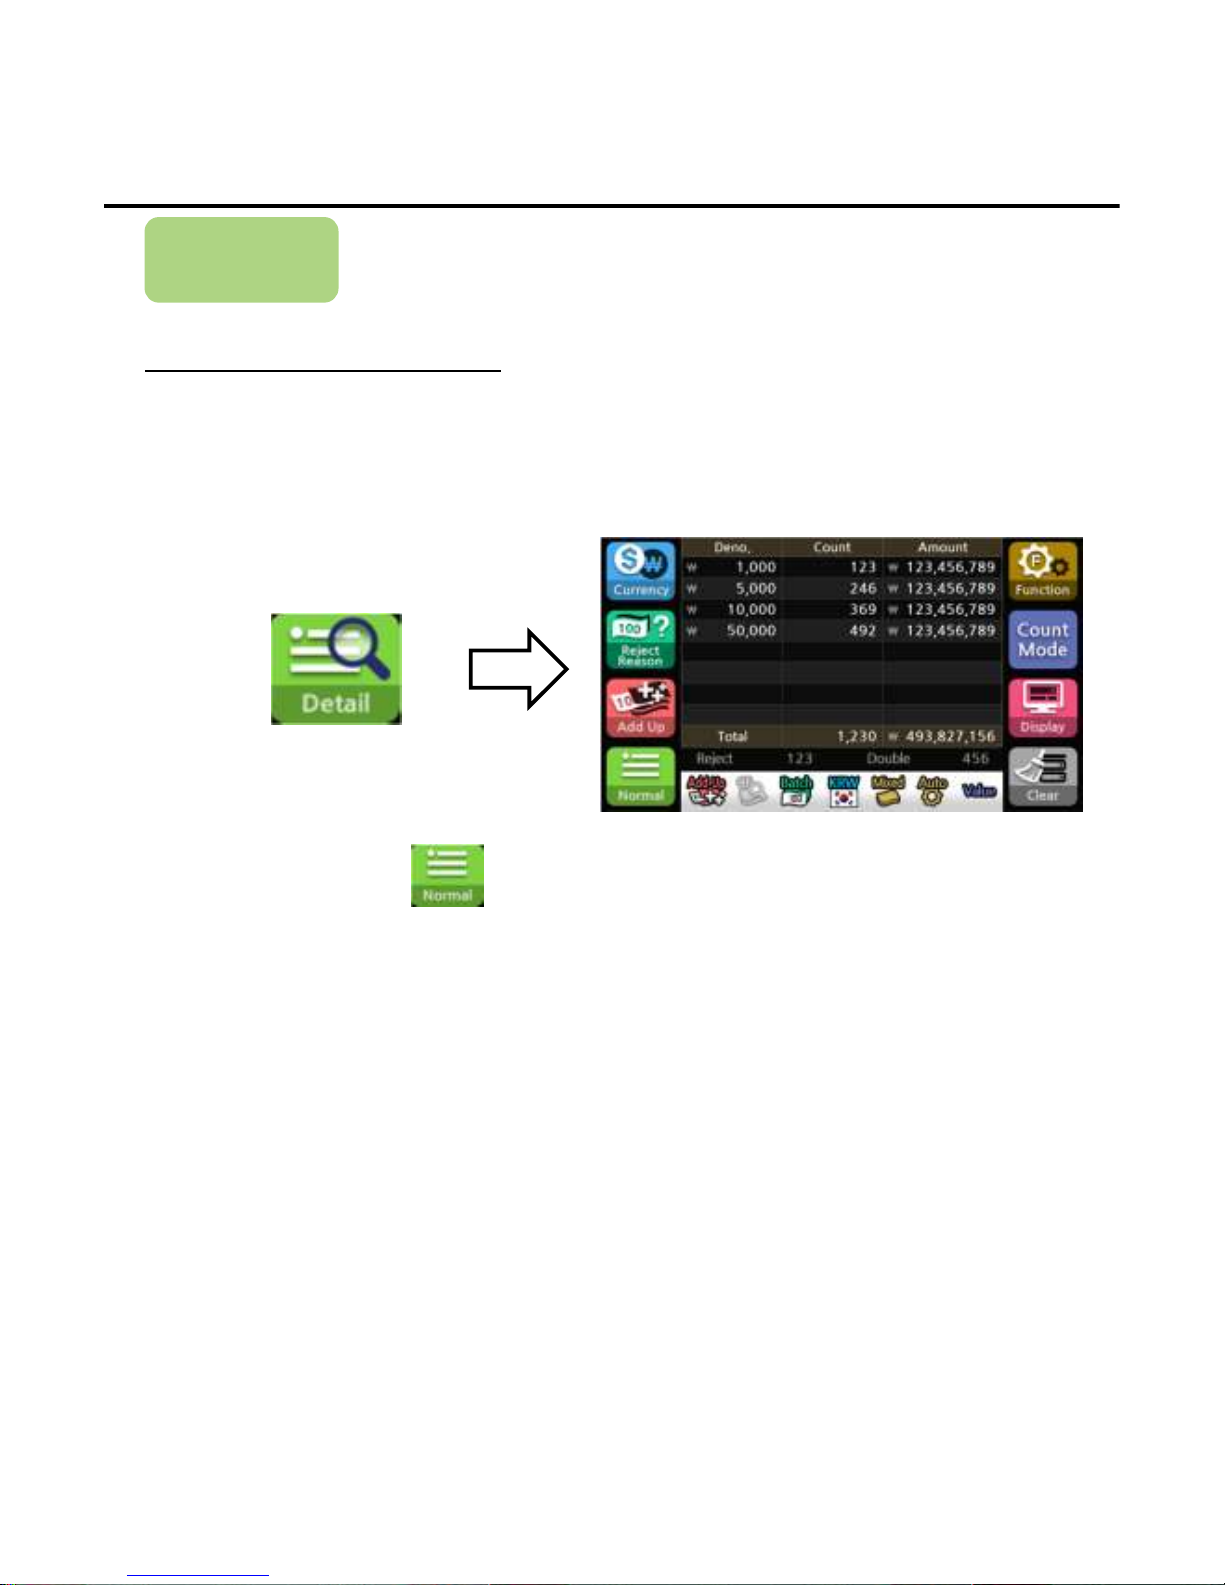
Detail
Confirm the count
The table shows the denomination, the number of each denomination and the
amount of the summation value to each denomination.
1) Press the button below to confirm the detail counting results.
2)When finishing, press the button to exit the detail table.
*When you start counting on the detail mode, it automatically switches to normal mode. When the counting is
finished, it returns to the detail mode again.
Operation
----33
3333
33----
Page 35
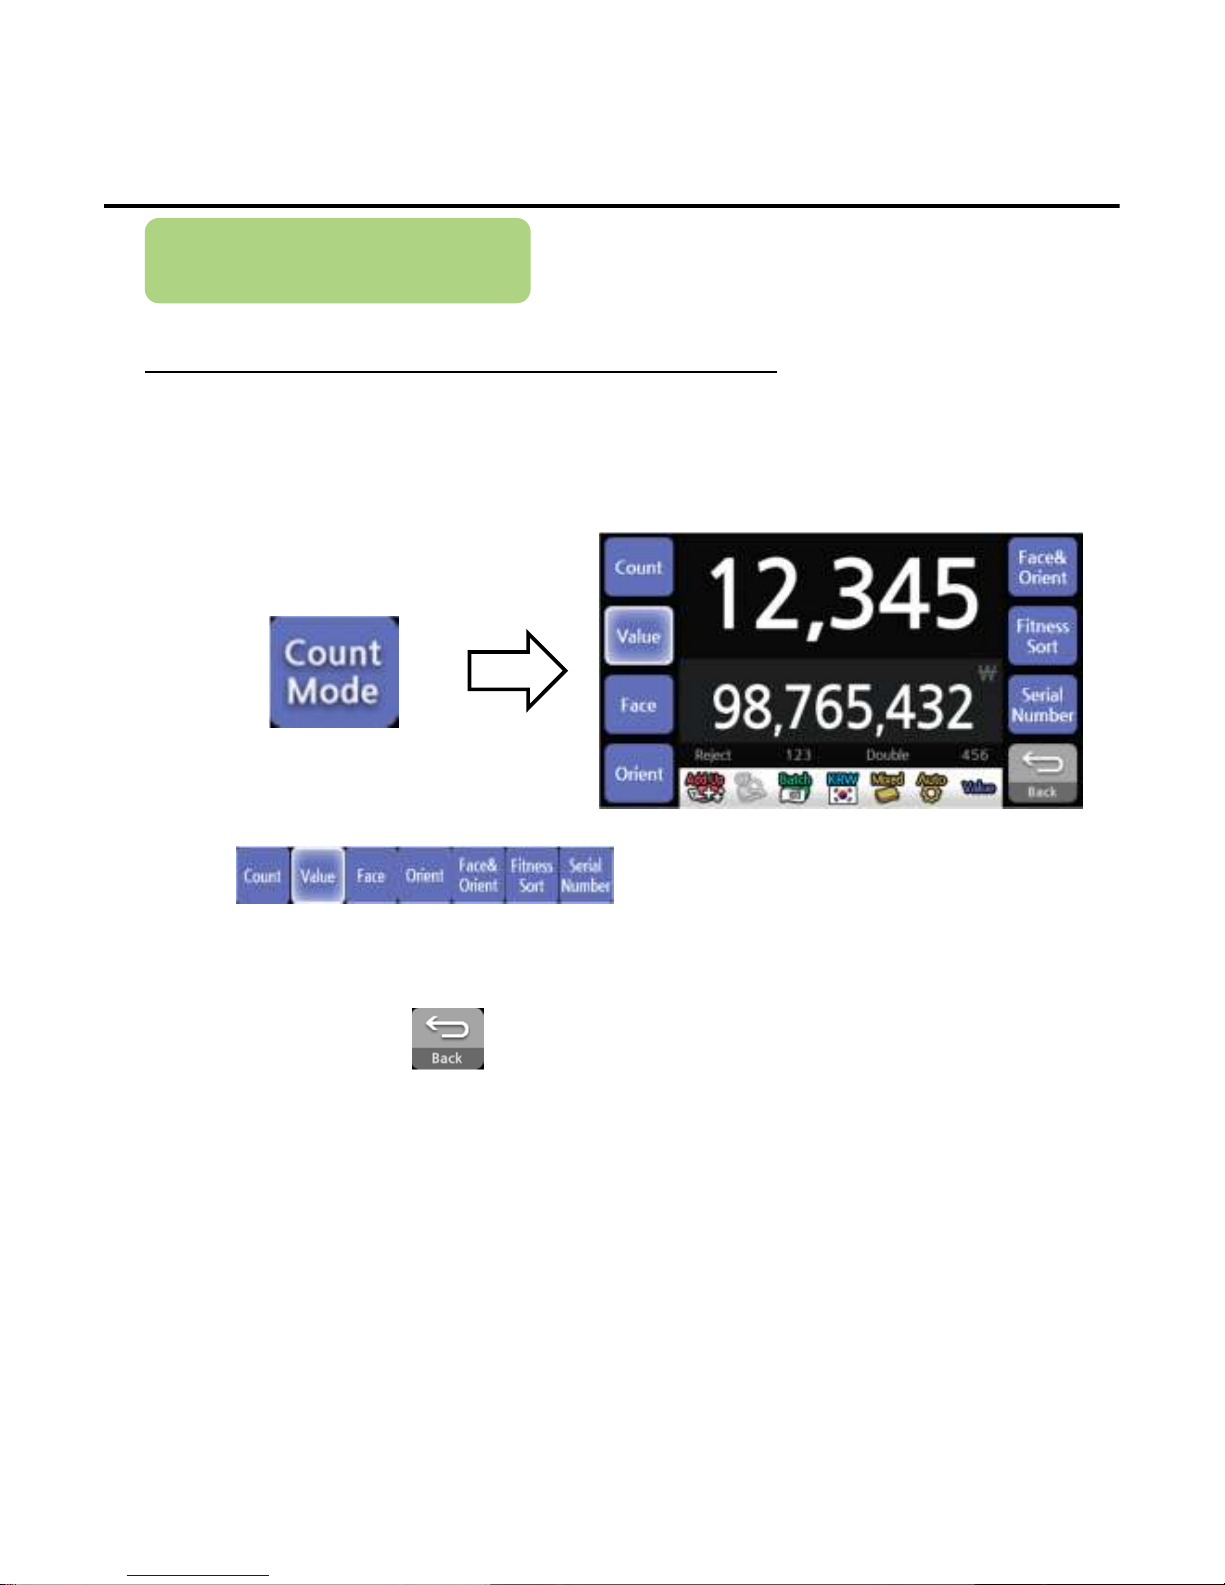
Count Mode
How to Select the Count Option
Each count mode has to be set prior to use
1)Press the button below to enter the count mode menu
3)When finishing, press the button to exit the count mode menu.
2)Press button to set the each setting.
Operation
----34
3434
34----
Page 36
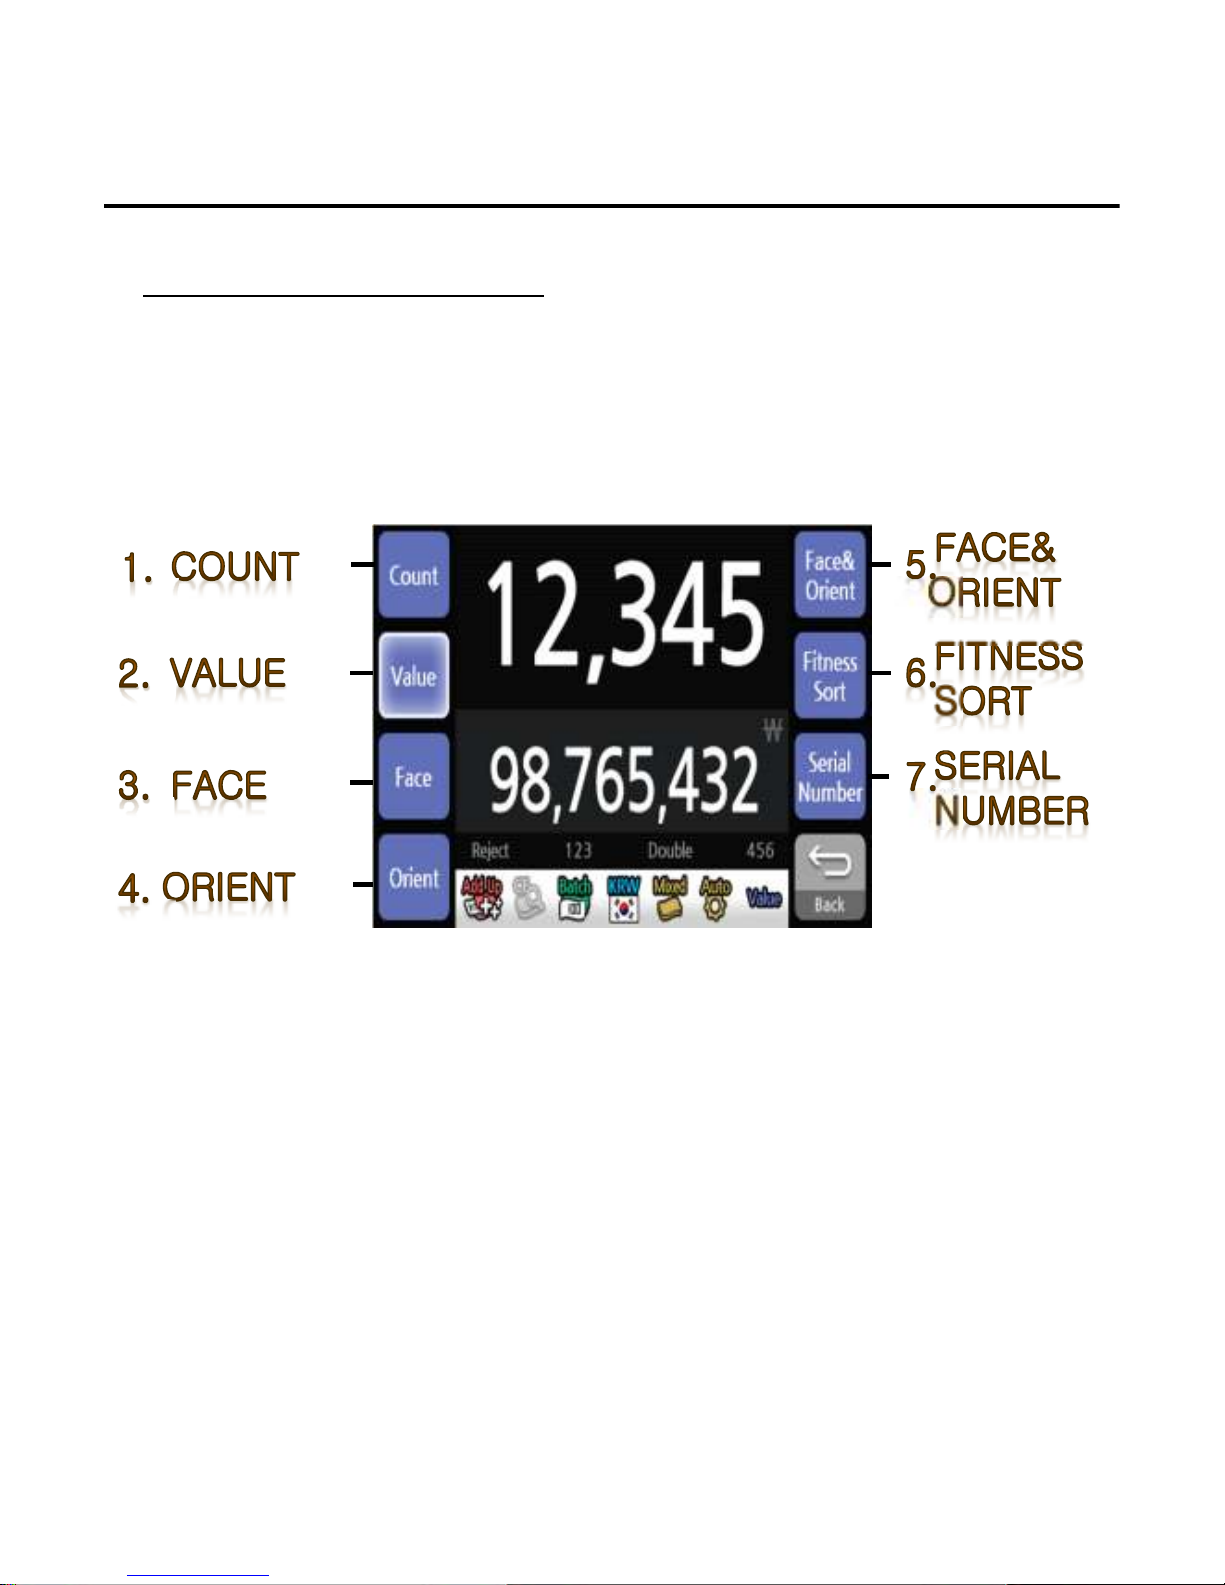
List of Count Modes
Operation
----35
3535
35----
Page 37
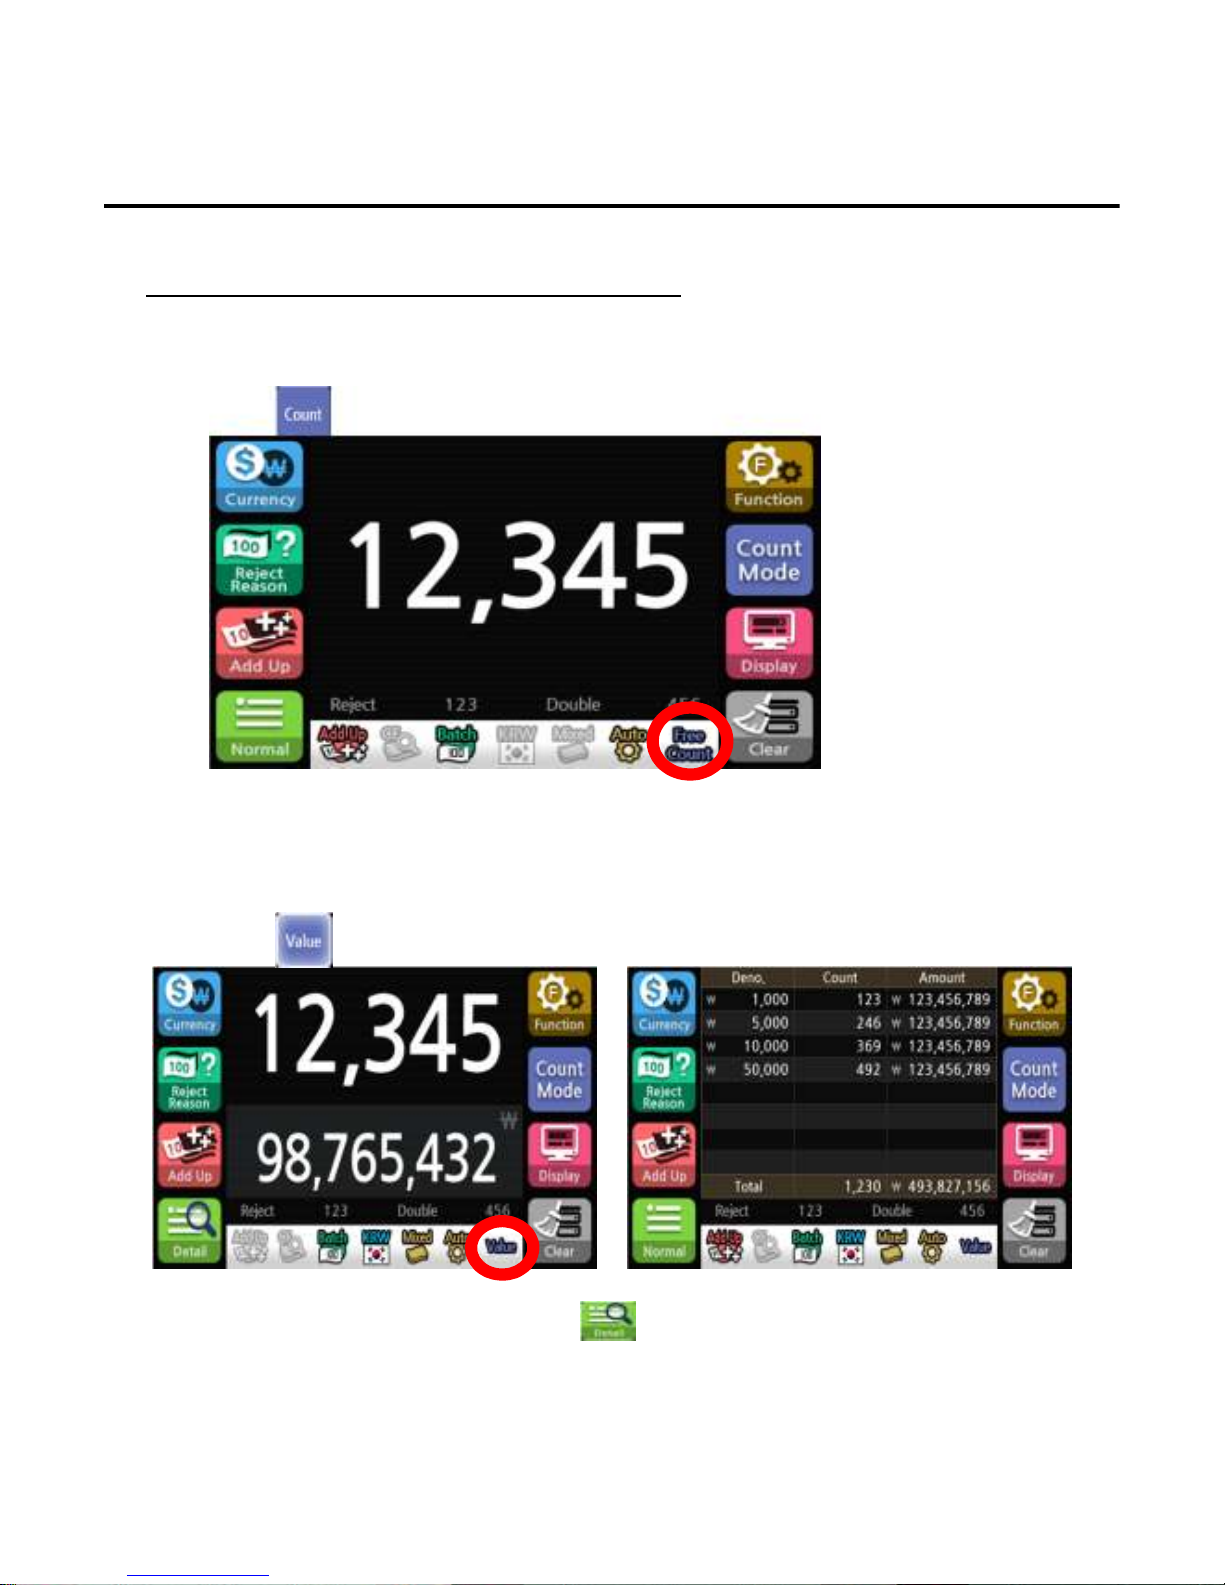
Description of Count Mode
1. Count
To count the total number of banknotes without recognition of denomination.
1)Press button to select free count mode.
2. Value
To count the total number of banknotes with recognition of denomination.
1)Press button to select value mode.
*The Value symbol will appear on the screen to indicate the selected state.
*To confirm the denomination and count, press button.
*The Free count symbol will appear on the screen to indicate the selected state.
*The count mode doesn’t offer the detail menu.
Operation
----36
3636
36----
Page 38
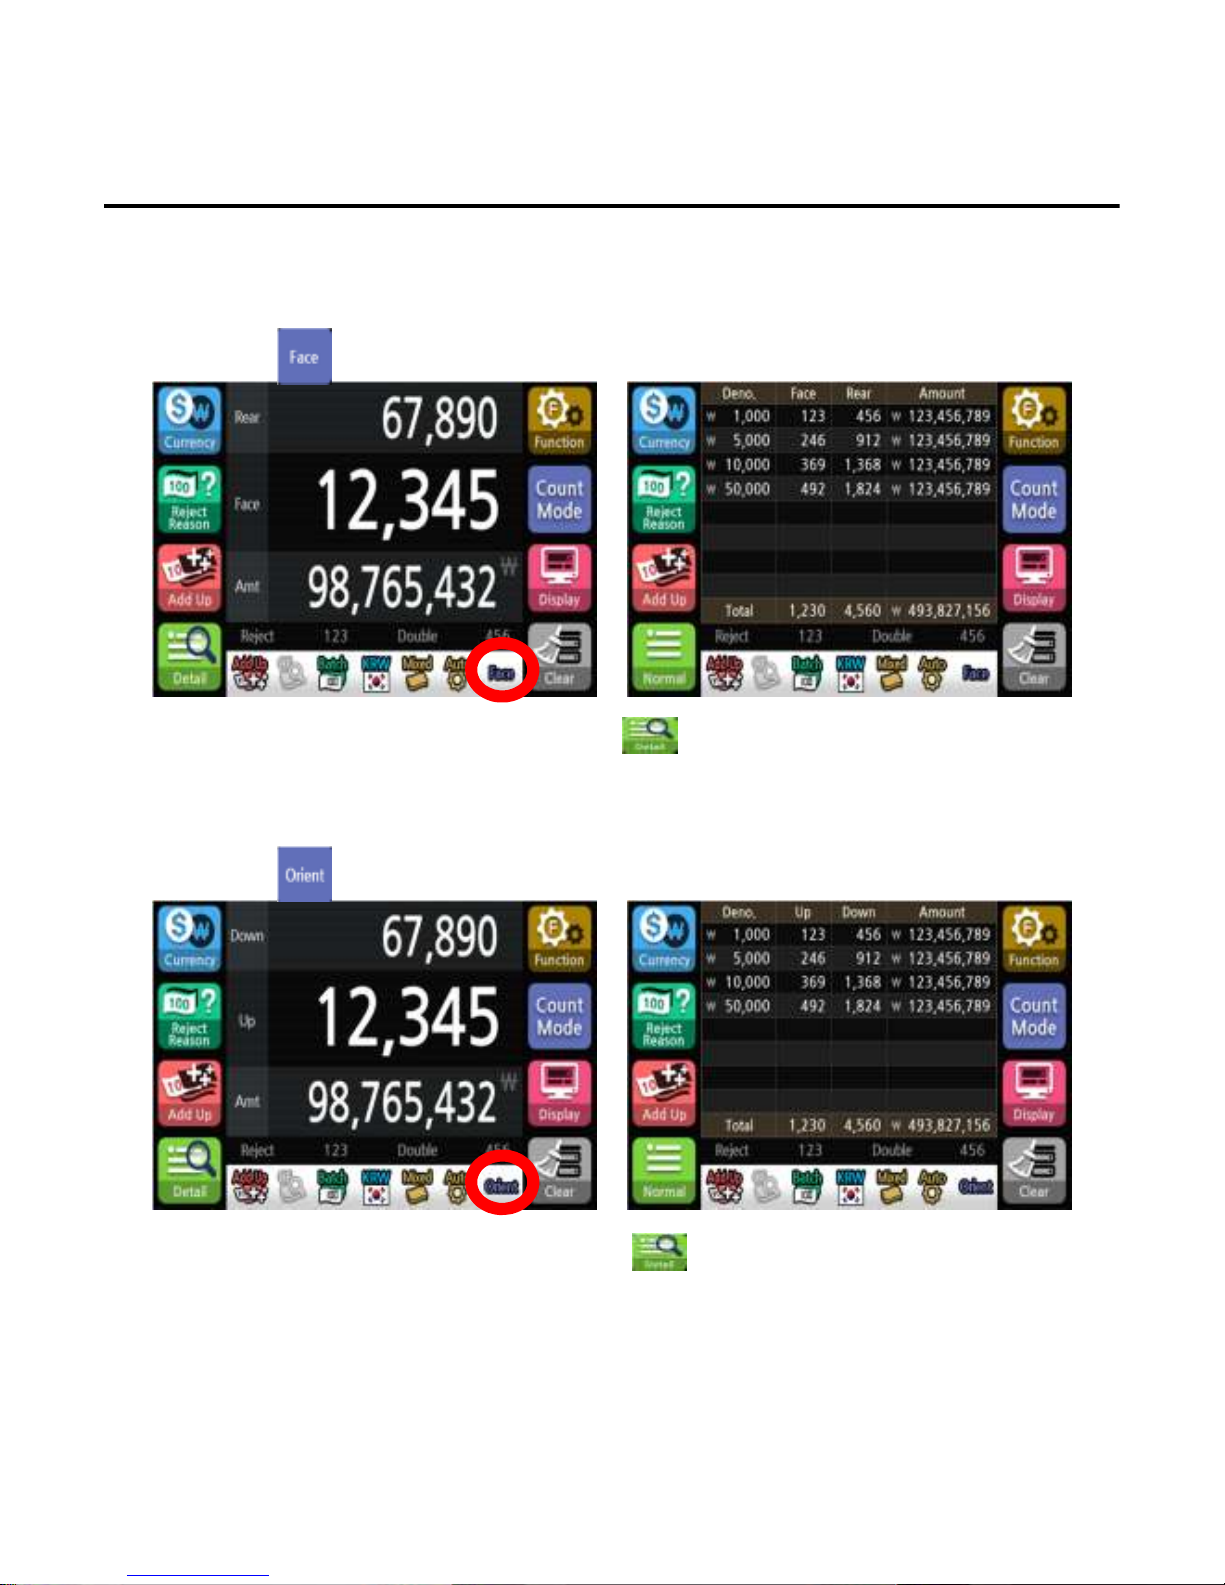
3. Face
4. Orient
To count by same side(front/back) of the banknote which is counted at first. If the note is not the same
side, the machine will send the banknote to the reject pocket.
1)Press button to select face mode.
To count by same direction(UP/Down) of the banknote which is counted at first. If the note is not the same
direction, the machine will send the banknote to the reject pocket.
1)Press button to select orient mode.
*The face symbol will appear on the screen to indicate the selected state.
*To confirm the denomination and face count, press button.
*The Orient symbol will appear on the screen to indicate the selected state.
*To confirm the denomination and orient count, press button.
Operation
----37
3737
37----
Page 39
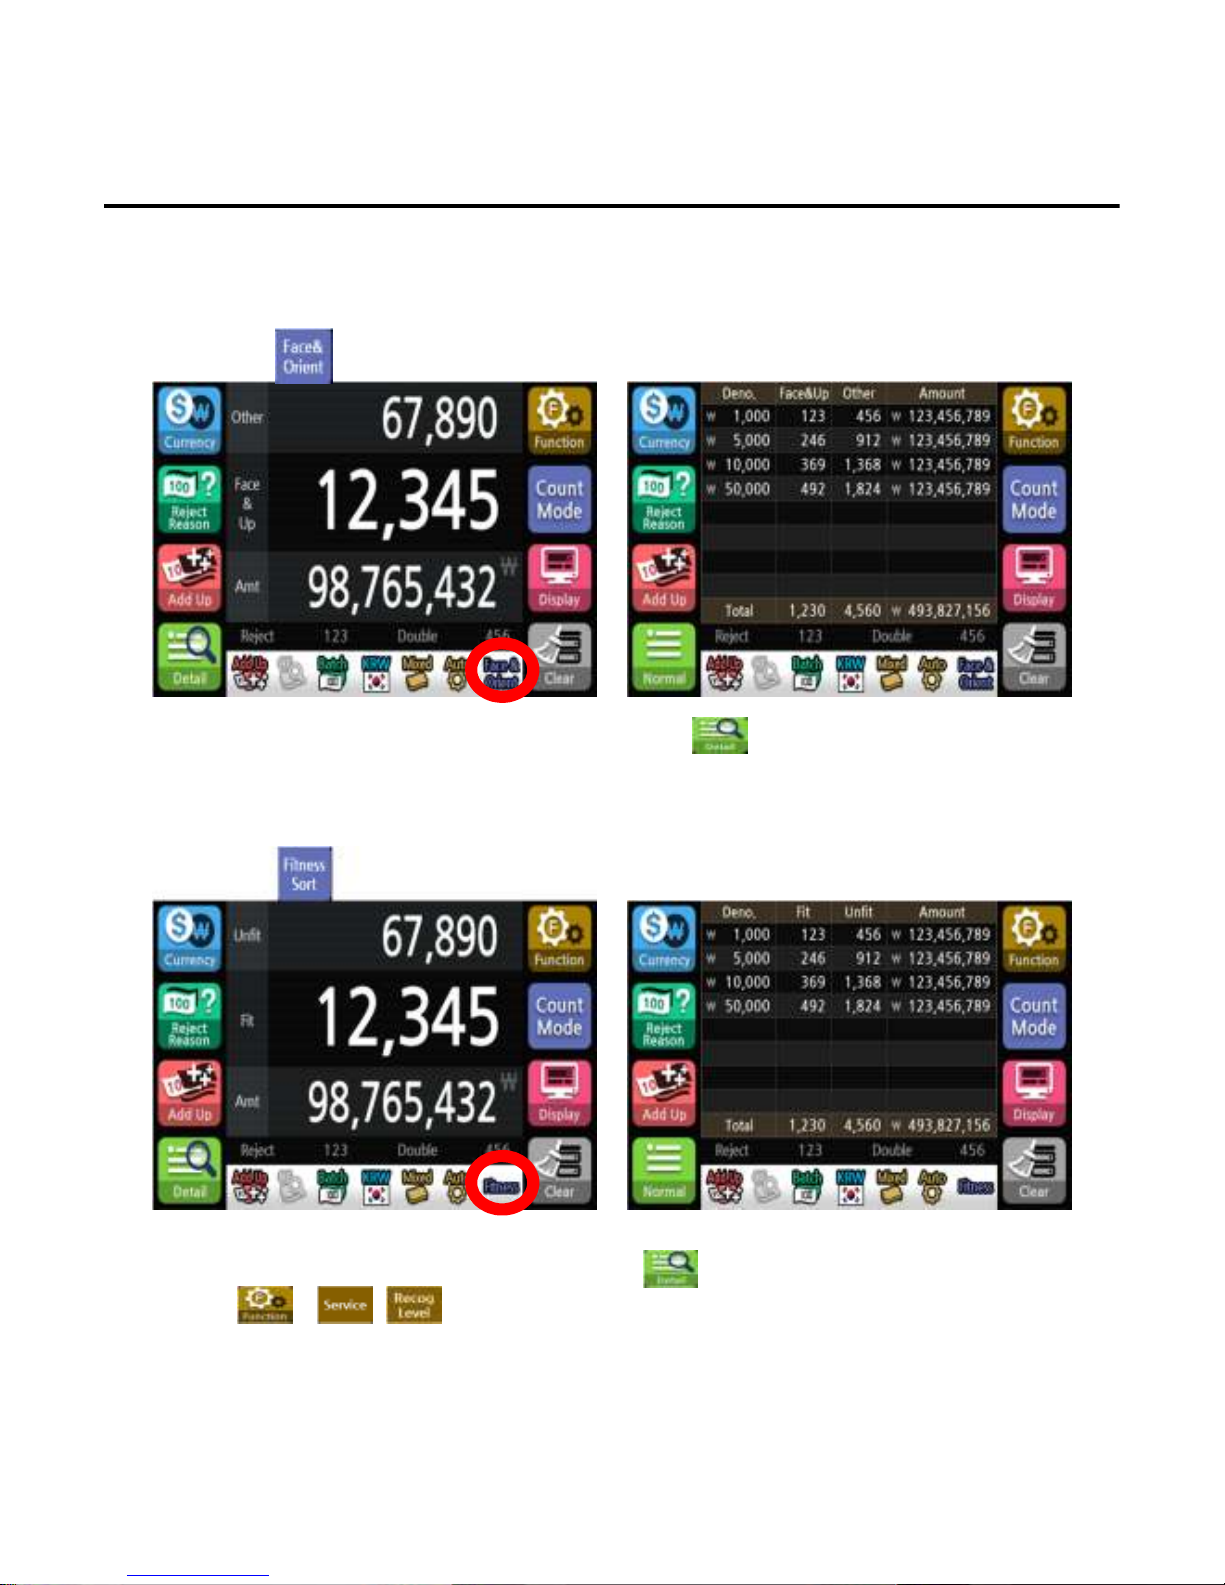
5. Face & Orient
6. Fitness Sort
To count by same side(front/back) and same direction(UP/Down) of the banknote which is initially counted.
If the note is not the same side and direction, the machine will send the banknote to the reject pocket.
1)Press button to select Face & Orient mode.
To sort out fit and unfit banknotes separately.
1)Press button to select Fitness Sort mode.
*The Face & Orient symbol will appear on the screen to indicate the selected state.
*To confirm the denomination and face & orient count, press button.
*The Fitness symbol will appear on the screen to indicate the selected state.
*To confirm the denomination and Fitness count, press button.
*Press - - button to select the level of fitness.
*This mode is not available on EE7 VS model.
Operation
----38
3838
38----
Page 40
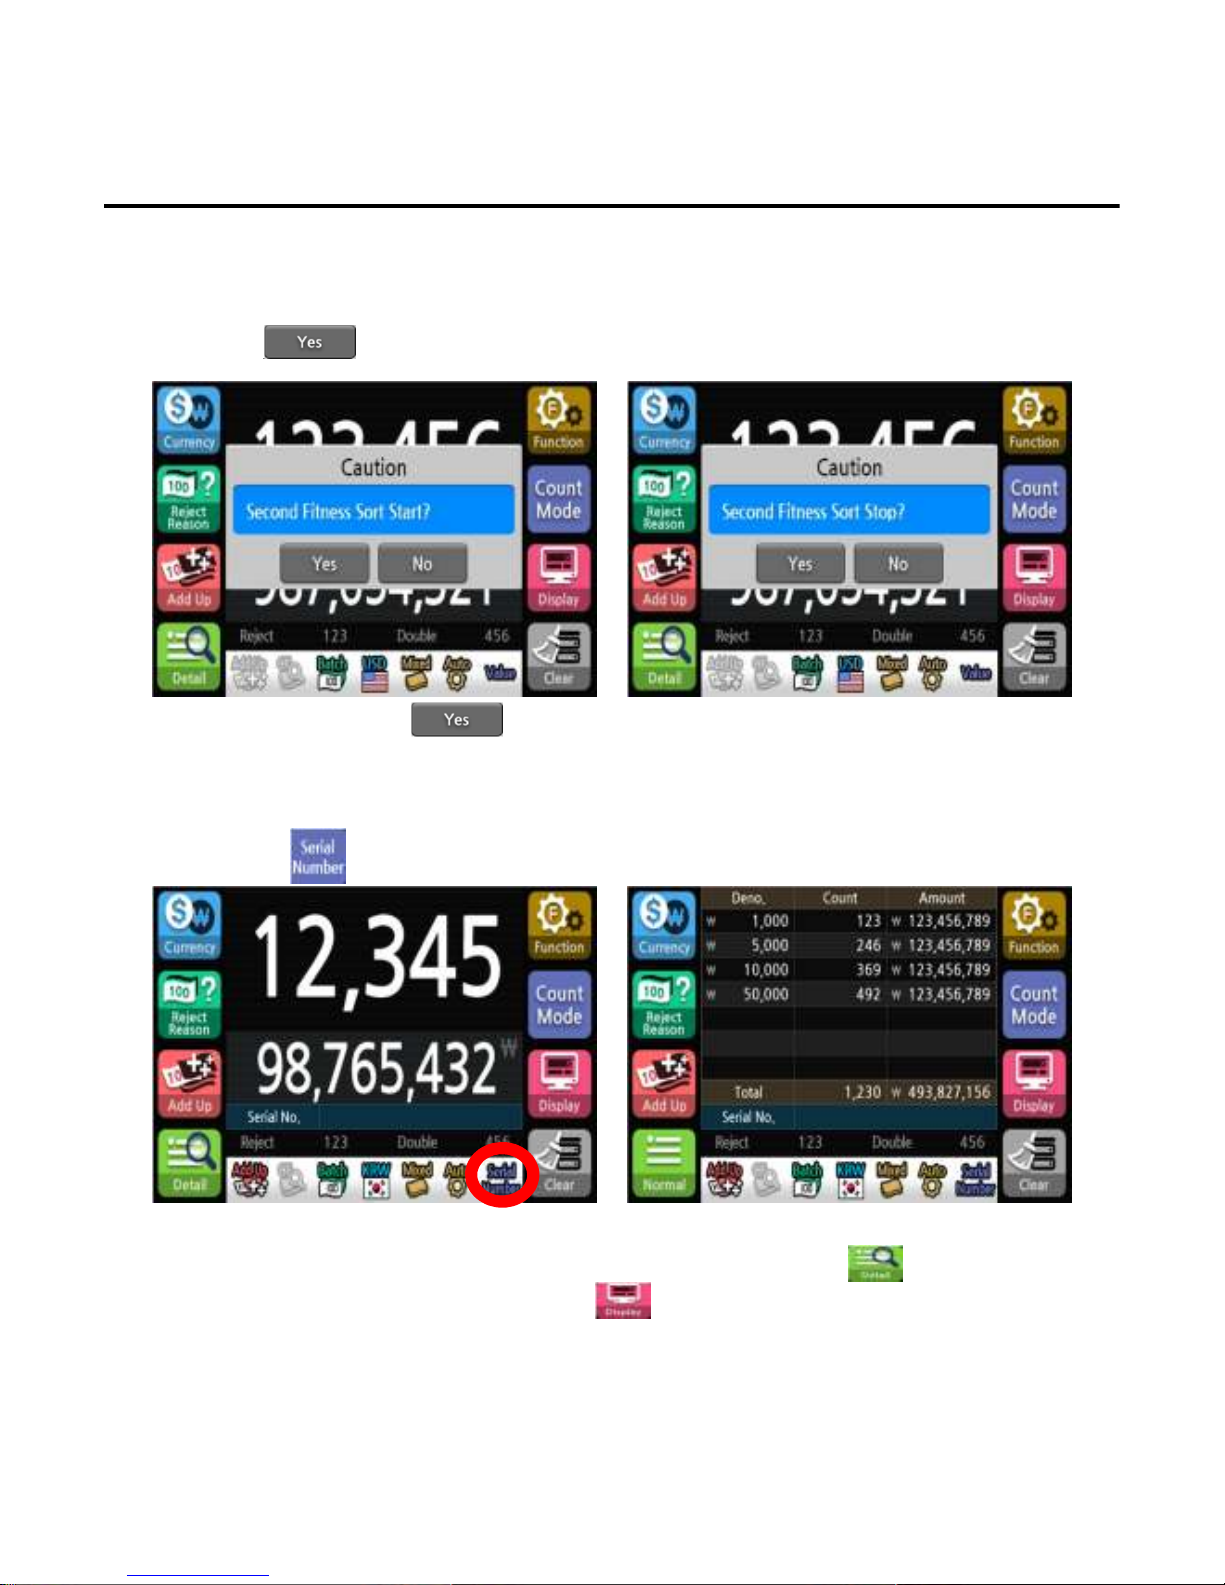
6.1. Fitness Second Sort
7. Serial Number
If Counterfeit notes are Detected after First Fitness sort , Second Sort Mode will Start Automatically.
1)Press button to Run Second sort at message
2)Clear Notes in Stack and Move Notes in Reject bin to Hopper.
*To Stop Second sort Press after Run Message.
Operation
Recognizes the series number of the banknote and shows it on the display.
1)Press button to select Serial Number mode.
*The Serial Number symbol will appear on the screen to indicate the selected state.
*To confirm the denomination and the serial number of the last banknote, press button.
*To confirm the Serial number information, using menu.
*The speed of Serial number recognition is fixed at 800 notes/min.
----39
3939
39----
Page 41
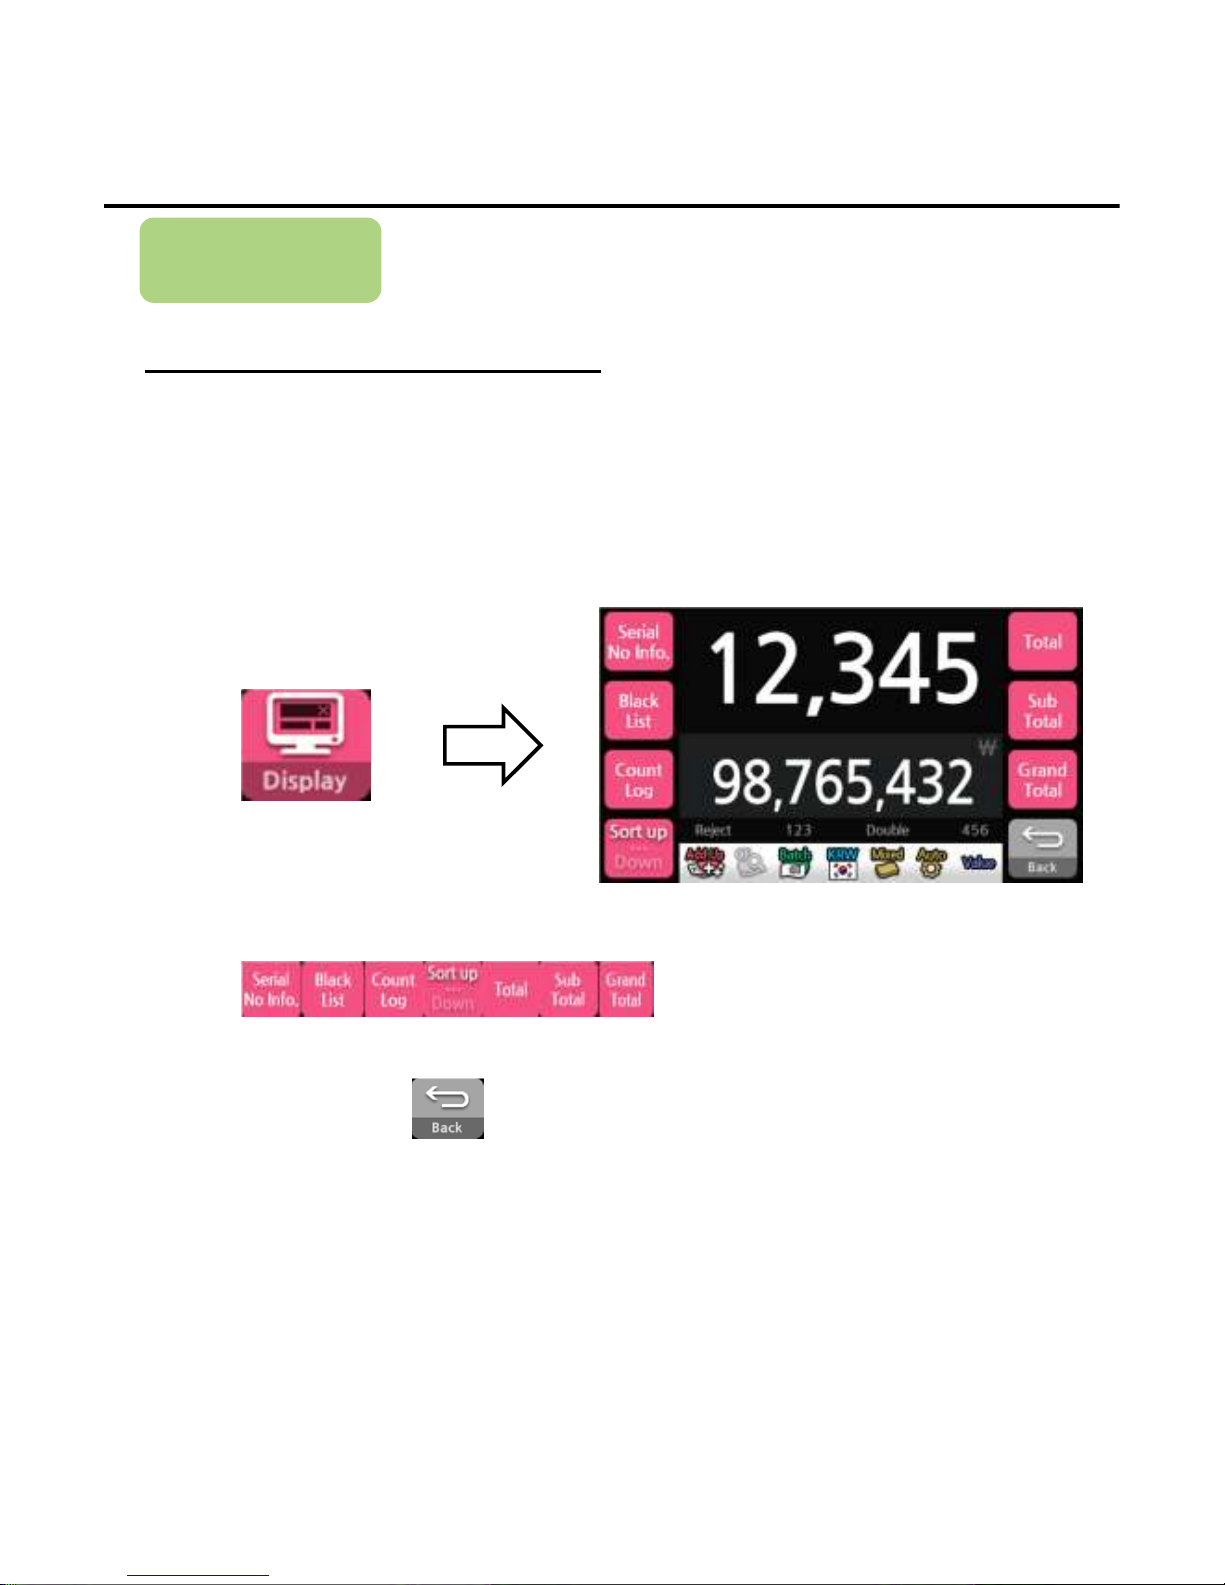
Display
How to Set the Display
Each setting item has to be set prior to use
1)Press the button below to enter the function menu
3)When finishing, press the button to exit the display menu.
2)Press button to set the each setting.
Operation
----40
4040
40----
Page 42
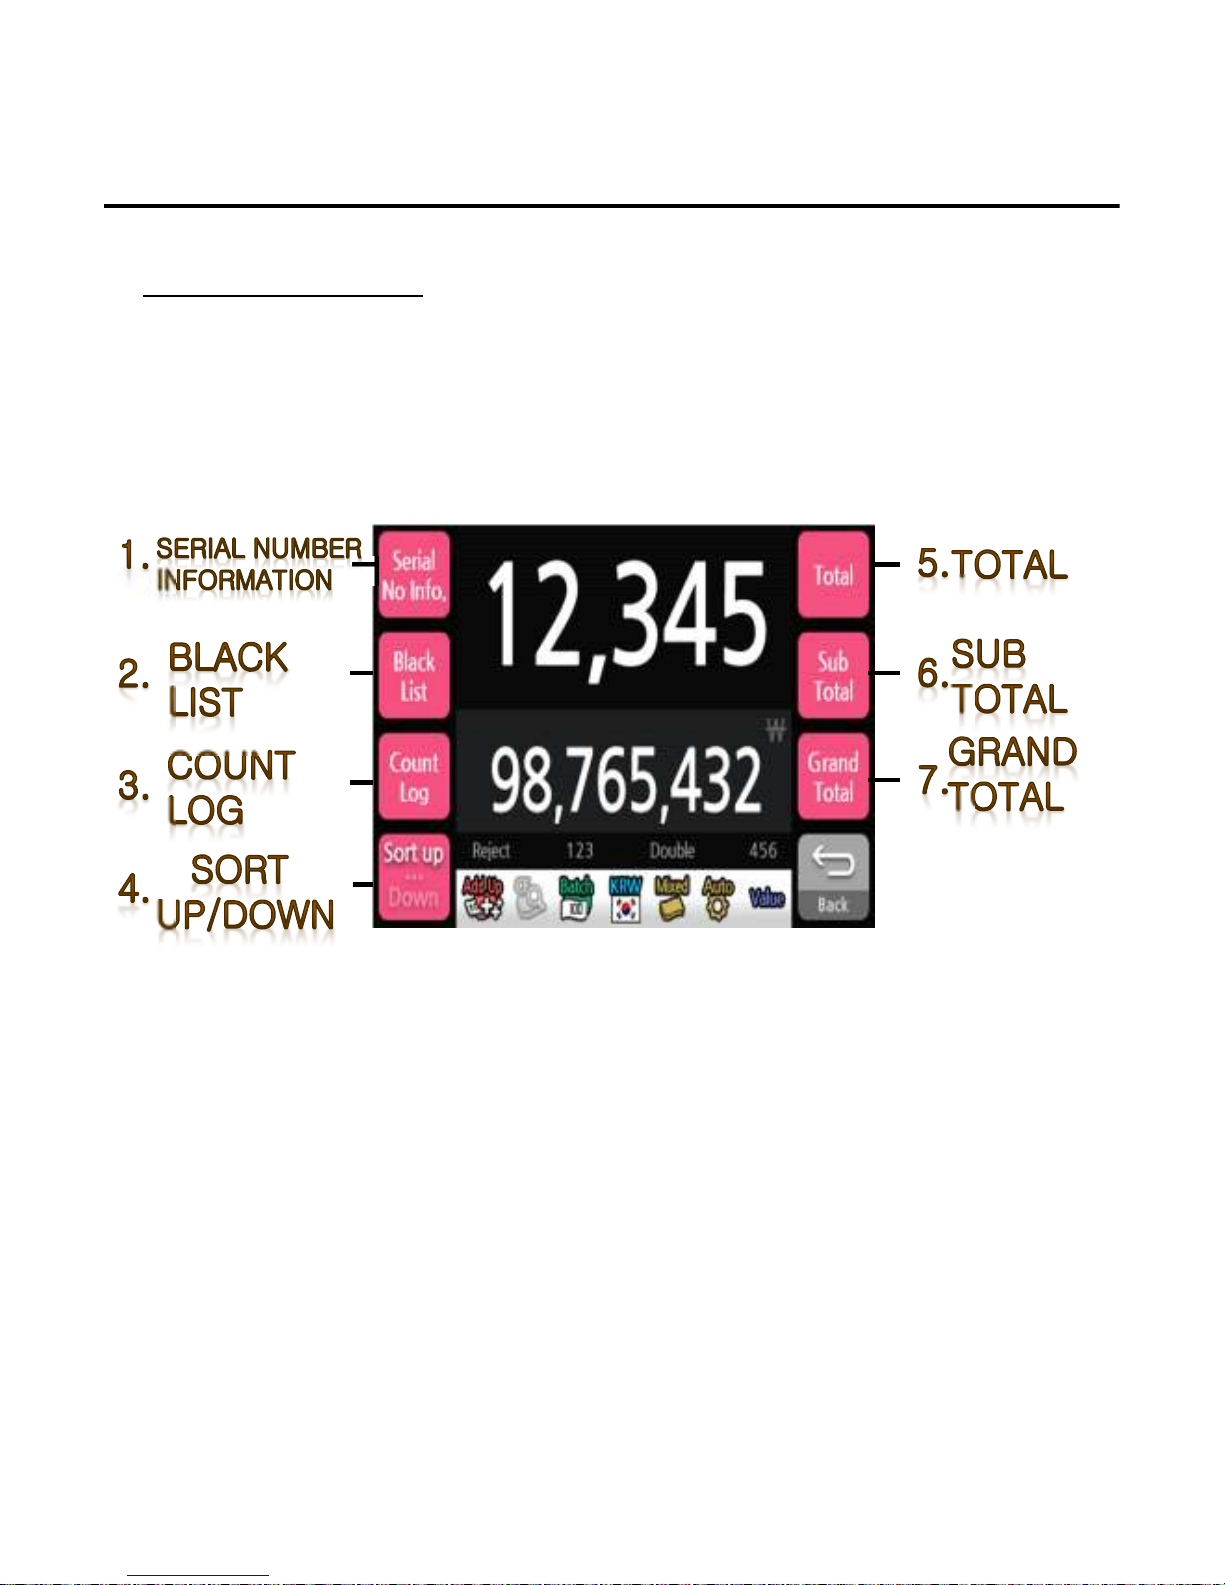
List of Display
Operation
----41
4141
41----
Page 43
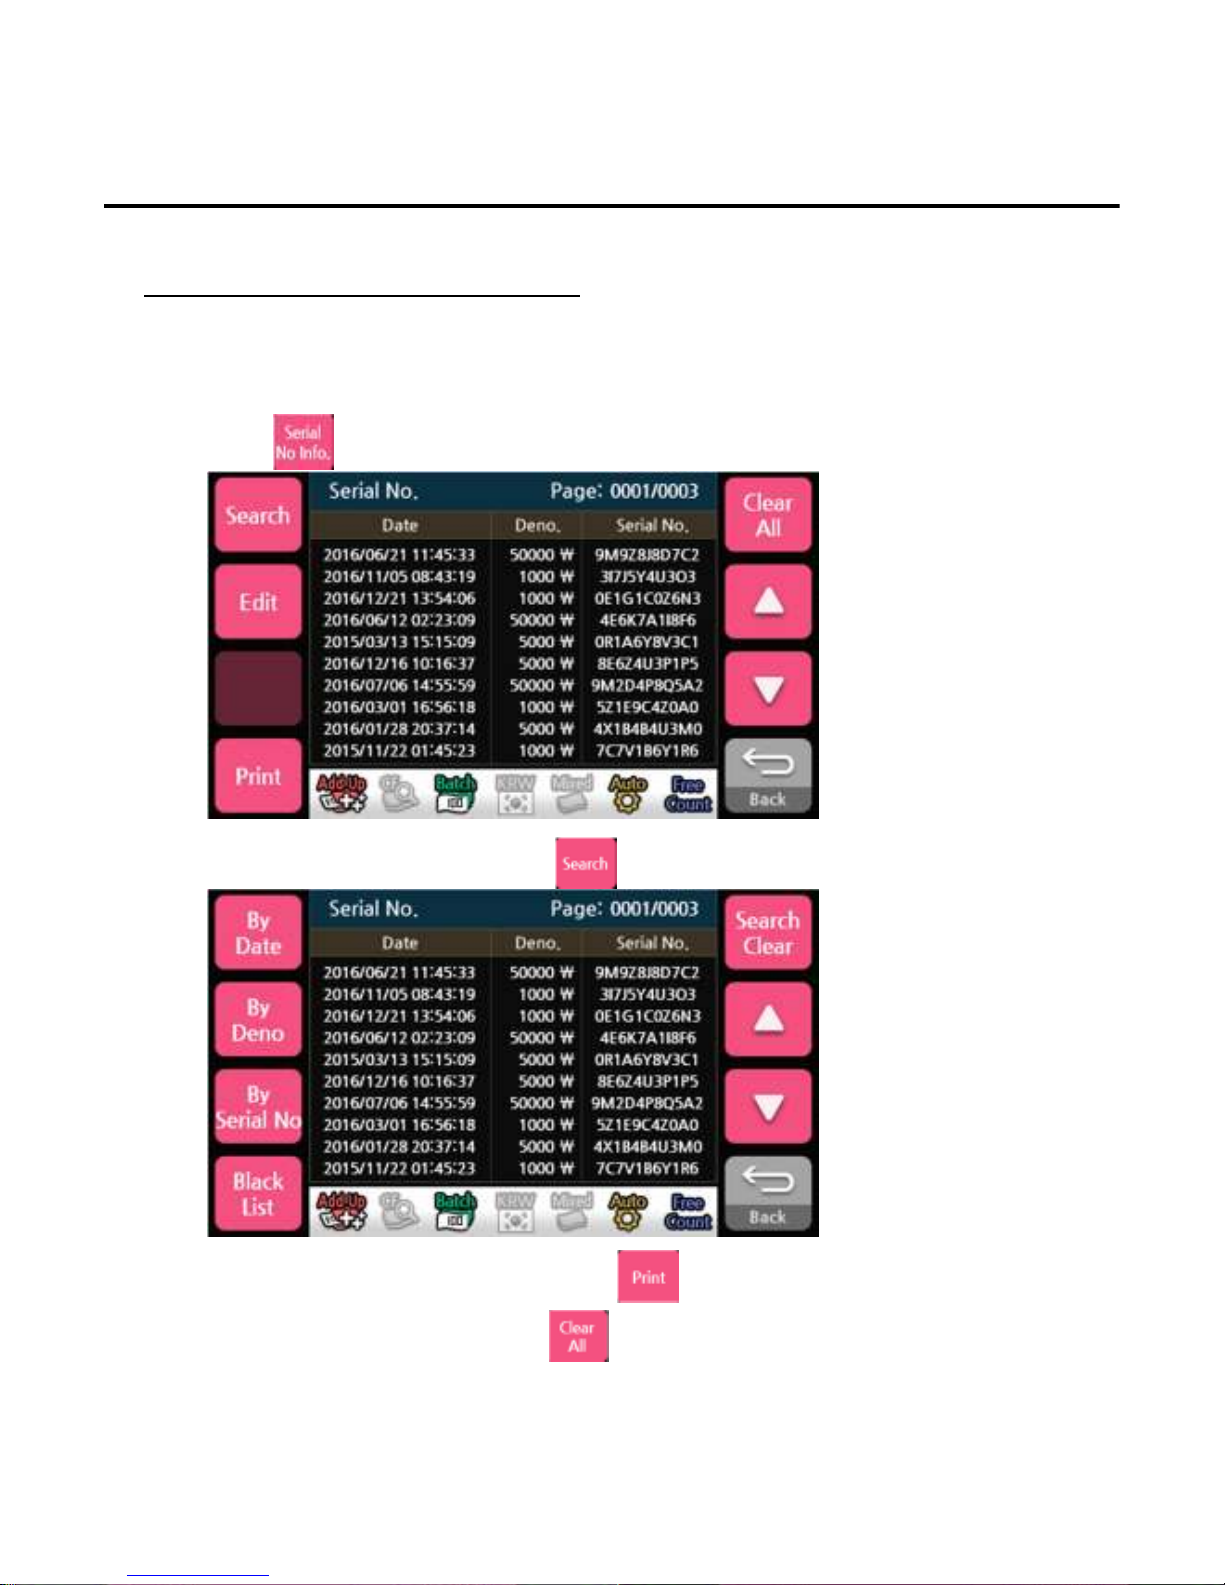
Description of Display
1. Serial Number Information
This table shows the time and date obtained, the denomination value and the serial numbers.
1)Press button to select serial number information.
To search the serial number information, press button
Operation
*If an external printer is fitted and enabled, pressing button will transmit the serial number
information to the Printer
*To remove serial number information, press button
----42
4242
42----
Page 44
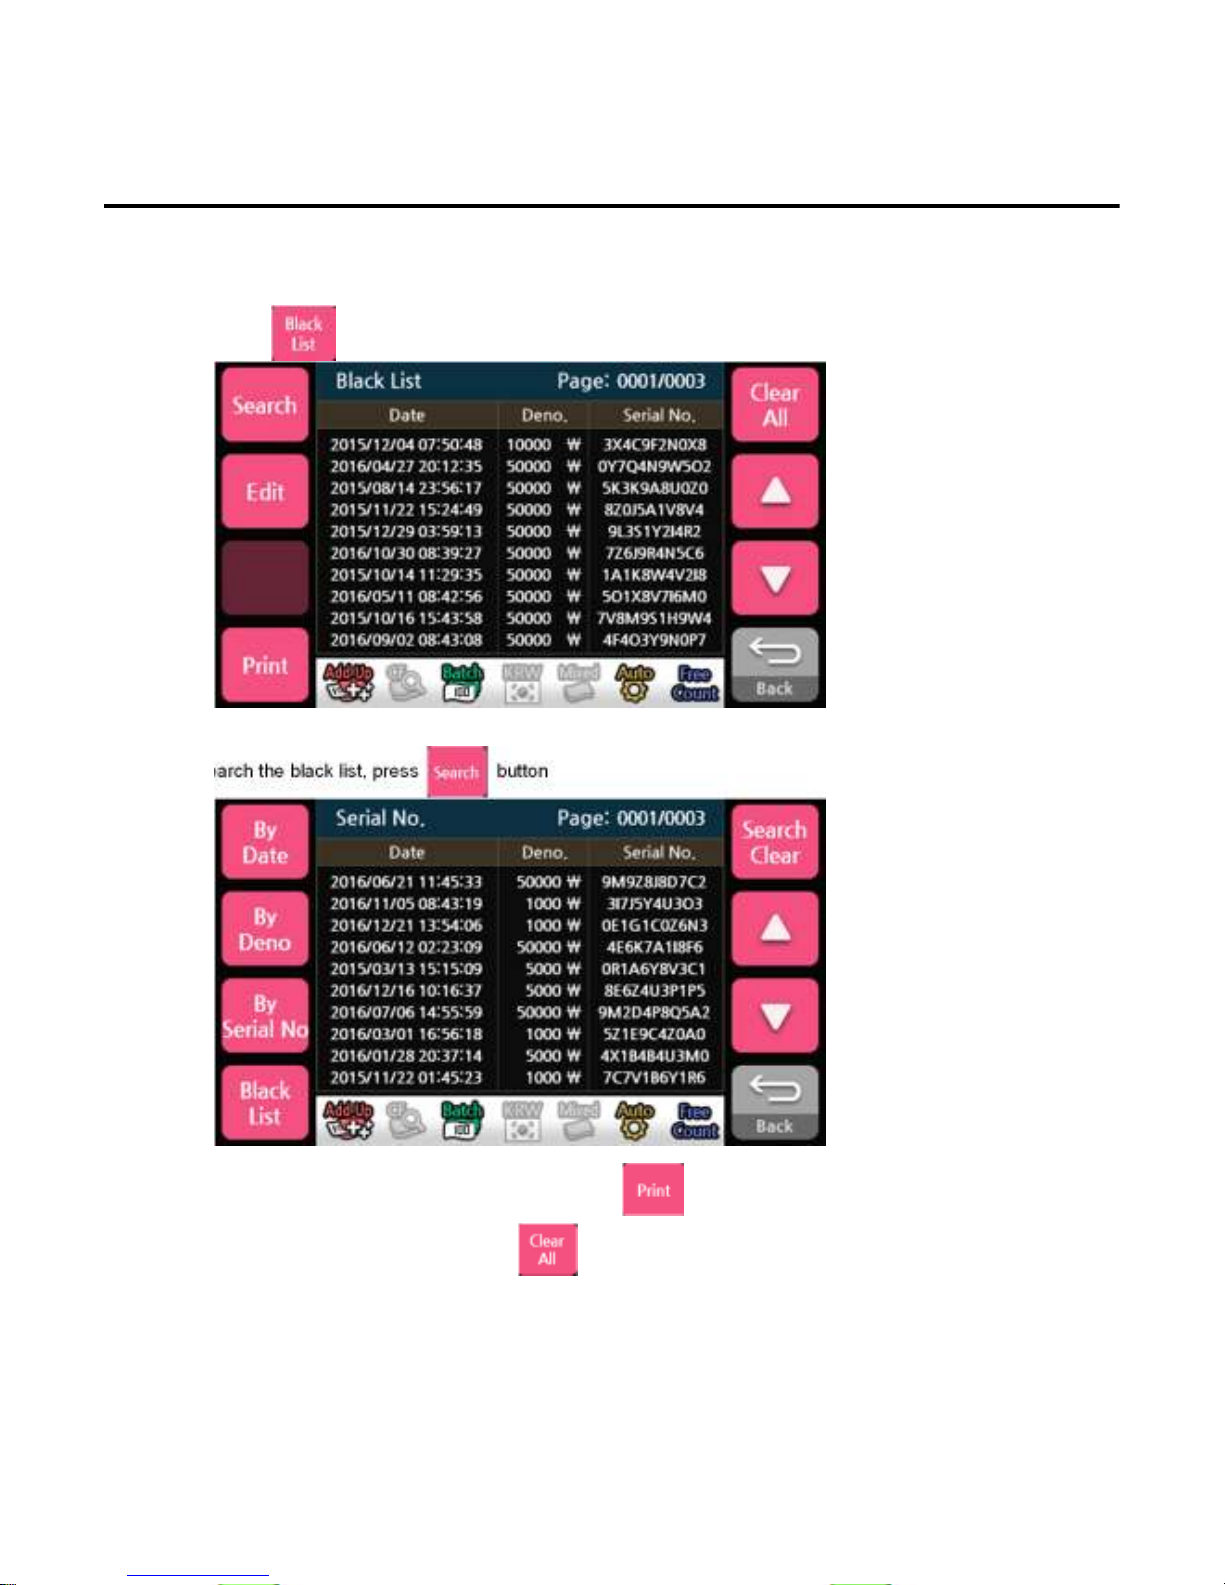
2. Black List
This table shows black list registration date, denomination value, the serial numbers. If the serial
number of banknote is in black list, the machine will send the banknote to the reject pocket.
1)Press button to select black list.
Operation
To search the black list, press button
*If an external printer is fitted and enabled, pressing button will transmit the black list
information to the Printer
*To remove black list information, press button
----43
4343
43----
Page 45
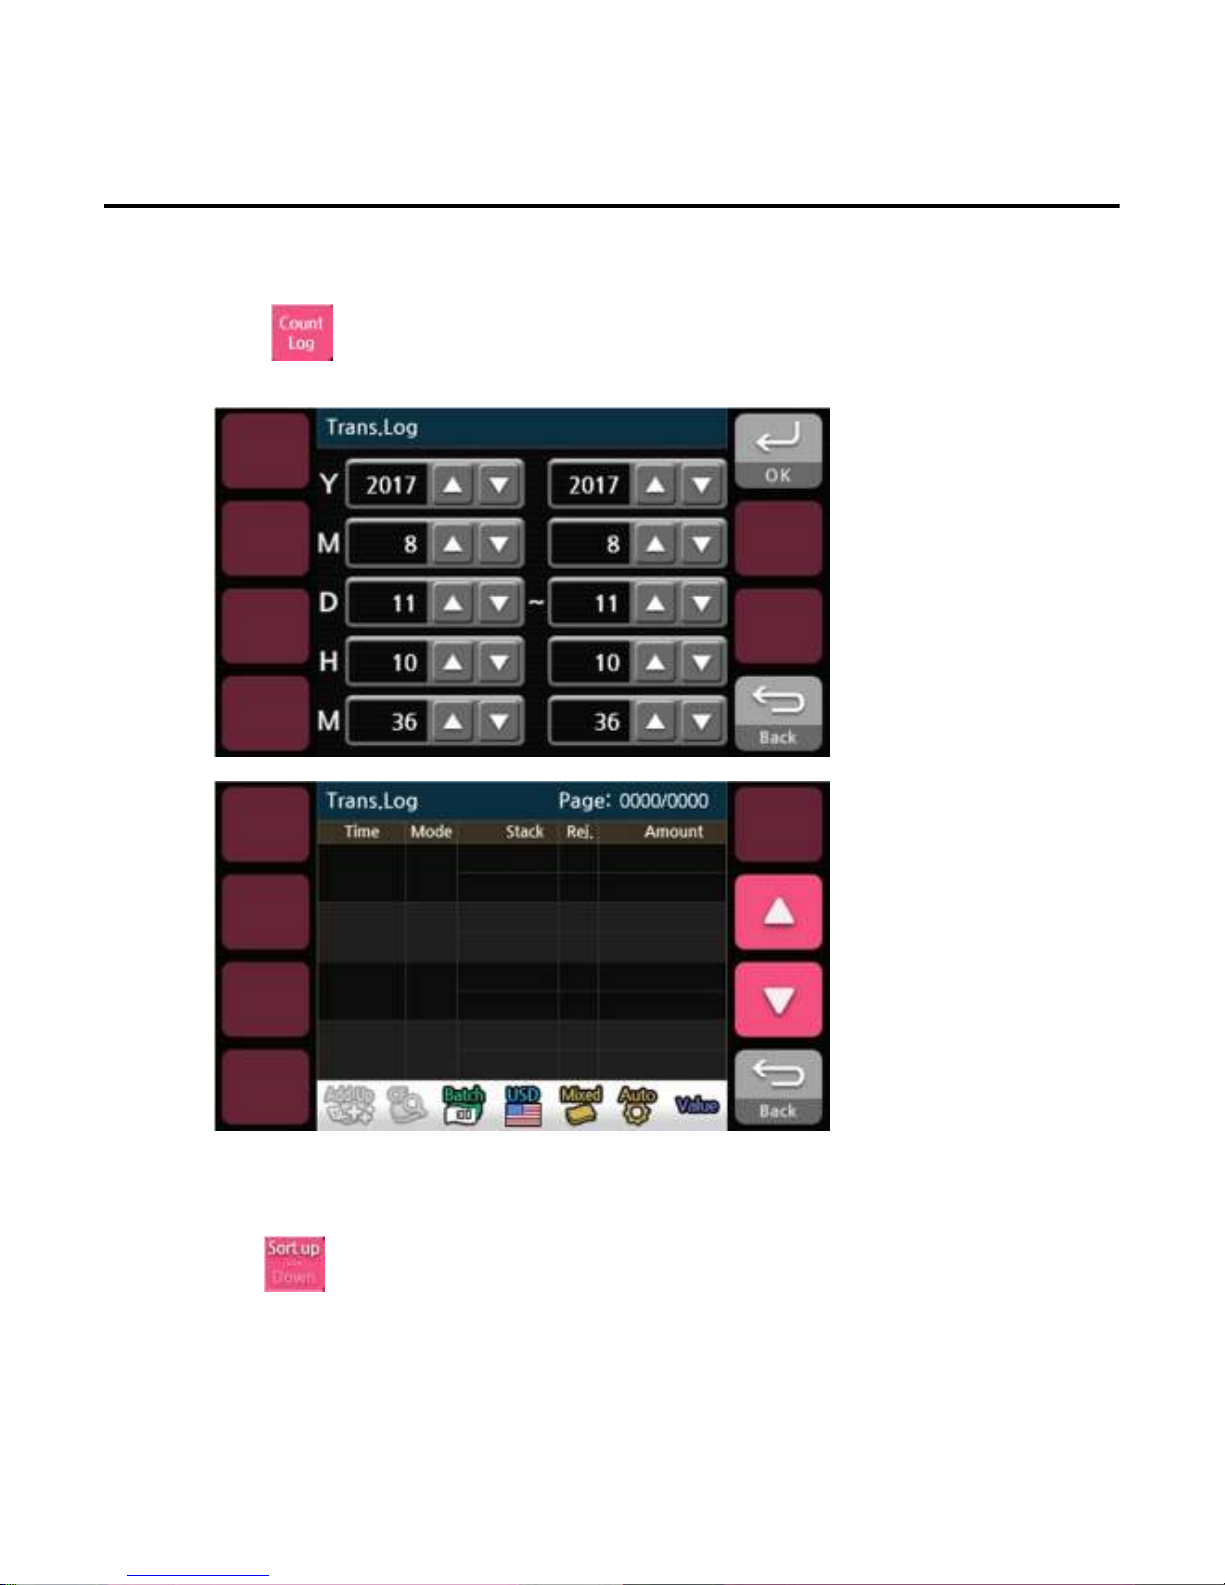
3. Count Log
This table shows count log.
1)Press button to select count log.
2)To set the time the log was recorded.
4. Sort up/down
Decide to sort method.
1)Press button to select setting.
Operation
----44
4444
44----
Page 46
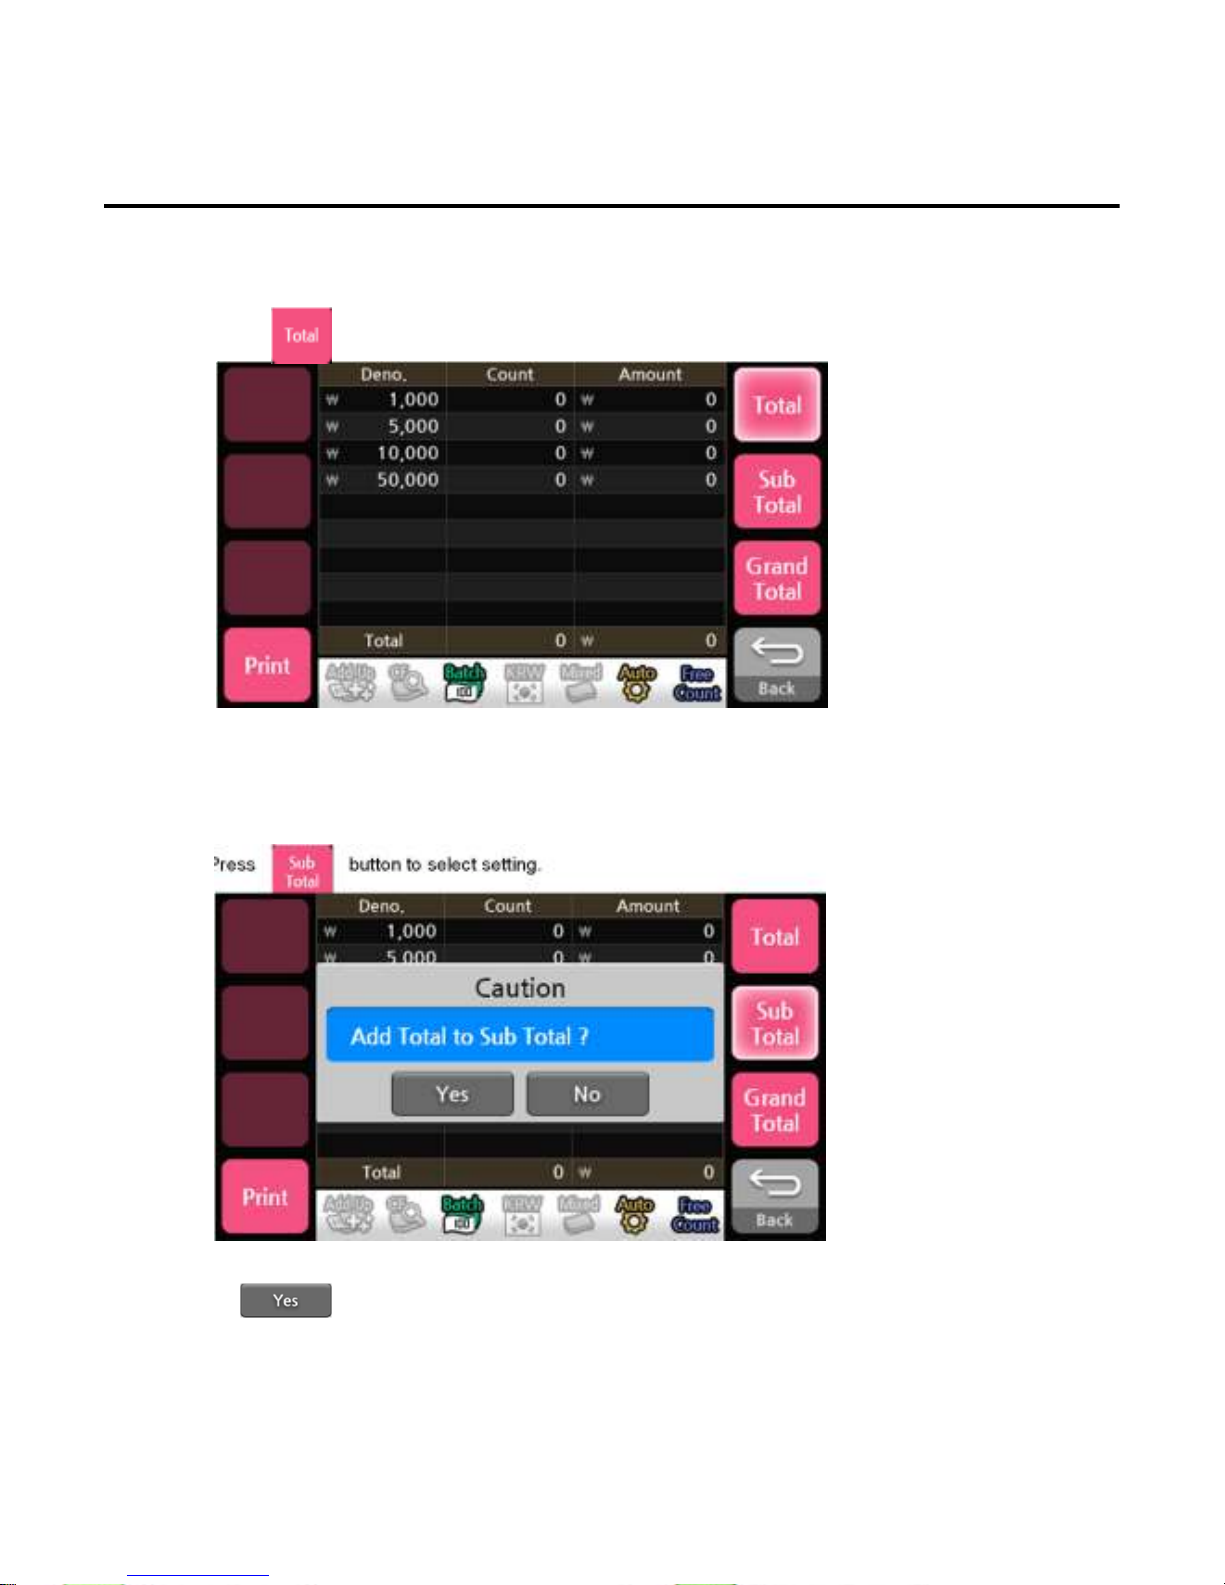
5. Total
To show the denomination and the number of banknotes and the total amount of the banknotes counted.
1)Press button to select setting.
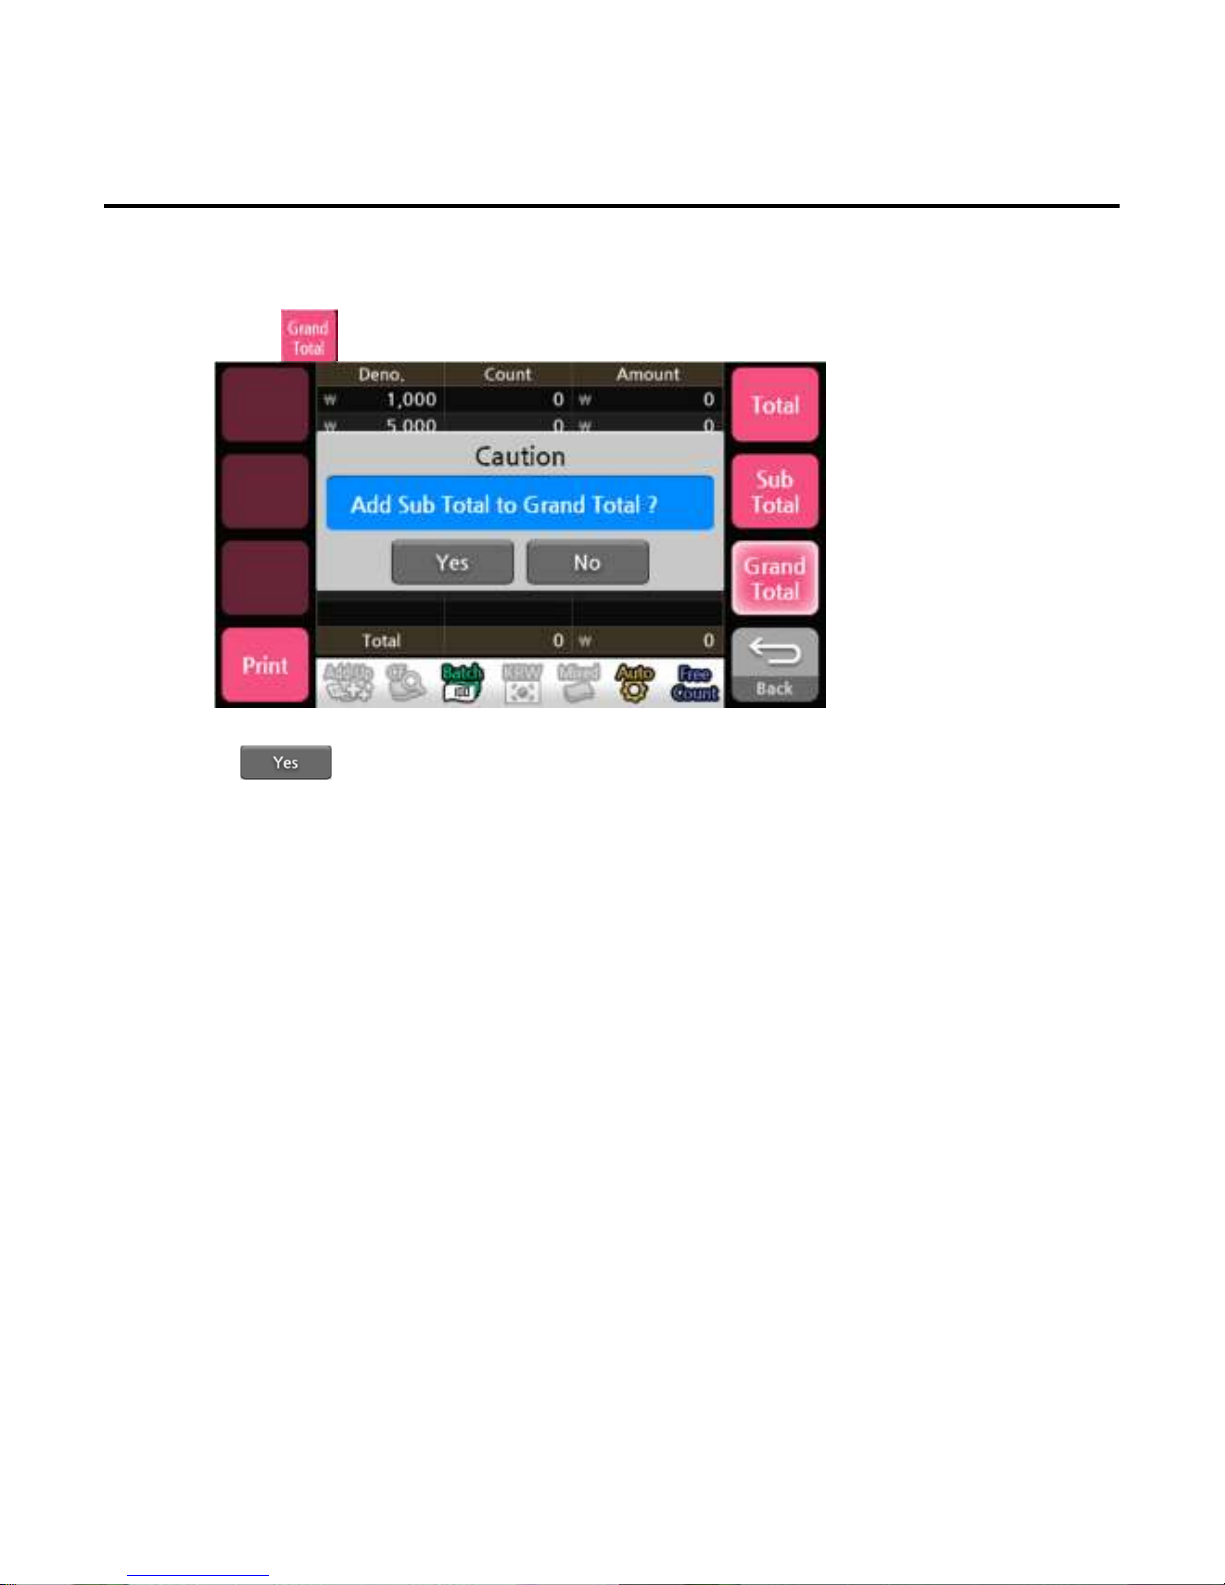
6. Sub Total
To show the denomination and number of banknotes, the total amount of the banknotes received from Total
1)Press button to select setting.
Operation
*Press button to transfer the count value to the sub total.
----45
4545
45----
Page 47
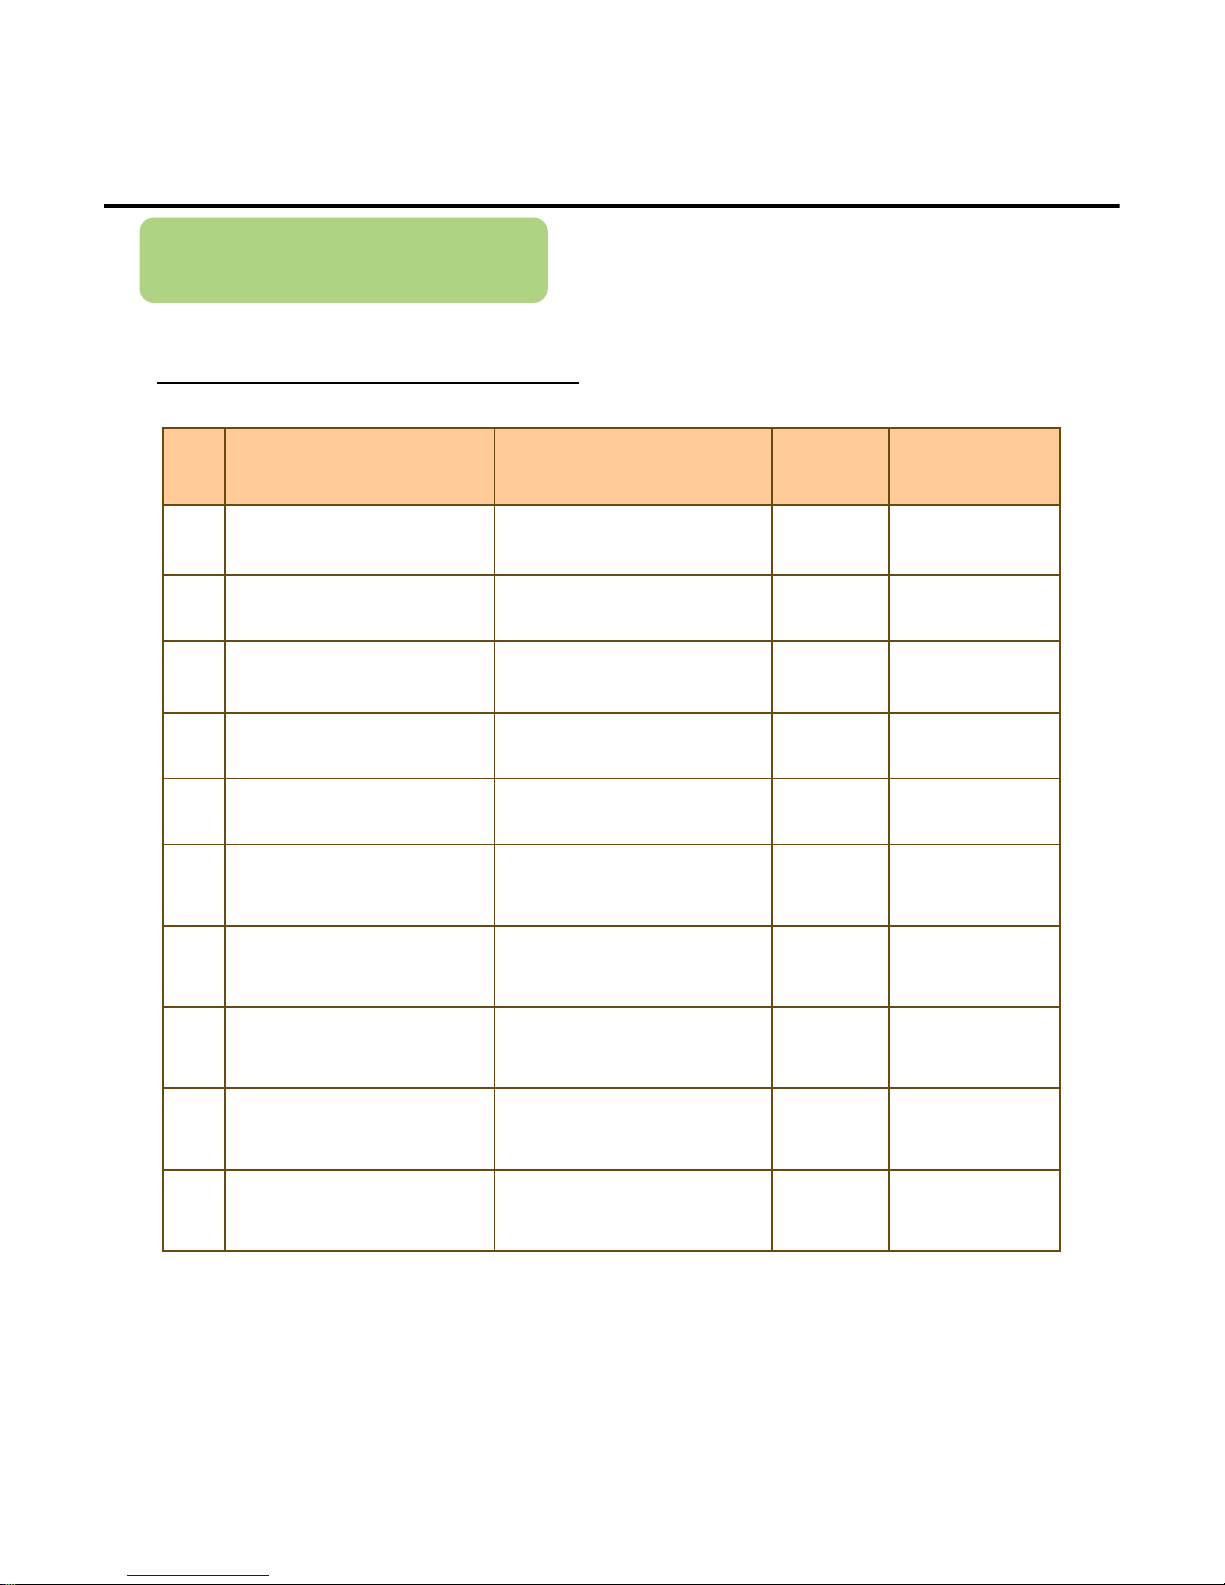
7. Grand Total
Show the denomination and number of banknotes, the total amount of the banknotes received from
sub total
1)Press button to select setting.
Operation
*Press button to transfer the count value of sub total to the grand total.
----46
4646
46----
Page 48
Maintenance Method
Daily Maintenance
No.
No.No.
No. Check Point
Check PointCheck Point
Check Point Maintenance
MaintenanceMaintenance
Maintenance Method
MethodMethod
Method Cycle
CycleCycle
Cycle Remarks
RemarksRemarks
Remarks
1 Hopper Sensor and Rollers Cleaning Daily 48 Page
2 Detection sensors Cleaning Daily 49 Page
3 Stacker sensor and reject
stacker sensor
Cleaning Daily 50 Page
4 Diverter sensor Cleaning Daily 51 Page
5 Dust pocket Clean and empty the dust
pocket.
2 month 51 Page
6 Pick-UP Roller Check strain 6 month Replacement by
trained person
7 CABLE and CONNECTOR Check exfoliation and
disconnect
6 month Replacement by
trained person
8 PATH SENSORS Using Service-Sensor Menu 6 month Replacement by
trained person
9 Motors Using Service-Diagnostic
Menu
6 month Replacement by
trained person
10 TIMING BELT Check abnormal noise and
belt deviation
6 month Replacement by
trained person
Maintenance
----47
4747
47----
Page 49
Guide for Components
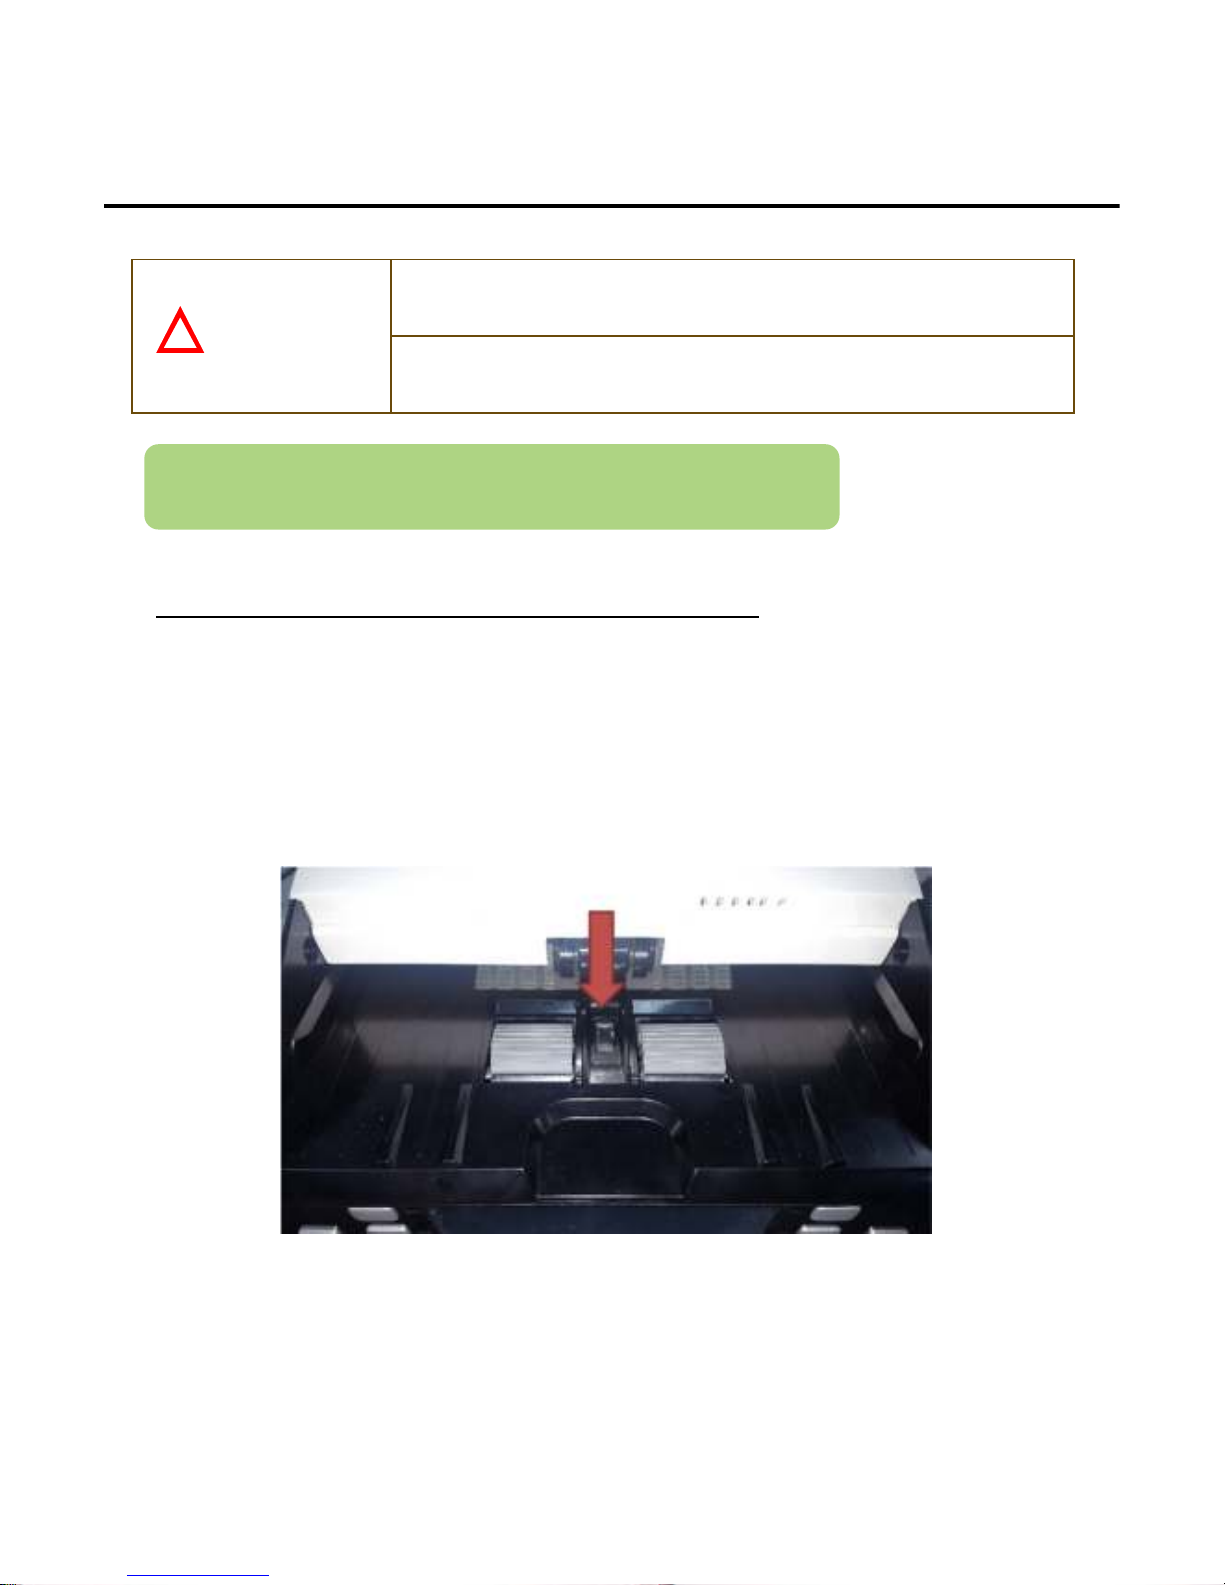
The hopper sensor and rollers
Clean the Inlet sensor and the roller as shown in the photo below with a soft
cotton towel or a brush.
Miscounting may be caused if dust, dirt, and other materials get stuck or clutter the sensors.
It is necessary to clean the sensors and rollers with an attached cleaner once a day.
Turn off the power switch before cleaning.
otherwise, this may result an electric shock or injury.
Do not use chemicals such as benzene, thinner, or water.
use of such may result in discoloring or breakage.
CAUTION
!
Daily Maintenance
<Inlet Sensor and Rollers>
----48
4848
48----
Page 50
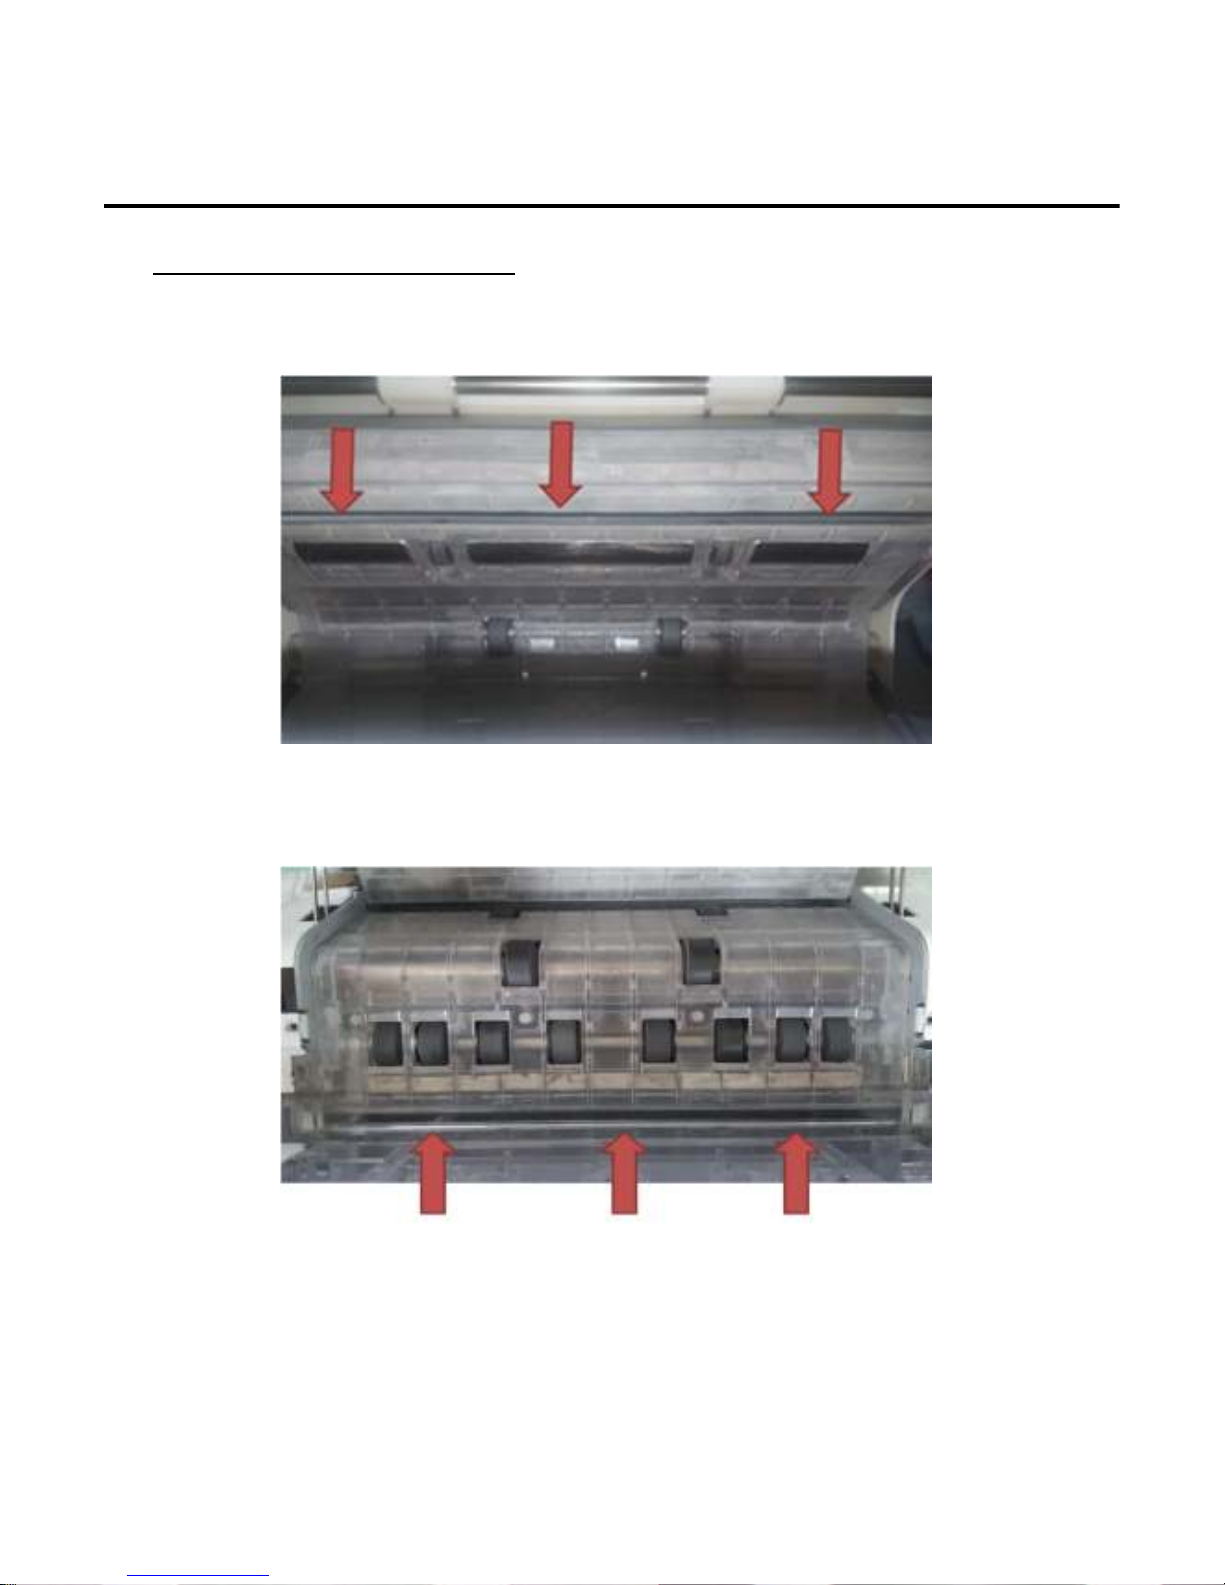
Detection sensors
Open the upper cover by pulling the lever and clean the sensors as shown in
the photo below with a soft cotton towel or a brush.
Daily Maintenance
<Lower CIS>
< MR and Upper CIS >
----49
4949
49----
Page 51
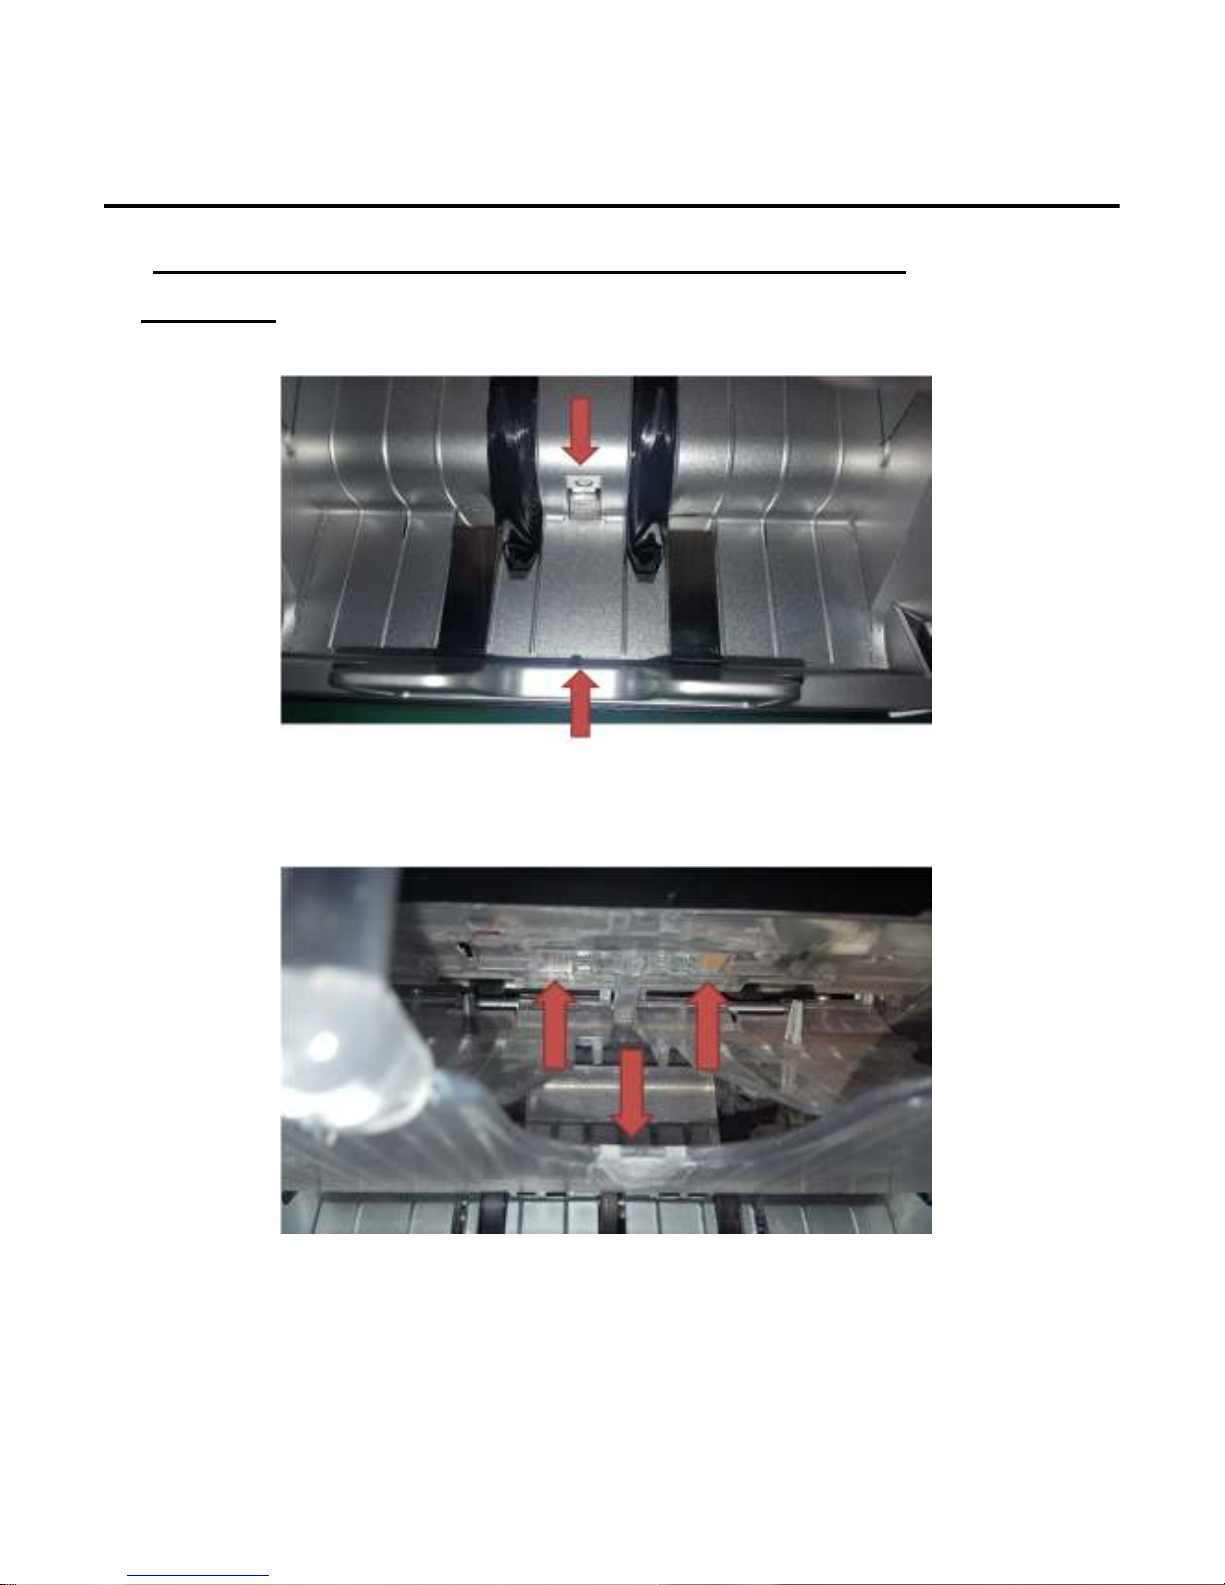
The stacker sensor and reject stacker
sensor
Clean the sensors as shown in the photo below with a soft cotton towel or a
brush.
Daily Maintenance
<Reject Sensor>
<Stack Sensor>
----50
5050
50----
Page 52
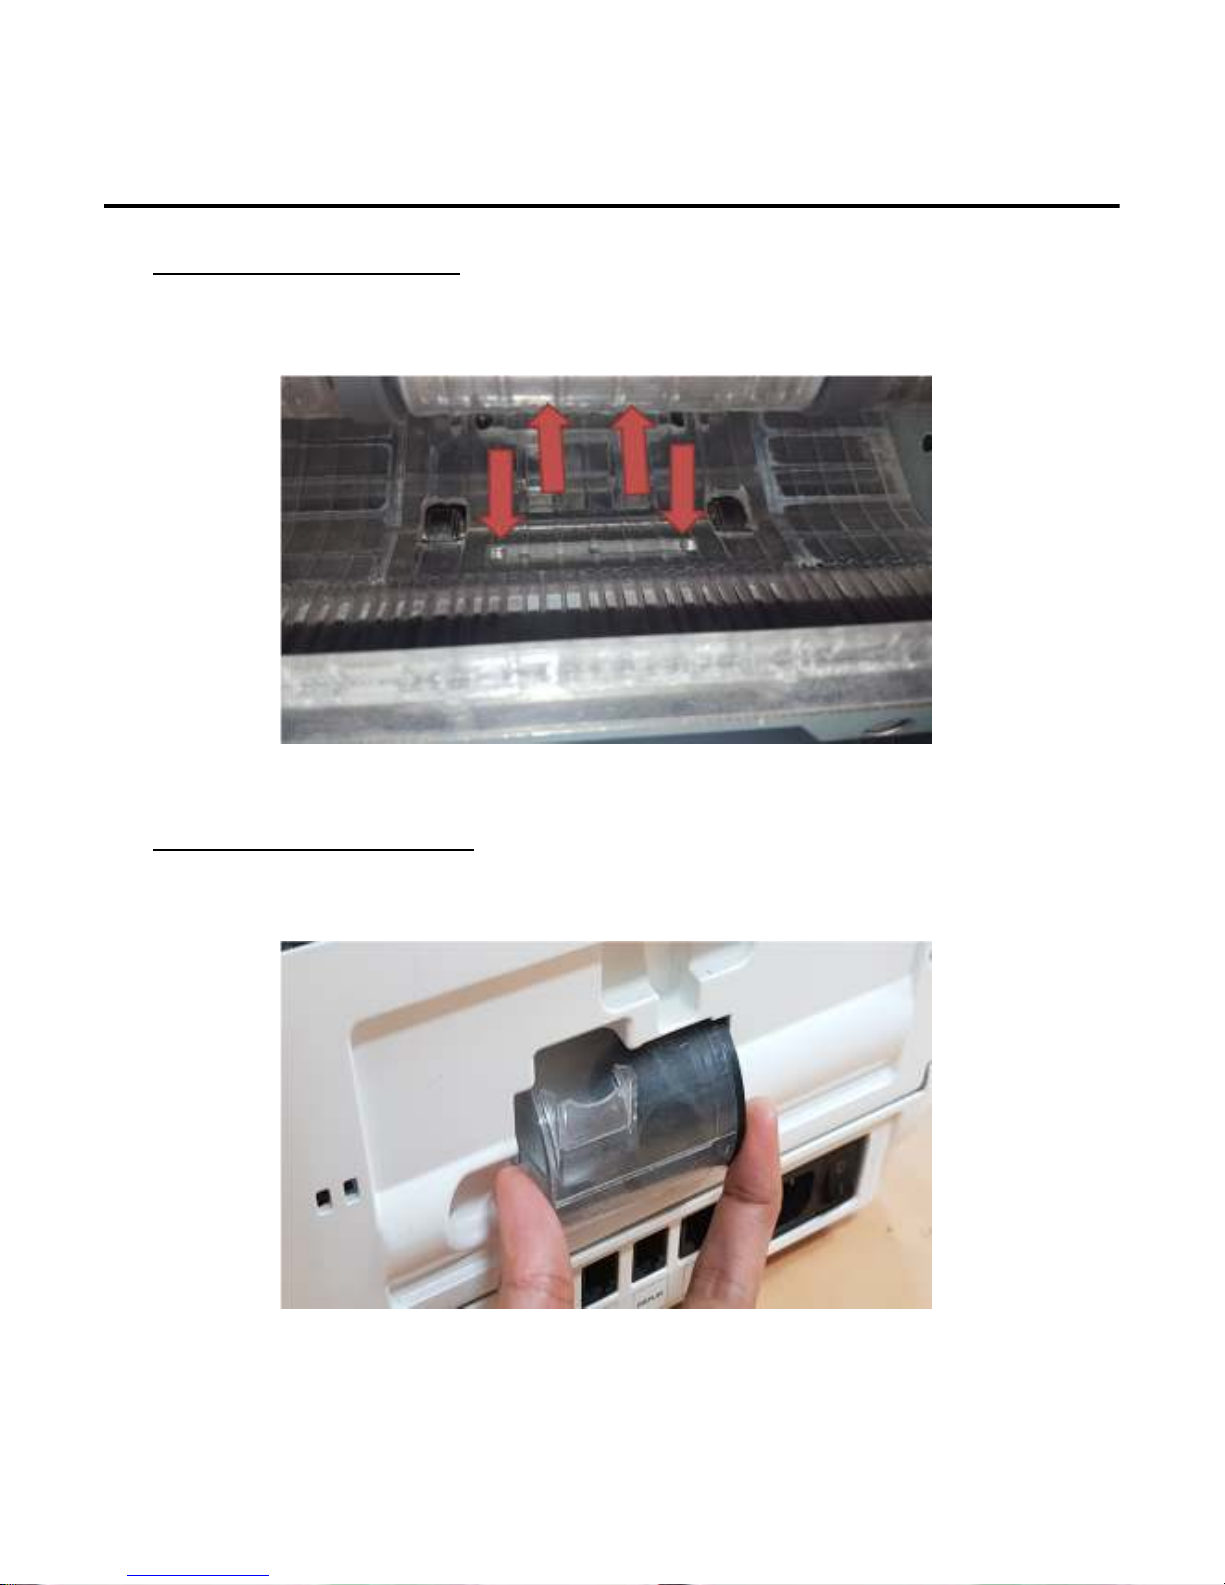
Diverter sensor
Open the lower cover by pulling the lever and clean the sensors as shown in
the photo below with a soft cotton towel or a brush.
Daily Maintenance
The dust pocket
Pull out a dust pocket and clean it
<dust pocket>
<Diverter Sensor>
----51
5151
51----
Page 53

Daily Maintenance
----52
5252
52----
Page 54
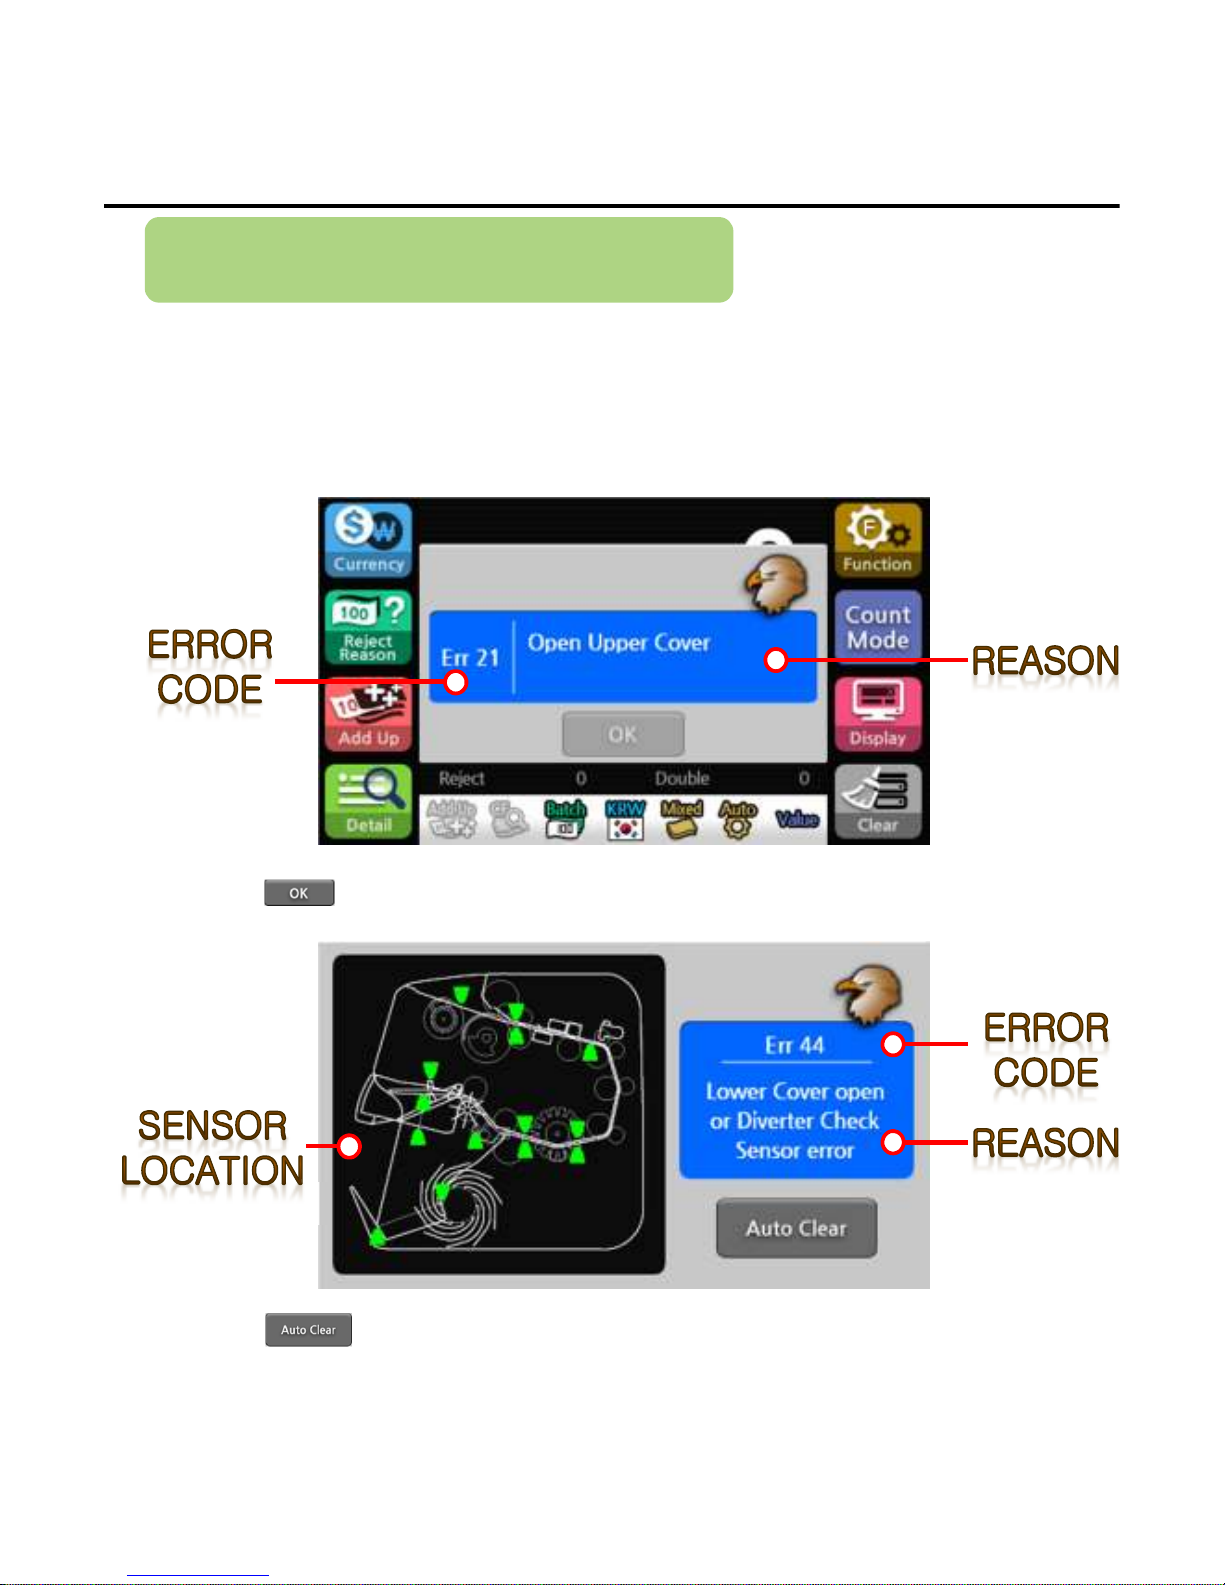
When Errors Occur
If an error occurs during using, an error code is displayed on the LCD display.
Find the cause of the error by the error code and follow the instructions to
release the error.
*Press the button, after cleared error.
*Press the button, after cleared error.
Error & Guide
----53
5353
53----
Page 55
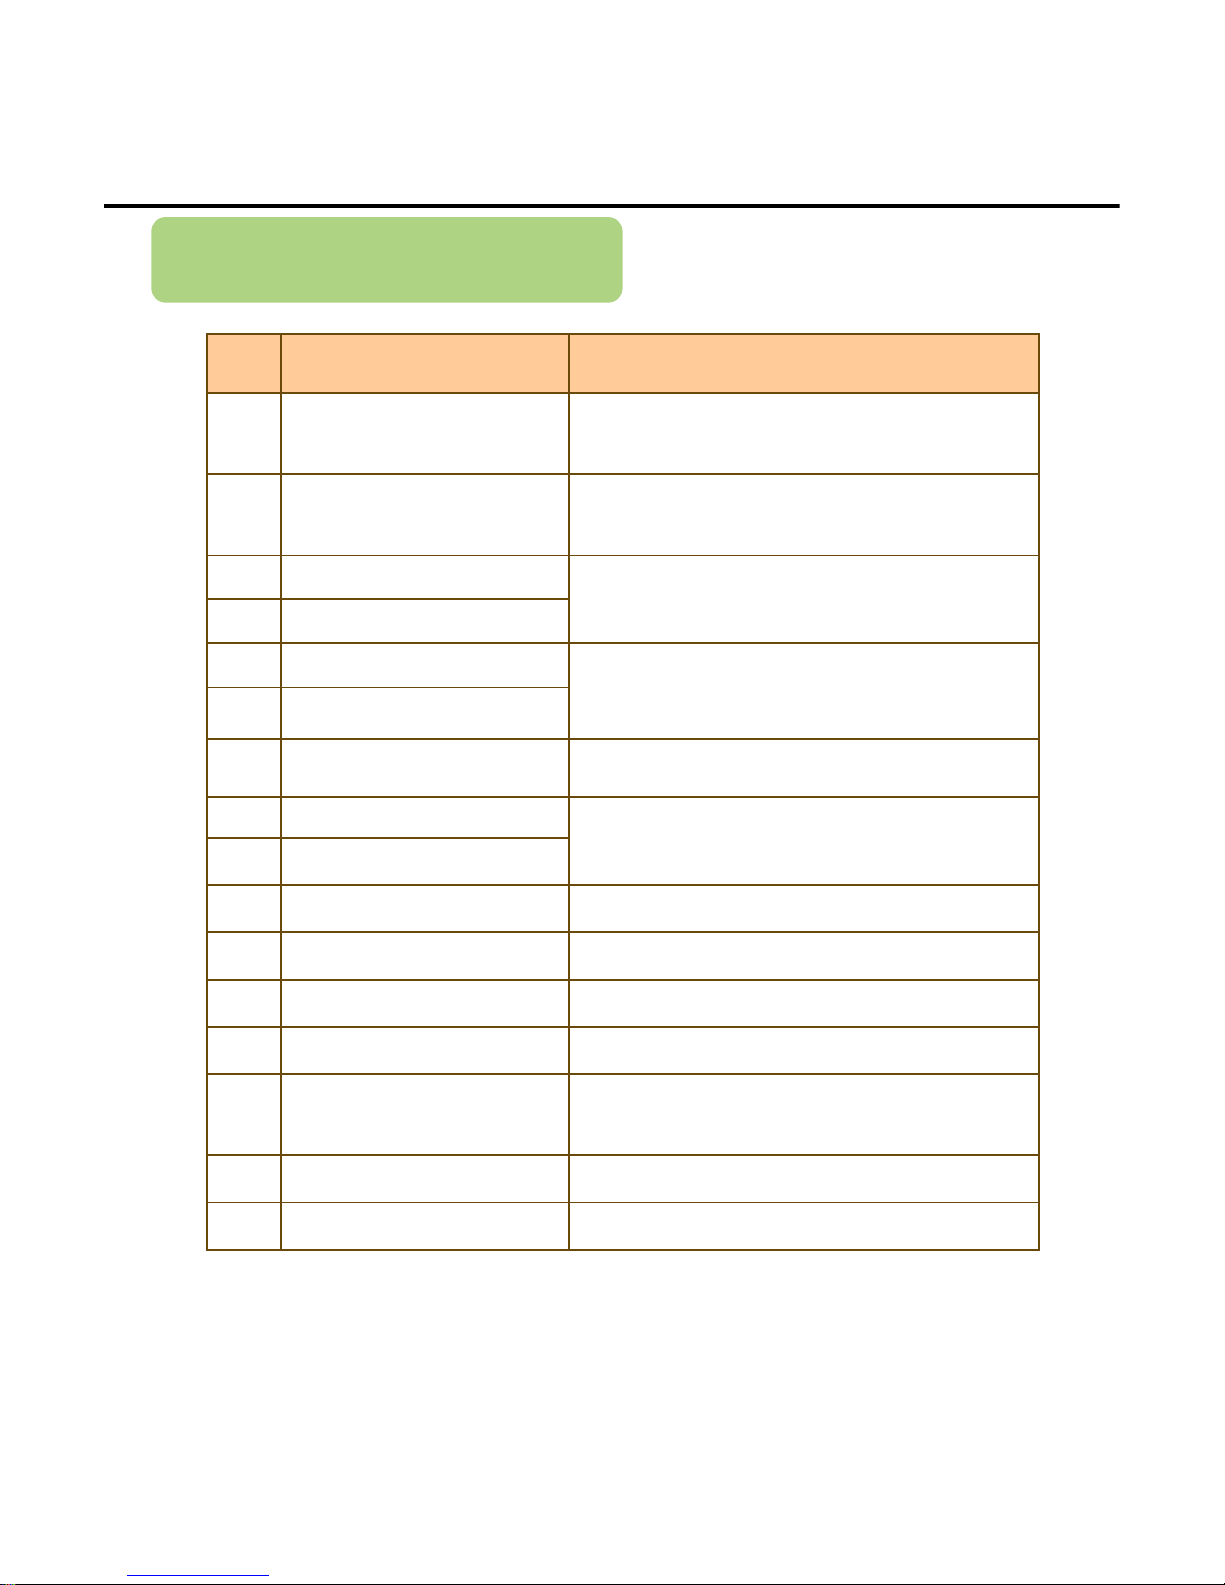
Error Code List
Code
Code Code
Code
No.
No.No.
No.
Reason
ReasonReason
Reason Releasing Method
Releasing MethodReleasing Method
Releasing Method
01~05 Communication error
1. Turn the power switch off and on.
2. If the Error continues, please Contact to
service Center.
10 Initial Inlet Sensor Fail
1. Open the upper cover and lower part.
2. Check and Cleaning the sensors.
11 Initial Check R Sensors Fail
1. Check and Cleaning the check sensors.
12 Initial Check L Sensors Fail
13 Initial Diverter Sensor Fail
1. Check and Cleaning the diverter and diverter
end sensors.
15
Initial Diverter End Sensor
Fail
16 Initial Stack Sensor Fail
1. Remove the banknotes from the stacker.
2. Check the stack sensor.
17 Initial Reject Sensor Fail
1. Remove the banknotes from the reject stacker.
2. Check the reject sensor.
18 Initial Reject Full Sensor Fail
20 Miscount
1. Count mismatch. Please count again.
21 Guide Open
1. Close the upper cover.
22 Feed Motor Error
1. Check the feed Motor.
23 Pickup Motor Error
1. Check the pickup Motor.
24 Feed Check Error
1. Turn the power switch off and on.
2. If the Error continues, please Contact to
service Center.
25 Diverter Act Error
1. Count mismatch. Please count again.
2A Pickup Fail
1. Clean the pickup sensor and rubber.
Error & Guide
----54
5454
54----
Page 56
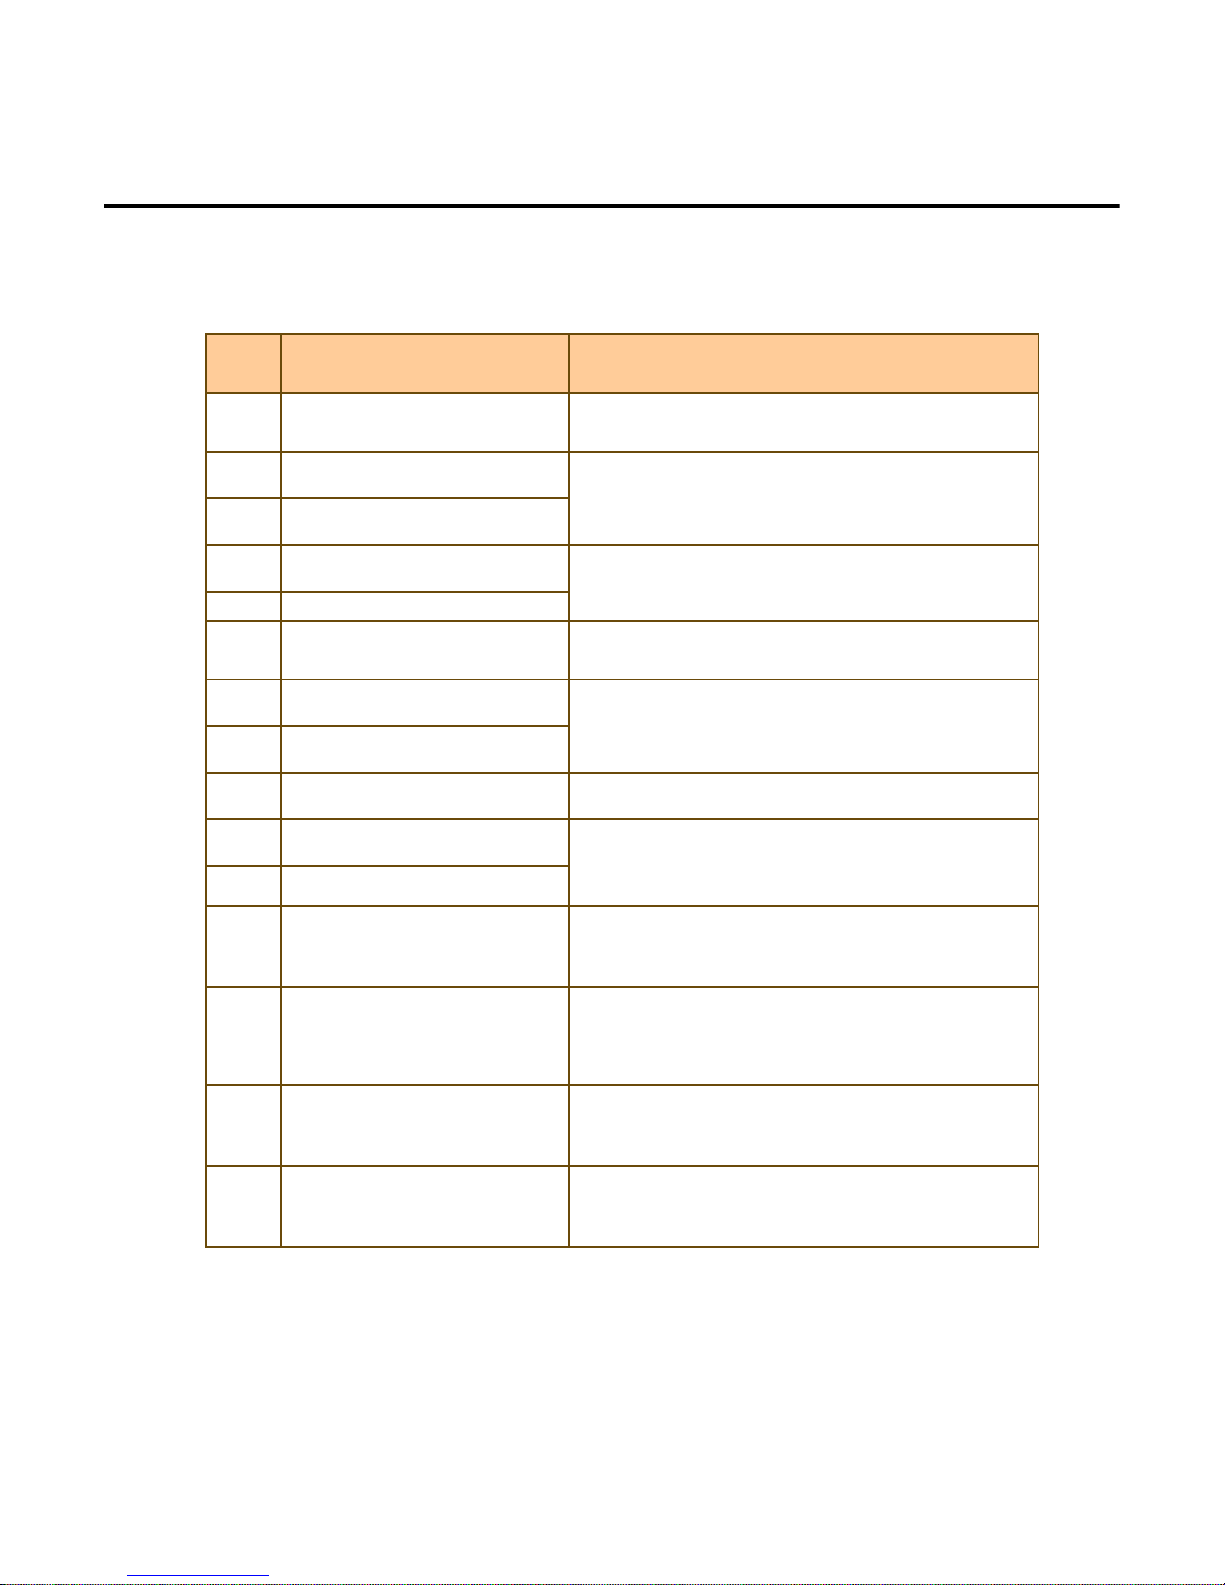
Code
Code Code
Code
No.
No.No.
No.
Reason
ReasonReason
Reason Releasing Method
Releasing MethodReleasing Method
Releasing Method
31 Pickup JAM
1. Open the upper cover, remove the notes.
2. Press auto clear button.
32 Path JAM
1. Open the upper cover and lower part, remove
the notes.
2. Press auto clear button.
33 Diverter Out JAM
41 Check R Sensor Fail
1. Check and Cleaning the check sensors.
42 Check L Sensor Fail
43 Diverter Sensor Fail
1. Check the lower cover is closing
2. Check diverter sensor.
44 Diverter Check Sensor Fail
1. Check and Cleaning the Diverter sensors.
45 Diverter End Sensor Fail
46 Stack Sensor Fail
1. Remove the banknotes from the stacker.
47 Reject Sensor Fail
1. Remove the banknotes from the reject stacker.
48 Reject Full Sensor Fail
50 Boot State
1. Turn the power switch off and on.
2. If the Error continues, please Contact to
service Center.
51~53,
56~58
Program upgrade error
1. Program upgrade retry.
2. If the Error continues, please Contact to
service Center.
61~62 Hardware problems
1. Turn the power switch off and on.
2. If the Error continues, please Contact to
service Center.
65~66 Calibration Error
1. Calibration retry.
2. If the Error continues, please Contact to
service Center.
Error & Guide
----55
5555
55----
Page 57

Error & Guide
----56
5656
56----
Page 58
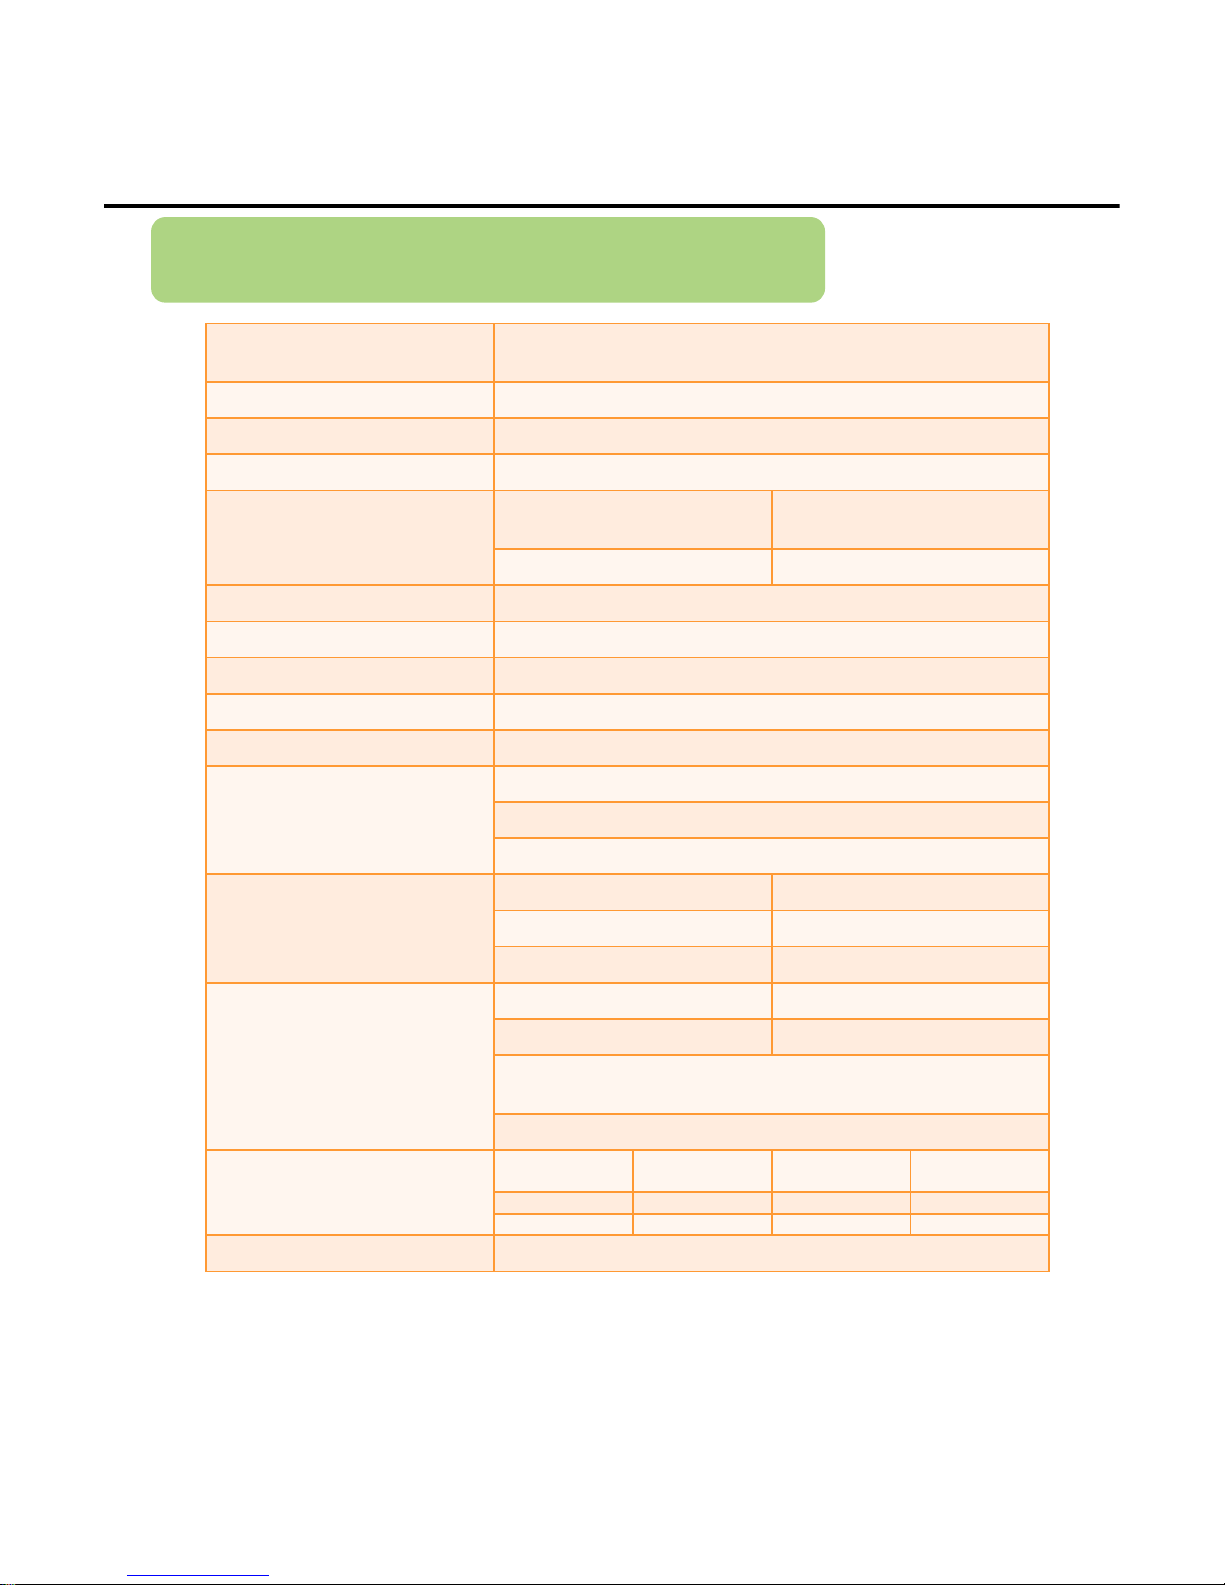
Product Specifications
Mode
Count, Value, Single, Mixed, Face/Orient, Fitness Sort, Serial
Number Recognition
Pocket number 2 Pockets
Outside Dimensions 273(W) x 275(D) x 293(H) mm
Weight 8.6kg
Counting Speed
Value Counting,
Fitness Sorting (EE7-FS)
1000 Note/min
Serial Number Recognition 800 Note/min
Size of countable notes W:50~90mm, L:100~185mm
Hoper Capacity 500 (1000 optional)
Stacker Capacity 200
Reject Stacker Capacity Approximately 100
Display 5” TFT Color Touch Screen LCD
Sensor
CIS - 2EA
MR, IR, UV
Mechanical Thickness Sensor(EE7-FS) or Sonar(EE7-VS)
Power supply specification
Voltage 100~240V
Frequency 50/60Hz
Power consumption 140W
Usage Environment
Temperature
0℃~45℃(32F~113F)
Humidity 10%~90%(no condensation)
Do not expose the product to the direct rays of the sun for a
long period.
Do not place the product in a dusty space and unstable place.
Model
Value Count Tape Detect
Serial Number Re
cognition
EE7 VS ● X ●
EE7 FS ● ● ●
Interface 3 Serial Ports, 1 USB2.0 (device), 1 USB2.0X1(Host), LAN port
Supplement
----57
5757
57----
Page 59

List of Attachments
Supplement
Standard Attachments
Power Cord
User Guide
Optional Attachments
External display
External display cable
----58
5858
58----
 Loading...