

Philips/Magnavox VRZ255AT Owner's Manual
Owner's Manual
Importantl
Return your Warranty Registration
Card within IO days. See why In_
• . # . ° o +_ , •
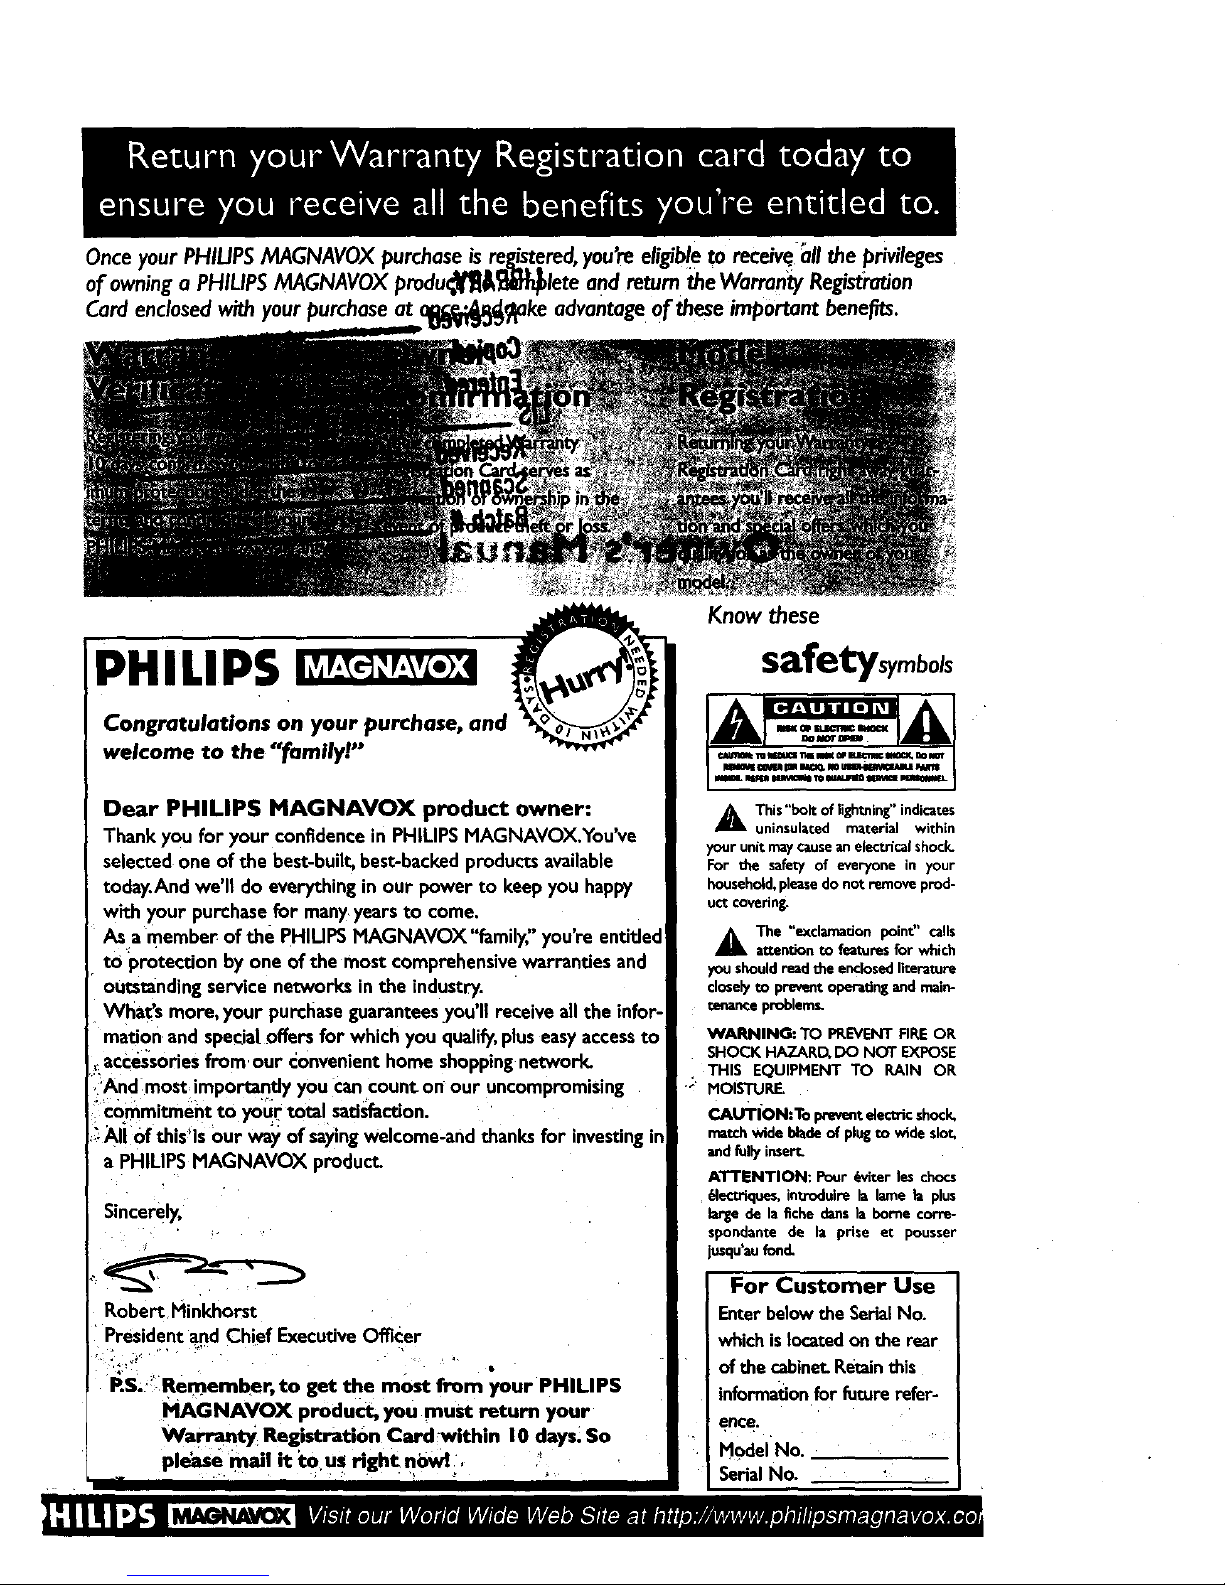
Onceyour PHILIPSMAGNAVOXpurchaseis reds.re.red, youreeligib!eto receive;all the prmleges
ofowninga PHILIPSMAGNAVOXprodu_&_iiPn_lete andreturntheWarran_ Re_st:rntion
Cardenclosedwithyourpurchaseat c advantageoftheseimportantbehests.
IPHILIPS
Congratulations on your purchase, and
welcome to the "family!"
Dear PHILIPS MAGNAVOX product owner:
Thank you for your confidencein PHIUPS HAGNAVOX.You've
selected one of the best-built,best-backedproductsavailable
today.And we'll do everythingin our power to keep you happy
with your purchasefor manyyears to come.
As a member of the PHIUPS HAGNAVOX"family," you're entitled
to protection by one of the most comprehensivewarranties and
outstandingservice networks in the industry.
What's more, your purchaseguaranteesyou'll receive all the infor-
mation and speciatoffers for which you qualify,pluseasyaccessto
_accessories from,our convenient home shoppingnetwork.
,'And most importantly you cancount.on our uncompromising
i'c_mmitment to your total,satisfaction.
_AII 0f this_ls our way of sayingwelcome-and thanks for investingin
a PHILIPS HAGNAVOX product.
Sincerely,
Robert Hinkhorst
Presidetlt and Chief ExecutiveOfficer
RS. ]Remember, to get the most from your PHILIPS
PIAGNAVOX product, you must return your
Warranty Registration Cardwithin 10 days.So
please mall it to us Hght ni)wl .
Know these
safetys mbols
_k This"bolt of Eghtning"indicates
uninsulated material within
your unit maycauseanelectricalshock.
For the safety of everyone in your
household,pleasedo not remove prod-
uct coverin_
_kThe "exdamadon point" calls
attention to featuresfor which
you shouldread the enclosedliterature
closelyto preventoperatingand main-
mnanceproblemL
WARNING: TO PREVENT RRE OR
SHOCK HAZARD, DO NOT EXPOSE
THIS EQUIPMENT TO RAIN OR
+_ HOISTURE+
CAUTION:To preventelectricshock.
matchwide blade of pfegcow_deslot.
andfully insert.
ATTENTION: Pour 6viter fes chocs
6fec_ques, inttoduire la lame El plus
large de la fiche dartsla home corm-
spondante de la prise et pousser
jusqu'aufond.
For Customer Use
Enter belowthe SerialNo.
whichis locatedon the rear
of the cabinet.Retainthis
informationfor futurerefer-
ence.
Model No.
SerialNo.
Introduction3
Welcome to yourVCR owner's manual.
This manualhassix sections:SettingUpYourVCR; Descriptionof Controls;BasicOperations;Recording;
Playing;andInformationYou May Need.The instructionsexplainallof the VCR'sfeatures,which arelisted
below.
Features
Automatic Channel Setup
Automatic Clock Setting
Automatic Head Cleaner
Daylight- SavingTime
Hi-Fi Stereo Tape Playback
Index Search
Multi-Channel Television Sound (MTS) System
19 Micron Head
On-Screen Menus in English, Spanish,or French
Quick Programming
•"Remote Control with Capability to Operate'IV, Cable Box, and Direct
Broadcast System (DBS)
• Repeat Play
• Skip Search
• VCR Plus+ Programming System
Safety Precautions
Warning:To prevent fire or shock hazard, do not expose this equip-
ment to rain or moisture.
FCC Warning:Any unauthorized changes or modifications to this
equipment void the user's authority to operate it,
ThisVCR, equippedwith a High Quality (HQ) System,is compatiblewith existing
Video Home System(VHS) equipment.ThisVCRalso isequippedwith S-VHS
Quasi Playback(SQPB),allowingyouto playS-VHS recordings with regularVHS
resolution.However,you maynot record on S-VHStapeswith thisVCR.
Thisproduct hasa 19 micron headwhichprovidesa better picturewhen you
viewtapes recorded in slowspeed(SLP).
Philips ConsumerElectronicsCompanyrecommends that youuse onlyvideo
cassettetapes that havebeen tested and inspectedfor useintwo, four, six,and
eighthourVCRs, andwhich are labelledwith the _ mark.The use oftapes
that havenot beeninspectedfor use in two, four,six,and eighthourVCRs may
result in poor picture qualityand excessivedepositson the video heads,which
may not be coveredbythe warrantyif damageoccurs.
Note to the CableTV System Installer:This reminder is provided to call the
Cable TV system installers attention to Article 820-40 of the National Electrical
Code, which provides guidelines for proper grounding - in particular, specifying
that the cable ground shallbe connected to the grounding system of the build-
ing, asclose to the point of cable entry as possible.
Operation is subject to the following two conditions: (I) this device maynot
cause interference, and (2) this device must accept any interference, including
interference that may cause undesired operation of the device.
Copyright 1998 PhilipsConsumer ElectronicsCompany.All
rights reserved.
VCR Plus+ and PlusCode are trademarks of Gemstar
Development Corporation.TheVCR Plus+ systemismanufac-
tured underlicensefrom Gemstar Development Corporation.
The ENERGYSTAR"name andlogoare registered marks of the
U.S.EnvironmentalProtection Agency.AsanENERGY STAR"
Partner, Philips Consumer ElectronicsCompanyhasdetermined
that this product or product model meets the ENERGY STAR•
guidelinesfor energyefficiency.
4 TableofContents
Setting UpYourVCR
Introduction ........... . .............. . ............................... 3
Table of Contents ........ _............................................. 4
Before UsingYour VCR .................................................. 5
Hookups Without a Cable Box ......................................... 6 - 7
HookupsWith a Cable Box/Direct Broadcast System ........................ 8 - 9
Turning on Your VCR .................................................. I0
Automatic Channel Seeup ........................................... 11 - 12
Setting the Clock ................................................. 13 - 17
Daylight-Saving Time ................................................... 18
LanguageSelection .................................................... 19
Description of Controls
Remote Control Buttons ........................................... 20 - 2 I
Display Panel ........................................................ 22
Front Panel .......................................................... 23
Rear Panel .......................................................... 24
On-Screen Status Displays .............................................. 25
Setting the Remote Control to Operate a'lV ............................... 26
Setting the Remote Control to Operate a Cable BoxiDBS ..................... 27
/-
Basic Operations
Playing ............................................................. 28
Recording ........................................................... 29
Recording
One-Touch Recording ................................................. 30
Recording One Channel/VVatchingAnother ................................ 3 I
Setting Up theVCR Plus+ Programming System .......................... 32 - 33
Timer RecordingWith theVCR Plus+ Programming System ................. 34 - 35
Quick Programming ............................................... 36 - 39
Timer Recording Speed Setting .......................................... 40
Rerecording (Tape Duplication) ........................................... 41
Playing
Index Search ......................................................... 42
Multi-Channel Television Sound System ................. _............... 43 - 44
Hi-Fi Stereo Tape Playback .............................................. 45
Video Stabilizer ...................................................... 46
Incredible Picture .................................................... 47
Playback Options ..................................................... 48
Automatic Operation Features ........................................... 49
InformationYou May Need
Glossary ............................................................. S0
Specifications ........................................................ 5 I
Helpful Hints ......................... _. ........................... 52 - 53
Limited Warranty .................................................... 54
Index ............................... . ................ .............. 55
Supplied Accessories .................................................. 56
BeforeUsingYourVCR5
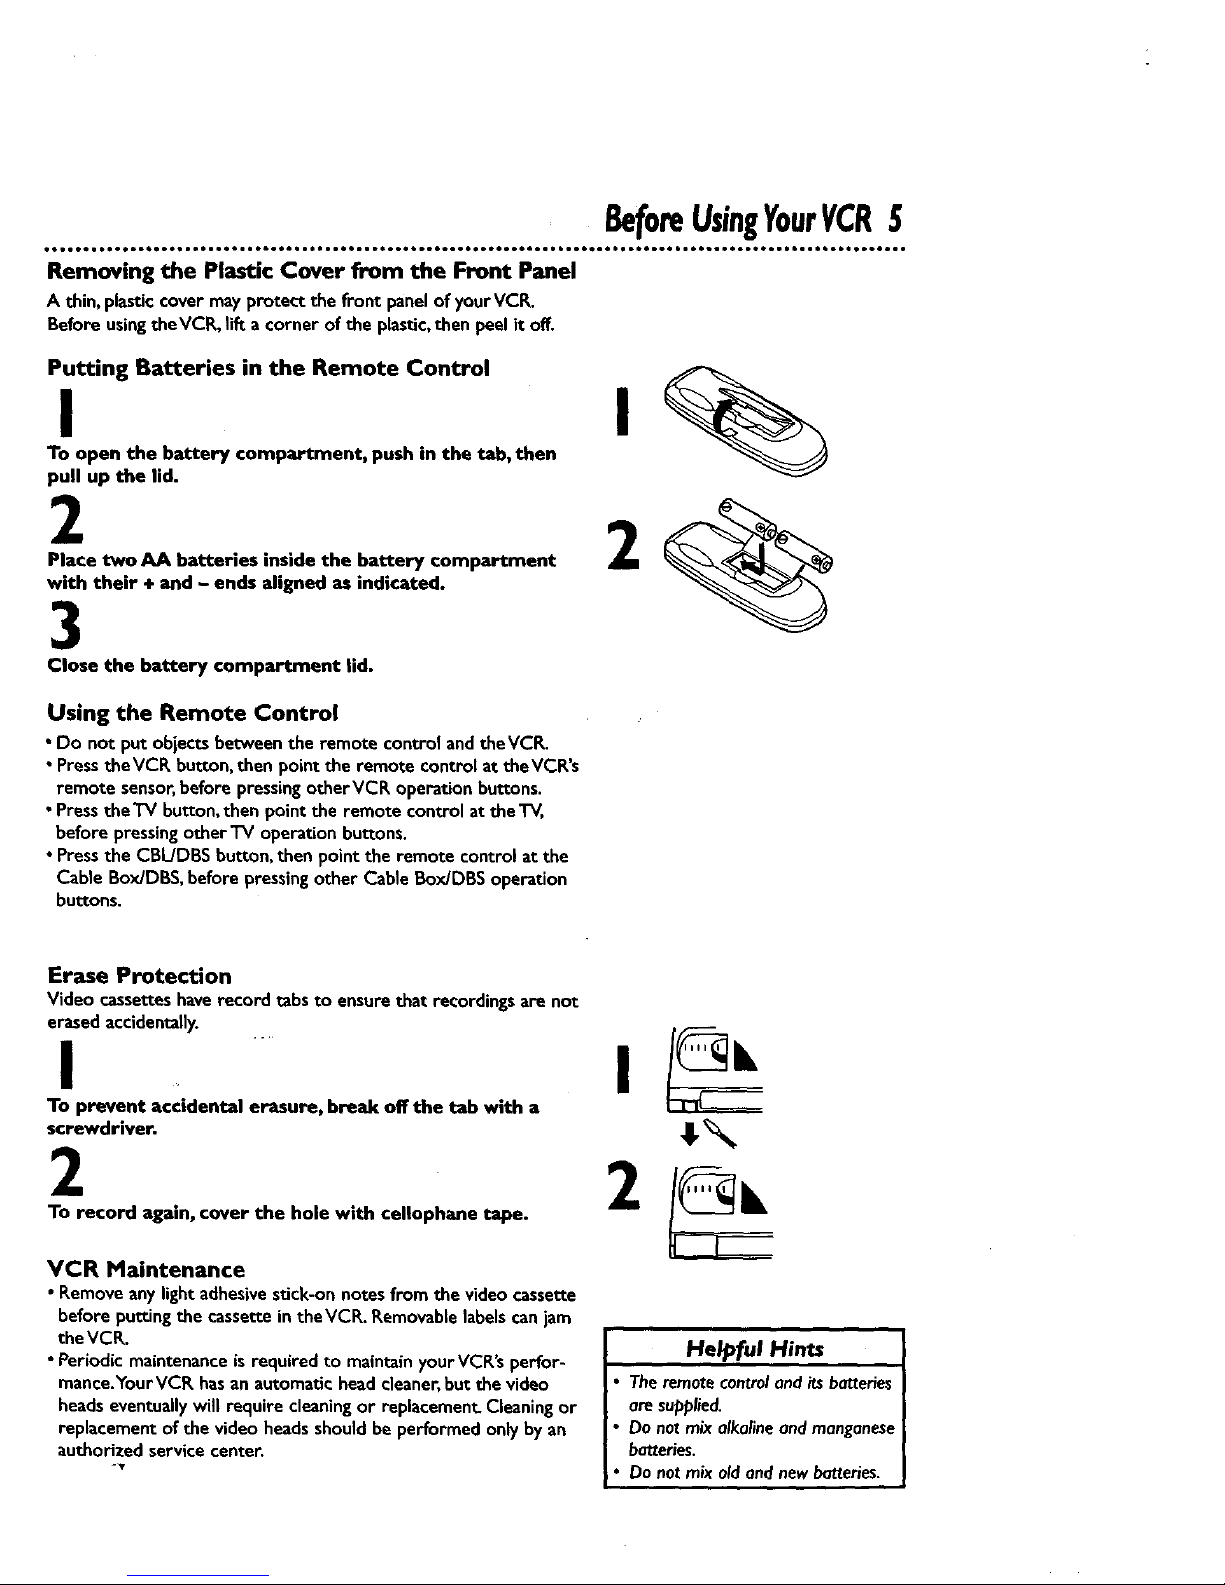
Removing the Plastic Cover from the Front Panel
A thin, plasticcovermayprotect the front panelof yourVCR.
BeforeusingtheVCP_lift a corner of the plastic,then peelit off.
Putting Batteries in the Remote Control
I I
To open the battery compartment, push in the tab, then
pull up the lid.
2
Place two AA batteries inside the battery compartment
with their + and - ends aligned as indicated.
3
Close the battery compartment lid.
2
Using the Remote Control
• Do not put objectsbetweenthe remote controlandtheVCR.
• PresstheVCR button, then point the remote controlat theVCR's
remote sensor,before pressingotherVCR operationbuttons.
• PresstheTV button,then point the remote control at theTV,
before pressingotherTV operation buttons.
• Pressthe CBIdDI3Sbutton,then point the remote controlat the
Cable Box/DBS,before pressingother Cable Box/DBS operation
buttons.
Erase Protection
Video cassetteshaverecord tabsto ensurethat recordings are not
erasedaccidentany.
I
To prevent accidental erasure, break off the tab with a
screwdriver.
2
To record again, cover the hole with cellophane tape.
VCR Maintenance
• Remove any lightadhesivestick-onnotes from the videocassette
beforeputtingthe cassettein theVCR. Removablelabels canjam
the VCR.
• Periodic maintenance is required to maintain your VCR'sperfor-
mance.¥ourVCR hasan automatichead cleaner,but the video
headseventually will require cleaningor replacement. Cleaningor
replacement of the video heads should be performed only by an
authorized service center.
Helpful Hints
Theremote controland itsbatteries
are supplied.
Do notmix alkalineand manganese
batteries.
Donotmix old and newbatteries.
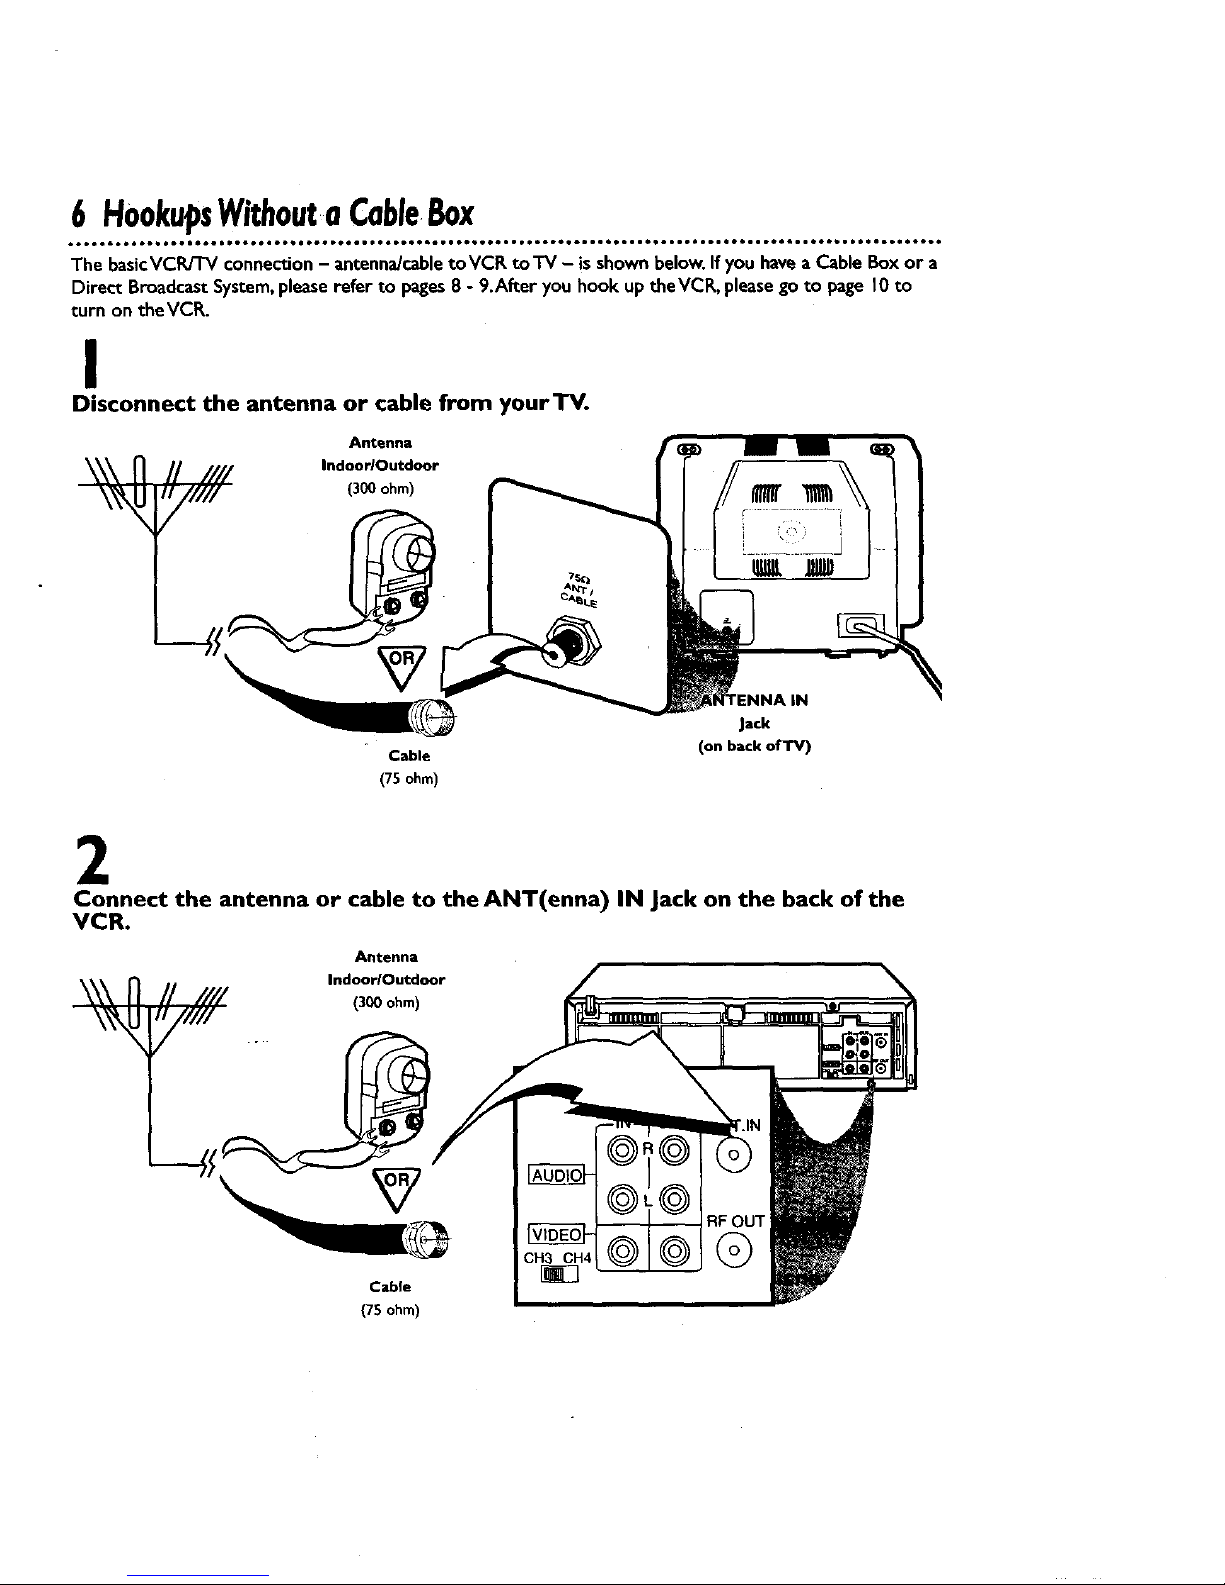
6 HookupsWithoutaCableBox
The basicVCWTV connection- antenna/cabletoVCR toTV - isshownbelow.Ifyou havea Cable Boxor a
Direct Broadcast System, please refer to pages 8 - 9.After you hook up theVCR, please go to page l0 to
turn on theVCR.
I
Disconnect the antenna or cable from yourTV.
Antenna
IndoorlOutdoor
(300 ohm)
Cable
(75 ohm)
Jack
(on back of'IV)
2
Connect the antenna or cable to the ANT(enna) IN Jack on the back of the
VCR.
Antenna
Indoor/Outdoor
(300 ohm)
Cable
(7Sohm)
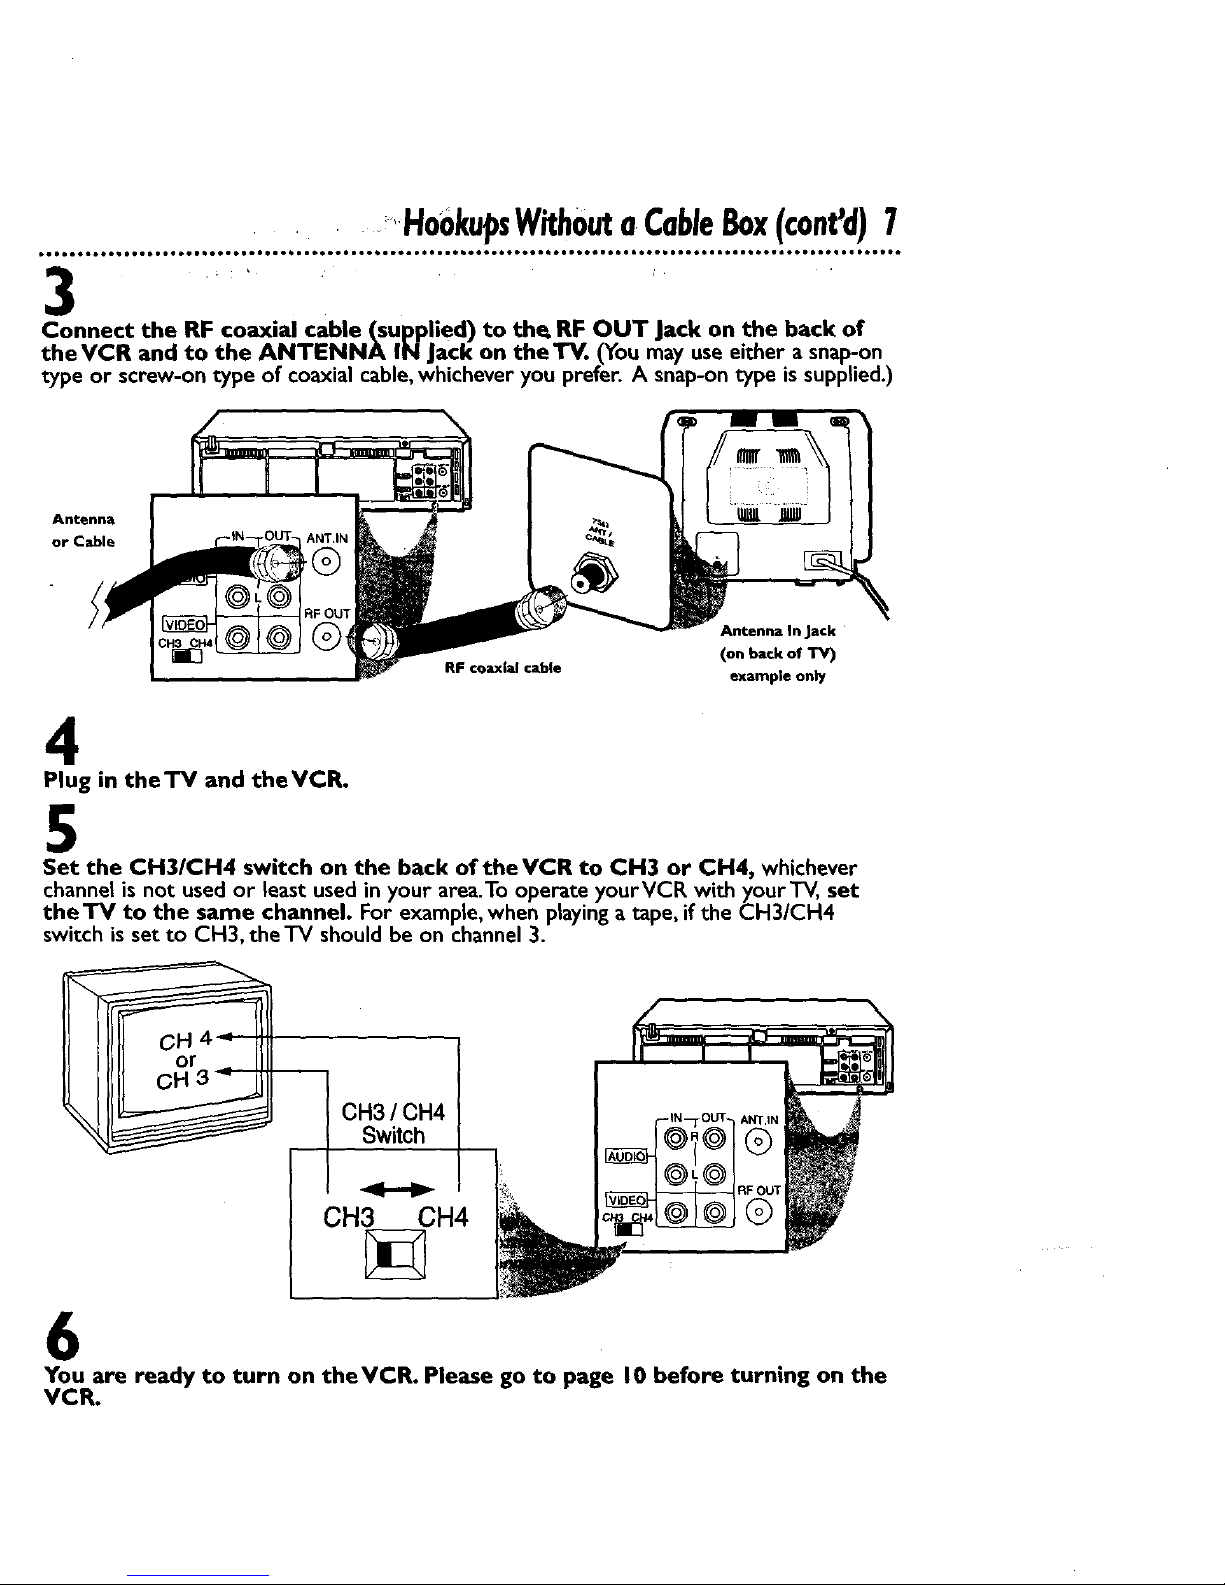
•HookupsWithoutaCableBox(cont'd)7
_ , ; •
Connect the RF coaxial cable (supplied) to the. RF OUT Jack on the back of
theVCR and to the ANTENNA IN Jack on the TV. (You may use either a snap-on
type or screw-on type of coaxial cable,whichever you prefer. A snap-on type is supplied.)
Antenna
or Cable
RF coaxial cable
Antenna In Jack
(on back of TV)
example only
4
Plug in theTV and theVCR.
5
Set the CH3/CH4 switch on the back of the VCR to CH3 or CH4, whichever
channel is not used or least used in your area.To operate yourVCR with your TV, set
the TV to the same channel. For example, when playing a tape, if the CH3/CH4
switch is set to CH3, the TV should be on channel 3.
CH3 / CH4
Switch
CH3 CH4
6
You are ready to turn on theVCR. Please go to page 10 before turning on the
VCR.
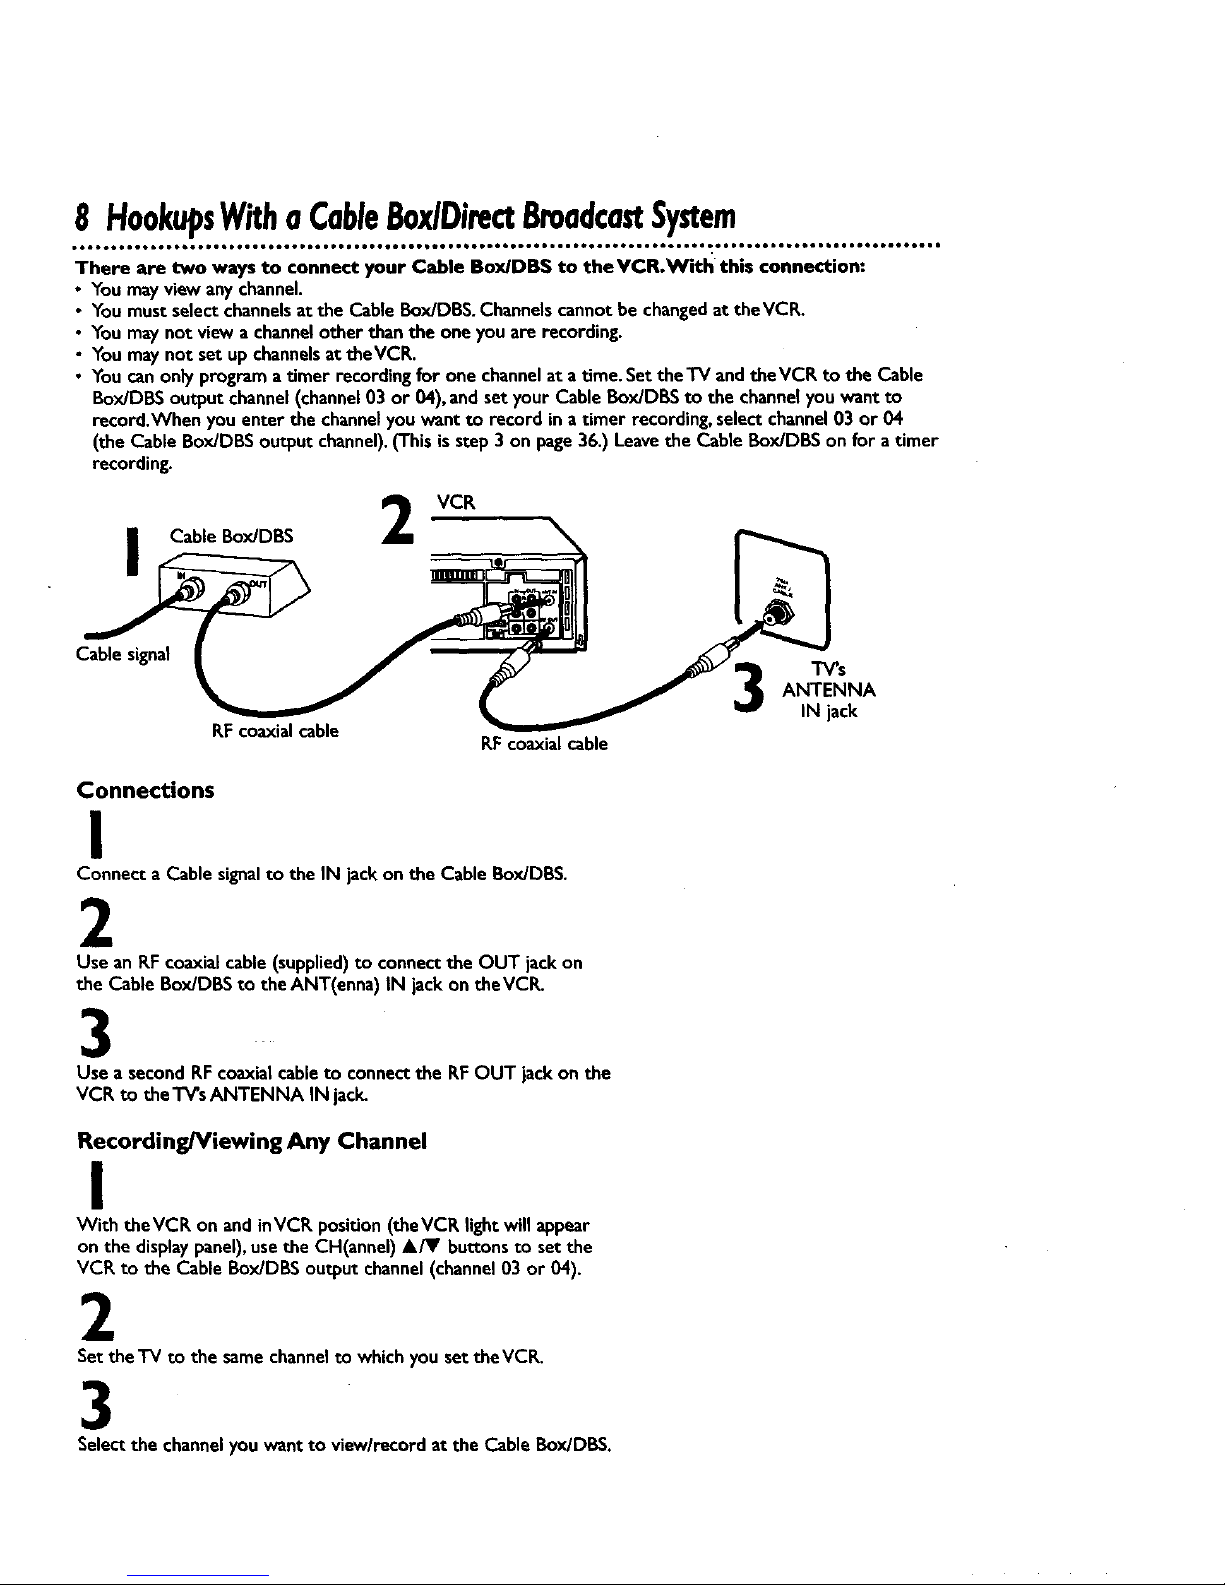
8 HookupsWitha CableB0x/DimctBroadcastSystem
• • • • • • • • • • • • • • • • • • • • • • • • • • • • • • • • • • • • • • • • • • • • • • • • • • Q • • • • • • • • • • • • • • • • • • • • • • • • • • • • • •! • • • • • • • • • • • • • • • • • • • • • • • • • • • • •
There are two ways to connect your Cable Box/DBS to theVCR.With this connection:
• Youmayview anychannel.
• You must selectchannelsatthe Cable Box/DBS.Channelscannotbechangedat theVCR.
• You maynot view a channelother than the one youare recording.
• You maynot set upchannelsat theVCR.
• You canonlyprograma timer recording for one channelat atime. SettheTV andtheVCR to the Cable
Box/DBSoutput channel(channel03 or 04), andsetyour CableBox/DBSto the channelyou want to
record.When you enter the channelyou want to record in atimer recording, selectchannel03 or 04
(the Cable Box/DBSoutput channel).(This isstep3on page36.) Leavethe CableBox/DBSon for a timer
recording.
Cable Box/DBS
VCR
Cable signal
RFcoaxialcable
RFcoaxialcable
Connections
I
Connect a Cable signalto the IN jack on the Cable 13ox/DBS.
2
Usean EF coaxialcable (supplied)to connectthe OUT jackon
the Cable Box/DBSto theANT(enna) IN jack on theVCR.
3
Use a secondRFcoaxialcableto connectthe RFOUT jack on the
VCR to theTV'sANTENNA IN jack.
Recording/Viewing Any Channel
I
With theVCR on and inVCR position (theVCR light will appear
on the display panel), use the CH(annei) A/Y buttons to set the
VCR to the Cable Box/DBS output channel (channel 03 or 04).
2
Set the TV to the samechannelto whichyou set theVCR.
TV_s
ANTENNA
IN jack
3
Select the channelyouwant to view/recordat the Cable Box/DBS.

HookupsWithaCableBox/DirectBroadcastSystem(cant'd)9
With this connection:
• Youmaywa:_chone channelwhile recording another.
• Youmaynot record scrambledchannels.
I VCR
CableBoxJDBS
Cable signal _ -I'V's
ANTENNA
RFcoaxialcable iN jack
RF coaxialcable
Connections
I
Connect a Cable signalto theVCR's ANT(enna) IN iack.
2
Use anRF coaxialcable(supplied)to connectthe RF OUT jackon
theVCR to the IN jack on the Cable Box/DES.
3
Use a secondRF coaxial cableto connect the OUT jackon the
Cable Box/DBS to the TV'sANTENNA IN jack.
Recording One Channel/_Natching Another
I ....
Putthe Cable Box/DBS on the samechannelastheVCR's
CH31CH4 switch.Then,with theVCR inVCR position(theVCR
light will appearon the displaypanel),usethe CH(annel) A/Y but-
tons to select the channelyou want to record at theVCR. Start
the recording.
2
PresstheVCRFIW button once to put theVCR inTV position.
(TheVCR lightwill disappear.)
3
Set theTV to the Cable BOx/DBSoutput channel(03 or 04).
4
Selectthe channelyou want to watch at the Cable BOx/DBS.
Whenyouplay atape,makesure
the CableBoxIDBSissetto the
samechanne/asthe CH3/CH4
switchontheVCR.SettheW to the
CableBox/DBSoutputchannel(0-!
or 04).
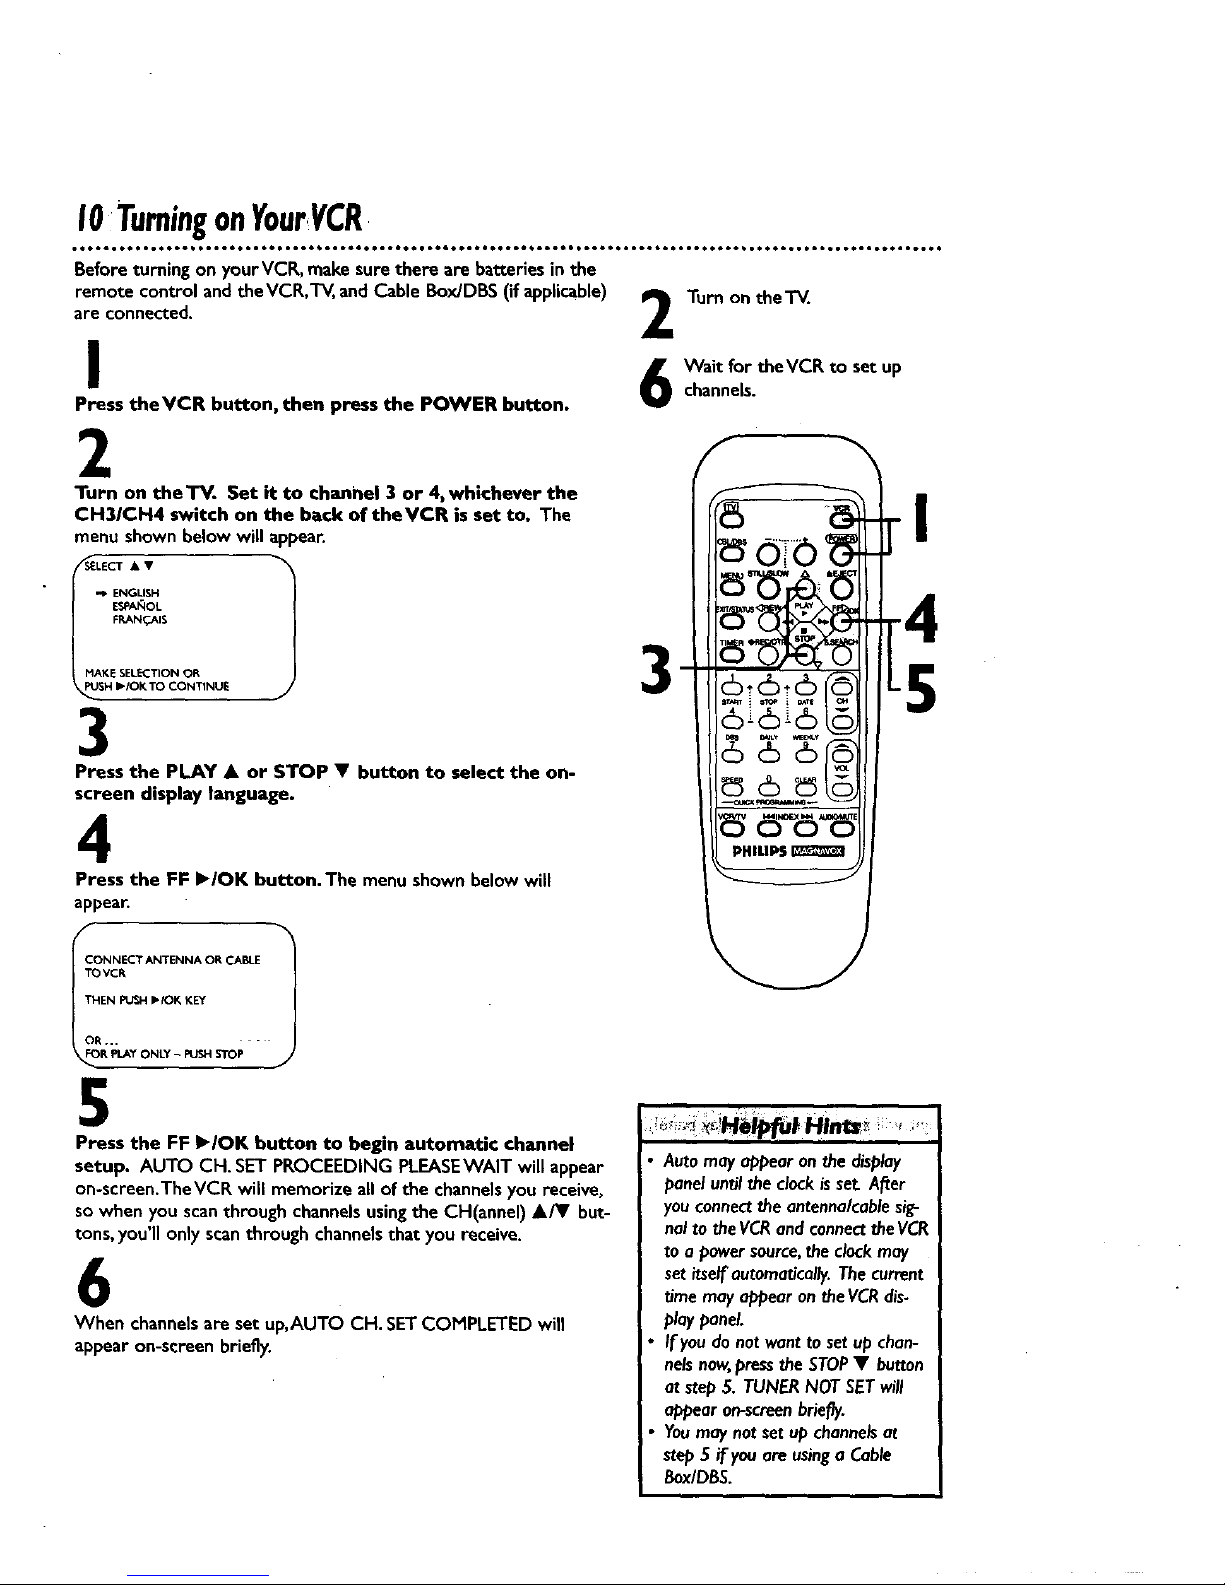
IOTurningonYourVCR
Before turning on yourVCR, make sure there are batteries in the
remote control and the VCR,TV, and Cable Box/DBS (if applicable)
are connected.
I
Press theVCR button, then press the POWER button.
Turn on theTV.
Wait for theVCR to set up
channels.
2
SIEIECT • •
•'_ ENGLISH
ESPA_Ot.
F'P,ANrCAIS
MAKE SELECTION OR
$H I_/OK TO CONTINUE
Turn on theTV. Set it to channel 3 or 4, whichever the
CH31CH4 switch on the back of theVCR is set to, The
menushownbelow will appear.
"/
J
3
Press the PLAY • or STOP • button to select the on-
screen display language.
4
Press the FF I_/OK button. The menu shown belowwill
appear.
I "/
CONNECT ANTENNA OR CABLE
TOVCR
THEN PUD4 I_IOK KEY
OR... -
R PI_Y ONLY - PtlN-I _rOP J
5
Press the FF ,IOK button to begin automatic channel
setup. AUTO CH.SET PROCEEDING PLEASEWAIT will appear
on-screen.The VCR will memorize all of the channels you receive,
so when you scan through channels using the CH(annel) •/V but-
tons, you'll only scanthrough channels that you receive.
6
When channels areset up,AUTO CH. SETCOMPLETED will
appear on-screen briefly.
3
I
Automayappear onthedisplay
panel untilthe clockisset.After
youconnectthe antenna/cablesig-
nal to theVCRandconnecttheVCR
toa power source,the clockmay
set itselfautomatically.Thecurrent
time mayappearon theVCRdis.
playpanel.
If youdo notwant to setup chan-
nelsnow,pressthe STOP• button
at step5. TUNERNOT SETwill
appear on-screenbriefly.
Youmaynotset upchannelsat
step5 if youareusinga Cable
Box/DBS.
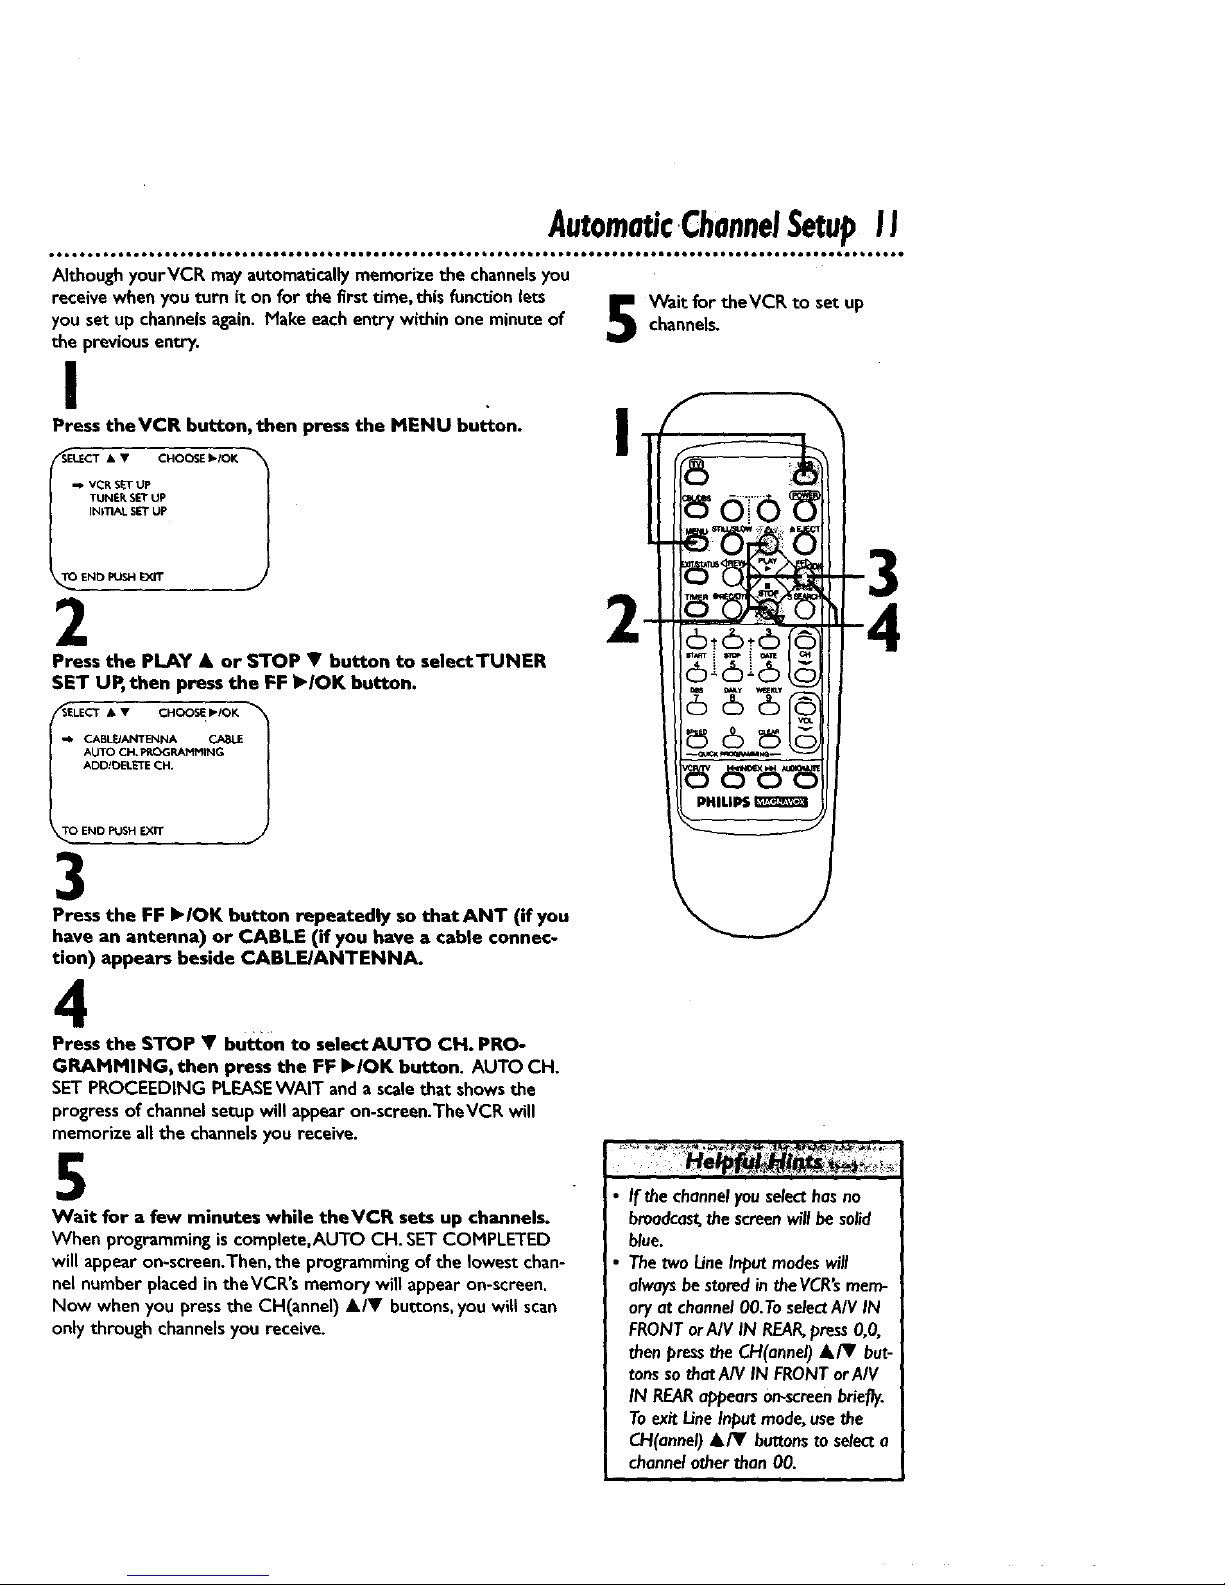
AutomaticChannelSetupII
Although yourVCR mayautomaticallymemorizethe channelsyou
receive whenyou turn it on for the first time, this functionlets
you setup channelsagain. Makeeach entrywithin one minute of
the previousentry.
!
Press theVCR button, then press the MENU button.
2
Press the PLAY • or STOP • button to selectTUNER
SET UP, then press the FF I_/OK button.
-I. CABLE/ANTENNA. CABLE
AUTO CH, PROGRAMMING
ADD/nELETE CH.
END PUSH EXIT
3
Press the FF I_IOK button repeatedly so that ANT (if you
have an antenna) or CABLE (if you have a cable connec-
tion) appears beside CABLE/ANTENNA.
Wait for theVCR to set up
channels.
I
4
Press the STOP • button to select AUTO CH. PRO-
GRAMMING_ then press the FF Ib/OK button. AUTO CH.
SETPROCEEDING PI.EASEWAlT anda scalethat showsthe
progressof channelsetup will appearon-screan.TheVCR will
memorizeall the channelsyou receive.
5
Wait for a few minutes while theVCR sets up channels.
When programmingiscomplete,AUTO CH. SET COMPLETED
will appearon-screen.Then,the programmingof the lowestchan-
nel numberplacedin theVCR's memory will appearon-screen.
Now when youpressthe CH(annel) •/• buttons,youwill scan
onlythrough channelsyou receive.
If the channelyouselecthasno
bmadca_thescreenwillbe solid
blue.
Thetwo/ine Inputmodeswill
alwaysbestored intheVCR'smem-
ory at channel00.1"oselectA/V IN
FRONTorAIV IN REAR,press0,0,
thenpressthe CH(annel)•IY but-
tonsso thatAIV IN FRONTor AIV
IN REARappearson-screenbriefly.
Toexit LineInputmode,usethe
CH(annel)•/• buttonstoselecta
channelotherthan 00.
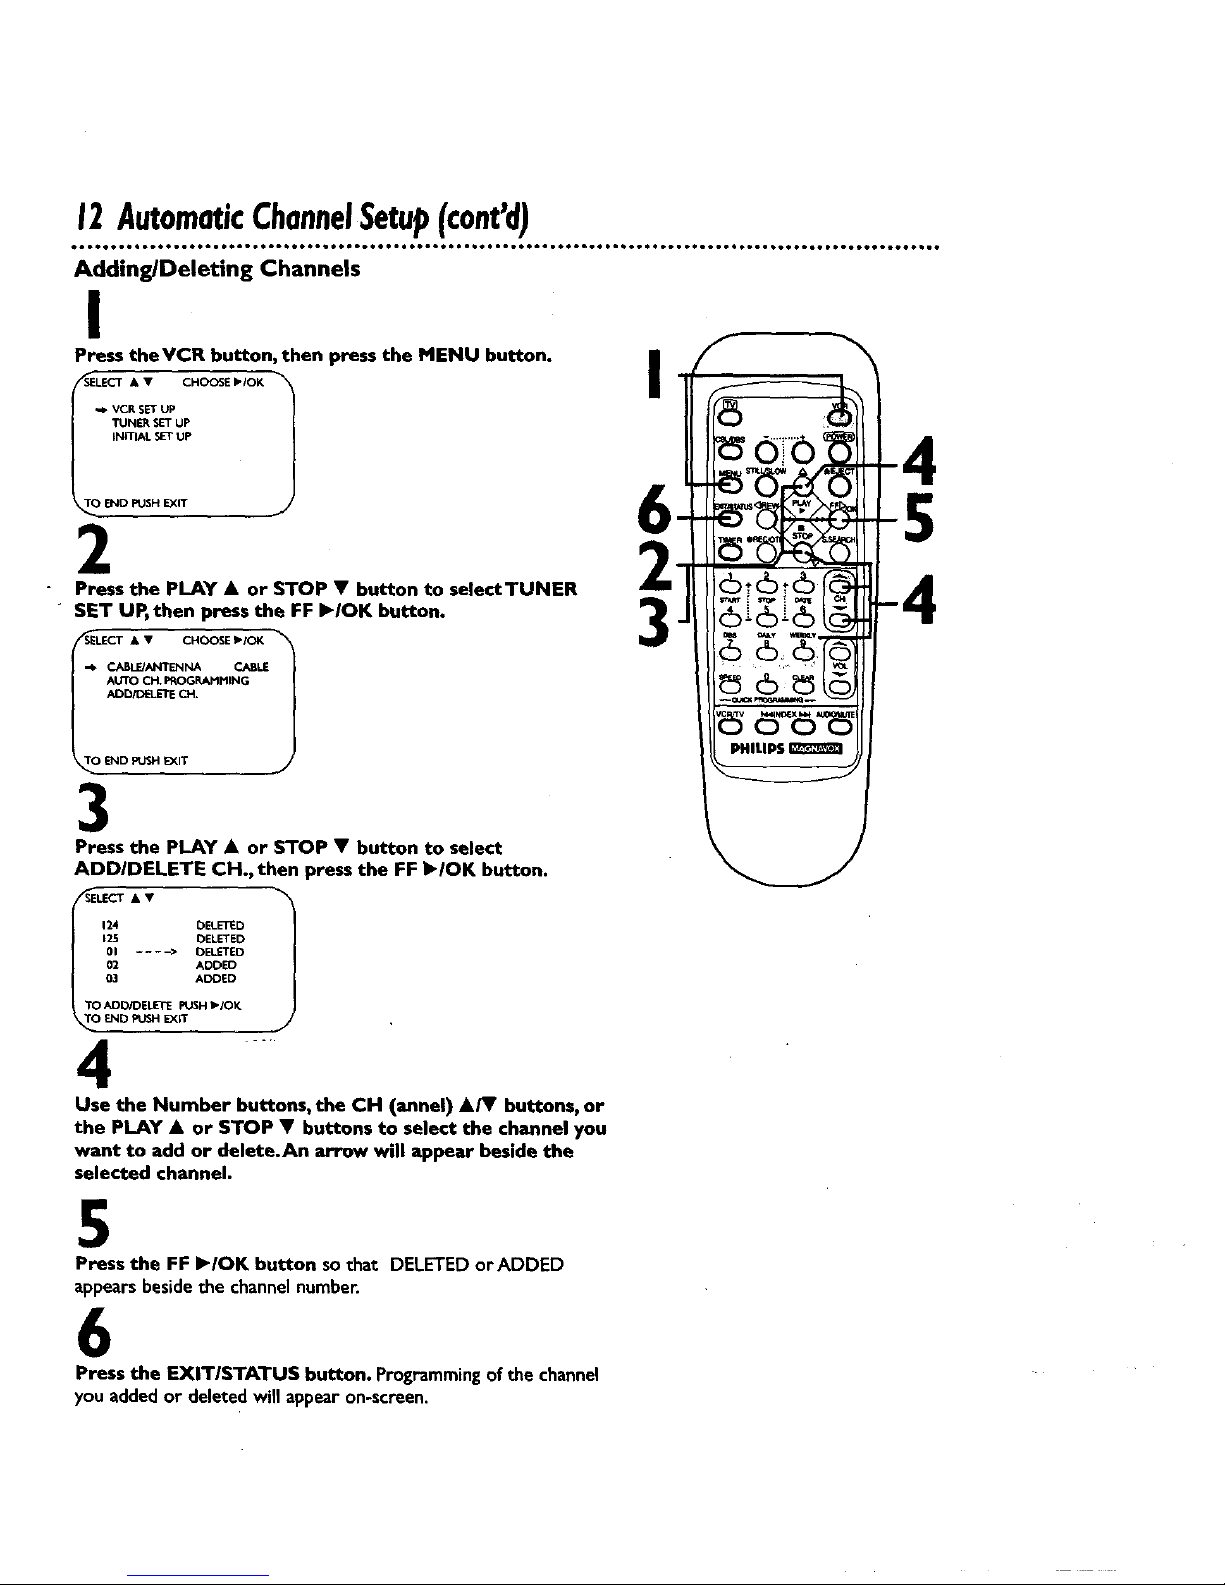
12AutomaticChannelSetupIcont'd)
Adding/Deleting Channels
I
Press theVCR button, then press the MENU button.
VCR SET UP
TUNER SET UP
IN_L _l" UP
2
Press the PLAY • or STOP • button to selectTUNER
• SET UP, then press the FF I_IOK button.
1
AUTO CH. P'ROGRJLMMING
3
Press the PLAY • or STOP • button to select
ADDIDELETE CH., then press the FF I_/OK button.
SELECT • •
_25 eEl&frED
01 .... • DELETED
02 ADDED
03 A_ED
"TOADD/DELETE PUSH _IOK
N_ID PUN-I EXff J
4 "
Use the Number buttons, the CH (annel) •/V buttons, or
the PLAY • or STOP • buttons to select the channel you
want to add or delete.An arrow will appear beside the
selected channel.
I
6
3
5
Press the FF I_IOK button so that DELETED orADDED
appears beside the channel numhen
6
Press the EXITISTATUS button. Programmingof the channel
you addedor deleted will appearon-screen.
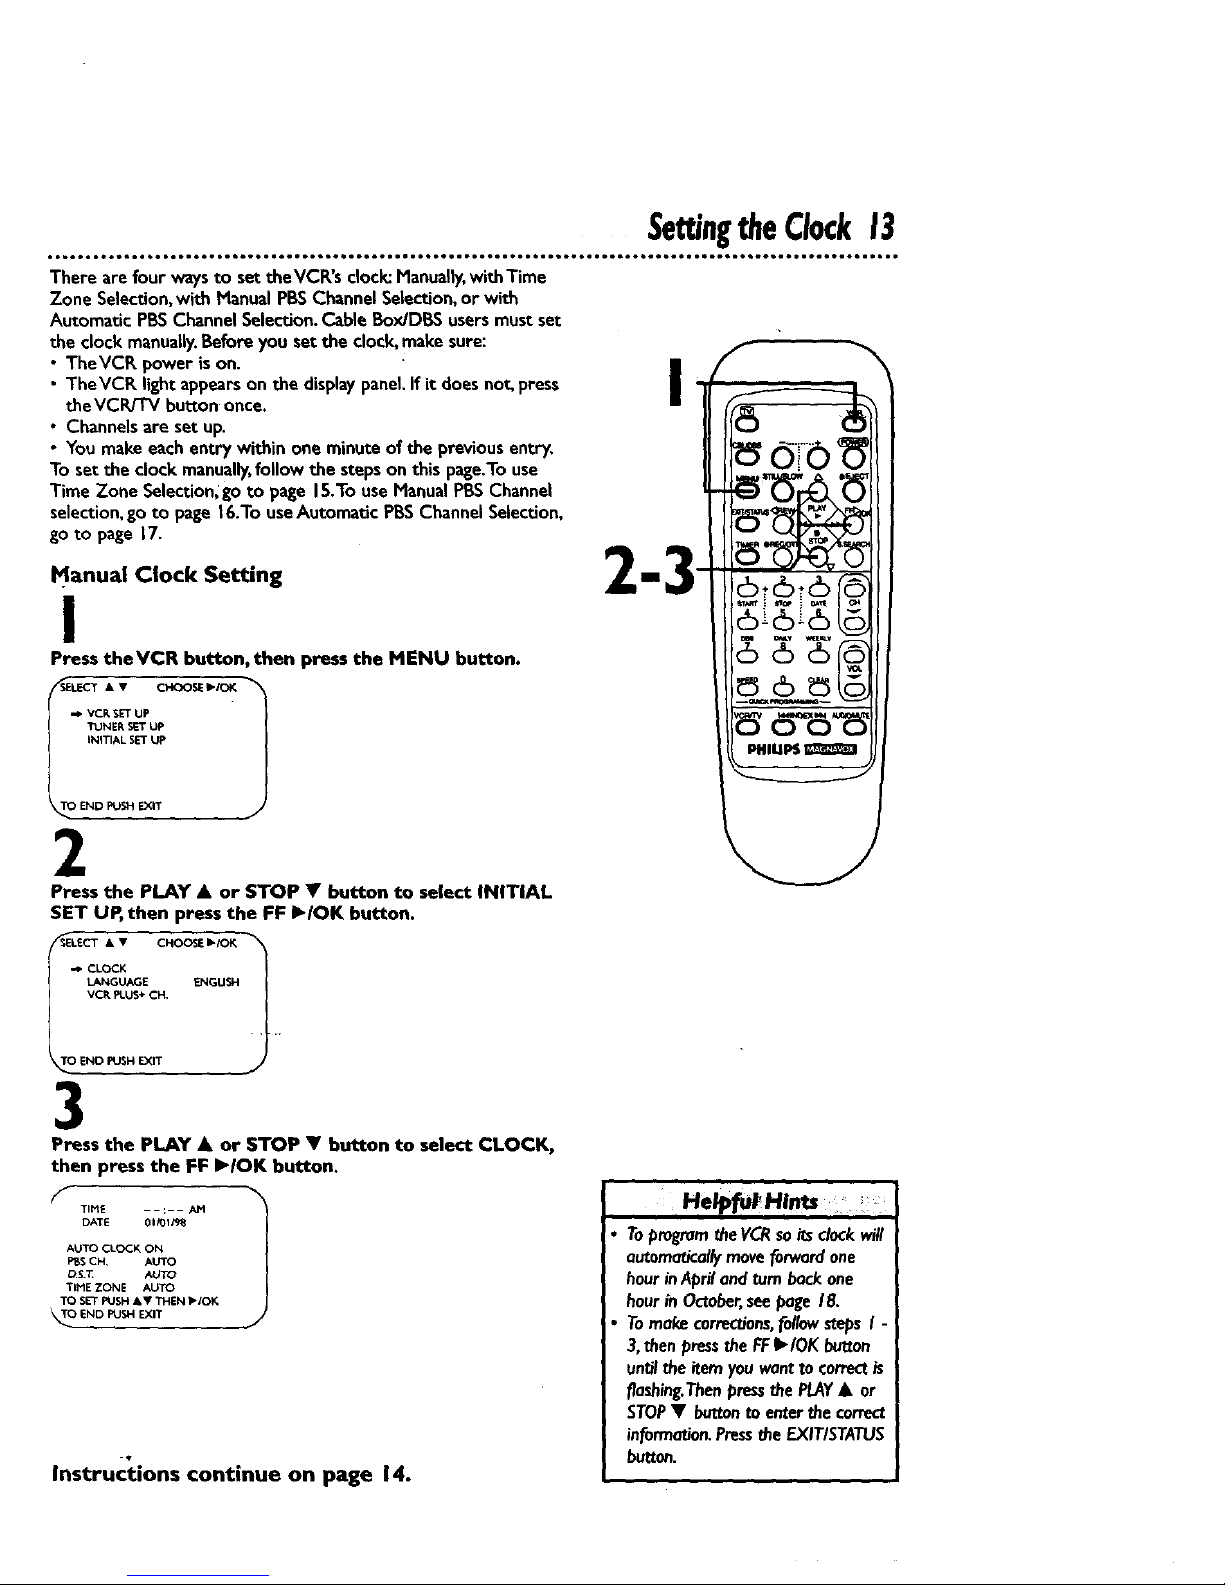
Se ngtheClock13
• • • * • • • • • • • • • • • • • • • • • • • • 6 • • • • • • • * • • • • • • • • • • • • • • • • • • • • • • • • • • • • • • 6 • • • • • • • • • • • • • • • • • • • • • • • • • • • • • e• • • • • • • • • • • • • • • • •
There are four waysto set theVCR's dock_Hanuatly,withTime
Zone Selection,with Hanual PBSChannelSelection,or with
Automatic PBSChannelSelection.CableBox/DBS usersmustset
the clockmanually.Before youset the clock,makesure:
• TheVCR power is on. •
• TheVCR lightappearson the displaypanel,if it does not,press
I
the VCPd'I"V button once.
• Channels are set up.
• Youmakeeachentry within oneminute of the previous entry,
To set the clock manually,follow the stepson this page:Touse
Time 7one SelecUon_goto page 15.Touse ManualPBSChannel
selection,go to page16.To use Automatic PBS Channel Selection,
go to page 17.
Manual Clock Setting
I
Press theVCR button, then press the MENU button.
-_ VCR SET UP
TUNER SET UP
INITIAL SET UP
END F_JSH EXiT j,
2
Press the PLAY • or STOP • button to select INITIAL
SET UP, then press the FF I_IOK button.
VCI_ PLUS+ C_
_T 0 " _
ENO PUSI'I EXIT _/
3
Press the PLAY • or STOP • button to select CLOCK,
then press the FF I_IOK button.
TIME ..... AM l
DATE 01_)1/9_
AUTO CLOCK ON
PBSCH, AUTO
_S.1_ AUTO
Tli'*1E ZONE AU'FO
TO SET PUSH k_ f THEN I_/OK
_.O END PUSH EXIT
J
Instructions continue on page 14.
He/p_ Hints
Toprogram theVCRsoitsclackwill
automatk:al/ymoveforwardone
hourinAprilandrumbackone
hourin October,seepage18.
Tomakecorrectious,fo//owstepsI
3,then pressthe FFI,'IOK button
unti/theitemyouwantto correct
flashing.Thenpressthe PLAY• or
STOP• buttonto enterthecorrect
informatJon.PresstheEXIT/STATUS
huron.
14SettingtheClock(cont'd)
TtHE l0 : 4SAM
DATE 01/01/96
AUTOCLOCK OFF
D_T. ON
TO SETPUSHAV THEN IPiOK
ENDPUSHEXIT
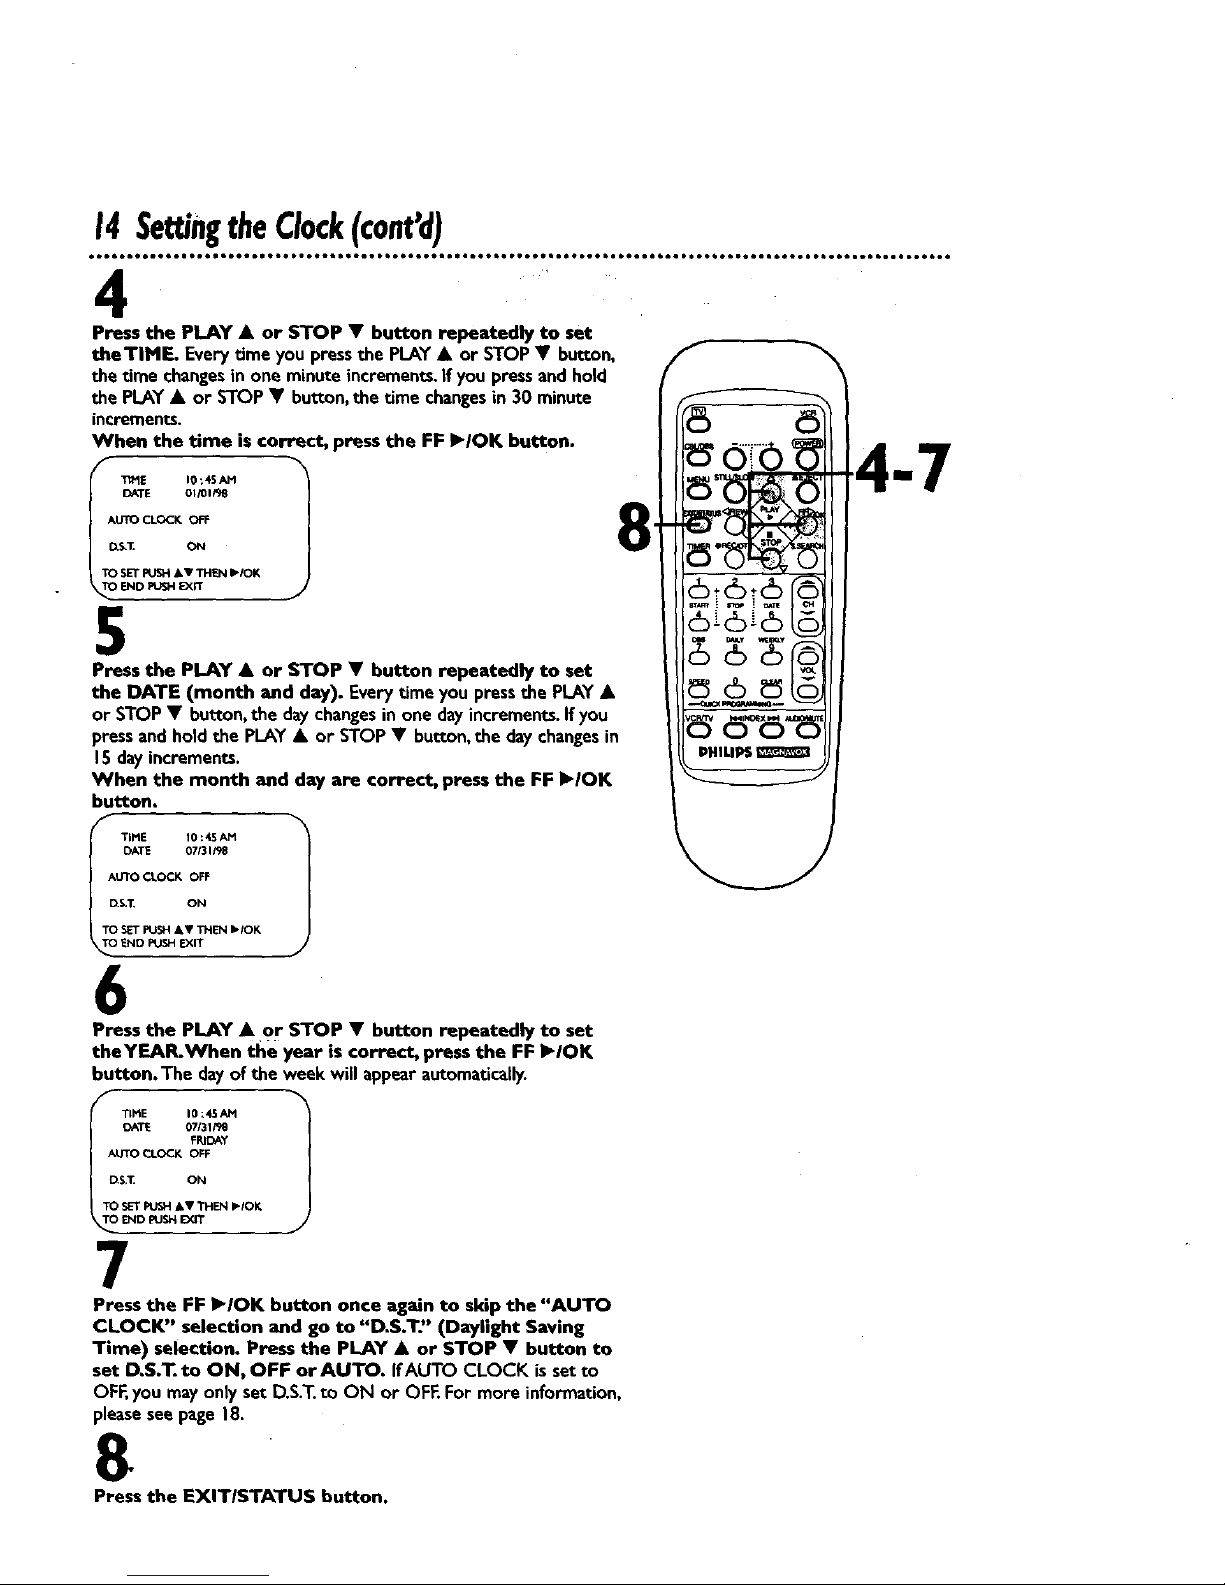
Press the PLAY & or STOP • button repeatedly to set
theTIME. Everytime you pressthe PLAY • or STOP• button,
the time changesin one minute increments,if you pressandhold
the PLAY• or STOP • button,the time changesin 30 minute
increments.
When the time is correct, press the FF )'/OK button.
5
Press the PLAY • or STOP • button repeatedly to set
the DATE (month and day). Everytime you pressthe PLAY•
or STOP • button, the daychangesin one dayincrements.If you
pressandhold the PLAY• or STOP • button,the day changesin
15 dayincrements.
When the month and day are correct, press the FF I_/OK
button.
DATE 07131,'98
AUTO CI.OCK OFF
D.$.T, ON
'TO SETPIJSH kV THEN Ib.IOK
_hlD PUSH EXIT
6
Press the PLAY • or STOP • button repeatedly to set
theYEAR.When the year is correct, press the FF I_IOK
button. The dayof the week will appearautomatically.
OAT_E 07/31/V8
_ _I.OCK OFF
D.S,_ ON
TO S_T PUSH&T THEN _IOK
E/,IDpJSl_ _¢.rr
7
Press the FF I_IOK button once again to skip the "AUTO
CLOCK" selection and go to "D.S.T:' (Daylight Saving
Time) selection. Press the PLAY • or STOP • button to
set D,S.T. to ON, OFF or AUTO. IfAUTO CLOCK is setto
OFF,youmayonly set D.S.T.to ON or OFF.For more information,
pleasesee page18.
8
Press the EXITISTATUS button.
SettingtheClock(c0nt'd)15
Time Zone Selection
I
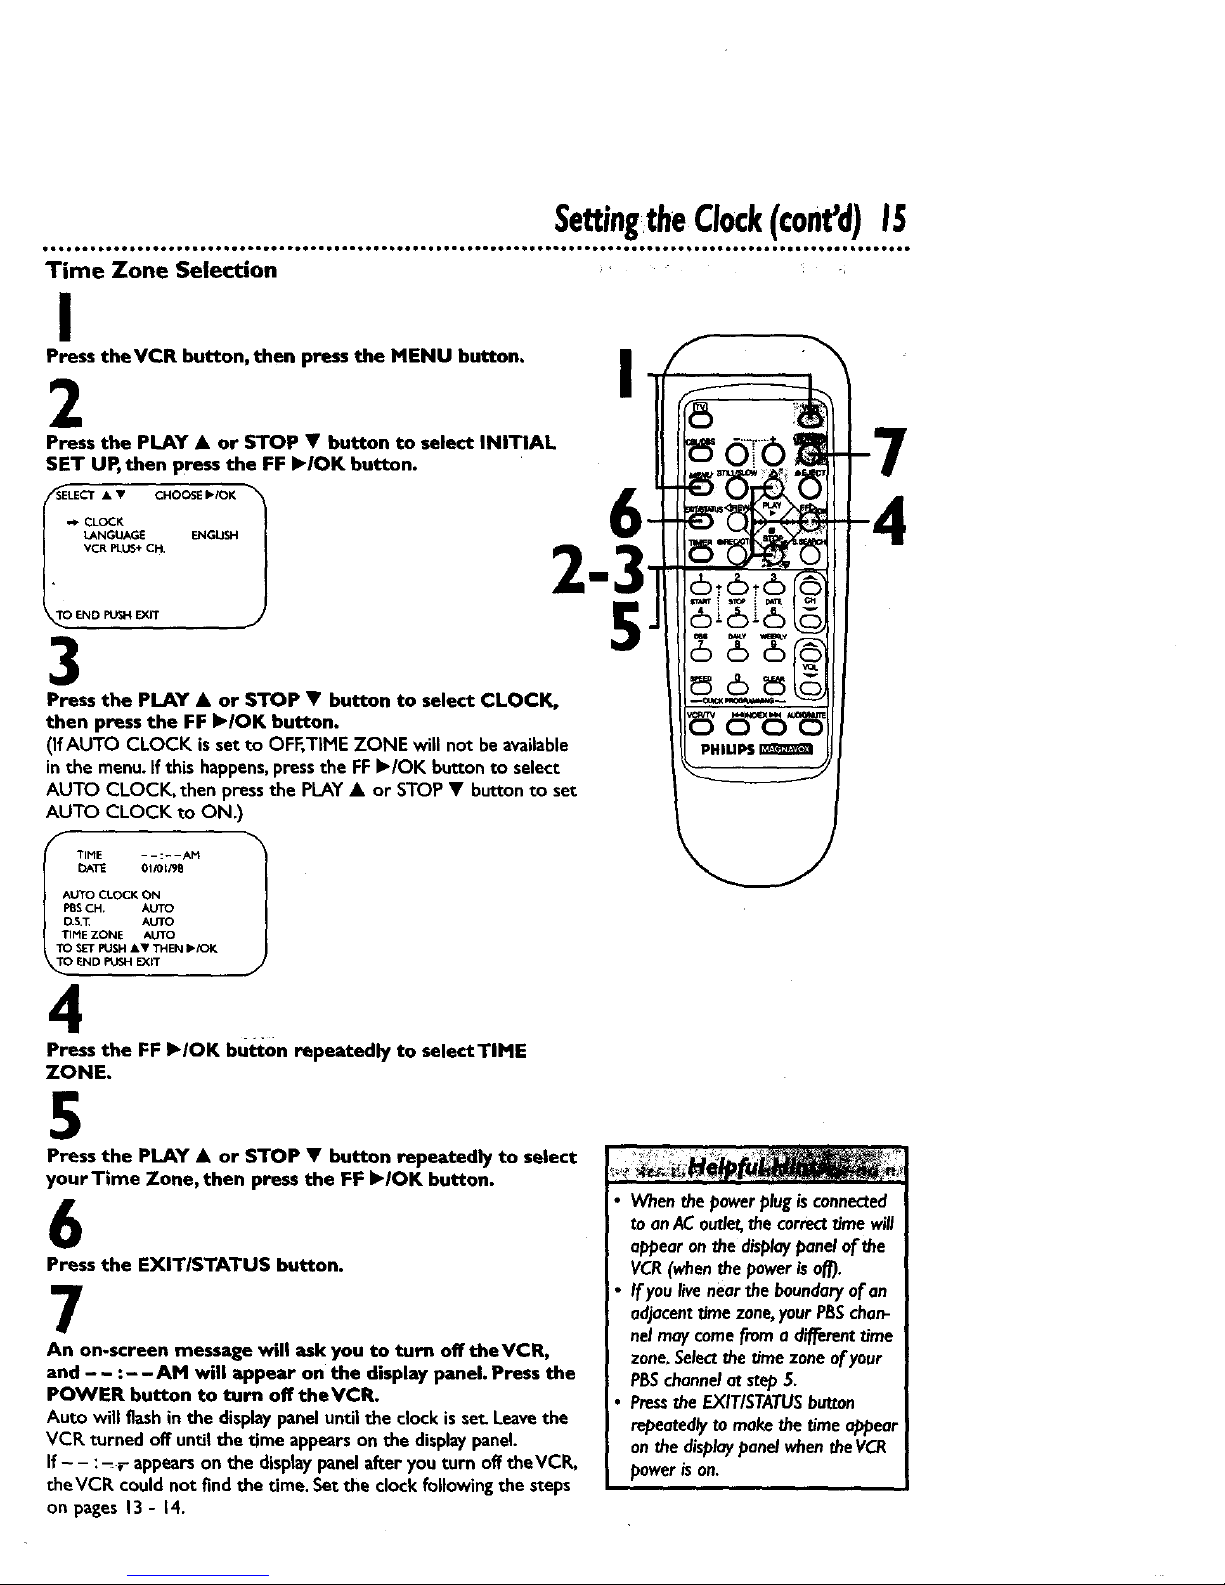
Press theVCR button, then press the MENU button.
2
Press the PLAY • or STOP • button to select INITIAL
SET UP, then press the FF I_/OK button.
SELECT • • CHOOSE IbiOK
" CL°CK
tANGUAGE ENGUSH
VCR PLUS÷ CH.
END PUSH EXIT
3
Press the PLAY • or STOP • button to select CLOCK,
then press the FF I_IOK button.
(IfAUTO CLOCK isset to OFF,TIME ZONE will not beavailable
in the menu. If this happens,pressthe FFI_/OK button to select
AUTO CLOCK, then pressthe PLAY• or STOP• button to set
AUTO CLOCK to ON.)
f "l
TIME --:--AM
I_ATE 01iOt/911
AUTO CLOCK ON
PBSCH, AUTO
O.S,_ AUTO
TIME ZONE AUTO
TO SET PUSH AV THEN I_/OK
END _ EXiT J
4
Press the FF I_IOK bu_0n repeatedly to selectTIME
ZONE.
I
5
5
Press the PLAY • or STOP • button repeatedly to select
yourTime Zone, then press the FF I_IOK button.
6
Press the EXIT/STATUS button.
7
An on-screen message will ask you to turn off theVCR,
and - - :- -AM will appear on the display panel. Press the
POWER button to turn off theVCR.
Auto will flashin the displaypaneluntilthe clockis se_Leavethe
VCR turned off untilthe time appearson the displaypanel.
If- - :-_r appearson the displaypanelafter you turn offtheVCR,
theVCR couldnot find the time. Setthe clockfollowingthe steps
on pages13- 14.
Whenthe power plugisconnected
to anAC outlet,thecorrecttimewill
appear onthe displaypanelof the
VCR(whenthe powerisoff).
Ifyou live nearthe boundaryof an
adjacenttime zone,your PESchan-
nelmay camefrom a differenttime
zone.Selectthetime zone0fyour
PBSchannelat step5.
Pressthe EXIT/STATUSbutton
repeated/ytomakethe time appear
onthe displaypanelwhentheVCR
poweris on.
16SettingtheClock(cont'd)
Manual PBS Channel Selection
I
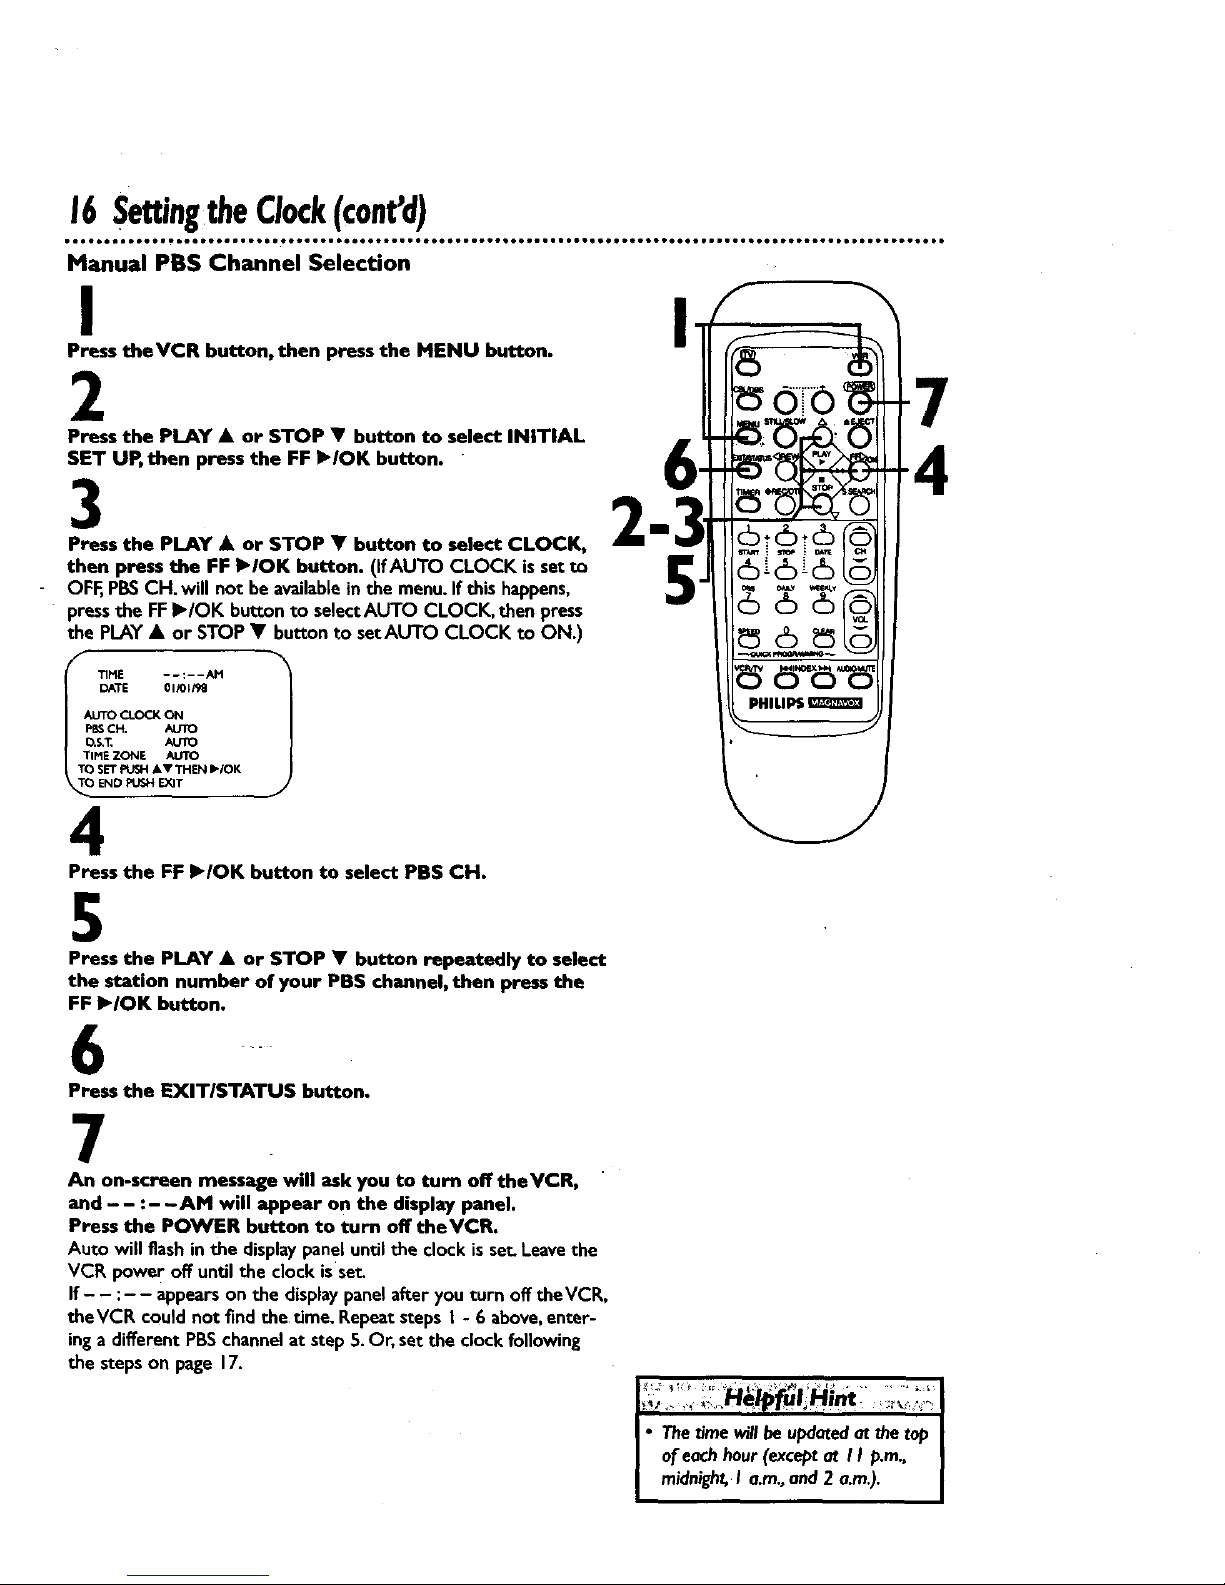
Press theVCR button, then press the MENU button.
2
Press the PLAY • or STOP • button to select INITIAL
SET UP, then press the FF I_/OK button.
3
Press the PLAY • or STOP • button to select CLOCK,
then press the FF I_IOK button. (IfAUTO CLOCK issetto
OFF,PBSCH. will not be availablein the menu.If this happens,
pressthe FFI_/OK bu_conto selectAUTO CLOCI_ then press
the PLAY• or STOP • button to setAUTO CLOCK to ON.)
TIME --:--AM
DATE 01_)[/_1
_UTO CLOCKON
PI_ CH, AUTO
O.S._ AUTO
TIME ZONE AUTO
TO SET FUeJ4 At THEN I_IOK
REND PUe'_HEXIT
4
Press the FF I_/OK button to select PBS CH.
4
5
Press the PLAY • or STOP • button repeatedly to select
the station number of your PBS channel, then press the
FF I_/OK button.
4.
Press the EXIT/STATUS button.
7
An on-screen message will ask you to turn off theVCR,
and - - :- -AM will appear on the display panel.
Press the POWER button to turn off theVCR.
Auto will flashinthe displaypaneluntilthe clockis set.Leavethe
VCP,power off untilthe clockisset
If - - :- - appearson the displaypanelafteryou turn offtheVCR,
theVCR couldnot findthe time. Repeatsteps I - 6 above,enter-
inga differentPBSchannelat step 5.Or, set the clockfollowing
the stepson page 17.
I
I
• Thetimewillbe updatedat thetoo
ofeachhour(exceptat II p.m., I
midnight,I a.m.,and2 a.m.). I
SettingtheClock(coned)17
Automatic PBS Channel Selection
I
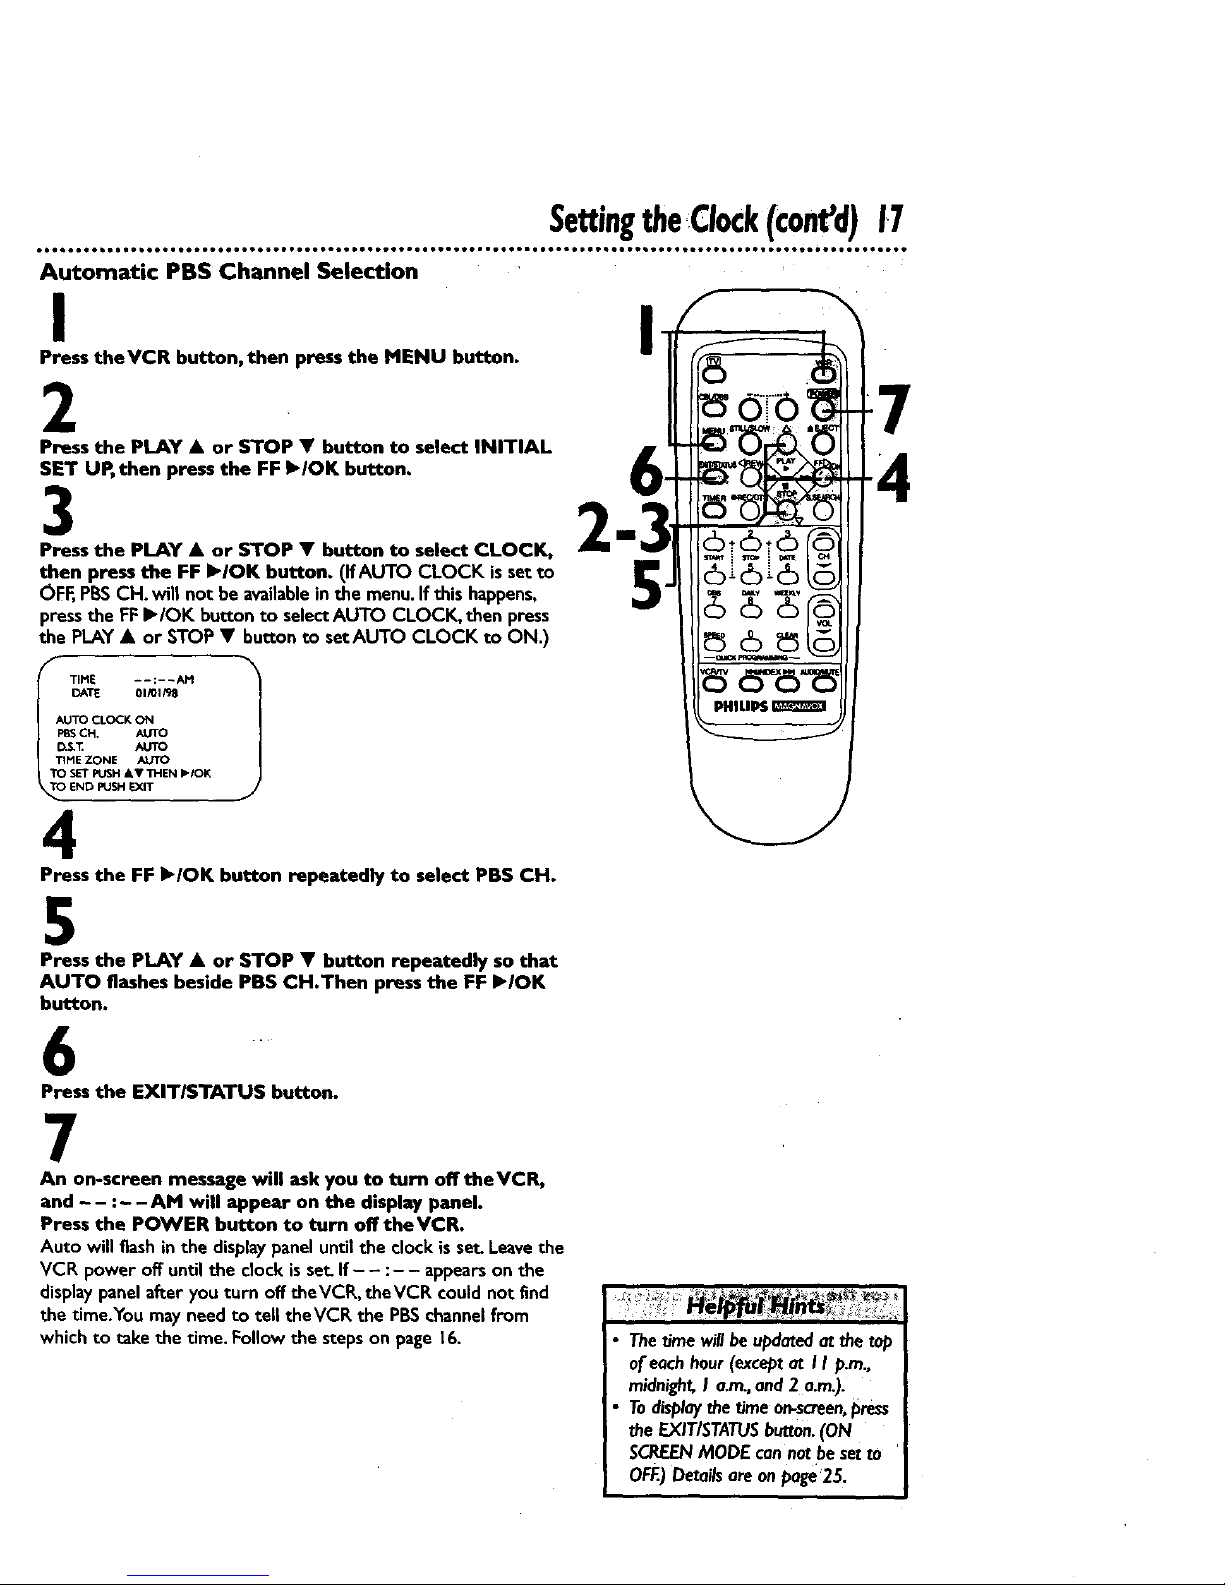
Press theVCR button, then press the MENU button.
2
Press the PLAY • or STOP • button to select INITIAL
SET UP, then press the FF I_IOK button.
3
Press the PLAY • or STOP • button to select CLOCK, _"
then press the FF I_IOK button. (IfAUTO CLOCK issetto
OFF,PI_SCH. will not be availablein the menu.If this happens,
pressthe FFI_/OK button to selectAUTO CLOCK, then press
the PLAY• or STOP • buttonto setAUTO CLOCK to ON.)
_" TIME ..... AM 1
I DATE 01,01/98
AUTOCLOCKON
CH. AUTO
"r]H E ZONE AUTO
TO S_" PUSH & Y "II-IEN b-IOK
_TOEND PUSH IE_T
4
Press the FF klOK button repeatedly to select PBS CH.
5
Press the PLAY • or STOP • button repeatedly so that
AUTO flashes beside PBS CH.Then press the FF I_IOK
button.
I
.
Press the EXITISTATUS button.
7
An on-screen message will ask you to turn off theVCR,
and - - :- -AM will appear on the display panel.
Press the POWER button to turn off theVCR.
Auto will flashin the displaypanel untilthe clockisset Leavethe
VCR power off untilthe clockisset.If - - :- - appearson the
displaypanelafter you turn off theVCR, theVCR couldnot find
the time.You mayneed to tell theVCR the PBSchannelfrom
whichto take the time. Follow the steps on page 16.
Thetimewillbeupdatedat the top
ofeachhour(exceptat I I p.m.,
midnight,I a.m.,and2 a.m.).
Todisplayd_etime0n-screen,_ress
• e EXIT/STATUSbutton.(ON
SCREENMODE cannatbesetto
OFF..)Detailsare onpage25.
 Loading...