

Magnavox VRX262AT21 Owner’s Manual

Video _ass_eRecord_r.
VRX262AT ,__
Owner's Manual

Once your PHILIPS MAGNAVOX purchase is registered, you're eligible to receive all the iL. . eg_
of owning a PHILIPS MAGNAVOX product. So complete and return the Warranty Registration
Card enclosed with your purchase at once. And take advantage of these important benefits.
Know these
PH ILIPS
Congratulations on your purchase, and
welcome to the "family!"
Dear PHILIPS MAGNAVOX product owner:
Thank you for your confidence in PHILIPS MAGNAVOX.You've
selected one of the best-built, best-backed products available
today.And we'll do everything in our power to keep you happy
with your purchase for many years to come.
As a member of the PHILIPS MAGNAVOX "family;' you're entitled
to protection by one of the most comprehensive warranties and
outstanding service networks in the industry.
What's more, your purchase guarantees you'll receive all the infor-
mation and special offers for which you qualify, plus easy access to
accessories from our convenient home shopping networl_
And most importantly you can count on our uncompromising
commitment to your total satisfaction.
All of this isour way of saying welcome-and thanks for investing in
a PHILIPS MAGNAVOX product.
Sincerely,
__-----_-'_ Robert Minkhorst
President and Chief Executive Officer
RS.
Remember, to get the most from your PHILIPS
MAGNAVOX product, you must return your
Warranty Registration Card within 10 days. So
please mail it to us right now!
safetysymbols
_ €OVI_III_ _ _ UW_R41ERWCFJWU_ imctRm
IA_a3F..REI:I[A_ m _ S&_IW1t_ ImE1qSomiEL
A This "bolt of lightning'" indicates
uninsulated material within vour
unit may cause an electrical sh _r
the safety of everyone in your e-
hold, please do not remove product
covering.
The "exclamation point '° calls
attention to features for which
you should read the enclosed lit-
erauJre closely to prevent operating
and maintenance problems.
WARNING: TO PREVENT FIRE OR
SHOCK HAZARD, DO NOT EXPOSE
THIS EQUIPMENT TO RAIN OR
MOISTURE.
CAUTION: To preventelectric shock,
match wide blade of plug to wide slot,
and fully insert.
ATTENTION: Pour _viter le_;chocs
_lectriques, introduire la lame la plus
large de la fiche dam la borne corre-
spondante de la prise et pousser
jusqu'aufond.
For Customer Use
Enterbelow the SerialNo.
whichis locatedon the rear
ofthe cabinet.Retainthis
informationfor future refer-
ence.
Model No.
Serial No.
--I
Introduction3
oooo oooo • Qo• ••••,• • ••! •Qol oo ioeoo oloeoo • ooolooooooooo • •oil•o•o•,,o,oo a•oo •tea• • oJol ioeoo • oeeoeo el ••o• o•* • o• oil •
Welcome to your VCR owner's manual.
This manual has seven sections: Setting Up Your VCR; Description of Controls; Basic Operations;
Recording; Playing; Stereo Features; and Information You May Need. The instru_ons explain all of
the VCR's features, which are listed below.You cannot hurt your VCR by trying the features!
So read on - and relax.
Features
• HQ (High Quality) System
• Automatic Channel Programming
• FrequencySynthesizerTuningwith Auto Set Feature
• On-Screen Displaysin Englishor Spanish
• Display Panel
• MTS (Multi-Channel Television Sound)System
• Hi-Fi Stereo SoundSystem
•Automatic TrackingAdjustment
• OneTouch Recording
• Unattended (Timer) Recording
• SpecialEffectsPlayback:Forward and ReverseSearching;Still;
Slow Motion
•Wireless Remote Control
• Repeat Playback
•Automatic Operation Features
• RealTime Counter
• Daylight-SavingTime
•TheVCR Plus+ Programming System
•Time SearchFunction
Safety Precautions
Warning:To prevent fire or shock hazard, do not expose
this equipment to rain or moisture.
FCC Warning:Any unauthorized changes or modifications
to this equipment void the user's authority to operate it.
ThisVCR, equipped with a HQ (High Quality) system, is compati-
ble with existingVHS (video home system) equipment.
PhilipsConsumer Electronics Company recommends that you use
only video cassette tapes that havebeen tested and inspected for
usein two, four, six,and eight hourVCRs, and which are labeled
Pwiththe _ mark.The use of tapes that havenot been inspected
for usein two, four, six,and eight hour VCRs may result in poor
picture quality and excessivedeposits on the video heads,which
may not be covered by the warranty if damageoccurs.
Note to the CATV System Installer: This reminder isprovid-
ed to call the CATV system installer'sattention to Article 820-40
of the National Electrical Code, which provides guidelinesfor
proper grounding - in particular, specifyingthat the cable ground
shall be connected to the grounding system of the building,as
close to the point of cable entry aspossible.
Copyright 1997 Philips Consumer Electronics Company.All rights
reserved.
VCR Plus+ and PlusCode are trademarks of Gemstar
Development Corporation.TheVCR Plus+ system is manufactured
under license from Gemstar Development Corporation.
Before doing anything else,record
the VCR's model and serial numbers
in the spaces provided on page two.
These numbers will help us assist
you if you ever call for help.

4 TableofContents
Setting Up Your VCR
Introduction ........................................................... 3
Table of Contents ...................................................... 4
Before UsingYour VCR .................................................. 5
Hookups Without a Cable Box .......................................... 6-7
n
Hookups With a Cable Box .............................................. 8-9
Hookups With a Stereo TV .............................................. I0
Turning on YourVCR ................................................... I I
Channel Memory ................................................... 12-14
Setting the Clock .................................... ................. 15
Daylight-Saving Time Selection ............................................ 16
Language Selection .................................................... 17
Description of Controls
Remote Control Buttons ............................................. 18-19
On-Screen Status Displays ............................................... 20
VCR Display Panel ..................................................... 21
Front Panel .............................. 22
Rear Panel ........................................................... 23
Basic Operations
Playing .................. ............................................ 24
• Recording .......................................................... _25
Recording
Recording One Channel/Watching Another ................................. z6
One Touch Recording .................................................. 27
Timer Recording ................................................... 28-3 I
Setting Up the VCR Plus+ Programming System ............................ 32-33
Timer Recording With the VCR Plus+ Programming System .................. 34-35
Rerecording ('rape Duplication) ........................................... 36
Playing
Repeat Playback ....................................................... 37
Time Search ......................................................... 38
Real Time Counter Memory ............................................. 39
Special Effects Playback ................................................. 40
Automatic Operation Features ........................................... 41
Stereo Features
MTS Broadcast Stereo System ......................................... 42-43
Hi-Fi Stereo Sound System ............................................ 44-45
Information You May Need
Helpful Hints ...................................................... 46-47
Glossary ............................................................ 48
Specifications ......................................................... 49
Limited Warranty .................................................... .50
Index .............................................................
Supplied Accessories ................................................... o2
i
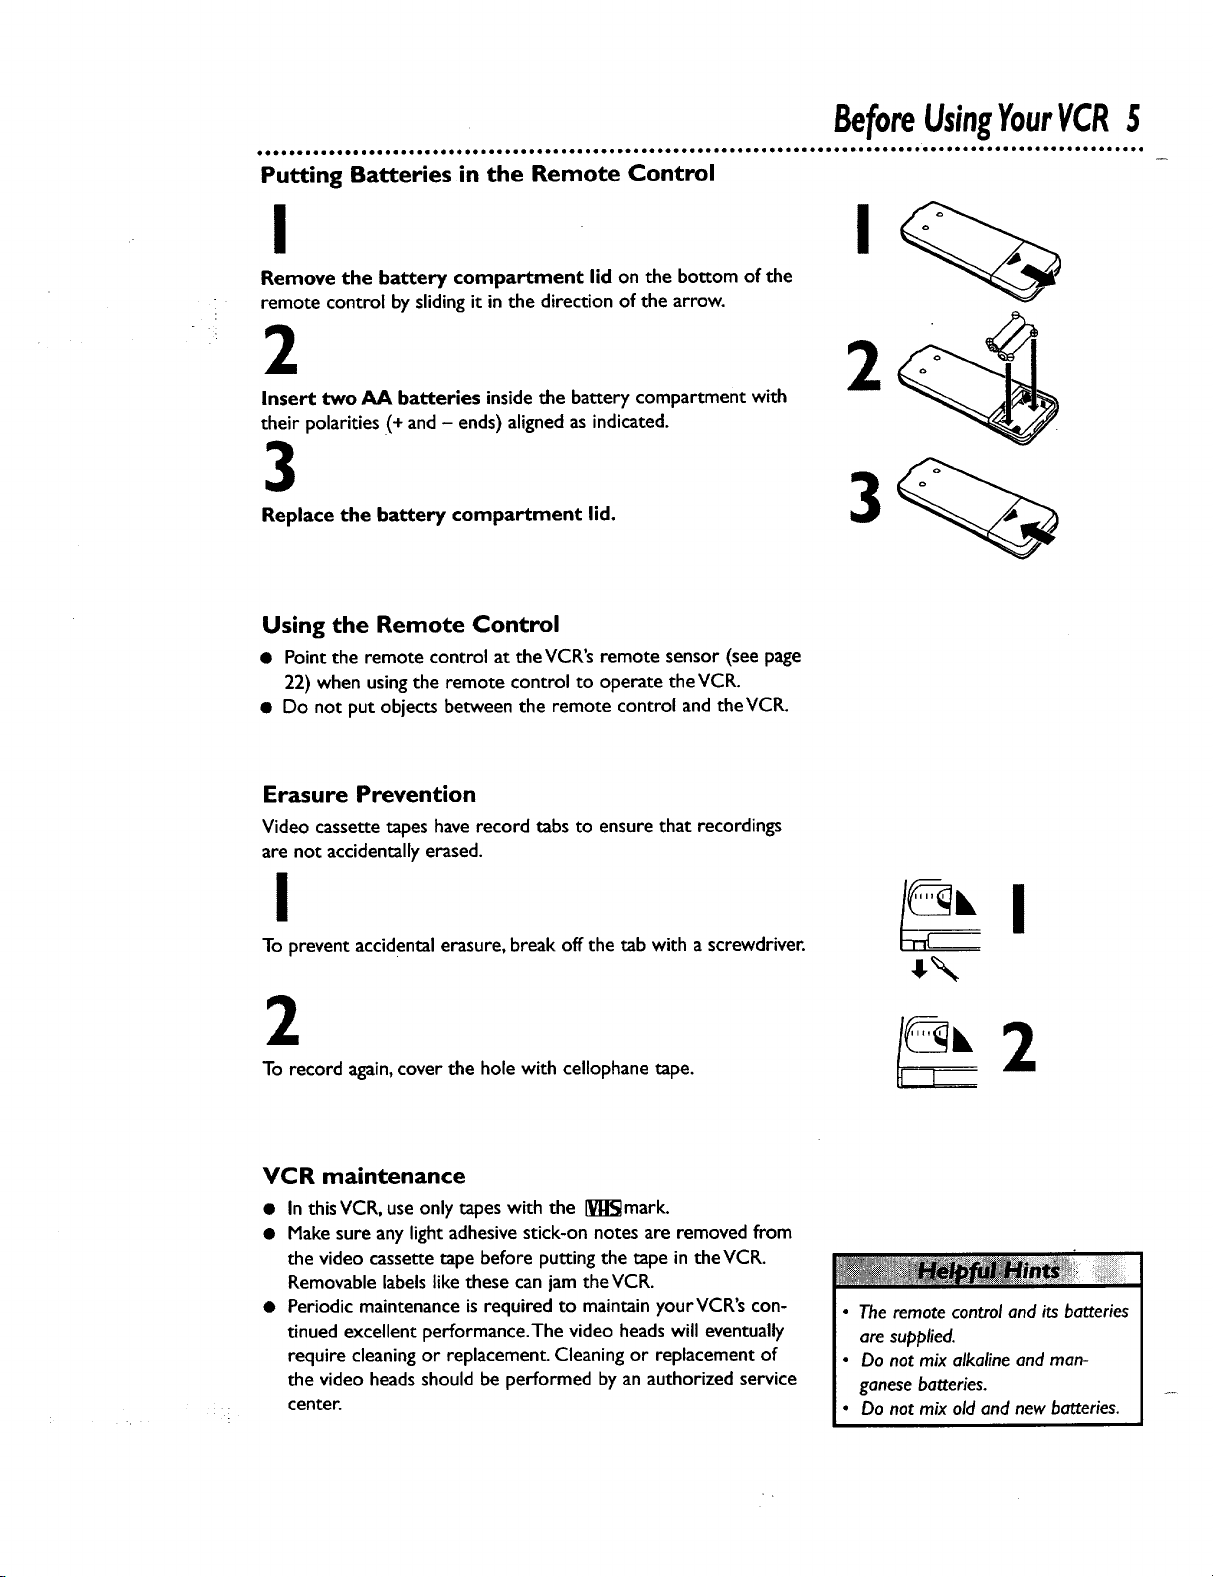
Putting Batteries in the Remote Control
Remove the battery compartment lid on the bottom of the
remote control by slidingit in the direction of the arrow.
2
Insert two AA batteries inside the battery compartment with
their polarities (+ and - ends) aligned as indicated.
3
Replace the battery compartment lid.
Using the Remote Control
• Point the remote control at theVCR's remote sensor (see page
22) when using the remote control to operate theVCR.
• Do not put objects between the remote control and theVCR.
BeforeUsingYourVCR5
Erasure Prevention
Videocassettetapes have record tabs to ensure that recordings
are not accidentally erased.
I
To prevent accidentalerasure,break off the tab with a screwdriver.
2
To record again,cover the hole with cellophanetape.
VCR maintenance
• In thisVCR, use only tapes with the IVl_mark.
• Make sure any lightadhesivestick-on notes are removed from
the video cassettetape before putting the tape in theVCR.
Removablelabelslike these can jam the VCR.
• Periodic maintenanceis required to maintain yourVCR's con-
tinued excellent performance.The video headswill eventually
require cleaningor replacement Cleaning or replacement of
the video headsshould be performed by an authorized service
center.
• The remote control and its batteries
are supplied.
• Do not mix alkaline and man-
ganese batteries.
• Do not mix old and new batteries.

6 HookupsWithoutaCableBox
• iJe lie •e • •e •e •eel• •ee• aeaele • el• eole •ioee• •oee me•coo ••lieo_oeoo.• eeoc eeeo eeoc • eeoc• .ee oe o• e• • oee co• •! oeee ••••
The basicVCR/TV connection - antenna/cable to VCR to TV - is shown below. If you hav,
Cable Box or a descrambler box, please refer to pages eight-nine. If you have a Stereo T_,
please go to page 10. After you hook up theVCR, please go to page I I to turn on theVCR.
I
Disconnect the antenna or cable from yourTV.
Antenna
\\\ _ II IIII Indoor/Outdoor
\_iIIIII (3ooohm)
IN
Jack
(on back of TV)
Cable
(75 ohm)
2
Connect the antenna or cable to the ANT(enna) IN jack of yourVCR.
Back of VCR
Antenna
Indoor/Outdoor
(300 ohm)
VIDEO
Cable
(75 ohm)
OUT
HookupsWithoutaCableBox(cont'd)7
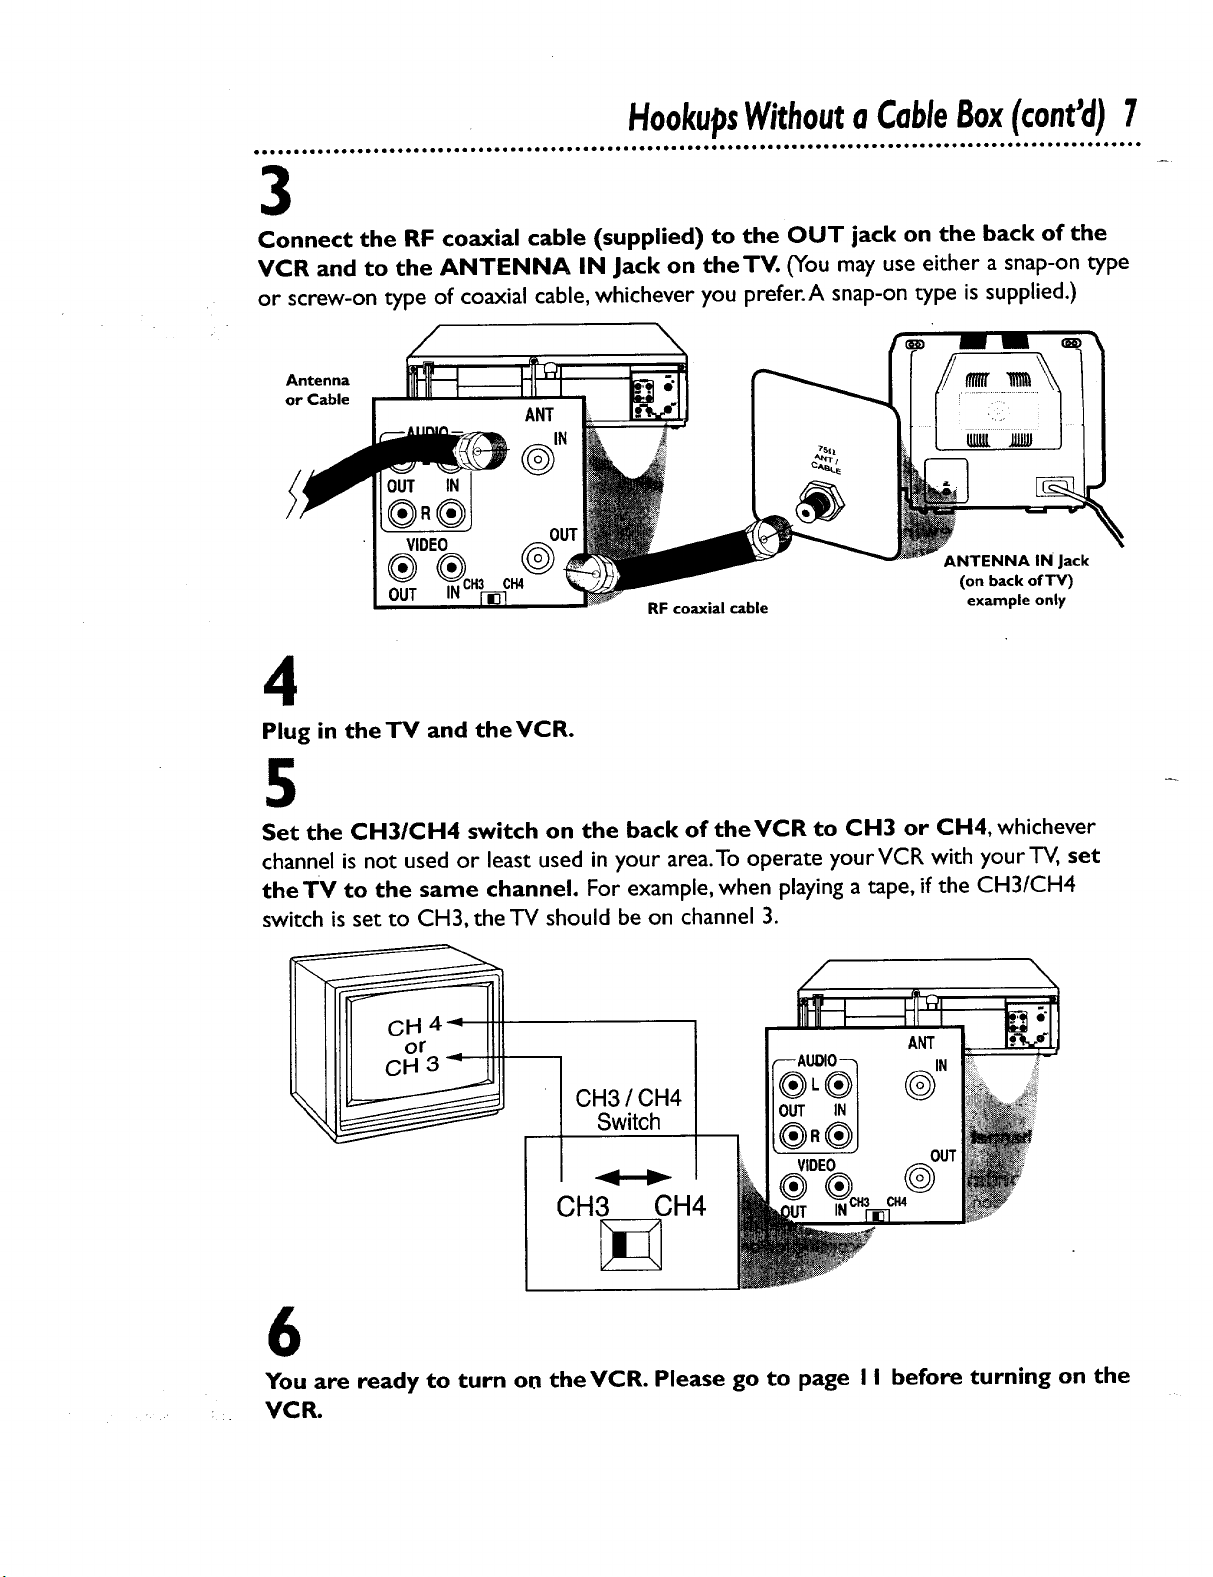
3
Connect the RF coaxial cable (supplied) to the OUT jack on the back of the
VCR and to the ANTENNA IN Jack on theTV. (You may use either a snap-on type
or screw-on type of coaxial cable, whichever you prefer.A snap-on type is supplied.)
Antenna
or Cable
OUT IN
®.®
VIDEO
O H3 (on back of TV)
I_NC: ANTENNA IN Jack
OUT example only
RF coaxial cable
4
Plug in theTV and theVCR.
5
Set the CH3/CH4 switch on the back of theVCR to CH3 or CH4, whichever
channel is not used or least used in your area.To operate yourVCR with yourTV, set
theTV to the same channel. For example, when playing a tape, if the CH3/CH4
switch is set to C1-13,the TV should be on channel 3.
CH3 / CH4
Switch
CH3 CH4
6
You are ready to turn on the VCR. Please go to page I I before turning on the
_ VCR,
8 HookupsWithaCableBox
e•e I•ee• ••ea ••
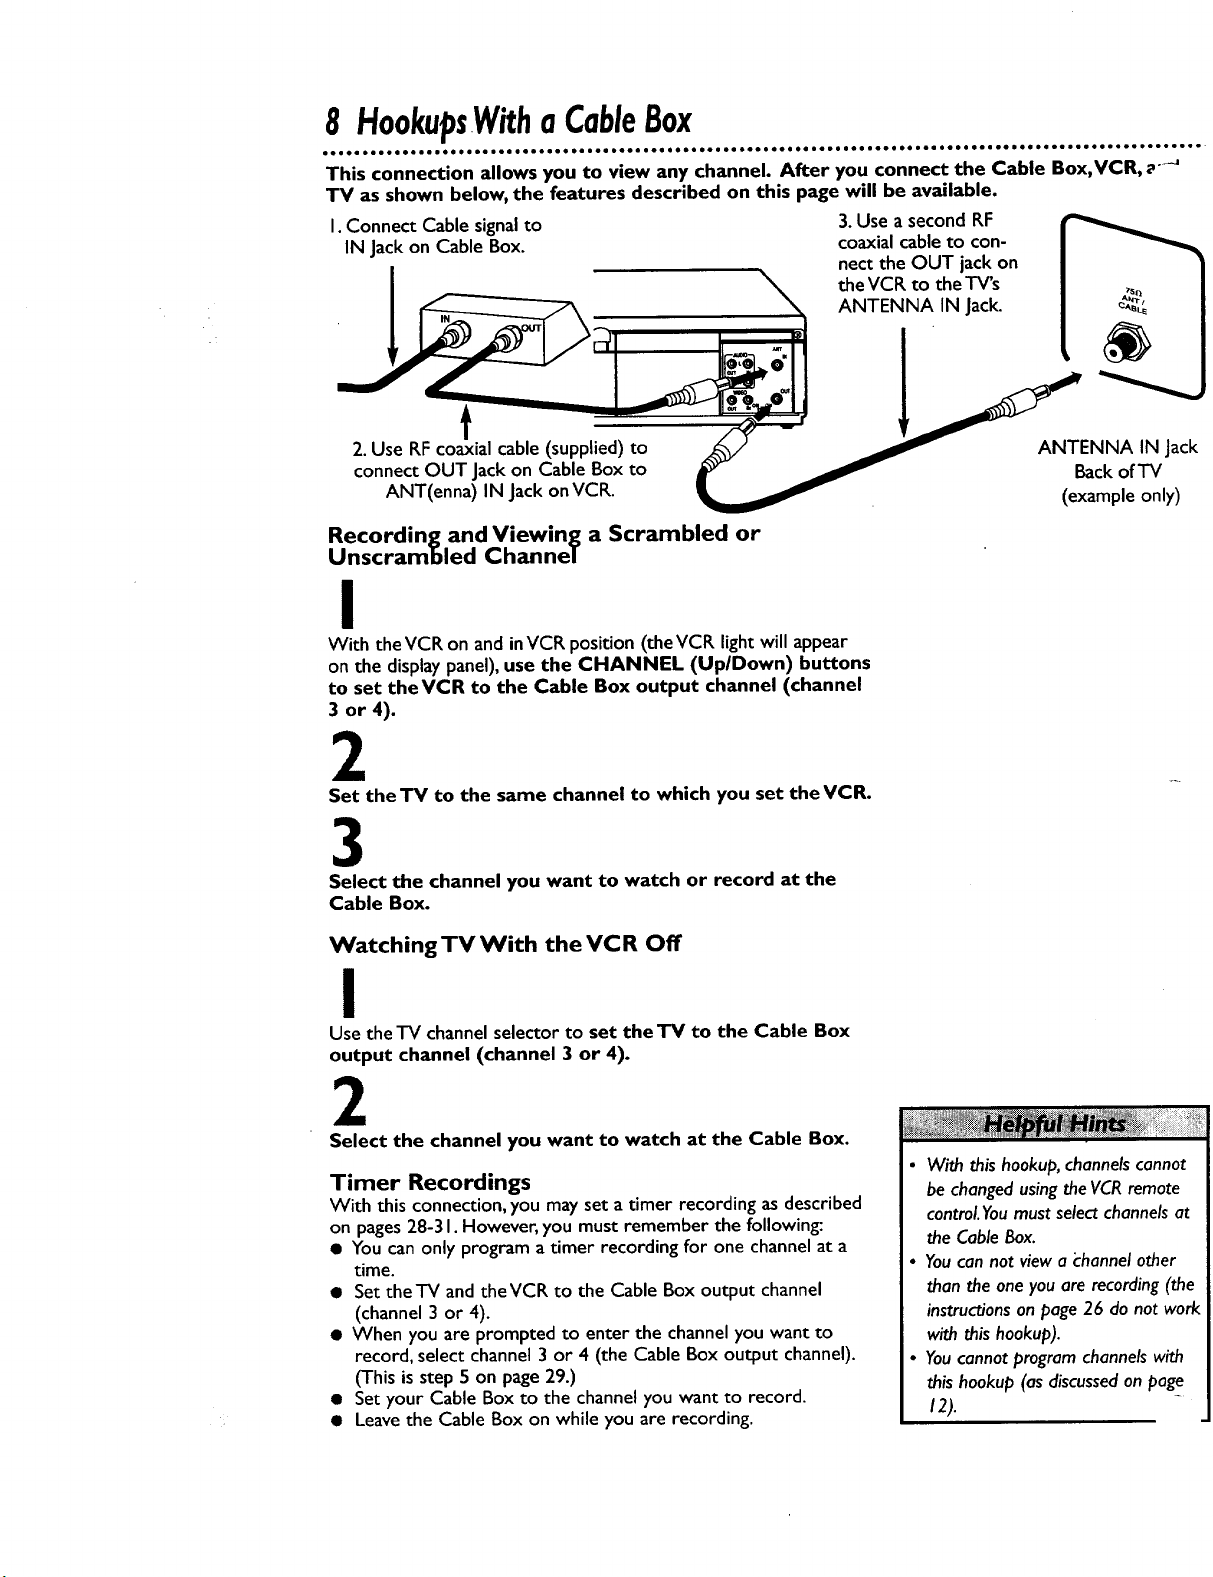
This connection allows you to view any channel. After you connect the Cable Box, VCR, a-_
TV as shown below, the features described on this page will be available.
I. Connect Cable signal to
IN Jackon Cable Box.
J• oleo aeo oeo oee • •co oeIo• •ee• ••• •eoo• e•e• •ell• eeo• oeoeloo• Go •••• ••• e• •o•• • • •• ••o •am a•• i•e •l• •• o• •
3.Use a second RF
coaxialcableto con-
nect the OUT jack on
theVCR to theTV's
ANTENNA IN Jack.
f
2. Use RF coaxial cable (supplied) to
connect OUT Jack on Cable Box to
ANT(enna) IN Jack on VCR.
Recording and Viewing a Scrambled or
Unscrambled Channel
ANTENNA IN Jack
Back of TV
(example only)
I
With theVCR on and inVCR position (theVCR light will appear
on the display panel),use the CHANNEL (UplDown) buttons
to set theVCR to the Cable Box output channel (channel
3 or 4).
2
Set the TV to the same channel to which you set the VCR.
3
Select the channel you want to watch or record at the
Cable Box.
Watching TV With the VCR Off
I
Use the TV channel selector to set the TV to the Cable Box
output channel (channel 3 or 4).
2
Select the channel you want to watch at the Cable Box.
Timer Recordings
With this connection, you may set a timer recording as described
on pages 28-3 I. However, you must remember the followin_.
• You can only program a timer recording for one channel at a
time.
• Set the TV and the VCR to the Cable Box output channel
(channel 3 or 4).
• When you are prompted to enter the channel you want to
record, select channel 3 or 4 (the Cable Box output channel).
(This is step 5 on page 29.)
• Set your Cable Box to the channel you want to record.
• Leave the Cable Box on while you are recording.
• With this hookup, channels cannot
be changed using theVCR remote
controLYoumust select channels at
the Cable Box.
• Youcan not view a "channel other
than the one you are recording (the
instructions on page 26 do not work
with this hookup).
• Youcannot program channels with
this hookup (as discussed on page
12).
HookupsWithaCableBox(cont'd)9
e• • ooQeeoo • ioeoooeooeo• •• •••••=•••••oleo•e••••••• I oloeo• • ••ee e• •Qolo I• ••coo •• eoooe • • o• aooo •l• • • •••co •eooeeooo• •
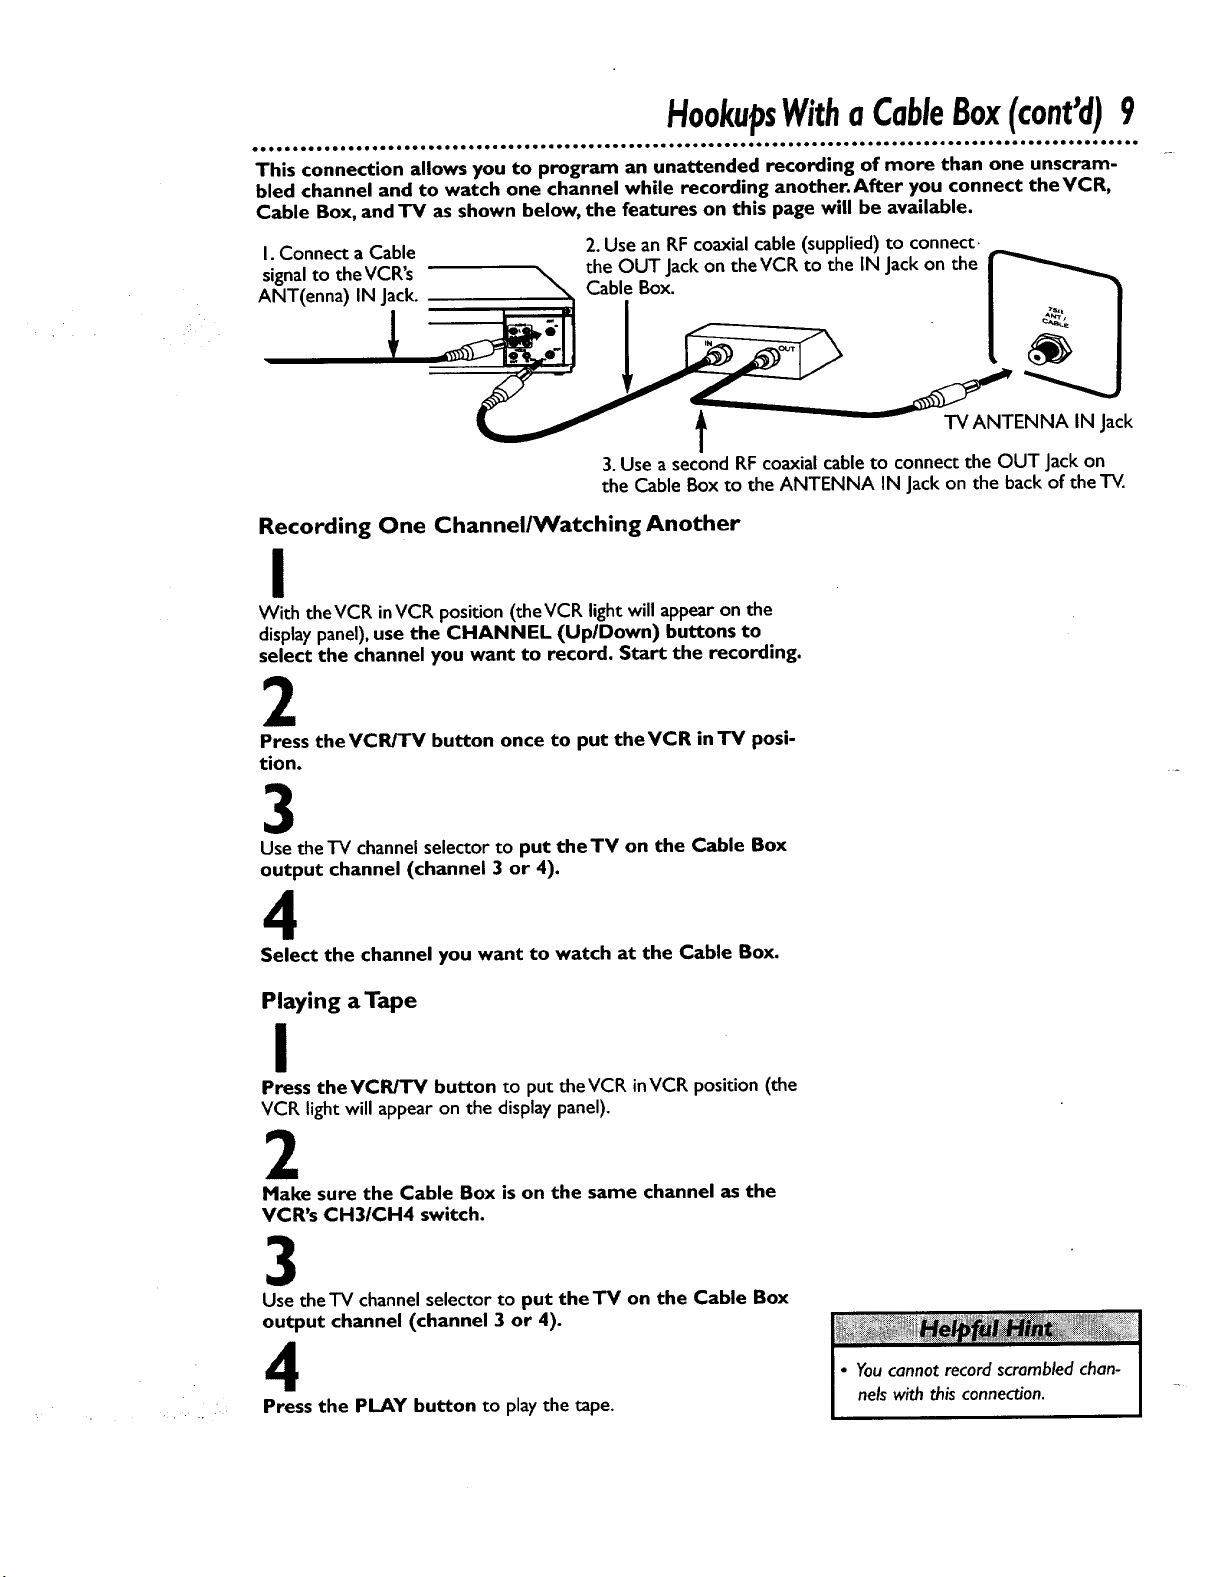
This connection allows you to program an unattended recording of more than one unscram-
bled channel and to watch one channel while recording another.After you connect theVCR,
Cable Box, and TV as shown below, the features on this page will be available.
I. Connect a Cable
signal to the VCR's
ANT(enna) IN Jack.
Recording One Channel/Watching Another
2.Use an RF coaxialcable(supplied)to connect.
the OUT Jack on the VCR to the IN Jackon the
Cable Box.
t TVANTENNA IN Jack
3.Use a second RFcoaxial cableto connect the OUT Jackon
the Cable Box to the ANTENNA IN Jack on the back of the TV.
I
With the VCR inVCR position (theVCR light will appearon the
displaypanel),use the CHANNEL (UplDown) buttons to
select the channel you want to record. Start the recording.
2
Press the VCR/TV button once to put the VCR in TV posi-
tion.
3
Use the TV channel selector to put the TV on the Cable Box
output channel (channel 3 or 4).
4
Select the channel you want to watch at the Cable Box.
Playing a Tape
I
Press theVCR/TV button to put theVCR inVCR position (the
VCR light will appear on the display panel).
2
Make sure the Cable Box is on the same channel as the
VCR's CH31CH4 switch.
3
Use the'IV channel selector to put the'IV on the Cable Box
output channel (channel 3 or 4).
4
Press the PLAY button to play the tape.
• Youcannot record scrambled chan-
nels with this conne_on.

I0 HookupsWithaStereoTV
/
antenna or cable to
ANT(enna) IN Jack
VIDEO (yellow) andAUDIO (red andwhite)
OUT Jacks
Audio Cable
• Audio and Video cables are not supplied.
I
Connect the antenna or cable to the ANT(enna) IN Jack
on the back of theVCR.
2
Connect a video cable to the yellowVIDEO OUT Jack on
the back of the VCR.Then, connect the other end of the
video cable to theVIDEO IN Jack on yourTV.
3
Connect an audio cable to the red and white AUDIO
OUT Jacks on the back of the VCR.Then, connect the
other end of the audio cable to the AUDIO IN Jacks on
y• ur TV.
Audio andVideo
IN Jackson"IV
4
Turn on yourTV, making sure it is in Line Input mode. Please
refer to your'IV owner's manual for details.
• A stereo audio cable (not supplied)
is used here to deliver audio to the
TV's left and right channels.
• The TVmust be in 13neInput mode.
Please refer to your TV owner's
manual.
Before turning on yourVCR, make sure there are batteries in the
remote control and theVCR andTV are connected correctly.
• Follow the steps on this pageonly when you plug theVCR
power cord into the wall outlet for the first time.
• You maynot be ableto program channelsat step 5 if you are
usinga Cable Box.
i Turn on the TV.
I 2
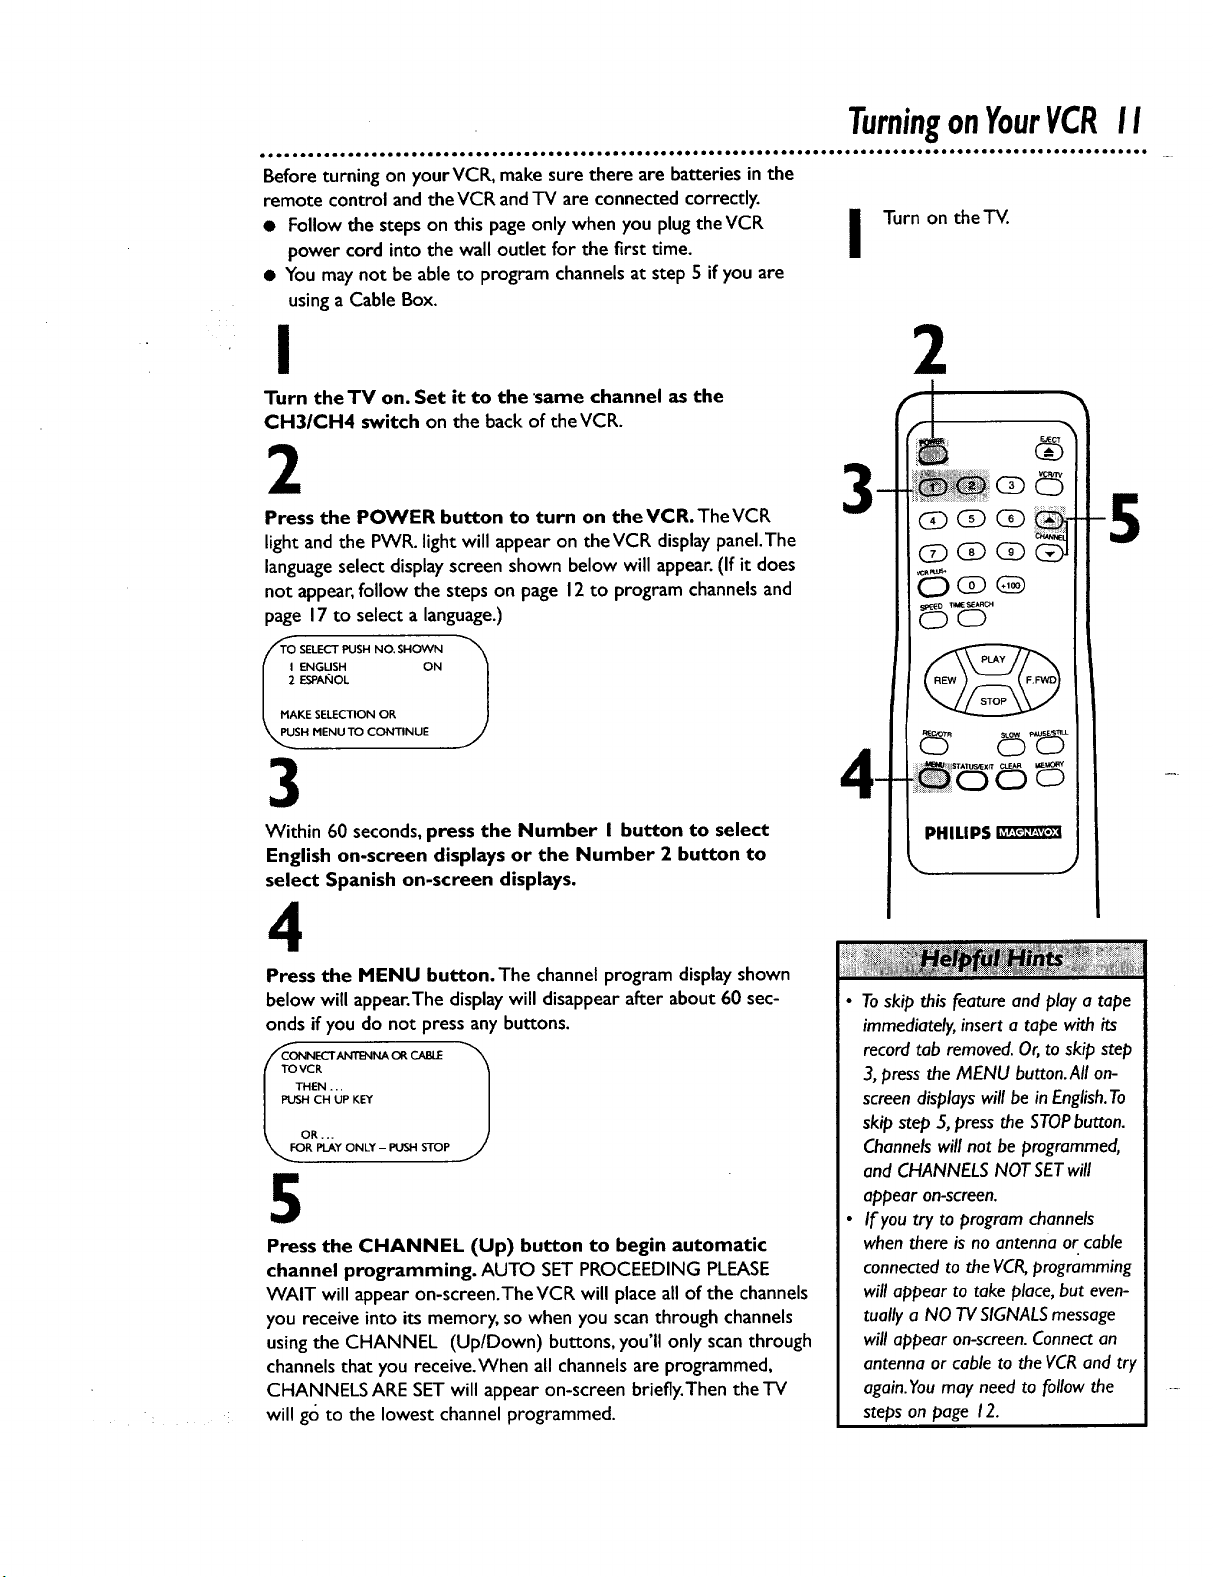
Turn the TV on. Set it to the 'same channel as the
CH31CH4 switch on the back of the VCR.
2
Press the POWER button to turn on theVCR.TheVCR
light and the PWR. light will appear on theVCR display panel.The
language select display screen shown below will appear. (If it does
not appear, follow the steps on page 12 to program channels and
page 17 to select a language.)
ENGUSH ON
ESPA_IOL
KE SELECTION OP,
SH MENU_ CONTINUE
3 4-
Within 60 seconds, press the Number I button to select
English on-screen displays or the Number 2 button to
select Spanish on-screen displays.
4
Press the MENU button. The channel program display shown
below will appear.The display will disappear after about 60 sec-
onds if you do not press any buttons.
CR
HEN ...
CH UP KEY
RpI_Y ONLY - PUSH STOP
5
Press the CHANNEL (Up) button to begin automatic
channel programming. AUTO SET PROCEEDING PLEASE
WAIT will appear on-screen.TheVCR will place all of the channels
you receive into its memory, so when you scan through channels
using the CHANNEL (Up/Down) buttons, you'll only scan through
channels that you receive.When all channels are programmed,
CHANNELS ARE SET will appear on-screen briefly.Then the TV
will go to the lowest channel programmed.
• Toskip this feature and play a tape
immediately, insert a tape with its
record tab removed. Or,to skip step
3,press the MENU button.All on-
screen displays will be in English.To
skip step 5, press the STOPbutton.
Channels will not be programmed,
and CHANNELS NOT SETwill
appear on-screen.
• If you try to program channels
when there is no antenna or cable
connected to the VCR,programming
will appear to take place, but even-
tually a NO TV SIGNALSmessage
will appear on-screen. Connect an
antenna or cable to the VCRand try
again.You may need to follow the
steps on page 12.
_ (_ (_
i
G) G)
5-d5
@
PHILIPS
dS-d5

12ChannelMemory
el• e• • el• •Qoeeeeeeeol• • •• • •• ee •eeeeeleeo el•e• • •lee•e•• • •••••••ee •lee•l••• eeoele•ee• eeoee•e•o•l ••eeeo•••! ••eee•
Programming Channels
Although yourVCR may automatically memorize the channels you
receive when you turn it on for the first time, this function lets
you reprogram channels.
2&4
I
Press the MENU button to bring up the main menu display. 4[
PR(X_
2VCR SET UP
3 TUNER SET UP
4 SETCLOCK
O END PUSH EXIT
2
Press the Number 3 button to selectTUNER SET UP.
"IV
2 CABLE TV ON
l 3 AUTO PROGRAMMING
| 4 ADO/DELETE CH
| 5 CH MEMORY REVIEW
| 6TV STEREO ON
7 2ND AUDIO
TO END PUSH EXIT
I
TATU_,/EXIT
PHILIPS
3
Press the Number I button to selectTV (if you have an
antenna) or the Number 2 button to select CABLE TV (if
you have a cable connection). ON will appear to the right of your
selection.
4
Press the Number 3 button to selectAUTO PROGRAM-
MING. MEMORIZED CHANNEL / PLEASEWAIT will appearon-
screen.TheVCR will place all the channels you receive into its
memory.
5
Wait for a few minutes while theVCR programs channels.When
programming iscomplete, CHANNELS ARE SET will appear on-
screen.Then the programmingof the lowest channel number placed in
theVCR's memory will appear on-screen. Now when you pressthe
CHANNEL (Up/Down) buttons,you will scanonly through channels
you receive.
• Youcan not enter the TUNER SET
UP menu when you are in Line
Input mode (channel 00).
• Line Input mode will always be
stored in the VCR'smemory as
channel 00.When you select chan-
nel 00 with the CHANNEL
(Up/Down) buttons or the Number
buttons, A/V IN will appear on the
screen briefly.
• Youmay not be able to program
channels if you are using a Cable
Box.
• Toswitch between TV and CABLETV
selection, repeat the steps on this
page.
ChannelMemory(cont'd)13
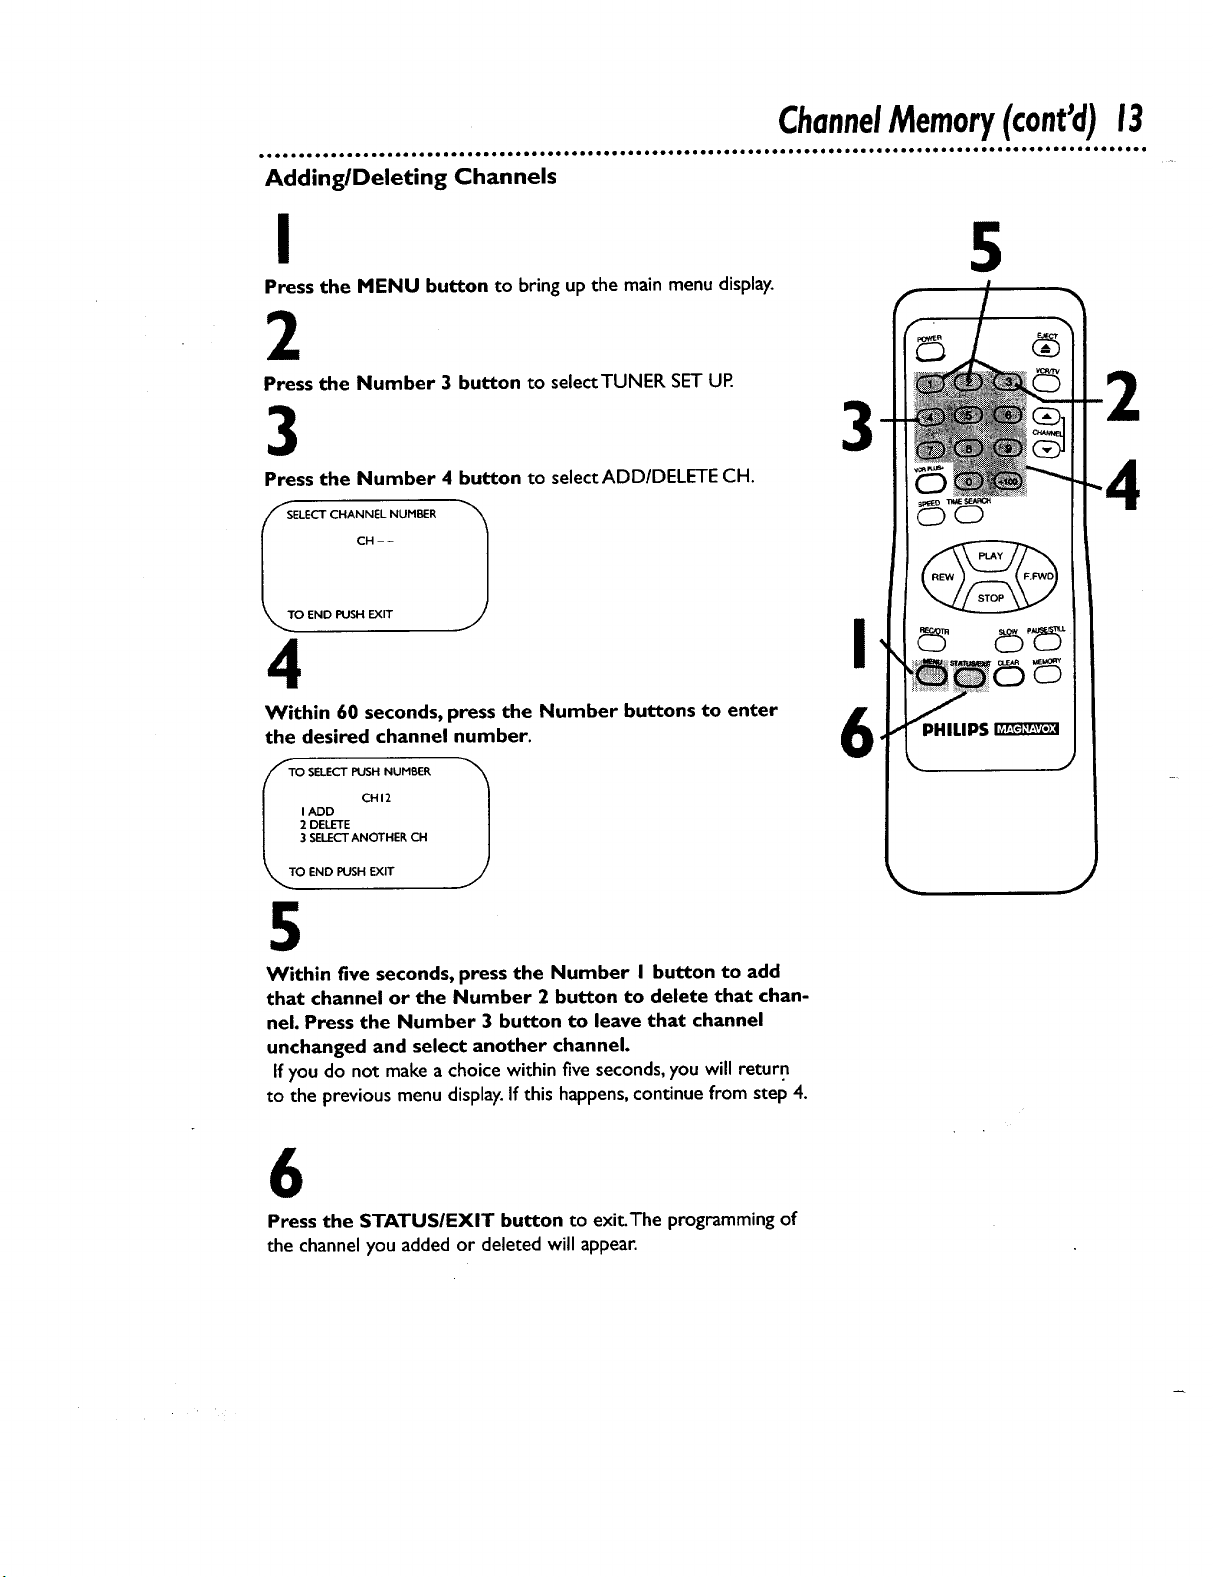
Adding/Deleting Channels
I 5
Press the MENU button to bring up the main menu display.
2
Press the Number 3 button to selectTUNER SETUP.
3 3
Press the Number 4 button to select ADD/DELETE CH.
_SELECT CHANNEL NUMBER
CH--
_, TO END PUSH EXIT
1
4
Within 60 seconds, press the Number buttons to enter
the desired channel number.
I ADD
2 DELETE
3 SELECTANOTHER CH
fTO SELECTPUSH NUMBER 1
TO END PUSH EXIT
CHI2
5
Within five seconds, press the Number I button to add
that channel or the Number 2 button to delete that chan-
nel. Press the Number 3 button to leave that channel
unchanged and select another channel.
If you do not make a choice within five seconds, you will return
to the previous menu display. If this happens, continue from step 4.
6
Press the STATUSIEXIT button to exit_The programming of
the channel you added or deleted will appear.

Reviewing Programmed Channels
i
Press the MENU button to bring up the main menu display.
PROGRAH
2VCR SET UP
3TUNER SET UP
4 SET CLOCK
END PUSH EXIT
2
C5
2
Press the Number 3 button to select TUNER SET UR
_TO SELECT PUSH NO. SHOWN
2 CABLETV ON
3 AUTO PROGRAHHING
4 ADD/DELETE CH
5 CH MEMORY REVIEVV
6 TV STEREO ON
7 2ND AUDIO
TO END PUSH EXIT
3 I
Press the Number 5 button to select CH MEMORY REVIEW. A
A list of programmed channels will appear on-screen.
• If all the programmed channels don't fit on the screen, press the
Number I button to see the remaining channels.Then press the
Number 2 button to return to the first screen of channels.
• If you do not press any buttons within 10 seconds, you will
either go to the next screen of channels or you will return to
the previous menu display.
4
_C_Q
Press the STATUSIEXIT button twice to exit.
SettingtheCIock15
lelo eeelel eeoee• •e eoo ell• eeloe oeeoe eel••e• eQee• ilei• •el• ole•lo• • • •ee• ooo • •e o••e, •e eee ee o• • eee e•• eee oeo•e •oo•eo •
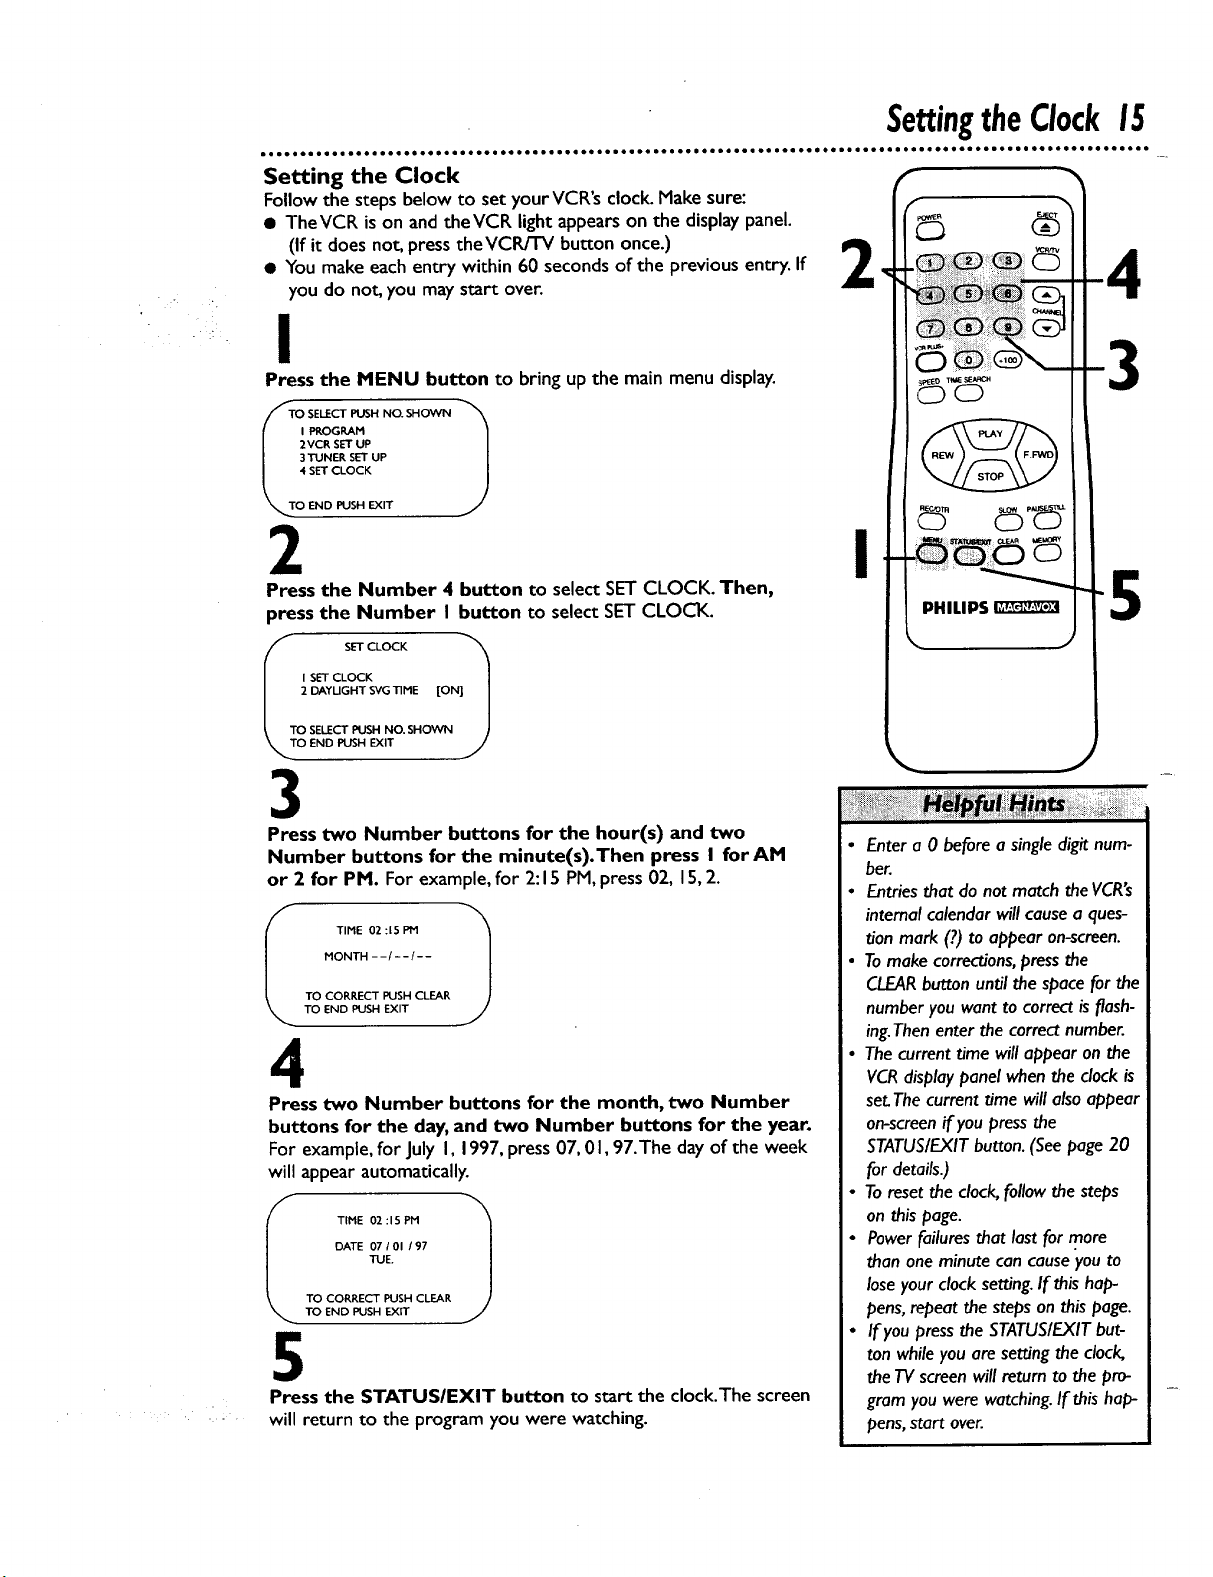
Setting the Clock f
Follow the steps below to set your VCR's clock. Make sure:
• TheVCR is on and theVCR light appears on the display panel. (_) (_
(If it does not, press the VCRFFV button once.)
• You make each entry within 60 seconds of the previous entry. If _,, ,_
r
you do not, you may start over.
!
Press the MENU button to bring up the main menu display.
PROGRAM
2VCR SET UP
3TUNER SET UP
4 SET CLOCK
O END PUSH EXIT
2 I
Press the Number 4 button to select SET CLOCK. Then,
press the Number I button to select SET CLOCK.
ITT( _ SETCLOCK _'_
I SET CLOCK 1
2 DAYUGHT SVG TIME ION] I
SELECT PUSH NO. SHOWN J
END PUSH EXIT
/
PHILIPS
3
5
3 "
Press two Number buttons for the hour(s) and two
Number buttons for the minute(s).Then press I for AM
or 2 for PM. For example, for 2:15 PM, press 02, 15, 2.
MONTH - - / - -/- -
TIME 02:15 PM
TO CORRECT PUSH CLEAR
TO END PUSH EXIT
4
Press two Number buttons for the month, two Number
buttons for the day, and two Number buttons for the year.
For example, for July I, 1997, press 07, 01,97.The day of the week
will appear automatically.
DATE 07 I OI / 97
TUE.
I TIME 02 : I S PM
TO CORRECT PUSH CLEAR
TO END PUSH EXIT
5
Press the STATUSIEXIT button to start the clock.The screen
will return to the program you were watching.
Enter a 0 before a single digit num-
ber.
• Entries that do not match the VCR's
internal calendar will cause a ques-
tion mark (?) to appear on-screen.
• Tomake corrections, press the
CLEARbutton until the space for the
number you want to correct is flash-
ing.Then enter the correct number.
• The current time will appear on the
VCR display panel when the clock is
set.The current time will also appear
on-screen if you press the
STATUS/EXIT button. (See page 20
for details.)
• To reset the clock, follow the steps
on this page.
• Power failures that last for more
than one minute can cause you to
lose your clock setting. If this hap-
pens, repeat the steps on this page.
• If you press the STATUS/EXITbut-
ton while you are setting the clock,
the TV screen will return to the pro-
gram you were watching. If this hap-
pens, start over.

16Daylight.SavingTimeSelection
Daylight-Saving Time Selection
You mayprogram theVCR so itsclock will automaticallymove
forward one hour in April and turn back one hour in October.
Daylight-SavingTime is set to ON prior to shipment from the fac-
tory.
You mayturn Daylight-SavingTime ON or OFF by following the
stepsbelow.
I
With the clockset, press the MENU button to bring up the
main menudisplay.
PROGRAM
2 VCR SET UP
•3 TUNER SET UP
4 SETCLOCK
Ii ELEC'I"PUSH NO. SI-IOVVN 1
END PUSH EXIT
2
Press the Number 4 button to select SETCLOCK.
m
3
@
PlllLIPS
4
SET CLOCK
DAYLIGHT SVGTIME [ON]
I_.r_ SETCLOCK 1
SELECT PUSH NO. SHOVVN
END PUSH EXIT
3
Press the Number 2 button so that ON or OFFappearsto
the right of DAYLIGHT SVGTIME.
SET CLOCK
DAYUGHT SVGTIME [ON]
TO SELECT PUSH NO. SHOVVN
SET CLOCK 1
OEND PUSH EXIT
4
Press the STATUSIEXIT button to exit.
J
 Loading...