

Magnavox VRU262AT Owner's Manual
Smart. Verysmart_
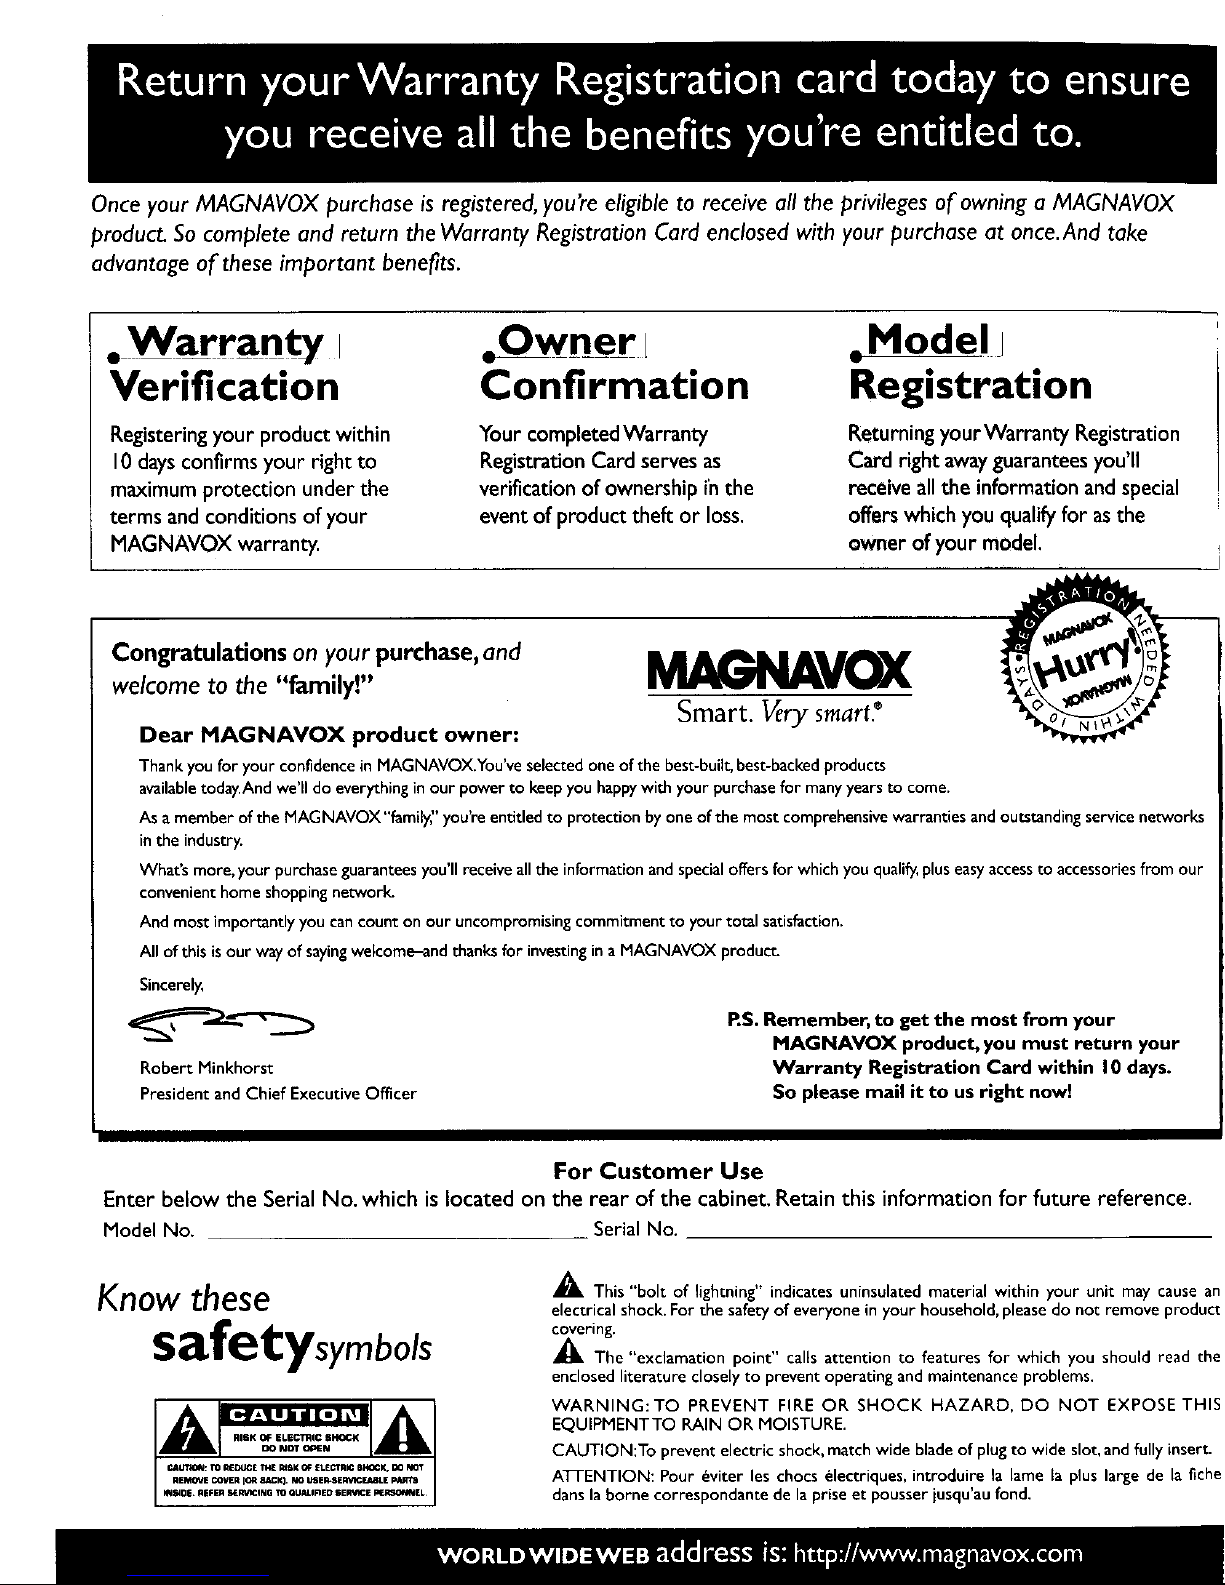
Once your MAGNAVOX purchase is registered, you're eligible to receive all the privileges of owning a MAGNAVOX
product. So complete and return the Warranty Registration Card enclosed with your purchase at once.And take
advantage of these important benefits.
• Warranty i
Verification
Registering your product within
10 days confirms your right to
maximum protection under the
terms and conditions of your
MAGNAVOX warranty.
,Owner l
Confirmation
Your completed Warranty
Registration Card serves as
verification of ownership in the
event of product theft or loss.
oModel I
Registration
Returning yourWarranty Registration
Card right away guarantees you'll
receive all the information and special
offers which you qualify for asthe
owner of your model.
Congratulations onyour purchase,and
welcome to the "family!" M__VOX
Smart. Very smart.®
Dear MAGNAVOX product owner:
Thank you for your confidenceinMAGNAVOX.You'veselectedoneof the best-buil_best-backedproducts
availabletoday.Andwe'll do everythinginour powerto keepyou happywith your purchasefor manyyearsto come.
As amemberof the MAGNAVOX"family," you'reentitled to protectionbyoneof the most comprehensivewarranties andoutstandingservicenetworks
in the industry.
What's more, your purchaseguaranteesyou'll receiveallthe informationandspecialoffers for which youqualify,pluseasyaccessto accessoriesfrom our
convenienthome shoppingnetwork.
And mostimportantlyyou cancount on our uncompromisingcommitment to yourtotal satisfaction.
All ofthis isour way of sayingwelcome_andthanksfor investingina MAGNAVOX produ_
Sincerely,
Robert Minkhorst
President and Chief Executive Officer
RS. Remember, to get the most from your
MAGNAVOX product, you must return your
Warranty Registration Card within I0 days.
So please mail it to usright now!
For Customer Use
Enter below the Serial No. which is located on the rear of the cabinet. Retain this information for future reference.
Model No. Serial No.
Knowthese
safetysymbols
_This "bolt of lightning" indicates uninsulated material within your unit may cause an
electrical shock. For the safety of everyone in your household, please do not remove product
covering.
The "exclamation point" calls attention to features for which you should read the
enclosed literature closely to prevent operating and maintenance problems.
WARNING:TO PREVENT FIRE OR SHOCK HAZARD, DO NOT EXPOSE THIS
EQUIPMENTTO RAIN OR MOISTURE.
CAUTION:To prevent electric shock, match wide blade of plug to wide slot, and fully insert.
ATI-ENTION: Pour _vJter les chocs electrJques, Jntroduire la lame la plus large de la fiche
dans la borne correspondante de la prise et pousser jusqu'au fond.
3
In oducfion
*ol ***it* • • o.o. • o* • • o.. • ..tt • • .6. • • 0.. • • ,o1 • _66.. • • wt*, • • • I*t. • .,6. • • • °oo°, • *o* • • • o,**.. • • o_.. • • _°o. • • • °ooo • • • _o6o° • • • _ot.oo°°°° • • •
Features
• HQ (High Quality) System
• Frequency Synthesizer Tuning with Auto Set Feature
• On-Screen Displays in English or Spanish
• Display Panel
• MTS (Multi-Channel Television Sound) System
• Hi-Fi Stereo Sound System
• Auto Tracking
• One Touch Recording
• Unattended (Timer) Recording
• Special Effects Playback: Forward and Reverse Searching; Still;
Slow
• Wireless Remote Control
• Repeat Playback
• Auto Operation Features
• Real Time Counter
• Daylight-Saving Time
Safety Precautions
Warning: To prevent fire or shock hazard, do not expose this
equipment to rain or moisture.
FCC Warning: Any unauthorized changes or modifications to
this equipment void the user's authority to operate it.
This VCR, equipped with a HQ (High Quality) system, is compat-
ible with existing VHS (video home system) equipment.
Philips Consumer Electronics Company recommends that you
use only video cassette tapes that have been tested and inspected
for use in two, four, six and eight hour VCRs, and which are
labeled with the _ mark. The use of tapes that have not been
inspected for use in two, four, six and eight hour VCRs may result
in poor picture quality and excessive deposits on the video heads,
which may not be covered by the warranty if damage occurs.
Note to the CATV System Installer: This reminder is provided to
call the CATV system installer's attention to Article 820-40 of
the National Electrical Code, which provides guidelines for proper
grounding - in particular, specifying that the ground cable shall
be connected to the grounding system of the building, as close to
the point of cable entry as possible.
Copyright 1996 Philips Consumer Electronics Company. All
rights reserved.
Welcome to your VCR owner's man-
ual. This manual was designed for
you. When looking through it, it will
help you to keep several things in
mind.
One, this manual is divided into four
sections. The Getting Started section
guides you through the initial setup
and simple operations of your VCR.
The Operating Your VCR section
shows you all of the controls of the
VCR and remote control and
explains on-screen displays. The
Doing More section guides you
through the more advanced features
of your VCR. Finally, the
Information You May Need section
provides information you may or
may not need - other hookups, for
example, and trouble checks.
Two, the instructions follow a simple
format. Detailed steps explaining
operations are on the outside edges of
pages. Illustrations accompanied by
brief steps explaining operations are
on the inside edges of pages.
Additional information can be found
in boxes labeled NOTES along the
lower edges of pages.
Finally, never be afraid to try a fea-
ture! You cannot hurt your VCR
by trying any of the features in this
manual.*
So read on - and relax.
doing anything else, recotzl the
ivcR:,model and ,serial numbers in the 1
l TPffCf?_l,rovided on paqe two. These num-[
[t?ers will help u_ a_sist you if you ever call[
_fi,r /,ell,. " " ]
4
Table of Contents
Getting Started
Introduction ............................................................ 3
Table of Contents ....................................................... 4
Before Using Your VCR .................................................. 5
Hooking Up Your VCR ................................................... 6
Turning on Your VCR .................................................... 7
Playing ............................................................... 8
Recording ............................................................. 9
Setting the Clock/Daylight-Saving Time Selection .............................. 10
Operating Your VCR
On-Screen Displays ..................................................... 11
Remote Control Buttons ................................................. 12
Display Panel ......................................................... 14
Front Panel ........................................................... 15
Rear Panel ............................................................ 16
Doing More
Recording One ChannelAVatching Another ................................... 17
One Touch Recording ................................................... 18
Rerecording (Tape Duplication) ............................................ 19
Timer Recording ....................................................... 20
Channel Memory ....................................................... 22
Language Selection ..................................................... 24
Playback Options ...................................................... 24
Playback Features ...................................................... 27
MTS Broadcast Stereo System ............................................ 28
Hi-Fi Stereo Sound System ............................................... 30
Information You May Need
Specifications/Notes .................................................... 3 l
Other Hookups ........................................................ 32
Before Requesting Service ............................................... 36
Glossary ............................................................. 37
Warranty ............................................................. 38
Index ................................................................ 39
Accessories ........................................................... 40
5
Before Using Your VCR
• ..o° • °°=°°°°, =°°°° ° ° o,.°°°° ,,° °°°°°o o°°°°,.,,.,=°
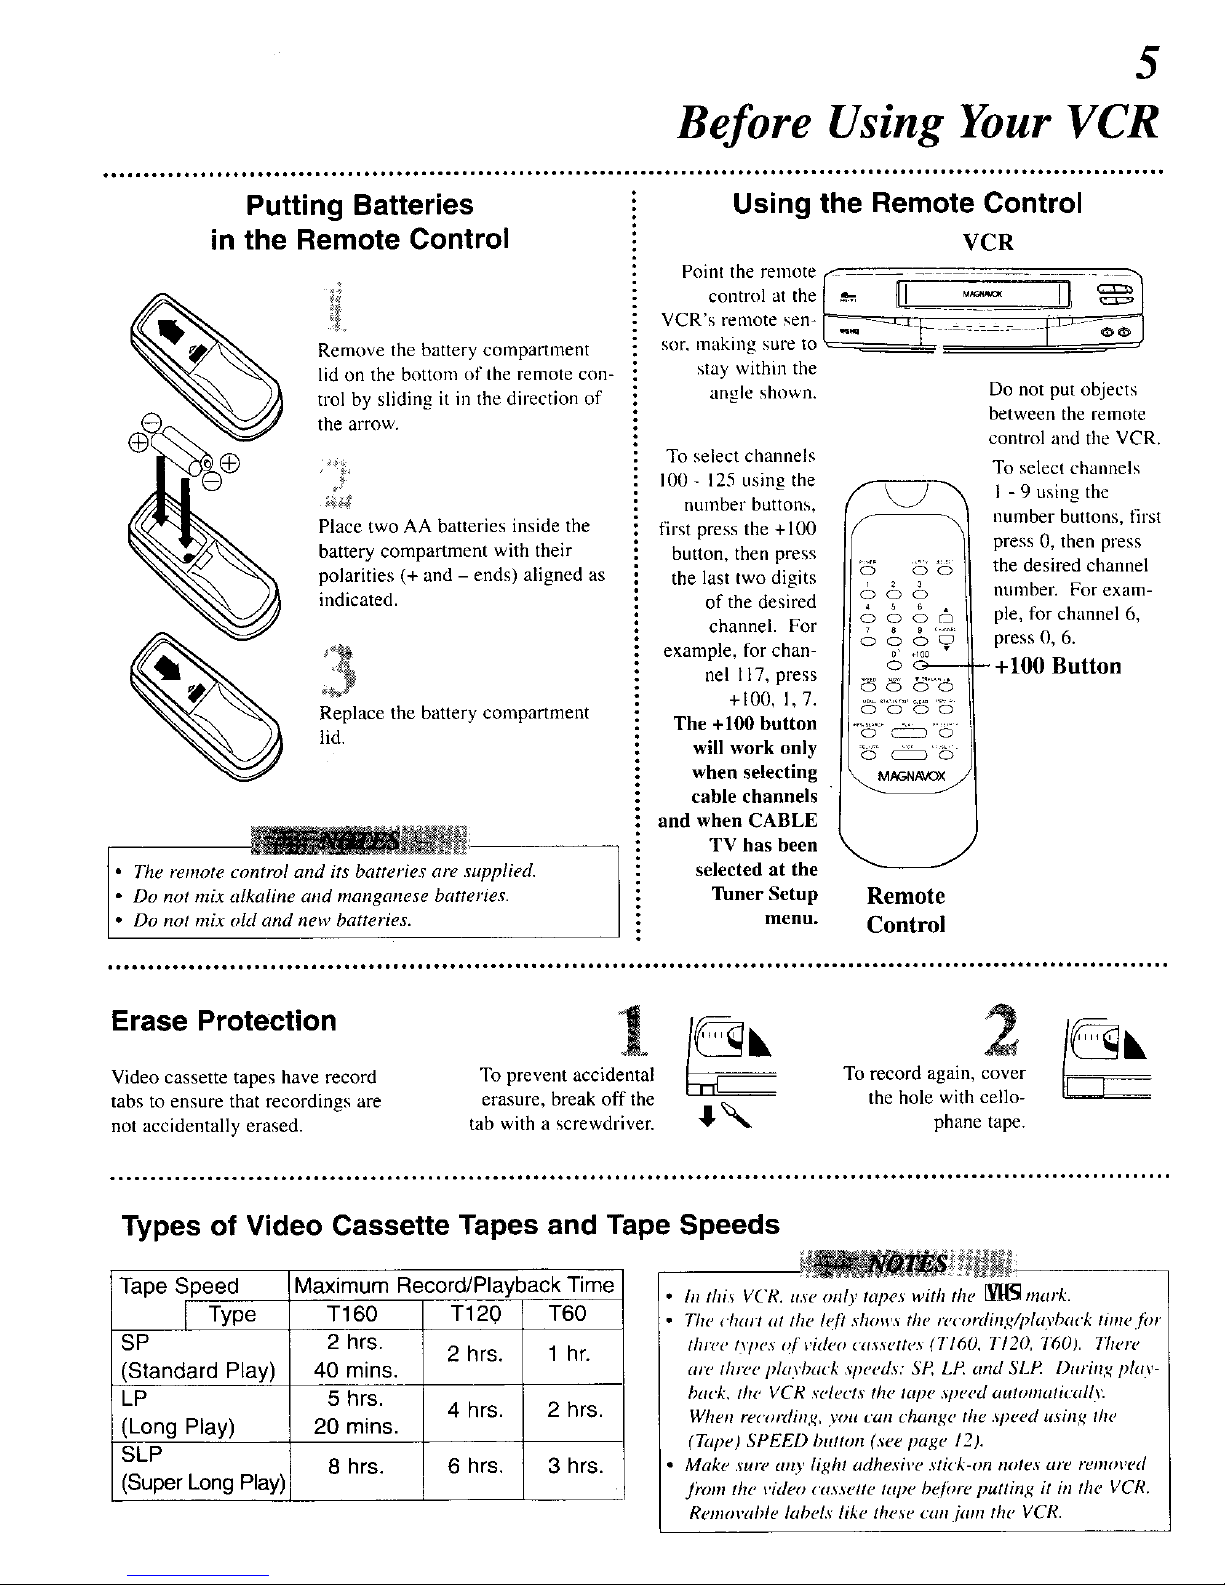
Putting Batteries
in the Remote Control
Remove the battery compartment
lid on the bottom of the remote con-
trol by sliding it m the direction of
the arrow.
/
Place two AA batteries inside the
battery compartment with their
polarities (+ and - ends) aligned as
indicated.
2}
Replace the battery compartment
lid.
The remote control and its batteries are supplied.
Do not mix alkaline and manganese batteries.
Do not mix old and new batteries.
Using the Remote Control
VCR
Point the remote
control at the
VCR's remote sen-
sor, making sure to
stay within the
angle shown.
To select channels
I00- 125 using the
number buttons,
first press the +100
button, then press
the last two digits
of the desired
channel. For
example, for chan-
nel 117, press
+I00, 1, 7.
The +100 button
will work only
when selecting
cable channels
and when CABLE
TV has been
selected at the
Tuner Setup
1 2yoJ
5
CD (D (D C_
0 0 0 0
0' .100 •
O0 O0
0 _ 0
0 _ 0
Do not put objects
between the remote
control and the VCR.
To select chmmels
I - 9 using the
number buttons, first
press 0, then press
the desired channel
number. For exam-
ple, for channel 6,
press 0, 6.
- +100 Button
Remote
menu. Control
Erase Protection
Video cassette tapes have record
tabs to ensure that recordings are
not accidentally erased,
To prevent accidental
erasure, break off the
tab with a screwdriver.
To record again, cover
the hole with cello-
"1_'_:_ phane tape.
Types of Video Cassette Tapes and Tape Speeds
Tape Speed Maximum Record/Playback Time
Type T160 T120 T60
SP 2 hrs.
2 hrs. 1 hr.
(Standard Play) 40 mins.
LP 5 hrs.
4 hrs. 2 hrs.
(Long Play) 20 mins.
SLP
8 hrs. 6 hrs. 3 hrs.
(Super Long Play)
In thi_ VCR. u.se only tapes with the [l[[_ mark.
The chain at the hi? shows the reeording/pho,baek tinw.fin
three t_7_es q! i,ideo cassettes (TI60, TI20, T601. 77wre
are three idayback speed._: SP, LP, and SLP During Ida.v -
back, the VCR _elects the tape ,weed atttomati('ally.
When recording, yon can change the .vwed using the
(Tape) SPEED button (see page 12).
Make sure arty light adhesive stick-on notes are removed
Jr'ore the video cassette tape befine putting it in the VCR.
Removable labels like these can./ant the VCR.
6
Hooking Up Your VCR
***ooJ*o °°. *t,oo4601 • • ° *.oQ_o_ol6 °°. *o*ooo,o ° iJ °°°° **Qo#o °..°° **oo6o ..° * ° *_oo#.o °,..° **ol .°°° *Q***Ill ° *t*oooo6ool • ****t ° *ool ° Q_I ° *_
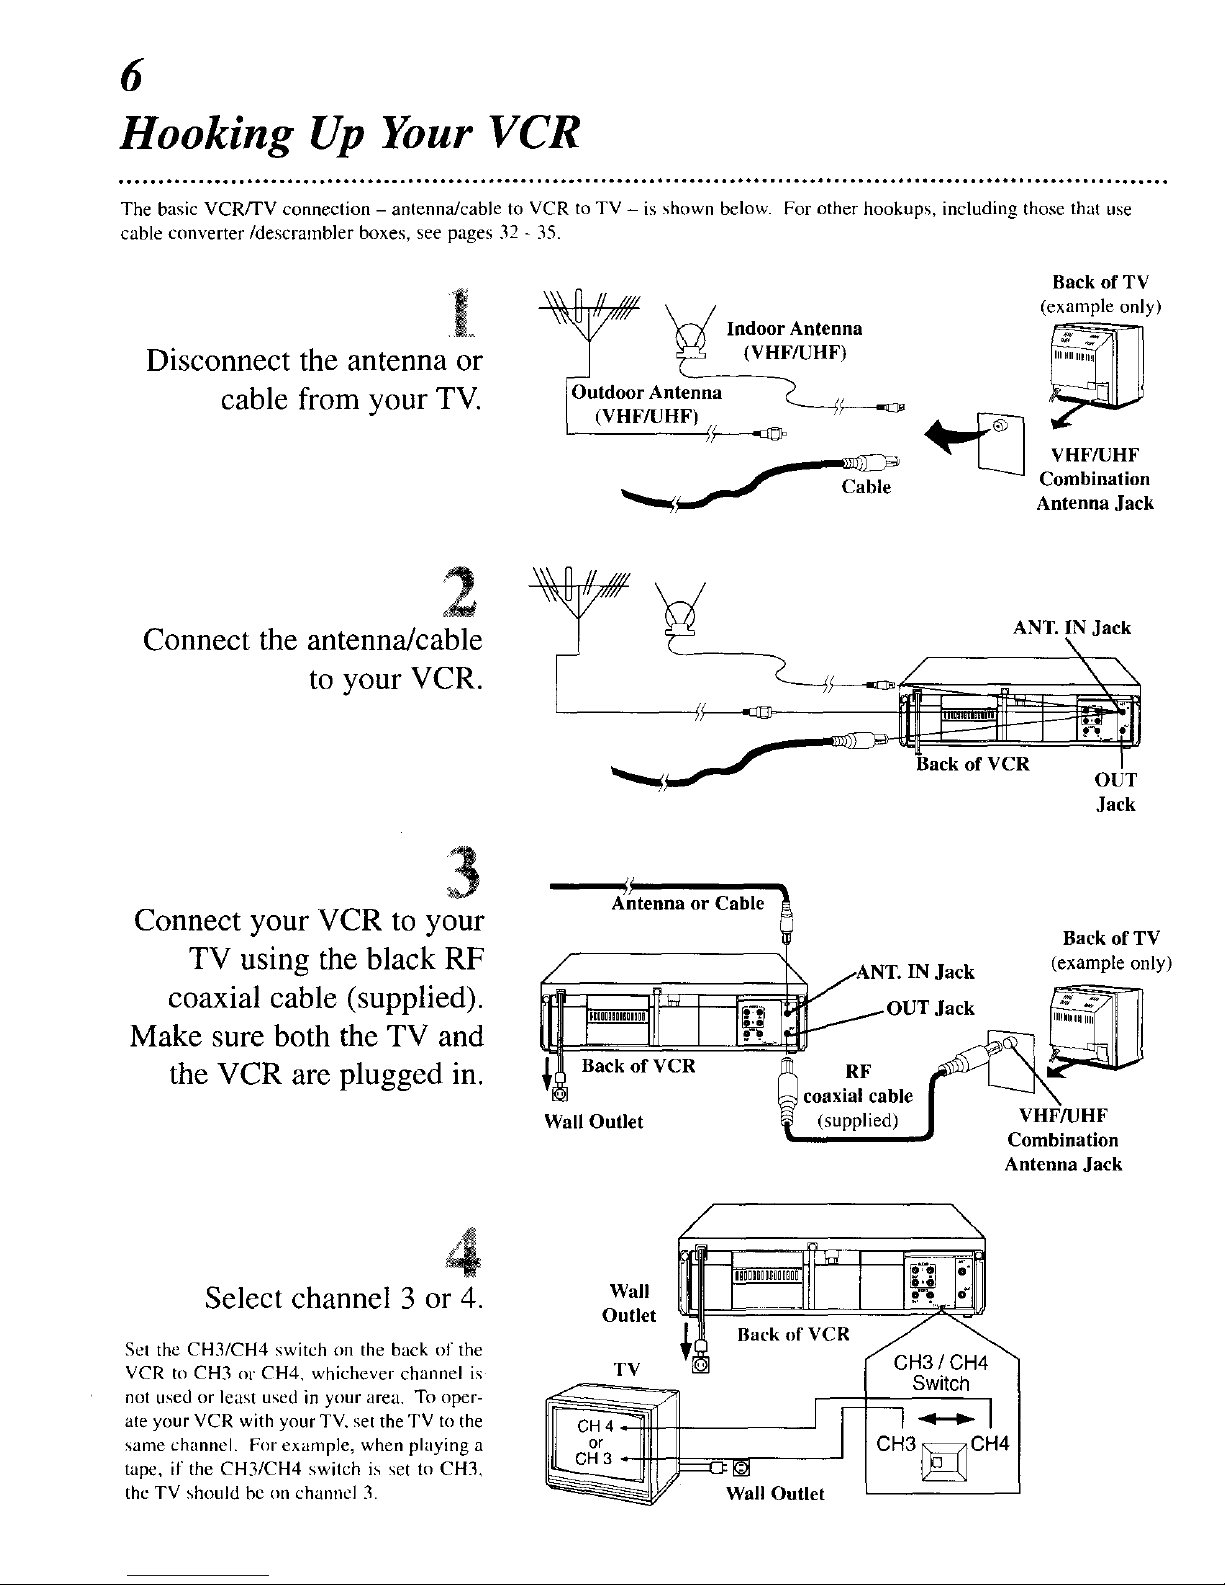
The basic VCR/TV connection - antenna/cable to VCR to TV - is shown below. For other hookups, including those that use
cable converter/descrambler boxes, see pages 32 - 35.
Disconnect the antenna or
cable from your TV.
Back of TV
_ (example only)
Indoor Antenna
(VHF/UHF)
)utdoor Antenna
(VHFBOHF)
_-_c_ _ VHF/UHF
Combination
Antenna Jack
Connect the antenna/cable
to your VCR.
_ ANT. IN Jack
Jack
Connect your VCR to your
TV using the black RF
coaxial cable (supplied).
Make sure both the TV and
the VCR are plugged in.
Antenna or Cable __ Back of TV
_// ,__-____L_ANT. IN jack (example only)
_ Back of VCR _ RF __ m_i_''¢
'D] _ coaxialfable | _'_._
Wall Outlet _ (supplied) J cV2Ff/_Jn2iFon
Antenna Jack
Select channel 3 or 4.
Set the CH3/CH4 switch on the back of the
VCR to CH3 or CH4, whichever channel is
not used or least used in your area. To oper-
ate your VCR with your TV, set the TV to the
same channel. For example, when playing a
tape, if the CH3/CH4 switch is set tu CH3,
the TV should be on channel 3.
Wall
Outlet
Back of VCR
TV CH3 / CH4
Switch
-*-,-1
CH3 _ CH4
[]
all Ontlet
7
Turning on Your VCR
°°,°°°, ° ° °,,o°,,° °°oo°°,,,°o°°°, ,,°°°° ° °,,,,,°,,, °°
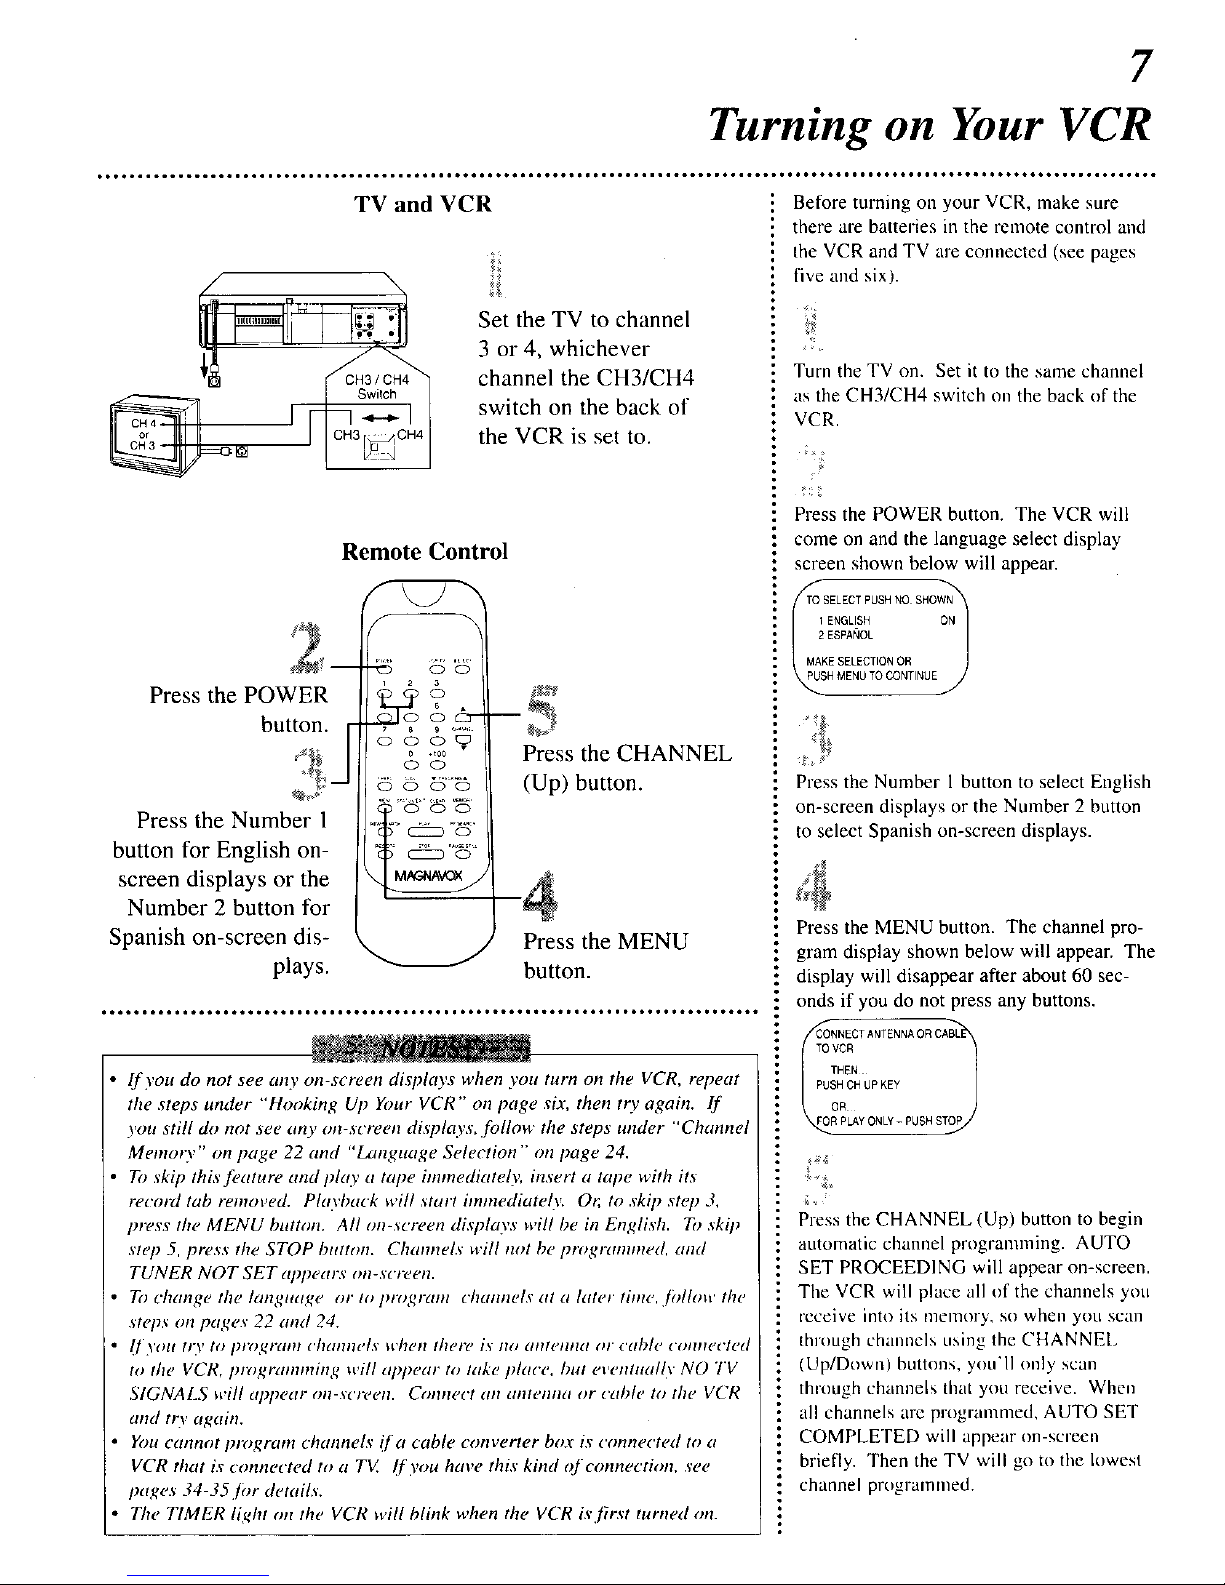
TV and VCR Before turning Oll your VCR, make sure
Set the TV to channel
3 or 4, whichever
channel the CH3/CH4
switch on the back of
the VCR is set to.
Remote Control
Press the POWER
button.
Press the Number 1
button for English on-
screen displays or the
Number 2 button for
Spanish on-screen dis-
plays.
Press the CHANNEL
(Up) button.
Press the MENU
button.
If you do not see any on-screen displays when you turn on the VCR, repeat
the steps under "Hooking Up Your VCR" on page six, then try again, ff
you still do not see any on-screen dLsplays, .follow the steps under "Channel
Memmy" on page 22 and "LmTguage Selection" on page 24.
To skip this feature and play a tape immediate@ insert a tape with its
recmd tab removed. Playback will start immediate@ Or, to skip step 3,
press the MENU button. All on-screen displays will be in English. To skip
step 5, press the STOP button. Chamwlx will not be programmed, and
TUNER NOT SET ¢q)peatw on-screen.
To change the langtutge or to program channels at a later tinte, [ollow the
.steps on pageY 22 and 24.
[]'yOll lily to plz)grtlnl ('h(innt'ls It'helt lheFe iY no (llltellna o1 cable ( ottneeted
to the VCR, I)tz)gramming will appear to lake place, but evenmall\ NO TV
SIGNALS will _q_pear oil-screen. Ctmneet an antelma or cable to the VCR
and tt3, again.
You cannot program channels i[a cable converter box is connected to a
VCR that is connected to a TV. (f you have this kind of connection, see
pages 34-35jor details.
The TIMER light on the VCR will blink when the VCR is first turned on.
there are batteries in the remote control and
the VCR and TV are connected (see pages
five and six).
Turn the TV on. Set it to the same channel
as the CH3/CH4 switch on the back of the
VCR.
Press the POWER button. The VCR will
come on and the language select display
screen shown below will appear.
TO SELECTPUSH NO SHOWN'_
ENGLISH ON
2 ESPANOL
MAKESELECTIONOR
H MENU TOCONTINUE
Press the Number 1 button to select English
on-screen displays or the Number 2 button
to select Spanish on-screen displays.
Press the MENU button. The channel pro-
gram display shown below will appear. The
display will disappear after about 60 sec-
onds if you do not press any buttons.
ToCONNECTvcBANTENNA OR CABLI__R HEN
PUSHOH UP KEY
OR
PLAYONLY- PUSHS
Press the CHANNEL (Up) button to begin
automatic channel pmgranuning. AUTO
SET PROCEEDING will appear on-screen.
The VCR will place all of the channels you
receive into its nlelrlory, so when yott scan
through channels using the CHANNEL
(Up/Down) buttons, you'll only scan
through channels that you receive. When
all channels are programmed, AUTO SET
COMPLETED will appear on-screen
briefly. Then the TV will go to the lowest
channel programmed.
8
Playing
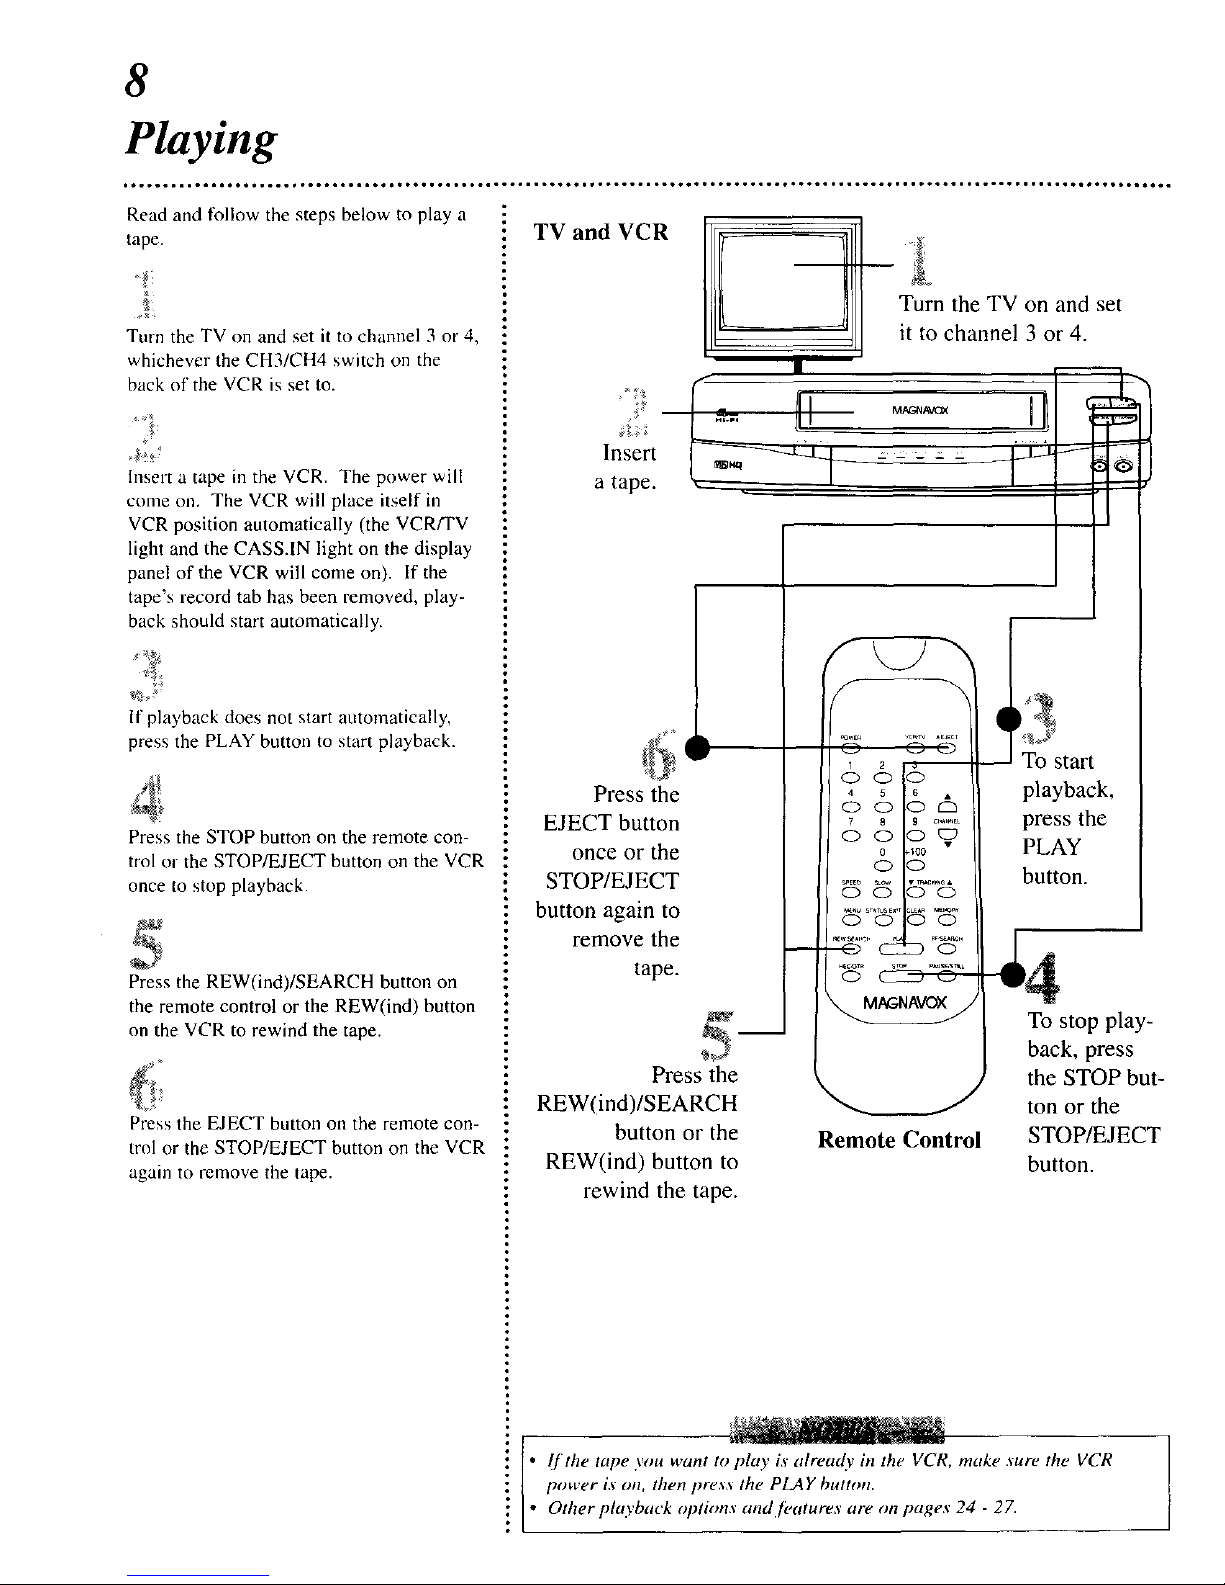
Read and follow the steps below to play a
tape.
Turn the TV on and set it to channel 3 or 4,
whichever the CH3/CH4 switch on the
back of the VCR is set to.
Insert a tape in the VCR. The power will
come on, The VCR will place itself in
VCR position automatically (the VCR/TV
Iigbt and the CASS.IN light on the display
panel of the VCR will come on). If the
tape's record tab has been removed, play-
back should start automatically.
If playback does not start automatically,
press the PLAY button to start playback.
Press the STOP button on the remote con-
trol or the STOP/EJECT button on the VCR
once to stop playback.
Press the REW(ind)/SEARCH button on
the remote control or the REW(ind) button
on the VCR to rewind the tape.
Press the EJECT button on the remote con-
trol or the STOP/EJECT button on the VCR
again to remove the tape.
TV and VCR
Insert
a tape.
Ill 1/11 urn onandset
II ll it to channel 3 or 4.
Press the
EJECT button
once or the
STOP/EJECT
button again to
remove the
tape.
Press the
REW(ind)/SEARCH
button or the
REW(ind) button to
rewind the tape.
Remote Control
!
-- To start
playback,
press the
PLAY
button.
To stop play-
back, press
the STOP but-
ton or the
STOP/EJECT
button.
I[the tape you want to play is already in the VCR, make sure the VCR
power is on, then pres,_ the PLAY button.
Other playback options and fi,atures are on pages 24 - 27.

9
Recording
Make sure the
Turn the TV on and set
it to channel 3 or 4.
TV and VCR
Insert a tape.
VCR/TV light is on.
If the light is not on,
press the VCR/TV
button once.
F5
Use the CHANNEL
(Up/Down) buttons
or the Number but-
tons to select the
channel you want to
record.
Press the (Tape)
SPEED button to
select tape speed.
Press the
REC(ord)/OTR button
once to start recording.
Press the PAUSE/
STILL button once to
pause recording. To
start recording again,
press the
PAUSE/STILL button
again.
Remote Control
To stop recording,
press the STOP
button.
ff the REC(ord)/OTR button is pressed while a tape without a record tab is
in the VCR, the VCR will eject the tape and PROTECTED CASSETTE
CANNOT RECORD will flash on-screen.
Other recording options are on pages 17 - 21.
You can change the tape speed while the VCR is recording, but some distor-
tion will appear on the tape.
The VCR will record in a preset volume.
Read and follow the steps below to record
a television program.
Turn the TV on and set it to channel 3 or
4, whichever the CH3/CH4 switch on the
back of the VCR is set to.
g
Insert a tape with its record tab intact (see
page five) in the VCR. The power will
come on, and the CASS.IN light will
appean
%
If the VCR/TV light on the front of the
VCR comes on, go to step 4. If the
VCR/TV light does not come om press
the VCR/TV button once.
Press the (Tape) SPEED button on the
remote control until the desired tape
speed (see page five) appears on the TV
screen. The tape speed will disappear
from the screen after about five seconds.
Use the CHANNEL (Up/Down) buttons
or the Number buttons to select the chan-
nel to be recorded.
Press the REC(ord)/OTR button once to
start recording. The REC light will come
on.
To pause the recording (for example, dur-
mg commercials), press the PAUSE/
STILL burton. The REC light will flash.
To start recording again, press the
REC(ord)/OTR button or the PAUSE/
STIt.L button again. The REC light will
COllle on again.
To stop recording, press the STOP button.
10
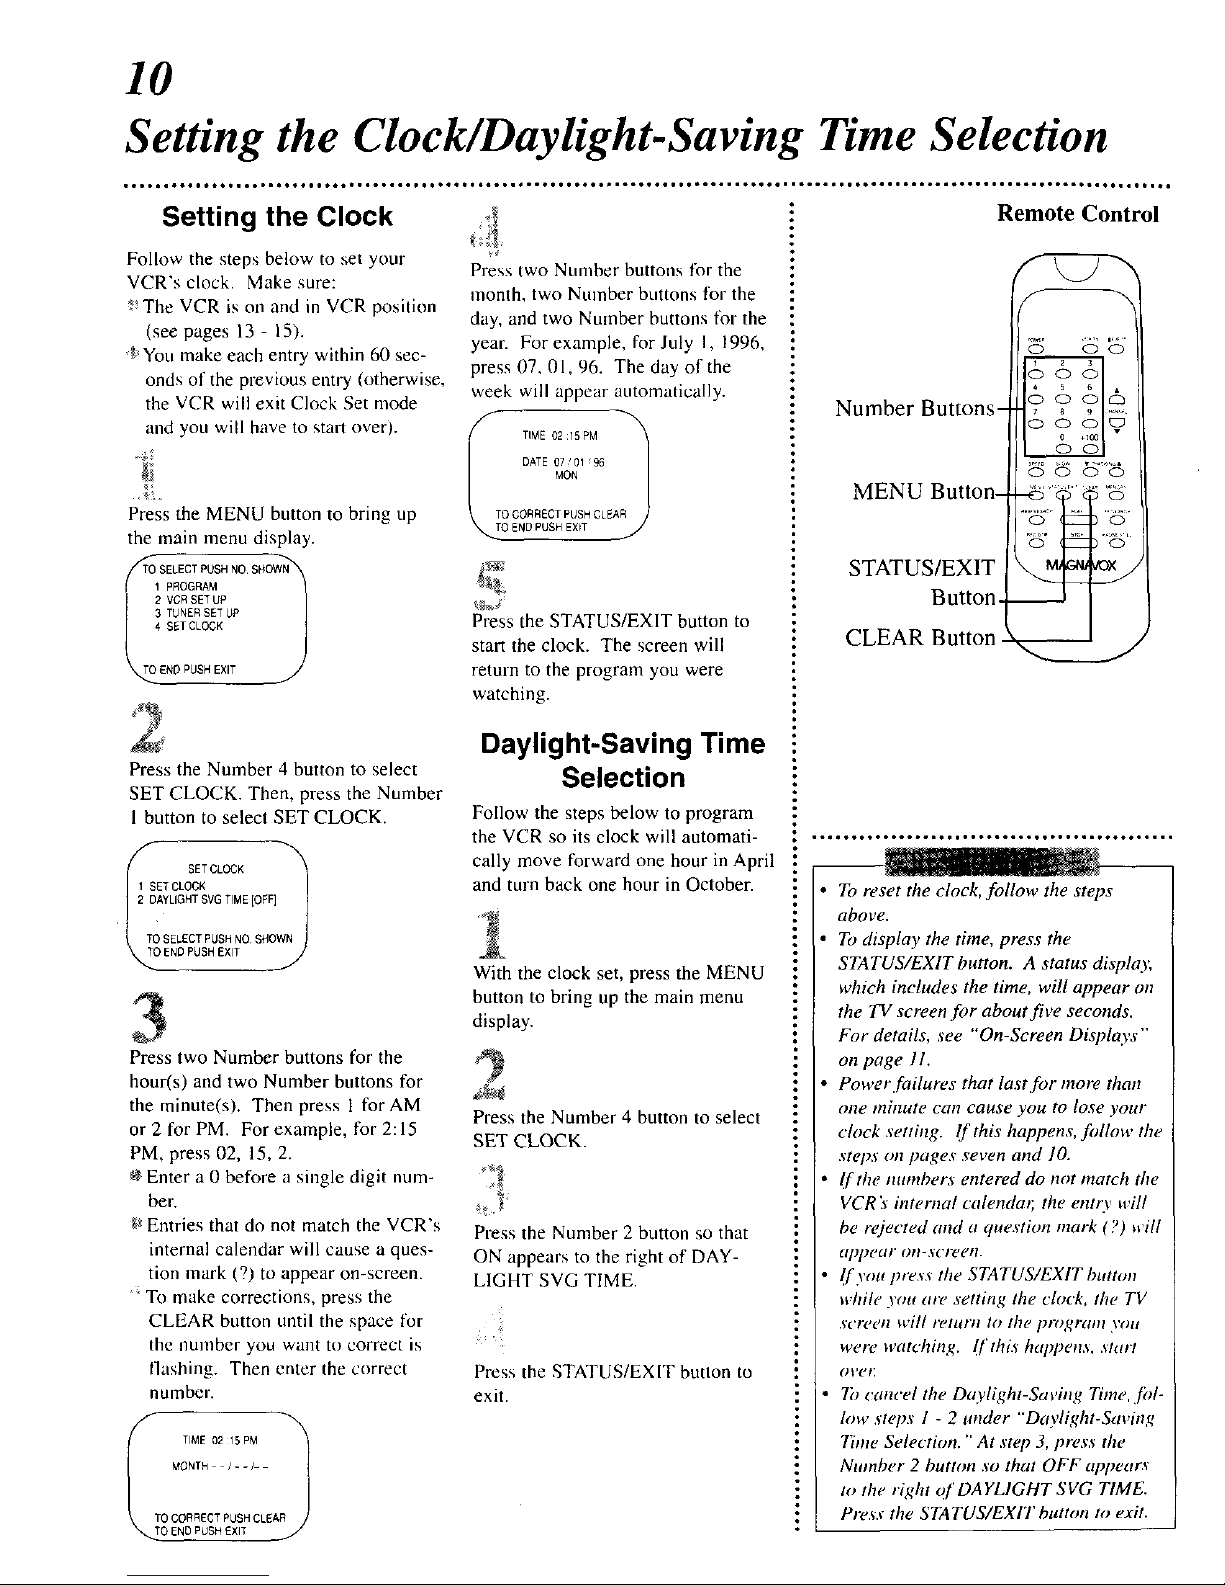
Setting the Clock/Daylight-Saving Time Selection
Setting the Clock
Follow the steps below to set your
VCR's clock. Make sure:
The VCR is on and in VCR position
(see pages 13 - 15).
g' You make each entry within 60 sec-
onds of the previous entry (otherwise,
the VCR will exit Clock Set mode
and you will have to start over).
Press the MENU button to bring tip
the main menu display.
TI 4321ENDSELECTSETTUNERVCRPROGRAMPUSHCLOCKSETPUSHSETUPEXITUPNO SHOW 1
Press the Number 4 button to select
SET CLOCK. Then, press the Number
1 button to select SET CLOCK.
SET CLOCK
1 SET CLOCK
_Z_TOCII[iii12DAYLIGHTSVG TIME [OFF]
TOSELECT PUSH NO SHOWN
Press two Number buttons for the
hour(s) and two Number buttons for
the minute(s). Then press 1 for AM
or 2 for PM. For example, for 2:15
PM, press 02, 15, 2.
_ Enter a 0 before a single digit num-
ber.
g_Entries that do not match the VCR's
internal calendar will cause a ques-
tion mark (?) to appear on-screen.
; To make corrections, press the
CLEAR button until the space for
the ilumber you want to correct is
llashing. Then enter the correct
number,
MONTh /- - I-
TO CORRECT PUSH CLEAR
O END PUSH EXIT
Press two Number buttons for the
month, two Number buttons tor the
day, and two Number buttons tor the
year. For example, for July I, 1996,
press 07, 01,96. The day of the
week will appear automatically.
DATE 07 '01 96
MON
TO CORRECT PUSHCLEAR
O ENDPUSH EXff
Press the STATUS/EXIT button to
start the clock. The screen will
return to the program you were
watching.
Daylight-Saving Time
Selection
Follow the steps below to program
the VCR so its clock will automati-
cally move forward one hour in April
and turn back one hour in October.
With the clock set, press the MENU
button to bring up the main menu
display.
z_
Press the Number 4 button to select
SET CLOCK.
Press the Number 2 button so that
ON appears to the right of DAY-
LIGHT SVG TIME.
Press the STATUS/EXIT button to
exit.
Remote Control
Number Buttons-
MENU Button-
STATUS/EXIT
Button-
CLEAR Button.
_d;" _'
• To reset the clock, follow the steps
aboye,
To display the time, press the
STATUS/EXIT button. A status display,
which includes the time, will appear on
the TV screen for about five seconds.
For details, see "On-Screen Displays"
on page I1.
Power failures that last for morn than
one minute can cause you to lose your
clock setting. If this happens, follow the
steps on pages seven and ]0.
If the monbers entered do not match the
VCR's internal calendar, the ent O, hill
be r(jected and u question mark (?) will
uppe_/" on-screen.
[[yott press the STATUS/EXIT button
while yon are setting the clock, the TV
screen will re/n/Tt 1o the ptogram yott
were watching. [['this h_q_pens, start
ovel_
7b cancel the Daylight-Saving Time, ,[ol-
low steps 1 - 2 under "Daylight-Saving
Time Selection." At step 3, press the
Number 2 button so that OFF appears
to the right _)f DAYLIGHT SVG TIME.
Press the STATUS/EXIT button to exit.
11
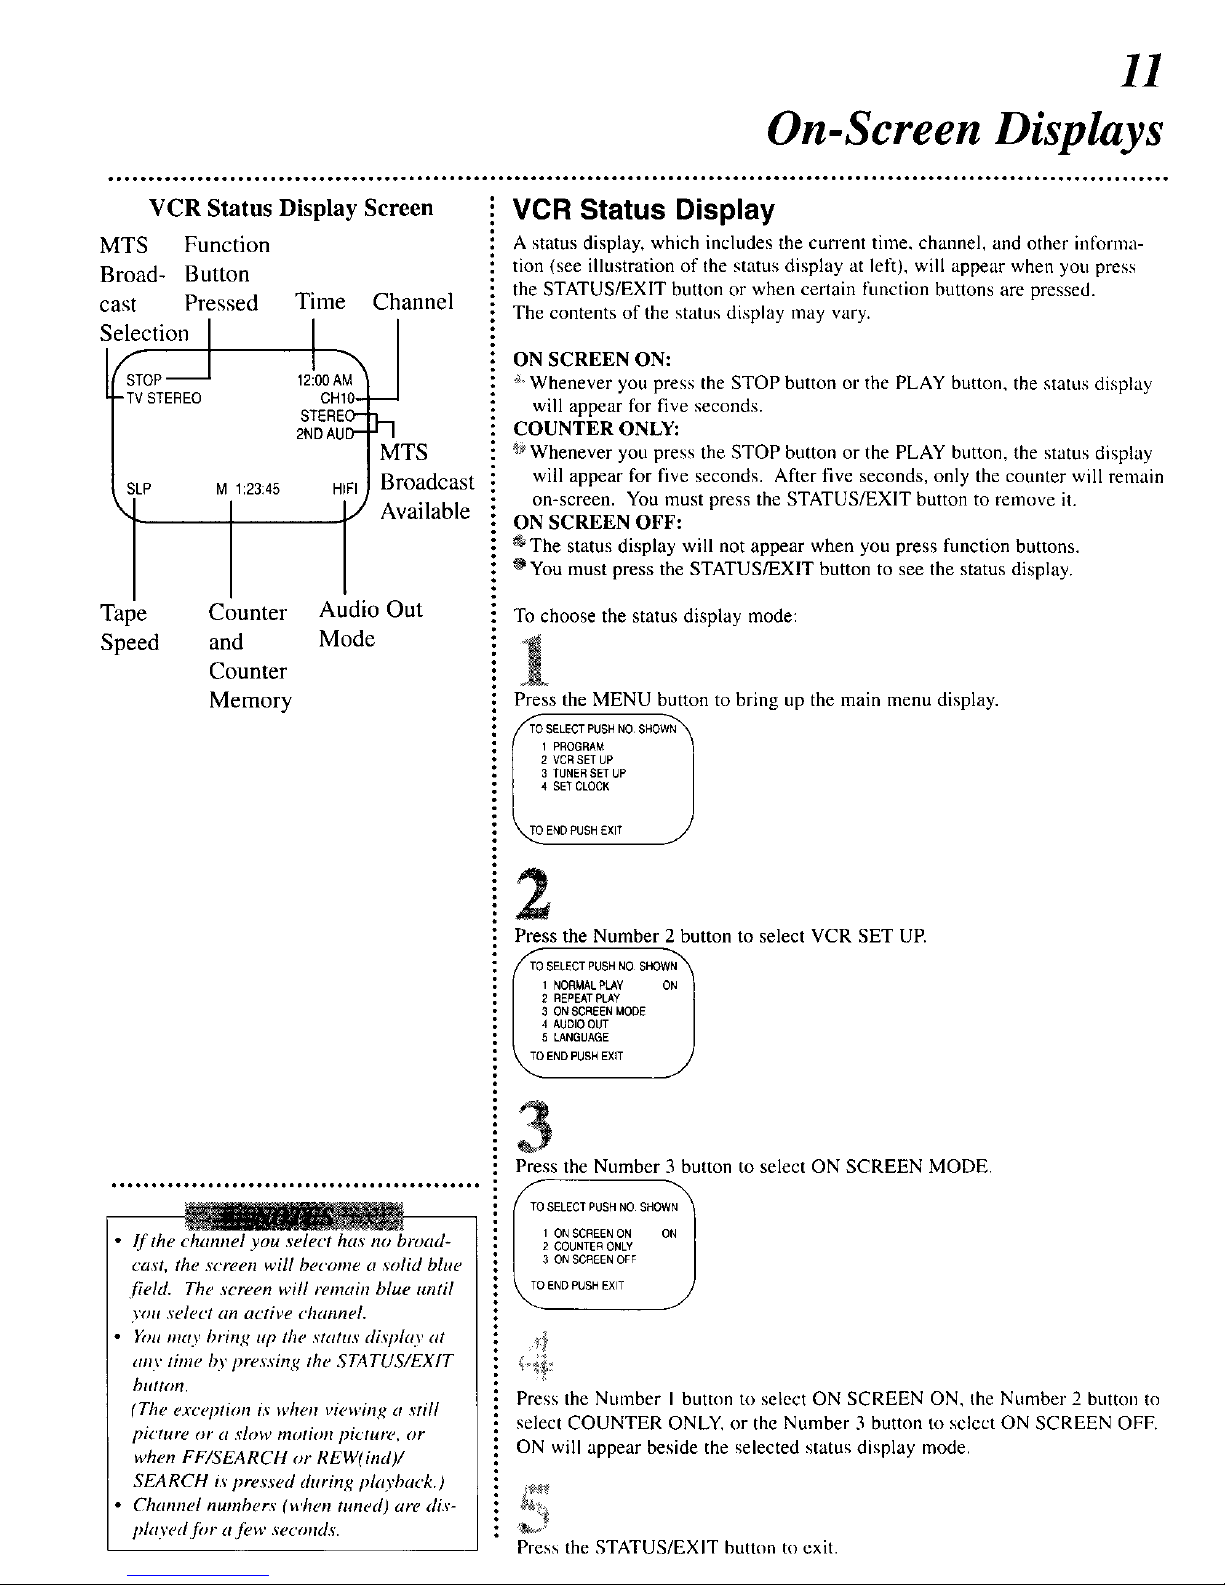
On-Screen Displays
VCR Status Display Screen
MTS Function
Broad- Button
cast Pressed Time
Selecti°n I [
fSTOP_
12:00AM
-TV STEREO CHIO-
STEREO"
2NDAUD-
SLP M 1:23:45 HIFI
Tape Counter
Speed and
Counter
Channel
A
h
MTS
Broadcast
Available
Audio Out
Mode
Memory
• If the channel you select has no broad-
cast, the screen will become a solid blue
[ield. The screen will remain blue until
you select an active channel.
Yott ot¢ty bring up the status display at
any time by pressing the STATUS/EXIT
btttton.
(The exception is when viewing a still
picture or a slow motion pictutv, or
when FF/SEARCH or REW(ind)/
SEARCH i.spressed (htring playback.)
Channel numbers (when tuned) are dis-
phtyed [br a.[_,w seconds.
VCR Status Display
A status display, which includes the current time. channel, and other intkn'ma-
tion (see illustration of the status display at left), will appear when you press
the STATUS/EXIT button or when certain ftmction buttons are pressed.
The contents of the status display may vary.
ON SCREEN ON:
Whenever you press the STOP button or the PLAY button, the status display
will appear for five seconds.
COUNTER ONLY:
_ Whenever you press the STOP button or the PLAY button, the status display
will appear for five seconds. After five seconds, only the counter will remain
on-screen. You must press the STATUS/EXIT button to remove it.
ON SCREEN OFF:
The status display will not appear when you press function buttons.
OYou must press the STATUS/EXIT button to see the status display.
To choose the status display mode:
Press the MENU button to bring up the main menu display.
/_TTOSELECTPUSH NO SHOWN_
I PROGRAM
2 VCR SET UP
3 TUNERSET UP
4 SET CLOCK
,_.OEND PUSH EXIT
2
Press the Number 2 button to select VCR SET UP.
F_TOSELECTPUSHNOSHOWN_
'"OGM'LRLA O.
r REPEATpLAy
3 ON SCREEN MODE
4 AUDIO OUT
5 LANGUAGE
_.OENDPUSHEXIT
Press the Number 3 button to select ON SCREEN MODE.
_TO SELECT PUSH NO SHOW)N_
Press the Number I button to select ON SCREEN ON, the Number 2 button to
select COUNTER ONLY, or the Number 3 button to sclcct ON SCREEN OFF.
ON will appear beside the selected status display mode.
Press the STATUS/EXIT buttun to exit.

12
Remote Control Buttons
Number Buttons
Use to select channels and on-screen menus, and to program VCR functions
(such as setting the clock).
Channels 1 - 9 _
To select, press 0, then press the channel you want. For example,
to select channel 7, press 0, 7.
Channels 100 and above
To select, press the + 100 button, then press the last two digits of the channel you
want. For example, to select channel 117, press the +100 button, 1, 7.
SLOW
Press to view the picture in slow motion.
(Tape) SPEED Button
Press to select recording speed (SP,
STATUS/EXIT Button
Press to see the status display. Press to make status displays disappear.
are on page 11.
Press to exit on-screen menus.
MENU
Press to bring up the main menu display.
REW(ind)/SEARCH
When in Stop mode, press to rewind the tape at high speed, When in Play mode,
press to rewind the tape while the picture stays on-screen.
Press to play a tape. Also, press to release Slow, Search or Still mode and to
return to normal playback (see page 26.fi)r details),
f
POWER VCRiTV -AEJECT
O O O
1 2 3
O O O
4 5 6 •
0 0 0 r-h
7 8 9 C_,_NNEL
O O O E_
0 +100
O O
SPEED S|OW • TRACKING •
O O O
MENU STA(_XIT _ MEMORYo
PLAY FF/SEARCH
0
STOP PAUSE/STILL
0
REC(ord
Press once to start a recording (.see page nine.ft." details).
Or. press three to 10 times to start a one touch recording (an inamediatc record-
ing. 30 minutes to lkmr hours long) of the channcl you are watching (,see page l_;
./or deudls).
 Loading...