

Magnavox VRT245AT Owner's Manual
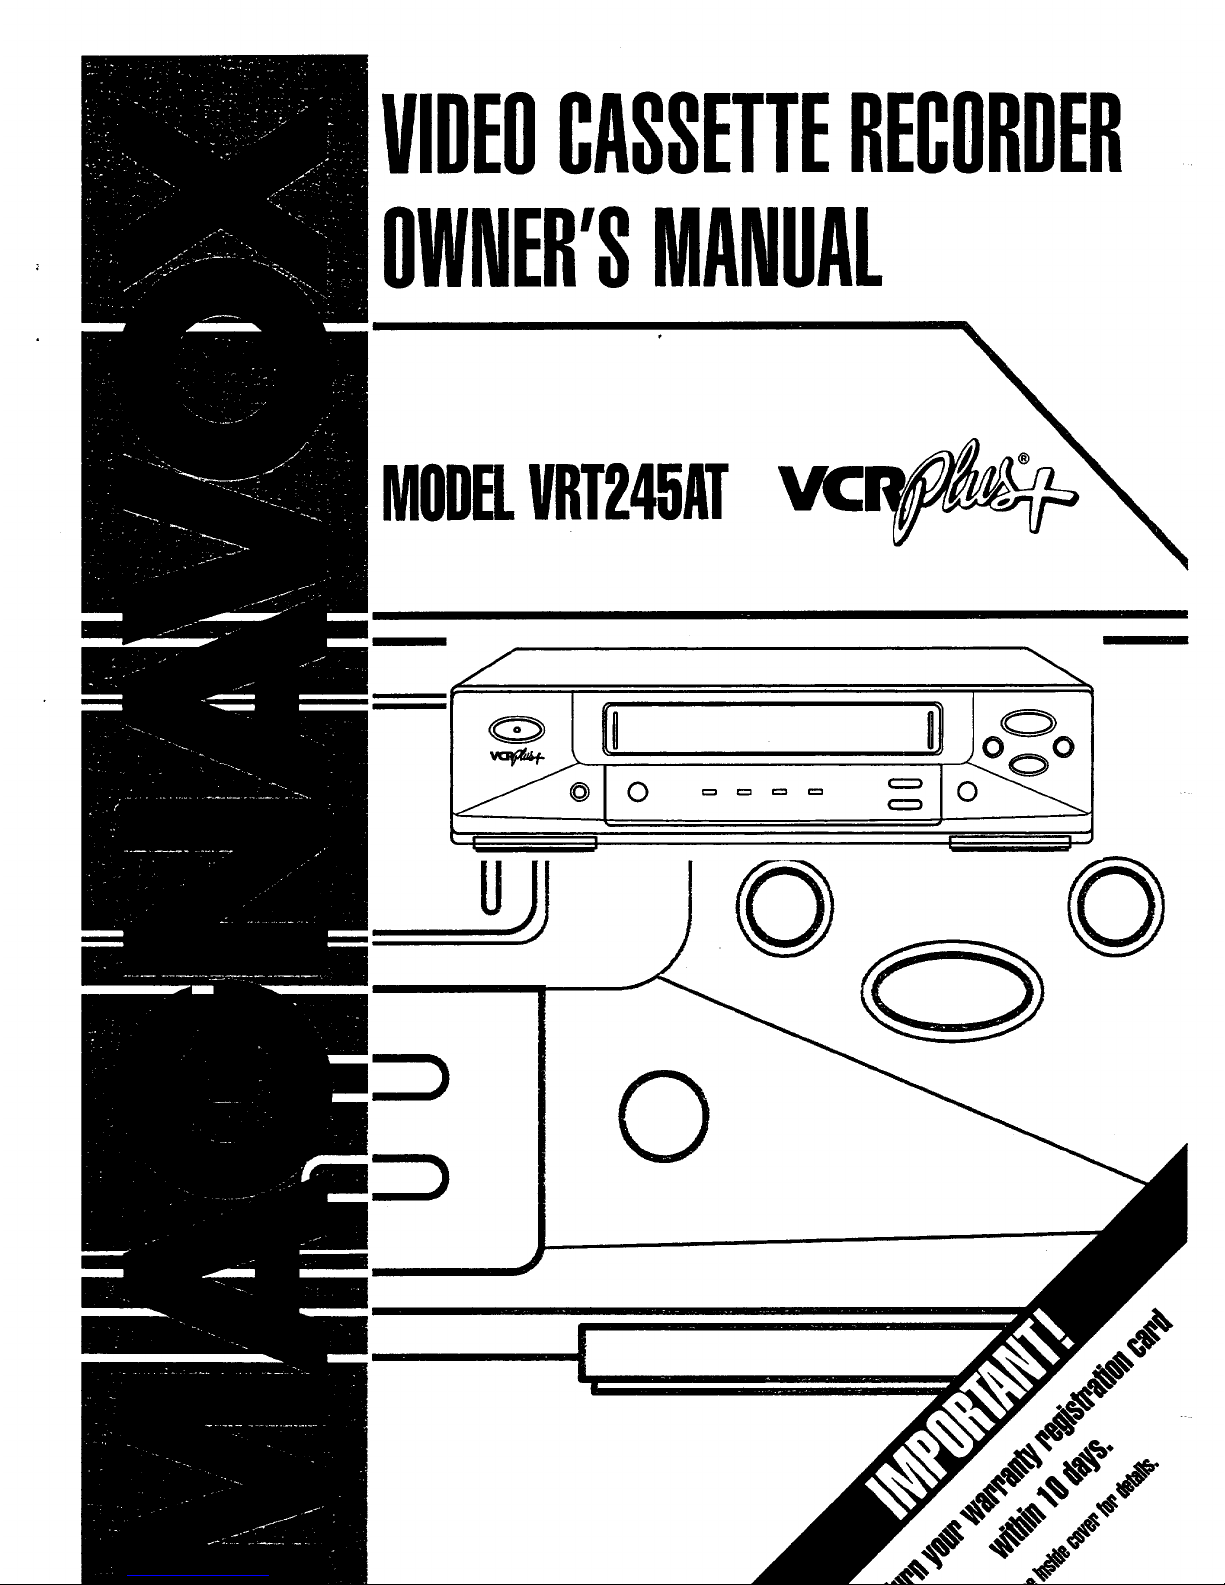
VIDEOCASSETTERECORDER
OWNER'SMANUAL
MODELVRT245AT
I I
0
0
0
MAGNAVOX
Smart.Verysmart:
MAGNAVOX
Smart.Verysmart:
Congratulations on your
and welcome to the "family!"
Dear MAGNAVOX product owner:
Thank you for your confidence in MAGNAVOX. You've selected one of the
best-built, best-backed products available today. And we'll do everything in
our power to keep _}ouhappy with your purchase for many years to come.
As a member of the MAGNAVOX "family," you're entitled to protection by
one of the m_)st comprehensive warranties and outstanding service
networks in the industry.
What's more, your purchase guarantees you'll receive all the information
and special offers for which you qualify, plus easy access to accessories
from our convenient home shopping network.
And most importantly, you can count on our uncompromising commitment
to your total satisfaction.
All of this is our way of saying welcome-and thanks for investing in a
MAGNAVOX product.
Sincerely,
Robert Minkhorst
President and Chief Executive Officer
P.S. Remember, to get the most from your NIAGNAVOX product,
you must return your Warranty Registration Card within 10
3
Introduction
Features
• HQ (High Quality) System
• Automatic Channel Setting
• On-Screen Displays in English or Spanish
• Automatic Tracking
• One Touch Recording
• Unattended (Timer) Recording With or Without VCR Plus+
• Special Effects Playback:
Forward and Reverse Searching; Still, Slow
• Wireless Remote Control with TV Control Possibility
• Repeat Playback
• Real Time Counter
• Automatic Daylight-Saving Time Adjustment
Safety Precautions
Warning: To prevent fire or shock hazard, do not expose this
equipment to rain or moisture.
FCC Warning: Any unauthorized changes or modifications to
this equipment voids the user's authority to operate it.
This VCR, equipped with a HQ (high quality) system, is compati-
ble with existing VHS (video home system) equipment.
Philips Consumer Electronics Company recommends that you
use only, video cassette tapes that have been tested and inspected
for use m two, four, six and eight hour VCRs, and which are
labeled with the _ mark. The use of tapes that have not been
inspected for use in two, four, six and eight hour VCRs may result
in poor picture quality and excessive deposits on the video heads,
which may not be covered by the warranty if damage occurs.
Note to the CATV System Installer: This reminder is provided to
call the CATV system installer's attention toArticle 820-40 of
the NEC, which provides guidelines for proper grounding - in
particular, specifying that ground cable shall be connected to the
grounding system of the building, as close as to the point of cable
entry as possible.
Copyright 1995 Philips Consumer Electronics Company. All
rights reserved.
t
,D
Q
i
Welcome to your VCR owner's man-
ual. This manual was designed for
you. When looking through it, it will
help you to keep several things in
mind.
One, this manual is divided into four
sections. The Getting Started section
guides you through the initial setup
and simple operations of your VCR.
The Operating Your VCR section
shows you where all of the VCR and
remote control controls and explains
on-screen displays. The Doing More
section guides you through the more
advanced features of your VCR.
Finally, the Information You May
Need section provides information
you may or may not need - other
hookups, for example, and trouble
checks.
Two, the instructions follow a simple
format. Detailed steps explaining
operations are on the outside edges of
pages. Illustrations accompanied by
brief steps explaining operations are
on the inside edges of pages.
Additional information can be found
in boxes labeled NOTES along the
lower edges of pages.
Finally, never be afraid to try a fea-
ture! You cannot hurt your VCR
by trying any of the features in this
manual!
So read on - and relax.
4
Table of Contents
Getting Started
Introduction ............................................................ 3
Table of Contents ....................................................... 4
Before Using Your VCR .................................................. 5
Hooking Up Your VCR ................................................... 6
Turning On Your VCR ................................................... 7
Playing ............................................................... 8
Recording ............................................................. 9
Setting the Clock ....................................................... 10
Operating Your VCR
On-Screen Displays ..................................................... 11
Remote Control Buttons ................................................. 12
Display Panel ......................................................... 14
Front Panel ........................................................... 15
Rear Panel ............................................................ 16
Doing More
Recording One Channel/Watching Another ................................... 17
One Touch Recording ................................................... 18
Rerecording (Tape Duplication) ............................................ 19
Timer Recording ....................................................... 20
Setting Up VCR Plus+ .................................................. 22
Timer Recording With VCR Plus+ ......................................... 24
Channel Memory ....................................................... 25
Language Selection ..................................................... 27
Daylight-Saving Time ................................................... 28
Playback Options ...................................................... 29
PlaybaCk Features . .......................... 33
TV Code Setting ....................................................... 34
Information You May Need
Other Hookups .................. ................................... ...35
Before Requesting Service ............................................... 39
Glossary ......................................................... .... 40
Warranty ............................................................. 41
Specifications/Notes .................................................... 42
Index ................................................................ 43
Accessories ........................................................... 44
5
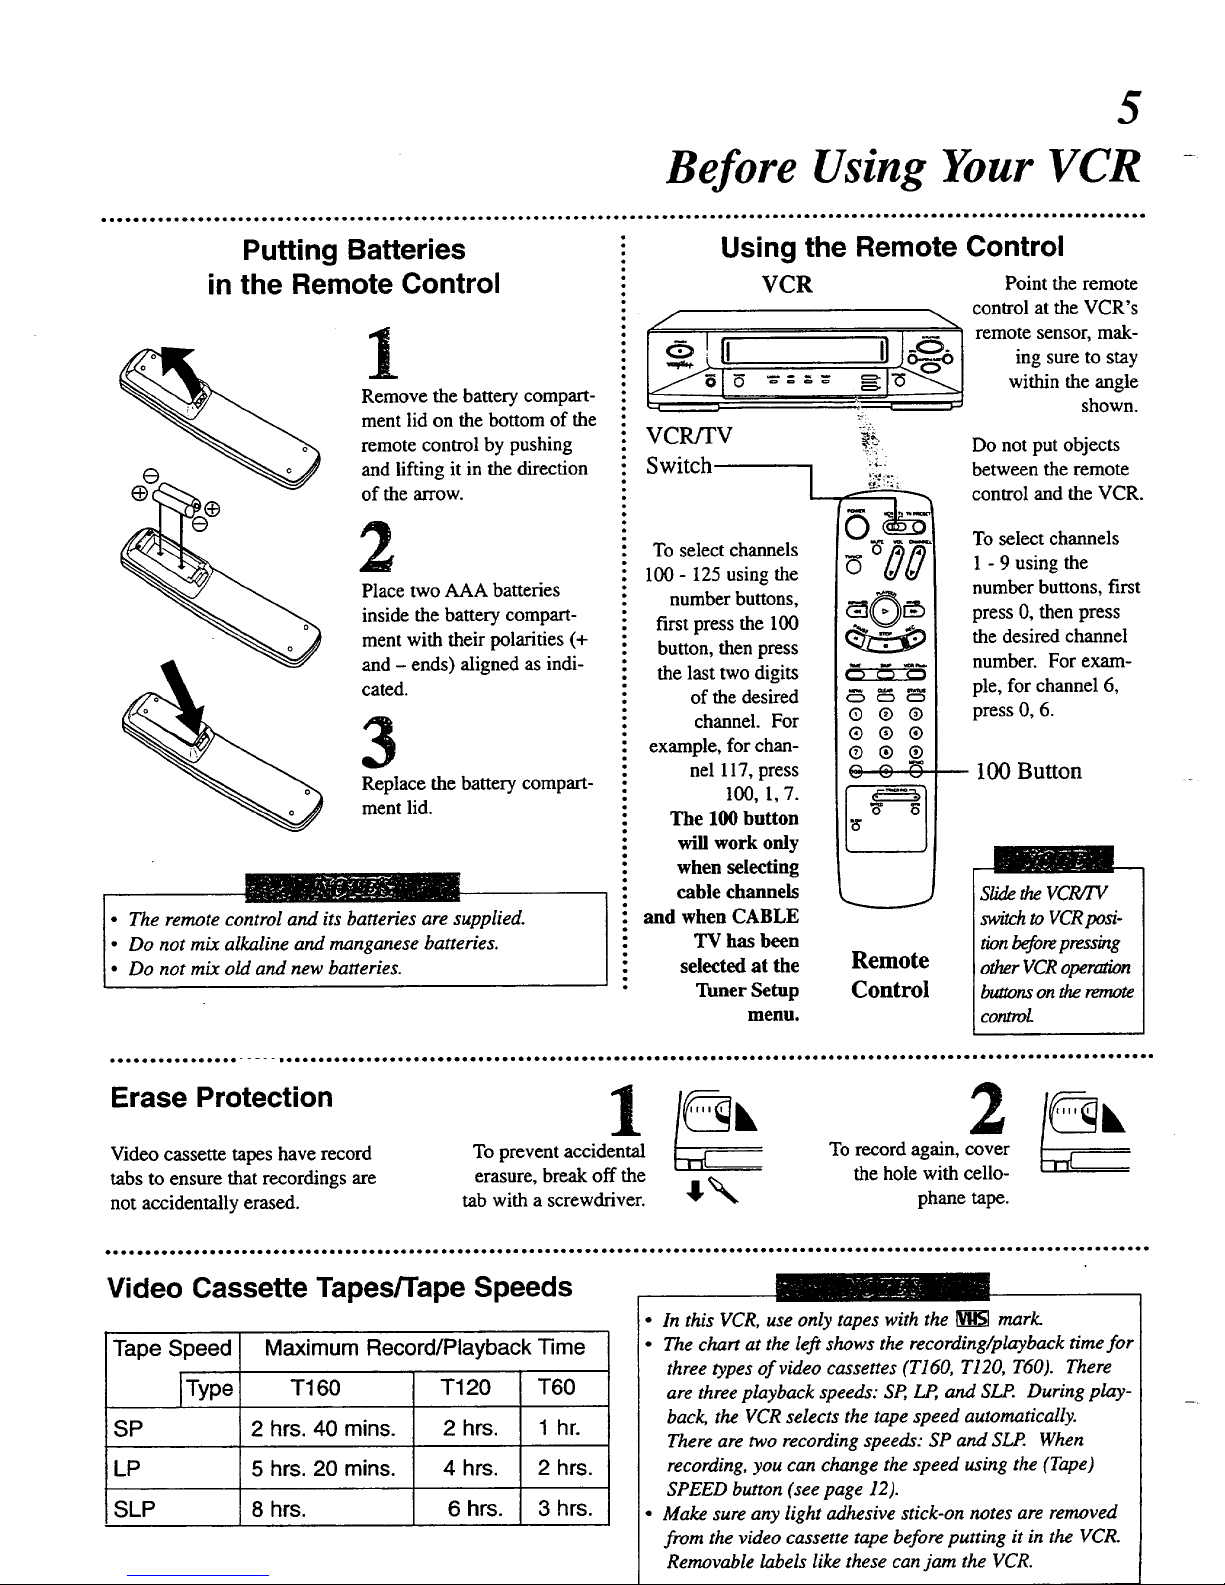
Before Using Your VCR
Putting Batteries
in the Remote Control
1
G
2
Remove the battery compart-
ment lid on the bottom of the
remote control by pushing
and lifting it in the direction
of the arrow.
Place two AAA batteries
inside the battery compart-
ment with their polarities (+
and - ends) aligned as indi-
cated.
Replace the battery compart-
ment lid.
• The remote control and its batteries are supplied.
• Do not mix alkaline and manganese batteries.
• Do not mix oM and new batteries.
Using the Remote Control
VCR
: VCR/TV _
Switch I ';
gg
: To select channels
: 100 - 125 using the
: number buttons,
: first press the 100
: button, then press
• the last two digits
: of the desired
: channel. For
example, for chan-
: nel 117, press
• 100, 1,7.
: The 100 button
will work only
: when selecting
• cable channels
: and when CABLE
: TV has been
: selected at the
: Tuner Setup
menu.
0 0 0
Q ® ®
® ® ®
® ® ®
Remote
Control
Point the remote
control at the VCR's
remote sensor, mak-
ing sure to stay
within the angle
shown.
Do not put objects
between the remote
control and the VCR.
To select channels
1 - 9 using the
number buttons, first
press 0, then press
the desired channel
number. For exam-
ple, for channel 6,
press 0, 6.
100 Button
Slidethe VCRiTV
switchto VCRposi-
tionbeforepressing
other VCRoperation
buttonson the remote
control
Erase Protection
Video cassette tapes have record
tabs to ensure that recordings are
not accidentally erased.
1
To prevent accidental
erasure, break off the
tab with a screwdriver.
GL 2
To record again, cover
the hole with cello-
!
k'-.
"_ phane tape.
Video Cassette Tapes/Tape Speeds
Tape Speed Maximum Record/Playback-time
Type T160 T120 T60
SP 2 hrs. 40 mins. 2 hrs. 1 hr.
LP 5 hrs. 20 mins. 4 hrs. 2 hrs.
SLP 8 hrs. 6 hrs. 3 hrs.
• In this VCR, use only tapes with the _ mark.
• The chart at the left shows the recording/playback time for
three types of video cassettes (T160, T120, T60). There
are three playback speeds: SP, _ and SLP. During play-
back, the VCR selects the tape speed automatically.
There are two recording speeds: SP and SLP. When
recording, you can change the speed using the (Tape)
SPEED button (see page 12).
• Make sure any light adhesive stick-on notes are removed
from the video cassette tape before putting it in the VCR.
Removable labels like these can jam the VCR.

6
Hooking Up Your VCR
• • e•. o e e. o. o• .a oe e • e • e • coo •. o• e • 1• ** e. o. •• o• o..coo• ol • * • • • • o* *a oo* • • • **• • , i•. e.o e ... ee * o* o * o e e* *• e# e o e o o • * * • so B* • • * o* oeo*o ee*o o• **o
The basic VCR/TV connection - antenna/cable to VCR to TV - is shown below. For other hookups, including those that use
cable converter/descrambler boxes, see pages 35 - 38.
1
Disconnect the antenna or
cable from your TV.
Back of TV
(example only)
_ VItF/VItF
Combination
Antenna Jack
2
Connect the antenna/cable
to your VCR.
[
IN FROM ANT(enna) Jack
Jack
3
Connect your VCR to your
TV with the black RF
coaxial cable.
or Cable
Back of TV
IN FROM
(example only)
ANT(enna) Jack
7- . ____._ OUT TO TV Jack
Ill Back of VCR / RF _ N4,
Wall Outlet _ Coaxial Cable[ _ _VHF/UHF
[_ (supplied) I
• Combination
Antenna Jack
4
Select channel 3 or 4.
Set the CH.3/CH.4 switch on the back of the
VCR to CH.3 or CH.4, whichever channel is
not used or least used in your area. To oper-
ate your VCR with your TV, set the TV to the
same channel. For example, when playing a
tape, if the CH.3/CH.4 switch is set to CH.3,
the TV should be on channel 3.
TV
Back of VCR
Wall
Outlet
Wall Outlet
CH.3 CH.4
7
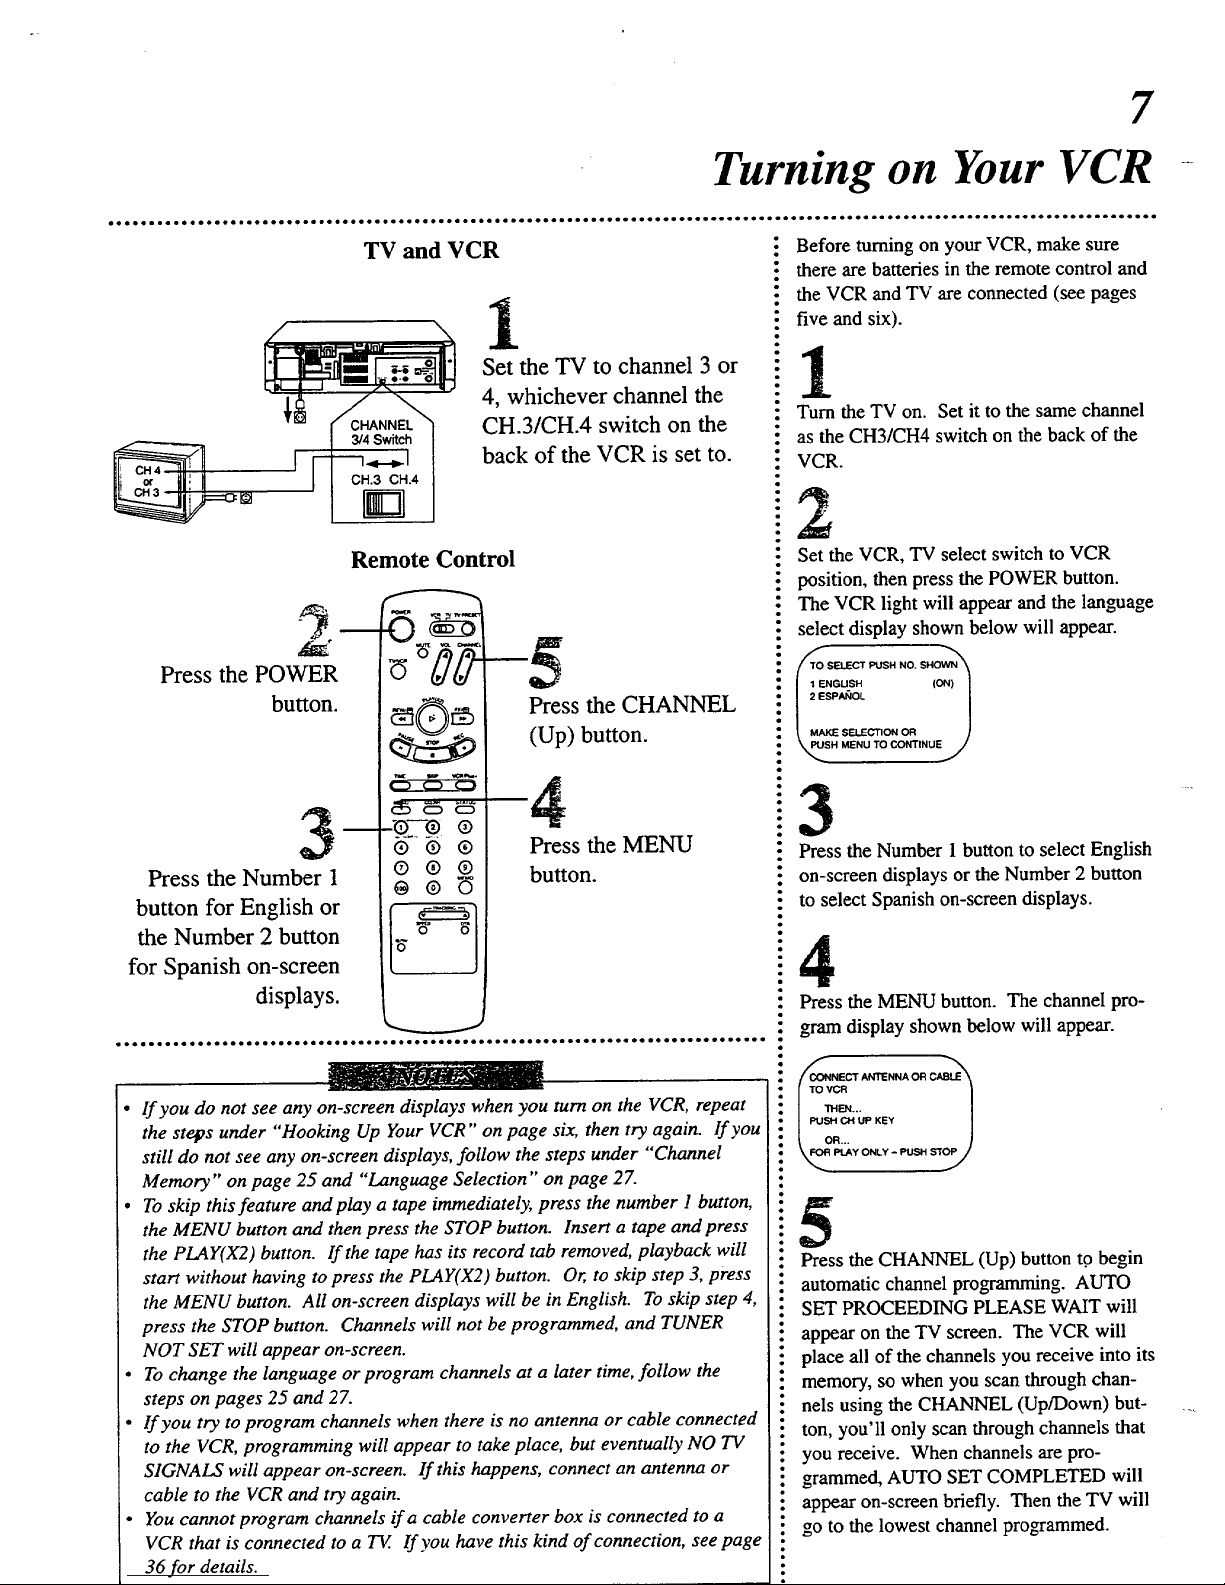
Turning on Your VCR
TV and VCR
CH.3 ell.4
ID
1
Set the TV to channel 3 or
4, whichever channel the
CH.3/CH.4 switch on the
back of the VCR is set to.
Remote Control
Press the POWER
button.
Press the Number 1
button for English or
the Number 2 button
for Spanish on-screen
displays.
_Q--® ®
o--®®
® ® ®
"8" 6
t_
-5
Press the CHANNEL
(Up) button.
4
Press the MENU
button.
• If you do not see any on-screen displays when you turn on the VCR, repeat
the stelps under "Hooking Up Your VCR" on page six, then try again. If you
still do not see any on-screen displays, follow the steps under "'Channel
Memory" on page 25 and "Language Selection" on page 27.
• To skip this feature andplay a tape immediately, press the number I button,
the MENU button and then press the STOP button. Insert a tape and press
the PLAY(X2) button. If the tape has its record tab removed, playback will
start without having to press the PLAY(X2) button. Or, to skip step 3, press
the MENU button. All on-screen displays will be in English. To skip step 4,
press the STOP button. Channels will not be programmed, and TUNER
NOT SET will appear on-screen.
• To change the language or program channels at a later time, follow the
steps on pages 25 and 27.
• If you try to program channels when there is no antenna or cable connected
to the VCR, programming will appear to take place, but eventually NO TV
SIGNALS will appear on-screen. If this happens, connect an antenna or
cable to the VCR and try again.
• You cannot program channels ifa cable converter box is connected to a
VCR that is connected to a TV. If you have this kind of connection, see page
36 for details.
i Before turning on your VCR, make sure
: there are batteries in the remote control and
i the VCR and TV are connected (see pages
i five and six).
: Turn the TV on. Set it to the same channel
i as the CH3/CH4 switch on the back of the
: VCR.
i Set the VCR, TV select switch to VCR
: position, then press the POWER button.
: The VCR light will appear and the language
select display shown below will appear.
: i _ENGUSH (ON) I
.I _ l
MAKESEUEC_ONOR 1
i _SH MENU TO CONTINUEJ
i3
Press the Number 1 button to select English
: on-screen displays or the Number 2 button
: to select Spanish on-screen displays.
Press the MENU button. The channel pro-
gram display shown below will appear.
NECT AN'TENNA OR CABLE'_
vc_ |
_._ _ |
5
Press the CHANNEL (Up) button t0 begin
automatic channel programming. AUTO
SET PROCEEDING PLEASE WAIT will
appear on the TV screen. The VCR will
place all of the channels you receive into its
memory, so when you scan through chan-
nels using the CHANNEL (Up/Down) but-
ton, you'll only scan through channels that
you receive. When channels are pro-
grammed, AUTO SET COMPLETED will
appear on-screen briefly. Then the TV will
go to the lowest channel programmed.
8
Playing
Read and follow the steps below to play a
tape.
Turn the TV on and set it to channel 3 or 4,
whichever the CH3/CH4 switch on the back
of the VCR is set to.
Insert a tape in the VCR. The power will
come on. The VCR will place itself in
VCR position automatically (the VCR light
and the CASS.(ette) IN(side) light on the
display panel of the VCR will appear). If
the tape's record tab has been removed,
playback should start automatically.
:9"
If playback does not start automatically,
press the PLAY(X2) button to start play-
back.
Press the STOP button on the remote con-
trol or the STOP/EJECT button on the VCR
to stop playback.
Press the REW(ind)/Search button on the
remote control or the REW(ind) button on
the VCR to rewind the tape.
Press the STOP/EJECT button on the VCR
to remove the tape.
The CASS. IN light on the VCR will blink
while the VCR ejects the tape.
TV and VCR
2
Insert
a tape.
!
it to channel 3 or 4.
,':, D
Press the
STOP/EJECT
button to
remove the
tape.
00`¸
c:) C:_ C::_
Q @ @
® ® ®
® ® ®
"3
To start
playback,
oress the
[ PLAY(X
' 2) button.
I
i
I
_ To stop play-
back, press
: Press the the STOP or
: REW(ind)/Search _ STOP!EJECT
." button to rewind the button.
- tape. Remote Control
t
!
:: I]i If the tape you want to play is already in the VCR and the VCR is on, just
i press the PLAY(X2) button to start playback.
Playback options are on pages 29 - 32.
9
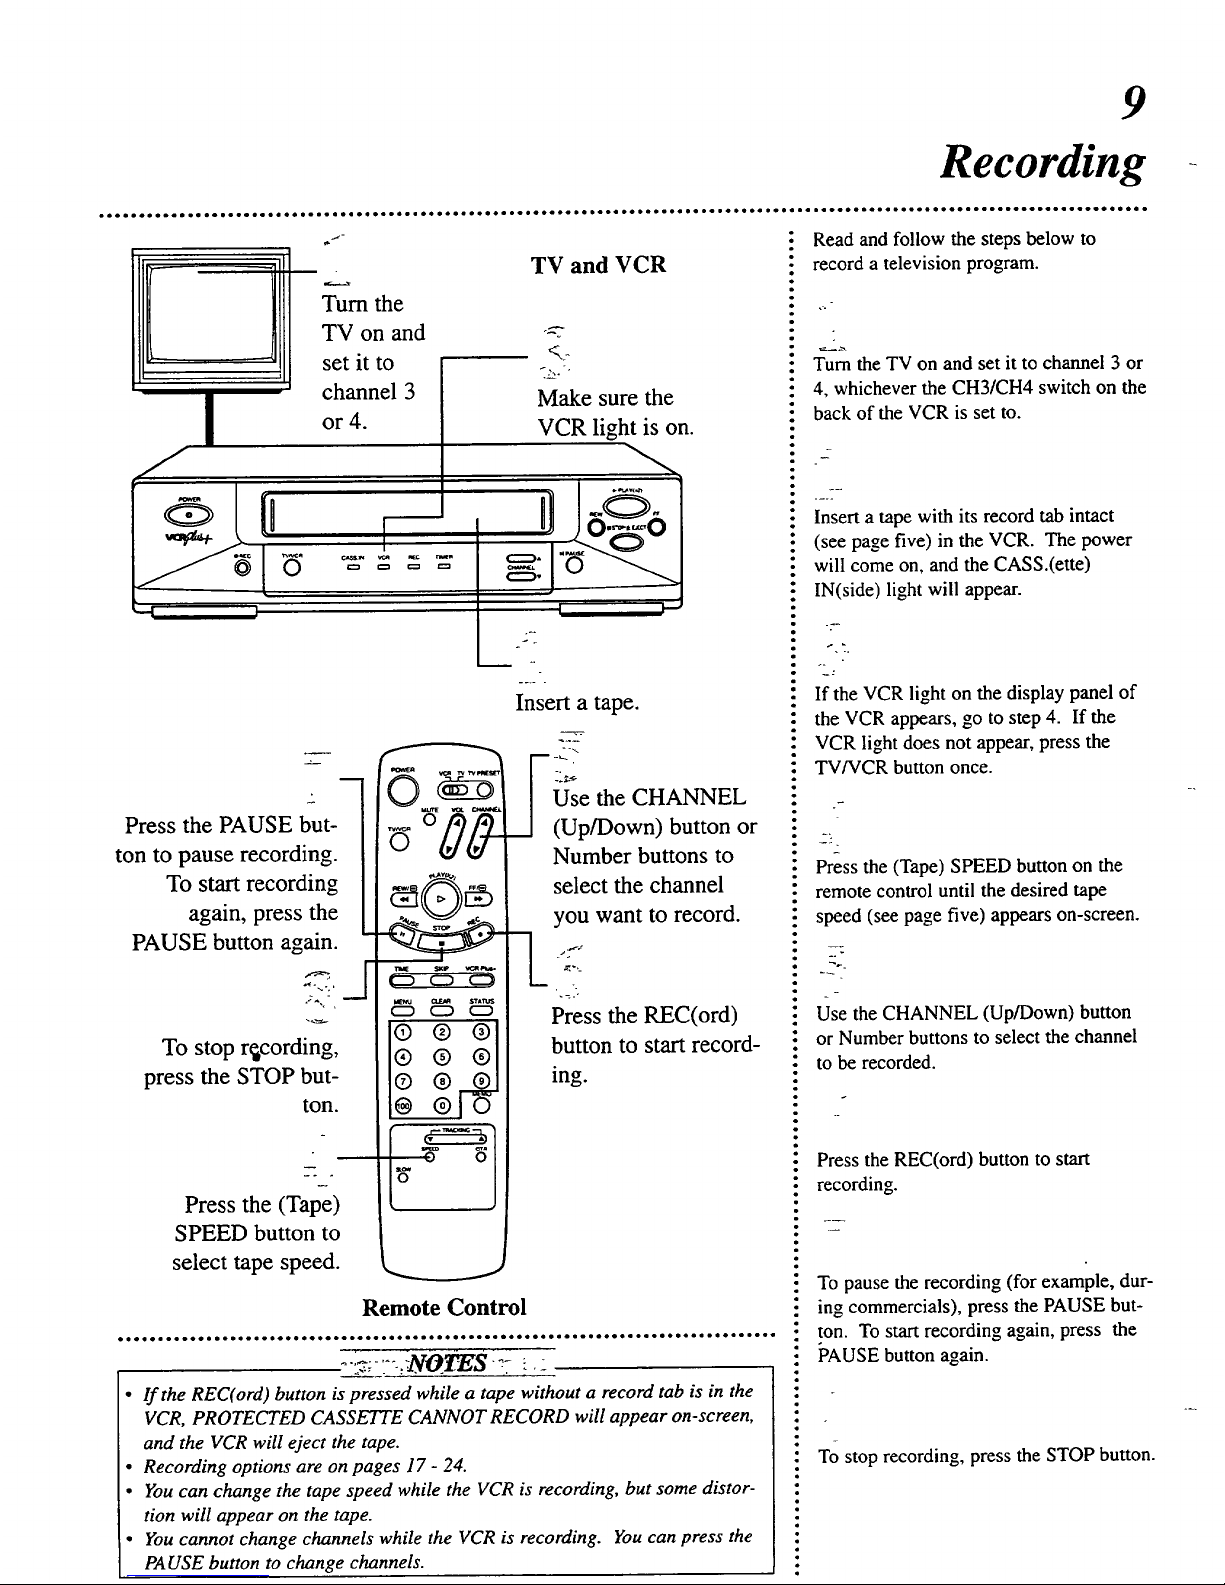
Recording
vw_
0
m
Press the PAUSE but-
ton to pause recording.
To start recording
again, press the
PAUSE button again.
To stop r_cording,
press the STOP but-
ton.
Press the (Tape)
SPEED button to
select tape speed.
Tum the
TV on and
set it to
channel 3
or 4.
_
TV and VCR
._-_y
Make sure the
VCR light is on.
--....
m
Insert a tape.
Use the CHANNEL
0J-
_:_ .___1(Up/Down) button or
Number buttons to
_t,SYLA,_
W:--_/_[_ select the channel
you want to record.
_ _ STA_
_ _ Press the REC(ord)
®®®1
® ® ®l button to start record-
® ®
ing.
Remote Control
_-:7-".:_N0t_S ,7 ::
• If the REC(ord) button is pressed while a tape without a record tab is in the
VCR, PROTECTED CASSETTE CANNOT RECORD will appear on-screen,
and the VCR will eject the tape.
• Recording options are on pages 17 - 24.
• You can change the tape speed while the VCR is recording, but some distor-
tion will appear on the tape.
• You cannot change channels while the VCR is recording. You can press the
PAUSE button to change channels.
: Read and follow the steps below to
: record a television program.
: Turn the TV on and set it to channel 3 or
4, whichever the CH3/CH4 switch on the
: back of the VCR is set to.
Insert a tape with its record tab intact
(see page five) in the VCR. The power
will come on, and the CASS.(ette)
IN(side) light will appear.
If the VCR light on the display panel of
the VCR appears, go to step 4. If the
VCR light does not appear, press the
TV/VCR button once.
Press the (Tape) SPEED button on the
remote control until the desired tape
speed (see page five) appears on-screen.
Use the CHANNEL (Up/Down) button
or Number buttons to select the channel
to be recorded.
Press the REC(ord) button to start
recording.
l
To pause the recording (for example, dur-
ing commercials), press the PAUSE but-
ton. To start recording again, press the
i_AUSE button again.
: To stop recording, press the STOP button.
10
Setting the Clock
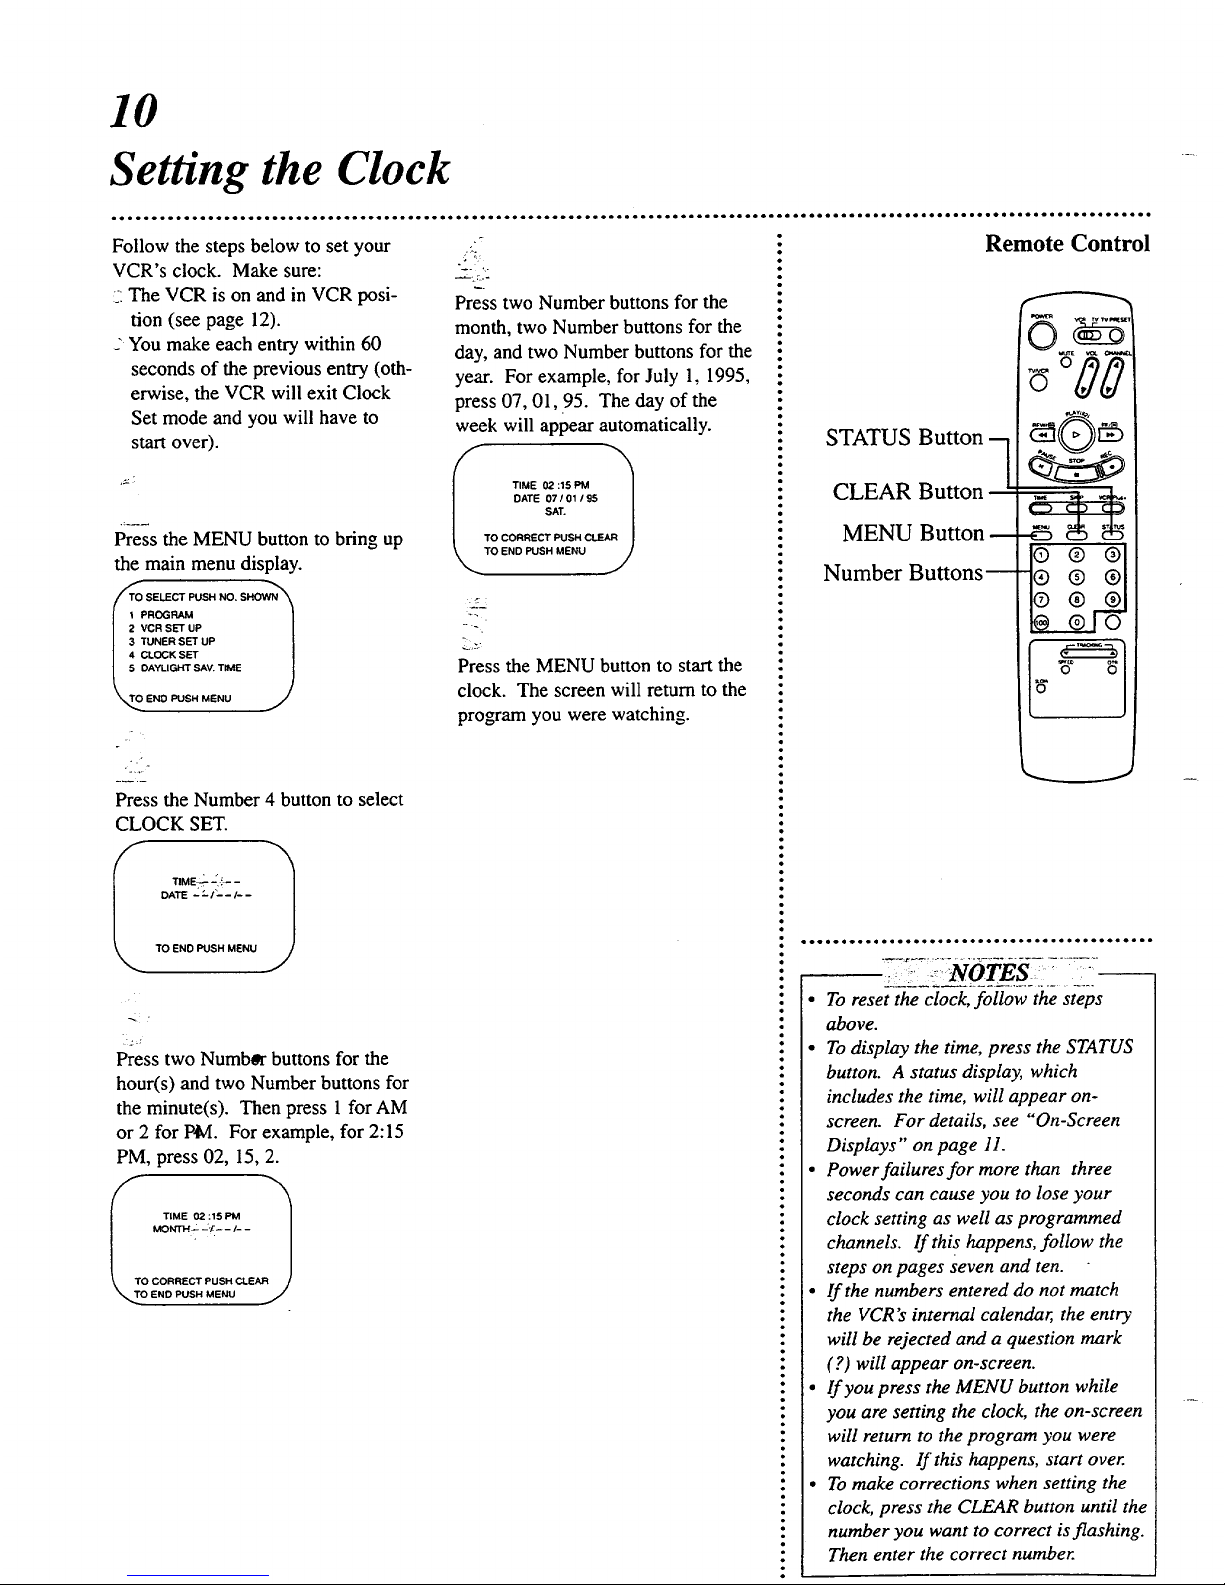
Follow the steps below to set your
VCR's clock. Make sure:
:-:The VCR is on and in VCR posi-
tion (see page 12).
-You make each entry within 60
seconds of the previous entry (oth-
erwise, the VCR will exit Clock
Set mode and you will have to
start over).
Press the MENU button to bring up
the main menu display.
SELECT PUSH NO, SHOWN_'_
ROGRAM |
VCR SET UP 1
TUNER SET UP |
CLOCK SET |
DAYLIGHT SAV. TIME J
/
END PUSH MENU j
__ ,..
Press two Number buttons for the
month, two Number buttons for the
day, and two Number buttons for the
year. For example, for July 1, 1995,
press 07, 01, 95. The day of the
week will appear automatically.
TIME 02:15 PM
DATE 07101195 |
SAT. /
TO CORRECT PUSH CLEAR
TO END PUSH MENU J
Press the MENU button to start the
clock. The screen will return to the
program you were watching.
Press the Number 4 button to select
CLOCK SET.
I-I
DATE - "- I'- - I- -
TO END PUSH MENU
Press two Numbor buttons for the
hour(s) and two Number buttons for
the minute(s). Then press 1 for AM
or 2 for P¢¢I. For example, for 2:15
PM, press 02, 15, 2.
I TIME 02:15 PM
_Ot, rrH_- ,'r.--/- - l
TO CORRECT PUSH CLEAR //
TO END PUSH MENU j
STATUS Button -_
CLEAR Button
MENU Button
Number Buttons_
e®®l
®®®1
D
• or * • • ••l _ e•eootoQooo•eQeooooo•oo••eoo•t • ••e
• To reset the clock, follow the steps
above.
• To display the time, press the STATUS
button. A status display, which
includes the time, will appear on-
screen. For details, see "On-Screen
Displays" on page 11.
• Power failures for more than three
seconds can cause you to lose your
clock setting as well as programmed
channels. If this happens, follow the
steps on pages seven and ten.
• If the numbers entered do not match
the VCR's internal calendar, the entry
will be rejected and a question mark
(?) will appear on-screen.
• If you press the MENU button while
you are setting the clock, the on-screen
will return to the program you were
watching• If this happens, start over.
• To make corrections when setting the
clock, press the CLEAR button until the
number you want to correct is flashing.
Then enter the correct number.
11
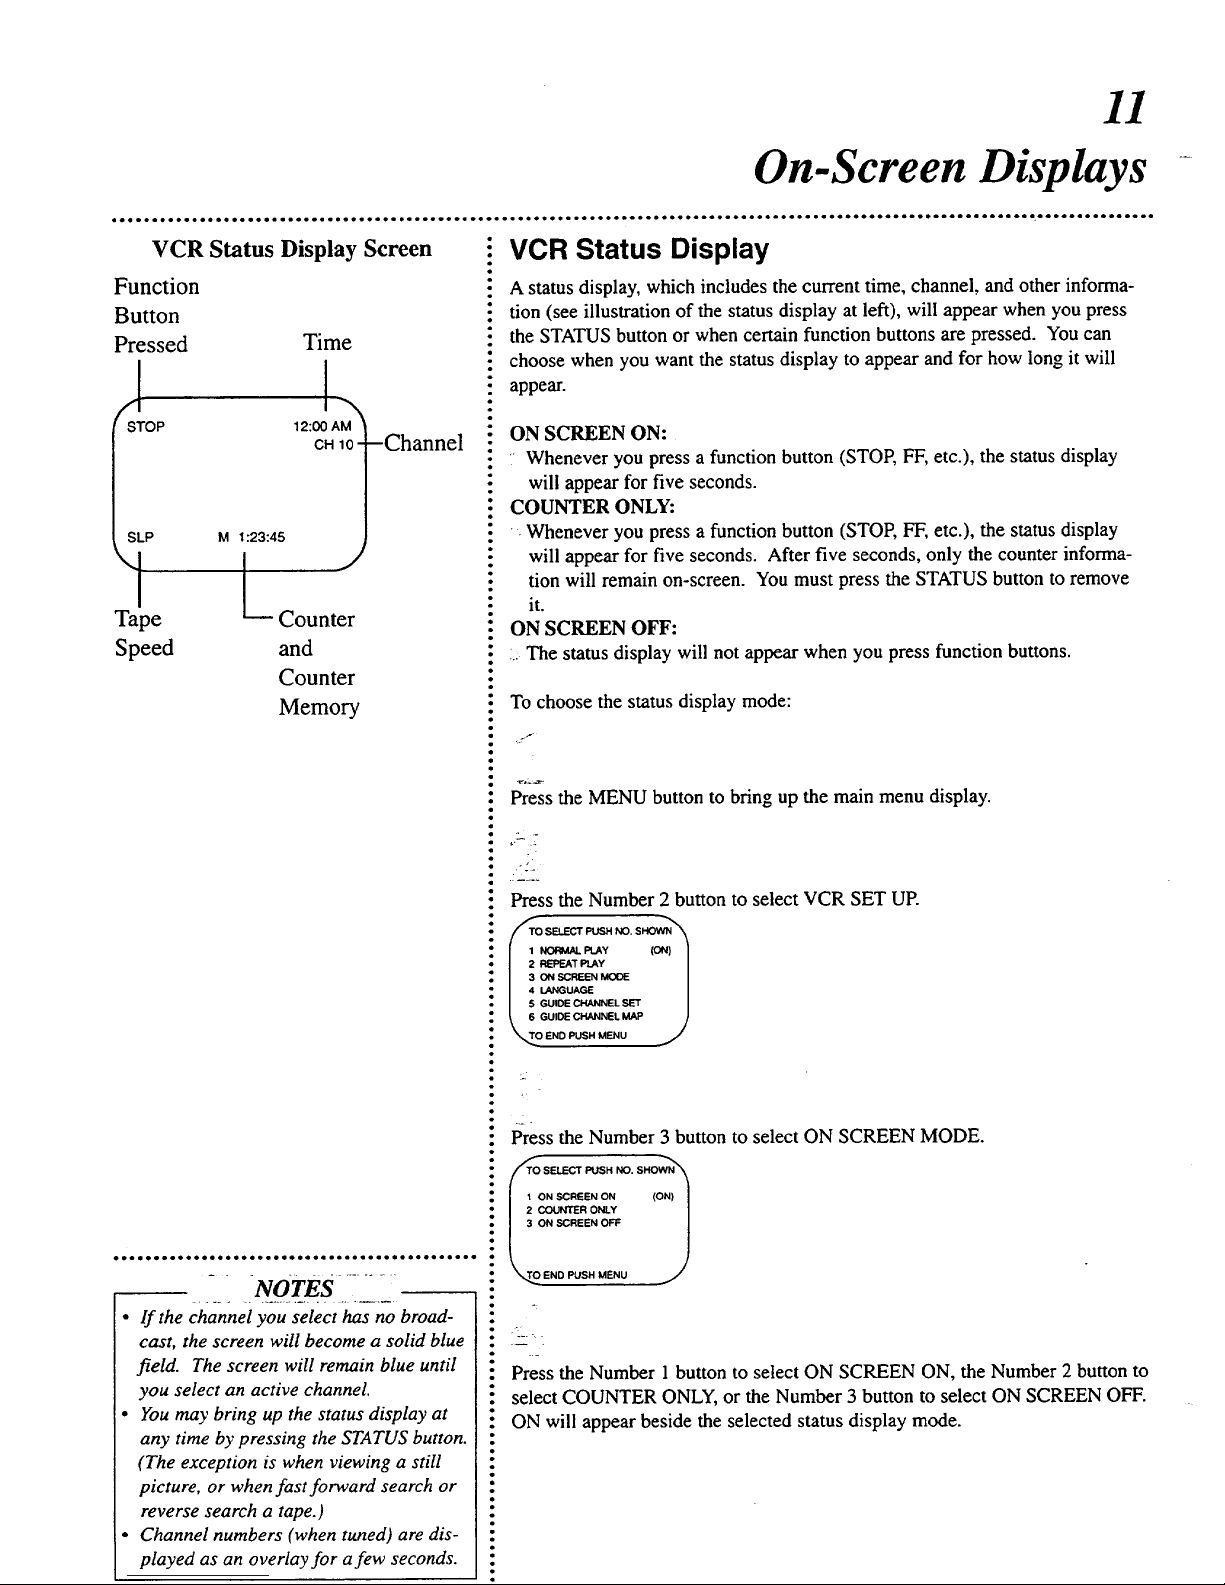
On-Screen Displays
VCR Status Display Screen
Function
Button
Pressed Time
A
STOP 12:00 AM
CH10 -Channel
SLP M 1:23:45
L
Tape
Speed
J
Counter
and
Counter
Memory
o*oleele*o*oeeeeoe*leoo*oo,o*oele=e*e*eeee*ieo
- NotES ;........
• If the channel you select has no broad-
cast, the screen will become a solid blue
field. The screen will remain blue until
you select an active channel.
• You may bring up the status display at
any time by pressing the STATUS button.
(The exception is when viewing a still
picture, or when fast forward search or
reverse search a tape.)
• Channel numbers (when tuned) are dis-
played as an overlay for afew seconds.
i VCR Status Display
: A status display, which includes the current time, channel, and other informa-
i tion (see illustration of the status display at left), will appear when you press
: the STATUS button or when certain function buttons are pressed. You can
" choose when you want the status display to appear and for how long it will
: appear.
: ON SCREEN ON:
i Whenever you press a function button (STOR FF, etc.), the status display
will appear for five seconds.
: COUNTER ONLY:
Whenever you press a function button (STOP, FF, etc.), the status display
will appear for five seconds. After five seconds, only the counter informa-
: tion will remain on-screen. You must press the STATUS button to remove
: it.
ON SCREEN OFF:
:. The status display will not appear when you press function buttons.
i To choose the status display mode:
i . f
Press the MENU button to bring up the main menu display.
• 2- -
Q
" Press the Number 2 button to select VCR SET UR
," FTO SELE: PUSH NO. SHOWN_
• I z_=ATPU_ /
: I 3_sc..E_.ooc /
: I 4t_uAGs /
I 5 GUIDE CHANNEL SET l
• \ , GU'DEO'U_NEtMAP )
: ",,,LoE,Df,us.M_U
Press the Number 3 button to select ON SCREEN MODE.
/O SELECT PUSH NO. SHOWN_
iilo-°i
ee _ END PUSH MENU
: Press the Number 1button to select ON SCREEN ON, the Number 2 button to
: select COUNTER ONLY, or the Number 3 button to select ON SCREEN OFF.
: ON will appear beside the selected status display mode.
12
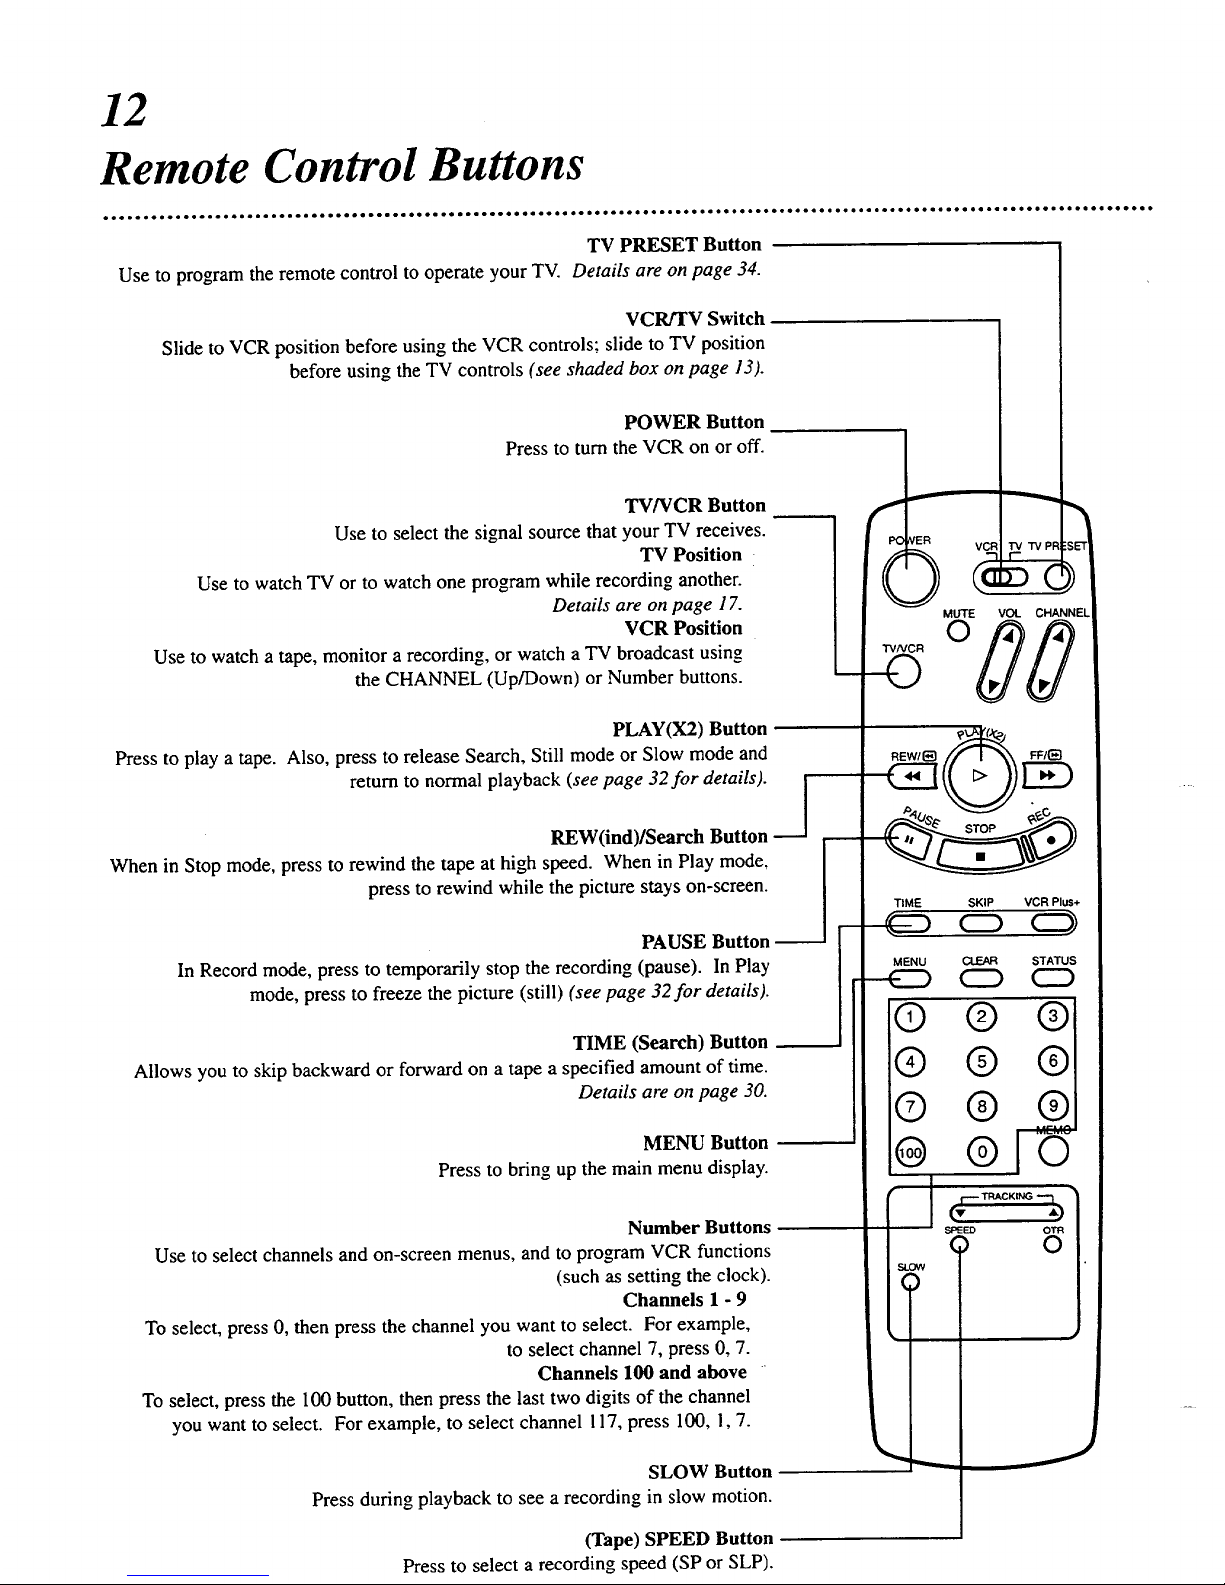
Remote Control Buttons
TV PRESET Button
Use to program the remote control to operate your TV. Details are on page 34.
VCR/TV Switch
Slide to VCR position before using the VCR controls; slide to TV position
before using the TV controls (see shaded box on page 13).
POWER Button
Press to turn the VCR on or off.
TV/VCR Button
Use to select the signal source that your TV receives.
TV Position
Use to watch TV or to watch one program while recording another.
Details are on page 17.
VCR Position
Use to watch a tape, monitor a recording, or watch a TV broadcast using
the CHANNEL (Up/Down) or Number buttons.
PLAY(X2) Button
Press to play a tape. Also, press to release Search, Still mode or Slow mode and
return to normal playback (see page 32for details). [
_J
REW(ind)/Search Button
When in Stop mode, press to rewind the tape at high speed. When in Play mode,
press to rewind while the picture stays on-screen.
PAUSE Button
In Record mode, press to temporarily stop the recording (pause). In Play
mode, press to freeze the picture (still) (see page 32for details).
TIME (Search) Button I
Allows you to skip backward or forward on a tape a specified amount of time.
Details are on page 30.
MENU Button
Press to bring up the main menu display.
Number Buttons
Use to select channels and on-screen menus, and to program VCR functions
(such as setting the clock).
Channels 1 - 9
To select, press 0, then press the channel you want to select. For example,
to select channel 7, press 0, 7.
Channels 100 and above -
To select, press the 100 button, then press the last two digits of the channel
you want to select. For example, to select channel ! 17, press 100, l, 7.
TIME
CHANNEl
SKIP VCRPlus+
CD
SLOW Button
Press during playback to see a recording in slow motion.
MENU CLEAR STATUS
CZ)
® ®
® ®
® ®
@ ®
(Tape) SPEED Button
Press to select a recording speed (SP or SLP).

13
Remote Control Buttons (cont'd)
MUTE Button
Press to eliminate the TV's sound. Press again to
return to the previous volume level.
TV Controls
POWER
Button
Press to turn the
TV on or off.
TVNCR
©
rE
)
TIME (_ VCR Plus+
Co
MENU _ STATUS
® ® ®
® ® ®
® ® ®
MEMO
@ ©
VOL(ume Up/Down) Buttons
Press to increase or decrease the TV's volume.
CHANNEL (Up/Down) Buttons
Press to scan through the TV channels.
SPEED OTR
0 (
o
CHANNEL (Up/Down) Buttons
Press to scan up or down through the VCR channels.
FF/Search Button
When in Stop mode, press to fast forward the tape at high speed. When in
Play mode, press to fast forward while the picture stays on-screen.
REC(ord) Button
Press to start a recording (see page nine for details).
STOP Button
Press to stop the tape.
SKIP (Search) Button
Press during playback to fast forward through 30 seconds of a recording.
Press up to four times in a row to skip up to two minutes of a recording.
-- VCR Plus+ Button
Press to start a VCR Plus+ recording.
Details are on pages 22 - 24.
m CLEAR Button
Press to erase incorrect data when programming VCR functions. Also, press
to reset the tape counter (0:00:00 will appear on-screen).
STATUS Button
Press to display the time counter, time, current VCR function, tape speed, and
channel. Details are on page 11.
MEMO(ry) Button
Press to memorize a tape position at which the counter was set to 0:00:00.
Details are on page 31.
TRACKING (Up/Down) Buttons
When playing a tape, press to adjust the tracking. Details are on page 33.
OTR Button
Press to start an immediate recording, 30 minutes to four hours long, of the
channel you are watching. Details are on page 18.
14
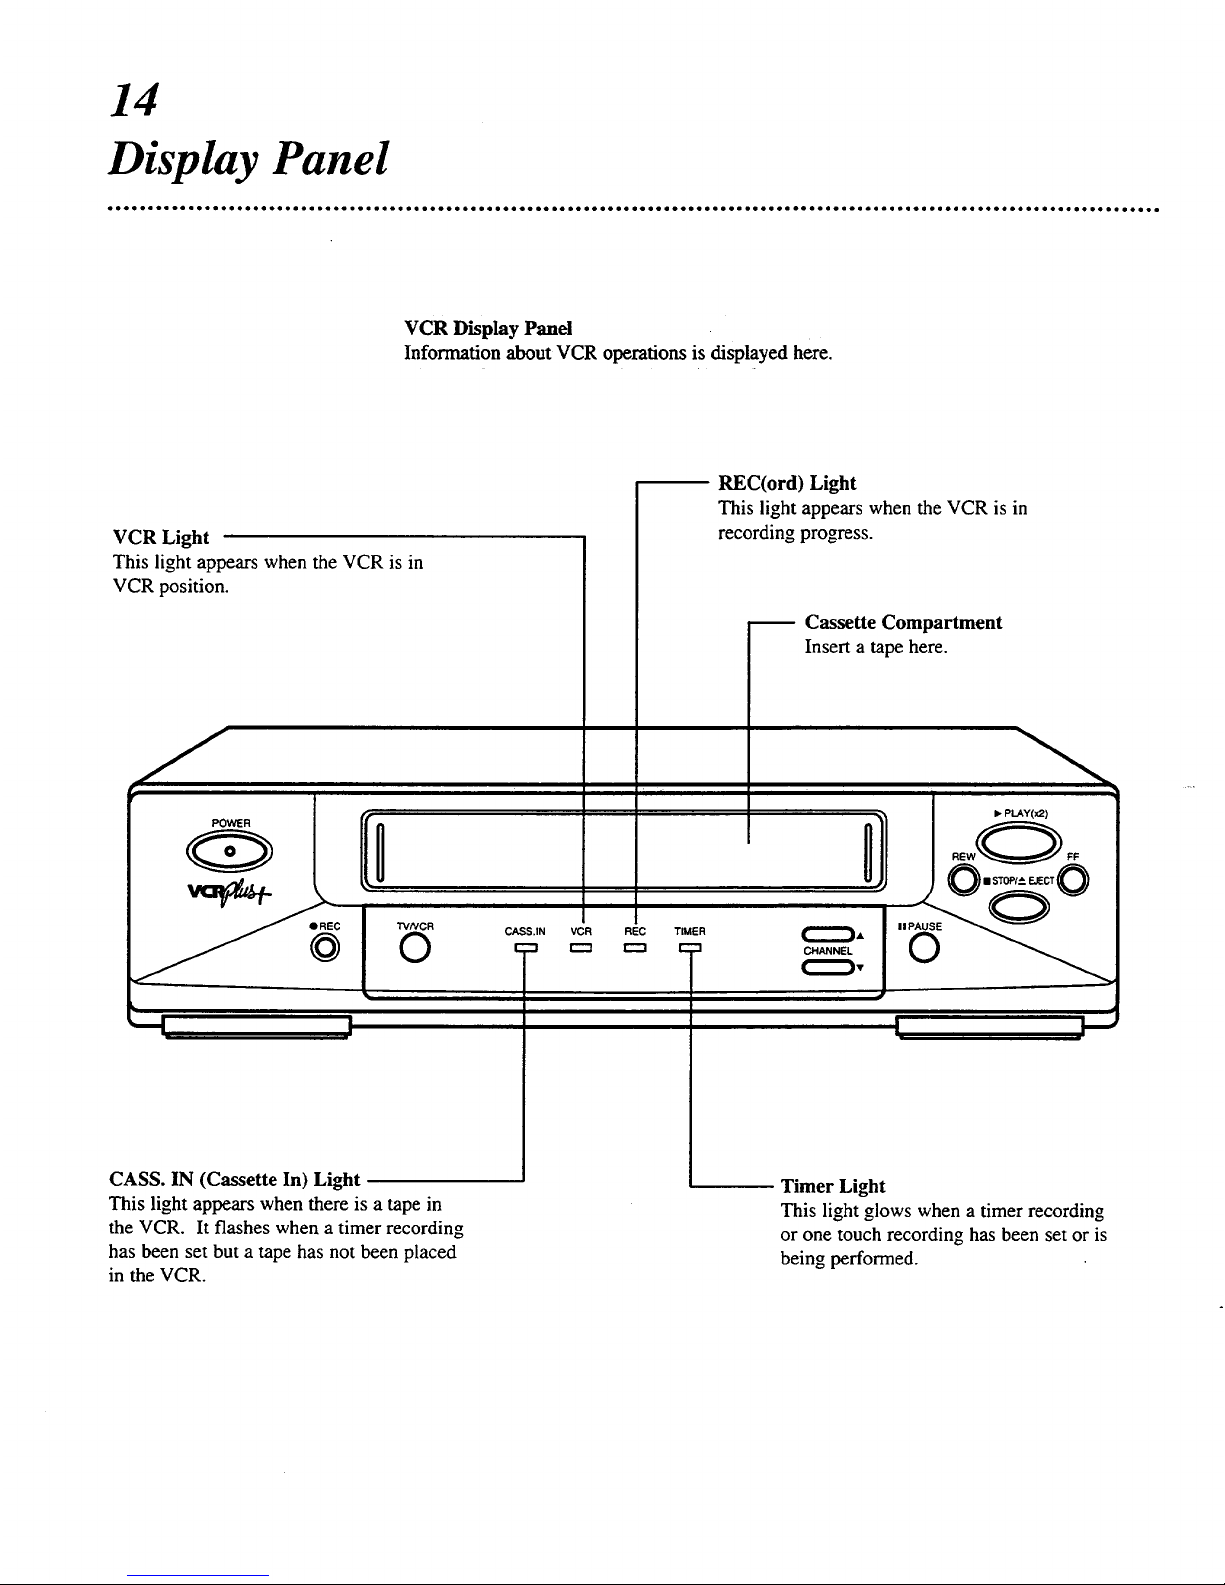
Display Panel
VCR Display Panel
Information about VCR operations is displayed here.
VCR Light
This light appears when the VCR is in
VCR position.
I
CASS.IN VCR REC TIMER
r"t _ r'-'n r" "=
REC(ord) Light
This light appears when the VCR is in
recording progress.
Cassette Compartment
Insert a tape here.
I
I • PLAY(x2}
II STOP/_- EJECT @
p
I I---"
CASS. IN (Cassette In) Light
This light appears when there is a tape in
the VCR. It flashes when a timer recording
has been set but a tape has not been placed
in the VCR.
Timer Light
This light glows when a timer recording
or one touch recording has been set or is
being performed.
 Loading...