

Magnavox VRS960AT01 Owner’s Manual

!

MAGNAVOX
Smart. Very smart_
ible to receive all the privilegesOf owning aMAGNAVOX prod_St. Sc
Verification Confi
product within 10 days Your completed Warranty Reg
Card se
'the terms and .,._........_._inthe event Of p_
your purchase at once. And take advantage Of these
: bonuses whichyou q
MAGNAVOX
Smart. Very smart_
Congratulations on your purchase
--and welcome to the "family!"
Dear MAGNAVOX product owner:
Thank you for your confidence in MAGNAVOX. You've selected one of the best-
built, best-backed products available today. And we'll do everything in our power
to keep you happy with your purchase for many years to come.
As a member of the MAGNAVOX "family," you're entitled to protection by one of
the most comprehensive warranties and outstanding service networks in the
industry.
What's more, your purchase guarantees you'll receive all the information, offers,
and bonuses which you qualify for, plus easy access to accessories from our
convenient home shopping network.
And most important of all, you can count on our uncompromising commitment to
your total satisfaction.
All of this is our way of saying welcome-and thanks for investing in a
MA GNA VOX product.
Sincerely,
Donald F. Johnstone
President and Chief Executive Officer
P.S. Remember, to get the most from your MAGNAVOX product, you
must return your Warranty Registration
Card within 10 days. So please mail it to us right nowr
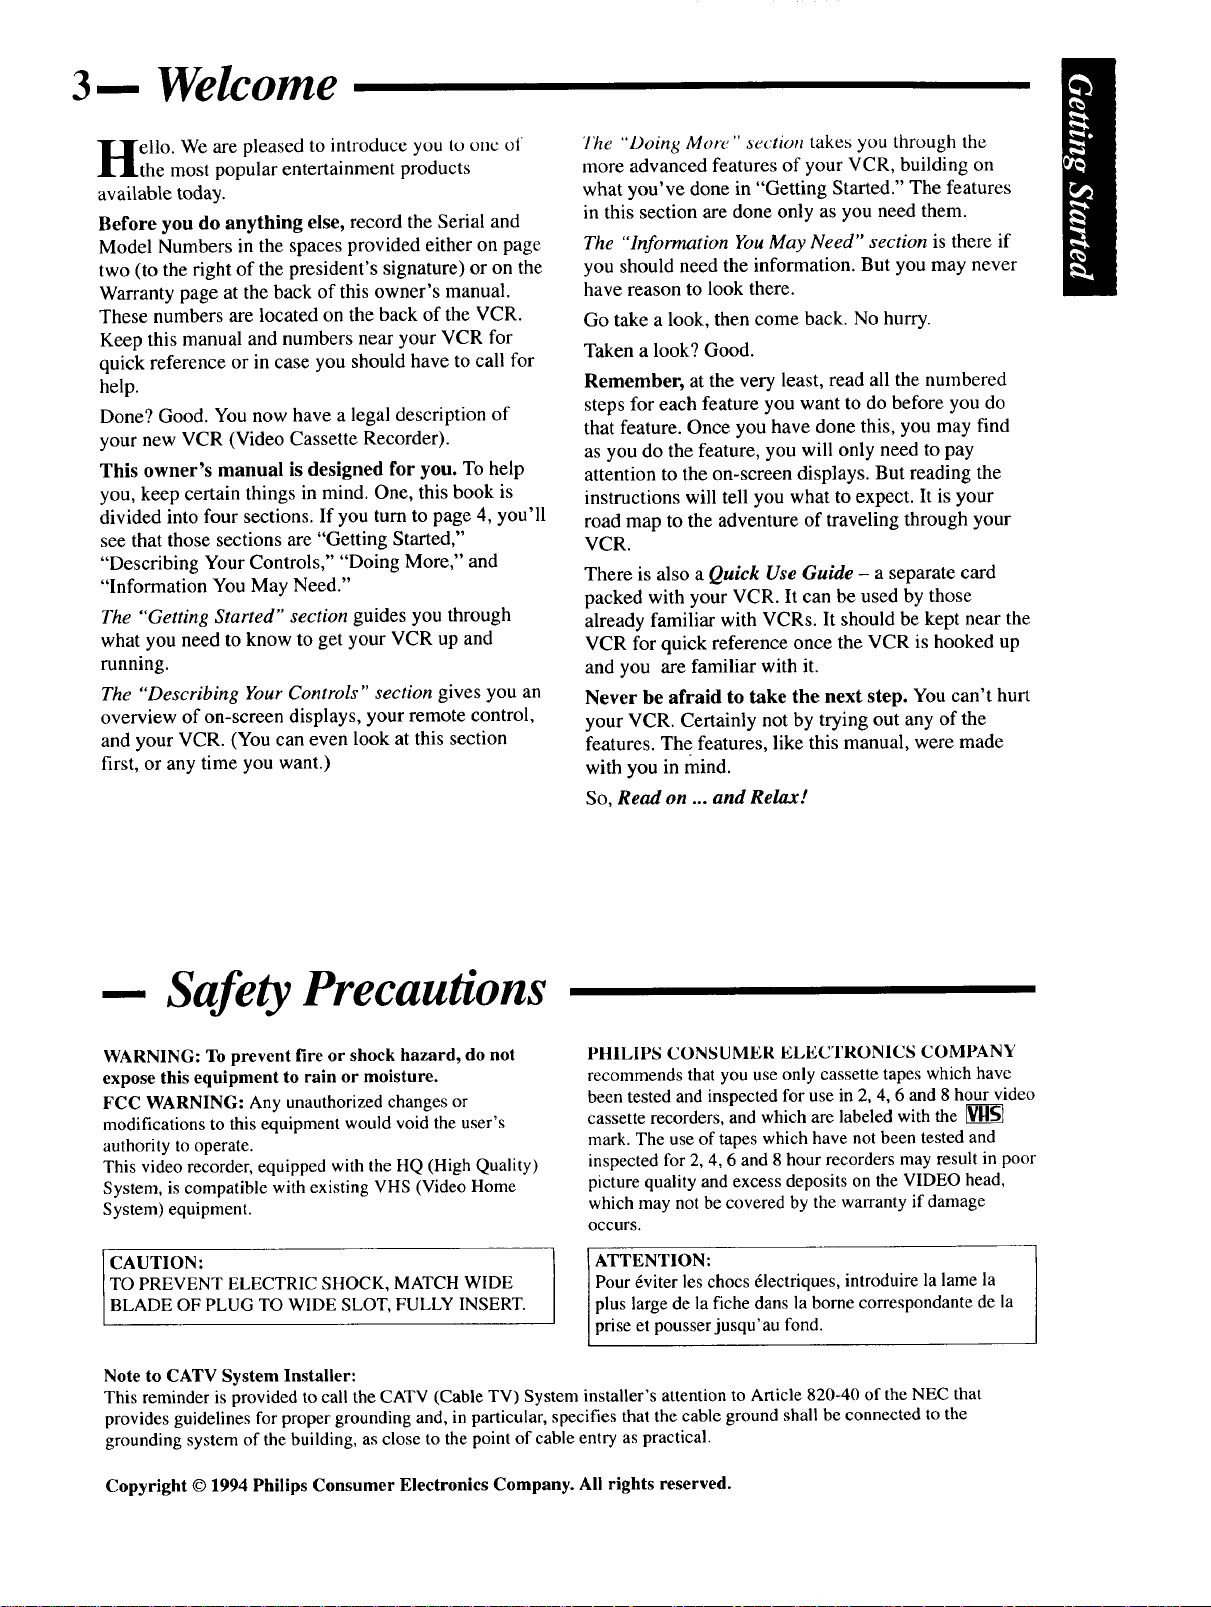
3-- Welcome
'ello. We are pleased to introduce you to one of
.the most popular entertainment products
available today.
Before you do anything else, record the Serial and
Model Numbers in the spaces provided either on page
two (to the right of the president's signature) or on the
Warranty page at the back of this owner's manual.
These numbers are located on the back of the VCR.
Keep this manual and numbers near your VCR for
quick reference or in case you should have to call for
help.
Done? Good. You now have a legal description of
your new VCR (Video Cassette Recorder).
This owner's manual is designed for you. To help
you, keep certain things in mind. One, this book is
divided into four sections. If you turn to page 4, you'll
see that those sections are "Getting Started,"
"Describing Your Controls," "Doing More," and
"Information You May Need."
The "Getting Started" section guides you through
what you need to know to get your VCR up and
running.
The "Describing Your Controls" section gives you an
overview of on-screen displays, your remote control,
and your VCR. (You can even look at this section
first, or any time you want.)
"lhe "Doing, More" section takes you through the
more advanced features of your VCR, building on
what you've done in "Getting Started." The features
in this section are done only as you need them.
The "Information You May Need" section is there if
you should need the information. But you may never
have reason to look there.
Go take a look, then come back. No hurry.
Taken a look? Good.
Remember, at the very least, read all the numbered
steps for each feature you want to do before you do
that feature. Once you have done this, you may find
as you do the feature, you will only need to pay
attention to the on-screen displays. But reading the
instructions will tell you what to expect. It is your
road map to the adventure of traveling through your
VCR.
There is also a Quick Use Guide - a separate card
packed with your VCR. It can be used by those
already familiar with VCRs. It should be kept near the
VCR for quick reference once the VCR is hooked up
and you are familiar with it.
Never he afraid to take the next step. You can't hurt
your VCR. Certainly not by trying out any of the
features. The features, like this manual, were made
with you in mind.
So, Read on ... and Relax!
-- Safety Precautions
WARNING: To prevent fire or shock hazard, do not
expose this equipment to rain or moisture.
FCC WARNING: Any unauthorized changes or
modifications to this equipment would void the user's
authority to operate.
This video recorder, equipped with the HQ (High Quality)
System, is compatible with existing VHS (Video Home
System) equipment.
CAUTION:
TO PREVENT ELECTRIC SHOCK, MATCH WIDE
BLADE OF PLUG TO WIDE SLOT, FULLY INSERT.
Note to CATV System Installer:
This reminder is provided to call the CATV (Cable TV) System installer's attention to Article 820-40 of the NEC that
provides guidelines for proper grounding and, in particular, specifies that the cable ground shall be connected to the
grounding system of the building, as close to the point of cable entry as practical.
Copyright © 1994 Philips Consumer Electronics Company. All rights reserved.
PHILIPS CONSUMER ELECTRONICS COMPANY
recommends that you use only cassette tapes which have
been tested and inspected for use in 2, 4, 6 and 8 hour video
cassette recorders, and which are labeled with the
mark. The use of tapes which have not been tested and
inspected for 2, 4, 6 and 8 hour recorders may result in poor
picture quality and excess deposits on the VIDEO head,
which may not be covered by the warranty if damage
occurs.
Pour 6viter les chocs 61ectriques, introduire la lame la
ATTENTION:
plus large de la fiche dans la borne correspondante de la
prise et pousser jusqu'au fond.
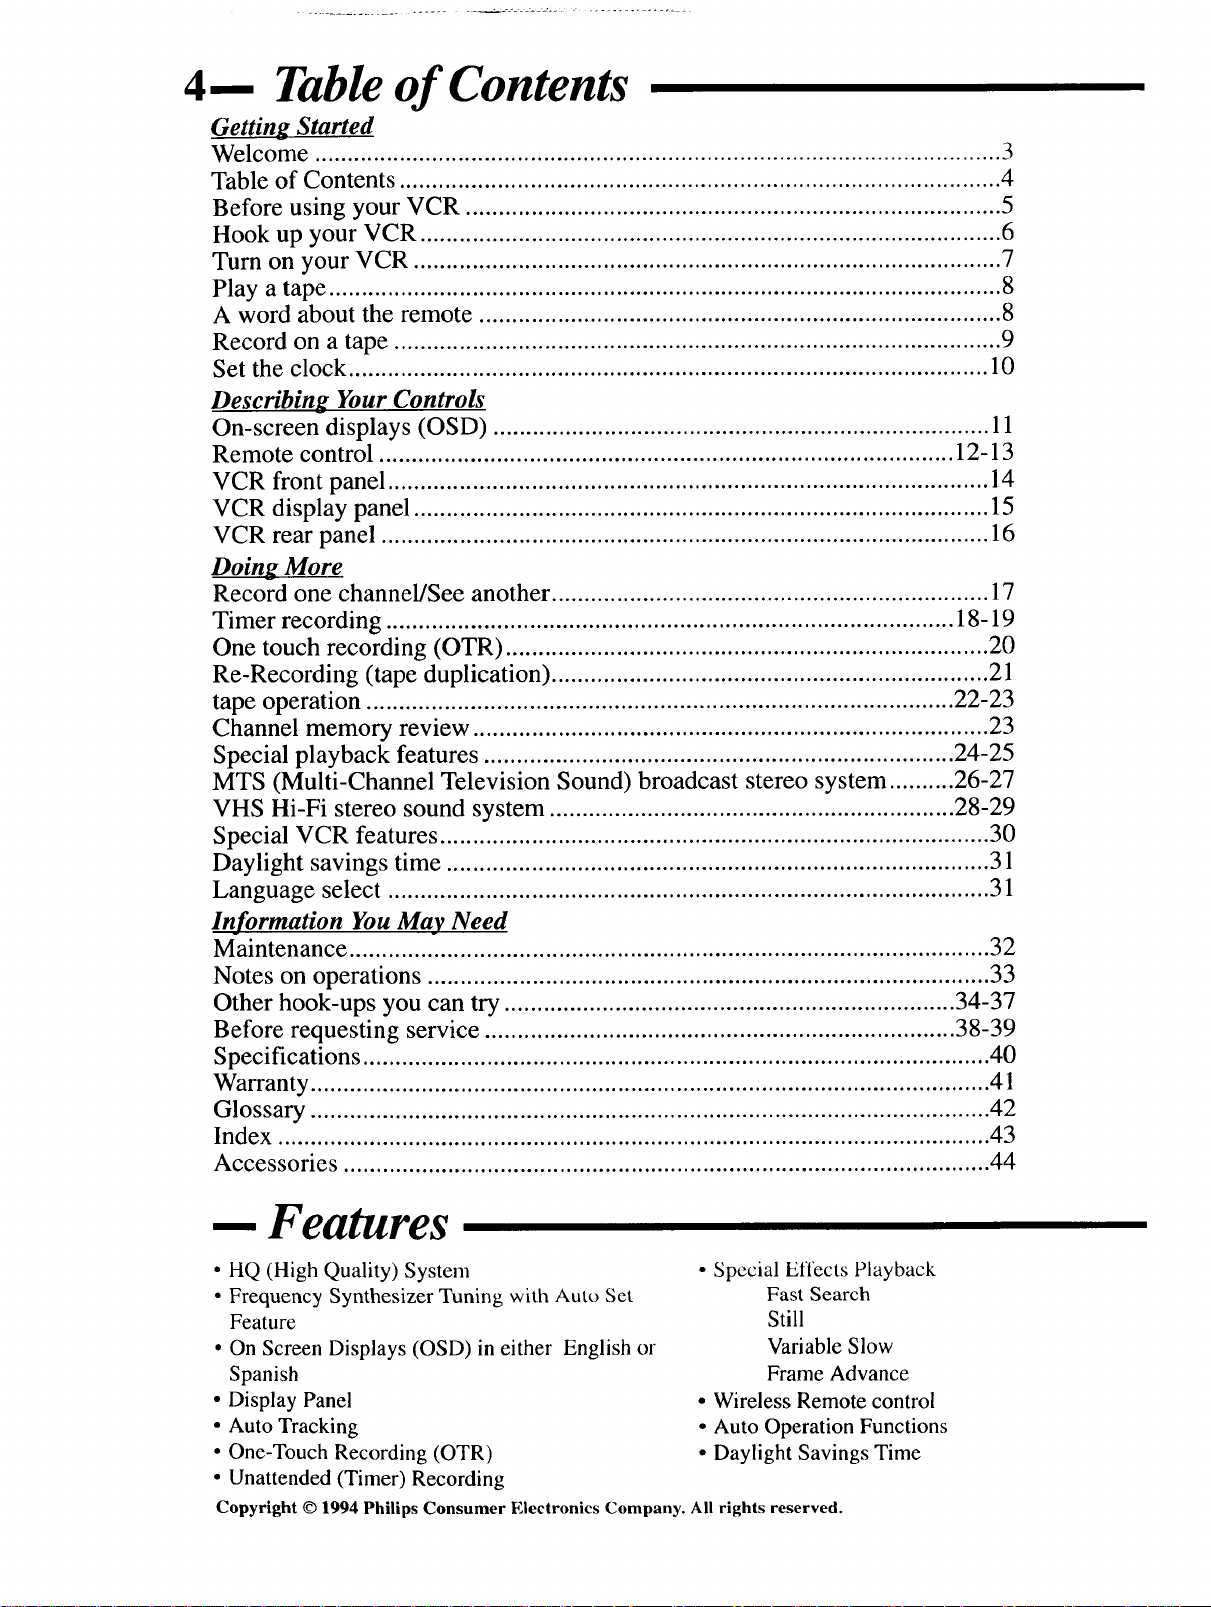
4-- Table of Contents
Getting Started
Welcome ......................................................................................................... 3
Table of Contents ............................................................................................ 4
Before using your VCR .................................................................................. 5
Hook up your VCR ......................................................................................... 6
Turn on your VCR .......................................................................................... 7
Play a tape ....................................................................................................... 8
A word about the remote ................................................................................ 8
Record on a tape ............................................................................................. 9
Set the clock .................................................................................................. 10
Describing Your Controls
On-screen displays (OSD) ............................................................................ 11
Remote control ........................................................................................ 12-13
VCR front panel ............................................................................................ 14
VCR display panel ........................................................................................ 15
VCR rear panel ............................................................................................. 16
Doing More
Record one channel/See another ................................................................... 17
Timer recording ....................................................................................... 18-19
One touch recording (OTR) .......................................................................... 20
Re-Recording (tape duplication) ................................................................... 21
tape operation .......................................................................................... 22-23
Channel memory review ............................................................................... 23
Special playback features ........................................................................ 24-25
MTS (Multi-Channel Television Sound) broadcast stereo system .......... 26-27
VHS Hi-Fi stereo sound system .............................................................. 28-29
Special VCR features .................................................................................... 30
Daylight savings time ................................................................................... 31
Language select ............................................................................................ 31
Information You May Need
Maintenance .................................................................................................. 32
Notes on operations ...................................................................................... 33
Other hook-ups you can try ..................................................................... 34-37
Before requesting service ........................................................................ 38-39
Specifications ................................................................................................ 40
Warranty ........................................................................................................ 41
Glossary ........................................................................................................ 42
Index ............................................................................................................. 43
Accessories ................................................................................................... 44
Features
• HQ (High Quality) System
• Frequency Synthesizer Tuning with Auto Set
Feature
• On Screen Displays (OSD) in either English or
Spanish
• Display Panel
• Auto Tracking
• One-Touch Recording (OTR)
• Unattended (Timer) Recording
Copyright © 1994 Philips Consumer Electronics Company. All rights reserved.
• Special Effects Playback
Fast Search
Still
Variable Slow
Frame Advance
• Wireless Remote control
• Auto Operation Functions
• Daylight Savings Time
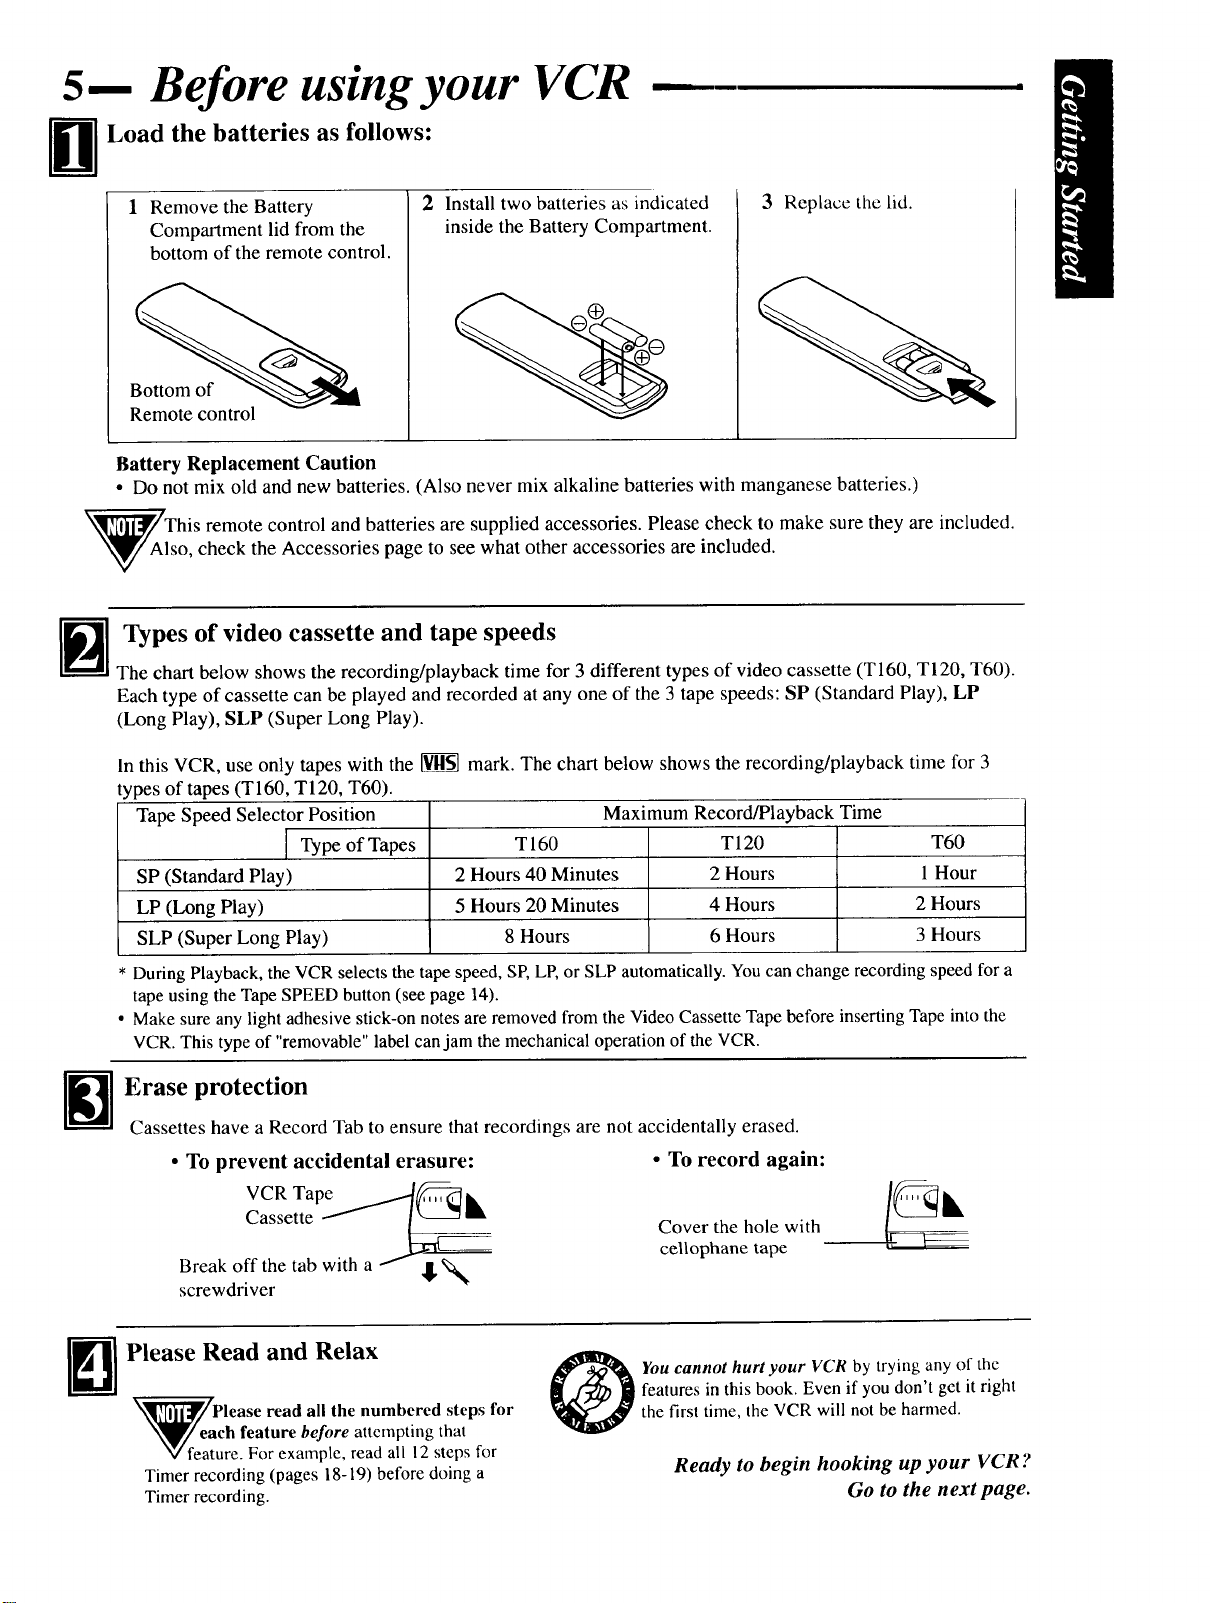
5-- Before using your VCR
Load the batteries as follows:
bm •
1 Remove the Battery
Compartment lid from the
2 Install two batteries as indicated
inside the Battery Compartment.
3 Replace the lid.
bottom of the remote control.
Bottom of
Remote control
Battery Replacement Caution
• Do not mix old and new batteries. (Also never mix alkaline batteries with manganese batteries.)
This remote control and batteries are supplied accessories. Please check to make sure they are included.
lso, check the Accessories page to see what other accessories are included.
N Types of video cassette and tape speeds
The chart below shows the recording/playback time for 3 different types of video cassette (T160, TI20, T60).
Each type of cassette can be played and recorded at any one of the 3 tape speeds: SP (Standard Play), LP
(Long Play), SLP (Super Long Play).
In this VCR, use only tapes with the _ mark. The chart below shows the recording/playback time for 3
types of tapes (T160, T120, T60).
Tape Speed Selector Position Maximum Record/Playback Time
Type of Tapes T 160 T 120 T60
SP (Standard Play) 2 Hours 40 Minutes 2 Hours 1 Hour
LP (Long Play) 5 Hours 20 Minutes 4 Hours 2 Hours
SLP (Super Long Play) 8 Hours 6 Hours 3 Hours
During Playback, the VCR selects the tape speed, SP, LP,or SLP automatically. You can change recording speed for a
tape using the Tape SPEED button (see page 14).
• Make sure any light adhesive stick-on notes are removed from the Video Cassette Tape before inserting Tape into the
VCR. This type of "removable" label canjam the mechanical operation of the VCR.
Erase protection
Cassettes have a Record Tab to ensure that recordings are not accidentally erased.
• To prevent accidental erasure:
• To record again:
VCR Tape J__------_IIL
Cassette _ __
Break off the tab with a f ,!!,_:_
screwdriver
Cover the hole with
cellophane tape
Please Read and Relax
features in this book. Even if you don't get it right
N_Please read all the numbered steps for
Timer recording (pages 18-19) before doing a
Timer recording.
ch feature before attempting that
V feature. For example, read all 12 steps for
O ou cannot hurtyour VCR by trying any of the
the first time, the VCR will not be harmed.
Ready to begin hooking up your VCR ?
Go to the next page.
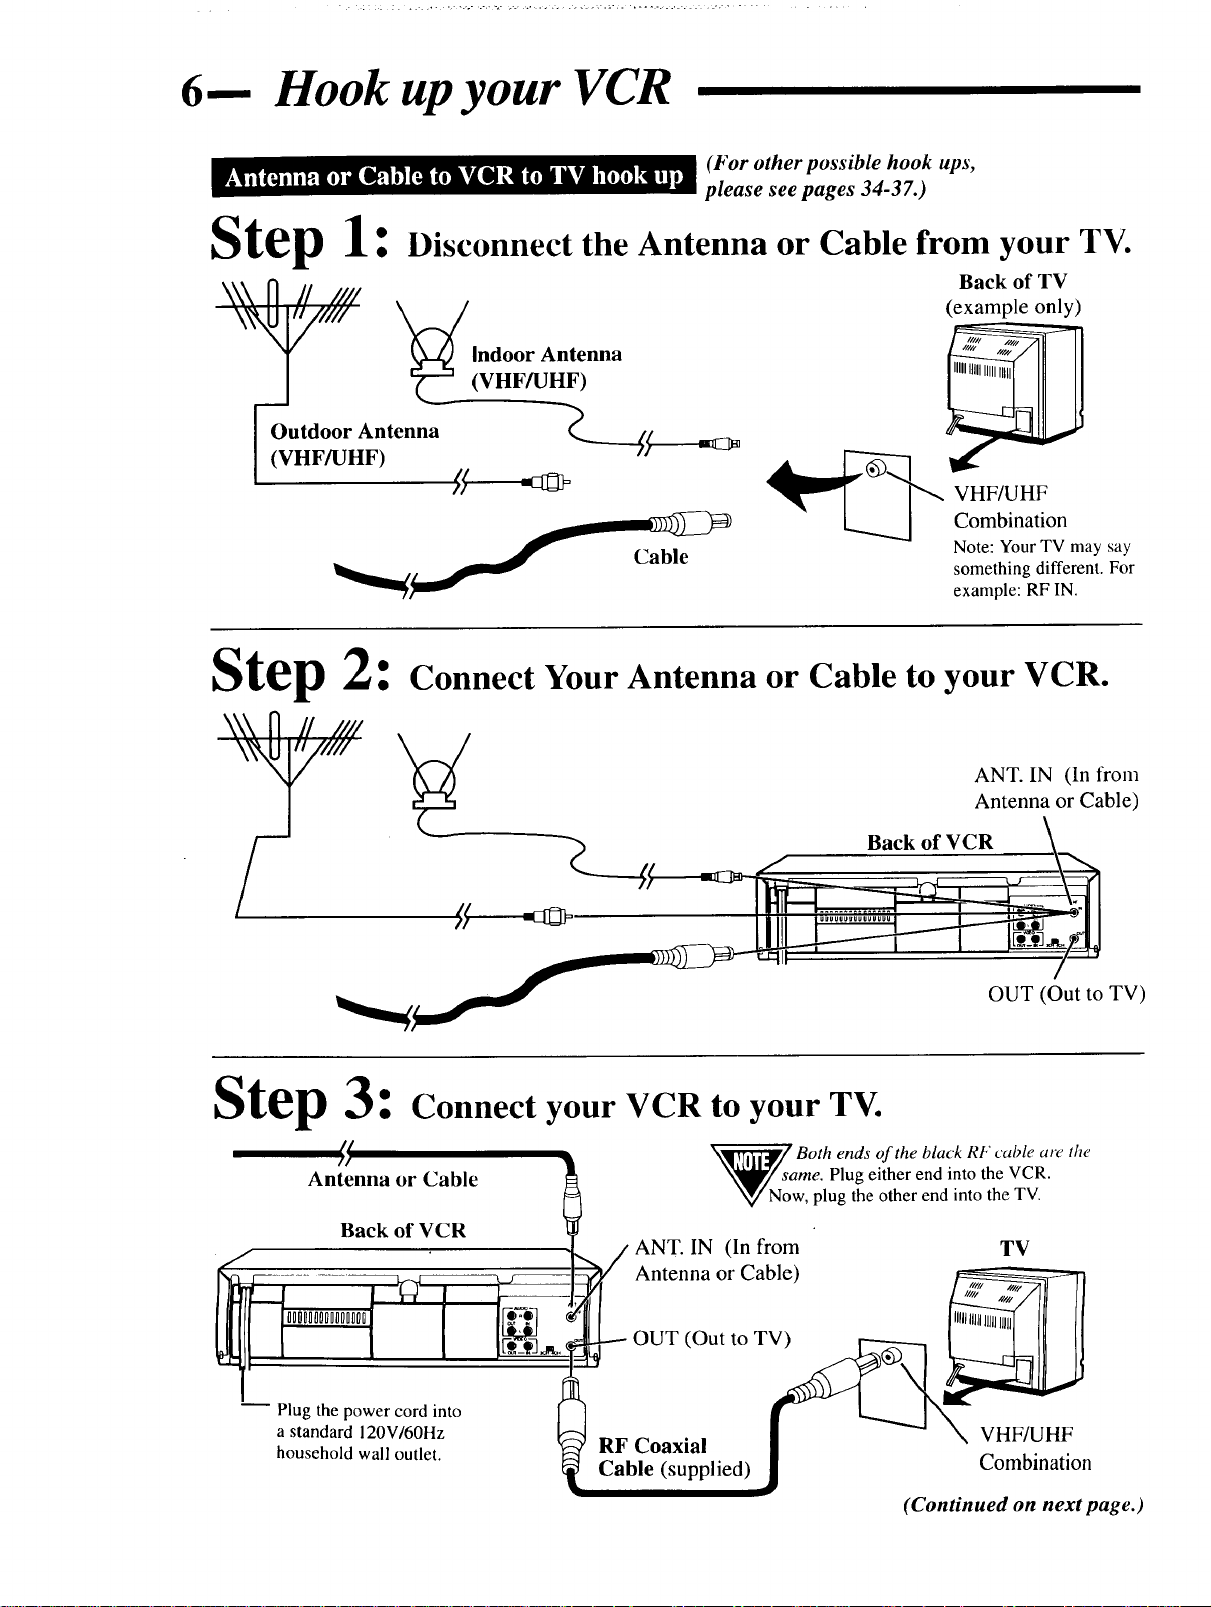
6-- Hook up your VCR
(For other possible hook ups,
please see pages 34-37.)
Step 1:
\\\ fl // IIII
Disconnect the Antenna or Cable from your TV.
Indoor Antenna
_-'-" (VHF/UHF)
IOutdoor Antenna _-----(_-----4_
i (VHF/_HF) ;_ " -
Step 2:
Connect Your Antenna or Cable to your VCR.
Back of TV
(example only)
Combination
Note: Your TV may say
something different. For
example: RF IN.
ANT. IN (In from
Antenna or Cable)
Back of VCR
ff =a_
OUT (Out to TV)
Oat.__
atep _: Connect your VCR to your TV.
_// Both ends of the black RF cable are the
Antenna or Cable \_y_s_me. Plug either end into the VCR.
Back of VCR
ANT. IN TV(In from
----r ...............PlugO000O00H00D000the power cord'__/ into [-__-_q__-- ._,ilp..li_]AntennaOUT (OutOrtoCable)T V__V_ g
Now, plug the other end into the TV.
a standard 120V/60Hz _ RF Coaxial F F
household wall outlet. _ Cable (supplied) Combination
(Continued on next page.)

7-- Hook up your VCR (continued)
Step 4: Select channel 3 or 4.
Back of VCR
-- Turn on your VCR
..... Make sure ... _,..... ........._.............
At the TV
Choose your language
TV
Wall outlet
CHANNEL
3/4 Switch
Wall outlet
3CH 4CH
MENU button
NUMBER buttons -
CHANNEL
UP/DOWN buttons
POWER button
_ Place channels in VCR's memory
_/ lf channel programming an antenna or hook up,
NkVj the on-screen display will say "NO TV SIGNALS." If this happens, hook
v up an antenna or cable and try step 3 again.
To confirm language selection, press the MENU button.
To confirm channel selection, press the CHANNEL UP button.
is done without cable
• J
Remote control
O You do this feature one
displays, please repeat the four steps under
"Hook up your VCR," pages 6 and 7.
If you still do not see either of the
displays, go to page 31, "OSD Language
Select," then page 30, "Special VCR
Features." Or, go on to page 8 and play a
tape.
Ata later time, you can change your
language selection or channels in memory
by going to page 30 or 31.
You can also fast track through this
feature. For details, see page l 1.
time_____,r
If you do not see any on-screen
Ready to play a tape?
Go to the next page.

8-- Play a tape
Make sure ...
At the TV
At the VCR
Start
TV
_l! TUI'll TV on.
r 1
I VCR
Insert tape
cassette.
Stop playback
* • If a cassette's record tab (page 5) is removed, playback starts
automatically.
• If a cassette is already in the VCR, just press the POWER button.
Other playback features are discussed on pages 24 - 25.
-- A word about the remote
Using the 100 button
To stop, press -
STOP/EJECT
or STOP
button.
Remote control
start,
c_ _ press
_ PLAY
button.
angle shown in the illustration at right. ' "
Point the remote control at the VCR 's rentote sensor, within the
Do notput objects between the remote control and the VCR.
Keep fresh batteries loaded in the remote. For details, see page 5.
More information about the remote control is on pages 12 - 13.
+100 button _
Remote control
Ready to record on a tape?
Go to the next page.
_r-_c2)r-%
_ cbc:bc:b
_5c5c5cb
r_nr-_
t2_11C=3-_ C=)
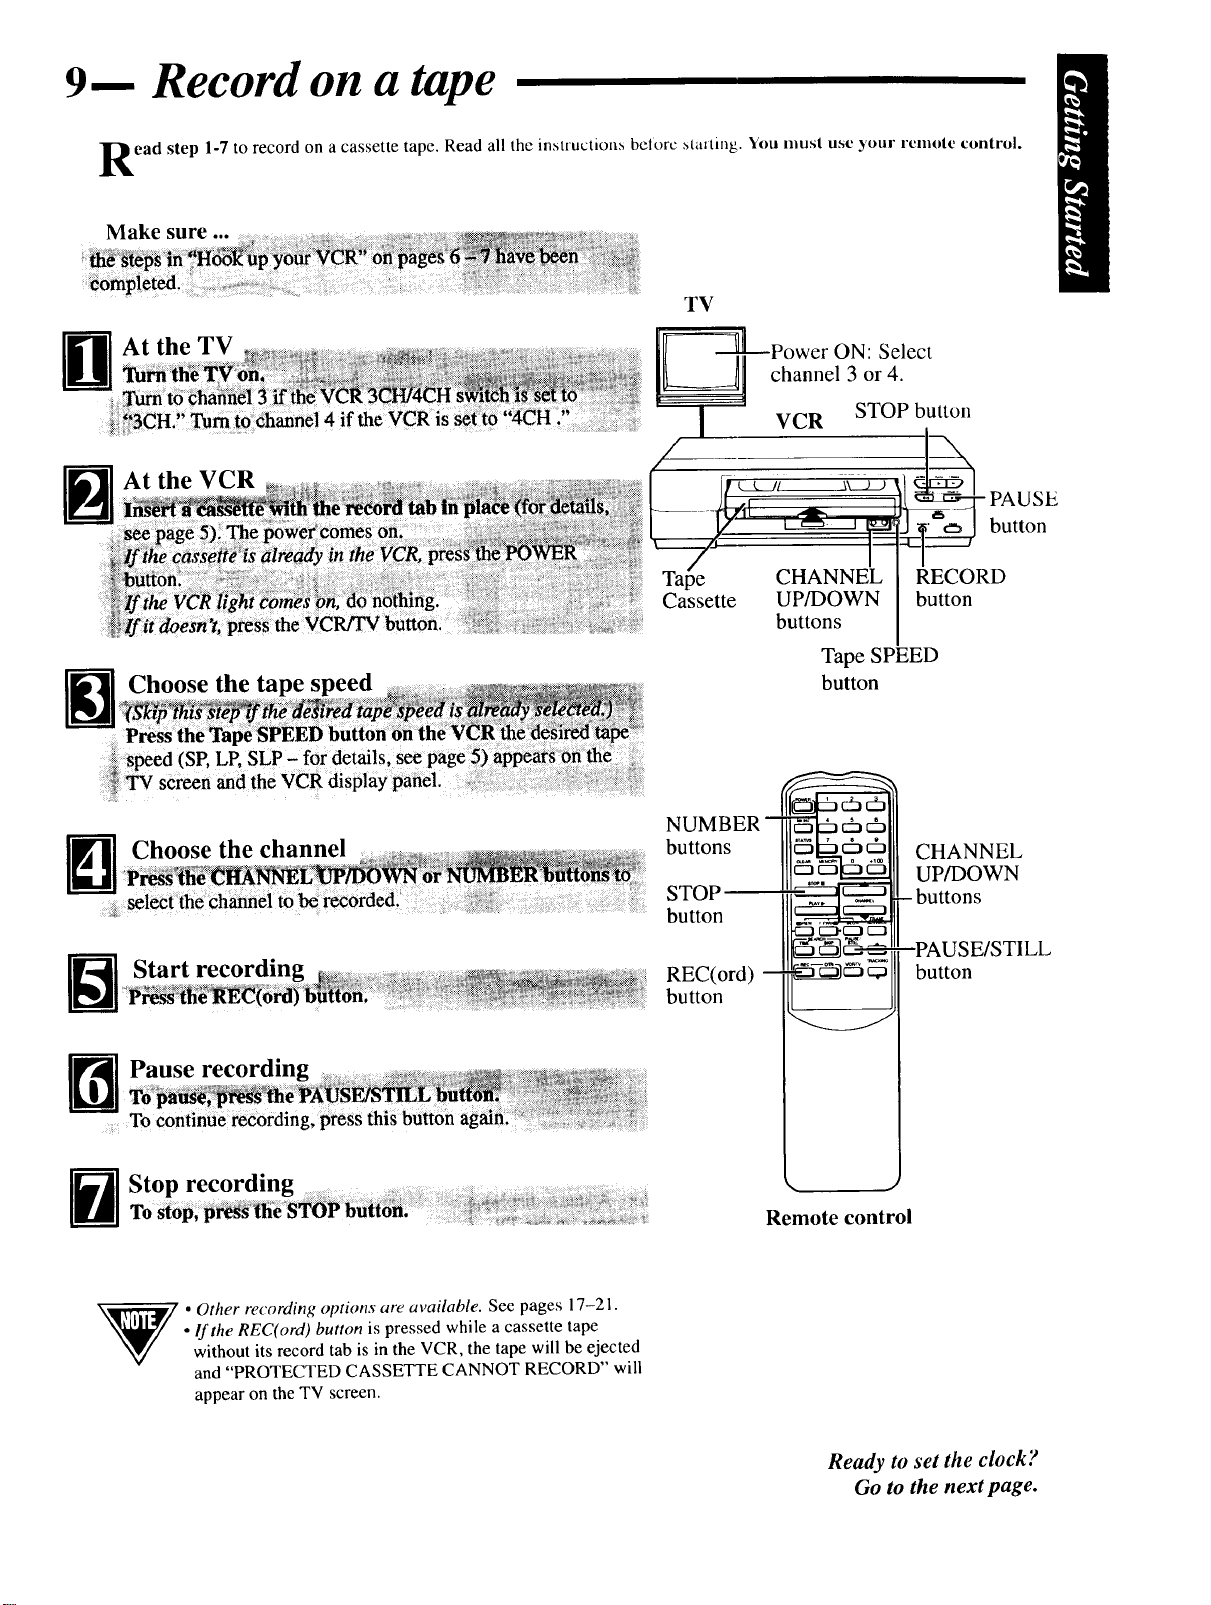
9-- Record on a tape
ead step 1-7 to record on a cassette tape. Read all the instructions belorc Maxting. You mus! use your rcmole control.
Make sure
D At the TV
i_ 3CH. to ¢h_nel 4 if the VCR is
--_At the VCR
TV
-=_tlt Power ON: Select
_--_! channel 3 or 4.
VCR STOP button
Choose the tape speed
Choose the channel
--_ Start recording
--_ Pause recording ........................To _a_e _he P_S_TILE _ii
It- "_ It"....
To continue rec0rding, press this buttoh
CHANNEL_
Cassette UP/DOWN
buttons
Tape SPEED
button
NUMBER --
buttons
STOP
button
REC(ord) --
button
-CZJIZ3"_ _
RECORD
button
CHANNEL
UP/DOWN
- buttons
--PAUSE/STILL
button
_ . Other recording options are available. See pages 17-21.
• If the REC(ord) button is pressed while a cassette tape
without its record tab is in the VCR, the tape will be ejected
and "PROTECTED CASSETTE CANNOT RECORD" will
appear on the TV screen.
Remote control
Ready to set the clock?
Go to the next page.
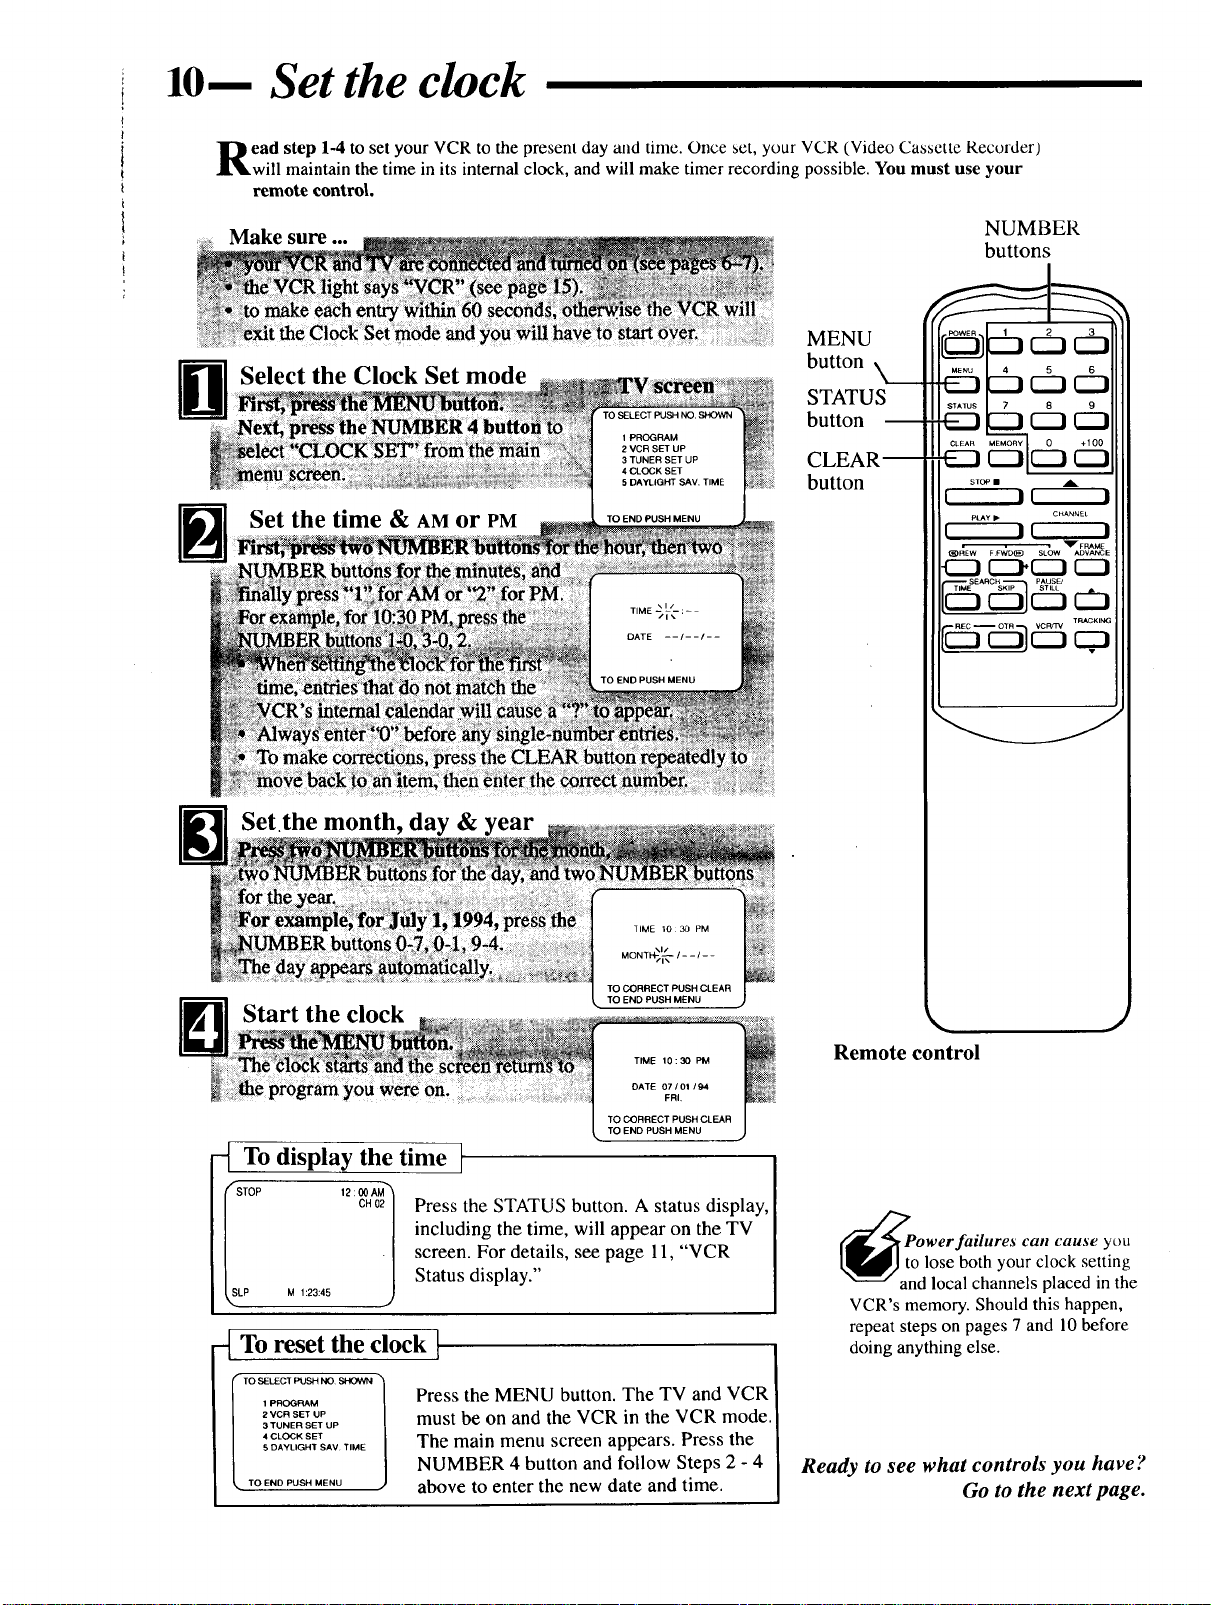
10-- Set the clock
I
i
t
ead step 1-4 to set your VCR to the present day and time. Once set, your VCR (Video Cassette Recorder)
will maintain the time in its internal clock, and will make timer recording possible. You must use your
remote control.
i
Make sure buttons
MENU
Select the Clock Set mode button
NUMBER
STATUS
button m
4 CLOCK SET
5 DAYLIGHT SAV. TIME
Set Lhe time & AMor PM TOENDPUSHMENU
CLEAR--
button
STOP •
r---7 _
PLAY I_ CHANNEL
f_----)_-----)
_REW F FWD_) SLOW ADVANCE
_FP_E
-(::::J1::::_[:::J (::J
F -dbl 6:3......
cp.
Setthe month, day & year
Start the clock
To display the time t
Press the STATUS button. A status display,
including the time, will appear on the TV
screen. For details, see page 11, "VCR
Status display."
-_ To reset the clock I
TO SELECT PUSH NO SHOVVN
1 PROGRAM
2 VCR SET UP
3 TUNER SET UP
4 CLOCK SET
5 DAYLIGHT SAV TIME
TO END PUSH MENU
Press the MENU button. The TV and VCR
must be on and the VCR in the VCR mode.
The main menu screen appears. Press the
NUMBER 4 button and follow Steps 2 - 4
above to enter the new date and time.
MONTI+/I _ / ....
TO CORRECT PUSH CLEAR
TO END PUSH MENU
TIME 10:30 PIM
DATE 07/01 /94
FRI,
TO CORRECT PUSH CLEAR
TO END PUSH MENU
J
Remote control
PtanOWerfailures can cause youo lose both your clock setting
d local channels placed in the
VCR's memory. Should this happen,
repeat steps on pages 7 and 10 before
doing anything else.
Ready to see what controls you have ?
Go to the next page.

11-- On-screen displays (OSD)
OSD Main menu screen
Press the MENU button on the remote to display the main menu screen.
Then, press the NUMBER button on the remote control for the desired
feature displayed on the menu. When you select a feature, turn to the
section in this manual and read the accompanying instructions.
VCR Status display
1. Press the MENU button.
2. Next, press the 2 button to select "VCR SET UP."
3. Then, press the 3 button to select "ON SCREEN MODE."
4. Now, press the 1, 2, or 3 button to select "ON SCREEN ON,"
"COUNTER ONLY" or "ON SCREEN OFF."
"ON" appears beside the selection made.
POSITION
ON-SCREEN ON: Whenever a function button (Stop, FF, etc.) is
pressed, a 5 second VCR Status Display appears.
COUNTER ONLY: Whenever a function button (Stop, FF, etc.) is
pressed, a 5 second VCR Status Display appears.
After 5 seconds, the counter information will remain on the screen. To
remove, press the STATUS button.
ON-SCREEN OFF: In this position, there will be no indication when
normal functions are pressed.
• You may display the VCR Status any time by pressing the STATUS
button. Status display remains on for 5 seconds. To remove press this
button again.
• Channels (when tuned) are displayed as an overlay for a few seconds.
1 PROGRAM
2 VCR SET UP
3 TUNER SET UP
4 CLOCK SET
5 DAYLIGHT SAV, TIME
l _oS_L._:CTPUSHNO._
TO END PUSH MENU
Main menu
1 NORMAL PLAY ON
2 REPEAT PLAY
3 ON SCREEN MODE
4 AUDIO OUT
5 LANGUAGE
I TO SELECT PUSH NO. SPK::)WN
VCR set up
VCR button
Pressed Time
rI'uner -sJo L, ,h 1
• ,. -']'_VS_REO '2:_,2-_--C anne
AUalO / _]EOn-- MTS
l_dCt _ '°_ [ broadcast
_p M,:23:,_.,F,...._Audio Out
] / Mode
Tape --Counter and
Speed Counter Memory
VCR Status display
Fast Track through "Turn on your VCR"
1. If the record tab on a cassette (see page 5 for details) is removed,
playback starts automatically.
Or
1. To skip Step 2 on page 7, press the MENU button. All on-screen
displays will be in English.
2. To skip Step 3 on page 7, press the STOP button. You can now play a
pre-recorded tape.
"TUNER NOT SET" briefly appears on the screen.
Blank tape or Channel indication
If a blank section of tape is encountered in the Play mode or the
channel you select has no broadcast, the screen will change to a solid
blue field. The screen will remain blue until a recorded signal is again
detected or an active channel is selected.
ELECTPUSHNO. SHOWN "_
ENGLISH ON I
ESPAI_IOL l
SELECTIONOR I
L PUSHMENUTOCONTINUE .,..)
CONNECTAN'[ENNAORCABLE
TO VCR
THEN,..
PUSHCHUPKEY
OR,..
FOR PLAY ONLY-PUSH STOP
"Fast Track" displays
TUNERNOTSET
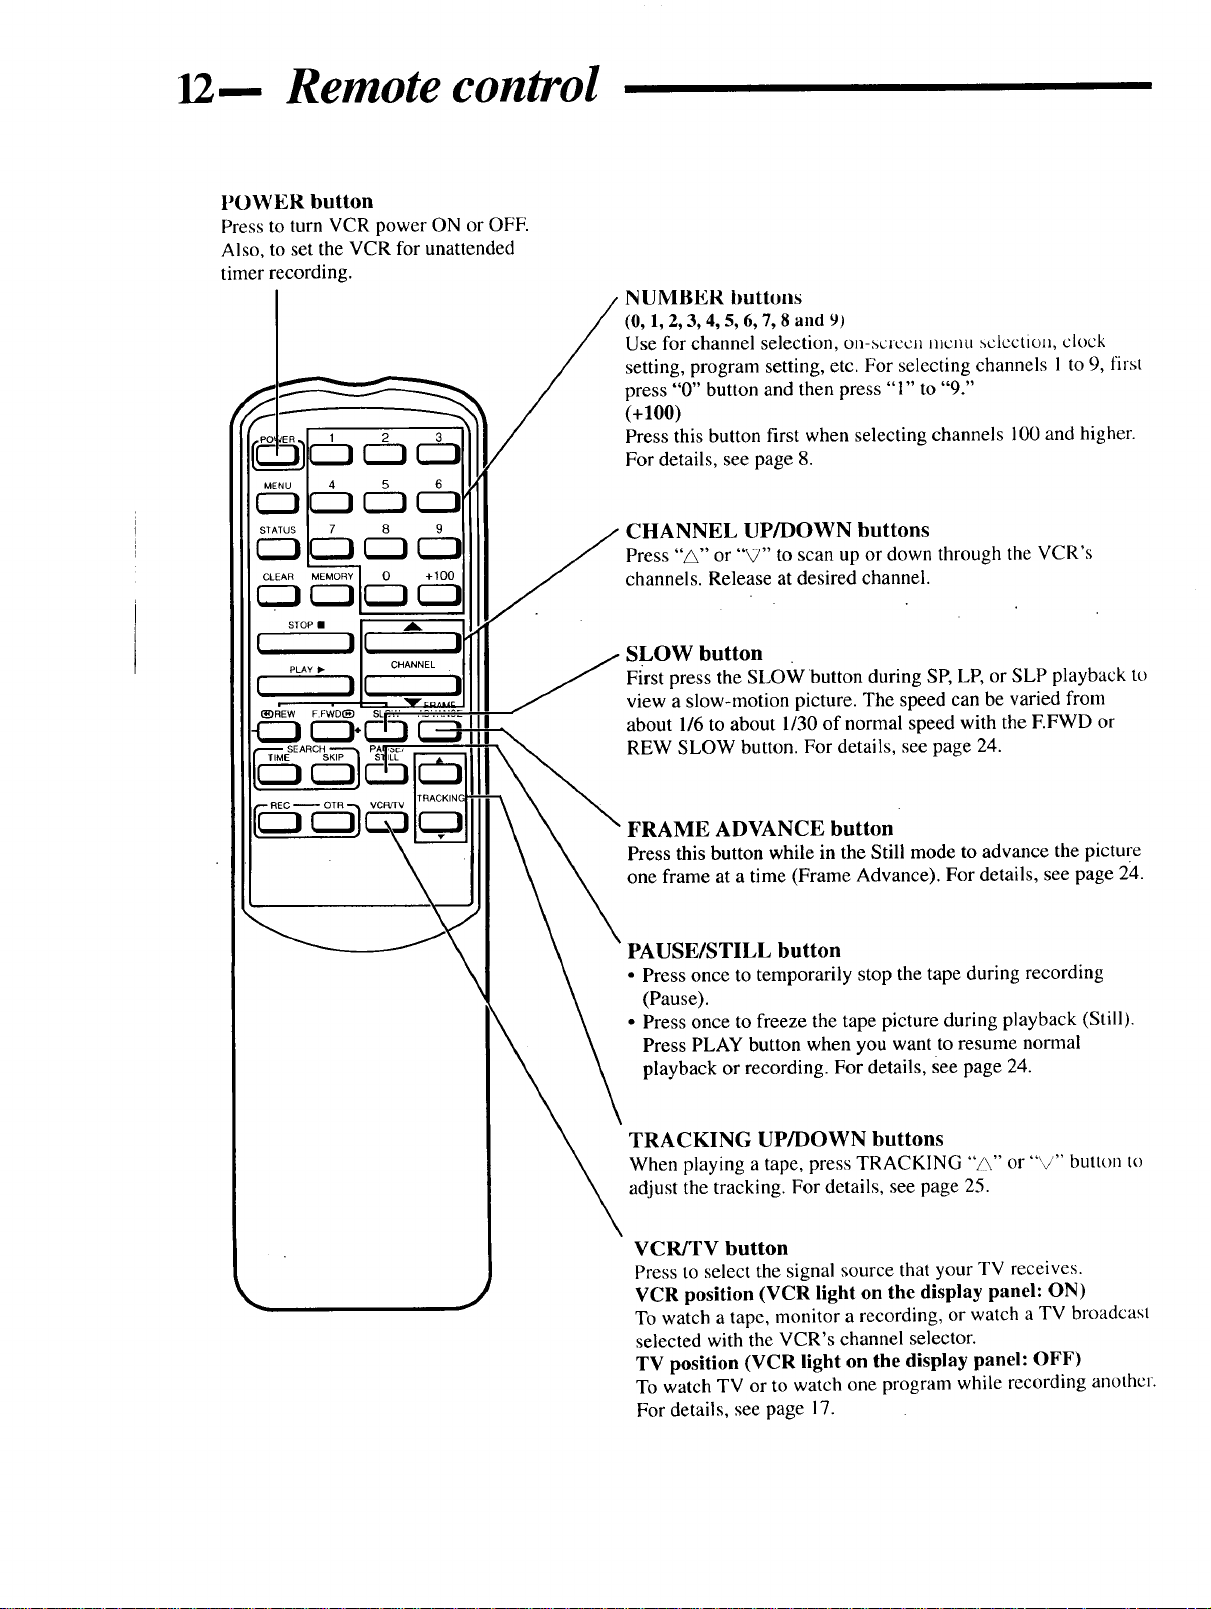
12-- Remote control
POWER button
Press to turn VCR power ON or OFE
Also, to set the VCR for unattended
timer recording.
NUMBER buttons
(0, l, 2, 3, 4, 5, 6, 7, 8 and 9)
Use for channel selection, on-scrccu menu sclcctiou, clock
setting, program setting, etc. For selecting channels 1 to 9, ilrst
press "0" button and then press "1" to '°9."
(+100)
Press this button first when selecting channels 100 and higher.
For details, see page 8.
CHANNEL UP/DOWN buttons
Press "A" or "V" to scan up or down through the VCR's
channels. Release at desired channel.
SLOW button
First press the SLOW button during SP, LP, or SLP playback to
view a slow-motion picture. The speed can be varied from
about 1/6 to about 1/30 of normal speed with the F.FWD or
REW SLOW button. For details, see page 24.
FRAME ADVANCE button
Press this button while in the Still mode to advance the pictu_e
one frame at a time (Frame Advance). For details, see page 24.
PAUSE/STILL button
• Press once to temporarily stop the tape during recording
(Pause).
• Press once to freeze the tape picture during playback (Still).
Press PLAY button when you want to resume normal
playback or recording. For details, See page 24.
TRACKING UP/DOWN buttons
When playing a tape, press TRACKING "_" or '"_/" button to
adjust the tracking. For details, see page 25.
VCR/TV button
Press to select the signal source that your TV receives.
VCR position (VCR light on the display panel: ON)
To watch a tape, monitor a recording, or watch a TV broadcast
selected with the VCR's channel selector.
TV position (VCR light on the display panel: OFF)
To watch TV or to watch one program while recording another.
For details, see page 17.

13-- Remote control (continued)
MENU button
Press to call up the on-screen menu display. For details, see
page 11.
STATUS button
Press this button to display or clear the counter, time, function,
and channel number. For details, see pages 11 and 23.
MEMORY button
Press to memorize the tape position at which the tape counter
was reset to : : . For details, see page 23.
CLEAR button
• To erase incorrect or unwanted data in on-screen menu
operation.
• To reset the tape counter. "0:00:00" will appear on the TV
screen.
For details, see page 23.
STOP button
Press to stop the tape.
PLAY button
• Press to play back a tape. For details, see page 8.
• Press to release the Search and Still modes and return to
playback. For details, see page 24.
"0 00 00"
STOP •
I[ I
CHANNEL
I I
_IqEW E.FVVD(_9 SLOW ADVANCE
• _ERAME
PAUSE/
di3c:3
TRACKING
REW(ind) button
Press to rewind the tape at high speed. Also, during playback,
press this button to view the picture in rapid reverse. For
details, see page 24.
EFWD (Fast Forward) button
To move the tape forward at high speed. Also, during
playback, press this button for rapid forward visual search. For
details, see page 24.
TIME SEARCH button
This button can make search easier by allowing you to skip
back or ahead on a tape. Press this button and select desired
counter number with NUMBER buttons. For details, see page
22.
SKIP SEARCH button
Press during playback mode to skip forward 30 seconds on
tape counter. Press up to 6 times consecutively to skip up to 3
minutes on the tape counter. VCR will automatically return to
Playback mode.
REC(ord) button
Press to start recording. For details, see page 9.
/
E TOUCH RECORDING
(OTR) button
Select the channel and press this
button to start an immediate recording
30 minutes to 4 hours long. Each press
delays the shut-off time by 30 minutes•
Power shut off is automatic. For
details, see page 20.

VCR frontpanel
Wireless remote sensor
Receives the signal from the (wireless)
remote control. For details, see page 8.
REWIND button
Press to rewind tapes. Also, during playback, press this
button for reverse visual search. For details, see page 24.
Cassette compartment
Where the video cassette is
inserted. For details, see page 8.
\
\
F:FWD (Fast Forward) button
Press to move the tape forward rapidly. Also,
during playback, press this button for rapid
forward visual search. For details, see ,)age 24.
PLAY button
• Press to play back a tape. For details, see page 8.
• Press to release the Search and Still modes and
return to playback. For details, see page 24.
CHANNEL UP/DOWN buttons
Press to scan up or down through the VCR's
channels.
You may also use these buttons to adjust the
tracking control. For details, see page 25.
NI
\
r \
I 7 ._"I g7 *v
w_
J
f
J
VCR display panel _ / / S E "1
Where various information on VCR operation / .. . n
is displayed. For details, see page 15. / aV_gaVr:_sn ,.__,._nt.o ,_..,_.-.,-,_aftlrtheta;Thas_t0_edvvv
J RECORD button --
/ _,,,,Press to start recording.
TAPE SPEED button / POWER button
Press to set the recording speed except for
timer recording. For details, see page 5.
VCR/TV button
Press to select the signal source that your TV receives.
VCR position (VCR light on the display panel: ON)
To watch a tape, monitor a recording, or watch a TV broadcast selected with thc VCR's
channel selector.
TV position (VCR light on the display panel: OFF)
To watch TV or to watch one program while recording another. For details, see page 17.
STOP/EJ "Cr' button
to eject the cassette.
Press to turn the VCR (Video.Cassette Recorder)
ON or OFE To set the VCR for unattended
recordings after timer settings have been completed.
PAUSE button
Pres'sto temporarilys'totJthetapeduringreeot'din ,ortoview
a still picture during playback. For details, see page 24.
 Loading...