

Page 1
MAGNAVOX
VIDEO CASSETTE RECORDER
OWNER'S MANUAL
MODEL VR3440
Page 2
RETURN YOUR OWNER'S
REGISTRATION CARD WITHIN
10 DAYS
MAIL
Registering your purchase isan essen-
tial step to guarantee you'll receive
all of the benefits you're entitled to as a
MAGNAVOX product owner. Com-
plete and mail your Owner's Registra-
tion Card today to ensure your right to
warranty verification, owner confirma-
tion, model registration, plus a wide
variety of special services and savings.
KNOW THESE SAFETY
SYMBOLS.
I .,sKo_SLECT._SHOCKI ..1. I
I DO NOT OPEN | I
CAUTION:TOREOUCETHERISKOF ELECTRICSHOCK,DONor I
REMOVECOV£R(ORBACK).NOUS[R-SERVICEABLEPARTS I
INSIDE.RI[FER_[NIglI_ TOQUALIFIEDStanCE PERSOSNtt. I
A his "bolt of lightning" indicates
uninsulated material within your
unit may causean electricalshock.For
the safetyof everyonein your household,
please do not remove product coveting.
The "exclamationpoint" calls
attentionto feature for which you
shouldread the enclosed literature carefully
to prevent operating and maintenance
problems.
Congratulations On Your New
Purchase ... And Welcome To The
MAGNAVOX Family!
Dear MAGNAVOX Family Member:
Thank you for your confidence in MAGNAVOX.
You've selected one of the best-built, best-backed
products available today.
We appreciate your support, and we'll do every-
thing we can to keep you happy with your purchase
for many years to come. After all, you're the reason
we're in business!
As a MAGNAVOX family member, you're entitled
to a world of special privileges - and our uncompro-
mising commitment to your total satisfaction. Your
MAGNAVOX product is protected by one of the
most comprehensive warranties and outstanding
service networks in the industry.
What's more, your purchase qualifies you to receive
advance information on exciting new products from
MAGNAVOX, convenient access to our home
shopping network for special products and accesso-
ries, plus factory-direct rebates and discounts on
your future MAGNAVOX purchases.
All.of this is our way of saying "thanks" for joining
the MAGNAVOX family.
To start taking advantage of these great benefits,
just remember to return your MAGNAVOX
Owner's Registration Card.
Simply complete, detach and mail us your Owner's
Registration Card today. And enjoy your new pur-
chase with our best wishes[
READ OPERATING
INSTRUCTIONS CAREFULLY.
The infornmtion in this manual can help
you take full advantage of your product's
ninny features, and ensure years of safe,
reliable operation. So don't miss out. Read
the enclosed i,lstructions, safety tips and
warranty information today.
Sincerely,_/_..),.,
Donald F. Johnstone
President and Chief Executive Officer
For Customer Use:
Enter below the Serial No. which is
located on the rear of the cabinet.
Retain this information for future
reference.
Model No.
Serial No.
Page 3

3
Gettina Started
v
Safety Precautions ............................................................................................................................................................3
Introduction ...........................................................................................................................................................................4
Features ....................................................................................................................................................................................4
Before Using Your VCR ................................................................................................................................................5
Getting Hooked Up ....................................................................................................................................................6 - 7
Playing a Tape .......................................................................................................................................................................7
Placing Local Channels in the VCR .......................................................................................................................8
Using the VCR/TVSelector Button .........................................................................................................................9
Setting the Clock .............................................................................................................................................................10
Recording on a Tape ......................................................................................................................................................11
Describing Your Controls
Description of Remote and VCR Controls ...........................................................................................12 - 17
On-Screen Displays (OSD) ........................................................................................................................................18
Doing More
One Touch Recording (OTR) ...................................................................................................................................19
Timer Recording ...................................................................................................................................................20 - 21
Special Playback Features .........................................................................................................................................22
Re-Recording (Tape Duplication) .........................................................................................................................23
Tape Operation .................................................................................................................................................................24
Information You May Need
Technical Notes on Operations ...............................................................................................................................25
Other Hook-Ups You Can Try ......................................................................................................................26 - 29
Before Requesting Service .............................................................................................................................30 - 31
Specifications ....................................................................................................................................................................31
Warranty ...............................................................................................................................................................................32
Glossary ...............................................................................................................................................................................33
Index .......................................................................................................................................................................................34
Accessories .........................................................................................................................................................................35
Safetv Precautions
WARNING: To prevent fire or shock hazard, do not
expose this equipment to rain or moisture.
FCC WARNING: Any unauthorized changes or
modifications to this equipment would void the user's
authority to operate.
This video recorder, equipped with the HQ (High Quality)
System, is compatible with existing VHS (Video Home
System) equipment.
CAUTION:
TO PREVENT ELECTRIC SHOCK, MATCH WIDE
BLADE OF PLUG TO WIDE SLOT, FULLY INSERT.
PHILIPS CONSUMER ELECTRONICS COMPANY
recommends that you use only cassette tapes which have
been tested and inspected for use in 2, 4, 6 and 8 hour video
cassette recorders, and which are labeled with the VHS mark.
The use of tapes which have not been tested and inspected for
2, 4, 6 and 8 hour recorders may result in poor picture quality
and excess deposits on the VIDEO head, which may not be
covered by the warranty if damage occurs.
ATTENTION:
Pour _viter les chocs _lectdques, introduire la lame la plus
large de la fiche dans la borne correspondante de la prise
et pousser jusqu'au fond.
Note to CATV System Installer.
This reminder is provided to call the CATV (Cable TV) System installer's attention to Article 820-40 of the NEC that provides
guidelines for proper grounding and, in particular, specifies that the cable ground shall be connected to the grounding system
of the building, as close to the point of cable entry as practical.
• " ..... :--lkt ¢F_ 1 (I_'_ DIsH'no _'_ancllmor l_loetranle_ ('_nmn_lnv. All rights reserved.
Page 4

4 dntroduction
e are pleased to introduce you to one of the most
W popular entertainment products available today. You
have a legal description of your VCR (Video Cassette
Recorder) when you record the Serial and Model Numbers in
the spaces provided either on page two (just below the
president's signature) or on the Warranty page at the back of
this owner's manual. These numbers are located on the back
of the VCR. Keep this manual and numbers near your VCR
for quick reference or in case you should have to call for help.
This owner's manual is designed for you. To h.elp you, keep
this color principle in mind: Blue is for Beginning, Green is
for Getting Acquainted, Tan is for Taking on More, and Black
is for Back-Up Information.
Blue is for Beginning
The headlines and first (large) letters of introduction in this
opening section are blue. This says you are at the beginning.
The features discussed on these pages are interrelated. To get
the most enjoyment out of your VCR you should do
everything in the Blue section. Blue is for Beginning.
Green is for Getting Acquainted
The headlines and first letters in the second section are green.
This says buttons and important areas of your VCR and
remote control are highlighted and briefly discussed here.
This section is for quick reference and can be used at any time.
You can even look at it first. Green is for Getting Acquainted.
Tan is for Taking On More
The headlines and first letters in this section are tan. This says
you are taking on more features. The pages here are not
interrelated, unless you see "(Continued on next page.)" at the
bottom. Each function can be done separately. Tan is Taking
On More.
Black is for Back-Up Information
The headlines and first letters in this, the last section are black.
This says there is additional information here you can look at
when you have a question. Or if you're just curious.
Definitions are here. So are accessories, other ways of
hooking up your VCR, and an index that helps you find
information more quickly. Black is for Back-Up Information.
Numbered Steps and Shaded Areas
Also remember: numbered steps and blue-shaded areas in this
manual are the steps necessary to complete a task. You must
do all the blue-shaded areas for each feature to accomplish
that feature. There are, however, tan-shaded areas. These
areas tell you how to cancel or alter a feature you have set up.
Clear-shaded areas in boxes provide additional information
you may find helpful. The color principle is the same: Blue
for Beginning and Tan for Taking on More.
You are now ready to begin.
• HQ (High Quality) System
• Frequency Synthesizer Tuning withAuto Set
Feature
• On Screen Display
• Indicator Panel
• Real TimeCounter
• Special Effects Playback
Fast Search
Still
VariableSlow
Frame Advance
• Auto Tracking
• One Touch Recording
• Unattended (Timer) Recording
• Auto Operation Functions
• Head Cleaner
• Wireless Remote Control
Copyright © 1992 Philips Consumer Electronics Company. All rights reserved.
Page 5
1
5
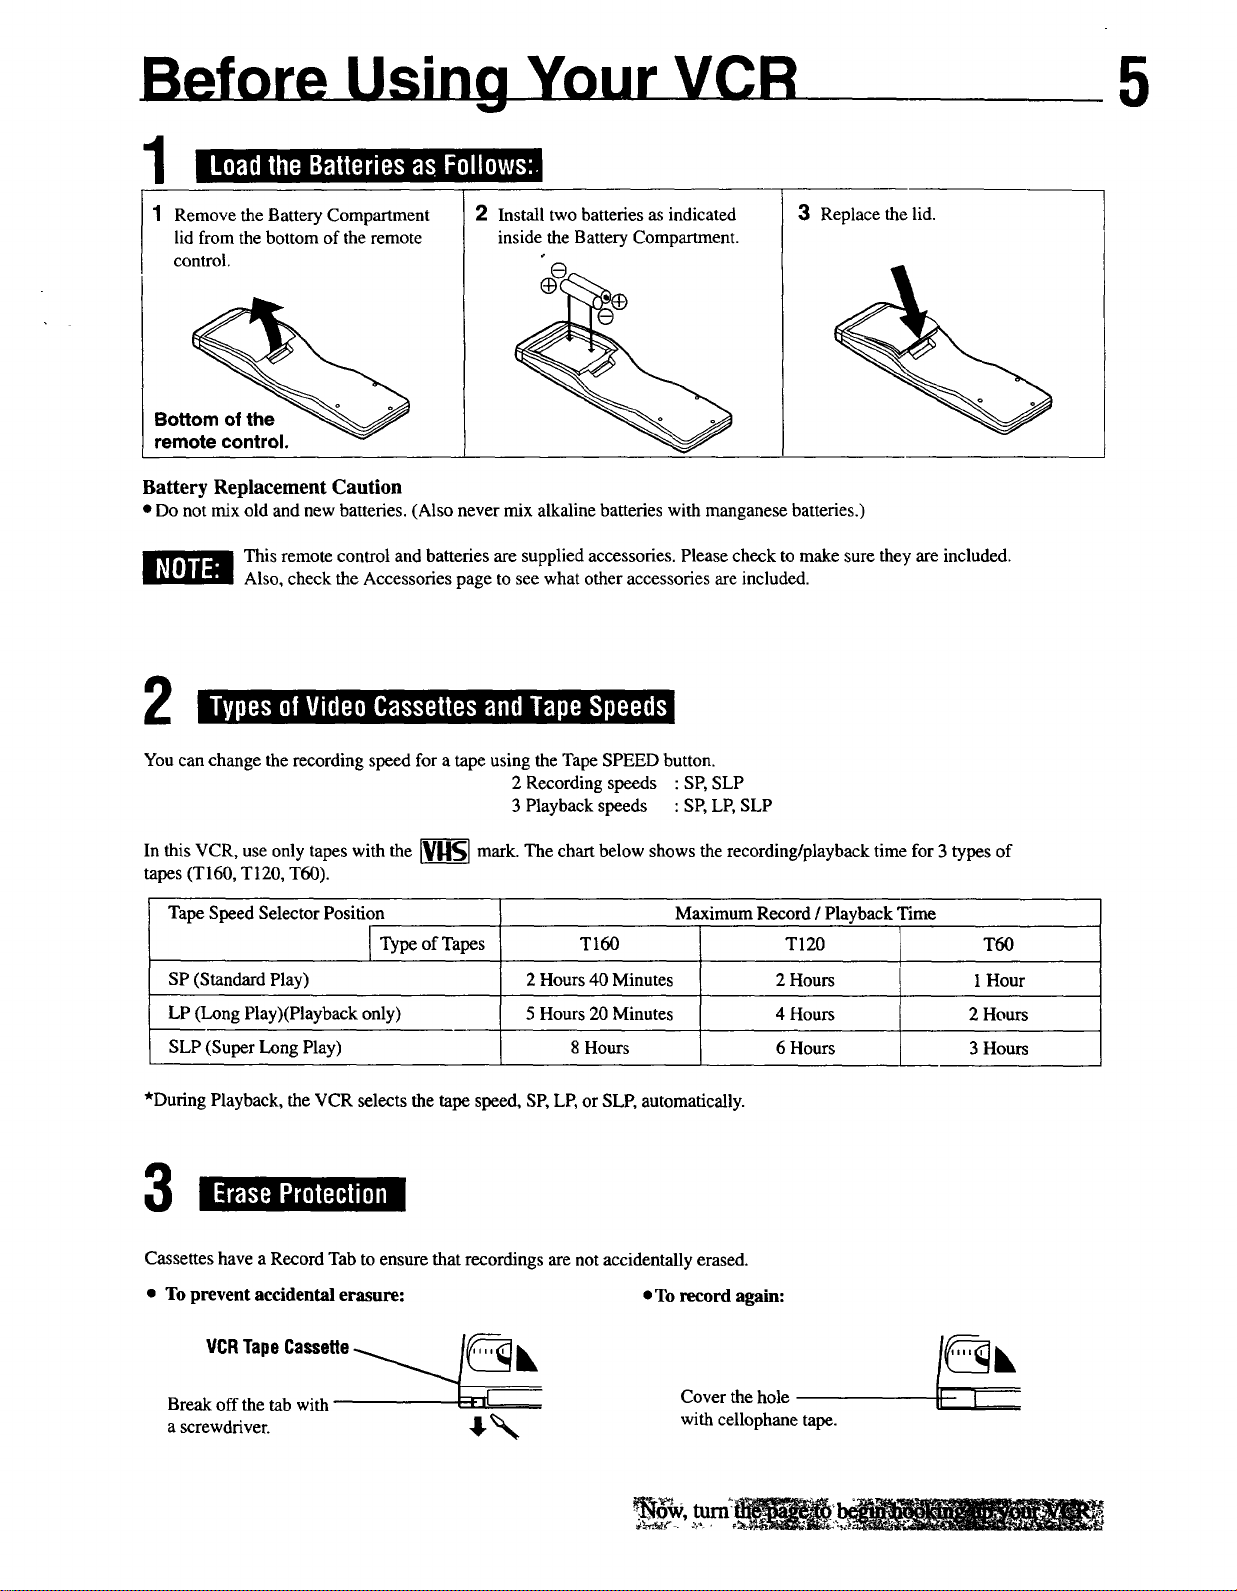
1 Remove the Battery Compartment
lid from the bottom of the remote
control.
Bottom of the
remote control.
Battery Replacement Caution
• Do notmix old andnewbatteries. (Also never mixalkalinebatteries with manganese batteries.)
This remote control and batteries are supplied accessories. Please check to make sure they are included.
Also, check the Accessories page to see what other accessories are included.
2 Install two batteries as indicated
inside the Battery Compartment.
3 Replace the lid.
2
You can change the recording speed for a tape using the Tape SPEED button.
2 Recording speeds : SP, SLP
3 Playback speeds : SP, LP, SLP
In this VCR, use only tapes with the _ mark. The chart below shows the recording/playback time for 3 types of
tapes (T160, T120, T60).
Tape Speed Selector Position
Type of Tapes
SP (Standard Play)
LP (Long Play)(Playback only)
SLP (Super Long Play)
*During Playback, the VCR selects the tape speed, SP, LP, or SLE automatically.
T160 T120 T60
2 Hours 40 Minutes 2 Hours I Hour
5 Hours 20 Minutes 4 Hours 2 Hours
8 Hours 6 Hours 3 Hours
Maximum Record / Playback Time
3
Cassettes have a Record Tab to ensure that recordings are not accidentally erased.
• To prevent accidental erasure: •To record again:
VCRTape Cassette_ /_l_
Break off the tab with
a screwdriver. _. %%
Cover the hole
with cellophane tape.
_. ._,_., ,_,4_'_,_-_ _' - _-_ o._.j
°: k
Page 6
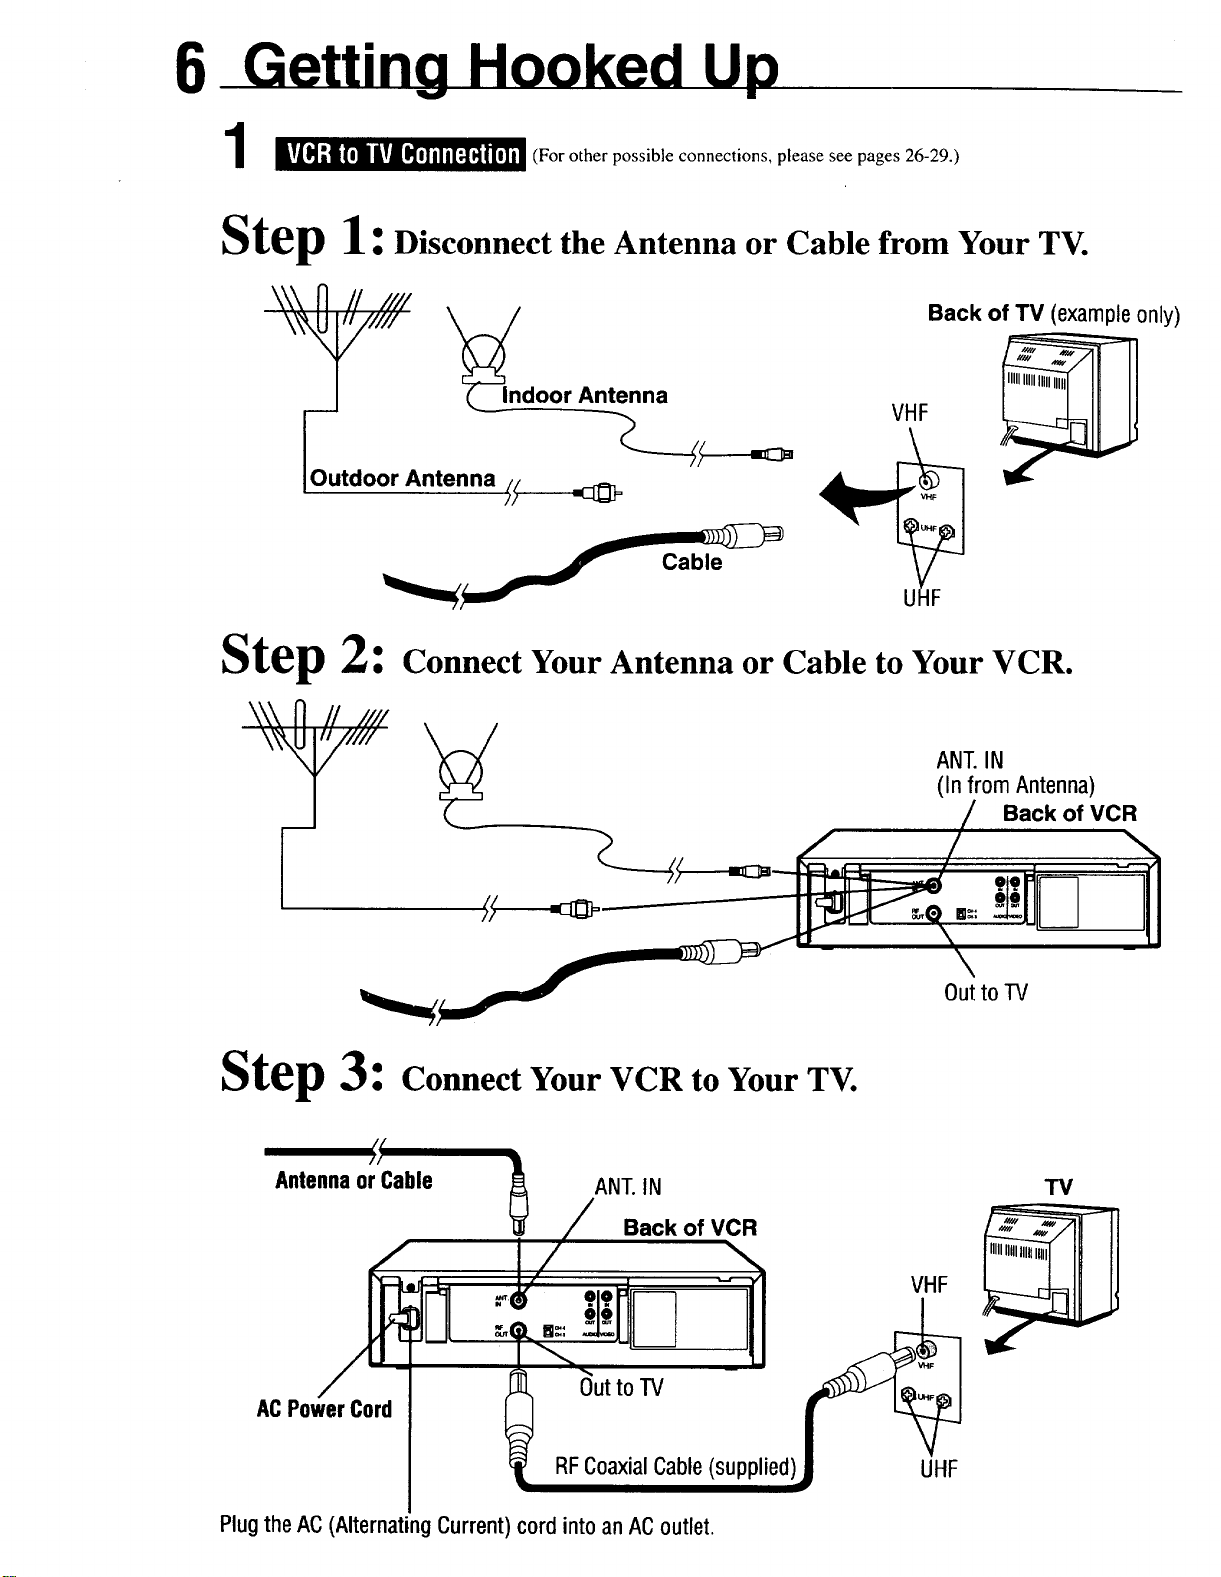
(For other possible connections, please see pages 26-29.)
Step 1:Disconnect the Antenna or Cable from Your TV.
\\\ J'l // //// Back of TV (example only)
IOutdoor Antenna//_____,_
U tF
Step 2: Connect Your Antenna or Cable to Your VCR.
\\\ N // ///1'
Step 3: Connect Your VCR to Your TV.
((
//
Antennaor Cable
ANT.IN
Back of VCR
(In from Antenna)
ANT. IN
VHF
Back of VCR
Outto TV
TM
ACPowerCord
Plugthe AC(Alternating Current) cord into an ACoutlet.
UHF
Page 7
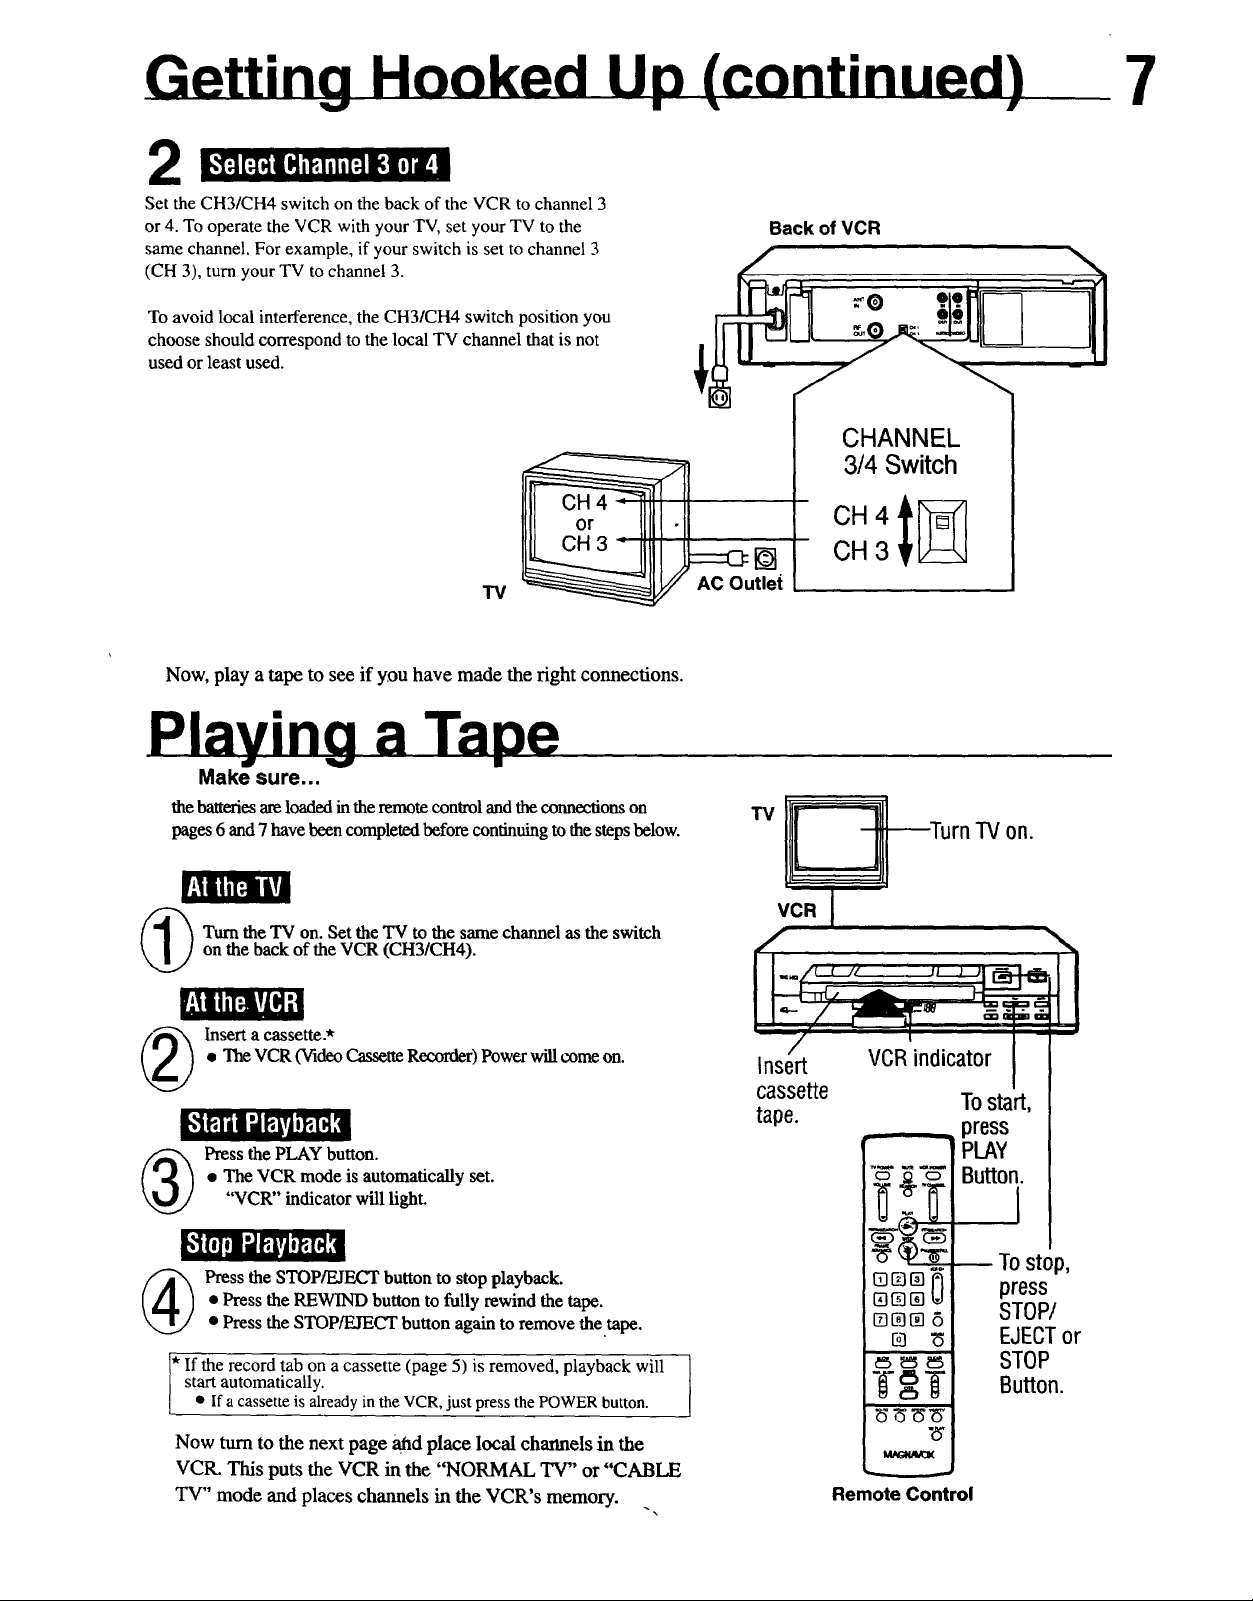
2
Set the CH3/CH4 switch on the back of the VCR to channel 3
or 4. To operate the VCR with your TV, set your TV to the
same channel. For example, if your switch is set to channel 3
(CH 3), turn your TV to channel 3.
To avoid local interference, the CH3/CH4 switch position you
choose should correspond to the local TV channel that is not
used or least used.
7
Back of VCR
CHANNEl_
314 Switch
"IV
Now, play a tape to see if you have made the right connections.
Make sure...
the batteries are loaded in the remote control and the connections on
pages 6 and 7 have been completed before continuing to the steps below.
r,._[1L_I|Ti
(_ urn theTV on.Set the "IVto the same channel as the switch
on theback of the VCR (CH3/CH4).
1.,IIllL_irllm
• The VCR (Video Cassette Recorder) Power will come on.
Insert a cassette.*
(_ Press the PLAY button.
• The VCR mode is automatically set.
"VCR" Indicator will light.
I¢toI !!1"-,1g|v| !BIll ,'1
• Press the REWIND button to fully rewind the tape.
Press the STOP/EJECT button to stop playback.
• Press the STOP/EJECT button again to remove the.tape.
* startIftheautomatically.recordtab on a cassette (page 5) is removed, playback will
e If acassette is already in the VCR, just press the POWER button.
[]
AC Outlet
TV
Insert
cassette
tape.
VCR
CH 3
----Turn TV on.
VCRindicator
CD 0 C)
To start,
press
PLAY
Button.
I
Tostop,
press
STOP/
EJECTor
STOP
Button.
Now turn to the next page _d place local channels in the
VCR. This puts the VCR in the "NORMAL TV" or "CABLE
TV" mode and places channels in the VCR's memory.
"x
Remote Control
Page 8
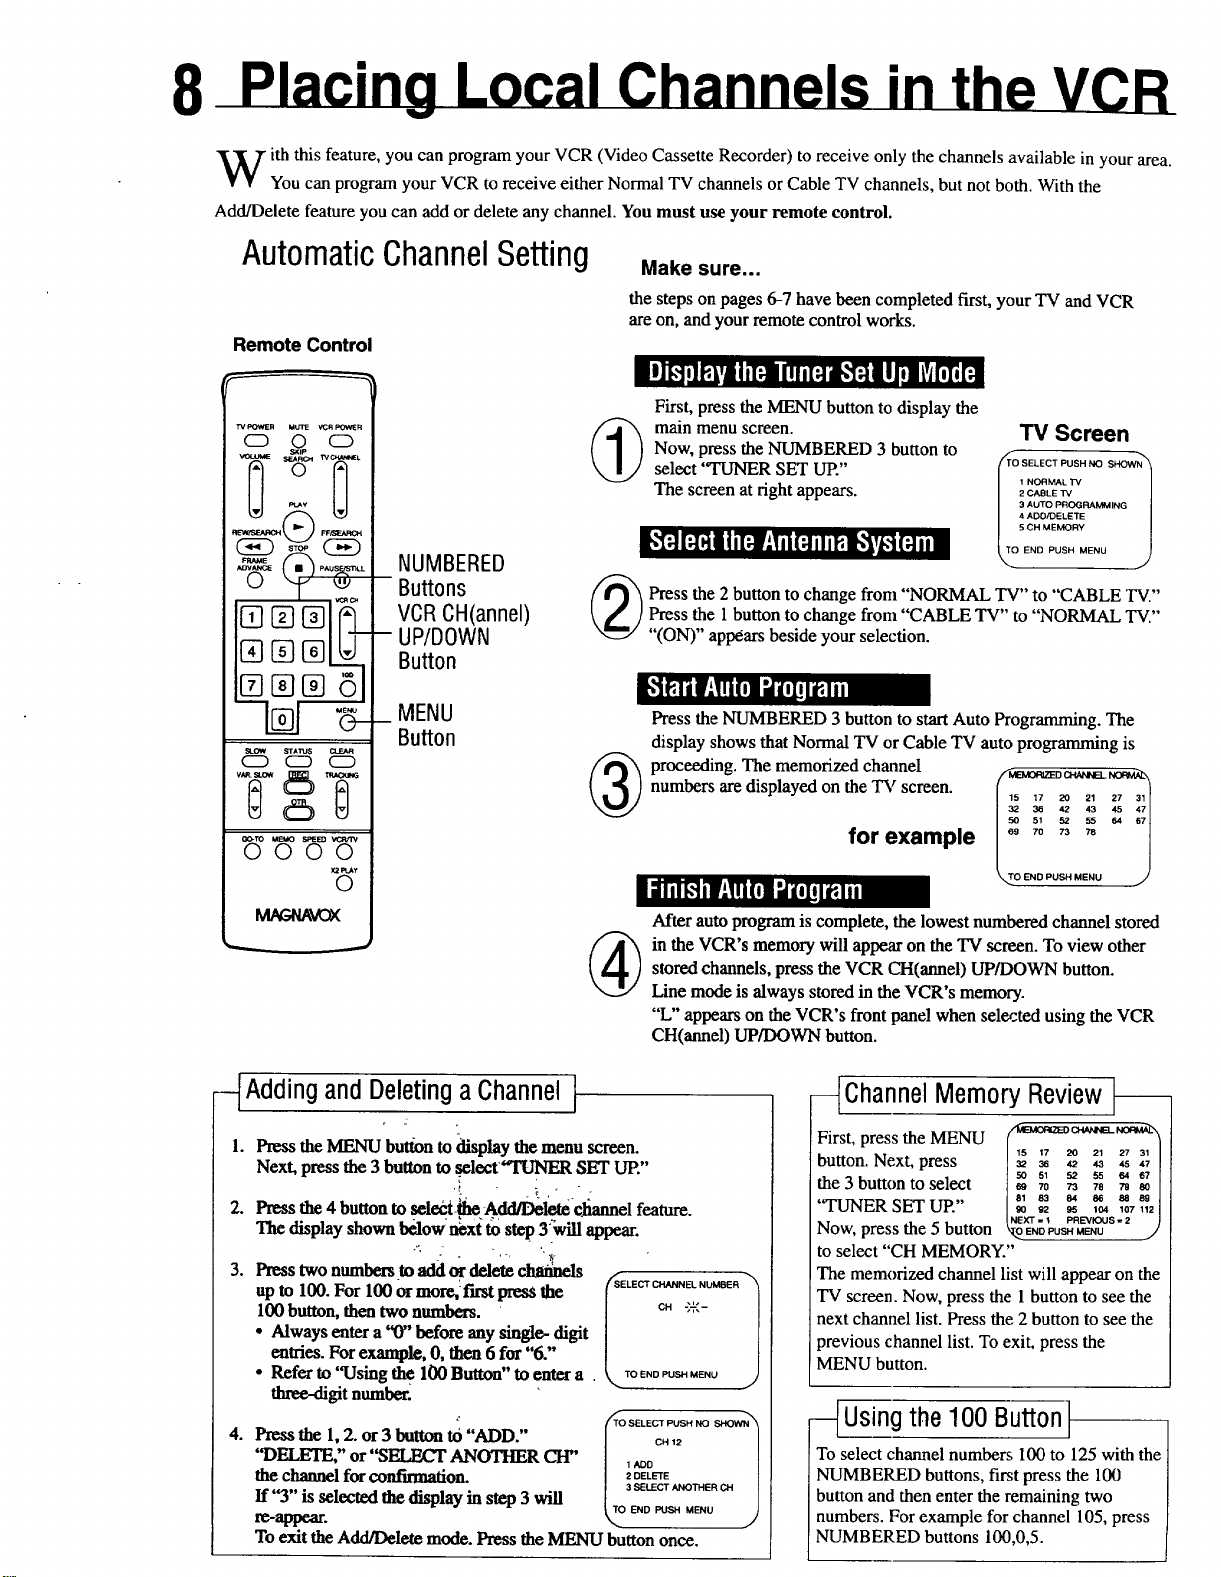
8
ith this feature, you can program your VCR (Video Cassette Recorder) to receive only the channels available in your area.
You can program your VCR to receive either Normal TV channels or Cable TV channels, but not both. With the
Add/Delete feature you can add or delete any channel. You must use your remote control.
AutomaticChannelSetting Make sure...
the steps on pages 6-7 have been completed first, your TV and VCR
are on, and your remote control works.
Remote Control
I I| 1,1o_,LVlh[_i i. d_F'_lllJl Lvd_[;]i
TV POWER MUTE V_CR pOWER
O O O
P_._v
[][]®L
stow status
CE) CD CE)
GO-TO MEMO SPEED
0000
NUMBERED
VCRCH(annel)
Buttons (_
- UP/DOWN
Button
_ MENU
Button
o
(_ ain menu screen.
(_ proceeding. The memorized channel
First, press the MENU button to display the
Now, press the NUMBERED 3 button to
select "TUNER SET UP."
The screen at right appears.
l:f'.! 1:I_1i i i[:l:Ti'i(:1di_lh'l,_,,l(;1. m
Press the 2 button to change from "NORMAL TV" to "CABLE TV."
Press the 1 button to change from "CABLE TV" to "NORMAL TV."
"(ON)" appears beside your selection.
["t_Brir:ITE,];lil_n_
Press the NUMBERED 3 button to start Auto Programming. The
display shows that Normal TV or Cable TV auto programming is
numbers are displayed on the TV screen.
TV Screen
_TO SELECT PUSH NO SHOWN_
I NORMAL "rv l
2CABLE TV
3 AUTO PROGRAMMING
4 ADD/DELETE
5 CH MEMORY
OEND PUSH MENU
15 17 20 21 27 31
32, 36 42 43 45 47
50 51 52 55 64 67
for example °, ,0 ,3 ,s
O END PUSH MENU
J
After auto program is complete, the lowest numbered channel stored
stored channels, press the VCR CH(armel) UP/DOWN button.
in the VCR's memory will appear on the TV screen. To view other
Line mode is always stored in the VCR's memory.
"L" appears on the VCR's front panel when selected using the VCR
CH(annel) UP/DOWN button.
Adding and Deletinga Channel ]
1. Press the MENU buKon to display the menu screen.
Next, press the 3 button to .seleet'q'UNER SET UP."
: _ ," _
2. Press the 4 button to sele_ iflo Add/Dalote¢liannel feature.
The display shown below next to step 3%vill appear.
3. Press two numbers to add or delete _Is
upto 100. For 100 or more_ first press the
100 button, then two numbers.
• Always enter a"0" before any single- digit
entries. For example, 0, then 6 for "6."
• Refer to "Using the 1130Button" to enter a
three-digit number_
4. Pressthe 1, 2. or 3 button to "ADD."
"DELETE" or "SELECT ANOTHER C'I-I"
the channel for confirmation.
If"3" is selected the display in step 3 will
re-appear.
To exit the Add/Delete mode. Press the MENU button once.
o- _ ,
SILECTCHANNB'NUMBERICH '-]',:-
TO END PUSH MENU
t_TO SELECT PUSH NO SHOWN_
1 ADD CH 12 /
2 DELETE
3 SELECT ANOTHER CH
OEND PUSH MENU
J
--{Channel Memory Review t--
button. Next, press 32 36 ,2 43 ,5 ,r
the 3 button to select _ 70 73 7a rg 8o
"TUNER SET UP." s,83 8, _ = .
Now, press the 5 button MENU
to select "CH MEMORY."
The memorized channel list will appear on the
TV screen. Now, press the 1 button to see the
next channel list. Press the 2 button to see the
previous channel list. To exit, press the
MENU button.
15 17 20 21 27 31
50 51 52 55 64 67
90 92 95 104 107 112
NEXT = _ PREVIOUS = 2
USin___g_the100 Button}
select channel numbers 100 to 125 with the
MBERED buttons, first press the 100
on and then enter the remaining two
bers. For example for channel 105, press
MBERED buttons 100,0,5.
Page 9
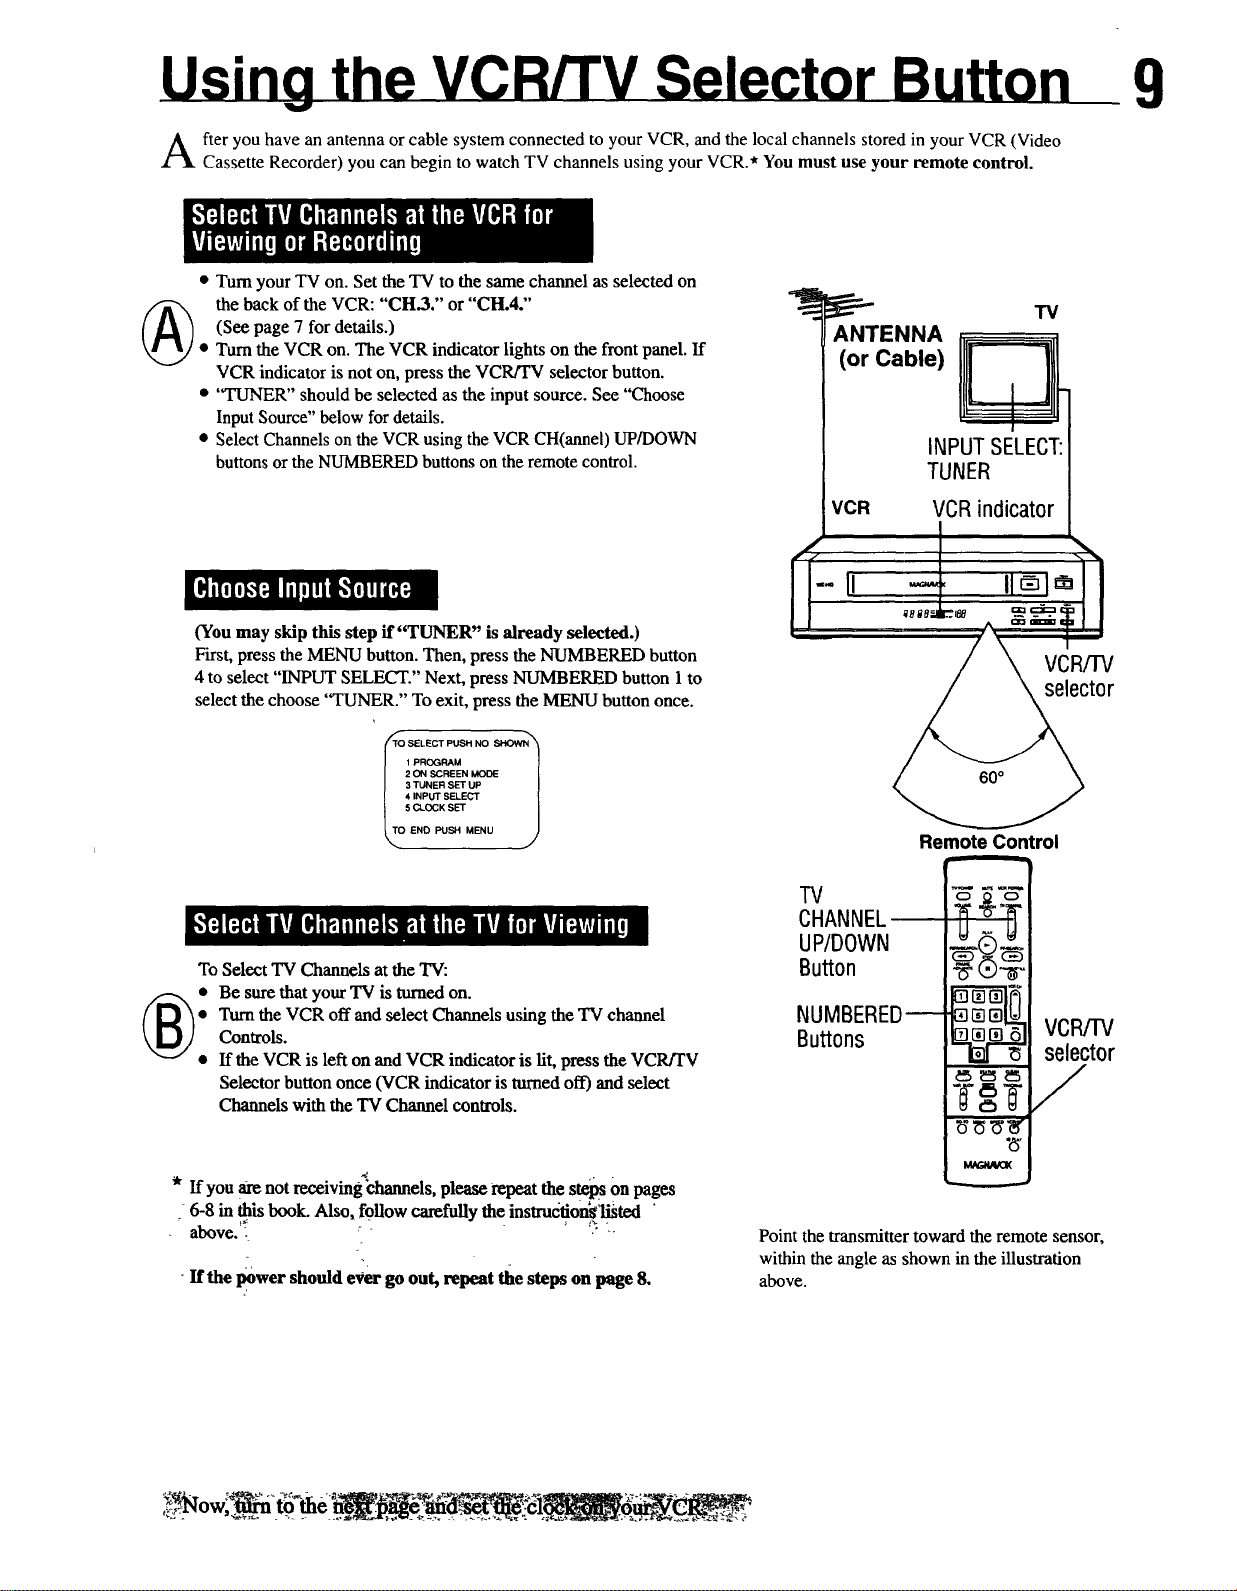
fter you have an antenna or cable system connected to your VCR, and the local channels stored in your VCR (Video
Cassette Recorder) you can begin to watch TV channels using your VCR.* You must use your remote control.
Turnyour TV on. Set theTV to the same channel as selected on
the back of the VCR: "CH.3." or "CH.4"'
(See page 7 fordetails.)
TurntheVCR on. The VCR indicatorlights onthe frontpanel.If
VCR indicatoris not on, pressthe VCR/TV selector button.
"TUNER" shouldbe selected as the inputsource. See "Choose
InputSource" belowfordetails.
SelectChannelson theVCRusingtheVCR CH(annei)UP/DOWN
buttonsorthe NUMBEREDbuttonsonthe remotecontrol.
ANTENNA
(or Cable)
VCR
TUNER
INPUTSELECT:I
VCRindicator
W
--II -="t tl l
9
(Youmay skip this step if "TUNER" is already selected.)
First, press theMENU button. Then, pressthe NUMBERED button
4to select "INPUT SELECT." Next, pressNUMBERED button I to
select the choose "TUNER." Toexit, press the MENU button once.
f_T-TOSELECT PUSH NO SI-tO_'N_
2 ON SCREEN MODE
3 TUNER SET UP
1PROGRAM /
4 INPUT SELECT
5 CLOCK SET l
ENO PUSH MENU
To Select TV Channels at the TV:
Turn the VCR off and select Channels using the "IV channel
Controls.
If the VCR is left on and VCR i_icamr is lit, press the VCR/TV
Selector button once (VCR indicator is turned off) and select
Channels with the TV Channel controls.
* If you are not receiving_hannels, please repeat the steps Onpages
6-8 in this book. Also, follow carefully the instruefioff_'listed "
above.'_ = - - ,:-k.
Ifthepower shouldevergo out,repeatthestepson page 8.
#
'' I
/ \ vcR v
ctor
Remote Control
CHANNEL
UPmOWN
,u.on
o vc. v
selector
/
Point the transmitter toward the remote sensor,
within the angle as shown in the illustration
above.
Page 10
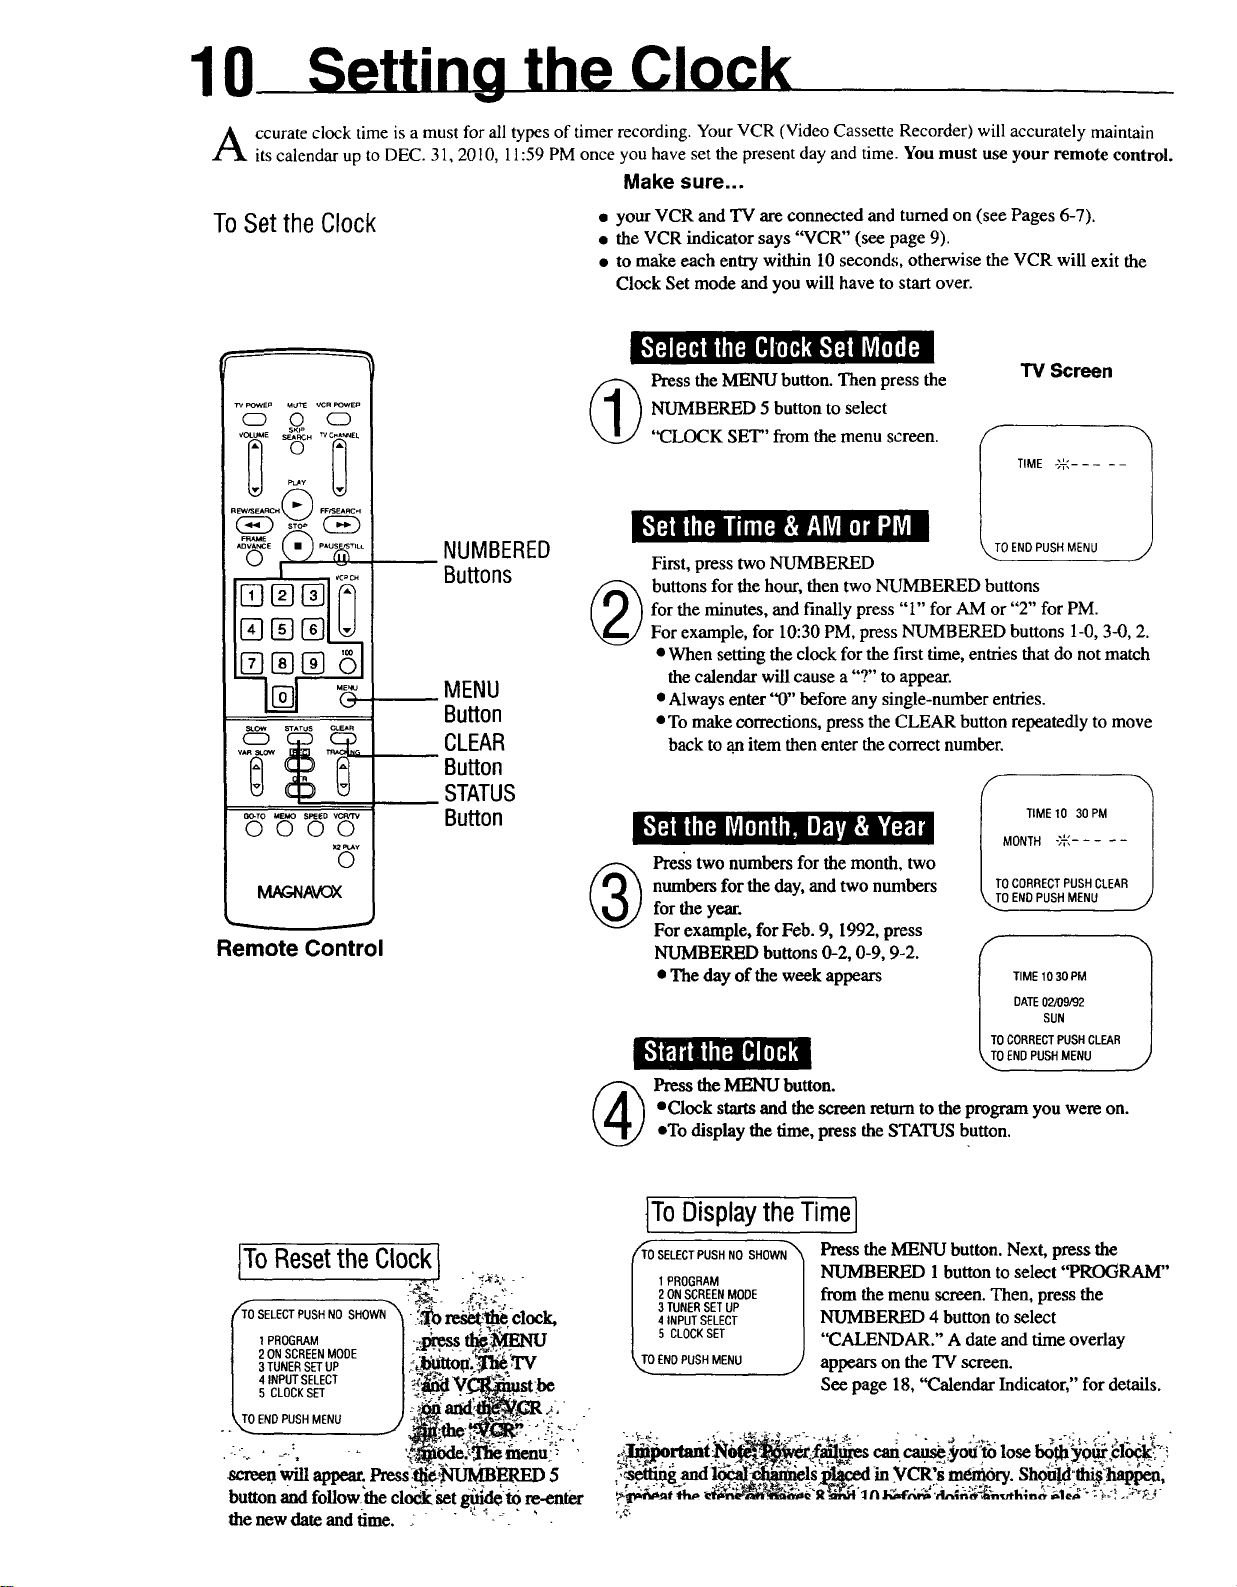
ccurateclocktimeisamustforalltypesoftimerrecording.YourVCR(VideoCassetteRecorder)willaccuratelymaintain
itscalendaruptoDEC.31,2010,11:59PMonceyouhavesetthepresentdayandtime.Youmustuseyourremotecontrol.
Make sure...
ToSetthe Clock . your VCR and _ are connected and tume.d on (see Pages6-7).
• the VCR indicator says "VCR" (see page 9).
• to make each entry within 10 seconds, otherwise the VCR will exit the
Clock Set mode and you will have to start over.
Jb'l_l:I_lI Ii[|q |d_l,lJ_'lilI |vjr_ [;11
TV Screen
7a/pOWEp Mt/T1E '/CR FOWEP
Q 0 ($3
SKI_
_ ress the MENU button. Then press the
NUMBERED 5 button to select
"CLOCK SET" from the menu screen.
+'iE"U"
_-'WtS_RCH_ FF_E,IO_
°6.... ®....
I
[]N@ 51
s_ow STAtus CLEAR
_rO MEMO •PESO VO_/TV
0000
0
I_A_
Remote Control
NUMBERED
Buttons
MENU
Button
CLEAR
Button
STATUS
Button
_,_Ji|hIt, illltt[:lO_ L_|Lv_I[,]il'JiVAI
First, press two NUMBERED
buttons for the hour, then two NUMBERED buttons
for the minutes, and finally press "1" for AM or "2" for PM.
For example, for 10:30 PM, press NUMBERED buttons 1-0, 3-0, 2.
• When setting the clock for the first time, entries that do not match
the calendar will cause a "?" to appear.
• Always enter "0" before any single-number entries.
• To make corrections, press the CLEAR button repeatedly to move
back to .an item then enter the correct number.
Pros two numbers for the month, two
numbers for the day,and two numbers
for the year.
MONTH -;,'-."....
IO IME 10 30PM 1
%.CLEAR
For example, forFeb. 9, 1992, press
NUMBERED buttons 0-2, 0-9, 9-2.
• The day of the weekappears
DATE02/09/92
SUN
TIME 10 30PM
TO CORRECTPUSH CLEAR
OEND PUSH MENU
[ToResetthe ClockI
SE,ECTPUSHNOSHOW""_',_'tO_ clock,
ONSCREE.MODE_ -?_tt_:_:rv
3 TUNER SETUP | .-t_ _J;:_l.]u_+,
4 INPUT SELECT I _,_'_I "_ +'&e_': ....
5CLOCKSET / _ y_st._
r P :;_+_I'-: "-:CRy: -
button and follow'the cl_=t _.de'_ _+¢nt_._r
the new date andtime. : .... -'_
@ ress the MENU button.
• To display the time, press the STATUSbutton.
]ToDisplaytheTime
• Clock startsand the screenreturn to theprogram you were on.
O0SELECTPUSH NO SHOWN_
1 PROGRAM /
2 ON SCREENMODE /
3 TUNER SET UP i
4 INPUT SELECT [
5 CLOCKSET J
END PUSH MENU J
,_.._j_l'l,llllt ___ can ean_:_otfto lose both ),our _|0_'-." !
Press the MENU button. Next, press the
NUMBERED 1 button to select "PROGRAM"
from the menu screen. Then, press the
NUMBERED 4 button to select
"CALENDAR." A date and time oveday
/
appears on the TV screen.
See page 18, "Calendar Indicator," for details.
Page 11
Make sure...
the steps in "Getting Hooked Up" on pages 6-7 have been completed.
(_ Turfi the TV on. Tum to channel 3 if the VCR CH3/CH4 switch is set
_/ to "CH 3." Turn to channel 4 if the VCR is set to "CH. 4."
11
TM
Power On:
Selectchannel
3or4.
Insert a cassette with the record tabinplace.
The power will come on.
®
_ irskpressthe MENU button. Then, pressthe NUMBERED button
(_ Youmay skip this step if desired tape speed isalready selected.)
_ ress the VCR CH(annel) UP/DOWN or NUMBERED buttons to
_ Press the REC(ord) button on the VCR.
If the cassette is already in the VCR, press the POWER button.
Be sure that the VCR/TV selector is set to "VCR."
I[l_i[qi],_[:]llll!l!il_l=lllOl;ll
(Youmay skip this step if "TUNER" is already selected.)
4 toselect "INPUT SELECT."Next, pressNUMBERED button 1
to select the choose "TUNER." To exit, press the MENU button
once.
[I]illlll_'[)lliil_lll_!!I_lb_l!I_I;lil
Pressthe TapeSPEED button on theremotecontrol until the
desiredtape speed(SP, SLP)appearson the TV screen.
}_illllI,'l_llii[;l)hI_lili[;
select the channel to be recorded.
_l_lii ;I_Dlll iilliI!ll
l_..m..x_-'la_,]i,lli[,]
_To pause, press the PAUSE/STILL button. To continue recording,
__.J press this button again.
VCRindicator STOPButton
i
/ \
IL 1 " -
J
Cassette CHANNEL REC(ord)
Tape UP/DOWN Button
Buttons
TV
CHANNEL
-UP/DOWN
STOP
Button
NUMBERED-
Buttons
E]_]@ 8
Button
_ PAUSE/STILL
Button
-VCR CH(annel)
UP/DOWN
Button
-REC(ord)
Button
_(l[il ;gl_lilliilili
(_ Tostop, pressthe STOPbutton.
To Watch Another TV Program While Recording I
You can record a channel selected with the VCR channel
controls and watch another channel selected with the TV
channel controls.
1. Set the VCR/TV selector to TV to select the TV mode.
The VCR indicator and the TV broadcast being recorded
will disappear.
2. Select the other channel to be viewed on the TV using the
channel controls on the TV.
The programselected with the "IV channelcontrols
appear on theTV screen,and the oneselected Withthe VCR
.channelcontrols will berecorded on the tape.
_'tem imok-up;y:OUnmynot!
Note:Otherrecordingoptionsareavailable.Pleaseseepages
19-21.
TapeSPEED '"
Button
rtant Note_-If,
o
Remote Control
Page 12

12 " "
RemoteControlTransmitter
SKIP SEARCH Button
Press during playback mode to skip forward 30 seconds
on tape counter. VCR will automatica;ly return to
Playback mode.
STOP Button
Press to
"IV POWER
(Z)
VOLUME
0,
REW/SEARCH
FRAME
,O CE
VCRCH
53%%
%@@
VCR POWER Button
to turn VCR power ON or OFF. Also, to set the VCR for
unattended timer recording.
FF(Fast Forward)/SEARCH Button
To move the tape forward at high speed. You can also press
this button in the Play mode for rapid forward visual search.
PAUSE/STILL Button
• Press once to temporarily stop the tape during recording
(Pause).
• Press once to freeze the tape picture during playback (Still).
Press again when you want to resume normal playback or
recording.
CH (annel) UP/DOWN Button
Press ,,A ,, or "v" to scan up or down through the VCR's
channels. Release at desired channel.
MENU Button
Press to call up the on-screen menu display.
@
_) (_ _SLOW STATUS
VAR.__SLOW _ TRACKING
GO-TO MEMO SPEED VCRrFV
Tape SPEED Button
Press to select recording speed
(SP, SLP). In playback, the tape
speed is automatically selected
(SP, LP, SLP).
CLEAR Button
• To erase incorrect or unwanted data in on-screen menu
operation.
oTo reset the tape counter. "0:00:00" will appear on the TV
screen.
TRACKING Button
In the Play and Slow modes, when playing a tape, press
TRACKING "A" or "v" button to adjust the tracking.
-VCR/TV Selector Button
Press to select the signal source that your TV receives.
VCR position (VCR indicator on the display panel: ON)
To watch a tape, monitor a recording, or watch a TV broadcast
selected with the VCR's channel selector.
TV position (VCR indicator on the display panel: OFF)
To watch TV or to watch one program while recording
another.
X2 PLAY Button
Press during playback mode to view a tape at 2 times normal
playback speed.
Button
Press to memorize the tape position at which the counter was
reset to "0:00:00."
Page 13

• " 13
RemoteControlTransmitter
THE TV CONTROLS ARE SET TO OPERATE MANY, BUT NOT ALL TVS. PUSH THE
'q'V CONTROL" BUTTONS TO SEE IF THEY OPERATE YOUR REMOTE CONTROL TV.
--IH m/
MUTE Button TV CHANNEL UP/DOWN Button
Press to instantly reduce the TV's sound level. Press again Press" A,, or "v" to scan up or down through the TV
to return to previous volume setting. _ channels. Release at desired channel. \
TV POWER Button '__ ,\
VOLUME UP/DOWN Button _ _--
Press"-- ""or "," to increase or decrease the TV's sound__ "_"'""'''------_ _ M°rE_?" P°wE"
volume
PLAY Button -'1"1
• Press to play back a tape. _ /_
• Press to release the Slow, or Search mode and return to ......... _ _ ) FFtS_RCN
playback. _ _
\
REW_nde)w/SEAthRCHBUh_grspeed You can also pressthis _ "_
button in the Play mode for rapid reverse visual search.
FRAME ADVANCE Button
Press this button while in the Still mode to advance the
picture one frame at a time (Frame Advance).
NUMBERED Buttons
(0, 1, 2, 3, 4, 5, 6, 7, 8 and9)
To use in channel selection, menu selection, clock setting,
program setting, etc. For selecting channels 1 to 9, first press
"0" button and then press "1" to "9."
(loo)
Press this button first to select the channel 100 and more.
SLOWNAR(iable) SLOW Buttons
First press the SLOW button during SP or SLP playback to
view a slow-motion picture. The speed can be varied from
about 1/6 to about 1/30 of normal speed with the VAR(iable)
SLOW button.
RECORDButton
Pressto start recording.
SLOW STATUS CLEAR
CD
MAGNAVOX
STATUS Button
Press to recall the VCR
status display
(see page 18).
GO-TO Button
Press 1o search for desired point on linear tape counter.
Press this button and select desired counter number with
NUMBERED buttons.
ONETOUCHRECORDING(OTR)Button
Select the channel and press this button to start recording
immediately for 30 minutes periods to the tape ends. In any
case, power shuts off automatically.
Page 14

14
VCR Indicator Panel
CassetteCompartment
VCRIndicator
Lights up when the VCR
mode is selected.
VCRIndicator Panel
Digital Clock
After setting the clock,
the present time is displayed.
Function Indicator
Indicates the VCR's currentstatus.
'R5'P,_
F
,gE,_
FF
If
I?E.,
: Playback
: Recording
: Fast forward
: Rewind
Indicator "TIMER"
Indicates the VCR is set for unattended
recording
Cassette-In Indicator
Conf'mns there is a cassette in the unit.
Page 15
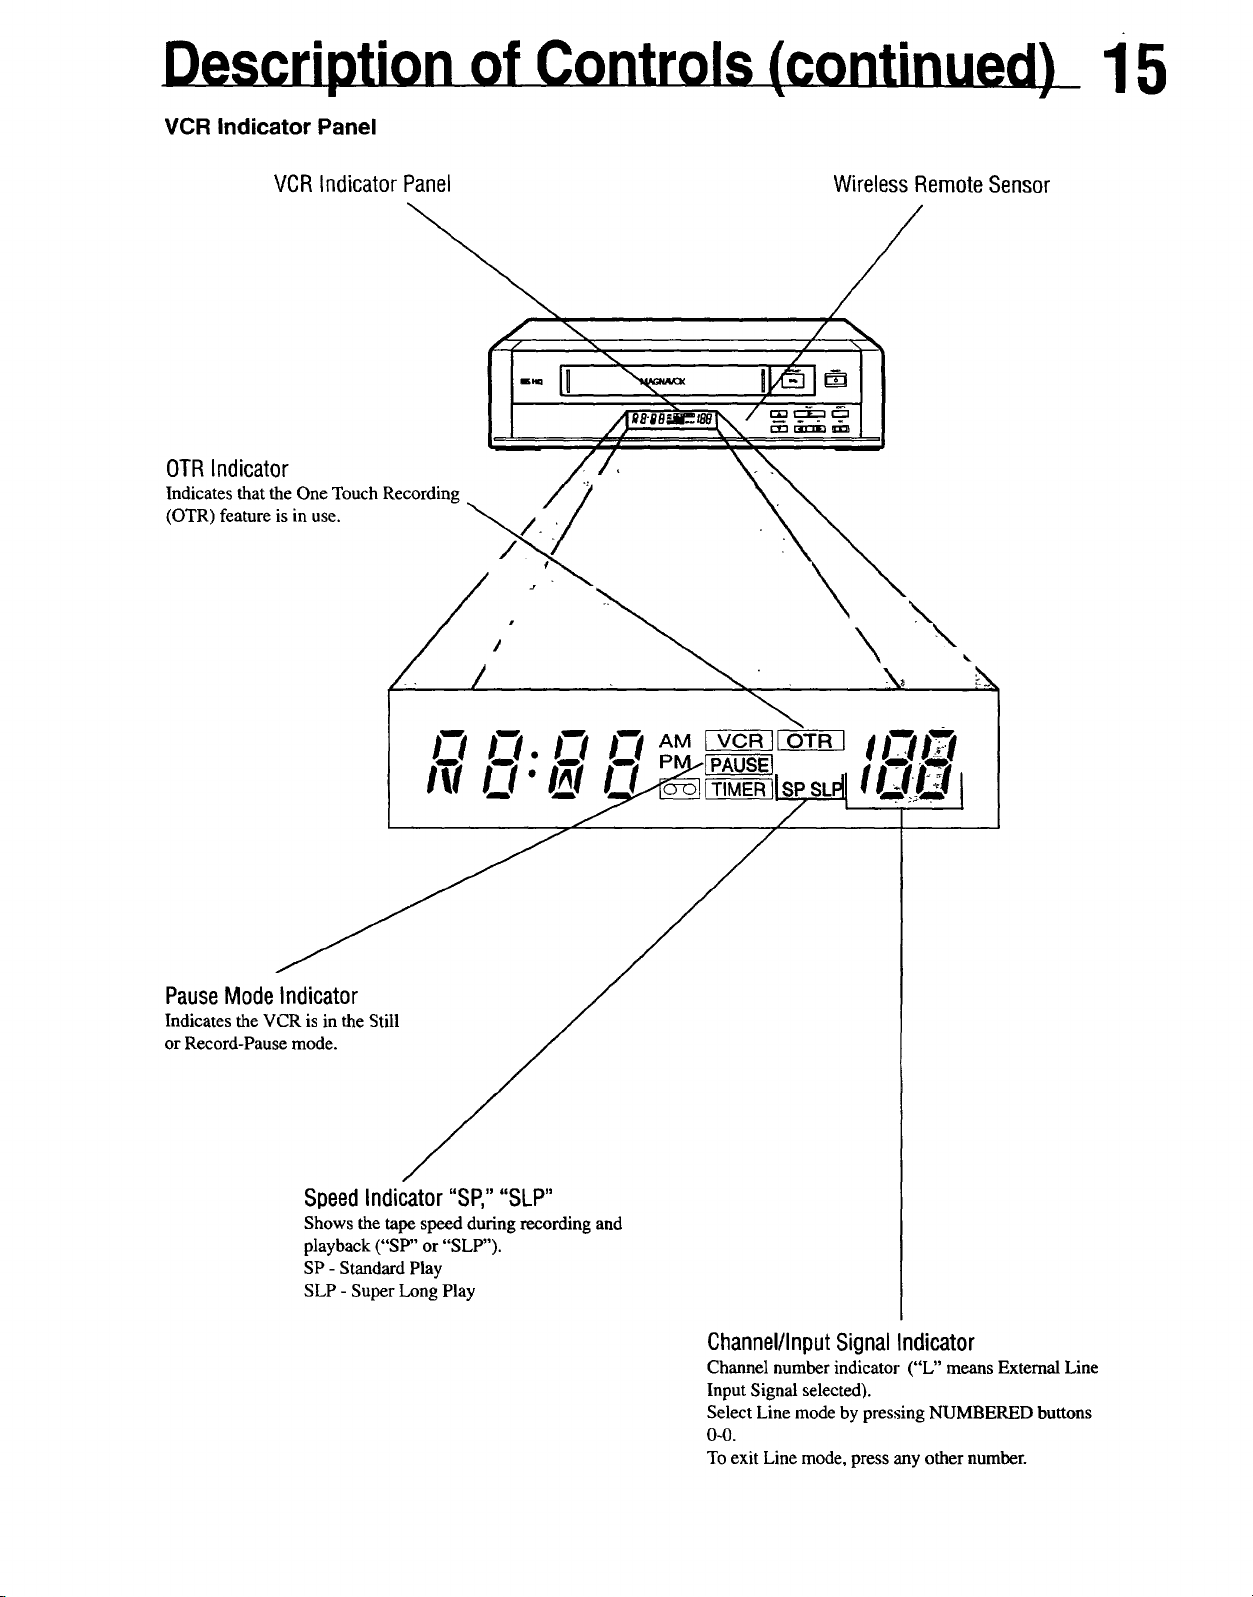
VCR Indicator Panel
VCR Indicator Panel Wireless RemoteSensor
15
PauseMode Indicator
Indicates the VCR is in the Still
or Record-Pause mode.
SpeedIndicator "SP,....SLP"
Shows the tape speed during recording and
playback ("SP" or "SLP').
SP - Standard Play
SLP - Super Long Play
Channel/Input SignalIndicator
Channel number indicator ("L" means External Line
Input Signal selected).
Select Line mode by pressing NUMBERED buttons
0-0.
To exit Line mode, press any other number.
Page 16
16
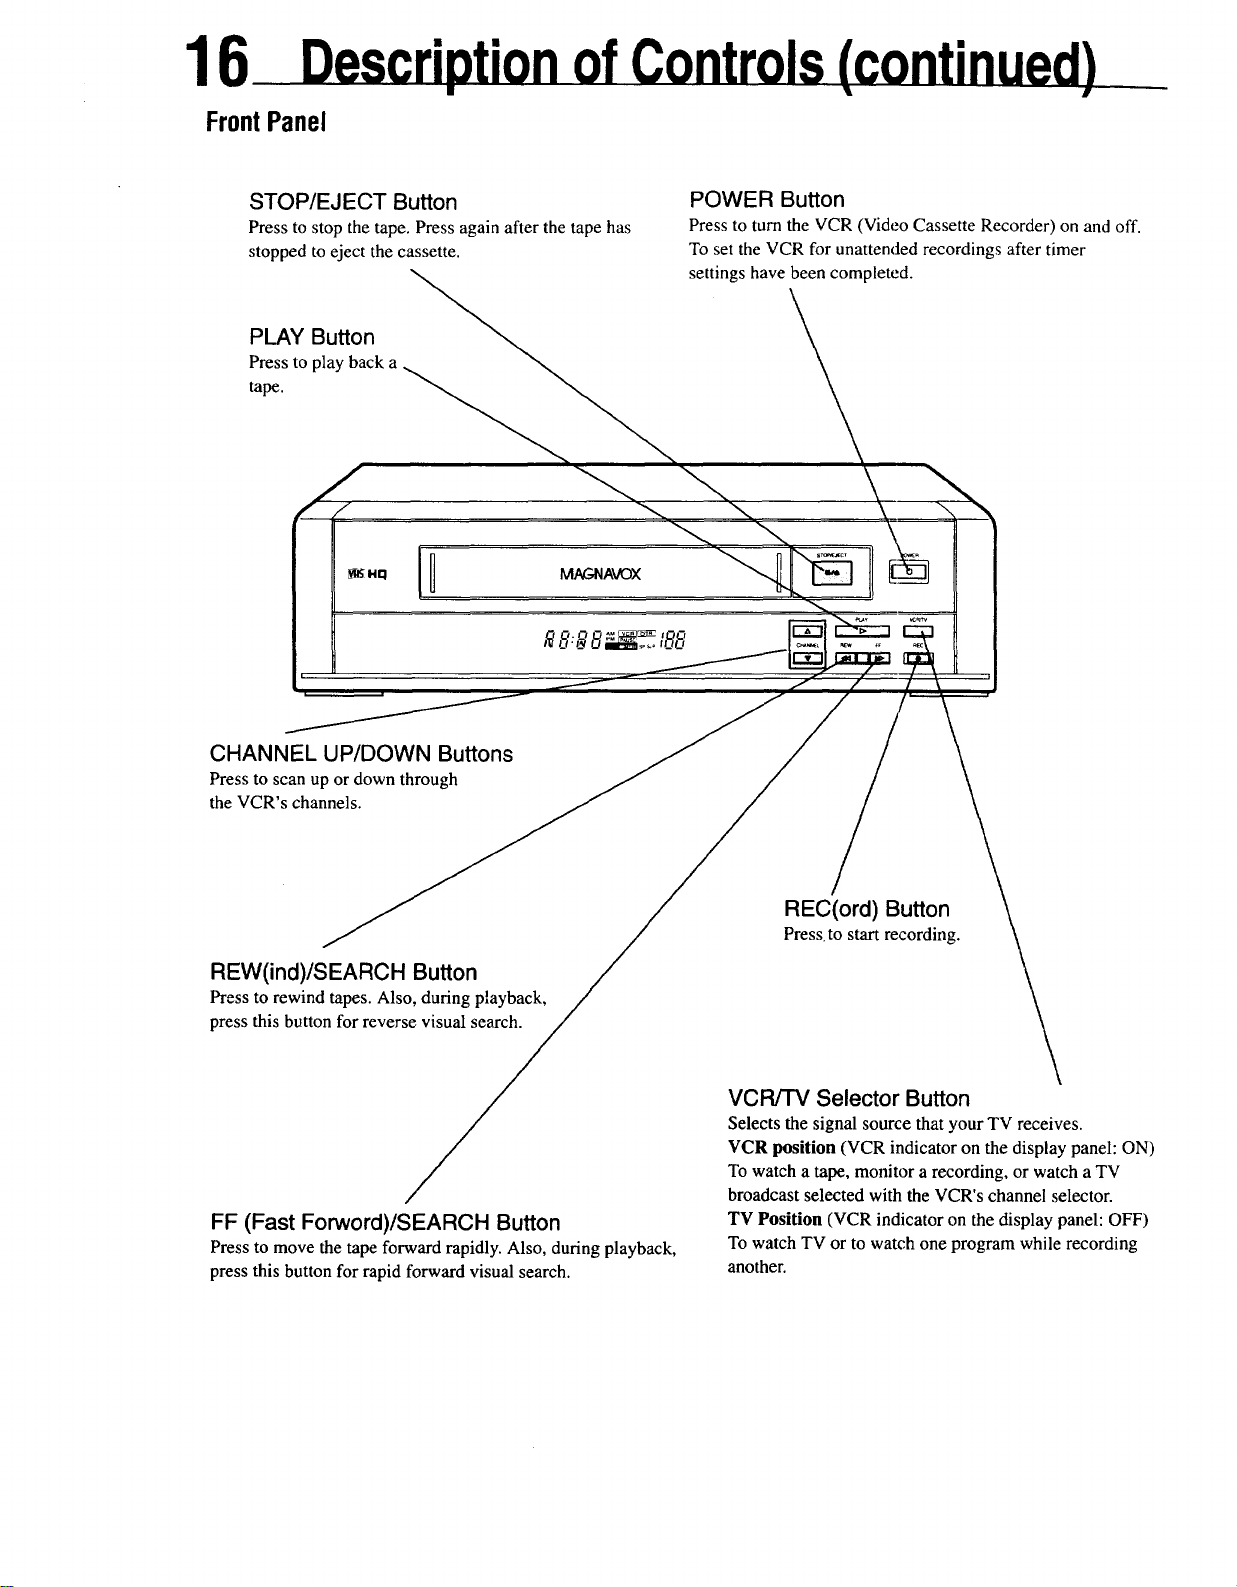
FrontPanel
STOP/EJECT Button
Press to stop the tape. Press again after the tape has
stopped to eject the cassette.
PLAY Button
Pressto play back a
tape.
CHANNEL UP/DOWN Buttons
Pressto scan up or down through
the VCR's channels.
POWER Button
Pressto turn the VCR (Video Cassette Recorder) on and off.
To set the VCR for unattended recordings after timer
settings have been completed.
REW(ind)/SEARCH Button
Press to rewind tapes. Also, during playback,
press this button for reverse visual search.
FF (Fast Forword)/SEARCH Button
Press to move the tape forward rapidly. Also, during playback,
press this button for rapid forward visual search.
REC(ord) Button
Press to start recording.
VCR/TV Selector Button
Selects the signal source that your TV receives.
VCR position (VCR indicator on the display panel: ON)
To watch a tape, monitor a recording, or watch a TV
broadcast selected with the VCR's channel selector.
TV Position (VCR indicator on the display panel: OFF)
To watch TV or to watch one program while recording
another.
Page 17

RearPanel
• " 17
CH3/CH4 switch
Set to channel 3 or 4 -- whichever is not used for regular TV
broadcasting in your area.
See "Getting Hooked Up" on pages 6-7.
ANT(enna) IN(put)jack
(in from Antenna)
Connect the UHF(Ultra High Frequency)/
VHF(Very High Frequency) antenna or cable
to this jack.
ANT
IN
AUDIO IN(put) jack
For audio input connection from the output jack of a
portable video camera, another VCR, or another audio
SOUrCe.
VIDEO IN(put) jack
For video input connection from another VCR
or a portable video camera.
/
/
AC (Alternating Current)
Power Cord
Connect to a 120V/60 Hz household outlet.
.RF OUT(put) jack
(out to TV set)
Connect this terminal to the UHF/VHF antenna jack on the
TV, using the Connection Cable (supplied).
VIDEO OUT(put) jack
For video output connection to a monitor TV
or another VCR.
AUDIO OUT(put) jack
For connection to an audio input connector on a
monitor TV, another VCR, or an audio tape recorder,
Page 18
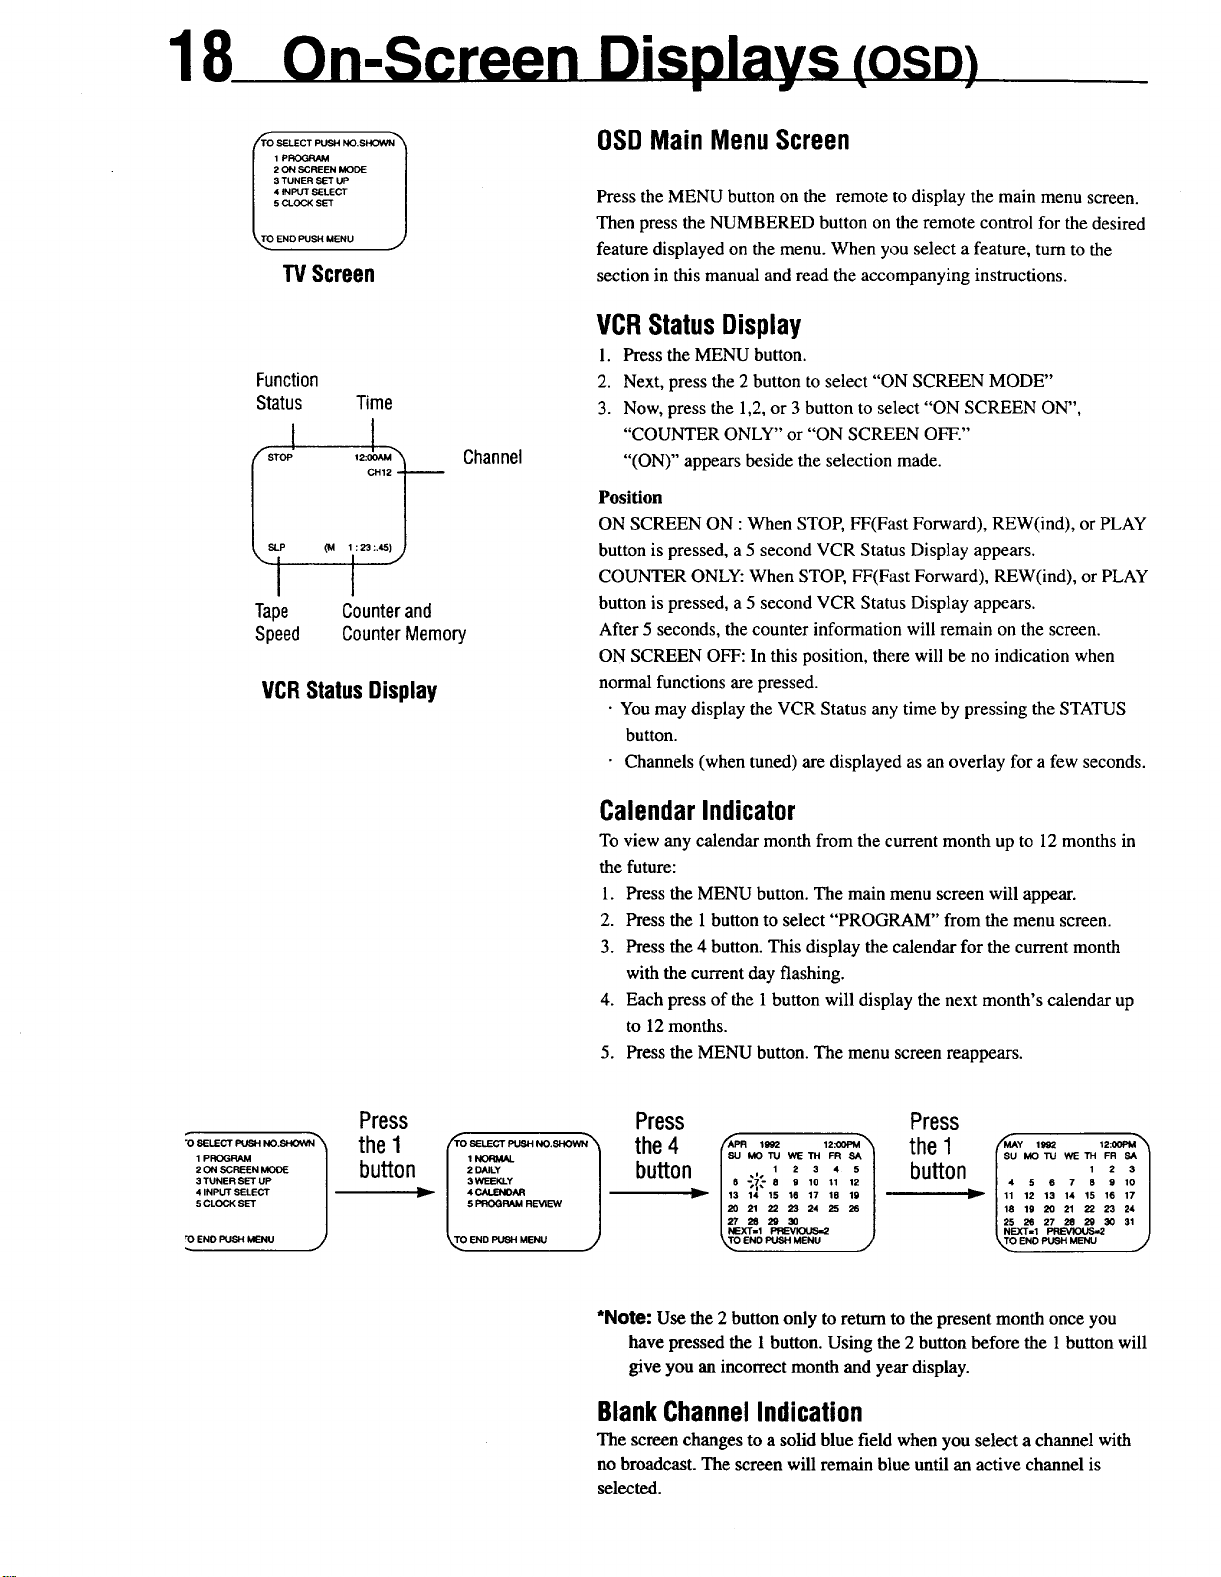
1
fTO SELECT PUSH NO.SHOWN_'_
2 _ _I_EN W_DE
3 TUNER _ UP
4 INPUT _LECr
1PROGRAM _
_OEND PUSH MENU
W Screen
Function
Status Time
Tape Counter and
Speed Counter Memory
VCRStatusDisplay
Channel
OSDMain MenuScreen
Press the MENU button on the remote to display the main menu screen.
Then press the NUMBERED button on the remote control for the desired
feature displayed on the menu. When you select a feature, turn to the
section in this manual and read the accompanying instructions.
VCRStatusDisplay
1. Press the MENU button.
2. Next, press the 2 button to select "ON SCREEN MODE"
3. Now, press the 1,2, or 3 button to select "ON SCREEN ON",
"COUNTER ONLY" or "ON SCREEN OFF."
"(ON)" appears beside the selection made.
Position
ON SCREEN ON : When STOP, FF(Fast Forward), REW(ind), or PLAY
button is pressed, a 5 second VCR Status Display appears.
COUNTER ONLY: When STOP, FF(Fast Forward), REW(ind), or PLAY
button is pressed, a 5 second VCR Status Display appears.
After 5 seconds, the counter information will remain on the screen.
ON SCREEN OFF: In this position, there will be no indication when
normal functions are pressed.
• You may display the VCR Status any time by pressing the STATUS
button.
• Channels (when tuned) are displayed as an overlay for a few seconds.
1PROGRAM
2 ON SCRIEEN MOOE
3 TUNER SET UP
4 INPUT SELECT
5 CLOCK SET
"O 8ELECT PUSH NO'SHOWt 1
_ END PUSH MENU
Press
the 1
button
fro SELECT PUSH NO._,.K_NN _
1NORMAL
2 DAILY
3 WEEKLY
4 CALENOAR
5 PROGRAM REVIEW
_'O END PUSH MENU J
CalendarIndicator
To view any calendar month from the current month up to 12 months in
the future:
1. Press the MENU button. The main menu screen will appear.
2. Press the 1 button to select "PROGRAM" from the menu screen.
3. Press the 4 button. This display the calendar for the current month
with the current day flashing.
4. Each press of the 1 button will display the next month's calendar up
to 12 months.
5. Press the MENU button. The menu screen reappears.
Press Press
button , , 4 , button ' ' '
the4 I"'"' ,2"_'1 the1 __,,_ ":_1
*Note: Use the 2 buuon only to return to the present month once you
have pressed the 1 button. Using the 2 button before the 1 button will
give you an incorrect month and year display.
SU MOTU WETH FR SA SU MOTU WETH FR SA
6-y-6 o 16. 12 4 6 6 z s 9 lo
_--- 13 14 15 10 17 16 19 _ 11 12 13 14 16 16 17
20 21 22 23 24 25 26 18 19 20 21 22 23 24
27 28 29 30 25 26 27 28 29 30 31
XT=I PREVK_ NEXT=I PREVIOUS=,2
_ END PUSH MENU j/ END PUSH MENU
BlankChannelIndication
The screen changes to a solid blue field when you select a channel with
no broadcast. The screen will remain blue until an active channel is
selected.
Page 19

O RisaveryeasyandconvenientwaytoimmediatelystartrecordingaTVprogramyouhappentobewatching,orto
quicklyspecifyhowlongyouwantrecordingtocontinuewithaprogramyouarealreadyrecording.WhenOTRis
completed,theVCR(VideoCassetteRecorder)automaticallyshutsoff.
Make sure...
• the steps in "Getting Hooked Up" (page 6-7) are done, channels are
programmed into the VCR's memory (page 8), and the TV and VCR
are both turned on.
• the clock is set to the correct time (page 10).
• the desired tape speed (SP, SLP) is selected. Use the Tape
SPEED button (page 12).
• the desired tab is in place on the cassette (page 5).
• the tape is long enough to record the programs (page 5).
19
InstantOTR
You set the recording length in 30 minute periods up to 9 hours total.
Recording starts instantly. The VCR shuts off when the recording is
complete.
lHi[.xii,,f:_.aliTII ;ii,],l_lii•
(_ ress the VCR CH(annel) UP/DOWN or NUMBERED buttons on
the remote control.
Press the OTR button on the remote control.
The screen below appears.
• Recording begins immediately.
This indicates thatthe VCR
. OTR will flash on the VCR display
will automaticallyshutoff after
30 minutesof recording.
_:_ [_[1_I i';ll-'t;;i']lliliilllll E;]iliili
_ ontinue pressing the OTR button until the desired recording
length is displayed.
Each press of the button will add 30 minutes,'up to9 hdurs.
'm(o i)
VCR
-It -- II
CHANNELj
UP/DOWN STOPButton
Buttons
In STOPButton
PAUSE/STILL
Button
VCRCH(annel)
UP/DOWNButton
--[_ NUMBERED
Buttons
db
OTRButton
0
Remote Control
Page 20

T is feature lets you set the VCR (Video Cassette Recorder) to do unattended recording. For each program you set, the VCR
will turn itself on at the scheduled time, do the recording, and turn off automatically. You can store up to eight programs.
Instructions for each step appear on the TV screen after you select the Program mode. You must use your remote control.
Make sure...
• the steps in "Getting Hooked Up" on pages 6-7 have been
completed, an antenna or cable system is connected to the VCR,
and the VCR and'IV are turned on.
• CABLE or NORMAL has been selected and channels have been
pmgramm_, into the VCR's memory. See "Placing Local
Chmlhels'in'the VCR," page 8.
• the VCRfl'V selector is set to "VCR."
Press the MENU button on the remote control.
The main menu screen at right will appear.
• the clock is set to the correct time (See page 10).
• a cassette tape is inserted in the VCR and the record tab is in place
on the cassette (See page 5).
• the tape is long enough to record the programs.
FOR EACH STEP BELOW, YOU HAVE 10 SECONDS TO
COMPLETE IT. IF YOU DONq', PROGRAMMING WILL
HAVE TO BE RESTARTED FROM STEP 1.
2 ON SCREENMODE l
3 TUNERSET UP /
VCR
Press the NUMBERED I button on the
remote control to select the Program mode.
Remember, use the NUMBERED buttons
on your remote control.
ro,,_=BPus,.E,. j
"13/Screen
g'_ [;isi _1,1ili M JJI1_11|,i,1ifJ_ial,_ [!]J;{_[,liiililll
TIMERindicator
Remote Control
Normal Recording
Press the 1 button to record a TV show on
any day you choose up to 12 months away.
Or
5PROGRAMREVIEW J
TO END PUSH MENU J
POWER
Button
NUMBERED
Buttons
MENU
u Bulon
--CLEAR
YIY
0000
0
Bulon
--_1"omake corrections., l
press the CLEAR button while in the screen
you wish to change is displayed.
This moves the flashing indicator to the
number you want to change. Now, enter the
correct number. You may have to press the
CLEAR button more than once to reach the
numbers you want to change.
Press the 2 button to record a TV show
_ Daily Recording
every day (Monday through Friday) atthe
same time and length.
Weekly Recording
Press the 3 button to record a TV show
once a week at the same day, "time,and
length. .-'_,._ - , ' ,
_"l_l[It.lJJil:llli_l,l|JI_lll ; _.,'_-_]2':._._ :..i'- -:,...... .-:----" -
Or
OGRAM - 1 345678- I
J SELECTPROGRAM NUMBER l
_ _%__-'
:-: -.-._
I ...... 'I
:;°penr°siti°" W
-;""'._'thenZdieposition b,bntents _e_. :_:
- -. - •.:-_ _. _%71F_1_.:,
_,,_'_1[:-Dii Ji[_ll_ iII iI i111. _: . .-:.
Enter two numbers for the TVp_el,:For channels above 100,
press the 100 button, then t_"n_f_for fine chamae]:.. -" .
[ I,_ _ Or, forchannel ll5,press tOO,_press 1 " ,'
\t..J] and 5, Refer to page 8, "Using th_I00 :, F.OR_t_.oG._
Fo_.example,forehanne!_O;-_im))_; EP,EDbntton-_;then-O.
RUttnn " f_r Pnt@r_no thn=_ _,t:r,n'l_k_-_" . : ]PROGRAM 1 |
To record from line input, pl'_ss'Oand O: Ic_ /
"AN IN" will appear on the.screen. J /
- 'q.oCORRECTPUS"CLEAR../
(Continued on next page.)
Page 21

• " • •
_ [;(_iii['41 / IL'JIlo)(hm
First, press two NUMBERED buttons for the hour.
Next, press two NUMBERED buttons for the minute.
21
Now, press NUMBERED button "1" for AM or (NORMALPROG_M
CHANNEL 10
For example, for 9:30 PM, press NUMBERED T,_EON -.
buttons 0-9, 3-0, 2.
"2" for PM. J PROG_M,
TO CORRECT PUSH CLEAR
TO END PUSH MENU
.,'lTh_,_iII t[',il I h'd:IIfl di
First, press two NUMBERED buttons for the hour.
For example, for 10:00 PM, press 1-0, 0-0. NORMALPROGRAM
AM or PM will appear when you have entered CHAHNEL,o
PROGRAM 1
TIME ON 09 30 PM
the hour and minute. T,MEOFF " -
_ Next, press two NUMBERED buttons for the minui.
TO CORRECT PUSH CLEAR
TO END PUSH MENU
i',"Ht_ili[a;t_,(tllalmiltl_!i_i,
Play) or SLP (Super Long Play). PROGRAM1CHANNEL 10
_U_ You cannot use the SPEED button on the remote TIME OFF 10 O_ PM
control to choose the recording speed. RECsp=ISPEEDsLP: 2---
(_ Press the 1 or 2 button to choose SP (Standard INOR_ALPROGRAM
First, press two NUMBERED buttons for the month.
Next, press two NUMBERED buttons for the day.
press 0-2,1-2. NORMALP_RAM
The day of the week and year will be displayed T,MEON O93OP_
automaHc_lh,. TIME OFF 10 O0 PM
For example,to make a recording on Feb. 12, [
l_l,l il JI diil'(tlll i kld,I!li_,liil
Press the MENU button.
TIME ON 09 30 PM
TO CORRECT PUSH CLEAR
TO END PUSH MENU
- _ PROGRAM I
• CHANNEL 10
REC SPEED SP
START DATE 02/12,92
(MONTH) WED
TO END PUSH MENU
TO CORRECT PUSH CLEAR
If "PR_ILMvI NOT'(]OMP .lr_D"_pp_._mmm try _t_g_i_:from
step 1 on page 20,
After 3 seconds, _eTdisplay wiU.',disappedlr'-fr_&_creen, a_ndthe -
normal TV pmgramw'dl reappear.
The TIMER indiCtS!vAil light_lp on the'_,-_ ,
(_)If l_ed, press _ b_--_tld-rt_t!_i_lo lO.
L'IIra_i dmn[ai.'tao(tmi,limm.'_.[,ll(l:(am_ _[_am _
Illthe powershouldtail... Irepeat the steps on page 8 and 10 before setting up a Timer Recording.
I
Page 22

2
i s your VCR(Video Cassette Recorder) connected to your TV(see page 6- 7 "Getting Hooked Up")'? Are you familiar with
tape playback(see page 7, "Playing a Tape")? If so, you are ready to enjoy the special playback features described on this
page. These features work best in the SP (Standard Play) or SLP (Super Long Play) mode. The sound will be muted. Buttons on
both the VCR and remote control are used.
,J__ I REW (Rewind) ( ] JSearch speed in SP mode is about 7 times normal speed.
_" _ +_=_"I Button _' Search speed in SLP mode is about 21 times normal speed.
• l'ill -'_1 il [iI[! IItl_l 1;!_,! _--_| IH!I B1il_la!lliI; -]II •
_ Press the FF (Fast Forward) or (Rewind) during playback.
REW button
_ _'_z]"_ [ If the FF or REW button is held down for more than 2 seconds, simply
_! _(_ _iii___W"--I in SLP mode is about 15 times normal speed.
r=a _ _ 7z__ L-PAUSE/STILL • There is no picture during search playback in the LP mode.
ard) / _ ) • During search playback, some noise bars will appear on the TV
releasing it will cancel the Search mode. In this case, the search speed
Press the PLAY button to return to playback.
screen.
II Button
[] [][] U- llTlq[av'_'Uimli_l_liI;Ia'l'Jt'i'IPPI_+Wl_mi[;l
E3®[]
_ Press the X2 PLAY button during playback.
slow STAI_S CL_R
CD CD CD
O0-TO U_ _EO _
0000
0---
--x2PLAY Button
Remote Control
VCR
/
f /
--I, --- ilr l '''
8eleim-2_e _ _ t__
.-a= 111=13 _
(_ Press the ×2 PLAY button to release the double speed playback.
II IIIFI [av_l,'tll II lllihult I ll_ Iii,I II_,|,i!_l_ ll-
//_ Press the PAUSE/STILL button on the remote control.
k,, I//After the VCR has been in the Still mode for 5 minutes, it will stop
automatically to protect the tape and video heads.
(_ ress the PAUSE/STILL button to release the Still mode and continue
playback.
IIi1IiI'i ivf,IiI_1,.!',Ill II Iili11! II-"
In the Still mode, press theFRAME ADVANCE button
on the remote control.
CHANNEL
UP/DOWN
Buttons
AUTO OPERATION
FUNCTIONS
Auto Playback
Aft_-yc_me_om
(Au_'_imwer oli_-Ailio playback:-
.(For_ wfl!ibut .i_ord tab.*.)+<-'.
_) nio P_wind
After Playback, Fast Forward or Manual
Record to tape en,d:
Rewind-- Stop mode "
*For record tab information refer to
page5.
Rewind Power-off
• Stop'tapeandpress REW (ind) button.
• PressVCR POWER button. _. •
• The VCR will shutt off at begiiming of
tape.
• During slow motion the slow speed can be controlled
by VAR(iable) SLOW button.
_(_ During playback, press the SLOW button on the remote control uniL
Press the SLOW button to release the Stow mode and continue
playbaeL
TRACKING CONTROL
This VCR incorporates an automatic tracking system. In most cases
you do not have to adjust the tracking. If automatic tracking fails and
some noise bars are visible, press the TRACKING button on the remote
control. The Auto Tracking mode is cancel and press either the UP or
DOWN button to minimize noise in the picture.
• Automatic tracking does not take place in the Slow mode. If tracking
adjustment is necessary, use the Manual mode.
• Once the cassette has been ejected, the Auto Tracking mode is
automatically engaged when it is inserted.
V-LOCK CONTROL
If jitter is observed in the Still mode, press either the TRACKING UP or
DOWN button on the remote control to reduce it. Once you have made
this adjustment, you probably will not have to do it again unless you
engage the Still mode when playing a tape recorded on a different VCR.
Page 23

ubbingfromanyVHSrecorder(orcamcorder)toanotherissimple.Justusetheconnectionsandstepsbelow.
TheexamplebelowusedtwoVCR'slikethisone.OtherVCR'smayoperatedifferently.
CONNECTIONS
23
VCR1
Source (Playing) VCR
(Back View)
J \
AUDIO and VIDEO OUT
From AUDIO OUT to AUDIO IN
From VIDEO OUT to VIDEO IN
"=CI3:_ a=:t31_.
that will play your tape. If your tape is missing its record tab (page 5),
Insert a pre-recorded tape. VCR 1 is the VCR (Video Cassette Recorder)
playback starts. In that case, press the STOP button.
VCR2
Editing (Recording) VCR
(Back View)
I
H:;
AUDIO and
VIDEO IN
Refer to the Optional Accessories
page at the end of this manual for
information on ordering optional
Audio and Video dubbing cables.
"FVSet
(Used for
monitoring)
Channel 3 or 4
automatically. The VCR indicator light on the VCR should come on.
Insert a blank tape in the editing VCR. The VCR will turn on
If not, press the VCR/TV button on the remote control.
Turn the"IV on.
Turn theTV channel to either3 or4, whicheverchannel VCR2 isset to
(See page 7).
I_1_ [_I_lI I ilil !Ii_lll! Ii _11
(_ oint yourremote control atVCR 2. Press 04)on the NUMBERED
buttons."L",appears on the VCRdisplay paneL
Point your remote control at VCR 2. Press Tape SPEED Button to select
SP (Standard Play) or SLP (Super Long Play).
Press the PLAY button on VCR 1.
(_ ress the REC(ord) button on VCR 2.
Remember:. press the buttons in steps 6 and 7 simultaneously to avoid
missing any of the recording.
Caution:
Unauthorized recording of copyrighted
television programs, films, video tapes,
and other materials may infringe on the
rights of copyright owners and be
contrary to copyright laws.
Page 24
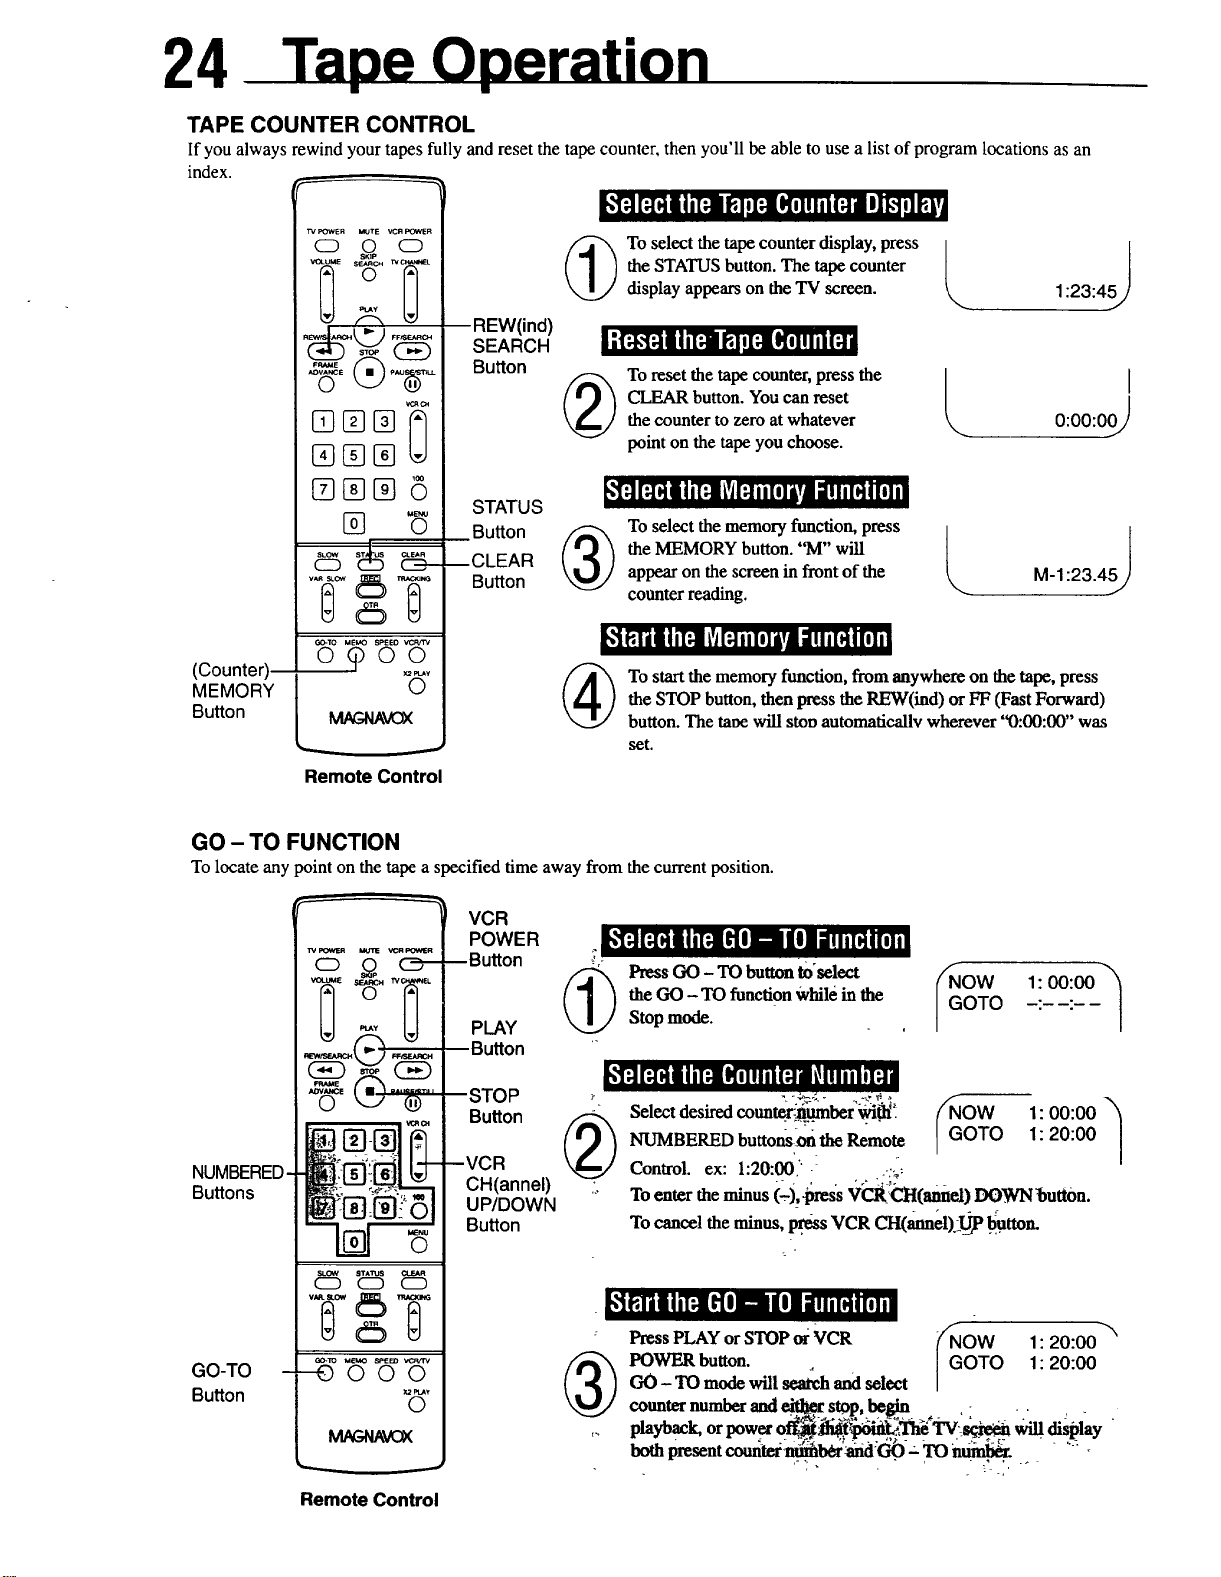
TAPE COUNTER CONTROL
If you always rewind your tapes fully and reset the tape counter, then you'll be able to use a list of program locations as an
index.
w POWER MUTE VCR FOWLER
O O O
[]®[]
[][][]6
T
C-_TO MEVO SPEEO vcP_rV
(Counter) ,,_,,
Button MAGNAVOX
MEMORY [ 0
0_00
Remote Control
REW(ind)
SEARCH
Button
STATUS
Button
--CLEAR
Button
I_"1_[:-191it[:ll _1a[:ii[,l! ItI1;]i I] gt i1r,F|
the STATUS button. The tape counter
To select the tape counter display, press /
display appears on the TV screen.
1:23:45_
;!;I,I;111i1;1g|!I;-itlll!lil 1;1
CLEAR button. You can reset
To reset the tape counter, press the |
the counter to zero at whatever
point on the tape you choose.
[,'_ [_I_liiiIdl _vfl;liiI0l Iri ii!lll_l 1lfl II
the MEMORY button. "M" will
@ T° select the mem°ry 'uncti°n, press _ 5_
appear on the screen in front of the M-1:23.4
counter reading.
!_'_IEl_J iiI;ll Lvfl;!IiIfl iVl ii!ll[_ll [fl il
the STOP button, then press the REW(ind) or FF (Fast Forward)
To start the memory function, from anywhere on the tape, press
button. The tat)e will stot) automatically wherever "0:00:00" was
set.
L
0:00:00_
I
GO - TO FUNCTION
To locate any point on the tape a specified time away from the current position.
VCR
NUMBERED-
Buttons
w POWER MUIE VCRPOWER
_(_
POWER
--Button
PLAY
--Button
--STOP
Button
--VCR
CH(annel)
UP/DOWN
Button
lCf_h_I_liii[_lifll- -Illi.,[_l[,l,.
._"
_(_ Press GO - TO button to'select [/_OW 1: 00:00"_
-/_,, Selectdesired counmr__umber_iii_ _. OW 1: 00:00
the GO - TO functionWhilein the OTO ,:. .:
Stopmode.
NUMBERED buttunson the Remote IGOTO 1: 20:00
Control. ex: 1:20:00." .-::_;
" To enterthe minus (_),#ress V_i'CH(amtel) DOWNbutton.
To cancel the minus,p_ VCR CH(annel)2T_ .b."utton.
©
SLOW STA'i_.IS
o o o
_iEl'iiili[_ tl"[I- -ill la!li[qi[fl
GO-TO -
Button
T£ T
GO-TO MEI/,O SPEBD VtaWTV
---0000
0
_V(_
Press PLAY or STOP oi VCR /NOW 1" 20:00 _
POWER button. GOTO 1"20:00
GO- TO modewill searchandselect
counter number and_ s_R,b¢ _ ,- ,: -. ; . .
playback, or power o_li_iTh_ TV:_ will display
both presentcoutitea:_l_'aiid:G0-- TO ia_ ....
/
Remote Control
Page 25

25
GettingHookedUp
• With cable connections, the numbers assigned to specific
channels may differ from those for antenna connections.
Refer to the separate Basic Guide for VCR (Video Cassette
Recorder) Connections (or your cable service information).
• If the reception on all VHF (Very High Frequency)
channels is unsatisfactory, you may need to re-tune your
TV set.
ClockAdjustment
• In the Clock Adjustment mode, be sure to enter the first
digit and all subsequent entries within 10 seconds of one
another. Otherwise, the VCR will automatically leave this
mode and the program you were watching will return to
the screen. If this happens, press the MENU button and
start again.
• Be sure to enter "0" before single-digit numbers.
• The letters indicating the day of the week will appear when
you have entered both digits for the year.
• If the digits entered for the day do not match the calendar,
the entry will be rejected and "?" will appear.
• If you press the MENU button while in the Clock Set
mode, the TV screen will return to the program you were
watching.
SpecialPlaybackFeatures
• During search playback, horizontal noise bars will appear
on the TV screen.
• When the VCR has been in the Still mode for 5 minutes, it
will automatically switch to the Stop mode to protect the
tape and video heads.
• Special-effects playback can be used during playback of
tapes recorded in the SP or SLP mode. Tapes recorded in
the LP mode cannot be viewed in special-effects playback.
ToRecord
• Although it is possible to change the tape speed while you
are recording, some distortion will appear on the tape at the
point where you make the change.
• When the VCR has been in the Pause mode for 5 minutes, it
will automatically switch to the Step mode to protect the
tape and video heads.
OneTouchRecording(OTR)
• If the preset time for a timer recording comes up during
OTR recording, OTR has priority.
TimerRecording
• To do a timer recording in the LINE mode, follow steps 1-4
in "Timer Recording" section. At step 5, press the
NUMBERED button 0 twice (0,0) to engage the LINE
(external source) mode. Complete the rest of the steps
under "Timer Recording" section.
• Timer recording may not be performed or continued if a
power interruption of more than one minute occurs before
or during timer recording, even if power resumes thereafter.
Preset clock and timer data will be lost. This is indicated by
the clock display on the VCR which resets to "- - : - -'. If
this happens, reset the clock and program the timer.
• If the time spans of two preset programs overlap, the lower-
numbered program will have priority and the second
program will start only after the first program has been
executed.
• If the POWER button is pressed to OFF with no cassette
loaded, the TIMER and "Cassette Inside" indicators will
continue blinking.
• If the record tab is missing, the cassette will be ejected
when the POWER button is pressed to OFF, and the
TIMER and "Cassette Inside" indicators will contimue
blinking.
PowerFailure
• Timer Recordings will be erased if the power fails. Repeat
"Placing Local Channels in the VCR" on page 8 and
"Setting the Clock" on page 10 before setting up a "Timer
Recording" on pages 20-21.
SatelliteHook-Up
• Watching one TV channel while recording another may not
be possible with a satellite hook-up.
• You may have to set your VCR to channel 3 or 4 and make
your channel selections at the satellite converter box.
• If you use accessory Audio and Video cables (not supplied)
to hook-up your VCR to T'V_you will have to set your VCR
to Line Input. "A/V IN" appears on your TV screen when
you first switch into this mode. "L" appears on your VCR.
The VCR to TV hook up will look similar to "VCR to
Stereo TV Hook-Ups" on page 29.
LineInput
• If you accidently get into the Line mode ("L" appears on
the VCR), simply press the VCR CH(annel) UP/DOWN
button or select a channel using the NUMBERED buttons
to exit.
Page 26

26
STEP 1: Disconnect the Antenna or Cable
from Your TV.
Your antenna or cable should have one of the ends shown
below. To avoid confusion, label all terminals (on TV)and
ends before disconnecting.
COMBINATION
[-VHF/UHF SYSTEM
A.v,,,_i_,__,o__
I-VHF ONLY OR UHF ONLY
/
B. VoY_o-'_r'
I-SYSTEMS COMBINED
C VVHF°r -_ ,-.m-__---_
L__l
[
SEPARATE VHF/UHF
• / w
I
300-75ohm----T _(_T)_.__I
Transformer El
(notsupplied) _
UHFNHF Band
Mixer
(not supplied)
STEP 2: Connect Your Antenna or Cable
to Your VCR.
F-type connector
Antenna
I I
{
CABLE
I CATV Input
A*
I Cable TV
B . Converter Box
CATV (cable)
RF _ CH4
OUT _ CH3
Outto TV
I
.Please see pages 28 - 29 for details.
Page 27
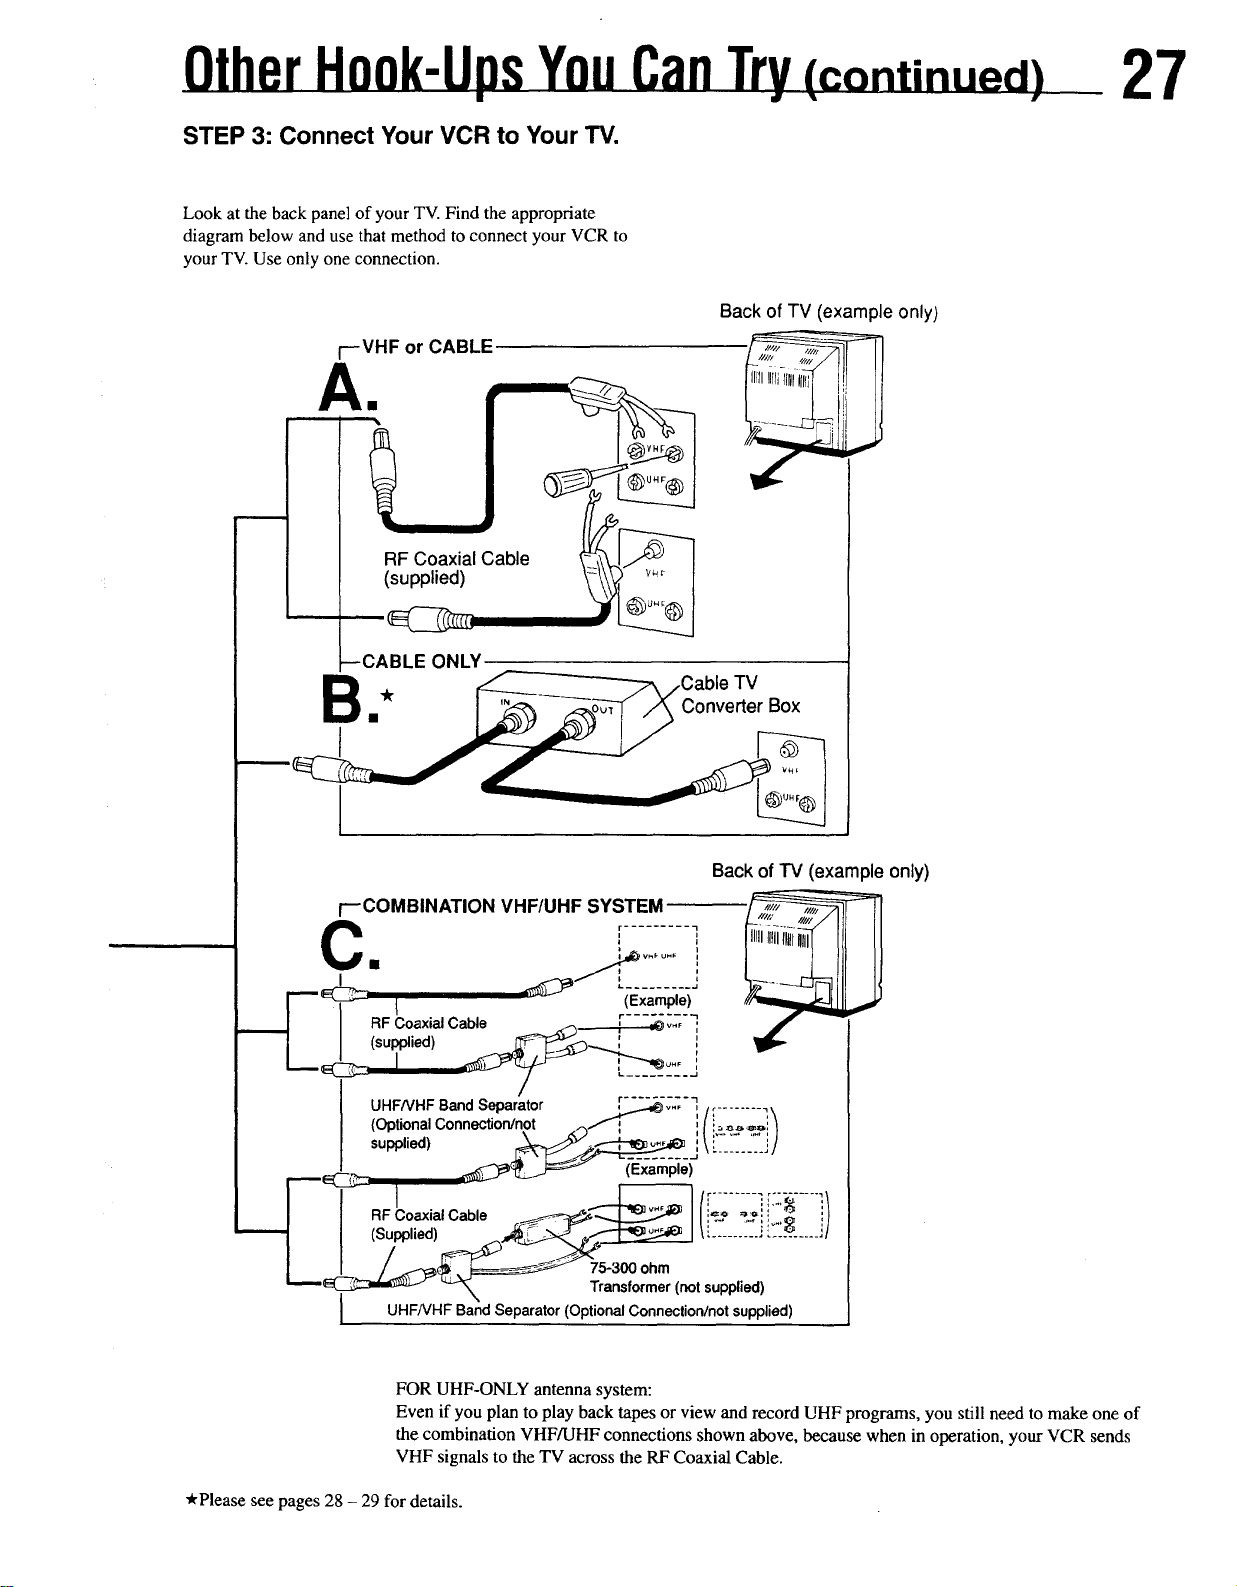
STEP 3: Connect Your VCR to Your TV.
Look at the back panel of your TV. Find the appropriate
diagram below and use that method to connect your VCR to
your TV. Use only one connection.
r--VHF or CABLE
All
!
(FlsFp$l°a_li)alCable _)l-"J/v_.__
wCABLE ONLY
27
Back of TV (example only)
TV
Converter Box
I
r-COMBINATION VHF/UHF SYSTEM
C [ ..........
RFCoaxialCable [----_ ;._-'_
__[ _ (Example)
(su_ied)___'_ '
UHF/VHFSandSeparator
(OptionalConnection/not
supplied)
UHF/VHF Sand Separator (Optional Connection/not supplied)
I
i .
(Example)
75-300 ohm
Transformer (not supplied)
Back ofTV (exampleonly)
FOR UHF-ONLY antenna system:
Even if you plan to play back tapes or view and record UHF programs, you still need to make one of
the combination VHF/UHF connections shown above, because when in operation, your VCR sends
VHF signals to the TV across the RF Coaxial Cable.
"kPlease see pages 28 - 29 for details.
Page 28

28
llTiTlliild lil_.li{t I i|r|_l i |_I|j ll=.],'{di_l tiI _ 1_II :f_i:ll
Use this connection if your cable system connects directly to your TV without a converter box.
In from Antenna
Backof TV
:Panel "
i
I
CATVInput
Outto TV
With this connection, you can 1) use your VCR Remote Control to select channels 2) program one or more unscrambled
channels for unattended recording 3) view one channel while recording another.
I NOTE: eYou can also use the VCR CHANNEL UP/DOWN button to select the desired channel.
oYou cannot record or view scrambled channels with this connection.
Outto TV
With this connection, you can record and view any channel including scrambled channels. However, channel selection must be
1,aade at the cable company converter box. This means that channels cannot be changed using the VCR Remote Control.
Unattended recording is limited to one channel at a time, and you cannot view any channel other than the one you are
recording..
To Record and View a Scrambled/Unscrambled Channel
1. Set the VCR/TV selector located on the front of the VCR to "VCR".
2. Set the TV channel selector to the output channel of the VCR (channel 3 or 4).
3. Set the VCR channel selector to the output channel of the Cable Converter Box. (If the Cable Converter Box is set to channel
3, the VCR should be set to channel 3. If the Box is set to channel 4, the VCR should be se! to channel 4.).
4. Select the channel to be recorded at the Cable Converter Box.
To Watch TV (with the VCR off)
l. Set the TV channel selector to the output channel of the Cable Converter Box.
2. Select the channel on the cable converter channel selector.
Page 29

If your cable system uses a converter box you may use this connection instead of the basic cable connection shown on the
previous page.
In from Antenna
CableTV
ConverterBox
CAIV Input
Outto TV
With this connection you can 1) program unattended recording of more than one unscrambled channel 2) view one channel
while recording another.
29
NOTE: oUse the VCR CHANNEL UP/DOWN button to select a channel to be recorded.
eYou cannot record scrambled channels with this connection.
To Record One Channel While Viewing Another
1. Select the channel to be recorded with the VCR CHANNEL UP/DOWN button.
2. On the VCR set the VCR/TV selector to "TV".
3. Set the channel selector on the TV to the output channel of the Converter Box.
4. Select the channel to be viewed on the Converter Box.
To Play Back a Tape
1. Set the VCR/TV selector to "VCR."
2. Set the TV channel selector to the output channel of the Converter Box.
3. Set the Converter Box channel selector to the VCR output channel (channel 3 or 4). Backof TV(example only)
II]1] ;ii_l+'t(:-i |g[,I ill l [_lq.llllal,'!
AudioCable
Video (yellow) and
Audio (white) out Jacks
For any additional adjustments you may need to make to your TV, please refer to your TV owner's manual.
Cables not included.
Video Cable(yellowtips)
Page 30

3O
IMPORTANT NOTE: Periodic maintenance is required in order to maintain the unit's continued excellent pertbrmance.
After a period of time the Video heads will require replacement. If cleaning or replacement of the
Video heads is required, this service should be performed by an authorized Video System Service Center.
Check the following points once again if you are having some difficulty with your VCR (Video Cassette Recorder).
-Power
No power...
Power Failure...
-Recording & Playback
TV program can't be recorded...
Timer recording can't be performed...
Correction
• Check that the Power plug is completely connected to an
AC (Alternating Current) outlet.
• Check that the Power button is set to on.
• Please complete "Placing Local Channels in the VCR" on
page 8 and "Setting the Clock" on page 10 before attempting
to set up a "Time Recording" on page 20- 21.
Otherwise, you may not be able to receive or record channels
above 13.
Correction
• Check the connections between the VCR, the external
antenna, and your TV.
• Check that the band selected matches your antenna or
cable TV system (P.8).
• Make sure that the record tab on the back of the cassette is
still intact (P.5).
• Set the recording start/stop time correctly (P.20).
• Make sure that the POWER button is set to "OFF" (P.21).
• Timer recording may not be performed or continued if a
power interruption of more than 1 second occurs before or
during Timer Recording, even if power resumes thereafter.
There is no playback picture, or the playback picture is
noisy or contains streaks ........
During special effects playback, the picture may contain
some vertical jitter when using a TV which has an
Automatic Vertical Hold Control ....
If the top of your playbackpicture waves back and forth
excessively...
• Select the same channel on your TV as that of the VCR
Channel 3/4 switch (P.7).
• Set the VCR/TV selector to "VCR" (P.9).
• Check that channel 3 or 4 of the TV is properly adjusted.
• Adjust the Tracking control slowly in either direction
(P.22).
• Set the TV's Vertical Hold Control, if available, to
"MANUAL" and adjust.
• Because the VCR playback signal is not as stable as an
off-the-air TV singal, the top of your TV screen may be
bent or unstable during playback. To solve this problem,
slowly turn the HORIZONTAL HOLD control on your
TV to correct the wavy picture. If your TV does not have
the horizontal hold control or adjusting the control does
not help, please contact your local TV service center.
Page 31

31
--Remote Control
VCR can't be remote controlled...
-Miscellaneous
You can't view programs normally on TV...
Video cassette can't be inserted...
Video cassette can't be removed...
Video cassette ejects when the OTR, RECORD and
PLAY buttons are pressed or the POWER button is
pressed off to set the Timer...
In the Stop mode, the motor(CYLINDER) continues to
rotate ....
Correction
oAim the Remote Control directly at the remote sensor on
the VCR.
oAvoid all obstacles which may interfere with the signal
path.
Olnspect or replace the batteries (P.5).
Correction
oSet the VCR/TV selector to "TV" (P.9).
olnsert the cassette with the window side up and the record
tab facing you.
• Check that the power plug is completely connected to an
AC outlet.
OCheck the cassette to be sure that the record tab on the
back of the cassette is still intact (P.5).
• To enable quick play mechanism the cylinder will rotate
for about 10 minutes.
If you cannot receive channels above 13....
Sae.r,iliemia
Video Recording System
Video Signal
Antenna
VHF Output Signal
Power Requirement
Power Consumption
Operating Temperature
Relative Humidity
Design and specifications are subject to change without notice.
Rotary four-head helical scan
system
EIA standards: NTSC color
VHF/UHF- 75 ohm external
antenna terminal
Channel 3 or 4 (switchable)
75 ohms unbalanced
120 V _ AC/60 Hz
19W
41 ° F(5 ° C) to 104 *F(40 *C)
10% to 80%
• Repeat "Placing Local Channels in VCR" on page 8,
making sure you select "CABLE TV" in step 2.
Weight
Dimensions
Tuner
Broadcast Channels
CATV Channels
9.5 lbs. (4.3 kg)
14-3116"(W) x 3-9/16"(H) x 12"(D)
(360 mm × 89 mm x 304 nun)
VHF 2 - 13, UHF 14 - 69
Midband A - I
Superband J - W
Hyperband A-5 - A- 1
Special channel 5A
Ultraband 65 - 94
Page 32
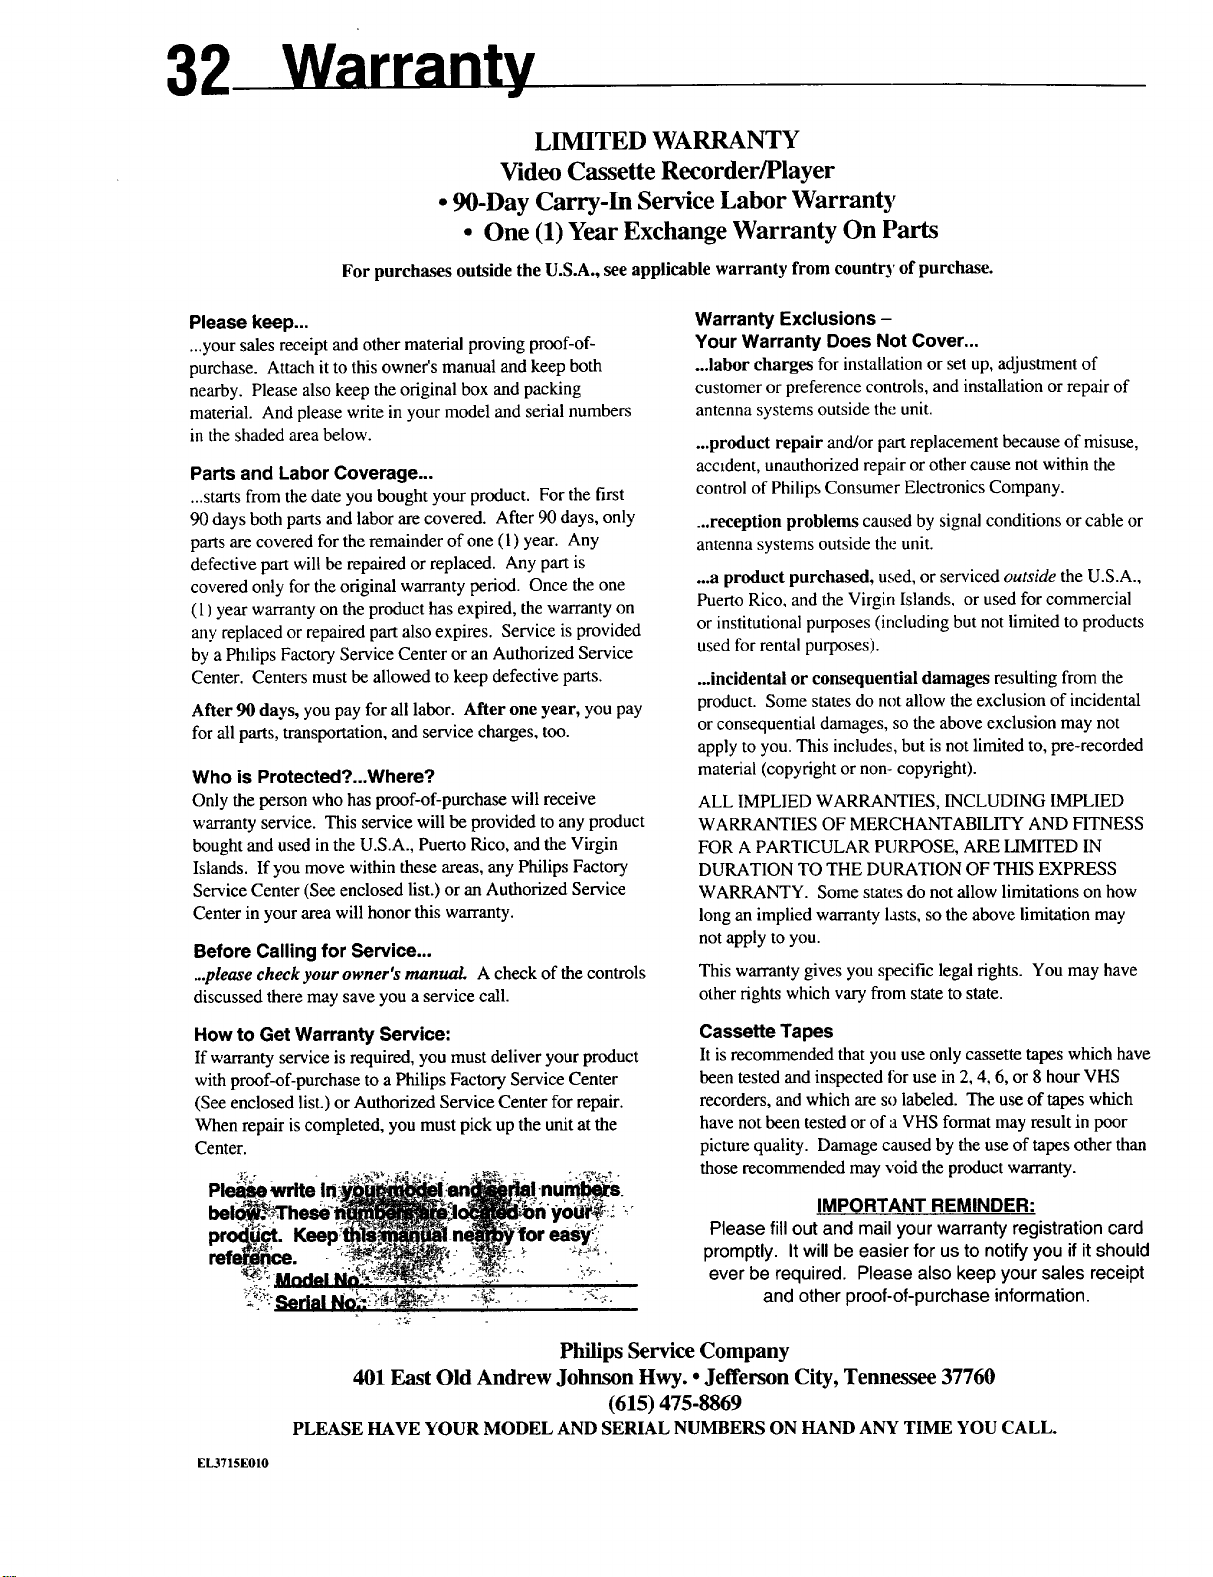
LIMITED WARRANTY
Video Cassette Recorder/Player
• 90-Day Carry-In Service Labor Warranty
• One (1) Year Exchange Warranty On Parts
For purchases outside the U.S.A., see applicable warranty from country of purchase.
Please keep...
...your sales receipt and other material proving proof-of-
purchase. Attach it to this owner's manual and keep both
nearby. Please also keep the original box and packing
material. And please write in your model and serial numbers
in the shaded area below.
Parts and Labor Coverage...
...starts from the date you bought your product. For the first
90 days both parts and labor are covered. After 90 days, only
parts are covered for the remainder of one (1) year. Any
defective part will be repaired or replaced. Any part is
covered only for the original warranty period. Once the one
(1) year warranty on the product has expired, the warranty on
any replaced or repaired part also expires. Service is provided
by a Phllips Factory Service Center or an Authorized Service
Center. Centers must be allowed to keep defective parts.
After 90 days, you pay for all labor. After one year, you pay
for all parts, transportation, and service charges, too.
Who is Protected?...Where?
Only the person who has proof-of-purchase will receive
warranty service. This service will be provided to any product
bought and used in the U.S.A., Puerto Rico, and the Virgin
Islands. If you move within these areas, any Philips Factory
Service Center (See enclosed list.) or an Authorized Service
Center in your area will honor this warranty.
Before Calling for Service...
..please checkyour owner's manual A check of the controls
discussed there may save you a service call.
How to Get Warranty Service:
If warranty service is required, you must deliver your product
with proof-of-purchase to a Philips Factory Service Center
(See enclosed list.) or Authorized Service Center for repair.
When repair is completed, you must pick up the unit at the
Center.
Please._,write !n__.-nu_.
prod_. Keep__.ne...__'lo easy:,
:': Serial No.".:-_'-_:',-:'- "_ .....
Warranty Exclusions -
Your Warranty Does Not Cover...
...labor charges for installation or set up, adjustment of
customer or preference controls, and installation or repair of
antenna systems outside the unit.
...product repair and/or part replacement because of misuse,
accident, unauthorized repair or other cause not within the
control of Philips Consumer Electronics Company.
...reception problems caused by signal conditions or cable or
antenna systems outside the unit.
...a product purchased, used, or serviced outside the U.S.A.,
Puerto Rico, and the Virgin Islands. or used for commercial
or institutional purposes (including but not limited to products
used for rental purposes).
...incidental or consequential damages resulting from the
product. Some states do not allow the exclusion of incidental
or consequential damages, so the above exclusion may not
apply to you. This includes, but is not limited to, pre-recorded
material (copyright or non- copyright).
ALL IMPLIED WARRANTIES, INCLUDING IMPLIED
WARRANTIES OF MERCHANTABILITY AND FITNESS
FOR A PARTICULAR PURPOSE, ARE LIMITED IN
DURATION TO THE DURATION OF THIS EXPRESS
WARRANTY. Some states do not allow limitations on how
long an implied warranty lasts, so the above limitation may
not apply to you.
This warranty gives you specific legal rights. You may have
other rights which vary from state to state.
Cassette Tapes
It is recommended that you use only cassette tapes which have
been tested and inspected for use in 2, 4, 6, or 8 hour VHS
recorders, and which are so labeled. The use of tapes which
have not been tested or of a VHS format may result in poor
picture quality. Damage caused by the use of tapes other than
those recommended may void the product warranty.
IMPORTANT REMINDER:
Please fill out and mail your warrantyregistrationcard
promptly. It willbe easierfor usto notifyyou ifitshould
ever be required. Pleasealso keep your sales receipt
and other proof-of-purchaseinformation.
EL3715E010
Philips Service Company
401 East Old Andrew Johnson Hwy. • Jefferson City, Tennessee 37760
(615) 475-8869
PLEASE HAVE YOUR MODEL AND SERIAL NUMBERS ON HAND ANY TIME YOU CALL.
Page 33

or your convenience, the following list of terms is provided to help you better understand your VCR and its operation.
33
AUDIO IN/OUT: These are connectors (jacks) located on
the back of the unit. They are used to record the audio from
another source (IN), or play the audio to another source
(OUT).
AUTO PROGRAM: This is part of the CHANNEL
MEMORY function. When used the VCR runs through
(scans) all the channels on the VCR and all the channels
received in your area are automatically placed in memory.
TV BANDS: Two possible settings:
NORMAL TV CH
This consists of two type of frequencies:
VHF
(Very High Frequency) Channels which are
receivedby the tuner on channels 2 to 13.
UHF
(Ultra High Frequency) Channels which are
received by the tuner on channels 14 to 69.
CABLE TV CH
The second setting possible for TV Band tuning. This
term means the unit is capable of receiving standard
and unscrambled channels on cable without the use of
a cable decoder or converter box.
CHANNEL (S): Selected with the NUMBERED buttons or
CHANNEL UP & DOWN buttons on the remote.
CLEAR: To remove a completely programmed Timer
Recording or to correct a single clock or program entry.
COUNTER: For locating specific areas on a tape by
referencing the counter number.
DUBBING: Copying the contents of a tape with the use of
a second VCR.
FAST FORWARD (FF I_): To move the tape rapidly in
the forward direction (I_).
FRAME: Single still picture.
HO (High Ouality): An enhancement feature in the VCR
circuitry which provides greater picture detail.
MATCHING TRANSFORMER: An adapter used
primarily on non-cable ready TV's. One end has a "screw
on" type connector and the other end has two flat leads that
connect to the TV.
ME_: Information that will appear on the TV screen and
give you operation directions.
OTR (One Touch Recording): Making immediate timed
recordings with the press of a single button. These recordings
can be set from 30 minutes to 9 hours or to tape end.
MENU BUTTON: When the MENU button is pressed,
you will be able to choose from a list of options:
1) Selecting the PROGRAM mode to enter information for
timed recordings.
2) Setting the channel memory, antenna system, and OSD.
3) Setting the clock.
REWIND (REW _ ): To move the tape rapidly in the
reverse direction (,_,().
RF COAXIAL CABLE: Black insulated round cable
used to connect the VCR to the TV.
SPECIAL EFFECTS: Viewing a STILL, SLOW
MOTION or FAST FORWARD picture during tape
playback.
SEPARATOR: An adapter used to separate TV signals
(VHF-UHF) when connecting the VCR to a TV with
separate VHF and UHF terminals.
TAPE SPEEDS: This detennines how fast the tape travels
during recording or playback. These can be selected for
recording but are automatically selected by the VCR in
playback.
SP (STANDARD PLAY):
Fastest tape speed. Recording time for a T120 tape
will be approximately 2 hours.
LP (LONG PLAY):
Average tape speed. Recording time for a T120 tape
will be approximately 4 hours (playback only).
SLP (SUPER LONG PLAY):
Slowest tape speed. Recording time for a Tl20 tape
will be approximately 6 hours.
TRACKING: The video heads do not trace the video track
properly and grainy streaks appear through the picture. This
may be corrected by adjusting the Tracking Control.
(CHANNEL UP/DOWN buttons on this VCR).
VCR/TV BUTTON: This button turns the "VCR"
indicator, on the display panel, ON and OFF. When "VCR"
is ON, this prepares the VCR for viewing your recording or
tape playback on the TV. When OFF, all channel selections
are made at the TV.
YCR: Video Cassette Recorder.
MODE: The operating condition or status of the VCR.
This is determined by the function currently engaged and/or
the setting selected. Eg.: "PLAY" mode
MUTE: Reduces the TV's sound level instantly.
OSD (On Screen Display): Features and information that
appear on the TV screen.
VIDEO IN/OUT: There are connectors (jacks) located on
the back of the unit that are used to record the video from
another source (IN), or play the video to another source
(OUT).
WIRELESS REMOTE CONTROL: By pressing the
button on the remote, signals are sent to the VCR to perform
the desired task (s).
Page 34

Index
Accessories (Optional) ..................... 35
Accessories (Supplied) ..................... 35
Adding Channels ................................ 8
Audio Input/Output .......................... 17
Auto Operation ................................. 22
Auto Play .......................................... 22
Auto Rewind ..................................... 22
Auto Tracking ................................... 22
Battery Installation ............................. 5
Calendar Indicator ............................ 18
Cassette ............................................... 5
Cassette In Indicator ......................... 14
CHANNEL 3/4 Switch ................. 7, 17
CHANNEL UP/DOWN Buttons ...... 13
Channels above 13.............................. 31
Input Select ................................. 11, 23
Insert a Cassette ............................ 7, 11
LINE Input .................................... 23, 25
LP (Long Play) ................................... 5
Manual Tracking ............................... 22
MEMORY Button ...................... 12, 24
MENU Button ...................... 10, 12, 18
MUTE Buttons ................................. 13
NUMBERED Buttons ...................... 13
On Screen Display ............................ 18
One Touch Recording (OTR) ........... 19
Optional Accessories ........................ 35
Other Hook-Ups You Can Try .... 26-29
OTR Button ................................ 13, 19
PAUSE/STILL Button ................ 12, 22
SEARCH Button ............ 12, 13, 16, 22
Sensor (Remote) ................................ 15
Set the Clock ..................................... 10
SLOW Button ................................... 13
SLP (Super Long Play) ........... 5, 11, 19
SP (Standard Play) .................. 5, 11, 19
Special Effects .................................. 22
Specifications .................................... 31
STATUS Button .......................... 13, 18
STOP Button .............................. 12, 16
Tape Speed ........................ 5, 11, 19, 22
Time (Clock) ..................................... 10
Time Counter .................................... 18
Time Display (Clock) ....................... 10
Timer (Programming) ................. 20, 21
Cleaning ............................................ 35
CLEAR Button ................................. 12
Clearing Timer Programs ................. 21
Clock (Setting) .................................. 10
Controls ....................................... 12-17
Deleting Channels .............................. 8
Double Speed (×2) Playback ..... 12, 22
Duplication ....................................... 23
EJECT Button ................................... 16
Erase Protection .................................. 5
FAST FORWARD Button .......... 12, 16
Features ............................................... 4
FRAME ADVANCE Button ............ 13
Getting Hooked Up ........................ 6, 7
Glossary ............................................ 33
PLAY Button .......................... 7, 13, 22
Playback .............................................. 7
POWER (VCR POWER) Button 12, 16
Precautions (Safety) ............................ 3
Programming the Timer ............. 20, 21
Rapid Scan ........................................ 22
REC Button ........................... 11, 13, 16
Record Tab ........................ 5, 11, 19, 20
Remote Control .......................... 12, 13
Requesting Service ........................... 30
Re-Recording .................................... 23
REWIND Button ........................ 13, 16
Rewind Play ...................................... 22
Rewind Power-off ............................. 22
RF Coaxial Cable ......................... 6, 35
Timer Indicator ........................... 14, 20
Timer Programs (Checking) ............. 21
Timer Programs (Clearing) ............... 21
TRACKING Control .................. 12, 22
Trouble Checks ........................... 30, 31
TV Position ................................... 9, 11
TV POWER Button .......................... !3
TV Viewing ........................................ 9
VCR Channel ...................................... 7
VCR Indicator ......................... 9, 11, 14
VCR Position ...................................... 8
VCR/TV. Selector ................... 9, 12, 16
Video Cassettes ................................... 5
VOLUME Buttons ........................... 13
X2 PLAY Button ............................... 12
GO-TO Function ............................... 24
Indicator Panel ............................ 14, 15
Copyright © 1992 Philips Consumer Electronics Company. All rights reserved.
Safety .................................................. 3
Satellite HOOK-UP ...................... 11, 25
Page 35
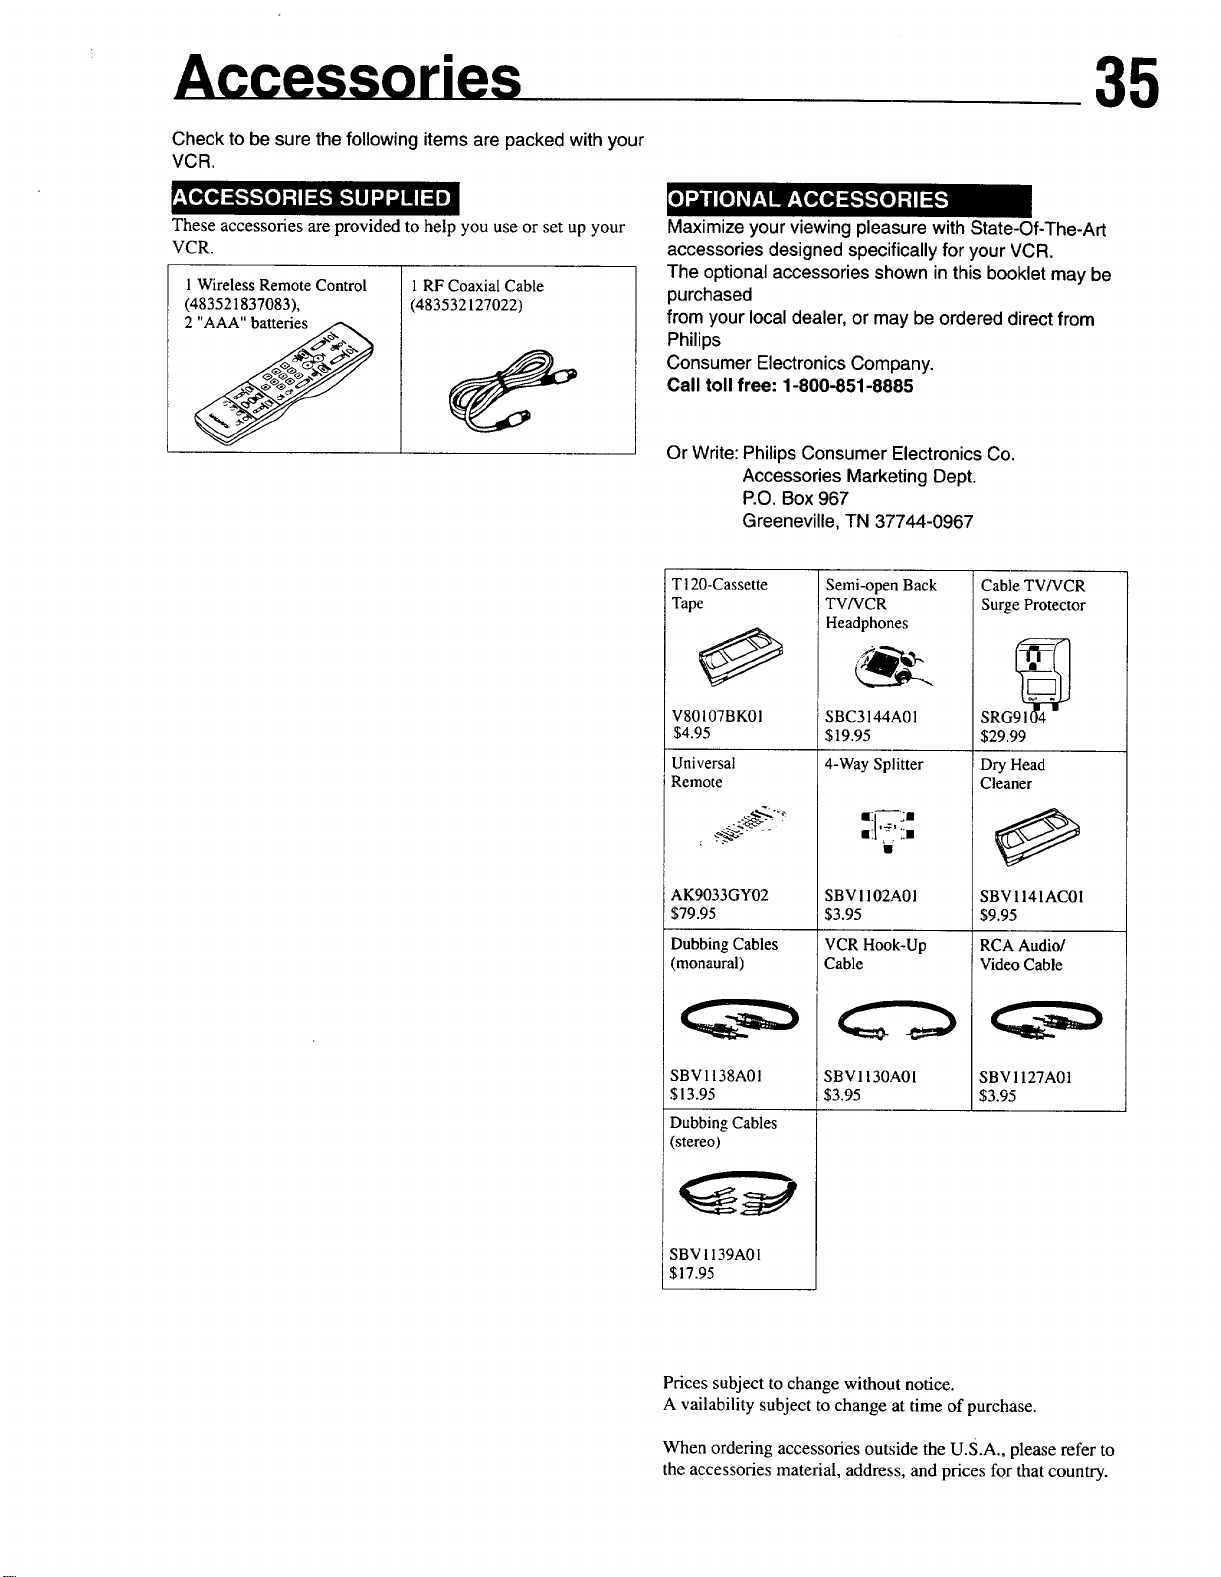
/ .cessadaa
Check to be sure the following items are packed with your
VCR.
_,_To[o,]:F:_'To]:|I::g$[¢tlJ'-]'.JnlI_ e]
These accessories are provided to help you use or set up your
VCR.
1Wireless Remote Control
(483521837083),
1 RF Coaxial Cable
(483532127022)
35
Maximize your viewing pleasure with State-Of-The-Art
accessories designed specifically for your VCR.
The optional accessories shown in this booklet may be
purchased
from your local dealer, or may be ordered direct from
Philips
Consumer Electronics Company.
Call toll free: 1-800-851-8885
Or Write: Philips Consumer Electronics Co.
Accessories Marketing Dept.
P.O. Box 967
Greeneville, TN 37744-0967
T120-Cassette
Tape
V80107B K0 I
$4.95
Universal
Remote
: ":_" -.
AK9033GY02 SBV! 102A01
$79.95
Dubbing Cables
(monaural)
SBV1138A01
$13.95
Dubbing Cables
(stereo)
Semi-open Back
TV/VCR
Headphones
SBC3144A01
$19.95
4-Way Splitter
153.95
VCR Hook-Up
Cable
SBV1130A01
$3.95
Cable TV/VCR
Surge Protector
SRG91( 14
$29.99
Dry Head
Cleaner
SBV1141AC01
$9.95
RCA Audio/
Video Cable
SBV1127A01
$3.95
SBV 1139A01
$17.95
Prices subject to change without notice.
Availability subject to change at time of purchase.
When ordering accessories outside the u.S.A., please refer to
the accessories material, address, and prices for that country.
Page 36

IB 6485-E001
 Loading...