

Page 1
Page 2
MAGNAVOX
Smart.Verysmart:
MAGNAVOX
Smart.Verysmart:
Congratulations on your purchas,
-and welcome to the "family!"
Dear MAGNAVOX product owner:
Thank you for your confidence in MAGNAVOX. You've selected one of the
best-built, best-backed products available today. And we'll do everything in
our power to keep you happy with your purchase for many years to come.
As a member of the MAGNAVOX "family," you're entitled to protection by
one of the most comprehensive warranties and outstanding service
networks in the industry.
What's more, your purchase guarantees you'll receive all the information
and special offers which you qualify for, plus easy access to accessories
from our convenient home shopping network.
And most important of all, you can count on our uncompromising
commitment to your total satisfaction.
All of this is our way of saying welcome-and thanks for investing in a
MAGNAVOX product.
Sincerely,
Robert Minkhorst
President and Chief Executive Officer
P.S. Remember, to get the most from your MAGNAVOX product,
you must return your Warranty Registration
Card within 10 days. So please mail it to us right now!
Page 3
SAFETYINSTRUCTIONS- Readbeforeoperatingequipment
Thisproductwasdesignedandmanufacturedtomeetstrictqualityand
safetystandards.Thereare,however,someinstallationandoperation
precautionswhichyoushouldbeparticularlyawareof.
1. ReadInstructions- Allthesafetyandoperatinginstructionsshould
bereadbeforetheapplianceisoperated.
2. RetainInstructions- Thesafetyandoperatinginstructionsshould
beretainedforfuturereference.
3. HeedWarnings- Allwarningsontheapplianceandintheoperating
instructionsshouldbeadheredto.
4. FollowInstructions- Alloperatinganduseinstructionsshouldbe
followed.
5. WaterandMoisture- Theapplianceshouldnotbeusednearwater
- forexample,neara bathtub,washbowl,kitchensink,laundrytub,
inawetbasementornearaswimmingpool,etc.
6. CartsandStands- Theapplianceshouldbeusedonlywithacartor
standthatisrecommendedbythemanufacturer.
6A. _ Anapplianceandcartcombinationshouldbemoved
withcare.Quickstops,excessiveforce, anduneven
surfacesmaycausetheapplianceandcartcombination
tooverturn.
7. Wall or CeilingMounting- Theapplianceshouldbe mountedto a
wallorceilingonlyasrecommendedbythemanufacturer.
8. Ventilation- Theapplianceshouldbesituatedsothatitslocationor
positiondoesnotinterferewithitsproperventilation.Forexample,
theapplianceshouldnotbesituatedona bed,sofa,rug,orsimilar
surfacethat may blocktheventilationopenings;or, placedin a
built-ininstallation,suchas a bookcaseorcabinetthatmayimpede
theflowofairthroughtheventilationopenings.
9. Heat- Theapplianceshouldbesituatedawayfromhearsources
suchas radiators,heatregisters,stoves,or otherappliances
(includingamplifiers)thatproduceheat.
10. PowerSources- Theapplianceshouldbeconnectedto apower
supplyonlyof thetypedescribedintheoperatinginstructionsoras
markedontheappliance.
11. Power-CordProtection- Powersupplycordsshouldberoutedso
thattheyarenotlikelyto bewalkedonorpinchedbyitemsplaced
uponor againstthem payingparticularattentionto cordsand
plugs,conveniencereceptacles,andthepointwheretheyext from
theappliance.
12. Cleaning- Theapplianceshouldbecleanedonlyasrecommended-
bythemanufacturer.
13. PowerLines- Anoutdoorantennashouldbelocatedawayfrom
powerlines.
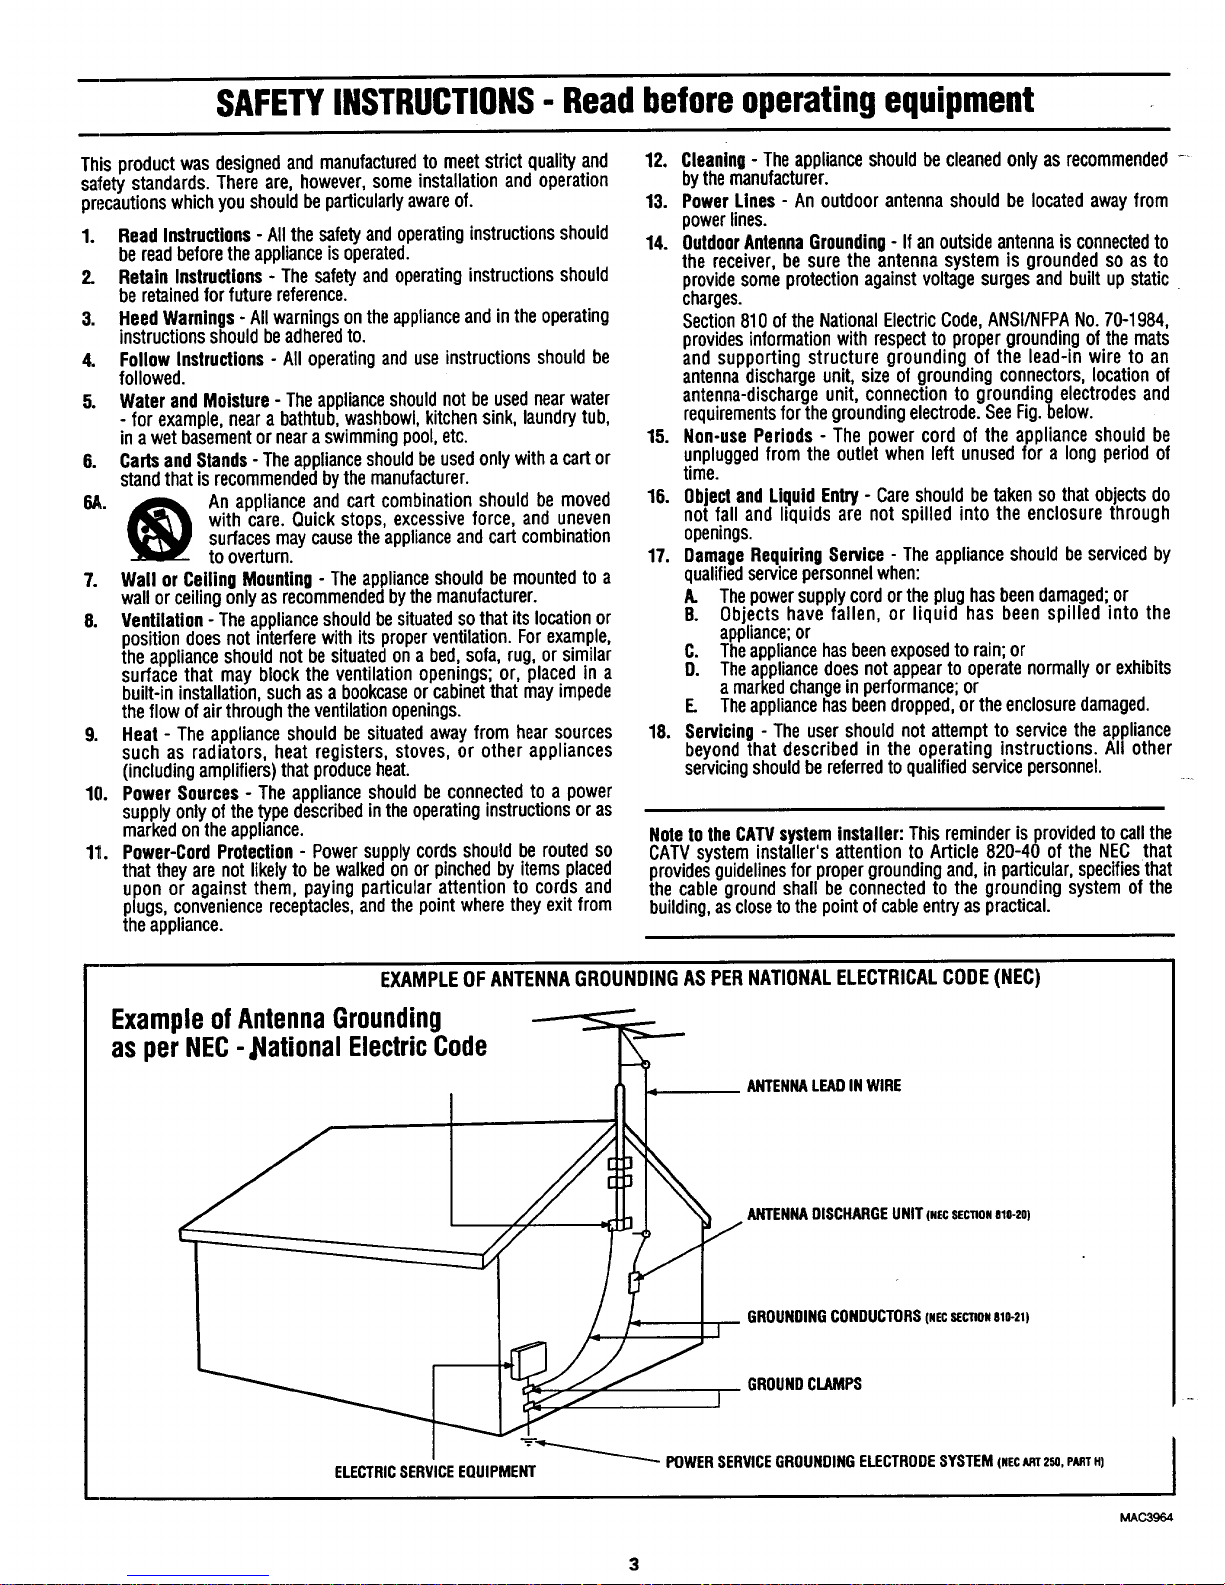
14. OutdoorAntennaGrounding- If anoutsideantennaisconnectedto
the receiver,be suretheantennasystemis groundedso as to
providesomeprotectionagainstvoltagesurgesandbuiltupstatic
charges.
Section810oftheNationalElectricCode,ANSI/NFPANo.70-1984,
providesinformationwithrespecttopropergroundingofthemats
andsupportingstructuregroundingof the lead-inwireto an
antennadischargeunit,sizeof groundingconnectors,locationof
antenna-dischargeunit,connectionto groundingelectrodesand
requirementsforthegroundingelectrode.SeeFig.below.
15. Non-usePeriods- The powercordof the applianceshouldbe
unpluggedfromtheoutletwhenleftunusedfor a longperiodof
time.
16. ObjectandLiquidEntry- Careshouldbetakensothatobjectsdo
not falland liquidsarenot spilledintotheenclosurethrough
openings.
17. DamageRequiringService-Theapplianceshouldbeservicedby
qualifiedservicepersonnelwhen:
A. Thepowersupplycordortheplughasbeendamaged;or
B. Objectshavefallen, or liquid has beenspilled into the
appliance;or
C. Theappliancehasbeenexposedto rain;or
D. Theappliancedoesnotappeartooperatenormallyorexhibits
a markedchangeinperformance;or
E. Theappliancehasbeendropped,ortheenclosuredamaged.
18. Servicing- Theusershouldnotattemptto servicethe appliance
beyondthat describedin the operatinginstructions.Allother
servicingshouldbereferredtoqualifiedservicepersonnel.
Noteto the CATVsysteminstaller: This reminderisprovidedto call the
CAW system installer'sattention to Article 820-40 of the NEC that
providesguidelinesfor propergroundingand, inparticular,specifiesthat
the cableground shall be connectedto the grounding system of the
building,asclosetothe pointofcableentryaspractical.
EXAMPLEOFANTENNAGROUNDINGAS PERNATIONALELECTRICALCODE(NEC)
ExampleofAntennaGrounding
as per NEC-,NationalElectricCode
ANTENNALEADINWIRE
ANTENNADISCHARGEUNIT(.EcSEC_ONel0.=o)
GROUNDINGCONDUCTORS(NECSECTION810-21)
GROUNDCLAMPS
I
_"_'_ POWERSERVICEGROUNDINGELECTRODESYSTEM(MECART2SO,PARTH)
ELECTRICSERVICEEQUIPMENT
I
MAC3964
3
Page 4
Introduction
Welcome/Registration of Your TV............................ 2
Safety/Precautions ..................................................... 3
Table of Contents ....................................................... 4
Features...................................................................... 4
[--_ On-Screen (MENU) Features
q-Setting the TV for Cable "IV Operation .............. 5
_-Adding Channels in Memory (Automatically) ...6
g, Adding Channels in Memory (Manually) ........... 7
_,How to Set the TV for Closed Captioning .........8
+Setting the TV for Stereo Programs .................... 9
"_Using Smart Sound .......................................... 10
"e,Using the TV Volume Bar Control ................... 10
_'Using the Smart Picture Control ....................... 11
_>-Settingthe Alternate Channel Control .............. 11
_'Using the TV Channel Reminder ...................... 12
,_,Adjusting the TV Color .................................... 12
_Setting the TV Sleep Timer Control ................. 13
<_Using the On-Screen Language Option ............ 13
,<_Using the Audio Out Jacks (with TV Speaker
On/Off Control) ............................................... 14
¢,Using the TV's Audio/Video Input Jacks ......... 15
Remote Control Operation
Setting the TV Remote to Work VCRs ..16-17
Setting the TV Remote to Work
Cable TV Converters .......................................... 18-19
Setting the TV Remote to Work VCRs or Cable
Converters - Search Method .................................... 20
Using the Remote's VCR Buttons ............................ 21
M General Information
Tips if Something Isn't Working ............... 22
Glossary of TV Terms ............................................. 23
Index ........................................................................ 24
Factory Service Locations .................................. 25-26
Warranty .................................................................. 27
Accessories .............................................................. 28
your TV information packet) for details on:
• Antenna Hook-ups
° First Time Set-Up
(Automatic Settings)
• Basic TV and Remote
Control Operation
• On-Screen Menu Use
Infrared Remote Control which works your TV set
and a variety of wireless remote control VCRs and
Cable Converters.
Standard broadcast (VHF/UHF) or Cable TV
(CATV) channel capability.
Stereo Ready TV with built-in audio amplifier and
twin speaker system for receiving TV programs
broadcast in stereo sound.
Closed Captioning which allows the viewer to read
TV program dialogue or voice conversations as on-
screen text.
Automatic Programming of channels for quick and
easy selection of favorite stations available in your
area.
On-Screen Features (in either English, French, or
Spanish) which show helpful messages for setting of
TV controls.
Audio/Video jackpanel for direct connections with
VCRs (or other video accessories) for quality TV
picture and sound playback.
Smart Sound for the control of TV volume levels
during program changes or commercial breaks.
Smart Picture automatic TV video control.
adjustments for a variety of viewing conditions and
program sources.
Sleep-Timer which automatically turns the TV OFF
at preset times.
Copyright © 1995 Philips Consumer Electronics Company. All rights reserved.
4
Page 5
I
<
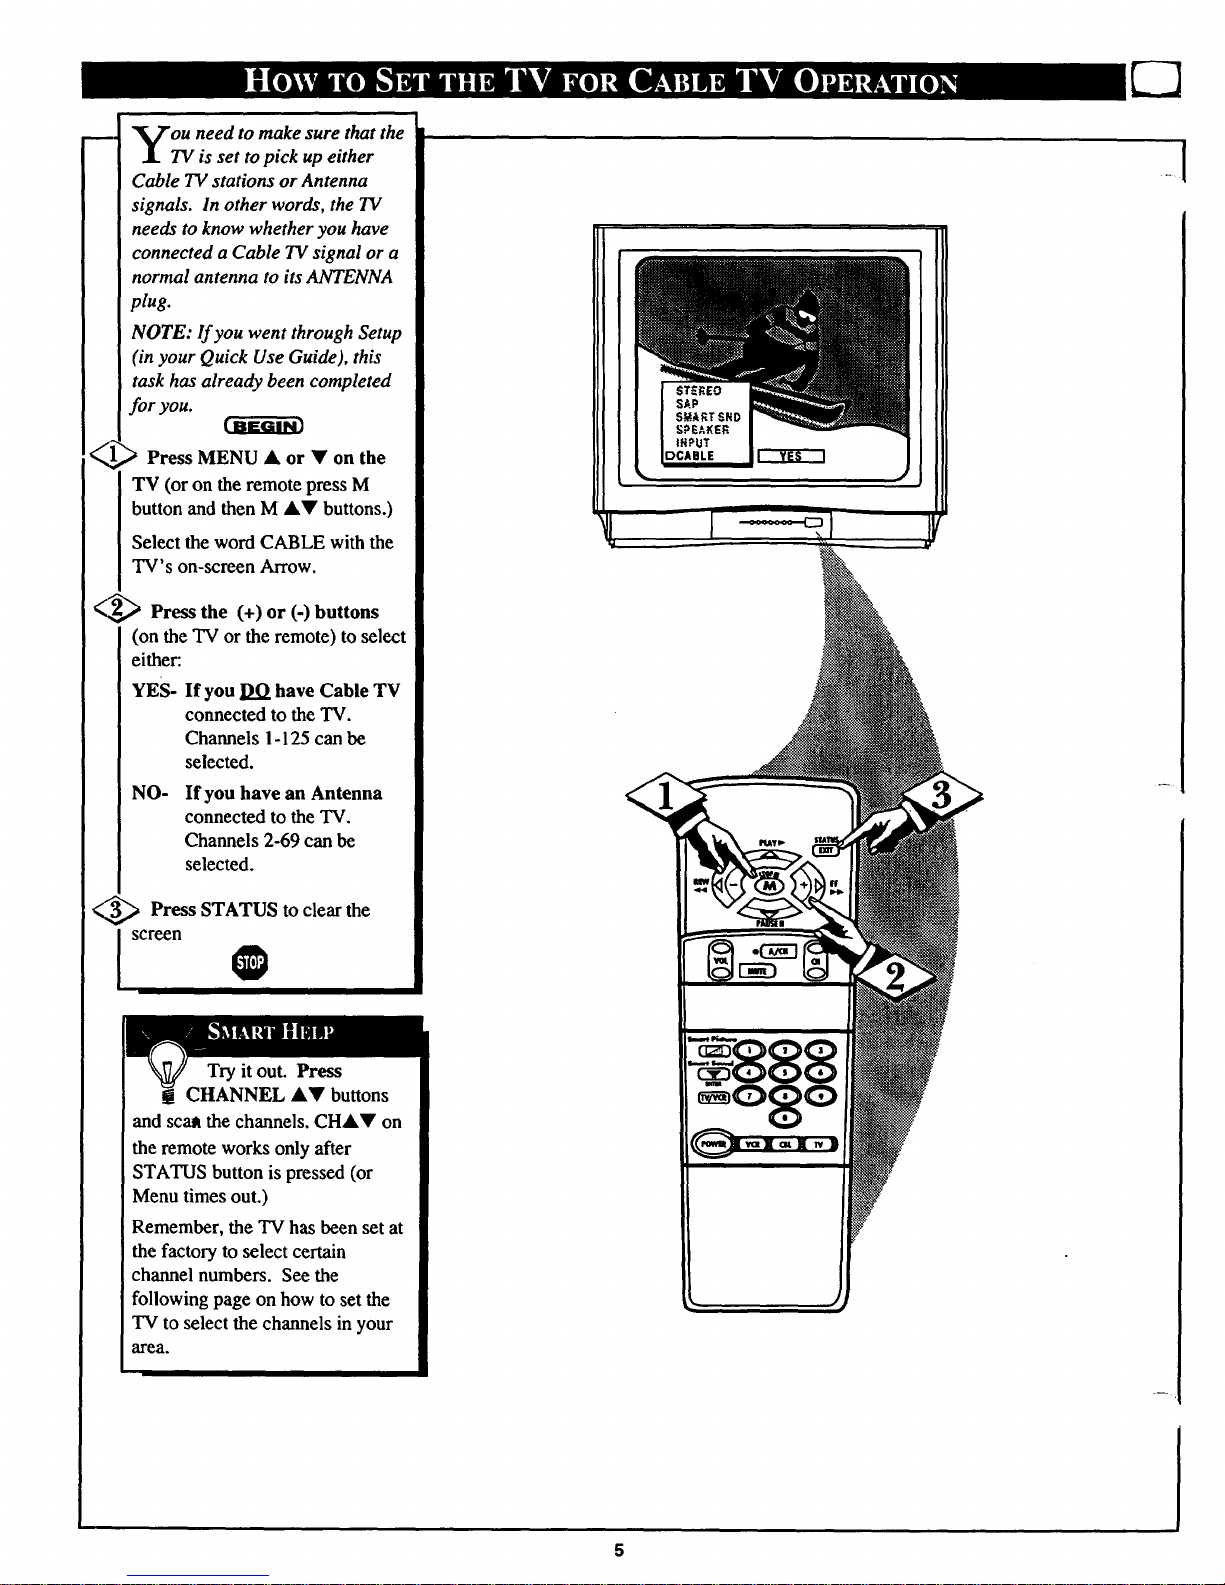
you need to make sure that the
TV is set to pick up either
Cable TV stations or Antenna
signals. In other words, the TV
needs to know whether you have
connected a Cable TVsignal or a
normal antenna to its ANTENNA
plug.
NOTE: If you went through Setup
(in your Quick Use Guide), this
task has already been completed
for you.
Press MENU • or • on the
TV (or on the remote press M
button and then M A• buttons.)
Select the word CABLE with the
TV's on-screen Arrow.
Press the (+) or (-) buttons
(on the TV or the remote) to select
either:
YES- If you DO have Cable TV
connected to the TV.
Channels 1-125 can be
selected.
NO- If you have an Antenna
connected to the TV.
Channels 2-69 can be
selected.
<,_ Press STATUS to clear the
Is"eenO
Try it out. Press
CHANNEL A• buttons
and scar the channels. CH&• on
the remote works only after
STATUS button is pressed (or
Menu times out.)
Remember, the TV has been set at
the factory to select certain
channel numbers. See the
following page on how to set the
TV to select the channels in your
area.
5
Page 6
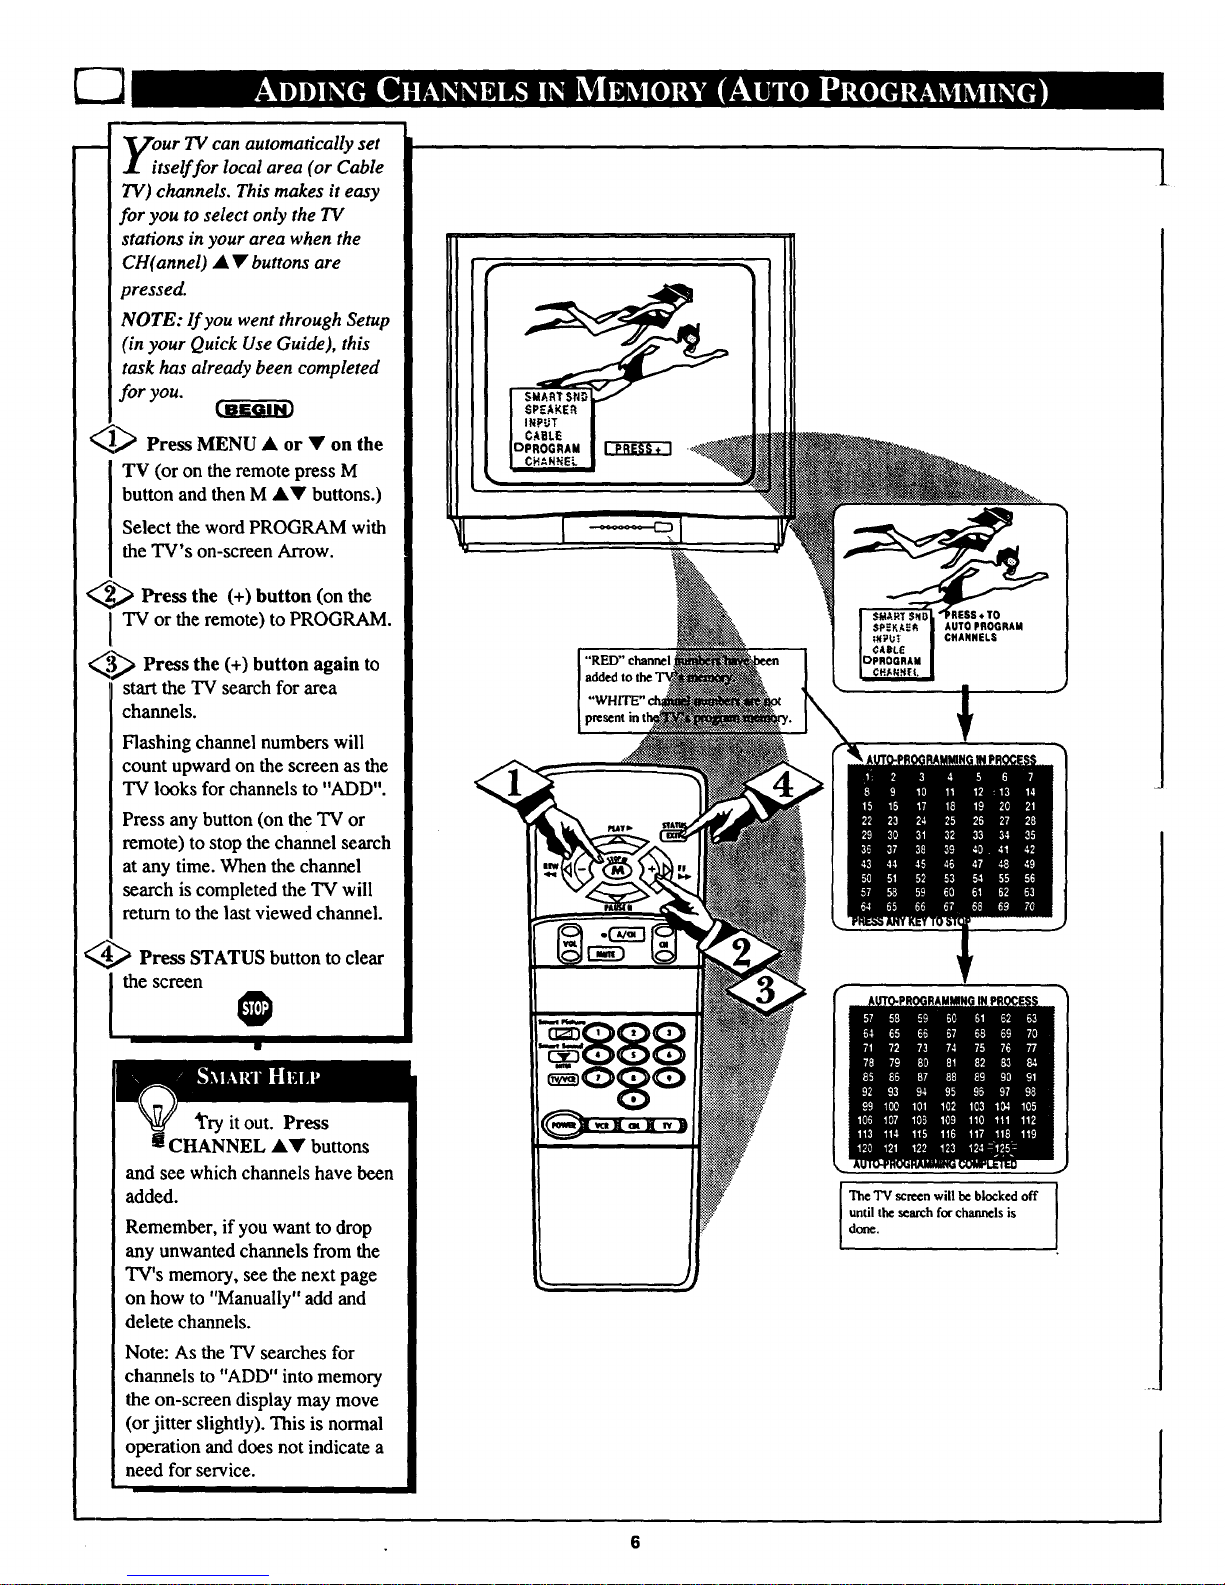
our TV can automatically set
tself for local area (or Cable
TV) channels. This makes it easy
for you to select only the TV
stations in your area when the
CH(annel) • • buttons are
pressed.
NOTE: lf you went through Setup
(in your Quick Use Guide), this
task has already been completed
for you.
_._ Press MENU • or • on the
'IV (or on the remote press M
button and then M J,V buttons.)
Select the word PROGRAM with
the TV's on-screen Arrow.
_ Press the (+) button (on the
TV or the remote) to PROGRAM.
_,'._ Press the (+) button again to
start the TV search for area
channels.
Flashing channel numbers will
count upward on the screen as the
TV looks for channels to "ADD".
Press any button (on the TV or
remote) to stop the channel search
at any time. When the channel
search is completed the TV will
return to the last viewed channel.
_ Press STATUS button to clear
the screen
O
'ii
4i'ry it out. Press
CHANNEL &Y buttons
and see which channels have been
added.
Remember, if you want to drop
any unwanted channels from the
TV's memory, see the next page
on how to "Manually" add and
delete channels.
Note: As the TV searches for
channels to "ADD" into memory
the on-screen display may move
(or jitter slightly). This is normal
operation and does not indicate a
need for service.
"RED"chan_l
AUTOPROGRAM
CHANNELS
J
The "IV screen will be blocked off I
1
until the search for channels is
done.
[
6
Page 7

uto Programming (see
previous page) adds all the
channels it can find (on your
Antenna or Cable TV system) into
the TV's memory. Add!Delete
Channels makes it easy for you to
add other channels, or drop
unwanted channels, from the list
of channels in the TV's memory.
_ Press MENU • or • on the
TV (or on the remote press M
button and then M •• buttons.)
Select the word CHANNEL with
the TV's on-screen Arrow.
<_ _ Press CHANNEL • •
buttons (or Channel Number
buttons on the remote) to select
the channel you want to SAVE (or
DELETE.)
_ Press (+) button to SAVE the
selected channel number into
memory.
Press (-) button to DELETE a
channel from memory.
_._'_ Press the STATUS button to
j clear the screen afteradding all
the channels yo_ant.
it out. Press the
buttons.
The channels you SAVED should
appear:t The channels you
DELETED should not appear.
Remember, you can also add the
VCR/AUX mode (see page 16)
into the TV's channel memory.
Then by pressing the CH • •
buttons you can quickly select the
Audio/Video Input jacks on the
rear of the TV. Just "SAVE" the
VCR/AUX mode (located
between the lowest and highest
channel numbers) into the TV's
memory.
12
If you need to SAVE (or DELETE) a
channel above 100, use the CHAr
buttons. The remote control number
buttons can select only up to channel 99.
Page 8
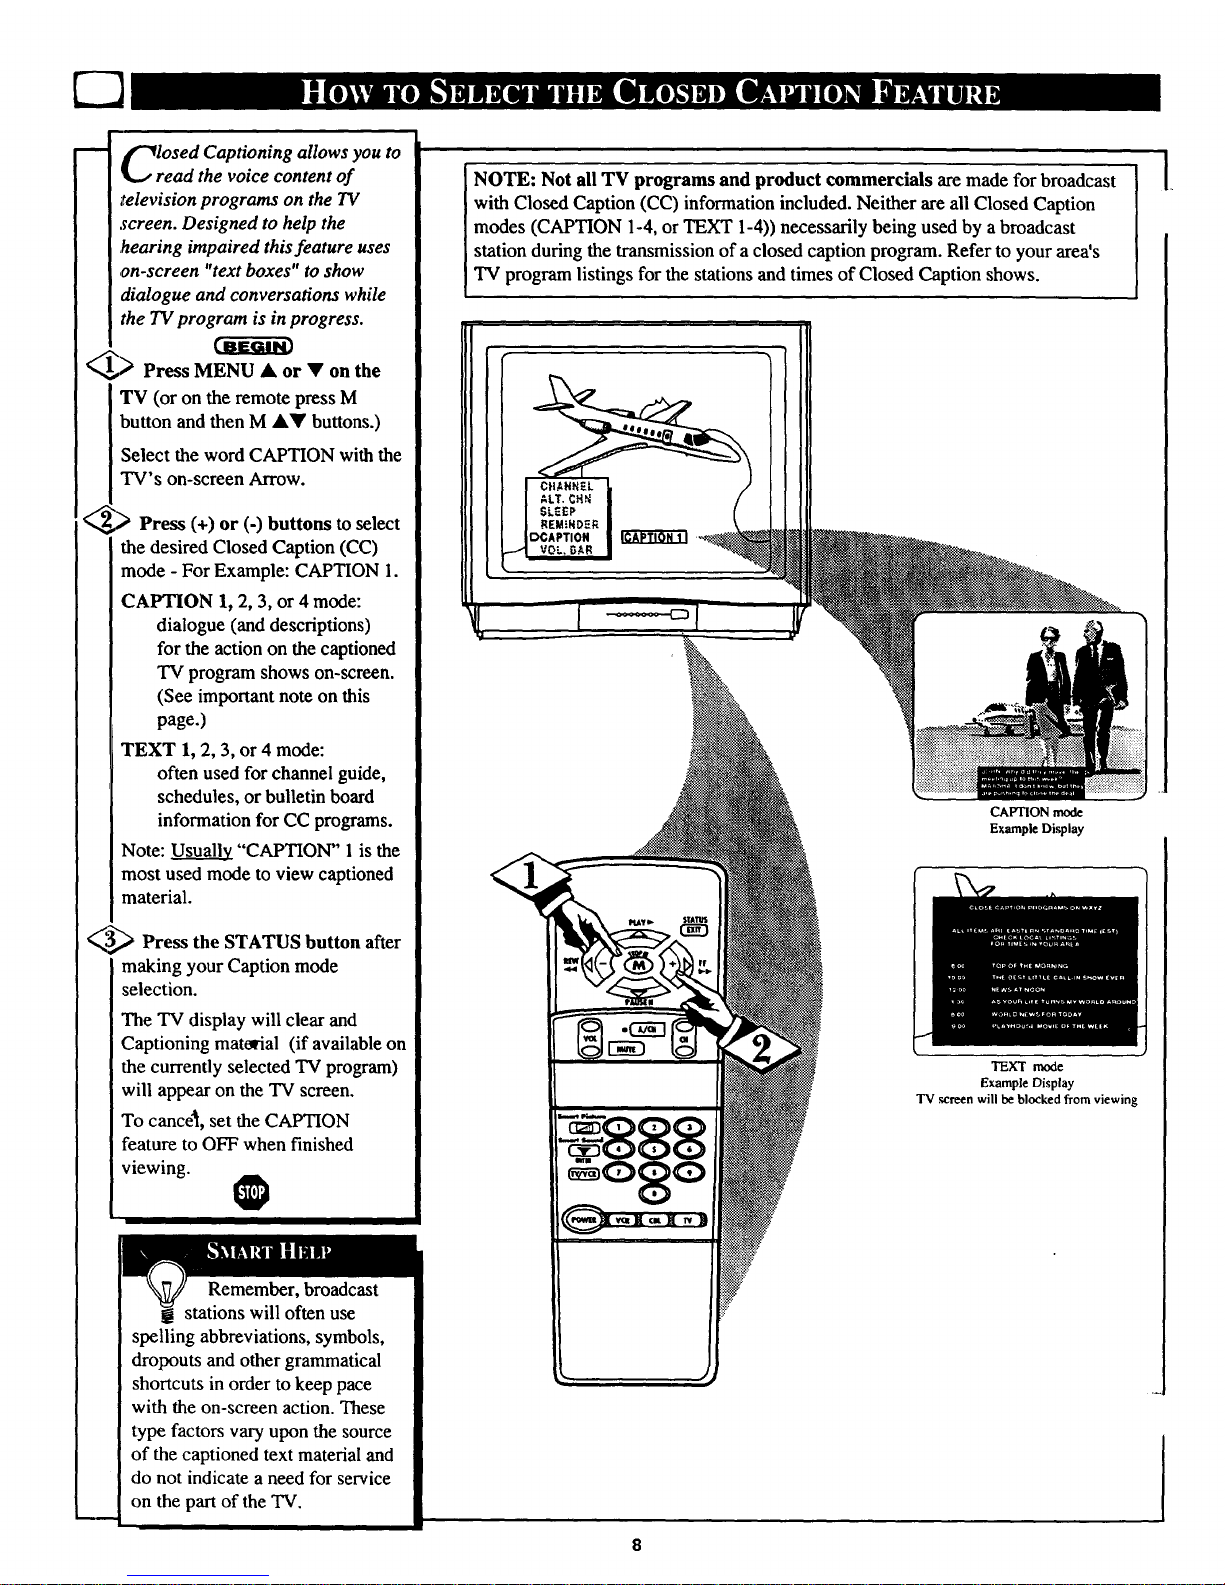
lrOSedCaptioning allows you to
ead the voice content of
television programs on the IV
screen. Designed to help the
,hearing impaired this feature uses
on-screen "text boxes" to show
dialogue and conversations while
the TV program is in progress.
__,,_ Press MENU • or • on the
TV (or on the remote press M
button and then M •• buttons.)
Select the word CAPTION with the
TV's on-screen Arrow.
_, _ Press (+) or (-) buttons to select
the desired Closed Caption (CC)
mode - For Example: CAPTION I.
CAPTION I, 2, 3, or 4 mode:
dialogue (and descriptions)
for the action on the captioned
TV program shows on-screen.
(See important note on this
page.)
TEXT I, 2, 3, or 4 mode:
often used for channel guide,
schedules, or bulletin board
information for CC programs.
Note: Usuall2L"CAPTION" 1 is the
most used mode to view captioned
material.
<,,_5._ Press the STATUS button after
making your Caption mode
selection.
The TV display will clear and
Captioning matorial (if available on
the currently selected TV program)
will appear on the TV screen.
To cance4l, set the CAPTION
feature to OFF when finished
viewing.
Remember, broadcast
stations will often use
spelling abbreviations, symbols,
dropouts and other grammatical
shortcuts in order to keep pace
with the on-screen action. These
type factors vary upon the source
of the captioned text material and
do not indicate a need for service
on the part of the TV.
NOTE: Not all TV programs and product commercials are made for broadcast
with Closed Caption (CC) information included. Neither are all Closed Caption
modes (CAPTION 1-4, or TEXT 1-4)) necessarily being used by a broadcast
station during the transmission of a closed caption program. Refer to your area's
TV program listings for the stations and times of Closed Caption shows.
CAPTION mode
Example Display
TEXT mode
Example Display
TV .screen will be blocked from viewing
Page 9
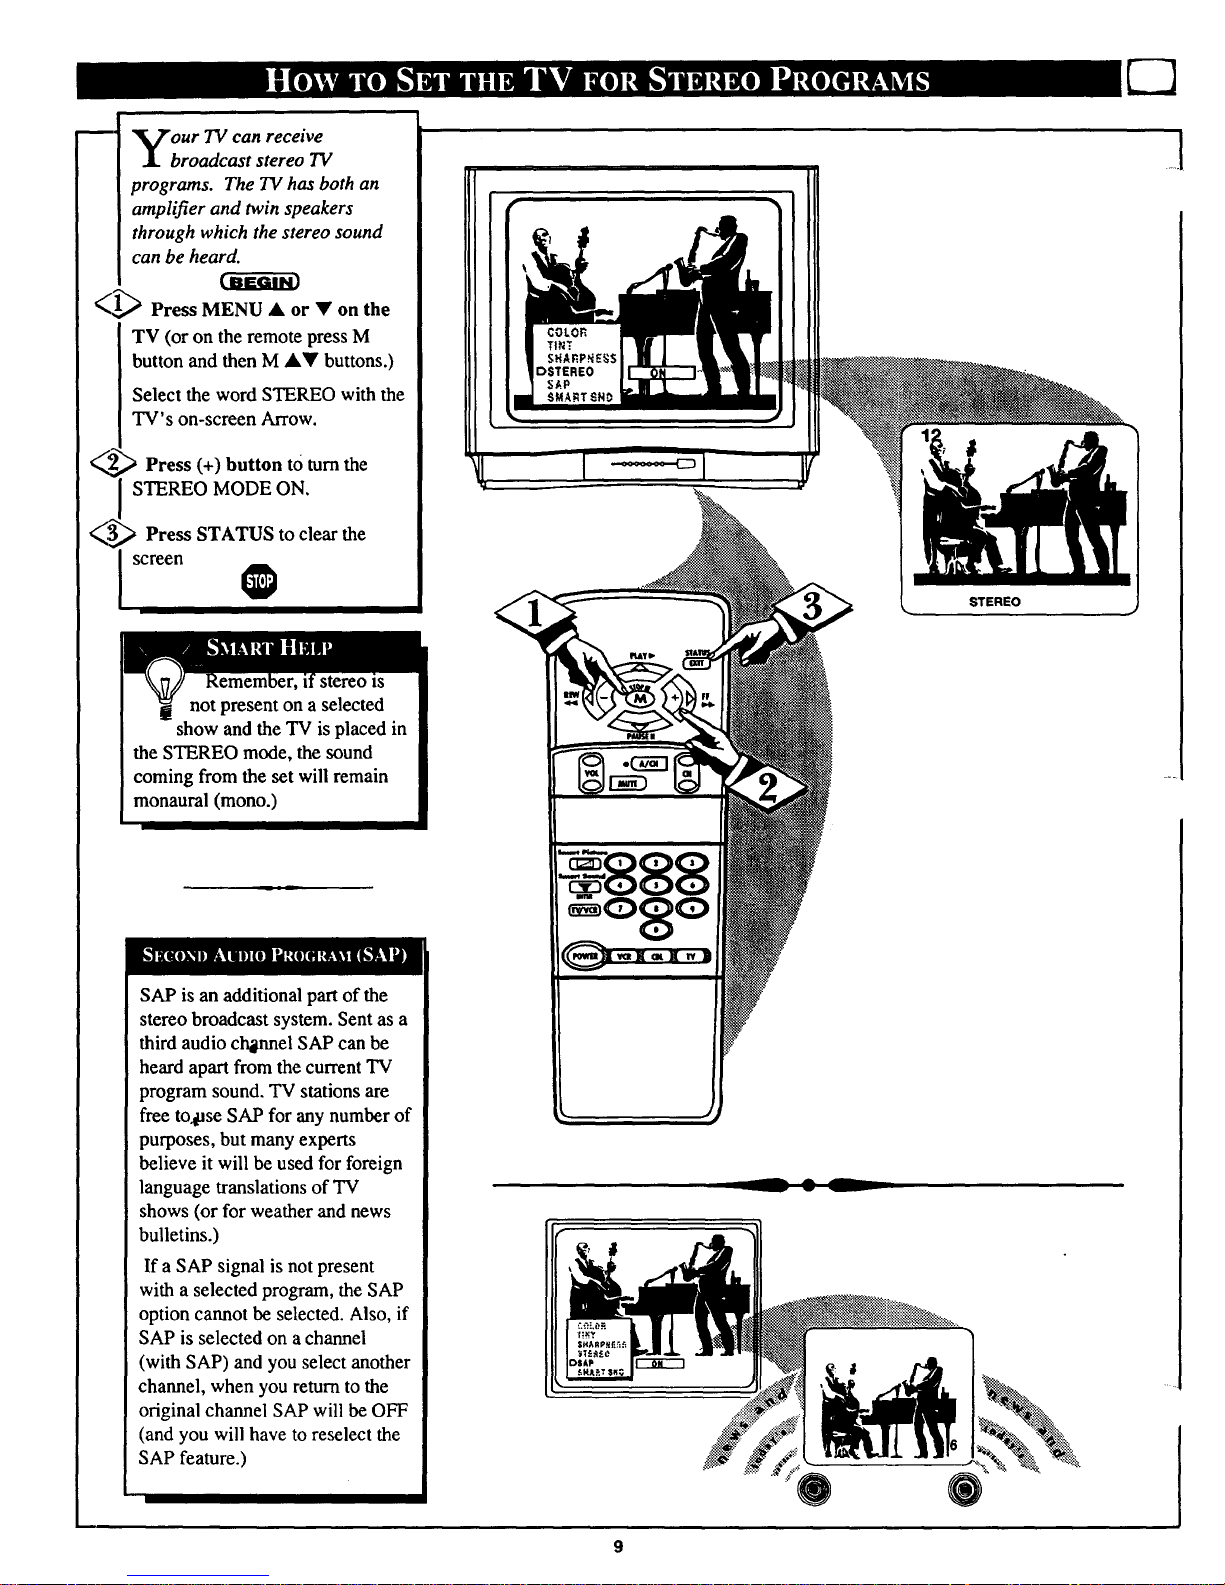
our TV can receive
broadcast stereo TV
programs. The TV has both an
amplifier and twin speakers
through which the stereo sound
can be heard.
_1_ Press MENU • or • on the
TV (or on the remote press M
button and then M A• buttons.)
Select the word STEREO with the
TV's on-screen Arrow.
> Press (+) button tOturn the
I STEREO MODE ON.
_ Press STATUS to clear the
I screen
not present on a selected
show and the TV is placed in
the STEREO mode, the sound
coming from the set will remain
monaural (mono.)
SAP is an additional part of the
stereo broadcast system. Sent as a
third audio channel SAP can be
heard apart from the current TV
program sound. TV stations are
free to4ase SAP for any number of
purposes, but many experts
believe it will be used for foreign
language translations of TV
shows (or for weather and news
bulletins.)
If a SAP signal is not present
with a selected program, the SAP
option cannot be selected. Also, if
SAP is selected on a channel
(with SAP) and you select another
channel, when you return to the
original channel SAP will be OFF
(and you will have to reselect the
SAP feature.)
STEREO
-- A --
w v
_1
Page 10

m
re you tired of the sound of
commercials following you
into the next room or all through
the house? Smart Sound allows you
to preset a desired volume level
that the TV sound will not go
above. This makes for an even,
more consistent sound by reducing
the peaks and valleys that can
occur during program changes or
commercial breaks.
.,,.q'..,.
_"J,_ Press the Smart Sound button
on the remote.
"SMART SOUND" shows on the
TV screen.
<_ Press the Smart Sound
} button repeatedly to turn the
volume level control ON (or OFF.)
_ Press the STATUS button to
clear the screen when completed.
0
U_h e the Volume Bar control to see
e TV s volume level settings
on the TV screen. Once set the
Volume Bar will be seen each time
the VOLUME buttons (on the TV or
remote) are pressed.
_,_ Press MEN_A or on the TV
(or on the remote press M button and
then M &• buttons.)
Select thetword VOL.BAR with the
TV's on-screen Arrow.
<_ Press (+) or (-) buttons to turn
I the VOL BAR control ON.
<_ Press STATUS button to clear
the screen. 1_
Remember,
Smart Sound works
only with the
programs coming
through the
Antenna/Cable
input on the rear of
the TV (RF audio).
It will not control
the sound levels for
the Auxiliary
(VCR/AUX IN)
audio inputs.
NOTE: SMART SOUND can al.so be
_lected with the TV's on-screen Menu.
Just press the (+) or (-) buttons to turn
the SMART SOUND control ON or
IOFF.
Try it out.
Press the VOLA•
buttons. The
VOLUME BAR
should appear at the
bottom of the
screen.
Io
Page 11

whether you're watching a movie
or a video game your TV has
automatic video control settings
matched for your current program
source or content. The Smart Picture
feature quickly resets your TV's video
controls for a number of different
types of programs and viewing
conditions you may have in your
home. Each Smart Picture setting is
preset at thefactory to automatically
adjust the TV's Picture, Color, and
Sharpness viewing control levels.
<('1._ Press the Smart Picture button
on the remote.
<_2,_ Press the Smart Picture button
I epeatedly to select any one of the
preset viewing categories (Example:
Video Games, Movies, etc.).
<_ Press STATUS button to clear
the screen.
i
"ring" or series of previously
viewed channels can be selected
from the Alternate Channel (A/CH)
button on your remote control. With
this feature you can easily switch
between different TV programs that
currently interest you. The ALT.
CHN. menu co_,rol allows you to set
up to four channels in the viewing
'h'ing". Great for viewing evening
news or_ports programming.
<'1_ Press MENU • or • on the TV
(or on the remote press M button and
then M •• buttons.)
Select the word ALT. CHN. with the
TV's oil-screen Arrow.
, Press the (+) or (-) buttons to
[_select the number of channels in the
"ring". (Either 2, 3, or 4 channels.)
,/3,_,_ Press STATUS button to clear
the screen.
I
Remember,
the Smart Picture
video control
settings are
memorized into the
TV at the factory
and can only be
reset by field and
service technicians.
The Menu ••
buttons can also be
used to make your
selections on the
Smart Picture
control screen.
11
4 Channel RIn,
Current
Channel
Previous
Channel
2nd Previous
Channel
3rd Previous
Channel
Remember,
to use A/CH first
select the desired
channels with the
number buttons on
the remote. (For
example: 02, 06, 11,
and 22.) Then press
the A/CH button on
the remote to
quickly select the
channels in the
"ring".
Try it out. Enter the
number of desired
channels and then
press the A/CH
button. You should
see only the 2, 3, c-
4 channels you
selected for the
Alternate Channel
ring.
Page 12

_ rfie channel number for a
• selected program can remain
on the TV screen by using the
,REMINDER feature.
_> Press MENU • or Y on the
TV (or on the remote press M
button and then M A• buttons.)
Select the word REMINDER with
the TV's on-screen Arrow.
_,"_ Press (+) or (-) button to turn
REMINDER ON.
_,) Press STATUS button to
clear the screen.
You should now see the channel
number at the bottom of the
screen.
O
I
_1 To adjust your TV color and
P
a picture controls, select a channel
and follow the steps shown below:
(I_ Press MENU • or • on the TV
(or on the remote press M button and
then M A• buttons) until the
desired control s_ows on-screen.
_Z_ Press (+) and (-) to adjust the
I selected color control.
_ Press STATUS button (or EXIT
Menu) to clear the screen when
picture adjustments are completed.
Remember, m
if Closed
Captioning is ON,
neither the Channel
Reminder or the
"MUTE" sound
indicator will show
on the TV screen.
I1••_••# -oo, .....
Remember,
when the bar scale
is centered, the
control settings are
at normal mid-range i
levels.
_.IB.qdt.I_!F,,_
Press (-) or (+) until
darkest parts of the
picture areas bright as
you prefer.
PICTURE Press (-)
or (+) until lightest
parts of the picture
show good detail.
COLOR Press (-) or
(+) to add or eliminate
color.
TINT Press (-) or
(+) to obtain natural
skin tones.
SHARPNESS Press
(-) or (+) to improve
detail in the picture.
12
Page 13

aVe you ever fallen asleep in
ont of the TV only to have
it wake you up at two in the
morning with a test pattern
screeching in your ears? Well,
your TV can save you all that
trouble by automatically turning
itself off.
_,_ Press MENU • or • on the
TV (or on the remote press M
button and then MAW buttons.)
Select the word SLEEP with the
TV's on-screen Arrow.
¢,,_,_ Press the (+) or (-) button
repeatedly to pick the amount of
time (15 minutes to 2 hours
ahead) before the TV will turn
itself off.
'/-,_ Press the STATUS button to
clear the screen after you have set
the time for the TV to turn off.
_m
Osprour French and Spanish
eaking TV owners an on-
screen LANGUAGE option is
present. With the LANGUAGE
control you can set the TV's on-
screen features to be shown in
either English,eFrench, or Spanish
text.
<_ PresstMENU • or • on the
TV (or on the remote press M
button and then M A• buttons.)
Select the word LANGUAGE
with the TV's on-screen Arrow.
"_-,_ Press (+) or (-) buttons to
select either the English, French
(FRANCAIS), or Spanish
(ESPANOL) language option.
Text for the on-screen Menu will
change to the selected language.
_ Press STATUS to clear the
_ Isc n"
13
Remember, g
to see how many
minutes are left
before the TV shuts
itself off, press the
STATUS button on
the remote.
To stop a SLEEP
TIMER setting,
reset the timer back
to OFF. (Turning
the TV off, and then
back on again, will
also cancel a
setting.)
A few seconds
before the TV is to
shut off a message
will come on the
screen telling you
GOOD NIGHT.
Remember, I
If you went through
Setup (in your
Quick Use Guide),
this task has already
been completed for
you.
The Language
control only makes
the TV's on-screen
(MENU) items
appear .inFrench or
Spanish text. It does
not change the
language of other
on-screen text
features such as
Closed Captioned _
(CC) TV shows.
Page 14

WOpUld you like to hear TV
rograms through your audio
hi-fi system? The TV's Audio
Output jacks and TV Speaker
On/Off control work together to
offer you this TV sound option.
1_ Connect the and L(eft)
R(ight)
AUDIO OUT jacks on the TV to
the R and L Audio Input jacks on
your amplifier or sound system.
Set the audio system's volume to
normal listening level.
Turn the TV and audio system
_, _ ON. You can now adjust the
sound level coming from the audio
system with the Volume ••
buttons on the TV or remote.
To hear the TV sound from only
_,"_ the audio system speakers,
select the TV's SPEAKER on-
screen control.
Press MENU • or • on the TV
(or on the remote press M button
and then M A• buttons.)
Select the word SPEAKER with
the TV's on-screen Arrow.
Press the (+) or (-) buttons to
4_ turn the TV's internal speakers
OFF.
You should now only hear TV
sound coming from the audio
system speakers.
Press the STA_rUS button to
clear the screen.
I ®
! su UED
- -- AUDIO OUT
, (RED/WHITE)
®®
AUDIO SYSTEM
1
14
Page 15

m-
ou can view the playback of
VCR tapes (Video Disc
Players, camcorders, etc). by
using the AUDIO and VIDEO
INPUT jacks (on the rear of the
TV).
For example: to view the
playback of a VCR tape:
<,,_ Connect the VIDEO and
AUDIO IN(put) jacks on the
TV to the AUDIO and VIDEO
OUT(put) jacks on the VCR.
Press MENU & or • on the
TV (or on the remote press M
button and then M &• buttons.)
Select the word INPUT with the
TV's on-screen Arrow.
Note: You can press the
CHANNEL&• buttons to select
"VCP-,/AUX" (if it has been
added to the TV's channel
memory.) See page 7 for details.
<_,,_ Press (+) or (-) button to
I select the VCR/AUX(iliary)
INPUTS on the rear of the TV.
<_ Turn the VCR ON and PLAY
the VCR tape to be viewed on the
TV.
Remember, when you're
ti through using the A/V
INpUT jacks, return the INPUT
display'_creen on the TV to
ANTENNA. If you leave the TV
in the VCR/AUX INPUT mode
and there is no signal source
connected to the jacks, you will be
seeing only a blank screen on the
TV.
NOTE: If you have a mono
(single audio OUTPUT) VCR,
"Y" Connectors are available
(from your dealer or Parts
Information Center 1 800 292-
6066) to connect to the audio
inputs on the TV.
PICTURE AND SOUND FROM
PLAYBACK OF VCR TAPE
15
VIDEO II_
(YELLOW)
_.J
RCA PHONO PLUG
__ CABLES (NOT
SUPP.... LIED)
AUDIO IN
%5o ®,®®J
VCR
(EQUIPPED WITH VIDEO AND
AUDIO OUTPUT JACKS)
NOTE: THE 'q"V/VCR" BUITON
CAN ALSO BE USED TO PLACE
THE TV IN THE VCR/AUX MODE
(AS WELL AS SELECT CHANNELS
3OR 4.)
Page 16

our remote control is set to
work your TV and many
infrared remote (IR) control
VCRs. However, an easy one-
time step may be necessary
before the remote will work your
VCR.
Try this initial check to see if
going on to thefollowing section
is necessary.
I_A_ Press the VCR System
button on the remote.
_ Point toward VCR
remote
I and press the POWER button.
3_ Does the remote turn the VCR
ON?
IF YES, O and try the other
VCR buttons on the remote. If
they also work the VCR, then
the remote is ready and no
further steps are needed.
If NO, continue...
® I
VCR
.......... .............................
l
<
First look up a TWO-DIGIT
remote code number for your
brand VCR before going through
the simple "1,2,3" steps (on the
following page).
continue to next page
Remember, if more than
_ one number is listed, you
may havetto try more than the first
two-digit'code given in order to
locate your VCR's remote code.
_VCR REMOTE
CODEYO.
Akai 24, 25, 36
Audio Dynamics 14, 21,29
Broksonic 31
Cannon 01
Capehart 33
Craig 07, 30
CurtisMathes 01,32, 42, 43
Daewoo 33
DBX 14, 21,29
Dynatech 27
Emerson 20, 31, 34, 40
Fisher 06, 07, 08
Funai 27, 28
GE 01
Goldstar 23
Go Video 45, 46
Hitachi 03, 51
InstantReplay 01
JC Penney 01,03, 23, 29
JVC 14,47, 48
Kenwood 13, i 4
Lloyds 27
Magnavox 00, 01, 02, 05, 27, 28
Magnin 30
Marantz 29
Memorex 01, 07, 23, 27
Minolta 03
Mitsubishi 16, 17, 38, 39, 50
Montgomery Ward 12
lfi
VCR REMOTE -%
BRAND CODENO.
Multitech 27,28
NEC 14, 21,29
Panasonic 01
Pentax 02, 03
Philco 01,02, 05, 27, 28
Philips 00, 01, 05, 27, 28
Quasar 01
RCA 03, 04, 32, 42, 43, 44
Realistic 07,11, 12, 23, 27, 28
Samsung 22, 30
Sansui 49
Sanyo 07, 13
Scott 19
Sears 03, 08, 23
Sharp 11, 12
Shinton 35
Sony 09, 10,41
Sound Design 27
Sylvania 01,02, 05
Symphonic 27
Tatung 14
Teac 14, 27
Teknika 26, 27
Thomas 27
TMK 20
Toshiba 18, 11_
Video Concepts 28
Yamaha 14, 29
Zenith 1
Page 17

[
ow that you have looked up
the two-digit Remote Code
Number for your brand of VCR
(on previous page), you are
ready to follow the four simple
steps below.
Please read through steps 1-4
before beginning.
Cffffffi'_
_._ Press and release the REC
I (RECORD) button.
_2_ Within thirty seconds after
releasing the REC button, press
and release the VCR System
button.
_,3,_ Within thirty seconds after
releasing the VCR System
button, ENTER THE TWO
DIGIT CODE NUMBER for
the desired VCR. The remote is
now ready to send commands to
the VCR.
¢,4_ Point the remote at the VCR.
Press the POWER button on the
remote to turn the VCR ON.
VCR
PAIJ_ II
Try it out. The Channel
t and VCR buttons on the
remote should l_OWoperate the
VCR.
Remember, if this doesn't work
the first4time, repeat steps using
the same remote code number.
If after a second try the remote
does not operate your VCR, and
there are more code numbers
listed for your brand VCR, use the
next listed code number.
If after repeated attempts the code
number method does not work
your VCR, try the "VCR
SEARCH" method on page 24.
17
Page 18

<
our remote control is set to
work your TV and many
infrared remote (IR ) control
Cable Converters. However, an
easy one-time step may be
,necessary before the remote will
work your Converter.
Try this initial check to see if
going on to the following section
is necessary.
Press the CBL
System
button on the remote.
_,_ Point remote toward Cable
Converter and press the POWER
button.
_ Does the remote turn the
Converter ON?
IF YES, • and try the CH • •
and CH number buttons on the
remote. If they also work the
Converter then the remote is
ready and no further steps are
needed.
If NO, continue...
Cable
I !
_
1_ First look up a TWO-DIGIT
I emote code number for your
brand Converter before going
through the simple "1,2,3" steps
(on the following page).
continue t_ next page
Remember, if more than
one number is listed, you
may have to try more than the first
two-digit code given in order to
locate your ConvertePs remote
code.
CONVERTER REMOTE CONVERTER REMOTE
BRAND CODE NO. BRAND CODE NO.
Archer 28 Rembrant 33
Diamond 23 Salora 52
Drake 37 Scientific Atlanta 08, 22, 47
Gemini 45 Sheritech 34
Hamlin 14, 15 Sylvania 16
Hitachi 25 Texscan 16, 48
Jerrold 01,02,03,04,05,30,46 Tocom 12,13, 53
Macom 29, 38 Toshiba 43
Magnavox 17,26, 31 Uniden Satellite 44, 54
NSC 49 Unika 50
Oak 06, 27, 39 Universal 36
Panasonic 18, 35 Video Tech 40
Philips 19, 20, 21, 24, 26 Video Way 51
Pioneer 09, 32 Viewstar 26
Regency 10, 11 Zenith 07, 41, 42
18
Page 19

ow that you have looked up
the two-digit Remote Code
Number for your brand of Cable
Converter (on previous page),
you are ready tofollow thefour
simple steps below.
Please read through steps 1-4
before beginning.
<,_ Press and release the REC
(RECORD) button.
<,,_ Within thirty seconds after
releasing the REC button, press
and release the CBL System
button.
¢,,_ Within thirty seconds
after
releasing the CBL System
button, ENTER THE TWO
DIGIT CODE NUMBER for
the desired Converter. The
remote is now ready to send
commands to the Converter.
<,_ Point remote at
the the
Converter. Press the POWER
button on the remote to turnthe
Converter ON.
Cable Converter
I I
R
PLAY_ STAIUS
PAUSEII
Try it out. The Channel
and POWER buttons on the
remote should l_ow operate the
Converter.
Remember, if this doesn't work
the first*time, repeat steps using
the same remote code number.
If after a second try the remote
does not operate your Converter,
and there are more code numbers
listed for your brand Converter,
use the next listed code number.
If after repeated attempts the code
number method does not work
your Converter, try the
"CONVERTER SEARCH"
method on page 24.
19
Page 20

m
our TV remote can be set to
work your VCR or Cable
Converter by what is called the
SEARCH method.
If the "REMOTE CODE" number
method shown in the previous
section did not set your remote to
work your VCR or Converter, then
follow the easy steps listed below.
Please read through steps 1-4
before beginning.
(,,_ Press the POWER button on
the VCR or Converter to turn the
unit ON.
2_,,_ Stand at least six feet away
from the front of the VCR or
Converter.
Point the remote toward the unit.
HOLD DOWN the A/CH and
the desired System (VCR or
CBL-Converter) buttons at the
same time. KEEP HOLDING
BUTI'ONS DOWN.
_.'._ Watch the Channel Indicator
on the unit.
Channel Numbers will SCAN UP
when the unit has been identified.
This may take up to two minutes.
4_ Release the AJCH and
System
(VCR or CBL) buttons as soon
as channel numbers startto scan
up. The code has been identified
and the remote is ready to operate
with the VCR _ Converter.
Remember, a minute or
two can seem very long, but
the code should be located within
two minutes.
Don't let the VCR scan up more
than five channels. If you do the
remote may pass up the right code
and another two minute search
cycle will have to be repeated.
If no channel change happens
within two minutes, repeat steps
1-4. Should a channel change still
not occur, the remote will not
work with the desired unit.
CABLE CONVERTER
Don_
09
T
Six Feet
(minimum)
!
20
.1
Page 21

hen using the TV remote
with a VCR, first make
certain it is set to control your
VCR ( by the REMOTE CODE or
SEARCH method - see earlier
section).
_ Press the VCR System
button on the remote.
._ Point the top of the remote
toward the front of the VCR
(remote sensor window) when
pressing buttons.
O
Record Button
Hold the RECORD button down, and
then press the PLAY button to begin
a VCR recording.
Rewilad Button
Press to rewind tapes. For some
VCRs you may need to press STOP
button first then REWIND. In
playback mode. hold button down to
view picture moving rapidly in
reverse.
Pause Button
Press to temporarily stop the tape dur-
ing a playback or recording. Press
again to release Pause.
TV-VCR Button
Press to the VCR position ("VCR"
indicator on the x_CR will light) to
view the playback of a tape. Press
again to place in the TV position
("VCR" indicator on the VCR will go
OFF) to View one program while
recording another program.
Remember, the VCR
buttons on the remote will
not operate your VCR if those
features are not already found on
your VCR remote control.
Note: All VCR functions
(particularly Search, Rewind, Fast
Forward, etc.) will operate the
same as with the original VCR
remote control provided with the
VCR.
PLAY STATUS
PAUSEII
J
Play Buttpn
Press to playback a tape. Hold down
after pressing the RECORD button to
start a recording.
Press to stop the tape.
'F;_stForward Button
Press to rapidly advance the tape. For
some VCRs you may need to press
STOP first then FF. In Playback
mode hold button down to view the
picture moving rapidly in the forward
direction.
•Channel Scan Buttons
Press to scan up or down through
VCR channel numbers.
Number Buttons
Press buttons for direct VCR channel
selections.
VCR System Button
Press to send remote commands to
the VCR.
Power Button
Press to turnthe VCR ON and OFF.
21
Page 22

lease make these simple
checks before calling for
service. Theses tips can save you
time and money since charges for
TV installation and adjustment of
customer controls are not
covered under your warranty.
NQ PQwer
No Picture
No Sound
Remote Does Not
Work
TV Displays Wrong
Channel or NO
ChanJels Above
CAUTION: A video source (such as a video game, Compact Disc Interactive - CDI, or
TV information channel) which shows a constant non-moving pattern on the TV screen.
can cause picture tube damage. When your TV is continuously used with such a sourct
the pattern of the non-moving portion of the game (CDI, etc.) could leave an image
permanently on the picture tube. When not in use, turn the video source OFF.
Regularly alternate the use of such video sources with normal TV viewing.
[ Check the TV power cord. Unplug the TV, wait 10 seconds, then reinsert plug into
outlet and push POWER button again.
Check to be sure outlet is not on a wall switch.
I[ heck antenna connections on the rear of the TV. Are they properly secured to the
antenna plug on the TV?
Check the CABLE/YES NO control for correct position.
Check INPUT control for correct position. VCR-AUX position without a signal source
will result in a blank screen.
Check the VOLUME buttons.
Check the MUTE button on the remote control.
Check the SPEAKER on-screen control. OFF position will eliminate sound at the set.
If attempting auxiliary equipment hook-ups, check audio jack connections.
Check TV-VCR-CBL "System" buttons on the remote. Press the remote's TV System Jl
button to send commands to the TV.
Check batteries. Replace with AA Heavy Duty (Zinc Chloride) or Alkaline batteries
if necessary.
Clean the remote and the remote sensor window on the TV.
Check the TV power cord. Unplug the TV, wait 10 seconds, then reinsert plug into
outlet and push POWER button again.
Check to be sure TV outlet is not on a wall switch.
li Repeat channel selection.
Add desired channel numbers (CHANNEL control) into TV memory.
Check CABLE/ YES NO control for correct position.
IThis TV is with that shuts the TV off in of
equipped protective circuitry
case
moderate
t Ipower surges. Should this occur turn the TV back on by pressing the POWER button
I once or twice, or unplug (wait 10 seconds) and then replug the power cord at the AC
[ outlet. This feature is NOT designed to prevent damage due to high power surges such
as those caused by lightning, which is not covered by your warranty.
Cleaning and Care
• To avoid possible shock hazard be sure the TV is unplugged from the electrical outlet before cleaning.
• When cleaning the TV screen take care not to scratch or damage the screen surface (avoid wearing jewelry or using
anything abrasive). Wipe the front screen with a clean cloth dampened with water. Use even, easy, vertical strokes when
cleaning.
• Gently wipe the cabinet surfaces with a clean cloth or sponge dampened in a solution of cool clear water. Use a clean dry
cloth to dry the wiped surfaces.
• Occasionally vacuum the ventilation holes or slots in the cabinet back.
• Never use thinners, insecticide sprays, or other chemicals on or near the cabinet, as they might cause permanent marring
of the cabinet finish.
22
Page 23

C_mxialCable* Asinglesolidantenna wire normally matched with a
metal plug (F-type) end connector that screws (or pushes) directly onto
a 715Ohm input found on the Television or VCR.
Closed Caption * Broadcast standard which allows you to read the
voice content of television programs on the TV screen. Designed to
help the hearing impaired this feature uses on-screen "text boxes" to
show dialogue and conversations while theTV program is in progress.
Display * An on screen message or graphics that help the user operate
and adjust his Television feature controls. See On Screen Displays
(OSD).
Direct Audio/Video Inputs * Located on the rear of the "IV these
connectors (RCA phono type plug) are used for the input of audio and
video signals. Designed for use with VCRs (or other accessories) in
order to receive higher picture resolution and offer sound connection
options.
Identify* Method by which a remote control searches and finds an
operating code for another product (such as a VCR or Cable Convener).
Once the code has been "identified" then the TV remote can operate
a_adsend commands to the other product.
Multichannel Television Sound (MTS) * The broadcast standard that
allows for stereo sound to be transmitted with the TV picture.
On Screen Displays (OSD) * Refers to the wording or messages
generated by the television (or VCR) to help the user with specific
feature controls (color adjustment, programming, etc.).
Menu * An on-screen listing of feature controls shown on the
Television screen that are made available for user adjustments.
Programming * The procedure of adding or deleting channel
numbers into the Television's memory circuits. In this way the
Television "remembers" only the locally available or desired
channel numbers and skips over any unwanted channel numbers.
Remote Sensor Window * A window or opening found on the
Television control panel through which infrared remote control
command signals are received.
Setup Mode * Automatic feature control settings made by the TV.
Designed for first time set-up and use. Settings for signal connections
(antenna or cable TV), plus channel program memory are held in the
TV's memory (even if the set is unplugged and moved to a new
location.)
Second Audio Program (SAP) * Another or additional audio
channel provided for in the Multichannel Television Sound (MTS)
broadcast standard. The most frequently proposed use for SAP is the
simultaneous bilingual broadcast of TV program material.
Status * Allows the user to quickly confirm what channel number is
currently being viewed. Status can also be used to clear the
Television of on screen displays or information (rather than waiting
for the displays to "time out" or automatically disappear from the
screen).
Twin Lead Wire * The more commonly used name for the two
strand 300 Ohm antenna wire used with many indoor and outdoor
antenna systems. In many cases this type of antenna wire requires an
additional adapter (or balun) in order to connect to the 75 Ohm Input
terminals designed into the more recent Televisions and VCRs.
23
Page 24

Accessories/Optional ........................................... 14-15, *Q/U- 1
Adapter Connector .............................................. 14-15, *Q/U-1
Add/Delete Channels .............................................. 6, 7, *Q/U-2
Audio/Video Input and Output Jacks ................................ 14-15
Battery Installation ......................................................... *Q/U-3
Cable TV Connections/Settings .............................. 5, *Q/U-1,2
Channel Display ...................................................... 12, *Q/U-3
Channel Memory .................................................... 6, 7, *Q/U-2
Channel Reminder .................................................................. 12
Closed Captioning .................................................................... 8
Controls/TV .................................................................... *Q/U-3
Controls/Remote ................................................. 16-21, *Q/U-3
Features ..................................................................................... 4
Glossary TV Terms ................................................................. 23
Identify VCRs with TV Remote ..................... ............. 16-17, 20
Identify Cable Converters with TV Remote ................ 18-19, 20
Input Control ........................................................................... 15
Inputs/Audio and Video .......................................................... 15
Language Option .................................................................... 13
Memory/Program Channels .................................... 6, 7, *Q/U-2
IVlenuButton ................................................................... *Q/U-4
Minus(-)/Plus (+) Buttons ............................................... *Q/U-4
Output (Audio) Jacks .............................................................. 14
Power Light Indicator ..................................................... *Q/U-3
Precautions/Safety ............................................ 2, 3, 27, *Q/U-I
Programming Channels .......................................... 6, 7, *Q/U-2
Remote Control ................................................... 16-21, *Q/U-3
Requesting Service ...................................................... 25-26, 27
RF Coaxial Cable .......................................................... *Q/U-1
Safety/Precautions ............................................ 2, 3, 27, *Q/U-I
Second Audio Program ............................................................. 9
Sensor Remote ................................................................ *Q/U-3
Set Up/First Time Use ........................................ *Q/U-l, 2, 3, 4
Sleep Timer ............................................................................. 13
Smart Picture .......................................................................... 11
Smart Sound ............................................................................ 10
Status Button .................................................................. *Q/U-4
Stereo ........................................................................................ 9
Tips for Service ..................................................... 22, 25-26, 27
VCR Buttons ........................................................................... 21
VCR/TV Connections .............................................. 15, *Q/U-1
Volume Bar Control ............................................................... 10
Warranty ................................................................................. 27
* Information contained in separate Quick-Use (Q/U) Guide
page number listed.
24
Page 25

Philips Consumer Electronics Company
FactoryService Center Locations
See Reverse Side for More Details.
San Francisco/Metro Area
Detroit/Toledo
Rockford
Chicago/
Milwaukee
:incinnati
• BostonlS Maine/
Diego
/
• Phoenix/Metro Area
Dallas/Ft. Worth
_ Beaumont/Austin
San Antonio
Charlotte
New Jersey
• _ i/ • PhiladelphleiS New Jersey
AtlantaJN Georgia
!ngtonlBaltimoreiRichmond
• Orlando/N Florida/SE Georgia
\
_ Tam_l_,l Flodda
'_Ft. Myers/SW Florida
_lMlami/SE Florida
Over 1100 Drop-Off Sites Nationwide
NOTE:IfyouresideinoneofourPhilipsFactoryServiceBranchareas(seedirectoryonback),youcancontactthenearestServiceBranchto obtain
efficientandexpedientrepairforyourproduct.Ifyourproductis In-Warranty,youshouldhaveproof-of-purchasetoensureNoChargeService.
ForOut-of-Warrantyservice,callthelocationnearestyou.
NOTA:Sivousr6sidezdansunedesrdgionsdesserviesparunesuccursaledeserviceapr_sventedufabdcantPhilips(voirlisteci-dessous),vous
pourrezcontacterlabranchedeserviceaprbsventelaplusprosdechezvouspourobtenirunserviceapr_sventerapideetefficace.Si leproduitest
sousgarantie,ilsuffiradeprdsenterunepreuved'achatpourbdndficierd'unservicesansfrais. Pourlesproduitsnoncouvertsparlagarantie,
contactezlecentreleplusprbsdechezvous.
NOTA:Si Ud.resideenunadenuestraszonasparasucursalesPhilipsdeservicioaldefdbrica(verdirectoriom,'tsabajo),Ud.puedecomunicarsecon
lasucursaldeserviciorodscercanaparaobtenerunareparaci(_noportunay efisazdesu producto.Sisuproductoestdtodaviabajogarant{a,Ud.debe
presentarcomprobantedecompraparanoocasionarningunoscargosporservicio.Paraserviciodespudsdelvencimientodelagarantia,Ilameal
lugarmdscercanodelosabajoindicados.
MAC29292i95 EL4482-3 Rev.K
25
Page 26

QUALITYSERVICEISASCLOSEASYOURTELEPHONE!SIMPLYLOOKOVERTHELISTBELOWFORTHENUMBEROFA FACTORYSERVICECENTER
NEARYOU.WHENYOUCALL,ASERVICEREPRESENTATIVEWILLGLADLYDIRECTYOUTOONEOFOVER1100DROP'OFFSITESLOCATEDNATIONWIDE.
YOURPRODUCTWILLRECEIVEEFRCIENTANDEXPEDIENTCARRY-IN,MAIL-IN,ORIN-HOMESERVICE,ANDYOUWILLRECEIVEPEACEOFMIND,
KNOWINGYOURPROOUCTISBEINGGIVENTHEEXPERTATTENTIONOFPHILLIS'FACTORYSERVICE.AND,IFTHEPHONENUMBERLISTEDFORYOURAREA
ISLONGDISTANCE,CALL1"800-242-9225FOeFJcxom'SmV_E. +
COMMENTOBTENIRNOTRESERVICEAPRJ:SVENTERAPIOEETEFFICACEson" PARCOURRIER,ADOMICILE,OUENSE PRI_SENTANTAUN CENTREDESERVICEPHILIPS.PLUSDE600 CENTRESb.
Rf:CEPTIONDEPRODUITS/_RI_PARERJ_TRAVERSLEPAYS:CONTACTERLECENTREDESERVICEAUXCONSOMMATEURSLEPLUSPROCHEPOURSAVOIRL'EMPLACEMENTDECESOf:POTSDANS
UNRAYONOE50A75 MILES(80KMA120KM)DUCENTREDESERVICELOCAL.
COMOOBTENERUN SERVICIOOPORTUNOY EFICIENTEPOR CORREO,ENCASA0 EN PERSONAPARASU PRODUCTOATRAVtS DEUNCENTROPHILIPSDESERVICIO.MAS DE600 SITIOS POR
TODQELPAlSPARALA RECEPClONDEPRODUCTOSNECESn.ADOSDEREPANACIONES:COMUNICARSECONEL CENTRODESERVICIODEFABRICAMAS CERCANOPARAESTOSLUGARESDENTRO
DEUN RADIODE80 A120 KM (50 A 75 MILLAS)DELCERTRODESERVICIOLOCAL.
Atlanta-Athens-
Macon-Chattanooga,TN-
NorthGeorgiaArea
1898 LelandDrive
Marietta,GA 30067
(404) 952-3279
Over100drop-off locations.
Boston-SouthernMaine-
SouthernNew HampshireArea
1 NorthAvenue
Burlington, MA 01803
(1617)272-4825
Over60 drop-off locations.
Charlotte-WinstonSalem-
Greensboro-ChapelHill-
Raleigh-Spartanburg,SCArea
520-GClantonRoad
Charlotte,NO 28217
(704)529-6330
Over25 drop-off locations.
Chicago-Milwaukee-
GaryArea
1360W. Hamilton Parkway
Itasca,IL 60143
(708) 775-0990
Over80 drop-off locations.
Cleveland-Akron-
YoungstownArea
24090 DetroitRoad
Westlake,OH 44145
(216) 899-2040 •
Over65 drop-off locations.
Columbus-_ayton-
CincinnatiArea
5164 BlazerParkway
Dublin, Ohio43017
(614) 792-1495
Over 19drop-off locations.
Connecticut-RhodeIsland-
Springfield,MAArea
1294BlueHillsAvenue
Bloomfield,CT06002
(203) 726-9612
Over45 drop-off locations.
Dallas-Ft. WorthArea
1901 N.GlenvilleDrive
Richardson,TX 75081
(214) 690-8440
Over25 drop-off locations.
Detroit/ToledoArea
25173 Dequindre
MadisonHeights,MI 48071
(810) 544-2110
Over30 drop-off locations.
Knoxville-Greeneville-
Tri Cities-EastTennesseeArea
6700D. PapermillRoad
PapermillPlaza
Knoxville,TN37919
(615) 584-6614
Over7drop-off locations.
Ft. Myers-Naples-
SouthwestFloridaArea
11601ClevelandAve.,Suite15
Ft.Myers,FL 33907
(813) 278-4242
Over30 drop-off locations.
Houston-Galveston-
Beaumont-Austin-
SanAntonioArea
1110NorthPostOakRoad
Suite100
Houston,TX 77055
(713)682-3990
Over40 drop-off locations.
LosAngeles-SanDiegoArea
2910E.LaPalma,SuiteE
Anaheim,CA 92806
(714) 238-7250
Over70 drop-off locations.
Miami-SoutheastFloridaArea
2099W. AtlanticBlvd.
PompanoBeach,FL 33069
(305) 978-0467
Over45 drop-off locations.
NorthNJ-StatenIsland-
RocklandCounty,NYArea
140JCommerceWay
Totowa,NJ 07512
(201) 890-7200
Over50drop-offlocations.
NewYorkMetroArea
116CharlotteAvenue
Hicksville,NY 11801
(516)933-1780 NassauCounty
Over40 drop-off locations.
Odando--Jacksooville-North
Florida-SoutheastGeorgiaArea
2452SandLakeRoad
Orlando,FL32809
(407) 857-8998
Over30 drop-off locations.
Philadelphia/Lancaster/
S.NewJerseyArea
352 Dunks FerryRoad
Bensalem,PA 19020
(215) 638-7500
Over35drop-offlocations.
Phoenix-Scottsdale-
Mesa-TempeArea
5032S. Ash Avenue,Ste.101
Tempe,AZ85282
(602) 897-7358
Over20 drop-off locations.
Pittsburgh,PA-Steubenville,OH-
Wheeling/Morgantown,WVArea
2891 BanksvilleRoad
Pittsburgh, PA15216
(412) 563-8020
Over11drop-offlocations.
Rocldord-Kenosha-
Beloit-MadisonArea
5602 N.Second
LovesPark,IL 61111
(815) 654-7343
Over5 drop-off locations.
SanFrancisco-Oakland-
SanJoseArea
3370 MontgomeryDrive
SantaClara,CA95054
(408) 492-9013
Over30 drop-off locations.
Seattle-Tacoma/OlympiaAre_+
1055AndoverParkEast
Tukwila,WA 98188
(206) 575-6288
Over20 drop-off locations.
Tampa-St.Petersburg-
SarasotaArea
CenterPointBusinessPark,
BuildingB-l, Suite100
1911 U.S.Hwy.301 North
Tampa,FL 33619
(813) 621-8181
Over75 drop-offlocations.
Washington,DC-Baltimore-
Richmond,VAArea
10800 B&D RhodeIslandAve.
Beltsville,MD 20705
(301) 595-5330
Over55 drop-off locations.
HOW YOU CANOBTAIN EFFICIENTAND EXPEDIENTCARRY-IN, MAIL-IN, ORIN-HOME SERVICEIN CANADAFORYOUR PRODUCTTHROUGHA PHILIPS CONSUMER SERVICECENTER
COMMENTOBTENIR NOTRESERVICEAPRP-SVENTE NAPIDEETEFFICACESOIT PARCOURRIER,A DOMICILE, OUEN SE PRI_SENTANTJ_UNCENTREDE SERVICE PHILIPS
COMO OBTENERUN SERVICIO OPQRTUNOY EFICIENTIEPOR CORREO,EN CASA0 EN PERSONAEN ELCANADAPARASU PRODUCTOATRAV¢$ DE UN CENTROPHILIPS BE $ERVICIO ALCONSUMIDOR
TORONTO
601 Milner Avenue
Scarborough, Ontario
M1B 1M8
(416) 754-6064 (Tel.)
(416) 292-5161 (Tel.)
(416) 754-6290 (Fax)
MONTRI_AL
4977 LevyStreet
St. Laurent, QuBbec
H4R 2N9
(514) 956-0120 (Tel.)
(514) 956-0828 (Fax)
VANCOUVER
1741BoundaryRoad
Vancouver,B.C.
V5M3Y7
(604)294-3441(Tel.)
(604)294-3574(Fax)
MAC2929 2/95
26
Page 27

COLOR TELEVISION
90 Days Free Labor
One Year Free Service on Parts (TWo Years Free Service on Color Picture TUbe Parts)
This product can be repaired in-home.
WHO IS COVERED'?
You must have proof of purchase to receive warranty service. A sales
receipt or other document showing that you purchased the product
is considered proof of purchase.
WHAT IS COVERED?
Warranty coverage begins the day you buy your product. For 90 days
thereafter, all parts will be repaired or replaced, and labor is fi'ee.
From 90 days to one year from the day of purchase, all parts will be
repaired or replaced, but you pay fbr all labor charges. From one m
two years from the d_, of purchase, you pay |br the replacement or
repair of all parts except the picture tube, and fbr all labor chargcs.
After two years from the day tf purchase, you pay fbr the replacement
or repair of all parts, and |br all labor charges.
Altlparts, including repaired and replaced parts, are covered only tbr
the original warranty period. When the warranty on the product
expires, the warranty on all replaced and repaired parts also expires.
WHAT IS EXCLUDED?
Your warranty does not cover:
• labor charges tbr installation or setup of the product, adjustment
of customer controls on the product, and installation or repair of
anatenna systems outside of the product.
J product repair and/or part replacement bccause of misuse, acci-
dent, unauthorized repair or other cause not within the control of
Philips ('onsunaer Electronics Company.
• reception problems caused by signal conditions or cable or anaten-
na systems outside the unit.
• a product that requires modification or adaptation to enable it to
operate in any country other than the country for which it was
designed, manuthctured, approved and/or authorized, or repair
of products damaged by these modifications.
• incidental or consequential damages resulting from the product.
(Some states do not allow the exclusion of incidental or conse-
que,ltial damages, so the above exclusion may not apply to you.
This includes, but is not limited to, prerecorded material, whether
copyrighted or not copyrighted.)
WHERE IS SERVICE AVAILABLE?
_/arranty service is available in all countries where the product is 011-i-
cially distributed by Philips Consumer Electronics Company. In
countries where Philips Consumer Electronics Company does not
diistribnte the product, the local Philips service organization will
attempt to provide service (although there may be a delay if the
appropriate spare parts and technical manual(s) are not readily avail-
able).
MAKE SURE YOU KEEP...
Please keep your sales receipt or other document showing proof of"
purchase. Attach it to this owner's manualand keepboth nearby.
Also keep the original box and packing material in case you need to
returnyour product.
BEFORE REQUESTING SERVICE...
Please check your owner's manual before requesting service.
Adjustments of the controls discussed there may save you a service
call.
TO GET WARRANTY SERVICE IN U.S.A.,
PUF_.RTO RICO OR U.S. VIRGIN ISLANDS...
Contact a Philips thctory service center (see enclosed list) or autho-
rizcd service center to arrange repair.
(In U.S.A., Puerto Rico and U.S. Virgin Islands, all implied war-
ranties, including implied warranties of merchantability and fitness
fbr a particular purpose, are limited in duration to the duration of this
express warranty. But, because some states do not allow limitations
on how long an implied warranty may last, this linfitation may not
apply to you.)
TO GET WARRANTY SERVICE IN CANADA...
Contact a Plailips consumer service center (listed below), self-servic-
ing dealer or authorized service depot to arrange repair.
Philips Electronics Ltd.
601 Milner Avenue, Scarborough, Ontario, M1B l M8
(416) 292-5161
4977 Levy Street, St. Laurent, Qurbec, H4R 2N9
(514) 956-0210
3695 Grandview Highway, Vancouver, B.C., V_;M 2G7
(604) 435-4411
(In Canada, this warranty is given in lieu of all other warranties. No
other warranties are expressed or implied, including any impliec_war-
ranties of merchantability or fitness fbr a particular purpose. Philips
is not liable under any circumstances fbr any direct, indirect, special,
incidental or consequential damages, howsoever incurred, even if
notified of the possibility of such damages.)
REMEMBER...
Please record the model and serial numbers found Oll the product
below. Also, please fill out and mail your warranty registration card
promptly. It will be easier for us to noti@ you if necessary.
MODEL #
SERIAL #
.;.::._ii i! i!!_i i_!_ i ii _________ __L_ :_k.::__ _:_ _......::_ _::.:;_.:¢:_ _ _ b£,_ _:_ b;._ __ __:..:_:_:__:_ k::.:.::____;_:._ __:.__:_:_:____.x-.._:___:_:_: _:
Philips Service Company 401 East Andrew Johnson Highway Jefferson City, Tennessee 37760
(615) 475-8869
EIA947E001/ MAC4099/ 12-94
27
Page 28

OptionalAccessories
Pnce_,subject to change without nobce Avadal_htysubjectto changeat tsmeotpurchase Whenordenngaccessoriesouts_le theU S A, please refer to theaccessor_ecmaterial, address, and pnces for that count[y
Maximizeyour viewingpleasure
withstate-of-the-artaccessories
designedspecificallyforyour
ColorTelevision.Theoptional
accessoriesshown inthis
bookletmaybepurchasedfrom
your/ocatdealer,ormaybe
ordereddirectfromPhilips
ConsumerElectronics
Company,
Calltoll-free
1-800-292-6066
Orwrite
PhilipsConsumer
ElectronicsCo.,
AccessoriesMarketingDepL,
P.O.Box967,
Greenevllle,TN37744-0967
SRG125
W/Cable SurgeProtector
YourCost$19.95
Electricalfluctuationsand
powersurgescandamage
yourvaluableelectronic
entertainmentequipment.
Protectyourantenna,cable,
andelectricallineswith
MagnavoxAudio/Video
EquipmentSurgeProtectors.
• Coaxialcableinput/output
• Fivegroundedoutlets
• Built-inLEDandresetbutton
LITE4
UniversalNight LiteTM
Audio/VideoRemote
YourCost$24.95
Replaceyourlostorbroken
remotecontrol,orconsolidate
allyourremotesintoone.Plus,
makeremoteeasiertousein
dimly-litareas,withourNight
LiteTM lightedkeypad.
• Preprogrammed
• Autoscanandmanual
codesetup
• On-screencapabilities
• Menuprogramming
• Spanishinstructionsincluded
• Toll-freecustomerassistance
numberincluded
I MANT300
SmartAmplifier
AmplifiedVHF/UHF/FM
IndoorAntenna
YourCost$34.95
Drasticallyimproves
VHF/UHF/FMreceptiononyour
TVor stereo.Simplyattach
antennato yourTv/stereoand
enjoycrisperandclearersound
andpicturequality.Adjustable
UHFlooptilts androtatesfor
thebestpossiblereception.
•39"retractabledipoles
• 6' 75ohm coaxconnection
cable
• Matchingtransformerincluded
•Softbasepreventsscratching
surfaces
•Activeantennawithamplifier
withupto 20dBgain
• LEDpowerindicatoronfront
ofantenna:easytoseewhile
watchingTV
• Knobontop of antennaserves
asgainandpoRerswitch
• AC/DCpoweradapterir .......
•90-daywarranty
28 IB 7216-E001
 Loading...