

Page 1
Instructions for use
M_Ar-NAvOX
Page 2
Once your PHILIPS MAGNA VOX purchase is registered, you're eligible to receive all the privileges of
owning a PHILIPS MA GNA VOX product. So complete and return the Warranty Registration Card
enclosed with your purchase at once. And take advantage of these important benefits.
AVOX warranty.
Congratulationson your purchase,
and welcome to the "family!"
PHILIPS
Dear PHILIPS MAGNAVOX product owner:
Thank you for your confidence in PHILIPS MAGNAVOX. You've selected one of the best-built, best-
backed products available today. And we'll do everything in our power to keep you happy with your
purchase for many years to come.
As a member of the PHILIPS MAGNAVOX "family," you're entitled to protection by one of the most
comprehensive warranties and outstanding service networks in the industry.
What's more, your purchase guarantees you'll receive all the information and special offers for which
you qualify, plus easy access to accessories from our convenient home shopping network.
And most importantly you can count on our uncompromising commitment to your total satisfaction.
All of this is our way of saying welcome-and thanks for investing in a PHILIPS MAGNAVOX product.
Sincerely,
Robert Minkhorst
President and Chief Executive Officer
P.S. Remember, to get the most from your PHILIPS
MAGNAVOX product, you must return your
Warranty Registration Card within 10days. So
please mail it to us right now!
Know ese
safetysymbo/s
,_ This "bolt of lightning" indicates uninsulated material within your unit may cause an electrical
shock. For the safety of everyone in your househctd, please do not remove product covering.
,_The "exclamation point" calls attention to features for which you should read the enclosed lit-
erature closely to prevent operating and maintenance problems.
WARNING: TO PREVENT FIRE OR SHOCK HAZARD, DO NOT EXPOSE THIS EQUIPMENT
TO RAIN OR MOISTURE.
CAUTION: To prevent electric shock, match wide blade of plug to wide slot, and fully insert.
ATTENTION: Pour eviter les chosa electriques, introduire la lame la plus large de la fiche dans la
borne correspondante de la prise et peusser jusqu'au fond.
Page 3
SAFETYINSTRUCTIONS- Readbeforeoperatingequipment
Thisproductwasdesignedand manufacturedtomeetstrictqualityand 11. Power-CordProtection- Powersupplycordsshouldberoutedso
safetystandards,Thereare,however,someinstallationandoperationpre- thattheyarenot likelyto bewalkedonor pinchedbyitemsplaced
cautionswhichyoushouldbeparticularlyawareof. uponoragainstthem,payingparticularattentiontocordsandplugs,
conveniencereceptacles,and the point wherethey exit from the
1. ReadInstruclions- All thesafetyandoperatinginstructionsshould
bereadbeforetheapplianceis operated.
2. RelainInstructions- Thesafetyand operatinginstructionsshould
beretainedfor futurereference.
3. HeedWarnings-Allwarningsontheapplianceandin theoperating
instructionsshouldbeadheredto.
4. FollowInstructions- All operatinganduseinstructionsshouldbe
followed.
5. WaterandMoisture- Theapplianceshouldnot beusednearwater
- for example,neara bathtub,washbowl,kitchensink,laundrytub,
in a wetbasementorneara swimmingpool,etc.
6. CartsandStands- Theapplianceshouldbeusedonlywithacartor
standthatisrecommendedbythemanufacturer.
6A. k An applianceandcart combinationshouldbe moved
withcare.Buickstops,excessiveforce,andunevensur-
facesmaycausethe applianceandcartcombinationto
overturn.
6B. Tilt/Stability-Alltelevisionsmustcomplywithrecommendedinter-
nationalglobalsafetystandardsfor tilt andstabilitypropertiesof its
cabinetdesign.
Donot compromisethesedesignstandardsbyapplyingexces-
sivepullforceto thefront, ortop,ofthe cabinetwhichcould
ultimatelyoverturntheproduct.
Also,do notendangeryourself,or children,byplacingelec-
tronicequipment/toysonthetopofthecabinet.Suchitems
couldunsuspeetinglyfallfrom thetop ofthesetandcause
productdamageand/orpersonalinjury.
7. Wallor CeilingMounting- Theapplianceshould bemountedtoa
wallorceilingonlyasrecommendedbythemanufacturer.
8. Ventilation- Theapplianceshouldbesituatedso thatits locationor
positiondoesnotinterferewith itsproperventilation.Forexample,
theapplianceshouldnot besituatedona bed,sofa,rug,orsimilar
surfacethatmayblocktheventilationopenings;or,placedina built-
in installation,suchas a bookcaseor cabinetthatmayimpedethe
flow ofairthroughtheventilationopenings.
9. Heat- Theapplianceshouldbesituatedawayfromheatsources
suchasradiators,heatregisters,stoves,orotherappliances(ineluit-
ingamplifiers)thatproduceheat.
10. PowerSources-Theapplianceshouldbeconnectedtoapowersup-
ply onlyof thetypedescribedintheoperatinginstructionsor as
markedontheappliance.
appliance.
12. Cleaning- Theapplianceshouldbecleanedonlyasrecommended
bythe manufacturer.
13. PowerLines- An outdoor antennashouldbe locatedawayfrom
powerlines.
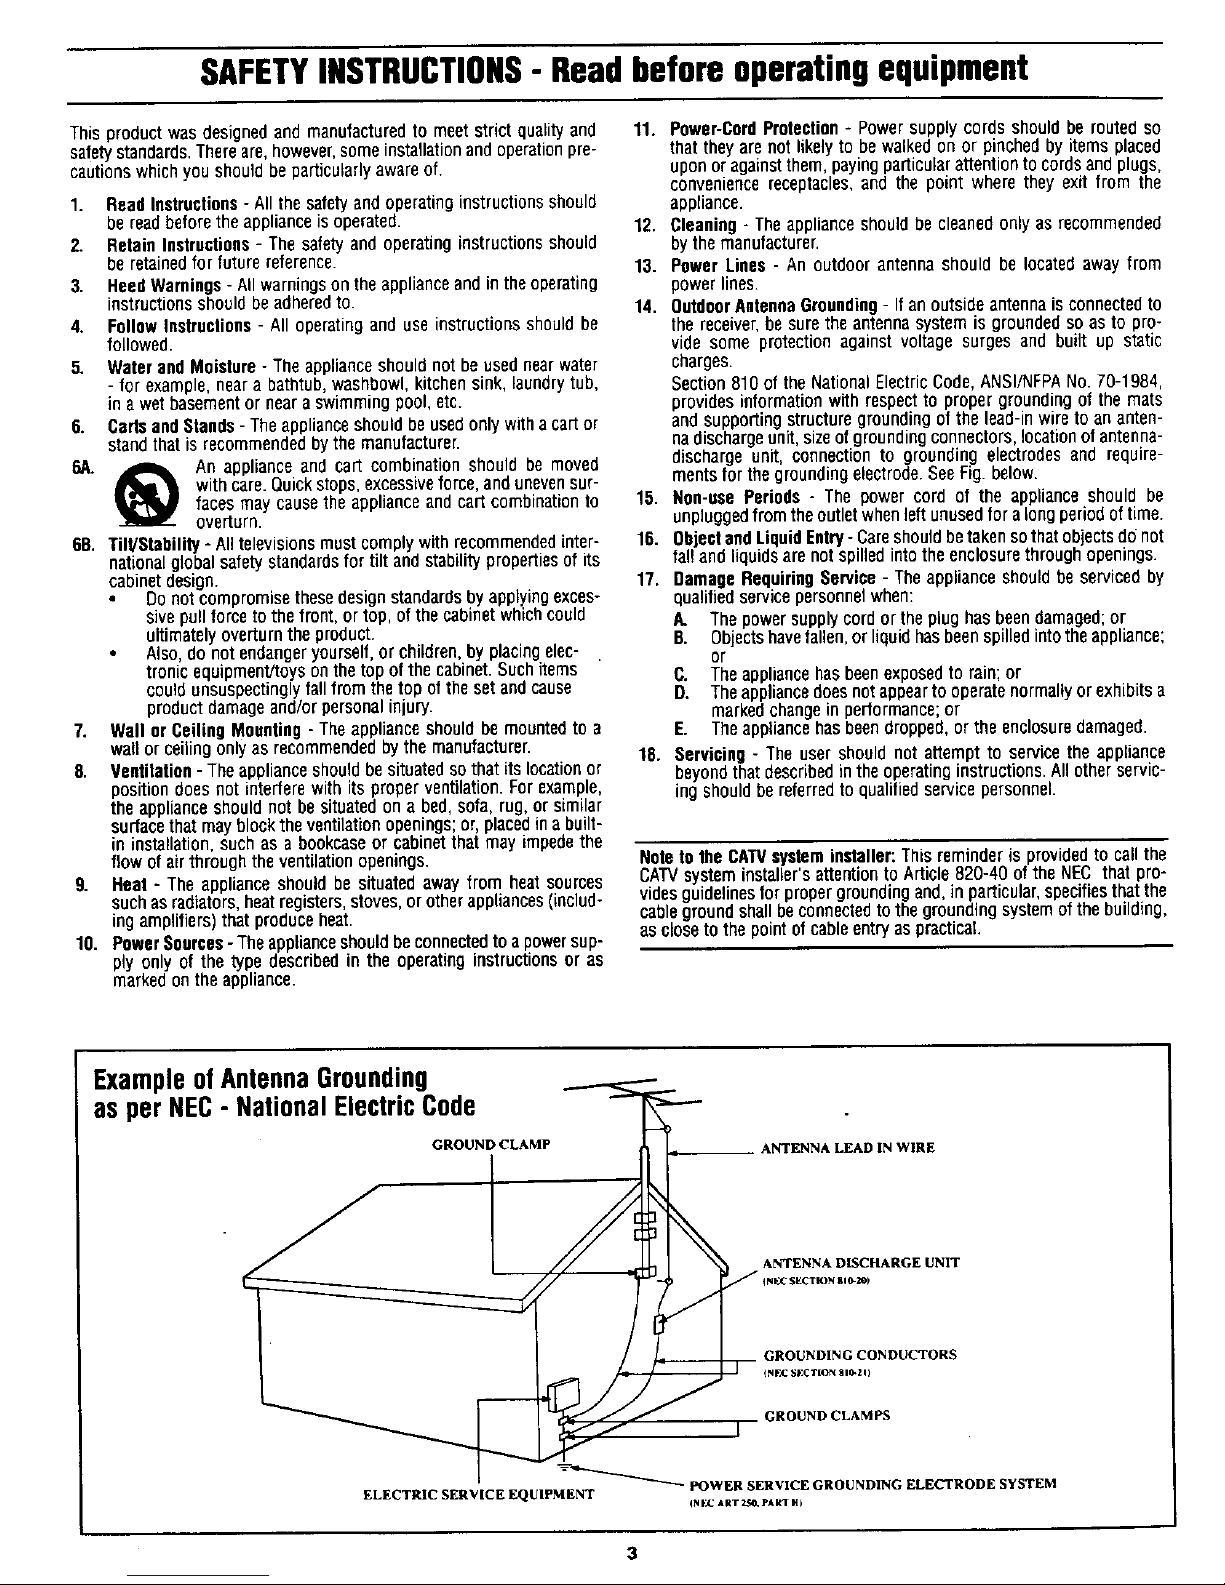
14. OutdoorAntennaGrounding-Ifanoutsideantannaisconnectedto
thereceiver,besurethe antennasystemis groundedso asto pro-
vide someprotectionagainstvoltagesurges and built up static
charges.
Section810of theNationalElectricCode,ANSI/NFPANo.70-1984,
providesinformationwith respectto propergroundingofthemats
andsupportingstructuregroundingofthe lead-inwireto ananten-
nadischargeunit sizeof groundingconnectors,locationof antenna-
dischargeunit, connectionto groundingelectrodesand requre-
mentsfor thegroundingelectrode.SeeFig.below.
15. Non-usePeriods- The power cord of the applianceshould be
unpluggedfromtheoutletwhenleftunusedfor alongperiodoftime.
18. ObjectandLiquidEntry-Careshouldbetakensothatobjectsdfinot
fal!and liquidsarenotspilledintotheenclosurethroughopenings.
17. DamageRequiringService- Theapplianceshouldbeservicedby
qualifiedservicepersonnelwhen:
A. Thepowersupplycordortheplughasbeendamaged;or
B. Objectshavefallen,orliquidhasbeenspilledintotheappliance;
or
C. Theappliancehasbeenexposedtorain;or
D. Theappliancedoesnotappeartooperatenormallyorexhibitsa
markedchangein performance;or
E. Theappliancehasbeendropped,ortheenclosuredamaged.
18. Servicing- Theusershouldnotattemptto servicetheappliance
beyondthatdescribedintheoperatinginstructions.Allotherservic-
ingshouldbereferredtoqualifiedservicepersonnel.
Noteto the CATVsystem installer: Thisreminder is providedto call the
CATVsysteminstaller'sattentionto Article820-40 ofthe NEC that pro-
videsguidelines for propergrounding and, in particular,specifies thatthe
cableground shallbe connectedto the grounding system of the building,
as closeto the pointof cableentryas practical.
ExampleofAntennaGrounding
as perNEC- NationalElectricCode
GROUND CLAMP ANTENNA LEAD IN WIRE
ANTENNA DISCHARGE UNIT
NEC SECTION 810-i_)
GROUNDING CONDUCTORS
GROUND CLAMPS
-_-_ POWER SERVICE GROUNDING ELECTRODE SYSTEM
ELECTRIC SERVICE EQUIPMENT _st:c ARTZ_.eAR1 H)
Page 4
Introduction
Welcome/Registration of Your TV............................. 2
Safety/Precautions ..................................................... 3
Table of Contents ....................................................... 4
Features...................................................................... 4
Onscreen MENU
_" Adjusting the TV Picture ......................... 5
_,Activating Contrast Plus (Black Stretch) ............ 6
_'Activating Noise Reduction (Picture) Control ...7
¢,Setting the TV's Clock ........................................ 8
Activating the Timer Control .............................. 8
<_Activating the Start-Up Channel ......................... 9
<_Setting the TV's Start Time Control ................... 9
¢"Setting the TV for Closed Caption ................... I0
<_Using the Sleep Timer Control ......................... I 1
I_ SmartLockrM
_" Understanding the SmartLock Feature....... 12
<>Setting the SmartLock Access Code ................ 13
<_Setting the SmartLock to Block Channels ....... 14
¢, Setting SmartLock's Blocking Options ........... 15
¢- Blocking Using the Movie/TV Ratings ..... 16-17
¢"Using the SmartLock Review Screen .............. 18
Sound
'_"Setting the Treble Boost and Bass Boost
Controls ................................................................ 19
+ Setting the TV for Stereo Programs ................ 20
+Using the Volume Bar Control .......................... 21
+ Using the Input control with the Audio/Video
InputJacks ........................................................ 22
Remote Control Operation
Using the SmartPicture TM Control ................ 23
Using the SmartSound TM (AVL) Control .....24
Using SmartSurf TM (Alternate Channel) .................. 25
Setting the Remote Control to Operate Accessory
Devices (Code Entry) ......................................... 26-27
Setting the Remote Control to operate Accessory
Devices (Search Method) ........................................ 28
Remote Control Direct Entry Code List ............ 29-30
Using the Remote's VCR Buttons ........................... 31
Ill General Information
Tips if Something Isn t Working ................ 32
Glossary of TV Terms ............................................. 33
Index ........................................................................ 33
Factory Service Locations .................................. 34-35
Warranty ................................................................... 36
Here are a few of the special features built into this
new Color Television:
SmartLock TM feature allows you to block the view-
ing of certain channel or external audio/video con-
nections were you might not want your children
viewing inappropriate material.
Infrared Remote Control works your TV set, VCR.
and a variety of wireless remote control Cable
Converters (Satellite Receivers, DVD, etc.).
Standard broadcast (VHF/UHF) or Cable TV
CATV) channel capability.
Stereo TV with built-in audio amplifier and twin
speaker system for receiving TV programs broadcast
in stereo sound. This 'IV can actually detect if the
signal being received is Stereo and adjust for it.
Closed Captioning allows the viewer to read TV
)rogram dialogue or voice conversations as onscreen
text.
Automatic Programming of Channels for quick and
easy selection of favorite stations available in your
area.
Onscreen Features (in either English, French, or
Spanish) show helpful messages for setting of TV
controls.
Audio/Video Jackpanel for direct connections with
VCRs (or other video accessories) providing quality
TV picture and sound playback.
On Timer automatically turns the TV ON at a preset
time, and channel.
Sleeptimer automatically turns the 'IV OFF at preset
times.
SmartPicture TM allows you to set the picture color,
tint, contrast, etc. for various types of programming
such as Sports, Movies, personal, or Weak Signals
with the push of one button.
SmartSound TM controls allow you to set the sound
controls for various types of listening programs such
as Personal (sound controls the way you set them),
Theater, Music, or Voice with the push of one button.
SmartPicture TM, SmartSound TM, SmartSurf TM, and SmartLock TM are all
registered trademarks of Philips Consumer Electronics Company.
Copyright © 1999 Philips Consumer Electronics Company. All rights reserved.
4
Page 5
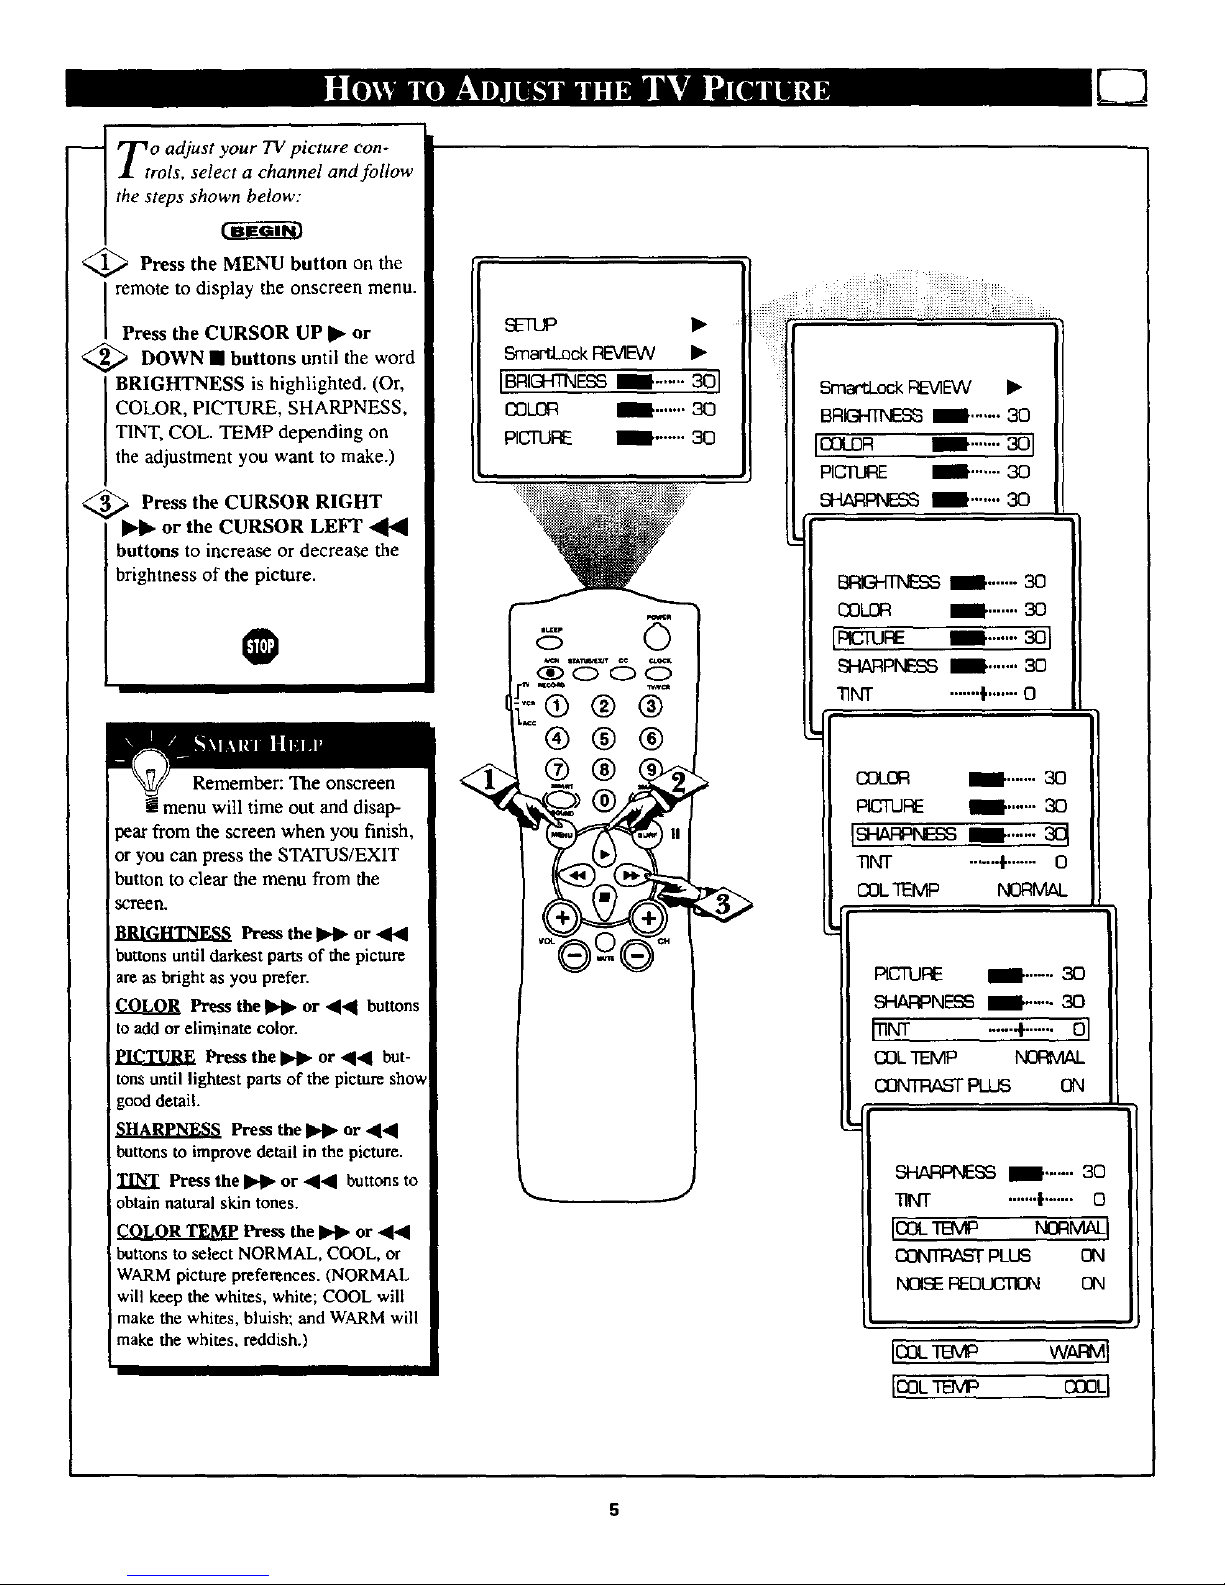
_ o adjust your TV picture con-
.1 trols, select a channel and follow
the steps sho_
_ Press the MENU button on
the
remote to display the onscreen menu.
Press the CURSOR UP • or
<_ DOWN • buttons
until the word
BRIGHTNESS is highlighted. (Or,
COLOR, PICTURE, SHARPNESS,
TINT, COL. TEMP depending on
the adjustment you want to make.)
_ Press the CURSOR RIGHT
or the CURSOR LEFT 41_
,uttons to increase or decrease the
brightness of the picture.
O
Remember: The onscreen
menu will time out and disap-
pear from the screen when you finish,
or you can press the STATUS/EXIT
button to clear the menu from the
scgeen.
Press the I_11_or _t_1
buttons untildarkest pans of the picture
are as bright as you prefer.
COLOR Press the _ or 4_1 buttons
to add or eliminate color.
PICTURE Press the _ or 4'_ but-
tons until lightest parts of the picture show
good detail.
Press the _ or '_4
buttonsto improve detail in the picture.
TINT Press the _ or 441 buttons to
obtainnatural skin tones.
COLOR TEMP Press the _ or 44
buttonsto select NORMAL, COOL, or
WARMpicture preferences. (NORMAL
will keep the whites, white; COOL will
make the whites, bluish; and WARMwill
makethe whites, reddish.)
_a_ck REVIEW •
IBRI_E_ I ....... 301
COLOR I .......
PI_ I .......30
®
SmartLockFE_EW
BRIGHTNESSI .......30
COLOR
COLOR I .......3O
[_ I .......
SHARPNESSI .......3O
"lINT .......l'....... O
II_N_ I--"
II -+- ol
II
_ I ....... 30
.......t....... O
PL_
lallaw wm l
IooLr ,p caoq
5
Page 6

Contrast Plus (Black Stretch)
feature helps to "sharpen" the
The black portions
,me richer in dark-
ness and the whites become brighter
Press the MENU button on the
remote to display the onscreen menu.
<_ Press the CURSOR UP • or
CURSOR DOWN • buttons until
the words CONTRAST PLUS are
high ghted.
<_ Press the CURSOR RIGHT
or CURSOR LEFT _ but-
tons to activate or deactivate the
Contrast Plus (Black Stretch) fea-
ture.
qqNT .......f....... 0
COL.TEMP NORMAL
IO0_rT___PLUS OfTI
NOISEI_DUCTION ON
VOLUME _ .......15
@®
._iiiiiiiiii!iii!iliiiiiiiiiiiiiiiiii!i_i!iiiiiiiiiii_iiiiii_ili_iiiiiiiiiiiiiiiiiiiiiii_i_i_iiiiii_iiiiiiiiiiil_i!_iiii_=
::' n_ .......,.......o
COL.1EMP NORMAL
_ m--N
NOISEREDUCTION OFF
VOLUME _' ....... 15
Page 7
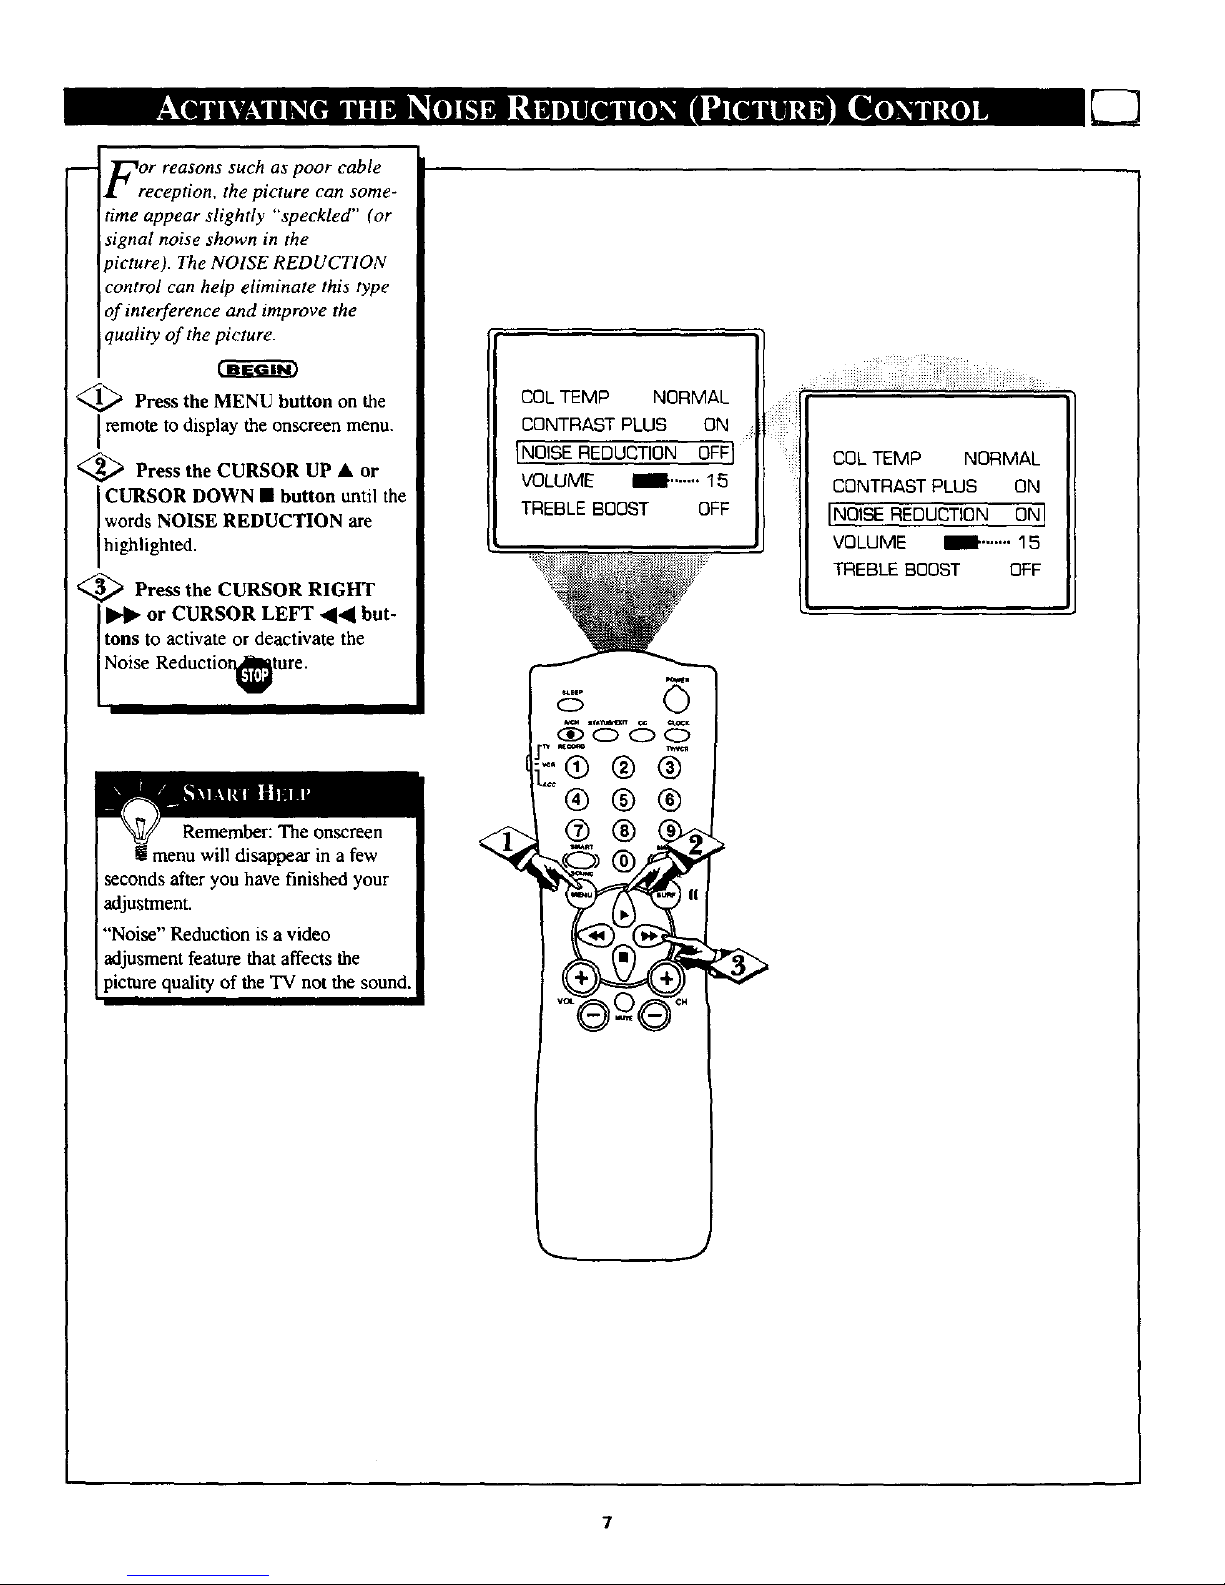
FreOr reasons such as poor cable
ception, the picture can some-
time appear slightly "speckled" (or
signal noise shown in the
picture). The NOISE REDUCTION
control can help eliminate this type
of interference and improve the
quality of the picture.
Press the MENU button on the
remote to display the onscreen menu.
<_ Press the CURSOR UP • or
CURSOR DOWN • button until the
words NOISE REDUCTION are
h ghl ghted.
<_ Press the CURSOR RIGHT
or CURSOR LEFT _1_1 but-
tons to activate or deactivate the
Noise Reduct on_ture.
Remember: The onscreen
t menu will disappear in a few
iseconds after you have finished your
adjustment.
'"Noise" Reduction is a video
adjusment feature that affects the
picture quality of the TV not the sound.
COL TEMP NORMAL
CONTRAST PLUS ON
[NOISE REDUCTION OFFI
VOLUME ml .......15
TREBLE BOOST OFF
®®
COL TEMP NORMAL
CONTRAST PLUS ON
INOISE REDUCTION ON !
VOLUME N" ....... 15
TREBLE BOOST OFF
Page 8
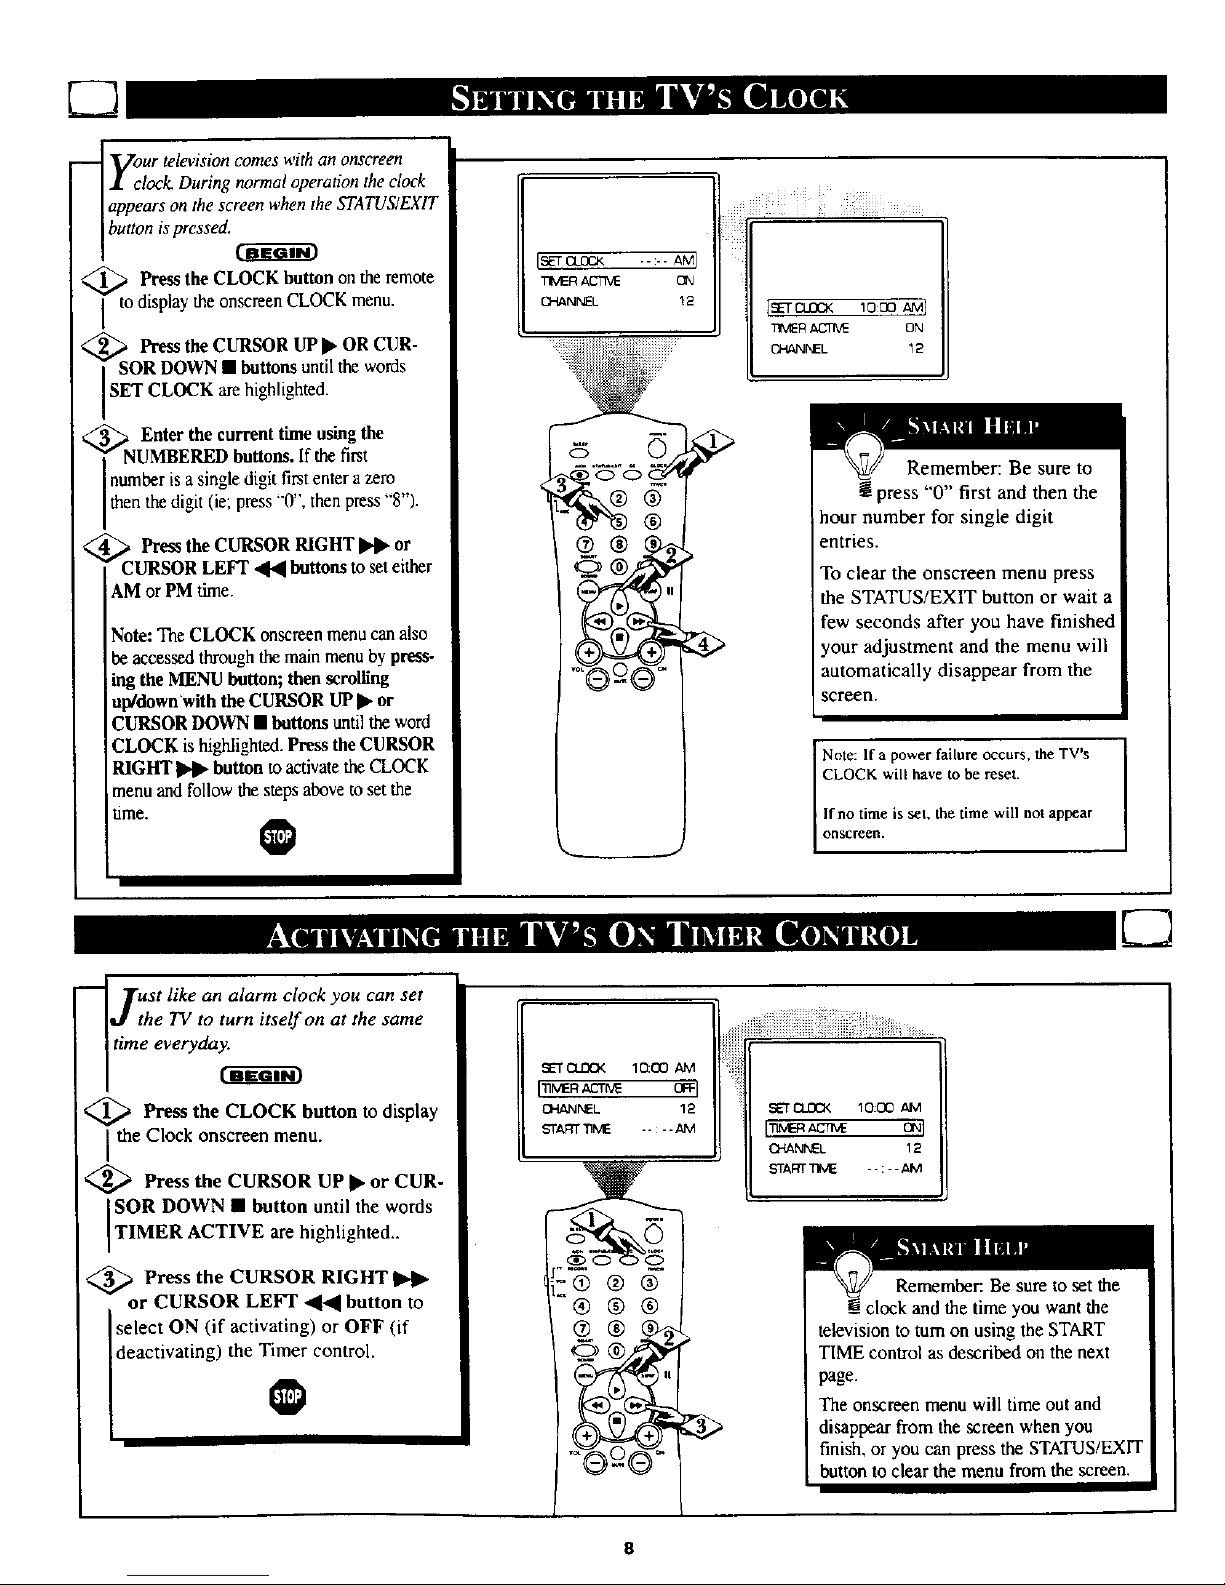
_ our televisioncomes with an onscreen
I clock During normaloperationthe clock
appears onthe screen whenthe STATUS/EXIT
button ispressed.
Pressthe CLOCK buttonon theremote
to displaytheonscreenCLOCK menu.
<,' PresstheCURSORUP• ORCUR-
SORDOWN• buttons until the words
SET CLOCK are highlighted.
_' _. Enter the currenttime usingthe
NUMBEREDbuttons.If the first
numberisa singledigit firstenter a zero
.o. •
thenthe th_tt ( e press 0 , then press "8").
[_ Pressthe CURSOR RIGHT_ or
CURSOR LEFT _ buttonsto seteither
AMor PMtime.
Note: The CLOCKonscreenmenucan also
beaccessed through themainmenu by press-
ing the MENU button; then scrolling
up/down With the CURSOR UP• or
CURSORDOWN • buttonsuntil the word
CLOCK is highlighted.Press the CURSOR
RIGHT _ button to activatetheCLOCK
menu andfollowthe steps above toset the
time.
@
ISET CI__< .--- AM I
TIMER ACT_E C_J
CHANNEL !2
IEETCLOCK 1000 AM]
_V_R _ ON
CHANNEL 12
Remember: Be sure to
! press "0'"first and then the
hour number for single digit
entries.
To clear the onscreen menu press
the STATUS/EXIT button or wait a
few seconds after you have finished
your adjustment and the menu will
automatically disappear from the
screen.
I Note: If a power failure occurs, the TV's [
I
CLOCK will have to be reset.
I
If no time is set, the time will not appear
OFISCreetl.
_rust like an alarm clock you can set
tithe TV to turn itself on at the same
time everyda_
_ Press the CLOCK button to display
the Clock onscreen menu.
<_ Press the CURSOR UP • or CUR-
SOR DOWN • button until the words
TIMER ACTIVE are highlighted..
,_ Press the CURSOR RIGHT
or CURSOR LEFT "q_l button to
select ON (if activating) or OFF (if
deactivating) the Timer control.
SET Cfd30< 10:00 AM
I"nM__ _l
CHANNEL 12
STARTTIME -- - - AIM
®®®
®®®
® ®
SETnLOCK lO:OO
I'nM_Acr_ ONI
CHANNEL 12
START_ME --:--AM
Remember: Be sure to setthe
clock and the time you want the
television to turn on using the START
TIME control as described on the next
page.
The onscreen menu will time out and
disappear from the screen when you
finish, or you can press the STATUS/EXIT
button to clear the menu from the screen.
8
Page 9

-- l" [sed along with the Clock fea-
t../ tures, you can select a specific
channel that the television will tune
to when the Timer Active control is
turned ON.
_,_ Press the CLOCK button to
display the Clock onscreen menu.
<_ Press the CURSOR UP • or
CURSOR DOWN • button until
the word CHANNEL is h ghlighted.
<_ Press the number buttons to
enter the start up channel you
wou d like the televis on to start on.
®
_"T CL(3CK 10:O:3 .aM
7qMERACTIVE ON
ICHANNEL 12 I
START]]ME - - :...aM
@
©®©
Remember: Be sure to set
! the Timer Active control to
ON.
The onscreen menu will time out
and disappear from the screen when
you finish, or you can press the
STATUS/EXIT button to clear the
menu from the screen.
UStued along with the Clockfea-
re, you can select a specific
time the television will turn on
when the Timer Active control is
turned ON.
<_ Press the CLOCK button to
I display the Clock onscreen menu.
<_ Press the CURSOR UP • or
CURSOR DOWN • button until
the words START TIME are high-
ghted.
<_ Enter the time to turn on the
T¥ using the NUMBERED but-
tons, If the first number is a single
digi,firstpyyrazerothe digit
(ie, press 0 , then press 8 ).
<_ Press the CURSOR RIGHT
I1_1_or CURSOR LEFT _ but-
tons to set either AM or PM time.
_ER _ ON
OHANNO- 12
[ST_ "---_1
::_i_i_iii:iiiiiiiiiiiiii!iiiiiiiiiiiiii_i_.......
_iiiiiiii%_iiiii_iii_i_ii_i!i%iiiiii_iiii_iiiiiiiiiiiiiii_ii_i_iii_ii!_iiiiiii_iiiiiiii_i_........
_ii O'_NEL 12
IST r : AUl
12 8:30
If theTV isin use when the
STARTTIME control is about
to be activated,the screenwill
display a warningstatingit's
going to changechannels in 30
seconds. It will appearlike the
screen shownbelowand
change to theselectedstart up
channel. Pressingany butch
onthe remote withinthiscount
downwill cancel thechange.
TOOdS/,/XLrL6
IN30 5EO_N[3_
Page 10
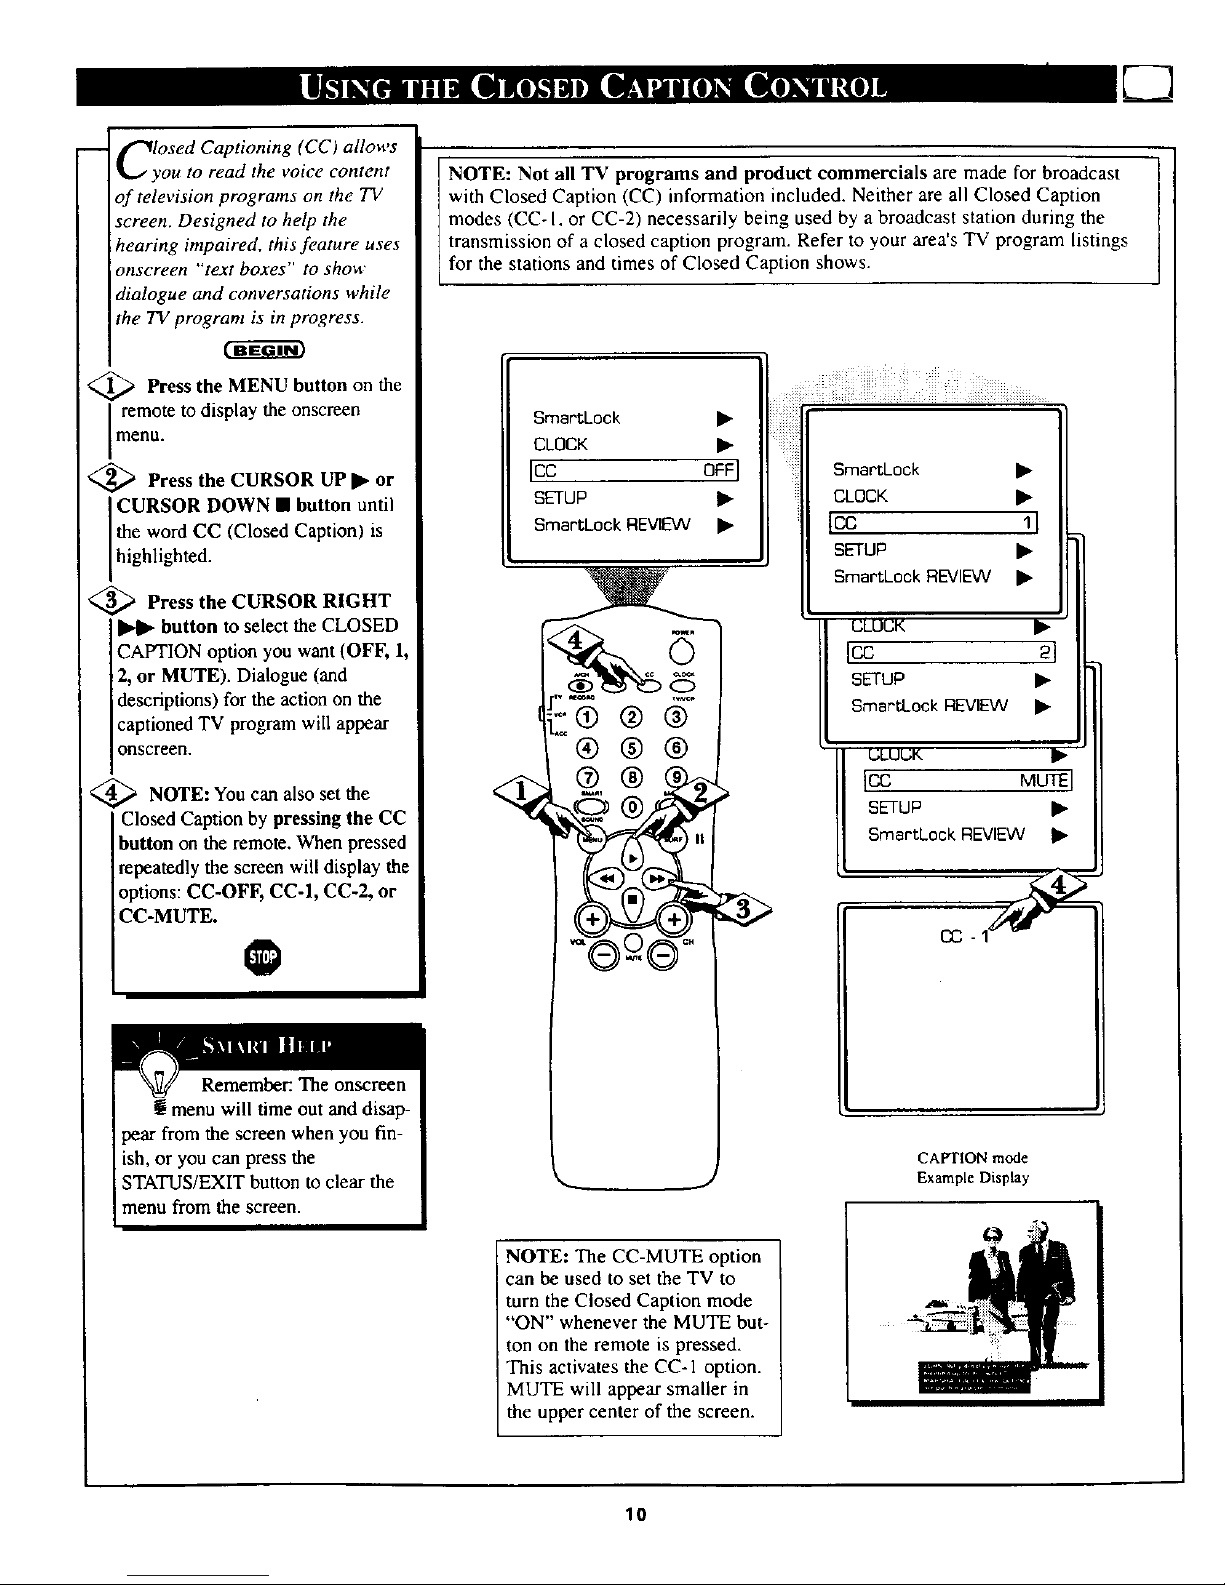
-- _'_losed Captioning (CC) allows
IkJ you to read the voice content
of television programs on the TV
screen. Designed to help the
hearing impaired, this feature uses
onscreen "'text boxes" to show
dialogue and conversations while
the TV program is in progress.
Press the MENU button on the
remote to display the onscreen
menu.
'_ Press the CURSOR UP • or
CURSOR DOWN • button until
the word CC (Closed Caption) is
h gh ghted.
<_ Press the CURSOR RIGHT
button to select the CLOSED
CAPTION option you want (OFF, 1,
2, or MUTE). Dialogue (and
descriptions) for the action on the
captioned TV program will appear
onscreen.
_ NOTE: You can set
also the
Closed Caption by pressing the CC
button on the remote. When pressed
repeatedly the screen will display the
options: CC-OFF, CC-1, CC-2, or
CC-MUTE.
NOTE: Not all TV programs and product commercials are made for broadcast
with Closed Caption (CC) information included. Neither are all Closed Caption
modes (CC- I, or CC-2) necessarily being used by a broadcast station during the
transmission of a closed caption program. Refer to your area's TV program listings
for the stations and times of Closed Caption shows.
SmartLock •
CLOCK •
Icc OFFI
SETUP •
SmartLnck REVIEW •
_:® ® @
®®@
@®
SmartLock •
CLOCK •
tcc 11
SETUP • 11
SmartLock REVIEW • II
II
I_ -_11
I sETuP • IIII
[I Smo_ookREV,_V• Illl
ICC MUTEI II
II sET , • II
I SmartCock R_
L
CAPTION mode
Example Display
NOTE: The CC-MUTE option
can be used to set the TV to
turn the Closed Caption mode
"'ON" whenever the MUTE but-
ton on the remote is pressed.
Tiais activates the CC-1 option.
MUTE will appear smaller in
the upper center of the screen.
lO
Page 11
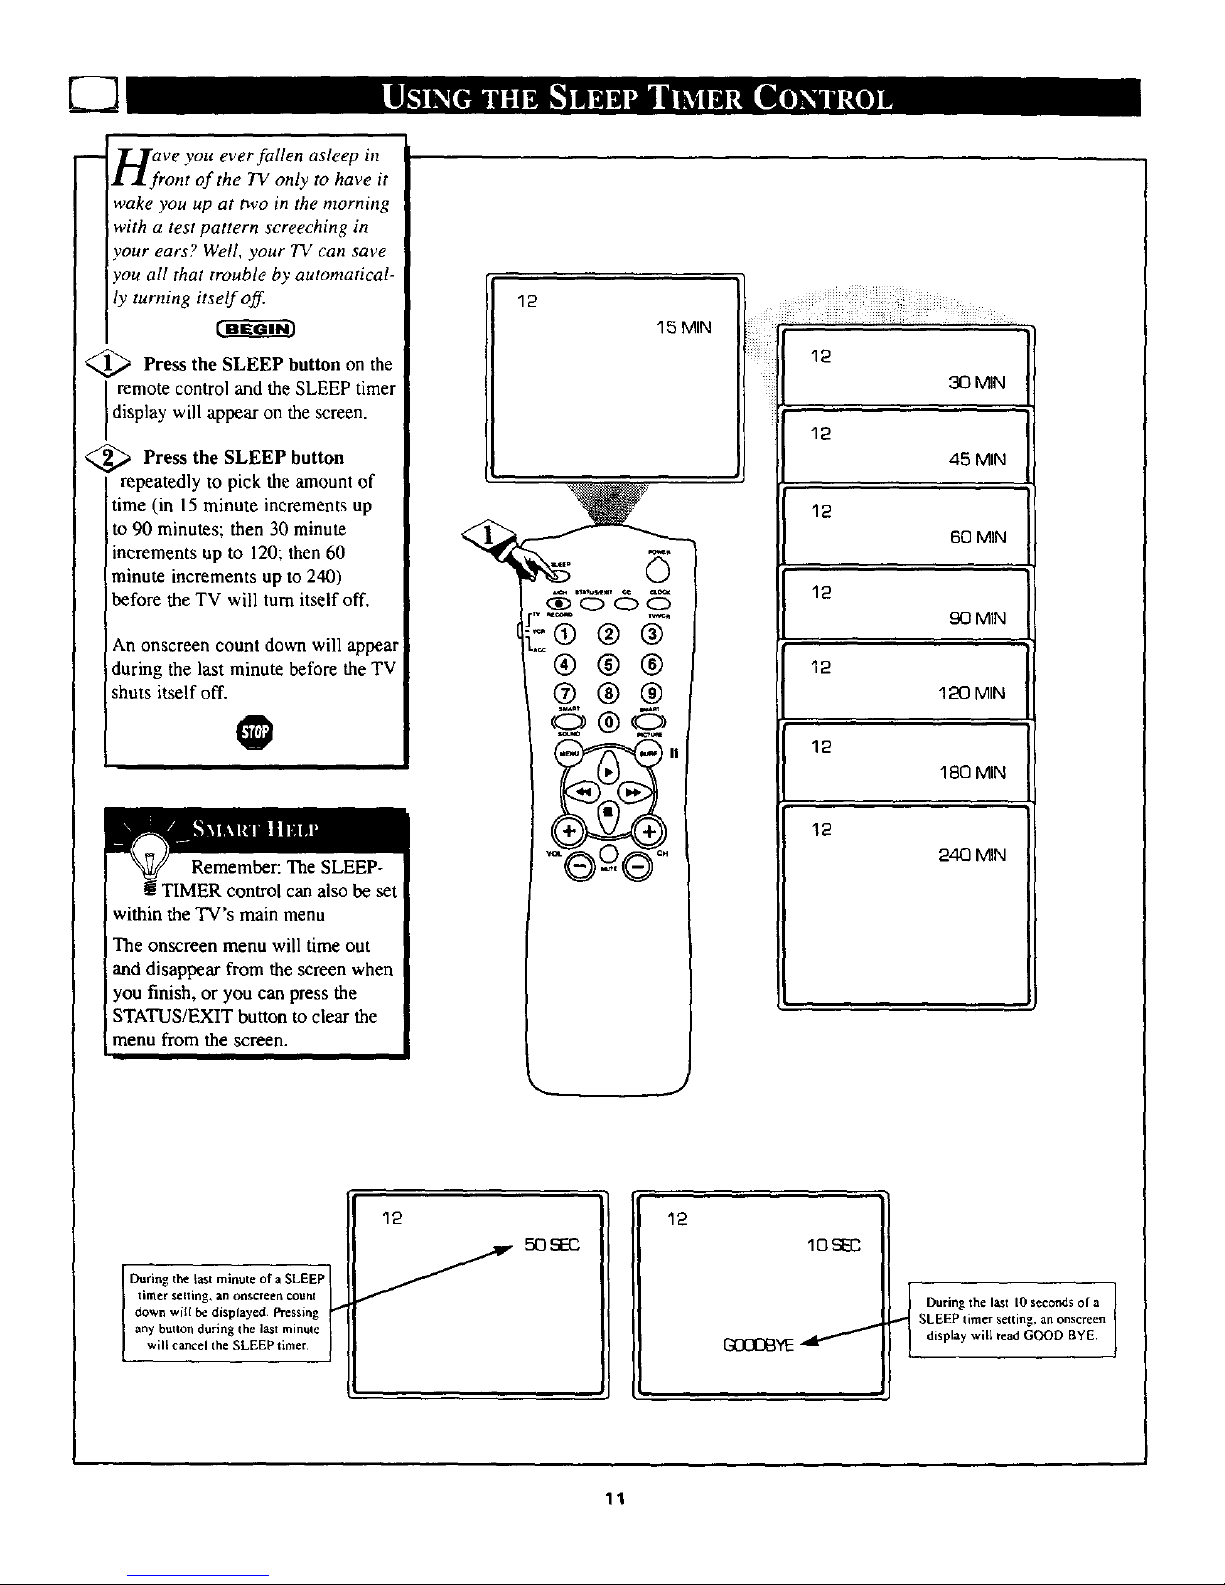
-- _._rave you ever fallen asleep in
• l front of the TV only to have it
wake you up at two in the morning
with a test pattern screeching in
your ears? Well, your TV can save
you all that trouble by automatical-
ly turning itself off
<_ Press the SLEEP button on the
remote control and the SLEEP timer
display will appear on the screen.
Press the SLEEP button
repeatedly to pick the amount of
time (in 15 minute increments up
to 90 minutes; then 30 minute
increments up to 120; then 60
minute increments up to 240)
before the TV will turn itself off.
An onscreen count down will appear
during the last minute before the TV
shuts itself off.
be set
within the TV's main menu
The onscreen menu will time out
and disappear from the screen when
you finish, or you can press the
STATUS/EXIT button to clear the
menu from the screen.
III
12
15 MIN
@ @
@@@
@@@
®-,®
12
240 _N
I During the last minute of a SLEEP
llrtt er Selling, all oil$creen ¢ollr_l
down will be displayed¸ Pressing
any button during the last mint_le
_ilL cancel the SLEEP timer¸
12
50SEC
12
10 S1_2
GC C 3VE
During the last 10 seconds of a
SLEEP timer setting, an onscreen I
display will read GOOD BYE.
11
Page 12

Tghe SmartLock feature is an inte-
rated circuit that receives and
processes data sent by broadcasters
or other program providers, that
contain program content advisories.
When programmed by the viewer, a
TV with SmartLock can respond to
the content advisories and block
program content that may be found
objectionable (such as offensive
language, violence, sexual situa-
tions, etc.). This is a great feature to
censor the type of viewing children
may watch.
Over the next few pages you'll
learn how to block channels and
certain rated programming. Below
is a brief explanation of some terms
and ratings you will find in the
SmartLock feature.
SmartLock offers various
BLOCKING OPTION controls
from which to choose:
MASTER DISABLE: This is what
might be called the "master switch"
for SmanLock. When in the ON
position, ALL blocking/censoring is
turned off (or disabled). When in the
OFF position, ALL blocking based
on specifically blocked settings will
take place.
BLOCK UNRATED: ALL unrated
programs based on the Movie
Ratings or Parental (TV) Guidelines
can be blocked if this feature is set
to ON and the MASTER DISABLE
feature is set to OFF.
BLOCK NO RATINGS: ALL pro-
gramming with NO content advisor3
data can be blocked if this feature is
set to ON and the MASTER DIS-
ABLE feature is set to OFF.
After an access code has been pro-
grammed, you can block up to 5
individual channels. But more than
just blocking channels, certain
blocking options exist which will
block programming based on ratings
patterned by the Motion Pictures
Association of America and TV
broadcasters. (See description of rat-
ings on this page.)
G OFF
PG OFF
PG-1 3 OFF
In 0NI
NC-1 7 ON
X ON
G: General Audience - All ages admitted.
Most parents would find this program
suitable for all ages. Tills type of pro-
gramrning contains little or no violence.
no strong language, and little or no sexual
dialogue or situations.
PG: Parental Guidance Suggested - This
programming contains material that parents
may find unsuitable for younger children.)
It may contain one or more of the follow-
ing: Moderate violence, some sexual situa-
tions, infrequent coarse language, or some
suggestive dialogue.
PG-13: Parents Strongly Cautioned - This
programming contains material that parents
may find unsuitable for children under the
age of 13. It contains one or more of the
following: violence, sexual situations,
coarse language, or suggestive dialogue.
R: Res_'cted -This is programming is
specifically designed for adults. Anyone
under the age of 17should only view this
programming with an accompanying parent
or adult guardian. It contains one or more
of the following: intense violence, intense
sexual situations, strong coarse language,
or intensely suggestive dialogue.
NC.I 7: No one under the age of 17 will
be admitted. - This type of programming
should be viewed by adults only. It con-
tains graphic violence, explicit sex, or
crude indecent language.
X: Adults Only - This type of programming
contains one or more of the following: very
graphic violence, very graphic andexplicit
or indecent sexual acts, very coarse and
intensely suggestive language.
TV-Y OFF
TV-Y7 •
TV-G OFF
Imv@G
TV-14 •
TV-MA I_
[_ TV.Y -(All children -- This program
_-_ is designed to be appropriate for all
children.) Designed for a very young
audience, including children ages 2-6. This
type of programming is not expected to
frighten younger children.
TV.Y7 - (Directed to Older
Children -- This program is designed
for children age 7 and above,) It may
be more appropriate for children who have
acquired the development skills needed to
distinguish between make-believe and reali-
ty. This programming may include mild fan-
tasy and comic violence (FV).
_ TV-G - (General Audience -- Most
parents wouldfind thisprogram suit-
ablefor all ages.) This type of pro-
Famming contains little or no violence, no
strong language, and little or nosexual dia-
logue or situations.
_ TV-PG - (Parental Guidance
Suggested -- This program contains
material that parents may find unsuit-
able for younger children.) This type of pro-
grammiog contains one or more of the fol-
lowing: Moderate violence (V), some sexual
situations (S), infrequent coarse language
(L), or some suggestive dialogue (D).
_ TV.14 - (Parents Strongly
Cautioned -- Thisprogram contains
some material lhal many parents
wouldfind unsuitable for children under 14
years of age.) This type of programming
contains one or more of the following:
intense violence (V), intense sexual situa-
tions (S), strong coarse language (L), or
intensely suggestive dialogue (D).
TV-MA - (Mature Audience Only --
This program is specifically designed
to be viewed by adults and therefore
may be unsuitable for children under I7.)
This type of programming contains one or
more of the following: graphic violence (V),
explicit sexual situations (S), or crude inde-
cent language (L).
12
Page 13

-- f')ver the next few pages you'll
L)" learn how to block channels
and get a better understanding of
the rating terms for certain pro-
gramming
[First, let's start by learning how to
set a personal access code:
t-fi- mm
<_ Press the MENU button the
on
I remote to display the onscreenmenu.
_C Press the CURSOR UP • or
URSOR DOWN • buttons until
the words SmartLock are highlight-
ed.
Press the CURSOR RIGHT
button to display the
martLock Access Code screen.
_ Using the NUMBERED but-
tons, enter 0, 7, 1, 1. "XXXX"
appears on the Access Code screen
i as you press the numbered buttons.
"INCORRECT CODE" will
appear on the screen, and you will
need to enter 0, 7, 1, 1 again.
_, i_ Press the CURSOR DOWN •
button until the words CHANGE
CODE are highlighted.
_ Press the CURSOR RIGHT
button to change your per-
sonal Access Code.
<_ "Next enter a "new" 4 digit
code using the NUMBERED
buttons. The screen will then ask
you to confirm the code you just
entered. Enter your new code
again. "XXXX" will appear when
you enter your new code.
_ Press the STATUS/EXIT
button after the new code has been
entered to set the code in the TV's
memory. @
INPUT
SLEEPTIMER
[SmartLock
CLOCK
CC
/
/
SmartLock
ACCESS CODE
@®
OFF
OFF
®
/
BLOt3K •
IcHANGE _ I_1
/
[CONFIRM CODE X X X XI
13
SmartLock
ACCESS CODE
XXXX
SmartLock
ACCESS CODE
INCORRECT CODE
Parents - it isn't possible for your child
to unblock a channel without knowing
your access code or changing it to a new
one. If your code changes, and you did-
u't change it, then you know it's been
altered by someone else and blocked
channels have been viewed.
ICHANGE CODE X X X X]
Page 14

After your personal access code
l'lhas been set (see previous
page), you are now ready to select
the channels you want to block out
Or censoK
<_ Press the MENU on
button the
I remote to show the onscreen menu.
<_C Press the • or
CURSOR UP
URSOR DOWN • button until
the words SmartLock are highlight-
ed.
<_ Press CURSOR RIGHT
the
• button to display the
SmartLock Access screen.
<_ Enter the correct access code
number. "XXXX" shows on the
Access Code display as you press
the NUMBERED buttons.
_1_ Press the CURSOR UP • or
DOWN • buttons until the word
BLOCK is highlighted. Press the
CURSOR RIGHT _ button then
highlight CHANNELS
BLOCKED.
,,_ _ Press the CURSOR RIGHT
button. Three options will be
displayed; CHANNEL, LOCK or
CLEAR ALL.
_ With CHANNEL highlighted,
use the NUMBERED buttons to
enter the charmeI number you wish
to block.
Use the CURSOR DOWN •
ighlight the word
LOCK, then press the CURSOR
RIGHT _ button to select YES
(block) or NO (do not block). The
channel chosen is now blocked from
viewing.
Repeat steps 7 and 8 for any other
channels you wish to block from
viewing.
Press the CURSOR DOWN •
button until the words CLEAR
ALL are highlighted, then press
the CURSOR RIGHT _ button.
The screen will read "ALL
previously
blocked channels will be unblocked.
SLEEPTIMER OFF
[SmartLock !l_l
CLOCK •
CC OFF
_ "_6_
[CHANNEL
LQCK
CLEAR ALL
51 CHANNEL
NO Iu:r--x
I1_ CLEAR ALL
SmartLock
ACCESS cODE
SrnartLock
ACCESSCODE
XXXX
IBLOCK _'1 ]
CHANGE CODE •
ICHANNELSBLOCKED •l- 7
MOVIE RATINGS •
/
5 CHANNEL 5 BLOCKED
YES] BY CHANNEL BLOCKING
• ENTER CODE TO _E"VV
I
When a blocked channel is viewed, this is what the screen will display. To view the blocked channel, sim-
ply enter the current access code. Note: Once the access code is entered ALL blocked channels will be
viewable until the TV is powered off. Once the set is turned offand then hack on the previously blocked
channels will again be blocked.
CHANNEL S
LOCK YES
ICLEAR ALL • I
CHANNEL
LOCK NO
}ALL UNBLOCKED I
Note: When the CLEAR
ALL option is selected, the
CHANNEL option will
display ALL.
If at this point if you change
the LOCK option to YES,
ALL channels will be blocked
from viewing.
14
Page 15

I
_'_nartLoek offers the viewer other
k.3 blocking features as well. With
these Blocking Option features, the
censoring can be turned ON or
OFF
Press the MENU button on the
remote to display the onscreen
menu.
Press the CURSOR UP • or
CURSOR DOWN • buttons until
the words SmartLock are highlight-
ed.
<_ Press the CURSOR RIGHT
• button to display the SmartLock
Access Code screen.
<_ Using the NUMBERED but-
tons on the remote, enter your per-
sonal Access Code.
<_ With the word BLOCK high-
lighted, Press the CURSOR
RIGHT • button.
<_ Scroll the menu using the
CURSOR UP • or CURSOR
DOWN Y buttons until the words
BLOCKING OPTIONS are high-
lighted.
<_ lPress the CURSOR RIGHT •
button to display the Blocking
Options (MASTER DISABLE,
BLOCK UNRATED, or BLOCK
NO RATING). When highlighted,
each feature can be turned ON or
OFF using the CURSOR RIGHT
• or CURSOR LEFT • buttons
on the remote.
INPUT •
SLEEPTIMER OFF
ISmartL ck •1 ....
CLOCK •
CC OFF
®®®L
® ,,
SmartLock
ACCESSCODE
SrnartLock
ACCESS CODE
XXXX
IBLOCK
CHANGE CODE
b-I
IBLOCKINGOPTIONS I_1
CHANNELSBLOCKEDlib
MOVIERA]INGS •
IMAS_RDISABLE
BLOCK UNRATED
BLOCK NO RATING
ON1
ON OR
ON
IMASTER DISABLE OFF
BLOCK UNRA1ED OFF
BLOCK NO RATING OFF
CHANNEL 20 BLOCKED
BY CONTENT ADVISORY
CANNOT DECOOE RA'I1NG
ENTER CODE TO VIEW
IIf the BLOCK UNRATED or BLOCK NO RATINGS con-
Itrois ate turned ON, all unrated programs and programs
containing NO content advisory data will display the screen
I
i shown to the Left.To watch the channel enter your access
[code, or change the BLOCK UNRATED and BLOCK NO
RATINGS back to OFF.
BLOCKING OPTIONS:
MASTER DISABLE: This is what might be called the "'master switch" for SmartLock. When in the ON position, ALL block-
ing/censoring is turned off (or disabled). When in the OFF position, ALL blocking based on specifically blocked settings will
take place.
BLOCK UNRATED: ALL unrated programs based on the Movie Ratings or Parental (TV) Guidelines can be blocked if this
feature is set to ON and the MASTER DISABLE feature is set to OFF.
BLOCK NO RATINGS: ALL programming with NO content advisory data can be blocked if this feature is set to ON and the
MASTER DISABLE feature is set to OFF.
15
Page 16

-- There are two types of program
I ratings within the SmartLock
feature. One is based on the Movie
Industry ratings while the other is
based on the TV Industry ratings.
Both can be used to block or censor
9rogramming that has been rated in
,.ither manner
Let's first look at the Movie Rating
options of SmartLock:
<_ Press the MENU button on the
remote to display the onscreen
meuu.
<_ Press the CURSOR UP I_ or
CURSOR DOWN • buttons until
the words SmurtLock are high-
ghted.
<_ Press the CURSOR RIGHT
III_l_ button to display the
SmartLock Access Code screen.
Using the NUMBERED but-
tons on the remote, enter your
Persona/Access Code.
<_ With the word BLOCK high-
lighted, Press the CURSOR
RIGHT _ button.
_3_ Scroll the menu using the
I CURSOR UP I_ or CURSOR
DOWN • buttons until the words
MOVIE RATINGS are highlight-
ed.
_ Press the CURSOR RIGHT
button to display the MOVIE
RATINGS (G, PG, PG-13, R,
NC17, or X).
When highlighted, all these options
can be tumed ON (which will allow
blocking) or OFF (which will allow
viewing).
Use the CURSOR RIGHT II*l_
ior CURSOR LEFF _1_ buttons
on the remote to turn the rating
option ON or OFF.
O
INPUT •
S_ OFF
mOCK •
CC OFF
Smarr,b:x=k
ACCESS CODE
Remember:
Selecting to
block any rating
will cause all the
higher ratings to
also be blocked
automatically.
_-_'*.Lock
ACCESS CODE
XXXX
CHANGECODE •
CHANNEL 5 BLOCKED
BY CONTENT ADVISORY
MOVIE RATING R
ENTER CODETO VIEW
BLOCKING0PTION_ •
CHANNELSBLOCKED•
[MOVIERA_NSS •1
PARENTALGUOB_IN_S•
PG OFF
PC--13 OFF
[R 0N I
NC-17 ON
X ON
NOTE: Whe_ a rating is t_ ON, all high-
er ratings will automatically be turned ON.
To turn them OFF, eachwill haveto be s_t
individually¸ (i.e._R blocked manually. NC-
17 _ X will he bloc_ au_m_'icalZy.)
Scr_n will display a message when programming is
blocked by the Movie Rating feature. To unblock, turn
l the Movie Rating OFF, c_ enler your persemal access
code. Entering the code will unblock ALL blocked
Mq3vie Ratings urail lhe TV is lure off. Tl_n Ihe
blocked ratings will be reset tQ ON.
16
Page 17

__ r_his portion of the SmartLock
• features cover program ratings
based on the TV Industry rating
system. This is know as Parental
Guideline within SmartLock.
After selecting the SmartLock
feature and entering your personal
access code, the BLOCK/CHANGE
CODE screen appears;
_ With the word BLOCK high-
lighted, Press the CURSOR
RIGHT •• button.
._ Scroll the menu using the
CURSOR UP • or CURSOR
DOWN • buttons until the words
PARENTAL GUIDELINE are
highlighted.
_.'._ Press the CURSOR RIGHT
button to display the
Parental (TV) Guideline (TV-Y,
TV-YT, TV-G, TV-PG, TV-14, or
TV-MA).
When highlighted, the TV-Y and
TV-G can be turned ON (which
will allow blocking) or OFF (which
will allow viewing), of these rated
programs.
<_The ratings of TV-Y7, TV-PG,
TV-14, TV-MA can be customized
to block V (violence), FV (fantasy
violence), S (sexual situations),
L (coarse language), or
D (suggestive dialogue).
Using the CURSOR RIGHT II_
or CURSOR LEFT _ buttons
on the remote to turn the rating
option ON or OFF,
O
IBLOCK •l
CHANGECOD_ •
©
-.Q®@
®@@
®@
Remember.
Selecting to
block any rating
will cause all the
higher ratings to
also be blocked
automatically.
TV-Y7 •
TV_ OFF
ITV 'G •l
TV-14 •
7_-MA •
"IV RATING SUB MENUS:
"[V-Y OFF
OFF
TV-P_ •
lY7 ON[
FV ON
TV-Y7 •
TV-G OFF
TV-MA •
PG ON
D ON
IL ONI
S ON
v ON
'IV-*/. (All childreil - This program isdes@ned to be appropriate for all children.)
De_igued for = "Icet young audience, inck.ding chik_n ages 21,5,This type of pro-
gramming is nc_expected to frighten younger children.
TV.y7. (Directed to Older Childeen -- This program is designed[or children age 7
and above.) It may be more aplnopnale for children who have acquiredthe devdop-
merit skills need_ to distinguish hotween maha-believe and. reali_ This ln'ogram-
ruing may include mild f='_ _y and comic violence (FV).
TV-G - (GeraexalAudience --/_ost parents wo_4 find this p_ogram suitable _ all
ages.) This lype of _gnanmi_g ccmlains little or no vioinnee, no strong language
lltde or 11osexual dialogue orsil_ations.
TV.PG o(ParentalG_idance Suggusted - This program contaJnsmaterial that ppr-
eros mayfind unsuitable for younger children.)This type of progeamming conlains one
or more of Ih¢ following: Moderate violence (V), _ome sexual situatin_s (S). infre-
q_m coarse language (L), or some sugg_iv_ dialogue (D),
T'q-14 - (Patems SIrongly Cautio,',ed - This program contains some material that
many parents would Snd unsiatable [or children =nder 14 y_ars of age.) This type of
_ming contains one or raor_of the following: intcrca: vinlcnc¢ (V). interr_e
sexual situ,linns (S). strong ¢oa_e language (LI, or intensely suggestive diafog_ (D).
TV.MA - (Malum Audicr,c¢ Only - This program isspecifically designed to be
_ewnd by adu_ and therefore rn_y be =nziatabie [or children under / 7.) This lype of
programming contains oae or more of the following: graphic vidcnc¢ (V), exptici:
sexual situations (S), or crude indecent language (L).
TV-G OFF
TV-_G •
TVa4 •1
14 ON
O ON
IL ON1
s ON
V ON
"tV-MA ON
L ON
Is ON [
V ON
17
Page 18

-- _Tow that you've learn how to
I V block channels or censor your
viewing using the Movie Ratings or
Parental (TV) Guideline let's review
what you've done. The SmartLock
Review feature allows you to see
what has been blocked. Whenever
the Menu button is pressed the
onscreen menu will be displayed
with the SmartLock Review high-
lighted.
Press the MENU button on the
remote to show the onscreen menu.
SmartLock REVIEW will be
h ghl ghted.
<_ Press the CURSOR RIGHT
button and the SmartLock
Review Menu will appear.
This menu will display what
channels have been blocked; what
Movie Ratings have been blocked;
what Parental (TV Ratings)
Guidelines have been blocked.
This review screen will also
display that status of Unrated and
No Rating settings. If the Master
Disable feature has been turned
ON, the SmartLock Review screen
will display "'SmartLock
iDISABLED,"
03 OFF
SElaJP •
I,s,_t_k REVEW •1
BBGqII',ESS ll--..... 30
COLOR mill........ 30
M_,q,
_tt_ O
O
[:yg® ®
®®®
®®®
N
CHANNELS BLOCKED
MOVIE RATINGS
PARENTAL GUIDELINE
BLOCK UNRATED OFF
BLOCK NO RATING OFF
SmartLock DISABLED
J_
SmartLock DISABLED will appear in the
SmartLock Review screen if the SmartLock
Disable feature is set to ON.
CHANNELS BLOCKED - Shows all blocked charahes that wbe_e set with-
in the CHANNELS BLOCKED feature. Up to 5 channels may be blocked at
one lhne.
MOVIE RATINGS - Shows all blocked Movie Ratings thai were set within
the MOVIE RATINGS feature. All or some may be blocked at or_ thee.
Note: If a lower rating is blocked; Ihls will automatically cause the higher
ratings to be blocked also. (i.e.. if R is set to be bincked, X will automatically
he blt_cked also.)
PARENTAL GUIDELINE - Shows alI blocked TV Ratings that were set
wilhin the PARENTAL GUIDELINES feature, All or some may be blocked
ato_e time. Note: If a lower rating is blocked; this will automatically cause
the higher rat ings to be blocked also. (i.e.. if TV-14 is set to be blocked. TV-
MA will aulomat ically he blocked.) Parental Guidelines also have sub ratings
for Violence (V). Fantasy Violence (FV). Sexual Situathels (S). Coa_e
Language (L). and Suggestive Language (D) lflbe main randg is turned off
b_t the sub rating is turned ON. the p_rxm will be blocked but the raling
will not appear within the SmartLock Review menu¸
BLOCK UNRATED - Shows ON or OFF depending on the status of the
BLOCK UNRATED feature¸ Based on the Movie Ratings or Parental (TV)
Guidelines.
BLOCK NO RAVING - Shows ON or OFF depending on the status of the
ILocK NO RATING feature. Based on programming wilh NO content
advisory data.
--.-...,.._._
--_CHANNELS BLOCKED
5 10 12 32 45
'_MOVlE RATINGS
RX
"-,_,PARENTAL GUIDELINE
14 MA
BLOCK UNRATED
L _-BLOCK NO RATING
ON
ON
18
Page 19

The TV' s Audio/Video Input jacks
are for direct picture and sound
connections between the TV and
a VCR (or similar device) that
has Audio/Video Output jacks.
<_ Connect the VIDEO (yellow)
CABLE to the VIDEO IN jack
on the back of the TV. Then con-
nect the AUDIO (red and white)
CABLES to the AUDIO (left and
right) IN jacks on the rear of the
TV.
<_ Connect the VIDEO (yellow)
CABLE to the VIDEO OUT jack
on the back of the VCR. Then
connect the AUDIO (red and
white) CABLES to the AUDIO
(left and right) OUT jacks on the
rear of the VCR.
<_ Turn the VCR and the TV
iON.
<_ Press the MENU button on
l the remote to display the
onscreen menu.
<_ Press the CURSOR LIP• or
I CURSOR DOWN • buttons
until the word INPUT is high-
lighted.
<_ Press the CURSOR RIGHT
• or CURSOR LEFT 41 button
to display the picture/sound menu
(ANTENNA, EXT 1). Use the
CURSOR UP • or DOWN •
buttons to select.
Insert a pre-recorded tape and press
the PLAY • button on the VCR or
remote.
@
IF YOU ARE USING A
MONO DEVICE, USE
ONLY THE AUDIO
L/MONO JACK. IF A
DUMMY JACK IS
PLUGGED INTO THE
AUDIO R, NO SOUND
WILL BE HEARD.
SOUND S_EREO
AVL ON
IINPUT !_1
SLEEPTIMER OFF
SmartLock
O
o
iS® ® @
®®®
¢®®
AUDIO IN
(RED/WHITE)
BACK OF VCR
VIDEO IN
(YELLOW)
VCR
(EQUIPPED WITH
VIDEO AND AUDIO
OUTPUT tACKS)
19
Page 20

-- l][17hether you're watching a
+L,r• movie or a video game, your
TV has automatic video control
settings matched for your current
program source or content. The
SmartPicture feature quickly resets
your TV's video controls for a num-
ber of different types of programs
and viewing conditions you may
have in your home. Each
SmartPicture setting is preset at the
factory to automatically adjust the
TV's Brightness, Color, Picture,
Sharpness, 71nt. and Color
Temperature levels+
<_ Press the SMART PICTURE
button on the remote control. The
current SmartPicturesetting will
appearin the midd e of the screen.
<_ Press the SmartPieture button
repeatedly to select either PER-
SONAL, MOVIES, SPORTS, or
WEAK SIGNAL picture settings.
i
Note: The PERSONAL setting is
the setting that you setup using the
PICTURE options within the
onscreen menu. This is the only
setting that can be changed. All
other settings are setup at the facto-
ry during the time of production.
0
PERSONAL
= +!_i_i_ii_i:!!iiii+iiiiii!i_i_iiiiii+i_ii:ii:_5111!i_ii+i_i_iiiiik+_+........
J
J
2O
Page 21

l
-- The SmartSound feature allows
J- the listener to select between
four different factory set sound
options. Personal (which can be set
by the user), Theater (for movie
viewing), Music (for musical type
programming) and Voice (when the
program is mainly dialogue). To
select any of the options follow the
directions below.
<_ Press the SMARTSOUND
button on the remote control.
The current SmartSound setting will
appear n the middle of the screen.
<_ Press the SMART SOUND
button repeatedly to toggle
between the four settings.
Remember, only the PERSONAL
control can be changed by the view-
er. This changes the settings in the
main onscreen menu's sound con-
trois.
Remember, Smart Sound
! works only with the pro-
grams coming through the 75
input on the rear of the TV (RF
audio). It will not control the
sound levels for the External
connections.
PERSONAL
THEATER
MUSIC
VOICE
NOTE: When the VOICE mode of
SraartSound isselected the AVL fea-
ture will be automatically turned ON.
In most cases the volume levels com-
ing from broadcast pmgramming or
commercials are never the same.
With the AVL control turned ON,
you can have the TV level out the
sound being heard. This makes for a
more consistent sound by reducing
the peaks and valleys that occur dur-
ing program changes or commercial
breaks.
BALqS BOOST ON
SOUND STEREO
IAVL OFFI
INPUT EXT1
SLEEPTIMER OFF
BASS BOOST ON
SOUND STEREO
]AVL ON I
INPUT EXT I
SLEEPTIMER OFF
21
Page 22

A "list" or series of previously
viewed channels can be select-
ed with the SURF button on your
remote control. With this feature
you can easily switch between dif-
&rent TV programs that currently
interest you. The SmartSurf control
allows you set up to eight channels
in its quick viewing "list".
<_ Press the CHANNEL (+) or (-)
buttons (or the NUMBER buttons)
to select a channel to add to the
SURF list.
_ Press the SURF button on the
Iremote while the channel number is
still displayed to ADD the channel to
the SURF list.
_ Repeat steps 1 through 2 to add
additional channels (up to 8) to the
SURF list.
To remove a channel for the SURF
list, simply choose the channel with
the numbered buttons and press the
SURF button while the channel
number is still displayed and the
screen will read DELETED.
O
5
AOOED
S
ADDED
_0
ADOED
J
I
s
SURF 8
SURF 10 "_
SURF
I I:IOTE: Press the Surf button r¢oe,at
edly to cycle or "'loop" through the
channels saved in the Surf Channel
J
22
Page 23

Besides the normal volume level
control, your TV also has Bass
and Treble Boost sound adjustment
controls. The TREBLE Boost effects
only the high frequency sound com-
ing from the TV enhancing the
highs; while the BASS Boost effects
only the low frequency sound com-
ing from the TV enhancing the lows.
Press the MENU button the
on
remote to show the onscreen
menu.
<_ Press the CURSOR UP I_ or
CURSOR DOWN • buttons to
select and highlight the name of the
control you wish to change (TRE-
BLE BOOST, or BASS BOOST).
<_Use the CURSOR LEFT _1_1
or RIGHT II_1_-buttons to turn
the selected control ON or OFF.
NOISE REDUCTION ON
VOLUME D ...........15
ITREBLEBOOST OFFI
BASS BOOST OFF
SOUND STEREO
©
O
-®®®
0_.
iii_iiiiiii_iii_ii_!_!_iii!i_i_iiiiiiiiiiiii_iiiiiii_iiiiiiii_i_iii_!i_iiii_ii_iii_i_i_iiii_ii_iiiiiiii_i_i_i!iii_iiii_ii!_i_iii_iiii_i_iiii_ii!iii_
NOISE REDUCTION ON
VOLUME ! ..........15
ITREBLE BOOST ONI
BASS BOOST OFF
SOUND STEREO
OR
II VOLUME 1 ........... 15
TREBLE BOOST ON
[B_S BOOST OFFI
SOUND STEREO
KS) AVL ON
VOLUME I .......... 15
TREBLE BOOST ON
IBASSBOOST ONI
SOUND STEREO
AVL ON
23
Page 24

I
yoiur 7!/can detect a stereo
gnal and will set itself
automatically so the stereo sound
can be heard. However, there may
be occasions when you might
want to set the TV to mono. The
following steps describe how to
change the SOUND control:
<_ Press MENU button
the on
the remote to show the onscreenmenu.
<_ Press the CURSOR UP
OF
CURSOR DOWN • button until
the word SOUND is highlighted.
_ Press the CURSOR RIGHT
or CURSOR LEFT
buttons to choose between
STEREO or MONO.
With STEREO selected, the tele-
vision will reproduce any stereo
broadcast signal it receives. Please
note that you can force a stereo
broadcast signal to MONO, but
/ou cannot force a mono broad-
cast signal to stereo.
q
TREBLE BOOST ON
BASS BOOST ON
ISOUND MONO I
AVL ON
INPUT •
©
@6)@
@_
TREBLE BOOST ON
BASS BOOST ON
[SOUND STEREOI
AVL ON
INPUT _-
Remember: If stereo is
not present on a selected
show and the TV is placed in
the STEREO mode, the sound
coming from the set will remain
monaural (mono).
24
Page 25

U_h e the Volume Bar control to see
e TV's volume level settings
on the TV screen. The Volume Bar
will be seen each time the VOLUME
buttons (on the TV or remote) are
oressed.
<_ Press the MENU button to
display the onscreen menu.
<_ Press the CURSOR UP • or
CURSOR DOWN • buttons until
the word VOLUME s h gh ghted.
<_ Press the CURSOR RIGHT
button to increase the TV's
volume or the CURSOR LEFT
button to decrease the sound.
®
CONTRAST PLUS ON
NOISE REDUCTION ON
[VOLUME • ........... 1BI
TREBLE BOOST ON
BASS BOOST ON
®®
OR
IVQLUME • ...........151
Note: Pressingthe VOL
(+) or (-) buttons will
also allow you to adjust
the sound levelof the
TV.A VolumeBar
adjustment will appear
onscreen.Press the (+)
tO thcre_ the volume
andthe (-) button to
decrease the volume.
©®©
25
Page 26

J
y:ur remote control is set to
ork your TV and many
infrared remote (IR) control
VCRs, Cable Boxes, Satellite
Systems, DBS, DVD, etc'.
However, an easy onetime step
may be necessary before the
remote will work your VCR.
Try this initial check to see if
going on to thefollowing section
is necessary.
<_ Place the TV/VCR/ACC
I Mode Switch in the proper
position.
<_ Point the remote control at
the device and press the POWER
button.
<_ Does the remote turn the
device ON?
If YES, stop and try other
function buttons on the remote.
If they also work the device,
then the remote is ready and
no further steps are needed.
If NO, continue...
<_ First look up a THREE-DIGIT
remote control number for your
brand of Device before going
through the simple steps on the
following page.
Find your Three-Digit Code on
pages 29-30.
VCR
Satellite Receiver
SLEEP
"ACC
® ® ®
SMART
(0) @
SOUND
Cable Converter
26
Page 27

l
NOhW that you have looked up
e three-digit Remote Code
Number for your brand of device.
you are ready to follow the four
simple steps below.
Please read through steps l-4
before beginning.
Place the TV/VCR/ACC
Mode Switch in the proper posi-
tion.
<_ Press the AJCH • RECORD
I button on the remote control and
release.
<_ Press the SMART SOUND
button on the remote within 30
seconds, then release.
<_ Enter the THREE-DIGIT
REMOTE CODE NUMBER
for your desired device. The
remote is now ready to send
commands to the unit.
<_ Point the the
remote at
Device. Press the POWER button
on the remote to turn the unit
ON.
Remember, if this doesn't
work the firsttime, repeat steps
using the same remote code number.
After a second try and the remote
does not operate your device, see if
there is another three-digit code
number (pages 29-30) listed for your
device and repeat the steps above
using the new number.
If after repeated attempts the code
number method does not work you
device, try the SEARCH METHOD
on page 28.
VCR
SateLlite Receiver
DVD
Cable Converter
® ®
SMART SMART
SOUNO pICIlJRE
J
27
Page 28

y;ur TV remote can be sel to
ork various external devices
such as VCRs, Cable Boxes,
Satellite Receivers, Dss, DVD,
etc. by what is called the search
method of remote control pro-
gramming.
lf the "Remote Code" number
method shown on page did not
set your remote to work your
external device, then follow the
easy steps listed below.
Please read steps 1-4 before
beginning.
@ Press the on
POWER
button
the device your are attempting toprogram to turn it ON.
<_ Place the
TV/VCR/ACC
I Mode Switch in the proper posi-
tion.
@ the VCR RECORD
Press
and the SMART SOUND but-
tons simultaneously and hold
them down.
@ The device will to
begin
change channels after the remote
identifies the correct code. When
the channels start to change
release the VCR RECORD and
SMART SOUND buttons. The
remote should he ready to oper-
ate the device.
O
This method can take up to
gg two minute to preform.
Don't let thedevice scan up more
than five channels. If you do the
remote may pass up the right code
and another two minute search cycle
will have to be repeated.
If no channel change happens within
two minutes, repeat steps 1-4.
Should a channel change still not
occur, the remote wilt not work the
desired device.
Satellite Receiver
Cable Converter i
VCR
..... t5
28
Page 29

l
REMOTE
yen COgE NO.
Admiral ........................ 048
Advantz ........................ 358
Adventure ...................... 000
Aiko .......................... 278
Aiwa ........... 000.037. 307. 348, 352
Akai ....... 041. 049,053,061, 106, 315
Alba ........................... 352
Amercian High .................. 035
Amstrad .................... 325, 332
Asha .......................... 240
Audiovox ....................... 037
Baird .......................... 107
Beaumark ...................... 240
Bell & Howell ................... 104
Blaupunkt ............... 003.006, 154
Brandt ................. 187. 320.32 I
Broksonic ....... 121, 184. 21 !. 295,361
Bush .......................... 352
CCE ....................... 072, 278
Calix .......................... 037
Canon ......................... 035
Capehart ....................... 020
Carver ..................... 081, 146
Citizen ..................... 037, 278
Colt ........................... 072
Combitach ...................... 352
Craig ........... 037, 047,072. 240, 271
Curtis Mathes ............ 035, 04!, 060
Cybermax .................. 051,240
Daewoo ................ 020, 045,276
Day,'on ........................ 020
Denon ......................... 042
Dynatech ....................... 000
Electrophonic .................... 037
Emerex ........................ 032
Emerson .... 000. 002, 036, 037,043, 06t
.......... 068, 088, 121. !64, 208, 209,
........... 21 I, 212, 278, 295, 361,479
Ferguson ............... 107. 320, 321
Fisher ............. .047,054, 066, 104
Fuji ...................... .033, 035
Funai .......................... 000
GE ................ 035,060, 065,202
Garrard ........................ 000
Go Video ............... 232, 279, 432
Gold Star ................... 037, 038
Gradiente ................... 000, 406
Grundig ............ 003, 007, 195, 347
HI-Q ......................... .047
Harley Davidson ................. 000
Harman/Kardon .............. 038, 075
Harwood ................... 068,072
Headquarter ..................... 046
Hinari ..................... 004, 352
Hitachi ............. 00(3, 004, 041,042,
................... 065, 105, 168, 235
Ingersol ........................ 004
JVC ........ 008,041,067, 208. 384, 486
Jensen ......................... 041
KEC ....................... 037,278
KLH .......................... 072
Kenwood ........... 038.04L, 067. 384
Kodak ..................... 035. 037
LXI ........................... 037
Lloyd's ..................... 000, 206
REMOTE
v__F.R CODE NO.
Loewe ......................... 004
Logik ...................... 004, 072
MEI ........................... 035
MGA ...................... 043, 061
MGN Technology ................ 240
MTC ...................... 000. 240
Magnavox ....... 000. 035. 081. 146, 181
Maria .......................... 037
Matsui ................. 004. 348, 352
Matsushita .............. 035, 162, 454
Memmorex ..................... 307
Memorex ....... 000, 035,037,039. 046.
........... 047. 048. 104. 240. 266. 307
Metz ...................... 003. 347
Minolta .................... 042. 105
Mitsubishi ...043. 061. 067. 075, 173. 443
Motorola ................... 035.048
Multitech ................... 000. 072
NAD .......................... 058
NEC ........... 036.040, 041,067, 104
Nikko ......................... 037
Nikon ...................... 034, 253
Noblex ......................... 240
Nordmende .............. 297. 320, 32 I
Okano ......................... 346
Olympus ................... 035. 226
Optimus ............ 037.048.058, 104,
...................... 162. 432. 454
Optonica ....................... 062
Orion .......... 004, 295,348, 352, 479
Panasonic .......... 035,077, 162, 225,
...................... 226, 378, 454
Penney ............. 035,037, 038, 040,
...................... 042, 065, 105
Pentax ................. 042, 065, 105
Philco ......................... 035 :
Philips ......... 035,062, 08 I, 110, 403
Pilot ........................... 037
Pioneer ..................... 058,067
Portland ........................ 020
Profax ......................... 322
Profitronic ...................... 240
Protec ......................... 072
Pulsar ...................... 039, 051
Quarter ........................ 046
Quartz ......................... 046
Quasar ............. 035, 077, 162, 454
RCA .............. 042,060,065, 077.
................... 105, 106, 149, 202
Radio Shack ................. 000, 037
Radix .......................... 037
Randex ........................ 037
Realistic ........ 0(30, 035, 037, 045,047
.................. 048. 062,066. 104
Ricoh ...................... 034, 253
Runco ......................... 039
SEG ........................... 322
SEI ........................... 004
STS ........................... 042
Saba ................... 297, 320. 321
Saisho ......................... 004
Salora ......................... 075
Samsung ............ 045.05 l, 053. 240
Sanky ...................... 039, 048
Sansui .............. 000, 041,067, 271
REMOTE
VCR CODE NO.
Sanyo .......... 046, 047, 104. 240, 268
Saville ......................... 352
Scott ....... 043, 045, 121, 164. 21 I, 212
Sears .......... 000. 035, 037,042,046,
............... 047,054. 066, 104. 105
Sharp ...................... 046, 062
Shintom ........................ 072
Shogun ..................... 05 I. 240
Shoral ......................... 004
Siemens ........................ 003
Singer ......................... 072
Sinudyne ....................... 004
Sony .......... 000, 01 I, 022, 032, 033,
................... 034, 035. 253, 275
Sunkel ......................... 348
Sunpak ........................ 253
Sylvania .... 000, 035,043,081, 103. 110
Symphonic ...................... 000
TMK .................. 036, 208,240
Tatung ......................... 041
Teac ....................... 000,041
Technics .................... 035, 162
Teknika ................ 000, 035,037
Telefunken .............. 187, 320, 321
Tansal ......................... 322
Thomas ........................ 000
Thomson ....................... 320
Toshiba ......... 043, 045,066, 2 [2, 366
Totavision .................. 037, 240
Towada ........................ 322
Unitech ........................ 240
Universum ...................... 325
Vactor ......................... 045
Vactor Research .............. 038,040
Video Concepts .......... 040, 045,061
Videosonic ...................... 240
Wards . .000, 035, 042, 047, 048,060, 062,
........... 072, 081, 149, 161,212, 240
XR-1000 ............... 000, 035,072
Yamaha ........................ 038
Zenith .............. 000, 033,034, 039
CABLE REMOTE
CONVERTOR CODE NO.
ABC .............. 001,003, 007,008,
................... 011,013.014,017
Aliegio ......................... 153
Andover ........................ 544
Antronix ....................... 022
Archer ..................... 022, 153
Balcor ........................ .056
British Telecom .................. 105
Cable Star ...................... 056
Cablatenna ...................... 022
Cabletime ........... 161, 27 l, 377, 448
Cableview ...................... 022
Century ........................ 153
Citizen ......................... 153
Clyde .......................... 086
Colour Voice ................ 025,031
Comtec ........................ 274
Comtronics ..................... 040
Contec ......................... 019
Cryptovision .................... 600
Deceat ......................... 423
29
Page 30

J
CABLE REMOTE
I_QNVERTOR CODE NO.
Eastern ..................... 002,274
Everq uest ................... 015.040
Filmnet ........................ 443
Focus .......................... 400
France Telecom .................. 45 I
GC Electronics .................. 056
GEC .......................... 086
Ganard ......................... !53
Gemini ................. 015.070, 242
General Instrument ........ 01 I. 276. 476
Gold Star ....................... 040
Gnmdig ........................ 529
Hamlin ............. 009, 020, 034, 259
Hitachi ......................... 01 I
Hytex .......................... 007
Jasco .......................... 153
Jerrold ............. 003, 01 I, 012, 014,
................... 015. 024, 276. 476
M.N.E, T. ....................... 443
MNet .......................... 443
Macon ........................ .033
Magnavox .............. 027, 032. 334
Memorex ....................... 000
Movie Time ..................... 063
NSC ....................... 063.070
Oak ....................... 007, 019
Optimus ........................ 02 I
Panasonic ............... 000, 021. 107
Paragon ........................ 000
Philips . .025.027, 031. 153, 242, 290. 334
Pioneer ..................... 533, 753
Popular Mechanics ................ 400
Pulsar ......................... 000
RCA .......................... 021
Radio Shack .................... 015
Recoton ........................ 400
Regal ..................... .020, 259
Regency ........................ 002
Rembrandt .................. 011,070
Runco ......................... 000
SL Marx ....................... 040
Salora ......................... 382
Samsung ....................... 040
Satbox ......................... 375
Scientific Atlanta ......... 008, 017, 477
Signal ..................... 015,040
Signature ....................... 01 I
Sprucer ........................ 02 I
Star Sight ....................... 542
Stareom .................... 003, 015
Stargate .................... 015,040
Starquest ....................... 015
Sylvania ........................ 001
TV85 .......................... 063
'randy ......................... 258
Tele+ 1 ......................... 443
Teleservice ...................... 28 I
Teleview ....................... 040
Texscan ........................ 00 I
Timeless ....................... 274
Tocom ................. 012, 013, 059
Toshiba ........................ 000
Tudl ........................... 286
Tusa ........................... 015
Unike ...................... 022, 153
CABLE REMOTE
CONVERTOR CODE NO.
United Artists .................... 007
United Cable .................... 003
Universal ........... 022,056, 153, 191
Videoway ....................... 250
Viewstar ................ 027, 063, 258
Visi Cable+ ..................... 461
Westminster ..................... 105
Wolsey Gaine .................... 544
Zenith .................. 000, 054. 525
Zentek ......................... 400
REMOTE
COOENO.
Alpha Star ...................... 772
Echostar ........................ 775
HTS ........................... 775
Hitachi ......................... 819
Hughes Network System ........... 749
Jerrold ......................... 627
Magnavox .................. 722, 724
Memorex ....................... 724
Panasonic ....................... 70 I
Philips ..................... 722, 724
Primestar ....................... 627
RCA .......................... 566
Sony .......................... 639
Toshiba ........................ 790
Uniden ......................... 724
REMOTE
AST ........................... 35 I
Akai ........................... 515
Alba ................... 352, 515, 613
AIdea .......................... 288
Amstrad .... 080, 252, 345, 461,509, 689
Ankaro ................. 220, 288. 369
Anitron ........................ 183
Armstrong ...................... 243
Astra .......................... 108
Avalon ......................... 396
Axis ........................... 369
BT ........................ 515. 668
Beko .......................... 189
Best ........................... 369
Boca ...................... 243, 513
Bush .......................... 067
Cambridge .................. 344, 515
Channel Master .................. 362
Commlink ...................... 288
Connexions ..................... 396
Conrad ......................... 607
Crown ......................... 243
DDC .......................... 362
DNT .......................... 396
Echostar ........................ 396
Farguson ............ 067, 183, 189, 336
Fidelity ........................ 252
Finiux ..................... 108, 397
Fuba ....................... 369, 396
G-Bat .......................... 183
Galaxis ........................ 286
Gooding ........................ 571
Grandig ............ 173, 189, 571. 750
Hinari ......................... 183
REMOTE
Hirschmann ................. 397, 573
Houston ........................ 668
Huth ................... 220, 243, 268
ITT ........................... 108
lntervision ...................... 592
JVC ....................... 515,571
Kathrein ............ 092. 504. 622, 658
La Sat ..................... 513, 607
Lennox ........................ 592
Lupus ......................... 369
Luxor ...................... 108,573
Manhatten ...................... 592
Maspro ................. 092, 336, 750
Matsui .................... i .... 57 [
Mediamarkt ..................... 248
Minerva ........................ 57 I
Mintee ......................... 576
Morgan's ................... 243, 513
Newhaus ....................... 220
Nikko ...................... 360, 713
Nokia .................. 108. 397, 573
Nordmende ..................... 362
Orbitech ........................ 501
Pace ........... 067, 183, 336. 455, 791
Paliadium ....................... 571
Palsat .......................... 501
Philips ............. 200, 292, 57 I. 750
Phonotrend .................. 288, 592
Plasmatic ....................... 442
Proset ......................... 288
Quadral .................... 362, 628
RFT ....................... 220, 288
Radix .......................... 396
SAT ....................... 351, 461
SEG ........................... 369
Saba ........................... 336
Salora ......................... 108
Satec .......................... 183
Schwaiger .................. 183, 504
Seemann ................ 396, 578. 626
Skymaster .................. 288, 626
Sony .......................... 704
Star Trak ....................... 42 I
Strong ......................... 42 I
Sunstar ........................ 513
Tantec ......................... 336
Techni Sat .................. 262, 501
Teleka ..................... 243, 613
Tonna ......................... 668
Triad .......................... 351
Universum ...................... 57I
Vtech .......................... 35 I
Wisi ....................... 35 I, 396
REMOTE
CODENO.
Kenwood ....................... 534
Mitsubishi ...................... 521
Panasonic ....................... 490
Philips ......................... 539
Pioneer ........................ 550
RCA ......................... .522
Sony ......................... .552
Toshiba ........................ 503
3O
Page 31

Whwen using the TV remote
ith a VCR, first make cer-
tain it is set to control your VCR
(by the REMOTE CODE or
SEARCH method).
Set the TV/VCR/ACC mode
switch to VCR on the remote.
<_ Point the top of the remote
toward the front of the VCR
(remote sensor window) when
pressing the buttons.
RECORD BU'ITON
Hold the A/CH • RECORD button
down to begin aVCR recording.
VCR SYSTEM SWITCH
Set in the VCR position to send
remote commands to the VCR.
PLAY BUTTON b.
Press to begin playback of a
video tape.
NUMBER BUTTOI
Press to rewind tapes. For some
VCR's the STOP button may
have to be pressed first, then
REWIND. In playback mode
hold down the button to view
picture moving rapidly in
reverse.
Press to stop the motion of a tape
in playback, rewind, fast forward,
etc.
Remember, the VCR but-
tons on the remote will not
operate your VCR if those features
are not found on your VCR remote
control.
Note: All VCR functions (parttcularly
Search, Rewind, Fast Forward, etc.)
will operate the same as with the orig-
inal VCR remote control provided
with the VCR.
CDCD
31
\
l
POWER BUTTON
Press to turn the VCR ON and
OFF.
TV/VCR BUTTON
Press while in the VCR mode
(VCR indicator on the front of
the unit will light) to view the
playback of a tape. Press again to
place in the TV position (VCR
indicator light will go off) to
view one program while record-
ing another program.
When used in the TV mode, the
TV/VCR/CLOCK button will
access the TV's Clock menu
options.
Press buttons for direct VCR
channel selections.
Press to temporarily stop the tape
during a playback or recording.
Press again to release Pause.
FAST FORWARD B_N
Press to rapidly advance the tape.
For some VCR's you may need
to press the STOP button first,
then the FAST FORWARD but-
ton. In playback mode hold the
button down to view the picture
moving rapidly in the forward
direction.
CHANNEL + & - BUTTONS
Press to scan up or down through
the VCR channel numbers
NOTE: If your VCR requires the pushing of two bul-
tons to stare a VCR recordlgn, you will have to press
PLAY)¸
bolh buttons on the remote also (i.e.. RECORD and
Page 32

please make these simple
checks before calling for ser-
vice. These tips can save you
time and money since charges for
TV installation and adjusmwnt of
customer controls are not covered
under your warranty.
NOPower
No Picture
No Sound
Remote Does Not
Work
TV Disnlays Wrong
Channel or No
Channels Above 13
CAUTION: A video source (such as a video game, Compact Disc Interactive - CDI, or
!TV information channel) which shows a constant non-moving pattern on the TV screen,
can cause picture tube damage. When your TV is continuously used with such a source
the pattern of the non-moving portion of the game (CDI. etc.) could leave an image
permanently on the picture tube. When not in use, turn the video source OFF.
Regularly altemate the use of such video sources with normal TV viewing.
I Check the TV power cord. Unplug the TV, wait 10 seconds, then reinsert plug into _1
outlet and push POWER button again. I
Check that outlet is not on a wall switch. Be sure fuse is not blown on AC Power strip. [
Check antenna connections. Are they properly secured to the TV's ANT/CABLE plug?
Check the TUNER control for CABLE or ANTENNA setting.
ICheck Audio/Video Input jack connections if using a VCR or other external device.
i Check the VOLUME buttons, i
Check the MUTE button on the remote control.
Check Audio/Video Input jack connections if using a VCR or other external device.
Check batteries. Replace with AA Heavy Duty (Zinc Chloride) or Alkaline batteries
if necessary.
Clean the remote and the remote sensor window on the "IV.
Check the TV power cord. Unplug the TV, wait 10 seconds, then reinsert plug into
outlet and push POWER button again. Be sure fuse is not blown on AC Power strip if
one is being used.
Check to be sure TV outlet is not on a wall switch.
i epeat channel selection.
Add desired channel numbers (CHANNEL control) into TV memory.
Check to be sure the TUNER control is set to the CABLE. i
Cleanin_ and Care
• To avoid possible shock hazard be sure the TV is unplugged from the electrical outlet before cleaning.
• When cleaning the TV screen take care not to scratch or damage the screen surface (avoid wearing jewelry or using
anything abrasive). Wipe the front screen with a clean cloth dampened with water. Use even, easy, vertical strokes when
cleaning.
• Gently wipe the cabinet surfaces with a clean cloth or sponge dampened in a solution of cool clear water. Use a clean
dry cloth to dry the wiped surfaces.
• Never use thinners, insecticide sprays, or other chemicals on or near the cabinet, as they might cause permanent marring
of the cabinet finish.
32
Page 33

Coaxial Cable • A single solid antenna wire normally matched with a
metal plug (F-type) end connector that screws (or pushes) directly onto a
75 Ohm input found on the Television or VCR.
Closed Caption • Broadcast standard which allows you to read the
voice content of television programs on the TV screen. Designed to help
the hearing impaired this feature uses onscreen "text boxes" to show
dialogue and conversations while the TV program is in progress.
Direct Audio/Video Inputs • Located on the rear of the TV these
connectors (RCA phono type plug) are used for the input of audio
and video signals. Designed for use with VCRs (or other accessories)
in order to receive higher picture resolution and offer sound connection
options.
Identify • Method by which a remote control searches and finds an
operating code for another product (such as a VCR or Cable Converter).
Once the code has been "identified" then the TV remote can operate and
send commands to the other product.
On Screen Displays (OSD) • Refers to the wording or messages
generated by the television (or VCR) to help the user with specific
feature controls (color adjustment, programming, etc.).
Menu • An onscreen listing of feature controls shown on the Television
screen that are made available for user adjustments.
Multichannel Television Sound (MTS) • The broadcast standard that
allows for stereo sound to be transmitted with the TV picture.
Programming • The procedure of adding or deleting channel numbers
into the Television's memory circuits. In this way the Television
_'remembers'" only the locally available or desired channel numbers
and skips over any unwanted channel numbers.
Remote Sensor Window • A window or opening found on the
Television control panel through which infrared remote control
command signals are received.
Setup Mode • Automatic feature control settings made by the TV.
Designed for first time setup and use. Settings for signal connections
(antenna or cable TV), plus channel program memory are held in the
TV's memory (even if the set is unplugged and moved to a new
location.)
Status • Allows the user to quickly confirm what channel number is
currently being viewed. Status can also be used to clear the Television
of on screen displays or information (rather than waiting for the
displays to "time out" or automatically disappear from the screen).
Twin Lead Wire • The more commonly used name for the two strand
300 Ohm antenna wire used with many indoor and outdoor antenna
systems. In many cases this type of antenna wire requires an additional
adapter (or balan) in order to connect to the 75 Ohm Input terminals
designed into the more recent Televisions and VCRs,
Accessories/Optional ............................ *(Q/U- 1), 22
Adapter Connector ................................ *(Q/U-I )
Add/Delete Channels ................... (Channel Edit) *(Q/U-4)
Alternate Channel ...................................... 25
Audio/Video Input Jacks ................................. 22
Battery Installation ................................. *(Q/U-2)
Cable TV Coonections/Settings ...................... *(Q/U- 1,3)
Channel Memory ................................. *(Q/U-4)
Clock Set Time ......................................... 8
Closed Captioning ...................................... 1 I
Controls/TV ...................................... *(Q/U-2)
Controls/Remote ............................. *(Q/U-2), 23-3 I
External Control .................................. *(Q/U-4)
Features ............................................... 4
Glossary TV Terms ..................................... 33
Input Control .......................................... 22
Language Option .................................. *(Q/U-3)
Memory/Program Channels ......................... *(Q/U-3)
Menu Button ..................................... *(Q/U-2)
Minus(-)/Plus (+) Buttons ........................... *(Q/U-2)
Picture Controls ......................................... 5
Picture Noise Reduction ................................... 7
Precautions/Safety ................................. 3, 32, 36
Programming Channels ............................. *(Q/U-4)
Remote Control .............................. *(Q/U-2), 23-3 I
Requesting Service ................................ 34-35, 36
RF Coaxial Cable .................................. *(Q/U- I)
Safety/Precautions ................................. 3, 32, 36
Sensor Remote .................................... *(Q/U-2)
Set Up/First Time Use .......................... *(Q/U- 1,2,3,4)
Sleep Timer ........................................... 12
SmartLock/Understanding the SmartLock Features ............. 12
SmartLock Access Code Feature ........................... 13
SmartLock Block Channel Feature .......................... 14
SmartLock Blocking Options .............................. 15
SmartLeck Blocking using the Movie/TV Ratings ............ 27-28
SmartLock Review ...................................... 18
SmartPicture Control ................................... .23
SmartSound Control/AVL Control .......................... 24
SmartSurf/Altemate Channel .............................. 25
Start-up Channel Control ................................. 10
Start-up Time Control .................................... I0
Status Button ..................................... *(Q/U-2)
Timer Control .......................................... 9
Tips for Service ................................ 32, 34-35, 36
VCR/TV Connections ........................... *(Q/U- 1), 22
Volume Bar Control ..................................... 20
Warranty ............................................. 36
* Information contained in Quick-Use (Q/U) Guide-page listed.
33
Page 34

Philips Consumer Electronics Company
Factory Service Center Locations
, ' , _ ----_< --_Ceveandli°_ b-f_ f i ' ' --
/ / i , I \ h • • \_ /
_ r °_ i _
LosAnqeles _< _ ; / '_ _'_ _ _ _ / _ _
_X > i , i , '7 _ / I "k p ttsburgh/WV Area
/ , ! ! [ /_--'_ Knoxvine/E Tenndssee ; \
i _ / • , / , PhUade phla/S New Jersey
; _ Atlanta/N Georgia i
Houston/GalvestonBeaumont/Austin"_ Tampa/W Florida
"\_iJ_ San Antonio _,_ Ft. Myers/SW Florida
lk
Indicates In-Home Bervice Only
%800-242°9225 _t Miami/SE Florida
• Indicates In-Home/Carry-In Service
NOTE:If youresidein oneof our PhilipsFactoryServiceBranchareas(seedirectoryonback),youcancontactthenearestServiceBranchto
obtainefficientandexpedientrepairforyourproduct.If your productis In-Warranty,youshouldhaveproof-of-purchaseto ensureNoCharge
Service.For0ut-of-Warrantyservice,callthelocationnearestyou.
NOTA:Sivousresidezdansunedesr_gionsdesserviesparunesuceursaledeserviceapr_sventedufabricantPhilips(voirlisteci-dessous),
vouspourrezeontacterlabranchedeserviceapresventelaplusprbsdeehezvouspourobtenirunserviceapr_sventerapideetefficace.Si le
produitestsousgarantie,ilsuffiradepresenterunepreuved'achatpourb_n_ficierd'unservicesansfrais. Pourlesproduitsnoncouvertsparla
garantie,contactezlecentrele plusprcsdechezvous.
NOTA:Si Ud.resideenunadenuestraszonasparasucursalesPhilipsdeservicioal defabrica(verdirectoriom_sabajo),Ud.puedecomunicarse
conlasucursaldeserviciore;iscercanaparaobtenerunareparaci6noporlunay eficazdesuproducto.Si suproductoest_todaviabajogaran-
tia, Ud.debepresentareomprobantedecompraparanoocasionarningunoscargosporservicio. Paraserviciodespu_sde1vencimientodela
garantia,Ilameal lugarm_iscercanodelosabajoindicados.
Howyoucanobtainefficientand expedientcarry-in,mail-in,orin-homeserviceforyourproduct
PleasecontactPhilipsat 1-800-661-6162(Frenchspeaking)
1-800-363-7278(Englishspeaking)
Commentobtenirleserviceapres-ventepourlesproduitsapport_souenvoy6sparlaposte_ notrecentredeserviceou leserviceadomicile
Veuillezcontacterphilips;J: 1-800-661-6162(Franeophone)
1-800-363-7278
E_anad_
C6morecibirservicioefficienteparasu producto,en persona,pot correoo a domicillo
Favorde comunicarseconPhilipsal: 1-800-661-6162(francOfono)
1-800-363-7278(angl6fono)
MAC_g2_ 1/99
EL4482-3 Rev. AA
3135 015 07541
34
Page 35

QUALITYSERVICE IS ASCLOSEAS YOURTELEPHONE!SIMPLY LOOK OVERTHE LIST BELOWFOR THE NUMBEROF A FACTORYSERVICE CENTER
REARYOU. YOURPRODUCTWILL RECEIVEEFFICIENTAND EXPEDIENTCARRY-IN, MAIL'IN, OR IN'HOME SERVICE,AND YOU WILL RECEIVEPEACEOF MIND,
KNOWING YOUR PRODUCT IS BEINGGIVENTHE EXPERTATfENTION OF PHILIPS' FACTORYSERVICE. AND, IF THE PHONE NUMBER LISTEDFOR YOUR AREA
IS LONG DISTANCE,CALL1-800-242-9225 FORFACTORYSERVICE,
COMMENTOBTENIRNOTRESERVICEAPRILSVENTERAPIDECTEFFICACESQiTPARCOURRIER./_DOMICILE.OUENSEPRESENTANTA UNCENTREOESERVICEPHILIPS.PLUSDE6_0CENTRES
OERI_CEPTIONDEPRODUITS/_REPARERJ_TRAVERSLEPAYS;CONTACTERLECENTREDESERVICEAUXCONSOMMATEURSLEPLUSPROCNEPOURSAVOIRE'EMPLACEMENTDECESOI_P()TS
DANSUNRAYONDE50A75MILES(80KMA120KM)DUCENTREDESERVICELOCAL.
COMOOBTENERUN SERVICIOOPORTUNOY EFICIENTEPORCORREO,EN CASA0 ENPERSONAPARASUPRODUCTOA TRAVESDE UN CENTROPHILIPSDESERVICIO. MASDE600S[TIOSPOR
TO00 EL PAlSPARALARECEPCIONDE PROOUCTOSNECESITADCSDEREPARACIONES:COMUNICARSECON EL CENTRODESERVICIODEFANRICAMAS CERCANOPARAESEOSLUGARESDENTRO
DE UN RADIODEN A 120 KM (50 A 75 MILLAS)DEL CENTRODE SERVICIOLOCAL.
GEORGIA
Philips FactoryServiceof Georgia
200 N.Cobb Pkwy.,Suite120
Marietta, GA30062
(770) 795-0085
FLORIDA
Philips FactoryServiceof Florida
1911 USHighway301 North
Tampa,FL33619
(813) 621-8181
WESTERNU.S.A.
Philips FactoryServiceWesternRegion
681 EastBrokaw Rd.
SanJose,CA95112
(408) 436-8566
TEXAS
Philips FactoryServiceof Texas
1110 N. PostOakRd., Suite100
Houston, TX 77055
(713) 682-3990
CENTRALU.S.A.
Philips FactoryServiceCentralUS
950 KeynoteCircle
Brooklyn Heights, OH44131
(216) 741-3334
MICHIGAN
Philips FactoryServiceof Michigan
25173 Dequindre
MadisonHeights, MI 48071
(248) 544-2110
DALLASAREA
PhilipsFactory Serviceof Dallas
415 N Main Street,#107
Euless,TX 76046
(713) 682-3990
ILLINOIS
PhilipsFactoryService of Illinois
1279 W.Hamilton Pkwy.
Itasca,IL 60143
(630) 775-0990
TENNESSEE
PhilipsFactory Serviceof EastTennessee
6700 D PapermillRd.
Knoxville,TN 37919
(423) 584-6614
MID-ATLANTIC
Philips FactoryServiceMid-Atlantic
352 DunksFerryRd.
Bensalem,PA19020
(215) 638-7500
35
Page 36

COLOR TELEVISION
90 Days Free Labor
One Year Free Replacement of Parts (Two Years Free Replacement on Color Picture Tube)
This product can be repaired in-home.
WHO IS COVERED?
You must have proof of purchaseto receive warranty service. A sales
receipt or other document showing that you purchased the product is
considered proof of purchase.
WHAT IS COVERED?
Warranty coverage beginsthe day you buy your product. For 90 days
thereafter,all parts will be repaired or replaced free, and labor isfree.
From 90 daysto one year from the day of purchase, all parts will be
repaired or replaced free, but you payfor all labor charges. From one
to two yearsfrom the day of purchase, you pay for the replacement or
repair of all parts except the picture tube, and for all labor charges.
After two years from the day of purchase, you payfor the replacement
or repair of all parts, and for all labor charges.
All parts, includingrepaired and replaced parts, are covered only for
the original warranty period. When the warranty on the product
expires, the warranty on all replaced and repaired parts also expires.
WHAT IS EXCLUDED?
Your warranty does not cover:
• bbor chargesfor installationor setupof the product"adjustmentof
customer controls on the product, and installationor repair of
antennasystems outside of the product.
• product repair and/or part replacement becauseof misuse, acci-
dent" unauthorized repair or other causenot within the control of
Philips Consumer ElectronicsCompany.
• reception problems caused by signalconditions or cable or antenna
systemsoutsidethe unit
• a product that requires modification or adaptationto enable it to
operate in any country other than the country for which it was
designed,manufactured, approved and/or authorized, or repair of
products damaged by these modifications.
• incidental or consequential damagesresulting from the product
(Some states do not allow the exclusion of incidental or consequen-
tial damages,so the above exclusion may not apply to you. This
includes, but is not limited to, prerecorded material, whether copy-
righted or not copyrighted,)
• a product used for commercial or institutional purposes.
WHERE IS SERVICE AVAILABLE?
Warranty service is availablein all countries where the product is offi-
ciallydistributed by Philips Consumer ElectronicsCompany. In coun-
tries where Philips Consumer Electronics Company does not distribute
the product, the local Philips service organization will attempt to pro-
videservice (although there may be a delay if the appropriate spare
parts and technical manual(s) are not readily available).
MAKE SURE YOU KEEP...
Pleasekeep your salesreceipt or other documentshowing proof of
purchase. Attach it to this owner's manual and keep both nearby.
Also keep the original box and packingmaterial in case you need to
return your product.
BEFORE REQUESTING SERVICE...
Pleasecheck your owner's manualbefore requestingservice.
Adjustments of the controls discussedthere may save you a service
call,
TO GET WARRANTY SERVICE IN U.S.A.,
PUERTO RICO OR U.S. VIRGIN ISLANDS...
Contact a Philips factory servicecenter (see enclosedlist)or autho-
rized service center to arrange repair.
(In U.S.A.,Puerto Rico and U.S.Virgin Islands, all impliedwarranties,
including impliedwarranties of merchantability and fitness for a partic-
ular purpose, are limited in duration to the duration of this express
warranty. But"becausesome states do not allow limitations on how
long an implied warranty may last"this limitation maynot apply to
you.)
TO GET WARRANTY SERVICE IN CANADA...
Pleasecontact Philips at:
1.800-661-6162 (FrenchSpeaking)
1-800-363-7278 (EnglishSpeaking)
(In Canada, this warranty is given in lieu of all other warranties, No
other warranties are expressed or implied, includingany impliedwar-
ranties of merchantability or fitnessfor a particularpurpose. Philips is
not liable under anycircumstances for any direct,indirect, special, inei-
deetal or consequentialdamages,howsoever incurred,even if notified
of the possibility of such damages.)
REMEMBER...
Pleaserecord the model and serialnumbersfound on the product
below. Also, pleasefill out and mail your warranty registrationcard
promptly. It will be easier for us to notify you if necessary.
MODEL #
SERIAL#
Phillps Service Company, P.O. Box 2976, Longview, Texas 75606, (903) 242-4B00
Prinled in U.SA.
 Loading...