

Magnavox TS2752 Owner's Manual
II C0L0.TE'EV,S,0.
) REMoT;N_NTROL
_ Gettine Started
Warning/Precautions .............................. 1, 8
Honking Up Your "IV ................................ 2
VCR to 'IV Antenna Connections ............................. 2
Basic "IV and Remote Control Operation ................. 3
How to Use the First Time Set-Up Control .............. 3
[_ On-Screen Features
,0.Setting the "IV for Cable "IV Operation ............. 4
_'Adding Channels in Mcmmy (Automatically)...4
'0"Adding Channels in Memory (Manually) .......... 4
_" Using the Surf Control ........................................ 4
<_Using the Smart Picture Control ........................ 5
,¢, Using the Smart Sound Control .......................... 5
_" Using the TV Volume Bar Control .................... 5
@Setting the TV Sleep Timer Control ................... 5
_" Using the Stereo and Second Audio
Program (SAP) ................................................... 6
_' Setting the Sound Image Control ....................... 6
_" Adjusting the TV Picture .................................... 6
_. How to Set the TV for Closed Captioning ........ 7
_. Using the On-Screen Language Option ............. 7
.0.Using the TV's Audio/Video Inpul Jacks ........... 7
_ General Information
Glorify of TV Terms ................................................ 7
Tips if Something Isn't Working ............................... 8
Index .......................................................................... 8
Warranty .................................................................... 8
• First Time Set Up which automatically sets the
"IV for local channels and the correct picture
signal (antenna or cable).
• Infrared Remote Control which works your
TV as well as all on-screen feature controls.
• Standard Broadcast (VHF/UHF) or Cable
'IV (CATV) channel capability.
• Closed Captioning which allows the viewer to
read T'V program dialogue or voice conversa-
tions as on-screen text.
• Automatic Programming of Channels for
quick and easy selection of favorite stations
available in your area.
• Sleep-Timer which automatically turns the 'IV
OFF at preset times.
• Smart Button for the control of TV Sound and
Picture levels. Use the Smart Button on the
remote to quickly adjust Smart Sound (to keep
volume levels consistent during program
changes or commercial breaks), and Smart
Picture (for automatic picture adjustments on a
variety of program sources).
• Stereo Ready TV with built-in audio amplifier
and twin speaker system for receiving TV pro-
grams broadcast in stereo sound.
• Audio/Vidro Jaekpanel for direct connections
with VCRs (or other video accessories) for quali-
ty TV picture and ._ound playback.
• Feature Demonstration Mode Preview. Press
the Volume • and Channel • buttons on the TV
at the same time to begin a series of messages
that describe the u_ and benefit of your TV's
features. To cancel the demonstration, press any
button on the from of the 'IV and follow the on-
screen instructions.
I
Once your MAGNAVOX purchase is registered, you're eligibleto receiveaftthe privileges ofowninga MAGNAVOX product. So complete
and return the Warranty Registration Card enclosed w#h your purchase at once. And take advantage of these important benefits.
,Congratulationson your purchase,and welcome to the "family!" _V_l_
Dear MAGNAVOX product owner: Smart. Va3, smart.*
Thankyou foryourconfidence inMAGNAVOX.You've .selectedo.neofthe best-built,.l:._st-backedproducts
ava labletoday, Andwe' do everything in our power to Keepyou nappywnnyour purchase formany years to come.
As a member of theMAGNAVOX "family,"you're entitled toprotectionby one of the mostcomprehensive warranties and outstanding
servicenetworks intheindustry.
What'smore, your purchaseguaranteesyoull receiveal!the informationand specialoffersforwhichyouqualify,pluseasyaccessto
accessoriesfrom ourconvenient home shoppingnetworK.
And mostimportantlyyoucan countonouruncompromisingcommitment toyourtotalsatisfaction.
Allofthis isourway ofsayingwelcome-andthanksfor investingina MAGNAVOXproduct.
Sincerely,
_--_-'_ P.S.Remember,to getthemostfromyourMAGNAVOXproduct,youmustretumyork
Robert Minkhorst WarrantyRegistrationCardwithin10days.Sopleasemailitto usrightnowi
Presidentand Chief ExecutiveOfficer
Know these
safetysymbo/s
A k..,_.,, n,-,,,,.I A J
n
_k This _ of lightning" indc_tes u_nsu_ated material within your unit may cause an electrical shock. Fm the safety
of everyone in yo4x household, pleasa de not remove product _ovedng.
_k The "exdamation poir_ calls atterttion to teatures for which yo,J shotJ4d r_ _ _ _ _ _ pr_
vent operating and maintenance problems.
WARNING: TO PREVENT FIRE OR SHOCK HAZARD, 0(3 NOT EXPOSE THIS EQUIPMENT TO RAIN OR MOISTURE.
CAUTION: To Ixevent electric shock, match wide blade Of plug to wide slot, and fully insert.
A'I-rENTION: Pour _,viter les chocs _k_6ms, introduce la lame la plus large de la _ dells 18 borne corresportdante
de la prise et pomser jusqu'au food.
1 IB 7423-E001
f
I!I it lII H UIIrLIIlik_ll Ufa i |
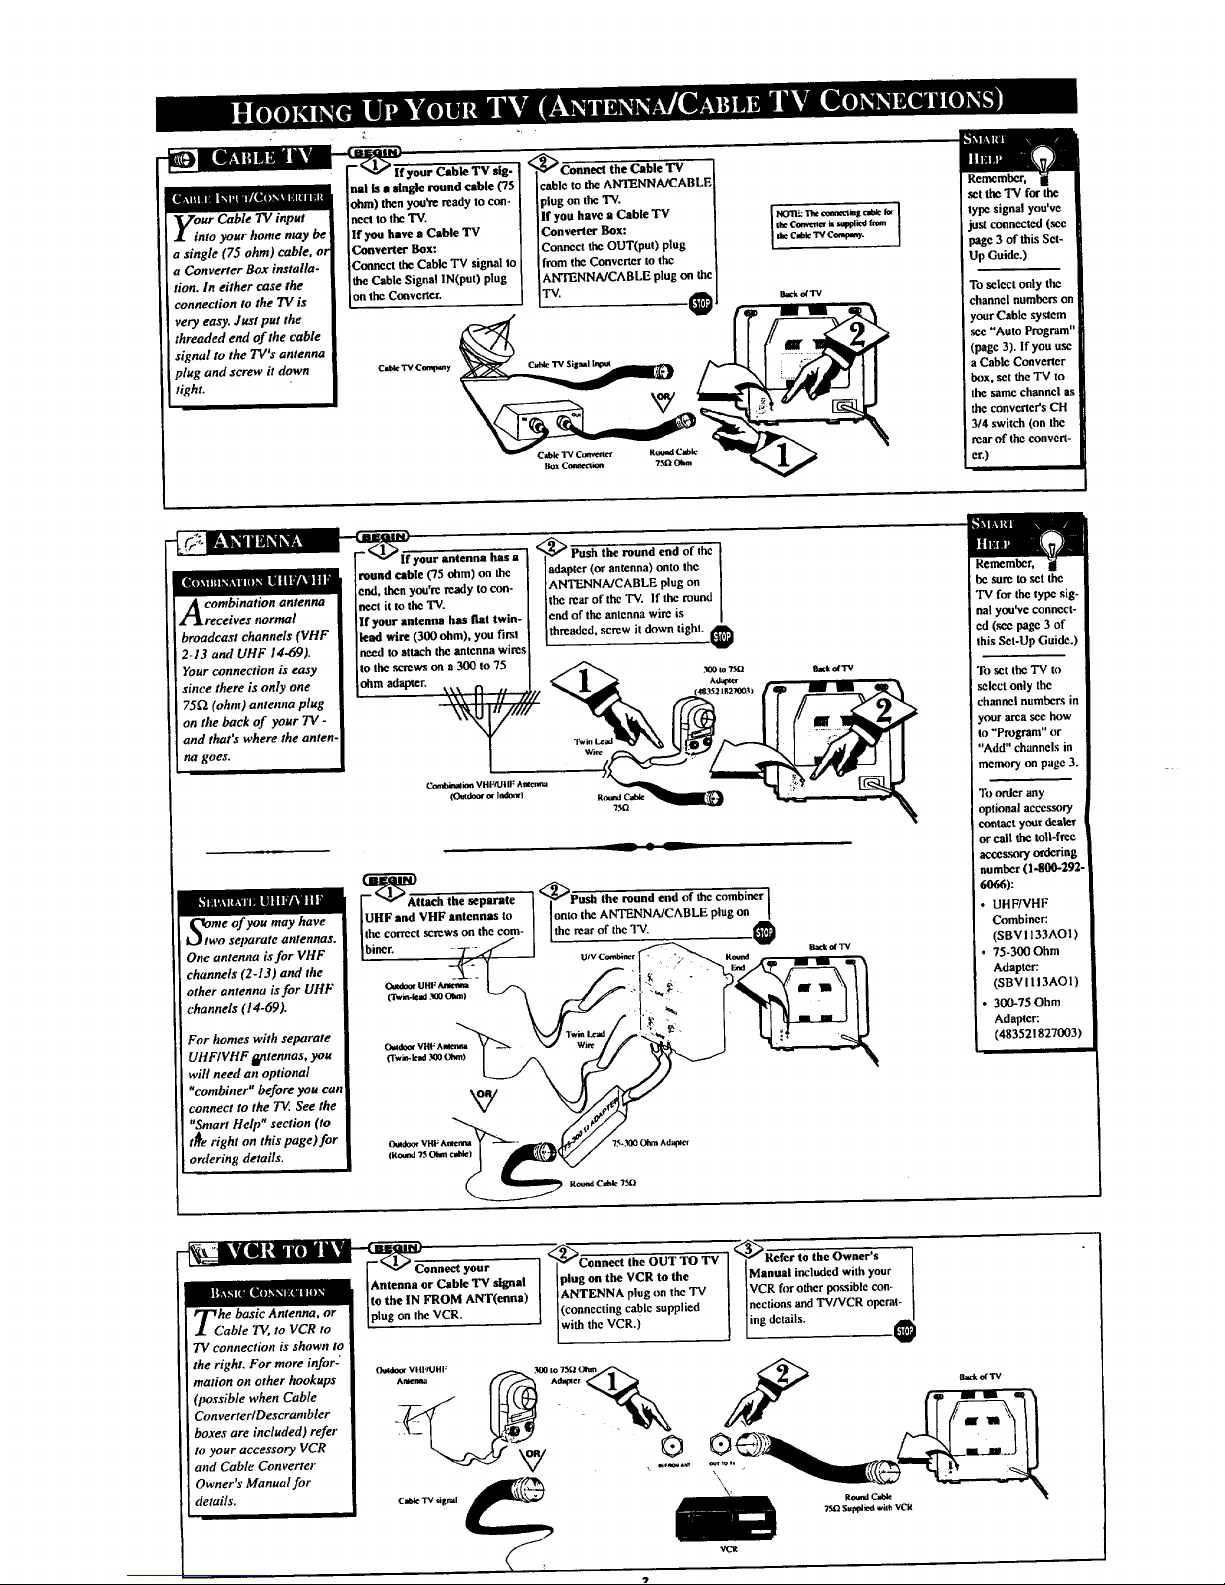
our Cable TV input i
nto your home may be
a single (75 ohm) cable, or
a Converter Box installa-
tion. In either case the
connection to the TV is
very easy. Just put the
threaded end of the cable
signal to the TWs antenna
plug and screw it down
tight.
i
_f your Cllb _ l_v"IiJ[g-
nil Is a tingle round cable (75
ohm) then you're ready to con-
nect to the "IV.
If yon have a Cable TV
Converter Box:
Connect tbe Cable TV signal to
the Cable Signal IN(put) plug
0n the Converter.
_Connect the Cable TV
cable to the ANTENNA/CABLE
plug on the TV.
If you have a Cable TV
Converter Box:
Connect the OUT(pu0 plug
from the Converter to the
ANTENNA/CABLE plug on the
"rv I_1
l====l
IbeCwlg_TVCom_ny.
a_k ofTV
C_le TV Company
set the 'IV for the
type signal you've
iust connected (see
page 3 of this Set-
Up Guide.)
To select only the
channel numbers on
your Cable system
see "Auto Program"
(page 3). If you use
a Cable Converter
box, set the TV to
the same channel as
the converter's CH
314 switch (on the
rear of the convert-
er.)
A ombination antenna
receives normal
broadcast channels (VHF
2-13 and UHF 14-69).
Your connection is easy
since there is only one
75£2 (ohm) antenna plug
on the back of your 7V -
and that's where the anten-
na goes.
&'l n i,_.11_1 umili I I |A| I I _
me of you may have
o separate antennas.
One antemta isfor VHF
channels (2-13) and the
other antenna is for UItF
channels (14-69).
For homes with separate
UHF/VHF _teanas, you
will need an optional
"combiner" before you can
connect to the TV See the
"Smart Help" section (to
t_e right on this page)for
ordering details.
-_yOUr ant_Da has a
round cable (75 ohm) on the
:rid, then you're ready to con-
nect it to the TV.
If your antenna has fiat twin-
lead wire (3UO ohm), you fir_l
need to attach the antenna wires
tO the ._erews OO e 300 to 75
ohm adapter.
_tach the separate
UHF and VHF antennas to
IthC @0_TCCtsereWS on [lie coin-
]biner.
adapter (or antenna) onto the [
[ANTENNA/CABLE plug on
Ithe rear of the 'IV. If the round J
lend of the antenna wire is i
[thremJed, screw it down tighl. @
300to"_f_
_'k dTV
<_Push the round end of the combiner n
onto the ANTENNA/CABLE plug on [
the rearof the TV, @
he sure go set the
"IV for the type sig-
nal you've connect-
ed (see page 3 of
this Set-Up Guide.)
°lb set theTV to
select only the
channel numbers in
your area see how
tO _Program" or
"Add" channels in
memory on page 3.
To order any
optional accessory
contact yoor d,:.aleT
nc call the toll-free
accessory ordering
number (1-800-292.
6066):
• UHF/VHF
Combiner:
(SBV1133AO1)
75-300 Ohm
Adapter:
(SBV I I 13AO 1)
• 300-75 Ohm
Adapter:
(483521827003)
-l llt.t.=b-
I- _ _ona_ your
iJ_d_ll__Wlk'ldDla_ [Antenna or Cable "IV signal
Ito the IN FROM ANT(enna)
he basic Antenna, or lug on the VCR
Th_bleTV,toVCRto IP'
TV connection is shown to
the right. For more infor-"
marion on other hookups
(possible when Cable
ConverterlDescrambler
boxes are included) refer
to your accessory VCR
and Cable Converter
Owner's Manual for
i details.
<_Connect the OUT TO TV <_Refer to the Owner's
plug on the VCR to the {Manual included with your
ANTENNA plug (m the TV IVCR for other po,_sibie con.
(connecting cable supplied Inectionsand TVlVCR operat-
w th the VCR.) [ng deta s.
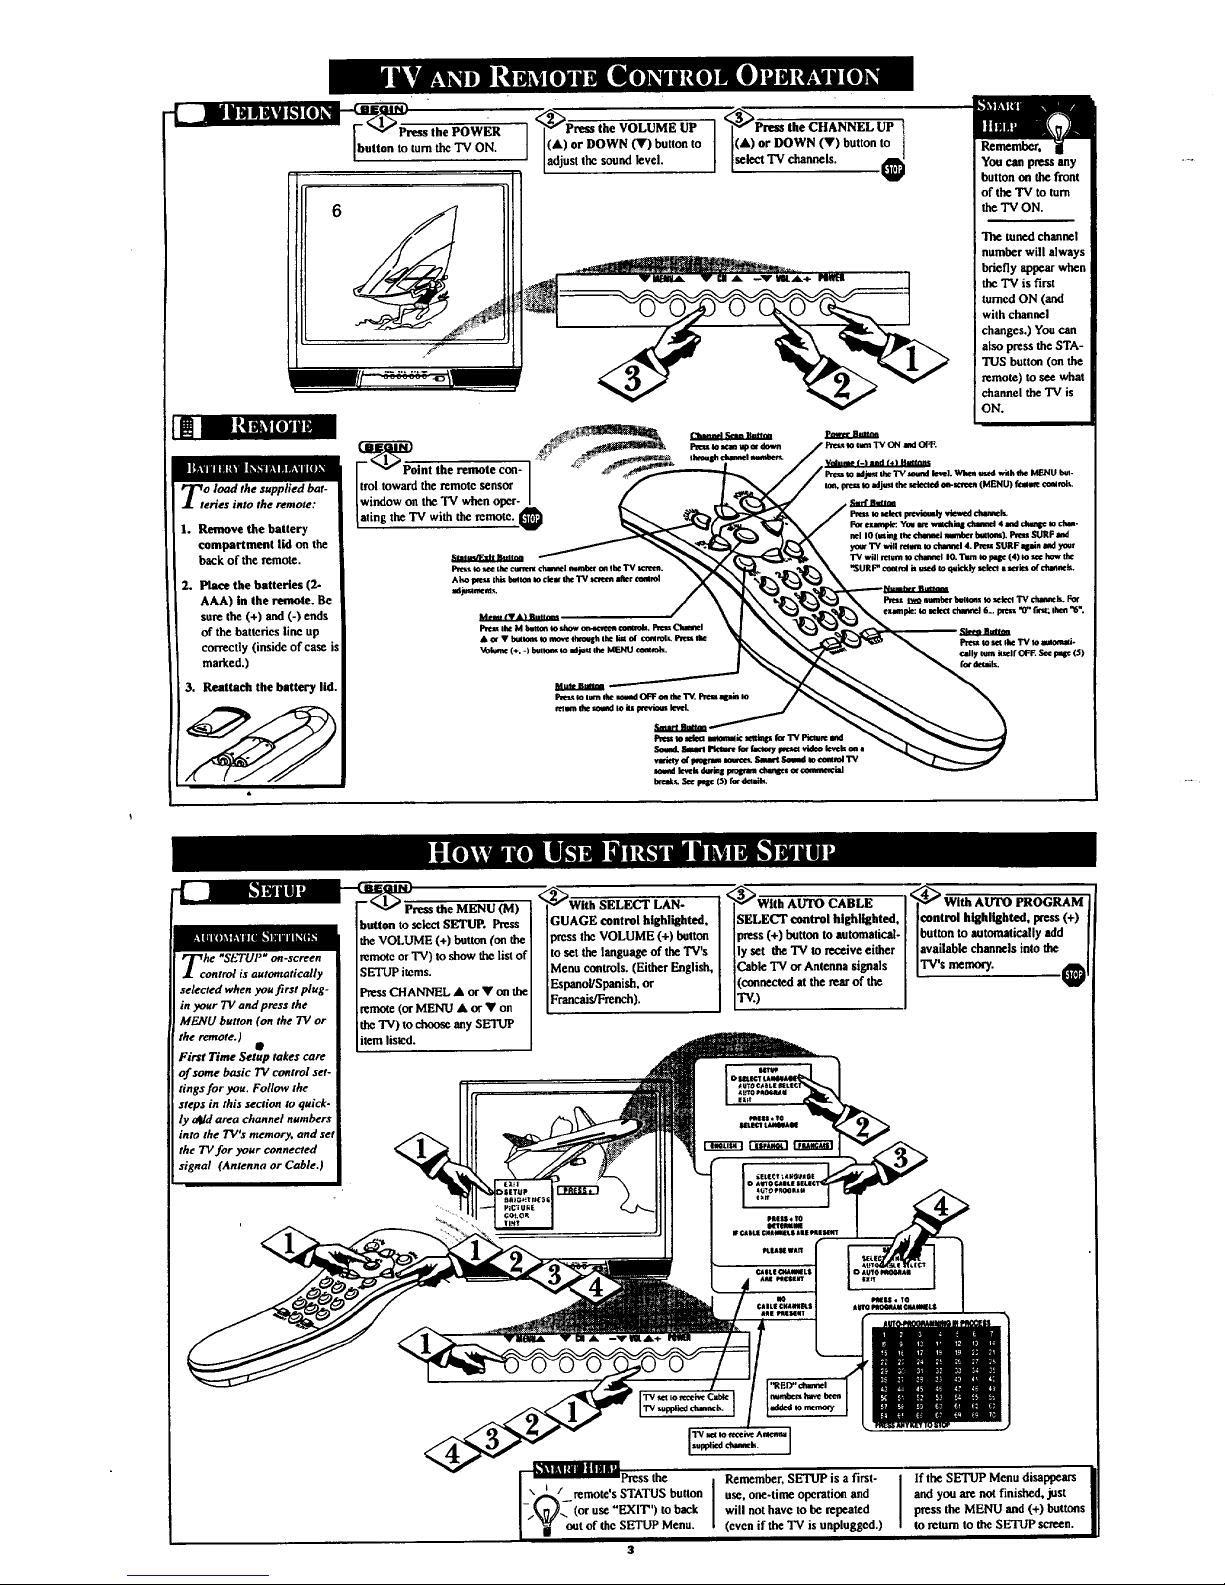
- PressthePOWER
buttontoturnthe'IVON.
Tt o load the supplied bat-
cries into the remote:
1. Remove the battery
compartment lid on the
back of the remote.
2. Place the batteries (2-
AAA) in the remote. Be
sure the (+) and (-) ends
of the batteries line up
correctly (inside of care i:
marked.)
3. Reattaeh the battery lid.
12_Press the VOLUME UP ] '<_Prem the CHANNEL UP
(A) or DOWN (T) button to (A) or DOWN (V) button to
adjust the sound level. ] select TV channe s. €
[_] [,/
||11 ||]t_ _,|1[11.31 i I I/[15]1
rche "SETUP" on-screen
ontrol is automatically
selected when you first plug-
in your 71/oudpress the
MENU button (on the TV or
the remote.)
First Time Setup takes care
of some basic TV control set-
tings for you. Follow the
steps in this seclion to quick-
ly a_ld area channel numbers
into the TV's memory, and set
the TV for your connected
signal (Antenna or Cable.)
(M) "_WRh SELECT LAN- "_With| AUTO CABLE .<_| With AUTO PROGRAM
GUAGE control highlighted, ]SELECT control higbligbted, [control bigldigbted, Ixess (+)
button to select SETUP. Pre.ss press the VOLUME (+) button IPress (+) button to automatical- --Ibutt°n to automatically_ add
the VOLUME (+) button (on the
remotc or TV) to show thc list of to ret tbe language of the TV's I [lyset the TV m receive either [avadablechannelsmto
the
Menu controls, (Either English, [ iCableTV or Antenna signals i s---y
SETUP items. EspanoUSpanish, or [ [ (connected at the rear of the I
PressCHANNEL.orVontbe i____,_reneh), i iw) I
remote (or MENU • or • on
tbe TV) to choose any SETUP
item listed.
__x/_/ut4w| laWaPresstbe Remember,SETUPis a first-
I
reraote's STATUS button I use, one-time operation and
ore hac Iwi,,notbaretobere.ted
ll out of the SETUP Menu. (even if the "IV is unplugged.)
3
If the SETUP Menu disappears
and yon are not finished, just
press the MENU and (+) buttons
to remm to the SETUP screen.
 Loading...