

Page 1

IIF.._|) ;I H[e]IO(e)_ll I)H_II$.
G¢{tine Started
WarningfPrecaulions ............................................. I, 8
Hooking Up Your TV ............................................... 2
VCR to TV Antenna Connections ............................. 2
Basic TV and Remote Control Operation ................. 3
How to Use the Firsl Time Set-Up ........................... 3
On-Screen Features
+Setting the TV for (:able TV Operation ............. 4
+Adding Channels in Memory (Manually) .......... 4
+ Using the Surf Control ........................................ 4
+ Using the Smart Picture Control ........................ 5
+Using the Smart Sound Control .......................... 5
+Using the TV Volume Bar Control .................... 5
+Setting the TV Sleep Timer Control ................... 6
+Using the TV Picture and Color Controls ......... 6
+How to Set the TV for Closed Captioning ........ 7
Geperal Information
Glossary of TV Terms ................................................ 7
Ttps if Something Isn't Working ............................... 8
Index .......................................................................... 8
Warranty ..................................................................... 8
For Customer Use
Enter (below) the Serial Number and the
Model Number of this television
(located on the rear of the TV cabinet).
Retain this information for future reference.
o,o,,o.TR I"!¢..
Serial No.
First Time Sel Up which automatically sets
the TV for local channels and the connect pie-
lure signal (antenna or cable).
Infrared Remote (ontrol which wolks your
TV ms well as all or-screen feature ccntrols.
Standard Broadcast (VHF/UHF) or Cable
TV (CATV) chann,:l capability.
Closed Captioning which allows the viewer to
read T'V plogram d alogue or voice conversa-
tions as on-screen t,.'xt.
Automatic Pr,3gramming of Channels for
quick and easy selection of favorite stations
available in yc,ur area.
Sleep-Timer which automatically turns the "IV
OFF at preset times.
Smart Button for t he control of TV Sound
and Picture levels. LJse the Smarl Button on
the remote to quickly adjust Smart Sound (t,3
keep volume levels consistent during program
changes ol commercial breaks), and Smart
Picture (for automatic picture adjustments on a
variety of program sources).
Language control allows the user to _lect
from three options; English, Spanish or
French. This controls the On-Screen Menu text
only. (Does not work for Closed Captioning.)
Once your PHILIPS MAGNAVOX purchase is registered, you're eligible to receive all the priwleges of owning a PHILIF'S MAGNAVOX product.
So complete and return the Warranty Registration Card enclosed with your purchase at once. And take advantage of _hese important benefits.
Congratulationson your purchase, and welcome to the "family!" PH ILIPS
Dear PHILIPS MAGNAVOX product owner:
Thank you for your confidence in PHILIPS MAGNAVOX. You've selected one of the best-built, best-backed product_
available today. And we'll do everything in our power to keep you happy with your purchase for many years to come
As a member of the PHILIPS MAGNAVOX "family," you're entitled to protection by one of the most comprehens ve warranties and out-
standing sewice networks in the industry.
What's more, your purchase guarantees you'll receive all the information and special offers for which you qualify, plu_ easy access to
accessories _rom ourconven=ent home shopping network.
And most importantly you can count on our uncompromising commitment to your total satisfaction.
All of this is our way of saying welcome-and thanks for investing in a PHILIPS MAGNAVOX product.
Sincerely,
__ P.S. Remember, to get the most tram your PHILIPS MAGNAVOX product,you mustretum
Robert Minkhorst your WarrantyRegistration Card within10 ¢Pdys.So please mail it to us right now!- -
President and Chief Executive Officer
Know _ese
safety syrnbots
_This "bolt of lightning" inaicates uninsulated material within your unit may cause an electrical shock. For tt_l safety
of ever/one in your household, please do not remove product cow_.
_k "the "exclamation point" calls attention to fealures _ which you st_ rea¢_ _ enclosed literature closely to pre-
vent operating and maintenance p_o/_ems.
WARNING: TO PREVENT FIRE OR SHOCK HAZARD, OO NOT EXPOSE THIS EQUII_MENT TO RAIN OR MOISTURE.
CAUTION: To prevent electric st',oc_, match wide blade _ plug to wide slot, and fully k_,ert.
ATTENTION: Pour _.vite_ los chocs _lectriques, Iraredulre la lame la plus large de la r_:he d_ur_ III borne correspc_dante
de la imse et poussar lu_u'au Iood
..Id: 1!I1 ,.I.-]!a_,,u,voxItr,_rt_r_,'=_,,a_ ,,t_ _'_m,'n...... ._._
1 IB7754 EO01
Page 2
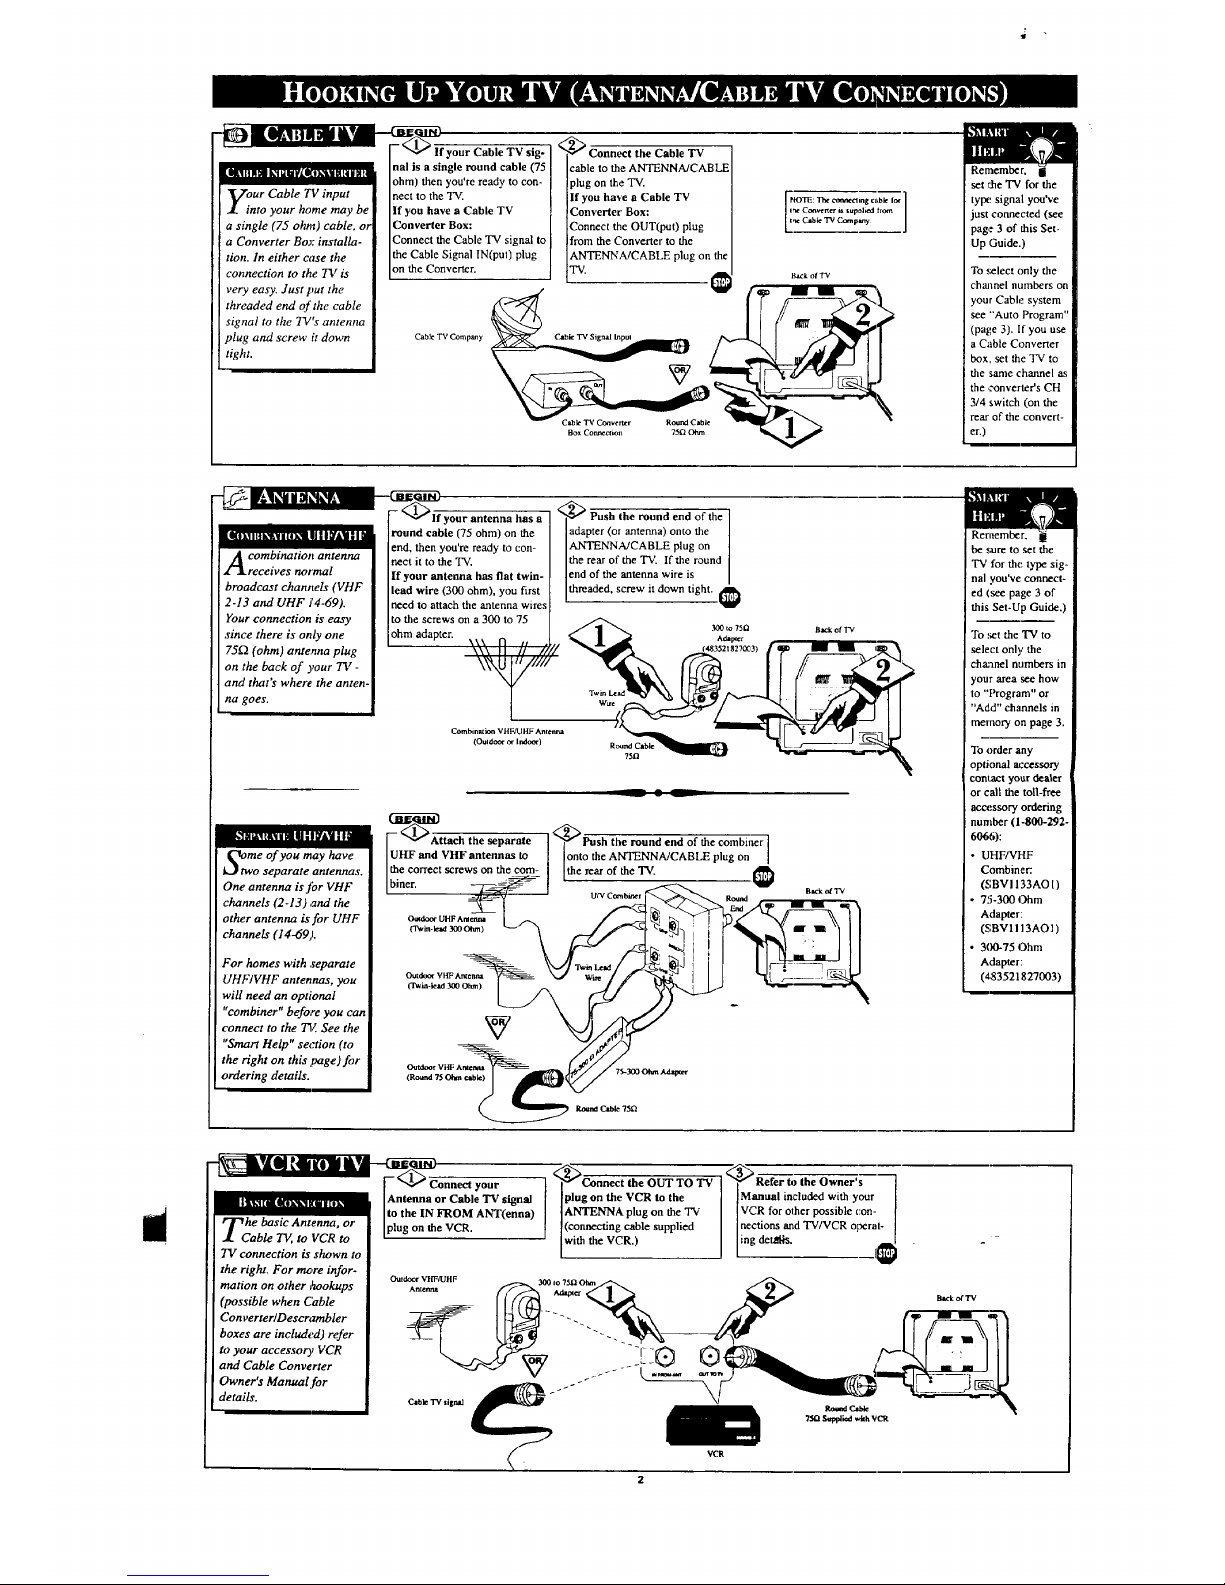
-_ Ekl aaS ILvm-
our Cable TV input
nto your home may be
a single (75 ohm) cable, or
a Converter Boz installa-
tion. In either cuse the
connection to the TV is
very easy. Just !:put the
threaded end of the cable
signal to the TV's antenna
plug and screw it down
tight.
--_llf your Cable TV sig-
nal is a single round cable (75
ohm) then you're ready to con-
nect to the TV.
If you have a Cable TV
Converter Box:
Connect the Cable TV signal to
the Cable Signal IN(pu0 plug
on the Converter.
Cable TV Company
2_ Connect the Cable TV
cable to the ANTENNA/CABLE
plug on the "IV.
If you have a Cable TV
Converter Box:
Connect the OUT(put) plug
from the Convener to the
ANTENNA/CABLE plug on the
TV.
___bk TV Signal blpul
= v¢ • a _
BoxCortecctmn 75f_OCun
HO'IE: The ctmaeOing o,bk 1_ ]
in¢ C_r_ u supMi_l [tom
I_ C=b_ TV Compmy
l_ac_ofTv
set 1'.he 'IV for the
tylx: signal you've
just connected (see
page 3 of this Set-
Up Guide.)
To .,;elect only the
channel numbers on
your Cable system
see "'Auto Program"
(page 3). If you use
a Cable Converter
box, set the TV to
the same channel as
the ,converter's CH
3/4 switch (on the
rear of the convert-
er.)
_our antenna has a
ilIil'Im'/k'_gWl1'kl II I I _r&lIl, I]
A ombination antenna
receives normal
broadcast channels (VHF
2-13 and UHF J'4-69).
Your connection is easy
since there is only one
75_ (ohm) antenna plug
on the back of ),our TV -
and that's where the anten-
na goes.
<_ Push the round end of the
round cable (75 ohm) on the adapter (or antenna) onto the
end, then you're ready to con- ANTENNA/CABLE plug on
neet it to the TV, the rear of the 'IV. If the round
lend of the antenna wire is
If your antenna has flat twin- [threaded, screw it down tight.
lead wire (300 ohm), you first
need to attach the antenna wires
to the screws on a 300 to 75 /6.. _o0_o7m aa,_ otrv
ohm adapter. .-'/ 1 _. ^,a
A • L
II,1 roll Ill I I _ I I _I! l I I
Otwmeof you may have
o separate antennas.
One antenna is for VHF
channels (2-13) and the
other antenna is for UHF
channels (14-69,1.
For homes with separate
UHF/VHF antennas, you
will need an optional
"combiner" before you can
connect to the 737.See the
"Smart Help" section (to
the right on this page)for
ordering details.
e:r.Orrect screws on the com-
O_doer OHF Arderma
O'win-lead2100Ohm)
be sure to set the
TV for the type sig-
nal you've connect-
ed (see page 3 of
this Set-Up Guide.)
To set the TV to
select only the
cha:anel numbers in
,our area see how
to "Program" or
"Add" channels in
memory on page 3.
To order any
optional accessory
conl2tCt yoar dealer
or call the ton-free
accessory ordering
number (1-800-292-
6066):
UHF/VHF
Combiner:.
(SBVI 133AO I)
75-300 Ohm
Adapter:
(SBVI I 13AOI)
300-75 Ohm
Adapter:
(,_.83521827003)
i
--_1 t_ [ol _,_
[- _ Connectyour
IAntennaor Cable TV signal
Ito the IN FROM ANT(enna)
tie oaslc tIBt_nlla or
"l_ ' Iplug on the VCR.
.£ Cable TV, to VCR to
TV connection is shown to
the right. For me,re infor-
mation on other _ookups
(possible when Cable
Converter/Descrarabler
boxes are included) refer
to your accessory VCR
and Cable Converter
Owner's Manual.for
details.
<_Connect the OUT TO TV
the Owner's ]
plug on the VCR to the Manual included with your
ANTENNA plug on the "IV VCR for other possible con- l
(connecting cable supplied nections and TV/VCR operat-
withtheVCR.) I lingaerates. 1€
7_ Sup#i_ withVCR
Page 3

-[ lg mmn_,Jmt0J_n_u_
V<_>Press the POWER
button to tum the TV ON.
<_Press the VOLUME UP ,<_ _--ess the CHANNEL UP ]
I(A) or Or) to (A) or
DOWN button I_:)WN
(v)
billion to
ladjust the sound level, select "IV cbaone s
or DOWN (Y) bu_ton to display I
the "IV*s on-scr_n menu. Press
i
the MEN U UP (A _or DOWN
(V) breton to scroll through the [
Lstof...... fe+._res.I_
Remember,
you can press
any button o'n the
front of the TV to
tuna the "IV ON.The
tuned channel num-
ber will always
briefly appezr when
the TV is first fumed
ON (and with chan-
nel changes.) You
can also press the
STATUS button (on
the remote) to see
what channel the TV
is ON.
Ions on the remote (or the MENU
• or • buttons on the TV) to
scroll to the feature SETUP with
tings for you. Follow the steps in tu ppe • the on-scr<_n arrow.
ti_,_epsin Ltu.... ppears, !
thts secnon to qmckly add area
channel numbers into the J"¢'s
memor); set the Language, the
Clock, and rite TV for Antenna or
Cable signal.
<_Press the VOL (+) button to
I
access the SETUP on-screen I
menu. Then, pre_ the CH • or
1
• buttons to scroll the SETUP
options. Next pre_ the VOL (+) [
or (-) buttons as directed to start
the automatic menu changes.
o load the supplied batter-
es into the remole:
1. Remove the battery com-
partment lid on the back of
the remote.
2. Place the batteries (2-
AAA) in the remote. Be
sure the (+) and (-) ends of
the batteries line up correct-
ly (inside of case is
marked.)
3. Reattach the battery lid.
P'_TATUS/EXIT
button on the remote to clear
the screen after an adjustment,
or scroll to the "EXIT" option
in the SETUP screen and press
the (+) button to bring you
back to the main on-screen
menu.
You can also just wait and after
a minule the MF:NU will drop
automatically from the screen
Press the
remote's STATUS
button (or use
"EXIT") to back OUt
of the SETUP menu.
Remember, SETUP
is a first-use, one-
time operation and
will not haw." to be
repeated (even if the
TV is unplugged.)
I_hannel Scan Button
Press to scan up or down through
channel numbers (Also can be
used with the ME2qU button to
select on-screen controls. With the
Menu displayed, press Channel •
or • buno_ to move up or down
the list of controlL)
Slatu._Exit Button /
Press to see thecurrent channel
number on the "IV screen. Also
press this button to clear the "IV
screen
Menu (•,/_) Buttons
Press the M button to show on-
screen controls. Press Channel •
or • butto_ to move through the
list of controls. Press the Volume
(+. ust the MENU
controls.
Press to turn tha sound OFF on the
'IV. Press again to return the sound
to its previous level.
Press to select automatic settings
for TV Picture and Sound. Smart
Picture for factory preset video
levels on a variety of program
_ources. Smart Sound to control
TV s_und levels during program
changes or commercial breaks. See
page (5)for details.
"<,_I_ Point the remote
conlToI toward the remote
sen.,or window on the "IV
Press to turn "IV ON and
OFT.
-- Volume (-) and f+'l
Buttons
to adjust the TV
+oand level. When used
_ith the MENU button,
to _djust the seiectud
m-_ (MENU) feature
,_ontrol$.
When ALT. CHN. is _lect-
xl, in the "IV on-screen
_/_nu, presstotoggle
I_etwes:ncurrent channel
_mdpreviously viewed
:hannel. With the SURF
,::ontrol selected, press and
_lddup to eight cha_r_els in
channel Surf dng. (See
0age 4 for operating
tetails,)
-- Number Buttons
Press _ number buttons
select TV channels. For
example: to select channel
S... press "0" first; then "6".
_ress to set the 1-'€ to auto-
amtic_ly tmn itself OFF.
Bit tee/ L_
\ when operating the TV with
Page 4

(M)
the
-_ .... [CHANNEL A or • buttons
]_k[O_ nt _ [(or press the MENU • or •
1 • through First Ttme Setu t [on the 'IV) to select the word
_d I CABLE with the TV's on-
b_e__omp_ayo_yo_ [_r_n A.ow.
You need to make sure #,at
the TV is set to pick up eithe
Cable TV stations or Anlenna
signals. In other words, the
TV needs to know whether
you hove connected a Cable
TV signal or a normal alllen-
na to its ANTENNA plug (see
page 2).
_ress the VOLUME (+)
or (-) buttons (on the TV or the
remote) to select either:.
YES- If you DO have Cable
TV connected to the
TV. Channels 1-125
can be selected.
NO- If you ha_.'e anAntenna
connected to the "IV.
Channels 2-69 can be
selected.
_'-_ss STATUS button on
the remote control to clear the I
screen.
Try it out. ai
Press the CHANNEL
&• buttons and scan
the channels. CH&•
works only after STA-
TUS button is pressed
to clear the _creen (or
Menu times out -
about 1 minute.)
Remember, to set the
TV to select the chan-
nels on your Cable
system, or it your
area, see the
"Autoprogram" steps
in the SETUP section
on page 3, and
"Adding Channels " in
the section below.
[- Press the MENU (M)
]button on the remote, then the
ICHANNEL • or • buttons
Auto-Program (see page 3) [(or the MENU • or • on the
[qkadds all the channels it IT'V) to select the word CHAN-
can find (on your Antenna or ]NEL with the TV's on-screen
Cable TV system) into th,e ]Arrow.
TV's memory. Save/Delete
channels makes it easy for
you to add other channels, or
drop unwanted channels.from
the list of channelsqn the TV's
memory.
to clear the screen after adding
CHANNEL •• buttons on the channel number into memory. ] I(or deleting) all the channels
TV) to select the channel you Press (-), button to DELETE I y_: want.
want to SAVE (or DELETE.) c _anne from memory.
y go up to channel 99.
,<_Press th'-----'--eVOLUME (+)
the MENU (M) ] '<_ STATUS button on
]button on the remote, then ] or (-) buttons to select the th_
IpresStheCHANNELa'°r• ] ALT. CHN.(AltemateChannel) _e"reT°tec°ntr°lt°clear
A seriesofup to eight pre- I(or the MENU • or • buttons / or SURF. See the Smart Help
_vio_ly viewed channels Ion the "IV) to select the word ] section (to the fight) for an
can beselectedfrorathe IS_F withtheTV'son-sc_n I lexplanationonmeuseofALT.
SURF button on your remote ]Arrow. I [CHN. and SURF features.
controL With this feature you t J
can easily switch between
different TV programa that ALl-.(:tiN. (Alter_t¢ Chanuel) -1
currently interest you. Currentt_xto_ _-_,i_ autm_l.
SURF- Up to eig_ chtmlehit,•
rin.
i Surf s
Note: There ire two ra¢thed_ to delete _h _ tl_ 8_1 SURF oa_ml ring:
To remove Idl chennds from the SURF memory (whh the _ot_on iff¢lmnad :_
whlea will he left v_tNn the SURF Iha) - _kct theCA BLE o_mml ia the on-t_r_
_ md I_ess the (÷). (-) batxom. Adju_ the c_rd "YEStNO/YBS" it _ou I_a_
CathieTV_ or "N_O" if you i_e in the bcotdcam Am_ mod_.
To we all dtmmds from the SURF mento_ (_th the _tx'_tlon o( the test
end t'_rr tnall_ _ dmtmdO - From the SURF on-r.o_en ¢_tml opliocb
prets the (+) o* (-) breton Io t_k_ctthe ALT.Cn N. co_ra in th* _matc_ met_. Prt_
the(÷) _ (-) _non tgain to _lect Ute SLrRF o_io_
Remember. to use I
ALT. CHN., first select: the
desired channels with the
number buttons on the
remote. (For example: I 1,
and 22.) Then press the
SURF button on the
remote to quickly toggle
between the two channels.
The Surf control will allow
up to eight cham_e!s to be
put into the "SORF
Memory." Enter the mnn-
ber of the desired cham'_el;
then press the SURF but-
ton to add it into the SURF
Memory. (Example: With
the SURF control selected
in the Menu, you press
channel 02, then the Surf
button (while the cham'tel
display is still visible on-
screen) to add channel 02
to the Surf mem_xy.
Repeat for up to 8 chan-
nels.
Page 5

"'_"Press the Smart button
]on the remote to select the
" " SMART PICT feature (high-
]_Ttetheryou're watching Ilighted with arrow).
Y F a movie ora video
game your TV has am'omatic
_icture settings matched for
your current program source
or content. The Smart Picture
feature quickly resets your
TV's picture for a number of
different types of progrants
and viewing conditim:s you
may have in your home.
'_ With the SMART PICT ,<_ P_----_e STATUS but- "]
control selected, press the (+) I [ton to clear the screen.
/
or (-) button repeatedly to selecl "_'
any of the preset viewing cate-
gories (Example: Video Games,
Movies, etc.).
Remember, It
the Smart Picture
settings are stored
into the TV at the
factory and can only
be reset by field and
service technicians.
Pressing the
SMART button
repeatedly toggles
between the Smal_
Picture and Smart
Sound controls.
-[_ !_3_1 t¢Uh3_;D_
_Pr_s the Smart button <_/_'_"_Wit h t he S mart Sou nd "_ P_SS the STATUS button
on th ..... te until the SMART control selected, press the (+) to ele'ar the sc_.... @1
[SND feature is highlighted with [ or (-) button to turn the volume +
Are you tired of tl ........ d [then ............ ] ]level contrel ON or OFF.
17kof commercials fi_llowing
k'_fl!_ig'll?lg_
yOU into the ttext room or all
through the house? Smart
Sound allows you to keep a
desired volume level that the
TV sound will not go above.
This makes for an eve/i, more
consistent sound by reducing
the peaks and valleys that
can occur during program
changes or commercial
bre.ks.
Pressing the !i!
SMART button
repeatedly toggles
between the Smart
Picture and Smart
Sound controls.
:___l_P--_s the MENU (M)
+ , g_ , Ibutton on the remote, then
Ipress the CHANNEL • or '_'
r rset,,_ot....B...... n[(or press theMENU• or •
l.I trol to see the T'V'_vol
_.1 _ TV$ vol- I [butto .... the TV) to select the
_on,h,_ _' I IwordVOL.BARwiththe
screen. Once set the Volume I [TV's on-screen Arrow
Bar will be seen each time [ I _ " .... -+
the VOLUME buttons ('on the I
TV or renmte) are pressed. I
I
',___ (+) ] ,<_ _ATUS buttonto-]
o,(+_.,,o+,oturntheVOL] tcloart+........ t_
BAR control ON or OFF.
Press the VOLAY
buttons. The VOL-
UME BAR should
appear at the bot-
tom of the screen.
NOTE: ']'he TV's
volume level c_tn
also be lowered
when the set is
turned OFF.
Page 6

ave you ever fallen
leep in front of the IV
only to have it wake you up
at two in the morning with a
test pattern screeching in
your ears? Well, your TV
can save you all that trouble
by automatically turning
itself off
_the SLEEP but-
ton on the remote.
W
Press the MENU (M) button
on the remote, then press the
CHANNEL • or • (or press
the MENU • or • buttons on
the 'IV) to select the word
SLEEP with the TV's on-
screen Arrow.
._ _sThe SLEEP button _."_P"_ss_ bulton
repeatedly to pick the amount to clear tt, e screen after you
of time (15 miuutes to 2 hours have set tar time for the "P! to
ahead) before the TV will turn turn off.
itself off. An on-screen count down will
The VOLUME (+) or (-) but- I I"pr_arduring the last minute
tons can also be used to set the [before the "IV shuts itself off_
amount of t me.
Remember. If
yon ever wal_t to fee how
many minutes axe left
before the TV ,shuts itself
off, press the STATUS
button Or,,the remote.
If you want to stop a
SLEEP TIMER setting,
reset the I'.imer back to
OFF. You could also turn
the TV off, and then back
on again, to cancel a set-
ting.
Pressing _my key on the
remote or TV in the last
60 seconds will cancel the
;LEEP TIMER setting.
L
i
['- _ Press the MENU (M)
lbutton on the remote, then
[press the CHANNEL • or •
To adjust your "F¢picture I(or ress MENU 11 or • but
• p -
.Z ¢'OlltFOIs. select channel
[tonson the TV) until the desired
and follow the step_ shown to ]control shows on-screen
the right, l-
NOTE: The Smart Picture
control can atttomatically
adjust your TV's picture for a
varieD' of program.i attd
viewing conditions. See page
5 for detailJ
';,_he VOLUME (+)
and (-) to adjust the selected
p cture contro.
I_Press STATUS hutto'n (or 1
EXIT Menu) to clear the screen I
wben pictme adjustment., are [
[competed.
Page 7

"_" i1_11 | (I]_
-- [-"_ Press MENU (M)
Ibutton on the remote, then
I_ [0_ tl_ W IIOk_k_l [
ipress the CHANNEL • or •
_"llosed Captioning allows [ior press the MENU at or •
you
to
read the voice ]buttons on the 'IV) to select the
content oftelewslon pro- [word CAPTION with the TV's
grams on the _ screen. Ion-screen Arrow.
Designed to help the hearing
t
impaired, this feature uses
m-screen "text boxes" to
show dialogue and conversa-
tions while the TV program
in progress.
Vote: Broadcast stations will
often ,se spelling abbr,._ia-
lions, symbols, dropouts and
other grammatical shortcuts
in order to keep pace with tht
on-screen action. These type
factors vary upon the source
of the captioned text material
and do not indicate a need
for service on the part of the
7_
.<_ P_-'-'_'s-'V-_UME (+) or (-)
buttons to select the desired
Closed Caption (CC) mode -
For Example: CAPTION l.
Note: ].L._&_.[_"CAPTION I" is
the most used mode to view
leapt oned mater a.
_ Press the STATUS but-
ton after makin_ your Caption
mode selection. The TV dis-
play will clear mad Captioning
material (if available on the
currently selecte:l TV program)
will appear on ",be "IV screen.
To cancel, set the CAPTION
feature to OFF when finished
viewing.
not all TV
programs and prod-
uct commercials are
made for broadcast
with Closed
Caption (CC) infor-
mation included.
Neither a_:eall
Closed Caption
modes (CAPTION
I or 2) necessarily
being use'l by a
broadcast station
during the. transmis-
sion of a closed
caption program.
Refer to 3,our arca's
TV program listings
for the stations and
times of Closed
Caption shows.
1
CAI_I'ION I or 2 mode: dialogue (and dc_xiptions) for
the aclion on the captioned "IV program shows on-scram.
(See Smart He p o_ this page.!
/
This symbol _ llppea r
illl] lltx- ' al
Round Cable 75D. * A single solid antenna wire normally matched with a metal
plug (F-type) end connector that screws (or pushes) directly onto a 75 Ohm input
found nn the Television or VCR. (Also known as Coaxial Cable.)
Display * An on screen message or graphics that help the user operate and adjust
his Television feature cot_.trols. See On Screen Displays (OSD).
Jack Panel * Refers to the area on the back of the "IV cabinet where the input and
output connections are Io:ated.
On Screen Displays (OSD) * Refers to the wording or messages generated by the
television (or VCR) to help the user with specific feature controls (color adjust-
merit, programming, etc.).
Menu * An on-screen lisling of feature controls shown on the Television screen
that are made available for user adjustments,
Programming * The procedure of adding or deleting channel numbers into the
Television's memory circuita. In this way the Television "remembers" only the
locally available or desired channel numbers and skips over any unwanted channel
ltumbers,
Remote Sensor Window * A window or opening found on the Television control
panel through which infrarcxtremote control comman,:l signals are received.
Smart Picture * Refers to factory setpicture adjustments _or specific types of view-
lug. Example; Movies, Video Games, WeakSignals o_:Spores.
Smart Sound * An option that _ even out the volume levels from channgl to chan-
tel and programs to commercials.
Status * Allows the user to quickly confn'm what channel number is currently being
viewed. Status can also be used to clear the Televisior of on screen displays or infor-
mation (rather than waiting for the displays to "time out" oc automatically disappe_c
trom the screen).
Twin Lead Wire * The more commonly used name for the two strand 300 Ohm
antem_a wire used with many indoor and outdoor an_:'tna systems. In many cases ff_is
type of antenna wire requires an additional adapter (or balun) in order to connect to
the 75 Ohm Input terminals designed into the morn recent Televisions and VC'Rs.
Volume Bar * When in the ON position, this feature .'lisplays an on-screen display
of the TV's volume setting.
Page 8

i | t.(#]IILt R_'1 | t}[HI IIk_N
lease make these simple
checks before calli,g for
service. These tips can save
you time and money sitEce
charges for TV installa_on
and adjustment of customer
controls are nor covered
under your warrant),.
CAUTION: A video source
(such as a video game,
Compact Disc Interactive -
CDI, or TV information
channel) which shows a con-
stanl non-moving pattern on '
the TV screen, can cause pic-
ture tube damage. When not
in use, turn the video source
OFF. Regularly alternate the
use of such video sources
with normal TV viewing.
-_--b/o Power
Check the TV power cord.
Unplug the TV, wait 1
minute, then reinsert plug
into outlet and push POWER
button again.
Check to be sure outlet is not
on a wall switch.
This TV is equipped with
protective circuitry that shuts
the TV off in case of moder-
ate power surges. Should
this occur turn the TV back
on by pressing the POWER
button once or twice, or
unplug (wait I0 seconds) and
then replug the power cord at
the AC outlet. This feature is
NOT designed to prevent
damage due to high power
surges such as those caused
by lightning, which is not
covered by your warranty.
.<_ _ nst|
• Check the VOLUMEbutto '/
• Check the MUTE button on |
/
the remote control. J
'/_"_o Picture YES NO
• Check the CABLE/ I
control for correct position. [
• Check antenna connections J
on the rear of the TV. Are J
they properly secured to the
antenna p ug on the TV?
_mote Doesn't
Check batteries. Replace
with AAA Heavy Duty (Zinc
Chloride) or Alkaline baner-
ies if necessary.
Cle_a the remote and the
remote sensor window on the
T_\
Check the "IV power cord.
Unplug the TV, wait 1
mine!re, then leinsert plug
into _utlet and push POWER
burton again.
V¢€r---ff_-Channel
(or no Channels
above13_
Repeat channel selection.
Add desired channel num-
bers (CHANNEL control)
into TV memory.
Check CABLE/ YES NO
contr.ol for correct position.
_:lcaning and Care
Unplug the 'IV before clean-
ing.
Avoid using anything abra-
sive that could scratch the
screen.
Wipe the TV screen with a
clean cloth damlxmed with
water.
Gently wipe cabinet sud'aces
with a clean cloth or sponge
dampened with cool clear
water. Use a clean dry cloth
to dry the wiped surfaces.
Occasionally vacuum the
ventilation holes or slot!; in
the cabinet back.
Never use thinners, insecti-
cide sprays, or otJner chemi-
cals on or near the cabinet.
i tranm
Accessories ............ 2
Add Channels .......... 4
Alternate Channe! ....... 4
Antenna Connect ........ 2
Autoprogram ........... 3
Batteries ............... 3
Cable TV Connect ....... 2
Cable TV Control ........ 4
Channel Memory ...... 3, 4
Closed Caption .......... 7
Coaxial Cable .......... 2
Controls/TV ............ 3
Controls/Remote ........ 3
Display ............... 3
Features ............... 1
First Time Use .......... 3
Glossary .............. 7
Language ............ 3
Menu Button .......... 3
Minus(-) Buttons ....... 3
Plus(+) Button ......... 3
Precautions .......... 1, 8
Programming .......... 3
Remote Control ........ 3
RF Cable ............. 2
Safety Notes ........... I
Service ............... 8
Sensor" Remote .......... 3
SETUP ............... 3
Sleep Timer ............ 5
Smart Picture ........... 5
Smart Sound ........... 5
Slatus Button ........... 3
Snrf .................. 4
T_ps for Service ......... 8
VCR Connections ....... 2
Volume Bar ............ 5
Warranty .............. 8
_- lt_A'_ltatm_k'_l'a_
COLOR TELEVISION
90 Days Free Labor
One Year Free Replacement 0f Parts (Two Years Free Replacement on Color Picture Tube)
This product can be repaired in-h0me.
WHO IS COVERED?
You must haveproof of purchaseto receive warranty service, A salesreceipt orother docu-
ment showing that you purchased the product is considered proof of purchase.
WHAT IS COVERED?
Warranty coveragehegira;the dayyou buyyour product. For90 daysthereafter, all parts will
be repaired or replaced fr_e, and labor is free. From 90 daysto one year from the day of
purchase,all parts will be repaired or replaced free, but you pay for all labor charges. From
one to two years from the day of purchase, you pay for the replacement or repair of all parts
except the piCturemb_ and for all labor charges.After two years from the day of purchase,
you pay for the replacerm;ntor repair of all parts, andfor all labor charges.
All parts,includingrepaired and replacedparts, are covered only for the original warranty
period, When the warrant/on the product expires,the warranty on all replacedand
repair_l parts also expires.
WHAT IS EXCLUDED?
Your warranty does not (:over;.
• labor chargesfor instalbtion or setup of the product, adjustment of customercontrols on
the product, andinstallationor repair of antenna systemsoutside of the product-
• product repair and/or part replacement becauseof misuse, accident,unauthorizedrepair
or other cause not wh_in the control of Philips ConsumerElectronicsCompany.
• reception problemscaused by si_palconditionsor cable or antenna systemsoutside the
unit.
a product that requires modificationor adaptation to enable it to operate inany country
other than the cotmtry for which it was designed,manufactured,approved and/or autho-
rized,or repair of products damagedby these modifications.
Incidentalor consequentialdamagesresultingfrom the product. (Some states do not
allow the exclusionof incidentalor consequenUaldamages,so the above exclusionmay
not apply to you. The; includes, but isnot limited to, prerecorded material whether
eop_ted or not copyrighted.)
a product used for con_merclalor institutional purposes.
WHERE IS SERVICE AVAILABLE?
Warranty service is avaJbJ0lein all countrieswhere the product isofficiallydistributedby
PhHipaConsumer ElectronicsCompany. In countrieswhere PhilipaConsumer Elecu'oales
Company doesnot dist_'_.e the product, the local Philips service organization will attempt
to provideservice (altho,_ghthere may be a delay if the appropriate spare parts and technical
manual(s)are not readily available).
MAKE SURE YOU KEEP...
Pleasekeep your salesreceipt or other document showing proof of purchase. Alxachit to
this owner's manual and keep both nearby. Also ke_-p the original box and packing material
in caseyou need to return your product.
BEFORE REQUESTING SERVICE...
Please checkyour owner's manual before requesting service. Adjustments of the ¢ontrok dis-
cussedthere may save you asettee call
TO GET" WARRANTY SERVICE IN U.S.A.,
PUERTO RICO OR U.S. VIRGIN ISLANDS...
Contact a Philipsfactory service center (see enclosedlist) or authorized service center 1:o
arrange repair.
(in U.S.A. Puerto RicoandU.S, Virgin Islands,all implied wanlnties, includingimplied wir-
rantiesof merchantability and fimessfor a particular purpose, are limited in duration to the
duration of this expresswarranty. BI_ becausesor_e s_;=tesdonot allow ;imitationson how
longan implied warranty may last,this limitationmay nct apply to you,)
TO GET WARRANTY SERVICE IN CANAI)A...
Pleasecontact Philipsat:
1-800_i61-6 t62 (FrenchSpeakhg)
I,,800-363-7278 (EnglishSpeaking)
(In Canada, this warranty is given in lieu of all other war rantk_s. No other warra_aties are
expressed or implied, induding any implied warrant_es cf merchantability or fimess for a par-
ticular purpose. Philipa is not liable under any circumst_unces for any direct, indin_ct, special,
incidental or consequential dama_, howsoever incurred, ev_n if notified of the possibiliity of
such damages.) +
REMEMBER...
Pleaserecord the model and serial numbers found on the product below. Also, pleasefill out
and mall your warranty registTation¢ard promptly. It wafthe easier for usto notify you if
necessary.
MODEL #
SERIAL#
Philips Service Company, P.O. Box SS5, Jefferson City, Tennessee $7760
(423) 475-8869
8
 Loading...