

Page 1
Instructions for use
3136 015 13171
Page 2

Once your PHILIPS MAGNAVOX purchase is registered, you're eligible to receive all the privileges of
owning a PHILIPS MAGNAVOX product. So complete and return the Warranty Registration Card
enclosed with your purchase at once. And take advantage of these important benefits.
Congratulationson your purchase,
and welcome to the "family!"
PHILIPS
Dear PHILIPS MAGNAVOX product owner:
Thank you foryourconfidenceinPHILLPSMAGNAVOX. You'veselectedoneof the best-built,best-
backedproductsavailabletoday.And we'lldo everythingin our powerto keepyou happywithyour
purchasefor many years to come.
Asa member of the PHILIPS MAGNAVOX "family,"you're entitledto protectionby one ofthe most
comprehensive warrantiesand outstandingservice networks in the industry.
What's more, your purchase guarantees you'llreceive all the information and special offers for which
you qualify, plus easy access to accessoriesfrom our convenient home shopping network.
And most importantly you can count on our uncompromising commitment to your total satisfaction.
All of this is our way of saying welcome-and thanks for investing in a PHILIPS MAGNAVOX product.
Sincerely,
Robert Minkhorst
President and Chief Executive Officer
P.S.Remember,to getthe mostfromyourPHlUPS
MAGNAVOXproduct,youmustreturnyour
WarrantyRegistrationCardwithin10 days.So
pleasemailitto usrightnova
Know ese
safetysymbols
A This"bolt oflightning"indicatesuninsuletedmaterialwithinyourunit maycausean electrical
shock. Forthe safetyofeveryonein yourhousehold,pleasedonotremoveproductcovering.
,_The "axcta_'_ationpo_t" calls attention tofeaturesforwhichyoushouldreadthee_.Jesedlit-
eraturedoselyto prevantoperatingand maintenanceproblems.
WARNING: TO PREVENT FIREOR SHOCK HAZARD, DO NOT EXPOSE THIS EQUIPMENT
TO RAINOR MOISTURE,
CAUTION: Toprevent electricshock_matchwidebladeof plug to wideslot,andfullyinsert.
ATTENTION:Pourq!k,'tterleschess6lectdques,introduirelelame le pluslargede la fichedartsla
bornecorrespondantede la pdseet pousaer|usqu'anfond.
Page 3
SAFETYINSTRUCTIONS- Readbeforeoperatingequipment
Thisproductwasdesignedandmanufacturedto meetstrictqualityand 11. Power-CordProteeflon- Powersupplycordsshouldberoutedso
safetystandards.Thereare,however,someinstallationandoperationpre- thattheyare notlikelyto be walkedonorpinchedbyitemsplaced
cautionswhichyoushouldbeparticularlyawareof, uponoragainstthem,paylngparticularattentiontocordsandplugs,
conveniencereceptacles,andthe pointwheretheyexitfromthe
1. ReadInstructions- Allthesafetyandoperatinginstructionsshould
bereadbeforetheapplianceisoperated.
2. RetainInstructions- Thesafetyandoperatinginstructionsshould
beretainedforfuturereference.
3. HeedWarnings- Allwarningsontheapplianceandintheoperating
instructionsshouldbeadheredto.
4. FollowInstructions- Alloperatinganduseinstructionsshouldbe
followed.
5. WaterandMoisture- Theapplianceshouldnotbeusednearwater
- forexamplenearabathtub,washbowl,kitchensink,laundrytub,
inawetbasementorneara swimmnopool,etc.
6. CadsandStands-Theapplianceshouldbeusedonlywithacartor
standthatisrecommendedbythemanufacturer.
6A. A An applianceand cart combinationshouldbe moved
withcare.Quickstops,excessiveforce,andunevensur-
facesmaycausetheapplianceandcartcombinationto
overturn.
68. 11I/Stability- Alltelevisionsmustcomplywithrecommendedinter-
nationalglobalsafetystandardsfortiltandstabilitypropertiesofits
cabinetdesign.
Donotcompromisethesedesignstandardsby applyingexces-
sivepullforcetothefront,ortop,ofthecabinetwhichcould
ultimatelyoverturntheproduct.
• Also,donotendangeryourself,orchildren,byplacingelec-
tronicequipment/toysonthetopof thecabinet.Suchitems
couldunsuspectinglyfallfromthetopofthesetandcause
productdamageand/orpersonalinjury.
7. Wallor CeilingMounting- Theapplianceshouldbemountedto a
wallorceilingonlyasrecommendedbythemanufacturer.
5. Ventilation- Theapplianceshouldbesituatedsothatitslocationor
positiondoesnotinterferewithits properventilation.Forexample,
theapplianceshouldnothesituatedona bed,sofa,rug,orsimilar
surfacethatmayblocktheventilationopenings;or,placedinabuilt-
ininstallation,suchasa bookcaseor cabinetthatmayimpedethe
flowofairthroughtheventilationopenings.
9. Heat- Theapplianceshouldbesituatedawa.yfrom heatsources
suchasradiators,heatregisters,stoves,orotherappliances(includ-
ingamplifiers)thatproduceheat.
10. PowerSources- Theapplianceshouldbeconnectedtoapowersup-
ply onlyofthetype describedintheoperatinginstructionsor as
markedontheappliance.
appliance.
12. Cleaning - The applianceshouldbe cleaned onlyas recommended
bythe manufacturer.
13. Power Lines - An outdoorantennashould be locatedaway from
powerlines.
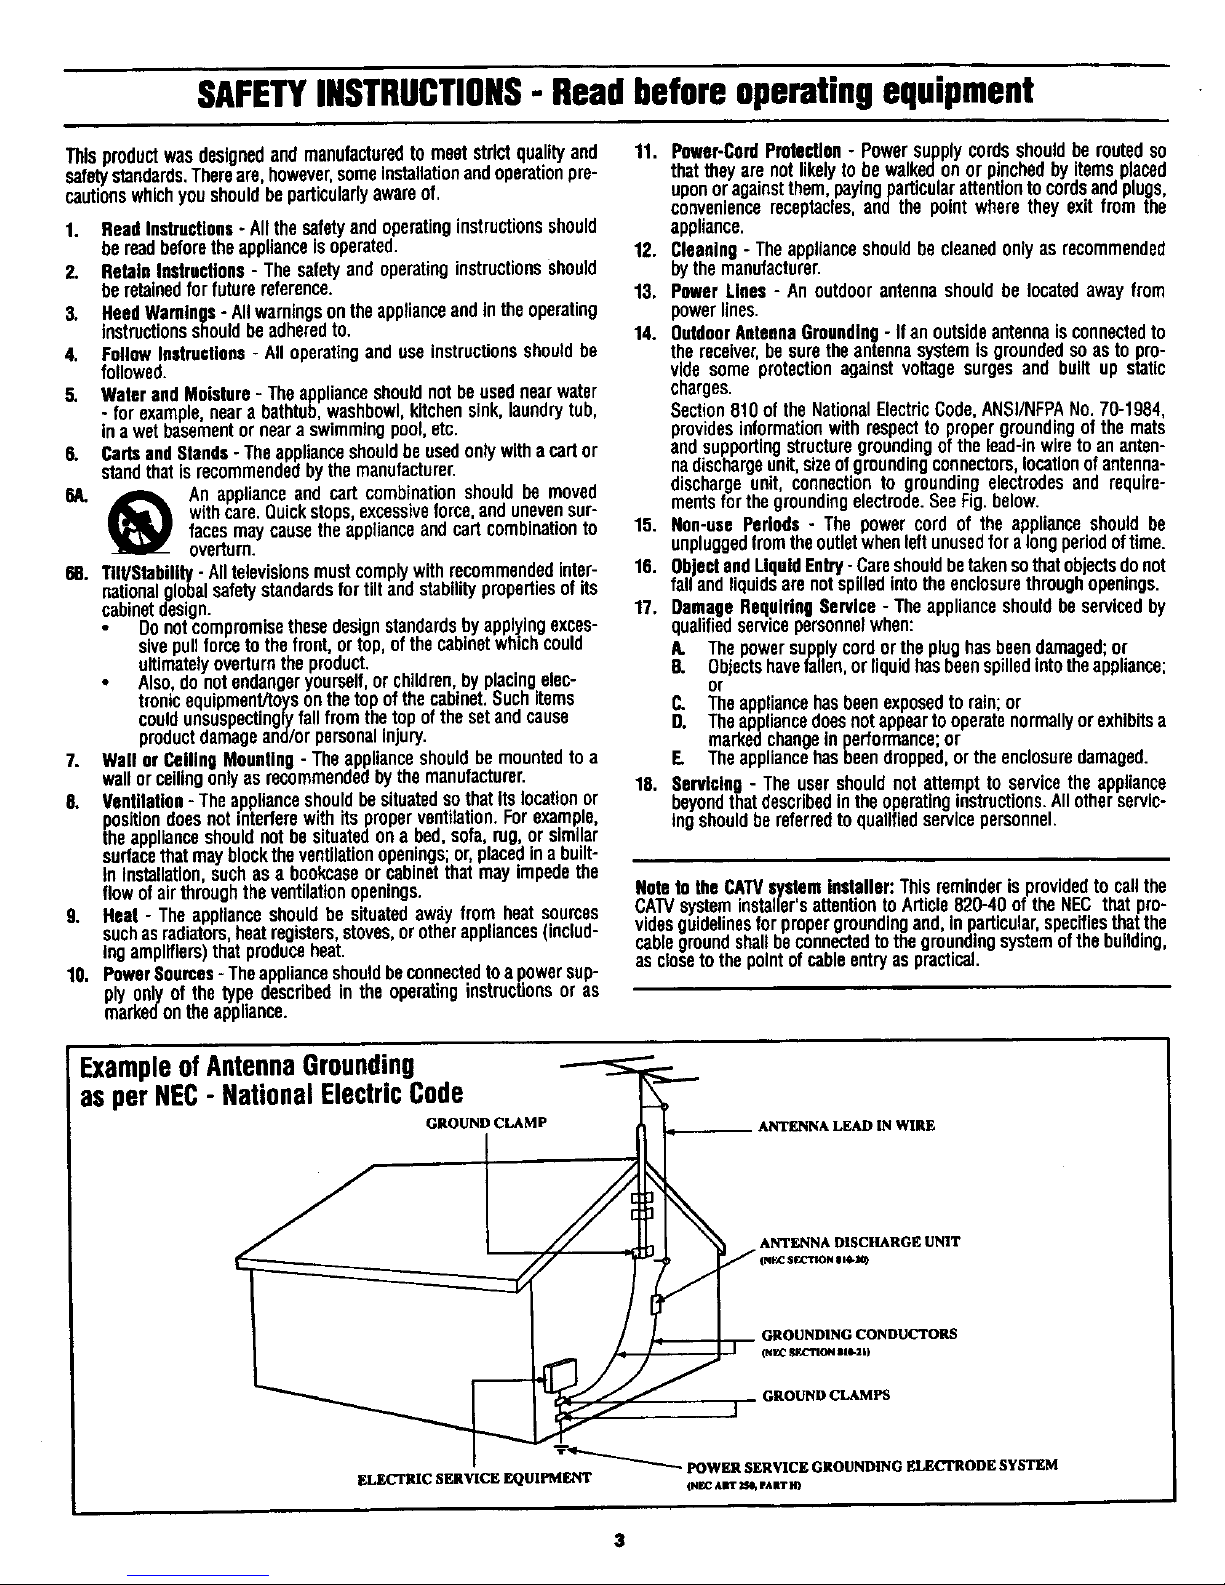
14. OutdoorAntennaGrounding- If anoutsideantennaisconnectedto
the receiver,be surethe antennasystem isgroundedso as to pro-
vide some protection against voltage surges and built up static
charoes.
Section810 of the NationalElectricCode,ANSI/NFPANo. 70-1984,
providesinformationwith respectto propergroundingof the mats
and supportingstructuregroundingof the lead-inwireto ananten-
nadischargeunit,sizeofgroundingconnectors,locationof antenna-
discharge unit, connectionto grounding electrodesand require-
mentsfor the groundingelectrode.SeeFig. below.
15. Non-use Periods - The power cord of the appliance should be
unpluggedfromthe outletwhenleft unusedfor a longperiodoftime.
16. Obect andLiquidEntry- Careshouldbetakensothatobjectsdonot
fa and quds are not spilledintothe enclosurethroughopenings.
17. Damage RequiringService - The appliance shouldbe servicedby
qualifiedservicepersonnelwhen:
A. The power supplycord or the plughas beendamaged;or
8. Objectshavefallen,orliquidhasbeenspilledintotheappliance;
or
C. The appliancehasbeenexposedto rain;or
D. Theappliancedoes notappearto operatenormallyor exhibitsa
markedchaoge in performance;or
F. The appliancehasbeen dropped,or the enclosuredamaged.
18. Servicing - The user should not attempt to service the appliance
beyondthatdescribedinthe operatinginstructions.Allotherservlc-
tngshouldbe referred to qualifiedservicepersonnel.
NotetotheCATVsys!eminstaller:Thisreminderisprovidedtocallthe
CAWsysteminstallers attentiontoArticle820-40ofthe NECthatpro-
videsguidelinesforpropergroundingand,inparticular,specifiesthatthe
cablegroundshaftbeconnectedto thegroundingsystemofthebuilding,
ascloseto thepointofcableentryaspractical.
ExampleofAntennaGrounding
as perNEC- NationalElectricCode
(i
GROUND CLAMP ANTENNA LEAD IN WIRE
ANTENNA DISCHARGE UNIT
GROUNDING CONDUCTORS
GROUND CLAMPS
_'_"_ POWER SERVICE GROUNDING ELECTRODE SYSTEM
ELECTRIC SERVICE F_UIPMENT o_l_cAar _ eAaT IO
Page 4
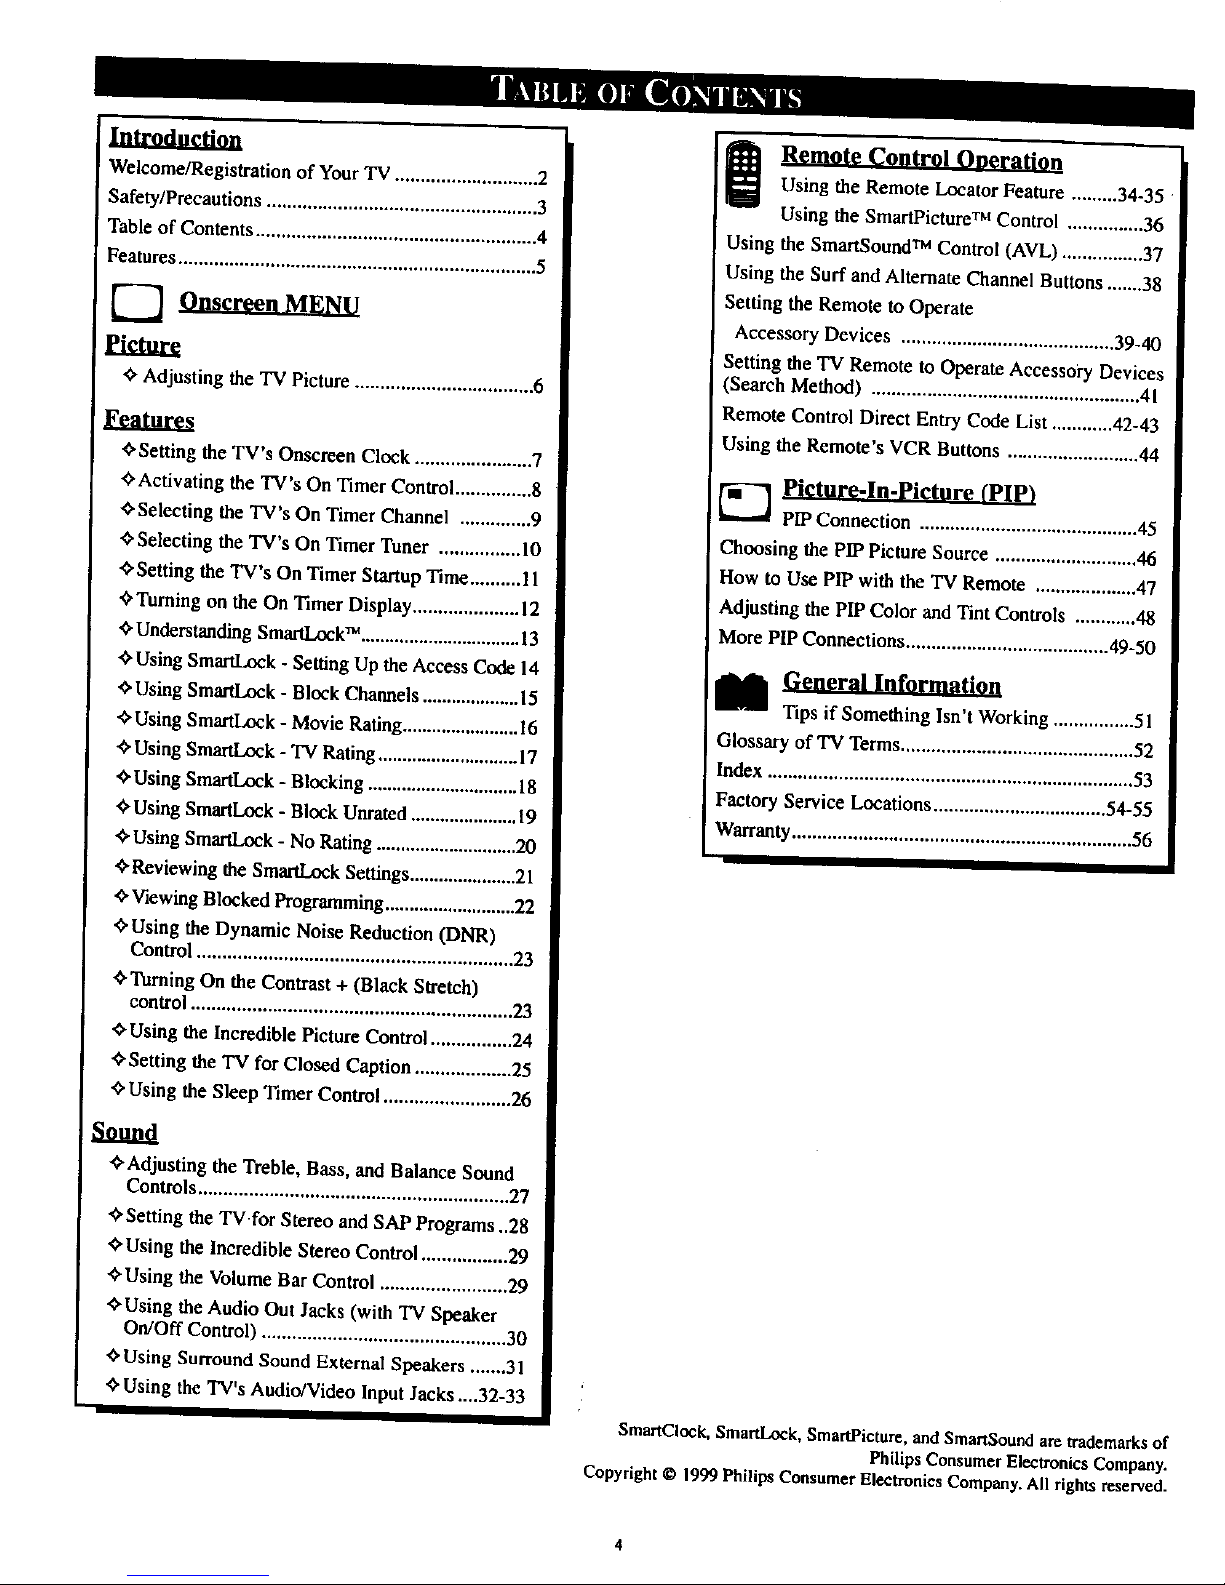
Introduction
Welcome/Registration of YourTV ............................ 2
Safety/Precautions ..................................................... 3
Table of Contents ....................................................... 4
Features ...................................................................... 5
[---] 9.at gml.H.Fdil2
Picture
Adjusting the TV Picture ................................... 6
Features
_'Setting the TV's Onacreen Clock ....................... 7
<_Activatingthe TV's On TimerControl ...............8
<_Selecting the TV's On Timer Channel .............. 9
_Selecting the TV's On Timer Tuner ................ 10
•_Setting the TV's On Timer Startup Time.......... 11
<_'I'urningon the On Timer Display..................... 12
"0"Understanding S_k TM ................................. 13
_ Using SmallLock - Setting Up the Access Code 14
_ Using Sma_,ock - Block Channels .................... 15
",_Using SmartLock - Movie Rating........................ 16
+Using SmartLx_k - TV Rating............................. 17
_'Using SmartLock - Blocking ............................... 18
Using SmartLock - Block Uarated ...................... 19
Using SmartI._k - No Rating ............................. 20
_Reviewing the SmartLock Settings ...................... 21
,0,Viewing Blocked Programming ........................... 22
'0'Using the Dynamic Noise Reduction (DNR)
Control .............................................................. 23
_Turning On the Contrast + (Black Stretch)
control...............................................................23
_Using theIncrediblePictureControl................24
_'SettingtheTV forClosedCaption...................25
_"UsingtheSleepTimerControl.........................26
Sound
<:'Adjusting the 'Dceble, Bass, and Balance Sound
Controls ............................................................. 27
€'Setting the "IV for Stereo and SAP Programs ..28
¢'Using the Incredible Stereo Control................. 29
Using the Volume Bar Control ......................... 29
_Using the Audio Out Jacks (with TV Speaker
On/Off Control) ................................................30
_'Using Surround Sound External Speakers ....... 31
Using the TV's Audio/Video Input Jacks ....32-33
e Remote Control Operad_|0_
Using the Remote Locator Feature .........34-35
Using the SmartPicture TM Control ............... 36
Using the SmartSound TM Control (AVL) ................ 37
Using the Surf and Alternate Channel Buttons ....... 38
Setting the Remote to Operate
Accesso Dev ces . 39-40
ry ,,,HH,. ...... ,U.H, ,.H..,,,,....*....
Setting theTV Remote to Operate Accessory Devices
(Search Method) ..................................................... 41
Remote Control Direct Entry Code List ............ 42-43
! Using the Remote's VCR Buttons .......................... 44
_-] Picture-ln-Picture (PIP)
PIP Connection ........................................... 45
) Choosing the PIP Picture Source ............................ 46
How to Use PIP with the TV Remote .................... 47
Adjusting the PIP Color and Tint Controls ............ 48
More PIP Connections ........................................ 49-50
I_l General Information
Tips if Something Isn't Working ................ 51
Glossary of TV Terms.............................................. 52
Index ........................................................................ 53
Factory Service Locations .................................. 54-55
Warranty................................................................... 56
SmanCIock, Sma_ock, SmartPieture, and SmanSound are trademarks of
Philips Consumer Electronics Company.
Copyright © 1999 Philips Consumer Electronics Company. All rights reserved.
Page 5
Infrared Remote Control works your TV set, VCR,
and a variety of wireless remote control Cable
Converters (Satellite Receivers, DVD, etc.).
Standard broadcast (VHFfOHF) or Cable TV
(CATV) channel capability.
Stereo Ready TV with built-in audio amplifier and
twin speaker system for receiving 'IV programs broad-
cast in stereo sound.
Closed Captioning allows the viewer to read 'IV pro-
gram dialogue or voice conversations as onscreen text.
Automatic Programming of Channels for quick and
easy selection of favorite stations available in your
area.
Onscreen Features (in either English, French, or
Spanish) show helpful messages for setting of 'IV con-
trois.
Audio/Video Jackpanel for direct connections with
VCRs (or other video accessories) providing quality
TV picture and sound playback.
Twin Antenna (A/B) Inputs for easy displaying of
two separate signal sources on the TV. An A/B button
on theremote control switches the TV's Main screen
between the twoAntenna (A & B) Input options.
Surround Sound external speaker connections allow
you hook your 'IV to external audio equipment for
more dynamic sound replay and audio effects.
On Timer automatically turns the "IV ON at apreset
time, and channel.
Sleep-Timer automatically turnsthe TV OFF atpreset
times.
SmartLock feature allows you to block the viewing of
certain channel or external audio!video connections
were you might not want your children viewing inap-
propriatematerial.
SmartPicture allows you to change the picture settings
(color, tint, contrast, etc.) for various types of program-
ruing, such as Sports, Movies, Multimedia (Games), or
WeakSignals, with the push of one button.
SmartSound controls the sudden volume changes dur-
ing program changes and commercials. It eliminates
the peaks and valleys in the TV's sound and creates
one pleasant listening level. You also may tailor the
SmartSound setting to the type of program you are
watching (Music, Theatre, etc.).
Picture-In-Picture (PIP) allows you view to different
programs (or picture sources) on the TV screen at the
same time. PIP will also let you swap the pictures,
move the PIP picture to any of the four corners, and
even f_eze the picture until you shut it off.
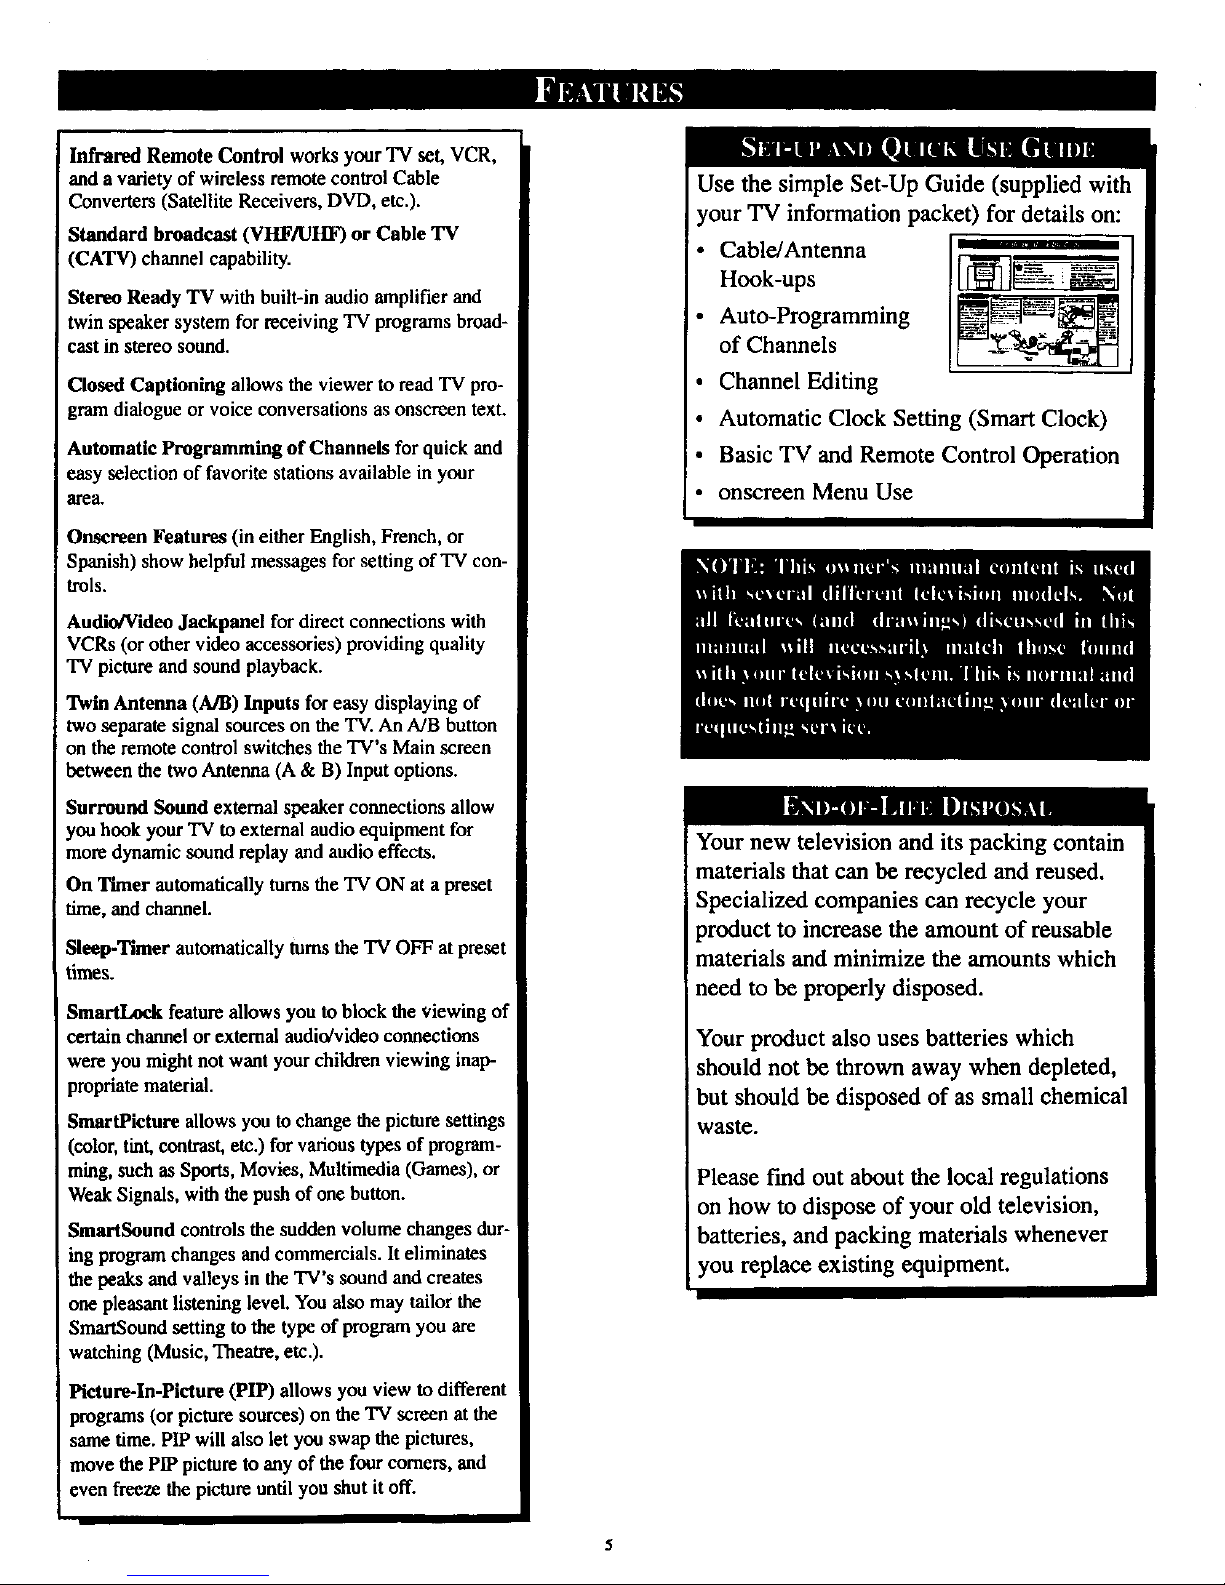
Use the simple Set-Up Guide (supplied with
your TV information packet) for details on:
• Cable/Antenna
Hook-ups
• Auto-Programming
of Channels
• Channel Editing
• Automatic Clock Setting (Smart Clock)
• Basic TV and Remote Control Operation
• onscreen Menu Use
Your new television and its packing contain
materials that can be recycled and reused.
Specialized companies can recycle your
product to increase the amount of reusable
materials and minimize the amounts which
need to be properly disposed.
Your product also uses batteries which
should not be thrown away when depleted,
but should be disposed of as small chemical
waste.
Please rmd out about the local regulations
on how to dispose of your old television,
batteries, and packing materials whenever
you replace existing equipment.
l
Page 6
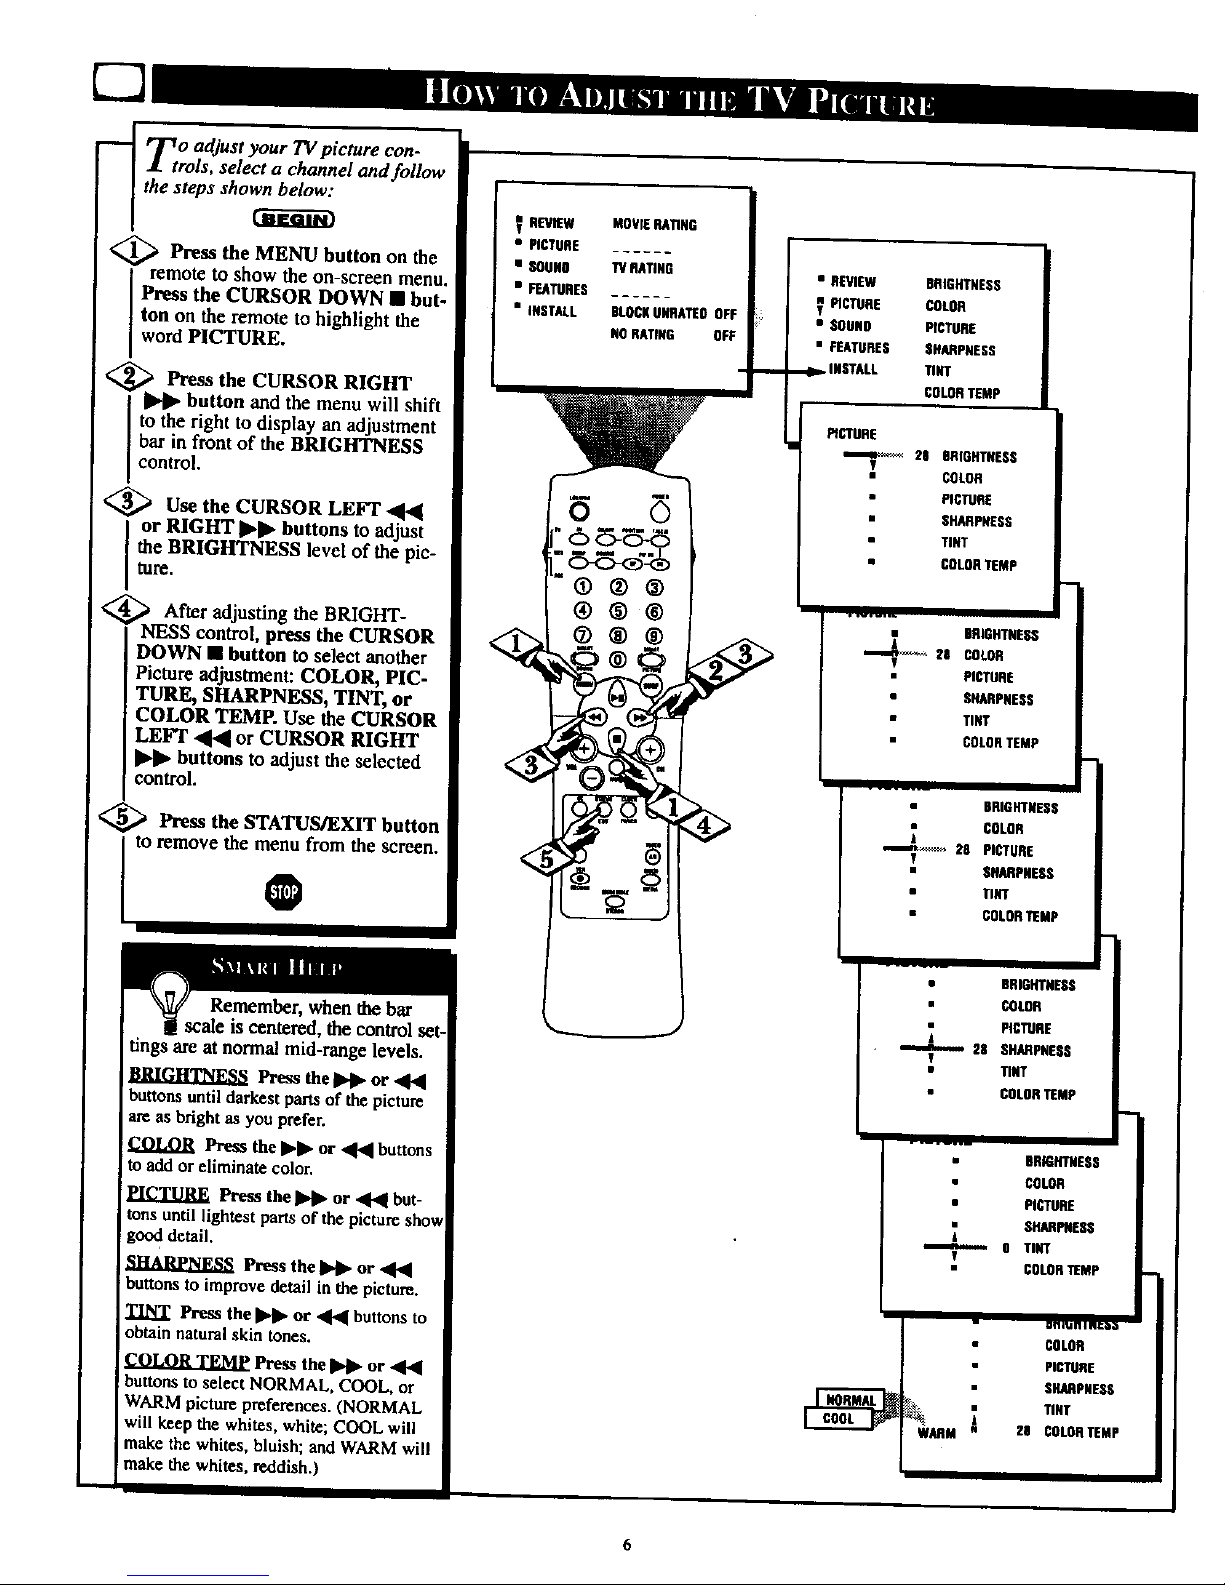
_ rr, o adjust your TV picture con-
trois, select a channel and follow
the steps $ho_
_ Press the MENU button on the
remote to show the on-screen menu.
I Press the CURSOR DOWN • but-
I ton on the remote to highlight the
I word PICTURE.
<_ Press the CURSOR RIGHT
button and the menu will shift
to the right to display an adjustment
bar in front of the BRIGHTNESS
contro.
<_ Use the CURSOR LEFT "11',4
or RIGHT _ buttons to adjust
the BRIGHTNESS level of the pie-
ture.
_ After adjusting the BRIGHT-
NESS control, press the CURSOR
DOWN • button to sdect another
Picture adjusUnent: COLOR, PIC-
TURE, SHARPNESS, TINT, or
COLOR TEMP. Use the CURSOR
LEFT .,q'41or CURSOR RIGHT
buttons to adjust the selected
control.
<_ Press the STATUS/EXIT button
to remove the menu from the screen.
@
Remember, when the bar
ca!e is centered, the control set-
tings are at norma! mid-range levels.
Press theI_1_ or ,4,4
buttons untildarkestpartsof thepicture
areas brightas you prefer.
Press the II_l_or ,4[,4buttons
to addor eliminate color.
PICTURE Press the II,_ or 41_1 but-
tons until lightest parts of the picture show
good detail.
Press the _ or
buttons to improve detail in the picture.
TINT Press the I1_1_or _ buttons to
obtain natural skin tones.
Press the _ or '41"4
buttons to select NORMAL, COOL, or
WARM picture preferences. (NORMAL
will keep the. whites, white; COOL will
make the whites, bluish; and WARM will
!make the whites, reddish.)
V REVIEW
• PICTURE
• SOUse
• FEATURES
• INSTALL
MOVIERATING
TVRATING
BLOCKUUNATEOOFF
NORATING OFF
• REVIEW BRIGHTNESS
? PtCTUi_ COLOR
• SOUl0 PICTURE
• FEATURES SHARPNESS
,_ _ tNSTAH. TINT
COLORTEMP
INCre_E
•--me_*,_ 2E BRIGHTNESS
-Y COLOR
PICTUP'£
• SHARPNESS
TINT
• COLORTEMP
• SR_GHTHESS
21 COLOR
• PICTURE
• sRAnPfiESS
• TINT
• COLORTEMP
BRIGHTNESS
COLO_
28 PICTURE
T
• SHARPNESS
• TIHT
• COLORTEMP
• BRIGHTNESS
• COLOR
PICTURE
28 SHARPNESS
T
• TINT
• COLORTEMP
• BRIGIOHESS
COLOR
• PICTURE
_ SNARMIESS
T
COLORTEMP
• COLOR
PICTURE
SHARPNESS
i TIHT
H CULONNMP
Page 7
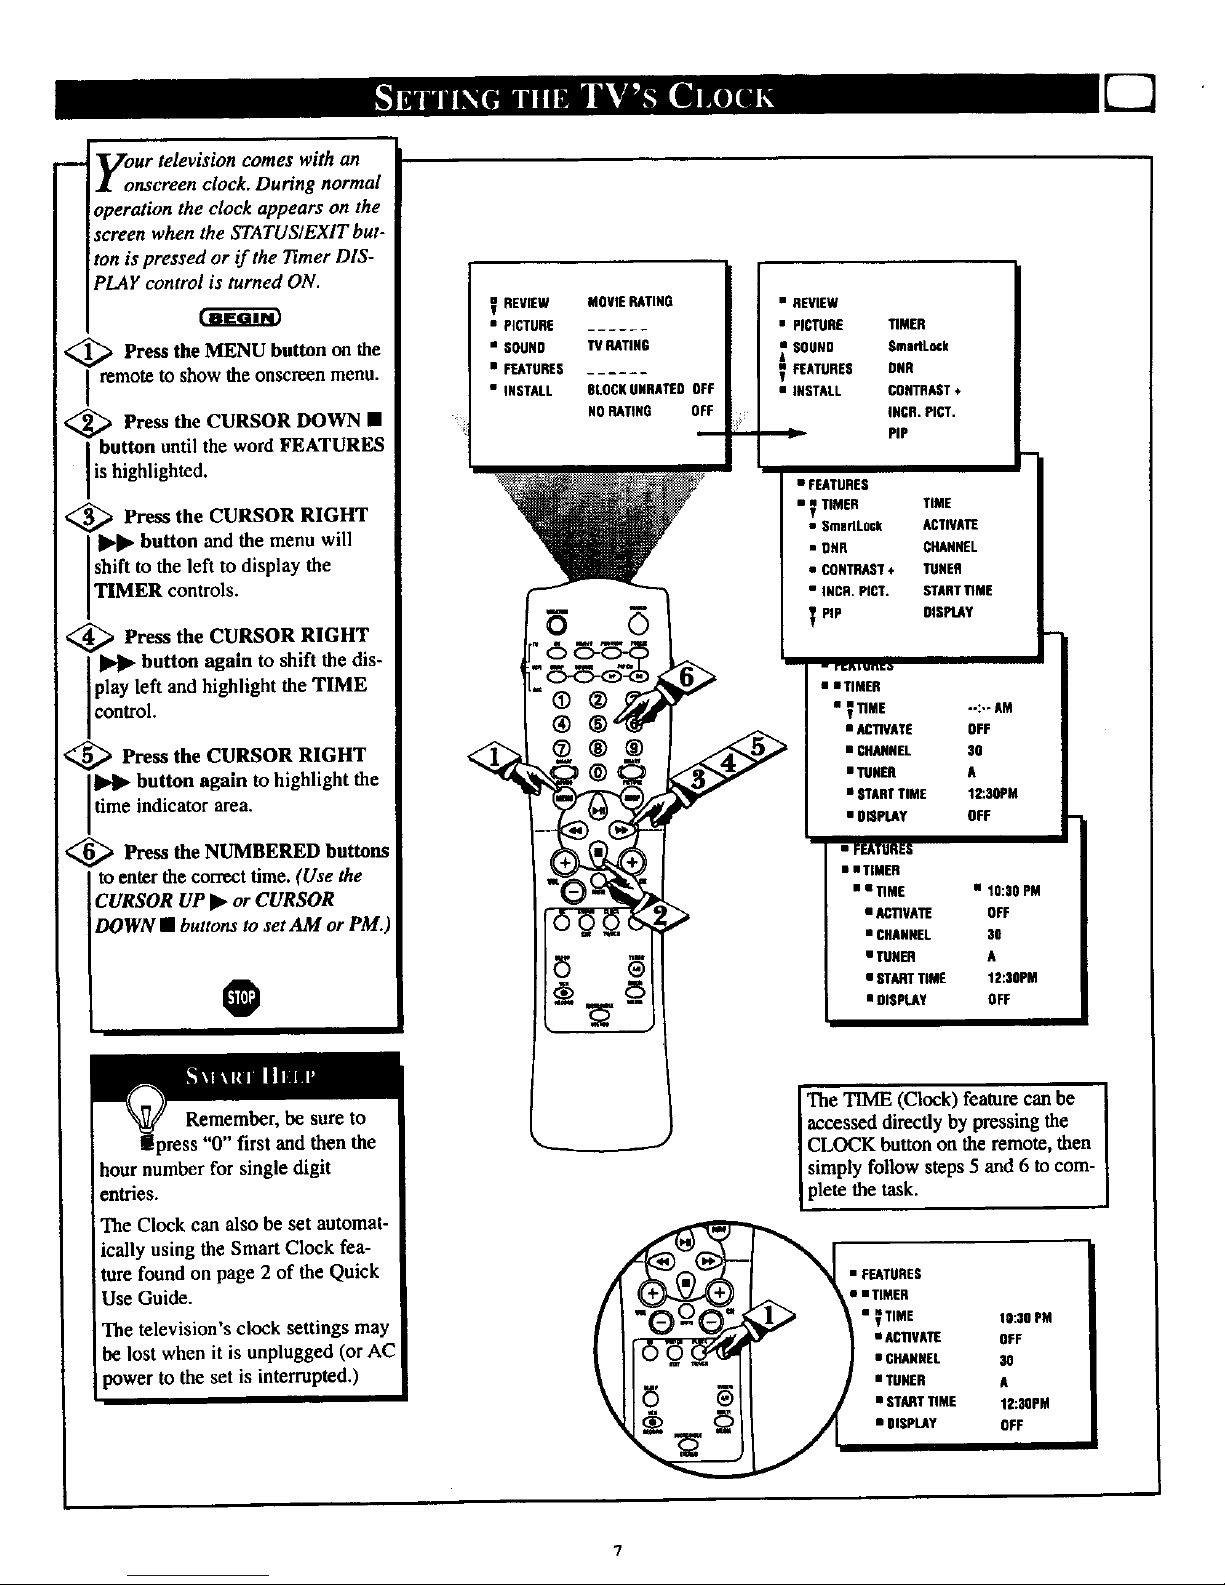
g:ur television comes with an
nscreen clock. During normal
aeration the clock appears on the
screen when the STATUSIEXIT but-
ton is pressed or if the Timer DIS-
PLAY control is turned ON.
<_ Press the MENU button the
OI1
remote to show the onscreen menu.
[_-_ Press the CURSOR DOWN •
button untilthe word FEATURES
is highlighted.
<_ Press the CURSOR RIGHT
II*l_ button and the menu will
shift to the left to display the
TIMER controls.
<_ Press the CURSOR RIGHT
button again to shift the dis-
play left and highlight the TIME
control.
<_ Press the CURSOR RIGHT
II_1_ button again to highlight the
time indicator area.
<_ Press the NUMBERED buttons
to enter the correct time. (Use the
CURSOR UP _. or CURSOR
DOWN • buttons to set AM or PM.
0
"0" first and then the
hour number for single digit
entries.
The Clock can also be set automat-
ically using the Smart Clock fea-
ture found on page 2 of the Quick
Use Guide.
The television's clock settings may
be lost when it is unplugged (or AC
power to the set is interrupted.)
V REVIEW MOVIE RATING
• PICTURE
•SOUNO TVRATING
• FEATURES
• INSTALL SLOSH UNRATEO OFF
NO RATING OFF
m
• REVIEW
• PICTURE TIMER
_ SOUND $madLock
V FEATURES DHR
• INSTALL CONTRAST*
INCR. PICT.
"_ p|p
• FEATURES
• _ TIMER TIME
• SmadLock ACTIVATE
• DNR CHANNEL
• CONTRAST* TUNER
• INCR. PIST. STARTUME
PIP DISPLAy
- ri;_ t unlc_
• iTIMER
• V UME --:-- AM
• ACTIVATE OFF
• CHANNEL SO
• TUNER A
• STARTTIME 12:30PM
• OmpLAy OFF
• FEATURES
• • TIMER
• a_ME • 10:30 PM
• AC_VATE OFF
• CHANNEL 30
• TUNER A
• STARTTIME 1E:30PM
• DISPLAY OFF
The TIME (Clock) feature can be
accessed directly by pressing the
CLOCK button on the remote, then
simply follow steps 5 and 6 to com-
plete the task.
• FEATURES
• • TIMER
• ? TIME 10:30 PM
• ACUVATE OFF
• CHANNEL 3_
• TUNER A
n STARTDME |2:SSPM
• DISPLAY OFF
7
Page 8
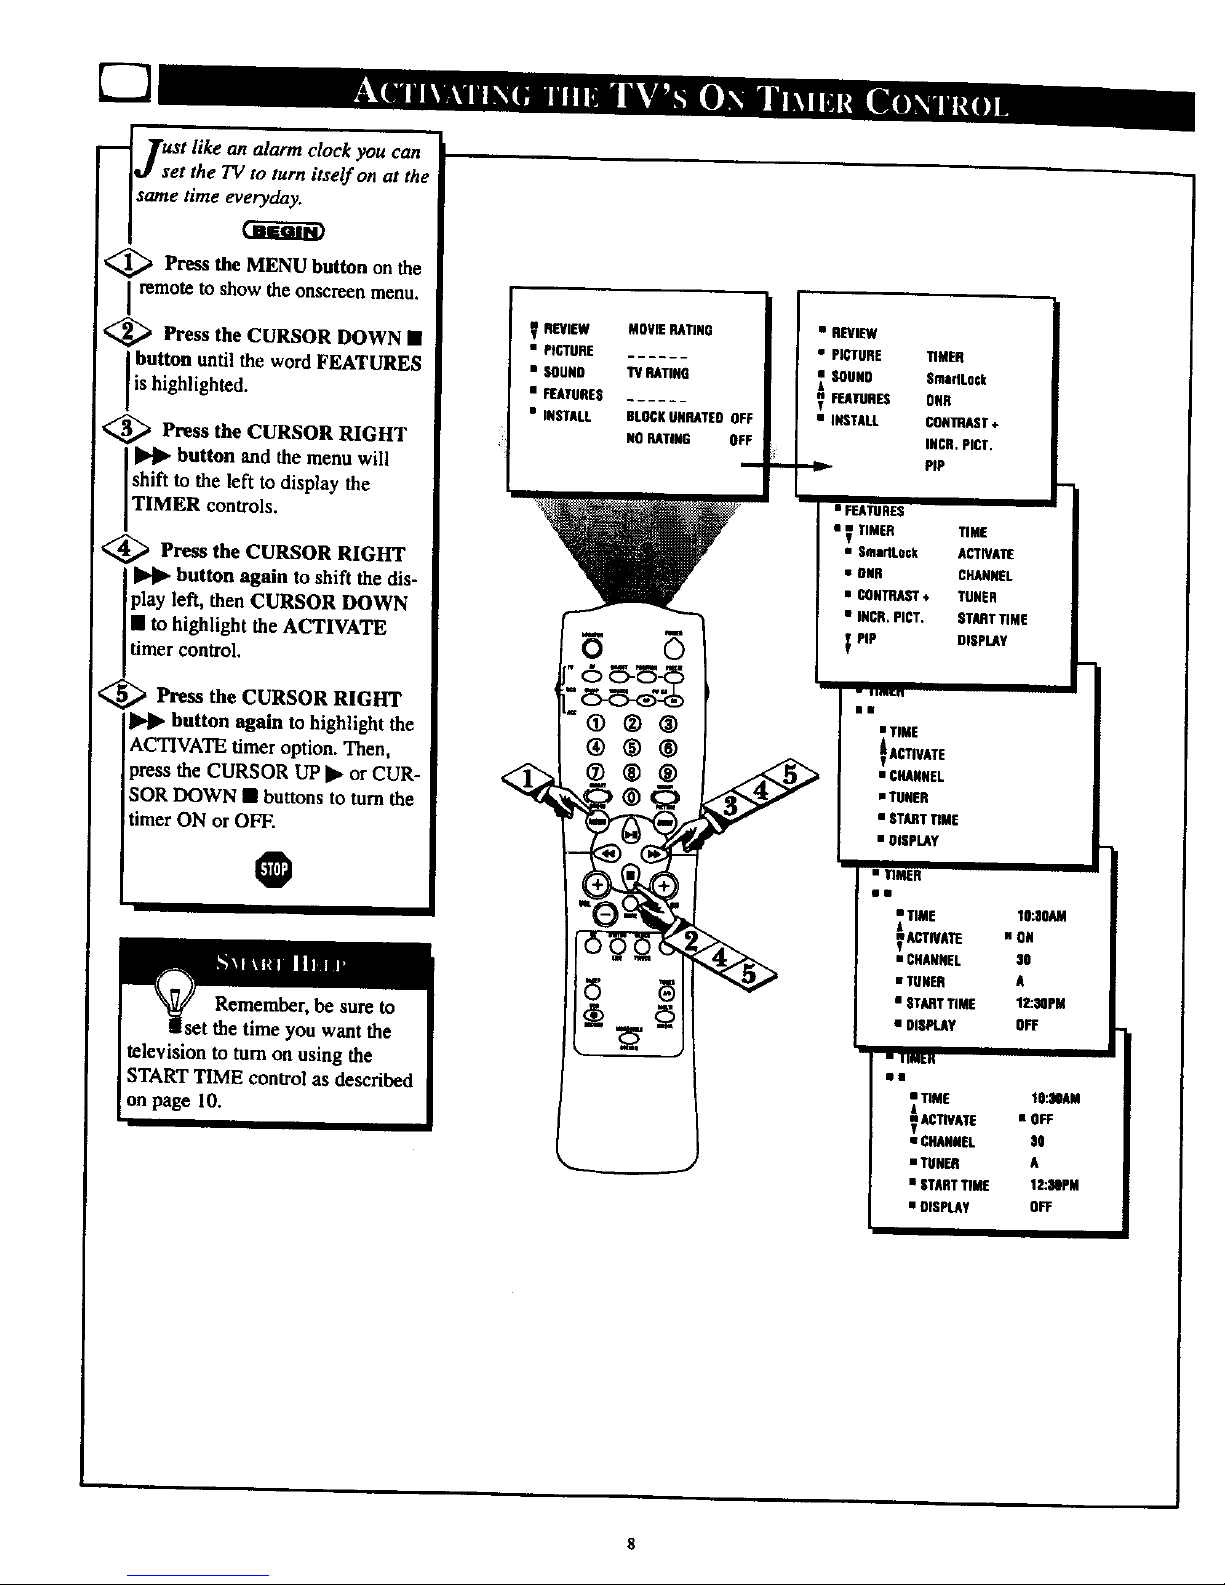
_ Tust like an alarm clock you can
J set the TV to turn itself on at the
same time ev_
<_ Press the MENU button on the
i remote to show the onscrcen menu.
_ Press the CURSOR DOWN •
button until the word FEATURES
is highlighted.
<_ Press CURSOR RIGHT
the
button and the menu will
shift to the left to display the
TIMER controls.
, <_ Press the CURSOR RIGHT
__l II_ button again to shift the dis-
play left, then CURSOR DOWN
• to highlight the ACTIVATE
timer control.
Press the CURSOR RIGHT
button again to highlight the
ACTIVATE timer option. Then,
press the CURSOR UP IP or CUR-
SOR DOWN • buttons to torn the
imer ON or OFF.
O
REVIEW MOVIE HATING
• PICTURE
• SOUND TV RATING
• FEATURES
• INSTALL BLOGKUNHATEO OFF
NO_TN4G OFF
@®®
®®®
• REVIEW
• PICTURE
SOUND
FEATURES
• INSTALL
TIMER
SmadLock
OUR
CONTRAST+
_CN. ptCT.
PIP
• FEATURES
• _ TIMER TIME
g
• Sma_Lock ACTNATE
• OAR CHANNEL
• CONTRAST÷ TUNER
• IRCR, PICT. STARTTIME
PIp OISPLAY
i i 1M.iq
I•
• TIME
• CHANNEL
mT_H
• STARTTHAE
• DISPLAY
• THAAR
ii
• _ME
I ACTIVAllE
• CHANNEL
• TUNER
• STARTTIME
• DiSPLAy
" TIM_H
Ill
• TIME
T_ACllVATE
• CHANNEL
• TUNER
• STARTTIME
• DISPLAY
'to..so_
n ON
30
A
12:SQPM
OFF
I
10:30AM
• OFF
3O
A
12:30PM
OFF
$
Page 9
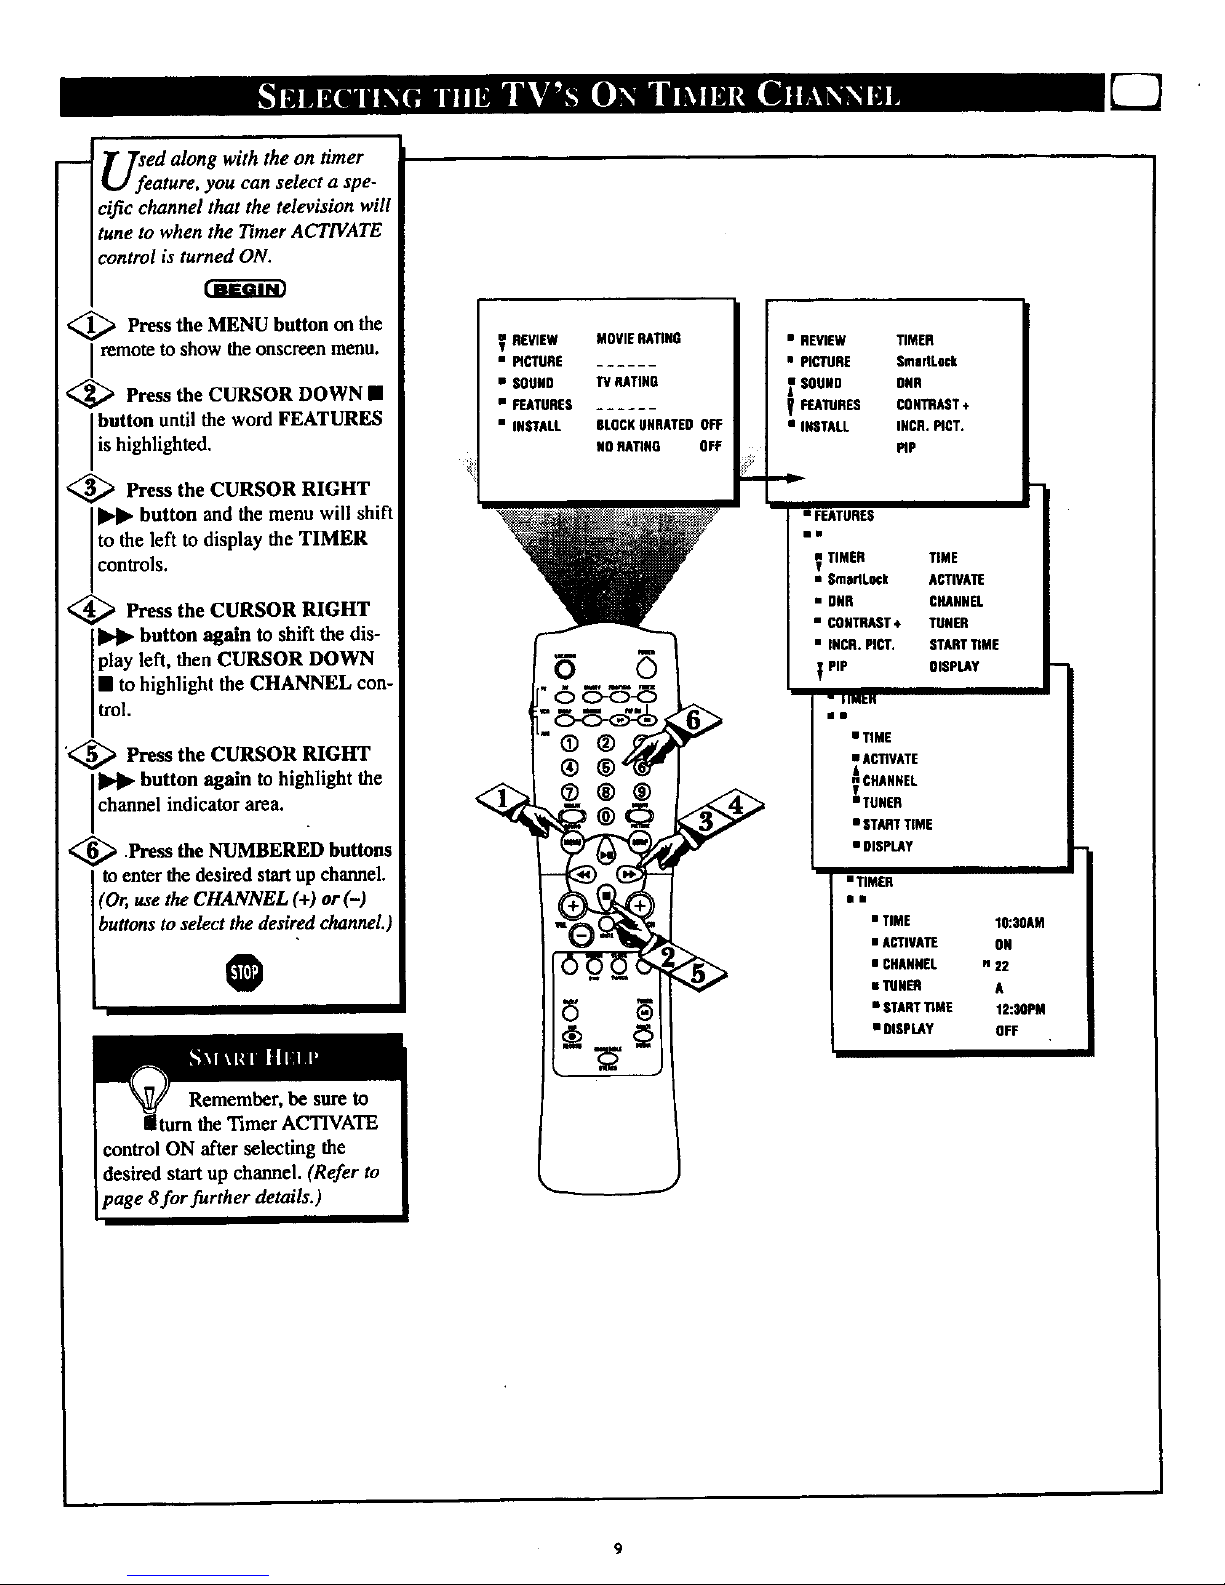
U;eed along with the on timer
ature, you can select a spe-
cific channel that the television will
tune to when the Timer ACTIVATE
control is turned ON.
<_ Press the MENU button on the
Iremote to show the onscreen menu.
<_ Press the CURSOR DOWN •
button until the word FEATURES
is highlighted.
<_ Press the CURSOR RIGHT
button and the menu will shift
to the left to display the TIMER
controls.
_ Press the CURSOR RIGHT
button again to shift the dis-
play left, then CURSOR DOWN
• to highlight the CHANNEL con-
trol.
'<_ Press the CURSOR RIGHT
button again to highlight the
Ichannel indicator area.
<_ Press the NUMBERED buttons
to enter the desired startup channel.
](Or, use the CHANNEL (+) or(-)
Ihu.o,sto,ele t ; sir a channel.)
REVIEW
• PICTURE
• SOUND
• FEATURES
• INSTALL
MOVIERATING
TVHATINO
6LOCKUURATEDOFF
NORATING OFF
• REVEW TIMER
• PICTURE SmadLo_
r SOUND OUR
FEATURES CONTRAST÷
• INSTALL INCR, MOT.
PIP
• FEATURES
im
TIMER TIME
• SmadL_k ACTIVAFF
• OUR CHANNEL
• CONTRAST*, TUNER
• INCR. PLOT, STARTUME
_ PiP OISPLAY
- i IMI:M
• TIME
• ACTIVATE
OHANNEL
TUNER
• STARTTIME
• DISPLAY
iTIMER
B•
• TIME
• ACTIVATE
• CHANNEL
• mNm
• START_ME
• DISPLAY
lO:3OAM
OH
n 22
A
12:30PM
OFF
Page 10
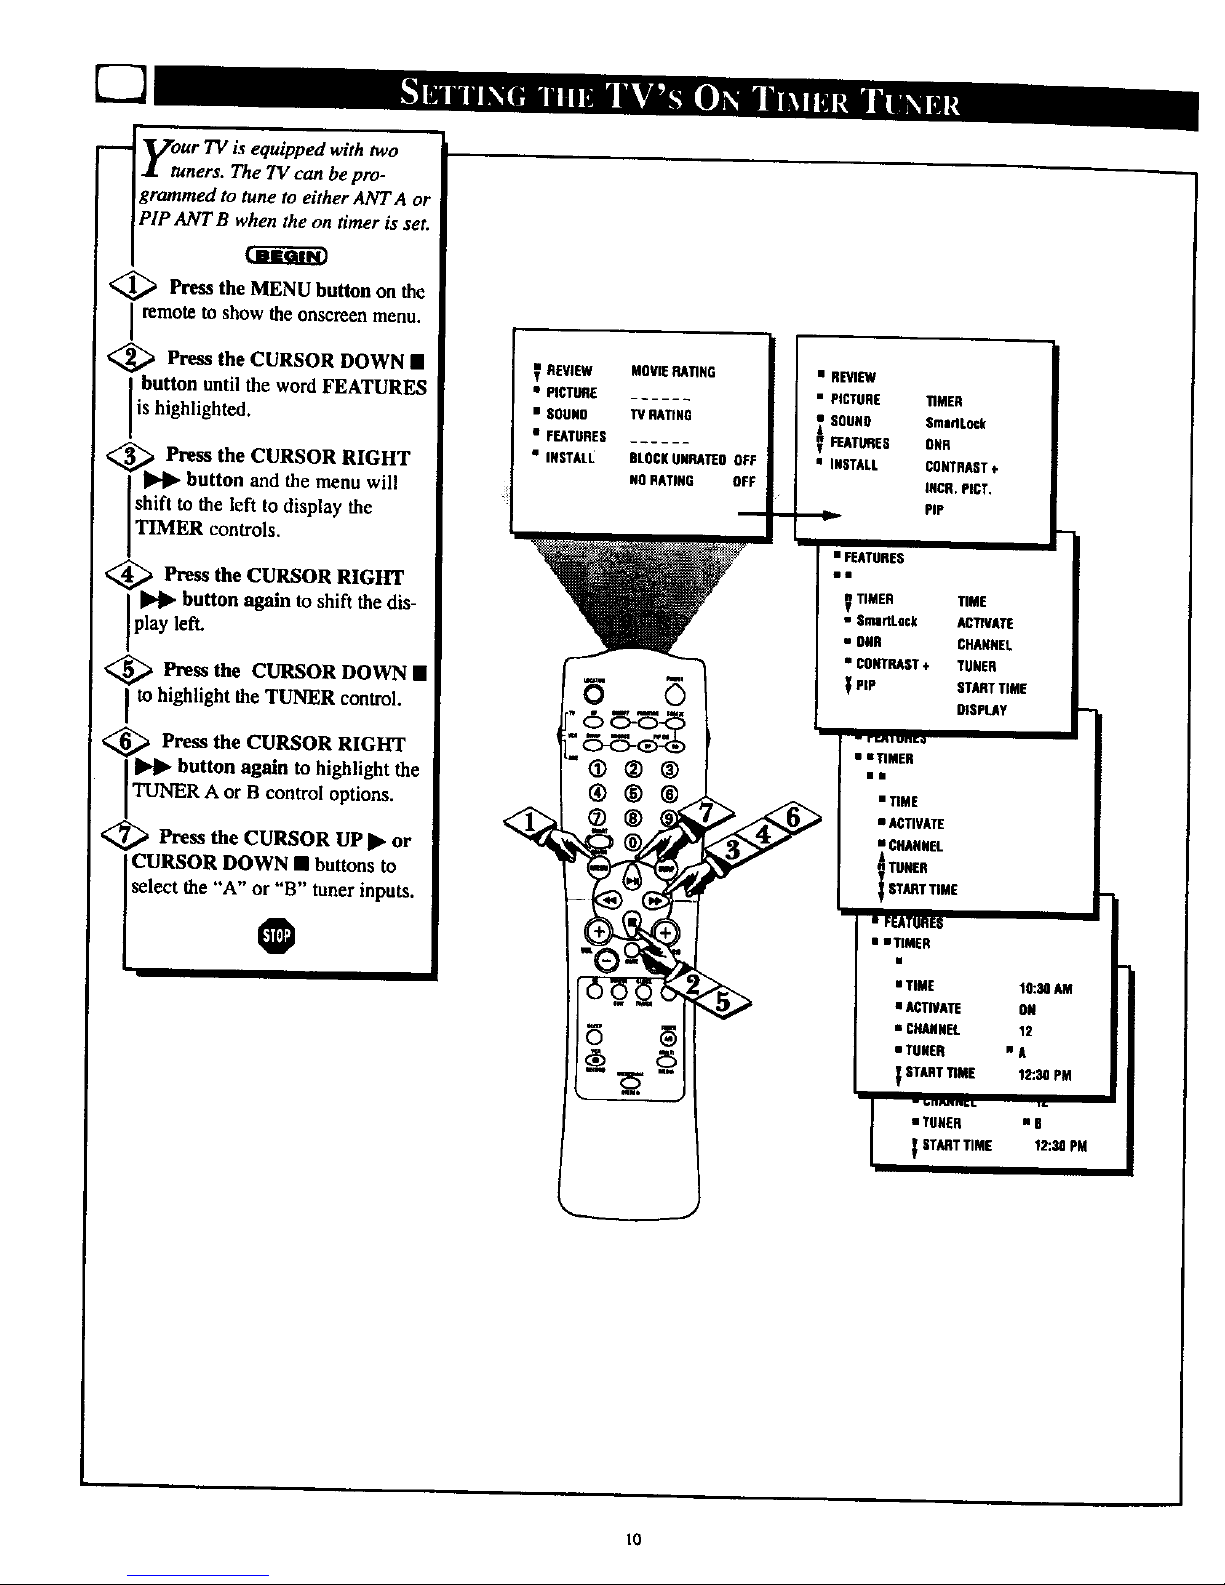
Vour is equipped with two
TV
& tuners. The TV can be pro-
grammed to tune to either ANT A or
PIP ANT B _n timer is set.
<_ Press the MENU button on the
remote to show the onsereen menu.
<_ Press the CURSOR DOWN •
button until the word FEATURES
is highlighted.
,_ Press the CURSOR RIGHT
button and the menu will
shift to the left to display the
TIMER controls.
_ Press the CURSOR RIGHT
button again to shift the dis-
pay left.
_ Press the CURSOR DOWN •
It'° highlight the TUNER control.
Press the CURSOR RIGHT
_1_ button again to highlight the
TUNER A or B control options.
,_ Press the CURSOR UP I_ or
CURSOR DOWN • buttons to
select the "A" or "B" tuner inputs.
@
V REVIEW MOVIERATING
• PICTURE
• I;OUNO 'iV RATING
• FEATURES
• INSTALI_ BLOCKUGRATEOOFF
NORATING OFF
• REVIEW
• PICTURE
SOUNO
V_ATURES
• INSTALL
• FEATORES
in
TIMER
$madLock
OaR
CONTRAST÷
INCR. PIGT,
PiP
TIMER TIME
• SmartLock ACTIVATE
• OaR CHANNEL
• CONTRAST+ TUNER
PiP STARTTIME
OIGPLAY
-- rr_l un_o
• • 71NIER
i•
• TIME
• ACTIVATE
• CaANNEL
TUNER
STARTTIME
• FEATURES
• • TIMER
• TIME
• ACTIVATE
• CHANNEL
• TUNER
_ STARTTIME
. _,l,rtnrl_b
• TUNER
STARTTIME
I
IO:N AM
ON
12
•A
12:30 PM
mS
12:30 PM
t_
Page 11
!
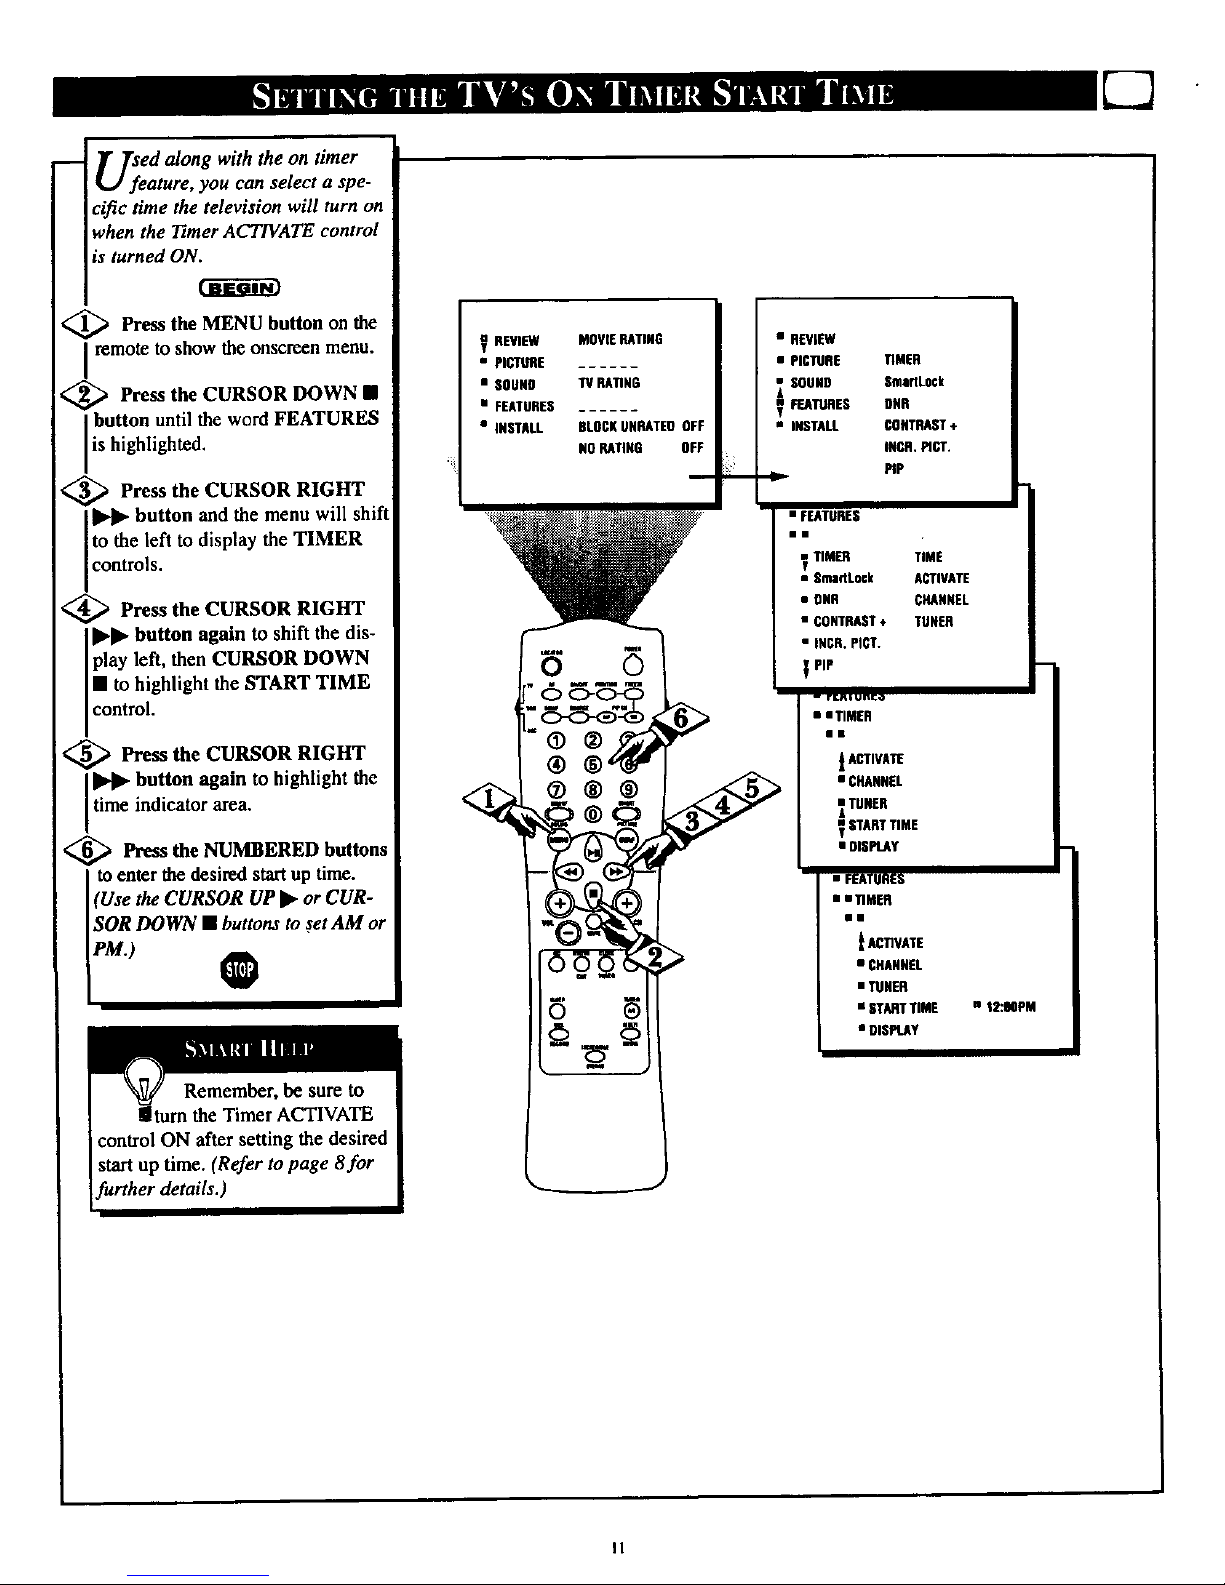
T Tsed alongwiththe on timer
feature, you can select a spe-
cific time the television will turn on
when the Timer ACTIVATE control
is turned ON.
_ Press the MENU button on the
remoteto show the onscreen menu.
<_ Press the CURSOR DOWN •
button until the word FEATURES
i is highlighted.
I
i_'_ Press the CURSOR RIGHT
v
button and the menu will shift
Itothe left to display the TIMER
controls.
<_ Press the CURSOR RIGHT
I_1_ button again to shift the dis-
play left, then CURSOR DOWN
• to highlight the START TIME
control.
<_ Press the CURSOR RIGHT
I IPI_ button again to highlight the
time indicator area.
<_ Press the NUMBERED buttons
to enter the desiredstart up time.
(Use the CURSOR UP _ or CUR-
ISOR DOWN • buttons to set AM or
I"' 0
REVIEW MOVIERATING
• PICTURE
• SOUND TV RATING
• FEATURED
• INSTALL BLOCKUNRATED OFF
NORATING OFF
ii:!¸
m
• REVIEW
• PICTURE UMER
SOUND SmaMLock
F_ATURES URR
• INSTALL CONTRAST+
INCR. _CT.
MP
• FEATURES
in
_ nM_
• B_dLock
• DNR
• CONTRAST÷
• INCR. PICT.
PiP
-- r_l un_o
• • TIMER
Illl
_AffFIVATI[
• CRANNEL
_ TUNER
STARTTIME
• DISPLAy
• FEATURES
• • _MER
•l
t ACTIVATE
• CHANNEL
• TUNER
• STARTTIME
• DISPLAY
TiME
ACTIVATE
CHANNEL
TUNER
• 12:OOPM
II
Page 12
[-7
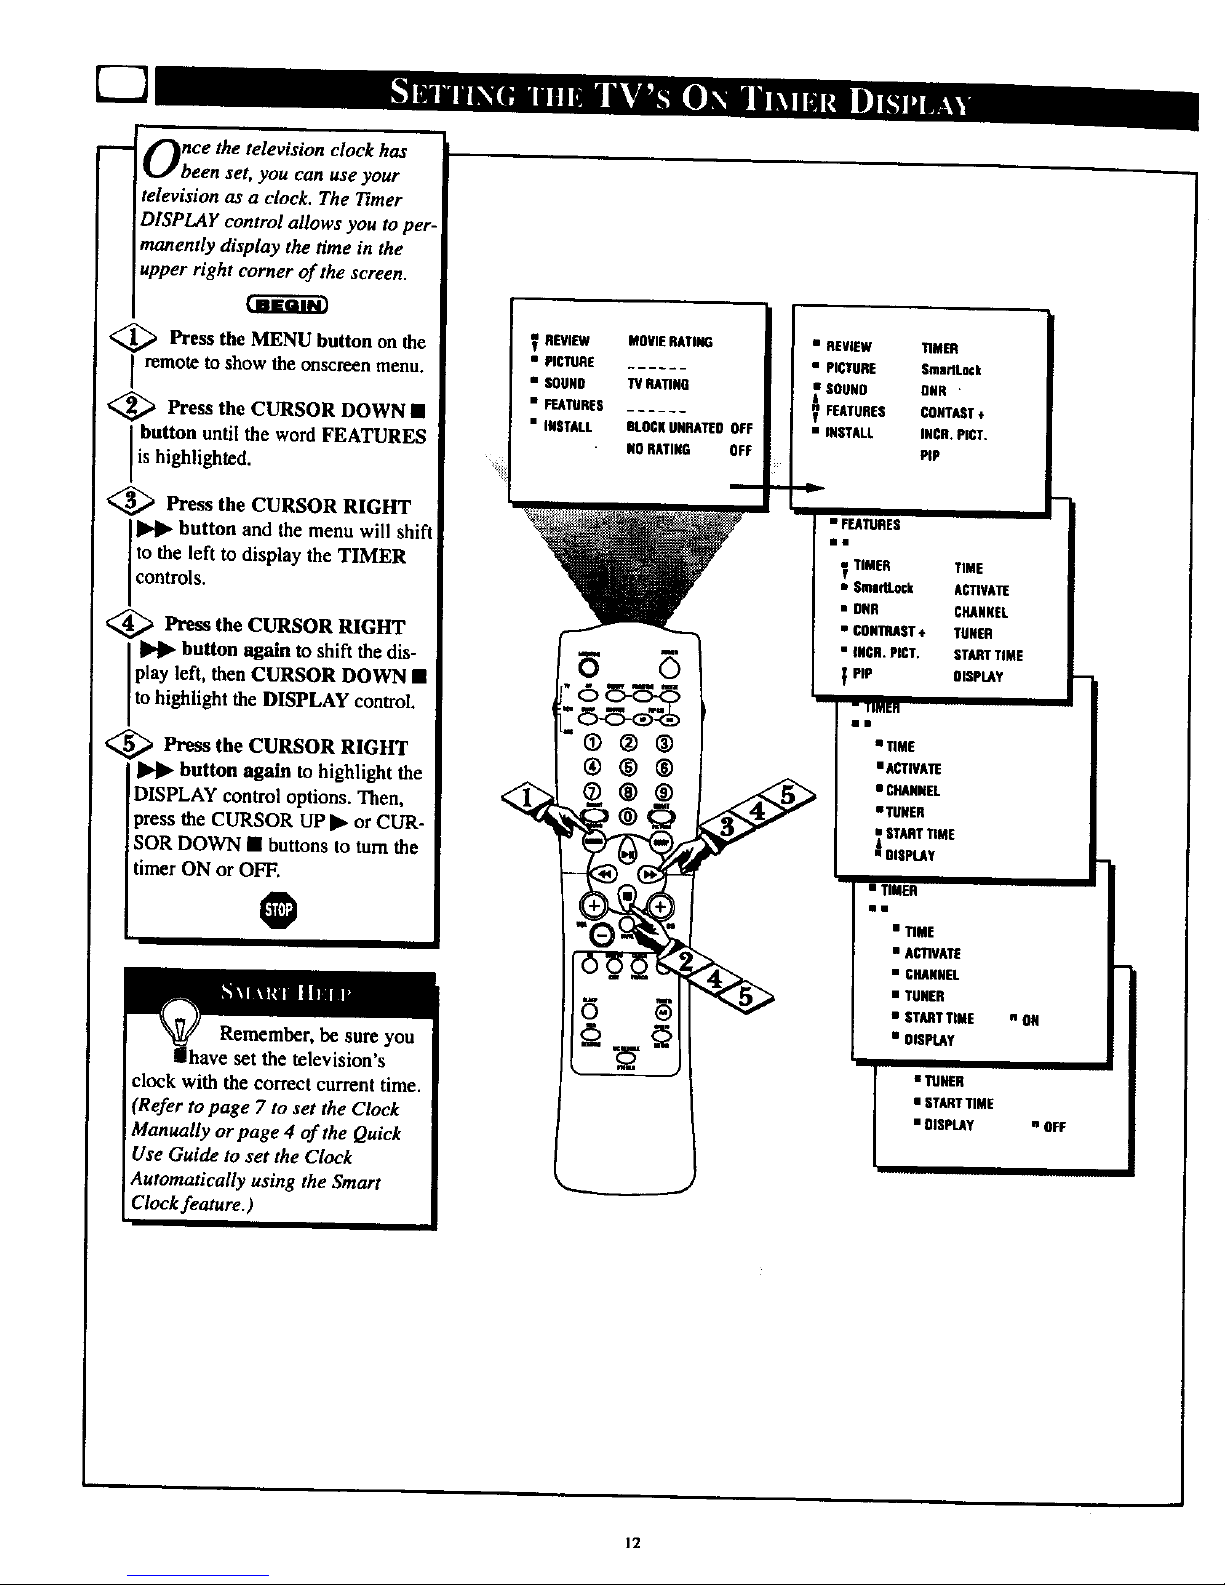
Once the television clock has
been set, you can use your
television as a clock. The Timer
DISPLAY control allows you to per-
manently display the time in the
upper right corner of the screen.
,_ Press the MENU button on the
I remote to show the onscreen menu.
<_ Press the CURSOR DOWN •
button until the word FEATURES
is high ghted.
<_ Press the CURSOR RIGHT
button and the menu will shift
to the left to display the TIMER
coutro S.
<_ Press the CURSOR RIGHT
I II_l_ button again to shift the dis-
play left, then CURSOR DOWN •
to highlight the DISPLAY control.
<_ Press the CURSOR RIGHT
button again to highlight the
DISPLAY control options. Then,
press the CURSOR UP • or CUR-
SOR DOWN • buttons to turn the
timer ON or OFF.
O
Remember, be sure you
have set the television's
clock with the correct current time.
(Refer to page 7 to set the Clock
Manually or page 4 of the Quick
Use Guide to set the Clock
Automatically using the Smart
Clock feature.)
I
REVIEW
• PICTURE
• SOUNO
• FEATURES
• INSTALL
MOVIERATING
HAUNO
BLOCKUNRATEOOFF
NOHATI_ OFF
i
6
@®®
®®®
®®®
6
• REVIEW
• PICTURE
SOUNO
_ FEATURES
• INSTALL
• FEATURES
Eli
TIMm
Sma_t_k
DNR
_NTACT ÷
INCR. PICT.
_P
TIMER TIME
• _a_ck ACTIVATE
• 0_ CHANNEL
• CONTRAST÷ TUNER
• _R. p_r, STARTTIME
PIP OISP_Y
" llMEfl
II
• TIME
• ACTIVATE
• CHANNEL
• TUNER
STARTTIME
• SiSPLAV
• TIMER
II
• TIME
• ACIW&TE
• CHANNEL
• TUNER
• STARTTIME
• OlS_Y
I
• TUNER
• START TIME
• OISPtAY
n ON
• OFF
12
Page 13
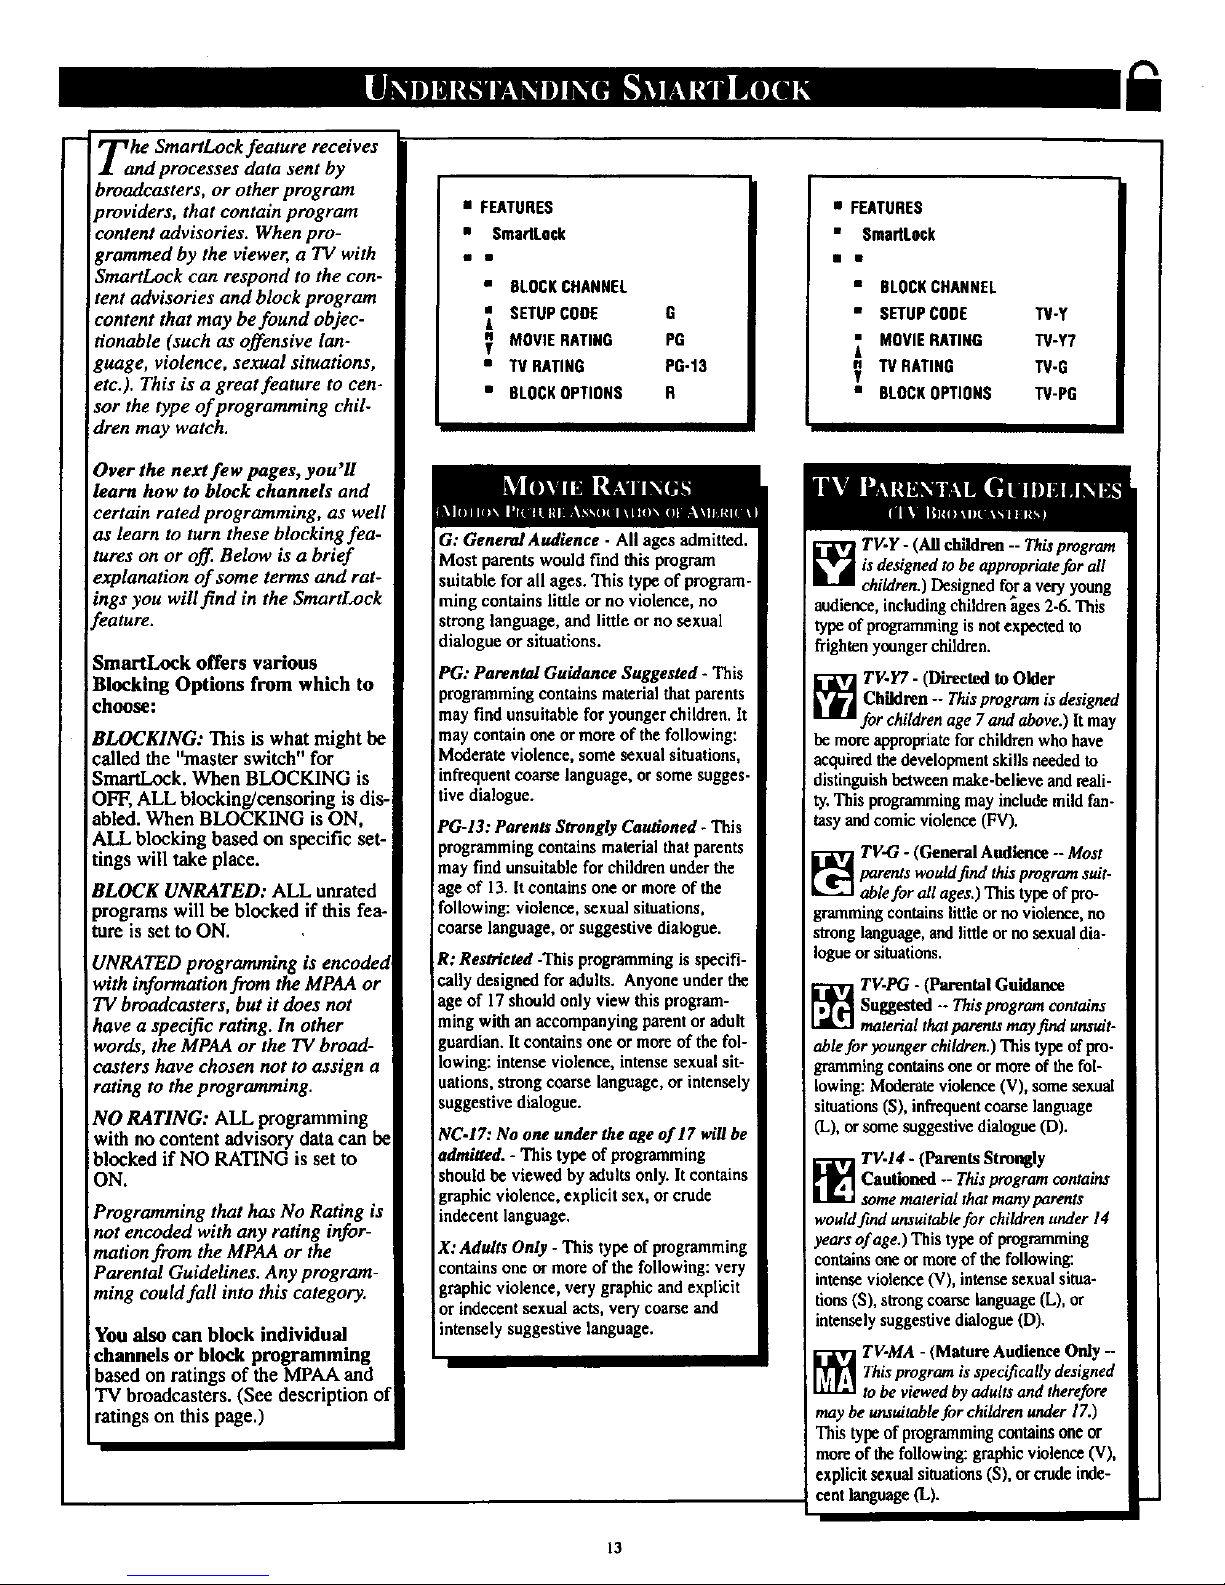
Zanhe SmartLock feature receives
d processes data sent by
broadcasters, or other program
providers, that contain program
content advisories. When pro-
grammed by the viewer, a TV with
SmartLock can respond to the con-
tent advisories and block program
content that may be found objec-
tionable (such as offensive lan-
guage, violence, sexual situations,
etc.). This is a great feature to cen-
sor the type of programming chil-
dren may watch.
Over the next few pages, you'll
learn how to block channels and
certain rated programming, as well
as learn to turn these blocking fea-
tures on or off. Below is a brief
explanation of some terms and rat-
ings you will find in the SmartLock
feature.
SmartLock offers various
Blocking Options from which to
choose:
BLOCKING: This is what might be
called the "master switch" for
SmartLock. When BLOCKING is
OFF, ALL blocking/censoring is dis-
abled. When BLOCKING is ON,
ALL blocking based on specific set-
tings will take place.
BLOCK UNRATED: ALL unrated
programs will be blocked if this fea-
ture is set to ON.
UNRATED programming is encoded
with information from the MPAA or
TV broadcasters, but it does not
have a specific rating. In other
words, the MPAA or the TV broad-
casters have chosen not to assign a
rating to the programming.
NO RATING: ALL programming
with no content advisory data can be
blocked if NO RATING is set to
ON.
Programming that has No Rating is
not encoded with any rating infor-
mation from the MPAA or the
Parental Guidelines. Any program-
ming could fall into this category.
You also can block individual
channels or block programming
based on ratings of the MPAA and
TV broadcasters. (See description of
ratings on this page.)
• FEATURES
• SmartLock
• SLOCKCHANNEL
SETUPCODE G
MOVIERATING PG
• TVRATING PG-13
• BLOCKOPTIONS R
i
I
G: General Audienee - All ages admitted.
Most parents would find this program
suitable for all ages. This type of program-
ming contains little or no violence, no
strong language, and little or no sexual
dialogue or situations.
PG: Parental Guidance Suggested - This
programmingcontains material that parents
may find unsuitable for younger children. It
may contain one or more of thefollowing:
Moderate violence, some sexual situations,
infrequentcoarse language, or some sugges-
tive dialogue.
PG-13: Parents Strongly Cautioned - This
programmingcontains material that parents
may find unsuitable for children underthe
age of 13. Itcontains one or more of the
following: violence, sexual situations,
coarse language, or suggestive dialogue.
R: Restricted -This programmingis specifi-
cally designed for adults. Anyone under the
age of 17should only view this program-
ming with an accompanying parentor adult
guardian.It contains one or more of the fol-
lowing: intense violence, intense sexual sit-
uations, strong coarse language, or intensel)
suggestive dialogue.
NC,17: No one under the age of 17 will be
admitted. - This type of programming
should be viewed by adults only. Itcontains
graphic violence, explicit sex, orcrude
indecent language.
X: Adults Only -This type of programming
contains one or more of the following: very
graphic violence, very graphic and explicit
or indecent sexual acts, very coarse and
intensely suggestive language.
• FEATURES
• SmartLock
• BLOCKCHANNEL
• SETUPCODE TV.Y
MOVIERATING TV-Y7
"IVRATING TV-G
g
• BLOCKOPTIONS TV-PG
TV.Y- (All ddldren -- Thisprogram
is designed to be appropriate for all
chiMren.)Designed for a very young
audience includingchildren_ges 2-6. This
typeof programmingis notexpected to
! frightenyoungerchildren.
_ TV,Y7 - (Directed to Older
Children -- Thisprogram is designed
for children age 7and above.) It may
be more appropriatefor childrenwho have
acquired thedevelopment skills needed to
distinguish between make-believe and reali-
ty. This programmingmay includemild fan-
tasy andcomic violence (FV).
_ TV-G - (General Audience -- Most
parents wouldfind thisprogram suit-
ablefor all ages.) This type of pro-
grammingcontains little or no violer,ce, no
stronglanguage, and little orno sexual dia-
logue or situations.
_ TV.PG - (Parental Guidance
Suggested -. This program contains
material that parents may find unsuit-
ablefor younger children.) This type of pro-
grammingcontains one or more of the fol-
lowing: Moderate violence (V), some sexual
situations (S), infrequent coarse language
(L), or some suggestive dialogue (D).
_ TV.14 - (ParentsStrongly
Cautioned -- This program contains
some material that many parents
woaid find unsuitable for children under 14
years of age.) This type of programming
contains one or more of the following:
intense violence (V), intense sexual situa-
tions (S), strong coarse language (L), or
intensely suggestive dialogue (D).
TV-MA - (Mature Audience Only --
Thisprogram is specifically designed
to be viewed by adults and therefore
may be unsuitable for children under 17.)
This type of programmingcontainsone or
more of the following: graphicviolence (V),
explicit sexual situations(S), or crude inde-
cent language(L).
13
Page 14
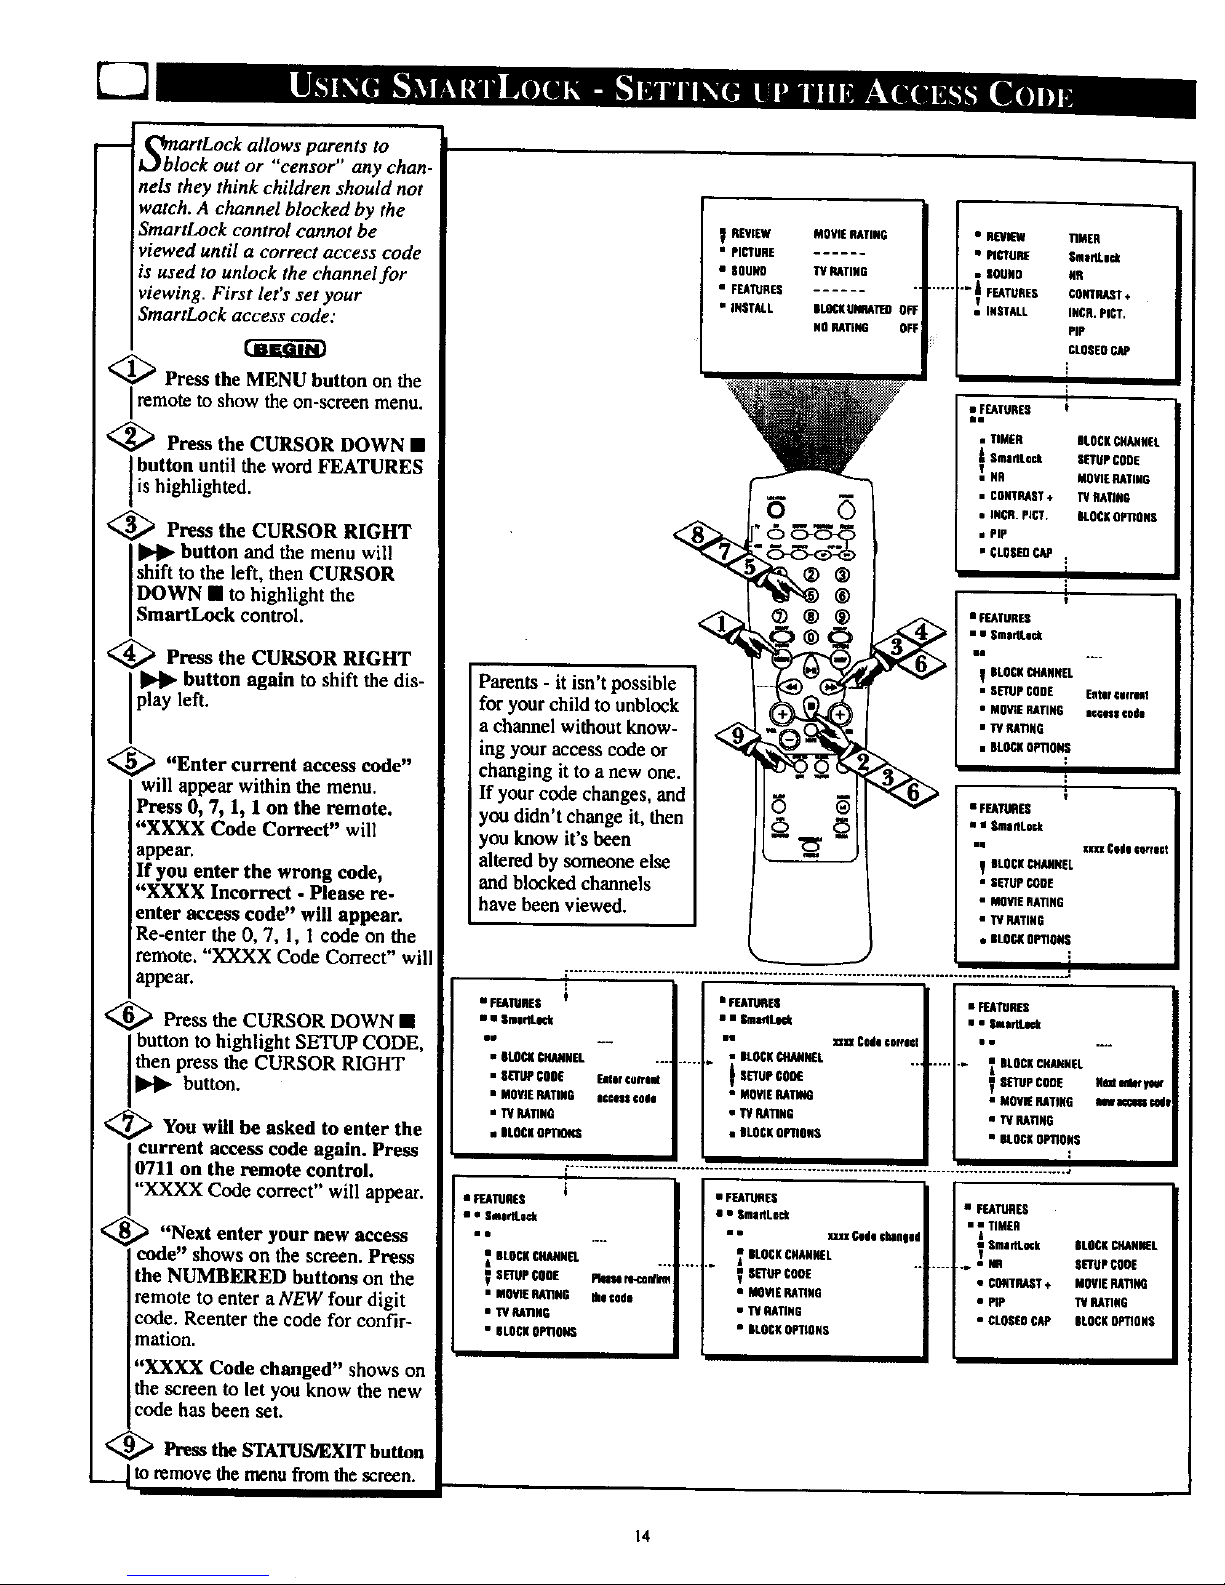
S_blartLock allows parents to
ock out or 'censor any chan-
nels they think children should not
watch. A channel blocked by the
SmartLock control cannot be
viewed until a correct access code
is used to unlock the channel for
viewing. First let's set your
SmartLock access code:
<_ Press the MENU button on the
Iremote to show the
on-screen menu.
<_ Press the CURSOR DOWN •
button until the word FEATURES
is highlighted.
<_ Press the CURSOR RIGHT
button and the menu will
shift to the left, then CURSOR
DOWN • to highlight the
SmartLock control.
<_ Press the CURSOR RIGHT
]P.]Ipbutton again to shift the dis-
play left.
_ "Enter current access code"
will appear within the menu.
Press 0, 7, 1, I on the remote.
"XXXX Code Correct" will
appear.
If you enter the wrong code,
"XXXX Incorrect - Please re-
enter access code" will appear.
Re-enter the 0, 7, 1, l code on the
remote. "XXXX Code Correct" will
appear.
<_ Press the CURSOR DOWN •
button to highlight SETLqa CODE,
then press the CURSOR RIGHT
button.
<_You will be asked to enter the
!current access code again. Press
0711 on the remote control.
"XXXX Code correct" will appear.
_ "Next enter your new access
code" shows on the screen. Press
the NUMBERED buttons on the
remote to enter aNEW four digit
code. Reenter the code for confir-
mation.
"XXXX Code changed" shows on
the screen to let you know the new
code has been set.
<_ Press the STATUS/EXIT button
..___to remove the menu from the screen.
REVIEW MOVIE RATING
• PICTURE
• SOUND IV RATING
• FUTURES
• iNSTALL ELCOKUNGNTEO
NO RATING
• REVEW TIMER
• PICTURE Smer_ick
• COUNO NR
J
FEATURES CONTRAST÷
1
• INSTALL IHCR.PICT.
PiP
CLOSEOCAP
F
i
:IEAIVRES
• nMOR BLOCKCHANNEL
A Sma_Lcck SETUPCORE
TuNG MOVIE RATING
• CONTRAST÷ PCRATING
• iNCH. PLOT. ALOCERETTORS
• PIP
• CLOSEt]CAP
1
i
1
• FEATURES
• • $ma_Le_k
in
Parents - it isn't possible
for your child to unblock
a channel without know-
ing your access code or
changing it to a new one.
If your code changes, and
you didn't change it, then
you know it's been
altered by someone else
and blocked channels
have been viewed.
BLOCKCEIANNTL
• SETUPCODE Eater eafrHi
• MOVIE RATING acoess code
• IV RATING
• BLOCKOPTIONS
1
• FEATUAOS
• • SmeDLock
"; BLOCKCHANNEL
• SETUPCODE
• MOVIERA_NG
• IV RATING
• BLOCKOPTIONS
........................................................................................................... J
• FEATURES
• • SmaftL_
o•
• SLOES CHANNEL ....
• SLffov €OOO Enter cunent
• MOVIE RATING ect_es$ c0de
• TU RATING
• ELOCH OPTII_
t • FT.A_E8
i i SmlffLl_
in
..... • BLOCKCHANNEL
_ SETUPGO0£
• MOWBRAnis1
• _ RAriNG
• BLOCKRET1ORS
• FEATURES
• • ssirS.eck
• fa_ Code€off$€1 • •
.... i BLOCKCHANNEL
VSETUPCODE
• MOVIERATING
• 1"4RATIOV
• NT_E OPTIONS
1
I
i
• FEATURES
• " Sme_Lock
its
BLOCKCHANNEL
V SETUP CODE Wwse re-cor4i
• MOVIE RAriNG Hie code
• IV RARRG
• BLOCKOPTIONS
• FEATURES
• • Oma_Lnk
• • IoJtl Cede ChlUlpd
OLOOKCHANNEL
0_ CRDE
• ssVIE RAnRO
• IV RRllHO
• OLSCRRPIIGSS
• FEATURES
• • TIMER
A
VSma_l._k
..... • NG
• COVTP&IIT÷
• WR
• GLOSEUCAP
Smdi_viar
NWn €Od|
BLOCKCHANNEL
SETUPGOOE
MOVIERAnNQ
TU RATING
BLOCKOPTIONS
14
Page 15
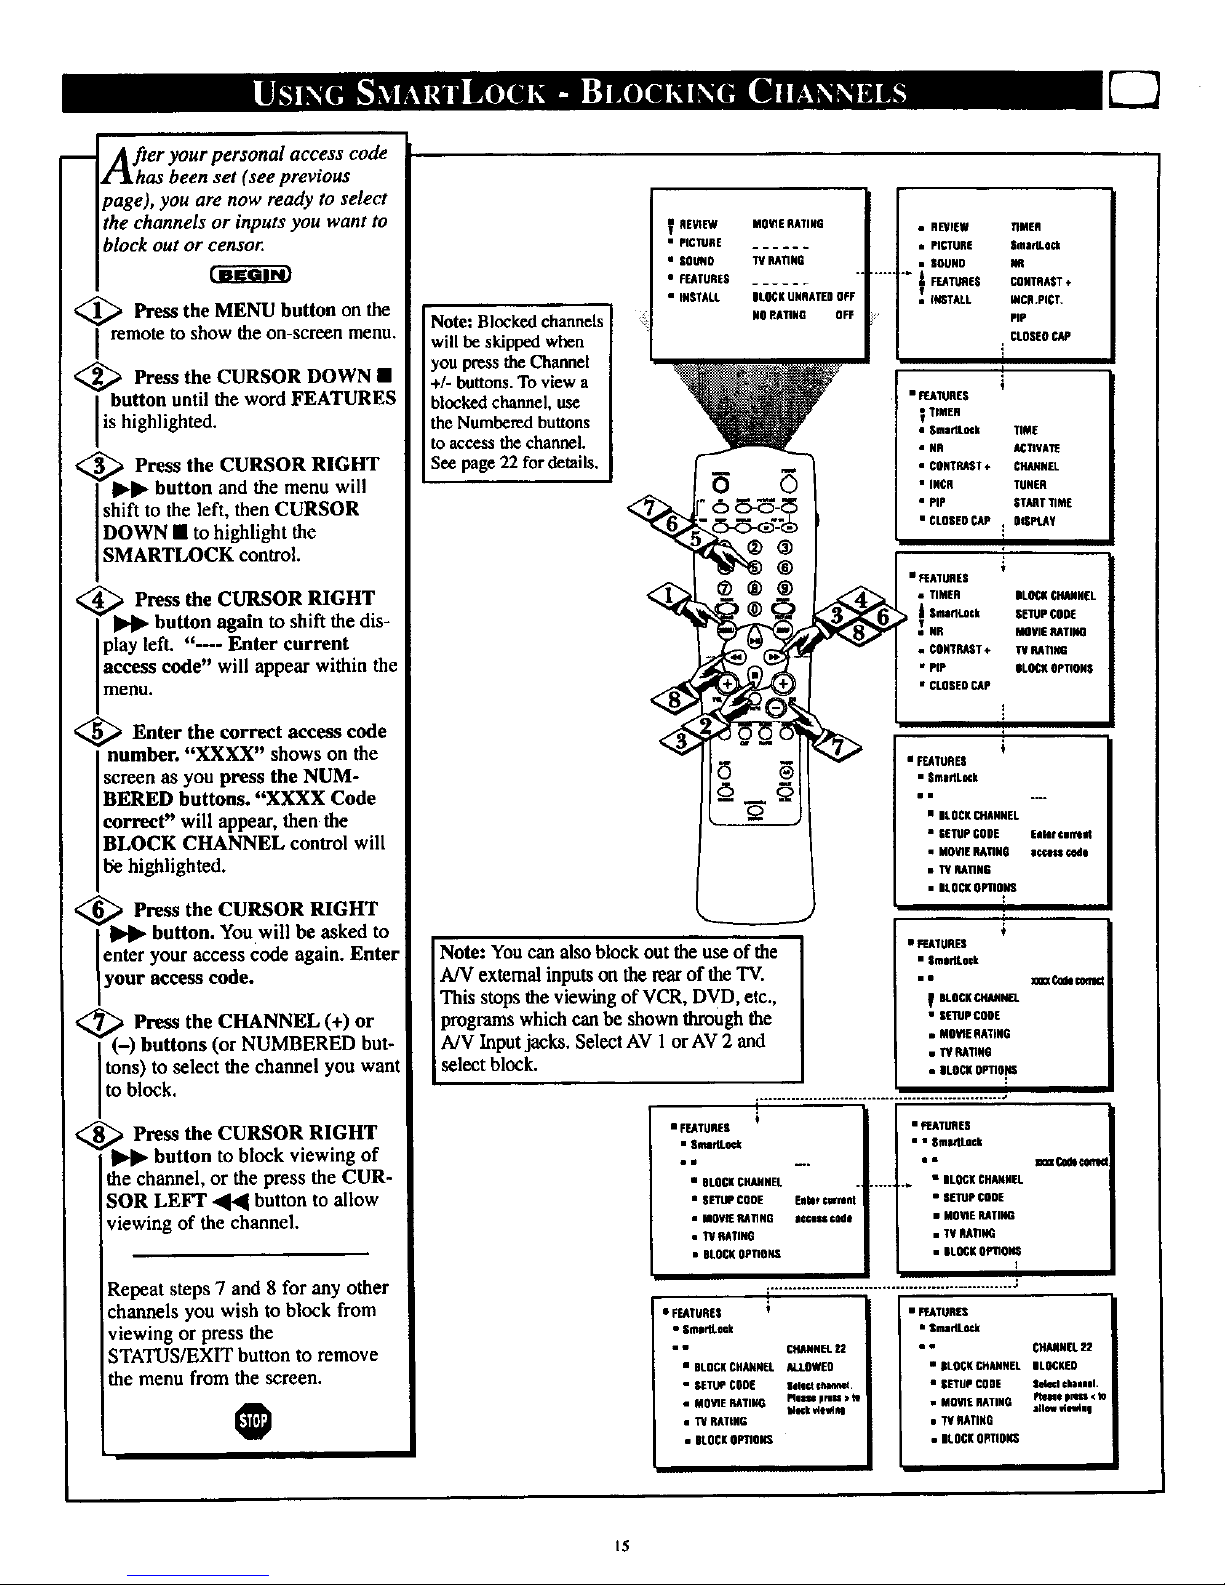
After your personal access code
as been set (see previous
page), you are now ready to select
the channels or inputs you want to
block out or censor.
<_ Press the MENU button the
on
remote to show the on-screen menu.
<_ Press the CURSOR DOWN •
button until the word FEATURES
is highlighted.
_: _ Press the CURSOR RIGHT
II_Jl_button and the menu will
shift to the left, then CURSOR
DOWN • to highlight the
SMARTLOCK control.
<_ Press the CURSOR RIGHT
["_ button again to shift the dis-
play left. "--- Enter current
access code" will appear within the
menu.
_uEnter the correct access code
n mber. "XXXX" shows on the
screen as you press the NUM-
BERED buttons. "XXXX Code
correct" will appear, then the
BLOCK CHANNEL control will
be highlighted.
_ Press the CURSOR RIGHT
button. Youwill be asked to
enter your access code again. Enter
your access code.
_ Press the CHANNEL (+) or
• (-) buttons (or NUMBERED but-
_ns) to select the channel you want
to block.
Press the CURSOR RIGHT
button to block viewing of
the channel, or the press the CUR-
;OR LEFT "441button to allow
viewing of the channel.
Repeat steps 7 and 8 for any other
channels you wish to block from
viewing or press the
STATUS/EXIT button to remove
the menu from the screen.
O
Note: Blocked channels
will be skipped when
you press the Channel
+/- buttons. To view a
blocked channel, use
the Numbered buttons
to access the channel.
See page 22 for details.
V REWEW
• PICTURE
• SOUN0
• FEATURES
• INSTALL
M0WE RATING
TV RA1TUG
BLOCKUNRATFDOFF
NORA_NG OFF
®®®
I
Note: You can alsoblock out the use of the
A/V external inputson the rearof the TV.
This stops the viewing of VCR, DVD, etc.,
programswhich can be shown through the
A/V Inputjacks. Select AV 1 or AV 2 and
select block.
i
+
t
• FEATURES
• SmIMLKk
ei
• BLOCKCHANNEL
• CETUPCODE
• MOVIE RATINO
• TV RAriNG
• BLOCKOPn0NS
i
• _ATURES
• Smar_ock
no
BLOCKCHANNEL
• SETUpCODF
• MOWERAWNG
• TVRAnN(J
• BLOCKOtWTlO_
t
• FEATUREA
• BLOCKCHAHHEC
• SETUPCOOF EnN_ cwrent
• MGV_ RA_NG access€ode
• TU RAFING
• BLOCK0P_OHS
• _EATUREV
• • Oma_LOck
• • _m Code€on1_
...... _ • BLOCKCHANNEL
• SETUPCOOE
• M0_E RATING
• TV RA_NG
• BLOCKOPllON$
1
• FEATURES
• S_dLOck
• • _ANNEL 22
• BLOCKCHANNFL ALI.OWE9
• SETUP COOF |ele_ chaone_.
• MO_E RATII_ _es_ press•
WKk _0
• TV RATING
• BLOCKOP_0k_
• F_ATUR_
• SmadLock
• • CHAKNBL22
• 0LOCK CHAHNEL DLOCKF0
• |_TUP COD[ Oe_ ¢haeel.
• MO_E RA11NG _e_€ p_ •
• 7VRATING
• BLOCK0PTIOKS
15
Page 16
[]
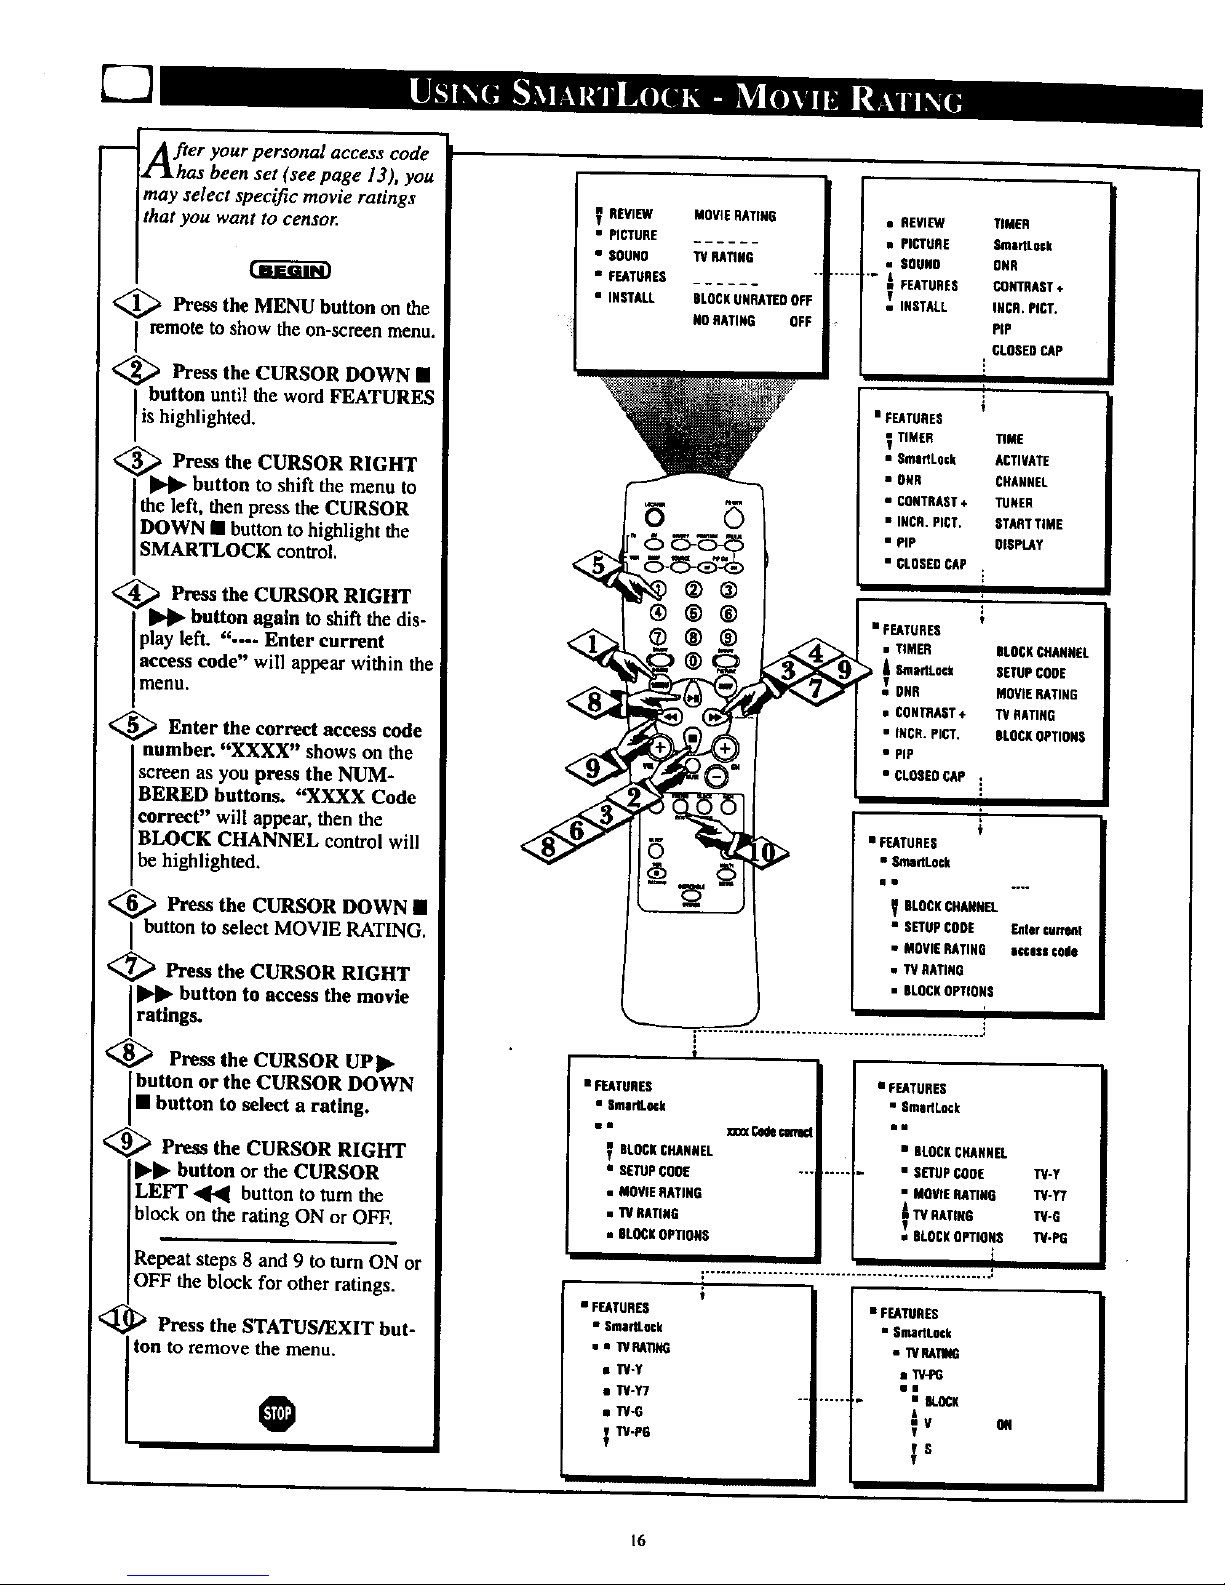
m _her your personal access code
as been set (see page 13), you
may select specific movie ratings
that you want to censo_
<_ Press the MENU button on the
remote to show the on-screen menu.
<_ Press the CURSOR DOWN •
button until the word FEATURES
is h ghlighted.
<
_ Press the CURSOR RIGHT
button to shift the menu to
the left, then press the CURSOR
DOWN • button to highlight the
SMARTLOCK control.
<_ Press the CURSOR RIGHT
I_ button again to shift the dis-
play left. ".--- Enter current
access code" will appear within the
menu.
<_ Enter the correct access code
number. "XXXX" shows on the
screen as you press the NUM-
BERED buttons. "XXXX Code
correct" will appear, then the
BLOCK CHANNEL control will
be highlighted.
<_ Press the CURSOR DOWN •
I button to select MOVIE RATING.
<_ Press the CURSOR RIGHT
I_l_ button to access the movie
ratings.
<_ Press the CURSOR UPI_
button or the CURSOR DOWN
• button to select a rating.
<_ Press the CURSOR RIGHT
I_ll_ button or the CURSOR
LEFT .4141 button to turn the
block on the rating ON or OFF.
Repeat steps 8 and 9 to turn ON or
OFF the block for other ratings.
<_ D Press the STATUS/EXIT but-
ton to remove the menu.
O
REVIEW
• PICTURE
• SOUND
• FEATURES
• INSTALL
MOVIERATING
'IV RATING
BLOCKUNRATEDOFF
NORATING OFF
• REVIEW TIMER
• PICTURE SmadLock
• BOOBS ONR
...... wi FEATURES CONTRAST*
-' INSTALL INCR.PICT.
PIP
CLOSEDCAP
[
!
• FEATURES v
TIMER TIME
• SmartLnck ACTIVATE
• OHN CHANNEL
• CONTRAST÷ TUNER
• INCR,PICT. STRNTTIME
• PiP OISPLAY
• CLOSEDCAP
• FEATURES t
• TIMER BLOCKCHANNEL
A EnnadLock SETUPCODE
T ONR MOVIEHATING
• CONTRAST + TV BATING
• INCR.PICT, BLOCKOPTIONS
• PiP
• CLOSEDCAP i
÷
• FEATURES
• S4,nadLock
f_ BLOCKCHANNEL
• SETUPCODE Entercurrant
• MOVIERATING |_esc code
• TV RATING
• BLOCKOPTIONS
....................................................... i
I "
!
• FEATURES
• Sma_L64k
ms
BLOCSCHANNEL
• SETUPCOOE
• MOVIERATING
• TUGATING
• BLOCKOPTIONS
• FEATURES
• Sma_ock
• • WHA_NG
• TV-Y
• TV-Y7
• W-G
TV-PG
• FEATURES
• SmoHLock
• n_(Codecat_ •0
• BLOCKCHANNEL
--, • SETUPCODE
• MOVIEHATING
ATVHATING
• BLOCKOPTIONS
!
• FEATURES
• SmadLock
• TVRATIG
• TV-P6
•i
..... • BLOCK
A
Tv _
VS
r
TV-y
TV-Y7
TV-G
TU-PG
16
Page 17
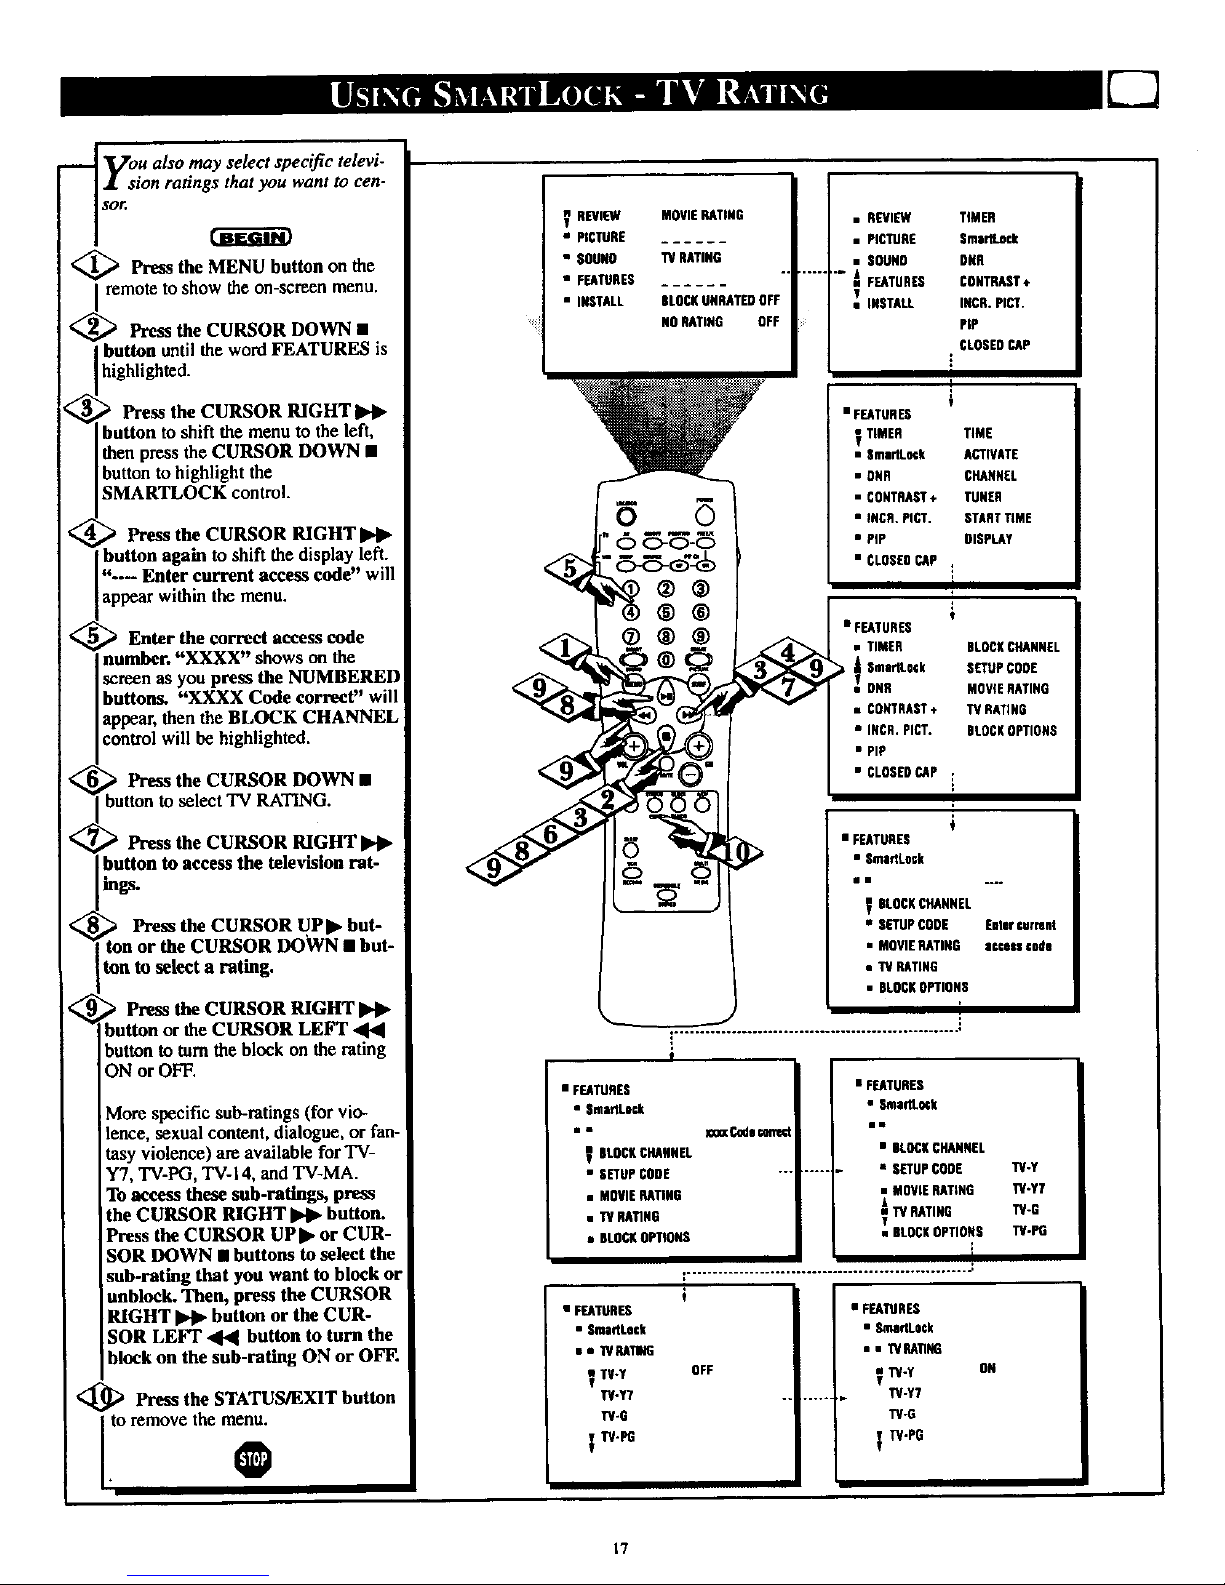
_ Vou also may select specific televi-
i sion ratings that you want to cen-
sor,
<_ Press the MENU button on the
remotetoshow theon-screenmenu.
Press the CURSOR DOWN •
button until the word FEATURES is
highlighted.
Press the CURSOR RIGHT
button to shift the menu to the left,
then press the CURSOR DOWN •
buttonto highlight the
SMARTLOCK control.
) Press the CURSOR RIGHT IPll_
button again toshift the display left.
"--- Enter current access code" will
appear within the menu.
Enter the correct access code
number. "XXXX" shows on the
screen as you press the NUMBERED
buttons. "XXXX Code correct" will
appear, then the BLOCK CHANNEL
control will be highlighted.
Press the CURSOR DOWN •
button to select 'IV RATING.
Press the CURSOR RIGHT
button to access the television rat-
ings.
_ Press the CURSOR UPIP but-
ton or the CURSOR DOWN • but-
ton to select a rating.
_ the CURSOR RIGHT
Press
p4_
button or the CURSOR LEFT "44
button to turn the block on the rating
ON or OFF.
V REVIEW
• PICTURE
•$OUNO
• FEATURES
• INSTALL
MOVIEHATING
TVRATING
KLOCRUNHATEDOFF
NOSATING OFF
®®
®®®
• REVIEW TIMER
• PICTURE $mtrlLo_
• SOUND DNR
..... t. FEATURES CONTRAST*
v INSTALL INCR.PICT.
PIP
CLOSEDCAP
i
I
• FEATURES
_ TIMER TIME
• SmadL_k ACTIVATE
• RNR CHANNEL
• CONTRAST* TUNER
• INCR.PIET. STARTTIME
• PIP DISPLAY
• CLOSEDCAP
I
)
t
• FEATURES
• TIMER BLOCKCHANNEL
A SnlertLock SETUPCOCE
•v DNR MOVIERATING
• CONTRAST, TV RATING
• INCR, PICT. BLOCKOPTIONS
• PiP
• CLOSEDCAP .
t
• FEATURES
• SmaflLock
BLOCKCHANNEL
• SETUPCODE
• MOVIERATING
• I"VRATING
• BLOCKOPTIONS
i
!
More specific sub-ratings(for vio-
lence, sexual content, dialogue, or fan-
tasy violence) are available for TV-
Y7, TV-PG, TV-I 4, and TV-MA.
To access these sub-rating_ press
the CURSOR RIGHT _ button.
Press the CURSOR UPI_ or CUR-
SOR DOWN • buttons to select the
• FEATURES
• SmadLeck
•m
SUOCKCHANNEL
• SETUPCODE
• MOVIERATING
• TV RATING
• BLOCKOPTIONS
• FEATURES
• Sma_Lo_k
• BLOCSCHANNEL
..... • SETUPCODE TV-Y
• MOVIERATING 1_-Y7
_TV RATING TV-G
• BLOCSOPTIONS TV-PG
!
sub-rating that you want to block or
unblock. Then, press the CURSOR
RIGHT _ button or the CUR-
SOR LEFT 41.4 button to turn the
block on the sub-rating ON or OFF.
<_ Press the STATUS/EXIT button
i
• FEATURES
• SmadLock
• * 1VBATh6
TV-Y OFF
TV-Y7
TV-G
TV-PG
• FEATURES
• SmadLock
• • WRA11NG
I_-Y DR
W-Y7
TV-G
W'PG
17
Page 18

After you block specific channels
or ratings, you must set j
BLOCKING to ON or OFF in order
to activate the blocking. To set
BLOCKING to ON or OFF, follow
these steps.
_ Press the MENU button on the
remote to show the on-screen
menu.
<_ Press the CURSOR DOWN •
button until the word FEATURES
is highlighted.
•_ Press the CURSOR RIGHT
button to shift the menu to
he left, then press the CURSOR
DOWN • button to highlight the
SMARTLOCK control.
_ Press the CURSOR RIGHT
I_ button again to shift the dis-
-- Enter e rrent
)lay left. "- u
access code" wilt appear within the
menu.
_1 _ Enter the correct access code
number. "XXXX" shows on the
screen as you press the NUM-
BERED buttons. "XXXX Code
correct" will appear,then BLOCK
CHANNEL will be highlighted.
> Press the CURSOR DOWN •
button to select BLOCK
OPTIONS.
,,_ Press the CURSOR RIGHT
button to shift the menu to
the left and see the options.
BLOCKING will be highlighted.
_ Press the CURSOR RIGHT
_1_ button or the CURSOR
LEFT _ button to set
BLOCKING to ON or OFF.
<_ Press the STATUS/EXIT but-
ton to remove the menu.
@
REWEW
• PICTURE
• $OUNO
• FEATURES
• INSTALL
MOVIE RATING
TV RATING
BLOCSUSRATEOOFF
NORATING OFF
®®
®®
®®®
• REVIEW TIMER
• PICTURE SmprlLock
• EOUNO ONE
A FEATIJSEB CONTRAST*
_-iNSTALL JNCS_PICT_
_P
CLUE• GAP
!
I
• FEATURES
_ nnn_
• OmatlLock liME
• GNR ACTIVATE
• CONTR_T + _NEL
• INCR.PICT TUNER
• nP EINRTriME
• CLOS_G_ _ OI$PEAY
II
V
• Et_AllmES
• TIMER ELOCKC_RNEL
_atS.Q_t I_UP GQOE
ONR MOVIERATING
• CONTRAST÷ 1¥ RATING
• INCR.PICT. |LOGS OPTIONS
• MP
• _.OSEO CAP i
m
€
• FEATURES
• Sl_ar_.Dt'l
• a __
_ SkOCKC_41_NEL
• on'uP CODE Emer_rre_
• MOVIERATINO accass €Oil
• W SAnSS
• BLOCKoPnos$
!
• _EJLTUBES
• S_ltrtLotk
V ELOCKCHANNEL
• CTmP COOt
• MOVIERATING
• _ RAnN6
• SLOCNOPTIONS
• FEATURES
• S mlldLKk
• BLOCK CHANNEL
..... " SETUP COOE
• MOVIE RAriNG BLOCKING
• TV RATING BLOCK UNRATEO
ELOCR OP_O_ NO _9
I
...................................................... J
• FEATURES
• SmartLock
• • KO_ OPTIONS
BLOCKING OFF
• NO RATING
• FEATURES
• $mllfl_oek
=• BLOCROPTIORA
•g
_BLOCKING ON
•Nt.GCNQtARAT_O
• NO RA_NG
18
Page 19

In addition to blocking specific
atings or channels, you may
choose to block all programming
that is unrated. (See explanation on
page 12.)
<_ Press the MENU button on the
remote to show the on-screen
menu.
<_ Press the CURSOR DOWN []
button until the word FEATURES
is highlighted.
Press the CURSOR RIGHT
_l_ button to shift the menu
the left, then press the CURSOR
DOWN [] button to highlight the
SMARTLOCK control.
Press the CURSOR RIGHT
_., button again to shift the dis-
play left. "---- Enter current
[access code" will appear within the
i menu.
_ Enter the correct access code
number. "XXXX" shows on the
screen as you press the NUM-
BERED buttons. "XXXX Code
correct" will appear, then BLOCK
CHANNEL will be highlighted.
4> Press the CURSOR DOWN •
button to select BLOCK
OPTIONS.
_ Press the CURSOR RIGHT
ll_ button to shift the menu to
the left and see the options.
BLOCKING will be highlighted•
'_ Press the CURSOR DOWN •
button to select BLOCK UNRAT-
ED.
-,_"_ Press the CURSOR RIGHT
_lb button or the CURSOR
LEFT "41"41button to set
BLOCK UNRATED to ON or
OFF.
<_ _ Press the STATUS/EXIT but-
ton to remove the menu.
O
REVIEW MO_E RATING
• PICTURE
• SOURO TVRATIRO
• FEATURES °
• INSTALL DtOCKUNRATI[UOFF
NO RATING OFF
• FEATURU
• SmldL+_
mR
_ ULO_ CRlUlNF.L
• SETUPgOOE
• MO'UERATING
• OLOUKO_IONS
• R_[W TIMER
• PICTURE SmdLOck
• SOUND DNR
" _ FEA[URES CONTRAST+
IHUTALL INCR,PICT.
Pip
CLOSEDCAP
i
I
• FEATURES
_ nM£R TIME
• Smlrit o_ ACTIVATE
• OSR €HI.tEL
• CORTSP,_T+ TUR[R
• INCR.PI_. STARTTIME
• _ RaPLA¥
• CLOEERS_ _
I
• FEATURES
• SmadLock
• • 8LO_UP_m
BLOCKING ON
• BLOCK UNRATER
• NO RATIHU
T
t
• FEATURES
• SmaflLo_
BLOCKCHANHEL
• SETUP UOOE EMer current
• MO_E RATING a¢cen ctde
• T¥RA_NU
• BLOCKOPROMS
[
I
• FEATURES
• SIIIIRLOcE
• BLOCKCHANNEL
.... • SETUPCORE
• MOVIE RATER BLOCKINU
• TV RATMU BLOCS UNRATEO
BLOCK OPTIONS NO RATING
F
19
• FEATURES
• • ILOEAOP_O_
• RLOCIQNG
_ULU_ UNRATEO
• NORAHRU
ON
Page 20
ii
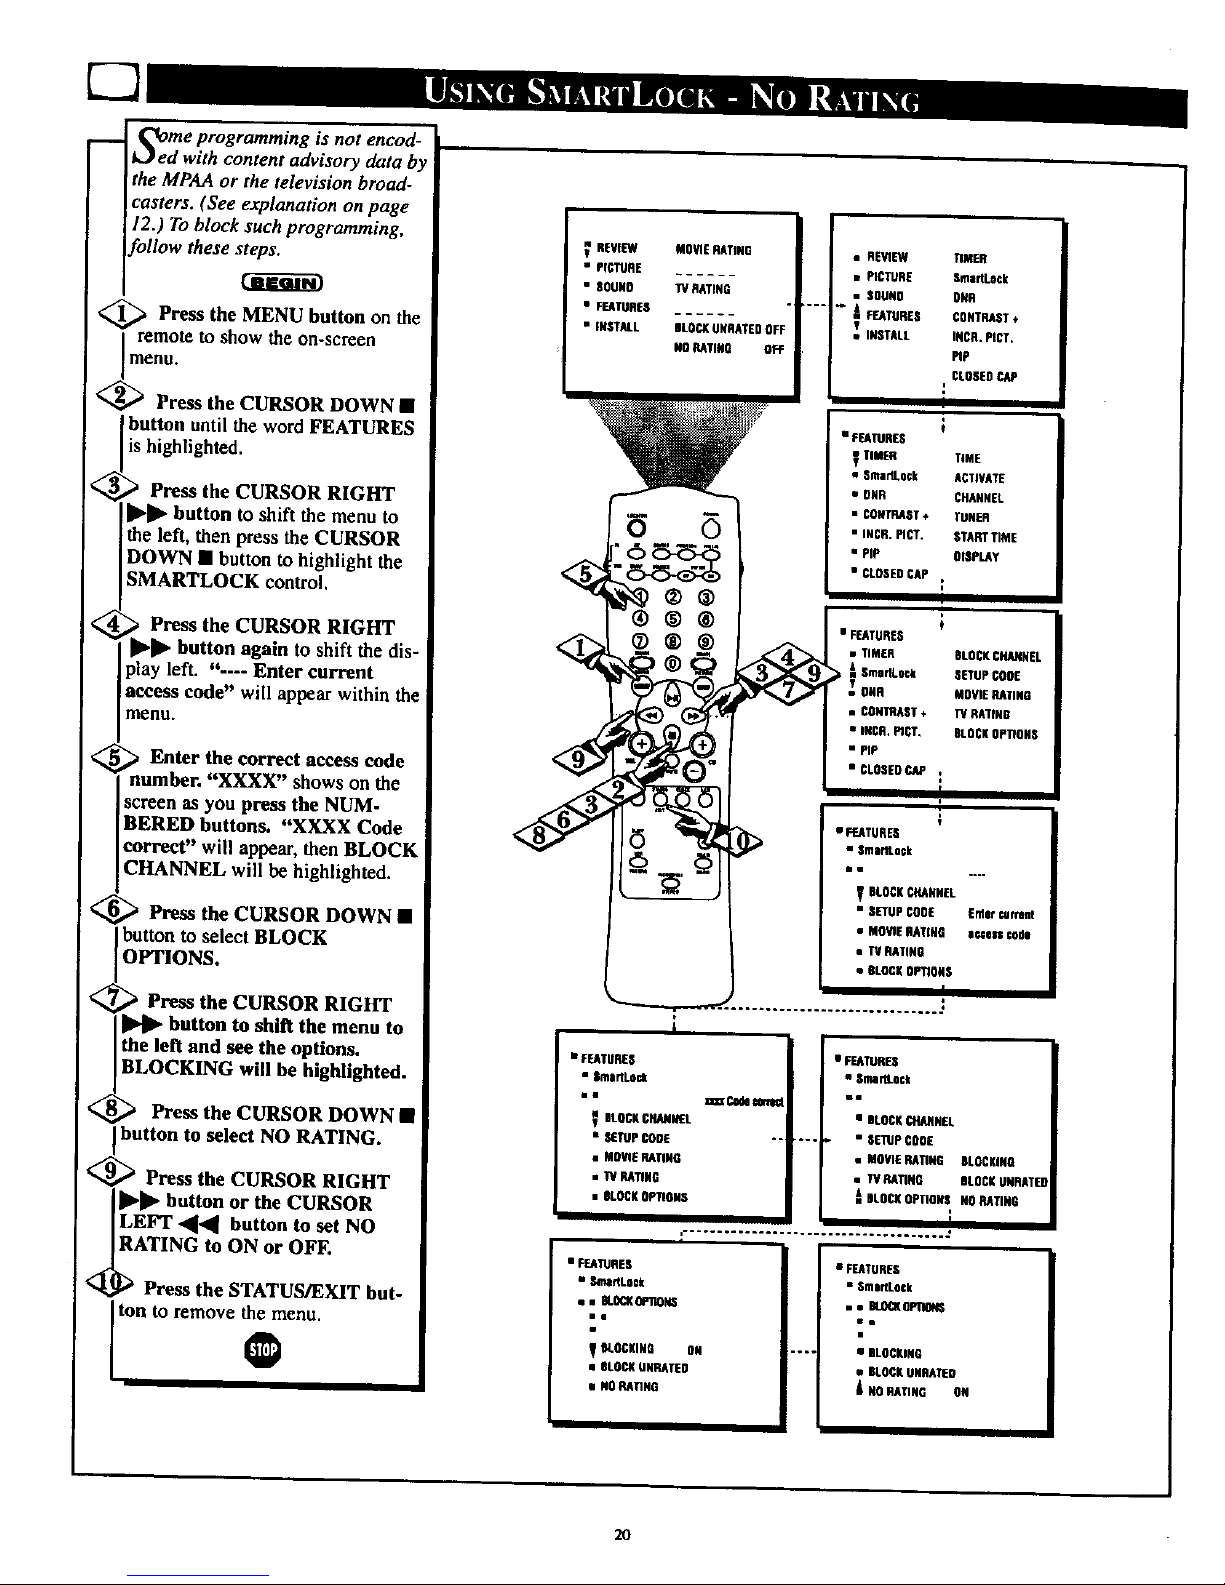
_ome programming is not encod-
_ed with content advisory data by
the MPAA or the television broad-
casters. (See explanation on page
12.) To block such programming,
bllow these steps.
<_ Press the MENU button on the
remote to show the on-screen
menu.
<_ Press the CURSOR DOWN •
button until the word FEATURES
is highlighted.
Press the CURSOR RIGHT
[l_lll_button to shift the menu to
the left, then press the CURSOR
DOWN • button to highlight the
SMARTLOCK control,
, Press the CURSOR RIGHT
Ibll_ button again to shift the dis-
lay left. "---- Enter current
eeess code" will appear within the
menu.
Enter the correct access code
number. "XXXX" shows on the
screen as you press the NUM-
BERED buttons. "XXXX Code
correct" will appear, then BLOCK
CHANNEL will be highlighted.
Press the CURSOR DOWN •
button to select BLOCK
OPTIONS.
Press the CURSOR RIGHT
button to shift the menu to
the left and see the options.
BLOCKING will he highlighted.
Press the CURSOR DOWN •
button to select NO RATING.
<_;_" Press the CURSOR RIGHT
]l_ll_ button or the CURSOR
LEFT ._,_ button to set NO
RATING to ON or OFF.
<_ _ Press the STATUS/EXIT but-
ton to remove the menu.
REVIBW
• PIGTU_B
• SOONO
•FFATUN[S
• INSTALL
• FF.ATURS$
MOVIE RATINE
TV RATINE
BLOCKUNRATED OFF
NO RATINO OFF
0
@®
®®
®®®
• Stair•Lock
V DLOCKC_EL
• SOTUP_OE "-
• MOVIERAriNG
• "IVRATING
• OLOOKOPTIONS
• FEATURES
• Stoat•Lock
• • OLOCKOF_O_
l|
• REVIEW TIMER
• PIL'TURB OmartLock
• SOUND ONR
""" _ E[ATURES OOU11_ST
_ INSTALL INCR.PICT.
Iqp
CLOSEOCAP
[
i
t
• f ra_lUROS
VTIM_ TIME
• Sma_.ock ACTIVATE
• UNR CHANNEL
• CONTRAST+ tUNER
• INCR._. I,_A_I T_E
• PIP O_P_Y
• CLOSEDCAP
I
I i
• F_TURDS
• TIMER BLOCKCHANNEL
L_ SmaHLOCk SETUPCOOE
m
TONN MOWERATING
R OONII_!_ST_ 'N N_G
• INCR._'. BLOCKOPnONS
• PIP
• CLOSEDCAP :
BLOCKING ON
• BLOCKUNI_TEO
• NO RATING
• FEATURES
• Omit•Lock
ai• .._
V BLOCKCHANNEL
• SETUPCODE Erllercu_rent
• M_O _ATI_ a_l_ €ode
• TV RATING
• 8LOCKOP_ONS
20
• FCKT,,5_.S
• Sma_Lock
Be
• BLOCK CHANNEL
*-. • SETUPCOOE
• MOVIE RATING BLOCKING
• IV RATING BLOCKONRATED
-L BLOCK OPTIONS NO RATING
• BLOCKING
•BLOCKU_RAT_O
NORAT•NO ON
• FEATURES
• SmldLo|k
,, • BLOCKOPOONS
in
i
Page 21

_A reviewscreen to
is available
l"Xremind you which ratings you
have blocked and which Block
Options you _ted.
_ Press the MENU button the
on
remote to show the on-screen menu.
REVIEW should be highlighted.
The ratings that you have blocked
will appear on the right side of the
menu.
If you have blocked specific sub-rat-
ings, such as Vfor Violence in the
TV-PG category, these blocked sub-
ratings will not appear in the
review. However, the sub-ratings are
still blocked according to your
selections.
If a sub-rating (such as V) is
blocked but the main category (such
as TV-PG) is not, the category will
not appear as a blocked rating in
the review. However, the sub-rating
is still blocked.
<_ Press the STATUS/EXIT but-
I ton to remove the menu.
0
Example:All ratingsareblocked and
all BLOCK OPTIONS are ON.
n REVIEW MOVIEDATING
• PICTURE GPGPG13R NCITX
• SOUND 1VRATING
• FEATURES YYTGPG14MA
• INSTALL BLOCKUNRATEDON
HORATING ON
V
Example:Someratingsare blocked anl
some BLOCKOPTIONS are ON.
V REVIEW MOVIERATING
• PICTURE - - _ R NC17X
• SOUND IV RATING
• FEATURES - _ _ PG 14 MA
• INSTALL BLOCKUNRATIEOON
NORATING OFF
V
Example:BLOCKING issetto OFF.
REVIEW SMARTLOCKOISABLEO
• PICTURE
• SOUND
• FEATURES
• INSTALL
"-v
21
Page 22

[]
m
V_ppiOUs on-screen messages will
ear when someone tries to
view blocked programming. Shown
here are examples of these mes-
sages. The message is determined
by how the current programming is
blocked. You may view the blocked
programming and turn off the
SmartLock feature by entering your
access code.
_p Aecess a channel directly by
tossing the Numbered buttons
on the remote control.
If the programming is blocked, a
message will appear on the screen,
indicating whether the program is
blocked because of its rating, the
channel, oryour selected blocking
options.
<_ Press the Numbered buttons
to enter your personal access
code.
If you do not know the code, you
must press the Channel +/- buttons
to select another channel. You can
not use the Numbered buttons to
select another channel at this time.
Once you enter the correct
personal access code, all blocked
channels and programming will
be viewable until you turn off the
TV power.
When you turn on the TV again,
the SmartLock blockings will be
restored.
o
@®®
®®
®®®
I| blellei.
CHANNEL22
Bilked by W/MOVIE unrated
Ill le ON.
CHANNEL22
Blockedby W/MOVIE no raUq
All okanne_| oil0 b4 vhnNd
enBI TV IS timed idl.
22
Page 23

i
Due to reasotm suo_ as poor cable
reception, the picture can some-
time appear slightly "speckled" (signal
noise in the picture). The DNR
(Dynamic Noise Reduction) control can
help eliminate this type of interference
and improve the quality of the picture.
<_ Press the MENU button on the
remote to show the onscreen menu.
<_ Press the CURSOR DOWN •
button until the word FEATURES is
highlighted.
<_ Press the CURSOR RIGHT
] button and the menu will shift to the
[left, TIMER will be highlighted.
<_ Press the CURSOR DOWN • to
[ highlight the DNR control.
_ Press the CURSOR RIGHT
[ button again to highlight the DNR
]option area.
<_ Press the CURSOR UP • or CUR-
SOR DOWN • buttons to tam the
DNR feature ON or OFF.
SEVaW MOrt[ EATING
• PlgreRS ......
• SOUND TV RATING
• FEATURES ......
• INSTALL BLOCKUNRATEOOFF
• REVIEW • _.AT_NF. s
in
• PICTURE TIMI_
• SUUNO SnadLeCk _ TIMES TInE
I FT.ATUSEV • SmarlLock ACTIVATE
ONN
• OUN CHANNEL
• INSTALL INCR. PICT.
• CONTUAST* TUNES
Pig
CLOSESCAP m m- • INCR.PICT. STARTrIME
[--
• rEATURES • FEATUSES
ON •ON
l _r_he Contrast +feature helps to
At "sharpen the picture quality. The
black portions of the picture become
richer in darkness and the whites become
brighter. _ *
<_ Press the MENU button on the
remote to show the onsoreen menu.
<_ Press the CURSOR DOWN • but-
ton until the word FEATURES ishigh-
ighted.
<_ Press the CURSOR RIGHT
button and the menu will shift to the
eft. TIMER w be high ghted.
<_ Press the CURSOR DOWN • but-
ton to highlight the CONTRAST + con-
trol.
_ Press the CURSOR RIGItT 1_
button again to highlight the CON-
TRAST + option area.
<_ Press the CURSOR UP • or CUR-
SOR DOWN • buttons to turnthe
CONTRAST + feature ON orOFF.
<_ Press the STATUS/EXIT button to
I remove the menu from the screen.
RI[VIEW MOW[ RARING
• PICTURE ......
• SOUND TV NSltNG
• FEATURES ......
• INSTALL ilLOCKUNRArED OFF
NORATING 0_
i
®®®
• REVIEW TIMES
• PICTUflE SmaTUod(
• SOUND ONS
_ FEA_IREV CONn_sr ÷
• I_TAI.L INCR. FICr.
FtP
_ OLEAED CAP
• FEATUSES
Ul
• 1UNEA
• SmarP_;k
o_
_ C_SAST 4
1
ON
• FEATURES
In
nuEo riME
• $n_ ACTIEA_
• ONS CNSNN_
• CONTUNST÷ TUNER
• INCR. PICT, SrEAT rIME
m i p- _ rip DIl_r
I
• FEATURES
ill
• TIMES
• Sm|rlLock
4iP-• CONTRAST÷ "ON
• INCR. PIC].
• nP
• INCR. PICT.
nP
r
• FEATUNEV
•m
• rIMES
• Sma_
• ONR
• CONTRAST• mOFF
• UCR. PICT,
PIP
r
23
Page 24

w
rhehe Incredible Picture feature
Ips to "sharpen' the picture
quality. The black portions of the
picture become richer in darkness
and the whites become brighter.
<_ Press the MENU button on the
remote to show the onscreen menu.
<_ Press the CURSOR DOWN •
button until the word FEATURES
is highlighted,
_'_ Press the CURSOR RIGHT
button and the menu will
shift to the left, TIMER will be
highlighted.
Press the CURSOR DOWN •
to highlight the INCR. PICT. con-
trol.
<:_ Press the CURSOR RIGHT
button again to highlight the
INCR. PICT. option area.
<_ ) Press the CURSOR UP_-or
CURSOR DOWN • buttons to
turn the INCR. PICT. feature ON or
OFF.
O
REVIEW
• PICTImE
• COUSS
• FEATURES
• INSTALL
MOVN!RATING
TVRATING
DLOCKUNRATEOOFF
NORATING OFF
®®®
• R£VtEW
• PICTURE
• _UNB
_ FEA_RES
• tNSI_.
TIMER
SmattLock
RNR
CONTRSST+
INCR.P_T.
PIP
CLOSEDCILP,
• FEATURES
ill
• SmsdLock AC_VATE
• 9_ CItAN_L
• CONTIIACT* TUNER
i • IN_. PtCT. STARTTtM_
_ PIP OISPLAY
• FEATURES
lil
• TIMER
• $ioartLock
• OSS
• CONTRAST*
_IN_. PICT. ON
_ PIP
• FEATURES
ii
• TIMER
• Sma_Lock
• OflR
• UONTRAS1+
• INCR. PICT. • ON
u _AIU_
HI
• TIMER
• SmarlLock
• DNR
• CONTRAST+
• INCR. PICT.
PIP
• OFf
24
Page 25

m
Closed Captioning (CC) allows
u to read the voice content of
television programs on the TV
screen. Designed to help the hear-
ing impaired, this feature uses
onscreen "text boxes" to show dia-
logue and conversations while the
TV program is in progress.
<_ Press the MENU button on the
remote to show the onsereen menu.
<_ Press the CURSOR DOWN •
button until the word FEATURES
s high ghted.
<_ Press the CURSOR RIGHT
•• button and the menu will
shift to the left, TIMER will be
highlighted.
@ Press the CURSOR DOWN •
to highlight the CLOSED CAP
<
control.
_ Press the CURSOR RIGHT
• • button again to highlight and
choose either CAPTION MODE or
TEXT MODE.
_ Press the CURSOR RIGHT
button again to highlight the
CAPTION MODE or TEXT
MODE options area.
<_ Press the CURSOR • or
LIP
CURSOR DOWN • buRons to
select the CLOSED CAPTION
option you want.
CAPTION MODE: CCI, CC2,
CC3, CC4, CC MUTE, or OFF
- dialogue (and descriptions) for the
action on the captioned TV program
shows onsereen.
TEXT MODE: TXTI, TXT2,TXT3,
TXT4, orOFF
- often used for channel guide, sched-
ules, or bulletin board information
forCC programs.
O
NOTE: Not all TV programs and product commercials are made for broadcast
with Closed Caption (CC) information included. Neither are all Closed Caption
modes (CAPTION 1-4, or TEXT 1-4) necessarily being used by a broadcast station
during the transmission of aclosed caption program. Refer to your area's TV pro-
Lgram I st rigs for the stat ons and t rues of C osed Capt on shows.
V REVIEW
• PICTURE
• SOUN D
• FEATURES
• INSTALL
CAPTION mode
Example Display
MOVIE RATING
TV RATING
OLOCKUKRATEOOFF
NO PARING OFF
®®®
®®
• REVIEW
• PICTURE TIMER
• SOUND Smadtock
FEATURES DNR
• INSTALL CONTRAST÷
INCR.PI_.
PIP
_ CUISEDCAP
• FEATURES
_ UMER TIME
• _r_k ACTIVATE
• OOO CMEL
• CONTRAST* TUH_
• INCR._CT. STARTTIME
_ PIP DISL_A_Y
,_, • v
•l
• OflR
• CONTRAST *
• INCR. PICT.
• PiP
A gLOSEO CAP
The CC button on the
remote call also be used
to enter the CLOSED
CAPTION menu
options directly.
TEXT mode Example Display
"IV screen will be
blocked from viewing
CAPTIO#MODE
TEXTMODE
• • CLOSEDCAP
vnCAPTION MODE OFF
i
• TEXTMODE
• • CLOSEDCAP
• CAPTION MORE • CC1
• TEXT MORE
• • CLOSERCAP
• CAPTIONMODE
• TEXTMODE
•TXT1
NOTE: The CC MUTE option
can be used to set the TV to
turn the Closed Caption mode
"ON" whenever the MUTE but-
ton on the remote is pressed.
25
Page 26

H_roVe you ever fallen asleep in
nt of the TV only to have it
wake you up at two in the morning
with a test pattern screeching in
your ears? Well, your TV can save
you all that trouble by automatical-
ly turning itself off
BEGIN
<_ Press the SLEEP button the
on
remote control and the SLEEP timer
oascreen display will appear in the
lower center of the screen.
<_ Press the SLEEP button
repeatedly to pick the amount of
time (15 minutes to 2 hours ahead)
before the TV will turn itself off.
An onscreen count down will appear
during the last minute before the TV
shuts itself off.
0
SLEEP0
5
@®®
®®®
SLEEP15
SLEEP30
SLEEP45
SLEEPGO
ILEEP 75
SLEEP90
SLEEp105
SLEEP120
During the last minute of a SLEEP_
rimeT setting, an oftscreen count
down will he displayed.
Jl_ SLEEP58
I
GOOO BYE
SUEEP !
During the last I0 _conds of a
-- SLEEP timer setting, an onscreen
display will read GOOD BYE.
26
Page 27

m
Besides the normal volume level
control, your TV also has indi-
vidual sound adjustment controls.
The TREBLE (high frequency),
BASS (low frequency), and Speaker
BALANCE may all be used to
adjust the sound playback of TV
7rograms.
@>Press the MENU button on the
Iremote to show the onscreen menu.
<_ Press the CURSOR DOWN •
button until the word SOUND is
h ghlighted.
_ Press the CURSOR RIGHT
I_ll_ button and the menu will
shift to the right to display an
adjustment bar in front of the TRE-
BLE control.
@Use the CURSOR LEFT
or RIGHT I_ll_ buttons to adjust
the TREBLE (high frequency)
evel of the television's sound.
<_ After adjusting the TREBLE
control, press the CURSOR
DOWN • button to select another
Sound adjustment; BASS or BAL-
ANCE. Use the CURSOR LEFT
or CURSOR RIGHT
buttons to adjust the selected con-
trol.
@
V REVIEW
• PICTURE
• soogo
• FEATURES
• INSTALL
MOVIE RATING
TURATING
BLOCKUNRATEOOFF
NORATING OFF
8
®®
®®®
®®®
• REVIEW
• PICTURE
_ SOUND
• FEATURES
• INSTALL
i •SOUND
mESLE
BASS
BALANCE
AVL
STEREO
a_n_ 28 TREBLE
T
BASS
8ALANCE
• AVL
STEREO
• SOUND
• _ TREBLE
21 BASS
_T BALANCE
AVL
STEREO
•SOUND
• TUESLE
BASS
_,a_ O BALANCE
f
AVL
STEREO
27
Page 28

your TV can receive broadcast
tereo TV programs, The TV
has both an amplifier and twin
speakers through which the stereo
sound can be heard.
<_ Press the MENU button on
the remote to show the onsereen
menu. PICTURE will be high-
lighted.
__ Press the CURSOR DOWN
[ • button to select the SOUND
] menu.
<_ Press the CURSOR RIGHT
button and the menu will
shift to the right to display an
adjustment bar in front of the
TREBLE control.
<_i Press the CURSOR DOWN
button to select the STEREO
contro.
5_ Use the CURSOR LEFT "41"4
or RIGHT _ buttons to select
STEREO or MONO. With
STEREO selected the television
will reproduce any stereo broad-
cast signal it receives.
@
SAP is an additional part of the
stereo broadcast system. Sent as a
third audio channel SAP can be
heard apart from the current TV
program sound. TV stations are
free to use SAP for any number
of purposes, but many experts
believe it will be used for foreign
language translations of TV
shows (or for weather and news
bulletins.)
If a SAP signal is not present
with a selected program, the SAP
option cannot be selected. Also, if
SAP is selected on a channel
(with SAP) and you select anoth-
er channel, when you return to
the original channel SAP will be
OFF (and you will have to rese-
lect the SAP feature.)
REVIEW
• PICTURE
• $OUNO
• FEATURES
• tNST_
MOVIE RATING
TV RATING
Bt.OCSURRATEROFF
NORATING 0L
®®®
®®®
• REVIEW
• PICTURE TREBLE
SOUND BASS
• FF_TUflES RALANCE
• laBTALL R_.
STEREO
m_
• SOUND
STEREOi
• SOUND
•
MORR _
I
TRERLE
BASS
BALANCE
RVl,.
STEREO
TREBLE
BASS
RALASCE
AVL
STEREO
V REVIEW MOVHERATING
• PICTURE ......
,• |RUN0 TV RATING
• FF,AnI_E$ ......
• fdaSTALL BLOCKUNRATEOOFF
NORATtN8 _FF
•,- l
TREBLE
OALANC|
ITERIEO ITEREO
• REVIEW
• PICnlNE TR£OLE
_ |RUNG pASs
• FEAIIlRn &_NCE
• INSTALL AYt.
$1EREG
I
)
*|OUNG
• : !
DALN4CE
AVl,
STEREO
lAP
q
Page 29

Tahe Incredible Stereo feature
dds greater depth and dimen-
sion to both monaural (MONO)
and stereo TV sound. With the con-
trol turned ON the TV's speakers
can add even wider sound separa-
tion to normal broadcasts.
<_ Press the MENU button on the
I remote to show the onscreen menu.
<_ Press the CURSOR DOWN •
button until the word SOUND is
highl ghted.
<_ Press the CURSOR RIGHT
_I_ button and the menu will shift
to the right to display an adjustment
bar in front of the TREBLE control.
Press the CURSOR DOWN •
button to select the INCR.
STEREO control.
<_Use the CURSOR LIPID"or
REVIEW MOVIE RATING
• FICIUR! ......
• $OUNB TV RATING
• FEAIUREI ......
• iNSTALL IILOCKUNRATEO OFF
NORATING OFF
• REVIEW
• PICTURE TRntL[
• FEATURES _gE
• I#STALL AR
STEREO
aSOUNO
DOWN • buttons to turn this fea-
ture ON. @
TREBLE
IIALANC_
i
Z_EREO STEREO
"$OUNO
• • [
t AVL
STEREO
SAP
ON _ $_KER$
INCR. S'_[IIEO
°80UND
OFF
AVk
STEREO
SAP
SPEAKF.RS
INCR. STEREO
Use the Volume Bar control to see
the TV s volume level setting on
the TV screen. The Volume Bar will
be seen each time the VOLUME but-
tons (on the TV or remote) are
_ressed.
_ Press the VOLUME (+) or (-)
buttons on the remote to show the
VOLUME bar display onscreen.
Press the VOLUME (+) or (-) but-
tons again to adjust the television's
sound level.
O
Try it out.
Press the VOL (+)
and (-) buttons. The
VOLUME BAR
should appear near
the bottom center of
the screen.
29
When the TV signal is MONO, SPATIALwill appear omcreen when the INCREDI-
BLE STEREO button is pressed. When the signal is STEREO, INCR. STEREO will
appear onscreen when theINCREDIBLE STEREO buil_ is _'-'c:,sed.
Page 30

<
W:uld you like to hear TV pro-
rams through your audio hi-
fi system? The TV's Audio Output
jacks and TV Speaker On/Off con-
trol work together to offer you this
TV sound option.
_'_ Connect the R(ight) and
_- L(eft) AUDIO OUT jacks on
the TV to the R and L Audio Input
jacks on your amplifier or sound
system. Set the audio system's vol-
ume to normal listening level.
,_ Turn the TV and audio system
ON. You can now adjust the sound
level coming from the audio sys-
tem with the VOLUME (+) or (-)
buttons on the 'IV or remote.
<_ To hear the TV sound from
only the audio system speakers.
Press the MENU button on the
remote to show the onscreen menu.
<_ Press the CURSOR DOWN •
button until the word SOUND is
h ghl ghted.
<_ Press the CURSOR RIGHT
I I_ll_ button and the menu will
shift to the right to display an
adjustment bar iDfront of the
TREBLE control.
<_ Press the CURSOR DOWN •
I button to select the SPEAKER
control.
Use the CURSOR RIGHT
I_IP" or CURSOR LEFT '41"4
buttons to select turn the televi-
sion's speakers OFF. You should
now only hear 'IV sound coming
from the audio system speakers.
O
V REVIEW MOVIE RATING
• PICTURE
• SOUND 'W RATING
• FEATURES
• INSTALL BLOCKUNRATEO OFF
NORATING
®®®/
JACK PANEL
• REVIEW
• P1CTURE TREBLE
SOUND BASS
• FEATURES BALANCE
• _STALL AVL
OFF STEREO
I •SOUNO i
• a 11_EBLE
BASS
BALANCE
AVL
STEREO_ STEREO
I reSOUND
• • A
• A= BALANCE
AVL
: STEREO
SAP
OFF _ SPEAKERS
LOCATED ON THE REAR OF
TIlE TELEVISION
RCAPHONO
AUDIO OUT (RED/WHITE)
[]
©
0
©
AUDIO SYSTEM
30
Page 31

By adding optional external
speakers to the TV's sound sys-
tem, you can create the feeling of
reflected sound that surrounds you
at a movie theater or concert hall.
<_ Connect both external speak-
ers to the speaker wire terminals
on the TV.
Recommended speakers: 8 ohm,
15 watt minimum. Be sure the (+)
and (-) speaker wires are connect-
ed to the correct R(ight) and L(eft)
speaker terminals on the TV.
<_ Place the so the
speakers
viewing area is between the TV
and the rear surround speakers.
(See overhead view drawing.)
<_ Turn the TV and
the
STEREO control ON.
After setup whenever a stereo sig-
nal is received the audio will be
heard in Surround Sound.
@
BACK OF "IV
r_
REAR SURROUND SOUND SPEAKERS
Note: The lear Sueround Sound speakers will not be
heard at Ihe same volume level as the front "IV
speakers. It is intended for the rear speakers to give a
backgt_ound noise effect which requires a lower vol-
ume level than the TV's front speakers.
"IV
REAR SPEAKER
[_ PRIMARY VIEWING AREA
REAR SPEAKER
31
Page 32

The TV's AudiolVideo Input jacks
are for direct picture and sound
connections between the TV and
a VCR (or similar device) that
has AudiolVideo Output jacks.
<_ Connect the VIDEO (yellow)
CABLE to the VIDEO IN jack
on the back of the TV. Then con-
nect the AUDIO (red and. white)
CABLES to the AUDIO (left and
right) IN jacks on the rear of the
TV (AV 1 or AV 2).
_ Connect the VIDEO (yellow)
CABLE to the VIDEO OWl'jack
on the back of the VCR. Then
connect the AUDIO (red and
white) CABLES to the AUDIO
(left and right) OUT jacks on the
rear of the VCR.
_Turn the VCR and the TV
ION.
<_ Use the A/V button on the
remote to select the AV I chan-
nel.
With the VCR ON and a prere-
corded tape inserted, press the
PLAY button to view the tape
on the television.
O
hutlOn on the remote will toggle the
picture sourcefrom the current chan-
nel, to the last channel viewed, then
to Ihe AV I cunnection, Iben to the
AV 2 connection.
"/'hisalso applies to the Multi Media
bultort on Ihe remote. Repeatedly
pressing the Multi Media bulton will
toggle the picture source from the
¢tarrentchannel to the last viewed
channel, then to the MM I tAV I)
connectio*a, then to the MM 2 (AV 2)
eonnecilotl.
24
AV I
®®®
When uskag the Audi_Video AV I itv0uljacks, the vtdea and tout_:lcu_ be[
vlewed and heard on the AV I channel.
When using the Audlo/Video AV 2 input jacks, the video and sound can be
viewed and heard on the AV 2 channel,
BACK OF 'IV
f
Y
©
0
VIDEO IN
{YELLOWI
BACKOFVCR
(_QUIPPF_U WITH VIDEO AND
AUDIO OUTPUT JACKS)
IFYOU ARE USING A
MONO DEVICE, USE
ONLY THE AUDIO R
JACK,
32
Page 33

The S(uper)-Video connection on
the rear of the television can give
you better picture detail and
clarity, for the playback of S-
VHS VCR tapes, or Digital Video
Discs than the normal antenna
picture connections.
Note: The accessory device being
used must have a S-Video Output
to complete this connection.. The
following steps show the connec-
tions to the S-VIDEO 1 andAV 1
input jacks. To hookup an addi-
tional device to S-VIDEO 2 and
AV 2 input jacks, repeat the pro-
cedure.
_ Connect the S-VIDEO
CABLE to the S-VIDEO 1 input
jack on the rearof the television,
then the AUDIO (red and white)
to the AUDIO IN (AV 1)jacks
on the rear of the TV.
<_ Connect the S-VIDEO
CABLE to the S-VIDEO OUtput
jack on the accessory device.
Then connect the red and white
AUDIO CABLES to the AUDIO
(left and right) output jacks on
the rear of the accessory device.
<_ "rum the (or Digital
VCR
I Video Disc Player) ON.
<_ Press the AV button on the
remote to tune to the SVID-R
channel. You are now ready to
view the tape or disc on the TV.
O
NOTE: Repeatedly pressing the AV
button on the remote will toggle the
plctur_ source from the eun'ent chan*
ne], to the last channel viewed, then
to the AV I connection, then to the
AV 2 connection.
This also applies to Ihe Multi Media
button on the remote. Repeatedly
pressing the Muhl Media button will
togg[e the picture _ource from the
curtICntchannel to the lasl vkwed
channel, then to the MM I (AV I)
connection, then to Ihe MM 2 (AV 2)
connection.
24
AV1
av 2
0
When using ihe S-VIDEO I and AV I Andio inpul jacks, the video and
sound can he viewed and heard on the AV I channel.
When using the S-VIDEO 2 and AV 2 Audio input jacks, the video and
sound can he viewed and heard on the AV 2 channel.
S-VIDEO CABLE BACK OF_
(NOTSU_LIED) I
DBS, DVD, V'uteo Game, etc.
(EQUIPPED WITH S-VIDEO AND
AUDIO oLrrPuT JACKS)
I IF YOU ARE USING A
MONO DEVICE. USE
ONLY THE AUDIO R
JACK.
33
Page 34
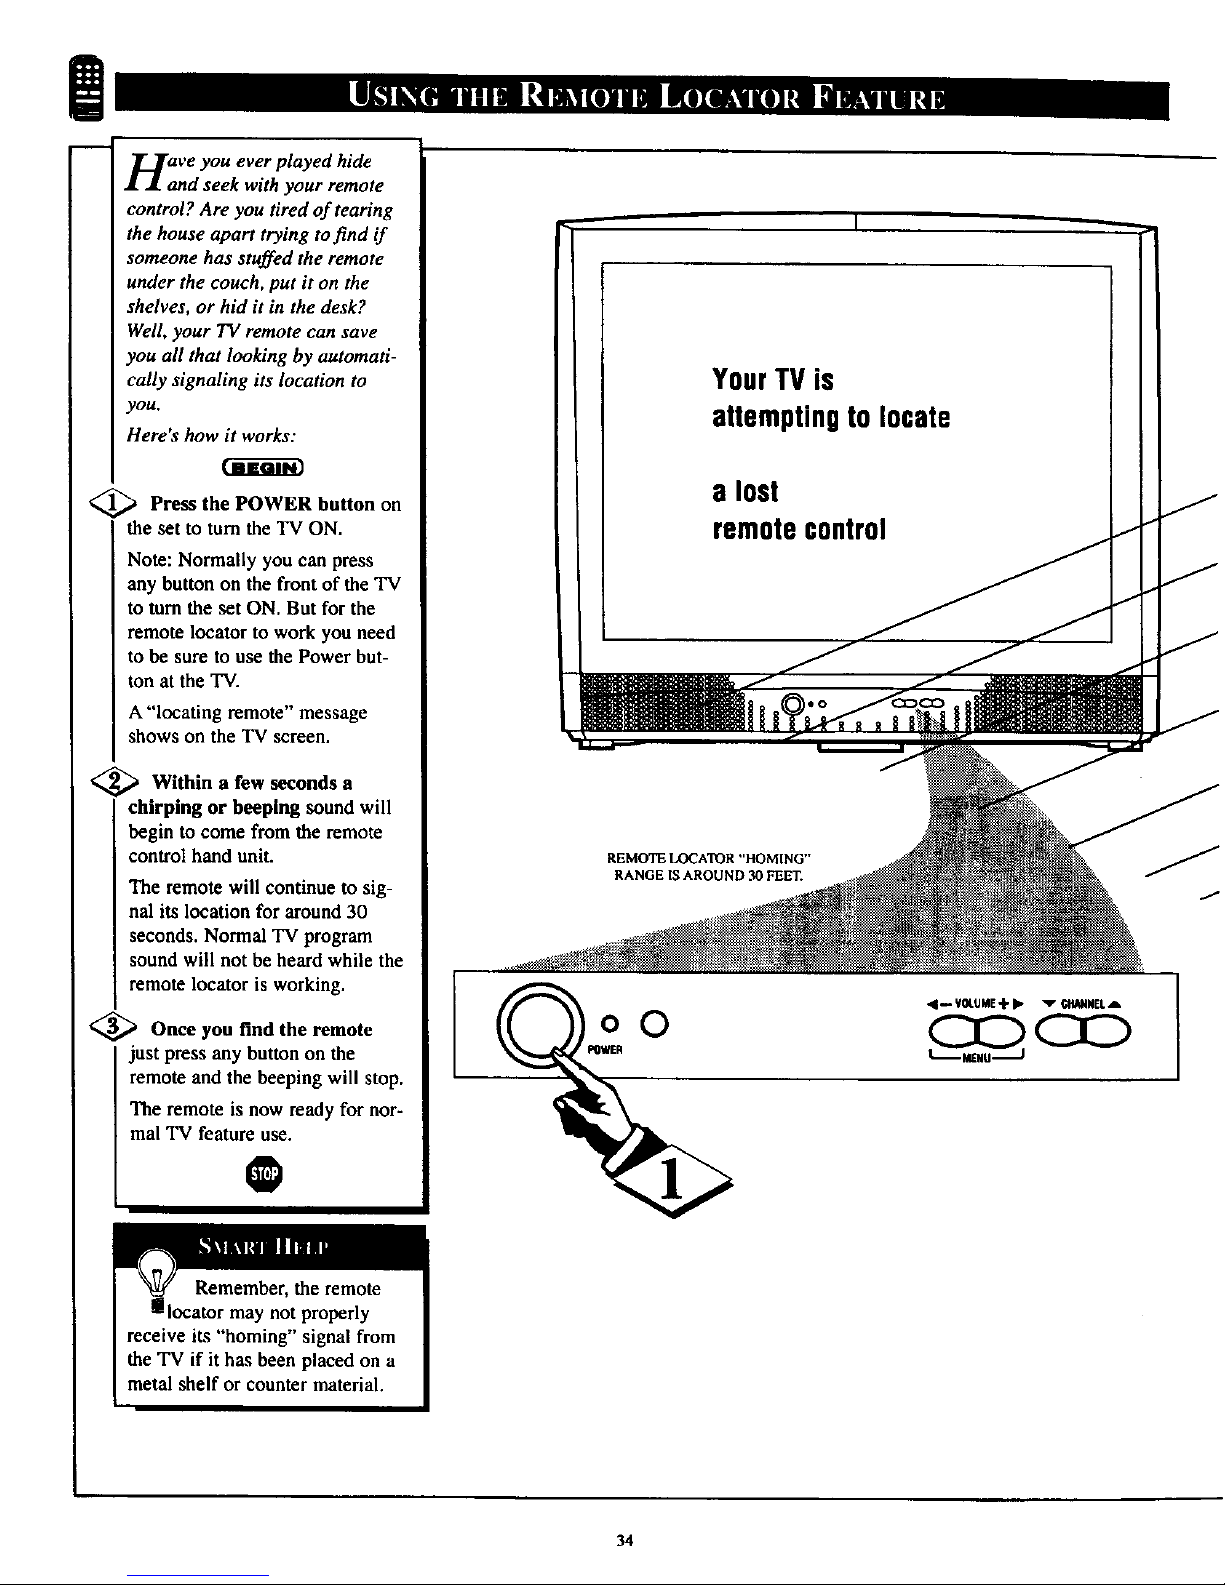
m
m
HaanVe you ever played hide
d seek with your remote
control? Are you tired of tearing
the house apart trying to find if
someone has stuffed the remote
under the couch, put it on the
shelves, or hid it in the desk?
Well, your TV remote can save
you all that looking by automati-
cally signaling its location to
yOU.
Here's how it works:
Press the POWER
button
on
the set to turn the TV ON.
Note: Normally you can press
any button on the front of the TV
to turn the set ON. But for the
remote locator to work you need
to be sure to use the Power but-
ton at the TV.
A "'locating remote" message
shows on the TV screen.
<_ Within a few seconds a
chirping or beeping sound will
begin to come from the remote
control hand unit.
The remote will continue to sig-
nal its location for around30
seconds. Normal TV program
sound will not be heard while the
remote locator is working.
<_ Once you find the remote
just press any button on the
remote and the beeping will stop.
The remote is now ready for nor-
mal 'IV feature use.
O
YourTV is
attemptingto locate
a lost
remotecontrol
REMOTE IX)CA'FOR "HOMING"
RANGE IS AROUND _ FEET.
oO
4_ V04.UME-_- I_ _ C_ANNELA
L
34
Page 35
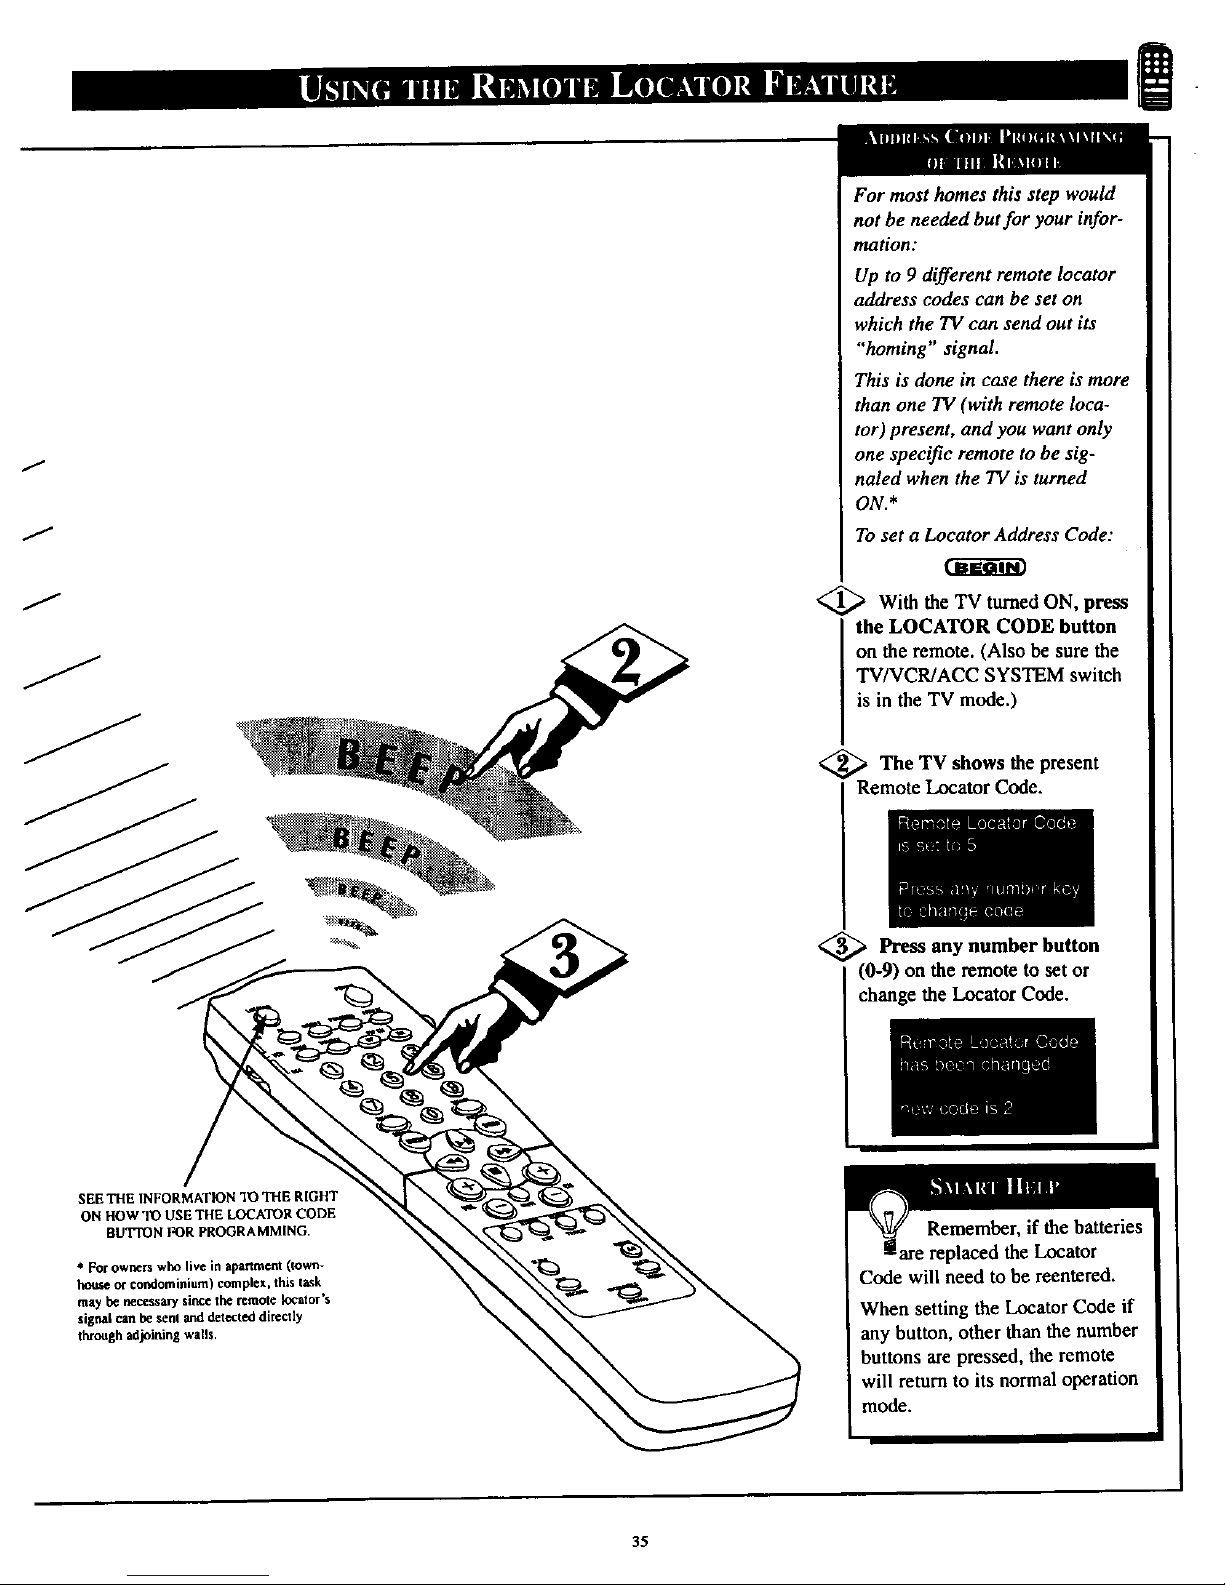
J
f
J
J
For most homes this step would
not be needed but for your infor-
mation:
Up to 9 different remote Iocator
address codes can be set on
which the TV can send out its
"homing" signal.
This is done in case there is more
than one TV (with remote loea-
tor) present, and you want only
one spec_c remote to be sig-
naled when the TV is turned
ON.*
To set a Locator Address Code:
<_ With the TV turned ON, press
the LOCATOR CODE button
on the remote. (Also be sure the
TV/VCR/ACC SYSTEM switch
is in the TV mode.)
<_The TV shows the present
Remote Locator Code.
_ Press any button
number
(0-9) on the remote to set or
change the Locatot Code.
SEE THE INFORMATION 10 THE RIGHT
ON HOW "PO USE THE LOCATOR CODE
BUTTON FOR PROGRAMMING.
* Forowners who live in apartment (town-
houseor condominium) complex, this task
may be nec_ssars"sincethe remole Iocalor's
slgnal can be sera_d delccted dJreclIy
through adjoining walls.
Remember, if the batteries
are replaced the Locator
Code will need to be reentered.
When setting the Locator Code if
any button, other than the number
buttons are pressed, the remote
will return to its normal operation
mode.
35
Page 36

!
-- _][Thether you're watching a
F V movie or a video game, you
TV has automatic video control set-
tings matched for your current pro.
gram source or content. The
SmartPicture feature quickly resets
your TV's video controls for a num-
ber of different types of programs
and viewing conditions you may
have in your home. Each
SmartPieture setting is preset at the
factory to automatically adjust the
TV's Brightness, Color, Picture,
Sharpness, Tint, and Color
Temperature levels.
<_ Press the SMART PICTURE
Ibutton on the remote control. The
current SmartPieture setting will
appear in the middle of the screen.
<_ Press the SmartPicture button
repeatedly to select either PER-
SONAL, MOVIES, SPORTS,
WEAK SIGNAL, or MULTI
MEDIA picture settings.
Note: The PERSONAL setting is
the setting that you setup using the
PICTURE options within the
onsereen menu. This is the only set-
ting that can be changed. All other
setting are setup at the factory dur-
ing the time of production.
PERSONAL
MOVIES
®
®
®®
O®
SPORTS
WEANSIGNAL
MUL_ MED_
36
Page 37

The SmartSound feature allows
he listener to select between
four different factory-set sound
options. Personal (which can be set
by the user), Theater (for movie
viewing), Music (for musical pro-
gramming) and Voice (when the
program is mainly dialogue). To
select any of the options, follow the
directions below.
<_ Press the SMART SOUND but-
ton on the remote control. The cur-
rentSmartSound setting will appear
in the middle of the scrb..an.
<_ Press the SMART SOUND
button repeatedly to toggle
between the four settings, PERSON-
AL, VOICE, MUSIC or THEATRE.
Remember, only the PERSONAL
control can be changed by the view-
er. This changes the settings in the
main on-screen menu's sound con-
trols.
0
PERSONAL
@@@
®®®
®®
!
VOICE
MUSIC
THEATRE
PERSONAL - The settings that you make in
the sound menu.
VOICE - Voices are brought to the forefront
or emphasized. Music is in the background.
MUSIC - Music is emphasized and dominant
over voices.
THEATRE - A balance between voices and
music.
In most cases, the volume levels
coming from broadcast programming
or commercials are never the same.
With the AVL (Audio Volume
Leveler) control turned ON, you can
have the TV level out the sotind
being heard. This makes for amore
consistent sound by reducing the
peaks and valleys that occur during
program changes or commercial
breaks.
REWEW MOVIE RATING
• PICTURE ......
• FEATTIJMS ......
• INSTALL m.IO_UNRATEO 0_
NO PatTING OFI
• REVIEW
• PICTU_
_ |mlllO
• FEATURES
• IKSTALL
TR_EDLIE
BASt
aUtLAN_
AV_
• • • • IfL|LE
BASS
Old Art
$1TRIEO
I OFF ! AVL
STl:_O
t u,,
37
Page 38

8
a ,,list,, or series of previously
_viewed channels can be select-
ed with the SURF button on your
remote control. With this feature
you can easily switch between dif-
ferent TVprograms that currently
interest you. The SURF control
allows you set up to ten channels in
its quick viewing "list".
Press the CHANNEL (+) or (-)
buttons (or the,NUMBER buttons)
toselect a channel to add to the
SURF list.
<_ Press the SURF button on the
remote. The onscreen display will
read,"THE SURF LIST IS
EMPTY, Press > to add".
<_ Press the CURSOR RIGHT
button to add the present
channe to the SURF list.
<_ Press the CURSOR LEFT
button to delete the present
channel from the SURF list.
Repeat steps 1 through 3 to add
additional channels (up to I0) to
the SURF list.
O
R
SURF
5
THE SURFLIST
IS EMPTY
Press• to odd
I
. I
, SUWF
5
9
Press• to lidd
S5SURF 1
SURF
s
Preu • to deleh
Press• to delete
Along with regular programmed chan-
nels, the External Video Source connec-
tions can be added to the SURF list. This
means the AV 1,AV 2, MM l, and MM 2
channels can be added to your SURF list.
Just tune to their channel and us the same
procedure described on this page.
38
Page 39

m
your remote control is set to
ork your TV and many
infrared remote (IR) control
VCRs, Cable Boxes, Satellite
Systems, DSS, DVD, etc.
However, an easy onetime step
may be necessary before the
remote will work your VCR.
Try this initial check to see if
going on to the following section
is necessary.
@ Place the TV/VCR/ACC
I j Mode Switch in the proper posi-
I
tion.
<_ Point the remote control at
I the device and press the POWER
button.
<_ Does the remote turn the
device ON7
If YES, stop and try other func-
tion buttons on the remote. If
they also work the device, then
the remote is ready and no fur-
ther steps are needed.
If NO, continue...
VCR
Satellite Receiver
Cable Converter
LOCATOR
©
J
TV AV ON/OFF
(D (D-(D
VCR SWAP SOURCE
ACC
(i) ®
i
First up a
look THREE-DIGIT
remote control number for your
brand of Device before going
through the simple steps on the
following page.
Find your Three-Digit Code on
pages 42-43.
39
Page 40

Nth w thai you have looked up
e three.digit Remote Code
Number for your brand of device,
you are ready to follow the four
simple steps below.
Please read through steps 1-5
before beginning.
_ Place the TV/VCR/ACC
I Mode Switch in the proper posi-
tion.
<_ Press the VCR RECORD
I button on the remote control and
release.
Press the SmartSound button
on the remote within 30 seconds,
then release,
<_ Enter the THREE-DIGIT
REMOTE CODE NUMBER
for your desired device. The
remote is now ready to send
commands to the nn'tt.
<_ Point the remote atthe
Device. Press the POWER button
Remember, if this doesn't
work the first time,repeat steps
using the same remote code number.
Aftera second tryandthe remote
does not operateyour device, see if
there is anotherthree-digit code num-
ber (pages 42-43) listed foryour
device andrepeat the steps above
using the new number.
If after repeated attempts the code
number method does not work you
device, trythe SEARCH METHOD
on page 41.
VCR
Satellite Receiver
or DSS, DVD
Cable Converter
0 0-0-0
®
® ®
SMART SMART
$OOND PiCTIJRE
RECORO INCRI_IIILE MEmA
0
40
Page 41

your TV remote can be set to
ark various external devices
such as VCRs, Cable Boxes,
Satellite Receivers, DBS, DVD,
etc. by what is called the search
method of remote control pro-
gramming
If the "Remote Code" number
method shown on the previous
page did not set your remote to
work your external device, then
follow the easy steps listed below.
Please read steps 1-4 before
beginning.
<_ Press the POWER button on
I the device your are attempting toprogram to turn ON,
<_ the TV/VCR/ACC
Place
I Mode Switch in the proper posi-
tion.
<_ Press the VCR RECORD
and the SMART SOUND but-
tons snmultaneously- and hold
I them down.
<_The device begin
will to
change channels after the remote
identifies the correct code. When
the channels start to change
release the VCR RECORD and
SMART SOUND buttons. The
remote should be ready to oper-
ate the device.
@
This method can take up to
two minuteto preform.
Don't let the device scan up more
than five channels. If you do the
remote may pass up the right code
and another two minute search cycle
will have to be repeated.
If no channel change happens within
two minutes, repeat steps 1-4.
Should a channel change still not
occur, the remote will not work the
desired device.
I
Satellite Receiver,
DBS, DVD, or
similar device
Cable Converter
VCR
®®®
®®®
®®®
41
!
Page 42
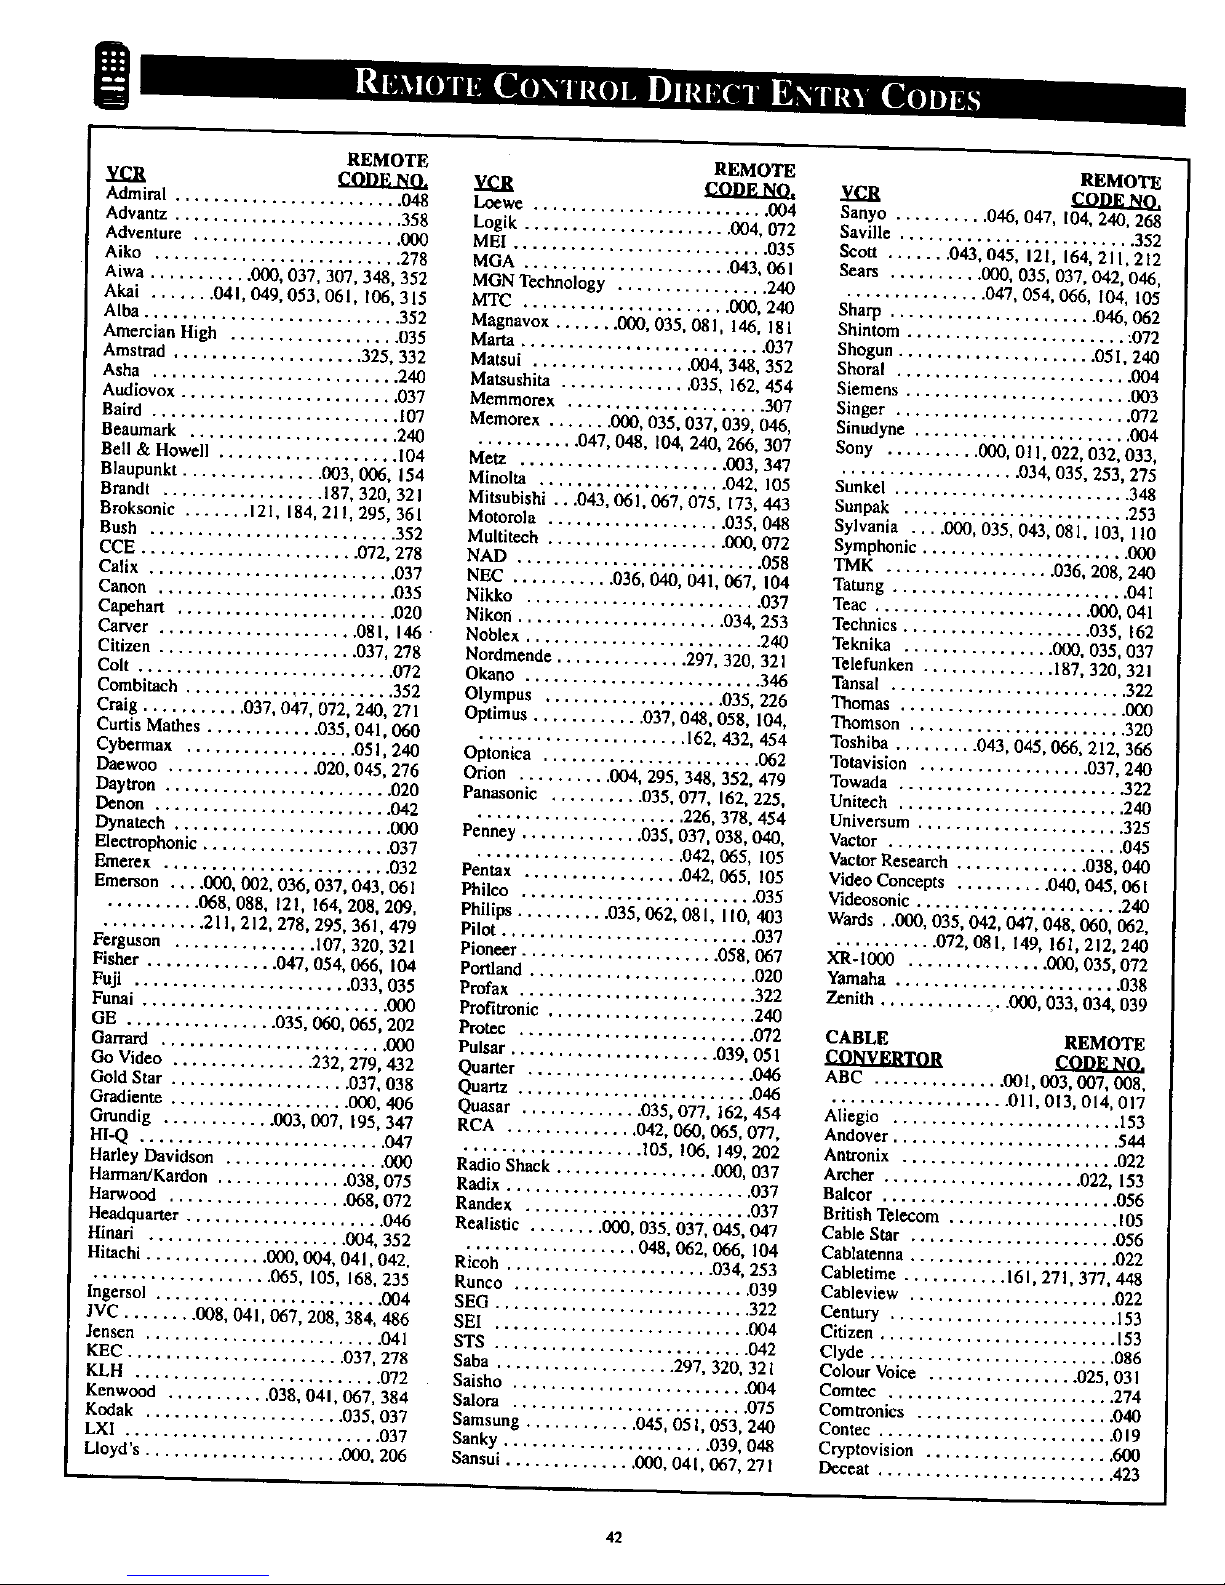
!
REMOTE
VCR COOE_O.
Admiral ........................ 048
Advantz ........................ 358
Adventure ...................... 000
Aiko .......................... 278
Aiwa ........... 000, 037, 307, 348, 352
Akai ....... 041,049, 053,061,106, 315
Alba ........................... 352
Amercian High .................. 035
Amstrad .................... 325, 332
Asha ......................... .240
Audiovox ....................... 037
Baird .......................... 107
Beaumark ...................... 240
Bell & Howell ................... [04
Blaupunkt ............... 003, 006. 154
Brandt ................. 187, 320, 321
Broksonic ....... 121, 184, 21 I, 295,361
Bush .......................... 352
CCE ....................... 072, 278
Catix .......................... 037
Canon ......................... 035
Cg@ehart .......................020
Carver ..................... 08 I, 146
Citizen ..................... 037, 278
Colt ........................... 072
Combimch ....................... 352
Craig ........... 037, 047, 072, 240, 271
Curtis Mathes ............ 035,041,060
Cyben'aax ................. .05I, 240
Daewoo ................ 020. 045, 276
Daytron ....................... .020
Denon ......................... 042
Dynatecb ....................... 003
Electrophonic .................... 037
Emerex ........................ 032
Emerson .... 000, 002, 036, 037,043, 061
.......... 068, 088, 121,164, 208, 209,
........... 211,212, 278, 295, 361,479
Ferguson ............... 107, 320, 321
Fisher ............. .047,054, 066, 104
Fuji ...................... 033,035
Funai .......................... 000
OE ................035,060,065,202
Garrard........................000
Go Video ...............232,279,432
GoldStar...................037,038
Gradiente...................000,406
Gmndig ............003,007, 195,347
HI-Q .......................... 047
Harley Davldson ................. 000
Harman/Kardon .............. 038,075
Hat'wood ................... 068. 072
Headquarter ..................... 046
Hinari ..................... 004, 352
Hitachi ............. 000, 004, 041,042,
...................065, 105,168,235
Ingersol........................004
JVC ........008,041,067,208,384,486
.|ensen.........................041
KEC ....................... 037,278
KLH .......................... 072
Kenwood ........... 038, 041,067, 384
Kodak .................... .035,037
LXI ........................... 037
Lloyd's ..................... 000, 206
REMOTE
vcR COnE NO.
Loewe ......................... 004
Logik ...................... 004, 072
MEI ........................... 035
MGA ...................... 043, 06 I
MGN Technology ................ 240
MTC ...................... 000, 240
Magnavox ....... 000, 035, 081, ld..6, 181
Marta .......................... 037
Matsui ................. 004, 348, 352
Matsushita ............. .035, 162, 454
Memmorex ..................... 307
Memo_x ....... 000, 035. 037, 039, 046,
.......... .047,048, 104, 240, 266, 307
Metz ..................... .003, 347
Minolta .................... 042, 105
Mitsubishi ...043, 061,067, 075, 173, 443
Motorola .................. .035, 048
Multitech ................... 000, 072
NAD ..........................058
NEC ...........036,040,041,067,104
Nikko .........................037
Nikon ......................034,253
Noblex.........................240
Nordmende ..............297.320.321
Okano ......................... 346
Olympus ................... 035, 226
Optimus ............ 037, 048, 058, 104,
...................... 162, 432, 454
Optonica ....................... 062
Orion .......... 004, 295, 348, 352. 479
Panasonic .......... 035, 077. 162, 225,
......................226,378,454
Penney .............035,037,038,040,
...................... 042, 065, 105
Pentax ................. 042, 065, 105
Philco ......................... 035
Philips..........035,062,08 l,ltO,403
Pilot..........................-037
Pioneer.....................058,067
Portland........................020
Profax ......................... 322
Profitronie ...................... 240
Prote¢ ......................... 072
Pulsar ...................... 039, 05 l
Quarter ........................ 046
Quartz ......................... 046
Quasar ............ .035,077, 162, 454
RCA .............. 042, 060, 065, 077,
................... 105, 106, 149, 202
Radio Shack ................. 000, 037
Radix .......................... 037
Rande,x ........................ 037
Realistic ........ 000, 035, 037, 045, 047
.................. 048,062,066, 104
Ricoh ..................... .034, 253
Runco .........................039
SEG ...........................322
SEI ...........................004
STS ........................... 042
Saba ................... 297, 320, 321
Saisho ......................... 004
Salora ......................... 075
Samsung ........... .045, 05i, 053, 240
Sanky ...................... 039, 048
Sansui .............. 000, 041,067, 271
REMOTE
vca
Sanyo .......... 046, 047. 104, 240, 268
Saville ......................... 352
Scott ....... 043. 045, 121, 164, 21 I, 212
Sears .......... 000, 035, 037, 042, 046,
............... 047, 054, 066, 104, 105
Sharp ...................... 046, 062
Shintom ....................... ;072
Shogun ..................... 05 I, 240
Shoral ......................... 004
Siemens ........................ 003
Singer ......................... 072
Sinudyne ....................... 004
Sony .......... 000, 0! I, 022,032, 033,
.................. .034, 035.253,275
Sunkel ......................... 348
Sunpak ........................ 253
Sylvania .... 000, 035,043, 081, 103, 110
Symphonic ...................... 000
TMK .................. 036, 208, 240
Tatung ......................... 04I
Teac ....................... 000, 041
Technics .................... 035, 162
Teknika ................ 000, 035, 037
Telefunken .............. 187, 320, 321
Tansat ......................... 322
Thomas ........................ 000
Thomson ....................... 320
Toshiba ......... 043,045,066, 212, 366
Totavision .................. 037,240
Towada ........................ 322
Unitech ........................ 240
Universum ...................... 325
Vactor ........................,045
VactorResearch..............038,040
VideoConcepts ..........040,045.061
'v'ideosonic ..................... .240
Wards, .000,035,042,047,048,060,062.
...........072,081,149,161,212,240
XR- 1000 ............... 000, 035, 072
Yamaha ........................ 038
Zenith ............ . .000, 033, 034, 039
CABLE REMOTE
COn_NO.
ABC .............. 001,003, 007, 008,
................... 011,013, 014, 017
Aliegio ........................ 153
Andover ........................ 544
Antronix ....................... 022
Archer ..................... 022, 153
Balcor ........................ .056
British Telecom .................. 105
CaNe Star ...................... 056
Cablamnna ...................... 022
Cabletime ........... 161,27 l. 377, 448
Cableview ..................... .022
Century ........................ 153
Citizen ......................... 153
Clyde .......................... 086
ColourVoice ............... .025,031
Comtec ........................ 274
Comtronics ..................... 040
Contec ........................ .019
Cryptovision .................... 600
Deneat ......................... 423
42
Page 43

CABLE REMOTE
cooE NO.
Eastern ..................... 002, 274
Everquest .................. .015, 040
Filmnet ........................ 443
Focus .......................... 400
France Telecnm ................. .451
GC Electronics .................. 056
GEC .......................... 086
Ganard ......................... 153
Gemini ................. 015, 070, 242
General Instrument ........ 011,276, 476
Gold Star ....................... 040
Gmndig ........................ 529
Harnlin ............. 009, 020, 034, 259
Hitachi ........................ .011
Hytex ......................... .007
Jasco .......................... 153
Jerrold ............. 003, 011,012, 014,
................... 015,024, 276,476
M.N.E, T. ....................... 443
MNet .......................... 443
Macon ........................ .033
Magnavox .............. 027, 032, 334
Memomx ....................... 000
Movie Time ..................... 063
NSC ....................... 063,070
Oak ....................... 007, 019
Optimos ....................... .021
Panasonic ............... 000, 021, 107
Paragon ........................ 000
Philips..025,027. 031, 153, 242, 290, 334
Pioneer ..................... 533, 753
Popular Mechanics ................ 400
Pulsar ......................... 000
RCA .......................... 021
Radio Shack ................... .015
Reco_n ........................ 400
Regal ...................... 020, 259
Regency ........................ 002
Rembrandt .................. 011,070
Runco ......................... 000
SL Marx ....................... 040
Salora ......................... 382
Samsung ....................... 040
Satbox ......................... 375
Scientific Atlanta ......... 008, 017, 477
Signal ..................... 015,040
Signature ....................... 011
Sprucer ........................ 021
Star Sight ....................... 542
Starcom .................... 003, 015
Stargate ................... .015,040
Starquest ...................... .015
Sylvania ........................ 001
TV85 .......................... 063
Tandy ......................... 258
Tele+l ......................... 443
Telaservice ...................... 28 I
Teleview ....................... 040
Texscan ........................ (301
Timeless ....................... 274
Tocom ................ .012, 013, 059
Toshiba ........................ 000
Tudl ........................... 286
Tusa ........................... 015
Unike ...................... 022. 153
CABLE REMOTE
CONVERTOR CODE NO.
United Artists ................... .007
United Cable .................... 003
Universal ........... 022, 056, 153, 191
Videoway ...................... 250
Viewstar ............... .027, 063, 258
Visi Cable._ ..................... 46 I
Westminster ..................... 105
Wolsey Gaine ................... 544
Zenith .................. 1200.054, 525
Zentek ......................... 400
REMOTE
Alpha Star ...................... 772
Echostar ........................ 775
HTS ........................... 775
Hitachi ......................... 819
Hughes Network System ........... 749
Jerrold ......................... 627
Magnavox .................. 722, 724
Memorax ....................... 724
Panasonie ...................... 701
Philips .................... .722, 724
Primastar ....................... 627
RCA .......................... 566
Sony .......................... 639
Toshiba ........................ 790
Uniden ......................... 724
REMOTE
AST ........................... 351
Akai ........................... 515
Alba ................... 352, 515, 6t3
Aldea .......................... 288
Amstrad .... 080, 252, 345, 461,509, 689
Ankaro ................. 220, 288, 369
Anitron ........................ 183
Armstrong ...................... 243
Astra .......................... 108
Avalon ......................... 396
Axis ........................... 369
BT ........................ 515. 668
Beko .......................... 189
Best ........................... 369
Boca ...................... 243, 513
Bush .......................... 067
Cambridge .................. 344, 515
Channel Master .................. 362
Commllnk ...................... 288
Connexions ..................... 396
Conrad ......................... 607
Crown ......................... 243
DDC .......................... 362
DNT .......................... 396
Echostar ........................ 396
Fargoson ........... .067, 183, 189, 336
Fidelity ........................ 252
Finiax ..................... 108, 397
Faba ....................... 369, 396
G-Bat .......................... 183
Galaxis ........................ 286
Gooding ........................ 57 {
Grundig ............ 173, 189, 57 I, 750
Hinari ......................... 183
REMOTE
Hirschmann ................. 397, 573
Houston ........................ 668
Huth ................... 220, 243, 268
I"IW ........................... 108
Intervision ...................... 592
JVC ....................... 515, 571
Kathrein ............ 092, 504, 622, 658
La Sat ..................... 513, 607
Lennox ....................... .592
Lupus ......................... 369
Luxor ...................... 108, 573
Manhatten ...................... 592
Maspro ................. 092, 336, 750
Matsui ......................... 571
Mediamarkt ..................... 248
Minerva ....................... .571
Mintec ......................... 576
Morgan's ................... 243, 513
Newhaus ....................... 220
Nikko ...................... 360, 713
Nokia .................. 108, 397. 573
Nordmende ..................... 362
Orbitech ........................ 501
Pace ........... 067, 183,336, 455, 791
Palladium ..................... .571
Palsat .......................... 501
Philips ............. 200, 292, 571,750
Phonotrend .................. 288,592
Plasmatic ....................... 442
Proset ......................... 288
Quadral .................... 362, 628
RFT ....................... 220, 288
Radix .......................... 396
SAT ....................... 351, 46t
SEG ........................... 369
Saba ........................... 336
Salora ......................... 108
Satec .......................... 183
Schwaiger .................. 183,504
Scemann ................ 396, 578,626
Skymaster .................. 288, 626
Sony .......................... 704
StarTrak ....................... 421
Strong ......................... 421
Sunstar ........................ 513
Tantec ......................... 336
Techni Sat .................. 262, 501
Teleka ..................... 243, 613
Tonna ......................... 668
Triad .......................... 35 I
Universum ...................... 57 I
Vtech .......................... 35 I
Wisi ....................... 351. 396
REMOTE
IZV.I!
Kenwo0d ....................... 534
Mitsubishi ...................... 52 I
Panasonie ...................... 490
Philips ........................ .539
Pioneer ........................ 550
RCA .......................... 522
Sony .......................... 552
Toshiba ....................... .503
43
Page 44

!
_wen usingtheTV remote
itha VCR, firstmake cer-
tainitissettocontrolyourVCR
(bytheREMOTE CODE or
SEARCH method).
<_Set the TV/VCR/ACC mode
[ switch to VCR on the remote.
I
<_ Point top the remote
the of
toward the front of the VCR
(remote sensor window) when
pressing the buttons.
O
Set in the VCR position to send
remote commands to the VCR.
Press to begin playback of a
video tape.
Press to rewind tapes. For some
VCR's the STOP button may
have to be pressed first, then
REWIND. In playback mode
press or press and hold the button
to view the picture moving rapid-
ly in reverse.
Press to stop the motion of a tape
in playback, rewind, fast for-
ward, etc.
Hold down the VCR/RECORD
button and the PLAY button to
begin a VCR recording.
Remember+the VCR but-
1tons on the remotewill not
o_rate your VCR if those features
are not found on your VCR remote
control.
Note: All VCR functions (particularly
Search, Rewind,Past Forward, etc.)
will operatethe same as with the orig-
inalVCR remote controlprovided
with the VCR.
@ ®
® ®
0
0
P
/
/
/
J
Press to turn the VCR ON and
OFF.
NUMBER BUTTON
Press buttons for direct VCR
channel selections.
Press to temporarily stop the tape
during a playback or recording.
Press again to release Pause.
FAST FORWARD BUTTON
Press to rapidly advance the tape.
For some VCR's you may need
to press the STOP button first,
then the FAST FORWARD but-
ton. During playback, press or
)ress and hold the button to view
the picture moving rapidly in the
forward direction.
CHANNEL ÷ & - BUTTONS
Press to scan up or down through
the VCR channel numbers,
TV/VCR BUTTON
Press to select the VCR position
(VCR indicatoron the fron of the
unit will ligh0, to view the play-
back of a tape, to watch a pro-
gram while recording it, or to
watch a TV broadcast using the
VCR CH +, - or Numbered but-
tons. Press again to place in the
"IV position (VCR indicator light
will go off) or to view one pro-
gram while recording another
program.
Page 45

Picture-In-Picture (PIP) is theshow-
ing of two pictures on the TV screen
at the same time. (One main screen
)ictureand one small insetpicture -
or PIP). For your ease and conve-
nience this TVhas two separate
inputs (ANTenna A and PIPANTenna
B)for your home's Antenna andl or
Cable TV system signal.
The ANT A input is primarily for the
TV' main screen picture. The PIP
ANTB input isprovided as a second,
dedicated source optionfor the TV's
PIP "window" and itsfeature opera-
tions. The signal connected to the
PIP ANT B input can be either a
Split Signal Input (as described in
the section on this page), or another
type of external signal source (such
as a satellite dish system, additional
home antenna, video accessory, etc.).
See the following steps on how chan-
nels connected to the PlP ANT(enna)
B Input can be shown and used with-
in the PIP window:
_ Connect your Antenna or Cable
TV signal to the single 75 ohm
INPUT plugon a two-way Signal
Splitter(notsupplied).
Connect two lengths of RF Coaxial
Cable (F-type connectors on both
ends) to the two OUTPUT plugs on
the two-way Signal Splitter.
(_ Connect the twin OUTPUT
plugs on the Signal Splitterto the
ANT A andPIP ANT B Inputs on the
rearof the TV.
For other possible PIP
connections see pages 49-50
for the "More PIP Connections"
section.
If you need any accessories or parts
to complete the described PIP con-
nections, contact your dealer, or our
Parts Information Center at:
1-800-851-8885
I
MAIN SCREEN PICTURE PIP INSET PICTURE
1 *
300 TO 7S OHM
_DAIq'ER
TWIN LEAD WIRE
ROUND CABLE
75 OHM
COMBINATION
VHF/UHF ANTENNA
\\\\ \\ fl///
O_R OR INDOOR ANTENNA
RECI_IVES NORMAL BROADCAST
CHANNELS 2- [3 (VHF) AND 14-69
(UHF)
/_OPTIONAL TWO-WAY SIGNAL
(single?5ohm Inpmto Iwin 75
ohm Outputs - optionalRF
Coaxial connecting cables also
requlsed)
CABLE "IV SIGNAL
v
ROUND CABLB 75 OHM
CABLE TV
COMPANY
BACK OF TV
ANT(chin0 "A"
Note: The pu_ of the PIP ANT B input is
to provide an easily connected, dedicated pic-
ture source for PIP featu_ use, Other signal
*oucce options (such as satellite di_ sy_aem,
additional external antenna, VCR, or Video
Game) could also be connec/ed and displayed
on the TV's pIP screen window through the
use of the PIP ANT a input.
45
Page 46
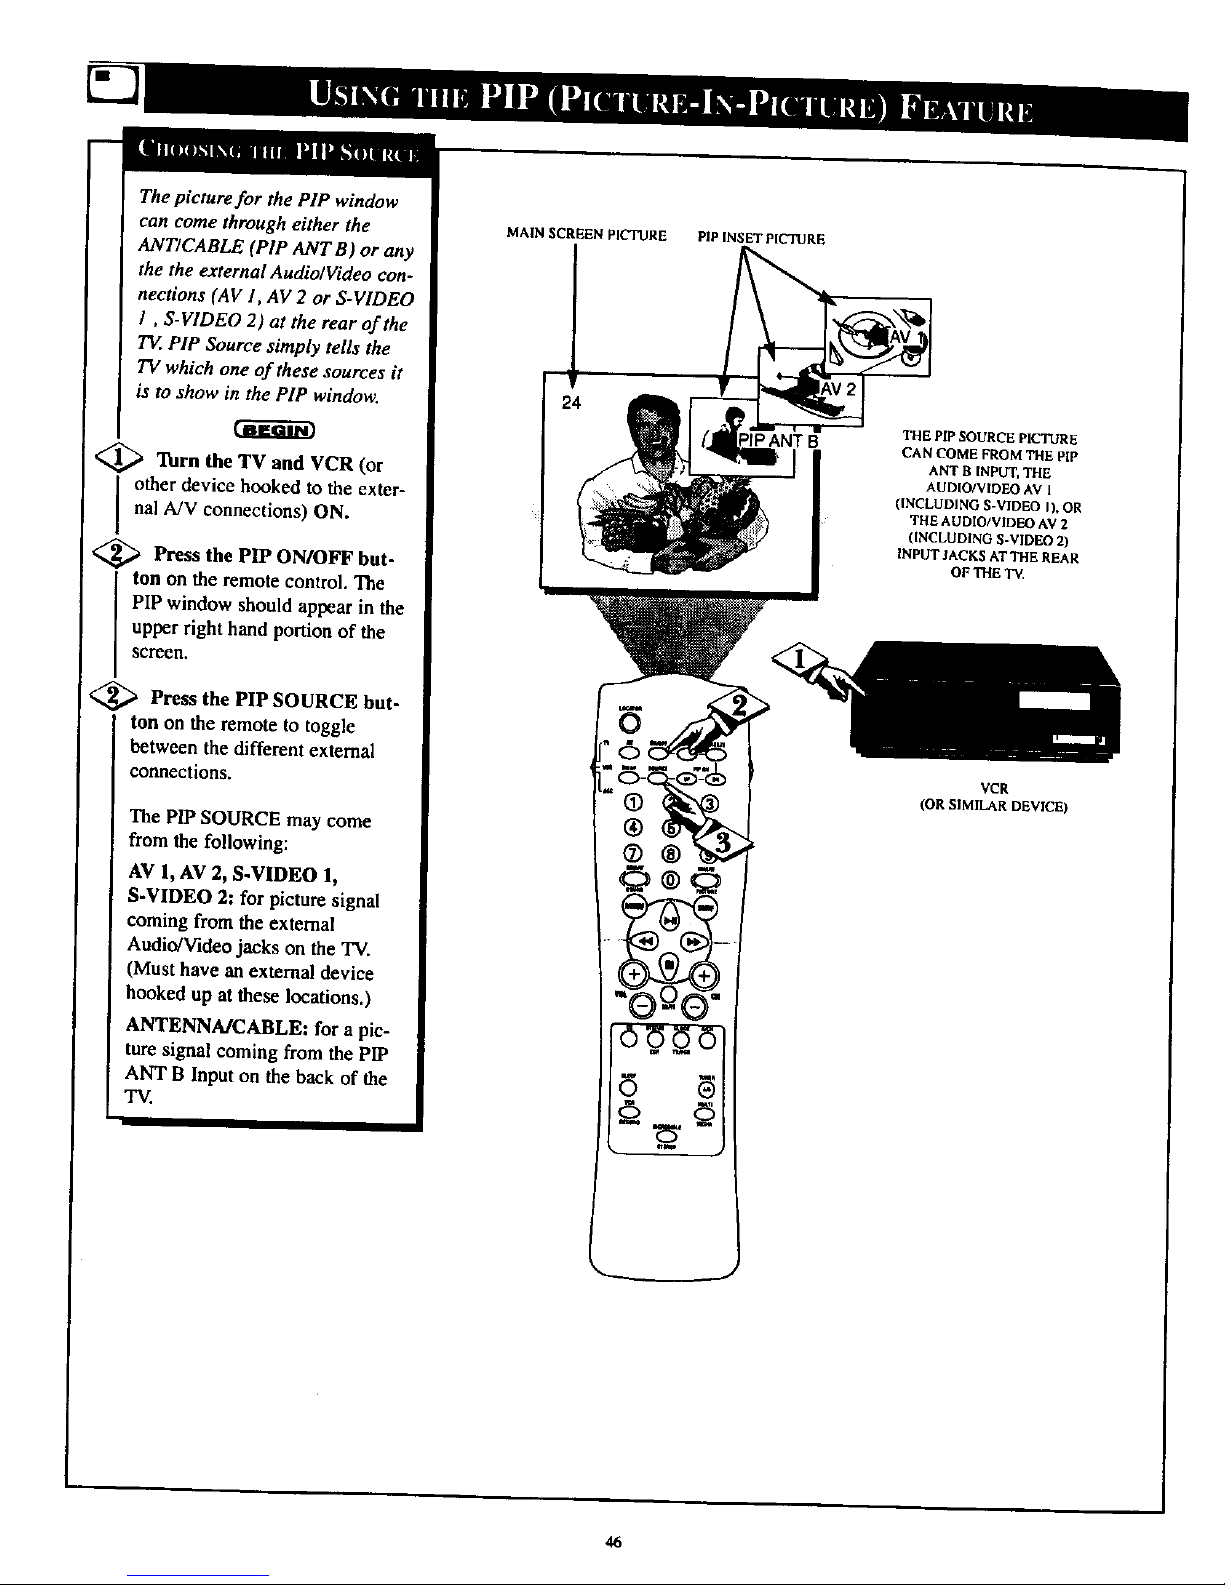
The picture for the PIP window
can come through either the
ANT/CABLE (PIP ANT B) or any
the the external AudiolVideo con-
nections (AV 1, AV 2 or S-VIDEO
I, S-VIDEO 2) at the rear of the
TE PIP Source simply tells the
TV which one of these sources it
is to show in the PIP window.
<_ Turn the TV and VCR (or
other device hooked to the exter-
nal A/V connections) ON.
<_ Press the PIP ON/OFF but-
ton on the remote control. The
PIP window should appear in the
upper right hand portion of the
screen.
<_ Press PIP SOURCE but-
the
ton on the remote to toggle
between the different external
connections.
The PIP SOURCE may come
from the following:
AV 1, AV 2, S.VIDEO 1,
S-VIDEO 2: for picture signal
coming from the external
Audio/Videojackson theTV.
(Musthaveanexternaldevice
hookedup attheselocations.)
ANTENNA/CABLE: forapic-
turesignal coming from the PIP
ANT B Input on the back of the
TV.
MAIN SCREEN PICTURE PiP INSET PICTURE
imp
THE PIP SOURCE PICTURE
CAN COME FROM THE PIP
ANT B INPUT, THE
AUDIOt'VIWEO AV t
(INCLUDING S-VIDEO I), OR
TH6 AUDIO/VIDEO AV 2
(INCLUDING S-VIDEO 2)
INPUT ! ACKS AT THe. REAR
OF THE TE
VCR
(ORSIMILARDEVICE)
46
Page 47
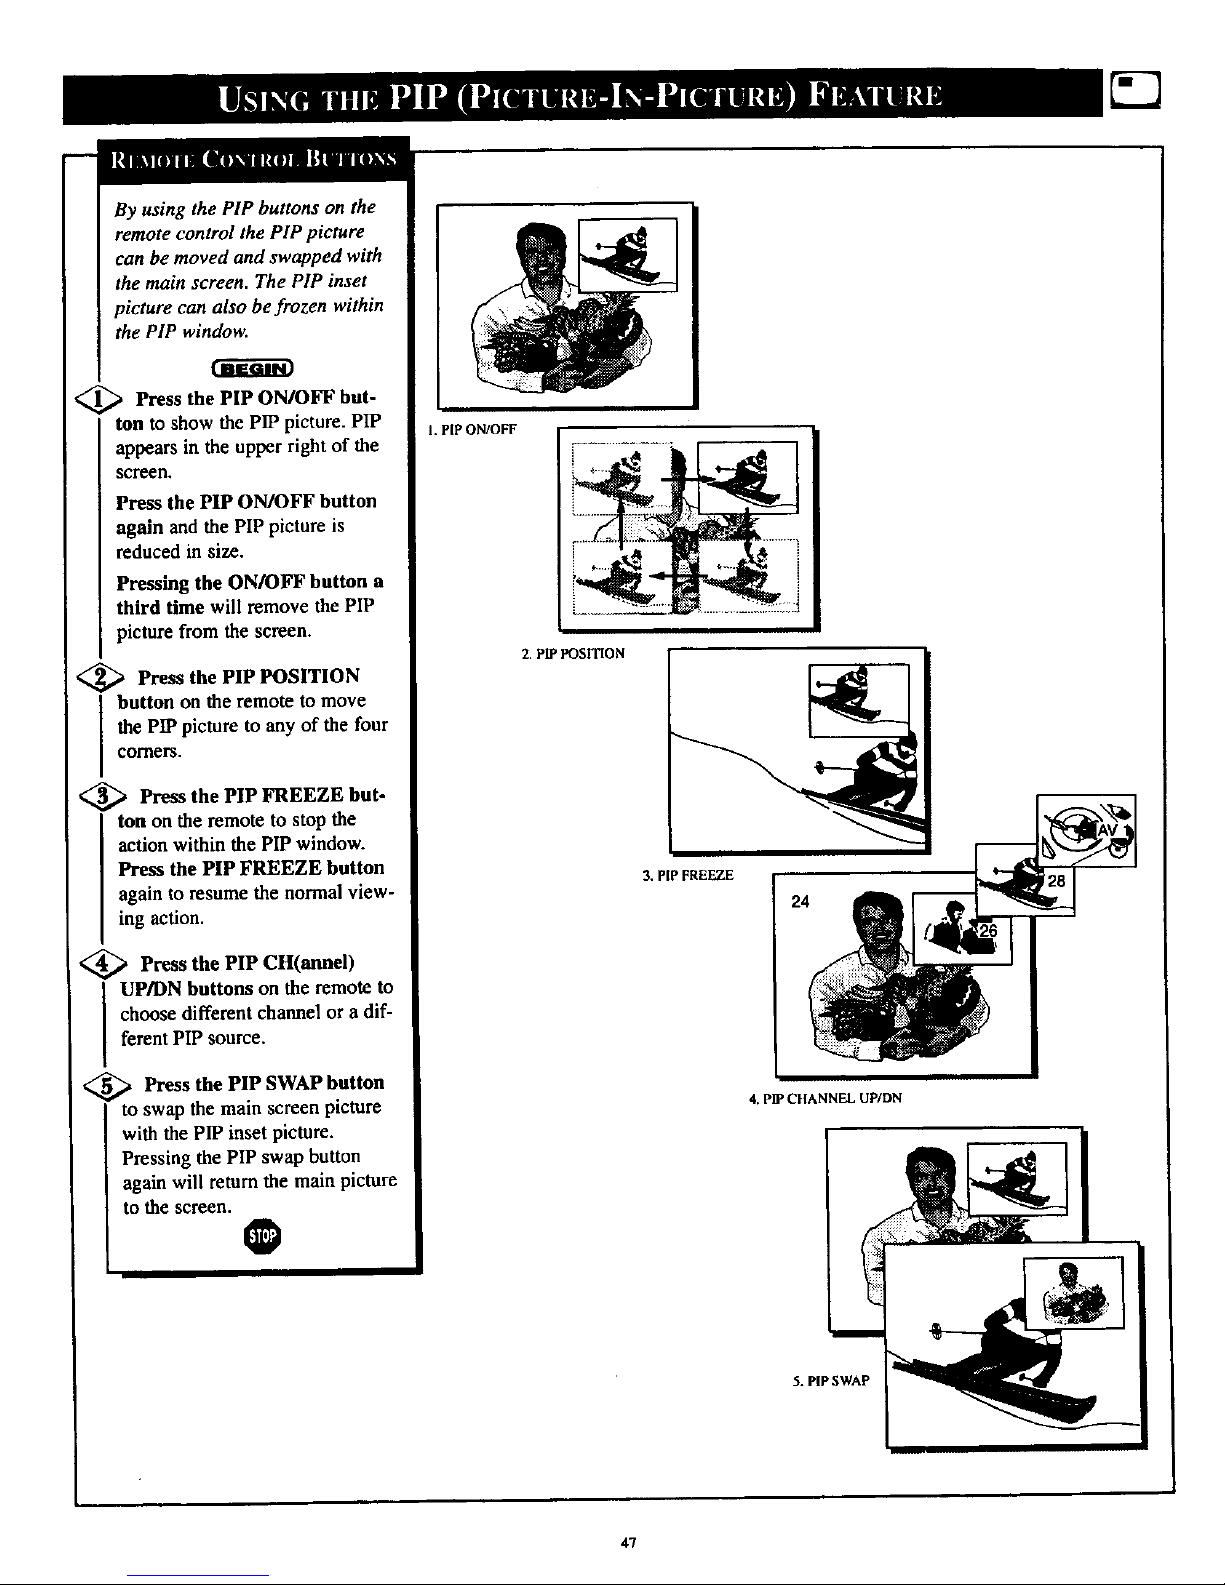
By using the PIP buttons on the
remote control the PIP picture
can be moved and swapped with
the main screen. The PIP inset
picture can also be frozen within
the PIP window.
_ Press the PIP ON/OFF but-
ton to show the PIP picture. PIP
appears in the upper right of the
S_reen.
Press the PIP ON/OFF button
again and the PIP picture is
reduced in size.
Pressing the ON/OFF button a
third time will remove the PIP
picture from the screen.
_ Press the PIP POSITION
button on the remote to move
the PIP picture to any of the four
coiners.
<_ Press the PIP FREEZE but-
ton on the remote to stop the
action within the PIP window.
Press the PIP FREEZE button
again to resume the normal view-
ing action.
<_ Press the PIP
CH(annel)
I UP/DN buttons on the remote to
choose different channel or a dif-
ferent PIP source.
<_ Press the PIP SWAP button
to swap the main screen picture
with the PIP inset picture.
Pressing the PIP swap button
again will retain the main picture
to the screen.
0
1. PIP ON/OFF
2. PIPFOSITION
3, PIPFREEZE
24
4. PIP CHANNEL UP/aN
5. PIPSWAP
47
Page 48

Tcohe Picture-ln-Picture (PIP)
lor and 7Tntcontrols are
used to make fine tune adjustments
to the color settings for PIP (when
it is shown on the TV screen).
<_ Press the MENU button on the
remote to show the onscreen menu.
<_ Press the CURSOR DOWN •
button until the word FEATURES
is highlighted.
<_ Press the CURSOR RIGHT
button and the menu will shift
to the left to display the TIMER
controls.
<_ Press the CURSOR DOWN •
button to select the PIP menu.
_ Press the CURSOR RIGHT
button again to shift the dis-
play to the COLOR and TINT
adjustment bars.
Press the CURSOR RIGHT
or the CURSOR LEFT "_!
Jbuttons to adjust the COLOR and
ITINT bars toth_sired levels.
Remember, although
there are separate COLOR
and TINT controls for PIP, the
adjustment levels for these controls
depend on the TV's main picture.
For example: If the main picture
screen is showing ablack and
white picture, PIP would also be
seen in black and white (even
though the PIP picture source is in
color).
V REVIEW MOVIERATING
• Pt_'URE
•SOUNO TV RATING
• FEAIUGEB
• INSTALL BLOCKUNRAT[O OFT
NORATING OFF
®®®
®®®
• REVIEW TIMER
• PICTURE Sms_Lock
• SOUND BNR
_F_TOREB CONTRAST+
• INS_LL INCR. PICT.
PIP
_ CLOSEOCAP
• TIMER TIME
• SmartLock AOTIVAn[
• DNR CHANNEL
• CONTRAST÷ TONER
• iNCR. PLOT. STARTTIME
_ PIP DISPLAY
• FEATURES
illi
• TIMER
• SmlartLock
• BNO
• CONTRAST÷
INCN, PtCT. UOLOP,
I
PiP TINT
n• PiP
48
Page 49

_ DIP hookup with a Cable Box
land VCR.I___._i__
_ First use an optional signal
splitter and connect the original
cable TV signal to both the CABLE
IINon the Cable Converterand the
IANTENNA plug on the rearof the
Itelevision.
<_ Connect the CABLE OUT on
the Converter to the ANT. IN on the
VCR.
<_ Connect the VIDEO OUT jack
on the VCR to the VIDEO IN jack
on the TV.
Also connect the AUDIO OUT (right
and left) jacks from the VCR to the
AUDIO IN jacks on the television.
O
@
REAR OF TV
AVI
in In
©
%
Ccetact the Parts
Inf_m ation Center
1-800-851-8885
to order any optional
$tCCeSsor_$,
VIDEOCABLE
(YBLLOW)
AUDIO CABLES
RED AND WHITE)
VCR
CABLE TV CONVERTER
49
Page 50

l l_lP with VCR and a
hookup
a
J[ Digital Video Disc Player (or
similar devie_
€_ First connect the original cable
TV signal orAntenna signal to the
ANT IN jack on the back of the
VCR,
<_ Connect the ANT OUT jack on
the rear of the VCR to the ANT IN
jack on the rear of the Video Disc
Player.
<_ Connect the ANT OUT jack on
the rear of _e Video Disc Player to
q_.ANT ' A' input on the rear of the
<_ Connect the yellow Video Cable
from the VIDEO OUTjack on the
VCR to the VIDEO IN jack on the
TV (labeled AV 1).Then, connect the
red andwhite Audio Cables from the
AUDIO OUT jacks on the VCR to the
AUDIO IN jacks on the rear of the
'IV (labeled AUDIO L & R AV 1).
_ Connect the yellow Video Cable
from the VIDEO OUT jack on the
Video Disc Player to the VIDEO IN
jack on the TV (labeled VIDEO AV
2). Then, connect the red and white
Audio Cables from the AUDIO OUq
jacks on the VCR to the AUDIO IN
jacks on the rear of the TV (labeled
AUDIO L & R AV 2).
Note: When selecting the PIP
SOURCE, the VCR will appear on
the AV 1 channel, and the Video
Disc Player will appear on the AV2
channel.
O
75 OHM COAXIAL CABLE
©
VIDEO
CABLE
(YELLOW)
OUTSIDE UHF/VHF
ANTENNA OR
CABLE TV SIGHAL
50
Page 51

please make these simple
checks before calling for ser-
vice. These tips can save you
time and money since charges for
TV installation and adjustment of
customer controls are not cov-
ered under your warranty.
NQ Power
NO Picture
No Sound
Work
TV Displays Wrono
CAUTION: A video source (such as a video game, Compact Disc Interactive - CDI, or
TV information channel) which shows a constant non-moving pattern on the "IV screen,
can cause picture tube damage. When your TV is continuously used with such a source
the pattern of the non-moving portion of the game (CDI, etc.) could leave an image
permanently on the picture tube. When not in use, turn the video source OFF.
Regularly alternate the use of such video sources with normal TV viewing.
Check the TV power cord. Unplug the TV, wait 10 seconds, then reinsert plug into
outlet and push POWER button again. [
Check that outlet is not on a wall switch. Be sure fuse is not blown on AC Power strip. ]
Check to be sure the system mode switch (TV/VCR/ACC) is in the correct position [
when using the remote control to power the set ON. I
i Check antenna connections. Are they properly secured to the TV's ANT/CABLE plug ?[
Check the TUNER control for CABLE or ANTENNA setting. I
Press the AV button on the remote to make sure the correct signal source is selected. I
(AV 1, AV 2, or MM 1, MM 2)
I
Check the VOLUME buttons.
Check the MUTE button on the remote control+
Check the SPEAKER onscreen control. OFF position will eliminate sound at the set.
If attempting auxiliary equipment hook-ups, check audio jack connections.
(If Applicable) Check Audio Receiver for correct operating mode.
Check TV/VCR/ACC "System" switch on the remote. Move the switch to the TV
position to operate the television.
Check batteries. Replace with AA Heavy Duty (Zinc Chloride) or Alkaline batteries
if necessary.
Clean the remote and the remote sensor window on the TV.
Check the TV power cord. Unplug the TV, wait 10 seconds, then reinsert plug into
outlet and push POWER button again. Be sure fuse is not blown on AC Power strip.
Check to be sure TV outlet is not on a wall switch.
Repeat channel selection.
Add desired channel numbers (CHANNEL control) into 'IV memory.
Check to be sure the TUNER control is set to the CABLE option.
I
Cleaning and Care
• To avoid possible shock hazard be sure the TV is unplugged from the electrical outlet before cleaning.
• When cleaning the 'IV screen take care not to scratch or damage the screen surface (avoid wearing jewelry or using
anything abrasive). Wipe the front screen with a clean cloth dampened with water. Use even, easy, vertical strokes when
cleaning.
• Gently wipe the cabinet surfaces with a clean cloth or sponge dampened in a solution of cool clear water. Use a clean
dry cloth to dry the wiped surfaces.
• Never use thinners, insecticide sprays, or other chemicals on or near the cabinet, as they might cause permanent marring
of the cabinet finish.
51
Page 52

Alternate Channel • When using the A/CH button on the remote
control, toggles between the last two channels viewed.
Auto Programming. Whenactivated, this featureautomatically
scans for all available channels. Thesechannels come fromregu-
lar antenna or cable signals (only active,broadcaststations)and
theyare storedinto the TV's memory.
Channel Edit • Add or delete channels from the sequential tun-
ing cycle to develop a customized list of channels you want to
watch. Editing makes it easy to limit the number of channels
when scanning the Channel up and down buttons or expand the
number of channels available to suit your own preference.
Coaxial Cable • A single solid antenna wire normally matched
with a metal plug iF-type) end connector that screws (or pushes)
directly onto a 75 Ohm input found on the Television or VCR.
Closed Caption • Broadcast standard which allows you to read
the voice content of t_levision programs on the TV screen.
Designed to help the hearing impaired this feature uses onscreen
"text boxes" to show dialogue and conversations while the TV
program is in progress.
Direct Audio/Video Inputs • Located on the rear of the TV
these connectors (RCA phono type plug) are used for the input
of audio and video signals. Designed for use with VCRs (or other
accessories) in order to receive higher picture resolution and
offer sound eonnoction options.
Identify • Method by which a remote control searches and finds
an operating code for another product (such as a VCR or Cable
Converter). Once the cede has been "identified" then the TV
remote can operate and send commands to the other product.
Onscreen Displays (OSD) • Refers to the wording or messages
generated by the television (or VCR)to helpthe user with specif-
ic feature controls (color adjustment, programming, etc.).
Menu • An onscreen listing of feature controls shown on the
Television screen that are made available for user adjustments.
Multichannel Television Sound (MTS) • The broadcast stan-
dardthat allows for stereo sound to be transmitted with the TV
picture.
Programming • The procedure of adding or deleting channel
numbers into the Television's memory circuits. In this way the
Television "remembers" only the locally available or desired
channel numbers and skips over any unwanted channel num-
bers.
Remote Sensor Window • Awindow or opening foundon the
Televisioncontrolpanel through which infrared remotecontrol
command signals are received.
Setup Mode • Automatic feature control settings made by the
'IV. Designed for first time setup and use. Settings for signal
connections (antenna or cable TV), plus channel program
memory are held in the TV's memory (even if the set is
unplugged and moved to a new location.)
Second Audio Program (SAP) • Another or additional audio
channel provided for in the Multichannel Television Sound
(MTS) broadcast standard. The most frequently proposed use
for SAP is the simultaneous bilingual broadcast of "IVprogram
material.
SmartClock • An accurate digital clock that's always right. By
monitoring the vertical blanking interval of PBS broadcasts,
TV's equipped with SmartClock can automatically set the right
time of day and maintain it through brown-nnts, power fail-
ures, and even daylight savings time adjustments.
SmartLock • Prevents young children from accessing particu-
lar broadcast channels (or using audio/video inputs) by elec-
trnnically locking them out. Undesired channels are blocked
out by entering a unique four-nnmber code, which you choose
when programming the feature. Blocked-out channels are just
as quickly restored with the same process.
Status/Exit • Allows the user to quickly confirm what channel
number is currently being viewed. Status/Exit cart also be used
to clear the Television of on screen displays or information
(rather than waiting for the displays to "time out" or automati-
cally disappear from the screen).
Twin Lead Wire • The more commonly used name for the two
strand 300 Ohm antenna wire used with many indoor and out-
door antenna systems. In many cases this type of antenna wire
requires an additional adapter (or balun) in orderto connect to
the 75 Ohm Input terminals designed into the more recent
Televisions and VCRs.
Two Tuner PIP • This TV has two separate tuners (and two
separate tuner inputs) which allow you to watch one show with
one tuner, while scanning other channel with the second tuner
in the PIP window.
52
Page 53
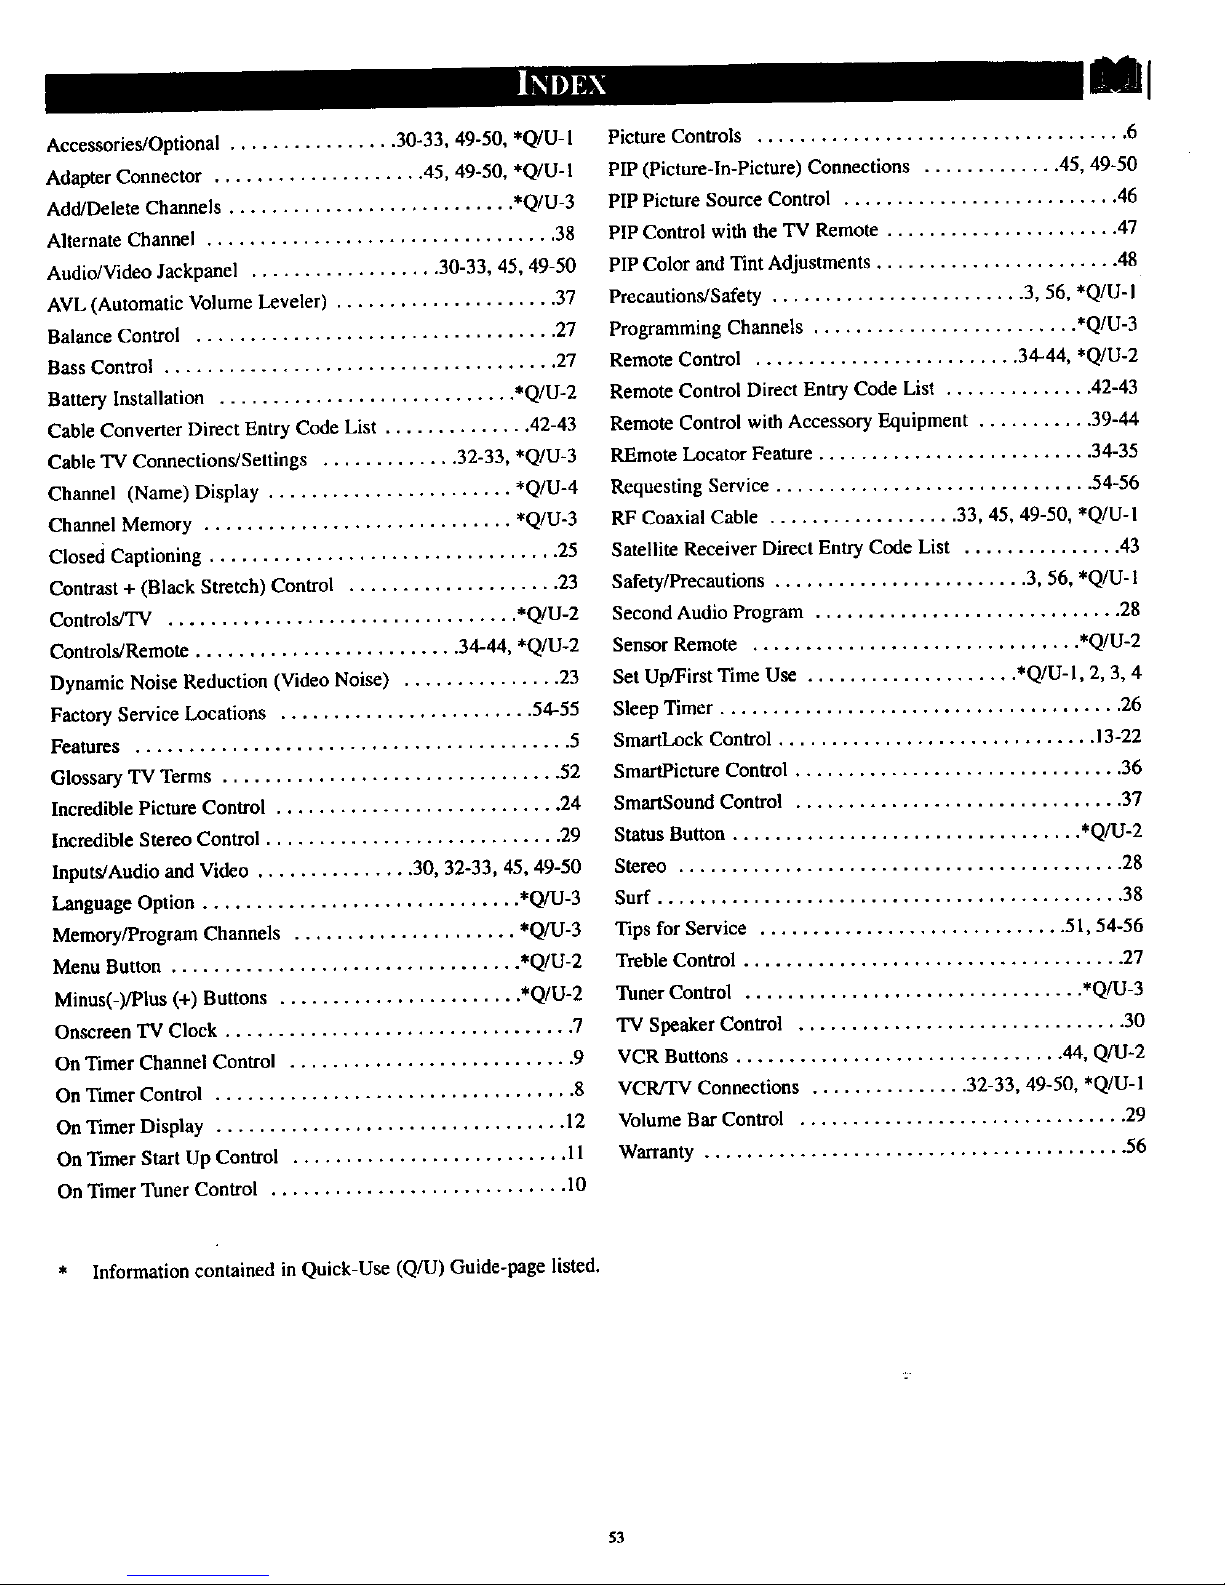
Accessories/Optional ................ 30-33, 49-50, *Q/U-1
Adapter Connector .................... 45, 49-50, *Q/U- I
Add/Delete Channels ........................... *Q/U-3
Alternate Channel ................................. 38
Audio/Video Jackpanel .................. 30-33, 45, 49-50
AVL (Automatic Volume Leveler) ..................... 37
Balance Control .................................. 27
Bass Control ..................................... 27
Battery Installation ............................ *Q/U-2
Cable Converter Direct Entry Code List .............. 42-43
Cable TV Connections/Settings ............. 32-33, *Q/U-3
Channel (Name) Display ....................... *Q/U-4
Channel Memory ............................. *Q/U-3
Closed Captioning ................................. 25
Contrast + (Black Stretch) Control .................... 23
Controls/TV ................................. *Q/U-2
Controls/Remote ......................... 34-44, *Q/U-2
Dynamic Noise Reduction (Video Noise) ............... 23
Factory Service Locations ........................ 54-55
Features ......................................... 5
Glossary TV Terms ................................ 52
Incredible Picture Control ........................... 24
Incredible Stereo Control ............................ 29
Inputs/Audio and Video ............... 30, 32-33, 45, 49-50
Language Option .............................. *Q/U-3
Memory/Program Channels ..................... *Q/U-3
Menu Button ................................. *Q/U-2
Minus(-)/Plus (+) Buttons ....................... *Q/U-2
Onscreen TV Clock ................................. 7
On Timer Channel Control ........................... 9
On Timer Control .................................. 8
On Timer Display ................................. 12
On Timer Start Up Control .......................... 11
On Timer Tuner Control ............................ 10
Picture Controls ................................... 6
PIP (Picture-In-Picture) Connections ............. 45, 49-50
PIP Picture Source Control .......................... 46
PIP Control with the TV Remote ...................... 47
PIP Color and Tint Adjustments ....................... 48
Precautions/Safety ........................ 3, 56, *Q/U-I
Programming Channels ......................... *Q/U-3
Remote Control ......................... 34-44, *Q/U-2
Remote Control Direct Entry Code List .............. 42-43
Remote Control with Accessory Equipment ........... 39-44
REmote Locator Feature .......................... 34-35
Requesting Service .............................. 54-56
RF Coaxial Cable .................. 33, 45, 49-50, *Q/U-I
Satellite Receiver Direct Entry Code List ............... 43
Safety/Precautions ........................ 3, 56, *Q/U-1
Second Audio Program ............................. 28
Sensor Remote ............................... *Q/U-2
Set Up/First Time Use .................... *Q/U-I, 2, 3, 4
Sleep Timer ...................................... 26
SmartLock Control .............................. 13-22
SmartPieture Control ............................... 36
SmartSound Control ............................... 37
Status Button ................................. *Q/U-2
Stereo .......................................... 28
Surf ............................................ 38
Tips for Service ............................. 51, 54-56
Treble Control .................................... 27
Tuner Control ................................ *Q/U-3
TV Speaker Control ............................... 30
VCR Buttons ............................... 44, Q/U-2
VCR/TV Connections ............... 32-33, 49-50, *Q/U- 1
Volume Bar Control ............................... 29
Warranty ........................................ 56
* Information contained in Quick-Use (Q/U) Guide-page listed.
53
Page 54

Philips Consumer Electronics Company
Factory Service Center Locations
• Indicates In-Home/Catxy-ln Service
'Beaumont/Auslic
Sen Antonio
Tsmpa/W Florida
NOTE:IfyouresideinoneofourPhllipsFactoryServiceBranchareas(seedirectoryonback),youcancontactthenearestServiceBranchto
obtainefficientandexpedientrepairforyourproduct.IfyourproductisIn-Warranty,youshouldhaveproof-of-purchasetoensureNoCharge
Service.ForOut-of-Warrantyservice,callthelocationnearestyou.
NOTA:SIvousrdsidezdansunedesrdgionsdesserviespar unesuccurealedeserviceaprilsventsdufabdcantPhntps(volrlistsci-dessous),
vouspourrezcontacterlabranchedeserviceapr_sventslaplusprosdochezvouspourobtenironserviceapr_sventsrapideetefficace.Sile
produitestsousgarantki,ilsuffiradepr6senterunepreoved'achatpourb_n_ficlerd'unservicesansfrais. Pourlesproduitsnoncouvertsparla
garantie,contactezlecentrele plusprosdechezvous.
NOTA:SiUd.resideenunadenuestraszonasparasucursalesPhilipsdecervlcloaldefiibrica(verdlrectoriorodsabaJo),Ud.puedecornunicarse
conlasucurealdeserviciom_scercanaparaobtanerunareparaoidnoportunay eficazdesuproducto.SIsuproductoestertodavfabajogaran-
Ua,Ud.debepresentarcomprobantedecompraparanoocaslonarningunascargosporservicio.Paraserviciodespe6sdelvencimientodela
garantfa,flameallugarm_tscercanodelosabaJoindicados.
InCNda
Howyoucanobtainefficientandexpedientcarry-in,mall-in,or In-homeservicefor yourproduct
PleasecontactPhilipsat 1-800-661-6162(Frenchspeaking)
1-800-363-7278(Englishspeaking)
A=CNdz
Commentobtenirleserviceapr_s-veotepourlosproduitsapport_souenvoy_parlaposts_ notrecentredeserviceoulaservice_ domiciic
Veuillezcontacterphilips_l: 1-800-661-6162(Francophone)
1-800-363-7278
Cdmoracibkservictoefftcicntaparasuproducto,anpersona,potcorreoo a domicfllo
FavordecomunlcerseconPhilipsal: 1-800-661-6162(franc(_fono)
1-800-363-7278(angldfono)
1/g9
EL4482-,3Rev.AA
3135 015 07541•
54
Page 55

QUALITYSERVICEISASCLOSEAS YOURTEI.EPIIONEISIMPLYLOOKOVERTHELISTBELOWFORTHENUMBEROFA FACTORYSERVICECENTER
NEARYOU. YOORPROUOCTWILLRECEIVEEFFICIENTANDEXPEDIENTCARRY-IN,MAIL-IN,ORIN'HOMESERVICE,ANDYOUWILLRECEIVEPEACEOFMIND,
KNOWINGYOURPRODUCTISBEINGGIVENTHEEXPERTATTENTIONOFPHILIPS'FACTORYSmWE.ANn,IFTHEPHONENUMBERLISTEDFORYOURAREA
IS LONGDISTANCE,CALL1-800-242-9225FOeFACTORYS_nvm.
COMMENTOBTENIRNOTRESERVICEAPRiE8VENTERAPIDEETEFFICACE8011'PARSOURRIER,ADOMICILE,OUEN$EPRtSERTANTAUNCENTREOESERVICEPHILIPS.PLUSOEgOCENTRES
DERECEPTIONDEPROOUITSAREpARERATRAVERSLEPAYS:CONTACTERLECENTREOESERVIC4EAUXCONSOMMATEURSLEPLUSPflOSHEPOURSAVOIRL'EMPLACEMENTDECESO_PGTS
RANSUNRAYONDE50A75MILD(80KMA120KM)OUCENTREO|SERVICELOCAL.
CGMOOBTENERUNSERVICIOOPORTUNOYEFICLENTEPORCORREO,ENC/USAOEllPERSONAPARASUPROOUCTOATRAV_OEtiNCENTROPHILIPSDEIERVICiO,_ DE810SITIOSPOR
TODOELPAlePARALARECEPCIORDEPRODUCTO8NECESITADOEDEREPARACIOES:COMUNICEREECONELCENTRODEEERVICIODEFABRICAMA$C£RCANOPAPAESTO$LUGERESOERTRO
DEUNRADIODE80A120I(M(50A75MILLAS)OELCENTROOESERVICIOLOCAL.
GEORGIA
PhilipsFactoryServiceofGeorgia
200 N. CobbPkwy.,Suite120
Marietta,GA30062
(770) 795-0065
FLORIDA
PhilipsFactoryServiceof Florida
1911USHighway301 North
Tampa,FL33619
(813) 621-8181
WESTERNU.S.A.
PhilipsFactoryServiceWesternRegion
681 EastBrokawRd.
SanJose,CA95112
(408) 436-8566
TEX_
Philips FactoryServiceofTexas
1110 N. PostOakRd.,Suite100
Houston,TX 77055
(713) 682-3990
CENTRALU.S.A.
PhilipsFactoryServiceCentralUS
950 KeynoteCircle
BrooklynHeights,OH44131
(216) 741-3334
MICHIGAN
PhilipsFactoryServiceof Michigan
25173 DequJndre
MadisonHeights,MI 48071
(248) 544-2110
DALLASAREA
PhilipsFactoryServiceofDallas
415 N. Main Street,#107
Euless,TX76040
(713) 682-3990
ILLINOIS
PhilipsFactoryServiceof Illinois
1279 W. HamiltonPkwy.
Itasca,IL60143
(630) 775-0990
TENNESSEE
PhilipsFactoryServiceof EastTennessee
6700D P_ermJJJRd,
Knoxville,TN 37919
(423) 584-6814
MID-ATLANTIC
Philips FactoryServiceMid-Atlantis
352 DunksFerryRd.
Bensalem,PA19020
(215) 638-7500
MAC29291/99
DR
Page 56

COLOR TELEVISION
90 Days Free Labor
One Year Free Replacement of Parts (Two Years Free Replacement on Color Picture Tube)
This product can be repaired in-home.
HHO IS COVERED?
fou musthaveproofofpurchaseto receivewarrantyservice.A sales
receiptor otherdocumentshowingthat you purchasedthe productis
consideredproof of purchase,
WHAT IS COVERED?
Warranty coveragebeginsthe dayyoubuy your product. For90 d_
thereafter,all parts will be repaired or replaced free, and labor isfree.
From 90 daysto one year from the day of purchase,all partswill be
repaired or replaced free, but you pay for all laborcharges. From one
to two yearsfrom the day of purchase,you payfor the replacement or
repair of all partsexcept the picture tube, and for all labor charges.
After two yearsfrom the day of purchase,you payfor the replacement
or repair of all parts,andfor all labor charges.
All parts, includin¢repaired and replaced parts, are covered onlyfor
the originalwarranty period. When the warranty on the product
expires,the warranty on all replaced and repaired parts alsoexpires.
WHAT IS EXCLUDED?
Your warranty doesnot cover:
• laborchargesfor installationor setup of the product, adjustmentof
customer controls on the product,and installationor repair of
entenna systems outside of the product.
• product repair and/or part replacement becauseof misuse,acci-
dent, unauthorized repair or other causenot within the control of
PhilipsConsumer ElectronicsCompany.
• II_ceptionproblemscausedbysignalconditions or cableor antenna
systemsoutsidethe unit
• a product that requiresmodification or adaptation to enable it to
operate in any country other than the country for which it was
designed,manufactured,approvedend/or authorized, or repairof
productsdamagedby these modifications.
inddental or consequentialdamagesresultingfrom the product.
(Somestatesdo not allow the exclusionof incidentalor consequen-
tial damages,so the aboveexclusionmay not applyto you. This
includes,but is not limited to, prerecorded mater_ai,whether C_ 1
rishted or not copyrighted.)
• a product usedfor commercial or institutionalpurposes.
WHERE IS SERVICE AVAILABLE?
Warranty serviceisavailablein all countries where the product isoffi-
ciallydistributed by Philips ConsumerElectronicsCompany, In coun-
tries where PhilipsConsumer ElectronicsCompanydoesnot distribute
the product,the Ional Philipsservice organizationwill attempt to pro-
videservice(although there may be a delayif the appropriate spare
partsand technicalmenual(s)are not readily available).
MAKE SURE YOU KEEP...
Pleasekeep your salesreceipt or other document showingproofof
purchase. Attach itto this owner'smanualand keep both nearby.
Also keep the originalbox and packingmaterialin caseyouneed to
return your product.
BEFORE REQUESTING SERVICE...
Pleasecheck your owner's manualbefore requestingservice.
Adjustmentsof the controls discussedthere may saveyou a service
call.
TO GET _VARRANTY SERVICE IN U.S.A.,
PUERTO RICO OR U.S. VIRGIN ISLANDS...
Contacta Philipsfactoryservicecenter(seeenclosedlist)or autho-
rizedservicecentertoarrangerepair.
(In U.S./_, Puerto Rico and U.S.Virgin Islands.all impliedwarranties,
includingimpliedwarranties of merchantability andfimessfor a partic-
ularpurpose,are limited in duration to the durationof this express
warranty. But,becausesome statesdo not allow limitationson how
longan Impliedwarranty maylast,this limitationmay not applyto
you,)
TO GET WARRANTY SERVICE IN CANADA...
PleasecontactPhilipsat:
1-800-661-6167.(FrenchSpeaking)
1-800-363-7278 (EnglishSpeaking)
(In Canada,this warranty is givenin lieu of allother warrandes. No
other warranties are expressed or implied,includingany impliedwar-
ranties of merchantability or fitnessfor a particularpurpose. Philipsis
not liable under anycircumstancesfor any direct, indirect, spedai, inci-
dentalor consequentialdamages,howsoever incurred, even if notified
of the possibilityof such damages.)
REMEMBER...
Pleaserecord the model andserialnumbers found on the product
below. Also, pleasefill out and mailyour warranty registrationcard
prompdy. It will beeasierfor us to notify youif necessary.
MODEL #
SERIAL#
Philips Service Company, P.O. Box ?.976, Longvlew, Texas 75606, (903) 2424800
Printed in U.SmA.
 Loading...