

Page 1
AL
C 0 L 0 R
T E L E V I S I 0 N
IPS
Page 2

Once your PHILIPS MAGNAVOX purchase is registered, you're eligible to r6ceive all the privileges of
owning a PHILIPS MAGNAVOX product. So complete and return the Warranty Registration Card
enc,!osed with your purchase at once. And take advantage of these irrTportant benefits.
Congratulations on your purchase,
and welcome to the "family!"
PHILIPS
Dear PHILIPS MAGNAVOX product owner:
Thank you for your confidence in PHILIPS MAGNAVOX. You've :selectedone of the best-built, best-
backed products
available today. And we'll do everything in our power to keep you happy with your purchase for many
years to come.
As a mernber of the PHILIPS MAGNAVOX "family," you're entitled to protection by one of tlhe most
comprehensive warranties and outstanding service networks in the industry.
What's more, your purchase guarantees you'll receive all the information and special offers for which
you qualify, plus easy access to accessories from our convenient home shopping network.
And most importantly you can count on our uncompromising corr_mitment to your total satisfaction.
All of this is our way of saying welcome-and thanks for investing in a PHILIPS MAGNAVOX product.
Sincerely',
Robert Minkhorst
President and Chief Executive Officer
P.S. Remember, to get the most from your PH,rLIPS
MAGNAVOX product, you must return your
Warranty Registration Ca*d within 10 days. So
please mail it to us right row!
m
Know these
safetysymbols
,_ This "bolt of lightning" indicates uninsulated material v_ith n your unit may cause an electrical
shock. For the safety of everyone in your household, please d3 not remove product covering.
,_k The "exclamation point" calls attention to features for which you should read the enclosed lit-
erature closely to prevent operating and maintenance problems.
WARNING: TO PREVENT FIRE OR SHOCK HAZARD, DO NOT EXPOSE THIS EQUIPMENT
TO RAIN OR MOISTURE.
CAUTION: To prevent electric shock, match wide blade of pluc to wide slot, anti fully insert.
ATTENTION: Pour eviter les chocs _lectriques, introduire la lame la plus large tie la fiche dans la
borne correspondante de la prise et pousser jusqu'au fond.
MAGNAVOX
Page 3
SAFETYINSTRUCTIONS- Readbefore operatingequipment
This product was de,signedand manufactured to meet strict quality and
safety standards. There are, however, some installation and operation
precautionswhich you should be particularly awareof.
,
2.
3.
4.
5.
6.
6A.
7.
8.
9,
10.
11.
'BeadInstructions - All the safety and operating instructions should
:)ereadbeforetheapplianceis operated.
Relain Instructions - The safety and operating instructions should
be retainedfor future reference.
HeedWarnings - All warnings on the appliance_nd in the operating
instructions should beadheredto.
Follow Instructions - All operating and use instructions should be
followed.
Waler and Moisture - The applianceshould not be used near water
- for example, neara bathtub, washbowl, kitchen sink, laundry tub,
in a wet basementor neara swimming pool, etc.
Cadsand Stands - Theapplianceshould be used only with acart or
standthat is recommendedbythe manufacturer.
An appliance and cart combination should be moved
with care. Quick stops, excessive force, and uneven
surfaces may cause the applianceand cart combination
tooverturn.
Wall or Ceiling Mounting - The appliance should be mounted to a
wall or ceiling only as recommendedby the manufacturer.
Ventilation - Tile applianceshould be situated so that its location or
position does not interfere with its proper ventilation. Forexample,
the appliance should not be situated on a bed, sofa, rug, or similar
surface that may block the ventilation openings; or, placed in a
built-in installa!:ion,such asa bookcaseor cabinet that may impede
the flow of a_rthrough the ventilation openings.
Heat - The appliance should be situated away from heat sources
such as radiators, heat registers, stoves, or other appliances
(including amplifiers) that produce heat.
Power Sources - The appliance should be connected to a power
supply only of the type describedin the operating instructions or as
markedon the appliance.
Power-Cord Protection - Power supply cords should be routed so
that they are not likely to be walkedon or pinched by items placed
upon or against them, paying particular attention to cords and
plugs, conveniencereceptacles,andthe point where they exit from
the appliance.
12. Cleaning - The appliance should b_,.cleaned only as recommended
bythe manufacturer.
13. Power Lines - An outdoor antenna should be located away from
power lines.
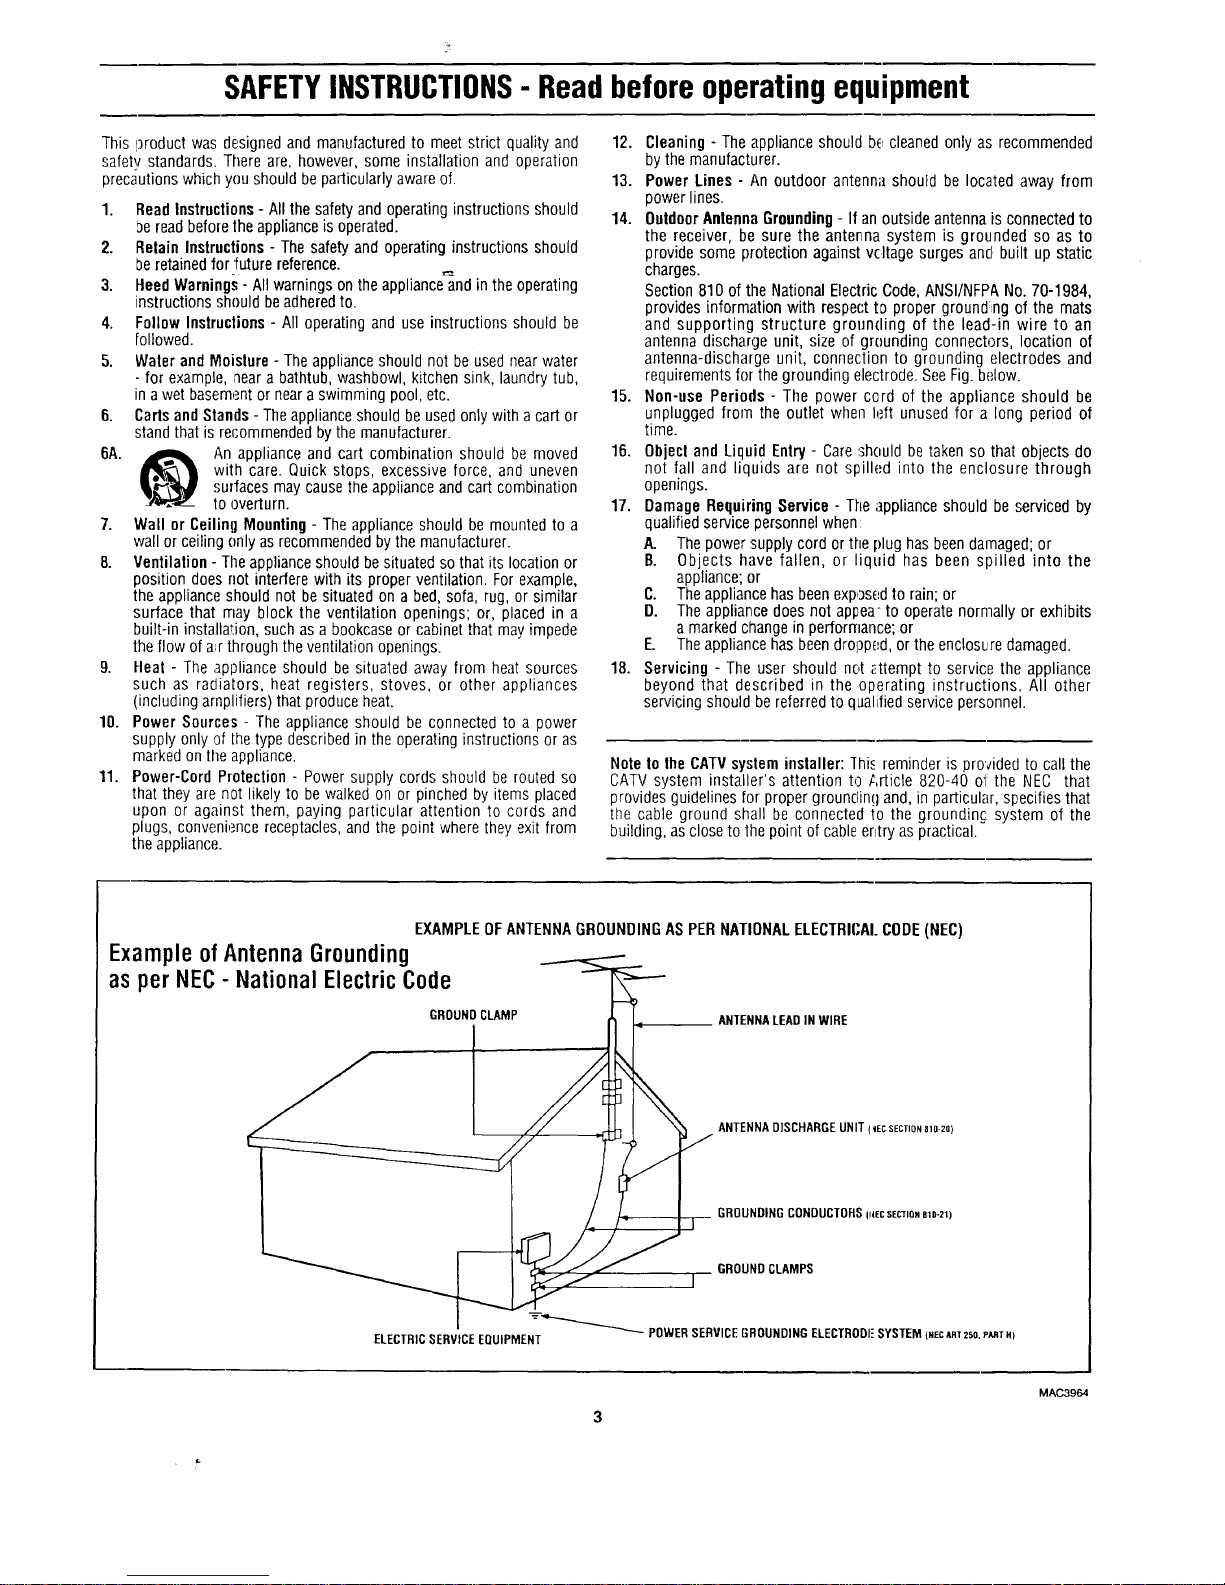
14. OutdoorAntennaGrounding- If an outside antenna is connected to
the receiver, be sure the antenna system is grounded so as to
provide some protection against vcItage surges and built up static
charges.
Section810 of the National Electric Code,ANSI/NFPANo. 70-1984,
provides information with respect tD proper grounding of the mats
and supporting structure grounding of the lead-in wire to an
antenna discharge unit, size of grounding connectors, location of
antenna-discharge unit, connection to grounding electrodes and
requirementsfor the grounding electrode. SeeFig. below.
15. Non-use Periods - The power cord of the appliance should be
unplugged from the outlet when left unused for a long period of
time.
16. Objecl and Liquid Enlry- Care should betaken so that objects do
not fall and liquids are not spilled into the enclosure through
openings.
17. Damage Requiring Service- The appliance should be serviced by
qualifiedservice personnel when:
A. The power'supply cord or the plug hasbeendamaged;or
B. Objects have fallen, or liquid has been spilled into the
appliance;or
C. The appliancehas been exposedto rain; or
D. The appliance does not appea to operate normally or exhibits
amarkedchange in performance; or
E. The appliancehas beendropped, or the enclosure damaged.
18. Servicing - The user should not _ttempt to service the appliance
beyond that described in the operating instructions. All other
servicing should bereferred to qualified service personnel.
Notelo the CATVsystem installer: [his reminder is provided to call the
CATVsystem installer's attention to Article 820-40 of the NEC that
provides guidelinesfor proper grounding and, in particular, specifies that
the cable ground shall be connected to the groundin_ system of the
building, as close to the point of cable entry as practical.
EXAMPLE OF ANTENNA GROUNDING AS PER NATIONAL ELECTRICAl.CODE (NEC)
Example ofAntenna Grounding
as per NEC- National Electric Code
ELECTRICSERVICEEQUIPMENT
GROUND CLAMP ANTENNALEADIN WIRE
ANTENNADISCHARGEUNIT (_ECSECTION810-2Q)
GROUNDINGCONDUCTORSmEcSECTION81D-211
GROUNDCLAMPS
]
"-_---"_'---"_'_ POWERSERVICEGROUNDINGELECTRODI"SYSTEM(NECARTZSO.PARTH)
3
MAC3964
Page 4
Introduction
Welcome/Registration of Your TV ............................ 2
Safety/Precautions ..................................................... 3
Table of Contents ....................................................... 4
Features ...................................................................... 4
O.- creon EN ) eature
"_Setting the T%r for Cable TV Operation ............. 5
_Adding Channels in Memory (Automatically)...6
"_Adding Channels in Memory (Manually) .......... 7
"_ttow to Set the TV for Closed Captioning ........ 8
_Setting the Bass, Treble and Balance ................. 9
_Setting the TV for Stereo/SAP Programs ......... l 0
_'Using the Sound Image Control ....................... 11
"_Using the TV Volume Bar Control ................... 11
<>Setting the Surf/Smart Surf Control ................. 12
"_Adjusting the TV Picture .................................. 13
4>Setting the TV Sleep Timer Control ................. 14
"¢'Adjusting the Set Clock Control ....................... 15
<>Adjusting the Set Timer/Timer ON/OFF .......... 16
<>Using the TV Channel Reminder ..................... 17
_Using the On-Screen Language Option ............ 18
_Using the Audio Out Jacks (with TV Speaker
On/Off Control) ................................................ 19
•_'Using the TV's Audio/Video Input Jacks .... 20-21
Remote Control Operation
Using the :Smart Picture Control ................. 22
Using the :Smart Sound Control .................. 23
Setting the TV Remote to Work VCRs .............. 24-25
Setting the TV Remote to Work
Cable TV Converters .......................................... 26-27
Setting the TV Remote to Work VCRs or Cable
Converters - Search Method .................................... 28
Using the Remote's VCR Buttons ........................... 29
_-'] Picture-in-Picture (PIP)
Using the PIP Feature (Connections)....30-31
Using PIP with the. TV Remote ............................... 32
Selecting the PIP Picture Source ............................. 33
More PIP Connections (CaNe Converter) ............... 34
General Information
Tips if Something Isn't Working ................ 35
Glossary of TV Terms .............................................. 36
Index ........................................................................ 37
Factory Service Locations .................................. 38-39
Warranty ................................................................... 40
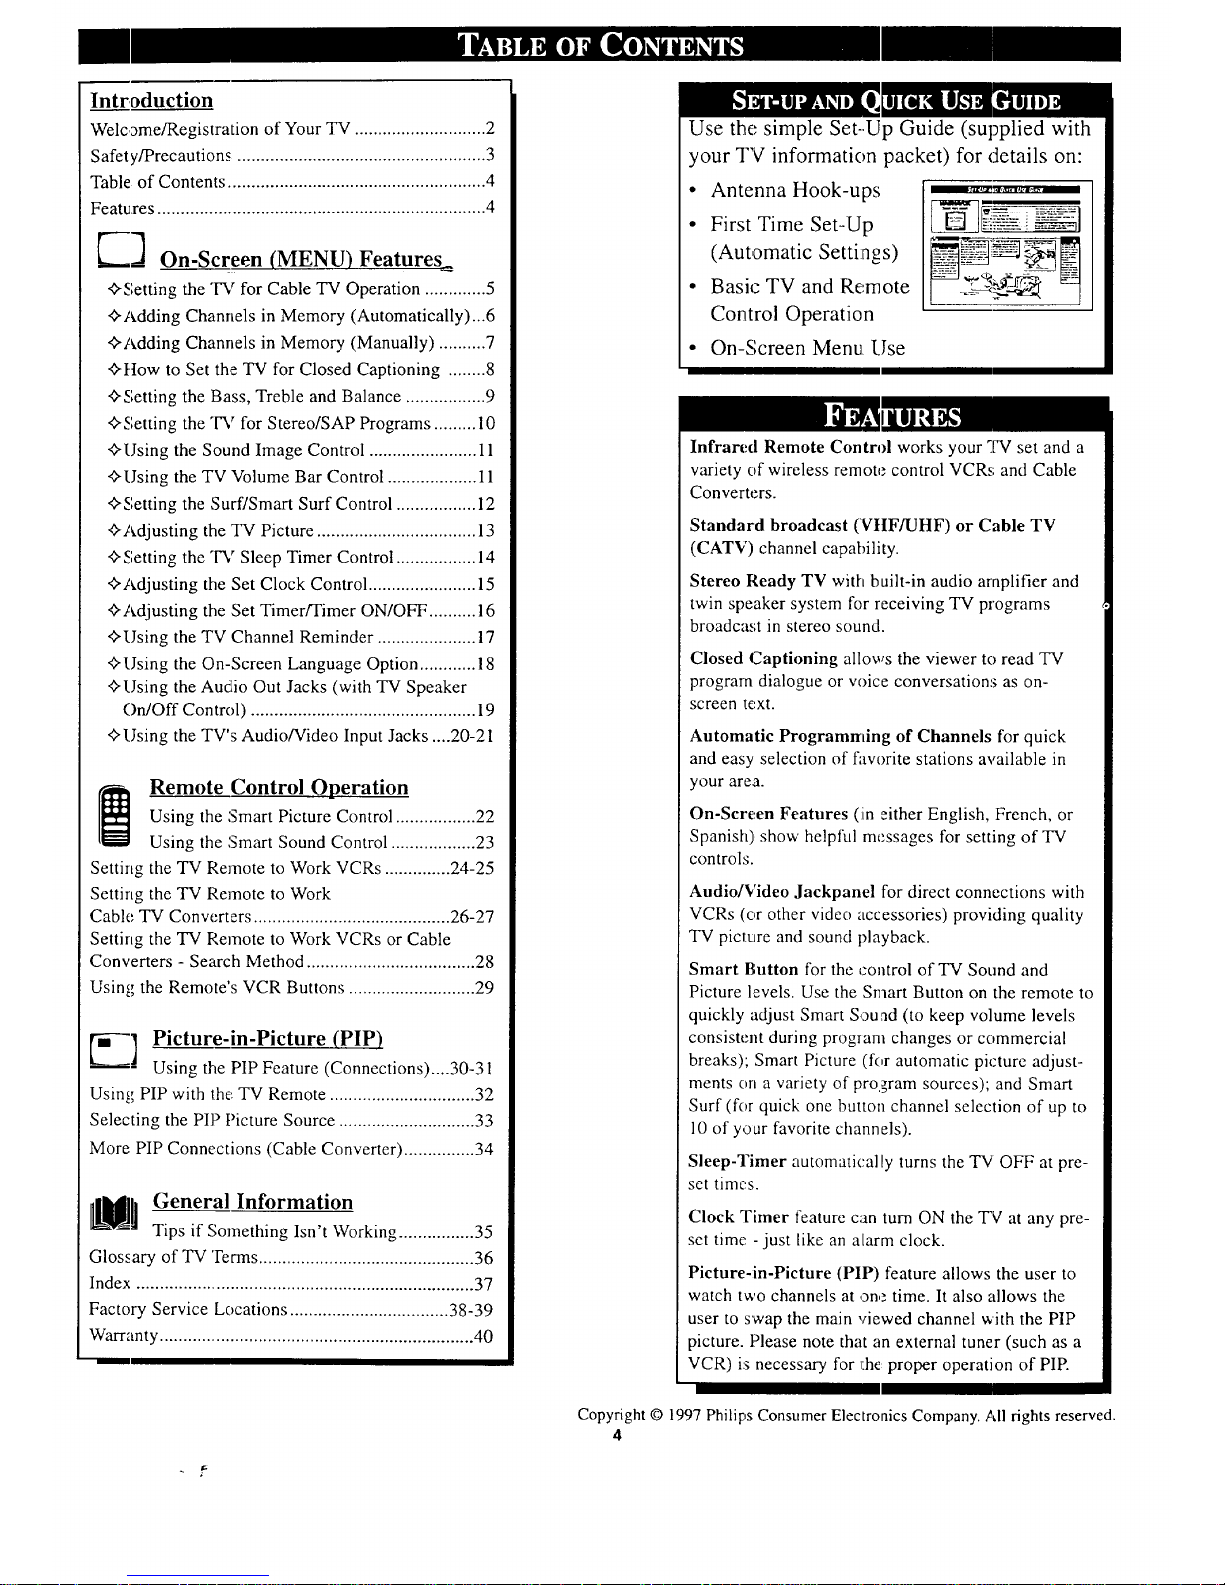
Use the; simple Set-.Up Guide (supplied with
your TV information packet) for details on:
• Antenna Hook-ups
• FirstTimeSet-Up
(Automatic Settings)
• Basic TV and Re,mote _%3"__
Control Operation
• On-Screen Menu Use
Infrared Remote Control works your TV set and a
variety of wireless remote control VCRs and Cable
Converters.
Standard broadcast (VtIF/UHF) or Cable TV
(CATV) channel capability.
Stereo Ready TV with built-in audio amplifier and
twin speaker system for receiving TV programs
broadcast in stereo sound.
Closed Captioning allows the viewer to read TV
program dialogue or wfice conversation:_ as on-
screen text.
Automatic Programming of Channels for quick
and easy selection of favorite stations available in
your area.
On-Screen Features (in either English, French, or
Spanish) show helpfltl messages for setting of TV
controls.
Audio/Video Jackpanel for direct connections with
VCRs (c)r other video accessories) providing quality
TV picture an(] sound playback.
Smart Button for the control of TV Sound and
Picture levels. Use the Smart Button on the remote to
quickly adjust Smart Souad (to keep volume levels
consistent during program changes or commercial
breaks); Smart Picture (for automatic picture adjust-
ments on a variety of pro,gram sources); and Smart
Surf (for quick one button channel selection of up to
10 of your favorite channels).
Sleep-Timer automatically turns the TV OFF at pre-
set times.
Clock Timer feature can turn ON the TV at any pre-
set time -just like an alarm clock.
Picture-in-Picture (PIP) feature allows the user to
watch two channels at one time. It also allows the
user to swap the main viewed channel with the PIP
picture. Please note that an external tuner (such as a
VCR) is necessary for 1:he proper operation of PIP.
Copyright © 1997 Philips Consumer Electronics Company. All rights reserved.
4
Page 5
OTE: If you went through
etup (in your Quick Use
Guide), this task has already been
completed f_r you.
You need to make sure that the TV
is set to pick up either Cable TV
stations or Antenna signals. In
other words, the TV needs to
know whether you have connected
a Cable 7V signal or a normal
antenna to its ANTENNA plug.
t BE'g-ff_€_
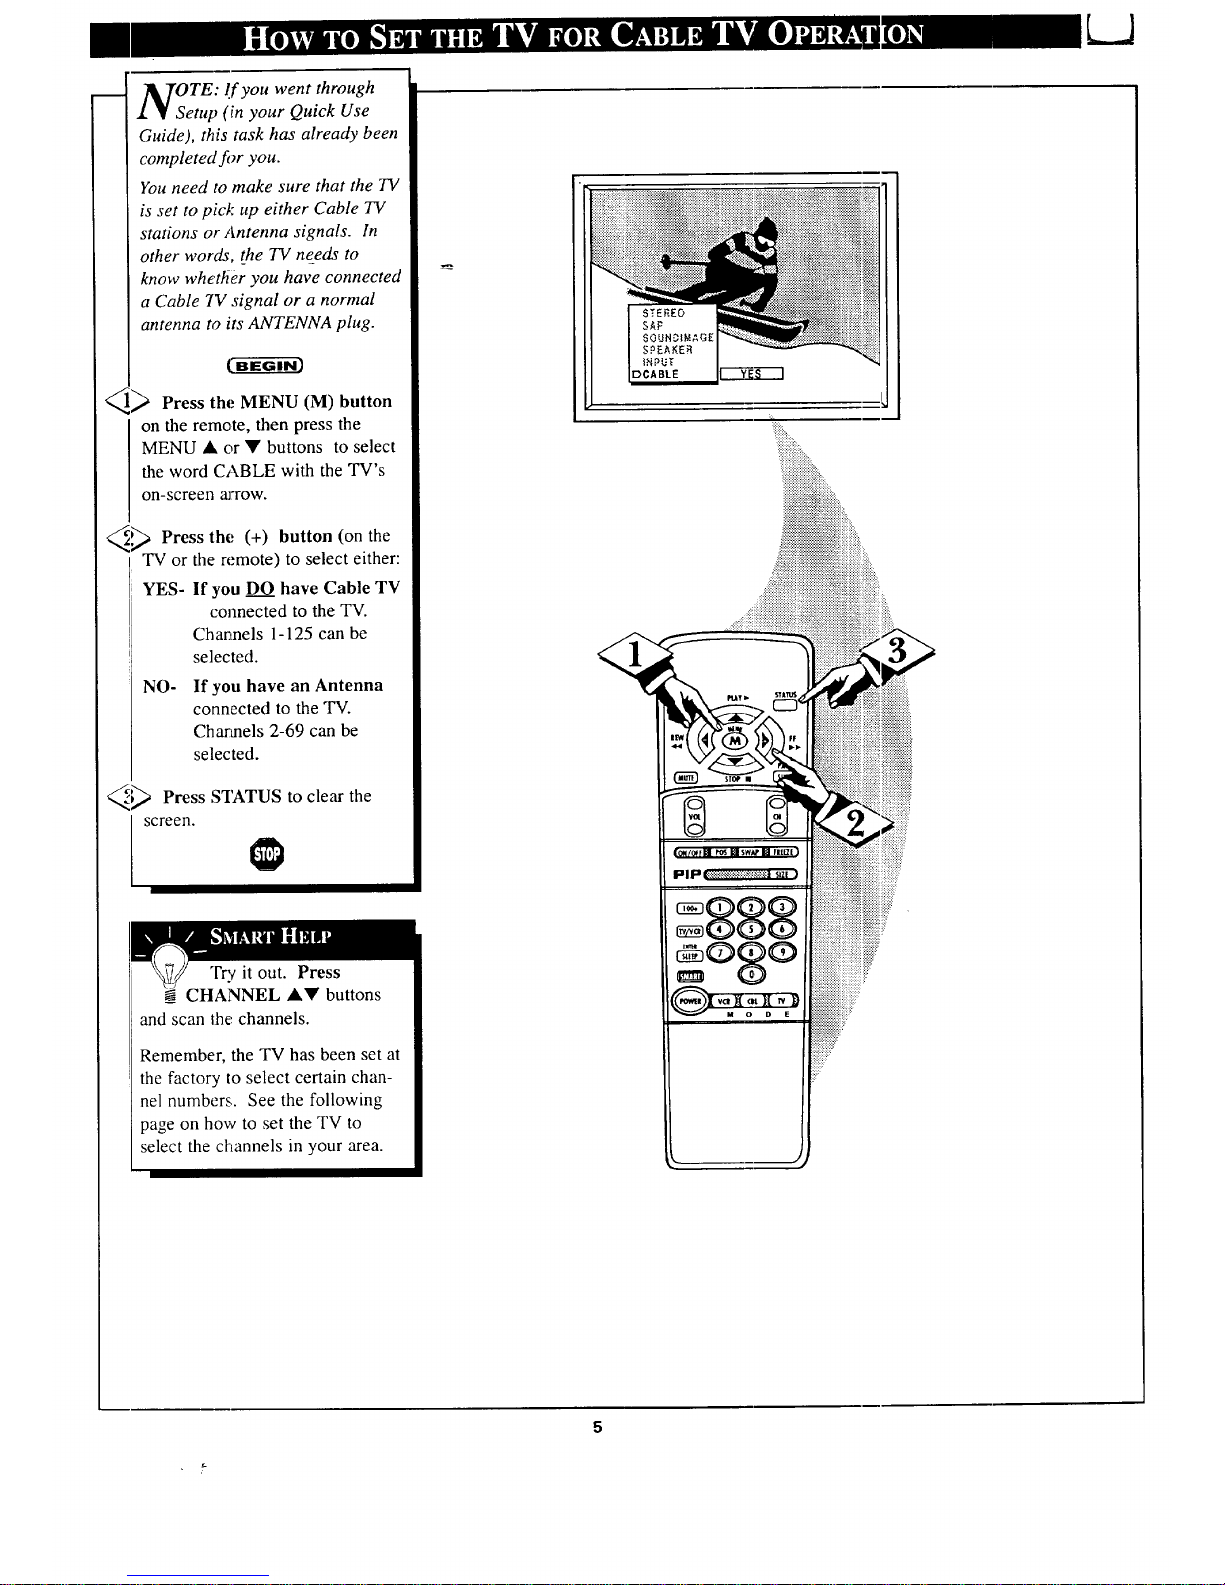
_ Press thl._MENU (M) button
on the remote, then press the
MENU • or • buttons to select
the word CABLE with the TV's
on-screen arrow.
_._ Press the (+) button (on the
TV or the remote) to select either:
YES- If you DO have Cable TV
connected to the TV.
Charmels 1-125 can be
selected.
NO- If you have an Antenna
connected to the TV.
Channels 2-69 can be
selected.
_"_ Press STATUS to clear the
I screen.
Try it out. Press
CHANNEL •• buttons
and scan the.channels.
Remember, the TV has been set at
the factory to select certain chan-
nel numbers.. See the following
page on how to set the TV to
select the channels in your area.
Page 6
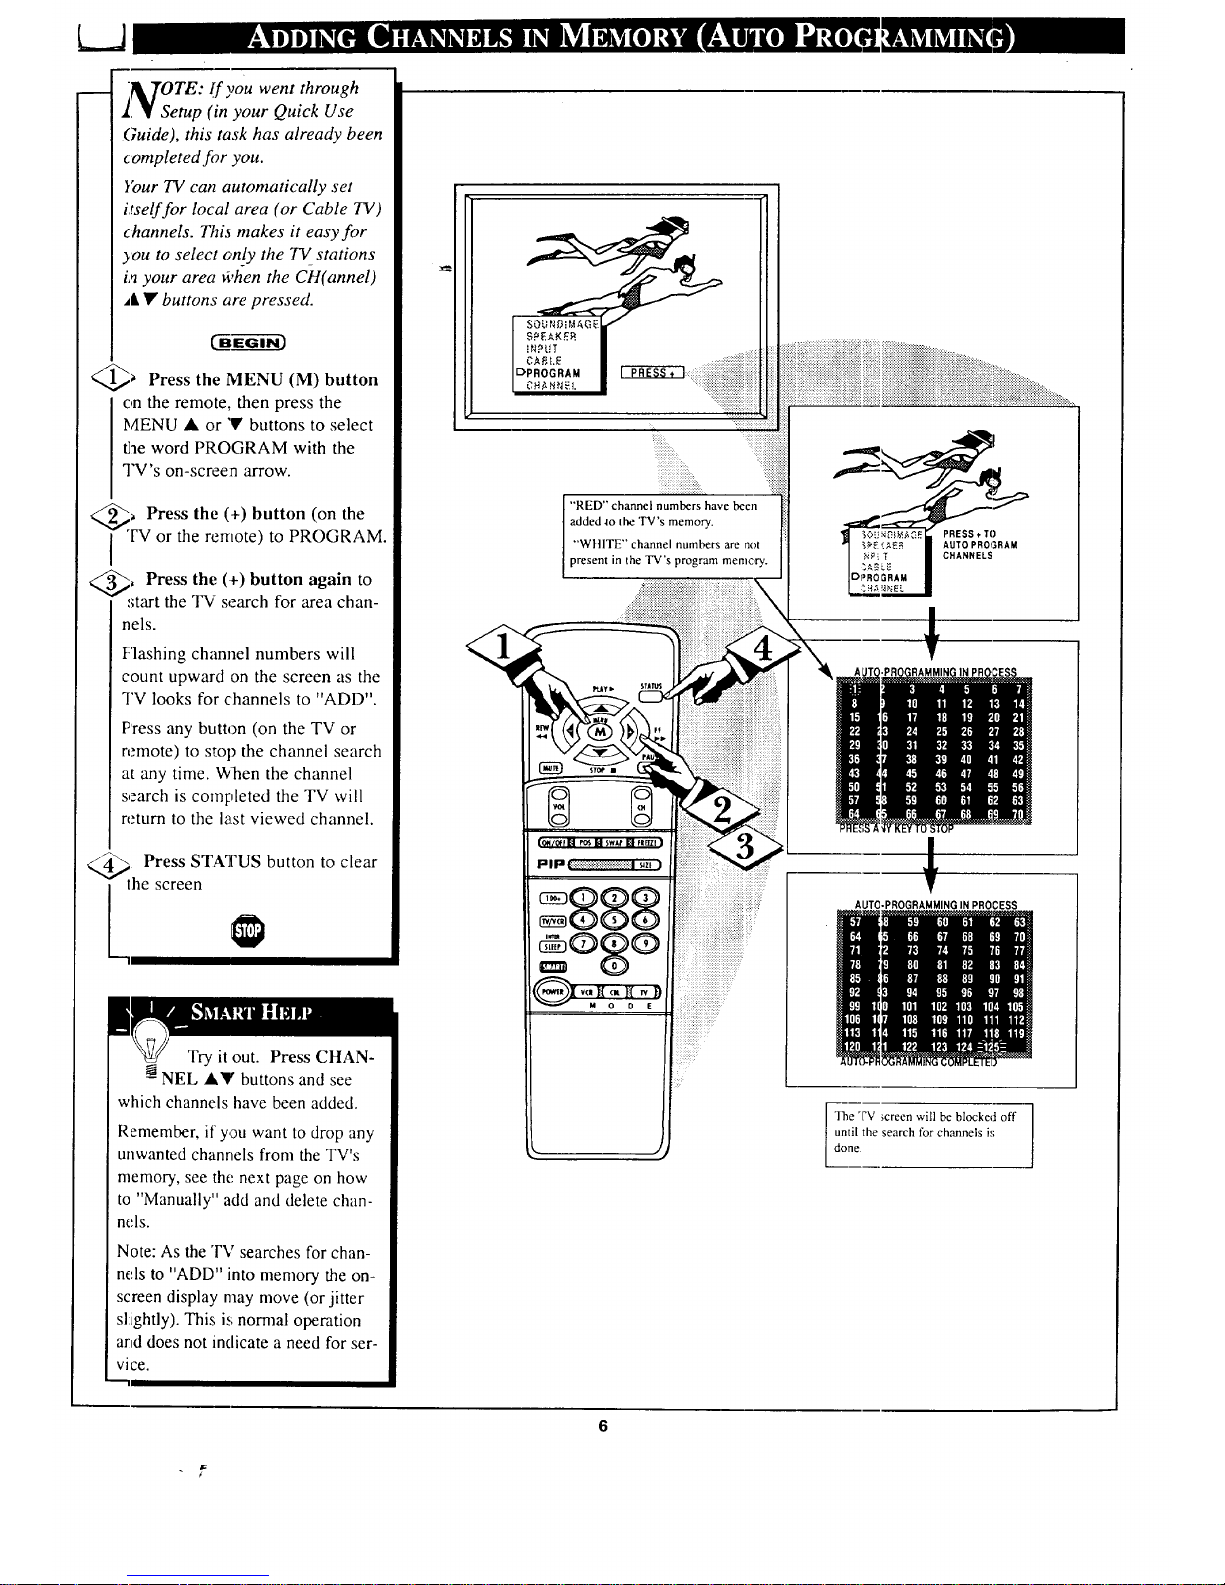
_ TOTE: o_you went through
11_ Setup (in your Quick Use
Guide), this task has already been
completed for you.
}'our TV can automatically set
itself for local area (or Cable TV)
channels. This makes it easy for
you to select only the TV stations
in your area ¢vhen the C-tt(annel)
,L • buttons are pressed.
_ Press the MENU (M) button
on the remote, then press the
MENU • or 'V buttons to select
the word PROGRAM with the
TV's on-screen arrow.
._ Press the (+) button (on the
i "IV or the remote) to PROGRAM.
_'_ Press the (_-) button again to
_start the TV search for area chan-
nels.
Flashing channel numbers will
count upward on the screen as the
TV looks for channels to "ADD".
Press any button (on the TV or
remote) to stop the channel search
at any time. When the channel
search is completed the TV will
return to the last viewed channel.
_._ Press STATUS button to clear
he screen
Try it out. Press CHAN-
-_NEL •Y buttons and see
which channels have been added.
Remember, if you want to drop any
unwanted channels from the TV's
memory, see the next page on how
to "Manually" add and delete chan-
nels.
Note: As the TV searches for chan-
nels to "ADD" into memory the on-
screen display may move (or jitter
sl:ightly). This is normal operation
and does not indicate a need for ser-
vice.
SO ND [_AGr
"RED" channel numbers have been
added .to the TV's memory.
"'WHITE" channel numbers are not
present in the TV's program memc,ry.
AUTO-PROGRAMMING IN PROCESS
"Ihe TV ;creen will be blocked off
until the search for channels is
done
Page 7

A uto Programming (see previous
.I ]kpage) adds all the channels it
can find (on .your Antenna or Cable
TV system) htto the TV's memory.
Add/Delete Channels makes it easy
for you to add other channels, or
drop unwanted channels, from the
list of channels in the TV's memory.
°t'-a-_ffi_
_1_ Press the MENU (M) button
on the remote, then press the
MENU A or • buttons to select
the word CHANNEL with the
TV's on-screen arrow.
Press the CHANNEL • or •
buttons (or Channel Number but-
tons on the remote) to select the
[ channel you want to SAVE (or
DELETE.)
_,_ Press the (+) button to SAVE
the selected channel number into
memory.
Press the (-) button to DELETE
a channel from memory.
_[_ Press the STATUS button to
clear the screen after adding all
the channels you want.
Try it out. Press the
CHANNEL•• buttons.
The channels you SAVED should
appear. The channels you
DELETED should not appear.
Remember, you can also add the
VCR/AUX mode (see page 20)
into the TV's channel memory.
Then by pressing the CH • •
buttons you can quickly select the
Audio/Video Input jacks on the
rear of the 'FV. Just "'SAVE" the
VCR/AUX mode (located between
the lowest and highest channel
numbers) into the TV's memory.
12 /
J_
Page 8
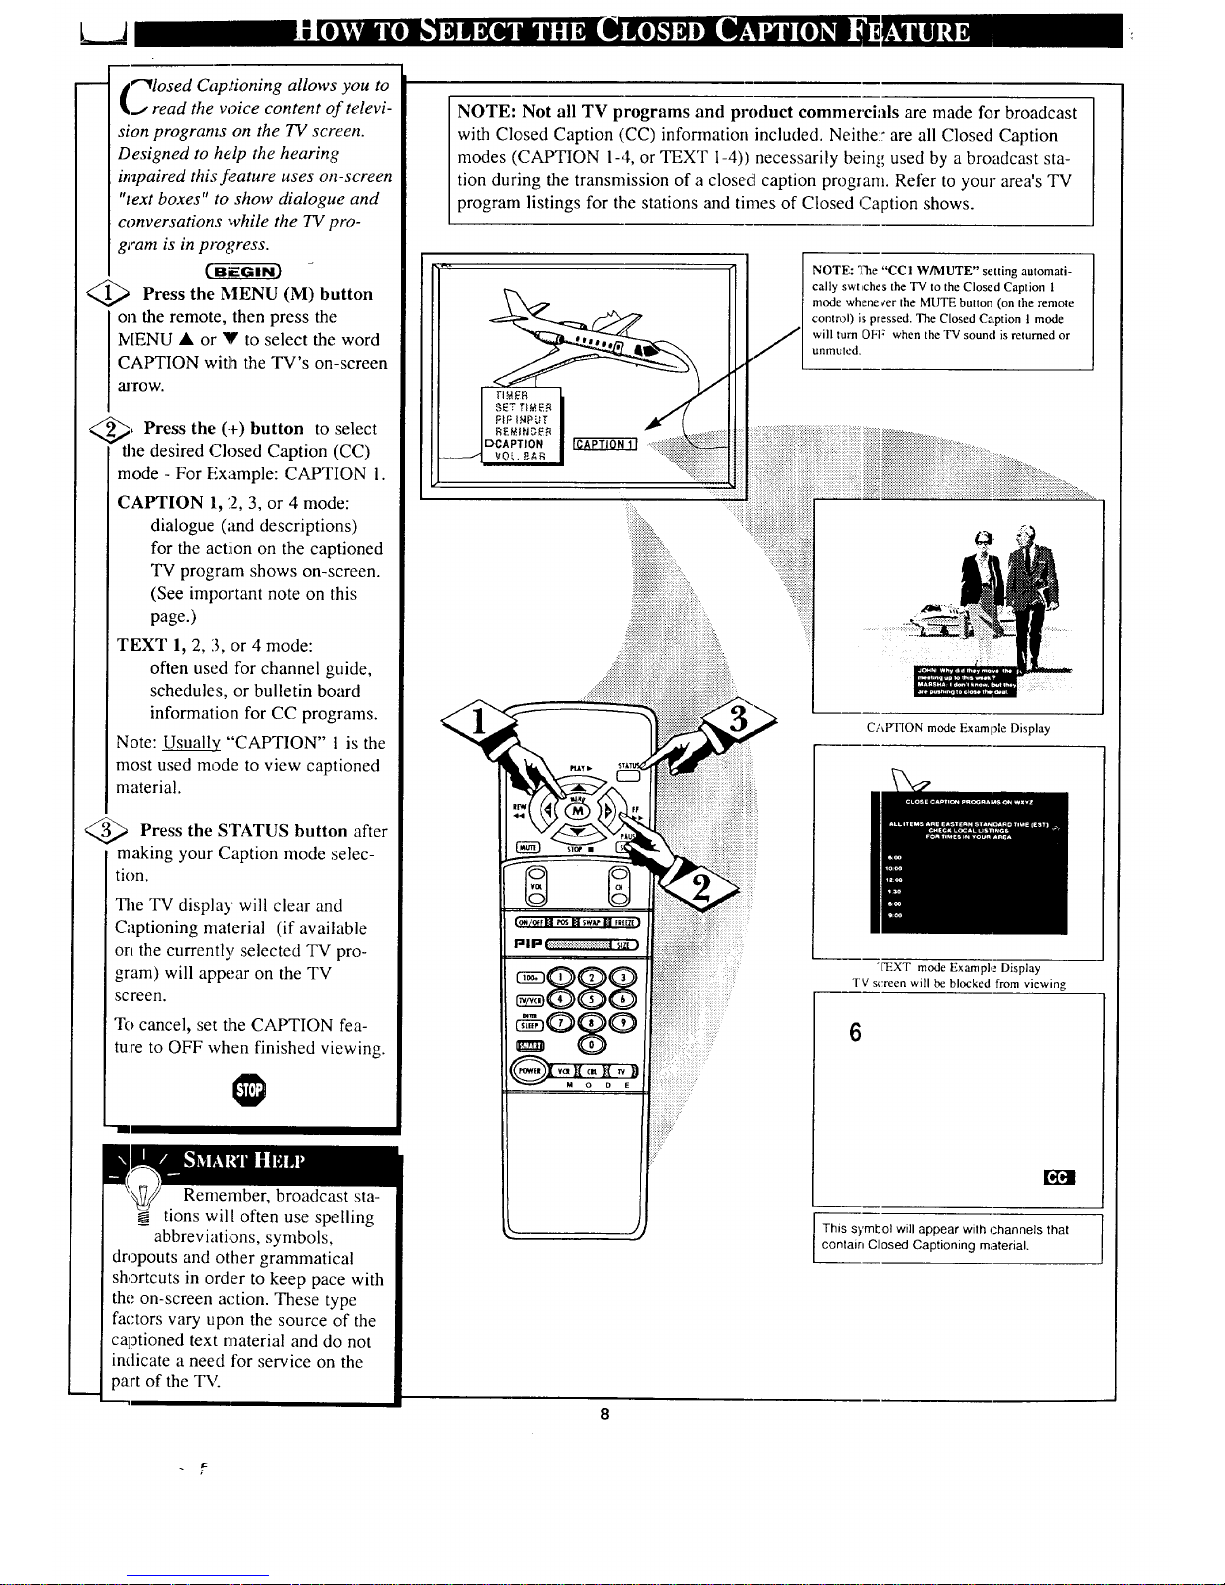
€'_losed Captioning allows you to
J read the voice content of televi-
sion programs on the TV screen.
Designed to help the hearing
impaired this feature uses on-screen
"text boxes" to show dialogue and
conversations while the TV pro-
gram is in progress.
Press the MENU (M) button
on the remote, then press the
IvIENU • or V to select the word
CAPTION with the TV's on-screen
alTOW.
<
•)_':, Press the (+) button to select
I the desired Closed Caption (CC)
mode - For Example: CAPTION 1.
CAPTION 1, 2, 3, or 4 mode:
dialogue (and descriptions)
for the action on the captioned
TV program shows on-screen.
(See important note on this
page.)
TEXT 1, 2, 3, or 4 mode:
often used for channel guide,
schedules, or bulletin board
information for CC programs.
Note: Usually "CAPTION" 1 is the
most used mode to view captioned
material.
<_ Press the STATUS
button after
making your Caption mode selec-
tion.
The TV display will clear and
Captioning material (if available
on the currently selected TV pro-
gram) will appear on the TV
screen.
To cancel, set the CAPTION fea-
ture to OFF when finished viewing.
1
Remember, broadcast sta-
tions will often use spelling
abbreviations, symbols,
dropouts and other grammatical
shortcuts in order to keep pace with
the on-screen action. These type
factors vary upon the source of the
captioned text material and do not
indicate a need for service on the
part of the TV.
NOTE: Not all TV programs and product commercials are made for broadcast
with Closed Caption (CC) information inclucied. Neithe::are all Closed Caption
modes (CAPTION 1-4, or TEXT 1-4)) necessarily being used by a broadcast sta-
tion during the transmission of a closed caption program. Refer to your area'sTV
program listings for the stations and times of Closed Caption shows.
NOTE: The "CC 1 W/M UTE" sc tting automati-
cally swt_ches the TV to the Closed Caption 1
mode wheneeer the MUTE button (on the remote
control) is pressed. The Closed Caption 1 mode
will tam OFI z when the TV sound is returned or
unmuted.
i!ii::..
,,,..............
_:_:::::::::::::::::.
iiiiiiiiiiii!iiiiii_!_!_....
_iiiiiiiiiiiiiiiiiiiiiiiiii_!;?,
!!iiii!i!iii!iiiiiiiiiiiiiiiiiiiiiiiiiii!ili ,
::::::::::::::::::::::::::::::::::::::::::::::::::::::
.;_i_i_i_i;i_ilililililililililililiSilil)i_i_iiiii_!i_iiiii_!_:
.:ii_iiiiiiiiiiiiiiiiiiiiiiiiiii?ii!iiiiiiiiiiiiiiiiiiiiiiiii_iiiiiii?iiiii!iii_!::
....iiiiiiiiiiiiiiiiii}iiiiiii))iii_iiiiiiiii}iiiiiiiiiiiiiiiiiiiiiii_ii_iii2iiiiiii_ii!;_iiiii}_
...._iiiiiiii[iiiiiiiii;i;iiiiiiiii)iiii_i!iiiiii[iiiiiiiiiiiiiiiiiiiiii_i_i_i_i_i_i_i_!}iii;iii_iii;iiii_i_
i:iiliii!2112111111121112211113111111111111111111117
iiiiiiiiiiiiiiiiiiiiiiiii iiii!
:: iiiiiiiiiiii!iiiiiiii ii! i!iiiiiiiiii
:,_i_:,iiii!!iii_i!iiiiiiil
:: ' ii!iiiiiiili!iiii
CAPTION mode Example Display
"['EXT mode Example Display
rv screen will be blocked from viewing
6
r4"-,!
This symbol will appear wilh channels that
contain Closed Captioning material.
8
Page 9
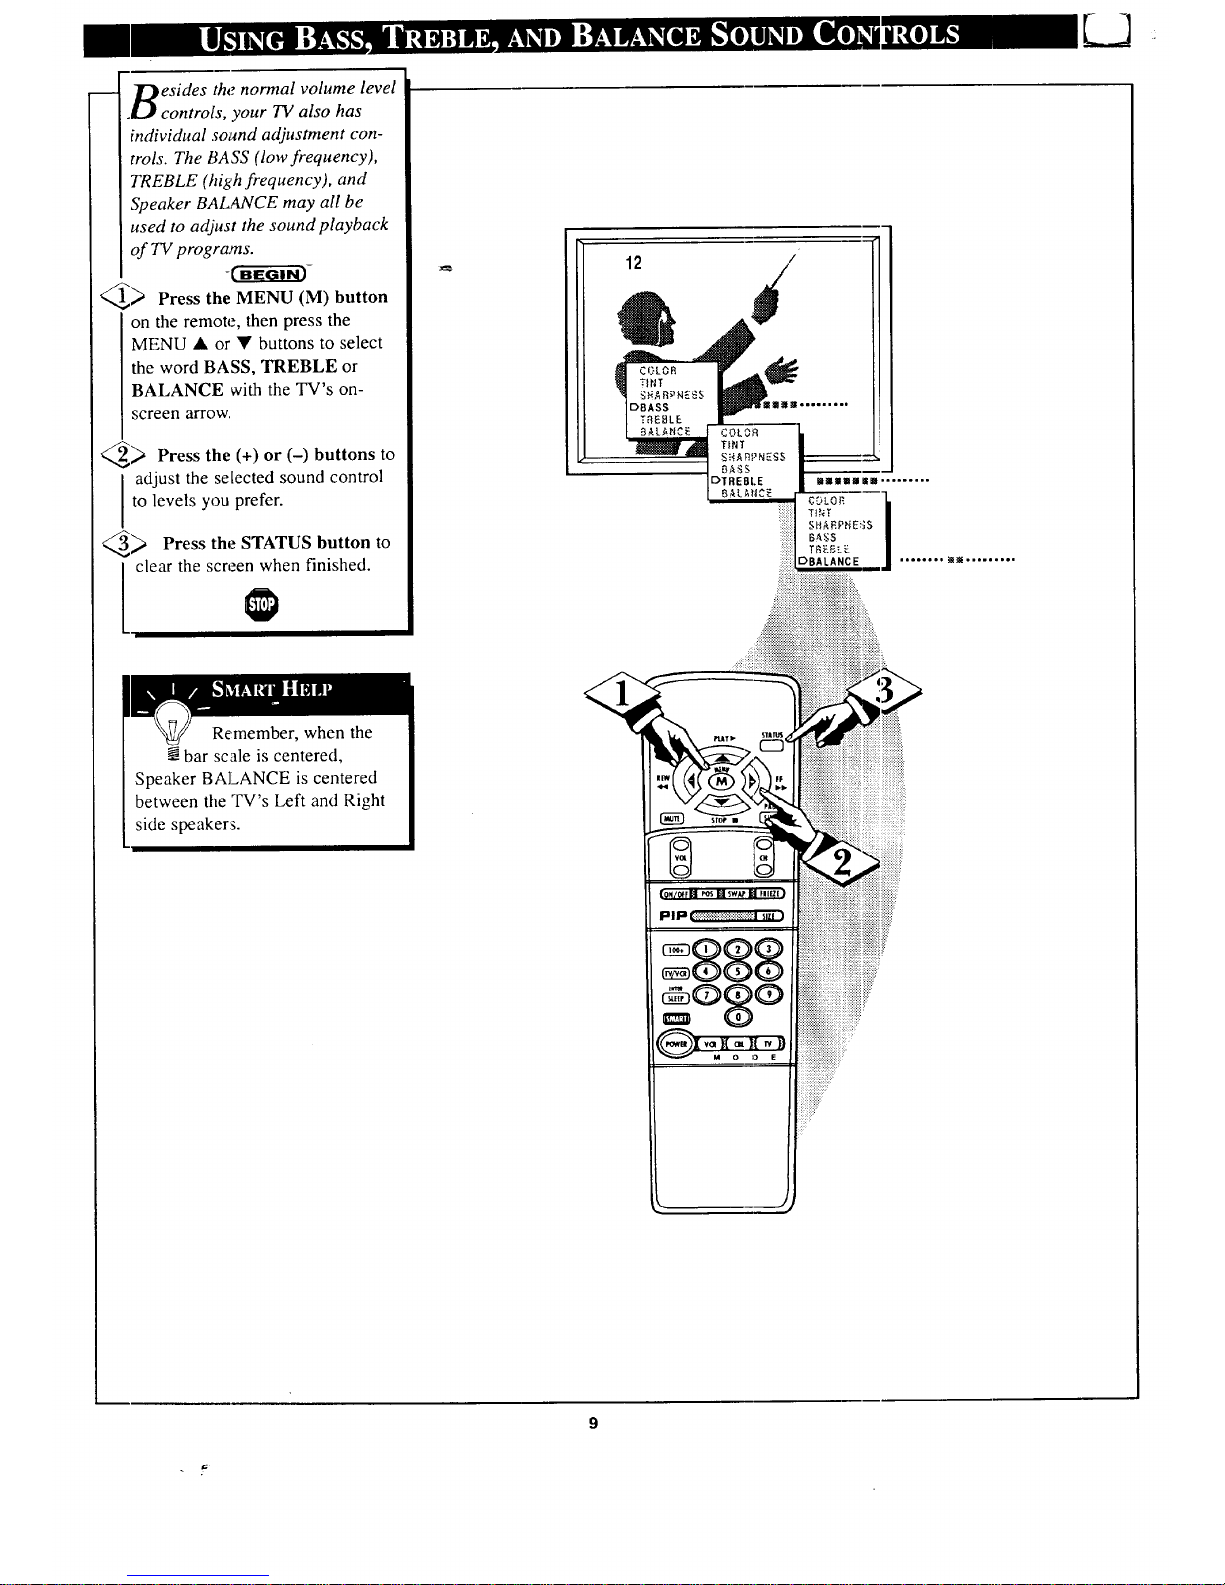
Resides the normal volume level
.LJl controls, your TV also has
individual sound adjustment con-
trols. The BASS (low frequency),
TREBLE (high frequency), and
Speaker BALANCE may all be
used to adjust the sound playback
of TV programs.
-t"_-Gi-_-
_ Press the MENU (M) button
on the remote, then press the
MENU • or • buttons to select
the word BASS, TREBLE or
BALANCE with the TV's on-
screen arrow,
_> Press the (+) or (-)
buttons to
adjust the selected sound control
to levels you prefer.
_ Press the STATUS button to
clear the screen when finished.
[
/
Remember, when the
N bar scale is centered, I
Speaker BALANCE is centered
between the TV's Left and Right
side speaker:_.
Page 10

.Vour TV can receive broadcast
.! stereo TV programs. The TV
has both an amplifier and twin
speakers through which the stereo
.round can be heard.
CaEG--ff_i-_
@_ Press the (M)
MENU button
on the remote,-then press the
MENU • or • buttons to select
the word S'I_:,REO with the TV's
on-screen arrow.
> Press the (+) button to turn the
STEREO MODE ON.
> Press STATUS to clear the
screen.
':_i_iiiiiiiiiiiiii:
iiiiiii!ili!ii ,,:
STEREO
Rememl stereo _s
not present on a selected
show and the TV is placed in
the STEREO mode, the sound
coming from the set will remain
monaural (mono.)
SAP is an additional part of the
stereo broadcast system. Sent as a
third audio channel SAP can be
heard aparl from the current TV
program sound. TV stations are
free to use SAP for any number
of purposes, 'but many experts
believe it will be used for foreign
language translations of TV
shows (or for weather and news
bulletins.)
If a SAP signal is not present
with a selected program, the SAP
option cannot be selected. Also, if
SAP is selected on a channel
(with SAP) and you select anoth-
er channel, when you return to
the original channel SAP will be
OFF (and yoa will have to rese-
lect the SAP feature.)
__ • L
......
....._ ......_i_i_i_i_....
7%: Niiiiii
10
Page 11
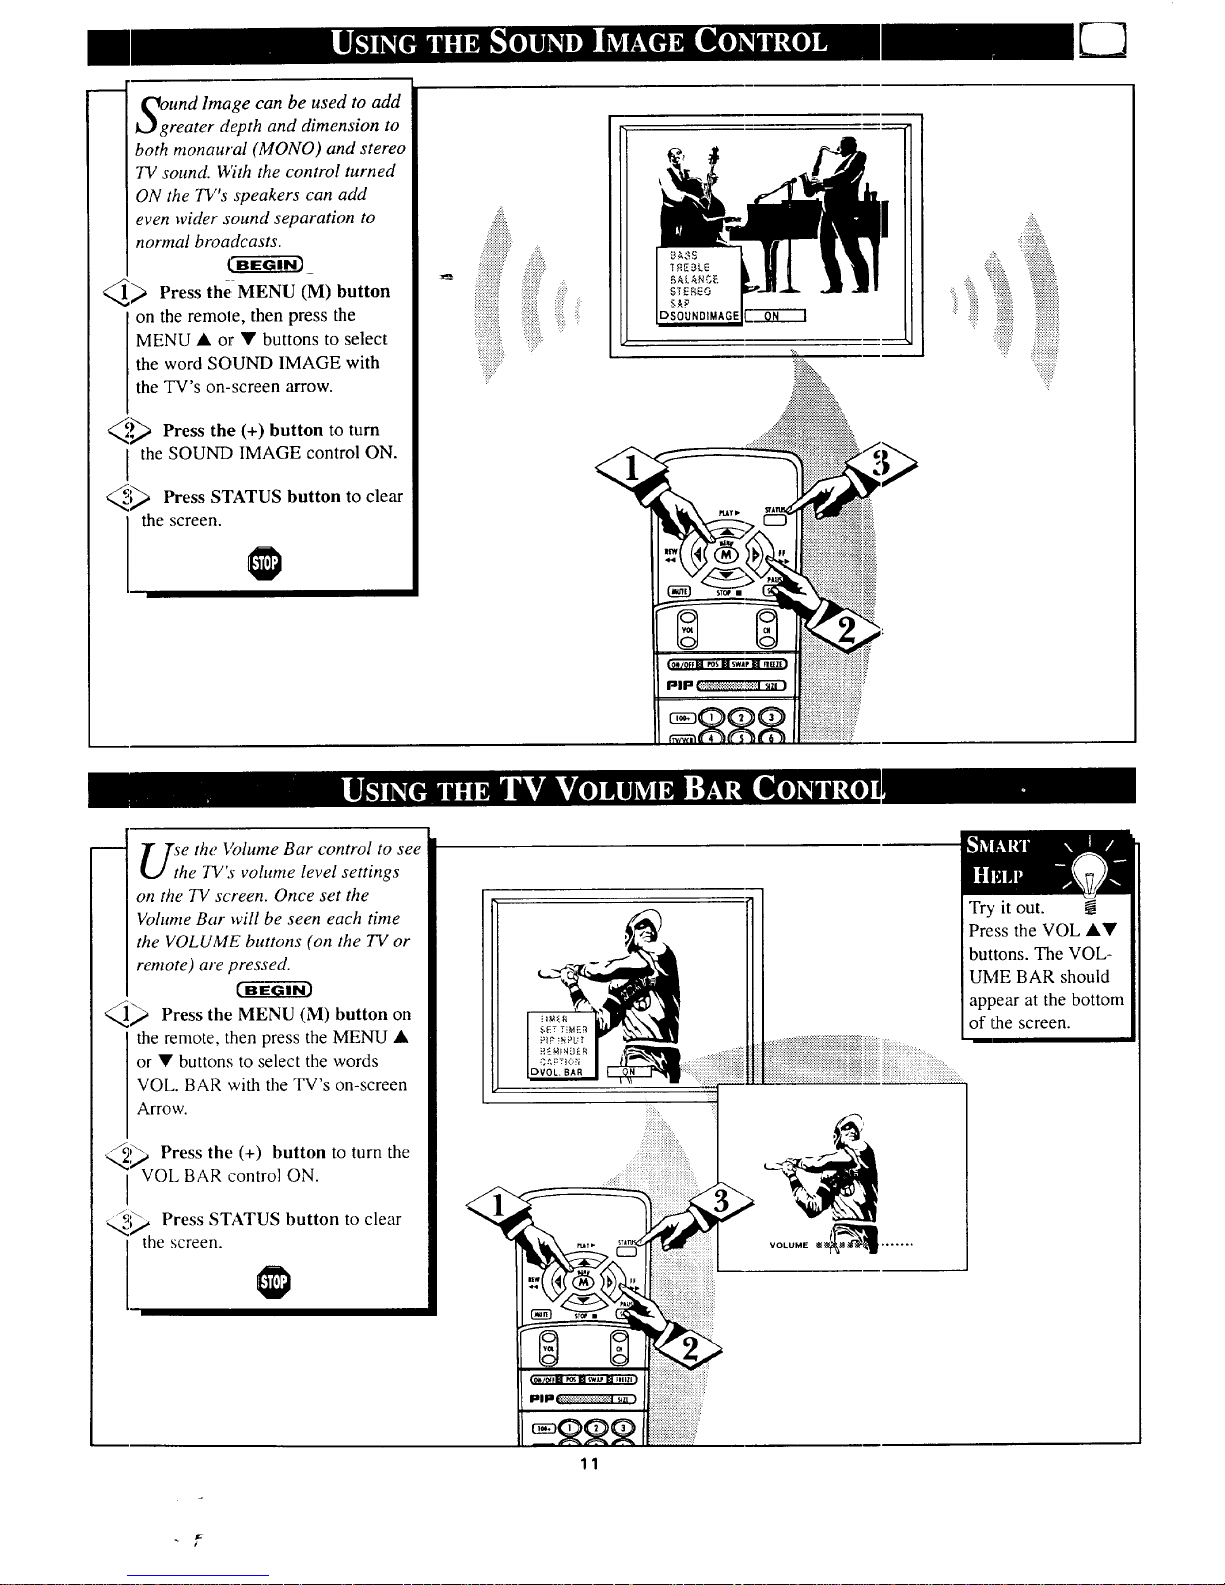
OgUndImage can be used to add
reater depth and dimension to
both monaural (MONO) and stereo
TV sound. With the control turned
ON the 73/'s speakers can add
even wider sound separation to
normal broadcasts.
_ Press the, MENU (M) button
on the remote, then press the
MENU • or • buttons to select
the word SOUND IMAGE with
the TV's on-screen arrow.
_€_ Press the (+) button to turn
the SOUND IMAGE control ON.
_ Press STATUS button to clear
I thescreen
Ji!ii_,
................
:iii!i!i!!ii!i!!!ii:
_ii!i!iii!i!iiiiii_ ::_i_
iiiii!iiii!iiiiii__ ,_iii!!iii!iii_'_
iiiiiiiiiiiiiiiilliiiiii'_,_iiiii_'_
!iiiiiiiiiii!iiiiiiiiiiiiiiiii_'iiiiii,_!i
DSOUNDIMAGE
.:::::::...
:::::::s::x
.:iii}!_.
....:_i_i_iii!i!!i!iiiiiiiiiili!ililiiii
::_iiiiiiiiii_'_i!iiiiiilili;i!i!_
_!!_ iiii!ii!ii!!iii!iii:
Uih e the Volume Bar control to see
e TV's volume leve! settings
on the TV screen. Once set the
Volume Bar will be seen each time
the VOLUME buttons (on the TV or
remote) are pressed.
_1_ Press the MENU (M) button on
the remote, then press the MENU •
or • buttons to select the words
VOL. BAR with the TV's on-screen
Arrow.
_,_ _ Press the (+) button to turn the
VOL BAR control ON.
_ Press STATUS button to clear
i the screen.
?_:i:i:i:i::.
_v=._+:+:+:,:,:+:+:+:
...._!ii!i!i!!iiiii!iiiii_!_!iiii_iiiiiiiiiiiii_ii!ilili!ii!!i!:
VOLUME _ .......
Try it out.
Press the VOL ••
buttons. The VOL-
UME BAR should
appear at the bottom
of the screen.
11
Page 12
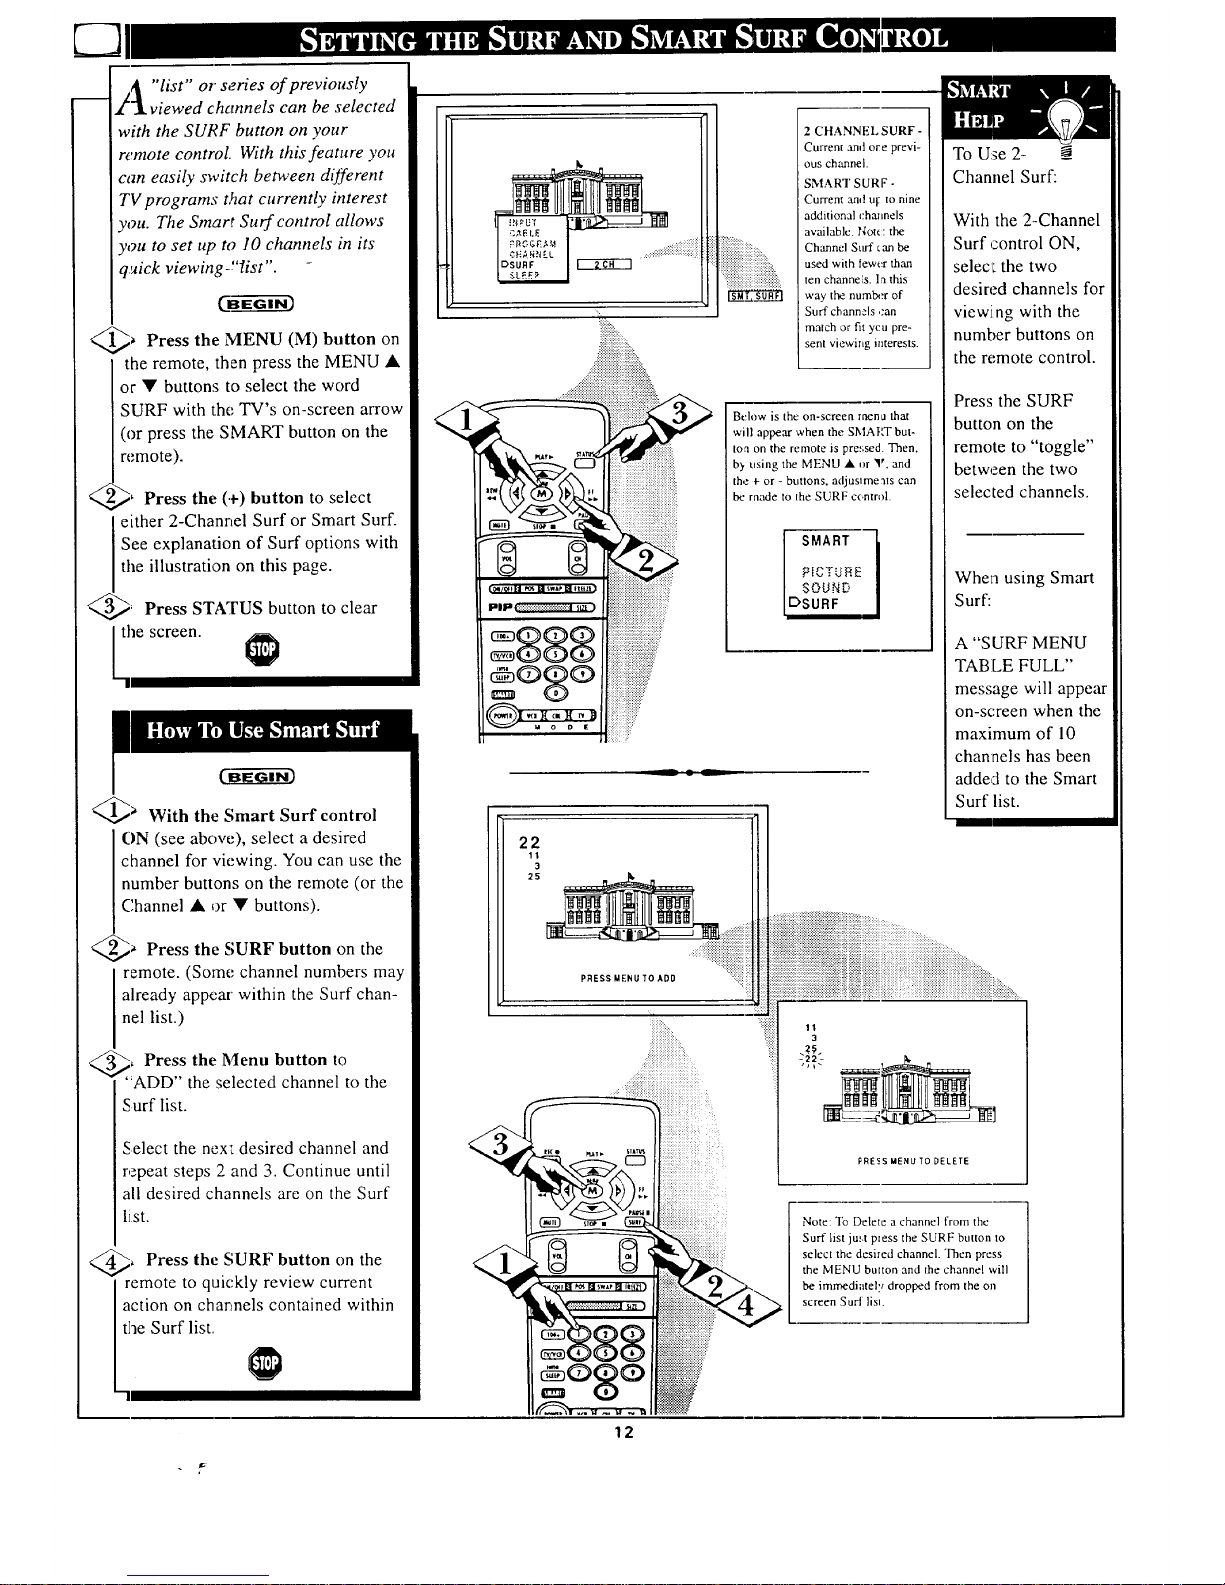
A "list"or series of previously
,/_ viewed channels can be selected
with the SURF button on your
remote control. With this feature you
can easily switch between different
TV programs t,_at currently interest
you. The Smart Surf control allows
you to set up to 10 channels in its
quick viewing-"list".
_ Press the MENU (M) button on
the remote, then press the MENU •
or • buttons to select the word
SURF with the TV's on-screen arrow
(or press the SMART button on the
re.mote).
<,,
<.,.
_' Press the (+) button to select
either 2-Channel Surf or Smart Surf.
See explanation of Surf options with
the illustration on this page.
_' Press STATUS button to clear
the screen.
_a With the Smart Surf control
ON (see above), select a desired
channel for viewing. You can use the
number buttons on the remote (or the
Channel • or • buttons).
_ Press the SURF button on the
remote. (Some channel numbers may
already appear within the Surf chan-
nel list.)
</_, Press the Menu button to
"ADD" the selected channel to the
Surf list.
Select the nex_ desired channel and
repeat steps 2 and 3. Continue until
all desired channels are on the Surf
list.
_, Press the SURF button on the
remote to quickly review current
action on channels contained within
the Surf list.
:::::::::::::::::::::::::::i_::
2 CHANNEL SURF-
Current and ore previ-
ous channel.
SMART SURF -
Current and Ul:to nine
additional chmmels
available, r,lot_:the
Channel Surf can be
used with tewer than
ten channels, la this
way the number of
Surf channsls ,.'an
match or fit ycu pre-
sent viewing interests.
Below is the on-screen rnen_ that
will appear when the SMAF'T but-
ton on the remote is pressed. Then,
b) using the MENU • or _r and
the + or - buttons, adjuslme'_ts can
be made to the SURF control.
SMART
PICTUEE
SOUND
DSURF
_ • _
To Use 2- -@
Channel Surf:
With the 2-Channel
Surf control ON,
selecL the two
desired channels for
viewing with the
number buttons on
the remote control.
Press the SURF
button on the
remote to "toggle"
between the two
selected channels.
When using Smart
Surf:
A "SURF MENU
TABLE FULL"
message will appear
on-screen when the
maximum of 10
channels has been
added to the Smart
Surf list.
Note: "Ib Delete a channel from the
Surf list ju.',t press the SURF button to
select the desired channel. Then press
the MENU button and the channel will
be immediately dropped from the on
screen Surl lisn.
12
Page 13

Tt o adjust your 73/picture con-
rols, select a channel and follow
the steps shown below."
t--a-gg )
<
<:
Press the MENU (M) button on
the remote, then press the MENU •
or • buttons until the desired con-
trol shows on-screen.
,_ Press the (+) and (-) buttons to
adjust the selected color control.
Press the STATUS button to
clear the screen when picture adjust-
ments are completed.
,.ooo.-, mi_ ..oo°i ....
............. COLOR
Remember, when the bar
- scale is centered, the control set-
tings are at normal mid-range levels.
BRIGHTNESS Press (-) or (+) until
darkest parts of the picture are as bright
as you prefer.
PICTURE Press (-) or (+) until lightest
parts of the picture show good detail.
C__OLORPress (-) or (+) to add or elim-
inate color.
TINT Press (-) or (+) to obtain natural
skin tones.
SHARPNESS Press (-) or (+) to
improve detail in the picture.
iiiiiii_iiiii_iiiii
13
Page 14

__..lave you ever fallen asleep in
l front of the TV only to have
it wake you up at two in the
morning with a test pattern
screeching in )'our ears? Well,
your TV can save you all that
trouble by atttomatically turning
itself off.
k__J
<_ Press the SLEEP button on
the remote.
Note: You can also press the
IVIENU • or V on the remote or
TV to select the word SLEEP
with the TV's on-screen arrow.
Q_ Press the SLEEP button
repeatedly to pick the amount of
time (15 minutes to 2 hours
_dmad) before the TV will turn
itself off.
The (+), (-) buttons can also be
used to set the amount of time.
;_ Press the STATUS button to
clear the screea after you have
set the time for the TV to turn
off.
A few seconds before the TV is
to shut off a message will come
on the screen telling you GOOD
NIGHT.
Remember, to see how
<
""11
many minutes are left
before the TV shuts itself off,
press the STATUS button on the
remote.
To stop a SLEFP TIMER setting,
reset the timer back to OFF.
(Turning the TV off and on, or
pressing a button during the last
minute of a timer setting, will also
cancel a setting.)
A few seconds before the TV is to
shut off a message will come on
the screen telling you GOOD
iiiiiiiiiiiiiii!i!i!iiiiiiiiiiiiiiiiii
iiiii!iiiiiiiiiiiiiii! !!!iiiii
_iiiiiiiiiiiiiiiiiiiii_ii"...................,..
+::+:.:+
NIGHT.
14
Page 15

_TOTE:If you went through First
_" • Time Setup (page 2 of the Quick
Use Guide), ttTis task has already
been completed for you.
Your TV comds with an on-screen
,:lock. During normal use the clock
shows on the screen with every chan-
i_el change (and when the STATUS
,button is pressed.)
_ Press the MENU (M) button on
l he remote, then the MENU • or •
buttons to select the words SET
CLOCK with the TV's on-screen
arrow.
@_ Press button to set the hour
(-_
(and AM or PM) parts of the clock.
Press (+) button to set the minutes
part of the clock.
_) Press STATUS button to set the
] clock in operation and clear the
screen.
Remember, the remote's
number buttons can also be
used to enter the time. Be sure to
press "0" first for single digit hour
entries. Pres_ the 0 or 1 number but-
tons for the ,:lock's AM or PM set-
tings.
::'i,..
!:!!!!!!!!!!!!!7
iiiii;iiii]i;
15
Page 16

k_.J
_rust like an alarm clock you
J can set the IV to turn itself on
at the same time everyday.
>Press (M) on
MENU
button
the remote, then-press the MENU
J_ or • buttons to select the
words SET TIMER with the
TV's on-screen arrow.
_; Press the (-.)button on the
remote to set the hour you want
the TV to turn itself ON. (Also
wess the (-) button for the correct
AM or PM setting).
Press the (+) button on the
remote to set the minutes part of
the timer clock.
<_ Press the STATUS button to
set the "ON TIME" and clear the
screen.
Remember,
the TIMER SET-
TIN(] will not take
place unless the
TIMER Menu con-
trol is also set to
"ON". (See TIMER
section below)
The remote's num-
ber buttons can also
be used to set the
clock. Be sure to
press "0" first for
single digit hour
entries. Press the 0
or I number buttons
for the clock's AM
or PM settings.
1
i zlfter you have set the timer to
l.t the correct time, this feature
allows you to turn the tinter ON
ot OFF. _EG---Gi-_
<_ Press MENU (M) button on
the remote, then press the MENU
A or • buttons to select the
word TIMER with the TV's on-
screen arrow.
<_ Press the (÷) button on the
I remote to choose between the
ON or OFF selection.
<_ Press the STATUS button
to
save the TIMER setting and clear
the screen.
01---6¢r-3
::::::x::::::::::::.,
=:_:i_i_i_i_i_i_i!i_iiii!iiiiiiiiiiiiiiiiiiiiii_!ii!!:!iiiiiiiii=
16
Page 17

'_7 ith the Reminder ,control
W'V ON the TV automatically
shows you the current time and
channel every thirty mirtutes.
_ Press the MENU (M) button
on the remote, then press the
MENU • or • buttons to select
the word REMINDER _,viththe
TV's on-screen arrow.
_ Press the (+) button to turn
I REMINDER ON.
_ Press STATUS button to
clear the screen.
Remember, if Closed
I @Captioning is ON, neither
the Channel Reminder or the
"MUTE" sound indicator will
show on the TV screen.
17
Page 18

L__J
_t'_or our French and Spanish
J[ " speaking TV owners an on-
screen LANGUAGE option is pre-
sent. With the LANGUAGE con-
trol you can set the TV's on-screen
features to be shown in either
English, French, or Spanish text.
@, Press the MENU (M) button
on the remote, then press the
MENU • or • buttons to select
the word LANGUAGE with the
TV's on-screen arrow.
_' Press the (+) button to select
either the English, French
(FRANCAIS), or Spanish
(ESPANOL) language option.
Text for the on-screen Menu will
change to the selected language.
, Press STATUS to clear the
screen.
Remember, If you went
@ through Setup (in your
Quick Use Guide), this task has
already been completed for you.
*l-he Language control only makes
the TV's on-screen (MEN'U) items
alppear in French or Spanish text.
I1does not change the language of
other on-screen text featuFes such
as Closed Captioned (CC)TV
shows.
18
Page 19

uld you like to hear TV pro-
rams through your audio hi-
ifi system? Tile TV's Audio Output
jacks and TV Speaker On/Off con-
trol work together to offer you this
TV sound option.
_._ Connect R(ight)
the and
L(eft) AUDIO OUT jacks on the
TV to the R and LAudio Input
jacks on your amplifier or sound
system.
Set the audio system's volume to
normal listening level.
_ Turn the TV and audio system
ON. You carl now adjust the sound
level coming from the audio sys-
tem with the Volume • or • but-
tons on the TV or remote.
_."_ To hear TV from
the sound
only the audio system speakers,
select the TV's SPEAKER on-
screen control.
Press the MENU (M) button on
the remote, then press the MENU
• or • burtons to select the word
SPEAKER with the TV's on-
screen arrow.
--_'_ Press the (+) button to turn the
TV's internal speakers OFF.
You should now only hear TV
sound coming from the audio sys-
tem speakers.
_ Press the STATUS button to
clear the screen.
..._,........,.,..
iiiiiii,ii;
_/'_A RCA PHONO PLUG
ELES (NOT SUPPLIED)
AUDIO SYSTEM
19
Page 20

,Vou can view the playback of
.l VCR tapes (Video Disc
Players, camcorders, etc). by
using the AUDIO and VIDEO
INPUT jacks (on the rear of the
TV).
For example: to view the play-
back of a VCR tape:
@' Connect the VIDEO and
AUDIO IN(put) jacks on the
7W to the AUDIO and VIDEO
OUT(put) jacks on the VCR.
<_ Press the MENU (M) button
on the remote, then press the
MENU • or • buttons to select
the word INPUT with the TV's
on-screen arrow.
Note: You carl press the CHAN-
NEL A• buttons to select
"VCR/AUX" (if it has been
added to the TV's channel mem-
ory.) See page 7 for details.
@, Press the button select
(+) to
the VCR/AUX(iliary) INPUTS
on the rear of the TV.
Remember, when you're
-_through using the A/V
INPUT jacks, return the INPUT
display screen on the TV to
ANTENNA. If you leave the TV
in the VCRJAUX INPUT mode
and there is no signal source con-
nected to the jacks, you will be
seeing only a blank screen on the
TV.
NOTE: If you have a mono (sin-
gle audio OU'FPUT) VCR, "Y"
Connectors are available (from
your dealer or Parts Information
Center I 800 292-6066) to con-
nect to the audio inputs on the TV.
PICTURE AND SOUND FROM PLAY-
BACK OF VCR TAPE
VII)EO IN
(YELLOX'_) ---
VCR
(EQUIPPED WITH VIDEO AND
AUDIO OUTPUT JACKS)
NOTE: TI IE 'q'VIVCR" BUTI'ON
('AN ALSO BE USL:D TO PI.,\C!:,
"]'ll[.2 TV IN [-ITH[-R VCR'AUX OR
S-VIDF, O MODES (AS WL:LL AS
SELEC'r CtlANN[-LS 3 OR 4.)
20
Page 21

he S(uper)-Video connection
n the rear of the TV is used
for the playback of S-VHS VCR
tapes, Video Discs, or Compact
Disc Interactive (cd-i) discs.
Better picture detail and clarity
is possible with the S-Video
playback as compared to the pic-
ture from a ltdrmal antenna (RF)
connection.
_> Connect the S-VIDEO IN
Jack on the TV to the S-VHS
Out(put) jack on a S-VHS VCR.
The S-VHS connecting cable
will be supplied with the S-VHS
VCR (or Video Disc player.)
Also connect the AUDIO
IN(put) jacks from the TV to the
AUDIO our jacks on the VCR.
_ Press the MENU button
(M)
on the remote, then press the
MENU • o:r • buttons to select
the word INPUT with the TV's
on-screen arrow.
_ Press button select the
(+)
to
S-VHS INPUT on the rear of the
TV.
_ Turn tile VCR ON and
place
it in the S-VIDEO or S-VHS
mode. Insert a S-VHS cassette
tape and PLAY the VCR in a
normal manner.
PICTURE AND SOUND FROM PLAY-
BACK OF S-VHS VCR TAPE
RCA PHONO
PLUG CABLES
(NOT SUPPLIED
S-VHS VCR
(EQUIPPED WITH S-VIDEO
OUTPUT JACK)
NOTE: THE 'q'V/VCR" BUTI'ON
CAN ALSO BE USED TO PLACE
TIlE TV 1N EITHER S-VIDEO OR
VCR!AUX IvlODES (AS WELl. AS
SELECT CHANNELS 3 OR 4.)
Remember, when you're
through using the S-VIDEO
IN(put) jack return the INPUT con-
trol on the TV to ANTENNA. If you
leave the TV in the S-VIDEO mode
and there is no signal source con-
nected to the jack, you will be see-
ing only a blank screen on the TV.
21
Page 22

m _,_]'hether yoldre watching a movie
V I€ or a video game your TV has
automatic video control settings
matched for your current program
source or content. The Smart Picture
feature quickly resets your TV's
video controls for a number of differ-
ent types of programs and viewing
conditions you may have in your
home. Each Smart Picture setting is
preset at the factory to automatically
adjust the TV's Picture, Color, and
Sharpness viewing control levels.
Press the Smart button on the
remote.
Press the Menu • or • button to
select the desired Smart Menu fea-
ture (highlighted with the arrow).
<_ With Smart Picture control
the
selected, press the (+) or (-) button
repeatedly to select any of the preset
viewing categories (Example: Video
Games, Movie:L etc.).
<_ STATUS button clear
Press to
the screen.
1
Remember, the video con-
trol settings for the Smart
Picture categories are memo-
rized into the TV at the factory and
can only be reset by field and ser-
vice technicians.
-'It
" jS .......:.:.:.:s:::::>::.:....
MOVIES ........ _:_':':iii::i::i::iiiii::ii)iiii
::iiiiiii.....
_iiiii!iiiiiiiiiii!_.
iiiiiiiiiiii_iiiiiiiiiiiiiiiiiiii_
_ii_iiiiiii:iiiiiiiiiiiiiiiiiiiiiiiii!!_i_._
i:iiiii::iiii!iiiiiiiiiiiiiiiiiiiiiiiil:::__......
- .:.::::::::::::::::::::::::::::::::::
ii::i
i!iii "
22
Page 23

m
re you tired of the sound of
commercials following you
into the next room or all through
the house? Smart Sound allows
you to preset a desired volume
level that the TV sound will not go
above. This makes for an even,
more consistent sound by reducing
the peaks w& valleys that can
occur during program changes or
commercial breaks.
> Press the Smart button on the
remote.
Press the Menu • or • button to
select the desired Smart Menu fea-
ture (highlighted with the arrow).
_,P_ With the Sound control
Smart
selected, press the (+) or (-) button
to turn the volume level control
ON or OFF
_."_ Press the STATUS button
to
clear the screen when completed.
Remember, Smart Sound
wo:;ks only with the pro-
grams coming through the
Antenna/Cable input on the rear of
the TV (RF audio). It will not con-
trol the sound levels for the
Auxiliary (VCR/AUX IN) audio
inputs.
%
iii!iiiiiiiii_:.
?iiiiiii:_i_iiii!:_.
:::::::::::::::::::::::
::: :::::: ::::
::::::::::::::::::::::::::
:::::::::::::::::::::::::::::::::
::::::::::::::::::::•:::: ::::::::::
::iiiiiiiiii_:.
::..:::: :::::::::::::::::::::::::::::::::::::::::::::::::
:::::::::::::::::::::::::::::::::::::::::::::::::::::::::::::.
iiiiiiiiiiiii.
::::::::::::::::::::::::::::::::::::::::::::::::::::::::::::
:::::::::::.::::: ::::: :::.:+:.::.:.:.:+:.::.:.:.:
:::: :::::::::::::::::::::::::::::::::::::::::::::::::::::::::::
:::: ================================
iiiiiii::)i::_iii:::::?:_::?:i
ggg ....................................
@og®
I
D E ::;;::::::::::
::::: :
23
Page 24

T"our remote control is set to
r work your TV and many
irfrared remote (1t?) control
VCRs. However, an easy one-
time step may be necessary
before the remote will work your
VCR.
Try this initial c-heck to see if
going on to the following section
is necessary.
<_> Press the VCR System but-
ton on the remote.
_ Point remote toward VCR
and press the POWER button.
<_ Does the remote turn the
VCR ON?
IF YES, I_ and try the other
VCR buttons on the remote. If
they also work the VCR, then
the remote is ready and no fur-
ther steps are :needed.
If NO, continue...
VCR
<_ First look up a TWO-DIGIT
remote code number for your
brand VCR before going through
I the simple "1,2,3" steps (on the
following page).
L continue, to next page
Remember, if more than
__ one number is listed, you
may have to try more than the
first two-digit code given in order
v9locate your VCR's remote code.
_VCR REMOTE VCR REMOTE _
BRAND CODE NO. BRANI3, CODE NO.
Akai 24, 25, 36 Panas3nic 01,02, 52
Capehart 33 Philips 00, 05
Conoid 13 Philips Video CD 37
Curtis Mathes 42 RCA- 04, 32, 42, 43, 44
Daewoo 33 Sarnsun_g 22, 30
Emerson 20, 31, 34, 40 Sansui 49
Fisher 06, 07 Sanyo 13
Goldstar 23 Sears 08
Go Video 45, 46 Sharp 11, 12
Hitachi 03, 51 Shintom 35
JVC 14, 47, 48 Sony 09, 10,41
Magnavox 00, 05 Teknika 26
Matsushita 01,02 Toshiba 18, 19
Mitsubishi 16, 17, 38, 39, 50 Video Concepts 29
Muhitech 27,28 Zenith 15
NEC 21
24
Page 25

_/w that you have looked up
he two-digit Remote Code
Number for your brand of VCR
(on previous page), you are
ready to follow the .four simple
steps below.
Please read through steps 1-4
before beginning.
CfiEG--'_i'fi3
@_ Press and release the REC
I (RECORD) button.
@_ Within seconds after
thii_y
releasing the REC button, press
and release the VCR System
button.
@> Within thirty seconds after
releasing the VCR System but-
ton, ENTER THE TWO
DIGIT CODE NUMBER for
the desired VCR. The remote is
now ready to send commands to
the VCR.
@u Point the remote at the VCR.
Press the POWER button on the
remote to turn the VCR ON.
Try it out. The Channel
__ and VCR buttons on the
remote should now operate the
VCR.
Remember, if this doesn't work
Lhe first time, repeat steps using
the same remote code number.
If after a second try the remote
does not operate your VCR, and
Lhere are more code numbers list-
,=d for your brand VCR, use the
next listed code number.
[f after repeated attempts the code
:number method does not work
your VCR, try. the "VCR
SEARCH" method on page 28.
VCR
25
Page 26

Tour remote control is set to
. work your TVand many
infrared remote (IR) control
Cable Converters. However, an
e6'sy one-time step may be neces-
sary before the remote will work
your Converter.
Tty this initial-check to see, if
going on to the following ,¢ection
is necessar):
Press the System
CBL button
I on the remote.
>Point remote toward Cable
Converter and press the POWER
button.
<_ Does remote turn
the
the
Converter ON?
IF YES, I_ and try the CH •
• ' and CH number buttons on the
remote. If they also work the
Converter then the remote is
ready and no further steps are
_Cable
Converter
| !
needed.
If NO, continue...
CONVERTER REMOTE
CONVERTER REMOTE
@ First look up a TWO-DIGIT
remote code number for your
brand Converter before going
through the simple "1,2,3" steps
(on the following page).
continue to next page
Remember, if more than
_ one number is listed, you
may have to try more than the
first two-digit code given in order
to locate your Converter's remote
code.
BRAND CODE NO.
Archer 28
Diamond 23
Drake 37
Gemini 45
Hamlin 14, 15
Hitachi 25
Jerrold 00,01,02,03,04,05,46,55
Macom 29, 38
Magnavox 17, 31
NSC 49
Oak 06, 27, 39
Panasonic 18, 35
Philips 19, 20, 21, 24, 26
Pioneer 09, 32
Regency 10, 11
%
BRAND CODE NO.
Rembrant 33
Salora 52
Scientific Atlanta 08, 22, 47
Sheritech 34
Starcom 30
Sylvania 16
Texscan 48
Tocom 12,13, 53
Toshiba 43
Uniden Satellite 44
Unika 50
United Satellite 54
Universal 36
Video Tech 40
Video Way 51
Zenith 07, 41, 42
26
Page 27

ctw that you have looked up
he two-digit Remote Code
Number for your brand of Cable
Converter (on previous page),
you are ready to follow the four
simple steps below.
Please read th_rough steps 1-4
before beginning.
c-a-ggr
@> Press and release the REC
I (RECORD) button.
@_ Within thirty seconds after
releasing the REC button, press
and release the CBL System
button.
_> Within thirty seconds after
releasing the CBL System but-
ton, ENTER THE TWO
DIGIT CODE NUMBER for
the desired Converter. The
remote is now ready to send
commands to the Converter.
@> Point the remote at the
Converter. Press the POWER
button on the remote to turn the
Converter ON.
Try it out. The Channel
and POWER buttons on the
remote should now operate the
,Converter.
Remember, if this doesn't work
the first time, repeat steps using
the same remote code number.
If after a second try the remote
does not operate your Converter,
and there are more code numbers
listed for your brand Converter,
ase the next listed code number.
[f after repeated attempts the code
:number method does not work
your Converter, try the "CON-
VERTER SEARCH" method on
page 28.
Cable Converter
I I
CON/OFF[_ lOS _ SWAP_
PIP _iiiiiiiiiiiiiiiiiiiiiiiiiiiiiiiiiiiii:iiiiiiiiiii_ii_zZ)
27
Page 28

7our TV remote can be set to
work your VCR or Cable
Converter by what is called the
SEARCH method.
If the "REMOTE CODE" number
method shown in the previous sec-
tion did not set )'our remote to
work your VCR or Converter, then
follow the easy steps listed below.
PJ'ease read through steps 1-4
b_fore beginning.
<_a Press the POWER button on
the VCR or Converter to turn the
unit ON.
_. Stand least six feet
at away
from the front of the VCR or
Converter.
Point the remote toward the unit.
HOLD DO_VN the SURF and the
desired System (VCR or CBL-
Converter) buttons at the same
time. KEEP HOLDING BUT-
TONS DOWN.
_, the Channel Indicator
Watch
on the unit.
Channel Numbers will SCAN UP
when the unit has been identified.
"['his may take up to two minutes.
,,_, Release the SURF and System
(VCR or CBL) buttons as soon
as channel numbers start to scan
up. The code has been identified
and the remote is ready to operate
with the VCR or Converter.
Remember, a minute or
two can seem very long, but
the code should be located within
two minutes.
Don't let the VCR scan up more
than five channels. If you do the
remote may pass up the right code
and another two minute search
cycle will have to be repeated.
]ifno channel change happens
within two minutes, repeat steps 1-
,J,. Should a channel change still
not occur, the remote wi]J not
work with the desired unit.
28
CABLE CONVERTER
Don't let
.... iiiiiiiiiiiiiiiiiiiliiiiiiiiiiiiiiiiiiiiiiiii{iiiiiiiiii >
.:_:iii!ii!i_i_i{{_i{{iiiiii_i....
Six Feet
(minimum)
Page 29

Then using the TV remote
V V with a VCR, first make cer-
tain it is set to control your VCR
(by the REMOTE CODE or
SEARCH method- see earlier
section).
<,_a Press the but-
VCR System
I ton on the remote.
@> Point the top of the remote
toward the front of the VCR
(remote sensor window) when
pressing buttons.
Record Button
Hold the RECORD button down, and
then press the PLAY button to begin
a VCR recording.
Rewind Button
Press to rewind tapes. For some
VCRs you may need to press STOP
button first then REWIND. In play-
back mode hold button down to view
picture moving rapidly in reverse.
Pause Button
Press to temporarily stop the tape
during a playback or recording. Press
again to release Pause.
TV-VCR Button
Press to the VCR position ("VCR"
indicator on the VCR will light) to
view the playback of a tape. Press
again to place in the TV position
("VCR" indicator on the VCR will go
OFF) to view one program while
recording another program.
When used with the TV the TV/VCR
button works as a source button.
Each press cycles the TV between
channels 3 and 4; or the VCR/AUX
and S-VIDEO Input modes. It is a
quick one-button way to select these
channels and modes (without directly
entering the TV's Menu system.)
f
(ON/OFF_ POS[] SWAP[] FREEZE)
I"aI I"z _,..._i_ _d SiZE)
QQQ
QQQ
QQQ
,BL_ E)_
-L_
Play Button
Press to playback a rope. Hold down
after pressing the RECORD button to
start a recording.
Stop Button
Pre:;s to stop the tape.
•Fast Forward Button
Press to rapidly advance the tape. For
some VCRs you may need to press
STOP first then FF. In Playback
mode I',old button down to view the
piclure moving rapidly in the forward
dire,ction.
-Ctlannel Scan Buttons
Press to scan up or down through
VCR channel numbers.
.Nu_mber Buttons
Press buttons for direct VCR channel
selections.
V._!(.__BSystem Button
Press to send remote commands to
the VCR.
Power Button
Press to turn the VCR ON and OFF.
Remember, the VCR but-
@ tons on the remote will not
operate your VCR if llhose fea-
tures are not already found on
your VCR remote control.
Note: All VCR functions (particu-
larly Search, Rewind, Fast
Forward, etc.) will operate the
same as with the original VCR
remole control provided with the
VCR.
29
Page 30

[_icture in Picture (PIP) is the
showing of two pictures on
the TV screen at the same time.
(One main screen picture and
one small inset picture - or PIP).
NOTE: The PIP picture must be
supplied by a VCR (or other
accessory equipped with u
VIDEO OUTPUT jack). See the
following example opt how a VCR
can be used to supply a PIP pic-
lure.
<_ Connect the VIDEO OUT
jack on the VCR to the VIDEO
IN jack on the TV.
Also connect the AUDIO OUT
jack (Right/Left) from the VCR
to the AUDIO IN jack on the TV.
(See Reminder note below.)
Also ensure the normal antenna
connection between the VCR and
qW is in place.
ml
@_ Move to page
the next
after
the VCR to TV PIP connections
are completed.
continue to next page
MAIN PIP
SCREEN WIN DOW
BACK OF TV
| ....................................................................VIDEO IN
__:_ _"" (YELLOW)
:;,-]
"Tt .......\: X / / CABLE
/ I | / -- lff. (SUPPLIED WITH
'/ i ti i I r vcR)
AUDIO 1N _i{ _ ]_
wHrrE) u to _ , OUTDOOR UHF/VHF
/_A kA ANTENNA
CABLE Tv
SIGNAL
VCR
(EQUIPPED WITH VIDEO AND
AUDIO OUTPUT JACKS)
For other possible PIP
_ connections see page for the
"More PIP Connections" section.
If you have a single (monaural)
Audio Output VCR, "Y" connec-
tors are available to complete
3'our connection to the TV.
Contact your dealer, or our Parts
Information Center ( 1-800-292-
6066), for details.
"1
30
Page 31

_ _ Tow that you have completed the
_[ ¥ required connections on the pre-
vious page you are ready to follow
the simple steps shown below.
_> Turn the VCR and TV ON.
Place the VCR in the TV mode -
Use the TV/VCR button on the
VCR (or on the TV remote if it is
set to work your VCR - See page .)
Place the TV's PIP INPUT control
to "VCR/AUX" -
Press MENU • or • on the TV
(or on the remote press M button
and then M A• buttons.)
Select the words PIP INPUT with
the TV's on-screen Arrow. Then
press the (+) button to select
VCWAUX.
Make sure the TV's "INPUT" on-
screen control is set to ANTENNA.
_> Select the channel the VCR to
OI71
I view in the PIP window. Select the
channel on the TV to view on the
main screen.
_> Press the PIP ON/OFF button
on the remote.
The PIP window should show in one
of the comers of the TV screen.
12:00 *_
VCR 1N "TV MODE"
(VCR Indicator Light will go out)
12:00 *_
19
VCR - FOR PIP CHANNEL
VCR
SELECTED
CttANN[!L
TV
SELECTED
CHANNF.L
PIP INPUT CONTROL SET TO "VCR!AUX"
TV - FOR MAIN SCREEN CHANNEL
12
Remember, if you see the
- same picture on the main
screen and in the PIP window, you
need to be sure the TV's PIP INPUT
control is set to "VCR/AUX.'"
No sound will be heard with the PIP
picture. See page on how to "SWAP"
the PIP picture with the main screen
picture so that sound can be heard.
Also, see the following page on how
to operate other PIP features with the
remote control.
31
_ens?ro_ :he_ictdbwehreenmp;!ees_;d_ e ] /1
VCR function buttons.
sggg
gog ,
Page 32

]_y using the PIP buttons on
l.J the remote the PIP picture
can be moved and swapped with
the main screen. Then main
screen picture can also be frozen
in the PIP window.
_. Press the ON button to
PIP
show the PIP picture.
PIP appears in a corner of the TV
screen. Press the PIP ON button
again to remove PIP from: the
main screen.
_, the PIP POSITION
Press
button to move the PIP picture
(from corner-to-corner on the TV
screen.)
This feature allows you to move
PIP and avoid blocking off any
main screen action.
_, With PIP the TV
on screen,
press the SWAP button to swap
the main screen picture with the
F'IP picture. See "Smart Help"
rtote on this page.
, Press FREEZE to hold the
current MAIN screen picture in
the PIP window (Main picture is
still active).
If PIP is currently OFT, the PIP
window will automatical]ty
appear.
Press FRZ repeatedly to update
the frozen PIP with current pic-
tures from the main screen.
You cannot swap a frozen PIP
picture with the TV's main
screen picture.
Press the PIP ON button to drop
the frozen PIP picture from the
screen.
QS_a Press the PIP SIZE tmtton
to change the size of the PIP win-
dow shown on the screen.
Press the PIP SIZE button again
Io see and compare the large and
,,;mallsize PIP windows.
i. PiP ON/OFF
2. PIP POSITION
3. PIP SWAP
_i _i_i_i_ _
4. PIP FREEZE
Remember, if
the TV is showing a
"VCR/AUX" sup-
plied picture on the
main screen (when
the TV and VCR are
turned OFF), a blank
screen will appear
when the TV is
turned back ON
again.
If this happens, just
press the CH(annel)
• or 'V' buttons to
select a TV station
for normal viewing.
5. PIP SIZE (Large or Small)
32
Page 33

he picture for the PIP window
an come through the TV's
ANTENNA or VCR/AUX Inputs (on
the rear of the TV..) The .PIP INPUT
control simply tells the TV which one
of these two sources it is to show in
the PIP window.
_ Press the MENU (M) button on
the remote, then press the MENU •
or • buttons to select the words PIP
INPUT with the TV's on-screen
a_ow.
_ Press the button to select the
(+)
source for the PIP picture:
ANTENNA -
for a picture signal coming from
the ANTENNA input on the rear of
the TV.
VCR/AUX -
for a picture signal coming from
the Video Input jack on the rear of
the TV. Used for VCR (or other
direct video accessory) connec-
tions.
Note: The TV's S-VIDEO Input
plug cannot be used for the PIP win-
dow. Also, when S-VIDEO is select-
ed for the main screen INPUT the
PIP window will not appear.
_) Press the STATUS button to
clear the screen.
Remember, the, PIP screen
will be blank unless a signal is
connected to the selected source
(either ANTENNA or VCR/AUX) on
the rear of the TV.
With ANTENNA selected (as the PIP
INPUT source), the main screen and
PIP window will show the same pic-
ture. The VCR/AUX inputs (on the
rear of the TV) must be used in order
to see a different channel or picture
source in the PIP window.
8
(ON/OO[] PO_H SWA_[] FettZl) : i ::::: :: :::::::
::: ::: : : ::::::::::
ggg
i_iiiii_!iiiiiiiiiiiiiiiiiii!ii_iiiii?
i}ili!i!ii!!i!iii!il7
ii!iiii++"
33
For details on how to view separate
programs on the PIP window and main
screen, see the PIP connection section
Page 34

_ J_)IP hookup with Cable
• Converter Box and VCR.
<_ First use an optional signal
splitter and connect the original
cable TV signal to both the
CABLE IN on t_he Cable_
Converter and the ANTENNA
plug on the rear of the TM
<_ Connect the CABLE OUT
on the Cable Converter to the
ANT. IN on the VCR.
<_ Connect the VIDEO OUT
jack on the VCR to the VIDEO
IN jack on the TV.
Also connect the AUDIO OUT
(R and L)jacks from the VCR to
the AUDIO IN jacks on the TV.
-I I
%
Contact the Parts
lnformalion Center
1-800-292-6066
to order any optional
accessories.
REAR OF TV
CONNECT TO TV
ANTENNA/CABLE
INPUT PLUG
VIDEO IN
(YELLOW)
RCAPHONO
PLUGCABLES
(NOTSUPPLIED)
Remember, to
use the Cable TV
Converter Box to
select chancaels for
PIP, the VCR must
be set to the same
channel as the chan-
nel selection switch
on the rear of the
Cable Converter
(either channel 3 or
VCR
I
CABLE IN
! I
CABLE TV CONVERTER
34
Page 35

jDlease make these simple
• checks before calling for ser-
vice. These tips can save you
ttme and money since charges for
7"1/installation and adjustment of
customer controls are not cov-
ered under your warrant3,.
No Power
No Picture
No Sound
Remote Does Not
Work
TV Displays Wrong
Channel or No
Channels Above 13
r .
CAUTION: A video source (such ias a video game, Compact Disc Interactive - CDI, or
TV information chmanel) which shows a constant non-moving pattern on tile TV screen,
can cause picture tube damage. When your TV is continuously used with such a source
the pattern of the non-moving portion of the game (CDI, etc.) could leave an image
permanently on the picture tube. When not in use, turn the video source OFF.
Regularly alternate the use of such video sources with normal TV viewing.
i heck the TV power cord. Unplug the TV, wait 10 seconds, then reinsert plug into
outlet and push POWER button again.
Check to be sure outlet is not on a wall switch.
i Check antenna connections. Are they properly secured to 'the TV's ANT/CABLE plug ? i
Check the CABLE/YES NO control for correct position. , [
Check INPUT control for correct position. VCR-AUX or S-x, IDEO position without a ]
signal source will result in a blank screen. Also the TV's S-VIDEO Input plug cannot [
be used as another video source to be shown in the PIP window. I
Check the VOLUME buttons.
Check the MUTE button on the remote control.
Check the SPEAKER on-screen control. OFF position will eliminate sound at the set.
If attempting auxiliary equipment hook-ups, check audio jack connections.
!•
I
Check TV-VCR-CBL "System" buttons on the remote. Press the remote's TV System
button to send commands to the TV.
Check batteries. Replace with AA Heavy Duty (Zinc Chloride) or Alkaline batteries
if necessary.
Clean the remote and the remote sensor window on the TV.
Check the TV power cord. Unplug the TV, wait 10 secords, then reinsert phag into
outlet and push POWER button again.
Check to be sure TV outlet is not on a wall switch.
f Repeat channel selection.
Add desired channel numbers (CHANNEL control) inlo 'IV memory.
• Check CABLE/ YES NO control for correct position.
This TV is equipped with protective circuitry that shuts the TV off in case of moderate
power surges. Should this occur turn the TV back on by pressing the POWER button
once or twice, or unplug (wait 10 seconds) and then replug the power cord at the AC
outlet. This feature is NOT designed to preveni damage due to high power surges such
as those caused by lightning, which is not covered by your warranty.
Cleaning and Care
• To avoid possible shock hazard be sure the TV is unplugged from the electrical outlet before cleaning.
• When cleaning the TV screen take care not to scratch or damage the screen surface (avoid wearing jewelry or using
anything abrasive). Wipe the front screen with a clean cloth dampened with water. Use even, easy, vertical strokes when
cleaning.
• Gently wipe the cabinet surfaces with a clean cloth or sponge dampened in a solution of cool clear water. Use a clean
dry cloth to dry the wiped surfaces.
• Occasionally vacuum the ventilation holes or slots in the cabinet back.
• Never use thinners, insecticide sprays, or other chemicals on or near the cabinet, as they might cause permanenll marring
of the cabinet finish.
35
Page 36

CoaxialCable* Asinglesolidantennawirenormallymatched
withametalplug(F-type)endconnectorthatscrews(orpushes)
directlyontoa75OhminputfoundontheTelevisionorVCR.
ClosedCaption* Broadcaststandardwhichallowsyoutoread
thevoicecontentoftelevisionprogramsontheTVscreen.
Designedtohelpthehearingimpairedthisfeatureuseson-screen
"textboxes"toshowdialogueandconversationswhiletheTVpro-
gramisinprogress.
DirectAudio/VideoInputs* LocatedontherearoftheTVthese
connecLors(RCAphonotypeplug)areusedfortheinputofaudio
andvideosignals.DesignedforusewithVCRs(orotheracces-
sories)inordertoreceivehigherpictureresolutionandoffersound
connectionoptions.
Identify*Methodbywhicharemotecontrolsearchesandfindsan
operati:agcodeforanotherproduct(suchasaVCRorCable
Converter).Oncethecodehasbeen"identified"thentheTV
remotecanoperateandsendcommandstotheotherproduct.
OnScreenDisplays(OSD)*Referstothewordingormessages
generatedbythetelevision(orVCR)tohelptheuserwithspecific
featurecontrols(coloradjustment,programming,etc.).
Menu * An on-screen listing of feature controls shown on the
Television screen that are made available for user adjustments.
Multichannei Television Sound (MTS) * The broadcast standard
that allows for stereo sound to be transmitted with the TV picture.
Programming * _[he procedure of adding or deleting channel
numbers into the _[Elevision's memory circuits. In this way the
Television "remembers" only the lccally available or desired
channel numbers and skips over any unwanted chzLnnel numbers.
Remote Sensor Window * A window or opening found on the
Television control panel through whicl-_infrared remote control
command signals _u-ereceived.
Setup Mode * Automatic feature control settings made by the TV.
Designed for first time set-up and use. Settings for signal connec-
tions (antenna or cable TV), plus channel program memory are
held in the TV's memory (even if the set is unplugged and moved
to a new location.)
Second Audio Program (SAP) * Another or additional audio
channel provided for in the Multichannel Television Sound (MTS)
broadcast standard. The most frequently proposed use for SAP is
the simultaneous bilingual broadca';t of TV program material.
Status * Allows the user to quickly confirm what channel number
is currently being viewed. Status c_tnalso be used to clear the
Television of on screen displays or information (rather than wait-
ing for the displays to "time out" o:r automatically disztppear from
the screen).
Twin Lead Wire * The more commonly used name for the two
strand 300 Ohm antenna wire used wilh many indoor and outdoor
antenna systems. In many cases r_histype of antenna wire requires
an additional adapter (or balun) in order to connect to the 75 Ohm
Input terminals designed into the more recent Televisions and
VCRs.
36
Page 37

Accessories/Optional ................................................ 20-2 I, *Q/U- 1
Adapter Connector ......................................................... 21),*Q/U- 1
AdclJDelete Channels ................................................... 6, 7, *Q/U-2
Audio/Video Input Jacks ........................................................ 20-2 I
Balance Control .............................................................................. 9
Bass Control .................................................................................... 9
Battery InstallaUon"..............................................................." - --- *Q!U-3
Cable TV Connections/Settings .................................... 5, *Q/U- 1,2
Channel Display ........................................................... 17, *Q/U-3
Channel Memory ......................................................... 6, 7, *Q/U-2
Charmel Reminder ........................................................................ 17
Clock ............................................................................................ 15
Closed Captioning ........................................................................... 8
Controls/TV ......................................................................... *Q/U-3
Controls/Remote ....................................................... 22-29, *Q/U-3
Features .......................................................................................... 4
Glossary TV Terms ...................................................................... 36
Identify VCRs with TV Remote ....................................... 24-25, 28
Identify Cable Converters with TV Remote ........................... 26-28
Inpw: Control ................................................................................ 20
Inpul:siAudio and Video .......................................................... 20-21
Language Option .......................................................................... 18
Memory/Program Channels ......................................... 6, 7, *Q/U-2
Menu Button ........................................................................ *Q/U-4
Minus(-)/Plus (+) Buttons .................................................... *Q/U-4
Picture Controls .............................................................................. 13
Precautions/Safety ...................................................... 3, 35, *Q/U-1
Programming Channels ............................................... 6, 7, *Q/U-2
Remote Control ....................................................... 22-29, *Q/U-3
Requesting Service ........................................................... 35, 38-40
RF Coaxial Cable .................................................... 20, 34, *Q/U-I
Safety/Precautions ..................................................... 3, 35, *Q/U- 1
Second Audio Program ................................................................... 10
Sensor Remote ....................................................................... *Q/U-3
Set Timer ....................................................................................... 16
Set Up/First Time Use ............................................ *Q/U-I, 2, 3, 4
Sleep Timer ................................................................................... 14
Smart Picture ................................................................................. 22
Smart Sound .................................................................................. 23
Smart Surf ..................................................................................... 12
Status Button ........................................................................ *Q/U-4
Stereo ............................................................................................. 10
Sound Image Control ....................................................................... 11
Timer .............................................................................................. 16
Tips for Service ............................................................... 35, 38-40
VCR Buttons .................................................................................. 29
VCR/TV Connections ............................................... 20-21, *Q/U- 1
Volume Bar Control ...................................................................... 11
Warranty ......................................................................................... 40
* Information contained in Quick-Use (Q!U) Guide-page listed.
37
Page 38

Philips Consumer Electronics Company
Factory Service Center Locations
See Reverse Side for More Details.
Houston/Galveston
Beaumont/Austin
San Antonio
•C,eve,°n .Oh,o /
• Columbus/DaytonlC incinnati F/
ile!E Tennessee_ \ __
"_ ./ _ _ "Philadelphia/S New Jersey
Atlanta/Athens/Macon/_ .m-
• PittsburghlWV Are
Chattanooga, TN/N. GA_/j _ ,, _ _
f__ b_" _. WashinqtonlBaltimorelF_tichmond
o¢)rlando/N Florida/SE Georgia _"_ -
--)/
• Myers/SW Florida
MiamilSE Florida
NOTE:Ifyou reside in one of our Philips FactoryService Branchareas (see directory on back), you carl contactthe nearest ServiceBranchto
obtain efficient and expedientrepair for your product. If your product is In-Warranty, you should haveproof-of-purchase to ensure No Charge
Service.
ForOut-of-Warranty service, call the location nearestyou.
NOTA:Sivous rdsidez dans une des rdgions desserviespar une succursale de service apr_svente du fabricant Philips (voir liste ci-dessous), vous
pourrezcontacter la branchede service apr_svente la plus prbsde chezvous pour obtenir un service aprbsventerapide et efficace. Si le produit
estsous garantie, il suffira de presenter une preuve d'achat pour b_ndficier d'un service sansfrais. Pour les produits non couverts par la garantie,
contactezle centre le plus pros dechezvous.
NDTA:Si Ud. reside en unade nuestras zonas parasucursales Philipsde servicio al de f_.brica(ver directorio re;is abajo), Ud.puedecornunicarse
con la sucursal de servicio m_,scercanaparaobtener una reparaciOnoportuna y eficazde su producto. Si su productc,estdtodavia bajo garantia,
U,:I.debepresentar comprobante de compra para no ocasionarningunos cargos por servicio. Para servicio deslgudsdelvencimiento de la
garantia,Ilameal lugar rodscercano delos abajoindicados.
M,_C2929 10/96
EL4482-3 Rev. Q
38
Page 39

OUALI]X SERVICEIS AS Ct.OSEASYOUR TELEPHONE!SIMPLY LOOKOVERTHE LIST BELOWFORTHE NUMBER OF,_,FACTORYSERVICECENTER'
NEARYOU.YOURPRODUCTWILLRECEIVEEFFICIENTANDEXPEDIENTCARRY-IN,MAIL-IN,ORIN-HOMESERVICE,ANDYOUWILLRECEIVE!PEACEOFMIND,
KNOWINGYOURPRODUCTISBEINGGIVENTHEEXPERTATI'ENTIONOFPHILIPS'FACTORYSERVICE.AND,IFTHEPHONENUMBERLISTEDFORYOURAREA
ISLONGDISTANCE,CALL1-800-242-9225 FORFACTORYSERVICE.
COMMENTOBTENIRNOTRESERVICEAPR_:SVENTERAPIDEETEFFICACESOITPARCOURRIER,A DOMICILE,OUENSEPRESENTANTA UNCENTREDE,%RVICEPHILIPS.PLUSDE600CENTRESDE
RECEPTIONDEPRODUITSA RI_PARERA TRAVERSLEPAYS:CONTACTERLECENTREDESERVICEAUX CONSOMMATEURSLEPLUSPROCHEPOURSAVOIRI.'EMPLACEMENTDE CESDI:POTSDANS
UN RAYONDE50 A 75 MILES (80 KM _.120 KM) DUCENTREDESERVICELOCAL.
C(_MO08TENERUN SERVIC]OOPORTUNOY EFICIENTEPORCORREO,ENCASA0 ENPERSONAPARASU PRODUCTOATRAV_:SDEUN CENTROPHILIPSDESERVICIO.MASDE600 SiTIOSPOR
TODDELPAlS PARALARECEPCIONDEPRODUCTOSNECESITADOSDE REPARACIONES:COMUNICARSECONELCENTRODESERVICIODEFABRICAMA:_CERCANOPARAESTOSLU_ARESDENTRO
DEUNRADIODE80 A120 KM(50 A 75 MILLAS)DELCENTRODESERVICIOLOCAL.
Atlanta- Athens-
Macon- Chattanooga,TN-
NorthGeorgiaArea
200 North CobbParkway
Suite120
Marietta,GA30062
(770) 795-0085
Charlotte - Winston Salem .-
GreensboroArea
520-GClantonRoad
Charlotte,NC28217
(704) 529-6330
Chicago-Naperville-Rockford -
Kenosha- Beloit- Madison-
Gary- Merrillville Area
1360W. Hamilton Parkway
Itasca,IL 60143
(708) 775-0990
Ch;veland- Akron-
YoungstownArea
24990 DetroitAvenue
Westlake,OH44145
(2_i6) 899-2040
Columbus- Dayton-
Cincinnati Area
63:33BuschBlvd.
Co/umbus,Ohio43229
(614) 781-2605
Dallas- Ft. WorthArea
13375StemmonsFreeway
Suite200
Dallas,Texas75234
(972) 243-4775
DetroitArea
25173 Dequindre
MadisonHeights,MI 48071
(810) 544-2110
Ft. MyersSatellite Location
11601 ClevelandAve.,Suite 15
Ft.Myers,FL33907
(941) 278-4242
Houston- Galveston- Beaumont
- Austin- SanAntonioArea
1110NorthPostOakRoad
Suite100
Houston,IX 77055
(713)682-3990
Knoxville- Greeneville-
Tri Cities - EastTennesseeArea
6700 D.PapermillRoad
PapermillPlaza
Knoxville,TN37919
(423) 584-6614
LosAngeles- SanDiegoArea
2910 E.LaPalma,SuiteE
Anaheim,CA92806
(714) 238-7250
Miami - SoutheastFloridaArea
2099W. Atlantic Blvd.
PompanoBeach,FL33069
(954) 978-0467
NewYorkMetroArea
116 CharlotteAvenue
Hicksville,NY11801
(516) 933-1780NassauCounty
Orlando- Jacksonville- Ocala-
Gainesville& EastCoast
2452SandLakeRoad
Orlando,FL32809
(407) 857-8998
Philadelphia- So_thNJ Area
352 DunksFerryRoad
Bensalem,PA19020
(215) 638-7500
Pittsburgh, PA- Steubenville,
OH- Wheeling/Morgantown,WV
Area
2891 BanksvilleRoad
Pittsburgh, PA15216
(412) 563-8020
SanFrancisco- Oakland-
SanJoseArea
337'0MontgomeryDrive
SantaClara,CA95054
(408) 492-9013
Seattle-Tacoma Area
10155AndoverParkEast
rukwila, WA98188
,(206)575-6288
Tampa - St.Petersburg -
Sarasota Area
CenterPointBusinessPark,
BuIdingB-l, Suite 100
1911 U.S.Hwy.30,1North
Tampa,FL 33619
(,813)521-8181
Washington, DC- Baltimore -
Northern VAArea
6671-J SantaBarbaraRoad
Elkridge,MD 21227
(410) 796-0105
HOWYOU CANOBTAINEFFICIENTANDEXPEDIENTCARRY-IN, MAIL-IN, OR IN-HOME SERVICEIN CANADAFORYOUR PRODUCTTHROUGHA PHILIPSCONSUMER SERVICECENTER
COMMENT OBTENIRNOTRESERVICEAPRf:SVENTERAPIDE ET EFFICACESOITPAR COURRIER, ._DOMICILE, OUEN SE PR¢SENTANTA IJN CENTREDESERVICEPHILIPS
COMO OBTENERUN SERVICIO OPORTUNOY EFICIENTEPOR CORREO,EN CASA0 ENPERSONAEN ELCANADA
PARASU PRODUCTOA TRAVI_SDE UN CENTROPHILIPS DE SERVICIOAt. CONSUMIDOR
TORONTO
601 Milner Avenue
Scarborough, Ontario
M1B _M8
(416) 754-6064 (Tel.)
(416) 292-5161 (Tel.)
(416) 754-6290 (Fax)
MONTRI_AL VANCOUVER
4977 Levy Street 1741 Boundary Road
St. Laurent, Quebec Vancouver, B.C.
H4R 2N9 V5M 3Y7
(514) 956-0120 (Tel.) (604) ;,!94-3441(Tel.)
(514) 956-0828 (Fax) (604) _,194-3574(Fax)
39
MAC2929 10/96
Page 40

COLOR TELEVISION
90 Days Free Labor
One Year Free Replacement of Parts (Two Years Free Replacement on Color Picture Tube)
This product can be repaired in-home
WHO IS COVERED?
You must have proof of purc.hase to receive warranty service. A
sales receipt or other document showing that you purchased the
product is considered proof of purchase.
WHAT IS COVERED?
Warranty coverage begins the day you buy your product. For 90
days thereafter, all parts will be repaired or replaced free, and labor
is free. From 90 days to one year from the day of purchase, all
parts will be repaired or replaced free, but you pay for all labor
charges. From one to two years from the day of purchase, you pay
for the replacement or repair of all parts except the picture tube, and
for all labor charges. After two years from the day of purchase, you
pay for the replacement or repair of all parts, and for all labor
charges.
All parts, including repaired and replaced parts, are covered only for
the original warranty period. When the warranty on the product
expires, the warranty on all replaced and repaired parts also
expires.
WHAT IS EXCLUDED?
Your warranty does not cover:
• labor charges for installation or setup of the product, adjustment
of customer controls on the product, and installation or repair of
antenna systems outside of the product.
product repair and/or part replacement because of misuse,
accident, unauthorized repair or other cause not within the
control of Philips Consumer Electronics Company.
reception problems caused by signal conditions or cable or
antenna systems outside: the unit.
• a product that requires modification or adaptation to enable it to
operate in any country other than the country for which it was
designed, manufactured, approved and/or authorized, or repair
of products damaged by these modifications.
incidental or consequential damages resulting from the product.
(Some states do not allow the exclusion of incidental or
consequential damages, so the above exclusion may not apply
to you. This includes, but is not limited to, prerecorded material,
whether copyrighted or not copyrighted.)
• a product used for commercial or institutional purposes.
WHERE IS SERVICE AVAILABLE?
Warranty service is available in all countries where the product is
officially distributed by Philips Consumer Electronics Company. In
countries where Philips Consumer Electronics Company does not
distribute the product, the local Philips service organization will
attempt to provide service (although there may be a delay if the
appropriate spare parts and technical manual(s) are not readily
available).
MAKE SURE YOU KEEP.,.
Please keep your sales receipt cr other document showing proof of
purchase. Attach it to this owner's manual and keep both nearby.
Also keep the original box and packing material in case you need to
return your product.
BEFORE REQUESTING SERVICE...
Please check your owner's manual before requesting service.
Adjustments of the controls disclJssed there may save you a service
call.
TO GET WARRANTY SERVRCE IN U.S.A.,
PUERTO RICO OR U.S. VIRGIN ISLANDS...
Contact a Philips faciory service center (see enclosed list) or
authorized service center to arrange repair.
(In U.S.A., Puerto Rico and U.S. Virgin Islands, all implied
warranties, including implied warranties of merc,hantability and
fitness for a particular purpose, are limited in duration to the
duration of this express warranty. But, because some states do not
allow limitations on how long an implied warranty may last, this
limitation may not apply to you.)
TO GET WARRANTY SERVICE IN CANADA...
Contact a Philips consumer service center (listed below), self-
servicing dealer or authorized service depot to arrange repair.
Philips Elect'onics Ltd.
601 Milner Avenue, Scarborough, Ontario, M1B 1M8
(416) 292-5161
4977 Levy Street, St. Laurent, Qu6bec, H4R 2N9
(514) 956-0120
1741 Boundary Road, Vancouver, B.C., V5M 3Y7
(604) 294-3441
(In Canada, this warranty is given in lieu of all other warranties. No
other warranties are expressed or implied, including any implied
warranties of merchantability or fitness for a particular purpose.
Philips is not liable under any ci:curnstances for an!/direct, indirect,
special, incidental or consequential damages, howsoever incurred,
even if notified of the possibil ty of such damages.)
REMEMBER...
Please record the model and serial numbers found on the product
below. Also, please fill out and mail your warranty registration card
promptly. It will be easier for us to notify you if necessary.
MODEL #
SERIAL #
Philips Service Company, P.O. Box 555, Jefferson City, Tennessee 2;7760
(423)475-8869
]BT770-E001
 Loading...