

Magnavox TP3573 Owner's Manual
Color Television
Owner's Manual

Once your MAGNA VOX purchase is registered, you're eligible to receive all the privileges of owning a MAGNAVOX
product. So complete and return the Warranty Registration Card enclosed with your purchase at once. And take
advantage of these important benefits.
• Warran ty
Verification
Registering your product within
I0 days confirms your fight to
maximum protection under the
terms and conditions of your
MAGNAVOX warranty.
,Owner
Confirmation
Your completed Warranty
Registration Card serves as
verification of ownership in the
event of product theft or loss.
,Model
Registration
Returning your Warranty Registration
Card right away guarantees you'll
receive all the information and special
offers which you qualify for asthe
owner of your model.
Congratulations on your purchase, and M_e__VOX
welcome to the "family!"
Smart. I4ry smart.*
Dear MAGNAVOX product owner:
Thank you for your confidencein MAGNAVOX. You've selected one of the best-built, best-backedproducts
availabletoday. And we'll do everythingin our power to keep you happywith your purchasefor manyyearsto come.
As a member of the MAGNAVOX '_amily," you're entided to protection by one ofthe most comprehensivewan-andesandoutstanding
service networks inthe industry.
What's more, your purchaseguaranteesyou'll receive allthe information and specialoffersfor which you qualify,pluseasyaccessto
accessoriesfrom our convenienthome shoppingnetwork.
And most importandyyou cancounton our uncompromisingcommitment to your total satisfaction.
All of this isour way of sayingwelcome-and thanksfor investingina MAGNAVOX product.
Sincerely,
P.S. Remember, to get the most from your
MAGNAVOX product, you must return your
Robert Minkhorst Warranty Registration Card within 10 days.
Preside_ and Chief Executive Officer So please mail it to us right now_.
For Customer Use
Enter below the Serial No. which is located on the rear of the cabinet. Retain this information for future reference.
Model No. Serial No.
1
Know these
safetysymbols
A This "bolt of lightning" indicates uninsulated material within your unit may cause an eiec0rical shoclc
For the safety of everyone in your household, please do not remove product covering.
_kThe "exclamation point" calls attention to features for which you should read the enclosed literature
closely to prevent operating and maintenance problems.
WARNING: TO PREVENT FIRE OR SHOCK HAZARD, DO NOT EXPOSE THIS EQUIPMENT TO"
OR MOISTURE
CAUTION: To prevent electric shock, match wide blade of plug to wide slot. and fully inser_
A'I-rENTION: Pour _viter les chocs _--uriques, introduire b lame la plus large de la fiche darts ta borne
correspondante de la prise et pousser jusqu'au fond.
SAFETYINSTRUCTIONS- Read before operatingequipment
Thisproductwasdesignedandmanufacturedto meetstrictqualityand
safetystandards.Thereare,however,someinstallationandoperation
precautionswhichyoushouldbei_rticuladyawareof.
1. ReadInstructions- Allthesafetyandoperatinginstructionsshould
bereadbeforetheapplianceisoperated.
2. RetainInstructions- Thesafetyandoperatinginstructionsshould
beretainedforfuturereference.
3. HeedWarnings- Allwarningsontheapplianceandintheoperating
instructionsshouldbeadheredto.
4. Followinstructions- Alloperatinganduseinstructionsshouldbe
followed.
5. WaterandMoisture- Theapplianceshouldnotbeusednearwater
- for example,neara bathtub,washbowl,kitchensink,laundrytub,
inawetbasementorneara swimmingpool,etc.
6. CartsandStands-Theapplianceshouldbeusedonlywithacartor
standthatis recommendedbythemanufacturer.
6A. ,_= Anapplianceandcartcombinationshouldbe moved
with care.Quickstops,excessivefore0,anduneven
surfacesmaycausetheapplianceandcartcombination
tooverturn.
7. Wall orCeilingMounting- Theapplianceshouldbemountedto a
wallorceilingonlyasrecommendedbythemanufacturer.
8. Ventilation- Theapplianceshouldbesituatedsothatitslocationor
positiondoesnotinterferewithitsproperventilation.Forexample,
theapplianceshouldnotbesituatedona bed,sofa,rug,orsimilar
surfacethat may blockthe ventilationopenings;or, placedina
built-ininstallation,suchasa bookcaseorcabinetthatmayimpede
theflowofairthroughtheventilationopenings.
9. Heat - Theapplianceshouldbe situatedawayfrom hearsources
such as radiators,heat registers,stoves,or otherappliances
(includingamplifiers)thatproduceheal
10. PowerSources- Theapplianceshouldbe connectedto a power
supplyonlyofthetypedescribedintheoperatinginstructionsoras
markedontheappliance.
11. Power-CordProtection- Powersupplycordsshouldbe routedso
thatthey arenotlikelyto bewalkedonorpinchedby itemsplaced
uponor againstthem,payingparticularattentionto cordsand
plugs,conveniencereceptacles,andthepointwheretheyexitfrom
theappliance.
12. Cleaning- Theapplianceshouldbe cleanedonlyasrecommended-,
bythemanufacturer.
13. PowerLines- Anoutdoorantennashouldbe locatedawayfron,
powerlines.
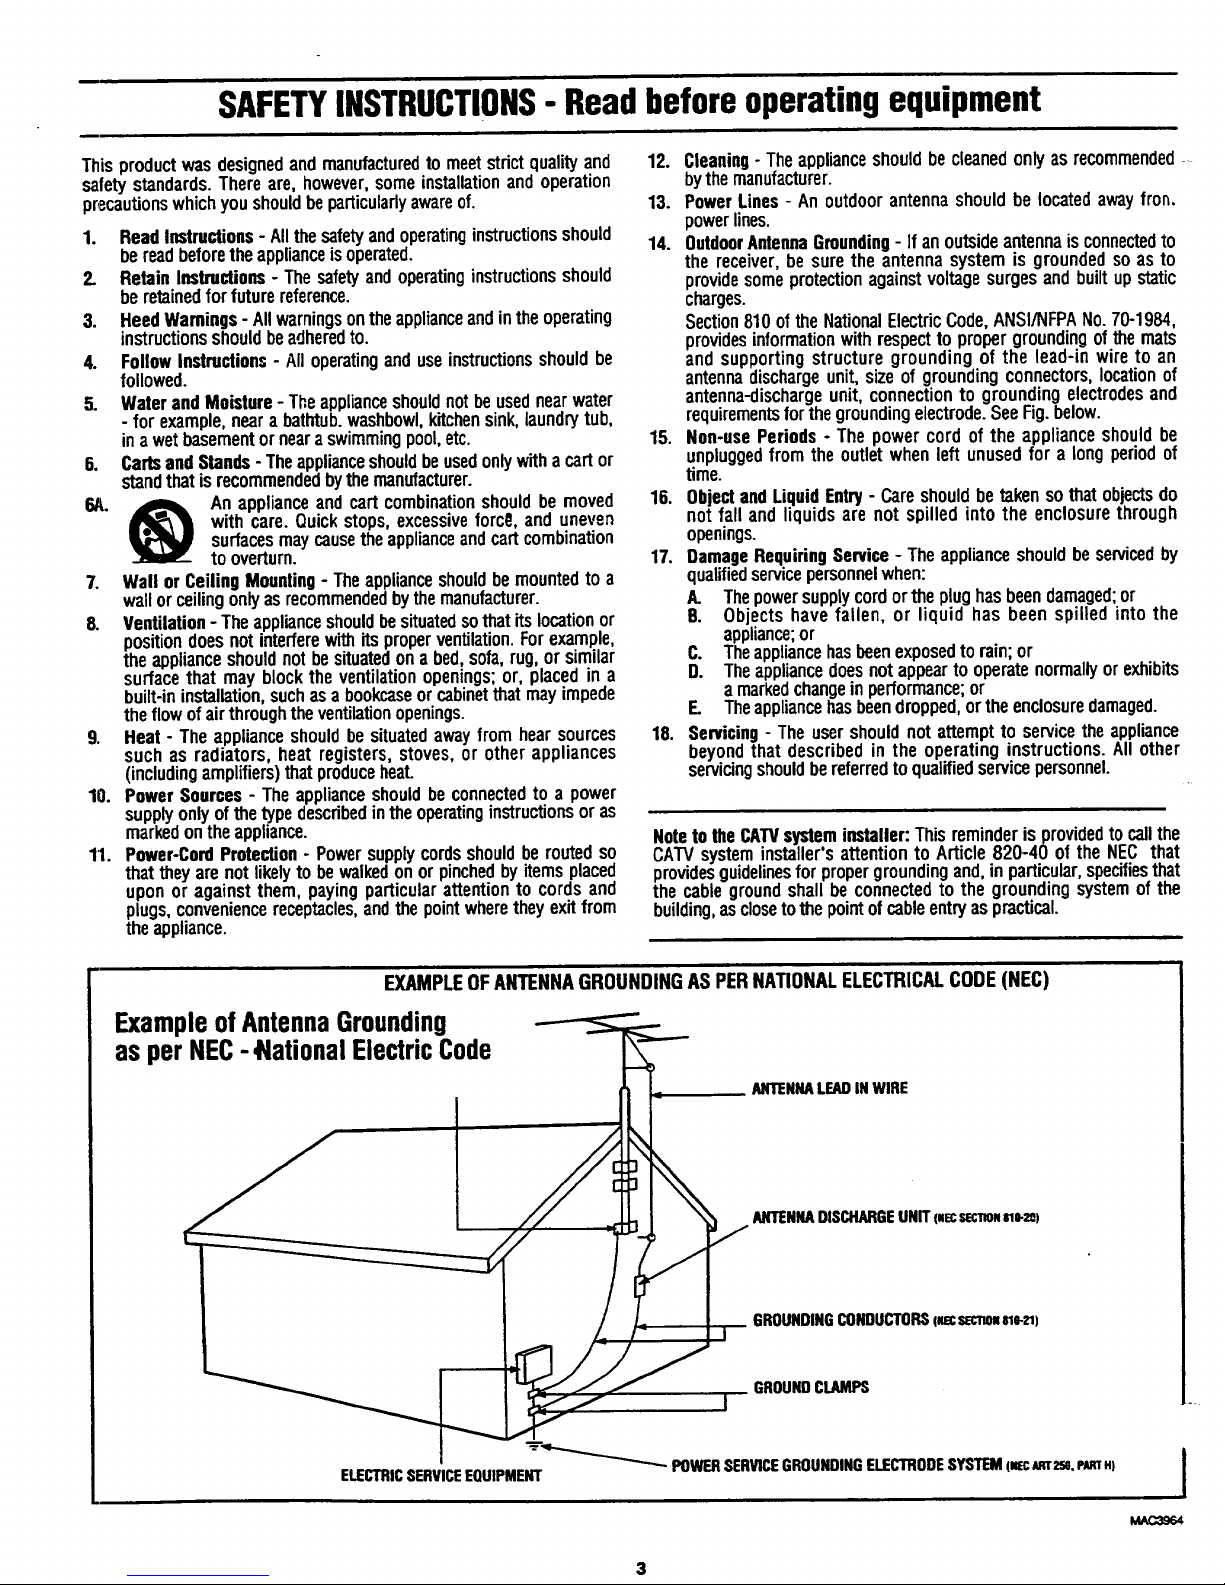
14. OutdoorAntennaGrounding- Ifanoutsideantennaisconnectedto
the receiver,be suretheantennasystemis groundedsoas to
providesomeprotectionagainstvoltagesurgesandbuiltupstatic
charges.
Section810ofthe NationalElectricCode,ANSI/NFPANo.70-1984,
providesinformationwithrespectto propergroundingofthe mats
andsupportingstructuregroundingof the lead-inwireto an
antennadischargeunit,sizeofgroundingconnectors,locationof
antenna-dischargeunit,connectionto groundingelectrodesand
requirementsforthegroundingelectrode.SeeFig.below.
15. Non-usePeriods - Thepowercord of the applianceshouldbe
unpluggedfromtheoutletwhenleftunusedfora longperiodof
time.
16. ObjectandLiquid Entry- Careshouldbetakensothat objectsdo
notfall and liquidsare not spilledintothe enclosurethrough
openings.
17. DamageRequiringService- Theapplianceshouldbeservicedby
qualifiedservicepersonnelwhen:
A. Thepowersupplycordorthe plughasbeendamaged;or
B. Objectshave fallen, or liquid has been spilled into the
appliance;or
C. Theappliancehasbeenexposedtorain;or
D. Theappliancedoesnotappearto operatenormallyorexhibits
a markedchangeinperformance;or
E. Theappliancehasbeendropped,ortheenclosuredamaged.
18. Servicing- Theusershouldnotattemptto servicetheappliance
beyondthat describedin the operatinginstructions.Allother
servicingshouldbereferredtoqualifiedservicepersonnel.
Noteto theCATVsysteminstaller:Thisreminderisprovidedtocallthe
CAW systeminstaller'sattentionto Article820-40 ofthe NEC that
providesguidelinesforpropergroundingand,inparticular,specifiesthat
thecablegroundshallbeconnectedto the groundingsystemof the
building,asclosetothepointofcableentryaspractical.
EXAMPLEOFANTENNAGROUNDINGASPERNATIONALELECTRICALCODE(NEC)
ExampleofAntennaGrounding
as perNEC- lational ElectricCode
ANTENNALEADINWIRE
ANTENNADISCHARGEUNIT (.ECSECnO.slO-:m)
GROUNDINGCONDUCTORSiNecsec.o, m-_)
GROUNDCLAMPS
-_'__ POWERSERVICEGROUNDINGELECTRODESYSTEM(_c imT2se,P_T.)
ELECTRICSERVICEEQUIPMENT
I
MAC3964
Introduction
Welcome/Registration of Your TV............................ 2
Safety/Precautions ..................................................... 3
Table of Contents ....................................................... 4
Features ...................................................................... 4
_] On-Screen (MENU) Features
¢,Setting the TV for Cable TV Operation .............. 5
ffAdding Channels in Memory (Automatically) ...6
,ffAdding Channels in Memory (Manually) ........... 7
¢,How to Set the TV for Closed Captioning ......... 8
Setting the TV for Stereo Programs .................... 9
¢, Using the Sound Image Control ........................ 10
¢, Using the TV Volume Bar Control ................... I0
<,.Setting the Surf/Smart Surf Control .................. 11
,_-Adjusting the TV Picture .................................. 12
,_.Adjusting the Set Clock Control ....................... 13
¢.Adjusting the Set TimerlTimer ON/OFF .......... 14
,_,Setting the TV Sleep Timer Control ................. 15
¢,Using the TV Channel Reminder ...................... 16
"_,Using the On-Screen Language Option ............ 16
<*Using the Audio Out Jacks (with TV Speaker
On/Off Control) ................................................ 17
,_Using Surround Sound External Speakers ........ 17
'0-Using the TV's AudioNideo Input Jacks ....18-19
[_ RemoteControl Operation
Using the Remote Locator Feature ....... 20-21
Using the SmartPicture Control .............................. 22
Using the Smart Sound Control ....._......................... 23
Setting the TV Remote to Work VCRs .............. 24-25
Setting the TV Remot_ to Work
Cable "IV Converters .......................................... 26-27
Setting the TV Remote to Work VCRs or Cable
Converters - Slearch Method .................................... 28
Using the Remote's VCR Buttons ............................ 29
[',_. Picture-in-Picture (PIP)
Using the PIP Feature (Connections) ................. 30-31
Using PIP with the TV Remote ............................... 32
Selecting the PIP Picture Source ............................. 33
More PIP Connections (Cable Converter) ............... 34
_ .General Information
Tips if Something Isn't Working ............................. 35
Glossary of TV Terms ............................................. 36
Index ........................................................................ 36
Factory Service Locations .................................. 37-38
Warranty .................................................................. 39
Accessories .............................................................. 40
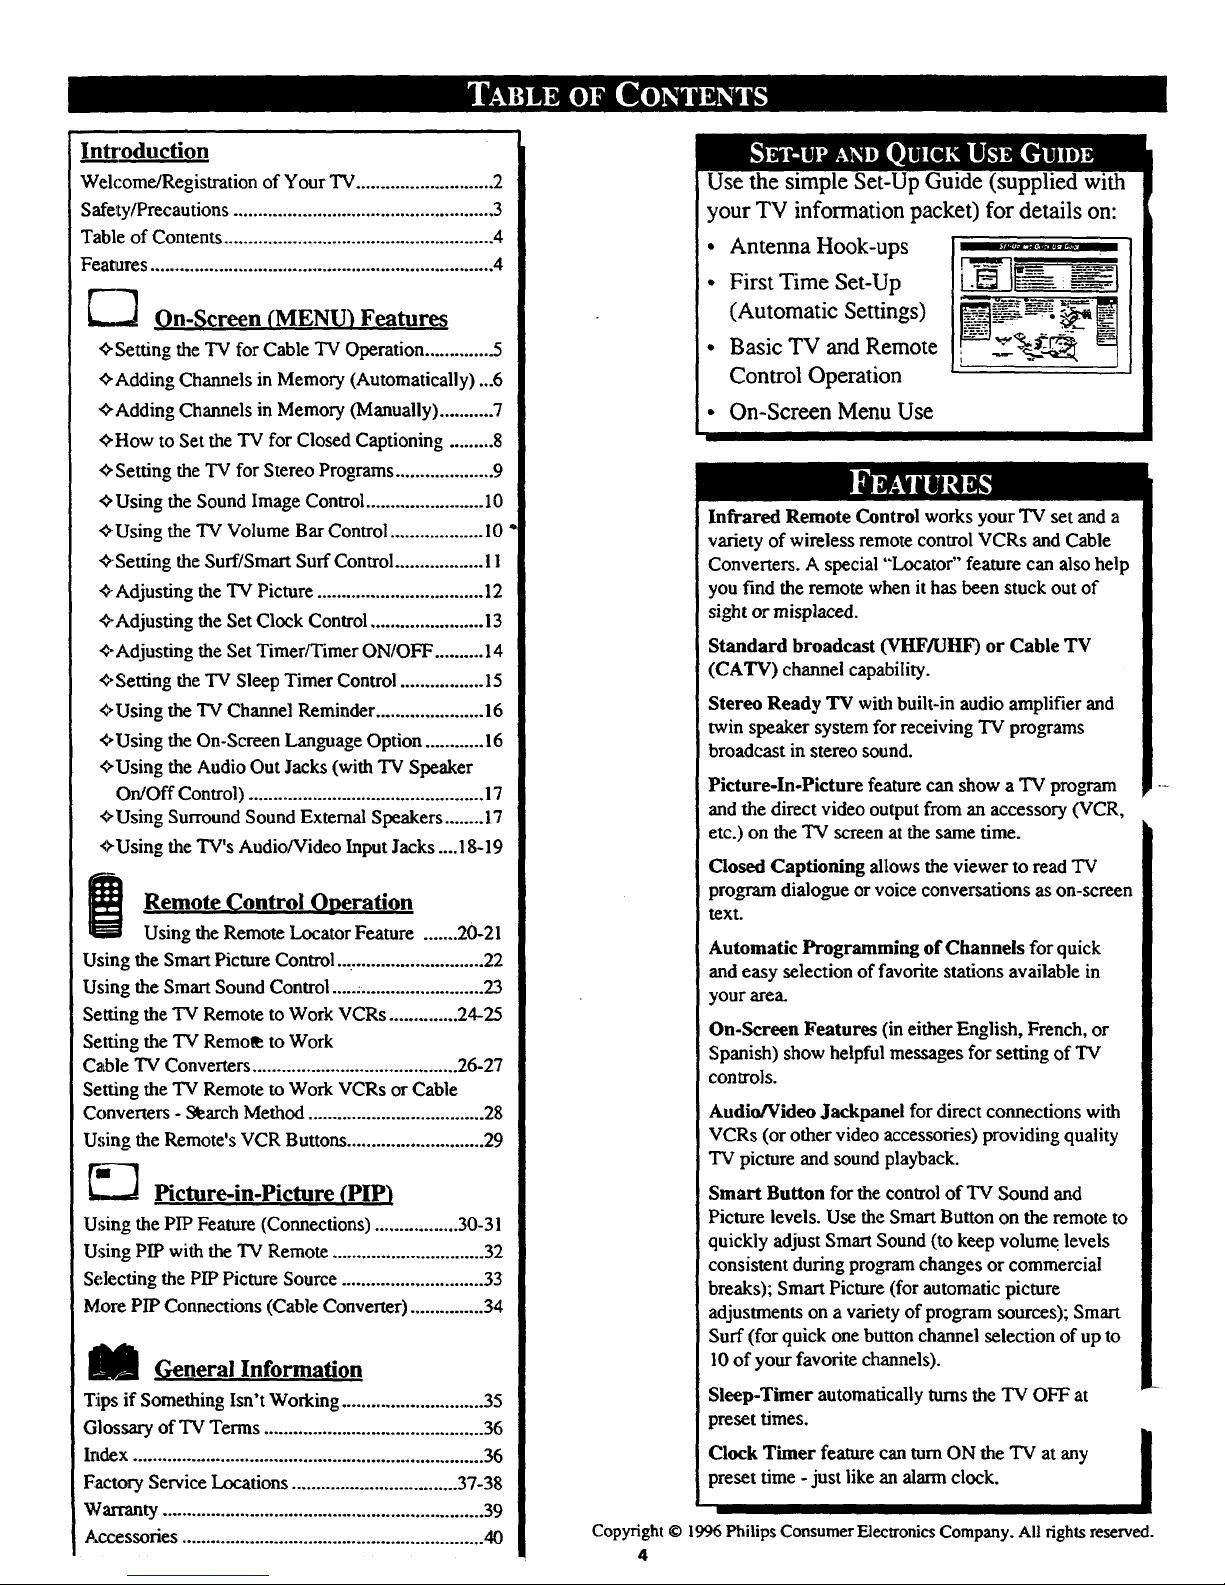
Use the simple Set-Up Guide (supplied with
your TV information packet) for details on:
• Antenna Hook-ups
• First Time Set-Up
(Automatic Settings)
• Basic TV and Remote
Control Operation
• On-Screen Menu Use
Infrared Remote Control works your TV set and a
variety of wireless remote control VCRs and Cable
Converters. A special "Locator" feature can also help
you find the remote when it has been stuck out of
sight or misplaced.
Standard broadcast (VHFKJHF) or Cable TV
(CATV) channel capability.
Stereo Ready TV with built-in audio amplifier and
twin speaker system for receiving TV programs
broadcast in stereo sound.
Picture-In-Picture feature can show a "IVprogram
and the direct video output from an accessory (VCR,
etc.) on the TV screen at the same time.
Closed Captioning allows the viewer to read TV
program dialogue or voice conversations as on-screen
text.
Automatic Programming of Channels for quick
and easy selection of favorite stations available in
your area.
On-Screen Features (in either English, French, or
Spanish) show helpful messages for setting of TV
controls.
Audio/Video Jackpanel for direct connections with
VCRs (or other video accessories) providing quality
TV picture and sound playback.
Smart Button for the control of TV Sound and
Picture levels. Use the Smart Button on the remote to
quickly adjust Smart Sound (to keep volume levels
consistent during progr_ changes or commercial
breaks); Smart Picture (for automatic picture
adjustments on a variety of program sources); Smart
Surf (for quick one button channel selection of up to
I0 of your favorite channels).
Sleep-Timer automatically turns the TV OFF at
preset times.
im
Clock Timer feature can turnON the TV at any I
preset time - just like an alarm clock.
I
Copyright © 1996PhilipsConsumer ElectronicsCompany. All fightsreserved.
4
w.
OeTE: If you went through
rap (in your Quick Use
Guide), this task has already been
completed for you.
You need to make sure that the TV
is set to pick up either Cable TV
stations or Antenna signals. In
other words, the TV needs to know
whether you have connected a
Cable TV signal or a normal
antenna to its ANTENNA plug.
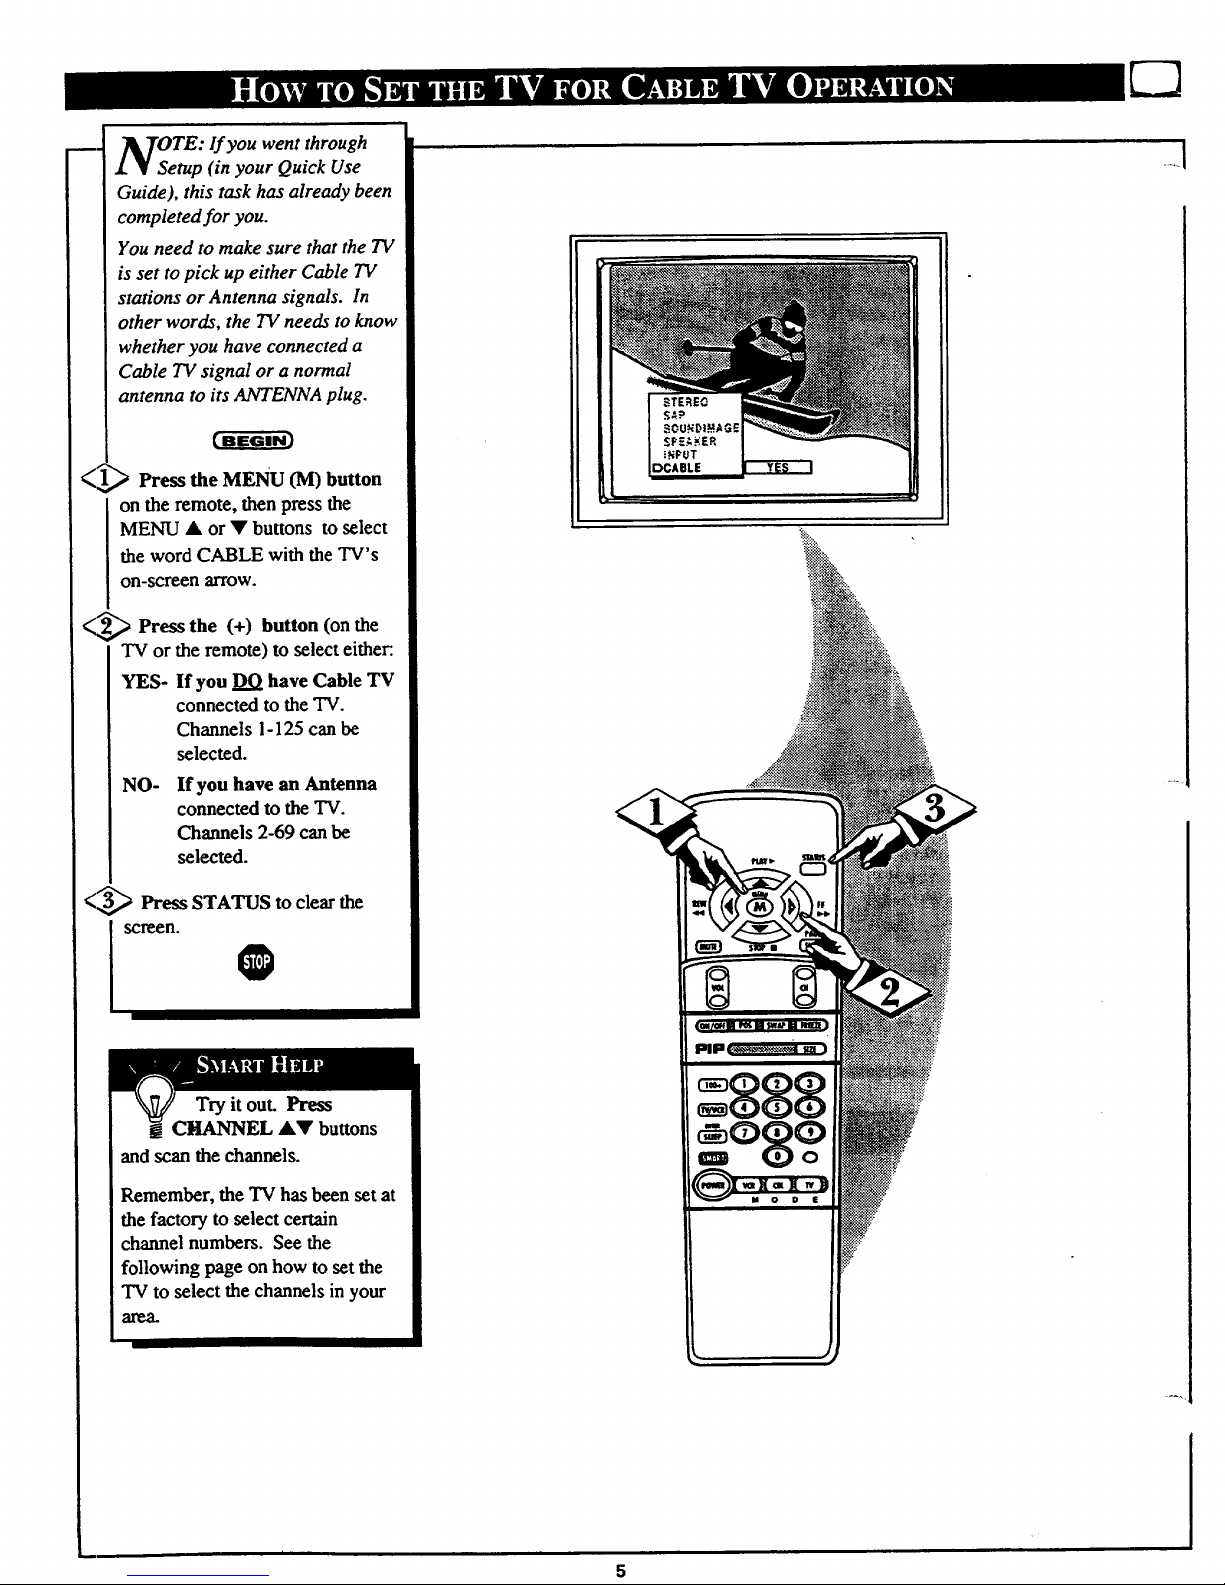
<_ Press the MENU (M) button
on the remote, then press the
MENU • or • buttons to select
the word CABLE with the TV's
on-screen arrow.
C.,_ Press the (+) button (on the
"IVor the remote) to select either-.
YES- If you DO have Cable TV
connected to the TV.
Channels 1-125 can be
selected.
NO- If you have an Antenna
connected to the TV.
Channels 2-69 can be
selected.
<5,_ Press STATUS to clear the
SCreen.
Try it out. Press
CltANNEL •• buttons
and SCanthe channels.
Remember, the TV has been set at
the factory to select certain
channel numbers. See the
following page on how to set the
TV to select the channels in your
01e0-
.... i
5
OTE: If you went through
etup (in your Quick Use
Guide), this task has already been
completed for you.
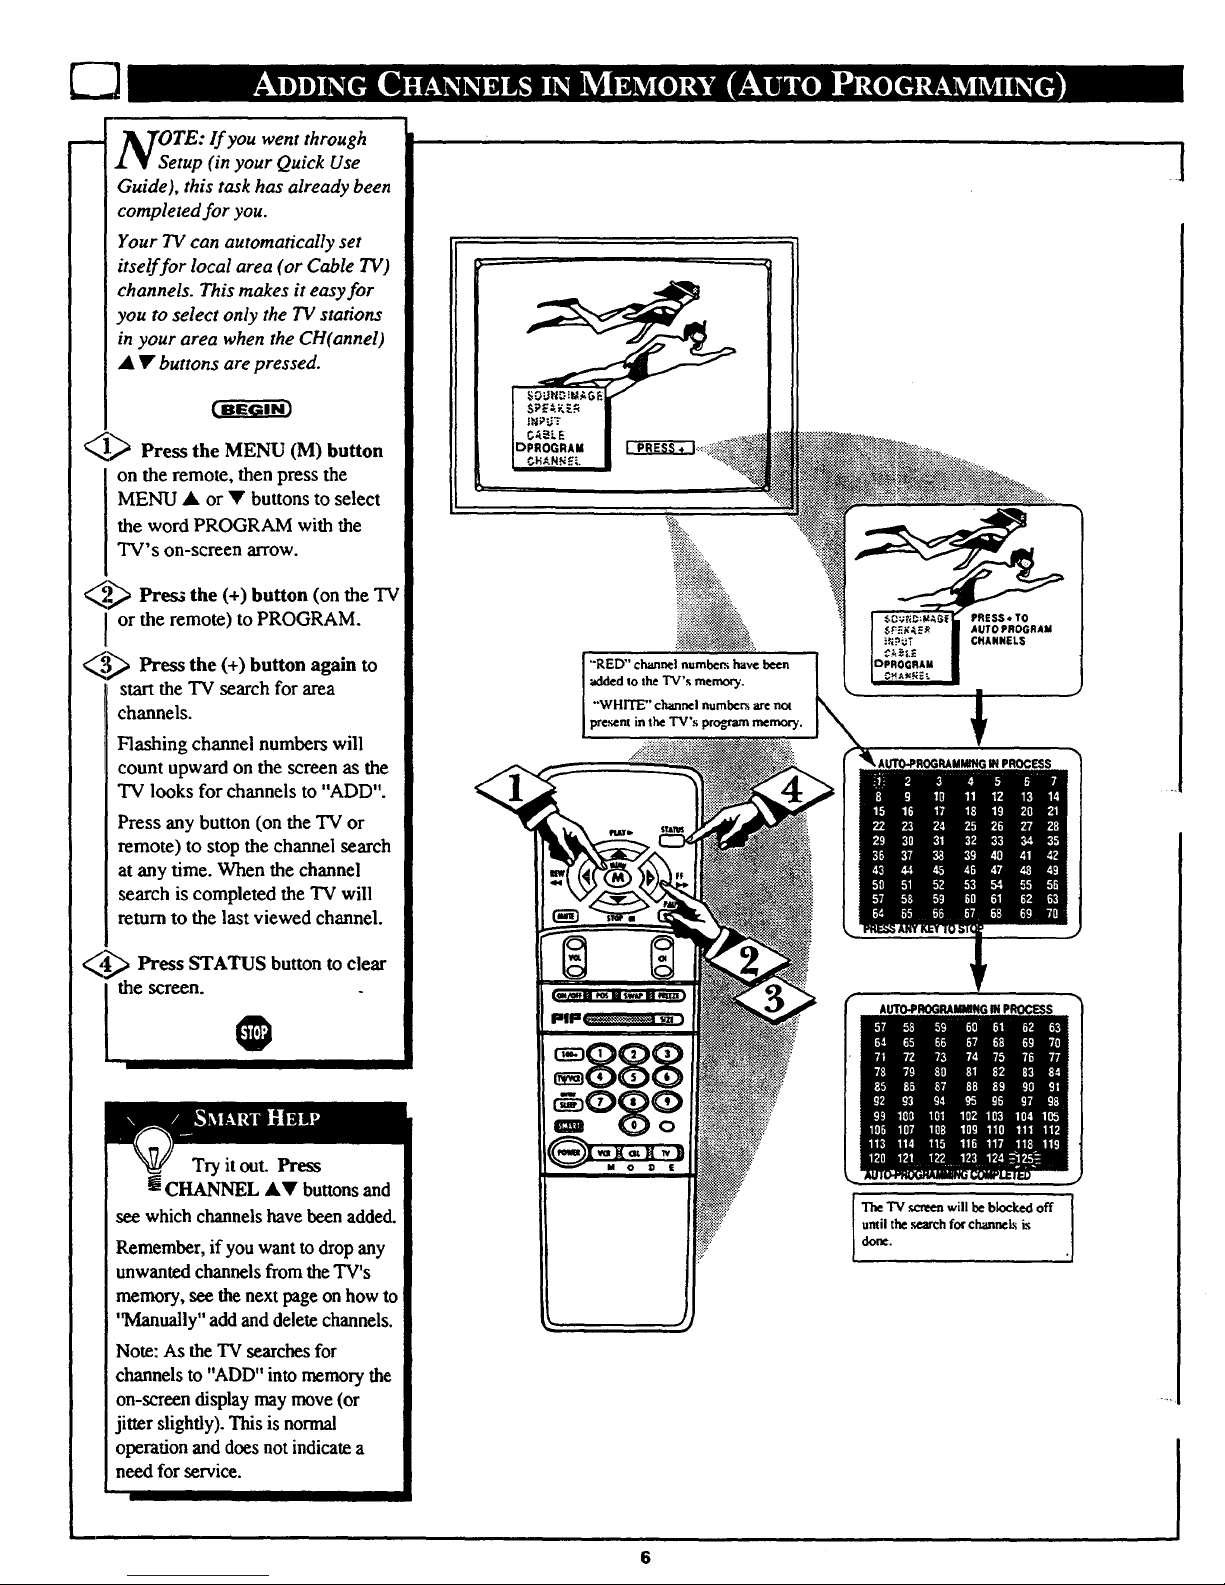
Your TV can automatically set
itself for local area (or Cable TV)
channels. This makes it easy for
you to select only the TV stations
in your area when the CH(annel)
• • buttons are pressed.
_ Press the MENU (M) button
on the remote, then press the
MENU • or • buttons to select
the word PROGRAM with the
TV's on-screen arrow.
_,.1_ Press the button the "IV
(+) (on
or the remote) to PROGRAM.
_.'._ Press the (+) button
again
to
start the TV search for area
channels.
Flashing channel numbers will
count upward on the screen as the
TV looks for channels to "ADD".
Press any button (on the TV or
remote) to stop the channel search
at any time. When the channel
search is completed the TV will
return to the last viewed channel.
_ Press STATUS button to clear
the screen.
. •
Try it out. Press
m CHANNEL AY buttons and
see which channelshave been added.
Remember, ifyou want to drop any
unwanted channels from the TV's
memory, see the next page on how to
'q_4anually" add and delete channels.
Note: As the TV searches for
channels to "ADD" into memory the
on-screen display may move (or
jitter slightly). This isnormal
operation and does not indicate a
need for service.
"RED" channel numbers have been
added to the TV's memory.
•"WHITE" channel numbers are no_
present in the TV's program memory.
;IH PROCESS
The TV _ will be blocked off
until the .q_'ch for channels is
done.
1
6
m,
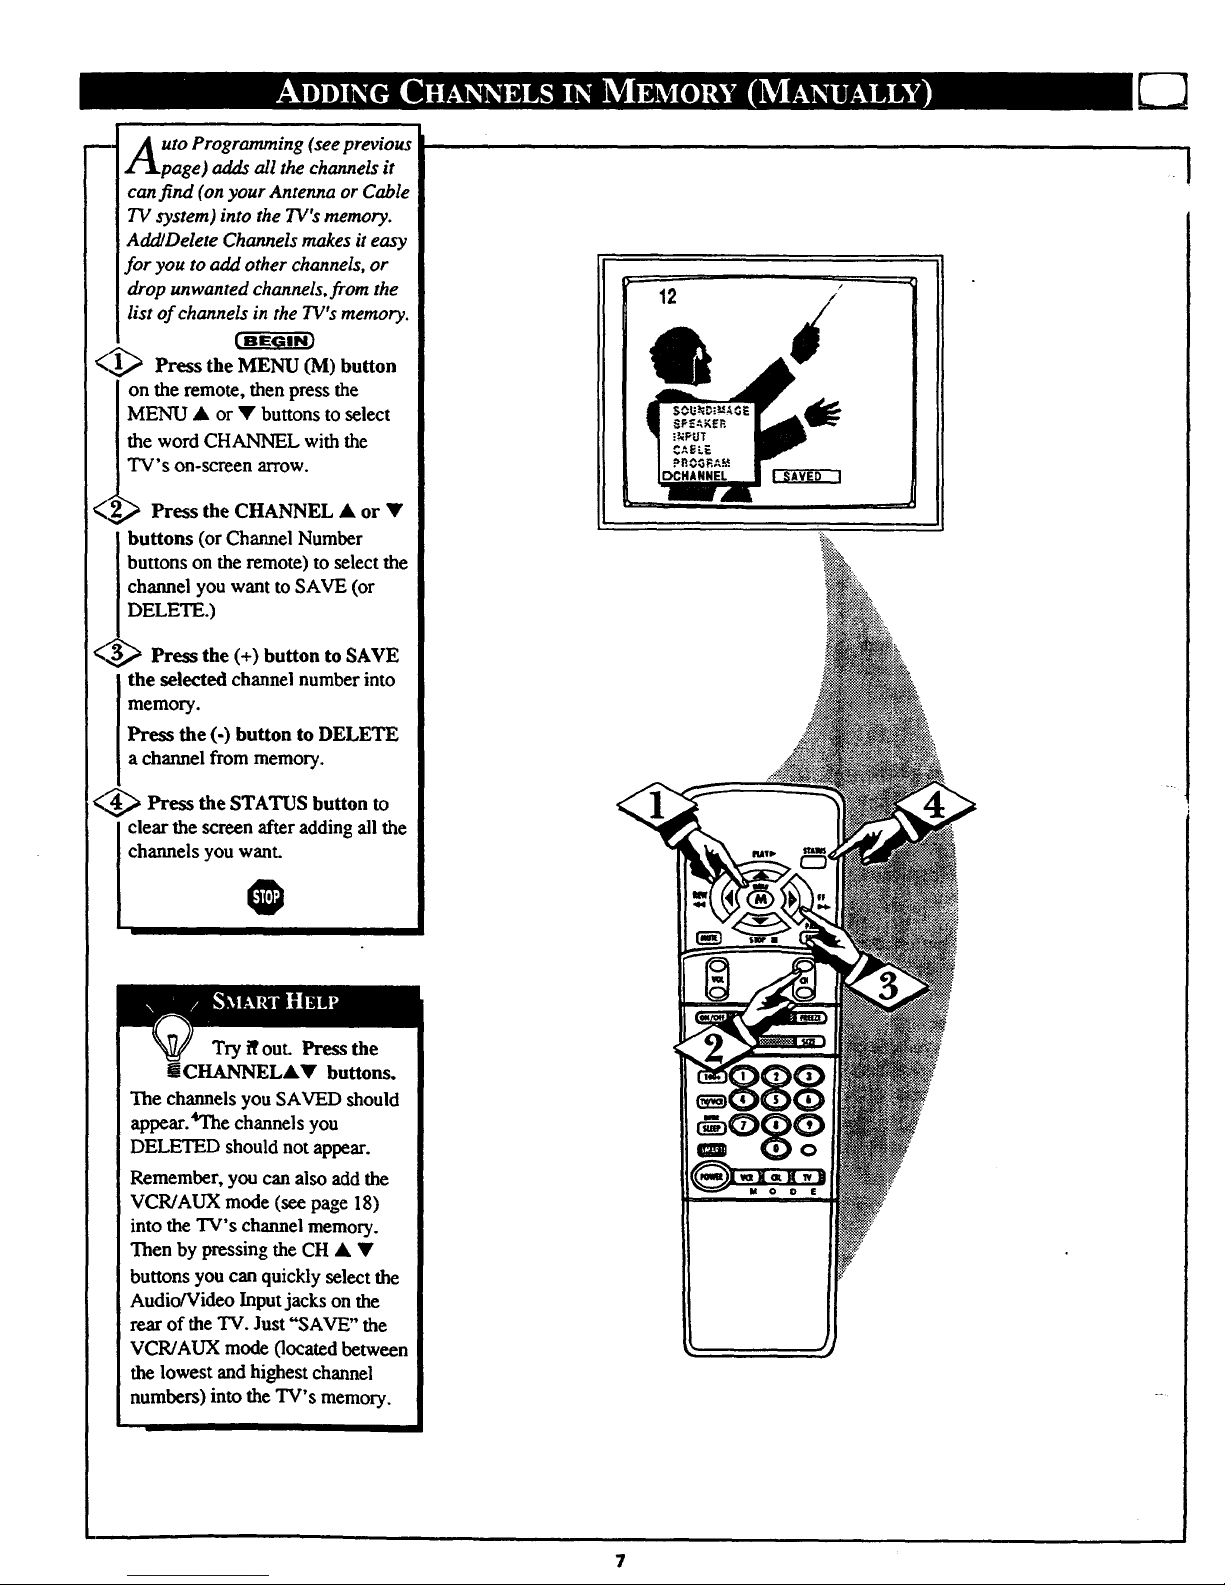
uto Programming (see previous
page) adds all the channels it
can find (on your Antenna or Cable
TV system) into the TV's memory.
Add/Delete Channels makes it easy
for you to add other channels, or
drop unwanted channels, from the
list of channels in the TV's memory.
(1,_ Press the MENU (M) button
on the remote, then press the
MENU • or • buttons to select
the word CHANNEL with the
TV's on-screen arrow.
(_ _ Press the CHANNEL • or •
] buttons (or Channel Number
[ buttons on the remote) to select the
I channel you want to SAVE (or
DELETE.)
<3,_ Press the (+) button to SAVE
the selected channel number into
memory.
Press the (-) button to DELETE
a channel from memory.
<_ Press the STATUS button to
clear the screen after adding all the
channels you want.
O
Try iTout. Press the
! CI-IANNELA• buttons.
The channels you SAVED should
appear._l'he channels you
DELETED should not appear.
Remember, you can also add the
VCR/AUX mode (see page 18)
into the TV's channel memory.
Then by pressing the CH • •
buttons you can quickly select the
Audio/Video Inputjacks on the
rear of the TV. Just "SAVE" the
VCR/AUX mode (located between
the lowest and highest channel
numbers) into the TV's memory.
7
m
lOSed Captioning allows you to
ad the voice content of
television programs on the TV
screen. Designed to help the
hearing impaired this feature uses
on-screen "text boxes" to show
_alogue and conversations while
t,_e TV program is in progress.
(BEGIN]
_ Press the MENU (M) button on
the remote, then press the MENU
A or • to select the word
CAPTION with the TV's on-screen
fkrfOW.
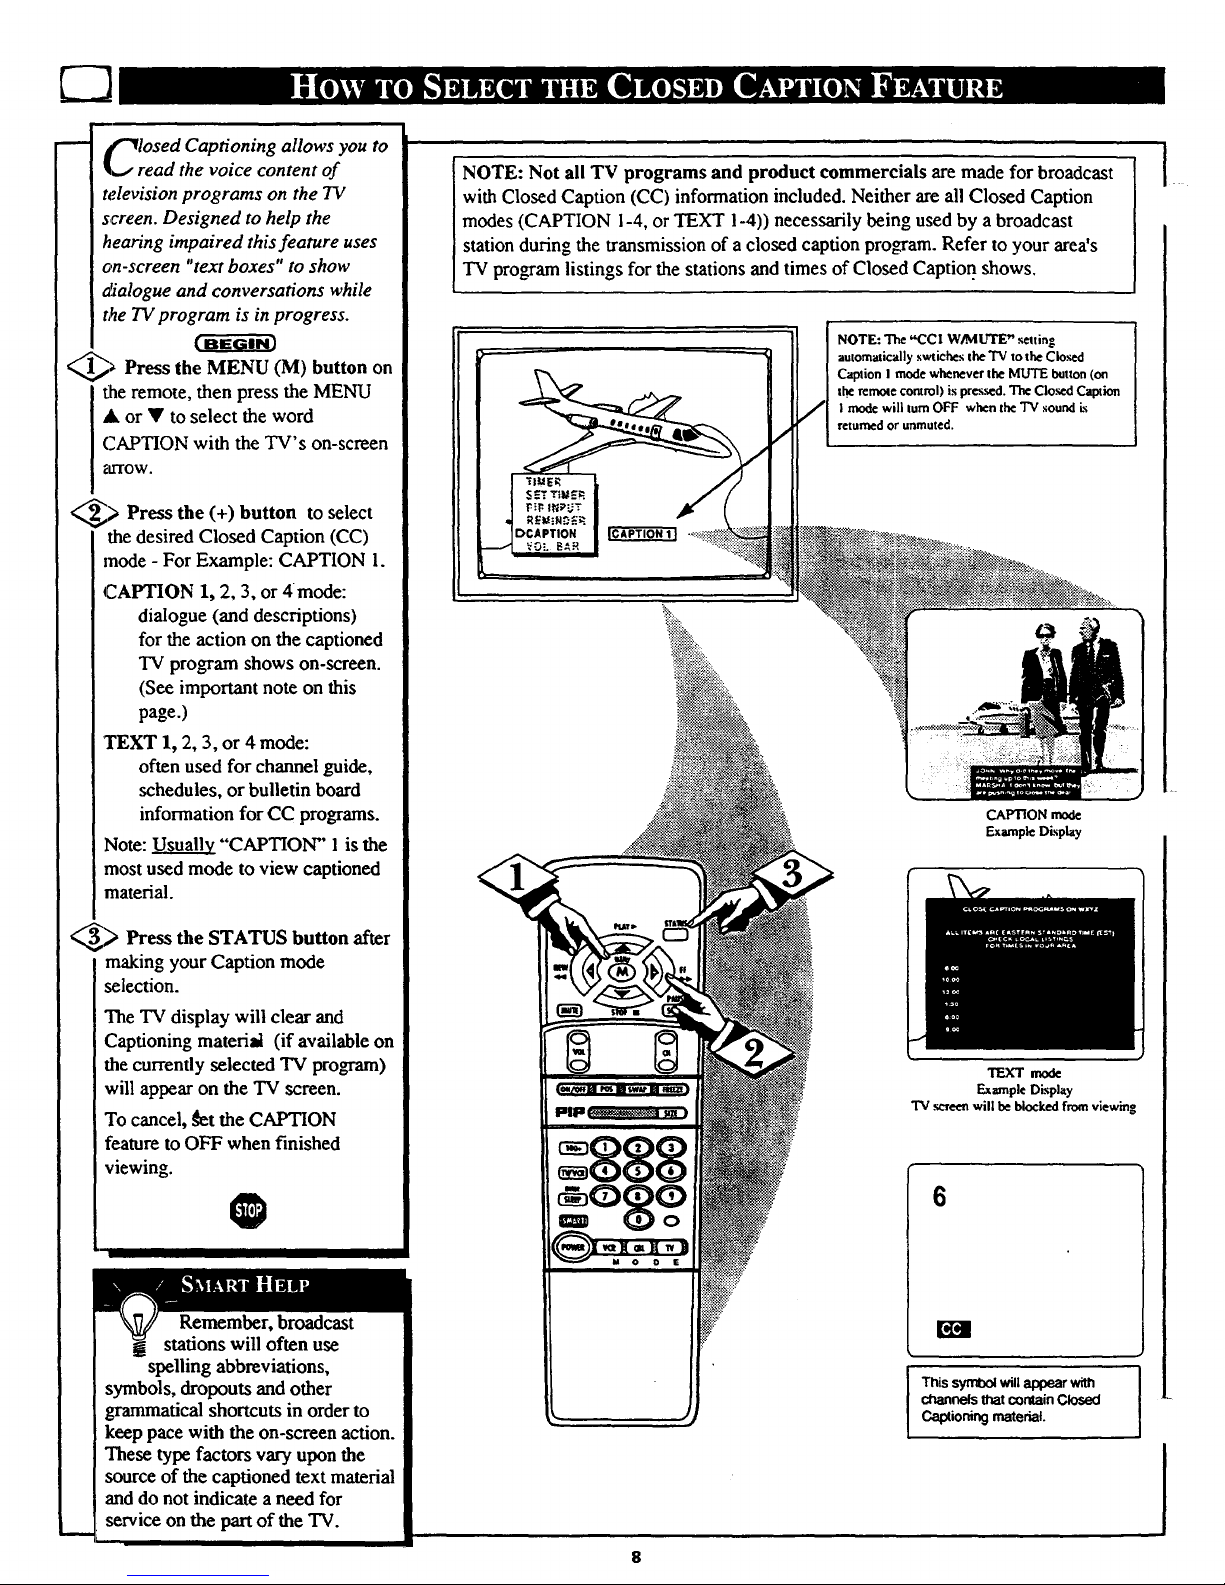
_> Press the button select
(+)
to
the desired Closed Caption (CC)
mode - For Example: CAPTION 1.
CAPTION 1, 2, 3, or 4mode:
dialogue (and descriptions)
for the action on the captioned
TV program shows on-screen.
(See important note on this
page.)
TEXT 1, 2, 3, or 4 mode:
often used for channel guide,
schedules, or bulletin board
information for CC programs.
Note: _ "CAPTION" 1is the
most used mode to view captioned
material.
_> Press the STATUS button after
making your Caption mode
selection.
The TV display will clear and
Captioning material (if available on
the currently selected TV program)
will appear on the TV screen.
To cancel, _t the CAPTION
feature to OFF when finished
viewing.
O
Remember, broadcast
stations will often use
spelling abbreviations,
symbols, dropouts and other
grammatical shortcuts in order to
keep pace with the on-screen action.
These type factors vary upon the
source of the captioned text material
and do not indicate a need for
service on the partof the TV.
NOTE: Not all TV programs and product commercials are made for broadcast
with Closed Caption (CC) information included. Neither are all Closed Caption
modes (CAPTION 1-4, or TEXT 1-4)) necessarily being used by a broadcast
station during the transmission of a closed caption pro_am. Refer to your area's
TV program listings for the stations and times of Closed Caption shows,
I
NOTE: The "COl W/MLrrlE" selting
automatically swtiches the'IV xothe Closed
Caption I mode whenever the MUTE button (on
t.he remole control) is pres._d. The Cloud Caption
I mode will turn OFF when the TV sound is
returned or unmuted.
CAPTION mode
Example Display
TEXT mode
Example Display
TV screen will be blocked from viewing
6
[*I4
This symbol will appear with
channels that contain Closed
Cakolioning material.
Jm
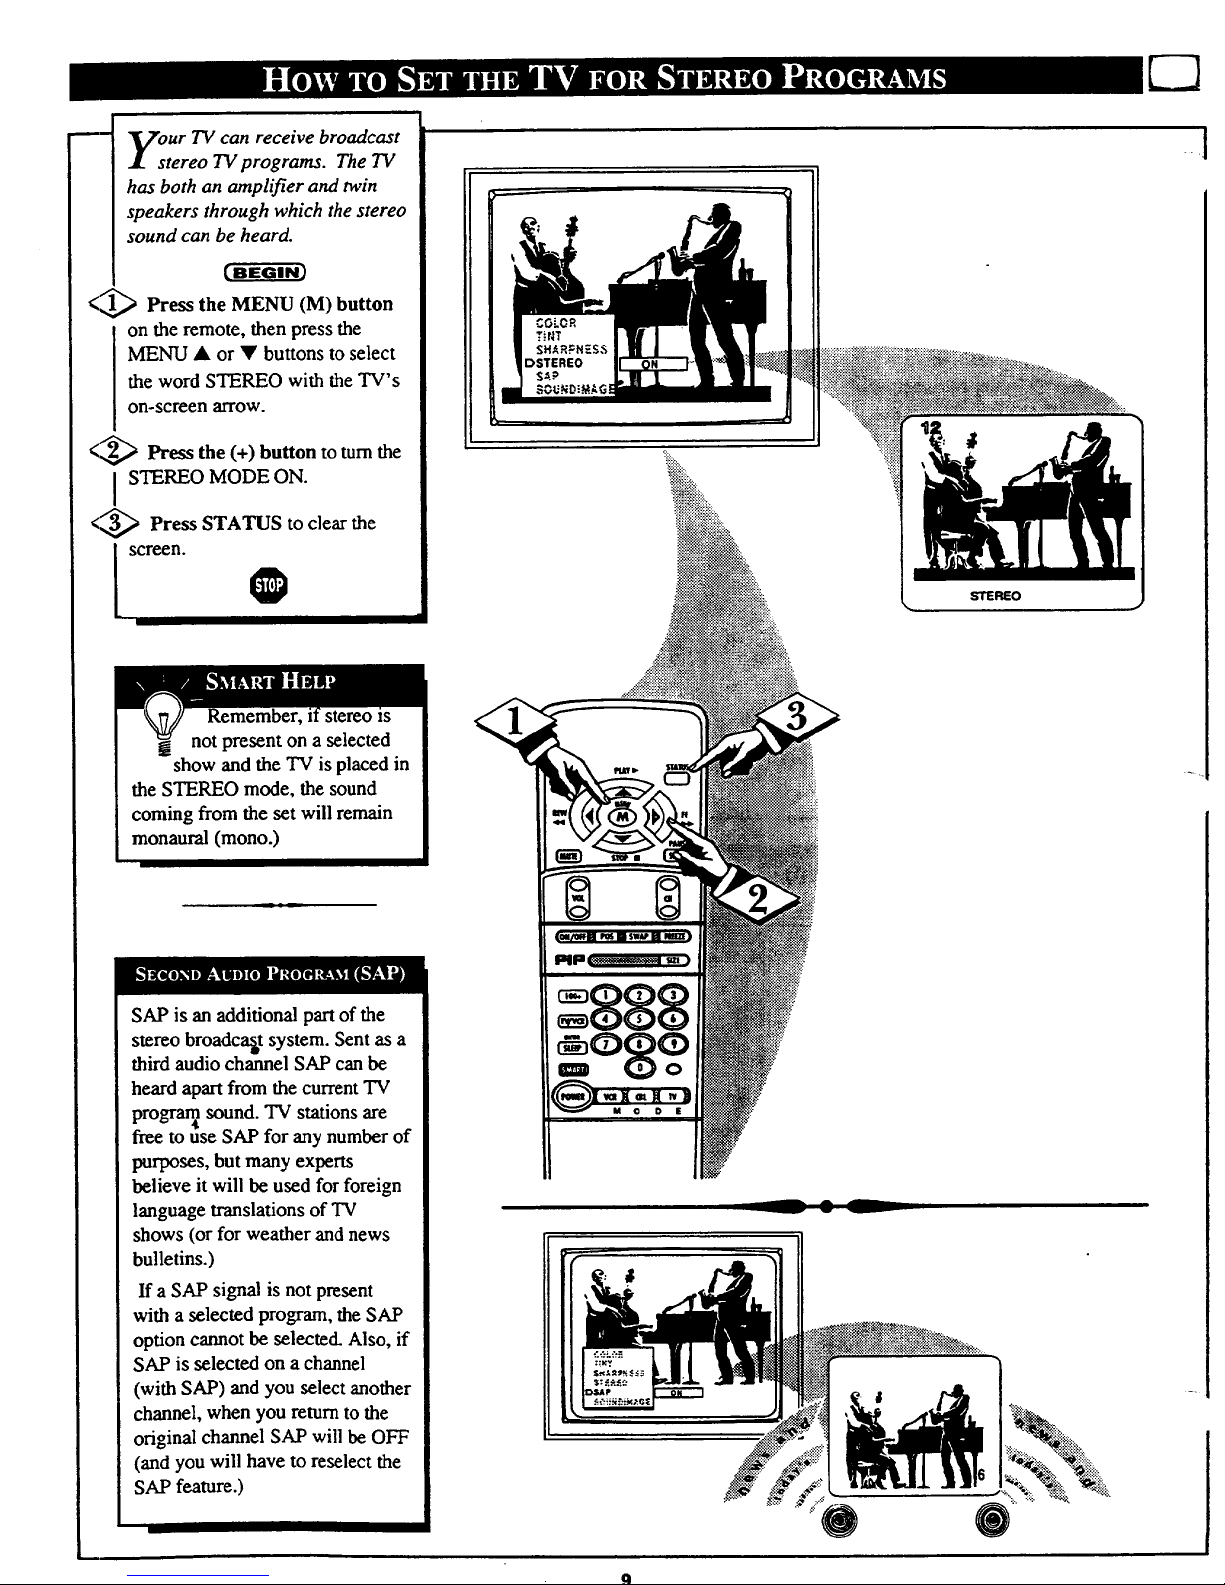
our TV can receive broadcast
tereo TV programs. The TV
has both an amplifier and twin
speakers through which the stereo
sound can be heard.
<_ Press the MENU (M) button
on the remote, then press the
MENU • or • buttons to select
the word STEREO with the TV's
on-screen arrow.
<_ Press the (+) button to tum the
I STEREO MODE ON.
<_ Press STATUS to clear the
Remember, stereo _s
not present on a selected
show and the TV is placed in
the STEREO mode, the sound
coming from the set will remain
monaural (mono.)
SAP is an additional pan of the
stereo broadcast system. Sent as a
third audio channel SAP can be
heard apan from the currentTV
progran_sound. TV stations are
free to use SAP for any number of
purposes, but many experts
believe it will be used for foreign
language translations of "IV
shows (or for weather andnews
bulletins.)
If a SAP signal is not present
with a selected program, the SAP
option cannot be selected. Also, if
SAP is selected on a channel
(with SAP) andyou select another
channel, when you return to the
original channel SAP will be OFF
(and you will have to reselect the
SAP feature.)
L_
STEREO
9
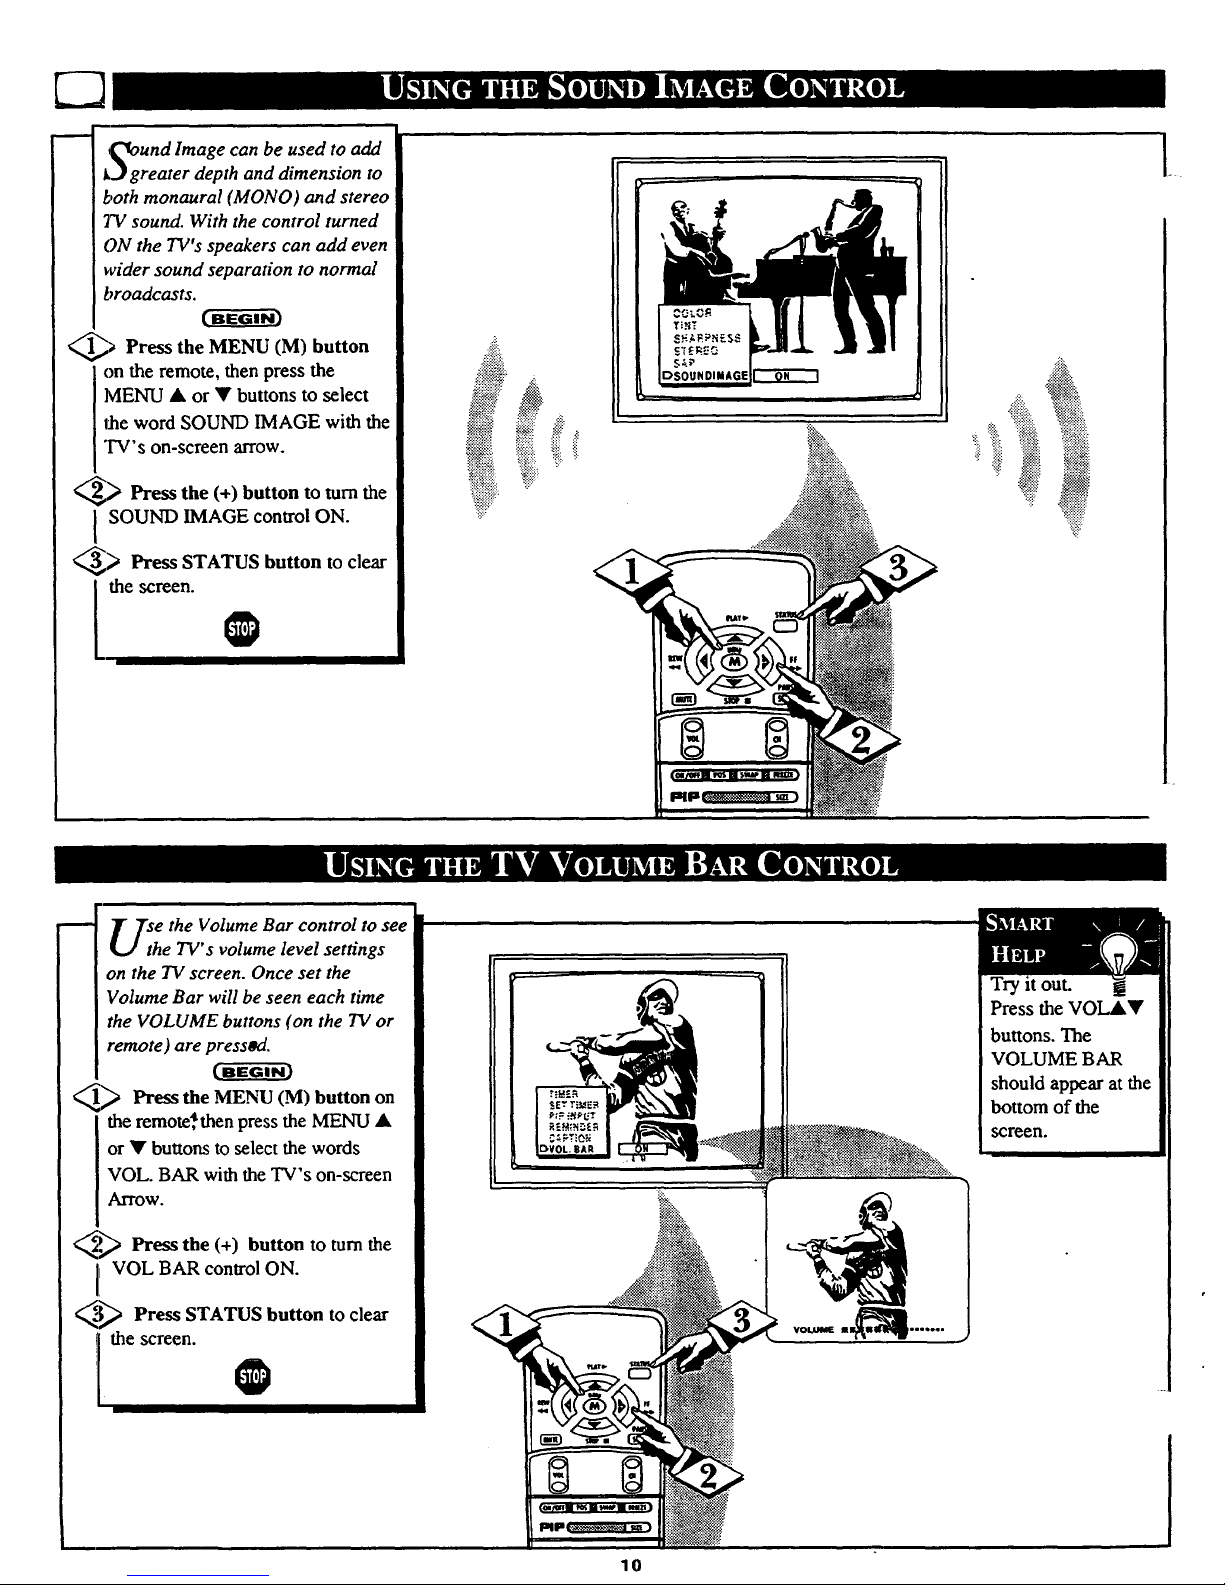
g_ggUnd Image can be used to add
reater depth and dimension to
both monaural (MONO) and stereo
TV sound. With the control turned
ON the TV's speakers can add even
wider sound separation to normal
broadcasts.
_ Press the MENU button
(M)
on the remote, then press the
MENU • or • buttons to select
the word SOUND IMAGE with the
TV's on-screen arrow.
_,,_ Press the (+) button to turn the
SOUND IMAGE control ON.
_> Press STATUS button to clear
[thescrce""l. l
il_:::_ ili
ii' il
.!ii!_.
".!!!.
.
U_h e the Volume Bar control to see
e TV's volume level settings
on the 73/screen. Once set the
Volume Bar will be seen each time
the VOLUME buttons (on the TV or
remote) are press_L
_ Press the MENU button
(M) on
the remote*then press the MENU •
or • buttons to select the words
VOL. BAR with the TV's on-screen
Arrow.
_.P_ Press the (+) button to turn the
VOL BAR control ON.
_"_ Press STATUS button to clear
Ithescreen.
Try it out.
Press the VOL&•
buttons. The
VOLUME BAR
should appear at the
bottom of the
screen.
10
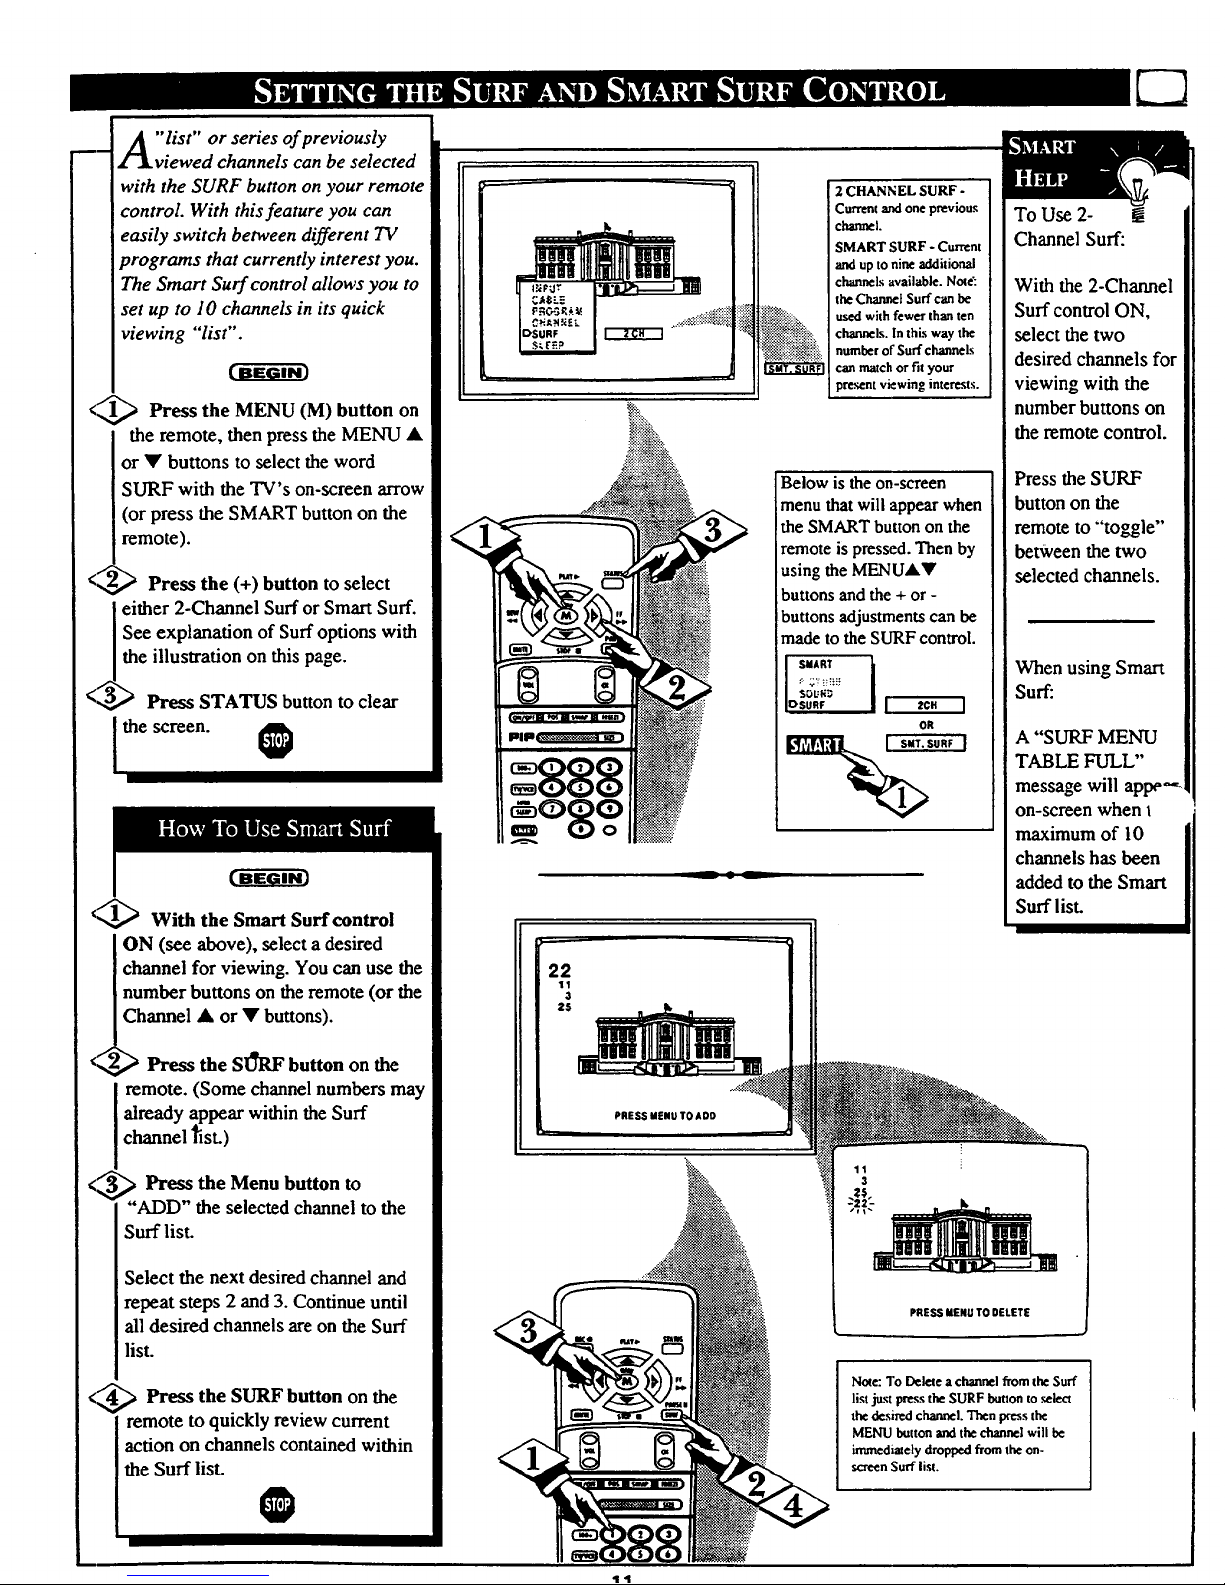
"list" or series of previously
viewed channels can be selected
with the SURF button on your remote
control With this feature you can
easily switch between different TV
programs that currently interest you.
The Smart Surf control allows you to
set up to 10 channels in its quick
viewing "list".
<_ Press the MENU (M) button on
the remote, then press the MENU •
or • buttons to select the word
SURF with the TV's on-screen arrow
(or press the SMART button on the
remote).
<,< Press the (+) button to select
either 2-Channel Surf or Smart Surf.
See explanation of Surf options with
the illustration on this page.
Press STATUS button to clear
the screen.
_ With the Smart Surf control
ON (see above), select a desired
channel for viewing. You can use the
number buttons on the remote (or the
hannel • or • buttons).
¢Z,,_ Press the SU'_7_"button on the
remote. (Some channel numbers may
already appear within the Surf
channel _st.)
;_ Press the Menu button to
r
"ADD" the selected channel to the
Surf list.
Select the next desired channel and
repeat steps 2 and 3. Continue until
all desired channels are on the Surf
list.
<_-"_ Press the SURF button on the
remote to quickly review current
action on channels contained within
the Surf list.
...:._.:::._:.:.:,:+
"2CHANNEL SURF -
i Current and one previous
channel.
SMART SURF - Current
and up to nine additional
c "hannelsavailable. Note':
the Channet Surf can be
used with fewer than ten
channels. In this way the
number of Surf channels
can match or fit your
present viewing interests.
Below is theon-screen
menu thatwill appear when
the SMART button on the
remote is pressed. Then by
using the MENUAY
buttons and the + or -
buttons adjustments can be
made to the SURF control.
SMART I
IOsuRF I _'C" I
OR
S.RFI
-- • --
To Use 2- !
Channel Surf:
With the 2-Channel
Surf control ON,
select the two
desired channels for
viewing with the
number buttons on
the remote control.
Press the SURF
button on the
remote to "'toggle"
between the two
selected channels.
When using Smart
Surf:
A "SURF MENU
TABLE FULL"
message will appe'_
on-screen when I
maximum of 10
channels has been
added to the Smart
Surf list.
22
11
3
25
PRESS MENU TO ADD
PRESS MENU TO DELETE
Note: To Delete a channel from the Surf
list just pressthe SURF buuon to .select
the desired channel.Then pressthe
MENU button and the channel will be
immediately dropped from the on-
screen Surf list.
i
11
E3
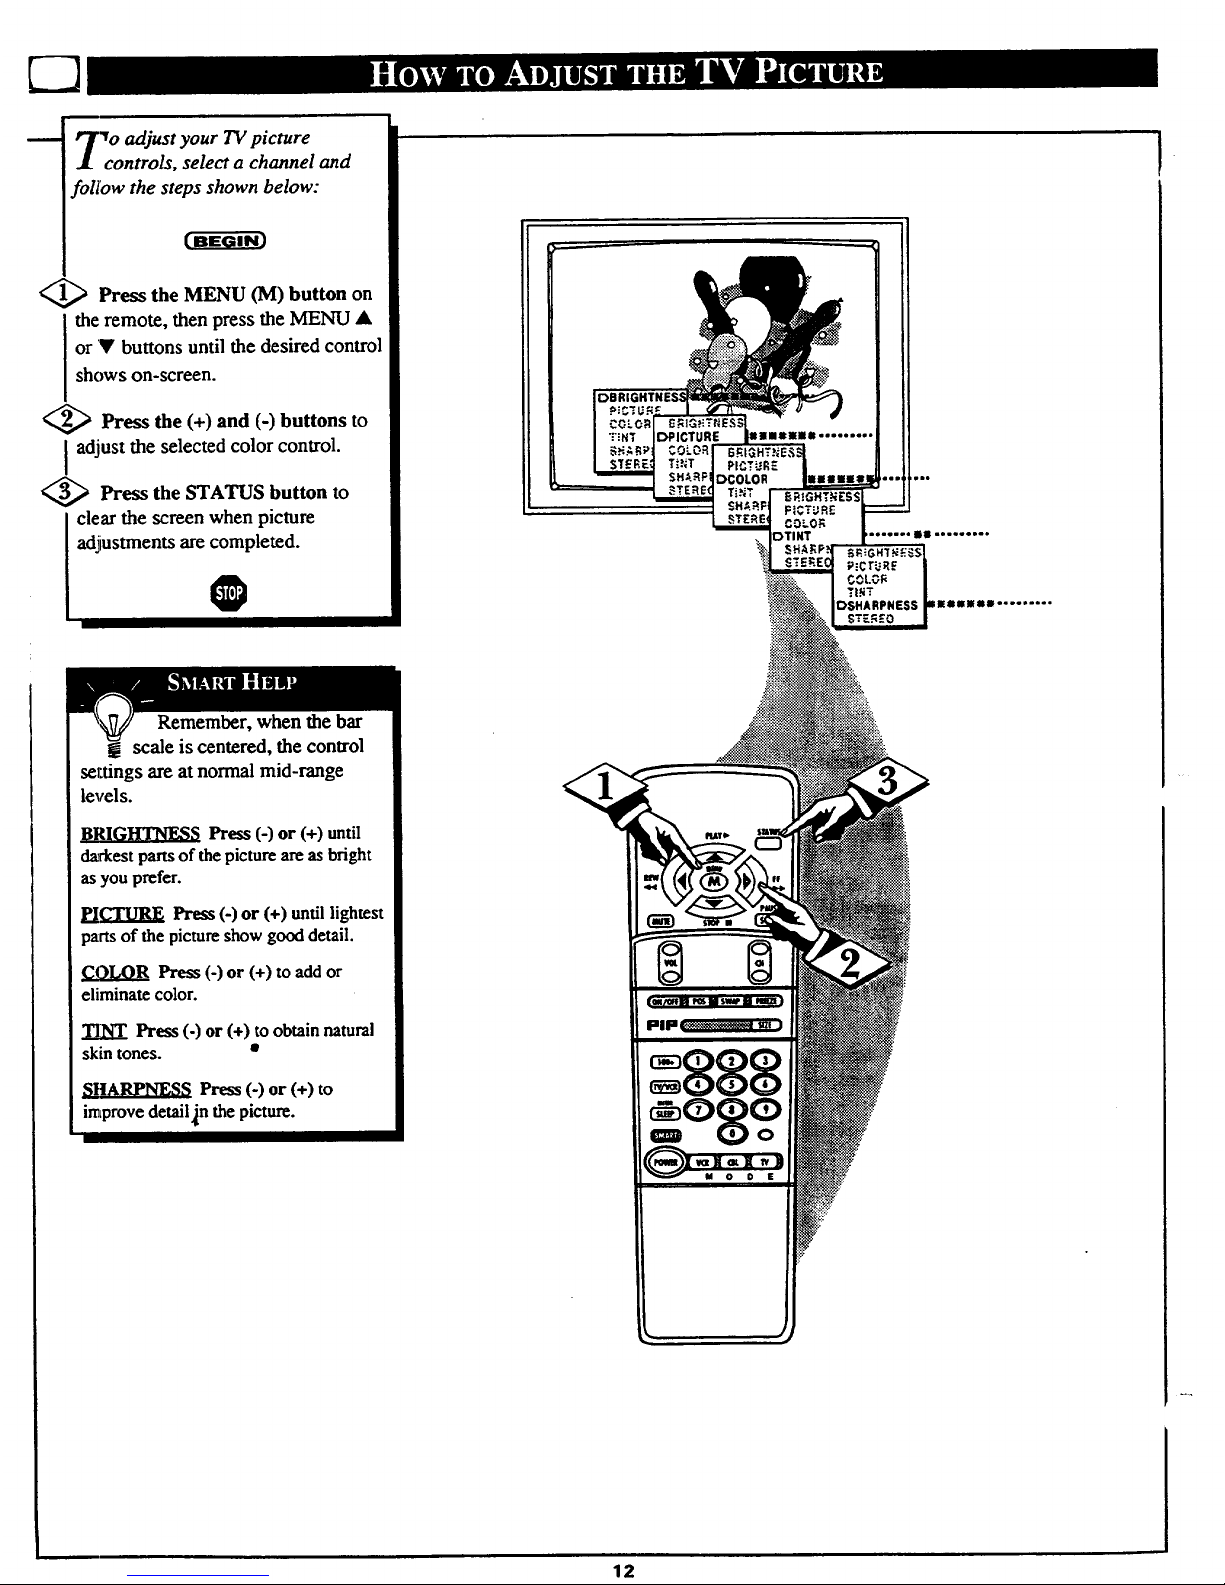
_o adjust your TVpicture
controls, select a channel and
foll'ow the steps shown below:
<_ Press the MENU (M) button on
the remote, then press the MENU •
or V buttons until the desired control
shows on-screen.
<_ Press the (+) and (-) buttons to
adjust the selected color control.
<_ Press the STATUS button to
I clear the screen when picture
adjustments are completed.
0
Remember, when the bar
g scale is centered, the control
se_tings are at normal mid-range
levels.
BRIGHTNESS Press (-) or (+) until
dztrkest parts of the picture are as bright
as you prefer.
PICTURE Press (-) or (+) untillightest
partsof the pictureshow gooddetail.
Press (-) or (+) to add or
eliminate color.
Press (-) or (+) to obtain natural
skin tones. •
SItARPNESS Press (-) or (+) to
improve detail]n the picture.
12
 Loading...